This answer covers a lot of ground, so it’s divided into three parts:
- How to use a CORS proxy to avoid “No Access-Control-Allow-Origin header” problems
- How to avoid the CORS preflight
- How to fix “Access-Control-Allow-Origin header must not be the wildcard” problems
How to use a CORS proxy to avoid “No Access-Control-Allow-Origin header” problems
If you don’t control the server your frontend code is sending a request to, and the problem with the response from that server is just the lack of the necessary Access-Control-Allow-Origin header, you can still get things to work—by making the request through a CORS proxy.
You can easily run your own proxy with code from https://github.com/Rob—W/cors-anywhere/.
You can also easily deploy your own proxy to Heroku in just 2-3 minutes, with 5 commands:
git clone https://github.com/Rob--W/cors-anywhere.git
cd cors-anywhere/
npm install
heroku create
git push heroku master
After running those commands, you’ll end up with your own CORS Anywhere server running at, e.g., https://cryptic-headland-94862.herokuapp.com/.
Now, prefix your request URL with the URL for your proxy:
https://cryptic-headland-94862.herokuapp.com/https://example.com
Adding the proxy URL as a prefix causes the request to get made through your proxy, which:
- Forwards the request to
https://example.com. - Receives the response from
https://example.com. - Adds the
Access-Control-Allow-Originheader to the response. - Passes that response, with that added header, back to the requesting frontend code.
The browser then allows the frontend code to access the response, because that response with the Access-Control-Allow-Origin response header is what the browser sees.
This works even if the request is one that triggers browsers to do a CORS preflight OPTIONS request, because in that case, the proxy also sends the Access-Control-Allow-Headers and Access-Control-Allow-Methods headers needed to make the preflight succeed.
How to avoid the CORS preflight
The code in the question triggers a CORS preflight—since it sends an Authorization header.
https://developer.mozilla.org/docs/Web/HTTP/Access_control_CORS#Preflighted_requests
Even without that, the Content-Type: application/json header will also trigger a preflight.
What “preflight” means: before the browser tries the POST in the code in the question, it first sends an OPTIONS request to the server, to determine if the server is opting-in to receiving a cross-origin POST that has Authorization and Content-Type: application/json headers.
It works pretty well with a small curl script — I get my data.
To properly test with curl, you must emulate the preflight OPTIONS the browser sends:
curl -i -X OPTIONS -H "Origin: http://127.0.0.1:3000"
    -H 'Access-Control-Request-Method: POST'
    -H 'Access-Control-Request-Headers: Content-Type, Authorization'
    "https://the.sign_in.url"
…with https://the.sign_in.url replaced by whatever your actual sign_in URL is.
The response the browser needs from that OPTIONS request must have headers like this:
Access-Control-Allow-Origin:  http://127.0.0.1:3000
Access-Control-Allow-Methods: POST
Access-Control-Allow-Headers: Content-Type, Authorization
If the OPTIONS response doesn’t include those headers, the browser will stop right there and never attempt to send the POST request. Also, the HTTP status code for the response must be a 2xx—typically 200 or 204. If it’s any other status code, the browser will stop right there.
The server in the question responds to the OPTIONS request with a 501 status code, which apparently means it’s trying to indicate it doesn’t implement support for OPTIONS requests. Other servers typically respond with a 405 “Method not allowed” status code in this case.
So you’ll never be able to make POST requests directly to that server from your frontend JavaScript code if the server responds to that OPTIONS request with a 405 or 501 or anything other than a 200 or 204 or if doesn’t respond with those necessary response headers.
The way to avoid triggering a preflight for the case in the question would be:
- if the server didn’t require an
Authorizationrequest header but instead, e.g., relied on authentication data embedded in the body of thePOSTrequest or as a query param - if the server didn’t require the
POSTbody to have aContent-Type: application/jsonmedia type but instead accepted thePOSTbody asapplication/x-www-form-urlencodedwith a parameter namedjson(or whatever) whose value is the JSON data
How to fix “Access-Control-Allow-Origin header must not be the wildcard” problems
I am getting another error message:
The value of the ‘Access-Control-Allow-Origin’ header in the response
must not be the wildcard ‘*’ when the request’s credentials mode is
‘include’. Origin ‘http://127.0.0.1:3000‘ is therefore not allowed
access. The credentials mode of requests initiated by the
XMLHttpRequest is controlled by the withCredentials attribute.
For requests that have credentials, browsers won’t let your frontend JavaScript code access the response if the value of the Access-Control-Allow-Origin header is *. Instead the value in that case must exactly match your frontend code’s origin, http://127.0.0.1:3000.
See Credentialed requests and wildcards in the MDN HTTP access control (CORS) article.
If you control the server you’re sending the request to, a common way to deal with this case is to configure the server to take the value of the Origin request header, and echo/reflect that back into the value of the Access-Control-Allow-Origin response header; e.g., with nginx:
add_header Access-Control-Allow-Origin $http_origin
But that’s just an example; other (web) server systems have similar ways to echo origin values.
I am using Chrome. I also tried using that Chrome CORS Plugin
That Chrome CORS plugin apparently just simplemindedly injects an Access-Control-Allow-Origin: * header into the response the browser sees. If the plugin were smarter, what it would be doing is setting the value of that fake Access-Control-Allow-Origin response header to the actual origin of your frontend JavaScript code, http://127.0.0.1:3000.
So avoid using that plugin, even for testing. It’s just a distraction. To test what responses you get from the server with no browser filtering them, you’re better off using curl -H as above.
As far as the frontend JavaScript code for the fetch(…) request in the question:
headers.append('Access-Control-Allow-Origin', 'http://localhost:3000');
headers.append('Access-Control-Allow-Credentials', 'true');
Remove those lines. The Access-Control-Allow-* headers are response headers. You never want to send them in requests. The only effect of that is to trigger a browser to do a preflight.
If you use Google Chrome browser you can hack with an extension.
You can find a Chrome extension that will modify CORS headers on the fly in your application. Obviously, this is Chrome only, but I like that it works with zero changes anywhere at all.
You can use it for debugging your app on a local machine (if everything works in production).
Notice:
If URL becomes broken the extension name is Access-Control-Allow-Origin: *. I recommend you to disable this extension when you not working on your stuff, because, for example, youtube does not work with this extension.
![]()
answered Jun 23, 2016 at 19:51
![]()
dkruchokdkruchok
1,7993 gold badges18 silver badges25 bronze badges
6
I believe this might likely be that Chrome does not support localhost to go through the Access-Control-Allow-Origin — see Chrome issue
To have Chrome send Access-Control-Allow-Origin in the header, just alias your localhost in your /etc/hosts file to some other domain, like:
127.0.0.1 localhost yourdomain.com
Then if you’d access your script using yourdomain.com instead of localhost, the call should succeed.
![]()
answered Feb 16, 2015 at 19:17
![]()
thanixthanix
1,2879 silver badges5 bronze badges
4
Try this — set Ajax call by setting up the header as follows:
var uri = "http://localhost:50869/odata/mydatafeeds"
$.ajax({
    url: uri,
    beforeSend: function (request) {
        request.setRequestHeader("Authorization", "Negotiate");
    },
    async: true,
    success: function (data) {
        alert(JSON.stringify(data));
    },
    error: function (xhr, textStatus, errorMessage) {
        alert(errorMessage);
    }
});
Then run your code by opening Chrome with the following command line:
chrome.exe --user-data-dir="C:/Chrome dev session" --disable-web-security
![]()
Pang
9,366146 gold badges85 silver badges121 bronze badges
answered Apr 22, 2016 at 15:40
![]()
0
cors unblock works great for chrome 78
[COrs unb]
[1]
https://chrome.google.com/webstore/detail/cors-unblock/lfhmikememgdcahcdlaciloancbhjino
it’s a plugin for google chrome called «cors unblock»
Summary:
No more CORS error by appending ‘Access-Control-Allow-Origin: *’ header to local and remote web requests when enabled
This extension provides control over XMLHttpRequest and fetch methods by providing custom «access-control-allow-origin» and «access-control-allow-methods» headers to every requests that the browser receives. A user can toggle the extension on and off from the toolbar button. To modify how these headers are altered, use the right-click context menu items. You can customize what method are allowed. The default option is to allow ‘GET’, ‘PUT’, ‘POST’, ‘DELETE’, ‘HEAD’, ‘OPTIONS’, ‘PATCH’ methods. You can also ask the extension not to overwrite these headers when the server already fills them.
![]()
2,3973 gold badges35 silver badges63 bronze badges
answered Nov 30, 2019 at 11:00
![]()
Serkan AKMANSerkan AKMAN
9742 gold badges8 silver badges20 bronze badges
1
Another way to resolve them is adding the below piece of code in the main application class which contains the '@SpringBootApplication' and restart the server if required. This worked for me.
    @Bean
    public CorsFilter corsFilter() {
        CorsConfiguration corsConfiguration = new CorsConfiguration();
        corsConfiguration.setAllowCredentials(true);
        corsConfiguration.setAllowedOrigins(Arrays.asList("http://localhost:4200"));
        corsConfiguration.setAllowedHeaders(Arrays.asList("Origin","Access-Control-Allow-Origin",
                "Content-Type","Accept","Authorization","Origin,Accept","X-Requested-With",
                "Access-Control-Request-Method","Access-Control-Request-Headers"));
        corsConfiguration.setExposedHeaders(Arrays.asList("Origin","Content-Type","Accept","Authorization",
                "Access-Control-Allow-Origin","Access-Control-Allow-Origin","Access-Control-Allow-Credentials"));
        corsConfiguration.setAllowedMethods(Arrays.asList("GET","PUT","POST","DELETE","OPTIONS"));
        UrlBasedCorsConfigurationSource urlBasedCorsConfigurationSource = new UrlBasedCorsConfigurationSource();
        urlBasedCorsConfigurationSource.registerCorsConfiguration("/**", corsConfiguration);
        return new CorsFilter(urlBasedCorsConfigurationSource);

    }
answered May 2, 2021 at 15:00
![]()
Just FYI, I noticed this information from the jQuery documentation which I believe applies to this issue:
Due to browser security restrictions, most «Ajax» requests are subject to the same origin policy; the request can not successfully retrieve data from a different domain, subdomain, port, or protocol.
Changing the hosts file like @thanix didn’t work for me, but the extension mentioned by @dkruchok did solve the problem.
answered Apr 26, 2018 at 14:16
![]()
vancy-pantsvancy-pants
97312 silver badges13 bronze badges
Chrome doesn’t allow you to integrate two different localhost,that’s why we are getting this error. You just have to include Microsoft Visual Studio Web Api Core package from nuget manager.And add the two lines of code in WebApi project’s in your WebApiConfig.cs file.
var cors = new EnableCorsAttribute("*", "*", "*");
config.EnableCors(cors);
Then all done.
![]()
answered Apr 3, 2018 at 6:18
![]()
1
If its calling spring boot service. you can handle it using below code.
@Bean
public WebMvcConfigurer corsConfigurer() {
    return new WebMvcConfigurerAdapter() {
        @Override
        public void addCorsMappings(CorsRegistry registry) {
            registry.addMapping("/**")
                    .allowedOrigins("*")
                    .allowedMethods("GET", "POST", "PUT", "DELETE", "HEAD", "OPTIONS")
                    .allowedHeaders("*", "Access-Control-Allow-Headers", "origin", "Content-type", "accept", "x-requested-with", "x-requested-by") //What is this for?
                    .allowCredentials(true);
        }
    };
}
answered Feb 8, 2019 at 12:40
![]()
Om.Om.
2,4524 gold badges22 silver badges22 bronze badges
For development you can use https://cors-anywhere.herokuapp.com , for production is better to set up your own proxy
async function read() {
   let r= await (await fetch('https://cors-anywhere.herokuapp.com/http://ajax.googleapis.com/ajax/services/feed/load?v=1.0&num=10&q=http://feeds.feedburner.com/mathrubhumi')).json();
   console.log(r);
}

read();
answered Apr 16, 2019 at 12:45
![]()
Kamil KiełczewskiKamil Kiełczewski
80.6k29 gold badges352 silver badges327 bronze badges
If you use Express
please add routes after use cors
app.use(cors());
app.use(‘/posts’, postRoutes);
answered Sep 13, 2022 at 4:25
![]()
Please use @CrossOrigin on the backendside in Spring boot controller (either class level or method level) as the solution for Chrome error 'No 'Access-Control-Allow-Origin' header is present on the requested resource.’
This solution is working for me 100% …
Example : Class level
@CrossOrigin
@Controller
public class UploadController {
—— OR ——-
Example : Method level
@CrossOrigin(origins = "http://localhost:3000", maxAge = 3600)
@RequestMapping(value = "/loadAllCars")
    @ResponseBody
    public List<Car> loadAllCars() {


Ref: https://spring.io/blog/2015/06/08/cors-support-in-spring-framework
![]()
ThisaruG
2,9957 gold badges40 silver badges58 bronze badges
answered Oct 5, 2016 at 18:43
![]()
2
This answer covers a lot of ground, so it’s divided into three parts:
- How to use a CORS proxy to avoid “No Access-Control-Allow-Origin header” problems
- How to avoid the CORS preflight
- How to fix “Access-Control-Allow-Origin header must not be the wildcard” problems
How to use a CORS proxy to avoid “No Access-Control-Allow-Origin header” problems
If you don’t control the server your frontend code is sending a request to, and the problem with the response from that server is just the lack of the necessary Access-Control-Allow-Origin header, you can still get things to work—by making the request through a CORS proxy.
You can easily run your own proxy with code from https://github.com/Rob—W/cors-anywhere/.
You can also easily deploy your own proxy to Heroku in just 2-3 minutes, with 5 commands:
git clone https://github.com/Rob--W/cors-anywhere.git
cd cors-anywhere/
npm install
heroku create
git push heroku master
After running those commands, you’ll end up with your own CORS Anywhere server running at, e.g., https://cryptic-headland-94862.herokuapp.com/.
Now, prefix your request URL with the URL for your proxy:
https://cryptic-headland-94862.herokuapp.com/https://example.com
Adding the proxy URL as a prefix causes the request to get made through your proxy, which:
- Forwards the request to
https://example.com. - Receives the response from
https://example.com. - Adds the
Access-Control-Allow-Originheader to the response. - Passes that response, with that added header, back to the requesting frontend code.
The browser then allows the frontend code to access the response, because that response with the Access-Control-Allow-Origin response header is what the browser sees.
This works even if the request is one that triggers browsers to do a CORS preflight OPTIONS request, because in that case, the proxy also sends the Access-Control-Allow-Headers and Access-Control-Allow-Methods headers needed to make the preflight succeed.
How to avoid the CORS preflight
The code in the question triggers a CORS preflight—since it sends an Authorization header.
https://developer.mozilla.org/docs/Web/HTTP/Access_control_CORS#Preflighted_requests
Even without that, the Content-Type: application/json header will also trigger a preflight.
What “preflight” means: before the browser tries the POST in the code in the question, it first sends an OPTIONS request to the server, to determine if the server is opting-in to receiving a cross-origin POST that has Authorization and Content-Type: application/json headers.
It works pretty well with a small curl script — I get my data.
To properly test with curl, you must emulate the preflight OPTIONS the browser sends:
curl -i -X OPTIONS -H "Origin: http://127.0.0.1:3000"
    -H 'Access-Control-Request-Method: POST'
    -H 'Access-Control-Request-Headers: Content-Type, Authorization'
    "https://the.sign_in.url"
…with https://the.sign_in.url replaced by whatever your actual sign_in URL is.
The response the browser needs from that OPTIONS request must have headers like this:
Access-Control-Allow-Origin:  http://127.0.0.1:3000
Access-Control-Allow-Methods: POST
Access-Control-Allow-Headers: Content-Type, Authorization
If the OPTIONS response doesn’t include those headers, the browser will stop right there and never attempt to send the POST request. Also, the HTTP status code for the response must be a 2xx—typically 200 or 204. If it’s any other status code, the browser will stop right there.
The server in the question responds to the OPTIONS request with a 501 status code, which apparently means it’s trying to indicate it doesn’t implement support for OPTIONS requests. Other servers typically respond with a 405 “Method not allowed” status code in this case.
So you’ll never be able to make POST requests directly to that server from your frontend JavaScript code if the server responds to that OPTIONS request with a 405 or 501 or anything other than a 200 or 204 or if doesn’t respond with those necessary response headers.
The way to avoid triggering a preflight for the case in the question would be:
- if the server didn’t require an
Authorizationrequest header but instead, e.g., relied on authentication data embedded in the body of thePOSTrequest or as a query param - if the server didn’t require the
POSTbody to have aContent-Type: application/jsonmedia type but instead accepted thePOSTbody asapplication/x-www-form-urlencodedwith a parameter namedjson(or whatever) whose value is the JSON data
How to fix “Access-Control-Allow-Origin header must not be the wildcard” problems
I am getting another error message:
The value of the ‘Access-Control-Allow-Origin’ header in the response
must not be the wildcard ‘*’ when the request’s credentials mode is
‘include’. Origin ‘http://127.0.0.1:3000‘ is therefore not allowed
access. The credentials mode of requests initiated by the
XMLHttpRequest is controlled by the withCredentials attribute.
For requests that have credentials, browsers won’t let your frontend JavaScript code access the response if the value of the Access-Control-Allow-Origin header is *. Instead the value in that case must exactly match your frontend code’s origin, http://127.0.0.1:3000.
See Credentialed requests and wildcards in the MDN HTTP access control (CORS) article.
If you control the server you’re sending the request to, a common way to deal with this case is to configure the server to take the value of the Origin request header, and echo/reflect that back into the value of the Access-Control-Allow-Origin response header; e.g., with nginx:
add_header Access-Control-Allow-Origin $http_origin
But that’s just an example; other (web) server systems have similar ways to echo origin values.
I am using Chrome. I also tried using that Chrome CORS Plugin
That Chrome CORS plugin apparently just simplemindedly injects an Access-Control-Allow-Origin: * header into the response the browser sees. If the plugin were smarter, what it would be doing is setting the value of that fake Access-Control-Allow-Origin response header to the actual origin of your frontend JavaScript code, http://127.0.0.1:3000.
So avoid using that plugin, even for testing. It’s just a distraction. To test what responses you get from the server with no browser filtering them, you’re better off using curl -H as above.
As far as the frontend JavaScript code for the fetch(…) request in the question:
headers.append('Access-Control-Allow-Origin', 'http://localhost:3000');
headers.append('Access-Control-Allow-Credentials', 'true');
Remove those lines. The Access-Control-Allow-* headers are response headers. You never want to send them in requests. The only effect of that is to trigger a browser to do a preflight.

В этой статье подробно разобрана история и эволюция политики одинакового источника и CORS, а также расписаны разные типы доступа между различными источниками, а также несколько оптимальных решений работы с ними.
Если вы давно хотели разобраться в CORS и вас достали постоянные ошибки, добро пожаловать под кат.
Ошибка в консоли вашего браузера
No ‘Access-Control-Allow-Origin’ header is present on the requested resource.
Cross-Origin Request Blocked: The Same Origin Policy disallows reading the remote resource at https://example.com/
Access to fetch at ‘https://example.com’ from origin ‘http://localhost:3000’ has been blocked by CORS policy.
Я уверен, вам уже доводилось видеть похожие сообщения об ошибках в консоли вашего браузера. Если нет, не волнуйтесь, скоро увидите. Все программисты достаточно часто натыкаются на CORS-ошибки.
Эти всплывающие ошибки в процессе разработки просто раздражают. Но на самом деле, CORS — это невероятно полезный механизм в мире неправильно настроенных веб серверов, злоумышленников, орудующих в интернете и организаций, продвигающих веб-стандарты.
Но давайте-ка пойдем к истокам…
В начале был первый субресурс
Субресурс — это HTML элемент, который требуется вставить в документ или выполнить в контексте этого документа. В 1993 году был введен первый тег <img>. С появлением веб стал более красивым, но заодно и стал сложнее.

Верни мне мой 1993 г.
Как вы поняли, если ваш браузер отображает страницу с <img>, он должен запросить этот тег из источника. Если браузер запрашивает тег из источника, который отличается от получателя по схеме, в полностью определенному имени хоста или порту, то это и есть запрос между различными источниками (cross-origin request).
Источники & cross-origin
Источник идентифицируется следующей тройкой параметров: схема, полностью определенное имя хоста и порт. Например, <http://example.com> и <https://example.com> имеют разные источники: первый использует схему http, а второй https. Вдобавок, портом для http по умолчанию является 80, тогда как для https — 443. Следовательно, в данном примере 2 источника отличаются схемой и портом, тогда как хост один и тот же (example.com).
Таким образом, если хотя бы один из трех элементов у двух ресурсов отличается, то источник ресурсов также считается разным.
Если, к примеру, мы будем сравнивать источник <https://blog.example.com/posts/foo.html> с другими источниками, то мы получим следующие результаты:
Пример запроса между различными источниками: когда ресурс (то есть, страница) типа <http://example.com/posts/bar.html> попробует отобразить тег из источника <https://example.com> (заметьте, что схема поменялась!).
Слишком много опасностей запроса между различными источниками
Теперь, когда мы определились, что такое совместное использования ресурсов между разными и одинаковыми источниками, давайте посмотрим, в чем же дело.
Когда тег <img> появился во Всемирной Паутине, мы тем самым открыли ящик Пандоры. Некоторое время спустя в Сети появились теги <script>, <frame>, <video>, <audio>, <iframe>, <link>, <form> и так далее. Эти теги могут быть загружены браузером уже после загрузки страницы, поэтому они все могут быть запросами в пределах одного источника и между о разными источниками.
Давайте погрузимся в воображаемый мир, где не существует CORS и веб-браузеры допускают все типы запросов между источниками.
Предположим, у меня есть страница на сайте evil.com с <script>. На первый взгляд это обычная страница, где можно прочесть полезную информацию. Но я специально создал код в теге <script>, который будет отправлять специально созданный запрос по удалению аккаунта (DELETE/account) на сайт банка. Как только вы загрузили страницу, JavaScript запускается и AJAX-запрос попадает в API банка.

Вжух, нет вашего аккаунта
Немыслимо, да? Представьте, что вы читаете что-то на веб странице и вам приходит электронное письмо от банка, что ваш аккаунт успешно удален. Знаю, знаю… если бы было так просто провести любую банковскую операцию… Отвлекся.
Для того чтобы мой вредоносный <script> сработал, ваш браузер должен был также отправить ваши учетные данные (куки), взятые с банковского сайта, как часть запроса. Именно таким образом банковские серверы идентифицировали бы вас и знали, какой аккаунт нужно удалить.
Давайте рассмотрим другой, не такой зловещий сценарий.
Мне нужно опознать людей, которые работают на Awesome Corp, внутренний сайт этой компании находится по адресу intra.awesome-corp.com. На моем сайте, dangerous.com, у меня есть <img src="https://intra.awesome-corp.com/avatars/john-doe.png">.
У пользователей, у которых нет активного сеанса с intra.awesome-corp.com, аватарка не отобразится, так как это приведет к ошибке. Однако если вы совершили вход во внутреннюю сеть Awesome Corp., как только вы откроете мой dangerous.com сайт, я буду знать, что у вас там есть аккаунт.
Это означает, что я смогу прощупать определенную информацию о вас. Конечно, для меня будет сложнее устроить атаку, но знание о том, что у вас есть доступ к Awesome Corp., является потенциальным направлением для атаки.
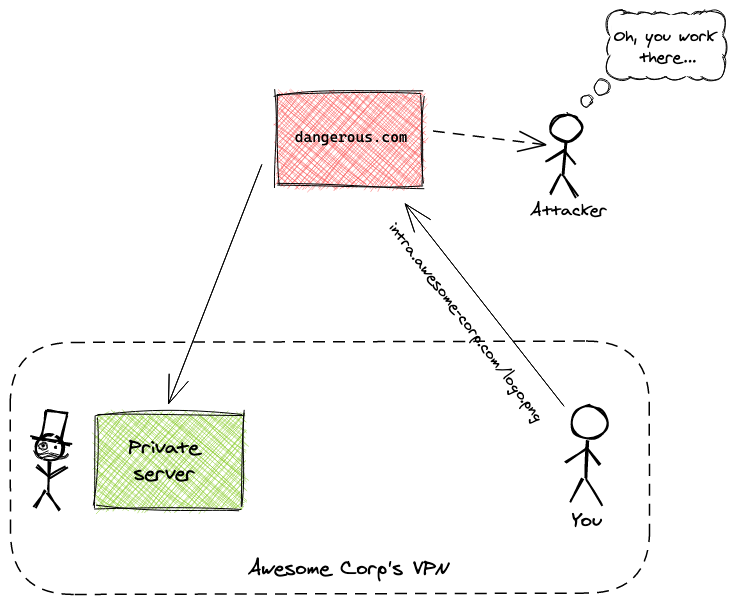
Утечка информации к 3-им лицам
Эти два примера крайне упрощены, но именно такие угрозы обусловили необходимость политики одинакового источника и CORS… Существуют разнообразные опасности, связанные с запросами между разными источниками. Некоторые из них можно сгладить, другие нет: они укоренены в природе интернета. Однако огромное количество заблокированных атак — это заслуга CORS.
Но до зарождения CORS существовала политика одинакового источника.
Политика одинакового источника
Политика одинакового источника предотвращает cross-origin атаки, блокируя доступ для прочтения загружаемых ресурсов из другого источника. Такая политика все еще разрешает нескольким тегам вроде <img> загружать ресурсы из других источников.
Политика одинакового источника введена Netscape Navigator 2.02 в 1995 году, изначально для защищенного cross-origin доступа к Объектной модели документа (DOM).
Даже несмотря на то, что внедрение политики одинакового источника не требует придерживаться определенного порядка действий, все современные браузеры следуют этой политике в той или иной форме. Принципы политики описаны в запросе на спецификацию RFC6454 Инженерного совета интернета (Internet Engineering Task Force).
Выполнение политики одинакового источника определено этим сводом правил:
Политика одинакового источника решает много проблем, но она довольно ограничительная. В век одностраничных приложений и сайтов, нагруженных медиа-контентом, эта политика не дает ни воздуха разработчикам, ни легко играться настройками.
CORS же появился с целью смягчения политики одинакового источника и для тонкой настройки доступа между различными источниками.
Врываемся в CORS
Я уже разъяснил, что такое источник, как он определяется, какие ошибки бывают у запросов с различными источниками и политику общего происхождения, выполняемые браузером.
Давайте разберемся с совместным использованием ресурсов различными источниками (CORS). CORS — это механизм, который дает контролировать доступ к тегам на веб странице по сети. Механизм классифицируется на три разные категории доступа тегов:
- Запись из разных источников
- Вставка из разных источников
- Считывание из разных источников
До того, как я начну объяснять каждую из этих категорий, очень важно понять, что несмотря на то, что браузер по умолчанию может разрешить определенный тип запросов между различными источниками, это не означает, что данный запрос будет принят сервером.
Запись из разных источников — это ссылки, переадресации и отправка форм. С активным CORS в вашем браузере все эти операции разрешены. Существует также штука под названием предварительный запрос, которая настраивает запись из разных источников. Таким образом, если некоторые записи могут быть разрешены, это не означают, что они будут выполнены на практике. Мы вернемся к этому немного позже.
Вставки из разных источников — это теги, загружаемые через <script>, <link>, <img>, <video>, <audio>, <object>, <embed>, <iframe> и т.п. Все они разрешены по умолчанию. <iframe> выделяется на их фоне, так как он используется для загрузки другой страницы внутри фрейма. Его обрамление в зависимости от источника может регулироваться посредством использования заголовка X-Frame-options.
Что касается <img> и других вставных тегов, то они устроены так, что сами инициируют запросы из разных источников cross-origin запроса. Именно поэтому в CORS существует различие между вставкой из разных источников и считыванием из разных источников.
Считывание из разных источников — это теги, загружаемые через вызовы AJAX/ fetch. Все они по умолчанию заблокированы вашим браузером. Существует обходной путь для вставки таких тегов на странице, но такие трюки регулируются другой политикой, которая соблюдается в современных браузерах.
Если ваш браузер обновлён, то он уже дополнен всей этой эвристикой.
Запись из разных источников
Операции записи из разных источников порой очень проблематичны. Давайте рассмотрим пример и посмотрим на CORS в деле.
Во-первых, у нас будет простой Crystal (с использованием Kemal) HTTP сервер:
require "kemal"

port = ENV["PORT"].to_i || 4000

get "/" do
  "Hello world!"
end

get "/greet" do
  "Hey!"
end

post "/greet" do |env|
  name = env.params.json["name"].as(String)
  "Hello, #{name}!"
end

Kemal.config.port = port
Kemal.run
Он просто берет запрос по ссылке /greet с name в теле запроса и возвращает Hello #{name}!. Чтобы запустить это маленький Crystal сервер мы можем написать
$ crystal run server.cr
Так запускается сервер, который будет слушать localhost:4000. Если мы откроем localhost:4000 в нашем браузере, то появится страница с тривиальным «Hello World».

Hello world!
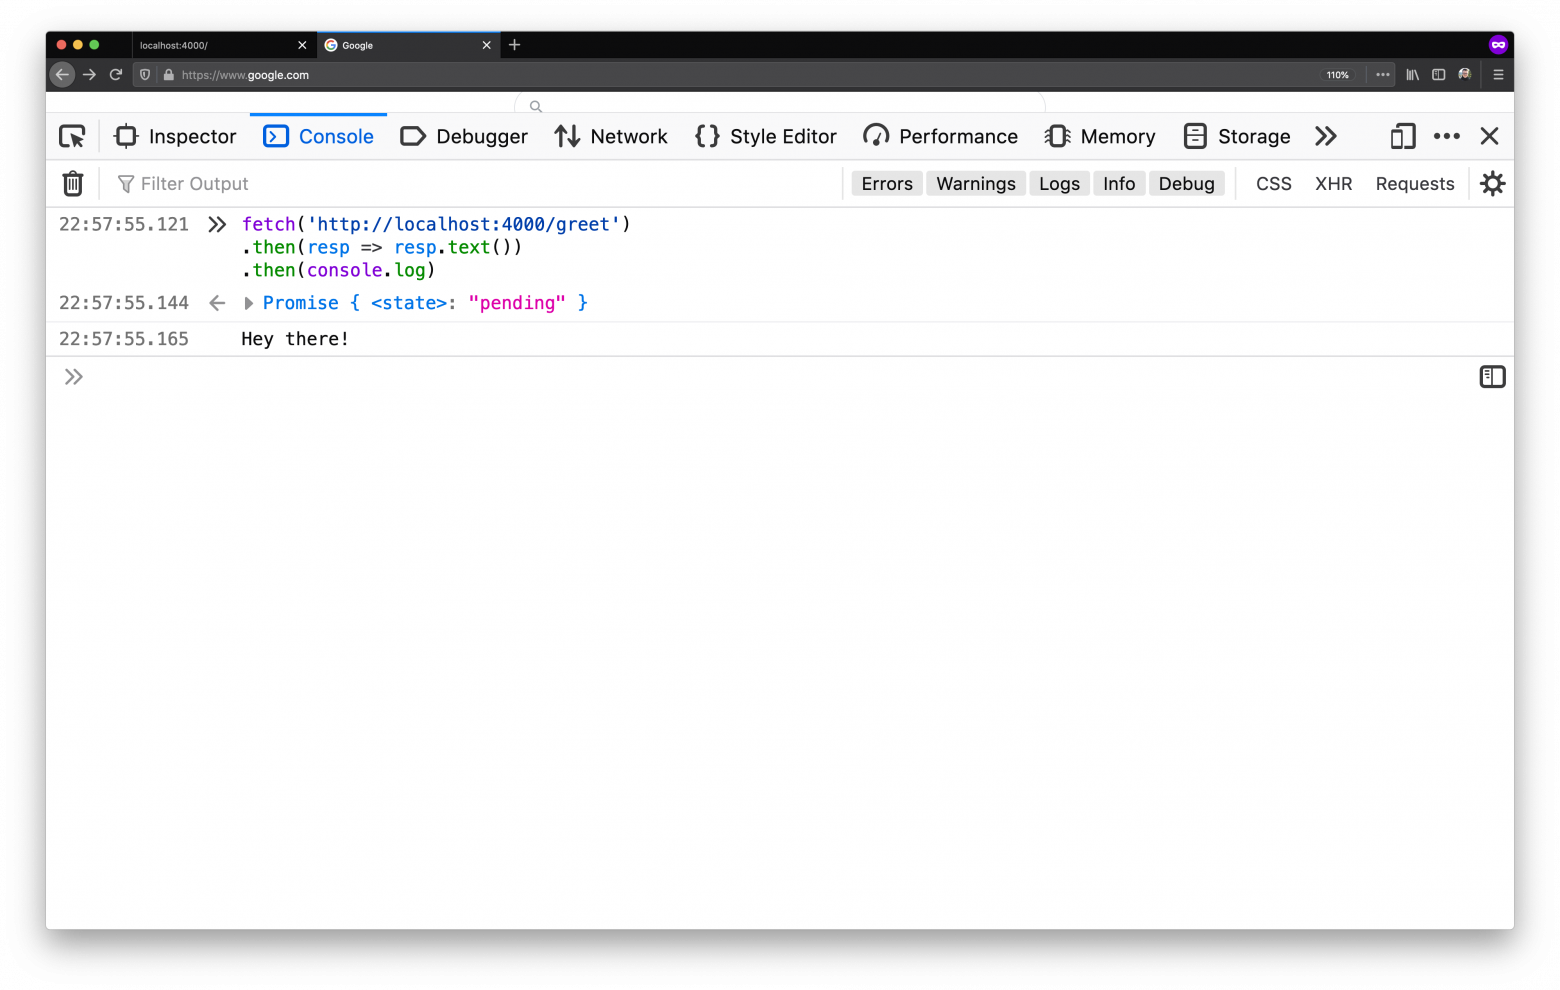
Теперь, когда мы знаем, что наш сервер работает, давайте из консоли нашего браузера сделаем запрос POST /greet на сервер, слушающий localhost:4000,. Мы можем это сделать, используя fetch:
fetch(
  'http://localhost:4000/greet',
  {
    method: 'POST',
    headers: { 'Content-Type': 'application/json' },
    body: JSON.stringify({ name: 'Ilija'})
  }
).then(resp => resp.text()).then(console.log)
Как только мы его запустили, мы увидим, что приветствие вернется из сервера:

Привет!
Это был POST запрос, но не из разных источников. Мы отправили запрос из браузера, где была отображена страница с адреса http://localhost:4000 (источник), к тому же источнику.
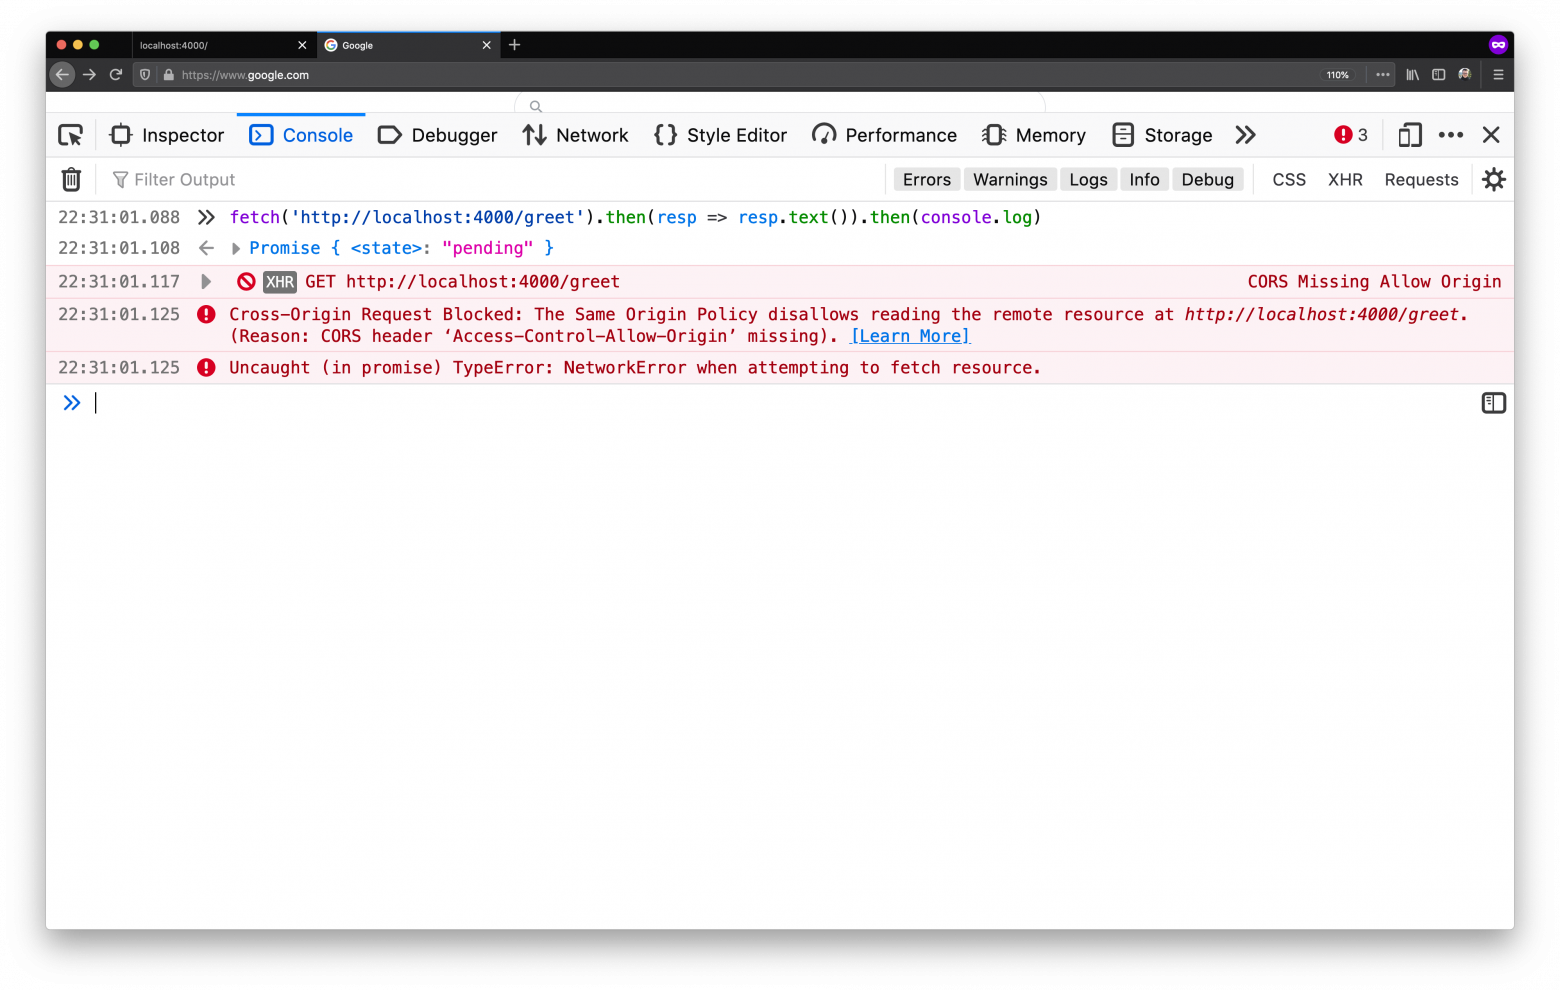
Теперь, давайте попробуем повторить такой же запрос но с различными источниками. Мы откроем https://google.com и попробуем тот же запрос с той же вкладки нашего браузера:

Привет, CORS!
Мы смогли добраться до знаменитой ошибки CORS. Несмотря на то что наш Crystal сервер смог совершить запрос, наш браузер защищает нас от нас самих. Он говорит нам, что сайт, который мы открыли, хочет внести изменения на другом сайте.
В первом примере, где мы отправили запрос в http://localhost:4000/greet из вкладки, которая отображала http://localhost:4000, наш браузер смотрит на запрос и разрешает, так как ему кажется, что наш сайт запрашивает наш сервер (что есть отлично). Но во втором примере где наш сайт (https://google.com) хочет написать на http://localhost:4000, тогда наш браузер отмечает этот запрос и не разрешает ему пройти.
Предварительные запросы
Если поподробнее разобраться в консоли разработчика, в частности, заглянуть во вкладку Network, то на самом деле мы увидим два запроса вместо одного, что мы отправили:

Как видно в панеле Network, отправленных запроса две штуки
Интересно заметить, то у первого запроса в HTTP фигурирует метод OPTIONS, в то время как у второго – метод POST.
Если внимательно посмотреть на запрос OPTIONS, то мы увидим, что этот запрос отправлен нашим браузером до отправления запроса POST.

Смотрим запрос OPTIONS
Интересно, что несмотря на то, что статус запроса OPTIONS был HTTP 200, он был все же отмечен красным в списке запросов. Почему?
Это предварительный запрос, который делают современные браузеры. Предварительные запросы выполняются перед запросами, которые CORS считает сложными. Признаки, свидетельствующие о сложности запроса:
- Запрос использует методы отличные от GET, POST, или HEAD
- Запрос включает заголовки отличные от Accept, Accept-Language или Content-Language
- Запрос имеет значение заголовка Content-Type отличное от application/x-www-form-urlencoded, multipart/form-data, или text/plain.
Следовательно, в примере выше, несмотря на то, что мы отправили запрос POST, браузер считает наш запрос сложным из-за заголовка Content-Type: application/json.
Если бы мы изменили наш сервер так, чтобы он обрабатывал контент text/plain (вместо JSON), мы бы могли обойтись без предварительных запросов:
require "kemal"

get "/" do
  "Hello world!"
end

get "/greet" do
  "Hey!"
end

post "/greet" do |env|
  body = env.request.body

  name = "there"
  name = body.gets.as(String) if !body.nil?

  "Hello, #{name}!"
end

Kemal.config.port = 4000
Kemal.run
Теперь, когда мы можем отправить наш запрос с заголовком Content-type: text/plain:
fetch(
  'http://localhost:4000/greet',
  {
    method: 'POST',
    headers: {
      'Content-Type': 'text/plain'
    },
    body: 'Ilija'
  }
)
.then(resp => resp.text())
.then(console.log)
Теперь, пока предварительный запрос не будет отправлен, CORS политика браузера будет постоянно блокировать запрос:

CORS стоит насмерть
Но так как мы создали запрос, который не классифицируется как сложный, наш браузер не заблокирует запрос.
Запрос прошел
Проще говоря, наш сервер неправильно настроен на принятие text/plain запросов из разных источников без какой-либо защиты и наш браузер не сможет ничего с этим поделать. Но все же он делает следующую вещь: он не показывает нашу открытую страницу/вкладку в ответ на это запрос. Следовательно, в этом случае CORS не блокирует запрос, он блокирует ответ.
CORS политика вашего браузера считает, что это фактически считывание из разных источников, так как, несмотря на то, что запрос был отправлен как POST, Content-type значение заголовка по сути приравнивает его к GET. Считывания из разных источников заблокированы по умолчанию, следовательно мы видим заблокированный запрос в нашей панели Network.
Не рекомендуется избегать предварительных запросов, то есть, действовать, как в вышеприведенном примере. Если вы ожидаете, что ваш сервер должен будет незаметно обрабатывать предварительные запросы, то на в таком случае он должен будет реализовывать конечные точки для приема запросов OPTIONS и возвращать правильные заголовки.
Выполняя запрос OPTIONS, вы должны помнить, что предварительный запрос браузера проверяет наличие трех заголовков, которые могут быть в ответе:
Access-Control-Allow-Methods, который указывает на то, какие методы поддерживаются URL-ом ответа в контексте CORS протокола.Access-Control-Allow-Headers, который указывает, на то, какие заголовки поддерживаются URL-ом ответа в контексте CORS протокола.Access-Control-Max-Age, который указывает число секунд (5 по умолчанию) и это значение соответствует периоду, на который предоставляемая заголовкамиAccess-Control-Allow-MethodsиAccess-Control-Allow-Headersинформация может быть кэширована.
Давайте вернемся к предыдущему примеру, где мы отправили сложный запрос:
etch(
  'http://localhost:4000/greet',
  {
    method: 'POST',
    headers: { 'Content-Type': 'application/json' },
    body: JSON.stringify({ name: 'Ilija'})
  }
).then(resp => resp.text()).then(console.log
Мы уже выяснили, что когда мы отправляем запрос, наш браузер будет сверяться с сервером, можно ли выполнить запрос с данными из разных источников. Чтобы обеспечить работоспособность в среде с разными источниками, мы должны сначала добавить конечную точку OPTIONS/greet к нашему серверу. В заголовке ответа новая конечная точка должна сообщить браузеру, что запрос на POST /greet с заголовком Content-type: application/json из источника https://www.google.com может быть принят.
Мы это сделаем, используя заголовки Access-Control-Allow-*:
options "/greet" do |env|
  # Allow `POST /greet`...
  env.response.headers["Access-Control-Allow-Methods"] = "POST"
  # ...with `Content-type` header in the request...
  env.response.headers["Access-Control-Allow-Headers"] = "Content-type"
  # ...from https://www.google.com origin.
  env.response.headers["Access-Control-Allow-Origin"] = "https://www.google.com"
end
Если мы запустим сервер и отправим запрос, то

Все еще заблокирован?
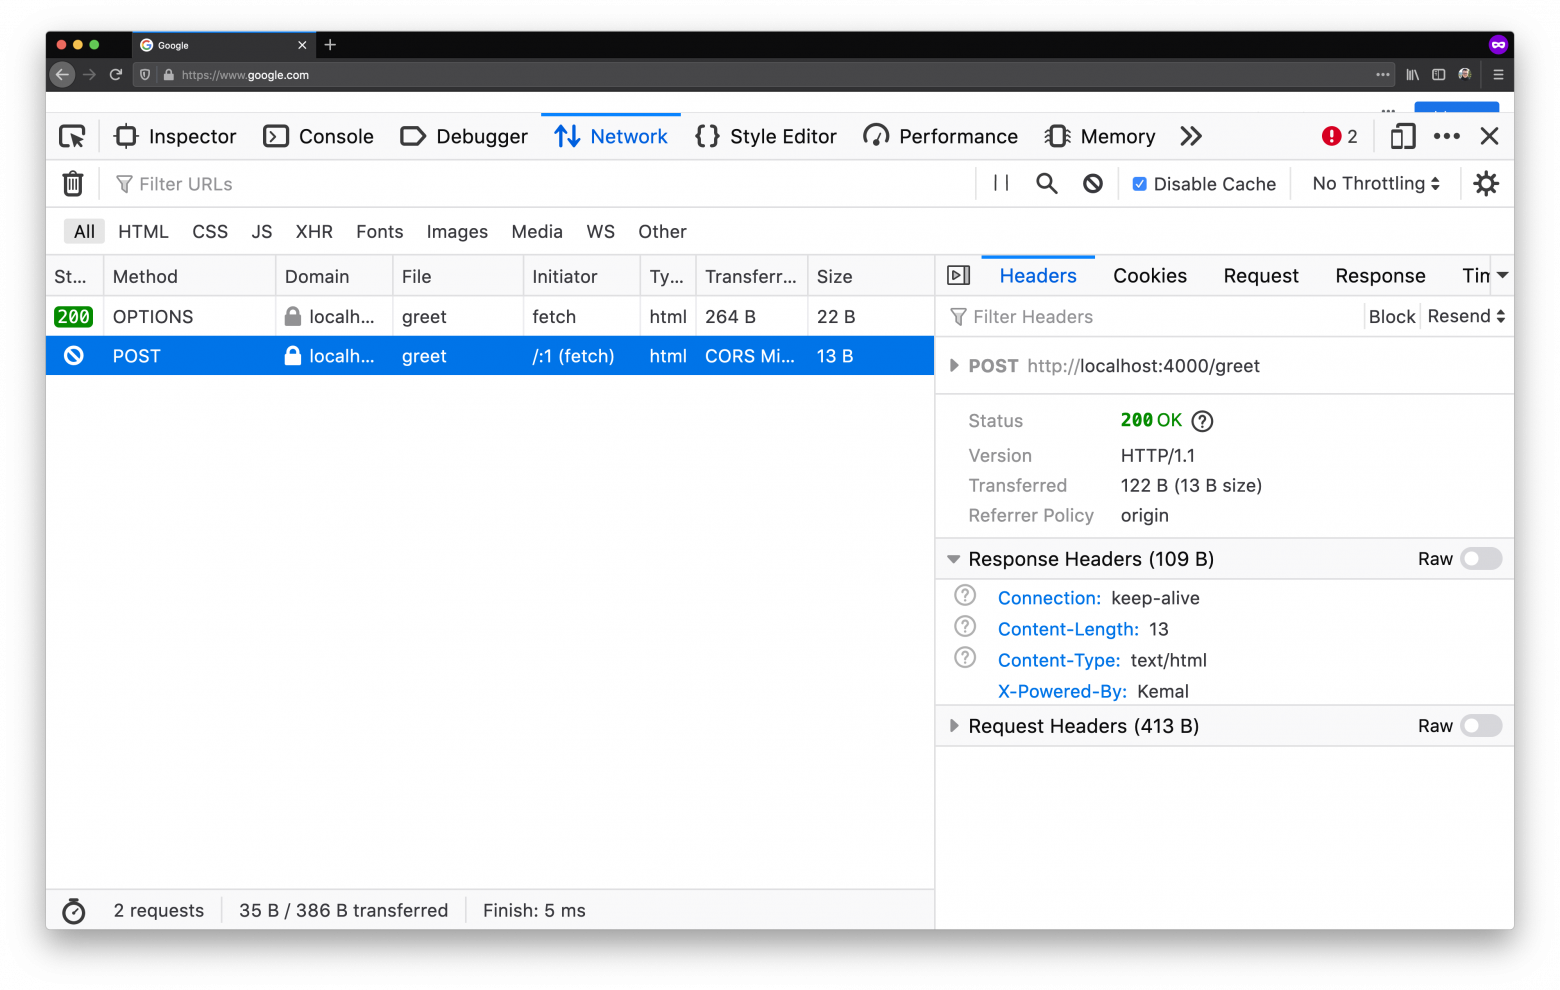
Наш запрос остается заблокированным. Даже несмотря на то что наша конечная точка OPTIONS/greet в самом деле разрешила запрос, мы пока еще видим сообщение об ошибке. В нашей панели Network происходит кое-что интересное:

OPTIONS стал зеленым!
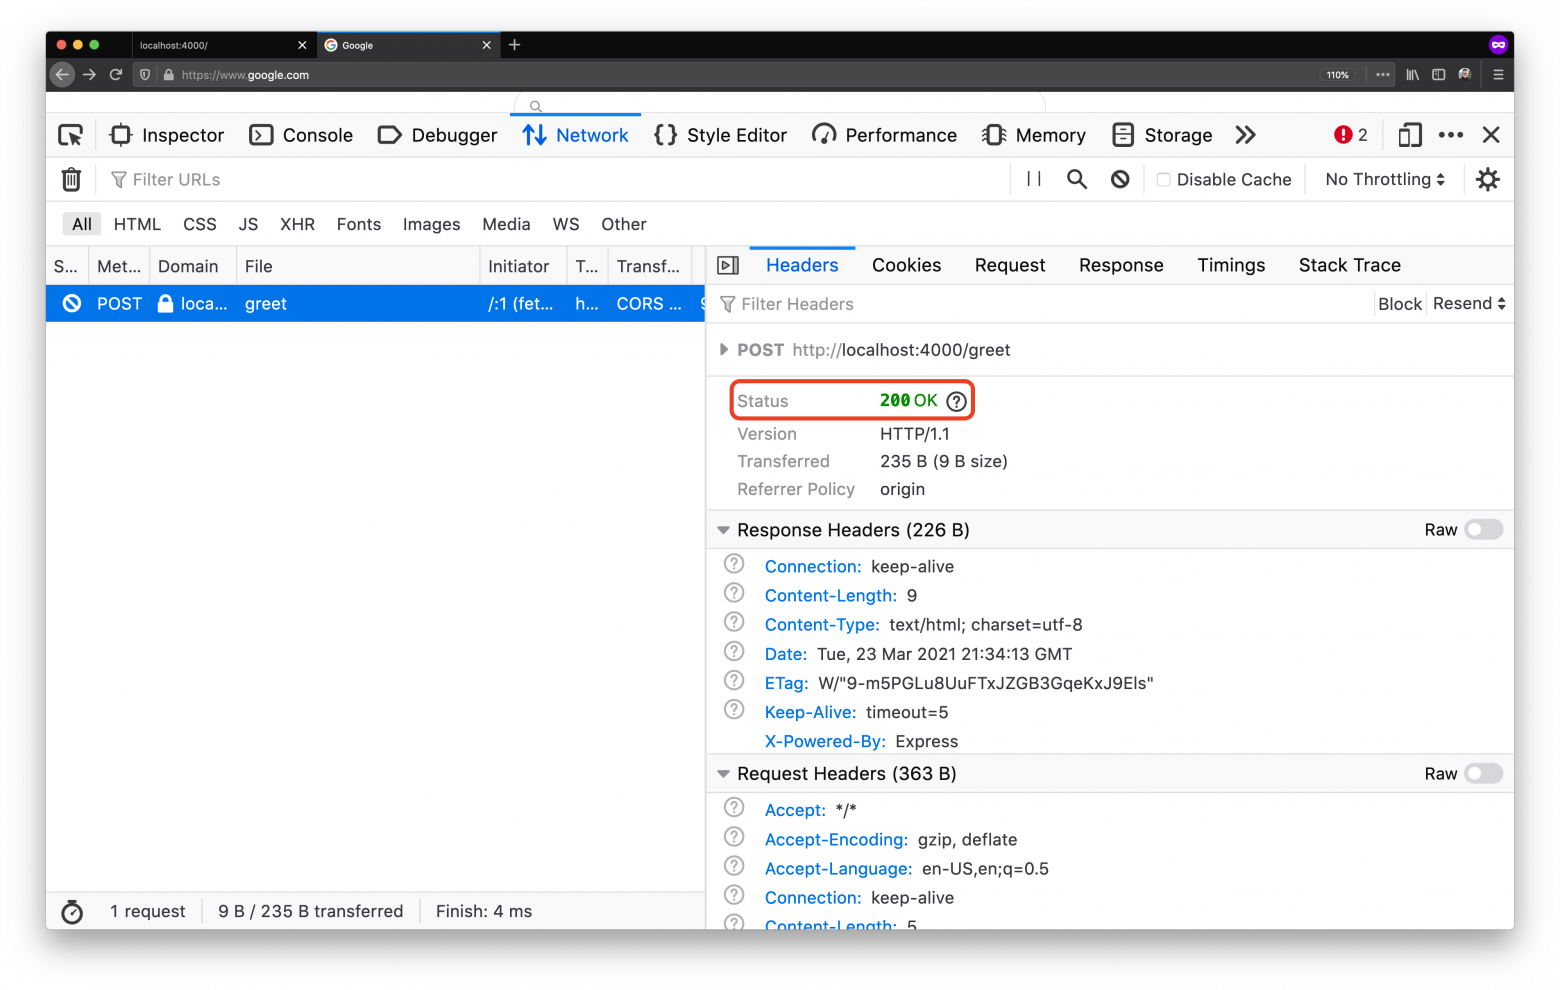
Запрос в конечную точку OPTIONS/greet прошел успешно! Однако запрос POST /greet все еще терпит неудачу. Если взглянуть на внутрь запроса POST /greet мы увидим знакомую картинку:
POST тоже стал зеленым?
На самом деле запрос удался: сервер вернул HTTP 200. Предварительный запрос заработал. Браузер совершил POST-запрос вместо того, чтобы его заблокировать. Однако ответ на запрос POST не содержит никаких CORS заголовков, так что даже несмотря на то, что браузер сделал запрос, он заблокировал любой ответ.
Чтобы разрешить браузеру обработать ответ из запроса POST /greet, нам также нужно добавить заголовок CORS к конечной точке POST:
post "/greet" do |env|
  name = env.params.json["name"].as(String)

  env.response.headers["Access-Control-Allow-Origin"] = "https://www.google.com"

  "Hello, #{name}!"
end
Добавляя к заголовку Access-Control-Allow-Origin заголовок ответа, мы сообщаем браузеру, что вкладка с открытой https://www.google.com имеет доступ к содержимому ответа.
Если попытаться еще разок, то

POST работает!
Мы увидим, что POST /greet получил для нас ответ без каких-либо ошибок. Если посмотреть на панели Network, то мы увидим, что оба запроса зеленые.

OPTIONS & POST в деле!
Используя надлежащие заголовки ответа в нашем конечной точке OPTIONS /greet, выполнявшей предварительный запрос, мы разблокировали конечную точку POST /greet нашего сервера, так, чтобы он имел доступ к информации из разных источников. Вдобавок, предоставляя правильный CORS заголовок ответа в ответе конечной POST /greet, мы позволили браузеру обрабатывать ответы без возникновения блокировок.
Считывание из разных источников
Как мы отмечали ранее, считывание из разных источников блокируются по умолчанию. Это делается намеренно: мы не хотели бы загружать другие ресурсы из других источников в пределах нашего источника.
Скажем, в нашем Crystal сервере есть действие GET /greet.
get "/greet" do
  "Hey!"
end
Из нашей вкладки, что передала www.google.com если мы попробуем запросить эндпоинт GET /greet, то CORS нас заблокирует:
CORS блокирует
Если посмотрим поглубже в запрос, то мы найдем кое-что интересное:

На самом деле, как и прежде, наш браузер разрешил запрос: мы получили код состояния HTTP 200. Однако он не показал нашу открытую страницу/вкладку в ответ на этот запрос. Еще раз, в данном случае CORS не заблокировал запрос, он заблокировал ответ.
Так же, как и в случае с записью из разных источников, мы можем освободить CORS и обеспечить считывание из разных источников, добавляя заголовок Access-Control-Allow-Origin:
get "/greet" do |env|
  env.response.headers["Access-Control-Allow-Origin"] = "https://www.google.com"
  "Hey!"
end
Когда браузер получит ответ от сервера, он проверит заголовок Access-Control-Allow-Origin и исходя из его значения решит, сможет ли он позволить странице прочитать ответ. Учитывая, что в данном случае значением является https://www.google.com, итог будет успешным:
Успешный запрос GET между разными источниками
Вот как наш браузер защищает нас от считывания из разных источников и соблюдает директивы server, сообщенные через заголовки.
Тонкая настройка CORS
Как мы уже видели в предыдущих примерах, чтобы смягчить политику CORS нашего сайта мы можем присвоить опцию Access-Control-Allow-Origin для нашего действия /greet значению https://www.google.com:
post "/greet" do |env|
  body = env.request.body

  name = "there"
  name = body.gets.as(String) if !body.nil?

  env.response.headers["Access-Control-Allow-Origin"] = "https://www.google.com"
  "Hello, #{name}!"
end
Это разрешит нашему источнику https://www.google.com запросить наш сервер, и наш браузер свободно сделает это. Имея Access-Control-Allow-Origin мы можем попробовать снова выполнить вызов fetch:

Сработало!
И это работает! С новой политикой CORS мы можем вызвать действие /greet из нашей вкладки, в которой загружена страница https://www.google.com. Или, мы могли бы присвоить заголовку значение *, которое сообщило бы браузеру, что сервер может быть вызван из любого источника.
Устанавливая такую конфигурацию, нужно тщательно взвесить все риски. Тем не менее, вставка заголовков с нестрогими требованиями к CORS почти всегда безопасна. Есть эмпирическое правило: если вы открываете URL в приватной вкладке и вас устраивает информация, которая там отображается, то вы можете установить разрешающую CORS политику (*) для данного URL.
Другой способ настройки CORS на нашем сайте — это использование заголовка запроса Access-Control-Allow-Credentials. Access-Control-Allow-Credentials запрашивает браузер, показывать ли ответ JavaScript коду клиентской части, когда в качестве режима учетных данных запроса используется include.
Учетный режим запросов исходит из внедрения Fetch API, который в свою очередь корнями идет к объектам XMLHttpRequest:
var client = new XMLHttpRequest()
client.open("GET", "./")
client.withCredentials = true
С вводом fetch, метод withCredentials превратился в опциональный аргумент fetch запроса:
fetch("./", { credentials: "include" }).then(/* ... */)
Доступными опциями для обработки учетных данных являются omit, same-origin и include. Доступны разные режимы, так что программист может настроить отправляемый запрос, пока ответ от сервера сообщает браузеру как вести себя, когда учетные данные отправлены с запросом (через заголовок Access-Control-Allow-Credential).
Спецификация Fetch API содержит подробно расписанный и детально разобранный функционал взаимодействия CORS и Web API fetch, а также характеризует механизмы безопасности, используемые браузерами.
Несколько правильных решений
В завершении, давайте рассмотрим некоторые из рекомендуемых методов, касающихся совместного использования ресурсов между разными источниками (CORS).
Свободный доступ для всех
Как правило, это тот случай, когда у вас есть сайт с открытым контентом, не ограниченный платным доступом или сайт, требующий аутентификацию или авторизацию. Тогда вы должны установить Access-Control-Allow-Origin: * для ресурсов сайта.
Значение * хорошо подойдет в случаях, когда
- Не требуется ни аутентификация, ни авторизация
- Ресурс доступен широкой аудитории пользователей без ограничений
- Источников и клиентов, у которых будет доступ к ресурсам великое множество, и вы не знаете о них или вам все равно, кто они.
Опасные последствия от применения такой конфигурации наступают, когда контент подается на частном сервере (то есть за брандмауэрами или VPN). Когда вы подключены через VPN, у вас есть доступ к файлам в сети компании:

Сверхупрощение VPN
Теперь, когда взломщик захостит dangerous.com, который содержит ссылку файла с VPN, то (в теории) он может создать скрипт в их сайте, который сможет иметь доступ к этому файлу:
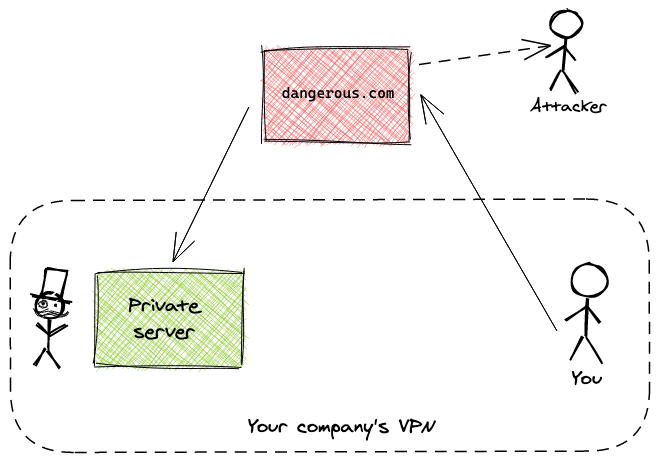
Утечка файла
В то время как атаку такого типа сложно устроить и это требует широких знаний о конкретном VPN и файлах, хранящихся в нем, это потенциальный вектор атаки, о которым мы должны знать.
Всё в семью
Продолжая этот пример, представим, что вы хотите провести аналитику нашего сайта. Мы хотели бы, чтобы браузеры наших пользователей отправляли нам данные о том, как пользователи взаимодействуют с сайтом и о поведении наших пользователей на нашем сайте.
Проще всего это сделать, периодически отправляя данные, реализовав в браузере асинхронные запросы с помощью JavaScript. На машинном интерфейсе у нас есть простой API, который берет эти запросы из браузеров наших пользователей и хранит данные на машине для последующей обработки.
В таких случаях наш API общедоступен, но мы не хотим, чтобы какой-либо сайт прислал данные в наш аналитический API. На самом деле мы заинтересованы только в запросах, исходящих из браузеров, открывавших наш сайт, вот и все.
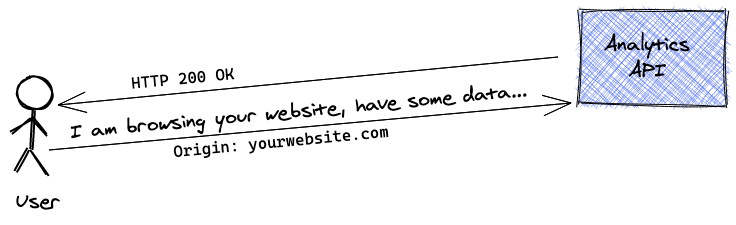
В данных случаях мы хотим, чтобы наш API установил заголовок Access-Control-Allow-Origin к URL нашего сайта. Это обеспечит нас тем, что браузеры никогда не отправят запросы нашему API с других страниц.
Если пользователи или другие сайты попробуют взломать данные нашего аналитического API, то набор заголовков Access-Control-Allow-Origin, установленный на нашем API, не пропустит запрос.

Null источник
Другим интересным случаем является null источник. Это происходит, когда ресурс получает доступ от браузера, который отображает локальный файл. Например, запросы, исходящие из определенного JavaScript, работающего в статическом файле на вашем ПК, имеют заголовок Origin со значением null.
В таких случаях, если ваш сервер разрешает доступ к ресурсам для null источников, то это может мешать продуктивности разработчика. Разрешение null источников в политике CORS должно быть сделано намеренно, и только если пользователями вашего сайта/продукта пока являются только его разработчики.
Пропускай куки, если возможно
Как мы уже видели с Access-Control-Allow-Credentials, куки не включены по умолчанию. Чтобы разрешить отправку куки с разных источников, нужно просто вернуть Access-Control-Allow-Credentials: true. Этот заголовок сообщит браузерам, что им разрешается пересылать удостоверяющие данные (то есть куки) в запросах между разными источниками.
Разрешение куки между разными источниками – часто ненадежная практика. Вы можете подставиться под потенциальные атаки, так что включайте куки их только когда это абсолютно необходимо.
Куки между разными источниками полезнее всего в ситуациях, когда вы точно знаете какие именно клиенты будут иметь доступ к вашему серверу. Именно поэтому семантика CORS не позволяет нам установить Access-Control-Allow-Origin: *, когда удостоверяющие данные между разными источниками разрешены.
В то время как комбинация из Access-Control-Allow-Origin: * и Access-Control-Allow-Credentials: true технически разрешается, она является анти-паттерном и ее следует безусловно избегать.
Если вы хотите, чтобы к вашим серверам имели доступ разные клиенты и источники, то вам стоит рассмотреть возможность создания API с аутентификацией через пароль вместо использования куков. Но если вариант с API не является оптимальным, то обеспечьте себя защитой от фальсификатора межсайтовых запросов (CSRF).
Дополнительная литература
Надеюсь, что этот длинный текст помог вам подробно разобраться в CORS, как появилась эта штука и почему она необходима. Вот ссылки, которые я использовал при написания своей статьи.
- Cross-Origin Resource Sharing (CORS)
- Access-Control-Allow-Credentials header on MDN Web Docs
- Authoritative guide to CORS (Cross-Origin Resource Sharing) for REST APIs
- The «CORS protocol» section of the Fetch API spec
- Same-origin policy on MDN Web Docs
- Quentin’s great summary of CORS on StackOverflow
Наши серверы можно использовать для разработки и хостинга сайтов любой сложности.
Зарегистрируйтесь по ссылке выше или кликнув на баннер и получите 10% скидку на первый месяц аренды сервера любой конфигурации!

Cross-Origin Resource Sharing (CORS) is a mechanism that browsers and webviews — like the ones powering Capacitor and Cordova — use to restrict HTTP and HTTPS requests made from scripts to resources in a different origin for security reasons, mainly to protect your user’s data and prevent attacks that would compromise your app.
In order to know if an external origin supports CORS, the server has to send some special headers for the browser to allow the requests.
An origin is the combination of the protocol, domain, and port from which your Ionic app or the external resource is served. For example, apps running in Capacitor have capacitor://localhost (iOS) or http://localhost (Android) as their origin.
When the origin where your app is served (e.g. http://localhost:8100 with ionic serve) and the origin of the resource being requested (e.g. https://api.example.com) don’t match, the browser’s Same Origin Policy takes effect and CORS is required for the request to be made.
CORS errors are common in web apps when a cross-origin request is made but the server doesn’t return the required headers in the response (is not CORS-enabled):
note
XMLHttpRequest cannot load https://api.example.com. No ‘Access-Control-Allow-Origin’ header is present on the requested resource. Origin ‘http://localhost:8100’ is therefore not allowed access.
Request with preflight
By default, when a web app tries to make a cross-origin request the browser sends a preflight request before the actual request. This preflight request is needed in order to know if the external resource supports CORS and if the actual request can be sent safely, since it may impact user data.
A preflight request is sent by the browser if:
- The method is:
- PUT
- DELETE
- CONNECT
- OPTIONS
- TRACE
- PATCH
- Or if it has a header other than:
- Accept
- Accept-Language
- Content-Language
- Content-Type
- DPR
- Downlink
- Save-Data
- Viewport-Width
- Width
- Or if it has a
Content-Typeheader other than:- application/x-www-form-urlencoded
- multipart/form-data
- text/plain
- Or if a
ReadableStreamor event listeners inXMLHttpRequestUploadare used.
If any of the conditions above are met, a preflight request with the OPTIONS method is sent to the resource URL.
Let’s suppose we are making a POST request to a fictional JSON API at https://api.example.com with a Content-Type of application/json. The preflight request would be like this (some default headers omitted for clarity):
OPTIONS / HTTP/1.1
Host: api.example.com
Origin: http://localhost:8100
Access-Control-Request-Method: POST
Access-Control-Request-Headers: Content-Type
If the server is CORS enabled, it will parse the Access-Control-Request-* headers and understand that a POST request is trying to be made from http://localhost:8100 with a custom Content-Type.
The server will then respond to this preflight with which origins, methods, and headers are allowed by using the Access-Control-Allow-* headers:
HTTP/1.1 200 OK
Access-Control-Allow-Origin: http://localhost:8100
Access-Control-Allow-Methods: GET, POST, OPTIONS
Access-Control-Allow-Headers: Content-Type
If the returned origin and method don’t match the ones from the actual request, or any of the headers used are not allowed, the request will be blocked by the browser and an error will be shown in the console. Otherwise, the request will be made after the preflight.
In our example, since the API expects JSON, all POST requests will have a Content-Type: application/json header and always be preflighted.
Simple requests
Some requests are always considered safe to send and don’t need a preflight if they meet all of the following conditions:
- The method is:
- GET
- HEAD
- POST
- Have only these headers:
- Accept
- Accept-Language
- Content-Language
- Content-Type
- DPR
- Downlink
- Save-Data
- Viewport-Width
- Width
- The
Content-Typeheader is:- application/x-www-form-urlencoded
- multipart/form-data
- text/plain
- No
ReadableStreamor event listeners inXMLHttpRequestUploadare used.
In our example API, GET requests don’t need to be preflighted because no JSON data is being sent, and so the app doesn’t need to use the Content-Type: application/json header. They will always be simple requests.
| Header | Value | Description |
|---|---|---|
| Access-Control-Allow-Origin | origin or * |
Specifies the origin to be allowed, like http://localhost:8100 or * to allow all origins. |
| Access-Control-Allow-Methods | methods |
Which methods are allowed when accessing the resource: GET, HEAD, POST, PUT, DELETE, CONNECT, OPTIONS, TRACE, PATCH. |
| Access-Control-Allow-Headers | headers |
Used in response to a preflight request to indicate which headers can be used when making the actual request, aside from the simple headers, which are always allowed. |
| Access-Control-Allow-Credentials | true or false |
Whether or not the request can be made with credentials. |
| Access-Control-Expose-Headers | headers |
Specifies the headers that the browser is allowed to access. |
| Access-Control-Max-Age | seconds |
Indicates how long the results of a preflight request can be cached. |
The browser automatically sends the appropriate headers for CORS in every request to the server, including the preflight requests. Please note that the headers below are for reference only, and should not be set in your app code (the browser will ignore them).
All Requests
| Header | Value | Description |
|---|---|---|
| Origin | origin |
Indicates the origin of the request. |
Preflight Requests
| Header | Value | Description |
|---|---|---|
| Access-Control-Request-Method | method |
Used to let the server know what method will be used when the actual request is made. |
| Access-Control-Request-Headers | headers |
Used to let the server know what non-simple headers will be used when the actual request is made. |
A. Enabling CORS in a server you control
The correct and easiest solution is to enable CORS by returning the right response headers from the web server or backend and responding to preflight requests, as it allows to keep using XMLHttpRequest, fetch, or abstractions like HttpClient in Angular.
Ionic apps may be run from different origins, but only one origin can be specified in the Access-Control-Allow-Origin header. Therefore we recommend checking the value of the Origin header from the request and reflecting it in the Access-Control-Allow-Origin header in the response.
Please note that all of the Access-Control-Allow-* headers have to be sent from the server, and don’t belong in your app code.
Here are some of the origins your Ionic app may be served from:
Capacitor
| Platform | Origin |
|---|---|
| iOS | capacitor://localhost |
| Android | http://localhost |
Replace localhost with your own hostname if you have changed the default in the Capacitor config.
Ionic WebView 3.x plugin on Cordova
| Platform | Origin |
|---|---|
| iOS | ionic://localhost |
| Android | http://localhost |
Replace localhost with your own hostname if you have changed the default in the plugin config.
Ionic WebView 2.x plugin on Cordova
| Platform | Origin |
|---|---|
| iOS | http://localhost:8080 |
| Android | http://localhost:8080 |
Replace port 8080 with your own if you have changed the default in the plugin config.
Local development in the browser
| Command | Origin |
|---|---|
ionic serve |
http://localhost:8100 or http://YOUR_MACHINE_IP:8100 |
npm run start or ng serve |
http://localhost:4200 for Ionic Angular apps. |
Port numbers can be higher if you are serving multiple apps at the same time.
Allowing any origin with Access-Control-Allow-Origin: * is guaranteed to work in all scenarios but may have security implications — like some CSRF attacks — depending on how the server controls access to resources and use sessions and cookies.
For more information on how to enable CORS in different web and app servers, please check enable-cors.org
CORS can be easily enabled in Express/Connect apps with the cors middleware:
const express = require('express');
const cors = require('cors');
const app = express();

const allowedOrigins = [
  'capacitor://localhost',
  'ionic://localhost',
  'http://localhost',
  'http://localhost:8080',
  'http://localhost:8100',
];

// Reflect the origin if it's in the allowed list or not defined (cURL, Postman, etc.)
const corsOptions = {
  origin: (origin, callback) => {
    if (allowedOrigins.includes(origin) || !origin) {
      callback(null, true);
    } else {
      callback(new Error('Origin not allowed by CORS'));
    }
  },
};

// Enable preflight requests for all routes
app.options('*', cors(corsOptions));

app.get('/', cors(corsOptions), (req, res, next) => {
  res.json({ message: 'This route is CORS-enabled for an allowed origin.' });
});

app.listen(3000, () => {
  console.log('CORS-enabled web server listening on port 3000');
});
B. Working around CORS in a server you can’t control
Don’t leak your keys!
If you are trying to connect to a 3rd-party API, first check in its documentation that is safe to use it directly from the app (client-side) and that it won’t leak any secret/private keys or credentials, as it’s easy to see them in clear text in Javascript code. Many APIs don’t support CORS on purpose, in order to force developers to use them in the server and protect important information or keys.
1. Native-only apps (iOS/Android)
Use the HTTP plugin from Ionic Native to make the requests natively from outside the webview. Please note that this plugin doesn’t work in the browser, so the development and testing of the app must always be done in a device or simulator going forward.
Usage in Ionic Angular 4
import { Component } from '@angular/core';
import { HTTP } from '@awesome-cordova-plugins/http/ngx';

@Component({
  selector: 'app-home',
  templateUrl: './home.page.html',
  styleUrls: ['./home.page.scss'],
})
export class HomePage {
  constructor(private http: HTTP) {}

  async getData() {
    try {
      const url = 'https://api.example.com';
      const params = {};
      const headers = {};

      const response = await this.http.get(url, params, headers);

      console.log(response.status);
      console.log(JSON.parse(response.data)); // JSON data returned by server
      console.log(response.headers);
    } catch (error) {
      console.error(error.status);
      console.error(error.error); // Error message as string
      console.error(error.headers);
    }
  }
}
2. Native + PWAs
Send the requests through an HTTP/HTTPS proxy that bypasses them to the external resources and adds the necessary CORS headers to the responses. This proxy must be trusted or under your control, as it will be intercepting most traffic made by the app.
Also, keep in mind that the browser or webview will not receive the original HTTPS certificates but the one being sent from the proxy if it’s provided. URLs may need to be rewritten in your code in order to use the proxy.
Check cors-anywhere for a Node.js CORS proxy that can be deployed in your own server. Using free hosted CORS proxies in production is not recommended.
C. Disabling CORS or browser web security
Please be aware that CORS exists for a reason (security of user data and to prevent attacks against your app). It’s not possible or advisable to try to disable CORS.
Older webviews like UIWebView on iOS don’t enforce CORS but are deprecated and are very likely to disappear soon. Modern webviews like iOS WKWebView or Android WebView (both used by Capacitor) do enforce CORS and provide huge security and performance improvements.
If you are developing a PWA or testing in the browser, using the --disable-web-security flag in Google Chrome or an extension to disable CORS is a really bad idea. You will be exposed to all kind of attacks, you can’t ask your users to take the risk, and your app won’t work once in production.
Sources
- CORS Errors in Ionic Apps
- MDN
Many websites have JavaScript functions that make network requests to a server, such as a REST API. The web pages and APIs are often in different domains. This introduces security issues in that any website can request data from an API. Cross-Origin Resource Sharing (CORS) provides a solution to these issues. It became a W3C recommendation in 2014. It makes it the responsibility of the web browser to prevent unauthorized access to APIs. All modern web browsers enforce CORS. They prevent JavaScript from obtaining data from a server in a domain different than the domain the website was loaded from, unless the REST API server gives permission.
From a developer’s perspective, CORS is often a cause of much grief when it blocks network requests. CORS provides a number of different mechanisms for limiting JavaScript access to APIs. It is often not obvious which mechanism is blocking the request. We are going to build a simple web application that makes REST calls to a server in a different domain. We will deliberately make requests that the browser will block because of CORS policies and then show how to fix the issues. Let’s get started!
NOTE: The code for this project can be found on GitHub.
Table of Contents
- Prerequisites to Building a Go Application
- How to Build a Simple Web Front End
- How to Build a Simple REST API in Go
- How to Solve a Simple CORS Issue
- Allowing Access from Any Origin Domain
- CORS in Flight
- What Else Does CORS Block?
- Restrictions on Response Headers
- Credentials Are a Special Case
- Control CORS Cache Configuration
- How to Prevent CORS Issues with Okta
- How CORS Prevents Security Issues
Prerequisites to Building a Go Application
First things first, if you don’t already have Go installed on your computer you will need to download and install the Go Programming Language.
Now, create a directory where all of our future code will live.
Finally, we will make our directory a Go module and install the Gin package (a Go web framework) to implement a web server.
go mod init cors
go get github.com/gin-gonic/gin
go get github.com/gin-contrib/static
A file called go.mod will get created containing the dependencies.
How to Build a Simple Web Front End
We are going to build a simple HTML and JavaScript front end and serve it from a web server written using Gin.
First of all, create a directory called frontend and create a file called frontend/index.html with the following content:
<html>
    <head>
        <meta charset="UTF-8" />
        <title>Fixing Common Issues with CORS</title>
    </head>
    <body>
        <h1>Fixing Common Issues with CORS</h1>
        <div>
            <textarea id="messages" name="messages" rows="10" cols="50">Messages</textarea><br/>
            <form id="form1">
                <input type="button" value="Get v1" onclick="onGet('v1')"/>
                <input type="button" value="Get v2" onclick="onGet('v2')"/>
            </form>
        </div>
    </body>
</html>
The web page has a text area to display messages and a simple form with two buttons. When a button is clicked it calls the JavaScript function onGet() passing it a version number. The idea being that v1 requests will always fail due to CORS issues, and v2 will fix the issue.
Next, create a file called frontend/control.js containing the following JavaScript:
function onGet(version) {
    const url = "http://localhost:8000/api/" + version + "/messages";
    var headers = {}

    fetch(url, {
        method : "GET",
        mode: 'cors',
        headers: headers
    })
    .then((response) => {
        if (!response.ok) {
            throw new Error(response.error)
        }
        return response.json();
    })
    .then(data => {
        document.getElementById('messages').value = data.messages;
    })
    .catch(function(error) {
        document.getElementById('messages').value = error;
    });
}
The onGet() function inserts the version number into the URL and then makes a fetch request to the API server. A successful request will return a list of messages. The messages are displayed in the text area.
Finally, create a file called frontend/.go containing the following Go code:
package main

import (
	"github.com/gin-contrib/static"
	"github.com/gin-gonic/gin"
)

func main() {
	r := gin.Default()
	r.Use(static.Serve("/", static.LocalFile("./frontend", false)))
	r.Run(":8080")
}
This code simply serves the contents of the frontend directory on requests on port 8080. Note that JavaScript makes a call to port http://localhost:8000 which is a separate service.
Start the server and point a web browser at http://localhost:8080 to see the static content.
How to Build a Simple REST API in Go
Create a directory called rest to contain the code for a basic REST API.
NOTE: A separate directory is required as Go doesn’t allow two program entry points in the same directory.
Create a file called rest/server.go containing the following Go code:
package main

import (
	"fmt"
	"strconv"
	"net/http"

	"github.com/gin-gonic/gin"
)

var messages []string

func GetMessages(c *gin.Context) {
	version := c.Param("version")
	fmt.Println("Version", version)
	c.JSON(http.StatusOK, gin.H{"messages": messages})
}

func main() {
	messages = append(messages, "Hello CORS!")
	r := gin.Default()
	r.GET("/api/:version/messages", GetMessages)
	r.Run(":8000")
}
A list called messages is created to hold message objects.
The function GetMessages() is called whenever a GET request is made to the specified URL. It returns a JSON string containing the messages. The URL contains a path parameter which will be v1 or v2. The server listens on port 8000.
The server can be run using:
How to Solve a Simple CORS Issue
We now have two servers—the front-end one on http://localhost:8080, and the REST API server on http://localhost:8000. Even though the two servers have the same hostname, the fact that they are listening on different port numbers puts them in different domains from the CORS perspective. The domain of the web content is referred to as the origin. If the JavaScript fetch request specifies cors a request header will be added identifying the origin.
Origin: http://localhost:8080
Make sure both the frontend and REST servers are running.
Next, point a web browser at http://localhost:8080 to display the web page. We are going to get JavaScript errors, so open your browser’s developer console so that we can see what is going on. In Chrome it is *View** > Developer > Developer Tools.
Next, click on the Send v1 button. You will get a JavaScript error displayed in the console:
Access to fetch at ‘http://localhost:8000/api/v1/messages’ from origin ‘http://localhost:8080’ has been blocked by CORS policy: No ‘Access-Control-Allow-Origin’ header is present on the requested resource. If an opaque response serves your needs, set the request’s mode to ‘no-cors’ to fetch the resource with CORS disabled.
The message says that the browser has blocked the request because of a CORS policy. It suggests two solutions. The second suggestion is to change the mode from cors to no-cors in the JavaScript fetch request. This is not an option as the browser always deletes the response data when in no-cors mode to prevent data from being read by an unauthorized client.
The solution to the issue is for the server to set a response header that allows the browser to make cross-domain requests to it.
Access-Control-Allow-Origin: http://localhost:8080
This tells the web browser that the cross-origin requests are to be allowed for the specified domain. If the domain specified in the response header matches the domain of the web page, specified in the Origin request header, then the browser will not block the response being received by JavaScript.
We are going to set the header when the URL contains v2. Change the GetMessages() function in cors/server.go to the following:
func GetMessages(c *gin.Context) {
	version := c.Param("version")
	fmt.Println("Version", version)
	if version == "v2" {
		c.Header("Access-Control-Allow-Origin", "http://localhost:8080")
	}
	c.JSON(http.StatusOK, gin.H{"messages": messages})
}
This sets a header to allow cross-origin requests for the v2 URI.
Restart the server and go to the web page. If you click on Get v1 you will get blocked by CORS. If you click on Get v2, the request will be allowed.
A response can only have at most one Access-Control-Allow-Origin header. The header can only specify only one domain. If the server needs to allow requests from multiple origin domains, it needs to generate an Access-Control-Allow-Origin response header with the same value as the Origin request header.
Allowing Access from Any Origin Domain
There is an option to prevent CORS from blocking any domain. This is very popular with developers!
Access-Control-Allow-Origin: *
Be careful when using this option. It will get flagged in a security audit. It may also be in violation of an information security policy, which could have serious consequences!
CORS in Flight
Although we have fixed the main CORS issue, there are some limitations. One of the limitations is that only the HTTP GET, and OPTIONS methods are allowed. The GET and OPTIONS methods are read-only and are considered safe as they don’t modify existing content. The POST, PUT, and DELETE methods can add or change existing content. These are considered unsafe. Let’s see what happens when we make a PUT request.
First of all, add a new form to client/index.html:
<form id="form2">
    <input type="text" id="puttext" name="puttext"/>
    <input type="button" value="Put v1" onclick="onPut('v1')"/>
    <input type="button" value="Put v2" onclick="onPut('v2')"/>
</form>
This form has a text input and the two send buttons as before that call a new JavaScript function.
Next, add the JavaScript funtion to client/control.js:
function onPut(version) {
    const url = "http://localhost:8000/api/" + version + "/messages/0";
    var headers = {}

    fetch(url, {
        method : "PUT",
        mode: 'cors',
        headers: headers,
        body: new URLSearchParams(new FormData(document.getElementById("form2"))),
    })
    .then((response) => {
        if (!response.ok) {
            throw new Error(response.error)
        }
        return response.json();
    })
    .then(data => {
        document.getElementById('messages').value = data.messages;
    })
    .catch(function(error) {
        document.getElementById('messages').value = error;
    });
}
This makes a PUT request sending the form parameters in the request body. Note that the URI ends in /0. This means that the request is to create or change the message with the identifier 0.
Next, define a PUT handler in the main() function of rest/server.go:
r.PUT("/api/:version/messages/:id", PutMessage)
The message identifier is extracted as a path parameter.
Finally, add the request handler function to rest/server.go:
func PutMessage(c *gin.Context) {
	version := c.Param("version")
	id, _ := strconv.Atoi(c.Param("id"))
	text := c.PostForm("puttext")
	messages[id] = text
	if version == "v2" {
	    c.Header("Access-Control-Allow-Origin", "http://localhost:8080")
	}
	c.JSON(http.StatusOK, gin.H{"messages": messages})
}
This updates the message from the form data and sends the new list of messages. The function also always sets the allow origin header, as we know that it is required.
Now, restart the servers and load the web page. Make sure that the developer console is open. Add some text to the text input and hit the Send v1 button.
You will see a slightly different CORS error in the console:
Access to fetch at ‘http://localhost:8000/api/v1/messages/0’ from origin ‘http://localhost:8080’ has been blocked by CORS policy: Response to preflight request doesn’t pass access control check: No ‘Access-Control-Allow-Origin’ header is present on the requested resource. If an opaque response serves your needs, set the request’s mode to ‘no-cors’ to fetch the resource with CORS disabled.
This is saying that a preflight check was made, and that it didn’t set the Access-Control-Allow-Origin header.
Now, look at the console output from the API server:
[GIN] 2020/12/01 - 11:10:09 | 404 | 447ns | ::1 | OPTIONS "/api/v1/messages/0"
So, what is happening here? JavaScript is trying to make a PUT request. This is not allowed by CORS policy. In the GET example, the browser made the request and blocked the response. In this case, the browser refuses to make the PUT request. Instead, it sent an OPTIONS request to the same URI. It will only send the PUT if the OPTIONS request returns the correct CORS header. This is called a preflight request. As the server doesn’t know what method the OPTIONS preflight request is for, it specifies the method in a request header:
Access-Control-Request-Method: PUT
Let’s fix this by adding a handler for the OPTIONS request that sets the allow origin header in cors/server.go:
func OptionMessage(c *gin.Context) {
	c.Header("Access-Control-Allow-Origin", "http://localhost:8080")
}

func main() {
	messages = append(messages, "Hello CORS!")
	r := gin.Default()
	r.GET("/api/:version/messages", GetMessages)
	r.PUT("/api/:version/messages/:id", PutMessage)
	r.OPTIONS("/api/v2/messages/:id", OptionMessage)
	r.Run(":8000")
}
Notice that the OPTIONS handler is only set for the v2 URI as we don’t want to fix v1.
Now, restart the server and send a message using the Put v2 button. We get yet another CORS error!
Access to fetch at ‘http://localhost:8000/api/v2/messages/0’ from origin ‘http://localhost:8080’ has been blocked by CORS policy: Method PUT is not allowed by Access-Control-Allow-Methods in preflight response.
This is saying that the preflight check needs another header to stop the PUT request from being blocked.
Add the response header to cors/server.go:
func OptionMessage(c *gin.Context) {
	c.Header("Access-Control-Allow-Origin", "http://localhost:8080")
	c.Header("Access-Control-Allow-Methods", "GET, OPTIONS, POST, PUT")
}
Restart the server and resend the message. The CORS issues are resolved.
What Else Does CORS Block?
CORS has a very restrictive policy regarding which HTTP request headers are allowed. It only allows safe listed request headers. These are Accept, Accept-Language, Content-Language, and Content-Type. They can only contain printable characters and some punctuation characters are not allowed. Header values can’t have more than 128 characters.
There are further restrictions on the Content-Type header. It can only be one of application/x-www-form-urlencoded, multipart/form-data, and text/plain. It is interesting to note that application/json is not allowed.
Let’s see what happens if we send a custom request header. Modify the onPut() function in frontend/control.jsto set a header:
var headers = { "X-Token": "abcd1234" }
Now, make sure that the servers are running and load or reload the web page. Type in a message and click the Put v1 button. You will see a CORS error in the developer console.
Access to fetch at ‘http://localhost:8000/api/v2/messages/0’ from origin ‘http://localhost:8080’ has been blocked by CORS policy: Request header field x-token is not allowed by Access-Control-Allow-Headers in preflight response.
Any header which is not CORS safe-listed causes a preflight request. This also contains a request header that specifies the header that needs to be allowed:
Access-Control-Request-Headers: x-token
Note that the header name x-token is specified in lowercase.
The preflight response can allow non-safe-listed headers and can remove restrictions on safe listed headers:
Access-Control-Allow-Headers: X_Token, Content-Type
Next, change the function in cors/server.go to allow the custom header:
func OptionMessage(c *gin.Context) {
	c.Header("Access-Control-Allow-Origin", "http://localhost:8080")
	c.Header("Access-Control-Allow-Methods", "GET, POST, OPTIONS, PUT")
	c.Header("Access-Control-Allow-Headers", "X-Token")
}
Restart the server and resend the message by clicking the Put v2 button. The request should now be successful.
CORS also places restrictions on response headers. There are seven whitelisted response headers: Cache-Control, Content-Language, Content-Length, Content-Type, Expires, Last-Modified, and Pragma. These are the only response headers that can be accessed from JavaScript. Let’s see this in action.
First of all, add a text area to frontend/index.html to display the headers:
<textarea id="headers" name="headers" rows="10" cols="50">Headers</textarea><br/>
Next, replace the first then block in the onPut function in frontend/control.js to display the response headers:
.then((response) => {
    if (!response.ok) {
        throw new Error(response.error)
    }
    response.headers.forEach(function(val, key) {
        document.getElementById('headers').value += 'n' + key + ': ' + val;
    });
    return response.json();
})
Finally, set a custom header in rest/server.go:
func PutMessage(c *gin.Context) {
	version := c.Param("version")
	id, _ := strconv.Atoi(c.Param("id"))
	text := c.PostForm("puttext")
	messages[id] = text
	if version == "v2" {
	    c.Header("Access-Control-Allow-Origin", "http://localhost:8080")
	}
	c.Header("X-Custom", "123456789")
	c.JSON(http.StatusOK, gin.H{"messages": messages})
}
Now, restart the server and reload the web page. Type in a message and hit Put v2. You should see some headers displayed, but not the custom header. CORS has blocked it.
This can be fixed by setting another response header to expose the custom header in server/server.go:
func PutMessage(c *gin.Context) {
	version := c.Param("version")
	id, _ := strconv.Atoi(c.Param("id"))
	text := c.PostForm("puttext")
	messages[id] = text
	if version == "v2" {
        c.Header("Access-Control-Expose-Headers", "X-Custom")
	    c.Header("Access-Control-Allow-Origin", "http://localhost:8080")
	}
	c.Header("X-Custom", "123456789")
	c.JSON(http.StatusOK, gin.H{"messages": messages})
}
Restart the server and reload the web page. Type in a message and hit Put v2. You should see some headers displayed, including the custom header. CORS has now allowed it.
Credentials Are a Special Case
There is yet another CORS blocking scenario. JavaScript has a credentials request mode. This determines how user credentials, such as cookies are handled. The options are:
omit: Never send or receive cookies.same-origin: This is the default, that allows user credentials to be sent to the same origin.include: Send user credentials even if cross-origin.
Let’s see what happens.
Modify the fetch call in the onPut() function in frontend/Control.js:
fetch(url, {
    method : "PUT",
    mode: 'cors',
    credentials: 'include',
    headers: headers,
    body: new URLSearchParams(new FormData(document.getElementById("form2"))),
})
Now, make sure that the client and server are running and reload the web page. Send a message as before. You will get another CORS error in the developer console:
Access to fetch at ‘http://localhost:8000/api/v2/messages/0’ from origin ‘http://localhost:8080’ has been blocked by CORS policy: Response to preflight request doesn’t pass access control check: The value of the ‘Access-Control-Allow-Credentials’ header in the response is ‘’ which must be ‘true’ when the request’s credentials mode is ‘include’.
The fix for this is to add another header to both the OptionMessage(), and PutMessage() functions in cors/server.go as the header needs to be present in both the preflight request and the actual request:
c.Header("Access-Control-Allow-Credentials", "true")
The request should now work correctly.
The credentials issue can also be resolved on the client by setting the credentials mode to omit and sending credentials as request parameters, instead of using cookies.
Control CORS Cache Configuration
The is one more CORS header that hasn’t yet been discussed. The browser can cache the preflight request results. The Access-Control-Max-Age header specifies the maximum time, in seconds, the results can be cached. It should be added to the preflight response headers as it controls how long the Access-Control-Allow-Methods and Access-Control-Allow-Headers results can be cached.
Access-Control-Max-Age: 600
Browsers typically have a cap on the maximum time. Setting the time to -1 prevents caching and forces a preflight check on all calls that require it.
How to Prevent CORS Issues with Okta
Authentication providers, such as Okta, need to handle cross-domain requests to their authentication servers and API servers. This is done by providing a list of trusted origins. See Okta Enable CORS for more information.
How CORS Prevents Security Issues
CORS is an important security feature that is designed to prevent JavaScript clients from accessing data from other domains without authorization.
Modern web browsers implement CORS to block cross-domain JavaScript requests by default. The server needs to authorize cross-domain requests by setting the correct response headers.
CORS has several layers. Simply allowing an origin domain only works for a subset of request methods and request headers. Some request methods and headers force a preflight request as a further means of protecting data. The actual request is only allowed if the preflight response headers permit it.
CORS is a major pain point for developers. If a request is blocked, it is not easy to understand why, and how to fix it. An understanding of the nature of the blocked request, and of the CORS mechanisms, can easily overcome such issues.
If you enjoyed this post, you might like related ones on this blog:
- What is the OAuth 2.0 Implicit Grant Type?
- Combat Side-Channel Attacks with Cross-Origin Read Blocking
Follow us for more great content and updates from our team! You can find us on Twitter, Facebook, subscribe to our YouTube Channel or start the conversation below.