Обновлено 2023 января: перестаньте получать сообщения об ошибках и замедлите работу вашей системы с помощью нашего инструмента оптимизации. Получить сейчас в эту ссылку
- Скачайте и установите инструмент для ремонта здесь.
- Пусть он просканирует ваш компьютер.
- Затем инструмент почини свой компьютер.
Пользователи снова получают это сообщение об ошибке, ошибка всегда одна и та же:
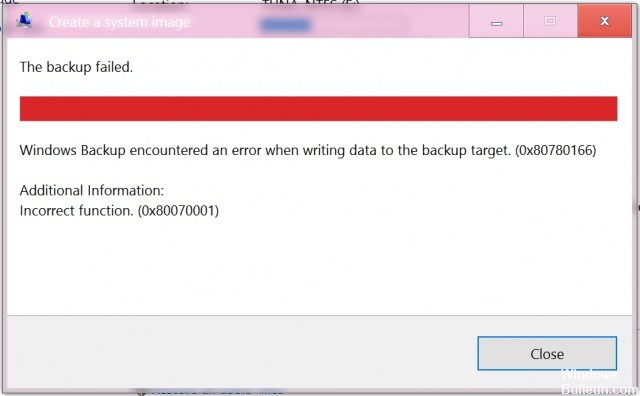
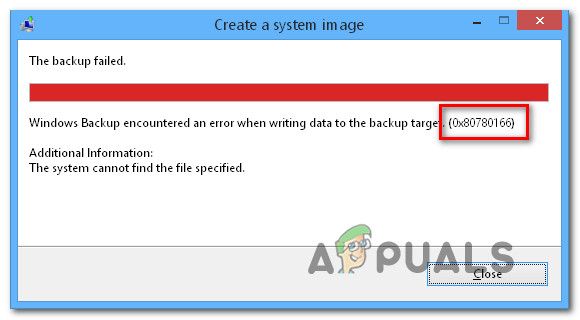
Сбой резервного копирования.
Windows Backup обнаружила ошибку при записи данных в цель резервного копирования. (0x80780166)
Дополнительная информация:
Неверная функция. (0x80070001)
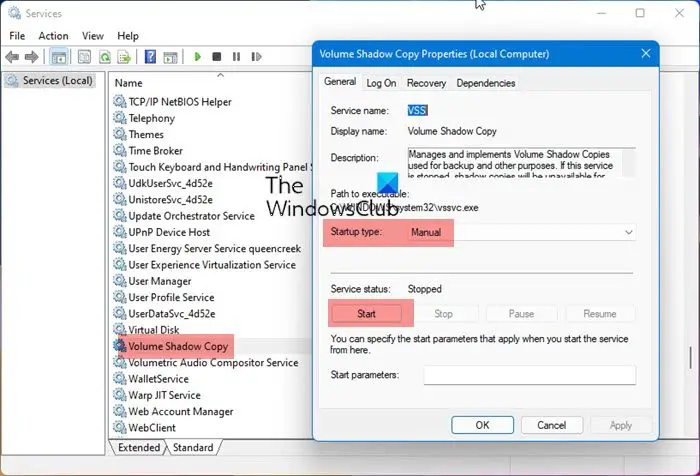
Проверьте службу теневого копирования тома

В свою очередь, я предлагаю вам проверить, правильно ли работает служба теневого копирования томов (VSS).
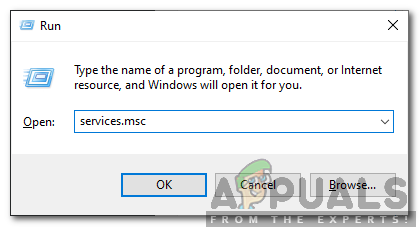
- Нажмите Windows + R, чтобы открыть команду «Выполнить», введите Services.msc и нажмите Enter.
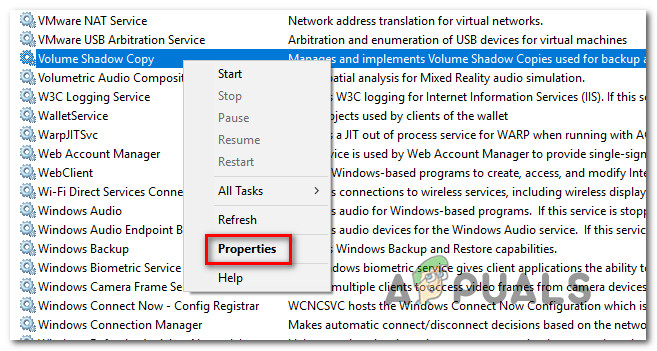
- Найдите службу теневого копирования томов, щелкните ее правой кнопкой мыши и запустите службу.
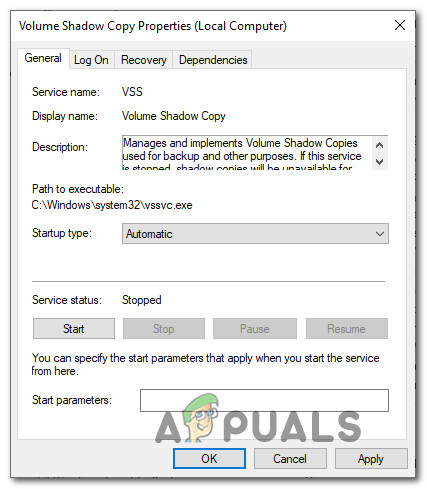
- Также установите тип запуска на Автоматический.
- Выйдите из текущей учетной записи пользователя, перезапустите, войдите снова и убедитесь, что проблема сохраняется.
Удаление папки WindowsImageBackup

Похоже, что эта конкретная проблема может возникнуть в тех случаях, когда диск, на котором пользователь пытается выполнить резервное копирование, уже содержит остаточные файлы из предыдущей резервной копии. В большинстве случаев этот код ошибки возникает, когда предыдущая операция резервного копирования была прервана или когда на диске было недостаточно места.
Обновление за январь 2023 года:
Теперь вы можете предотвратить проблемы с ПК с помощью этого инструмента, например, защитить вас от потери файлов и вредоносных программ. Кроме того, это отличный способ оптимизировать ваш компьютер для достижения максимальной производительности. Программа с легкостью исправляет типичные ошибки, которые могут возникнуть в системах Windows — нет необходимости часами искать и устранять неполадки, если у вас под рукой есть идеальное решение:
- Шаг 1: Скачать PC Repair & Optimizer Tool (Windows 10, 8, 7, XP, Vista — Microsoft Gold Certified).
- Шаг 2: Нажмите «Начать сканирование”, Чтобы найти проблемы реестра Windows, которые могут вызывать проблемы с ПК.
- Шаг 3: Нажмите «Починить все», Чтобы исправить все проблемы.

Несколько пользователей, оказавшихся в аналогичной ситуации, подтвердили, что они успешно решили проблему, получив доступ к диску, на котором они пытались сохранить резервную копию, и удалив содержимое Резервное копирование Windows папка. После этого и повторения процедуры большинство заинтересованных пользователей сообщили, что проблема не возникла.
Запустить средство проверки системных файлов
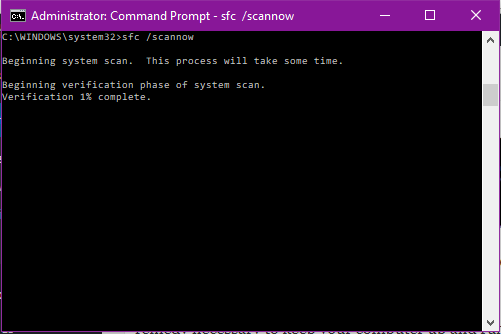
Команда sfc / scannow сканирует все защищенные системные файлы и заменяет поврежденные и ошибочные версии на правильные версии Microsoft.
Важно: в конце анализа появляется короткое сообщение, информирующее вас о результатах. Если вы получили сообщение «Нарушений целостности не обнаружено», вам больше нечего делать, поврежденных файлов не обнаружено. Вы должны просмотреть сканирование, чтобы увидеть результаты в конце сканирования.
Это должно быть сделано через учетную запись администратора.
Вы не должны больше ничего делать с компьютером, пока идет анализ. Не останавливайте сканирование, так как это может повредить файлы Windows.
Вы должны открыть командную строку для запуска sfc / scannow. Самый простой способ — нажать клавишу Windows и клавишу X. Откроется меню с параметром Командная строка (Администратор), щелкните по нему. Это откроет командную строку.
Если вам будет предложено ввести пароль администратора или подтверждение, введите пароль или нажмите Разрешить.
Скопируйте и вставьте следующую команду в командную строку, затем нажмите Enter.
ПФС / SCANNOW
Этот анализ займет некоторое время, пожалуйста, не прерывайте его, так как это может повредить операционную систему.
Если анализ обнаруживает проблемы с целостностью, укажите протокол CBS со следующими инструкциями.
Чтобы найти журнал sfc / scannow, нажмите / коснитесь в проводнике файлов, выберите диск, на котором установлена Windows (обычно это диск C :), нажмите / коснитесь Windows, затем «Журналы», затем CBS. Если существует более одного протокола, вы можете определить желаемый протокол по его дате и времени.
Скопируйте и вставьте журнал на хост-сайт, который я предложил ниже.
Этот журнал обычно очень большой, поэтому вы должны использовать хост-сайт, такой как Dropbox, для публикации журнала. Вы можете начать бесплатную пробную версию 30. После того, как вы загрузили журнал в выпадающий список, создайте ссылку на сайт.
Установка статуса обслуживания VSS на Автоматический
Наиболее распространенная причина появления кода ошибки 0x80780166 — недопустимый экземпляр службы теневого копирования томов (обычно называемой службой VSS). Маловероятно, что процедура резервного копирования может быть завершена, потому что тип запуска службы VSS установлен на Вручную.
Несколько пользователей, у которых также возникла эта проблема, сообщили, что им наконец удалось решить проблему, изменив тип запуска службы Volume Shadow Copy с Manual на Automatic. Впоследствии большинство заинтересованных пользователей указали, что они могут завершить процесс резервного копирования, не обнаружив код ошибки 0x80780166.
Совет экспертов: Этот инструмент восстановления сканирует репозитории и заменяет поврежденные или отсутствующие файлы, если ни один из этих методов не сработал. Это хорошо работает в большинстве случаев, когда проблема связана с повреждением системы. Этот инструмент также оптимизирует вашу систему, чтобы максимизировать производительность. Его можно скачать по Щелчок Здесь

CCNA, веб-разработчик, ПК для устранения неполадок
Я компьютерный энтузиаст и практикующий ИТ-специалист. У меня за плечами многолетний опыт работы в области компьютерного программирования, устранения неисправностей и ремонта оборудования. Я специализируюсь на веб-разработке и дизайне баз данных. У меня также есть сертификат CCNA для проектирования сетей и устранения неполадок.
Сообщение Просмотров: 202
This post will help to properly fix Windows Backup encountered an error when writing data to the backup target (0x80780166), The system cannot find the file specified. (0x80070002) on your Windows 11/10 computer. Some users face this issue that when they try to create a system image or take a backup of their Windows, the backup process fails and this error 0x80780166 is visible. The error message may look like this:
The backup failed.
Windows Backup encountered an error when writing data to the backup target. (0x80780166)
Additional Information:
The system cannot find the file specified. (0x80070002)
")
If you are also facing the same problem, then there are some fixes that might help.
Here are the fixes that might be useful to fix this Windows Backup encountered an error when writing data to the backup target (0x80780166), The system cannot find the file specified. (0x80070002) you may see in Windows 11/10:
- Set Volume Shadow Copy Service to Manual
- Clear WindowsImageBackup folder
- Use File History to create a system image
- Use third-party tools for Windows Backup.
Let’s have a look at these fixes.
1] Set Volume Shadow Copy Service to Manual
If the status of the Volume Shadow Copy Service is set to Disabled, then also you can face issues while creating a system image or Windows Backup. So, it is recommended to set the Volume Shadow Copy service to Manual, which is the default Windows OS setting. Here are the steps:
- Click on the Search box of your Windows 11/10 computer
- Write services in the Search box
- Hit the Enter key to open the Services window
- In the right section, the list of all the services will be visible to you. Scroll down the page to find Volume Shadow Copy service
- Double-click on the Volume Shadow Copy service to open its Properties box
- Click on the drop-down menu available for the Startup type option
- Select the Manual option in that drop-down menu
- Click on the Apply button
- Now click the Start button to start the Service.
Now try to take the backup and see.
2] Clear WindowsImageBackup folder
When you create a system image to some hard drive, all its content is stored in a WindowsImageBackup folder. It is possible that there are some leftovers of previous Windows Backup because of which you are not able to create a new backup and receive this error 0x80780166.
If this is the case, just access that hard drive on your computer where you want to create the backup. Look for the WindowsImageBackup folder at the root of the backup media and double-click on it. Select all the content available in that folder and delete it. After that, restart your computer, and then start the Windows Backup process. This might work.
3] Use File History to create a system image

File History is a built-in feature of the Windows 11/10 computer that helps to create a mirror image of your system (that includes Desktop, Libraries, and other data). If you are using the Backup and Restore tool to backup your Windows, then there are chances that this tool is not working properly on these newer versions of Windows OS. Therefore, if a Windows Backup error is happening because of using that tool, then use File History to backup and restore files. This might solve your problem.
Related: Fix Error 0x80070002 during Windows Backup
4] Use third-party tools for Windows Backup
If the above solutions don’t work, then the other option that will be helpful is using the third-party tools for Windows Backup. Thankfully, there exists some best free imaging, recovery, and backup software for Windows that lets you create system images and make copies of your files. So, you can try those tools one by one, and then decide which one is best fitted for you.
Read next: Windows Backup not working, failed, or did not complete successfully.
How do I fix a Windows Backup error?
Windows users receive tons of Windows Backup errors from time to time. Sometimes, it happens because of a new Windows Update and sometimes there is some other reason for that. To fix a Windows Backup error, you can try some known solutions like using Windows troubleshooters, using the System File Checker tool to find corrupt system files and repair them, setting Volume Shadow Copy service to run on automatic mode, updating device drivers, deleting leftovers of previous backups, etc.
Why is backup not working on Windows 10?
There could be any reason that when you try to backup Windows or create a system image on your Windows 11/10 computer, the backup process doesn’t work and fails with some error code. This may happen because of File History service or Volume Shadow Copy service is not running automatically, there are corrupt system files on your computer, previous backup data is interfering with the new backup process, etc. So, to solve this problem, you need to manually run built-in tools available to fix corrupt system files, delete data or leftovers of previous backups, and try other fixes.
This post will help to properly fix Windows Backup encountered an error when writing data to the backup target (0x80780166), The system cannot find the file specified. (0x80070002) on your Windows 11/10 computer. Some users face this issue that when they try to create a system image or take a backup of their Windows, the backup process fails and this error 0x80780166 is visible. The error message may look like this:
The backup failed.
Windows Backup encountered an error when writing data to the backup target. (0x80780166)
Additional Information:
The system cannot find the file specified. (0x80070002)
If you are also facing the same problem, then there are some fixes that might help.
Here are the fixes that might be useful to fix this Windows Backup encountered an error when writing data to the backup target (0x80780166), The system cannot find the file specified. (0x80070002) you may see in Windows 11/10:
- Set Volume Shadow Copy Service to Manual
- Clear WindowsImageBackup folder
- Use File History to create a system image
- Use third-party tools for Windows Backup.
Let’s have a look at these fixes.
1] Set Volume Shadow Copy Service to Manual
If the status of the Volume Shadow Copy Service is set to Disabled, then also you can face issues while creating a system image or Windows Backup. So, it is recommended to set the Volume Shadow Copy service to Manual, which is the default Windows OS setting. Here are the steps:
- Click on the Search box of your Windows 11/10 computer
- Write services in the Search box
- Hit the Enter key to open the Services window
- In the right section, the list of all the services will be visible to you. Scroll down the page to find Volume Shadow Copy service
- Double-click on the Volume Shadow Copy service to open its Properties box
- Click on the drop-down menu available for the Startup type option
- Select the Manual option in that drop-down menu
- Click on the Apply button
- Now click the Start button to start the Service.
Now try to take the backup and see.
2] Clear WindowsImageBackup folder
When you create a system image to some hard drive, all its content is stored in a WindowsImageBackup folder. It is possible that there are some leftovers of previous Windows Backup because of which you are not able to create a new backup and receive this error 0x80780166.
If this is the case, just access that hard drive on your computer where you want to create the backup. Look for the WindowsImageBackup folder at the root of the backup media and double-click on it. Select all the content available in that folder and delete it. After that, restart your computer, and then start the Windows Backup process. This might work.
3] Use File History to create a system image
File History is a built-in feature of the Windows 11/10 computer that helps to create a mirror image of your system (that includes Desktop, Libraries, and other data). If you are using the Backup and Restore tool to backup your Windows, then there are chances that this tool is not working properly on these newer versions of Windows OS. Therefore, if a Windows Backup error is happening because of using that tool, then use File History to backup and restore files. This might solve your problem.
Related: Fix Error 0x80070002 during Windows Backup
4] Use third-party tools for Windows Backup
If the above solutions don’t work, then the other option that will be helpful is using the third-party tools for Windows Backup. Thankfully, there exists some best free imaging, recovery, and backup software for Windows that lets you create system images and make copies of your files. So, you can try those tools one by one, and then decide which one is best fitted for you.
Read next: Windows Backup not working, failed, or did not complete successfully.
How do I fix a Windows Backup error?
Windows users receive tons of Windows Backup errors from time to time. Sometimes, it happens because of a new Windows Update and sometimes there is some other reason for that. To fix a Windows Backup error, you can try some known solutions like using Windows troubleshooters, using the System File Checker tool to find corrupt system files and repair them, setting Volume Shadow Copy service to run on automatic mode, updating device drivers, deleting leftovers of previous backups, etc.
Why is backup not working on Windows 10?
There could be any reason that when you try to backup Windows or create a system image on your Windows 11/10 computer, the backup process doesn’t work and fails with some error code. This may happen because of File History service or Volume Shadow Copy service is not running automatically, there are corrupt system files on your computer, previous backup data is interfering with the new backup process, etc. So, to solve this problem, you need to manually run built-in tools available to fix corrupt system files, delete data or leftovers of previous backups, and try other fixes.
Содержание
- ошибка архивации 0x8078006b windows 10
- Ошибка резервного копирования системы в Windows 10
- Как исправить проблемы с резервным копированием системы в Windows 10
- Решение 2. Отформатируйте диск
- Исправить не удается создать ошибку образа системы 0x80780166
- Проверьте службу теневого копирования тома
- Удаление папки WindowsImageBackup
- Запустить средство проверки системных файлов
- Установка статуса обслуживания VSS на Автоматический
- Ошибка архивации в W10
- Сообщение о нарушении
- Ответы (5)
- Сообщение о нарушении
- Сообщение о нарушении
- Сообщение о нарушении
- Сообщение о нарушении
- ошибка при архивации 0x807800С5 в Win 10
- Сообщение о нарушении
- Ответы (4)
- Сообщение о нарушении
- Сообщение о нарушении
- Сообщение о нарушении
- Ошибка архивации 0x8078006b windows 10
- Вопрос
- Все ответы
ошибка архивации 0x8078006b windows 10
Ошибка резервного копирования системы в Windows 10
Резервное копирование системы всегда полезно, особенно если ваша система повреждена или повреждена. Хотя резервное копирование системы является отличной функцией, иногда оно может не работать в Windows 10, поэтому давайте посмотрим, как это исправить.
Эта проблема возникает вместе с различными кодами ошибок, а именно:
Как исправить проблемы с резервным копированием системы в Windows 10
Решение 2. Отформатируйте диск
Если вы пытаетесь создать резервную копию системы на внешнем жестком диске, возможно, вам придется отформатировать ее заранее. Перед форматированием внешнего жесткого диска обязательно переместите все файлы из него в безопасное место. Чтобы отформатировать внешний жесткий диск, выполните следующие действия:
После того, как внешний жесткий диск отформатирован, попробуйте снова создать резервную копию системы.
Решение 3. Удалить системный раздел EFI и раздел восстановления
В некоторых случаях при обновлении до Windows 10 или установке его на новый жесткий диск некоторые разделы предыдущих версий Windows могут по-прежнему присутствовать на вашем компьютере, что приведет к сбою резервного копирования системы. Чтобы это исправить, рекомендуется удалить системный раздел EFI и раздел восстановления. Для этого выполните следующие действия:
После удаления этих двух разделов вы сможете успешно создать резервную копию системы на этом жестком диске.
Решение 4. Включите защиту системы
Некоторые пользователи утверждают, что для создания резервной копии системы на вашем компьютере должна быть включена защита системы. Чтобы включить защиту системы, выполните следующие действия.
Немногие пользователи предполагают, что отключение защиты системы и удаление предыдущих точек восстановления устранило проблему для них. Для этого выполните следующие действия:
После того, как вы отключили защиту системы и удалили предыдущие точки восстановления, вы сможете создать резервную копию системы.
Решение 6. Изменение использования дискового пространства
Проблемы с резервным копированием системы могут быть вызваны настройками защиты системы, поэтому рекомендуется изменить настройки вручную, выполнив следующие действия:
В некоторых случаях резервное копирование системы может произойти сбой, если ваш жесткий диск содержит поврежденные файлы. Чтобы проверить и восстановить поврежденные файлы, вам нужно использовать команду chkdsk. Чтобы проверить свой жесткий диск, сделайте следующее:
Мы должны упомянуть, что вы, возможно, не сможете запустить команду chkdsk на диске C, и вас спросят, хотите ли вы сканировать диск C при следующем перезапуске системы. Нажмите Y и перезагрузите компьютер, чтобы отсканировать и проверить диск C.
Если вы установите дополнительный жесткий диск и установите на него новую Windows, ваш предыдущий раздел EFI со старого жесткого диска может остаться на вашем старом жестком диске и вызвать проблемы с восстановлением системы. Мы рекомендуем вам быть очень осторожными при использовании этого метода, потому что вы можете навсегда удалить свои важные файлы.
Еще раз, будьте предельно осторожны при этом, потому что вы можете навсегда удалить свои системные файлы, если не будете осторожны. Используйте это решение на свой страх и риск.
Немногие пользователи сообщили, что проблемы с резервным копированием системы могут быть вызваны тем, что в качестве фона задано Слайд-шоу. Чтобы это исправить, вам нужно установить сплошной цвет фона, выполнив следующие действия:
После смены фона на сплошную систему резервного копирования проблемы должны быть исправлены.
Сообщалось, что некоторые дисковые инструменты могут вызвать проблемы с резервным копированием системы, поэтому, если вы используете какие-либо оптимизаторы дисков или инструменты для очистки дисков, обязательно отключите их, прежде чем пытаться создать резервную копию системы.
Решение 11. Используйте концентратор USB 3.0
Немногие пользователи сообщили, что использование внешнего жесткого диска USB 3.0 может вызвать проблемы из-за драйверов USB 3.0. Чтобы избежать этих проблем, рекомендуется использовать концентратор USB 3.0 для подключения внешнего диска. Это всего лишь потенциальное решение, но немногие пользователи имели успех с ним, так что, возможно, вы могли бы попробовать его.
Резервное копирование системы довольно важно, и если вы не можете создать резервную копию системы в Windows 10, обязательно попробуйте некоторые из наших решений.
Исправить не удается создать ошибку образа системы 0x80780166
Пользователи снова получают это сообщение об ошибке, ошибка всегда одна и та же:

Windows Backup обнаружила ошибку при записи данных в цель резервного копирования. (0x80780166)
Дополнительная информация:
Неверная функция. (0x80070001)
Проверьте службу теневого копирования тома
В свою очередь, я предлагаю вам проверить, правильно ли работает служба теневого копирования томов (VSS).
Удаление папки WindowsImageBackup
Похоже, что эта конкретная проблема может возникнуть в тех случаях, когда диск, на котором пользователь пытается выполнить резервное копирование, уже содержит остаточные файлы из предыдущей резервной копии. В большинстве случаев этот код ошибки возникает, когда предыдущая операция резервного копирования была прервана или когда на диске было недостаточно места.
Теперь мы рекомендуем использовать этот инструмент для вашей ошибки. Кроме того, этот инструмент исправляет распространенные компьютерные ошибки, защищает вас от потери файлов, вредоносных программ, сбоев оборудования и оптимизирует ваш компьютер для максимальной производительности. Вы можете быстро исправить проблемы с вашим ПК и предотвратить появление других программ с этим программным обеспечением:
Несколько пользователей, оказавшихся в аналогичной ситуации, подтвердили, что они успешно решили проблему, получив доступ к диску, на котором они пытались сохранить резервную копию, и удалив содержимое Резервное копирование Windows папка. После этого и повторения процедуры большинство заинтересованных пользователей сообщили, что проблема не возникла.
Запустить средство проверки системных файлов
Команда sfc / scannow сканирует все защищенные системные файлы и заменяет поврежденные и ошибочные версии на правильные версии Microsoft.
Важно: в конце анализа появляется короткое сообщение, информирующее вас о результатах. Если вы получили сообщение «Нарушений целостности не обнаружено», вам больше нечего делать, поврежденных файлов не обнаружено. Вы должны просмотреть сканирование, чтобы увидеть результаты в конце сканирования.
Это должно быть сделано через учетную запись администратора.
Вы не должны больше ничего делать с компьютером, пока идет анализ. Не останавливайте сканирование, так как это может повредить файлы Windows.
Если вам будет предложено ввести пароль администратора или подтверждение, введите пароль или нажмите Разрешить.
Скопируйте и вставьте следующую команду в командную строку, затем нажмите Enter.
Этот анализ займет некоторое время, пожалуйста, не прерывайте его, так как это может повредить операционную систему.
Если анализ обнаруживает проблемы с целостностью, укажите протокол CBS со следующими инструкциями.
Чтобы найти журнал sfc / scannow, нажмите / коснитесь в проводнике файлов, выберите диск, на котором установлена Windows (обычно это диск C :), нажмите / коснитесь Windows, затем «Журналы», затем CBS. Если существует более одного протокола, вы можете определить желаемый протокол по его дате и времени.
Скопируйте и вставьте журнал на хост-сайт, который я предложил ниже.
Этот журнал обычно очень большой, поэтому вы должны использовать хост-сайт, такой как Dropbox, для публикации журнала. Вы можете начать бесплатную пробную версию 30. После того, как вы загрузили журнал в выпадающий список, создайте ссылку на сайт.
Установка статуса обслуживания VSS на Автоматический
Несколько пользователей, у которых также возникла эта проблема, сообщили, что им наконец удалось решить проблему, изменив тип запуска службы Volume Shadow Copy с Manual на Automatic. Впоследствии большинство заинтересованных пользователей указали, что они могут завершить процесс резервного копирования, не обнаружив код ошибки 0x80780166.
CCNA, веб-разработчик, ПК для устранения неполадок
Я компьютерный энтузиаст и практикующий ИТ-специалист. У меня за плечами многолетний опыт работы в области компьютерного программирования, устранения неисправностей и ремонта оборудования. Я специализируюсь на веб-разработке и дизайне баз данных. У меня также есть сертификат CCNA для проектирования сетей и устранения неполадок.
Ошибка архивации в W10
Ошибка архивации. Сервер RPC недоступен. (0х800706ВА).
То есть образ системы создать невозможно. В чем тут дело? Подскажите, кто в курсе.
ПК. Windows 10 Домашняя. Версия 1803.
Сообщение о нарушении
Ответы (5)
Посмотрите эту тему.
Возможно, вам придется смотреть сторонние приложения для создания архива.
——————————
Если совет вам помог, вы можете отметить его как ответ.
Это поможет другим участникам форума.
Сообщение о нарушении
Был ли этот ответ полезным?
К сожалению, это не помогло.
Отлично! Благодарим за отзыв.
Насколько Вы удовлетворены этим ответом?
Благодарим за отзыв, он поможет улучшить наш сайт.
Насколько Вы удовлетворены этим ответом?
Благодарим за отзыв.
Volume Shadow Copy
Remote Procedure Call (RPC)
Windows Backup Service
— Попробуйте запустить проверку диска (по очереди, и системного C, и внешнего, на который хотите записать образ, сменив букву)
Сообщение о нарушении
Был ли этот ответ полезным?
К сожалению, это не помогло.
Отлично! Благодарим за отзыв.
Насколько Вы удовлетворены этим ответом?
Благодарим за отзыв, он поможет улучшить наш сайт.
Насколько Вы удовлетворены этим ответом?
Благодарим за отзыв.
Добрый день! Спасибо за уделенное внимание.
Проверка дисков прошла без замечаний. (Кстати, забыл упомянуть в первом запросе: Архивация данных с диска D на тот же внешний диск проходит без проблем)
Что касается проверки Служб. В моей версии списка служб не нашел ни
Прилагаю скриншот установленных программ.
С уважением, Сергей
Сообщение о нарушении
Был ли этот ответ полезным?
К сожалению, это не помогло.
Отлично! Благодарим за отзыв.
Насколько Вы удовлетворены этим ответом?
Благодарим за отзыв, он поможет улучшить наш сайт.
Насколько Вы удовлетворены этим ответом?
Благодарим за отзыв.
Добавлю к моему предыдущему ответу:
Скриншот дисковой памяти:
Сообщение о нарушении
Был ли этот ответ полезным?
К сожалению, это не помогло.
Отлично! Благодарим за отзыв.
Насколько Вы удовлетворены этим ответом?
Благодарим за отзыв, он поможет улучшить наш сайт.
Насколько Вы удовлетворены этим ответом?
Благодарим за отзыв.
Запускаем Media Creation Tool. Принимаем лицензионные условия. Выбираем Обновить этот компьютер сейчас. Далее последует загрузка файлов для обновления, будут проведены подготовительные действия. После чего необходимо жать кнопку Установить. И ждать завершения процесса обновления. Это поможет, в случае если системные файлы были повреждены и по этой причине возникает ошибка.
С наилучшими пожеланиями,
Георгий.
ошибка при архивации 0x807800С5 в Win 10
При выполнении архивации выскакивает эта ошибка в графическом интерфейсе. Из командной строки:
Всё упирается в этот раздел: «SYSTEM(Шифрованный (EFI) системный раздел) ( 100.00 МБ)»
Как победить эту «БЯКУ»? На прошлых сборках этой проблемы не было.
Сообщение о нарушении
Ответы (4)
Не открывается изображение. При каком действии возникает ошибка? Архивация чего?
Вы пишите у Вас Insider Preview, но создали тему в разделе Windows 10. Опишите, пожалуйста, всё более подробно и перенесите тему, если у Вас Insider Preview в соответствующий раздел.
Посмотрите кстати эту тему, если проблема с бэкапом:
Сообщение о нарушении
1 пользователь нашел этот ответ полезным
Был ли этот ответ полезным?
К сожалению, это не помогло.
Отлично! Благодарим за отзыв.
Насколько Вы удовлетворены этим ответом?
Благодарим за отзыв, он поможет улучшить наш сайт.
Насколько Вы удовлетворены этим ответом?
Благодарим за отзыв.
В данное время установлена неинсайдерская система:
На физическом диске (SSD Kingston KC300 120GB) создавал разделы (RE, EFI, MSR, C:) как сам. так и предоставлял установщику (На этом скриншоте разделы созданы установщиком Windows). Причём в этой же системе, установленной в Hyper-V, архивация проходит без проблем, как и в системе. установленной на SSD в разметке MBR.
Тему по Вашей ссылке посмотреть не смог: сам английским не владею, а Google-переводчик страницу «не взял»
Сообщение о нарушении
Был ли этот ответ полезным?
К сожалению, это не помогло.
Отлично! Благодарим за отзыв.
Насколько Вы удовлетворены этим ответом?
Благодарим за отзыв, он поможет улучшить наш сайт.
Насколько Вы удовлетворены этим ответом?
Благодарим за отзыв.
Перенос старых резервных копий в другую папку не помог, так как переносить нечего.
пытался сделать backup на другие HDD (их в компьютере 3) всё то же самое.
Отключал службы группами. Результат: либо та же ошибка, либо невозможность выполнения архивации
Сообщение о нарушении
Был ли этот ответ полезным?
К сожалению, это не помогло.
Отлично! Благодарим за отзыв.
Насколько Вы удовлетворены этим ответом?
Благодарим за отзыв, он поможет улучшить наш сайт.
Насколько Вы удовлетворены этим ответом?
Благодарим за отзыв.
И прошу прощения у сообщества, что вопрос сформулирован был неверно, не предоставил все данные, из-за чего решение могло и не найтись.
Ошибка архивации 0x8078006b windows 10
Вопрос
Windows Backup failed to create the shared protection point on the source volumes. (0x8078006B)
Additional Information:
The shadow copy provider had an unexpected error while trying to process the specified operation. (0x8004230F)
I was trying to create a system image and it was successfully done twice the last day. After a day the system suddenly can’t process my request to backup my system into an external drive.
Все ответы
Chose settings on the C: drive (even though shadow copies are disabled). Then set it to No Limit. Do the same thing for the System drive.
Please find the below thread for more info
Thanks for posting in our forum!
1. The error 0x80042308 is related to Volume Shadow Copy.
Check if the Volume Shadow Copy service is running on your computer or not. You can refer to the following steps:
(1). Click ‘Start’, type ‘services.msc’ and hit Enter.
(2). Locate “Volume Shadow Copy” and check if the service is started.
(3). If not ‘Start’ the service. If yes, you can try stop the service and restart the same.
(4). Repeat the above steps for ‘Windows Backup service”, too.
2. You should check your disk, Shadow copy errors are often caused by disk problems which check disk will find and correct. You can run cmd command “chkdsk” to check.
3. Please run cmd command “vssadmin list writers” to check whether the writers has some errors.
In addition, here are some related links for your reference:
Please Note: Since the website is not hosted by Microsoft, it may change without notice. Microsoft does not guarantee the accuracy of this information.
Hope this information can help you. If you have any questions, please let me know.
Источник
In this guide, we will discuss what is Windows Backup Failed Error 0x80780166, when it appears, the reasons behind it, and the potential solutions to this problem. This error occurs immediately afterward a backup procedure fails on your computer.
Upon encountering this error code, you may receive an error message as well that reads the following –
The backup failed
Windows Backup encountered an error when writing data to the backup target. (0x80780166)

What causes Backup failing on Error 0x80780166?
Windows Backup might fail on this error code when your device meets one or more of the following conditions –
- VSS service is set to Automatic
- Files inside the WindowsImageBackup Folder get corrupted somehow
- Presence of corrupted system files or folders
To solve Windows Backup failing on this error code, try out the below suggestions, and see which one helps to fix this issue on your PC –
1] Check the current status of VSS
The error 0x80780166 primarily occurs when the Volume Shadow Copy Service (VSS) is set to manual or when this service is not running. Go and check the current status of this service on the Services window. If you do find it disabled, change its startup type to “Automatic” and restart it.
Here’s how you may configure the VSS service on Windows 11/10 PC –
- Press WinKey + R to launch Run.
- Type “
services.msc” and hit OK. The services window will pop up next. - Scroll down and locate – “Volume Shadow Copy service”. When found, right-click on it, and hit the option – Properties.
- See what’s the current status of this service and what’s selected inside the Startup type.
- If it is set to Manual, use the drop-down menu and change it to “Automatic“.

- Click Apply then OK to confirm the changes.
Note: If you do find the VSS service is set to “Automatic”, simply hit the Stop button. Let this service stop and when it does, restart it by hitting the Start button.
- Restart your PC and check if the backup failed error 0x80780166 now resolves.
2] Purge the WindowsImageBackup Folder
When you are trying to restore your PC to an earlier point, the drive where you would like to apply the backup should not contain any leftover files from the previous backups. As a matter of fact, several users simply go and revert their operating system to an earlier stable point. This results in Windows Backup failing on error code 0x80780166.
To avoid this error from re-occurring, one must purge all the contents inside the WindowsImageBackup folder. Here’s how you may perform this task –
- Press Win + E to launch File Explorer.
- Click This PC on the left navigation and reach out to the drive where you would like to save the backups.
- Here, you may find a folder named “WindowsImageBackup”. Open this folder and see what lies inside it.
- In case, you are not able to locate this folder, go to View > Show, and click Hidden items.
- Doing so will display the WindowsImageBackup folder on the opened window.
- Press Ctrl + A to select all items, and hit the Delete button.
Restart your PC and check if you can run Windows backup again without getting into the error code 0x80780166.
3] Fix System Files Corruption using SFC/DISM
As stated above, the Backup failed error 0x80780166 may also occur when the system files or folders have become corrupted or have gone missing. SFC and DISM are good tools that can find and repair any issues with the system files. folders, or the Image itself.
Here’s how you may run both these tools together on CMD –
- First of all, launch Command Prompt with admin privileges.
- When it does, run this code –
Dism.exe /online /cleanup-image /restorehealth

- Wait for 15-20 minutes so that it can find and fix any issues within the operating system.
- Only when the DISM scan is completed, execute this command –
sfc /scannow

- Similar to that of DISM, this tool also runs for 15-20 minutes. The timing may, however, increase or decrease depending upon the level of file corruption or the number of affected files.
- Once the System File Checker attains 100% scanning, type exit and press Enter to come out of CMD.
Restart your PC and check if you can now run Windows Backup without encountering the error 0x80780166.
4] Try Restoring your PC to an earlier stable point
If Windows Backup is still failing on an error code 0x80780166 and you do have access to restore points on your PC, try applying them. In case you hadn’t generated any system restore point in the past, skip this method and proceed to the next one.
Restore Point is basically a system image state when no errors were occurring on your device. When you revert your PC back to such a point, there is a huge possibility that the error 0x80780166 resolves automatically.
5] Reset Your PC
If none of the above fixes help you to overcome this error code 0x80780166, this must be because of some complex issues. There’s no point in applying any more workaround. Instead, what you should do is download Windows 11 ISO file, and repair your PC.
You may also go for either resetting your computer or performing a clean installation of Windows OS.
Tip: If you are facing update, activation, or driver issues on your Windows PC, try RESTORO PC Repair Tool. This software will scan your device for potential issues and resolve them automatically.
Several affected users have been reaching us with questions after being unable to back up their Windows 10 installation. Most affected users are reporting that they are seeing the 0x80780166 error code after the backup procedure fails. The issue is not exclusive to a certain Windows version since it’s confirmed to occur on Windows 7, Windows 8.1 and Windows 10.
What’s causing the 0x80780166 error code?
We investigated this particular issue by looking at various user reports and by trying out the different repair strategies that are recommended by other users that have successfully managed to resolve the issue. As it turns out, several different scenarios might trigger this error code. Here’s a shortlist of potential culprits:
- VSS service is set to Automatic – As it turns out, an improper instance of the Volume Shadow Copy Service (VSS). This is the most likely cause that will make interrupt the backup procedure. If this scenario is applicable, you should be able to resolve the issue by changing the startup service from Manual to Automatic.
- Corrupted data inside the WindowsImageBackup folder – If you’re retrying the backup procedure after a botched procedure, the leftover data may be interfering with the new backup attempt. In this case, you should be able to resolve the issue by clearing the contents of the WindowsImageBackup folder.
- System file corruption – System File corruption is also a common suspect when it comes to this particular error code. During the backup procedure, multiple associated services are involved, which means that a large number of files can end up interrupting the procedure if they become corrupted. In situations like this one, your best chance of fixing the error code is to fix the system file corruption with built-in utilities like SFC and DISM.
- Underlying file corruption – Under certain situations, the issue can due to a more serious case of system file corruption that cannot be resolved conventionally. In situations like this, your only hope of resolving the issue is to reset every OS component either by using a System Restore snapshot or by performing a repair install.
Method 1: Setting the status of the VSS service to Automatic
The most common cause that will cause the 0x80780166 error code is an improper instance of the Volume Shadow Copy service (commonly referred to as VSS service). Most likely, the backup procedure can’t complete because the startup type of the VSS service is set to Manual.
Several users that also had this issue have reported that they finally managed to resolve the issue by changing the startup type of the Volume Shadow Copy service to Automatically from Manual. After doing this, most affected users have reported that they were able to complete the backup process without encountering the 0x80780166 error code.
Here’s a quick guide on modifying the status type of the Volume Shadow Copy Service to Automatic:
Note: These instructions will work regardless of the operating system version that you’re encountering the issue on.
- Press Windows key + R to open up a Run dialog box. Once you’re inside the Run box, type “service.msc” and press Enter to open up the Services window.

Running Services Manager - Once you’re inside the Services screen, scroll down through the list of Services (Local) and locate Volume Shadow Copy. Once you see it, right-click on it and choose Properties from the newly appeared context menu.

Accessing the Properties screen of the VSS service - Once you’re inside the Properties screen of the Volume Shadow Copy Service, select the General tab from the list of menu options and change the Startup type to Automatic. Next, click on Apply to save the changes.

Change the status tab to Automatic - Restart your computer and repeat the action that was triggering the 0x80780166 error code at the next startup.
If the same issue is still occurring, move down to the next method below.
Method 2: Cleaning the WindowsImageBackup folder
As it turns out, this particular issue can occur in instances where the drive where the user tries to store the backup already contains leftover files from a previous backup. In most cases, this error code will occur in case the previous backup procedure was interrupted or didn’t have enough space to complete.
Several users that found themselves in a similar situation have confirmed that they managed to resolve the issue by accessing the drive where they tried to store the backup on and cleared the contents of the windows image backup windowsimagebackup folder. After doing this and retrying the procedure, most affected users have reported that the issue was no longer occurring.
Here are a few steps that will allow you to clear the windowsimagebackup folder to resolve the 0x80780166 error code:
- Open File Explorer and navigate to the drive that you just tried to create the backup on.
- Once you get there, look for the WindowsImageBackup folder and double click on it to access it. Keep in mind that this folder is hidden by default, so if you can’t see it, go to the View tab at the top of the screen and check the box associated with Hidden items.

View Hidden Items option is checked - Once the hidden folders are visible, access the WindowsImageBackup folder, select every file and delete everything until the folder is empty.
- Run the backup procedure once again and see if the issue is now resolved.

If the same 0x80780166 error code is still occurring, move down to the next potential fix below.
Method 3: Running SFC and DISM scans
According to several different user reports, this issue can also occur due to some type of system file corruption that is somehow interfering with the backup procedure. As it turns out, in situations such as this one, you should be able to resolve the 0x80780166 error by running a couple of utilities capable of fixing logical errors and system file corruption instances: DISM (Deployment Image Servicing and Management) and SFC (System File Checker).
Keep in mind that both tools are useful for situations that are caused by system file errors, but they have different approaches to the way they approach file corruption. For example, SFC is better fixing logical errors since it relies on a locally cached copy when having to replace corrupted items with healthy copies. On the other hand, DISM is better at resolving broken OS component and it uses the WU (Windows Update) component to download fresh copies that will be used to replace corrupted files.
Both utilities are useful in their way, so we advise you to run both if you’re facing the 0x80780166 error and the previous fixes didn’t help. Here’s what you need to do:
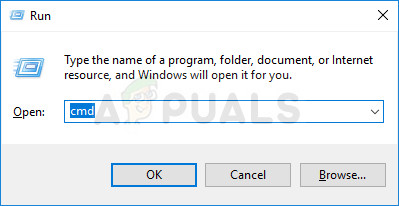
- Open up the Run dialog box by pressing Windows key + R. Next, type ‘cmd’ inside the text menu and press Ctrl + Shift + Enter to open up a Command Prompt with admin access. When you see the UAC (User Account Control), click Yes to grant administrative privileges.

Running Command Prompt - Once you’re inside the elevated CMD window, type the following command and press Enter to initiate a DISM scan:
Dism.exe /online /cleanup-image /scanhealth
Dism.exe /online /cleanup-image /restorehealth
Note: Keep in mind that DISM will actively be using Windows Update to download healthy copies of the files that need to be replaced. Ensure that you have a reliable Internet connection before starting this procedure. The first command (scanhealth) is used to scan and look for system inconsistencies, while the second command (restorehealth) is used to replace inconsistencies found by the first scan.
- Once the DISM scan is finished, restart your computer and wait for the next startup sequence to complete.
- After the next complete startup, follow step 1 again to open up another elevated Command Prompt, then type the following command and press Enter once again to initiate another SFC scan:
sfc /scannow
Note: Keep in mind that after you start the SFC scan, interrupting the process is not recommended. Doing this will leave your system exposed to other logical errors in the future.
- Restart your computer once again and see if the 0x80780166 error is now resolved.
If the same problem is still occurring, move down to the next potential fix below.
Method 4: Using the System Restore utility
If the 0x80780166 error is still and the problem only started occurring after you performed a certain action that ended up prematurely (with an unexpected shutdown, critical error, etc.), you might be able to fix the issue by utilizing the System Restore utility to restore your computer state back to a healthy point when the error was not occurring.
This tool is capable of utilizing snapshots to restore the machine state to a previous point in time. Keep in mind that by default, Windows is configured to create new snapshots at every important PC event ( app installation, major update, security scan, etc.) If you’re didn’t change the default behavior, chances are you will have plenty of snapshots to choose from.
Before you start following the instructions below to get your machine to a previous point in time, keep in mind that all changes that you’ve made since you created it will be lost. This means that any application, user preference or anything else that was enforced during that time will be reverted.
If you decide to go forward with the system restore, here’s a step-by-step guide through the whole thing:
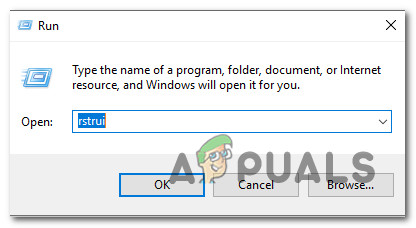
- Press Windows key + R to open up a Run dialog box. Once you’re inside the text box, type ‘rstrui’ and press Enter to open up the System Restore wizard.

Opening the System Restore wizard via Run box - Once you’re inside the System Restore wizard, click Next at the initial prompt to advance to the next menu.

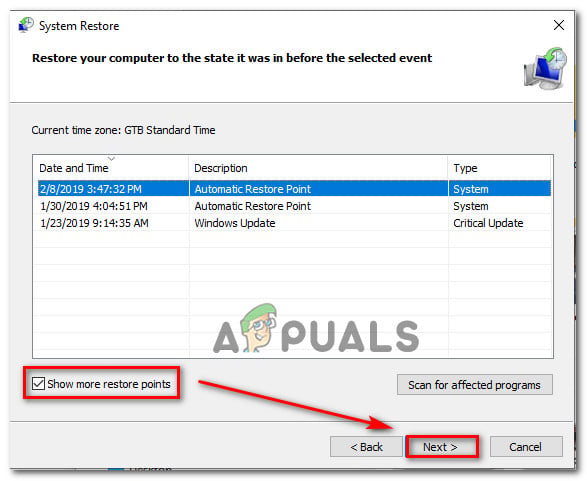
Getting past the initial screen of System Restore - Then, go ahead and select a restore point that is dated before you first tried to create the backup and click Next to advance to the final menu.

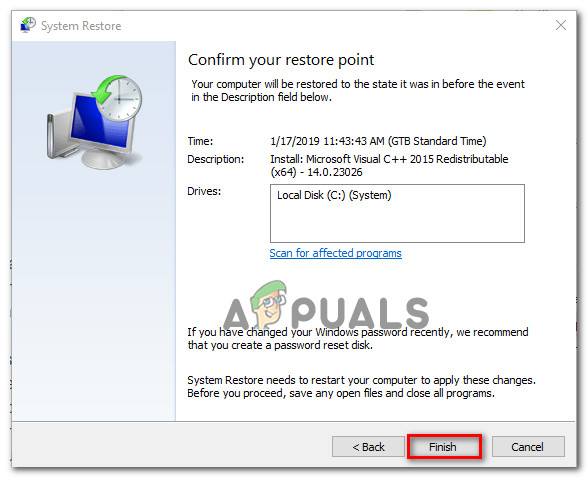
Restoring your system to a previous point in time - To start the restoring process, simply click Finish and then click Yes at the confirmation prompt to start the restoring process.

Starting the System Restore process - After a couple of seconds, your computer will restart and the new state will be enforced at the next system startup.
- Once the old state is enforced, try to backup your OS once again and see if the same error is occurring.

If you’re still seeing the 0x80780166 error when during the late stages of backing up your Windows version, move down to the next method below.
Method 5: Performing a Repair/Clean install
If none of the potential fixes featured above have allowed you to resolve the issue, chances are you’re dealing with an underlying system file corruption issue that cannot be resolved conventionally. If this scenario is applicable, you should be able to resolve the issue by resetting every operating system component to make sure that every instance of system file corruption is completely eradicated.
Several Windows users that were also struggling to resolve the 0x80780166 error have confirmed that the problem stopped occurring and they were able to create backups without issues after performing a repair install or a clean install procedure.
If you want the quickest possible procedure and you are not concerned about data loss, the best way to go is a clean install. This focused approach will reset every Windows component that might be affected by corruption. But the major downside is that all personal files including apps, games, user preferences, and personal data are also lost (if you don’t back up your data with a 3rd party utility).
A more lengthy but more efficient approach that will allow you to keep most of your files (including apps, games and personal data) is to perform a repair install (in-place repair). But keep in mind that you need an installation media or create one in case you don’t already have one.
When you running the built-in backup software – Backup and Restore (Windows 7), you may encounter the error 0x80780166. This post shows how to solve this Windows backup error. Besides the Windows snap-in tool, you can also use MiniTool software to back up the OS.
Some users complain that when they used the Windows snap-in backup tool – Backup and Restore (Windows 7) to back up the OS, they encountered the error 0x80780166. The Windows backup error often occurs on Windows 7, 8 and 10.
Meanwhile, what may cause this Windows backup error 0x80780166? In fact, there are a lot of reasons giving rise to the Windows backup error 0x80780166. Here, we list some of them.
- Corrupted system files
- Incorrect status setting of Volume Shadow Copy service.
- Corrupted data inside the WindowsImageBackup folder.
- Underlying file corruption.
No matter what the reason is, the most important thing is to fix the Windows backup error 0x80780166. So, in the following section, we will show you how to solve the Windows 10 backup 0x80780166.
Solution 1. Set VSS to Automatic
As we have mentioned in the above section, the error 0x80780166 may be caused by the incorrect status of the Volume Shadow Copy service. So, in order to solve the Windows backup error 0x80780166, try to set the service status to automatic.
Now, here is the tutorial.
Step 1: Press Windows key and R key together to open Run dialog, then type services.msc in the box and click OK to continue.
Step 2: In the pop-up window, scroll down to find out the Volume Shadow Copy service and right-click it. Then choose Properties to continue.

Step 3: In the pop-up window, change the Startup type to Automatic, change the Service status to Started, and then click Apply and OK to confirm the changes.

When all steps are finished, you can run Windows backup again to check whether the error 0x80780166 is solved.
Solution 2. Clean the WindowsImageBackup Folder
If the drive where you want to store the backup contains the leftover files of the previous backups, you may encounter the Windows backup error 0x80780166. Thus, you can try cleaning the WindowsImageBackup folder to solve this problem.
Now, here is the tutorial.
Step 1: Open File Explorer and navigate to the drive you want to save the backups.
Step 2: Look for the WindowsImageBackup folder and double-click it to access it. If you can’t see it, please go to the View tab and check the option Hidden items to continue.
Step 3: Once the WindowsImageBackup is visible, select it and delete everything in it.
After that, run Windows backup again to check whether the error 0x80780166 is solved.
If there are corrupted system files on your computer, you may also encounter the Windows 10 backup 0x80780166 error when running Windows backup. So, in order to solve this error, try running SFC and DISM tools to fix the corrupted system files.
Now, here is the tutorial.
Step 1: Type Command Prompt in the search box of Windows, choose the best-matched one, then right-click it to choose Run as administrator to continue.
Step 2: In the pop-up window, type the command sfc /scannow and hit Enter to continue.
Step 3: Do not close the command line window until you see the message verification 100% complete.
Step 4: When the process is finished, run Windows backup again to check whether the error 0x80780166 is solved.
Step 5: If the sfc sannow fails to work, you can run DISM tool.
Step 6: Type the following commands and hit Enter to continue after each command.
Dism.exe /online /cleanup-image /scanhealth
Dism.exe /online /cleanup-image /restorehealth
When all process is finished, you can run Windows backup again to check whether the error code 0x80780166 is solved.
Solution 4. Try a Third-Party Backup Software
If the above solutions are not effective, you can try to run third-party backup software. Thus, the professional backup software – MiniTool ShadowMaker is strongly recommended.
MiniTool ShadowMaker is designed to back up the operating system. It can also be used to back up files, folders, disks, and partitions. So, in order to back up the operating system, MiniTool ShadowMaker is efficient. Hence, you can download it from the following button to continue.
Free Download
Now, we will show you the tutorials to back up the OS.
Step 1: Download MiniTool ShadowMaker, install it, launch it, and click Keep Trial to continue. Then choose Connect in This Computer to enter its main interface.

Step 2: MiniTool ShadowMaker is designed to back up the operating system. So, it chooses the OS as the backup source by default. Then click Destination module to choose the destination path to save the backups.
Step 3: After selecting the backup source and destination, click Back up Now to perform the task immediately.

When it is finished, you can successfully create a system image. With this professional backup software, you will not encounter the Windows backup error 0x80780166 any longer. In addition, you can also read the post How to Back up Windows to Safeguard Your Computer? Try MiniTool! to look for more ways to safeguard your PC.
Final Words
To sum up, this post has introduced 4 ways to solve the Windows backup error 0x80780166. If you come across the same issue, try these solutions. In addition, MiniTool ShadowMaker would be an efficient and comprehensive program to create a system image.