- Главная
- Ремонт ноутбуков
- Сбой инициализации сети parallels desktop macOS Big Sur
При обновлении системы на Big Sur
возникла проблема с сетью в Parallels Desktop?
«Сбой инициализации сети. Ваша виртуальная машина продолжит работать в обычном режиме, но без подключения к Интернету»

Проблема лечится не так уж и сложно, но всё же доставила неприятности
Вот метот для тех кто знает инглиш или умеет пользоваться гугл переводчиком:
Network Fix:
1. sudo nano /Library/Preferences/Parallels/network.desktop.xml
2. find <UseKextless>1</UseKextless> (value can be -1), and change the value to the <UseKextless>0</UseKextless>
3. if you can’t to find this tag, then just create it under root tag <ParallelsNetworkConfig …>here</ParallelsNetworkConfig>
USB Fix:
1. /Library/Preferences/Parallels/dispatcher.desktop.xml
2. <Usb>0</Usb> find ==>> <Usb>1</Usb>
Result: you can start/restart Parallels without sudo — network will work.
А вот и по нашему, как решить проблему с сетью в Parallels Desktop на Big Sur:
Данный метод был успешно проверен на Parallels Desktop Версия 16.1.1 (49141), macOS — «Big Sur»
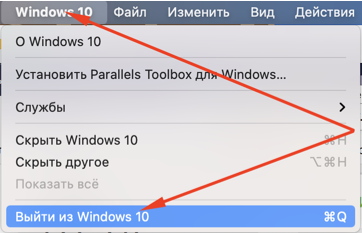
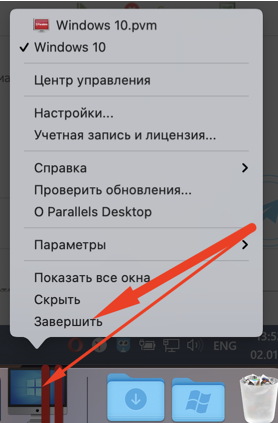
- Полностью закройте параллели:

- В Терминале введите (скопируйте и вставьте):
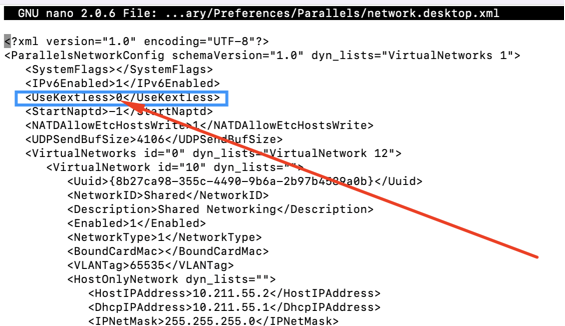
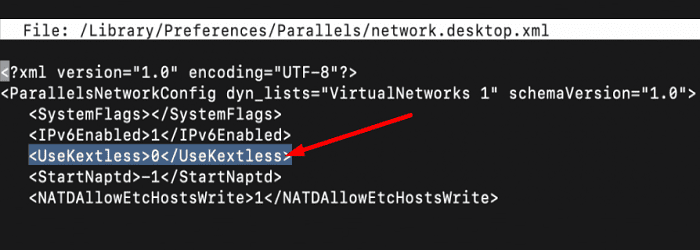
sudo nano /Library/Preferences/Parallels/network.desktop.xml
(откроется текстовый редактор терминала «nano»);

- Введите пароль администратора для доступа к файлу (пароль не будет виден при наборе);

- Найдите эту строку <UseKextless>-1</UseKextless>, она также может иметь значение 1 и замените любое значение там на 0 (передвигать курсор нужно с помощью клавиш на клавиатуре, стрелками), то есть должно получиться: <UseKextless>0</UseKextless>
- Нажмите Control + O, чтобы запросить сохранение, затем Control + C и Control + X, чтобы закрыть редактор, далее подтвердите сохранение изменение нажав Y (не забудьте сменить расскладку на инглиш и нажмите Enter (для проверки перезаписи, повторите 2-3 пункты и убедитесь, что изменения вступили в силу)
- Закройте терминал и откройте Parallels как обычно, ваша виртуальная машина должна загрузиться как на Catalina и раньше


Надеюсь помогли ✊
✅ Будем рады Вашему отзыву

Популярные услуги
Популярные сервисы
Информация
Контакты (метро, адреса)
Для улучшения качества обслуживания, ваш разговор может быть записан.
Все указанные цены на сайте являются ознакомительными, они могут меняться в зависимости от стоимости запчастей производителей, точную стоимость уточняйте в чате или по телефону, не является публичной офертой.
Представленные на сайте товарные знаки используются с правомерной информационной и описательной целью, в отношении которых производятся услуги по ремонту в неавторизованных сервисных центрах «re-Center» в городе Санкт-Петербурге. Apple Watch, iMac, MacBook, iPhone (Айфон), iPad — правообладатель техники Apple, Inc. Android — товарный знак Google, Inc. Huawei и Honor — правообладатель HUAWEI TECHNOLOGIES CO., LTD. (ХУАВЕЙ ТЕКНОЛОДЖИС КО., ЛТД.), Samsung – правообладатель техники Samsung Electronics Co. Ltd. (Самсунг Электроникс Ко., Лтд.), MEIZU — правообладатель MEIZU TECHNOLOGY CO., LTD., Nokia — правообладатель Nokia Corporation (Нокиа Корпорейшн), Lenovo — правообладатель Lenovo (Beijing) Limited, Xiaomi — правообладатель Xiaomi Inc., ZTE — правообладатель ZTE Corporation, HTC — правообладатель HTC CORPORATION (Эйч-Ти-Си КОРПОРЕЙШН), LG — правообладатель LG Corp. (ЭлДжи Корп.), Sony — правообладатель Sony Corporation (Сони Корпорейшн), ASUS — правообладатель ASUSTeK Computer Inc. (Асустек Компьютер Инкорпорейшн), ACER — правообладатель Acer Incorporated (Эйсер Инкорпорейтед), DELL — правообладатель Dell Inc.(Делл Инк.), HP — правообладатель HP Hewlett-Packard Group LLC (ЭйчПи Хьюлетт Паккард Груп ЛЛК), Toshiba — правообладатель KABUSHIKI KAISHA TOSHIBA, also trading as Toshiba Corporation (КАБУШИКИ КАЙША ТОШИБА также торгующая как Тосиба Корпорейшн). Услуги оказываются в неавторизованных сервисных центрах «re-Center», не связанными с компаниями Правообладателями товарных знаков и/или с ее официальными представителями в отношении товаров, которые уже были введены в гражданский оборот в смысле статьи 1487 ГК РФ
Информация о соответствующих моделях и комплектующих, и их наличии, ценах, возможных выгодах и условиях приобретения доступна в сервисных центрах re-Center СПб. Не является публичной офертой.
Когда вы запускаете свою виртуальную машину с Windows 10, Parallels Desktop может иногда выдавать раздражающийОшибка инициализации сети» ошибка. Программа сообщает вам, что «Ваша виртуальная машина продолжит работать в обычном режиме, но не будет иметь сетевого подключения.“. Простая перезагрузка Mac не решит проблему. Следуйте приведенным ниже решениям по устранению неполадок, чтобы избавиться от ошибки.
СОДЕРЖАНИЕ
-
Как исправить ошибку «Ошибка инициализации сети» на Parallels Desktop?
- Убить NetworkInterfaces и отключить общий доступ в Интернет
- Запустите клиент с правами суперпользователя
- Используйте адаптер Wi-Fi
- Изменить настройки параллельного рабочего стола
- Заключение
- Похожие сообщения:
Как исправить ошибку «Ошибка инициализации сети» на Parallels Desktop?
Убить NetworkInterfaces и отключить общий доступ в Интернет
- Запуск Finder, перейти к Приложения и выберите Утилиты.
- Дважды щелкните на Терминал для запуска инструмента.
- Запустить
sudo rm /Library/Preferences/SystemConfiguration/NetworkInterfaces.plist && sudo killall -9 configdкоманда. - Перезагрузите компьютер.
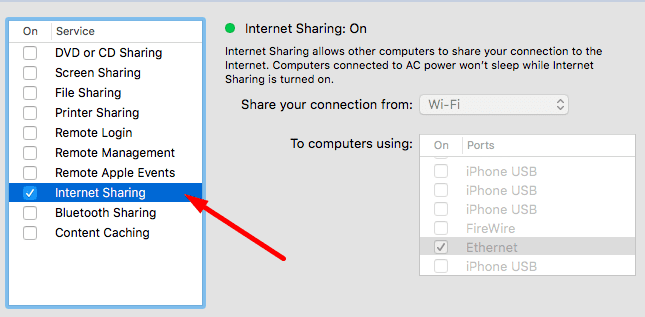
- Затем перейдите к Системные настройки, и найдите Совместное использование предпочтений панель.
- Запрещать Совместное использование Интернета.
- Снова запустите Parallels Desktop и проверьте результаты.
Запустите клиент с правами суперпользователя
Если ошибка не исчезнет, запустите клиент Parallels Desktop от имени суперпользователя.
- Закройте виртуальную машину и полностью выйдите из Parallels.
- После этого запустите Терминал и выполните следующую команду:
sudo -b / Applications / Parallels / Desktop.app/Contents/MacOS/prl_client_app
⇒ Примечание: Некоторые пользователи жаловались, что команда работала, но они потеряли целостность домашних папок. Если вы столкнулись с подобными проблемами, переустановите Parallels.
Используйте адаптер Wi-Fi
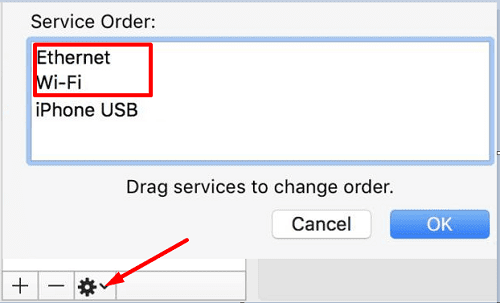
Ошибка «Ошибка инициализации сети» также может указывать на то, что Parallels Desktop неправильно считывает адаптеры. Другими словами, Parallels автоматически помещает Ethernet в верхнюю часть списка заказов на обслуживание, отключая ваше беспроводное соединение.
В качестве временного решения, если вы используете Ethernet в качестве основного подключения, измените настройки заказа на обслуживание и выберите адаптер Wi-Fi. Конечно, если Wi-Fi является вашим основным подключением, выберите адаптер Ethernet.
Если вы используете проводное соединение, выполните следующие действия:
- Включите Wi-Fi и дождитесь, пока ваше устройство подключится к сети. Теперь у вас должно быть два IP-адреса.
- Перейти к Системные настройки, нажмите на Сеть, и выберите Заказ на обслуживание (значок шестеренки). Убедитесь, что ваше соединение Ethernet по-прежнему находится на первом месте в списке (основное соединение). Перетащите сеть Wi-Fi в первую позицию.
- Запустите Parallels и выберите Wi-Fi в качестве сети для использования на вашей виртуальной машине. Иногда вам может потребоваться дважды выбрать беспроводную сеть на вашей виртуальной машине.
Другие пользователи устранили проблему, переключившись с общей сети на мостовую. Проверьте, какой из этих методов лучше всего подходит для вас.
Изменить настройки параллельного рабочего стола
- Полностью закройте Parallels. Запустите Монитор активности и закройте все процессы Parallels, которые могут все еще работать в фоновом режиме.
- Запустите Терминал и запустите
команда sudo nano /Library/Preferences/Parallels/network.desktop.xml. - Найдите 1линия.
- Затем измените его на 0.
- Нажмите CLT и O, чтобы сохранить изменения, а затем CLT и X, чтобы выйти из файла XML.
- Перезагрузите ваш Mac. Снова запустите Parallels и проверьте, доступен ли Wi-Fi на вашей виртуальной машине с Windows 10.
Заключение
Если ваша виртуальная машина с Windows 10 не может подключиться к Интернету, запустите Parallels с суперпользователем. права с помощью этой команды Терминала: sudo -b /Applications/Parallels/Desktop.app/Contents/MacOS/prl_client_app. Не забудьте отключить общий доступ в Интернет. Если проблема не исчезнет, отредактируйте файл Network.desktop.xml и измените 1 строка к 0.
Какой из этих методов сработал для вас? Дайте нам знать в комментариях ниже.
Posted in Полезное 0 Likes 1287 Views
При обновлении системы на Big Sur
возникла проблема с сетью в Parallels Desktop?
«Сбой инициализации сети. Ваша виртуальная машина продолжит работать в обычном режиме, но без подключения к Интернету»

Сбой инициализации сети. Ваша виртуальная машина продолжит работать в обычном режиме, но без подключения к Интернету
Проблема лечится не так уж и сложно, но всё же доставила неприятности
Вот метот для тех кто знает инглиш или умеет пользоваться гугл переводчиком:
Network Fix:
- sudo nano /Library/Preferences/Parallels/network.desktop.xml
- find 1 (value can be -1), and change the value to the 0
- if you can’t to find this tag, then just create it under root tag here
USB Fix:
- /Library/Preferences/Parallels/dispatcher.desktop.xml
- 0 find ==>> 1 Result: you can start/restart Parallels without sudo — network will work.
А вот и по нашему, как решить проблему с сетью в Parallels Desktop на Big Sur:
Данный метод был успешно проверен на Parallels Desktop Версия 16.1.1 (49141), macOS — «Big Sur»
Полностью закройте параллели:

В Терминале введите (скопируйте и вставьте):
sudo nano /Library/Preferences/Parallels/network.desktop.xml
(откроется текстовый редактор терминала «nano»);

Введите пароль администратора для доступа к файлу (пароль не будет виден при наборе);

Найдите эту строку -1, она также может иметь значение 1 и замените любое значение там на 0 (передвигать курсор нужно с помощью клавиш на клавиатуре, стрелками), то есть должно получиться: 0

Нажмите Control + O, чтобы запросить сохранение, затем Control + C и Control + X, чтобы закрыть редактор, далее подтвердите сохранение изменение нажав Y
(не забудьте сменить расскладку на инглиш и нажмите Enter
(для проверки перезаписи, повторите 2-3 пункты и убедитесь, что изменения вступили в силу)
Закройте терминал и откройте Parallels как обычно, ваша виртуальная машина должна загрузиться как на Catalina и раньше 🙂
Уже посмотрели 10 136
Related Articles

0 846

0 720

1 1062
")
0 2774
Symptoms
- No internet connection in Windows, however internet is accessible on the Mac side.
- Internet connection is low or unstable.
- Issues with network dependent software even though the internet in Windows is working fine.
- Other home network computers are not reachable.
Cause
- Network settings misconfiguration in Windows.
- 3rd party applications or antivirus software are blocking network connection.
- Virtual machine’s settings misconfiguration.
- Corrupted Windows environment.
Resolution
- Make sure your Mac is connected to the internet, Windows will not be able to access the internet if it’s disconnected or inaccessible on the Mac side.
- Before going any further please take a snapshot (Actions > Take Snapshot) to revert to a pre-troubleshooting point.
- Reinstall Parallels Tools.
- Perform clean boot in Windows by disabling 3rd party applications’ services including 3rd party antivirus software which may have a negative impact on a network driver’s installation.
NOTE: in step 3 keep both Parallels Tools services enabled.
If this helped and internet connection restored, enable all services back one-by-one to identify the problematic 3rd party application.
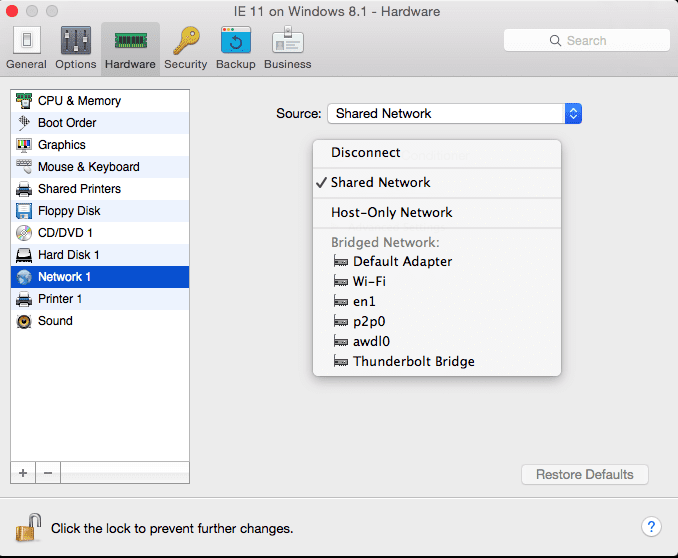
- Go to the virtual machine’s configuration > Hardware > Network > Source > Shared Network (Recommended) option should be set by default.
If you have already got a Shared network set but still experience network issues in Windows switch it to Bridged Network: Default Adapter and verify if the internet is working in any of these modes.
If the internet is accessible in one of the modes — either Shared or Bridged but having a different connection type set doesn’t suit your needs, proceed to additional troubleshooting.
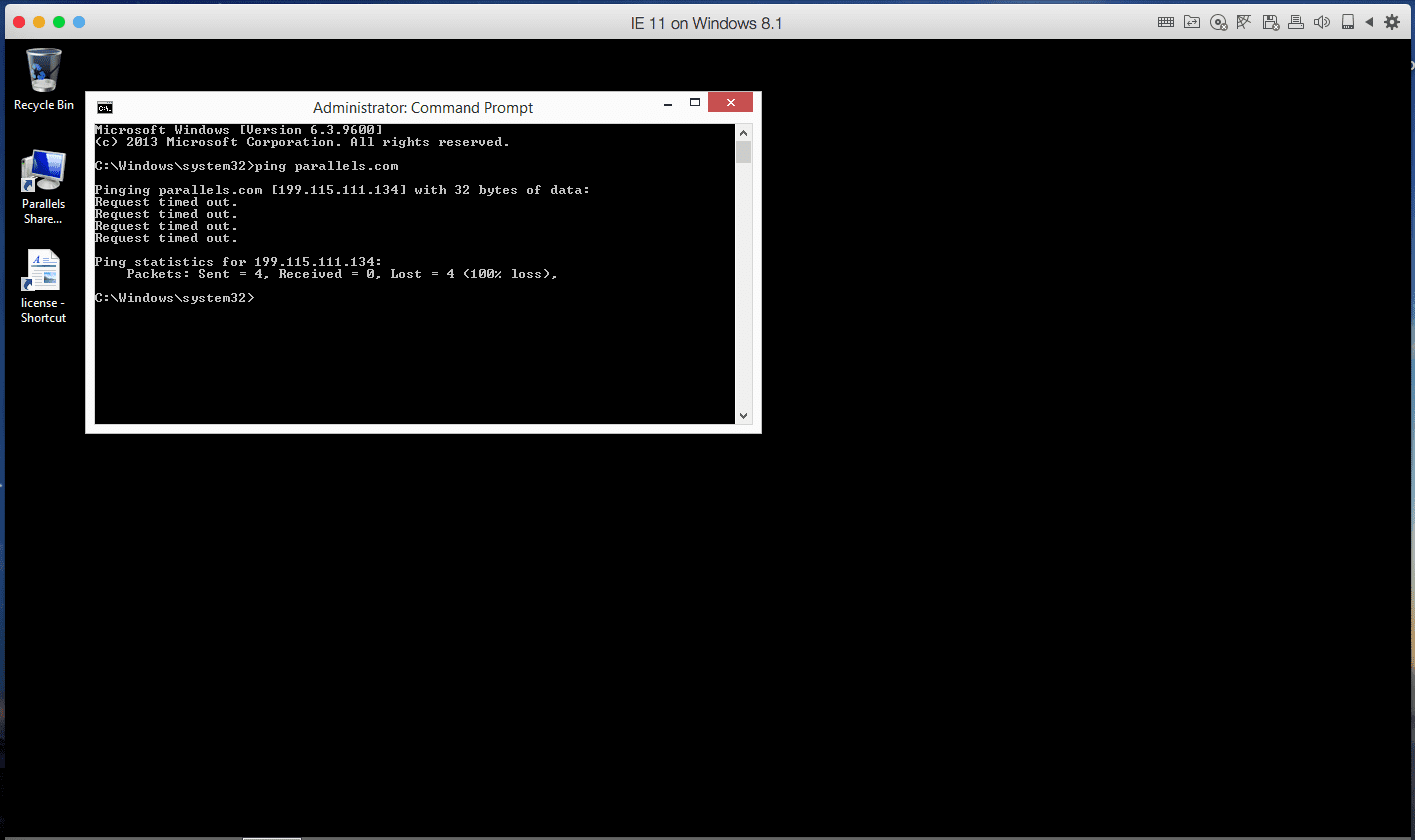
- Open Command Prompt in Windows by clicking on Start menu and typing in cmd, then hit Enter.
Try pinging any Parallels server by entering the following command:ping parallels.comA normal output looks somewhat like this:
Reply from 64.131.89.6: bytes=32 time=188ms TTL=54

    Reply from 64.131.89.6: bytes=32 time=187ms TTL=54
If you get the following reply:
Request timed out.
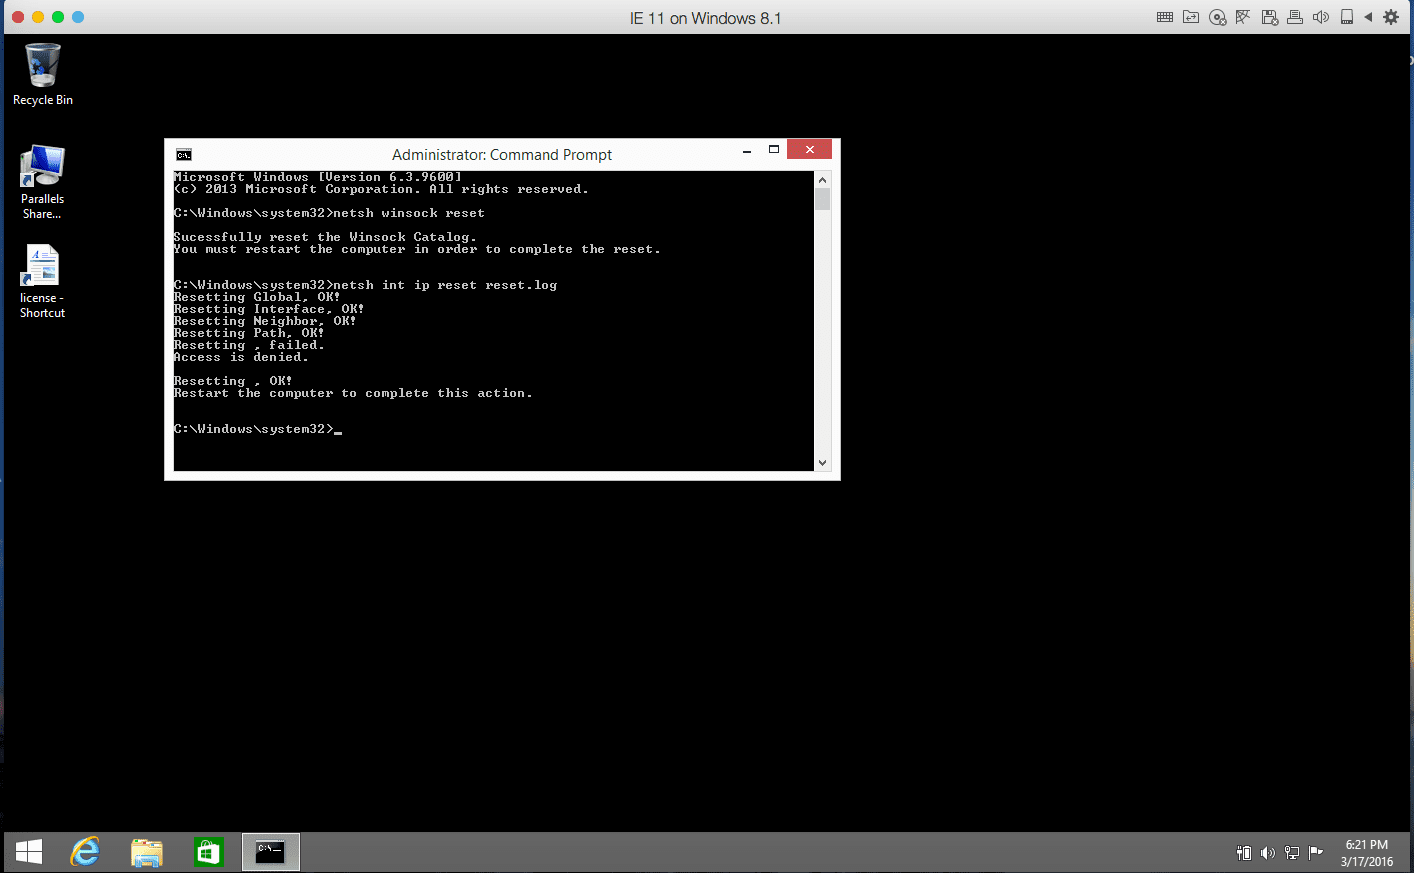
Request timed out.Reset Windows TCP/IP protocol using the following commands:
netsh winsock reset

    netsh int ip reset reset.log
Then close Command Prompt window and restart Windows.
If after Windows restart internet is not working, open Command Prompt again, release and renew IP address by entering the commands below:ipconfig /release
ipconfig /renew - If the above steps do not help, in Windows open Device Manager (right-click Start menu and select Device Manager).
In Device Manager go to Network adapters tab and expand it. Check the name of the network adapter. It should be identical to the name in the virtual machine’s configuration (the virtual machine’s configuration > Hardware > Network > Type).If instead, it is something like Parallels Ethernet Adapter #…, it means the driver was installed incorrectly and needs to be updated.

To do that right-click on the adapter > click Update driver > Search automatically for updated driver software. Windows will try to update the driver.
- If none of the above helped, scan your system for integrity violations.
- When the issue is resolved remove the snapshot taken in step 2 by going to Actions > Manage Snapshots > choosing the snapshot > pressing Delete > Yes.

Additional information
If you have Parallels Desktop for Mac Pro or Business edition you can reset preset network settings for the whole Parallels Desktop application by going to ![]() > Preferences > Network > Restore Defaults.
> Preferences > Network > Restore Defaults.
Содержание
- Сбой инициализации сети parallels desktop macOS Big Sur
- Parallels desktop не работает wifi
- Información adicional
- Была ли эта статья полезной?
- Network Troubleshooting your Parallels Desktop VM
Сбой инициализации сети parallels desktop macOS Big Sur

При обновлении системы на Big Sur
возникла проблема с сетью в Parallels Desktop?
“Сбой инициализации сети. Ваша виртуальная машина продолжит работать в обычном режиме, но без подключения к Интернету”
Сбой инициализации сети. Ваша виртуальная машина продолжит работать в обычном режиме, но без подключения к Интернету
Проблема лечится не так уж и сложно, но всё же доставила неприятности
Вот метот для тех кто знает инглиш или умеет пользоваться гугл переводчиком:
- sudo nano /Library/Preferences/Parallels/network.desktop.xml
- find 1 (value can be -1), and change the value to the 0
- if you can’t to find this tag, then just create it under root tag here
- /Library/Preferences/Parallels/dispatcher.desktop.xml
- 0 find ==>> 1 Result: you can start/restart Parallels without sudo – network will work.
А вот и по нашему, как решить проблему с сетью в Parallels Desktop на Big Sur:
Данный метод был успешно проверен на Parallels Desktop Версия 16.1.1 (49141), macOS – “Big Sur”
Полностью закройте параллели:
В Терминале введите (скопируйте и вставьте):
sudo nano /Library/Preferences/Parallels/network.desktop.xml
(откроется текстовый редактор терминала «nano»);
Введите пароль администратора для доступа к файлу (пароль не будет виден при наборе);
Найдите эту строку -1, она также может иметь значение 1 и замените любое значение там на 0 (передвигать курсор нужно с помощью клавиш на клавиатуре, стрелками), то есть должно получиться: 0
Нажмите Control + O, чтобы запросить сохранение, затем Control + C и Control + X, чтобы закрыть редактор, далее подтвердите сохранение изменение нажав Y
(не забудьте сменить расскладку на инглиш и нажмите Enter
(для проверки перезаписи, повторите 2-3 пункты и убедитесь, что изменения вступили в силу)
Закройте терминал и откройте Parallels как обычно, ваша виртуальная машина должна загрузиться как на Catalina и раньше 🙂
Источник
Parallels desktop не работает wifi
- Asegúrese de que el Mac está conectado a internet, ya que Windows no podrá acceder a internet si el Mac no tiene conexión o si no puede acceder a internet.
- Antes de continuar, cree una instantánea (Acciones >Realizar instantánea) para revertir los cambios y volver a un punto anterior a la resolución de problemas.
- Reinstale Parallels Tools.
- Realice un arranque limpio en Windows deshabilitando los servicios de las aplicaciones externas, como un software antivirus externo, que pueda afectar negativamente a la instalación del controlador de red.
NOTA: En el paso 3, mantenga habilitados los dos servicios de Parallels Tools.
Si esto resultó útil y restauró la conexión a internet, vuelva a habilitar todos los servicios de uno en uno para identificar la aplicación externa problemática.
Vaya a la configuración de la máquina virtual; la opción Hardware >Red >Origen >Red compartida (recomendada) debería estar establecida de forma predeterminada.
Si ya tiene una Red compartida establecida, pero sigue experimentando problemas de red en Windows, cámbiela a Red en modo bridge: Adaptador predeterminado y verifique si internet funciona en alguno de estos modos.
Si se puede acceder a internet en uno de los modos (Red compartida o Red en modo bridge), pero el hecho de tener un tipo de conexión diferente no se ajusta a sus necesidades, continúe con la resolución de problemas.
En Windows, abra Símbolo del sistema haciendo clic en el menú Inicio y escribiendo cmd y, a continuación, pulse Intro.
Intente hacer ping en cualquier servidor de Parallels introduciendo el siguiente comando:
Un resultado normal tiene más o menos el siguiente aspecto:
Respuesta desde 64.131.89.6: bytes=32 tiempo=188ms TTL=54
Respuesta desde 64.131.89.6: bytes=32 tiempo=187ms TTL=54
Si recibe la siguiente respuesta:
Tiempo de espera agotado para esta solicitud.
Tiempo de espera agotado para esta solicitud.
Restablezca el protocolo TCP/IP de Windows usando los siguientes comandos:
netsh winsock reset
netsh int ip reset reset.log
A continuación, cierre la ventana de Símbolo del sistema y reinicie Windows.
Si internet no funciona después de reiniciar Windows, vuelva a abrir Símbolo del sistema, libere y renueve la dirección IP introduciendo los siguientes comandos:
ipconfig /release
ipconfig /renew
Si los pasos anteriores no resultan útiles, abra Administrador de dispositivos en Windows (haga clic con el botón derecho en el menú Inicio y seleccione Administrador de dispositivos).
En Administrador de dispositivos, vaya a la pestaña Adaptadores de red y expándala. Compruebe el nombre del adaptador de red. Debería ser idéntico al nombre que aparece en la configuración de la máquina virtual (configuración de la máquina virtual >Hardware >Red >Tipo).
Si, de lo contrario, se llama algo parecido a Parallels Ethernet Adapter #. , significa que el controlador no se instaló correctamente y es necesario actualizarlo.
Para ello, haga clic con el botón derecho en el adaptador > haga clic en Actualizar controlador >Buscar automáticamente software de controlador actualizado. Windows intentará actualizar el controlador.
Información adicional
Si tiene la edición Parallels Desktop para Mac Pro o Business, puede restablecer la configuración de red preestablecida para toda la aplicación Parallels Desktop en  > Preferencias > Red > Restaurar valores predeterminados.
Была ли эта статья полезной?
Как, по вашему мнению, можно улучшить эту статью?
Источник
Network Troubleshooting your Parallels Desktop VM
Network troubleshooting commands are important for any VM user.
Today we can’t imagine our life without information technology. Access to all this data wouldn’t be possible the actual network connection. Almost all the modern devices nowadays have a way to connect to the the network. Your Mac and Parallels Desktop virtual machine are no exception!
There are several network modes in Parallels Desktop which we covered is one of the past blog s: Bridged, Shared and Host Only network. Let’s summarize the purpose of each in brief:
With Shared mode, we use the Mac connection to connect to the external network. It’s the easiest to use because your VM can use any type of network connection available on the Mac to connect to Internet (Ethernet, wifi). Bridged mode is used when you want your VM to establish direct connection with your Mac network card. In Bridged mode your VM will look like a standalone PC on the network. And last but not least is Host only mode. Host-Only network is a closed network that is accessible only to Mac OS X and Windows. Select this option to allow the VM to connect to the host computer and the VMs residing on it and to make it invisible outside of the host computer.
But what if something went wrong? What if the default virtual machine setup does not let you surf the internet from Parallels Desktop side, what if the app hangs out which force quit command to use? Don’t panic. We’ve got some easy troubleshooting steps. By the way – many of the steps below are applicable to Windows PCs (not only virtual machines).
First you need to check the network connection on the Mac side. Mac shares the network connection with the VM, and if you can’t connect to any website from the Mac side you won’t be able to do it from your VM. So in this case you need to check all of Mac settings and contact your provider or system administrator for help.
Once you’ve checked the network connection on the Mac side you should do the same thing on the virtual machine side. But in virtual machine we need to perform a bit more steps and actions, because the reason for the dropped network connection could be different.
As a first step, check the Parallels Tools performance. A specific component of Parallels Tools works as a sharing of network between Mac and VM and if it has not been installed correctly, that may be the network issue. We can simply reinstall it with the following steps:
- Launch Windows virtual machine.
- Disable antivirus in Windows.
- Open Control Panel > Programs and Features (Uninstall a program for Windows 10, or Add/Remove programs for Windows XP) and remove Parallels Tools if present.
- Restart Windows.
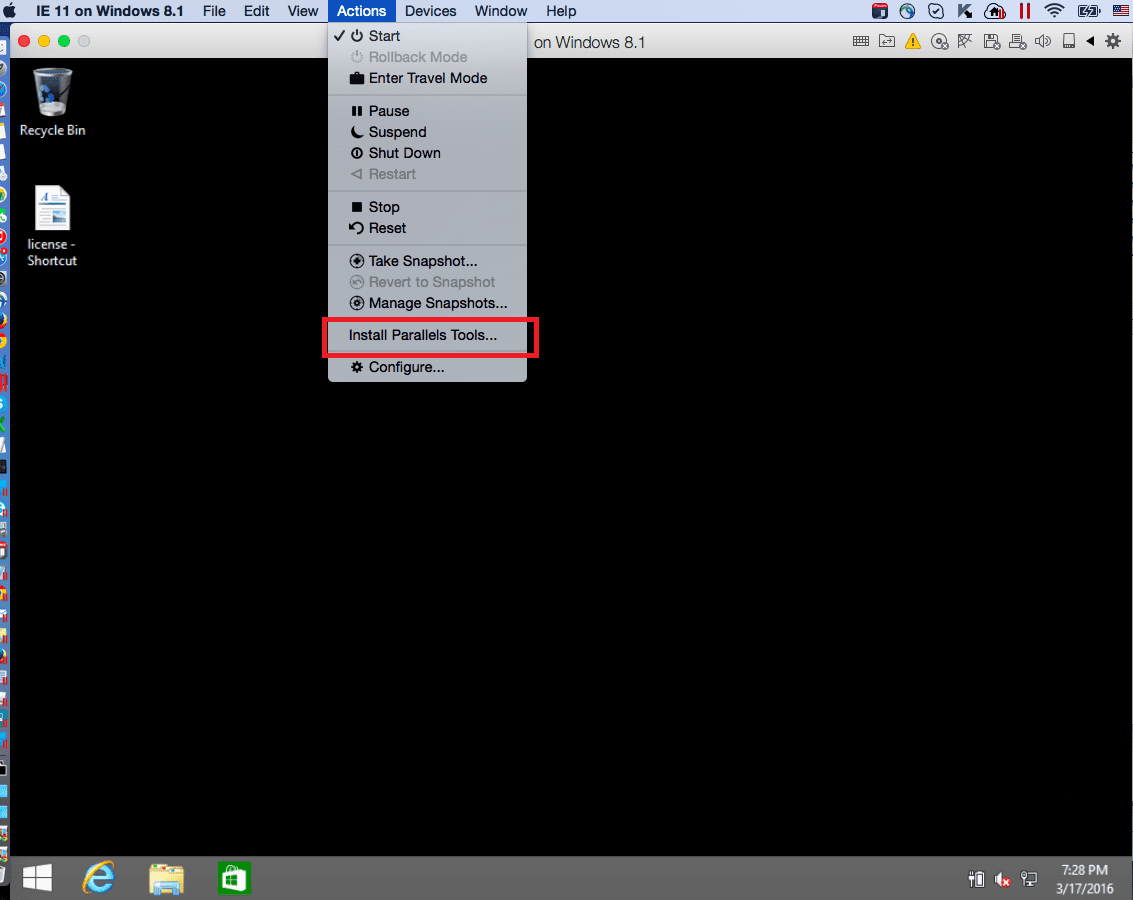
- In Mac menu bar click on Actions (Virtual Machine in older versions) > Install Parallels Tools.
- Restart Windows again.
- Enable your antivirus back.
Once the Parallels Tools have been reinstalled we can check performance of this component to make sure that everything has been installed and works correctly. To do that we need to use the following steps:
- Open the Task Manager and find the following processes in process tab: (In Windows 8 you need to click “More details” button > then you will be able to find out the “Process” tab)
- Go through processes and make the Parallels Tools and Parallels Tools Service processes are running.
Check the connection now. Everything works fine now? Perfect! Still an issue? Read on.
As a next step you need to check and adjust the virtual machine configuration; Check the network adapter status (and if it’s there at all).
- Go to Configuration > Hardware > Network 1 and verify that one of the network modes has been used. If you find the “Disconnect” status change it to the “Shared mode”.
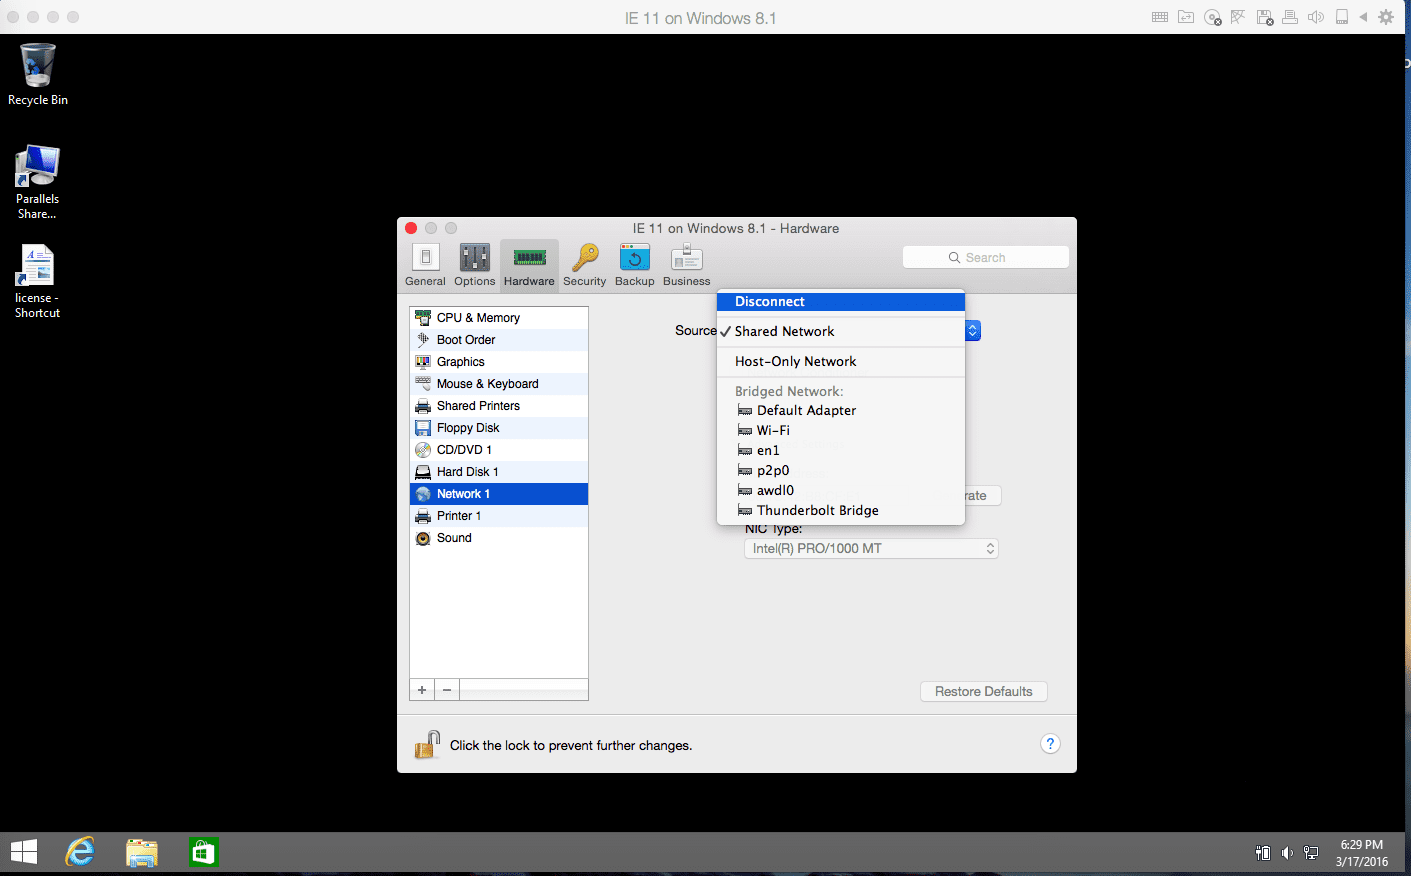
Virtual machines use the Shared mode by default, but sometimes it may be set to Bridged or the Host only. In this case we need to switch between modes back and forth, for example between Bridged and Shared.
This simple steps will help your VM to configure some internal important settings and set it up correctly.
After that we need to check one more configuration setting – OS type. Go to the General tab, and verify that the operating system matches the OS currently installed in your virtual machine. Sometimes it may have changed after you upgraded the operating system inside your virtual machine.
Now that you’ve checked your VM configuration and if the network connection still doesn’t appear, we need to continue our troubleshooting on the Windows side.
Let’s revert back to the Network adapter, but at that time we will check it in Windows Device Manager. To open the Device Manager, follow these steps:
- For Windows XP: Click Start > Control Panel > Performance and Maintenance > System. Then go to the Hardware tab and click Device Manager.
- For Windows Vista/7: Click the Start button, then scroll to the Control Panel > System and Maintenance then select Device Manager.
- Windows 8: Click the Start button, type ‘Control Panel’ without quotes > System and Maintenance then select Device Manager
Check the network adapter’s name. It should be either a Parallels Network Adapter or Intel PRO/1000 MT Network Connection. If you see any other name (e.g., Ethernet Controller) right-click it and select Uninstall. Then Right-click on Computer in the Device Manager and choose Scan for hardware changes.
Restart Windows and check if the Internet connection is working now. After these steps we need to check a few other adapter settings. For example, if you are using an AirPort router (capsule) in Bridged mode or any network in Shared mode, make sure that Properties are set to Internet Protocol v4, Obtain IP and DNS automatically is selected instead of manual configuration.
Alright, still no connection? There is one more method to find the reason and fix the issue with network connection. First, let me explain to you some troubleshooting steps in Command Prompt.
Command Prompt is known as cmd.exe or cmd (after its executable file name), is the command-line interpreter on Windows NT, Windows CE, OS/2 and eComStation operating systems, and it interacts with the user through a command-line interface . In Windows, this interface is implemented through Win32 console . Command Prompt may take advantage of features available to native programs of its own platform.
In our case we can simply execute some commands in CMD for checking network connection and fixing issue with it. First, let’s open Command prompt and check the IPs and default gateway
- Open Command Prompt:
- For Windows XP: Select the Start button, then click Run… When the pop-up window appears, type CMD and hit Return/Enter.
- For Windows Vista/7/8/10: Click the Start button, then type CMD in the Search box. Right-click on CMD in search results, then click the “Run as Administrator” option. This will open Command Prompt with admin privileges.
Now we have the Black window and can type in it the following command in order to check the network configuration.
and hit Enter and check the output.
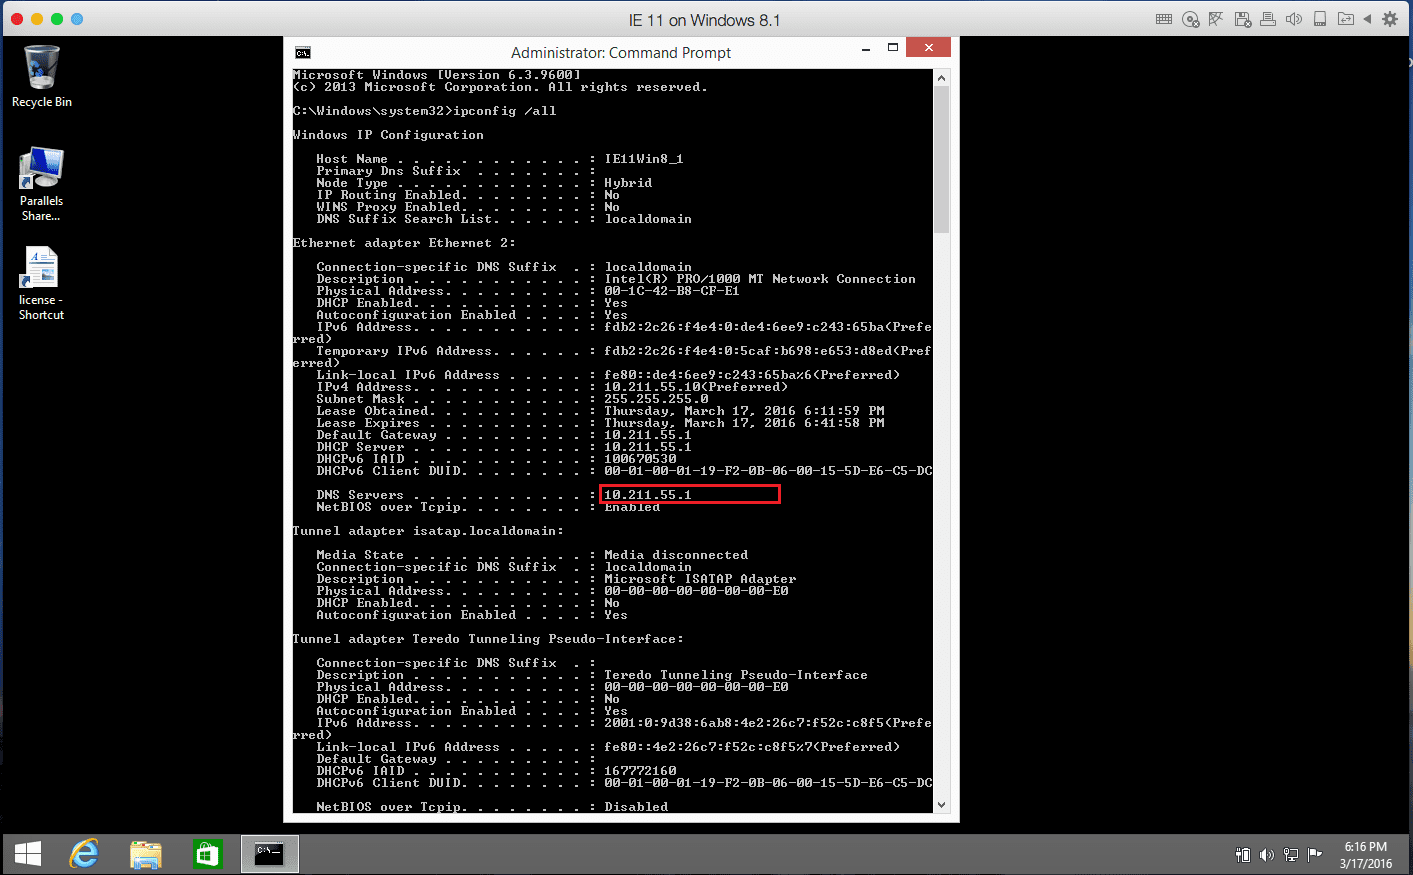
If your virtual machine is in Shared networking mode, the IP address should resemble 10.211.55.x. If you are in Bridged networking mode, the IP address should look similar to your Mac IP address, e.g. 192.168.0.10. If it is 0.0.0.0, it means that the issue related to the known incompatibility issue between Windows operating systems (it may affect all OSes) and Apple’s Bonjour service. The Default Gateway may have been set to 0.0.0.0 on a Windows Vista-based or later OS running Apple’s Bonjour service (Apple’s Bonjour service might appear on your virtual machine after installing Adobe CS3 or similar software).
In this case we can fix the issue using the following steps:
- Go to Start > Run
- Type Services.msc and hit Enter
- Find a service with a strange name, for example:
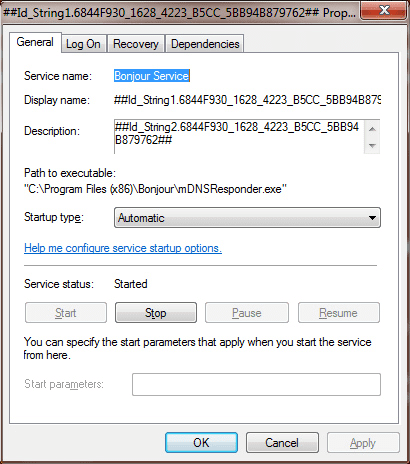
- Stop the service and change its Startup type to Disabled.
- Reboot your virtual machine.
If the “ipconfig” output is OK, we can continue our troubleshooting with other command – “ping”
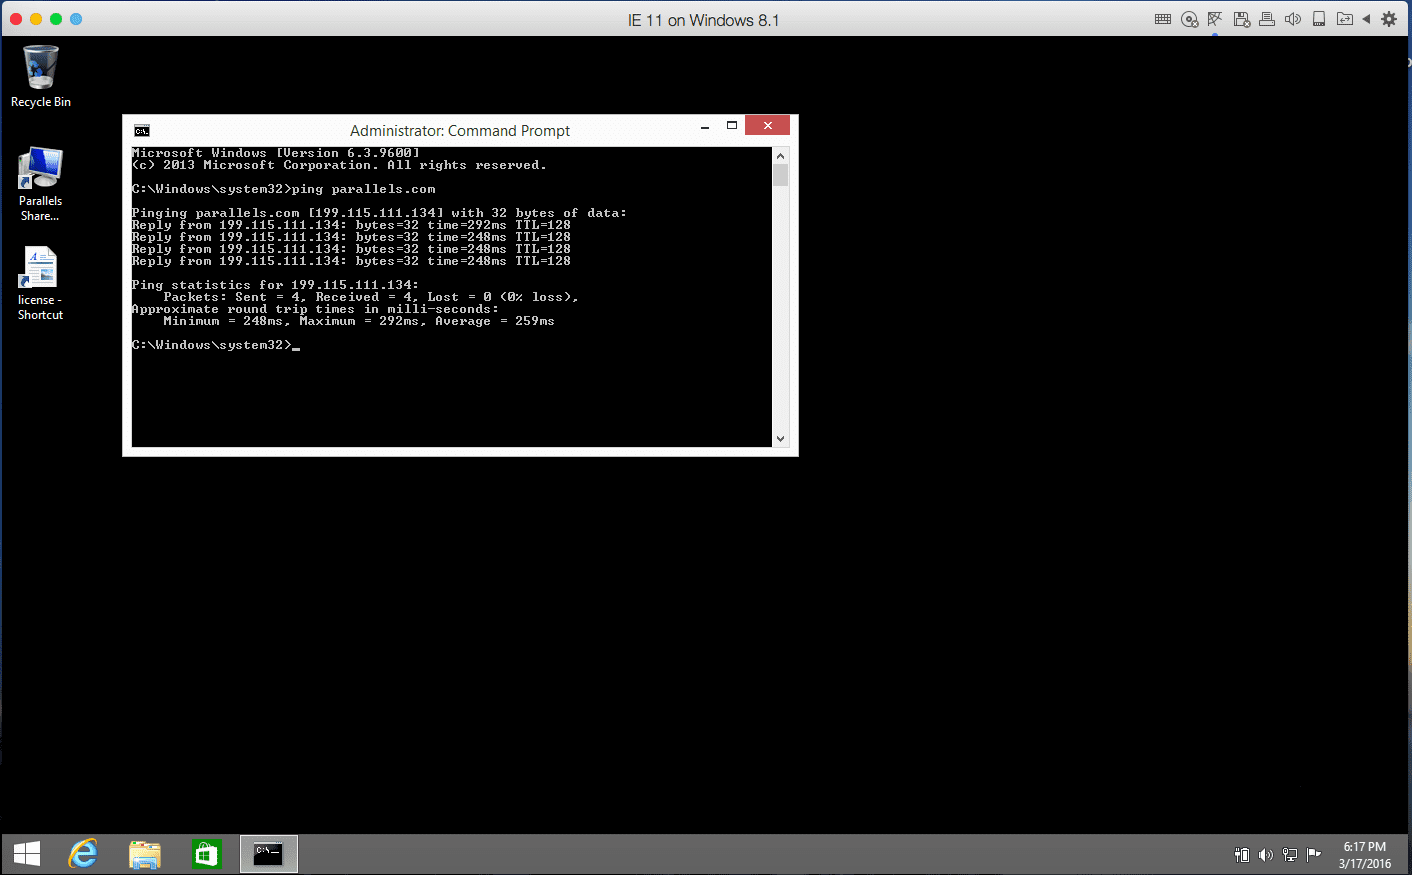
We can try to ping any Parallels server for example, by entering the following command:
A normal reply looks like this:
Reply from 64.131.89.6: bytes=32 time=188ms TTL=54
Reply from 64.131.89.6: bytes=32 time=187ms TTL=54
If you get this reply:
Request timed out.
Request timed out.
Try pinging via IP address:
If you get a normal reply this time, it means that your virtual machine is in Bridged networking mode and failing to get correct DNS settings from the gateway or that you set them incorrectly. Please direct this problem to your network provider if you can’t resolve it.
Because the DNS settings and the gateway issue too is not related to the Parallels Desktop settings, it’s internal Windows issue and could appear on the real PC too. But on the other hand, we have one more tip to resolve these issue without help from your network administrator.
If you see “Request timed out” in both cases, try to reset the Windows TCP/IP protocol with the following commands:
netsh winsock reset
netsh int ip reset reset.log
These command will help you to reset your network adapter’s software to default and restore all default settings of Windows network adapter. You can simply type the first command, hit enter and then do the same with the second one. Now you can simply restart our Windows VM and check the network connection.
Hope you found this blog helpful and don’t forget to follow us on Twitter !
Need to run Windows on your Mac? Download our free 14-day trial.
Источник
Содержание
- Parallel desktops mac os не работает интернет
- Known issues
- Была ли эта статья полезной?
- Сбой инициализации сети parallels desktop macOS Big Sur
- Parallel desktops mac os не работает интернет
- Additional information
- Была ли эта статья полезной?
- Parallels Desktop 13 — семь советов для эффективной работы
- Parallel desktops mac os не работает интернет
- Known issues
- New macOS Catalina features support
- Issues fixed in macOS Catalina
- Была ли эта статья полезной?
Parallel desktops mac os не работает интернет
Parallels engineers have been putting thousands of hours into Parallels Desktop 16 for Mac development and testing to make sure it fully supports macOS 11 Big Sur. Most of issues we ran into have been resolved, some have workarounds, and there are just few we’re still working hard on to resolve. Older Parallels Desktop versions only partially support working on macOS Big Sur due to technical reasons may experience the issues below depending on the configuration.
Click Get updates to subscribe to this article to be immediately notified on us fixing these few remaining issues.
Known issues
Parallels Desktop cannot be installed in macOS Big Sur Beta.
Parallels Desktop does not start after upgrading a Mac to macOS Big Sur Beta.
Macs with macOS Big Sur Beta 5 crash when a user starts a virtual machine.
After upgrading Mac to Big Sur the notification ‘To start the virtual machine, please restart your Mac first.’ appears on attempt to start a virtual machine
sudo rm /Library/Preferences/SystemConfiguration/preferences.plist
sudo rm /Library/Preferences/SystemConfiguration/NetworkInterfaces.plist
Parallels Desktop freezes when opening Control Center or virtual machine configuration.
When trying to quit Parallels Desktop, it freezes.
Graphics artifacts appear in the background when a virtual machine is running in the Coherence view mode.
After upgrading a Mac to Big Sur, the «Unable to load the Parallels driver.» message appears when starting a virtual machine.
The «Deleting a snapshot…» window freezes each time a user tries to delete a snapshot.
Fixed in macOS Big Sur Beta 5
Parallels Desktop crashes after clicking «VM is ready» at the end of the virtual machine installation.
Cannot type certain symbols in a virtual machine (e.g., 1, 2, T, Y, etc.).
Parallels Tools do not install automatically in a Boot Camp-based virtual machine.
Click the Actions menu in the macOS menu bar and select Install Parallels Tools. Once the installation is finished, restart the virtual machine
A virtual machine crashes when a user logs in to Windows.
An existing macOS virtual machine cannot be upgraded to macOS Big Sur.
Fixed in macOS Big Sur Beta 4
Increase the disk size of an existing virtual machine to at least 128 GB (as described in the KB 112119) before upgrading it.
Installation Assistant shows the macOS Big Sur version incorrectly (as 10.16).
Unable to install macOS Big Sur in a virtual machine from the Recovery partition.
A virtual machine with macOS Big Sur shows a black screen after the Parallels Tools reinstallation.
Installation Assistant freezes when trying to create a virtual machine with macOS Big Sur Beta 5.
Fixed in macOS Big Sur Beta 6
Была ли эта статья полезной?
Как, по вашему мнению, можно улучшить эту статью?
Источник
Сбой инициализации сети parallels desktop macOS Big Sur

При обновлении системы на Big Sur
возникла проблема с сетью в Parallels Desktop?
“Сбой инициализации сети. Ваша виртуальная машина продолжит работать в обычном режиме, но без подключения к Интернету”

Сбой инициализации сети. Ваша виртуальная машина продолжит работать в обычном режиме, но без подключения к Интернету
Проблема лечится не так уж и сложно, но всё же доставила неприятности
Вот метот для тех кто знает инглиш или умеет пользоваться гугл переводчиком:
А вот и по нашему, как решить проблему с сетью в Parallels Desktop на Big Sur:
Данный метод был успешно проверен на Parallels Desktop Версия 16.1.1 (49141), macOS – “Big Sur”
Полностью закройте параллели:

В Терминале введите (скопируйте и вставьте):
sudo nano /Library/Preferences/Parallels/network.desktop.xml
(откроется текстовый редактор терминала «nano»);

Введите пароль администратора для доступа к файлу (пароль не будет виден при наборе);


Нажмите Control + O, чтобы запросить сохранение, затем Control + C и Control + X, чтобы закрыть редактор, далее подтвердите сохранение изменение нажав Y
(не забудьте сменить расскладку на инглиш и нажмите Enter
(для проверки перезаписи, повторите 2-3 пункты и убедитесь, что изменения вступили в силу)
Закройте терминал и откройте Parallels как обычно, ваша виртуальная машина должна загрузиться как на Catalina и раньше 🙂
Источник
Parallel desktops mac os не работает интернет


A normal output looks somewhat like this:
Reply from 64.131.89.6: bytes=32 time=188ms TTL=54
Reply from 64.131.89.6: bytes=32 time=187ms TTL=54
If you get the following reply:
Request timed out.
Request timed out.
Reset Windows TCP/IP protocol using the following commands:
netsh winsock reset
netsh int ip reset reset.log
Then close Command Prompt window and restart Windows.
If after Windows restart internet is not working, open Command Prompt again, release and renew IP address by entering the commands below:


Additional information
If you have Parallels Desktop for Mac Pro or Business edition you can reset preset network settings for the whole Parallels Desktop application by going to > Preferences > Network > Restore Defaults.
Была ли эта статья полезной?
Как, по вашему мнению, можно улучшить эту статью?
Источник
Parallels Desktop 13 — семь советов для эффективной работы

По умолчанию в Parallels Desktop 13 выставлены оптимальные настройки для работы. Но, если вы привыкли брать от жизни все, держите несколько советов, как увеличить быстродействие и сохранить заряд батареи вашего Макбука.
Совет #0. Не нужно ничего менять. В Parallels Desktop 13 настроен оптимальный режим работы. Максимум, убедитесь, что обновились до последней версии утилиты и у вас включен режим скачивания обновлений.
Совет #1. Припасите SSD максимального объема. Больше память, больше скорость.
Совет #2. Активируйте режим Scaled mode. Если у вас Макбук с Retina-дисплеем, попробуйте включить в Parallels Desktop 13 ненативное разрешение в режиме Scaled mode. Это позволит существенно ускорить быстродействие компьютера, при сохранении оптимального качества изображения.

Совет #3. Используйте функцию «Приостановить/Возобновить». При прекращении работы с приложениями в гостевой ОС, вы обычно закрываете свои программы в ней и останавливаете виртуальную машину. Когда гостевые приложения снова нужны, процесс повторяется в обратном порядке. Все это отнимает кучу времени, которое легко экономится использованием функций «Приостановить/Возобновить». Вместо того, чтобы закрыть PD 13, выберите Виртуальная машина → Приостановить.
Гостевая ОС может «замораживаться» вместе с открытыми в ней приложениями — в нашем случае, с тем же Internet Explorer. Это удобно, когда нужно быстро возобновить работу виртуальной машины со всеми открытыми программами. Причём система выводится из спячки буквально за секунды вместе со всеми ранее открытыми программами.
Состояние памяти и состояние внутренних устройств виртуального компьютера сохраняется на жёстком диске в виде файла. Этот файл потом «разворачивается» средствами Parallels Desktop. При использовании функции «Приостановить/Возобновить» вместо одной-двух минут ожидания загрузки Windows и её приложений на все про все уходит от силы секунд десять. Экономия времени колоссальная.
Совет #4. Активируем опцию «Всегда готова в фоновом режиме». Виртуальные машины в Parallels Desktop 13 могут быть переведены в режим готовности к использованию в фоновом режиме, без графического интерфейса — это позволяет приложениям Windows стартовать ориентировочно в три раза быстрее, чем обычно. Как правило, время необходимое для запуска приложения, тратится на то, чтобы запустить виртуальную машину, в этой виртуальной машине загрузить Windows, а затем при помощи Windows запустить выбранное приложение. На средней конфигурации Mac или MacBook на весь этот цикл может уходить, например, около 30 секунд. Опция «Всегда готова в фоновом режиме» оптимизирует этот процесс, делая его практически мгновенным. Когда пользователь покидает Parallels Desktop, виртуальная машина ставится на паузу и в оперативной памяти остается все необходимое для ее моментального запуска и продолжения работы. Особенно это актуально, если у вас 8ГБ оперативной памяти и вы часто работаете с Windows-приложениями.
Совет #5. Настройте плановое обслуживание системы. Никто не любит моменты, когда вместо того, чтобы работать, приходится ждать, пока установятся Windows-обновления, у которых почему-то всегда свои собственные планы. К тому же процессы обновления и обслуживания Windows 10 довольно ресурсоемки, они потребляет заметную долю процессорного времени и пропускной способности, они даже включают активное охлаждение процессора (кулеры). Parallels Desktop 13 предупреждает пользователя о подобных действиях, но, разумеется, у него должна быть возможность влиять на этот процесс для своего удобства. Пользователи могут указать время, в которое они не работают в Mac, для автоматического обслуживания Windows 10. В этом случае планировщик запрещает Windows-обновления в любое другое время, когда пользователю надо работать, чтобы не занимать процессорное время и не снижать производительность. Это касается не только установки обновлений, но и их загрузки, которая тоже может влиять на производительность, особенно на сетевую. Каждый 10-й пользователь Parallels Desktop 13 использует возможность настройки планового обслуживания системы. Не отставайте и вы!
Совет #6. Настраиваем PD13 для игр. Parallels Desktop можно настроить так, чтобы гостевая Windows показывала в играх максимальное быстродействие. Процессоры относительно свежих Маков имеют по нескольку ядер. Если вы собираетесь поиграть в виртуальной машине, вам нужно переключить все имеющиеся ядра на поддержку гостевой ОС. Сделать это можно в меню Центр управления → Параметры → Оптимизировать полноэкранный режим для игр.
Совет #7. Активируйте «Режим поездки». Если вам в ближайшее время придется работать от батареи вашего Макбука, рекомендуем активировать «Режим поездки». В этом случае Windows будет работать в энергосберегающем режиме. Кстати, если вам кажется, что наличие виртуальной машины автоматически значительно влияет на заряд батареи, то это не так. Опытным путем установлено, что при обычном времени работы Макбука в 5 часов 9 минут, с запущенной виртуальной машиной в Parallels Desktop он продолжает работать 5 часов ровно.
Для того, чтобы постоянно не заходить в Центр управления, вы можете активировать «Режим поездки» щелкнув правой клавишей мыши на значок Parallels Desktop в Dock.
Источник
Parallel desktops mac os не работает интернет
Parallels Desktop 15 for Mac is fully compatible with macOS 10.15 Catalina and supports new macOS features. Older Parallels Desktop versions only partially support working on macOS Catalina due to technical reasons may experience the issues below depending on the configuration.
Note: Subscribe to this article by clicking «Get Updates» above to receive updates on the issues.
Known issues
| Issue | Workaround | |
|---|---|---|
| macOS Big Sur as a host operating system | ||
| 16 | Suspended virtual machine not resuming after updating to Parallels Desktop 16. | Fixed in 16.1.0 (Download) |
| 17 | “Unable to pause “virtual machine name”.” message appearing while deleting a snapshot. | Fixed in 16.1.0 (Download) |
| 18 | The CPU menu in the virtual machine configuration showing only two menu items. | Fixed in 16.1.0 (Download) |
| 19 | Multiple virtual machine icons in the Dock. | Fixed in 16.1.0 (Download) |
| macOS Big Sur as a virtual machine | ||
| On Macs with the macOS version other than Big Sur, screen resolution of a newly created Big Sur virtual machine is set to 1024×768 | Fixed in 16.1.0 (Download) | |
| 7 | A macOS virtual machine showing a black screen after upgrading it to macOS Big Sur. | Fixed in 16.1.0 (Download) |
| 8 | Virtual machine apps showing a black window upgrading an existing macOS virtual machine to Big Sur. | Click the Actions menu in the macOS menu bar and select Reinstall Parallels Tools. Once the installation is finished, restart the virtual machine |
Sidecar onscreen keyboard only prints ‘aaaaaa’ in virtual machines
Open VM configuration > Hardware > Sound & Camera > disable Camera sharing and change Microphone option to Disabled.
Enable Full Disk Access for Parallels Desktop.app in System Preferences > Security and Privacy
Workaround: Either relocate VM to
/Parallels/ folder or enable Full Disk Access for Parallels Desktop in System Preferences > Security and Privacy
| Issue | Current Status | |
|---|---|---|
| macOS Catalina as a host operating system | ||
| 1 | Windows Applications folder in the Dock is broken. | Fixed in 15.0.0 (Download) |
| 2 | Cannot open Windows applications’ menus with Apple Pencil tap (Sidecar). | Fixed in 15.1.0 (Download) |
| 3 | Fixed in 15.1.0 (Download) | |
| 4 | Low-resolution icons on a virtual machine’s status bar. | Fixed in 15.1.0 (Download) |
| 5 | Virtual machine crashes if it’s set to ‘Always ready in the background’ with enabled Camera and Microphone. | |
| 6 | Parallels Desktop UI performance and font issues. | Fixed in 15.1.0 (Download) |
| 7 | “Share” with Mac services in Windows doesn’t work. | Fixed in 15.1.0 (Download) |
| 8 | Cannot open files from Windows with Mac system applications (e.g. with Preview, TextEdit, Photos, Music, etc.). | Fixed in 15.1.0 (Download) |
| 9 | Mac crashes if VM is set to start when the Mac starts. | Fixed in 15.1.0 (Download) Note: Full Disk Access for Parallels Desktop.app in System Preferences > Security and Privacy should be enabled |
| 10 | Cannot open VM if it’s set to ‘Always ready in the background’. | Fixed in 15.1.0 (Download) Note: Full Disk Access for Parallels Desktop.app in System Preferences > Security and Privacy should be enabled |
| 11 | Parallels Desktop does not display alert type notifications. | Fixed in 15.1.0 (Download) |
| 12 | Frame rate is always locked to 60 fps. | Fixed in 15.1.0 (Download) |
| 13 | macOS Trash is not merged with Windows Recycle Bin. | |
| 14 | Parallels Desktop preferences show the ‘Install’ button for Parallels Access and Parallels Toolbox even though they are installed. | Fixed in 15.1.0 (Download) |
| 15 | Previews of Windows applications windows in Coherence are not shown in Control Center. | Fixed in 15.0.0 (Download) |
| 16 | Parallels Desktop user interface can be half-light and half-dark when macOS Appearance is set to Auto | Fixed in 15.1.0 (Download) |
| 17 | Unable to use VM located in Desktop, Documents or Downloads. | |
| 18 | Parallels Mounter does not mount VM and crashes | Fixed in 15.1.1 (Download) |
| macOS Catalina as a virtual machine | ||
| 19 | The upgrade process to macOS Catalina in a virtual machine hangs. | Reset virtual machine using Actions > Reset menu. |
| 20 | Unable to install macOS from Mac Recovery partition. Error: “Unable to create a disk image from recovery.” | Fixed in 15.1.0 (Download) |
| 21 | Parallels Tools try to reinstall every time after suspending/resuming the virtual machine prompting to enter the password. | Fixed in 15.1.0 (Download) |
New macOS Catalina features support
The following macOS Catalina features are supported in Parallels Desktop 15 for Mac:
Issues fixed in macOS Catalina
Fixed in macOS Catalina Beta 7
After upgrading to Beta 7 go to virtual machine configuration Hardware > Mouse & Keyboard, then switch Mouse option to Auto-detect for games/Don’t optimize for games.
| Issue | Current Status |
|---|---|
| «Unable to start Parallels Services» error message appears upon Parallels Desktop start. | Fixed in macOS Catalina Beta 10 |
| Cannot access Documents/Desktop shared folders in a VM if they are synchronized with iCloud Drive. | Fixed in macOS Catalina Beta 7 |
| Cannot move applications windows around the Desktop in the macOS Catalina virtual machine. | |
| Parallels Desktop Business Edition: Autoactivation from the invitation email is not working. | Fixed in macOS Catalina Beta (19A536g) |
| Adding Windows applications to Launchpad doesn’t work. | Fixed in macOS Catalina Beta 4 |
| Unable to connect a USB device to a virtual machine. | Fixed in macOS Catalina Beta 2 |
| Installation of Parallels Desktop hangs. | Fixed in macOS Catalina Beta 4 |
| Parallels Tools Installation Agent window remains on the screen after reaching 100%. | Fixed in macOS Catalina Beta 4 |
Была ли эта статья полезной?
Как, по вашему мнению, можно улучшить эту статью?
Источник
-
#1
I’m on Parallels 16.0.1 and since I have upgraded to Mac OS 11 Big Sur when I start my Windows 10 virtual machine I get this error message «Network initialization failed. Your virtual machine will continue working normally but will no have no network connection».
I tried the solution posted on some forums to use Terminal with this command line:
«sudo rm /Library/Preferences/SystemConfiguration/NetworkInterfaces.plist && sudo killall -9 configd» but to no avail and the problem still persists.
Anyone with some ideas? Does Parallels 16.1 solves this issue?
Many thanks for your help, support and ideas.
-
#3
Have you tried restarting your Mac after the sudo command, as suggested in the Parellels help https://kb.parallels.com/en/125039 ?
Sure, I’ve done exactly as requested, but no joy!
-
#4
I had the same issue. Do this AND disable internet sharing in system preferences. That made the trick for me.
-
#5
Same issue here
Using Parallels 16.0.1 and have just upgraded to Mac OS 11 Big Sur
Tried:
1) «sudo rm /Library/Preferences/SystemConfiguration/NetworkInterfaces.plist && sudo killall -9 configd» + Restart
Internet Sharing is disabled
Any ideas on how to solve or woraround this issue?
-
#6
Seems to be a known issue
This workaround works for me:
1) Quit Parallels (shutdown any running VM)
2) Open terminal and type this command
sudo -b /Applications/Parallels Desktop.app/Contents/MacOS/prl_client_app
-
#7
Seems to be a known issue
This workaround works for me:1) Quit Parallels (shutdown any running VM)
2) Open terminal and type this command
sudo -b /Applications/Parallels Desktop.app/Contents/MacOS/prl_client_app
This worked for me, thanks
-
#8
Seems to be a known issue
This workaround works for me:1) Quit Parallels (shutdown any running VM)
2) Open terminal and type this command
sudo -b /Applications/Parallels Desktop.app/Contents/MacOS/prl_client_app
Worked for me BUT lost integrity of home folders (desktop, downloads, etc). Reinstalled Parallels toolbox and revert to previous state, i.e everything works fine except network
-
#9
Parallels was unable to provide help on this, but I needed a workaround and here it is. I have only been able to reproduce this bug with bridged networking.
Parallels is reading the «Default» and «Ethernet» adapters incorrectly. I am close to figuring out the pattern, but even creating an «Ethernet 2» does not help. The workaround is to use the wi-fi adapter if «Ethernet» is your primary or «Ethernet» if wi-fi is your primary.
Steps to fix:
Assume: Connection to the Mac is wired and «Ethernet» is the Mac’s primary network.
Enable Wi-Fi and allow it to connect to your network. You will have 2 IP addresses, but as long as Wi-Fi is later than «Ethernet» in the «Set Service Order», you are all good.
For the network of the guest machine, choose «Wi-Fi». There is another tiny bug where you may have to select it twice if the machine is active. Make sure it was selected.
Bridged networking will now work, albeit over wi-fi. I intend to experiment with a second physical network adaptor, but for right now I just needed my virtual machines up and running.
-
#10
Wasnt that fixed in 16.1 version? Why you not updating it?
-
#11
Wasnt that fixed in 16.1 version? Why you not updating it?
On 16.1. Was not fixed.
-
#12
any news about this problem??
-
#13
I have the same issue, I tried the fixes mentioned in this thread but no hope. any solution?
-
#14
It is said that Parallel Desktop 16.1.0 has solved this problem.
-
#15
1) Quit Parallels (shutdown any running VM)
2) Open terminal and type this command
sudo -b /Applications/Parallels Desktop.app/Contents/MacOS/prl_client_app
that worked for me also! thanks!! running parallels 16.0.1 on big sur
-
#16
Check for Updates on your installation, I got Parallels 16.1.1 today.
-
#17
Updated to Parallels 16.1.1 did not work for me, still no network with Parallels 16.1.1 & Big Surr.
The suggested command from @dabiohazard only works for one time. I re-installt he virtual machine after the command line. Then, networks works, al seems fine, until I shutdown and re-open. The network issue will be back.
-
#18
Updated to Parallels 16.1.1 did not work for me, still no network with Parallels 16.1.1 & Big Surr.
The suggested command from @dabiohazard only works for one time. I re-installt he virtual machine after the command line. Then, networks works, al seems fine, until I shutdown and re-open. The network issue will be back.
It works just one time, but I created an «automator» app that send that command to the terminal, so I don’t have to open the terminal every time. Try, it could be a nice suggestion for you.
-
#19
It works just one time, but I created an «automator» app that send that command to the terminal, so I don’t have to open the terminal every time. Try, it could be a nice suggestion for you.
Good evening
Can you send the automators app please???? Tanks!!!!
-
#22
Hi, what about sharing files between mac and windows?
-
#23
this is what happens when I try to run the app!