- Sign up
- Sign in
- HP Community
- Printers
- Printer Paper Jams & Feed Issues
- Transfer belt error HP colour laser MFP179 fnw
Options
- Mark Topic as New
- Mark Topic as Read
- Float this Topic for Current User
- Bookmark
- Subscribe
- Mute
- Printer Friendly Page
![]()

Create an account on the HP Community to personalize your profile and ask a question
Your account also allows you to connect with HP support faster, access a personal dashboard to manage all of your devices in one place, view warranty information, case status and more.

09-06-2021
02:05 AM

HP Recommended
- Mark as New
- Bookmark
- Subscribe
- Permalink
- Flag Post
Product: ExampleHP Colour Laser MFP 179 fnw
Operating System: Microsoft Windows 10 (64-bit)
Tried to print on thick photo paper printer said paper jam realised paper as instructed but something did not go back in place. Paper will not pick up error message is “ transfer belt error
![]()
Be alert for scammers posting fake support phone numbers and/or email addresses on the community.
If you think you have received a fake HP Support message, please report it to us by clicking on «Flag Post».
† The opinions expressed above are the personal opinions of the authors, not of HP. By using this site, you accept the Terms of Use and Rules of Participation.

-
English
Open Menu

† The opinions expressed above are the personal opinions of the authors, not of HP. By using this site, you accept the <a href=»https://www8.hp.com/us/en/terms-of-use.html» class=»udrlinesmall»>Terms of Use</a> and <a href=»/t5/custom/page/page-id/hp.rulespage» class=»udrlinesmall»> Rules of Participation</a>.
- Sign up
- Sign in
- HP Community
- Printers
- Printer Paper Jams & Feed Issues
- Transfer belt error HP colour laser MFP179 fnw
Options
- Mark Topic as New
- Mark Topic as Read
- Float this Topic for Current User
- Bookmark
- Subscribe
- Mute
- Printer Friendly Page
![]()
Create an account on the HP Community to personalize your profile and ask a question
Your account also allows you to connect with HP support faster, access a personal dashboard to manage all of your devices in one place, view warranty information, case status and more.
09-06-2021
02:05 AM
HP Recommended
- Mark as New
- Bookmark
- Subscribe
- Permalink
- Flag Post
Product: ExampleHP Colour Laser MFP 179 fnw
Operating System: Microsoft Windows 10 (64-bit)
Tried to print on thick photo paper printer said paper jam realised paper as instructed but something did not go back in place. Paper will not pick up error message is “ transfer belt error
![]()
Be alert for scammers posting fake support phone numbers and/or email addresses on the community.
If you think you have received a fake HP Support message, please report it to us by clicking on «Flag Post».
† The opinions expressed above are the personal opinions of the authors, not of HP. By using this site, you accept the Terms of Use and Rules of Participation.
-
English
Open Menu

† The opinions expressed above are the personal opinions of the authors, not of HP. By using this site, you accept the <a href=»https://www8.hp.com/us/en/terms-of-use.html» class=»udrlinesmall»>Terms of Use</a> and <a href=»/t5/custom/page/page-id/hp.rulespage» class=»udrlinesmall»> Rules of Participation</a>.
This document is for HP Color Laser MFP 178nw, 178nwg, 179fnw, and 179fwg printers.
During printing, the printer stops feeding pages, the Status/Attention light  blinks and one of the following messages might display on the printer control panel or computer screen:
-
Paper Jam in exit area.
-
Paper Jam in tray.
-
Paper Jam inside machine.
-
Document jam. Remove jam.
Clear the printer of any jammed paper or reset the printer if the printer has no jammed paper.
note:
Paper jams can be real or false. The printer might report a paper jam even when there is no jammed paper. The following steps apply to both real and false paper jams.
Step 1: Look for jammed paper
Paper jams can occur in multiple areas of the printer. If you cannot find the paper jam in one area, continue to the instructions for the next area until you locate the jam.
Clear jammed paper from the exit area
Remove any loose or jammed paper that is accessible from the exit area.
-
Lift the scan unit.

-
Open the rear door.
-
Pinch the latch to release the transfer roller, and then lower the roller to access the inside of the printer.
-
Use both hands to remove any jammed paper or objects from the exit area.
-
Close the scan unit.
-
Raise the transfer roller until it snaps into its original position, and then close the rear door.
-
Reconnect the power cord to the wall outlet or power strip, and then turn on the printer.


If the error persists, check for jammed paper in another area of the printer.
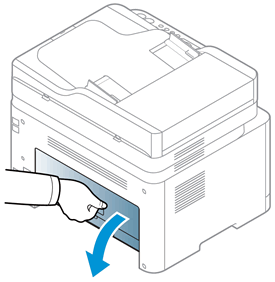
Clear jammed paper from the input tray
Remove any loose or jammed paper that is accessible from the input tray.
-
Pull out the input tray.
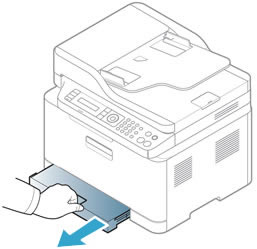
-
Use both hands to remove any jammed paper from the input tray.
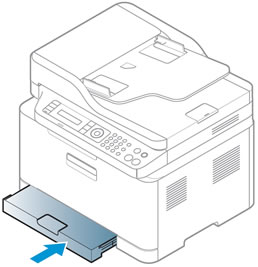
-
Push in the input tray.
-
Open the toner cartridge access door, and then close it to clear the error message.


If the error persists, check for jammed paper in another area of the printer.
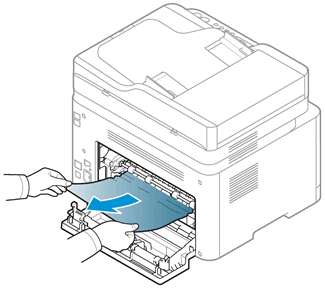
Clear jammed paper from inside the printer
Remove any loose or jammed paper that is accessible from inside the printer.
-
Turn off the printer, and then disconnect the power cord from the wall socket or power strip.
warning:You must disconnect the power cord before reaching inside the printer to avoid risk of injuries or electric shock.
-
Lift the scan unit.
-
Open the rear door.
-
Pinch the latch to release the transfer roller, and then lower the roller to access the inside of the printer.
-
Use both hands to remove any jammed paper or objects from inside the printer.
warning:The fuser is located above the rear door, and it is hot. Do not attempt to reach into the area above the rear door until the fuser is cool.
-
Raise the transfer roller until it snaps into its original position, and then close the rear door.
-
Close the scan unit.
-
Reconnect the power cord to the wall outlet or power strip, and then turn on the printer.
If the error persists, check for jammed paper in another area of the printer.
Clear jammed paper from the ADF (HP Color Laser MFP 179fnw, 179fwg printers)
Remove any loose or jammed paper that is accessible from the automatic document feeder (ADF).
-
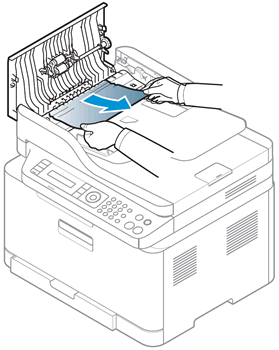
Open the document feeder cover.
-
Use both hands to remove any jammed paper from the ADF input tray area.
-
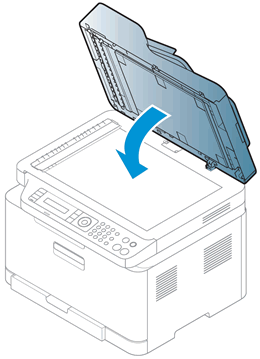
Close the document feeder cover.
-
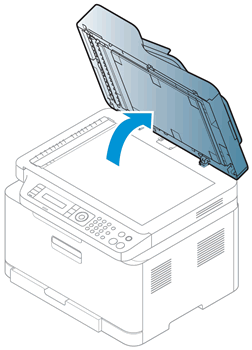
Raise the ADF input tray to access
to the document feeder output tray, and then use both hands to remove any
jammed paper from the ADF output tray area.
-
Lower the document feeder input tray, and then open the scanner lid.
-
Use both hands to gently pull out any jammed paper behind the white
plastic backing.
-
Close the scanner lid.
-
Reconnect the power cord to the wall outlet or power strip, and then turn on the printer.


If the error persists, check for jammed paper in another area of the printer.
If you have checked all areas of the printer, and the error persists, continue to the next step to reset the printer.
Step 2: Reset the printer
Sometimes a paper jam error persists even though there is no jammed paper (false paper jam).
-
With the printer turned on, disconnect the power cord from the printer.
-
Unplug the power cord from the power source.
-
Wait 60 seconds.
-
Reconnect the power cord to a wall outlet and to the printer.
note:
HP recommends plugging the printer directly into a wall outlet.
Step 3: Try to print, scan, or copy again
Send the print, scan, or copy job again to make sure the hardware functions correctly. If the problem persists, continue to the next step.
Step 4: Service the printer
Service or replace your HP product if the issue persists after completing all the preceding steps.
Go to Contact HP Customer Support to schedule a product repair or replacement. If you are in Asia Pacific, you will be directed to a local service center in your area.
To confirm your warranty status, go to HP Product Warranty Check. Repair fees might apply for out-of-warranty products.
 Принтеры и МФУ, построенные на базе цветного принтера CLP-300, оказались на редкость неудачными: не успеешь убрать одну ошибку, через неделю выскакивает другая ошибка. В данной заметке рассмотрим ряд ошибок, связанных с лентой переноса, и возможные способы их устранения.
Ошибки, связанные с лентой переноса (Transfer Unit/ ITB).
Ошибка «замените ленту переноса». Это даже не ошибка, а информационное сообщение о том, что ресурс ленты переноса подошел к концу и ее необходимо заменить.
Решение. Если у Вас МФУ, то для разблокировки аппарата достаточно воспользоваться этой ссылкой. Если у Вас принтер, то решение несколько иное: для разблокировки нужно на плате форматера прошивать микросхему памяти 24с64, но это тема отдельной статьи и в рамках этой заметки рассматривать не будем.
Ошибка «установите ленту переноса». Ошибка означает, что принтер физически не видит ленту переноса.
Решение. В данном случае проблему нужно искать в контактах на ленте переноса. Конструкция аппарата такова, что ряд контактов на ленту переноса идет транзитом через блок IU (JC96-03610F/JC96-03610A). Прежде всего, проверяем контакт с ленты переноса на высоковольтный блок. Если контакт стабильный, то далее проверяем транзитные контакты на блоке IU. При проверке контактов тестером, рекомендуем предварительно зачищать и обезжиривать контакты от окиси или нагара. В основном виноваты бывают просто окислившиеся контакты, реже встречаются случаи погнутых или выломанных контактов.
Ошибка «ошибка ленты переноса». Ошибка означает, что принтер не видит начальное положение ленты переноса.
Решение. Начальное положение ленты переноса принтер считывает с помощью оптического датчика. Причин, по которым датчик не считывает начальное положение ленты переноса, может быть несколько. Прежде всего, нужно начать с непосредственной чистки оптического датчика и проверки его работоспособности. Если с датчиком все в порядке, то далее проверяем контакты, идущие транзитом через блок IU (не забываем очищать и обезжиривать контакты ).
 Это все касается скрытых неисправностей. А бывает так (см.фото слева). В таких случаях клиенты всегда делают страшные глаза и говорят следующую фразу: «это все после вашей заправки!!!».В данном случае виноват твердый предмет, который затянуло в принтер вместе с бумагой (в офисе это, как правило, канцелярские принадлежности в виде скрепок, скоб и т.д.). В данном случае поможет только замена ленты переноса. Попытки отремонтировать ленту скотчем ни к чему хорошему не приведут, хотя бывали случаи, когда при незначительном надрыве полотна ленты переноса клиенты заклеивали ленту скотчем, и принтер продолжал печатать с небольшим дефектом на изображении.
Совместимость ленты переноса JC96-03611 для Samsung CLX-2160

 При замене ленты переноса столкнулись с тем, что оригинальной ленты переноса для CLX-2160 у поставщиков не оказалось, и было принято решение использовать ленту переноса от аналогичного аппарата Xerox Phaser 6110. Не смотря на то, что лента переноса имеет другой артикул, изготавливает ее все-таки компания Samsung.
 Приобретая ленту переноса, мы уже морально были готовы к тому, что блок придется немного дорабатывать, но корпорация Xerox не только не удосужилась изменить направляющие для несовместимости блока с принтерами Samsung , но и поленилась толком изменить этикетку на коробке. Кстати, в комплекте с Transfer Unit идет тестовый лист.
Замена ленты переноса достаточно дорогое удовольствие для клиента, как правило, в бюджетных госучреждениях сотрудники проводят ремонт принтера за свой счет. Удешевить ремонт ленты переноса можно путем перекидки непосредственно полотна с ленты переноса от цветных принтеров, вышедших из строя по другим причинам. Для ремонта ленты переноса подойдут полотна со следующих принтеров: Samsung clp-310, clp-320, CLX-3170, CLX-3175, CLX3180, CLX3185.

![]() Загрузка…
Загрузка…