При запуске игр мы часто сталкиваемся с различными ошибками и сбоями, которые заставляют переключить нашу вовлеченность с игрового мира в процесс поиска способов их решения. Более того, некоторые из них не просто решить. В частности, к таким ошибкам при запуске Minecraft относится и «internal exception java.io.ioexception», которая препятствует подключению ПК к внешнему серверу игры.
Содержание
- 1 Простые решения
- 2 Варианты запуска
- 3 Отключение межсетевого экрана
- 4 Установка разрешений в брандмауэре Windows
- 5 Уменьшение глубины прорисовки
Простые решения
В общем она может появиться по ряду причин и некоторые из них можно исправить простыми способами. Поэтому прежде чем перейти к более продвинутым решениям выполните следующие шаги.
Во-первых, попробуйте исправить ошибку Java.Io.Ioexception обычным перезапуском Minecraft. В противном случае перезапустите компьютер и роутер. Также нужно проверить состояние внешнего сервера Minecraft. Если эти методы не сработали, перейдите к следующим шагам.
Варианты запуска
Ошибка внутреннего исключения «internal exception java.io.ioexception удаленный хост принудительно разорвал существующее подключение» в основном происходит из-за проблем с Java. Даже если игра работает, сбой может произойти из-за проблем этой среды выполнения. Иногда программа запуска использует старую версию java, хотя в системе установлен последний ее выпуск.
В этом случае нужно заставить загрузчик Minecraft использовать последнюю версию программной среды. Для этого нужно перейти в параметры запуска и в профиле переключить путь с устаревшей версии на новую.
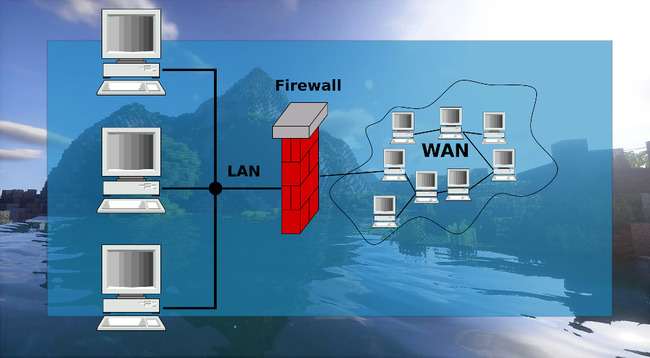
Отключение межсетевого экрана
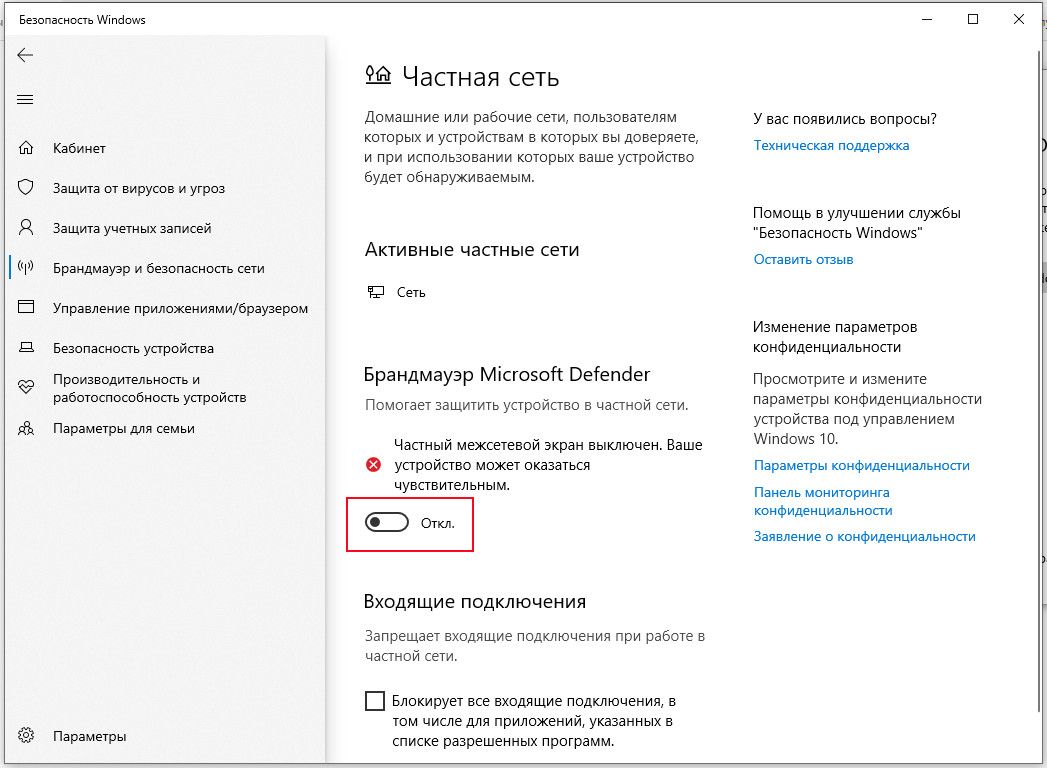
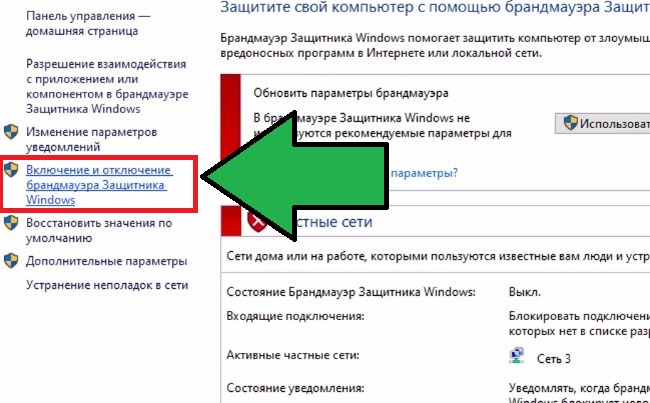
Межсетевые экраны, включая брандмауэр Windows, могут сбросить подключение с внешним сервером Minecraft на этапе запуска игры. Чтобы узнать, не причастен ли он к этому событию, попробуйте отключить эту функцию безопасности.
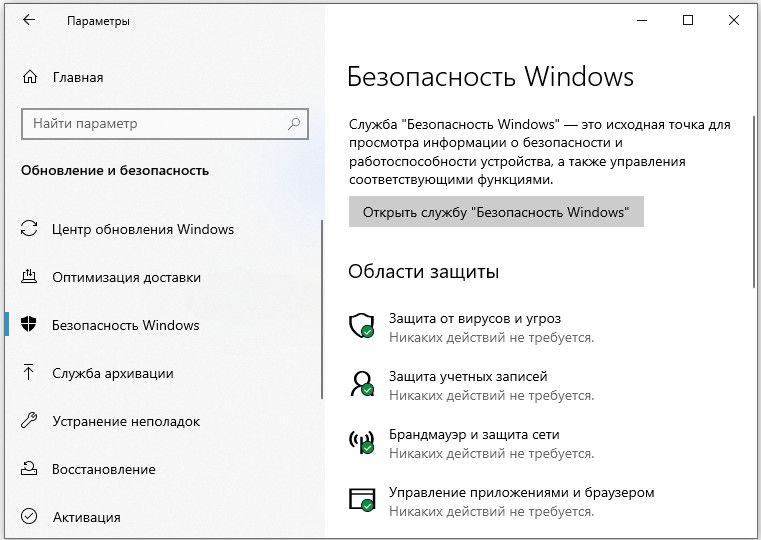
Откройте параметры Windows нажатием на Win + I и перейдите в раздел Обновление и безопасность. На вкладке Безопасность Windows выберите раздел Брандмауэр и защита сети.
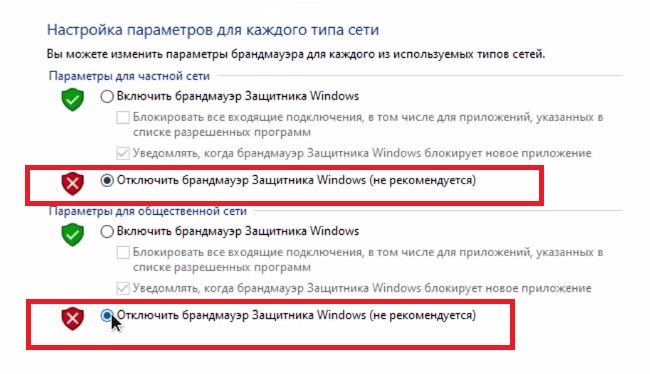
Для активной частной сети переместите переключатель в положение «Отключено». После этого попробуйте запустить игру.
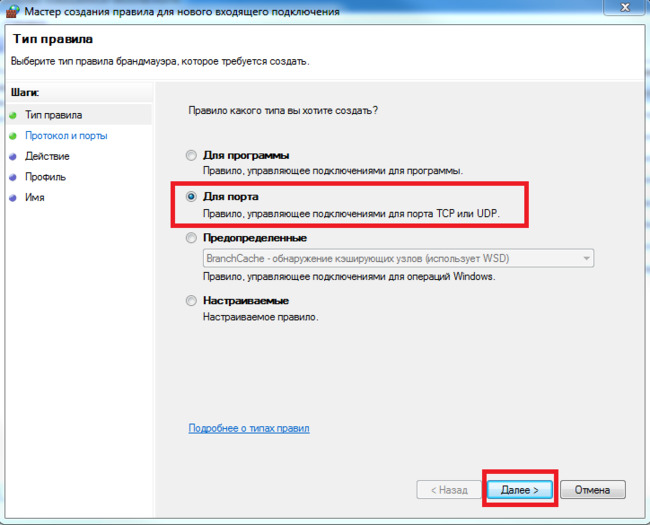
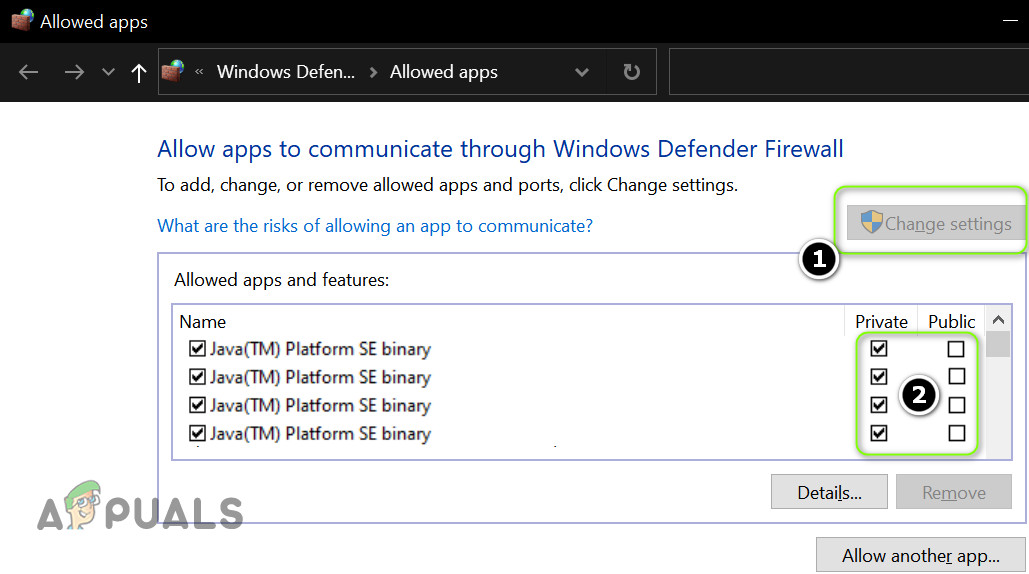
Установка разрешений в брандмауэре Windows
Если продолжаете сталкиваться с ошибкой внутреннего исключения java.io.ioexception, попробуйте добавить среду в список разрешений брандмауэра.
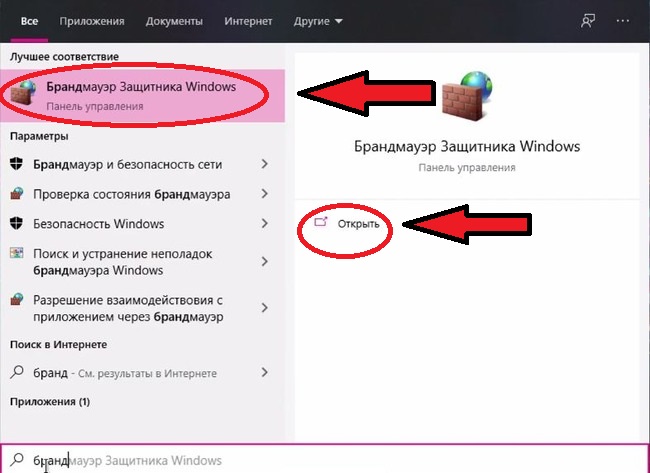
С помощью поискового запроса перейдите в брандмауэр. На панели слева перейдите на вкладку «Разрешение взаимодействия с приложением или компонентом в брандмауэре Windows». Затем щелкните на кнопку изменения параметров.

Найдите в списке файлы Java Platform SE и разрешите им доступ по частной сети.

После перезагрузки компьютера проблема должна быть решена.
Уменьшение глубины прорисовки
С ошибкой внутреннего исключения можно столкнуться, когда Minecraft не сможет отобразить всю картинку в целом из-за низкой скорости Интернета. В этом случае уменьшите глубину прорисовки в настройках до минимально допустимого.
В настройках Майнкрафт в разделе «Настройки графики» переместите ползунок прорисовки до минимального, например, до 2-х позиций.
Если ошибка исчезла, увеличьте этот показатель на единицу, пока не достигните оптимального значения.
Средство запуска Minecraft может отображать проблему «Internal Exception Java.IO.IOException», если установка Minecraft повреждена или устарела. Более того, поврежденный кеш DNS системы или неправильная конфигурация Java также могут вызвать проблему.
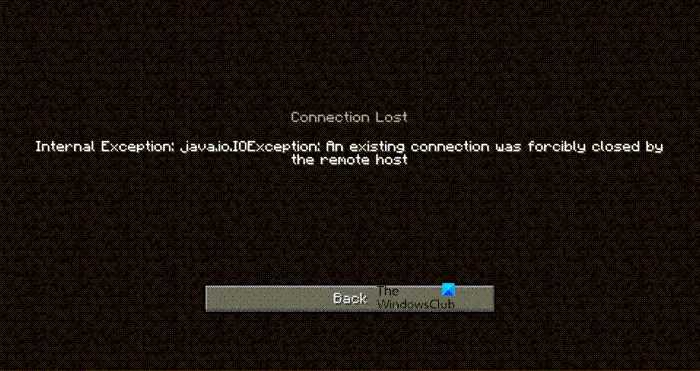
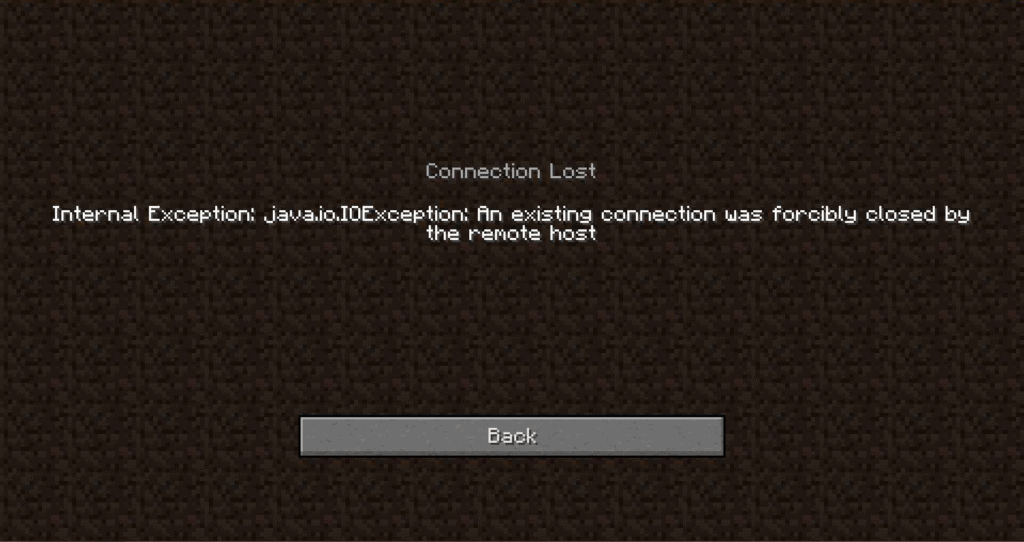
Проблема возникает, когда пользователь пытается присоединиться к серверу или подключиться к нему, но встречает следующее сообщение:
«Внутреннее исключение при потере соединения: java.io.IOException: существующее соединение было принудительно закрыто удаленным узлом»
Прежде чем приступить к решениям по остановке внутренних исключений в Java IO IOException, проверьте, решает ли проблему попытка использования другого сетевого кабеля (при использовании соединения Ethernet).
Если у вас длинное имя пользователя (7+ символов), проверьте, решает ли проблему сокращение его до (7 или меньше символов). Также проверьте, соответствует ли скорость вашего интернета требованиям Minecraft к минимальной скорости.
Кроме того, убедитесь, что выйти из / отключить в Minechat (если используется) , а затем закройте его. Кроме того, проверьте, решает ли проблему запуск программы запуска Minecraft (или сервера) от имени администратора.
Вы можете столкнуться с проблемой внутреннего исключения, если программа запуска Minecraft в вашей системе устарела, поскольку это может создать несовместимость между программой запуска и сервером.
В этом контексте обновление средства запуска Minecraft до последней версии может решить проблему. Но прежде чем двигаться дальше, проверьте, настроено ли у вас более одной учетной записи с пусковой установкой Minecraft, если да, то удалите все остальные учетные записи, кроме одной.
- Откройте панель запуска Minecraft и рядом с именем пользователя нажмите Параметры.
- Затем нажмите кнопку «Принудительное обновление» и примените обновление средства запуска.
- После обновления перезапустите средство запуска Minecraft и проверьте, не возникла ли в нем ошибка IOexception.
- Если нет, проверьте, решает ли проблему использование другого средства запуска.
Решение 2. Очистите кеш DNS вашей системы
Ошибка Java.io может возникнуть, если кеш DNS вашей системы поврежден, поскольку это может привести к тому, что система не сможет разрешить доменное имя. В этом контексте очистка кеша DNS (что заставит систему повторно выбирать комбинации) может решить проблему.
- Кликните Windows, введите: Командная строка и кликните правой кнопкой мыши результат командной строки. Затем выберите «Запуск от имени администратора».
- Теперь выполните следующее одно за другим:
ipconfig /flushdns

ipconfig /release

ipconfig /renew
- Затем выйдите из командной строки и проверьте, решена ли проблема исключения Java.
Если проблема не исчезнет, проверьте, решает ли изменение DNS-сервера (например, Google DNS ) проблему внутреннего исключения.
Решение 3. Отключите пакет ресурсов сервера
Пакеты ресурсов позволяют игрокам выполнять множество настроек (например, текстуры, музыку, модели, тесты на всплески и т. д.), Но эта настройка может препятствовать обмену данными между клиентом и сервером и, таким образом, вызвать проблему исключения ввода-вывода. В этом сценарии отключение пакета ресурсов сервера может решить проблему.
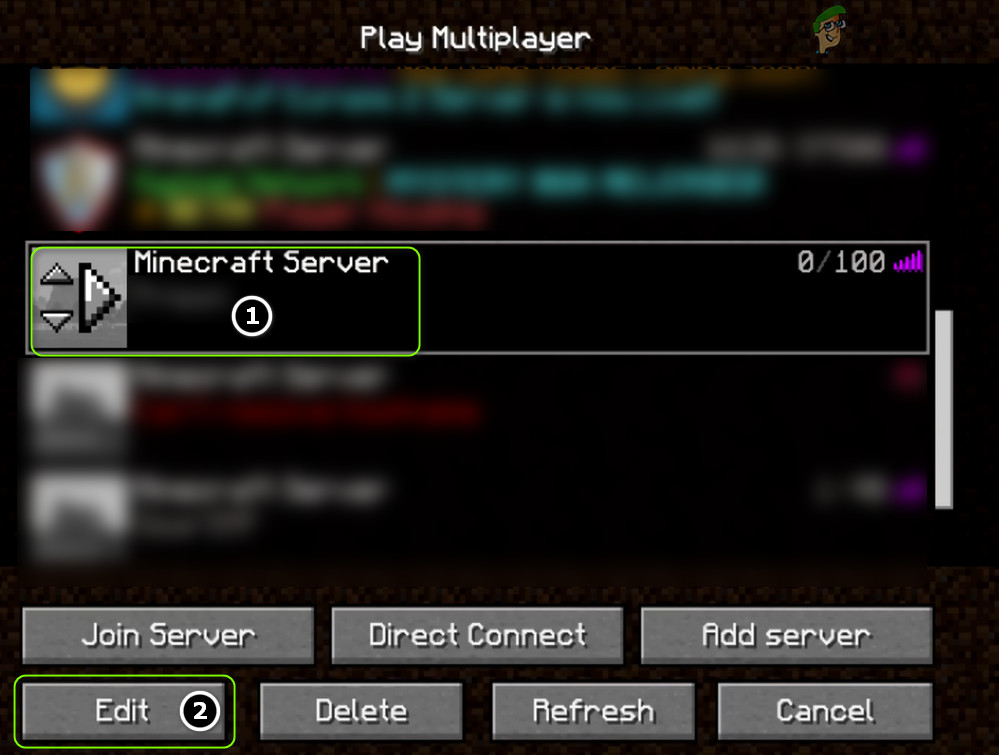
- Откройте программу запуска Minecraft и выберите «Многопользовательская игра».
- Затем выберите проблемный сервер и нажмите «Изменить».
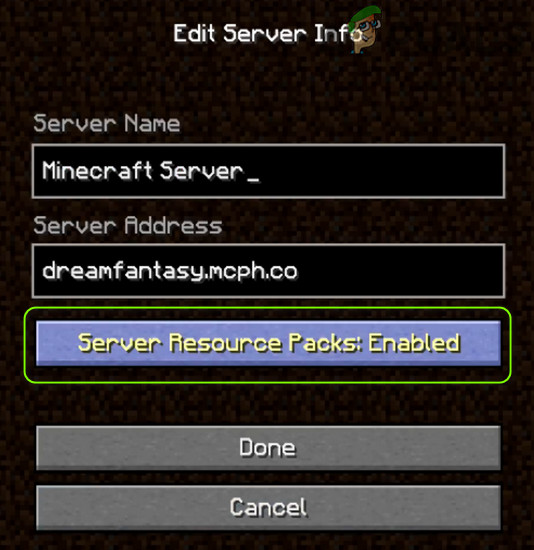
- Теперь нажмите Server Resource Packs, чтобы установить его в Disabled (если он включен), и нажмите Done.
- Затем проверьте, очищена ли программа запуска от проблемы Java.io.
Решение 4. Удалите конфликтующие приложения.
Вы можете столкнуться с проблемой Java.io, если приложение в вашей системе препятствует работе Minecraft. В этом случае удаление конфликтующего приложения может решить проблему.
Вы можете выполнить чистую загрузку своего ПК, чтобы определить проблемное приложение. Для иллюстрации мы обсудим процесс для Hamachi VPN (по сообщениям пользователей, вызывающий проблему).
- Кликните правой кнопкой мыши Windows и откройте «Приложения и компоненты».
- Теперь нажмите LogMeIn Hamachi, чтобы развернуть его, а затем нажмите Удалить.
- Затем следуйте инструкциям по удалению Hamachi и перезагрузите компьютер.
- После перезагрузки проверьте, решена ли проблема IOexception.
Решение 5.Уменьшите расстояние отрисовки в настройках Minecraft
Проблема с внутренним исключением может возникнуть, если Minecraft не может отобразить все видеоблоки сразу (из-за низкой скорости интернета). В этом контексте уменьшение расстояния рендеринга в настройках Minecraft до минимально возможного может решить проблему.
- Откройте Minecraft Launcher и откройте его Параметры (также будет хорошей идеей уменьшить Расстояние рендеринга в настройках сервера, если это возможно).
- Теперь выберите «Настройки видео» и сдвиньте расстояние рендеринга до минимально возможного (например, до 2).
- Затем проверьте, решена ли проблема с Java.io. Если да, то вы можете увеличить расстояние рендеринга на единицу, пока не достигнете желаемого расстояния рендеринга.
Решение 6. Измените настройки Java.
Ошибка Java.io может возникнуть, если установка Java в вашей системе настроена неправильно. В этом контексте изменение настроек Java (например, включение собственной песочницы) может решить проблему. Но прежде чем продолжить, убедитесь, что у вас только одна установка Java.
Обновите Java до последней сборки
- Кликните Windows, введите: Configure Java и затем откройте его.
- Теперь перейдите на вкладку «Обновить» и нажмите кнопку «Обновить сейчас».
- Если доступно обновление, примените обновление Java и проверьте, решена ли проблема с внутренним исключением.
Включить собственную песочницу
- Кликните Windows, введите: Configure Java & open it.
- Теперь перейдите на вкладку «Дополнительно» и установите флажок «Включить ограниченную среду операционной системы (собственная песочница)».
- Затем примените изменения и перезагрузите компьютер.
- После перезагрузки проверьте, решена ли проблема Minecraft IOexception.
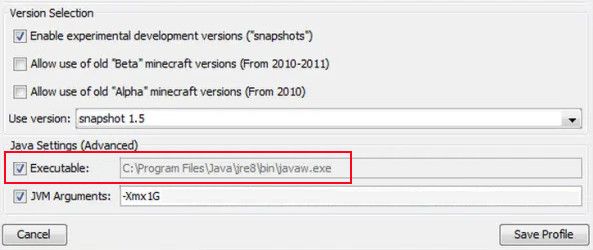
Отредактируйте путь к Java в настройках программы запуска
- Кликните правой кнопкой мыши Windows и откройте «Выполнить».
- Теперь перейдите по следующему пути:
Program Files (x86)
- Затем откройте папку Java и перейдите к последней версии установки Java (например, папке jre1.8.0_291).
- Теперь откройте папку Bin и скопируйте адрес из адресной строки.
- Затем откройте программу запуска Minecraft и выберите «Редактировать профиль».
- Теперь в разделе «Настройки Java» («Дополнительно») установите флажок «Исполняемый файл».
- Затем вставьте адрес (скопированный на шаге 4) в Bin, так что путь должен быть примерно таким:
C:Program Files (x86)Javajre1.8.0_291binjavaw.exe
- Теперь примените свои изменения и проверьте, решена ли проблема с внутренним исключением.
Если проблема не исчезнет, проверьте , решает ли переустановка Java проблему исключения ввода-вывода.
Решение 7. Ремонт / переустановка Minecraft
Проблема с Java.io может возникнуть, если установка Minecraft повреждена. В этом контексте его ремонт или переустановка могут решить проблему.
- Кликните Windows, введите: Панель управления и запустите.
- Теперь откройте Удаление программы и выберите Minecraft.
- Затем нажмите «Восстановить» и следуйте инструкциям по ремонту Minecraft.
- Теперь перезагрузите компьютер и проверьте, решена ли проблема IOexception.
- Если нет, удалите Minecraft и Java (обязательно сделайте резервную копию самого необходимого).
- Теперь перезагрузите компьютер и после перезагрузки кликните правой кнопкой мыши Windows и выберите «Выполнить».
- Затем перейдите по следующему пути (скопируйте и вставьте адрес):
AppData
- Теперь откройте каждый каталог (Local, LocalLow и Roaming) один за другим и удалите в них папки Minecraft.
- Затем загрузите последние версии Java и Minecraft.
- Затем установите Java от имени администратора и перезагрузите компьютер.
- После перезагрузки установите Minecraft от имени администратора и проверьте, решена ли проблема с внутренним исключением.
Решение 8. Измените параметры, связанные с сетью
Minecraft может отображать проблему внутреннего исключения, если сетевые настройки вашей системы не настроены должным образом (или ваш интернет-провайдер блокирует доступ к ресурсу, необходимому для работы Minecraft). В этом случае изменение настроек сети (или попытка использования другой сети / VPN) может решить проблему.
Попробуйте другую сеть или VPN
- Отключите вашу систему от текущей сети и подключитесь к другой сети, например, к точке доступа вашего телефона, чтобы проверить, решена ли проблема IOexception. Вы также можете проверить с помощью VPN. Кроме того, это будет идея хорошо переключаться между с Wi-Fi и локальных сетей связи.
- Если проблема не исчезнет, подключите систему к Интернету напрямую без маршрутизатора, чтобы исключить, не вызывает ли проблема его конфигурация.
Отключите ускорение NAT в настройках роутера.
- Запустите браузер и перейдите на страницу управления маршрутизатором.
- Теперь выберите LAN (на левой панели) и отключите аппаратное ускорение на вкладке Switch Control. Если аппаратное ускорение (функция фирменного маршрутизатора Asus) не отображается, ищите его с другими названиями, такими как CTF (сквозная пересылка) и FA (ускоритель потока).
- Затем примените свои изменения и проверьте, решена ли проблема с внутренним исключением.
Решение 9. Отредактируйте настройки брандмауэра
Вы можете столкнуться с проблемой внутреннего исключения, если брандмауэр вашей системы блокирует доступ к ресурсу, необходимому для работы Minecraft. В этом контексте изменение настроек брандмауэра (например, разрешение Java ™ Platform SE Binary в настройках брандмауэра) может решить проблему.
Прежде чем продолжить, рекомендуется проверить, решает ли проблему временное отключение брандмауэра вашей системы. Для иллюстрации мы рассмотрим процесс для брандмауэра Защитника Windows.
Предупреждение : продвигайтесь вперед на свой страх и риск, поскольку редактирование настроек брандмауэра — это умелая задача, и в случае неправильного выполнения вы можете подвергнуть свою систему / данные угрозам.
Установите Java (TM) Platform SE на Private в настройках брандмауэра
- Кликните Windows, введите: Разрешить приложению через брандмауэр Windows и откройте его.
- Теперь нажмите «Изменить настройки» и в списке приложений найдите Java (TM) Platform SE Binary. Если нет, то нажмите на Разрешить другой App & бычка в директорию установки Явы (обычно, каталог Java в Program Files и Program Files (X86) папки) и двойным щелчком по javaw.exe.
- Затем снимите отметку с опции Public и отметьте опцию Private для всех двоичных процессов Java (TM) Platform SE.
- Теперь выберите Java (TM) Platform SE Binary и нажмите Details.
- Затем откройте «Тип сети» и установите флажок «Частная».
- Теперь примените ваши изменения и перезагрузите компьютер.
- После перезагрузки проверьте, решена ли проблема IOexception.
Разрешить Minecraft через брандмауэр
- Кликните Windows, введите: Брандмауэр и откройте брандмауэр Защитника Windows.
- Теперь убедитесь, что правила для входящего и исходящего трафика, связанные с Minecraft, не установлены для блокировки подключения.
- Затем выберите «Правила для входящих подключений» и нажмите «Новое правило».
- Теперь выберите «Программа» и нажмите «Далее».
Выберите программу в окне нового правила - Затем нажмите «Обзор» и перейдите в каталог установки Minecraft.
- Теперь дважды кликните на Minecraft.exe и выберите Разрешить подключение.
- Затем нажмите «Далее» и выберите все три профиля (т. Е. «Общедоступный», «Частный» и «Доменный»).
- Теперь назовите правило и нажмите Готово.
- Затем повторите то же самое для правила исходящего трафика и перезагрузите компьютер.
- После перезагрузки проверьте, решена ли проблема Java.io.
Если проблема не устранена , проверьте, разрешает ли подключение Minecraft через брандмауэр маршрутизатора (если есть) проблему (особенно, если он использует некоторую функцию автоблокировки).
Если это не помогло, проверьте , не ограничивает ли родительский контроль доступ Minecraft. Кроме того, будет хорошей идеей убедиться, что порты правильно перенаправлены в брандмауэре системы / маршрутизатора в соответствии с требованиями Minecraft.
Если проблема не исчезнет, проверьте, решает ли проблему выделение для Minecraft дополнительной оперативной памяти . Если это не помогло, вы можете связаться с администраторами сервера, чтобы удалить данные вашего игрока или проверить наличие проблем на стороне сервера.
Если проблема до сих пор не решена, возможно, вам придется выполнить сброс настроек вашего компьютера до заводских настроек, и если это не помогло, проверьте свою систему (особенно жесткий диск и сетевую / Wi-Fi карту) на наличие аппаратной ошибки.
Содержание
- Как исправить ошибку «java.io.ioexception» в Minecraft?
- Простые решения
- Варианты запуска
- Отключение межсетевого экрана
- Установка разрешений в брандмауэре Windows
- Уменьшение глубины прорисовки
- Удалённый хост принудительно разорвал существующее подключение Майнкрафт как исправить?
- Способ исправить проблему подключения к хосту Minecraft
- Что делать, если удаленный хост разорвал существующее подключение
- Каким образом принудительно отключить брандмауэр
- Настройка Hamachi для игры в Майнкрафт через удаленный хост
- Обновление ядра Minecraft, чтобы исправить разрыв подключения
- Рассказываем, как обновить ядро:
- Видео-инструкция
- Fix Internal Exception Java.IO.IOException Minecraft problem
- Fix An existing connection was forcibly closed by the remote host error in Minecraft
- Fix Internal Exception Java.IO.IOException Minecraft problem
- 1] Restart your PC
- 2] Update Minecraft
- 3] Ask Admin to restart the server
- 4] Flush DNS and Renew IP
- 5] Disable Server’s Resource Pack
- 6] Troubleshoot in Clean Boot
- 7] Check your Internet Connection
- 8] Fix Java
- What kind of error is Internal Exception Java IO IOexception?
Как исправить ошибку «java.io.ioexception» в Minecraft?
При запуске игр мы часто сталкиваемся с различными ошибками и сбоями, которые заставляют переключить нашу вовлеченность с игрового мира в процесс поиска способов их решения. Более того, некоторые из них не просто решить. В частности, к таким ошибкам при запуске Minecraft относится и « internal exception java.io.ioexception», которая препятствует подключению ПК к внешнему серверу игры.
Простые решения
В общем она может появиться по ряду причин и некоторые из них можно исправить простыми способами. Поэтому прежде чем перейти к более продвинутым решениям выполните следующие шаги.
Во-первых, попробуйте исправить ошибку Java.Io.Ioexception обычным перезапуском Minecraft. В противном случае перезапустите компьютер и роутер. Также нужно проверить состояние внешнего сервера Minecraft. Если эти методы не сработали, перейдите к следующим шагам.
Варианты запуска
Ошибка внутреннего исключения «internal exception java.io.ioexception удаленный хост принудительно разорвал существующее подключение» в основном происходит из-за проблем с Java. Даже если игра работает, сбой может произойти из-за проблем этой среды выполнения. Иногда программа запуска использует старую версию java, хотя в системе установлен последний ее выпуск.
В этом случае нужно заставить загрузчик Minecraft использовать последнюю версию программной среды. Для этого нужно перейти в параметры запуска и в профиле переключить путь с устаревшей версии на новую.
Отключение межсетевого экрана
Межсетевые экраны, включая брандмауэр Windows, могут сбросить подключение с внешним сервером Minecraft на этапе запуска игры. Чтобы узнать, не причастен ли он к этому событию, попробуйте отключить эту функцию безопасности.
Откройте параметры Windows нажатием на Win + I и перейдите в раздел Обновление и безопасность. На вкладке Безопасность Windows выберите раздел Брандмауэр и защита сети.
Для активной частной сети переместите переключатель в положение «Отключено». После этого попробуйте запустить игру.
Установка разрешений в брандмауэре Windows
Если продолжаете сталкиваться с ошибкой внутреннего исключения java.io.ioexception, попробуйте добавить среду в список разрешений брандмауэра.
С помощью поискового запроса перейдите в брандмауэр. На панели слева перейдите на вкладку «Разрешение взаимодействия с приложением или компонентом в брандмауэре Windows». Затем щелкните на кнопку изменения параметров.
Найдите в списке файлы Java Platform SE и разрешите им доступ по частной сети.
После перезагрузки компьютера проблема должна быть решена.
Уменьшение глубины прорисовки
С ошибкой внутреннего исключения можно столкнуться, когда Minecraft не сможет отобразить всю картинку в целом из-за низкой скорости Интернета. В этом случае уменьшите глубину прорисовки в настройках до минимально допустимого.
В настройках Майнкрафт в разделе «Настройки графики» переместите ползунок прорисовки до минимального, например, до 2-х позиций.
Если ошибка исчезла, увеличьте этот показатель на единицу, пока не достигните оптимального значения.
Источник
Удалённый хост принудительно разорвал существующее подключение Майнкрафт как исправить?
Игра Minecraft не теряет своей популярности уже более 10 лет. Поэтому очень часто пользователям приходится сталкиваться со схожими проблемами и ошибками. В этой статье мы объясним, каким образом исправить проблему, если удалённый хост принудительно разорвал ваше существующее подключение во время игры в Майнкрафт. Ниже вы найдете подробные инструкции по улаживанию ситуации.
Способ исправить проблему подключения к хосту Minecraft
Огромная популярность Minecraft сделала своего создателя Маркуса Перссона миллиардером. Получать доходы от Майнкрафта он начал еще до того, как он продал права на игру корпорации Microsoft в 2014 году.
Одним из способов заработка был платный хостинг серверов. Он осуществляется по подписке на сервис Realms . В настоящий момент существует несколько тарифов, рассчитанных на разное количество игроков.

Так как компания сама хостит сервера для вашей сессии, она берет на себя обязательство помогать игрокам со всеми возникающими проблемами. Если вы пользуетесь платным сервисом, то просто напишите в поддержку по адресу https://help.minecraft.net/hc/en-us. Подписаться на Realms Plus можно на официальном сайте игры https://www.minecraft.net/ru-ru/realms-plus.
Если упали сервера Майнкрафт, то их вскоре восстановят. В этом случае вам не потребуется совершать лишние манипуляции.
Что делать, если удаленный хост разорвал существующее подключение
Многие пользователи заходят в Майнкрафт через Хамачи, подключаются по LAN или Wi-Fi . Соединение в этом случае может работать нестабильно. Однако с первого раза безошибочно установить источник неполадок не получится. Вам придется попробовать разные методы по устранению неполадки «Удалённый хост принудительно разорвал существующее подключение».
Перечислим самые распространенные методы, способные исправить в Minecraft проблему с удаленным хостом, который принудительно разорвал существующее подключение.
Итак, что следует делать в сложившейся ситуации:
- Перезапустите роутер.
- Перезагрузите компьютер.
- Убедитесь, установлена ли на вашем компьютере последняя версия Java. Если вы припозднились с апдейтом, обновите ее. Для этого проверьте разрядность операционной системы и скачайте с официального сайта нужный файл.
- Проверьте наличие обновлений для ОС.
- Через специальную программу поищите апдейты для драйверов и установите себе последние версии для них.
- Используйте другую точку подключения.
- Снизьте потребление ОЗУ с 1200 на 900.
- Попробуйте установить соединение через другого провайдера.
- Смените лаунчер.
- Откройте порты.
Если ничего не помогает, напишите на форум игры или в техническую поддержку провайдера. Возможно, наблюдаются проблемы с вашим интернет-соединением. В некоторых случаях проблема через некоторое время улаживается сама собой. Ничего делать не потребуется. Достаточно будет просто немного подождать.
Каким образом принудительно отключить брандмауэр
Файрвол Windows фильтрует поступающий трафик, позволяя безопасно пользоваться мировой паутиной. Однако такая защита может снижать производительность ПК, тормозить скорость интернета и ошибочно срабатывать там, где никакой угрозы не наблюдается. Иногда это мешает пользователям в онлайн-играх вроде Майнкрафта.
Чтобы справиться с этой проблемой, отключите брандмауэр Защитника Windows, если удаленный хост принудительно разрывает ваше существующее подключение к игре.
- Нажмите на кнопку « Пуск ».
- Пропишите в поиске «брандмауэр».
Кликните курсором на появившуюся опцию.
На расположенной по левую сторону панели найдите пункт « Включение ».
Помните, что без брандмауэра компьютер уязвим к DDoS-атакам, взломам через бэкдоры и удаленный рабочий стол. Файрвол отслеживает движение трафика и мешает злоумышленникам обманывать вашу систему с помощью метода переадресации пакетов. Также брандмауэр пресечет соединение с фишинговыми сайтами, которые воруют данные от чужих банковских карт или социальных сетей.
Настройка Hamachi для игры в Майнкрафт через удаленный хост
Хамачи представляет собой ПО для построения VPN-сетей. Клиент Hamachi используется игроками в Майнкрафт для организации совместных онлайн-сессий. Чтобы вы могли хостить сервер без ошибок, эта программа нуждается в дополнительной настройке.
Рассмотрим, как отключить сжатие и шифрование в « Параметрах » Hamachi:
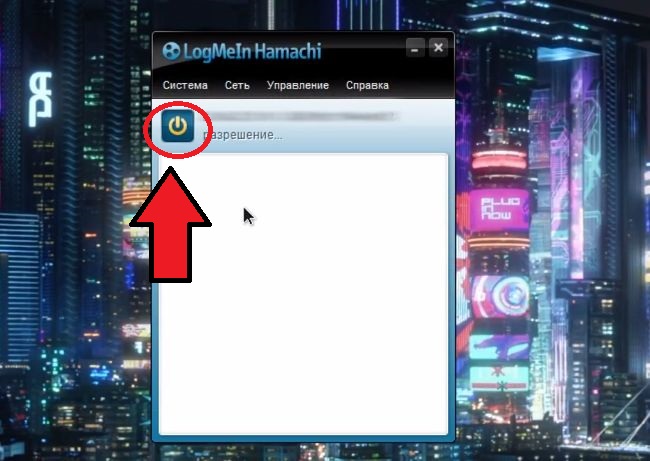
- Запустите файл с программой.
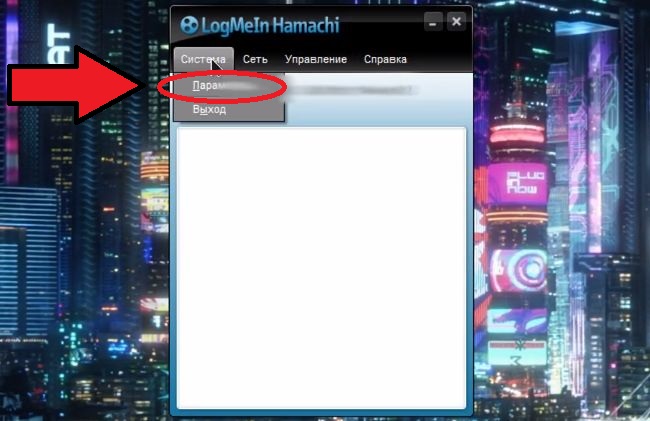
- Обратите внимание на левый верхний угол окна. Нажмите на название вкладки « Система ».
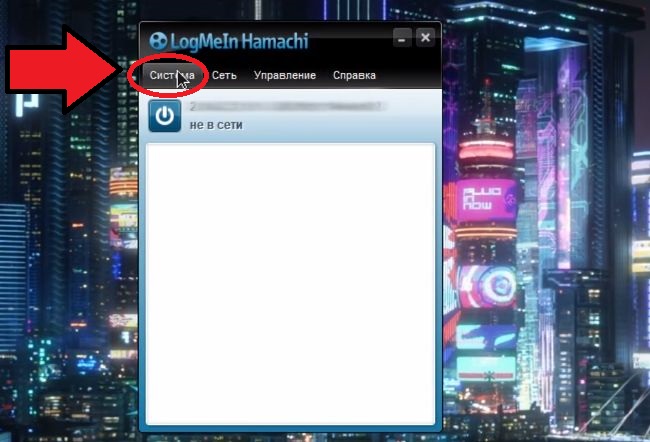
Выберите пункт « Параметры ».
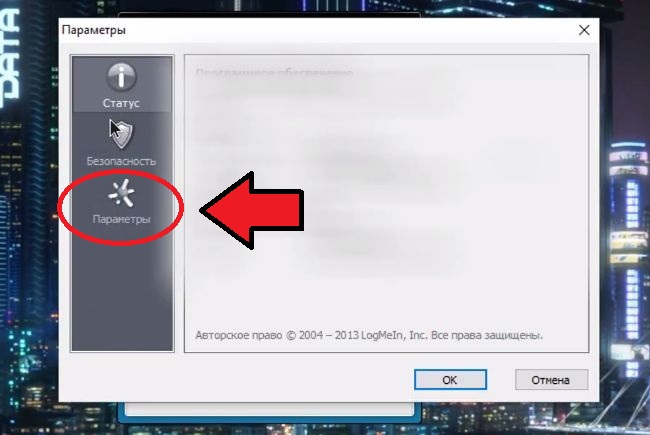
В новом окне с левой стороны экрана найдите строчку с аналогичным названием и нажмите на нее.
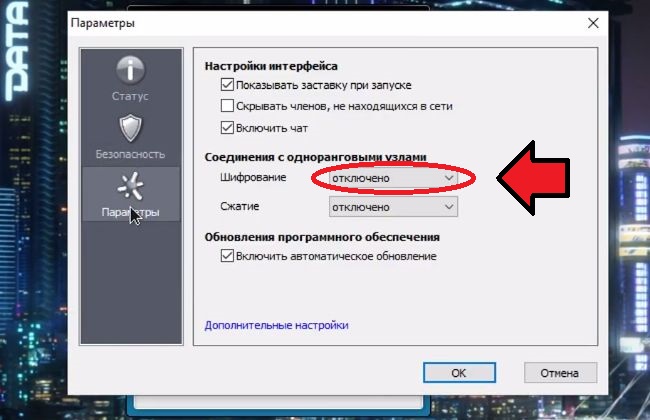
Напротив опции « Шифрование » выберите пункт « Отключено ».
Перейдите к следующей строке « Сжатие ». Здесь тоже поставьте параметр « Отключено ».
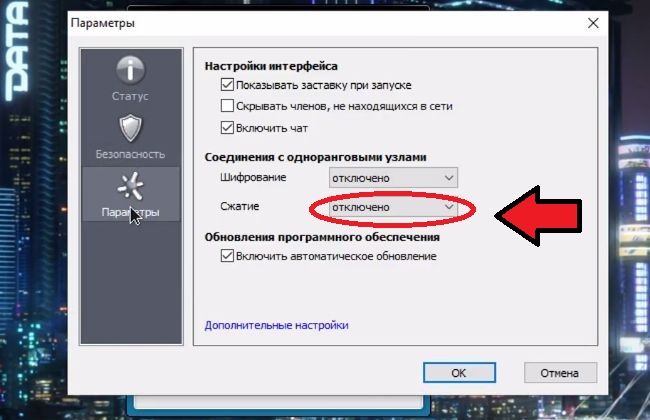
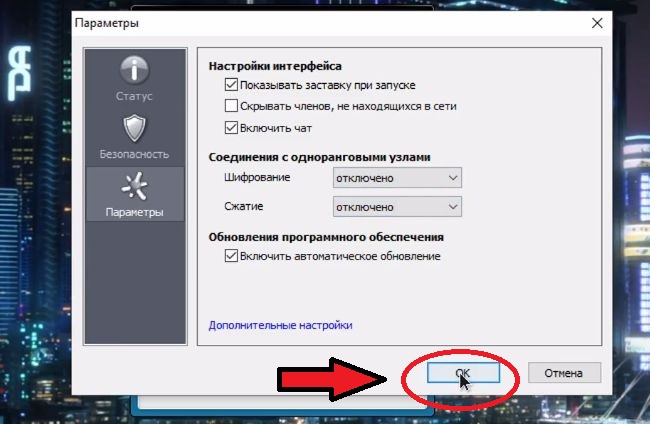
Перезапустите активную сессию, кликнув на большую клавишу « Вкл ».
Все игроки обязательно должны были установить одну и ту же версию клиента Hamachi. Если это не так, то могут начаться проблемы. Если у вас стоит клиент с модами, то он должен быть инсталлирован и у всех остальных игроков. Это должно помочь исправить проблему, когда удалённый хостинг принудительно разрывает ваше существующее подключение к игре Майнкрафт.
Обновление ядра Minecraft, чтобы исправить разрыв подключения
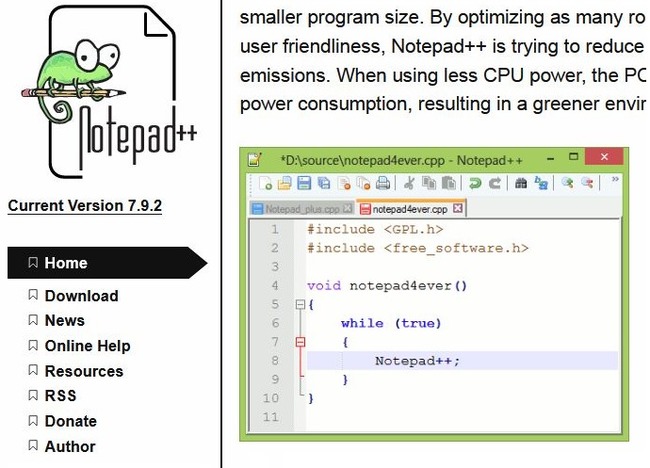
Вам может понадобиться программа Notepad++ для того, чтобы отредактировать файлы сервера. Ее можно скачать на сайте notepad-plus-plus.org. С её помощью можно сохранять документы формата UTF-8 без символов BOM .
Рассказываем, как обновить ядро:
- Приостановите работу сервера.
- Сделайте бэкап, скопировав файлы и папки игры в отдельный каталог на компьютере. Это поможет сделать откат к предыдущей версии. Если возникнут проблемы, то так вы точно не потеряете все файлы сразу.
- Поставьте самые актуальные версии плагинов, поддерживающих нужное обновление Майнкрафт.
- Удалите ядро. Это может быть spigot.yml или файл с иным названием. Сотрите заодно все документы с аналогичной конфигурацией, расположенные в том же каталоге. Оставьте файлы для запуска, так как они не имеют привязки к определенным ядрам.
- Сотрите каталоги с мирами.
- Скачайте нужную версию Майнкрафта. К примеру, с онлайн-ресурса getbukkit.org/download/spigot. Переместите его в директорию, где лежала предыдущая версия.
- Измените имя ядра на такое название, которое вы изначально могли увидеть на исполняемом файле. Например, на server.yml или spigot.yml .
- Начните инсталляцию через исполняемый файл – например, start.bat . Если ваш документ называется start.sh , вы можете сделать это через программу WinSCP . Используйте консоль виртуального сервера. Поищите в файле запуска такие же строки, какие приведены чуть ниже на приложенной иллюстрации. Вместо spigot.jar следует подставить такое наименование ядра, которое было прежде установлено у вас на компьютере.

Найдите в папке файл eula.txt . Откройте его. Найдите внутри этого документа строку eula=false . Поменяйте значение на true.

Если вы столкнетесь с ошибками вроде [Server thread/ERROR] , избавьтесь от них. Причина неполадок будет указана в документе latest.log . Можно также просто избавиться от плагина, из-за которого появляются неполадки. Далее просто заходите на сервер и приступайте к игре.
Видео-инструкция
В видео будет подробно рассмотрено, каким образом исправить ошибку, когда удалённый хост принудительно разорвал существующее подключение в игре Майнкрафт.
Источник
Fix Internal Exception Java.IO.IOException Minecraft problem
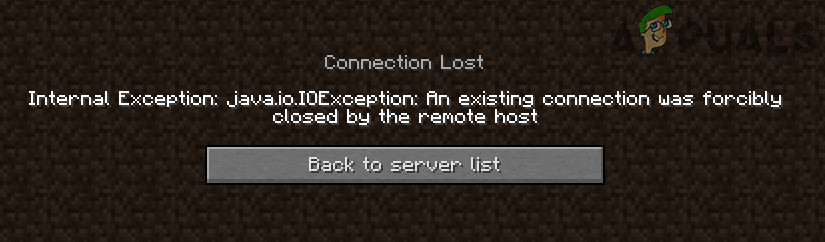
Some Minecraft users see an error message saying Connection Lost, Internal Exception: java.io.IOException, An existing connection was forcibly closed by the remote host, as a result of which they cannot launch or play the game. the following error while trying to launch the game. And because of this, they are not able to play the game.
In this article, we are going to see how to resolve this issue with some simple and easy-to-execute solutions. So, if you are experiencing Internal Exception Java.IO.IOException Minecraft problem then this guide is for you.
Fix An existing connection was forcibly closed by the remote host error in Minecraft
Minecraft Internal Exception error is usually a bug or a glitch that can easily be fixed with some solutions. It can also be caused by a poor Internet Connection. If you are using a Mobile Hotspot or some other mode of connection with slow Internet, then the chances are you are not going to connect to the server. If the issue is because of a bug then the only way to fix it is if the Minecraft developer releases a software update. If it’s a glitch, then you need to check the workarounds that we have mentioned after this to resolve the issue.
Fix Internal Exception Java.IO.IOException Minecraft problem
To fix Internal Exception: java.io.IOException, An existing connection was forcibly closed by the remote host Minecraft error, you need to follow the given solutions.
- Restart your PC
- Update Minecraft
- Ask Admin to restart the server
- Flush DNS and renew IP
- Disable Server’s Resource Pack
- Troubleshoot in Clean Boot
- Check your Internet Connection
- Fix Java
Let us talk about them in detail.
1] Restart your PC
Let us start with the most basic of the solutions. Restarting the PC has worked for a lot of users as it basically restarts all the services that were running earlier, and also turns off all the unnecessary processes. So, restart your PC and see if the issue persists.
2] Update Minecraft
Update Minecraft tends to kill two birds with one stone. It will not only get rid of the bug that could have been the cause of the problem but also at the same time, will make your client app match the version of the server that you are trying to connect to. Because you won’t be able to connect to the server if there is a disparity between the version of the app that you both are running.
To update Minecraft, you need to follow the given steps.
- Open Minecraft.
- Click on Options from the Login page.
- Then click Force update! > Apply.
Wait for the update to be installed and see if that can resolve the issue.
3] Ask Admin to restart the server
The issue can occur because of a glitch in the server. You should contact the server admin and ask them to restart the server. They are the only ones who have the right to restart it. So, do that and see if the issue persists.
4] Flush DNS and Renew IP
The issue can be because of corrupted DNS and IP addresses. The good news is, you can easily flush DNS and Renew IP and see if that can resolve the issue. To do that, open Command Prompt as an administrator from the Start Menu and execute the following commands.
Finally, restart your computer, reopen Minecraft and see if that can resolve the issue.
5] Disable Server’s Resource Pack
A lot of users tend to install Resource Pack in order to add some panache to your game. It allows you to texture, music, and other things to do the game. But sometimes, it can forbid you from connecting to the server. So, this error can be because of that very reason. That’s why we are going to disable Server’s Resource Pack and see if that helps.
- Launch Minecraft.
- Go to Multiplayer.
- Then navigate to Problematic Server and click Edit.
- Finally, click Server Resource Packs and Disable it.
Then check if the issue persists.
6] Troubleshoot in Clean Boot
Sometimes, another app can be the reason for your exasperation. However, we don’t need what that application is. Therefore, you should troubleshoot in Clean Boot and see which application is interfering with your program. Then you can decide what to do with it.
7] Check your Internet Connection
Talking about an issue that stops you from connecting to the server and not checking your Internet Connection would be a bit of a foolish decision. Pull out an Internet Speed Checker and see if you are getting adequate bandwidth. If not, check if all the devices connecting to the same network are experiencing similar bandwidth. In case, yours is the only device that’s having slow Internet then try fixing slow Internet.
8] Fix Java
As you may have noticed after seeing the error message, this issue has something to do with Java. So, try updating Java and see if that works. To do that, follow the given steps.
- Click Win + S, type “Configure Java” and click Ok.
- Go to the Update tab.
- Click Update now.
This way, your Java will be updated and see if the issue persists
What kind of error is Internal Exception Java IO IOexception?
The error signifies a problem with your internet connection, and the connection was lost. As a result of a network problem, your connection with the Minecraft server got disconnected.
Источник
Few things are as frustrating as running into error codes, especially when you have no idea what the problem might be.
What kind of error is: Internal Exception: java.io.ioexception
Simply put it is an internet connection error. Your computer is trying to establish a connection to the Minecraft server you have chosen and that connection gets interrupted while traveling between the server and your computer.
What is the solution to this error?
Let’s start solving this problem with some basic solutions that work for almost any error. Do not skip these unless you have already tried them, because these are the simplest solutions that take the least amount of time!
- Power cycle your Router, by unplugging it for a minute and then plugging it back in to start again.
- Restart your computer.
- Restart Minecraft.
Those are basic steps that will let us figure out if your problem is temporary, or comes from a larger issue that will need more troubleshooting. If these didn’t help it is time to try some of the more advanced steps.
Advanced Troubleshooting
If the basic steps above didn’t work for you, it’s probably time to look at more advanced solutions.
Uninstall and reinstall a fresh version of Minecraft
One of the biggest culprits with Minecraft issue is … Minecraft itself. Before you do anything too advanced to try and solve this problem, try to uninstall the game and reinstall it fresh. Do not reinstall any texture packs, mods, or Optifine yet. Try connecting to the server with the base game and see if it solves your problem.
Enabling the Java Native Sandbox
The Java Native Sandbox lets you start Java applications such as Minecraft in a restricted environment that might bypass whatever is causing the issue with your connection to the server. You can enable it with the following steps:
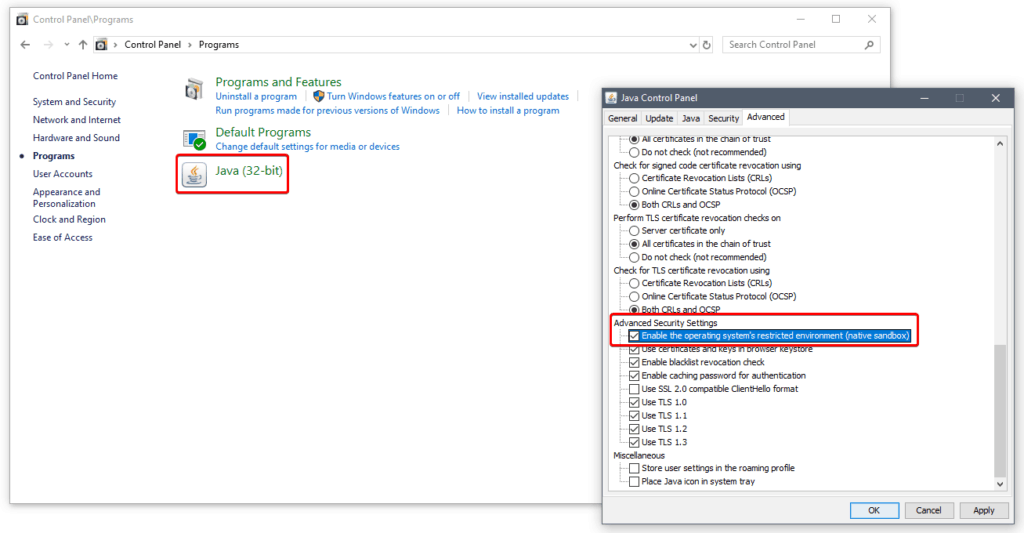
- Go to the search bar on the Windows Task Bar, usually at the bottom of your screen, and type in “Control Panel” and click on the entry that pops up.
- Find a section with a header “Programs” and click on that header.
- On the following screen you should see an icon for “Java”. Click on the header. We have marked the Java header and icon in red in the below graphic.
- You should now have a small pop up labeled “Java Control Panel”. In it switch to the “Advanced” tab and start scrolling down until you see a section labeled “Advanced Securrity Settings”. We have marked this section in red in the graphic above.
- Here you will find an option for “Enable the operating system’s restricted environment (native sandbox)”. Make sure it is checkmarked, then click “Apply” and then click “OK”.
- It is very important that you now restart your computer, so that the changes can take effect.
After restarting your computer, start up Minecraft again and see if the connection to the server now holds. If it doesn’t, feel free to disable the native sandbox again for the sake of not adding more parameters to the problem you’re trying to track down.
Changing the DNS on your router to the Google DNS servers
Your internet service provider might have temporary issues with its DNS server, preventing your computer from finding the server you are connecting to. You can find your DNS settings in your router/modem administration panel and it will usually be set automatically.
Almost all routers will allow you to switch DNS servers to the ones you specify manually, usually two of them. You should enter the following values:
- Primary DNS Server: 8.8.8.8
- Secondary DNS Server: 8.8.4.4
The new DNS server settings will connect to Google’s own servers whenever it is trying to connect to something from your computer, and this tends to be a lot more reliable over time than whatever your local internet service provider will give you. Even if this solution doesn’t work, it is probably a good thing for you to keep the new settings.
Conclusion
Hopefully this solution helped you fix the Internal Exception: java.io.ioexception error and let you get back to playing Minecraft. If not then you might want to take to the Minecraft Forum to find some more information.

The Minecraft launcher may show the ‘Internal Exception Java.IO.IOException’ issue if the Minecraft installation is corrupt or outdated. Moreover, the corrupt DNS cache of the system or improper configuration of Java may also cause the issue at hand.
The issue arises when the user tries to join or connect a server but encounters the following message:
“Connection Lost Internal Exception: java.io.IOException: An existing connection was forcibly closed by the remote host”
Before proceeding with the solutions to stop internal exceptions in Java IO IOException, check if trying another network cable (if using an ethernet connection) resolves the issue. If you have a long username (7+ characters), then check if reducing it to (7 or fewer characters) solves the issue. Also, check if your internet speed meets the minimum speed requirements of Minecraft. Moreover, make sure to log out/disconnect the Minechat (if using) and then close it. Additionally, check if launching the Minecraft launcher (or server) as an administrator resolves the issue.
Solution 1: Update the Minecraft Launcher to the Latest Build
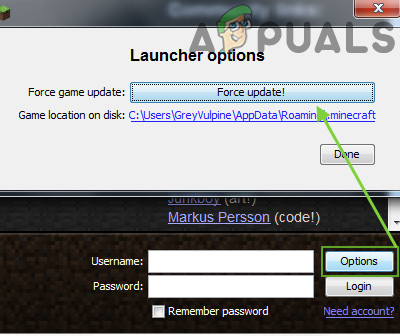
You may encounter the internal exception issue if the Minecraft launcher of your system is outdated as it can create incompatibility between the launcher & server. In this context, updating the Minecraft launcher to the latest release may solve the problem. But before moving on, check if you have more than one account configured with the Minecraft launcher, if so, then remove all the other accounts but one.
- Open the Minecraft launcher & near the username, click on the Options.
- Then click on the Force Update button & apply the launcher update.

Force Update the Minecraft Launcher - Once updated, relaunch the Minecraft launcher and check if it is clear of the IOexception error.
- If not, check if using another launcher resolves the issue.
Solution 2: Clear the DNS Cache of Your System
The Java.io error may emerge if the DNS cache of your system is corrupt as it may lead to the system’s ability to resolve the domain name. In this context, flushing the DNS cache (which will force the system to re-fetch the combinations) may solve the problem.
- Click Windows, type: Command Prompt, and right-click on the result of Command Prompt. Then choose Run as Administrator.

Open Command Prompt as Administrator - Now execute the following one by one:
ipconfig /flushdns

ipconfig /release

ipconfig /renew

Flush the DNS Cache - Then exit the Command Prompt and check if the Java exception issue is resolved.


If the issue persists, then check if changing DNS server (e.g., Google DNS) resolves the internal exception issue.
Solution 3: Disable Server’s Resource Pack
Resource packs allow the players to do a lot of customization (like textures, music, models, splash tests, etc.) but this customization may hinder the client/server communication and thus cause the IOexception issue. In this scenario, disabling the server’s resource pack may solve the problem.
- Open the Minecraft launcher and select Multiplayer.
- Then select the problematic server and click on Edit.

Edit the Minecraft Server Properties - Now click on Server Resource Packs to set it to Disabled (if enabled) and click on Done.

Disable Server Resource Packs in Minecraft - Then check if the launcher is clear of the Java.io issue.
Solution 4: Uninstall the Conflicting Applications
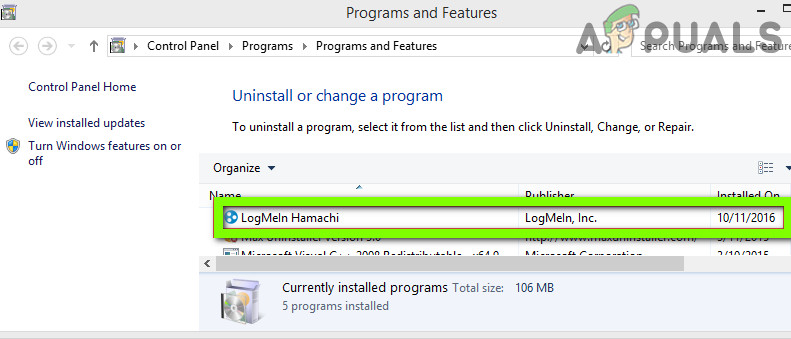
You may encounter the Java.io issue if an application on your system is hindering the operation of Minecraft. In this scenario, removing the conflicting application may solve the problem. You can clean boot your PC to find out the problematic application. For illustration, we will discuss the process for the Hamachi VPN (reported by the users to cause the issue).
- Right-click Windows & open Apps and Features.
- Now click on LogMeIn Hamachi to expand it & then click on Uninstall.

Uninstall Hamachi - Then follow the prompts to remove Hamachi & reboot your PC.
- Upon reboot, check if the IOexception issue is resolved.
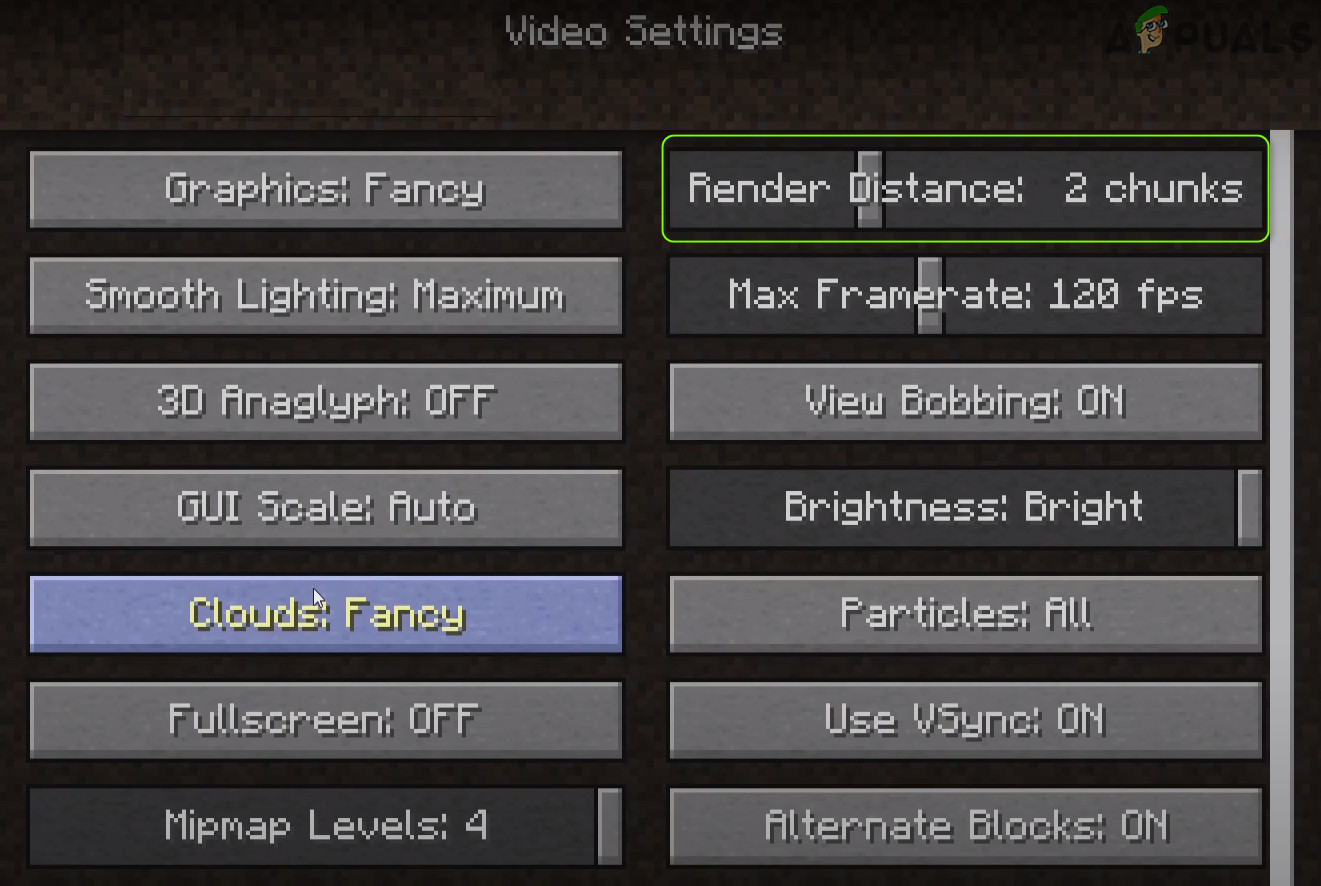
Solution 5: Decrease the Render Distance in the Minecraft Settings
The internal exception issue may arise if Minecraft could not render all the video blocks at once (due to the poor internet speed). In this context, decreasing the Render Distance in the Minecraft settings to the lowest possible may solve the problem.
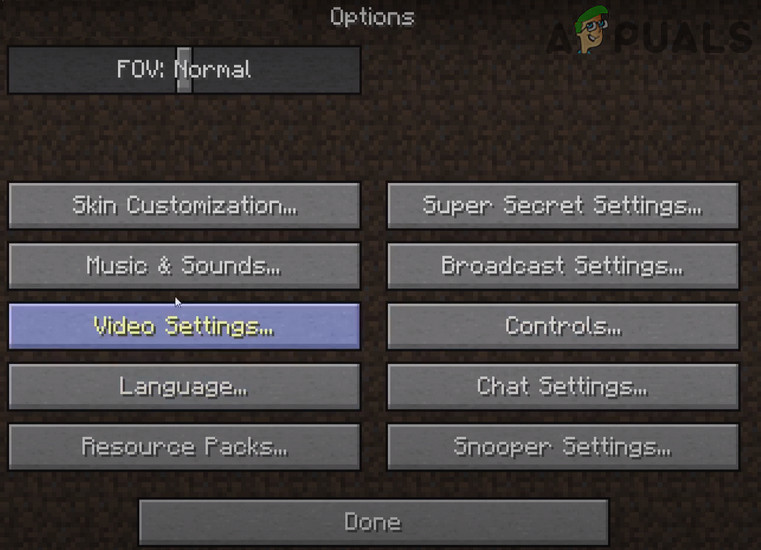
- Open the Minecraft Launcher & open its Options (it will be also a good idea to lower the Render Distance in the server settings, if possible).

Open the Minecraft Options - Now select Video Settings & slide the Render Distance to the lowest possible (e.g., to 2).

Open Video Settings of Minecraft - Then check if the Java.io issue is resolved. If so, then you may increase the Render Distance by one till you reach your desired Render Distance.

Set Render Distance to 2 Chunks in Minecraft

Solution 6: Edit the Java Settings
The Java.io error may arise if the Java installation of your system is not properly configured. In this context, editing the Java settings (like enabling the Native Sandbox) may solve the problem. But before proceeding, make sure you have only one Java installation.
Update Java to the Latest Build
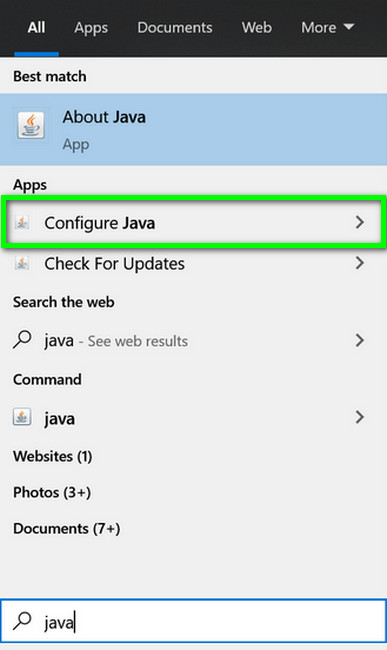
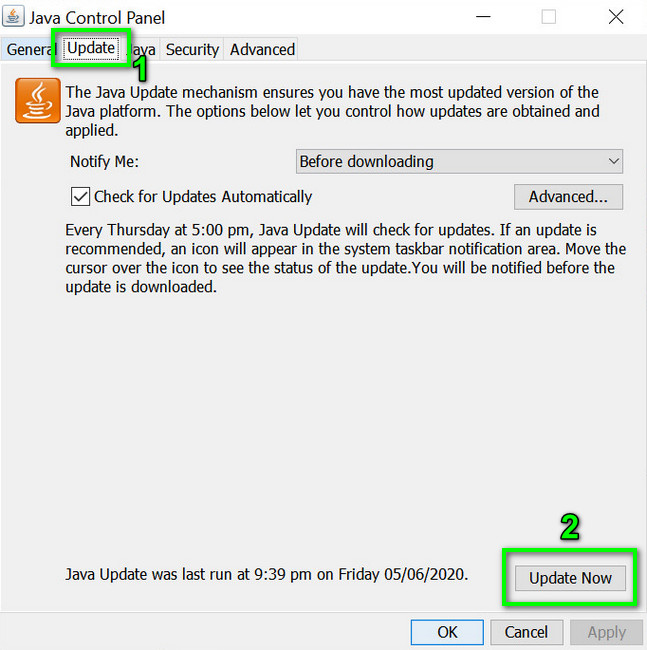
- Click Windows, type: Configure Java & then open it.

Open Configure Java - Now steer to the Update tab & click on the Update Now button.

Click Update Java in the Update Tab - If an update is available, apply the Java update & check if the internal exception issue is resolved.
Enable Native Sandbox
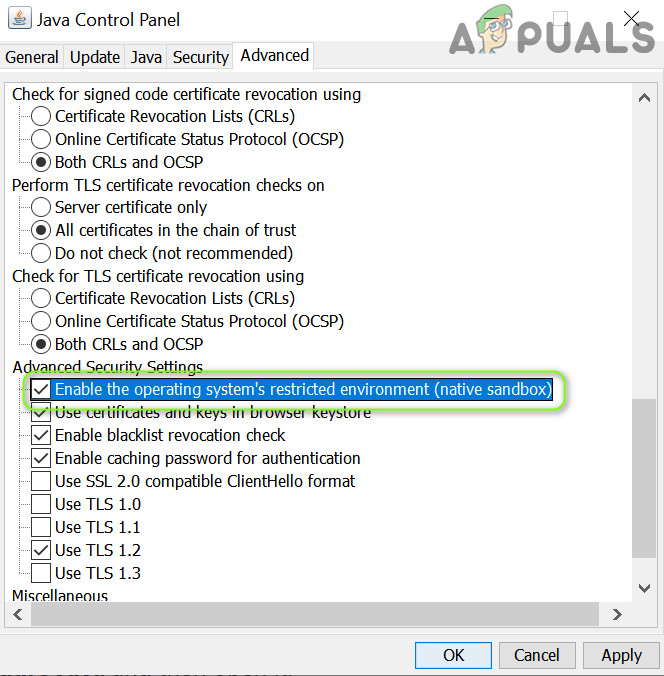
- Click Windows, type: Configure Java & open it.
- Now steer to the Advanced tab & checkmark Enable the Operating System’s Restricted Environment (Native Sandbox).

Enable the Operating System’s Restricted Environment (Native Sandbox) - Then apply your changes & reboot your PC.
- Upon reboot, check if the Minecraft IOexception issue is resolved.
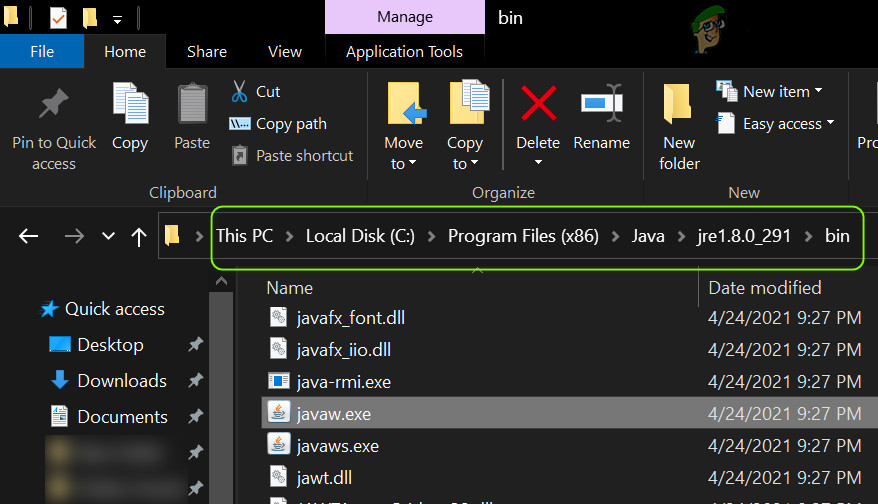
Edit the Java Path in the Launcher Settings
- Right-click Windows & open Run.
- Now navigate to the following path:
Program Files (x86)

Open Program Files (x86) From Run - Then open the Java folder & steer to the latest version of the Java installation (e.g., the jre1.8.0_291 folder).
- Now open the Bin folder & copy the address from the address bar.

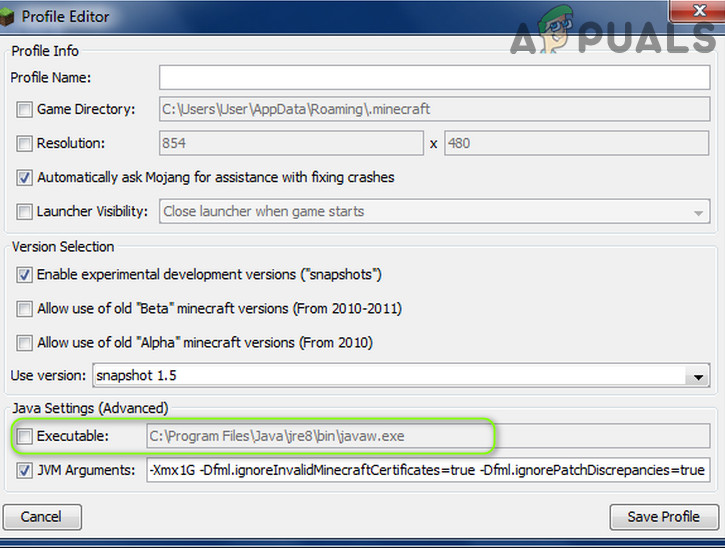
Copy the Java Path - Then open the Minecraft Launcher & select Edit Profile.
- Now, under Java Settings (Advanced), checkmark the option of Executable.
- Then paste the address (copied at step 4) up to Bin, so the path should be something like below:
C:Program Files (x86)Javajre1.8.0_291binjavaw.exe

Edit the Java Path in the Minecraft Profile Editor - Now apply your changes & check if the internal exception issue is resolved.

If the issue persists, then check if reinstalling Java sorts out the IOexception issue.
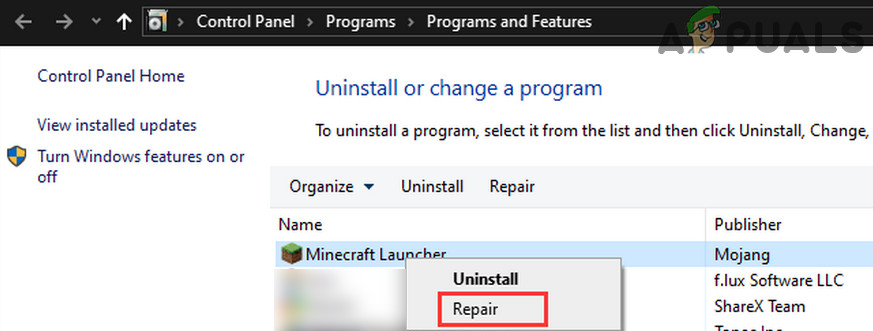
Solution 7: Repair / Reinstall the Minecraft
The Java.io issue may arise if the Minecraft installation is corrupt. In this context, repairing or reinstalling it may solve the problem.
- Click Windows, type: Control Panel, & launch it.

Open Control Panel - Now open Uninstall a Program & select Minecraft.

Repair the Minecraft Launcher - Then click on Repair & follow the prompts to repair Minecraft.
- Now reboot your PC & check if the IOexception issue is resolved.
- If not, uninstall Minecraft & Java (make sure to back up the essentials).
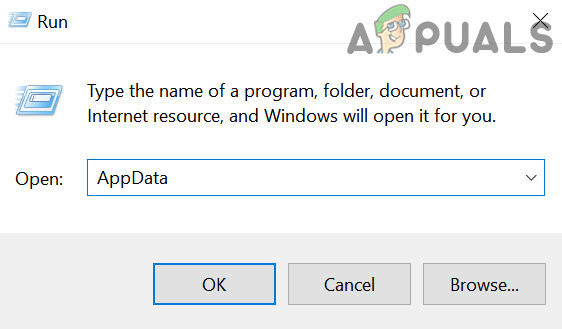
- Now reboot your PC & upon reboot, right-click Windows & select Run.
- Then navigate to the following path (copy-paste the address):
AppData

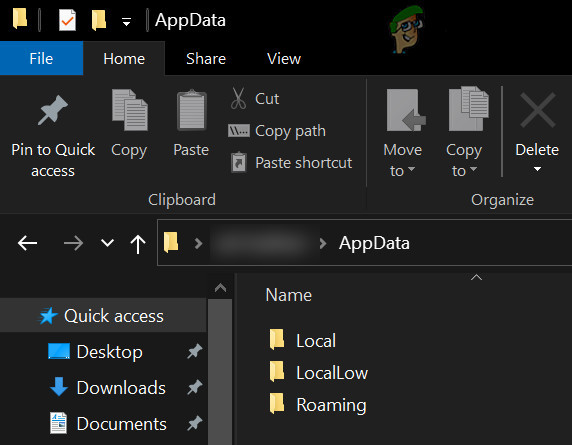
Open AppData Through the Run Box - Now open each directory (Local, LocalLow, & Roaming) one by one & delete the Minecraft folders in them.

Delete the Minecraft Directories in the AppData Folders - Then download the latest versions of Java & Minecraft.
- Then install Java as administrator & reboot your PC.
- Upon reboot, install Minecraft as administrator & check if the internal exception issue is resolved.
Solution 8: Edit the Network-Related Settings
Minecraft may show the internal exception issue if the network settings of your system are not properly configured (or your ISP is blocking access to a resource essential for the operation of Minecraft). In this case, editing the network settings (or trying another network/VPN) may solve the problem.
Try Another Network or a VPN
- Disconnect your system from the current network & connect to another network e.g., the hotspot of your phone to check if the IOexception issue is resolved. You can also check by using a VPN. Also, it will be a good idea to switch between the Wi-Fi and ethernet connection.
- If the issue persists, directly connect the system to the internet without the router to rule out if its configuration causing the issue.
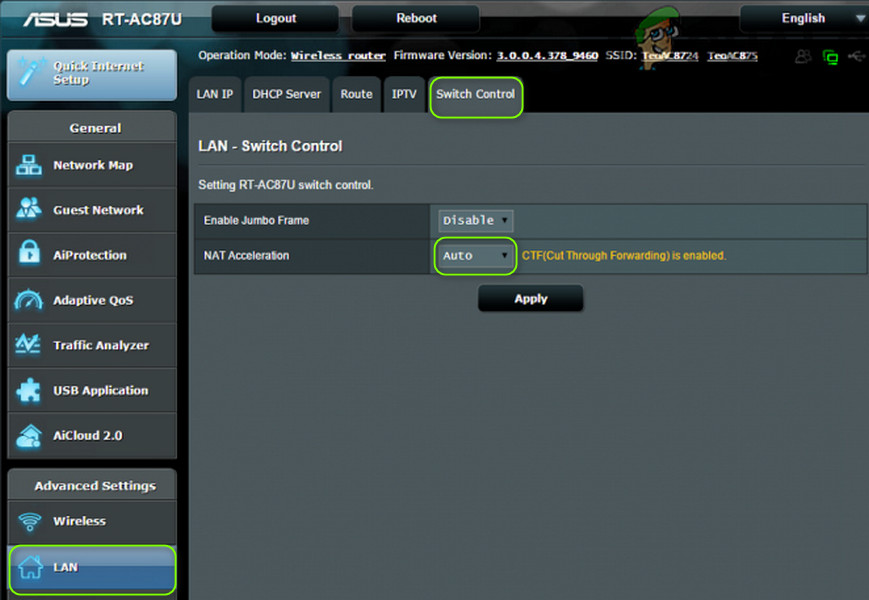
Disable NAT Acceleration in the Router’s Settings
- Launch a web browser & navigate to the Router’s control page.
- Now select LAN (in the left pane) & disable Hardware Acceleration in the Switch Control tab. If the Hardware Acceleration (the Asus branded router feature) is not shown, look for it with different names like CTF (Cut-Through Forwarding) & FA (Flow Accelerator).

Disable NAT Acceleration - Then apply your changes & check if the internal exception issue is resolved.
Solution 9: Edit the Firewall Settings
You may encounter the internal exception issue if the Firewall of your system is blocking access to a resource essential for the operation of Minecraft. In this context, editing the Firewall settings (like allowing Java (TM) Platform SE Binary in the Firewall settings) may solve the problem. Before proceeding, it will be a good idea to check if temporarily disabling the firewall of your system resolves the issue. For illustration, we will go through the process for the Windows Defender Firewall.
Warning: Advance at your own risk as editing the firewall’s settings is a skillful task & if done wrong, you may expose your system/data to threats.
Set Java (TM) Platform SE to Private in the Firewall Settings
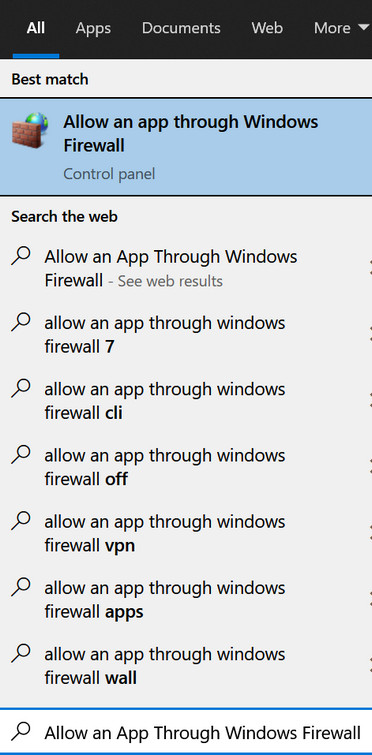
- Click Windows, type: Allow an App Through Windows Firewall, & open it.

Open Allow an App Through Windows Firewall - Now click on Change Settings & in the list of Apps, find Java (TM) Platform SE Binary. If it is not present, click on Allow Another App & steer to the installation directory of Java (usually, the Java directory of Program Files and Program Files (X86) folders) and double-click on Javaw.exe.

Set Java (TM) Platform SE Binary to Private - Then uncheck the option of Public and checkmark the option of Private for all the Java (TM) Platform SE Binary processes.
- Now select Java (TM) Platform SE Binary & click on Details.
- Then open Network Type and checkmark Private.
- Now apply your changes & reboot your PC.
- Upon reboot, check if the IOexception issue is resolved.
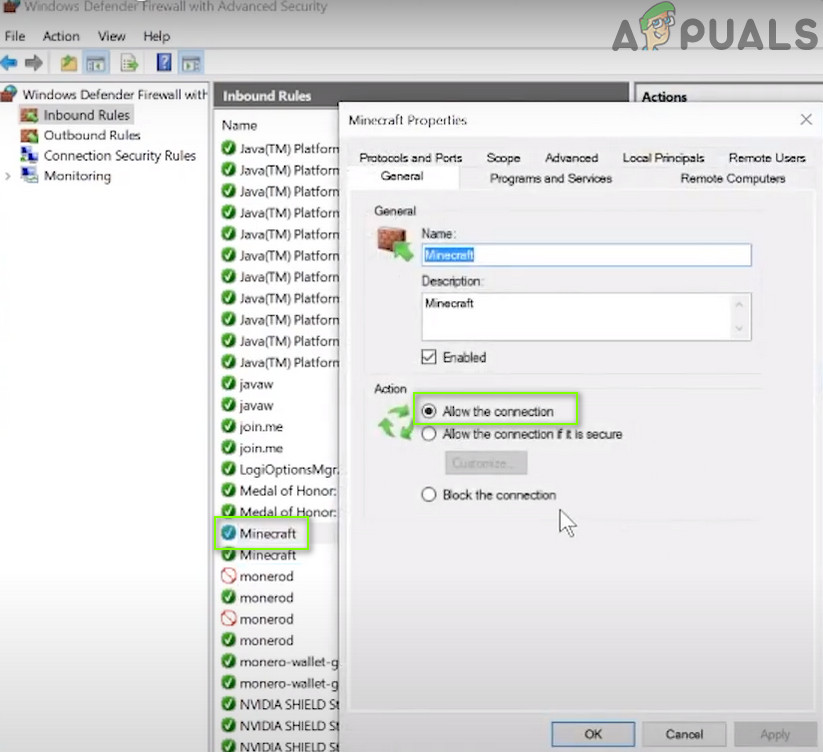
Allow the Minecraft Through the Firewall
- Click Windows, type: Firewall, & open Windows Defender Firewall.

Open Windows Defender Firewall - Now make sure no Inbound and Outbound rules related to Minecraft are set to Block the Connection.

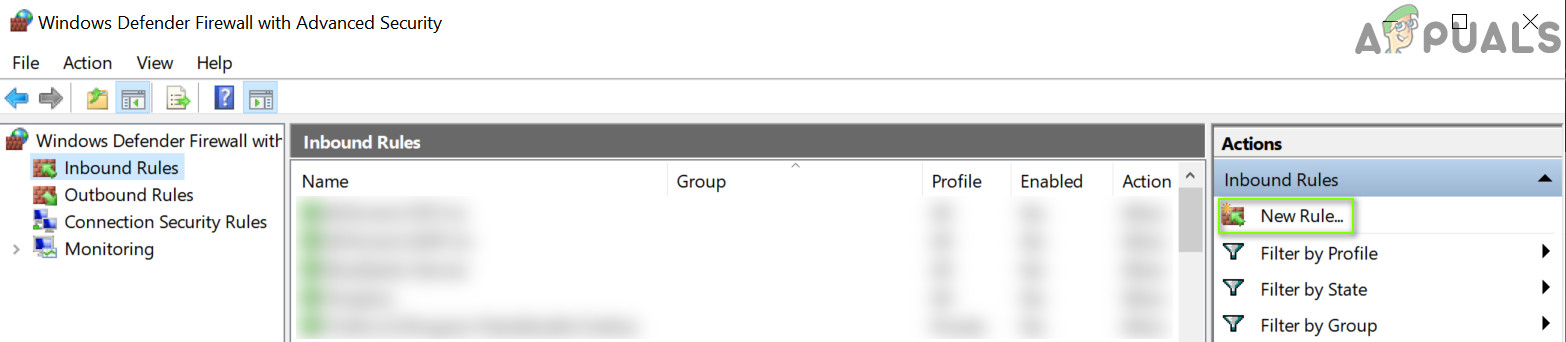
Allow the Minecraft Connection Through the Windows Defender Firewall - Then select Inbound Rules & click on New Rule.

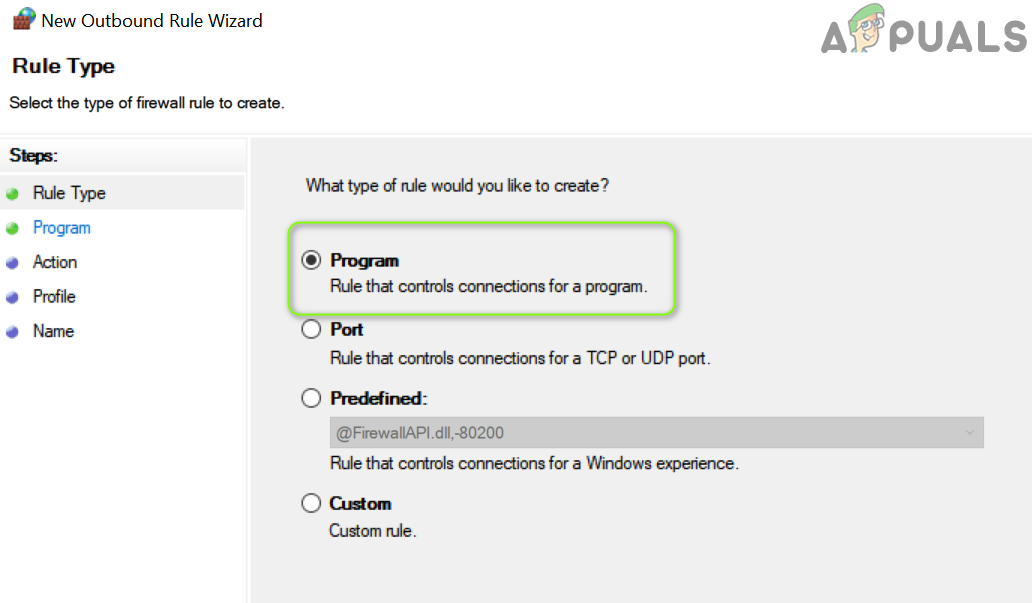
Create a New Inbound Rule - Now select Program & click on Next.

Select Program in New Rule Window - Then click on Browse & steer to the installation directory of Minecraft.

Open Browse and Steer to The Installation Directory of Minecraft - Now double-click on Minecraft.exe & select Allow the Connection.
- Then click on Next & select all the three profiles (i.e., Public, Private, & Domain).
- Now name the rule & click on Finish.
- Then repeat the same for the Outbound Rule & reboot your PC.
- Upon reboot, check if the Java.io issue is resolved.


If the issue persists, check if allowing the Minecraft connections through the router’s Firewall (if any) resolves the issue (especially, if it is using some autoblocking feature). If that did not do the trick, check if the parental controls are not restricting the Minecraft access. Also, it will be a good idea to ensure that the ports are properly forwarded in the system/router firewall as required by Minecraft.
If the issue persists, check if allocating more RAM to Minecraft solves the problem. If that did not do the trick, you may contact the server’s admins to delete your player data or check for a server-side problem. If the issue did not resolve so far, you may have to perform a factory reset of your PC & if that did not do the trick, get your system (especially, hard disk and network/Wi-Fi card) checked for a hardware error.
Многие пользователи Minecraft видят следующие ошибки при попытке запустить игру. И из-за этого они не могут играть в игру.
Соединение потеряно
Внутреннее исключение: java.io.IOException: существующее соединение было принудительно закрыто удаленным хостом.
В этой статье мы увидим, как решить эту проблему с помощью некоторых простых и простых в исполнении решений. Итак, если у вас возникла проблема с внутренним исключением Java.IO.IOException Minecraft, то это руководство для вас.
Как исправить внутреннее исключение Minecraft Java IO IOException Существующее соединение было принудительно закрыто удаленным хостом?
Ошибка внутреннего исключения Minecraft — это обычно ошибка или сбой, которые можно легко исправить с помощью некоторых решений. Это также может быть вызвано плохим подключением к Интернету. Если вы используете мобильную точку доступа или какой-либо другой режим подключения с медленным Интернетом, то, скорее всего, вы не собираетесь подключаться к серверу. Если проблема связана с ошибкой, единственный способ исправить ее — это если разработчик Minecraft выпустит обновление программного обеспечения. Если это сбой, вам необходимо проверить обходные пути, которые мы упоминали ниже, чтобы решить проблему.
Чтобы исправить ошибку Internal Exception Java.IO.IOException Minecraft, вам необходимо следовать данным решениям.
- Перезагрузите компьютер
- Обновить Майнкрафт
- Попросите администратора перезапустить сервер
- Очистить DNS и обновить IP
- Отключить пакет ресурсов сервера
- Устранение неполадок в чистой загрузке
- Проверьте подключение к Интернету
- Исправить Java
Поговорим о них подробнее.
1]Перезагрузите компьютер
Начнем с самого простого из решений. Перезагрузка ПК сработала для многих пользователей, поскольку в основном перезапускаются все службы, которые были запущены ранее, а также отключаются все ненужные процессы. Итак, перезагрузите компьютер и посмотрите, сохраняется ли проблема.
2]Обновить Майнкрафт
Обновление Майнкрафт имеет свойство убивать двух зайцев одним выстрелом. Это не только избавит вас от ошибки, которая могла быть причиной проблемы, но и в то же время заставит ваше клиентское приложение соответствовать версии сервера, к которому вы пытаетесь подключиться. Потому что вы не сможете подключиться к серверу, если есть несоответствие между версией приложения, которое вы оба используете.
Чтобы обновить Minecraft, вам необходимо выполнить следующие действия.
- Откройте Minecraft.
- Нажмите на Опции со страницы входа.
- Затем нажмите Принудительное обновление! > Применить.
Подождите, пока будет установлено обновление, и посмотрите, поможет ли это решить проблему.
3]Попросите администратора перезапустить сервер.
Проблема может возникнуть из-за сбоя на сервере. Вам следует связаться с администратором сервера и попросить его перезапустить сервер. Только они имеют право перезапустить его. Итак, сделайте это и посмотрите, сохраняется ли проблема.
4]Очистить DNS и обновить IP
Проблема может быть из-за поврежденных DNS и IP-адресов. Хорошая новость в том, что вы можете легко очистить DNS и обновить IP и посмотреть, поможет ли это решить проблему. Для этого откройте командную строку от имени администратора из меню «Пуск» и выполните следующие команды.
ipconfig / flushdns ipconfig / release ipconfig / обновить
Наконец, перезагрузите компьютер, снова откройте Minecraft и посмотрите, поможет ли это решить проблему.
5]Отключить пакет ресурсов сервера
Многие пользователи склонны устанавливать Пакет ресурсов чтобы придать вашей игре немного размаха. Это позволяет вам создавать текстуры, музыку и другие вещи для игры. Но иногда он может запретить вам подключиться к серверу. Итак, эта ошибка может быть именно по этой причине. Вот почему мы собираемся отключить Server’s Resource Pack и посмотреть, поможет ли это.
- Запустите Minecraft.
- Перейти к Мультиплеер.
- Затем перейдите к Проблемный сервер и нажмите Редактировать.
- Наконец, щелкните Server Resource Packs и отключите его.
Затем проверьте, сохраняется ли проблема.
6]Устранение неполадок при чистой загрузке
Иногда причиной вашего раздражения может быть другое приложение. Однако нам не нужно, что это за приложение. Следовательно, вам следует устранить неполадки в чистой загрузке и посмотреть, какое приложение мешает работе вашей программы. Затем вы можете решить, что с ним делать.
7]Проверьте подключение к Интернету
Говорить о проблеме, которая мешает вам подключиться к серверу, и не проверять подключение к Интернету, было бы немного глупым решением. Вытащите средство проверки скорости Интернета и посмотрите, получаете ли вы достаточную пропускную способность. Если нет, проверьте, все ли устройства, подключенные к одной сети, имеют одинаковую пропускную способность. В случае, если ваше единственное устройство имеет медленный Интернет, попробуйте исправить медленный Интернет.
8]Исправить Java
Как вы могли заметить, увидев сообщение об ошибке, эта проблема как-то связана с Java. Итак, попробуйте обновить Java и посмотрите, работает ли это. Для этого выполните следующие действия.
- Нажмите Win + S, тип «Настроить Java » и нажмите ОК.
- Перейти к Вкладка «Обновить».
- Щелкните Обновить сейчас.
Таким образом ваша Java будет обновлена и посмотрите, сохраняется ли проблема.
Вот и все!
Также проверьте:
Что это за ошибка: внутреннее исключение: java.io.ioexception — проще говоря, это ошибка интернет-соединения. Ваш компьютер пытается установить соединение с выбранным вами сервером Minecraft, и это соединение прерывается во время перемещения между сервером и вашим компьютером.
Содержание
- Какое решение этой ошибки?
- Расширенный поиск и устранение неисправностей
- Удалите и переустановите свежую версию Minecraft.
- Включение собственной песочницы Java
- Смена DNS на вашем роутере на DNS-серверы Google
Какое решение этой ошибки?
Давайте начнем решать эту проблему с некоторых основных решений, которые работают практически при любой ошибке.
Не пропускайте их, если вы еще не пробовали их, потому что это самые простые решения, которые занимают минимум времени!
- Включите и снова включите роутер, отключив его на минуту, а затем снова подключив, чтобы начать играть.
- Перезагрузите компьютер.
- Перезапустите Майнкрафт.
Это основные шаги, которые позволят нам выяснить, является ли ваша проблема временной или возникла из-за более серьезной проблемы, которая потребует дополнительного устранения неполадок. Если это не помогло, пора попробовать более сложные шаги.
Расширенный поиск и устранение неисправностей
Если описанные выше базовые шаги не помогли вам, возможно, пришло время рассмотреть более сложные решения.
Удалите и переустановите свежую версию Minecraft.
Одним из главных виновников проблемы с Minecraft является… сам Minecraft. Прежде чем делать что-либо слишком сложное, чтобы попытаться решить эту проблему, попробуйте удалить игру и заново установить ее. Пока не переустанавливайте никакие пакеты текстур, моды или Optifine. Попробуйте подключиться к серверу с базовой игрой и посмотрите, решит ли это вашу проблему.
Включение собственной песочницы Java
Собственная песочница Java позволяет запускать приложения Java, такие как Minecraft, в ограниченной среде, которая может обойти все, что вызывает проблему с вашим подключением к серверу. Вы можете включить его, выполнив следующие действия:
- Перейдите к строке поиска на панели задач Windows, обычно в нижней части экрана, введите «Панель управления» и щелкните появившуюся запись.
- Найдите раздел с заголовком «Программы» и щелкните этот заголовок.
- На следующем экране вы должны увидеть значок «Java». Щелкните заголовок. Мы отметили заголовок Java и значок красным на рисунке ниже.
- Теперь у вас должно появиться небольшое всплывающее окно с надписью «Панель управления Java». В нем переключитесь на вкладку «Дополнительно» и начните прокрутку вниз, пока не увидите раздел с надписью «Дополнительные параметры безопасности». Мы отметили этот раздел красным на рисунке выше.
- Здесь вы найдете параметр «Включить ограниченную среду операционной системы (собственная песочница)». Убедитесь, что он отмечен галочкой, затем нажмите «Применить», а затем «ОК».
- Очень важно перезагрузить компьютер , чтобы изменения вступили в силу.
После перезагрузки компьютера снова запустите Minecraft и посмотрите, сохраняется ли соединение с сервером. Если это не так, не стесняйтесь снова отключить собственную песочницу, чтобы не добавлять дополнительные параметры к проблеме, которую вы пытаетесь отследить.
Смена DNS на вашем роутере на DNS-серверы Google
У вашего интернет-провайдера могут быть временные проблемы с DNS-сервером, из-за которых ваш компьютер не может найти сервер, к которому вы подключаетесь. Вы можете найти настройки DNS в панели администрирования вашего маршрутизатора / модема, и обычно они устанавливаются автоматически.
Почти все маршрутизаторы позволяют переключать DNS-серверы на те, которые вы указываете вручную, обычно два из них. Вам следует ввести следующие значения:
- Первичный DNS-сервер: 8.8.8.8
- Вторичный DNS-сервер: 8.8.4.4
Новые настройки DNS-сервера будут подключаться к собственным серверам Google всякий раз, когда он пытается подключиться к чему-либо с вашего компьютера, и со временем это будет намного надежнее, чем то, что вам даст ваш местный интернет-провайдер. Даже если это решение не сработает, вероятно, вам стоит сохранить новые настройки.
Minecraft is a beloved sandbox video game by Mojang Studios. Children and adults alike enjoy building their own worlds in this 3D game.
However, many players have recently received a stressful error message: Internal Exception: java.io.ioexception. When you get the notification “an existing connection was forcibly closed by the remote host Minecraft,” you won’t be able to continue playing.
So what exactly does the java.io.ioexception error mean? The main reason you received this error is an internet connection error. There are several possible causes of connection failure, such as firewall blocking, router and issues, or outdated Minecraft or Java.
While fixing the internal exception error in Minecraft might seem too technical, the problem can easily be resolved with the help of our step-by-step guide. If a standard power cycle or re-installing Minecraft or Java doesn’t work, set up your DNS, IP address, and server settings.
In this article, we’ll begin by giving you an introduction to this common error. From there, go through our list of tried-and-tested troubleshooting solutions.
Table of Contents
- 1 What is Minecraft Internal Exception Java io ioexception?
- 1.1 What causes the error?
- 2 How to fix Minecraft internal exception java.io.ioexception
- 2.1 Check your Internet Connection
- 2.2 Powercycle your system
- 2.3 Update Minecraft
- 2.4 Uninstall and Reinstall Minecraft
- 2.5 Update/Fix Java
- 2.6 Reset the Server
- 2.7 Flush DNS and Renew IP address
- 2.8 Change Router DNS to Google DNS servers
- 2.9 Disable Server’s Resource Pack
- 2.10 Turn off Firewall Permissions
- 2.11 Enable Java Native Sandbox
- 3 Conclusion
When you receive “Minecraft Internal Exception: java.io.ioexception an existing connection was forcibly closed,” this means that there was a problem with your internet connection. This network issue likely prevented your device from connecting with the Minecraft server.
Getting this error can be very frustrating because you won’t be able to continue playing.
On top of that, it’s difficult to find the main cause of the problem. Any disruption in your network can cause a Minecraft server error.
This means that you’ll have to try multiple solutions to try and fix the error.
What causes the error?
As mentioned, there are many possible reasons why you received the connection error. It’s hard to pinpoint the exact point where the connection failed, but these are some of the most common causes:
- Firewall permissions blocked access to the Minecraft server
- Incorrect DNS, IP address, or router settings
- Incompatible or outdated Minecraft and Java softwares
How to fix Minecraft internal exception java.io.ioexception
As mentioned, the Minecraft internal exception error is a bit complicated because there are many possible causes of the glitch.
To help you out, we provided 11 solutions on how to fix the java.io.ioexception issue.
Before proceeding, make sure that you have a stable internet connection. Try not to use mobile data or a mobile hotspot as these are much more unstable compared to a WiFi network.
Make sure to try which solution works for you, and don’t skip any steps.
However, if none of these work, you may need to contact your internet service provider (ISP).
Check your Internet Connection
Before trying anything complicated, make sure that your internet connection is stable.
Unreliable internet connection using mobile data or mobile hotspot can prevent your PC from connecting to the Minecraft server. Standard multiplayer mode will use 40MB of data per hour.
Open an internet speed checker, and check if your bandwidth is up to par. The host computer should have at least 1.5 Mbps bandwidth.
The appropriate bandwidth speed will depend on how many other gamers you’re playing with in Multiplayer mode. Ideally, though, bandwidth should be at least 100Mb an hour per user.
Powercycle your system
The first thing you should try is restarting your PC, internet connection, and Minecraft.
For many users, simply doing a full power cycle fixes the issue. This is because it restarts the services and closes all failed processes.
- Close Minecraft and shutdown your PC. Remove your PC from the power source.
- Unplug the router from the power source while it is still running, then switch it off. Disconnect the ethernet cable from the power source.
- Leave your router and PC unplugged for five minutes.
- Reconnect the ethernet cable and switch on your router and PC. Connect your PC to the internet network.
- Launch Minecraft and see if the issue persists.
If this doesn’t work, try connecting to the internet using a different device, such as your smartphone. If you can’t connect to the network, the problem might be with your ISP.
Call your ISP so they can find the issue with your network setup.
Update Minecraft
This is another effective solution that fixes the Minecraft internal exception error for most users. Updating Minecraft will do two things: it will remove the glitch in the installed program, and it will match your client application to the Minecraft server you’re connecting to.
If your current Minecraft version doesn’t match your server, you will likely encounter some sort of connection error.
- Open the Minecraft launcher and double-click the Minecraft app. Log in with your email address and password if necessary.
- Look for the Download button beside Play in the main menu. The Download option will appear if a new Minecraft version update is available.
- Click Play. The update will start to download –– wait for the green progress bar to finish downloading. You can now start playing.
Here’s another way to update Minecraft:
- Open the Minecraft launcher and double-click the Minecraft app.
- On the Login page, click on Options.
- From the list, click Manage game & add-ons > Updates.
- Click the update you want to download. You can now start playing.
If there’s a problem with updating Minecraft, you need to uninstall the game, then reinstall it again.
Uninstall and Reinstall Minecraft
You need to re-download Minecraft if the available update in your area fails. Here’s how to uninstall and reinstall the latest version of Minecraft:
Reinstall Minecraft on Windows:
- Press Win+R on your keyboard and type %appdata%. Press enter and select the Roaming folder.
- Open the .minecraft folder and locate saves. Copy and paste the saves folder to a secure location. You will need this folder to restore your Minecraft progress.
- Return to the Roaming folder and delete the .minecraft folder. This will uninstall the game.
- Visit the Minecraft website and log in with your Mojang account if necessary. Download the latest Minecraft Windows version available in your region.
- Launch the Minecraft installer and follow the on-screen instructions. After installing and loading, close Minecraft.
- Open the .minecraft folder and drag the saves folder to this location. This will restore your Minecraft gameplay.
Reinstall Minecraft on macOS:
- Open the Finder Window and click Go on the Toolbar. Click Go to Folder and type ~/Library/Application Support/minecraft. Press Enter.
- Copy and paste the saves folder to a secure location. You will need this folder to restore your Minecraft progress.
- Select all the other folders in the Minecraft folder and drag them to the Trash. Empty the Trash folder.
- Visit the Minecraft website and log in with your Mojang account if necessary. Download the latest Minecraft macOS version available in your region.
- Launch the Minecraft installer and follow the on-screen instructions. After installing and loading, close Minecraft.
- Open the .minecraft folder and drag the saves folder to this location. Click Replace to overwrite to restore your Minecraft gameplay.
Reinstalling Minecraft is also a recommended fix for jna-4.4.0.jar Error (the File Contents Differ From What Was Expected).
Update/Fix Java
For Minecraft to work, your Java software should be up to date.
- Press Win + S on your keyboard, then type Configure Java. Click OK.
- Navigate tot he Update tab, then click Update Now.
There are some cases when updating Java doesn’t work. You’ll need to reinstall Java:
- Type Control Panel on the Windows Search Bar then launch the program.
- Click on Uninstall a Program, then look for Java.
- Download the latest version of Java, and install it onto your PC.
- Restart your computer, then launch Minecraft. Check if the problem persists.
Reset the Server
If you receive a connection error and restarting your PC or internet connection doesn’t work, you may need to reset the Minecraft Server.
If you’re using someone else’s server, the only way to configure the server is to request the owner to reset it. If you own the server, you can use programs like Shockbyte, CraftyControl, or Multicraft.
- Log into your server’s Control Panel, and select the server you want to reset. Make sure to stop the server from running to prevent creating or modifying files.
- Navigate to the Server Type dropdown menu and select the action you want to take after the restart.
- Navigate to the Setup tab of your control panel choose Reset or Delete All server files. Enter your password when prompted.
- Click Apply or Done to confirm the changes.
- Start the Server, then launch Minecraft. Check if the error still persists.
Flush DNS and Renew IP address
If your DNS or IP address is corrupted, you can flush DNS and renew your IP address.
- Launch Command Prompt from the Start menu.
- Type these commands:
ipconfig /flushdns
ipconfig /release
ipconfig /renew
- Restart your computer, than launch Minecraft. Check to see if the error persists.
Change Router DNS to Google DNS servers
In cases where it’s difficult to get a stable internet connection, your ISP may have temporary issues that prevent your computer from connecting with the server. To fix this issue, you need to adjust your DNS settings in your router control panel.
- Access your router settings –– enter your login and password when prompted.
- Navigate to the DNS tab then type the following under Primary DNS server and Secondary DNS server. These settings will automatically connect to Google’s more reliable DNS servers.
Primary DNS Server: 8.8.8.8
Secondary DNS Server: 8.8.4.4
- Apply the changes, then restart your internet connection. Launch Minecraft and see if the problem persists.
While this strategy may not work all the time, connecting to Google DNS servers usually works better than the settings given by your ISP.
Disable Server’s Resource Pack
Resource Packs allow users to add more personality into their gameplay. You can customize textures, music, and other skins onto Minecraft.
However, if you have Resource Pack enabled, there are times when you will be blocked from the server. In this case, you need to adjust Resource Pack permissions:
- Launch Minecraft then navigate to Multiplayer.
- Click Problematic Server, then Edit.
- Locate Server Resource Packs, then click Disable.
- Save the changes and check if the error persists.
Turn off Firewall Permissions
Another common reason why Minecraft players get the connection error is because their PC fails to connect to the server because of Windows Firewall permissions:
- Click the Windows search bar and look for Windows Security.
- Open Firewall & Network protection, then click on the network and Firewall protection option on the menu.
- Select the network that you’re connected to, and toggle off Windows firewall protection on your device.
- Apply the changes, then restart your computer. Launch Minecraft and check if the problem persists.
Enable Java Native Sandbox
Java Native Sandbox allows users to access Java applications in a restricted environment. This means that you can play Minecraft while bypassing connection issues to the server.
- Type Control Panel on the Windows Search Bar then launch the program.
- Look for the header labeled ‘Programs.’
- In the next section, look for the Java icon. A small pop-up notification labeled ‘Java Control Panel’ will appear. In the same window, navigate to Advanced > Advanced Security Settings.
- Select the option Enable the operating system’s restricted environment (native sandbox), then apply and click OK.
- Restart your computer then launch Minecraft. Check if the problem persists. If it does, try disabling Native Sandbox then enabling it again.
Conclusion
The Minecraft Internal Exception Java.io.ioexception is caused by failed connections between your PC and the Minecraft server. This error is more complicated compared to other Minecraft connection errors because there are a lot of possible causes of the issue.
Before troubleshooting your PC, the first thing that you should do is check that you have stable internet connection. After confirming a strong connection, you can try powercycling your router and PC, updating or reinstalling Minecraft.
If these don’t work, try to fix your internet connection by changing your DNS, router settings, or IP address. You can also try turning off Firewall permissions and disabling server resource pack.
Other gamers solved the issue by enabling Java Native Sandbox.
If these solutions don’t work for you, try contacting your ISP.
Внутреннее исключение java.io.ioexception — одна из самых раздражающих ошибок в Minecraft. Она возникает в результате различных технических факторов, поэтому и решения также разнообразны.
Рассмотрим основные причины возникновения этой ошибки и разберем их решения.
Что такое ошибка java.io.ioexception в Minecraft?
Ошибка java.io.ioexception — это ошибка подключения к интернету. Она возникает из-за разрыва соединения между вашим компьютером и сервером Minecraft. Источником проблемы может быть либо ваш маршрутизатор, либо интернет-соединение, либо брандмауэр.
Решения
Прежде всего, вам следует начать с основных решений, чтобы сэкономить время и сберечь себя от сложного поиска неисправностей. К таким решениям относятся:
- Перезагрузка компьютера.
- Перезапустите Minecraft.
- Перезапуск домашней сети.
Во время устранения неполадок в домашней сети вы также можете попробовать создать точку доступа Wi-Fi на своем смартфоне и подключиться к компьютеру.
Если вы сможете подключиться к серверу Minecraft, используя данные сотовой связи, то вы будете уверены, что в домашней сети есть проблемы.
Выключив устройства, подождите несколько минут перед перезапуском. Если любое из этих решений сработает, значит, проблема была временной, но если они не сработают, то вам следует подготовиться к расширенному поиску неисправностей. К ним относятся:
Переустановите Minecraft
Очень вероятно, что причиной ошибки внутреннего исключения java.io.ioexception является сам Minecraft. Если вы хотите знать наверняка, то удалите и переустановите игру.
- Нажмите клавишу Windows + R. Это приведет к открытию программы «Выполнить».
- Введите appwiz.cpl в поле, затем нажмите OK.
- Появится список установленных приложений. Выберите Minecraft.
- Нажмите Деинсталляция, затем нажмите OK для подтверждения.
- После удаления скачайте последнюю версию Minecraft и установите заново.
После переустановки попробуйте подключиться к серверу с базовой игрой. То есть, без каких-либо Optifine, модов или текстур-паков.
Исправьте Java
Бывают случаи, когда игра может работать нормально, но проблема в Java. В этом случае вы можете переустановить Java, включить Java native sandbox или использовать другую программу запуска, чтобы исправить ошибку java.io.ioexception.
Чтобы переустановить java:
- Нажмите клавишу Windows + R. Откроется окно «Выполнить».
- Введите Control в поле и нажмите OK.
- Выберите Деинсталляция программы.
- Выберите Java из списка.
- Нажмите на Uninstall.
- Найдите последнюю версию Java и установите ее.
- Перезагрузите компьютер.
Родная песочница java позволяет запустить Java-приложение, например Minecraft, в ограниченной среде. В результате вы сможете обойти проблему, мешающую вашему соединению с сервером.
Выполните следующие шаги, чтобы включить Java native sandbox:
- Перейдите к строке поиска на панели задач Windows. Обычно она находится в нижней части экрана. Введите «Панель управления» в строке поиска.
- Найдите раздел «Программы» и нажмите на него.
- Найдите значок Java и щелкните на нем.
- Появится небольшое всплывающее окно с заголовком «Панель управления Java». Выберите вкладку «Дополнительно», затем прокрутите вниз, пока не дойдете до «Дополнительные параметры безопасности».
- Найдите опцию «Включить ограниченную среду операционной системы (встроенную песочницу)». Убедитесь, что она отмечена. Нажмите «Применить», затем «ОК».
- Перезагрузите компьютер, чтобы изменения вступили в силу.
- Перезапустите Minecraft, чтобы проверить, исправлена ли проблема. Если нет, вы можете продолжить и отключить родную песочницу.
Используйте другую программу запуска
В этом случае проблема может заключаться в том, что ваша программа запуска использует старую версию Java. Чтобы исправить это, вы можете перейти на JAR Minecraft launcher или заставить вашу программу запуска принять последнюю версию Java.
Это так же просто, как перейти к настройкам Java в опциях пусковой установки и изменить путь или каталог со старой версии на новую.
Измените настройки DNS на маршрутизаторе
DNS-сервер вашего интернет-провайдера может иметь проблемы, которые препятствуют вашему подключению к серверу Minecraft. Чтобы решить эту проблему, измените DNS на DNS-серверы Google.
Выполните следующие шаги для редактирования настроек DNS:
- Откройте программу «Выполнить», нажав клавиши Windows + R.
- Введите Control в поле и нажмите OK.
- В Панели управления найдите Сеть и Интернет.
- Выберите Изменить параметры адаптера. Он находится на левой панели.
- Щелкните правой кнопкой мыши на сетевом адаптере и выберите Свойства.
- Прокрутите вниз до пункта Протокол Интернета версии 4 (TCP/IPV4) и дважды щелкните на нем.
- Щелкните на Использовать следующий DNS-сервер и адрес.
- В предпочтительном DNS-сервере поставьте 8.8.8.8
- В альтернативном DNS-сервере поставьте 8.8.4.4
- Эти настройки DNS-сервера подключат вас к Google, что более надежно, чем вариант с локальным интернет-провайдером. Это может помочь решить вашу проблему.
- Нажмите OK, чтобы сохранить изменения.
Измените настройки брандмауэра windows
Ваш брандмауэр также может блокировать доступ к серверу Minecraft. Поэтому вы должны разрешить Minecraft Java TM Platform SE Binary через ваш брандмауэр. Чтобы сделать это, вы должны использовать компьютер в качестве администратора.
Вот шаги, которые необходимо выполнить:
- Перейдите к поисковой строке в нижней части панели задач и введите firewall.
- Выберите Брандмауэр Windows Defender.
- На левой панели найдите пункт Разрешить приложение или функцию через брандмауэр Windows Defender Firewall и нажмите на него.
- Выберите Java TM Platform SE Binary, затем отметьте флажками Public и Private.
- Нажмите OK, чтобы сохранить изменения.
- Перезагрузите компьютер и откройте Minecraft, чтобы проверить, решена ли проблема.
В идеале, вы также можете отключить брандмауэр Windows, а затем попытаться зайти на сервер Minecraft.
Использование VPN
Другим решением проблемы ошибки внутреннего исключения Minecraft является установка VPN и подключение к вашей стране или любой другой, находящейся поблизости. В Интернете есть множество бесплатных программ VPN, которые вы можете скачать и использовать.
Измените расстояние просмотра на стороне сервера
Наконец, вы можете попробовать уменьшить расстояние просмотра сервера:
- Убедитесь, что сервер не запущен.
- Нажмите Файлы и выберите Cong Files.
- Перейдите в Настройки сервера.
- Найдите View Distance и измените его на 4.
- Нажмите сохранить, чтобы применить изменения.
- Заново запустите сервер.
Заключение
Надеюсь, одно из этих решений ошибки внутреннего исключения java.io.ioexception поможет решить проблему, и вы сможете вернуться к наслаждению игрой в Minecraft. Если вы попробовали что-то другое и это сработало, не стесняйтесь поделиться своим опытом.
Гайды
21 февраля 2022
0

 (1 488 голосов)
Technology has contributed to the creation of new modern games and the updates of existing games. Gaming used to be primarily for entertainment, but technological improvements have extended consumers’ views on the subject.
Minecraft is currently one of the most popular and engaging games. Minecraft is an objective video game that encourages players to use their imaginations to achieve a particular objective. Many children have become engrossed in the game due to its numerous exciting features.
Automatically Repair Windows Errors
Recommended: To easily install drivers automatically, use the tool below.
However, as fascinating as Minecraft is, it may not be easy to access. This is true for any built applications or websites, not only Minecraft. Internal Exception java.io.ioexception does not suggest a serious problem with the game.
However, explicit knowledge of its genuine meaning is essential to judge the severity of the issue. On the other hand, this page addresses java.io.ioexception concerns in Minecraft games.
Mojang used Java to create the Minecraft video game. When playing Minecraft, there will be some instances when you might experience specific errors, much like using other applications. On the other hand, this is not unusual, as various factors can trigger it.
Causes of the Minecraft Error Internal exception: java.io.ioexception
The following reasons can cause this Minecraft Error:
- Weak/intermittent internet connection.
- Low storage on the hard drive.
- The anti-virus application is blocking Minecraft and other files associated with the game.
- Minecraft does not have permission to access/make changes to its files.
- Minecraft files are missing/corrupted.
Troubleshooting Methods to Fix the Minecraft Error Internal exception: java.io.ioexception
Before you make changes in the settings of Minecraft or your system, you have to ensure that error is not from any external causes. Here are some basic troubleshooting steps that you can perform that might save you time and effort.
Reboot Your Internet Router
Rebooting your router will clear your connection settings, stop malicious network attacks, and remove any unauthorized connections from your network. Restarting your connection will also fix various speed and connectivity issues, such as the Minecraft internal exception error.
Reboot Your Computer/Device
When you restart a computer, all device drivers are unloaded, all programs are closed, and the operating system is restarted. In the course of regular usage or as a troubleshooting procedure to remedy a problem, you may need to reboot your computer, and both Windows and Mac OS provide options for you to do so fast.
Reinstall a Fresh Copy of Minecraft
If the above steps do not work for you, try this next. Uninstalling the current version of Minecraft from your computer and installing a fresh copy of the game may solve the error.
- Hold down the “Windows + R” keys on your keyboard, type in “appwiz.cpl” on the run command line, and press “enter.”

- In the list of applications, look for Minecraft and click uninstall.

- While waiting for the process to complete, go to Minecraft’s official website to download a fresh installer by clicking here. Select the appropriate installer version for your computer.

- Once Minecraft has been removed, go to the installer file of Minecraft and install the application as usual. Install a fresh copy of Minecraft, launch the game, and see if the error message has been fixed.
Temporarily Disable Windows Defender
In some cases, Windows Defender will quarantine files that aren’t harmful. These files are referred to as “false positives.” If a Minecraft file is recognized as a false positive, the program may fail to function correctly, resulting in a crash. To see if Windows Defender is the issue, turn it off momentarily.
- Open Windows Defender by clicking on the Windows button, type “Windows Security,” and press “enter.”
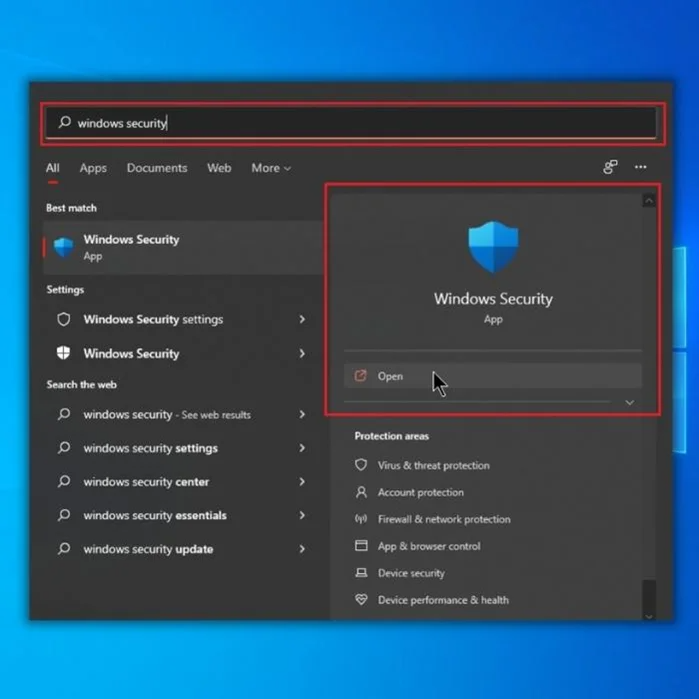
- Click on “Virus & Threat Protection” on the Windows Security homepage.
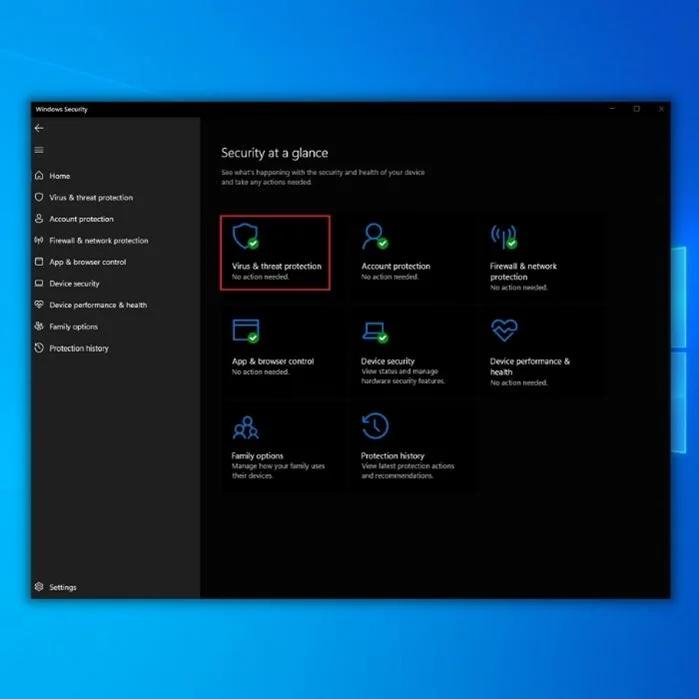
- Under Virus & Threat Protection Settings, click “Manage Settings” and disable the following options:
- Real-time Protection
- Cloud-delivered Protection
- Automatic Sample Submission
- Tamper Protection
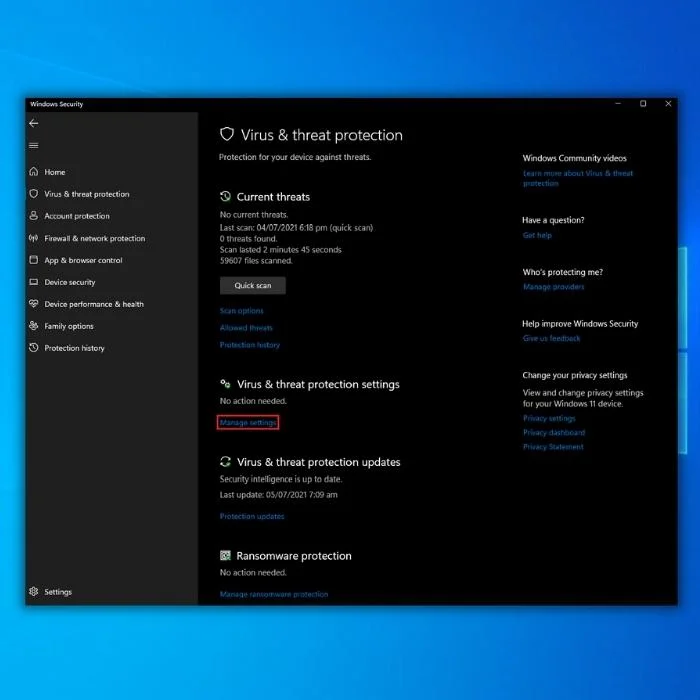
Recommended: Restoro System Repair Tool – Fix Errors & Speed Up Windows Automatically
Add Minecraft to the Windows Defender Whitelist
If Minecraft appears to work after disabling Windows Defender, that suggests Windows Defender is preventing or quarantining Minecraft files. You must now add the Minecraft folder to Windows Defender’s whitelist or exception folder.
This implies that Windows Defender will not block or put any files in quarantine in the Minecraft folder, whether old or new.
- Open Windows Defender by clicking on the Windows button, type “Windows Security,” and press “enter.”
- Under the “Virus & Threat Protection Settings,” click on “Manage Settings.”
- Click on “Add or Remove Exclusions” under Exclusions.

- Click on “Add an exclusion” and select “Folder.” Choose the “Minecraft Launcher” folder and click “select folder.”

- You can now enable Windows Defender and open Minecraft to check if the Minecraft internal exception error message has been fixed.
Allow Minecraft Through the Firewall
If your Firewall blocks Minecraft, it may lead to the Minecraft Error Internal exception: java.io.ioexception. Here’s how to get Minecraft to work around your Firewall.
- Hold down the “Windows + R” keys on your keyboard and type in “control firewall.cpl” in the run command line.

- In the Firewall window, click on “Allow an app or feature through Windows Defender Firewall.”

- Click on “Change Settings” and put a check on both “Private” and “Public” for all apps with the name “javaw.exe,” “Minecraft,” and “Java Platform SE Binary.”

- If you cannot see the “Minecraft” application on the list, click on “Allow another app.”

- Click on “Browse,” go to the folder of Minecraft and select “Minecraft Launcher,” and click “Add.” Once it has been added, you will be brought back to the main window of Windows Firewall; click “OK” to complete the steps.

- Once you have completed all the steps, launch Minecraft and see if the Minecraft Internal exception: java.io.ioexception error.
Wrap Up
There might be multiple reasons why Minecraft players would encounter the Minecraft Error Internal exception: java.io.ioexception, but most of these causes can easily be fixed by performing their corresponding troubleshooting methods.
Windows Automatic Repair Tool

System Information
-
Your machine is currently running Windows 10 -
Restoro is compatible with your operating system.
Recommended: To repair Windows Errors, use this software package; Restoro System Repair. This repair tool has been proven to identify and fix these errors and other Windows problems with very high efficiency.

-
100% safe as confirmed by Norton. -
Only your system and hardware are evaluated.
Frequently Asked Questions
Why does my Minecraft server say connection timed out?
When you attempt to connect to a Minecraft server, your computer sends a “connection request” to the server. The server responds with an acknowledgment that it has received the request and then sends a response back to your computer. If the response takes too long to arrive (known as a “timed out” connection), either the server is not responding or is too busy to respond to the request promptly. This could be due to various reasons, such as a slow internet connection, a congested network, or an overloaded server.
java enable the operating system’s restricted environment what is it?
Java enables the operating system’s restricted environment, a type of security measure designed to protect the system from malicious software and unauthorized access to the system. The operating system typically implements a restricted environment and restricts the type of programs and data that can be accessed and executed. This helps to protect the system from malware, viruses, and other malicious software. Java enables the operating system to control the environment by limiting the resources that can be accessed and used and the types of programs that can be run. This helps to ensure that only trusted programs and data can be accessed and executed and that malicious software and unauthorized access are blocked.
Minecraft not working when I play it says: internal exception: java .lang.nullpointerexception?
This error is caused when a program attempts to access a data structure or variable that has not been initialized or set to null. Minecraft could be caused by a corrupted game file, a bug in the game code, or a conflict with another program running on your computer. You should try updating the game, reinstalling it, or running it in a different compatibility mode to fix this issue. You should contact the game’s support team if the issue persists.
Which primary DNS server is best to play Minecraft?
The best primary DNS server to play Minecraft depends on your specific needs. Generally, it is recommended to use a secondary DNS server in addition to your primary DNS server to ensure optimal performance. Google’s Public DNS is a popular choice for a secondary DNS server due to its reliability and security. Google’s Public DNS is also known to be faster than many other DNS servers, which may be beneficial when playing Minecraft.
How to disable a disable server’s resource pack Minecraft?
Disabling a server’s resource pack in Minecraft is easy to do. First, you need to open the server settings menu. This can be accessed by clicking the “Settings” button in the server list. Once you are in the server settings, you should see a section labeled “Resource Packs.” In this section, you can disable or enable resource packs. You can also choose which resource packs to use. To disable a resource pack, simply uncheck the box next to it. Once you have done this, the resource pack will no longer be used on the server.
How do I use the Java Native Sandbox to run Minecraft?
First, open the Java Control Panel and select the Java tab. In the Java Control Panel, click on the Security tab and check the box labeled “Enable Java content in the browser.” Then, go to the Java folder in the Windows Control Panel and select the Java settings. Check the box labeled “Use the Java Native Sandbox” and click OK. Finally, launch Minecraft, and you should be able to play the game with the Java Native Sandbox enabled.
How do I fix an existing internet connection error on my Minecraft server?
Check your router and modem for any loose connections or power issues. Ensure your internet connection is stable, and check your network settings to ensure that your Minecraft server uses the correct ports. If all else fails, try restarting your router and modem.
How do I set up new DNS server settings for Minecraft?
You’ll need to log into your problematic server and find the DNS settings. Once you’ve located the DNS settings, you’ll need to enter the IP addresses for the Google DNS servers (8.8.8.8 and 8.8.4.4). After entering the IP addresses, save the changes and restart your server. Your new Minecraft server DNS settings should now be active.
What can I do if I am getting a Minecraft internet connection error?
If you are getting an internet connection error in Minecraft, try the following solutions: 1. Check your existing connection and ensure it is stable and working properly. 2. Ensure you are connected to the correct Wi-Fi network or Ethernet cable. 3. Check if your firewall or antivirus is blocking the connection. 4. Make sure you have the latest version of Java installed. 5. Try restarting your router or modem. 6. Try uninstalling and reinstalling the game. 7. If you still have issues, contact your internet service provider.
What is the purpose of configuring Java Native Sandbox in Minecraft?
Configure Java Native Sandbox in Minecraft allows players to adjust the amount of memory and RAM that Minecraft can use. This helps ensure the game runs smoothly and prevents system crashes or slowdowns due to insufficient resources.