Профиль brum
Значение основных индикаторов неисправностей на приборной панели автомобиля

brum
Была больше месяца назад
Я езжу на MINI Cooper S Checkmate
Москва, Россия
Почему-то проще всегда поискать в интернете, чем лезть в «Руководство» ))
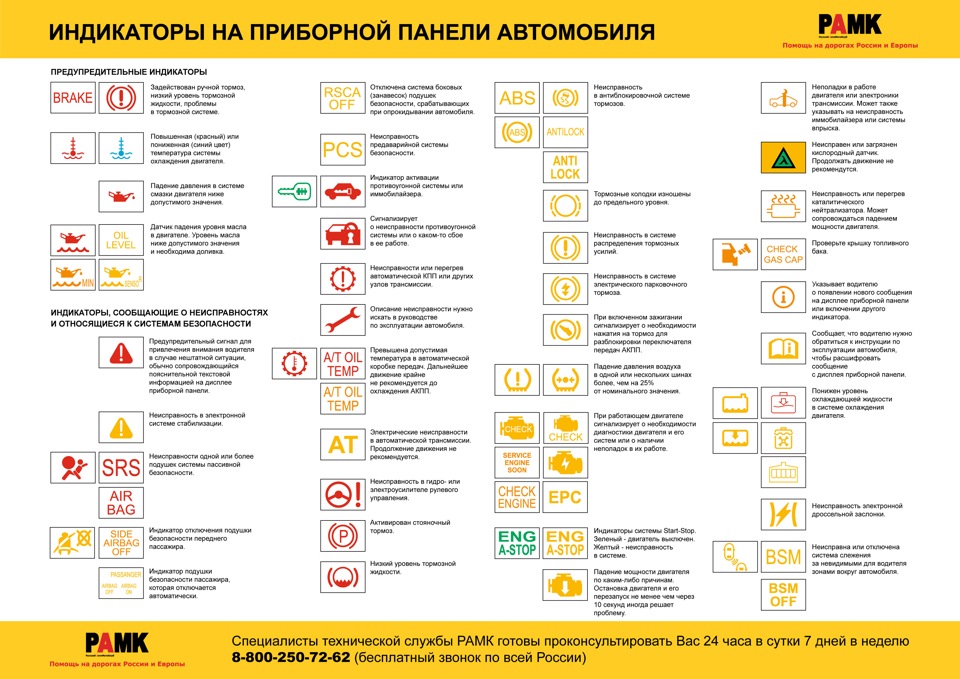
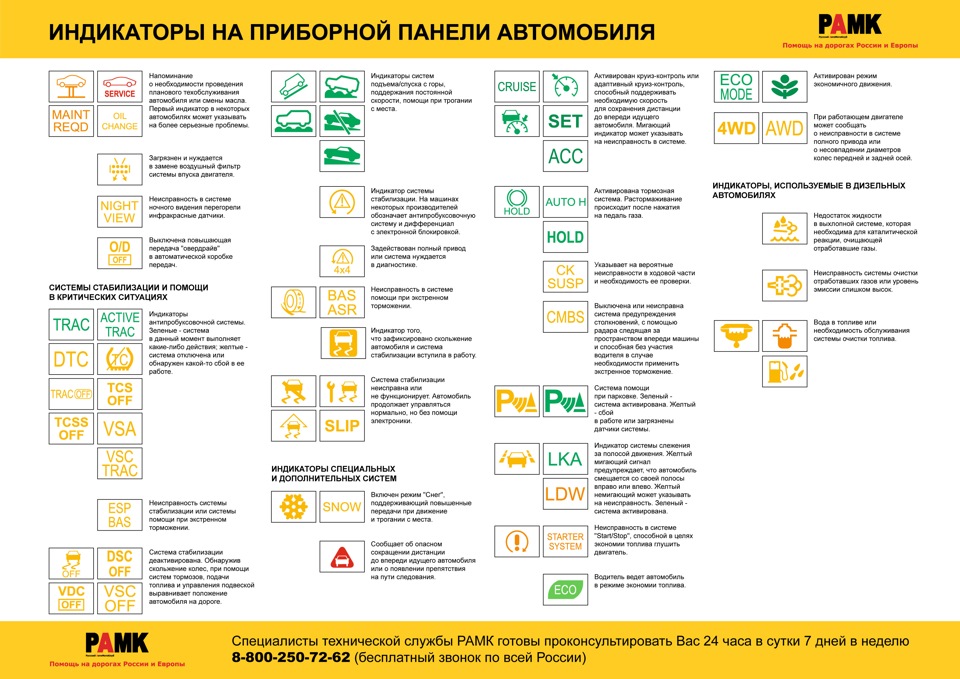
В картинках собраны основные индикаторы неисправностей на приборной панели (для разных авто) и их значения.
20 октября 2014
1
Ранее Контрамарки — бесплатные билеты куда угодно
Разместить рекламу
Реклама
Комментарии
1
Войдите или зарегистрируйтесь, чтобы писать комментарии, задавать вопросы и участвовать в обсуждении.
Войти
Зарегистрироваться

kav96
Я езжу на MINI Countryman (1G)
В случае с мини это полезно
7 лет
- Manuals
- Brands
- Mini Manuals
- Automobile
- COOPER, COOPER
- Owner’s manual
-
Contents
-
Table of Contents
-
Bookmarks
Quick Links
OWNER’S MANUAL
MINI
Contents
MINI CONVERTIBLE
A-Z
Online Edition for Part-No. 01 41 0 159 801 — © 09/05 BMW AG
Related Manuals for Mini COOPER
Summary of Contents for Mini COOPER
-
Page 1
OWNER’S MANUAL MINI Contents MINI CONVERTIBLE Online Edition for Part-No. 01 41 0 159 801 — © 09/05 BMW AG… -
Page 2
Online Edition for Part-No. 01 41 0 159 801 — © 09/05 BMW AG… -
Page 3
CONGRATULATIONS ON YOUR NEW MINI This Owner’s Manual should be considered a permanent part of this vehicle. It should stay with the vehicle when sold to provide the next owner with important operating, safety and maintenance information. We wish you an enjoyable driving experience. -
Page 4: Table Of Contents
CONTENTS NOTES OVERVIEW CONTROLS About this Owner’s Manual Cockpit Opening and closing: Additional sources of information Display elements Keys Symbols used Display elements with navigation system Central locking system Your individual vehicle or Cockpit Chrono Pack Opening and closing: from outside Editorial notice Indicator and warning lamps Opening and closing: from inside…
-
Page 5
Washer fluid Cigarette lighter, 12 V power supply Cruise control Integrated universal remote control Everything under control: Loading and transporting cargo: Odometer Luggage compartment in the MINI Clock Luggage compartment in the MINI Fuel gauge Convertible Coolant temperature gauge Loading cargo… -
Page 6
Replacement procedures: Engine data MINI COOPER and Onboard tool kit Dimensions: MINI COOPER Convertible Wiper blades MINI MINI COOPER S and Lamps and bulbs MINI Convertible MINI COOPER S Convertible Repairing a flat tire Weights: Engine oil Space-saver spare tire… -
Page 7
INDEX Everything from A to Z Online Edition for Part-No. 01 41 0 159 801 — © 09/05 BMW AG… -
Page 8: Notes
MINI makes available with a ter. specific model range. Refers to measures that can be taken Should you wish to sell your MINI at some We hope you will understand that equip- to help protect the environment. time in the future, please remember to…
-
Page 9: Editorial Notice
Have the neces- Battery posts, terminals and related acces- ethanol or other oxygenates with up to sary work on your MINI carried out by a sories contain lead and lead compounds. 2.8% oxygen by weight, i.e. 15% MTBE or…
-
Page 10: Symbol On Vehicle Parts
Symbol on vehicle parts every product from other manufacturers to Warranty and Service Guide Booklet for verify if it can be used on a MINI safely and Indicates that you should consult the Canadian models. without risk to either the vehicle, its opera- relevant section of this Owner’s Man- tion, or its occupants.
-
Page 11: Reporting Safety Defects
Ville Tower C, 330 Spark Street, Ottawa ON inform the National Highway Traffic Safety K1A 0N5. Administration NHTSA in addition to noti- fying the MINI Division of BMW of North America, LLC, P.O. Box 1227, Westwood, New Jersey 07675-1227, telephone toll- free 1-866-275-6464.
-
Page 12
Online Edition for Part-No. 01 41 0 159 801 — © 09/05 BMW AG… -
Page 13: Controls
OVERVIEW CONTROLS OPERATION, CARE, MAINTENANCE OWNER SERVICE PROCEDURES TECHNICAL DATA INDEX Overview Online Edition for Part-No. 01 41 0 159 801 — © 09/05 BMW AG…
-
Page 14: Cockpit
COCKPIT 1 >Parking lamps/Low beams 2 Washer/wiper system 6 Bonnet release >Turn signal indicators 3 Instrument lighting 7 Adjusting steering wheel >Standing lamps 4 Outside mirror adjustment 8 Horn >High beams >Headlamp flasher 5 Hazard warning flashers 9 Socket for Onboard Diagnostics >Onboard computer Online Edition for Part-No.
-
Page 15: Display Elements
DISPLAY ELEMENTS 1 Tachometer 4 Indicator for 6 Fuel gauge >Odometer with indicator and warning lamps, 7 Engine coolant temperature gauge >Trip odometer page >Service interval 2 Display for onboard computer >Program indicator for automatic without onboard computer: transmission with Steptronic Display of outside temperature and cur- >Clock rent vehicle speed…
-
Page 16
DISPLAY ELEMENTS WITH NAVIGATION SYSTEM OR COCKPIT CHRONO PACK 1 Tachometer 3 Speedometer with indicator and warn- 5 Indicator for >Odometer with indicator and warning lamps, ing lamps, page >Trip odometer page 4 Trip odometer, reset to zero >Service interval 2 Display for onboard computer Setting the clock >Program indicator for automatic… -
Page 17
DISPLAY ELEMENTS WITH NAVIGATION SYSTEM OR COCKPIT CHRONO PACK 1 Indicator and warning lamps, page 3 Engine oil temperature 6 Indicator and warning lamps, page 2 Fuel gauge 4 Engine oil pressure 7 Fuel gauge 5 Coolant temperature For more information about the navigation system, refer to the Owner’s Manual for Navigation System. -
Page 18
The engine oil pressure is too low. lamp in the navigation system or Pull over immediately and switch Cockpit Chrono Pack off the engine. Please contact your MINI Lights up while driving: Dealer. Engine is too hot. Pull over to the side of the road immediately, switch off the Do not continue driving;… -
Page 19
INDICATOR AND WARNING LAMPS Yellow: stop immediately Red and yellow: continue driving Red: an important reminder cautiously Flat Tire Monitor Brake warning lamp with parking The warning lamp indicates a flat Brake warning light together with brake applied. tire or a system malfunction. In the yellow indicator lamp for ABS, CBC, More information on the parking event of a flat tire, an acoustic signal also… -
Page 20
INDICATOR AND WARNING LAMPS Red: check as soon as possible Yellow: check as soon as possible Engine The exhaust emissions have deteri- Airbags Antilock Brake System (ABS) orated. There is a malfunction in the airbag The ABS has failed. Conventional Have the vehicle checked as soon as possi- system. -
Page 21
INDICATOR AND WARNING LAMPS Yellow: for your information Green: for your information Blue: for your information The warning lamp comes on. Turn signal indicator High beams The gas cap is not correctly closed Flashes when turn signal indicator Comes on when the high beams or missing. -
Page 22
MULTIFUNCTION STEERING WHEEL Multifunction sports steering wheel 5 Fast forward/rewind or scroll through phone book: The multifunction sports steering wheel >Radio comes with integrated control buttons Press briefly: next/previous station enabling you to operate the following func- stored in memory tions quickly and safely, without having to Extended pressure: station scan take your eyes from the road:… -
Page 23
Online Edition for Part-No. 01 41 0 159 801 — © 09/05 BMW AG… -
Page 24
Online Edition for Part-No. 01 41 0 159 801 — © 09/05 BMW AG… -
Page 25
OVERVIEW CONTROLS OPERATION, CARE, MAINTENANCE OWNER SERVICE PROCEDURES TECHNICAL DATA INDEX Controls Online Edition for Part-No. 01 41 0 159 801 — © 09/05 BMW AG… -
Page 26: Keys
KEYS CENTRAL LOCKING SYSTEM Spare key The concept For keeping in a safe place, e.g. in your wal- The central locking system is ready for let. This key is not intended for constant operation whenever the driver’s door is use. closed.
-
Page 27: Opening And Closing: From Outside
OPENING AND CLOSING: FROM OUTSIDE Via remote control Compliance statement: When the vehicle is unlocked or locked, the This device complies with part 15 of the anti-theft system is also deactivated/acti- FCC Rules. Operation is subject to the fol- vated and the interior lamp is switched on/ lowing two conditions: off.
-
Page 28
Hold the button pressed. The tailgate can be unlocked separately if In the MINI, the windows and the glass the vehicle has been locked via central lock- sunroof are opened. ing. In the MINI Convertible, the windows and 1 Unlocking and convenience opening the sliding sunroof are opened. -
Page 29
In the event of a system malfunction, Convenience closing via the door lock please contact your MINI Dealer. You can You can also close the power windows, also obtain replacement keys there. glass sunroof or the convertible top via the door lock. -
Page 30: Opening And Closing: From Inside
Windows and glass sunroof are opened. but the anti-theft system is not activated. You can have this function activated/ MINI Convertible: The fuel filler door remains unlocked. deactivated and the speed set.< Windows and sliding sunroof are opened.
-
Page 31: Tailgate
TAILGATE To open from the outside Tailgate on the MINI Convertible To close Press the button in the handle strip or the The maximum load that may be To avoid injuries, as with all closing button on the remote control, refer to…
-
Page 32
TAILGATE Manual release in the MINI Convertible In the event of an electrical malfunction, you can also unlock the tailgate manually. 1. Use a master key or ignition key to release the catches of the rear backrests, refer to Through-loading system on… -
Page 33: Electric Power Windows
TAILGATE ELECTRIC POWER WINDOWS From ignition key position 1: Press the switch upwards. The window closes until you release the switch. Watch the closing process to ensure that no one is injured.< After the ignition has been switched off: You can continue using the electric power windows for a limited period as long as no one opens either of the doors.
-
Page 34
Power windows in the MINI 1. Close the doors Convertible 2. Close both windows To open the windows: 3. Press both switches of the power win- >Tap the button:… -
Page 35: Glass Sunroof, Electric
GLASS SUNROOF, ELECTRIC To open and close After the ignition has been switched Be sure that adequate clearance is maintained for the opening path of You can continue using the glass sunroof the glass sunroof; otherwise damage can for a limited period as long as no one opens occur.
-
Page 36: Roller Sun Blind
GLASS SUNROOF, ELECTRIC ROLLER SUN BLIND Trap protection If, while closing, the glass sunroof encoun- ters resistance within roughly the last 8 in/ 20 cm, the closing procedure is interrupted and the roof reopens. Despite the trap protection, be extremely careful that the travel path of the sunroof is not obstructed whenever it is closed.
-
Page 37: Convertible Top With Integrated Sliding Sunroof
So that you can get the most enjoyment can lead to damage or personal injury. out of your MINI Convertible, please Make sure that the convertible top’s travel observe the following tips: path is clear and do not reach into the con- >It is recommended that you close the…
-
Page 38
CONVERTIBLE TOP WITH INTEGRATED SLIDING SUNROOF To close: Press button 1 until the convertible top and sliding sunroof are closed. If the convertible top is left open for a longer period of time, it may be necessary to support the first automatic closing pro- cedure. -
Page 39
CONVERTIBLE TOP WITH INTEGRATED SLIDING SUNROOF Checking Interruption secutive attempts to operate it, the con- vertible top system has overheated. Allow >The LED lights up during convertible top The automatic movement is immediately the system to cool down for approx. operation until the opening or closing interrupted when the buttons for convert- minutes.<… -
Page 40
CONVERTIBLE TOP WITH INTEGRATED SLIDING SUNROOF Manual closing in the event of an electrical malfunction Only close the convertible top manu- ally if it is absolutely necessary. Never open it manually. Improper handling of the convertible top can result in damage. The closing procedure must be completely fin- ished. -
Page 41
Continue to turn the hexagon wrench until the convertible top is locked in place. Please contact your MINI Dealer to have the electrical malfunction repaired.< Online Edition for Part-No. 01 41 0 159 801 — © 09/05 BMW AG… -
Page 42: Wind Deflector
WIND DEFLECTOR With the convertible top open, the wind deflector keeps air movement in the pas- senger compartment to a minimum, thus providing you with a pleasant drive, even at higher speeds. The wind deflector comes folded in a protective pouch and can be stored in the luggage compartment.
-
Page 43
WIND DEFLECTOR Removing Collapsing Adjusting screws 1. Fold down the upper part of the wind 1. To unlock, push the handle of the secur- The gap between the wind deflector and deflector ing pin on the side into its rearmost posi- the side trim panel can be adjusted using 2. -
Page 44: Safe Seating Position
SAFE SEATING POSITION The ideal seating position can make a vital Make sure that passengers do not lean equipped with four seats, each of which is contribution to relaxed, relatively fatigue- their heads against the side or head airbag, provided with a safety belt. free driving.
-
Page 45: Seat Adjustment
SEAT ADJUSTMENT Important adjustment information Never try to adjust your seat while operating the vehicle. The seat could respond with an unexpected movement, and the ensuing loss of vehicle control could lead to an accident. While driving, do not recline the backrest too far toward the rear;…
-
Page 46: Head Restraints
SEAT ADJUSTMENT HEAD RESTRAINTS Lumbar support* Backrest tilt Adjusting You can adjust the contour of the backrest 1. Pull up the lever at the inside of the seat To raise: pull the head restraint upward. for additional support in the curvature of 2.
-
Page 47: Entry To The Rear
HEAD RESTRAINTS ENTRY TO THE REAR Original position Adjust the head restraint in such a way that it is centered roughly at ear Slide the seat back to its home posi- level. Otherwise, there is an increased risk tion before folding back the backrest, of injury in the event of an accident.
-
Page 48: Safety Belts
Airbags are an additional the seats on page 42. safety device and work in conjunction with the safety belts, but do not replace them. Safety belt height in the MINI Convertible To close The seat belt height is adapted to your Make sure you hear the lock engage in the body size if you are sitting correctly.
-
Page 49: Seat Heating
Have the necessary work carried out only by a MINI Dealer or a workshop that has specially trained personnel working in accordance…
-
Page 50: Mirrors
MIRRORS Press the edge of the lens. To fold the mirrors in or out* Press button 3. The mirrors can be folded in or out up to a road speed of approx. 20 mph / 30 km/h. This can be useful on narrow roads, for example, or to reset the mirrors to their correct positions after they have been folded in.
-
Page 51: Vehicle Memory
77. In developing this vehicle, the manufac- turer of the MINI has incorporated a num- This symbol alerts you to Vehicle ber of options which can be programmed Memory functions in the Owner’s specifically for your vehicle.
-
Page 52: Transporting Children Safely
Exception for the front passenger seat diminished.< In principle, all seats in your MINI or MINI Should it be necessary to use a child- Convertible except for the driver’s seat are restraint system on the front passen-…
-
Page 53
As an example, the illustration shows the 2. Guide the tether strap through the being pulled out in order to secure child- MINI COOPER and the MINI COOPER S. mounting for the head restraint restraint systems. 3. Push the head restraint into its lower- There are two additional anchors for child- most position. -
Page 54
TRANSPORTING CHILDREN SAFELY LATCH child-restraint fixing system LATCH: Lower Anchor and Tethers for CHil- dren. The anchor points for the LATCH child- restraint fixing system are behind the marked cover caps. Flip up the correspond- ing cover caps. To mount a LATCH child-restraint sys- tem, follow the system manufac- turer’s operating and safety instructions.<… -
Page 55: Ignition Lock
IGNITION LOCK STARTING THE ENGINE The ignition key cannot be turned to Do not allow the engine to run in position 0 and removed until the selector enclosed spaces. Breathing the nox- lever is in position P. ious exhaust gases can lead to uncon- sciousness and death.
-
Page 56: Switching Off The Engine
STARTING THE ENGINE SWITCHING OFF THE ENGINE PARKING BRAKE Manual transmission You should never remove the ignition key when the vehicle is in motion, as 1. Engage the parking brake the steering lock could engage. 2. Gearshift lever in idle position When you leave the vehicle, always remove 3.
-
Page 57: Manual Transmission
PARKING BRAKE MANUAL TRANSMISSION Reverse gear force. Keep your thumb pressed against the release button while pulling the lever up Before selecting reverse gear, ensure the carefully. vehicle is stationary; then, fully depress the Otherwise, excessive force could lead to clutch and pause briefly before moving the overbraking and loss of traction, i.e.
-
Page 58: Automatic Transmission With Steptronic
AUTOMATIC TRANSMISSION WITH STEPTRONIC In addition to the fully automatic mode, If the engine speed is too high when you can shift gears manually using Step- the vehicle is at a standstill, the selec- tronic, refer to page 57. tor lever is also blocked to protect the transmission.
-
Page 59
AUTOMATIC TRANSMISSION WITH STEPTRONIC Kickdown Kickdown can be used to achieve maxi- mum vehicle performance. Press the accelerator pedal past the increased resistance point at the full-throt- tle position. Available displays M/S + – Manual mode and Sport program P R N D SD M1 to M6 EP Switch from D into M/S + –: This activates the Sport program and dis- plays SD in the gear indicator in the speed-… -
Page 60
AUTOMATIC TRANSMISSION WITH STEPTRONIC Switching from M/S + – Manual mode into In the MINI COOPER S, with the selec- the selector lever positions P, R and N is tor lever in position D, automatic only possible via D. mode, you can shift gears using the shift paddles on the steering wheel. -
Page 61: Parking Lamps/Low Beams
PARKING LAMPS/LOW BEAMS Low beams cle lights should be switched on. For exam- ple, the sensors are not able to detect fog. Turn the light switch to position 2. To avoid safety risks, you should respond to With the low beams on and with these kinds of low-visibility situations by the ignition switched off, only the switching the headlamps on…
-
Page 62: Turn Signal Indicator/Headlamp Flasher
PARKING LAMPS/LOW BEAMS TURN SIGNAL INDICATOR/HEADLAMP FLASHER ‘Lights on’ warning If the lights have not been switched off and the ignition key is in position 0, an acoustic signal sounds for a few seconds when you open the driver’s door to remind you that the lights have not been switched off.
-
Page 63: Interior Lamps
INSTRUMENT LIGHTING FOG LAMPS INTERIOR LAMPS Switching the interior light in the MINI To control the instrument lighting, press When the parking lamps/low beams are on and off manually the button. switched on: Tap the switch upwards or downwards. Press button 1 briefly.
-
Page 64: Washer/Wiper System
The wipers will move once across the wind- shield. To deactivate the rain sensor: Lever in position 0. Switching the interior light in the MINI 0 Wipers parked Switch the rain sensor off when pass- Convertible on and off manually ing through an automatic car wash.
-
Page 65: Washer Fluid
WASHER/WIPER SYSTEM WASHER FLUID You can have this function activated/ deactivated.< Cleaning windshield and headlamps∗ The system sprays washer fluid against the windshield. The wipers are automatically activated for a brief period. When the vehicle lighting is on, the head- lamps are also cleaned at appropriate inter- vals.
-
Page 66: Cruise Control
WASHER FLUID CRUISE CONTROL On the multifunction sports steering wheel Above approx. 20 mph / 30 km/h the cruise control maintains and stores any desired speed. Do not use cruise control when unfa- vorable conditions make it inadvis- able to drive at a constant speed. Other- wise, the vehicle could go out of control and an accident could be caused.
-
Page 67
CRUISE CONTROL To deactivate To continue cruise control If you are already driving with active cruise control, the speed is decreased by approx. Press button 2 repeatedly until the indica- Press button 1. 1 mph / 2 km/h every time you tap the but- tor lamp goes out. -
Page 68: Odometer
ODOMETER CLOCK FUEL GAUGE Setting In the speedometer or Cockpit Chrono 1 Trip odometer/clock Pack* The clock must be shown on the display. 2 Odometer If the LED begins to be lit continuously, 1. If necessary, press button 1 to display there are approx.
-
Page 69: Coolant Temperature Gauge
FUEL GAUGE COOLANT TEMPERATURE GAUGE Drive with moderation and at low engine speeds. If necessary, switch off the engine and allow it to cool down. Checking coolant level, refer to page 115. Temperature warning LED 1 lights up while driving: Engine is too hot.
-
Page 70: Tachometer
Please schedule an appointment with your MINI Dealer or a workshop that has spe- cially trained personnel working in accor- dance with the specifications of your MINI Remaining distance for service Do not operate the engine with the needle manufacturer.
-
Page 71: Onboard Computer
ONBOARD COMPUTER Black ice can occur at temperatures above +36/377 as well. You should therefore drive carefully on bridges and shaded roads, for example; as other- wise there is an increased risk of an acci- dent.< With navigation system: The temperature is displayed in the status line of the navigation system, refer to the Owner’s Manual for Navigation System.
-
Page 72
ONBOARD COMPUTER otherwise engine functions are not guaran- teed and damage could occur.< Average speed, average fuel consumption To reset average consumption, average speed: Press the button in the turn signal indicator lever for a long time. The average consumption is determined for the time during which the engine is run- ning. -
Page 73: Driving Stability Control Systems
DRIVING STABILITY CONTROL SYSTEMS Dynamic Stability Control (DSC)* Your MINI or MINI Convertible is equipped tion, especially when just starting off, with a series of systems that help maintain when accelerating or when cornering. DSC prevents slip at the drive wheels while…
-
Page 74
DRIVING STABILITY CONTROL SYSTEMS Switching the ASC or DSC on again Briefly press the switch once again. The indicator lamp goes out. Indicator lamp The indicator lamp will go out shortly after the ignition has been switched on, refer to pages 17, 18. If the indicator lamp flashes: ASC or DSC is regulating drive torque and braking forces. -
Page 75: Flat Tire Monitor
FLAT TIRE MONITOR The concept System limitations As you drive, the Flat Tire Monitor keeps The Flat Tire Monitor cannot alert you track of the tire inflation pressure in all four to severe and sudden tire damage tires. The system alerts you when there is a caused by external factors, nor does it substantial pressure loss in one of the tires detect the gradual and minor loss of pres-…
-
Page 76
For safety reasons, the manufacturer of your MINI recommends not having dam- If the tire inflation pressure is cor- aged Run Flat tires repaired, but to consult… -
Page 77: Airbags
When needed, the bled only by a MINI Dealer or a workshop head and side airbags help to furnish pro- with specially trained personnel working in tection in the event of side impact.
-
Page 78
MINI. and side airbags for the front passenger. Airbag system malfunctioning Do not place any objects under the seat The indicator lamp shows whether the >The warning lamp does not come on… -
Page 79: Park Distance Control (Pdc)
PARK DISTANCE CONTROL (PDC) The concept System limitations You can have a signal tone set as a confirmation that PDC has been acti- The PDC assists you when you back into a Even with PDC, final responsibility for vated.< parking space. A signal tone tells you the estimating the distance between the current distance to an object behind your vehicle and any objects always remains…
-
Page 80: Air Conditioning System
AIR CONDITIONING SYSTEM 1 Air onto the windshield and onto the 4 Temperature 8 Air distribution side windows 5 Windshield heating 9 Recirculated air mode 2 Air for the upper body area 6 Air volume/Blower 10 Rear window defroster 3 Air for the front and rear footwells 7 Cooling function Online Edition for Part-No.
-
Page 81
AIR CONDITIONING SYSTEM Air volume/Blower Rear window defroster Cooling function You can select blower speeds The LED is lit when the rear win- The LED is lit when the cooling from 1 to 4. Position 0: fan is off. dow defroster is on. function is on. -
Page 82
The integrated microfilter removes dust and pollen from the incoming or recircu- lated air. Your MINI Dealer will replace it during rou- tine maintenance. A substantial reduction in the air supply indicates that the filter must be replaced before scheduled mainte- nance. -
Page 83: Automatic Climate Control
AUTOMATIC CLIMATE CONTROL 1 Air onto the windshield and onto the 5 Interior temperature sensor, please keep 10 Temperature side windows clear and unobstructed 11 Display for air temperature and air 2 Air for the upper body area 6 Recirculated air mode volume 3 Air for the front and rear footwells 7 Cooling function…
-
Page 84
AUTOMATIC CLIMATE CONTROL Automatic air distribution and volume Cooling function The recirculated air mode should not be used constantly over a longer The LED is lit when the AUTO pro- The LED is lit when the cooling period of time; otherwise the air quality in gram is on. -
Page 85
Condensation is removed from the win- lutants from the outside air. dows more quickly when the cooling func- Your MINI Dealer replaces this combined tion is also activated. Draft-free ventilation filter as a standard part of your scheduled… -
Page 86: Glove Compartment
GLOVE COMPARTMENT CENTER ARMREST To open Ventilation Storage compartments Pull the handle. To allow ventilation: Depending on the equipment version , the The light goes on. center armrest between the front seats Turn the rotary switch to the horizontal contains a compartment or a base plate for position.
-
Page 87: Drinks Holders, Ashtray
200 watts at 12 volts. Avoid damaging the socket with plugs of different shapes or sizes. If the vehicle is equipped with a MINI Mobility System, the 12 V socket is also for supplying the compressor. Online Edition for Part-No. 01 41 0 159 801 — © 09/05 BMW AG…
-
Page 88
If you have any additional question, please contact your MINI Dealer or The signal of an original control device can call: 1-800-355-3515. be programmed onto one of the three You can also find more information on the memory buttons 1. -
Page 89
5. Repeat steps 3 and 4 to program other remote control. Read through the operat- Consult your MINI Dealer if you have original control devices. ing instructions for information on syn- questions.<… -
Page 90: Luggage Compartment In The Mini
LUGGAGE COMPARTMENT IN THE MINI Luggage compartment cover When the tailgate is opened, the luggage compartment cover is also raised. Never place any heavy or hard objects on the luggage compartment cover; otherwise occupants could be injured dur- ing braking maneuvers.<…
-
Page 91: Luggage Compartment In The Mini Convertible
LUGGAGE COMPARTMENT IN THE MINI CONVERTIBLE Loading aid Expanding the luggage compartment Through-loading system volume When the convertible top is closed, you can To be able to transport larger objects, the load the vehicle more easily by releasing You can enlarge the luggage compartment rear backrest can be folded down.
-
Page 92: Loading Cargo
LUGGAGE COMPARTMENT IN THE MINI CONVERTIBLE LOADING CARGO Avoid overloading the vehicle so that the permissible carrying capacity of the tires is not exceeded. Overloading can lead to overheating and damage inside the tires. Depending on the circumstances, this can result in sudden air loss.<…
-
Page 93
LOADING CARGO 4. The resulting figure equals the available amount of cargo and luggage load capacity. For example, if the YYY amount equals 1,400 lbs. and there will be four 150 lbs. passengers in your vehicle, the amount of available cargo and luggage load capacity is 800 lbs.: 1,400 lbs. -
Page 94
As an example, the illustration shows the opposite buckle. This provides additional ble, directly behind the backrests, and as luggage compartment of the MINI. stabilization for the backrests. low as possible >Secure smaller and lighter items using >Cover sharp edges and corners… -
Page 95: Roof-Mounted Luggage Rack
Do not secure the roof-mounted luggage wise the vehicle’s operating safety is no rack to the MINI’s trim strips or to the MINI longer assured and it will not be in compli- Convertible top. Otherwise, the lack of a ance with the certification regulations.
-
Page 96
Online Edition for Part-No. 01 41 0 159 801 — © 09/05 BMW AG… -
Page 97
OVERVIEW CONTROLS OPERATION, CARE, MAINTENANCE OWNER SERVICE PROCEDURES TECHNICAL DATA INDEX Operation Online Edition for Part-No. 01 41 0 159 801 — © 09/05 BMW AG… -
Page 98: Break-In Procedures
BREAK-IN PROCEDURES GENERAL DRIVING NOTES Moving parts need to be given some time Tires until they can interact smoothly with one Due to technical factors associated with another. To ensure that your vehicle pro- their manufacture, tires do not achieve vides maximum economy throughout a their full traction potential until after an long service life, we request that you com-…
-
Page 99
This occurs because the mini- Otherwise, even light but consistent pres- mal pressure that must be exerted by the Online Edition for Part-No. 01 41 0 159 801 — © 09/05 BMW AG… -
Page 100
GENERAL DRIVING NOTES Mobile communications in the vehicle Clothes hooks Close the tailgate The manufacturer of your MINI rec- When suspending clothing from the Drive the vehicle only when the tail- ommends that you do not use mobile hooks, ensure that they will not gate is completely closed. -
Page 101: Refueling
REFUELING Observe the following when refueling US models only: Always observe all safety precautions The warning lamp comes on. posted at the service station when The gas cap is not correctly closed handling fuel.< or missing. Check if the gas cap is correctly closed.
-
Page 102
Canada. Fuels containing up to and includ- ing 10% ethanol or other oxygenates with up to 2.8% oxygen by weight, that is, 15% Manual release with the MINI Manual release with the MINI MTBE or 3% methanol plus an equivalent… -
Page 103: Tire Inflation Pressure
MINI. drive with deflated, i.e. flat, tires except if ambient temperature. Your MINI Dealer will be glad to advise you. Run Flat tires are fitted. A flat tire greatly impairs steering and braking response, and…
-
Page 104
30/210 30/210 35/240 35/240 195/55 R 16 87 H 205/45 R 17 84 V M+S A/S MINI COOPER/ 205/45 R 17 84 V MINI COOPER Convertible 175/60 R 15 84 H M+S 175/60 R 16 82 H M+S 195/55 R 16 87 H M+S… -
Page 105
195/55 R 16 87 V 195/55 R 16 87 H M+S 33/230 33/230 33/230 33/230 38/260 38/260 205/45 R 17 84 V M+S A/S MINI COOPER S 205/45 R 17 84 V M+S 35/240 35/240 35/240 35/240 39/270 39/270 205/45 R 17 84 V… -
Page 106
35/240 195/55 R 16 87 V 195/55 R 16 87 H M+S 33/230 33/230 33/230 33/230 38/260 38/260 MINI COOPER S 205/45 R 17 84 V M+S A/S Convertible 205/45 R 17 84 V M+S 35/240 35/240 35/240 35/240 38/260… -
Page 107: Tire Coding
Week 35 of the year 2005. Speed code letter, For example, a tire graded 150 would wear The manufacturer of your MINI recom- in front of the R on ZR tires one and one-half, 1 γ, times as well on the mends replacing all tires after 6 years at government course as a tire graded 100.
-
Page 108: Tire Condition
TIRE CODING TIRE CONDITION Traction Standard No. 109. Grades B and A represent Inspect your tires frequently for tread wear, higher levels of performance on the labora- signs of damage and for foreign objects The traction grades, from highest to low- tory test wheel than the minimum required lodged in the tread.
-
Page 109
Drive carefully to the nearest tire and are marked on the sidewall of the MINI Dealer or tire dealer, or have the vehi- tire with TWI, Tread Wear Indicator. When cle towed there, if necessary. -
Page 110: Run Flat Tires
RSC on safety. This is due to possible variations in In the MINI COOPER S and MINI COOPER S the side of the tire. casing structures and, in some cases, to…
-
Page 111: New Wheels And Tires
Although versa. Keep in mind that no spare wheel is other wheels and tires may theoretically available in the event of a flat. Your MINI have the same dimensions, variations in Dealer will be glad to advise you.
-
Page 112: Snow Chains
Special characteristics of winter tires Only certain types of snow chains have been tested by the manufacturer of your The manufacturer of your MINI recom- MINI, classified as road-safe and recom- mends winter tires for driving in adverse mended. Contact your MINI Dealer for winter road conditions.
-
Page 113: Bonnet
If you are not famil- iar with the regulations to be observed, have the necessary work on your vehicle carried out only by a MINI Dealer or a work- shop that has specially trained personnel working in accordance with the specifica- tions of the MINI manufacturer.
-
Page 114: Mini Cooper And Mini Cooper Convertible
ENGINE COMPARTMENT: MINI COOPER AND MINI COOPER CONVERTIBLE 1 Reservoir for windshield and rear 4 Engine oil filler neck 7 Reservoir for headlamp cleaning window washer system system 5 Battery 2 Vehicle identification number 8 Engine oil dipstick 6 Brake fluid reservoir 3 Coolant expansion tank Online Edition for Part-No.
-
Page 115: Mini Cooper S And Mini Cooper S Convertible
ENGINE COMPARTMENT: MINI COOPER S AND MINI COOPER S CONVERTIBLE 1 Reservoir for windshield and rear 3 Coolant expansion tank 6 Brake fluid reservoir window washer system 4 Engine oil filler neck 7 Reservoir for headlamp cleaning 2 Vehicle identification number…
-
Page 116: Engine Oil
Oil change Have the oil changed only by a MINI Dealer Measuring the oil level As with fuel economy, oil consumption is or a workshop that has specially trained 1.
-
Page 117: Coolant
ENGINE OIL COOLANT Approved engine oils The correct SAE grade for your MINI is Do not open the cooling system when determined by the climatic conditions of the engine is hot. Escaping coolant The quality of the engine oil selected has…
-
Page 118
5. MINI COOPER and MINI COOPER Con- vertible: Press the cap on and press it down firmly. MINI COOPER S and MINI COOPER S Con- vertible: Turn the cap back on and tighten it As an example, the illustration shows the… -
Page 119: Brake System
Have the system checked immediately. Use brake pads which the manufac- turer of your MINI has approved for If the brake fluid level is too low and brake your particular vehicle model. The manu- pedal travel has become longer, there may…
-
Page 120: Mini Maintenance System
MINI covers every kind of operating situation. your vehicle, but also plays a significant Dealer or a workshop that has specially People who drive very little, i.e.
-
Page 121: Socket For Onboard Diagnostics Obd
Dealer.< sions-related components, especially the catalytic converter. Washing your vehicle You can wash your new MINI or MINI Con- If the fuel filler cap is not properly vertible in automatic car washes from the tightened, the OBD system may con- beginning.
-
Page 122
CARING FOR YOUR VEHICLE damage caused by undesired wiper activa- Vehicle paintwork Care of special parts tion.< >Light-alloy wheels Regular care contributes greatly to driving safety and value retention. Use wheel cleaner especially during the Rod antenna winter months, but do not use any Environmental influences varying from one If necessary, for example before aggressive, acidic, strong alkali or rough… -
Page 123
Care of the MINI Convertible’s top The leather and imitation leather used by The appearance and service life of the con- the manufacturer of your MINI are high vertible top largely depend on the proper quality products processed using state-of- care and operation of the convertible top. -
Page 124: Vehicle Storage
CARING FOR YOUR VEHICLE VEHICLE STORAGE If the convertible top is very dirty, it is rec- Your MINI Dealer will be glad to advise you ommended that it be cleaned with a spe- on what is important if the vehicle is to be cial convertible top cleaning agent.
-
Page 125
Online Edition for Part-No. 01 41 0 159 801 — © 09/05 BMW AG… -
Page 126
Online Edition for Part-No. 01 41 0 159 801 — © 09/05 BMW AG… -
Page 127
OVERVIEW CONTROLS OPERATION, CARE, MAINTENANCE OWNER SERVICE PROCEDURES TECHNICAL DATA INDEX Repairs Online Edition for Part-No. 01 41 0 159 801 — © 09/05 BMW AG… -
Page 128: Onboard Tool Kit
4. Unhook the wiper blade towards the tool kit stored at the locations described MINI COOPER S and MINI COOPER S Con- windshield below: vertible: 5. Pull the wiper blade past the wiper arm >Tire change set:…
-
Page 129: Lamps And Bulbs
To replace bulbs which are not described the cable from the negative terminal of the here, please contact a MINI Dealer or a battery. Failure to do this could result in workshop that has specially trained per- short circuits.
-
Page 130
5 watt bulb For checking and adjusting headlamp carried out only by a MINI Dealer or a work- The parking lamps and standing lamps are aim, please contact your MINI shop that has specially trained personnel integrated in the lamp housing of the turn Dealer.<… -
Page 131
1. Slide the lamp toward the rear of the Rear lamp 2: 21/5 watt bulb ment for MINI and MINI Convertible. vehicle and remove Backup lamp 3: 16 watts 2. Remove and replace the bulb. -
Page 132
In the event of a malfunction, please sources for many of the controls and dis- contact your MINI Dealer or a work- plays in your vehicle. These light-emitting shop that has specially trained personnel… -
Page 133: Repairing A Flat Tire
>Vehicles with a space-saver spare tire, 7 Lifting handle refer to the following section >Vehicles with MINI Mobility System, The onboard tool kit includes a pouch with a plastic bag in which you can place the refer to page 135.
-
Page 134
SPACE-SAVER SPARE TIRE Removing the space-saver spare tire 3. Screw the lifting handle from the 5. Squeeze the securing spring onboard tool kit onto the thread 6. The space-saver spare tire is released The screw connection of the space-saver 4. Raise the lifting handle slightly and must be held by the lifting handle spare tire is in the luggage compartment 7. -
Page 135: Changing Tires
SPACE-SAVER SPARE TIRE CHANGING TIRES Driving with the space-saver spare tire Additional safety measures in the event of a tire change: Drive cautiously. Do not exceed a speed of Change the tire only on a level, firm surface 50 mph / 80 km/h. which is not slippery.
-
Page 136
CHANGING TIRES 6. Tighten all the lug bolts firmly in a diag- onal pattern 7. Lower the vehicle 8. Remove the jack. Tightening the lug bolts Tighten the lug bolts in a diagonal pattern. As soon as possible, have the secure seating of the lug bolts, tightening torque 88.5 lb ft/120 Nm, checked using a calibrated torque wrench. -
Page 137: Mini Mobility System
Using the MINI Mobility System In order to repair a flat tire with the MINI Mobility System, proceed as follows: >Pump in liquid sealant, refer to page >Reinflate the tire, refer to page >Distribute liquid sealant, refer to…
-
Page 138
MINI MOBILITY SYSTEM 7. Hold the filling canister with the cap down and squeeze. Squeeze the entire contents of the canis- ter into the tire 8. Remove filling hose 9. Screw valve core into the tire valve with the valve remover. -
Page 139
6. Unscrew hose 1 from the tire valve When changing a tire, always observe the Turn on compressor 2. Correct the tire 7. Store the MINI Mobility System back in safety measures and the procedure for inflation pressure to the specified value, the vehicle. -
Page 140: Vehicle Battery
Individual settings are also lost and it from tilting during transport.< must be reprogrammed: MINI COOPER S and MINI COOPER S Con- >The clock must be reset, refer to page vertible: >The power windows must be reinitial- The battery is located in the luggage com- ized, refer to page partment under the floor mat.
-
Page 141: Fuses
Convertible to the right of the battery. trim panel. In the MINI COOPER S and the MINI COO- Open the fuse box lid. To do so, press the PER S Convertible to the right of the air fil- fastener.
-
Page 142: Jump-Starting
Make sure that there is ing and pose an injury hazard.< In the MINI COOPER S and the MINI no contact between the bodywork of the COOPER S Convertible, the auxiliary jump- two vehicles to avoid a short circuit haz- starting terminal, arrow 1, acts as the posi- ard.<…
-
Page 143: Towing And Tow-Starting
3. Allow the engines of both vehicles to run onboard tool kit, refer to page 126; be sure Engine or body ground in your MINI or MINI for several minutes. that it remains with the vehicle at all times.
-
Page 144
Attach the tow bar to the towing eye- The illustration shows by way of example let only. Attaching it to other parts of Only tow vehicles featuring auto- the MINI COOPER and the MINI COOPER the vehicle can result in damage.< matic transmission with Steptronic Convertible. -
Page 145
With a tow truck: 2. Turn the ignition key to position 2 Have the MINI or MINI Convertible trans- 3. Engage the 3rd gear ported by a tow truck with a lift sling, or on 4. Have the vehicle towed with the clutch a flatbed. -
Page 146
Online Edition for Part-No. 01 41 0 159 801 — © 09/05 BMW AG… -
Page 147
OVERVIEW CONTROLS OPERATION, CARE, MAINTENANCE OWNER SERVICE PROCEDURES TECHNICAL DATA INDEX Data Online Edition for Part-No. 01 41 0 159 801 — © 09/05 BMW AG… -
Page 148: Engine Data
ENGINE DATA MINI COOPER, MINI COOPER S, MINI COOPER S, MINI COOPER Convertible MINI COOPER S Convertible MINI COOPER S Convertible with John Cooper Works Displacement cu in/cmµ 97.5/1,598 97.5/1,598 97.5/1,598 Number of cylinders Maximum output hp/kW 115/85 168/125 208/155…
-
Page 149: Dimensions Mini
DIMENSIONS: MINI All measurements in inches/millimeters. Smallest turning circle dia. 34 ft 10 in/10.66 m. Values following a ; are differing values for MINI COOPER S. Online Edition for Part-No. 01 41 0 159 801 — © 09/05 BMW AG…
-
Page 150: Mini Convertible
DIMENSIONS: MINI CONVERTIBLE All measurements in inches/millimeters. Smallest turning circle dia. 34 ft 10 in/10.66 m. Values following a ; are differing values for MINI COOPER S. Online Edition for Part-No. 01 41 0 159 801 — © 09/05 BMW AG…
-
Page 151: Weights Mini
816/370 Approved front axle load lbs/kg 1,918/870 1,962/890 Approved rear axle load lbs/kg 1,609/730 1,698/770 Approved roof load, with special MINI roof rack lbs/kg 165/75 165/75 Luggage compartment volume cu ft/liters 5.3/150 5.3/150 with rear backrest folded down cu ft/liters 23.7/670…
-
Page 152: Mini Convertible
771/350 Approved front axle load lbs/kg 1,918/870 1,962/890 Approved rear axle load lbs/kg 1,697/770 1,763/800 Approved roof load, with special MINI roof rack lbs/kg – – Luggage compartment volume cu ft/liters 4.2/120 4.2/120 with luggage compartment cover hooked in above cu ft/liters 5.8/165…
-
Page 153: Capacities
Cooling system including heater circuit quarts/liters 5.6/5.3 MINI COOPER and More details, refer to page MINI COOPER Convertible 6.3/6.0 MINI COOPER S and MINI COOPER S Convertible Engine with oil filter change quarts/liters 4.8/4.5 MINI COOPER and High Performance Synthetic Oil:…
-
Page 154
Online Edition for Part-No. 01 41 0 159 801 — © 09/05 BMW AG… -
Page 155
OVERVIEW CONTROLS OPERATION, CARE, MAINTENANCE OWNER SERVICE PROCEDURES TECHNICAL DATA INDEX Index Online Edition for Part-No. 01 41 0 159 801 — © 09/05 BMW AG… -
Page 156
EVERYTHING FROM A TO Z All-season tires, refer to Winter Automatic transmission with Belts, refer to Safety belts ABS Antilock Brake System tires Steptronic Beverage holders indicator lamp 17, Antenna ignition Black ice, refer to Temperature Accessories, refer to Your Antifreeze indicator lamp warning… -
Page 157
Vehicle Memory California Proposition 65 Cargo area, refer to Luggage Chrome-plated parts, care Consumption, refer to warning compartment in the MINI Cigarette lighter Average consumption Capacities Carpet care Cigarette lighter socket Current fuel consumption Car care, refer to Caring for your… -
Page 158: Display Elements With Navigation System Or Cockpit Chrono Pack
EVERYTHING FROM A TO Z Convertible top Cup holders, refer to Beverage Defrosting and demisting Disposal care holders windows vehicle battery convenience operation Curb weight, refer to air conditioning system Distance covered, refer to electrical malfunction Weights 149, automatic climate control Odometer emergency closing Current fuel consumption…
-
Page 159
Failure of an electrical Foot braking, refer to General fuel filler door COOPER Convertible consumer driving notes glass sunroof, electric MINI COOPER S and MINI Fastening safety belts, refer to Front airbags tailgate COOPER S Convertible Safety belts Front turn signal indicators,… -
Page 160
EVERYTHING FROM A TO Z Fuel filler door Glass sunroof, electric Heating Ignition lock unlocking in the event of convenience operation exterior mirrors Illuminated vanity mirror electrical malfunction opening and closing in the rear window 79, Imitation leather Fuel tank capacity event of an electrical seats Imprint… -
Page 161
Jets, refer to Windshield Light-emitting diodes Luggage compartment in the fuel filler door washer jets (LEDs) MINI glass sunroof, electric John Cooper Works Kit Lighter Luggage compartment lid tailgate Jump-starting Lighting of the instruments emergency operation, refer Manual air distribution… -
Page 162
Onboard computer warning lamp Memory restraints Onboard tool kit Parking lamps Microfilter New tires MINI Mobility System bulb replacement air conditioning system Non-smoker’s equipment Run Flat tires Parking lamps/Low beams automatic climate control package, refer to Cigarette space-saver spare tire… -
Page 163
Power windows compartment cover Reservoir, washing systems Safety belt height Pressure, tires Rear turn signal indicators, bulb Restraint systems adjustment reinflation using MINI replacement for children Safety belts Mobility System Rear window wiper 63, refer to Safety belts care Protective function, electric… -
Page 164
Selector lever positions, refer to Ashtray transmission with Luggage compartment in the automatic transmission with Snow chains Steptronic MINI Convertible Steptronic Socket 12 V Stability control, refer to Storing the tires Selector lever shiftlock, refer to Socket for Driving stability control… -
Page 165
Torque Trip odometer Temperature display Tire puncture engine Trunk, refer to Luggage ice warning Run Flat tires lug bolts compartment in the MINI outside temperature Tow bar Convertible setting units Tow rope Turn signal indicators Temperature grades Towing indicator lamp… -
Page 166
Universal remote control parking Weights 149, Windshield wipers Unlocking storage Wheel stud wrench intermittent operation bonnet washing MINI Mobility System Windshield wipers, refer to from inside weight 149, space-saver spare tire Washer/wiper system from outside Vehicle battery Wheel/tire combination Windshield, cleaning… -
Page 167
REFUELING Fuel Designation Please enter your preferred fuel quality here. Engine oil Quality The oil volume between the two marks on the dip- stick corresponds to approx. 1.1 US quarts/1 liter. Tire inflation pressure Summer Winter To ensure that you always have convenient access to all essential information when you stop for fuel, front rear… -
Page 168
*BL015980100Y* DRIVE ME. Online Edition for Part-No. 01 41 0 159 801 — © 09/05 BMW AG…
Расшифровка символов на приборной панели.

Предлагаем нашим читателям самый полный список значков-символов, которые могут загораться на приборной панели автомобилей. Современные автомобили имеют множество датчиков и сенсоров, а также и электронное управление двигателем. Вся информация с датчиков стекается в бортовой компьютер автомашины. В случае какой-либо ошибки, поломки или другой необходимости сообщить водителю важную информацию, автопроизводители предусмотрели на приборной панели большое количество сигнальных символов и надписей, которые при определенных условиях тут-же загораются. К всеобщему сожалению, такое большое разнообразие сигнальных символов на приборной панели машины путает многих наших водителей, а иногда даже просто пугает. Мы собрали для вас дорогие читатели более 150 сигнальных значков-символов, которые встречаются сегодня в более-чем в 2000 автомобилях. В данный обзор включены 30 автомобильных марок машин.
Почему значки-символы на приборной панели разного цвета?

Производители автомобилей предусмотрели в них несколько видов таких надписей и символов на приборной панели, разделив их по цвету (цветовой гамме). Например, если вы видите на приборке (на приборной панели) не красный значок-символ, а например зеленый или синего цвета, то ваша автомашина скорее всего работает по-прежнему в нормальном режиме и Вы спокойно можете продолжать движение. Но тем не менее, вы ни в коем случае не должны игнорировать появление любого предупреждающего сигнала на приборной панели.
Если на данной панели появился красный значок-символ, то электронная система автомобиля заранее предупреждает вас о потенциальной серьезной проблеме.
Если на приборной панели появился желтый или оранжевый значок-символ, то автомобиль также предупреждает вас о том, что вашему автомобилю возможно требуется техническое обслуживание, или диагностика, или ремонт.
Обратите друзья ваше внимание на тот момент, когда значок-символ мигает, в таком случае Вы не должны затягивать на долго с поездкой в автотехнический центр.
И так уважаемые читатели приступим и начнем наши разъяснения с наиболее важных и серьезных значков-символов на приборной панели, а далее в порядке убывания и по их значимости (важности) мы продолжим постепенно описывать данные значения значков-символов находящихся на приборных панелях автомобилей.
Предупреждающие символы — Серьезные предупреждения.

Если вы видите на приборной панели какой-либо из ниже указанных следующих символов, ни в коем случае не игнорируйте данное предупреждение. Немедленно остановитесь, заглушите двигатель и далее срочно обратитесь в автотехнический центр или автосервис.
Внимание! Нижеуказанные предупреждающие символы (значки) не должны быть Вами проигнорированны. В противном случае ваш автомобиль в любой момент может быть серьезно поврежден.
 |
Предупреждающие индикаторы тормозной системы. |
 |
 |
Система охлаждения двигателя, индикатор температуры. |
 |
 |
Уровень масла в двигателе или давление масла. |
 |
 |
Датчик индикатора уровня масла в двигателе. |
 |
 |
Индикатор зарядки аккумулятора. |
 |
Обычные и общие значки-символы на приборной панели.

Следующие символы на приборной панели автомобилей предназначены для того, чтобы предупреждать водителя о плановых потребностях их автомашины и напоминать им о том, что необходимо в этом случае сделать. Например, данный вид значков-символов предупреждает Вас о низком уровне стеклоомывающей жидкости или о том, что вы не закрыли за собой плотно дверь. Этот вид значков-символов может загораться как на самой приборной панели, так и на информационно-развлекательной системе автомобиля (на экране по центру консоли).
 |
Напоминание о не пристегнутом ремне безопасности |
||
 |
Символ дверей автомобиля. Может предупреждать о не закрытой двери. |
 |
|
 |
Уровень топлива, индикатор низкого уровня топлива. |
||
 |
Значок жидкости стеклоомывателя. Низкий уровень жидкости. |
||
 |
Контроль давления в шинах. Если загорелся, то в шинах упало давление. |
 |
|
 |
Check Engine — Чек двигателя. Ошибка работы двигателя. Подробнее… |
 |
 |
 |
Напоминание о необходимости технического обслуживания автомобиля. |
 |
 |
Осветительные значки и символы в автомобилях.

Ниже представлены все индикаторы на приборной панели, которые связаны с системой освещения вашего автомобиля. Многие значки-символы многие из нас наверняка видели в своей автомашине. Большинство из них загораются зеленым или синим цветом.
 |
Значок включенных фар. |
||
 |
Символы неисправности фар. |
 |
 |
 |
Значок включенного дальнего света. |
||
 |
Включена автоматическая система ближнего света. Датчик света. |
||
 |
Автоматическая система управления дальним светом. |
||
 |
Значок о выравнивании фар. Если горит, то необходима диагностика. |
 |
|
 |
Неисправность поворотников. |
||
 |
Индикатор дневных световых огней. |
||
|
|
Неисправность лампочки в задних фарах. |
||
 |
Символ габаритных огней. |
||
 |
Символ задних противотуманных фар. |
||
 |
Стрелки, указывающие на работу поворотников или включенную аварийную сигнализацию. |

Информационные дисплеи на приборной панели для технических сообщений и предупреждений.


В последние годы во всех современных автомобилях производители стали устанавливать в приборную панель информационные дисплеи, которые созданы в первую очередь для того, чтобы сообщать водителю более подробную информацию об автомобиле, а также о многих работающих системах в автомобиле. Как правило этот информационный экран установлен в машине по центру приборной панели.
На авторынке в наше время существует огромное количество автомобилей, которые оснащены подобным экраном, данный экран способен выводить на дисплей различную информацию об ошибках, различные предупреждения и т.п. сигналы.
Символы неисправности систем автомобиля и предупреждения о безопасности.

Если Вы увидите на приборной панели указанные значки-символы, то обратитесь друзья напрямую к дилеру или в автосервис как можно быстрее. Внимание! Символы (значки) указаны в порядке их важности, от серьезных к менее серьезным предупреждениям.
 |
Значок загорается вместе с появлением предупреждения-сообщения на приборной панели. В Европейских автомобилях желтый знак(цвет) означает неисправность системы контроля устойчивости. |
 |
|
 |
Ошибка подушки безопасности. |
 |
|
 |
Индикатор не активных боковых подушек безопасности. |
||
 |
Предупреждение о не пристегнутых ремнях безопасности водителя и переднего пассажира. |
||
 |
Предупреждение о непрестегнутых ремнях безопасности задних пассажиров. |
||
 |
Индикация сигнализации автомобиля / Значок Иммобилайзера. |
 |
 |
 |
Ошибка коробки передач. Неисправность АКПП. |
 |
|
 |
Предупреждение о перегреве АКПП или системы привода. |
||
 |
Перегрев коробки передач или проблема со сцеплением. |
||
 |
Слишком большая температура масла в коробке передач. |
||
 |
Неисправность усилителя рулевого управления. |
||
 |
Стояночный тормоз (ручник). |
 |
|
 |
Низкий уровень тормозной жидкости. |
||
 |
Антиблокировочная тормозная система. |
 |
 |
 |
Символ о износе тормозных колодок. |
||
 |
Проблемы с электронным управлением тормозной системы. |
||
 |
Неисправность электрического стояночного тормоза (ручник). |
||
 |
Предупреждение о необходимости нажать педаль тормоза перед запуском двигателя или перед переключением коробки передач. |
 |
|
 |
Система контроля за давлением в шинах. При появлении проверьте давление. |
 |
|
 |
Check Engine — Чек двигателя. Подробнее здесь… |
 |
 |
 |
Проверьте электрооборудование двигателя. |
||
|
|
Снижение мощности двигателя. |
||
 |
Неисправность двигателя. |
||
 |
Лямбда-зонд. Индикатор неисправности датчика кислорода. |
||
 |
Не закрыт бензобак. Воздух в топливной системе. |
||
 |
Символ, указывающий на наличие информационного сообщения в системе. |
||
 |
Необходимость ознакомиться с руководством по эксплуатации автомобиля. |
||
 |
Перегрев или неисправность катализатора. |
||
 |
Низкий уровень охлаждающей жидкости. |
 |
 |
 |
Проблемы с охлаждением двигателя / Низкий уровень охлаждающей жидкости. |
 |
|
 |
Проблема с электронной системой управления дроссельной заслонкой. |
||
 |
Индикатор загрязнения воздушного фильтра. |

Значки-символы на приборной панели систем помощи и безопасности.

Новые автомобили кроме стандартных пиктограмм на приборной панели имеют множество новых неизвестных многим символов, которые относятся к индикации многих функций систем безопасности и помощи водителю.
 |
Индикация системы контроля тяги. |
 |
|
 |
Низкая скорость автомобиля / Система помощи спуска с горы. |
 |
|
 |
Режим движение по бездорожью на маленькой скорости. |
||
 |
Система стабилизации выключена. |
||
 |
Различные индикаторы контроля стабильности и устойчивости — Выключена. |
 |
|
 |
Система динамической стабилизации выключена. |
||
 |
Неисправность антипробуксовочной системы / Неисправность электронной тормозной системы. |
||
 |
Система предупреждения о заносе автомобиля / Система контроля устойчивости. |
 |
 |
Специальные и дополнительные значки-символы на приборной панели автомобилей.

Все символы и индикаторы которые мы внесли в эту группу, напрямую связаны с особыми и новыми технологическими функциями в современных автомобилях. Часть символов из этой группы в случае индикации зеленым цветом означают следующее, что в данный момент времени они активны. Другие же символы при появлении их на приборной панели сообщают водителю о том, что появилась проблема с работой той или иной функции. Как правило при таких проблемах высвечиваются либо желтые, либо красные значки-символы.
 |
Неисправность крыши в кабриолете. |
||
 |
Индикация обнаружения бесконтактного ключа. |
 |
 |
 |
Ключ не обнаружен. |
 |
|
|
|
Индикатор предупреждения отрицательной температуры на улице. |
||
 |
Предупреждение водителю о необходимости отдыха. |
 |
|
 |
Система предупреждения об опасном сближении автомобиля с другими ТС. |
||
 |
Индикация легкого доступа в автомобиль. |
||
 |
Индикация включенного круиз-контроля. |
||
 |
Значок включенного круиз-контроля. |
||
 |
Активный адаптивный круиз-контроль. |
 |
 |
 |
Проблемы с круиз-контролем. |
 |
 |
 |
Автоматический ограничитель скорости (ASL). |
||
 |
Система контроля полосы и безопасность проезда перекрестков. |
 |
 |
 |
Система безопасности столкновения выключена или неисправна. |
 |
|
 |
Предупреждение об опасности столкновения в задней части машины. |
 |
|
 |
Система оповещения об опасности столкновения в передней части машины. |
||
 |
Предупреждение о пешеходе на дороге. |
 |
|
 |
Система предупреждения о нахождении автомобиля в мертвой зоне. |
 |
|
 |
Система помощи при парковке. |
 |
|
 |
Система предупреждения о нажатой педали тормоза. |
||
 |
Включена система режима работы подвески СПОРТ. |
||
 |
Режим буксировки / Индикация наличия прицепа. |
 |
|
Различные символы экономии топлива: |
|||
 |
Функция запуска системы стоп-старт. |
 |
 |
 |
Неисправность системы старт-стоп. |
 |
|
 |
Включен режим экономии топлива. |
||
 |
Включен режим экономии топлива. |
||
 |
Предупреждение о необходимости перейти на другую передачу (МКПП). |
 |
|
 |
Индикация спорт-режима автомобиля. |
||
Различные значки в полноприводных автомобилях: |
|||
 |
Включен полноприводный режим (AWD). |
||
 |
Привод на все четыре колеса. |
 |
|
 |
Блокировка дифференциала. |
 |
 |
 |
Блокировка заднего дифференциала. |
 |
|
 |
Неисправность полного привода. |
 |
|
 |
Система помощи спуска с горы или система безопасности при движении в гору. |
 |

Символы и значки на приборной панели гибридных автомобилей.

За последние несколько лет в авто-мире появилось немало гибридных и электрических автомобилей, которые имеют совсем новые специфические значки-символы на приборной панели. В большей своей части эти специальные символы в гибридных автомобилях обозначают следующее, а именно, как работает гибридная система и в каком именно режиме она действует. Внимание! Мигающий значок на приборной панели гибридной машины, как правило означает какую-либо проблему с самим автомобилем. В этом случае Вы обязательно должны обратиться в автотехнический центр к дилеру.
 |
Неисправность аккумулятора. |
 |
 |
Предупреждающий индикатор электронной системы. |
|
 |
Высокое напряжение аккумуляторной батареи. |
|
 |
Индикатор низкого напряжения аккумуляторной батареи. |
|
 |
Мощность ограничена. |
|
 |
Индикатор зарядки аккумуляторной батареи. |
 |
 |
Режим тяги на одном электродвигателе. |
|
 |
Готовность гибридной установки. |
 |
 |
Режим тяги на одном электродвигателе. |
|
 |
Система внешней звуковой системы для предупреждения пешеходов о движении электроавтомобиля. Неисправность. |
 |
Символы (значки), используемые в дизельных автомобилях.

Ниже нами представлены значки-символы приборной панели, которые используются в дизельных автомобилях.
 |
Индикация работы свечи накаливания. |
||
 |
Предупреждение о сажевом фильтре. |
 |
|
 |
Предупреждение о проблемах с выхлопом из-за сажевого фильтра. |
 |
|
 |
Вода в топливной системе. |
 |
 |
Количество систем в автомобилях постоянно растет, развиваются новые технологии, ассистенты и автопилоты. Автопроизводители часто внедряют в свои автомобили схожие технологии, но под собственными названиями, поэтому проблема с одной и той же системой может отображаться на приборной панели разными значками. В этом материале мы собрали каталог индикаторов (значков) на приборных панелях автомобилей с подробными описаниями и расшифровками их обозначений.
Как правило, значки зеленого цвета обозначают активацию какой-то автомобильной системы, желтые и красные говорят о неисправностях. Значки красного цвета обычно говорят о более серьёзных проблемах, либо могут означать критические неисправности, при которых использование автомобиля недопустимо.
Значки с критическими неисправностями
Восклицательный знак в круге или надпись Brake

Включен ручной тормоз или неполадки с тормозной системой (низкий уровень тормозной жидкости, чрезмерный износ колодок и другое), или неисправность одного из датчиков.
Синий или красный термометр (градусник)

Проблемы с температурой двигателя. Красный термометр означает перегрев — необходимо срочно заглушить двигатель, синий термометр означает низкую температуру двигателя — перед началом движения стоит прогреть мотор. Также данные ошибки могут возникать из-за неисправных температурных датчиков.
Масленка с каплей (чайник)
Обычно обозначает низкое давление масла в двигателе или неисправность датчика давления масла. Иногда также этот значок значит низкий уровень масла, хотя для последнего чаще встречается другое обозначение (смотрите ниже).
Масленка с волнами или надписями Oil level, Min, Sensor

Низкий уровень масла в двигателе или неисправность датчика уровня масла. Проверьте масляный щуп. Некоторые из этих значков также могут обозначать низкое давление масла в моторе.
Аккумулятор или аккумулятор с надписью Main

Если горит лампа аккумулятора это означает низкий заряд батареи, отсутствие зарядки аккумулятора в следствие неисправности генератора или проблемы в его цепи. На гибридных автомобилях чаще встречается с надписью Main.
Двигатель с надписью STOP или просто надпись STOP

Такая сигнальная лампа означает необходимость экстренной остановки двигателя. На автомобилях ВАЗ обычно означает низкий уровень тормозной жидкости или масла. Появление такого значка может сопровождаться звуковым сигналом. Движение лучше прекратить.
Неисправности систем безопасности
Надпись Airbag, SRS, «беременный мужик»

Ошибка по SRS (Supplemental Restraint System) — вспомогательной удерживающей системе, относится к системам пассивной безопасности. Лампочка SRS горит если есть проблема с подушками безопасности или в их цепи. Автомобилисты именуют первый значок «беременный мужик», эта ошибка часто возникает из-за окисления контактов в цепи к подушкам безопасности, на некоторых авто это «болячка».
Легковой автомобиль и волны вокруг

Ошибка системы предупреждения столкновений. Обычно используется в автомобилях с системами автономного управления, укомплектованных камерами и/или радарами.
Человек с ремнем, надпись Side Airbag Off

Обозначает отключение подушки безопасности переднего пассажира. Это может быть признаком неисправности в цепи, проблемы с подушкой безопасности, либо же попросту подушка переднего пассажира отключена — современные авто имеют такую функцию — с отключенной подушкой можно перевозить детей спереди в детских креслах. Переключатель обычно находится в правом торце торпедо.
Надпись ABS, Antilock, значок скользящего автомобиля

Все эти индикаторы обозначают проблему с антиблокировочной системой ABS. Обычно датчики этой системы есть в каждом колесе и неисправность любого из сенсоров будет вызывать такую ошибку. Требуется диагностика.
Восклицательный знак в красном треугольнике
Открыта одна из дверей, багажник или капот, не пристегнут ремнем безопасности водитель или пассажиры или иные нештатные ситуации. Индикатор может сочетаться с писком зуммера.
Восклицательный знак в оранжевом треугольнике

Проблемы в электронной системе контроля устойчивости автомобиля (ESP).
Надпись RSCA OFF
Отключены боковые шторки безопасности, срабатывающие при переворачивании автомобиля. Обычно кнопкой с возможностью отключения данной системы комплектуются внедорожники — при сильных кренах кузова шторки могут сработать.
Надпись PCS или машина с ключом

Отключена система предупреждения столкновений или предаварийной безопасности — PCS (Pre-collision system или Pre-crash system).
Надпись EPB
Сигнальный индикатор системы электронного стояночного тормоза (EPB)
Значок ключа или машины с замком

Активирована штатная сигнализация или иммобилайзер. После распознавания ключа должна потухнуть. Если этого не происходит ключ не распознается или есть иная проблема.
Красный круг
Красный круг или мяч означает активацию противоугонной системы в результате которой был заблокирован двигатель. После распознавания ключа должна потухнуть, если этого не происходит — возможно есть проблема с иммобилайзером или ключ не распознается.
Ошибки и индикаторы автоматической коробки передач
Восклицательный знак в шестеренке красного или желтого цвета

Ошибка с шестеренкой желтого цвета означает проблемы с автоматической коробкой передач и ее работе в аварийном режиме. Красная шестеренка может также означать проблемы с силовым агрегатом.
Надписи AT или A/T Oil Temp, гаечный ключ, термометр в шестеренке

Включение одного из данных индикаторов означает наличие проблем с автоматической трансмиссией — AT (Automatic Transmission). Чаще всего это означает перегрев масла в коробке передач или неисправность температурного датчика. Желтые лампочки предупреждают о наличии проблем, при загорании красной лучше прекратить движение. Также такие лампочки могут означать проблемы с блоком управления коробкой передач.
Ошибки P-Shift; A/T P; P
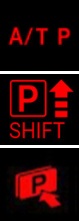
Такие значки на панели приборов означают аварийный (или сервисный) режим автоматической коробки передач. Могут означать как неисправность, так и перевод коробки передач в сервисный (нейтральный) режим для обслуживания на СТО (в автомобилях предусмотрена кнопка для включения этого режима).
Ось автомобиля с рычагами

Может означать различные проблемы с узлами трансмиссии, в том числе перегрев коробки передач, проблемы со сцеплением и другое. Точное значение для конкретного автомобиля читайте в руководстве по эксплуатации.
Коробка передач и надпись Auto
Такая лампочка может загореться только на автомобилях с автоматической коробкой передач. Означает наличие проблем с АКПП — низкий уровень масла, высокая температура, проблемы с блоком управления АКПП или датчиками.
Стрелка вверх
Подсказывает о необходимости сменить передачу на более высокую.
Надпись CVT
Ошибка по бесступенчатой коробке передач или вариатору CVT (Continuously Variable Transmission).
Надпись 2nd STRT
В некоторых автомобилях с автоматической коробкой передач есть функция трогания с места на второй передаче, которая помогает начать движение в сложных условиях (гололед). Подсветка этой лампочки означает активацию системы.
Ботинок в кружочке со скобками
Этот индикатор бывает на автомобилях с автоматической трансмиссией. Напоминает о необходимости нажать на педаль тормоза, прежде чем включить передачу.
Иконка автомобиля с гаечным ключом
Может обозначать проблемы с двигателем, трансмиссией или иммобилайзером. Конкретно что обозначает эта лампочка в вашем автомобили смотрите в руководстве по его эксплуатации.
Надпись PWR
Эта лампочка горит когда активирован режим «Power» в автомобиле с автоматической коробкой передач. В этом режиме переключение на более высокую передачу происходит на более высоких оборотах чем обычно с целью получить максимальную мощность.
Надпись O/D Off или Over Drive Off
Эта лампочка сообщает об отключении системы OverDrive. Есть только на автомобилях с автоматической коробкой передач, при отключении этой системы машина не будет переходить на повышенную передачу для экономии топлива. При наличии системы OverDrive должна быть и кнопка ее отключения.
Прочие ошибки на панели приборов
Волны в круге и скобки с двух сторон
Индикатор обозначает низкий уровень тормозной жидкости.
Руль с восклицательным знаком
Проблемы с системой рулевого управления с электроусилителем (EPS).
Красная буква P в кружочке со скобками
Включен ручной (стояночный) тормоз. На новых автомобилях «ручной» тормоз автоматически включается при остановке автомобиля.
Желтый восклицательный знак в кружочке со скобками
Проблема с системой распределения тормозных усилий (Electronic brakeforce distribution, EBD). Это более развитая система чем ABS и она действует постоянно, а не только при экстренном торможении.
Желтый круг с прерывистыми скобками
Индикатор износа колодок. Информация поступает от датчиков-расходников, которые постепенно стирается вместе с колодками, пока не разорвется электрическая цепь — в этот момент и загорается такая лампочка. Нужно заменить колодки или проверить датчики.
Молния в кружочке со скобками
Система обнаружила проблему с электрическим стояночным тормозом.
Индикатор низкого давления шин

Такие индикаторы обычно используются у автомобилей, оборудованных датчиками давления шин. Сообщают о низком давлении в шинах (падение давления на более чем 25% от номинального).
Иконка двигателя с надписью Check, надписи Check Engine, EPC

Такие ошибки обозначают наличие проблем с двигателем. Лампочка горит только при заведенном двигателе. Это могут быть неисправности датчиков, плохая топливо-воздушная смесь и так далее. Check Engine с английского переводится «проверьте двигатель». Ошибка может сопровождаться неровной работой мотора, плохой тягой, рывками при движении и так далее. Эту ошибку автомобилисты часто в шутку называют «джеки чан». Надпись EPC (Electronic Power Control) можно увидеть на автомобилях концерна Volkswagen Group, означает проблемы с зажиганием или управлением двигателем.
Надпись ENG A-Stop

Такой индикатор можно увидеть на автомобилях с системой старт-стоп. Зеленый значок горит при заглушенном двигателей, желтый сигнализирует о неисправностях с этой системой.
Двигатель со стрелкой вниз
Индикатор плохой тяги мотора (снижение его мощности).
Значок с греческой буквой λ (лямбда) в треугольнике
Система обнаружила неисправности в датчике-кислорода (так называемый лямбда-зонд). Таких датчиков в автомобиле может быть несколько, они участвуют в регулировке топливовоздушной смеси. При неисправности может быть повышенный расход топлива или плохая тяга.
Индикатор катализатора
Проблемы с нейтралитическим катализатором системы выпуска отработанных газов — перегрев или иная неисправность.
Крышка бензобака или надпись Check Gas Cap

Открыта крышка бензобака или в топливную систему попадает воздух. Надпись Check Gas Cap переводится как «проверьте крышку бака»,
Буква «i» в круге
Информационное сообщение, может также напоминать о наличии какой-то другой ошибки.
Книга с буквой «i»
Рекомендация ознакомиться с инструкцией по эксплуатации автомобиля,
Индикатор низкого уровня охлаждающей жидкости

Данные лампочки в том или ином виде сообщают о низком уровне охлаждающей жидкости в системе или неисправности датчика, отвечающего за отслеживанием ее уровня — чаще всего контакты датчика окисляются.
Молния и две скобки
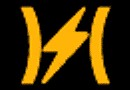
Ошибка в электронной системе управления дроссельной заслонкой.
Машина на подъемнике, надписи Maint REQD, Service, Oil change

В основном эти лампочки сообщают о завершении интервала технического обслуживания и напоминают о необходимости посетить сервис для замены масла или обслуживания. Обычно интервал устанавливается в дилерском центре, ошибка снимается там же с помощью специального диагностического устройства. Некоторые из этих ошибок иногда могут означать серьезные поломки, читайте руководство по пользованию вашим автомобилем.
Точки и стрелки
Когда горит такая лампочка это говорит о том, что воздушный фильтр двигателя плохо пропускает воздух, требуется его замена.
Надпись Night view
Night view переводится как «ночное виденье» — обозначает проблемы с системой ночного виденья, скорее всего неисправны инфракрасные датчики или их цепь.
Надпись VGRS
Проблемы с рулевым управлением с переменным передаточным числом. Эта технология называется VGRS (Variable Gear Ratio Steering).
Надписи ETCS, ECT PWR, EML

Проблемы с системами ETCS или ETC (Electronic Throttle Control System, Electronic Throttle Control) — электронное управление дроссельной заслонкой, ECT (Electronically Controlled Transmission) — электронно-управляемая система передачи, EML (Elektronische Motorleistungsregelung) — электронная система управления двигателем.
Неисправности систем стабилизации
Надписи Trac, DTC, VSA, TCS
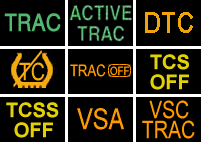
Такие лампочки обозначают проблемы с антипробуксовочной системой, которая может иметь различные названия — TRAC (Traction and Active Traction Control), DTC (Dynamic Traction Control), TCS (Traction Control System). Антипробуксовочная система связана с тормозной, поэтому в случае проблем с последней могут быть ошибки и по DTC.
Надпись КDSS
Ошибка по KDSS (Kinetic Dynamic Suspension System) означает, что система кинетической стабилизации подвески неисправна.
Значки спуска/подъема в гору
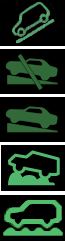
Подсветка этих индикаторов носит информационный характер и отображает состояние вспомогательных систем подъема или спуска в гору. Могут присутствовать на машинах, в списке оборудования которых значатся системы помощи при трогании с места и поддержания постоянной скорости.
Надписи ESP BAS
Обнаружена неисправность с системой помощи при экстренном торможении ESP (Electronic Stability Program) и стабилизации BAS (Brake Assist System). Обе системы связаны друг с другом, поэтому на лампочке изображены аббревиатуры двух систем сразу.
Надписи VDC OFF, DSC OFF, VCS OFF
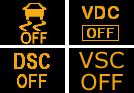
Все эти лампочки означают отключение системы стабилизации (Stability Control), отвечающей за выравнивание автомобиля в экстренных ситуациях (например, при заносе). У разных производителей данные системы именуются по-разному.
Индикатор горного тормоза
Если этот значок горит зеленым — означает активацию системы горного тормоза. Если горит желтым — она отключена или неисправна. Выключатель, как правило, находится на подрулевом переключателе.
Восклицательный знак в треугольнике и стрелка
Отключена система динамической стабилизации автомобиля -Vehicle Stability Control (VSC) или Dynamic Stability Control (DSC).
Восклицательный знак в треугольнике и надпись 4×4
Неисправность в системе полного привода.
Колесо со стрелками или надпись BAS

Проблемы с системой помощи при экстренном торможении автомобиля BAS (Brake Assist System) еще эту систему именуют в народе «дотормаживатель». Ошибка по этой системе приводит к отключению антипробуксовочной системы ASR (Automatic Slip Regulation, Acceleration Slip Regulation, Anti-Slip Regulation).
Надпись IBA OFF
Не работает система интеллектуальной помощи во время экстренного торможения IBA (Intelligent Brake Assist). Отвечает за автоматическое срабатывание тормозной системы в случае вероятности столкновения.
Скользящая машина
Датчики обнаружили проскальзывание колес, в этом случае может быть активирована система стабилизации.
Две машины столкнулись
Данный индикатор обозначает неисправность системы экстренного торможения (FCA). Вероятные причины: неисправна камера переднего вида или передний радар.
Скользящая машина с гаечным ключом, в треугольнике, надпись SLIP
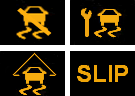
Система стабилизации неисправна, в обычных условиях не мешает управлению автомобилем, но в экстренной ситуации «искусственный интеллект» ничем не поможет.
Специальные значки на приборной панели
Иконки ключей

Иконка ключа обозначает различные состояния электронного ключа в автомобиле — его присутствие (зеленый) или отсутствие (красный). На монохромных дисплеях эти состояния могут отображаться несколько по-иному.
Иконки ключа и ключа с молнией

Иконка в виде брелока с ключом означает, что автомобиль увидел электронный ключ. Такая же иконка с молнией говорит о необходимости заменить батарейку в брелоке.
Иконки ключа или брелока с индикатором заряда
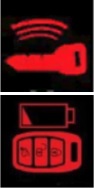
Значки на панели приборов с изображением ключа или брелока и индикатором зарядки говорят о необходимости заменить батарейку в ключе или брелоке.
Снежинка или надпись SNOW

Активирован режим передвижения по снегу или льду, так называемый Snow Mode. Такая система обычно ставится на автомобили с автоматической коробкой передач.
Машина в красном треугольнике
Обычно такая лампочка может загораться при движении на круиз-контроле, когда радары замечают близкое сближение со впереди идущим автомобилем или обнаруживают препятствие.
Машина со стрелками над крышей

Данный значок загорается при открытии/закрытии складной крыши на кабриолетах. Если процесс завершается успешно — индикатор гаснет.
Значок человека и двери
Активирована функция комфортной посадки водителя и пассажиров Easy Entry. Обычно умеет регулировать положение кузова и сидений для удобства посадки.
Надписи Cruise, SET, ACC, иконки авто со спидометром
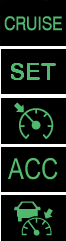
Все эти индикаторы отображают включение системы адаптивного круиз-контроля (ACC, Adaptive Cruise Control). В случае, если лампочка мигает — это означает наличие проблем в работе системы.
Значок прямоугольника со стрелками
Включен обогрев заднего стекла.
Надписи HOLD, AUTO HOLD

Активирована система Automatic Brake Hold, которая предотвращает движение автомобиля после полной остановки. Чтобы разблокировать тормоза нужно нажать на педаль газа.
Надписи Sport и Comfort

Информирует водителя о выбранном режиме жесткости амортизаторов (еще называют режимы вождения, жесткость подвески).
Надпись Height high
Обозначает достижения максимальной высоты кузова на автомобилях с пневматической подвеской.
Надпись CMBS
Неполадки в системе предупреждения столкновений CMBS (Collision Mitigation Brake System).
Неисправность динамической подвески
Есть проблемы с системой динамической подвески. Обычно появление этой лампочки обозначает появление проблемы, но при этом двигаться на автомобиле не запрещается. Если эта лампочка будет гореть красным — проблема критическая, продолжать движение небезопасно.
Иконка прицепа или надпись TOW

Означает активацию режима движения с прицепом Tow Mode. Этот режим рекомендуется использовать при использовании трейлера или тяжелой загрузке прицепа.
Буква «P» с радаром

Иконка парковочного ассистента Park Assist, который помогает при парковке. Если эта лампочка горит зеленым — это означает активацию системы, желтым — есть неполадки.
Машина между полос, надписи LKW, LDW

Иконка помощника движения автомобиля по полосам. У разных производителей может называться по-разному — LDW (Lane Departure Warning Indicator), LKA (Lane Departure Prevention), LKA (Lane Keeping Assist), соответственно и обозначения на иконке могут отличаться.
Индикатор Start-Stop

В системе старт-стоп найдена неисправность.
Зеленые значки с растениями или надпись ECO

Значок говорит об активации эко-режима, в котором снижен расход топлива.
Надпись Smart

Сигнальный значок, обозначающий активированный «умный» режим движения, функция которого — подстраиваться под стиль вождения водителя.
Индикаторы полноприводных машин
Надпись 4×2
Эта лампочка говорит о включении монопривода в машине с системой полного привода.
Надпись 4×4 Auto
Эта лампочка говорит о включении заднего привода в машине с системой полного привода и готовности автоматически переключиться в режим 4х4 при необходимости.
Надписи 4×4 LOW, 4×4 HIGH, 4LO, 4HI

На автомобиле с системой полного привода сообщает о включении повышенной (HIGH) или пониженной (LOW) передачи.
Надписи AWD Lock, Lock
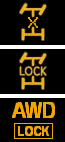
Включена блокировка дифференциала.
Лампочка блокировки межосевого дифференциала

Включена блокировка заднего межосевого дифференциала.
Оси автомобиля и гаечный ключ

Проблемы в системе полного привода.
Надписи 4WD, AWD

Говорит о неисправности в системе полного привода.
Надписи SH-AWD, R.DIFF TEMP

Говорит о перегреве дифференциала или проблемах с системой полного привода.
Надпись 4WAS
Ошибка по электронно-полноуправляемому шасси 4WAS (4 Wheel Active Steering). Эта система автоматически подруливает задними колесами.
Надпись RAS
Ошибка по системе подруливания задними колесами RAS (Rear Active Steer).
Значки на панели приборов гибридных автомобилей
Значок батареи или аккумулятор с надписью Main

Сообщает о неисправности основной аккумуляторной батареи гибридного автомобиля или контура высокого напряжения.
Иконка автомобиля с восклицательным знаком
Проблемы с электроприводом — аналог Check Engine (проверьте двигатель) для гибридных автомобилей.
Иконка батареи с молнией
Высоковольтная батарея автомобиля разряжена.
Иконка заправочной станции и электрической вилки
Низкий уровень заряда высоковольтной батареи, необходима зарядка.
Значок черепахи в круге
Снижение мощности батареи до низких значений.
Лампочка с электрической вилкой

Батарея заряжается (подключена к электрической сети).
Надписи EV или EV Mode

Гибридный автомобиль движется на электротяге (активирован режим EV Mode).
Значок автомобиля с иконками сигнала

Не работает звуковая система предупреждения пешеходов о приближении автомобиля. Такие системы устанавливаются на гибридные и электромобили из-за беззвучной работы силовой установки, из-за чего пешеходы и другие участники дорожного движения могут не слышать приближения автомобиля.
Значок автомобиля с иконками сигнала

Неисправность в силовой цепи электромобиля, может сопровождаться снижением мощности силовой установки. Красный цвет лампочки сигнализирует о критичности ошибки, движение на автомобиле с таким индикатор не рекомендуется.
Значки на приборной панели автомобилей с дизельными двигателями
Красная «колба»
Индикатор неисправности топливного фильтра в автомобиле с дизельным двигателем внутреннего сгорания.
Лампочка со спиралью
Активирован подогрев свечей накала — эта лампочка загорается после поворота ключа в замке зажигания. Перед запуском двигателя рекомендуется подождать пока эта лампочка потухнет.
Индикатор сажевого фильтра

Требуется замена противосажевого фильтра (Diesel Particulate Filter). Такой фильтр ставится только на дизельные автомобили и предназначен для снижения количества сажи в выхлопных газах.
Иконка низкого уровня реагента очистки выхлопных газов

Требуется долить реагент очистки выхлопных газов AdBlue. Его бачок может располагаться под капотом, рядом с заливной горловиной бензобака, в нише запасного колеса багажника. Пробка горловины бака с жидкостью AdBlue синего цвета. В некоторых странах этот реагент называется AUS 32 (Aqueous Urea Solution 32) или DEF (Diesel Exhaust Fluid).
Надпись Adblue и гаечный ключ
Значки с надписью AdBlue и гаечным ключом или перечёркнутый значок двигателя с надписью AdBlue означают неисправность в системе AdBlue. Необходимо обратиться в сервисный центр.
Значок выхлопа

Обнаружен предельно допустимый уровень эмиссии выхлопных газов. Ошибка говорит о проблемах с дизельным сажевым фильтром (DPF).
Значки наличия воды в выхлопе

Датчики обнаружили наличие воды в топливе. Высокий уровень воды в топливе может стать причиной повреждения форсунок или двигателя. Также эти ошибки могут означать необходимость обслужить систему очистки топлива.
Надпись EDC
Проблемы с электронной системой впрыска в автомобиле с дизельным двигателем EDC (Electronic Diesel Control). Получает систему с множества датчиков в автомобиле, при неисправности какого-либо из них может загораться такая ошибка.
Ошибка в виде кардиограммы
Вода в дизельном топливе, неисправность датчика или нарушена работа электронных систем управления двигателем.
Надпись T-BELT
Ошибка T-BELT означает необходимость замены ремня газораспределительного механизма (ГРМ). Обычно загорается каждые 100 000 километров пробега. Ошибку можно сбросить с помощью диагностического оборудования.
Значки внешних световых приборов
Зеленая лампочка
Индикатор включенного наружного освещения.
Зеленая лампочка с восклицательным знаком или перечеркнутая лампочка

Одна или несколько ламп наружного освещения перегорели или неисправность в их электрической цепи.
Синий фонарик
Включен дальний свет.
Синий фонарик

Активирована система управления дальним светом Active High Beam. Датчик в лобовом стекле следит за светом фар встречных автомобилей и светом фонарей попутных машин и при возможности автоматически включает дальний свет.
Лампочка со стрелками вверх-вниз

Неисправен корректор фар, который автоматически регулирует уровень наклона фар в зависимости от загрузки автомобиля. Возможно неисправен датчик наклона кузова.
Надпись AFS OFF или лампочка со стрелками влево-вправо

Ошибка по системе адаптивных фар AFS (Adaptive Front-lighting System). Эта система регулирует положение фар для наилучшего освещения дороги.
Надпись DRL или лампочка с точками

Данные лампочки означают работу системы автоматического включения ближнего света днем DRL (Daytime Running Lamps).
Оранжевая машина и горящие фонари
Перегорела лампочки или лампочки заднего освещения — стоп-сигналов или фонарей заднего хода.
Зеленые фонари светят в разные стороны
Включены габаритные огни.
Фонарь светит влево с перечеркнутым светом
Включены передние противотуманные фары.
Фонарь светит вправо с перечеркнутым светом
Включены задние противотуманные фары.
Зеленые стрелки в разные стороны
Мигающая стрелка влево или вправо — включен левый или правый сигнал поворота, мигают обе — включена аварийная световая сигнализация.
Значки дополнительных функций
Человек с ремнем
Водитель или пассажир не пристегнуты ремнем безопасности.
Открытые двери
Одна из дверей или багажник не закрыты. Также может означать неисправность одного из концевиков дверей. На некоторых автомобилях концевики зимой замерзают и несмотря на закрытые двери может гореть такая ошибка.
Открытый капот
Открыт или плохо закрыт капот, проблема с концевиком капота.
Бензоколонка
Сигнальный индикатор низкого уровня топлива. Также возможна неисправность поплавка в бензобаке.
Надпись GAS
На автомобилях с газовым оборудованием означает необходимость заправить газовый баллон.
Лобовое стекло с фонтаном
Низкий уровень омывающей жидкости, нужно долить. Или неисправность датчика уровня омывающей жидкости.
Ошибка по складной крыше кабриолета
Проблемы с электроприводом складной крыши на автомобилях с кузовом кабриолет.
Если вы не нашли своего значка — пишите нам на почту, мы постараемся Вам помочь. Также если вы считаете, что если какого-то значка не хватает — присылайте его туда же с описанием условий, при которых он отображается — мы обязательно его добавим.