Обновлено: 11.02.2023
Благодаря стараниям разработчиков из команды Odd Sheep Games, вы можете подключить PSVR к своему ПК, используя Trinus PSVR – программное обеспечение, которое позволяет использовать шлем с вашим персональным компьютером.
К примеру, у вас имеется большая библиотека игр в Steam (VR-игры или нет – не важно). Вы можете играть в них c использованием Trinus PSVR. Кроме этого, можно смотреть фильмы или телепередачи в режиме виртуальной реальности. Мы подготовили подробную инструкцию о том, как это сделать.
Что вам понадобится
- Доступ к Steam: учетная запись Steam (бесплатно);
- Доступ к играм Steam VR: SteamVR (бесплатно);
- Клиент Trinus PSVR (14 долларов США).
Возможные проблемы
Trinus PSVR все еще находится в стадии разработки, поэтому иногда могут возникать ошибки. Для того чтобы их избежать, перед первым нажатием Start для калибровки, необходимо досконально убедиться, что гарнитура находится на ровной и устойчивой поверхности и направлена в сторону, куда вы будете смотреть во время игры.

Подключитесь к ПК и играйте как в Oculus Rift, через Trinus VR или Moonlight + OpenTrack
Обзор, подключения Trinus VR (в программе так же есть возможность отслеживания положения головы для игр)
Обзор подключения через программу Moonlight + Отслеживания положения головы для игр OpenTrack
Обзор Подключения смартфона с VR очками к ПК War Thunder Moonlight TriDef 3D OpenTrack Oculus

Мы затронули пару достойных программ от талантливых разработчиков, которая действительно работает — это Trinus VR и Moonlight Game Streaming
(остальные программы есть тут).

Full wireless connection has limited performance, and may require decreasing the Image size (resolution) and increasing compression.
USB deliver the best speeds, but you may need to install up to date drivers from your smartphone manufacturer (eg. Samsung includes the USB Tethering driver with its Kies Desktop software). It is also recommended to update the Windows RNDIS driver to version 6 (details).
Note that USB connection is not supported for iOS devices.
Trinus should detect the device through the network automatically. If it doesn’t, check that there are no firewalls blocking the connection or manually set the IP address and port set on the Trinus Android client.
There are some common issues that can occur for certain configurations. Here are some solutions:
Connectivity
— Ensure phone and PC are on the same network (Wifi) or Tethering is working (USB)
— USB Tethering may require updating Windows USB drivers from your phone’s manufacturer. Otherwise the connection might fail or be slower
— Manually set the IP address and port in Trinus PC Server, matching Trinus Android client
— When using USB tethering, the PC will use the phone to connect to the internet unless you change Windows network selection priority
— If using mobile hotspot, you may also need to set the IP address manually (give the network discovery process a few seconds before trying that). This can be changed in Network tab>Set IP textbox. The usual IP for Android wifi hotspot is 192.168.43.1 (and the one for usbtethering is 192.168.42.192). Either way, keep in mind the PC might start using the hotspot internet connection, so best to switch mobile data if you are using a limited data plan.
Bad/No Image
— For non-VR games, change the Capture Mode (Game, General, Compatible). Also try running the game windowed
— If image is partial, try disabling Display Scaling in Windows Compatibility tab or enable/disable the DPI fix checkbox in Trinus Video tab
— Check that the correct 3D mode is set, either Fake 3D enabled for non-VR games running at a 4:3 or 8:9 resolution ratio, or disabled for non-VR games in Side By Side (16:9 double 3 D image). Some games support SBS, but you can also use Tridef, Vireio, VorpX or ReShade* to add it
— If frame freezes when you start streaming, try switching out and back again to the game window
Visual discomfort
— Adjusting the IPD setting to match the distance between your eyes is important for a comfortable experience
— Choose a lens / headmount setting in Trinus PC server that suits your headset (you can also disable Lens Correction)
— Bad head tracking can also cause discomfort. Try calibrating your phone’s sensor prior to use. Test the alternative sensor options
BSOD
— Some users have reported a Windows crash when connecting via USB. This is usually solved by disabling Fast Boot option in Windows
There are a few settings in the Trinus VR Android client that can help sort certain issues or improve the VR experience:
Video Port: Main connection port as set on the Trinus VR PC server. Default is fine unless you get port already in use issues
Sensor Jitter Filter: To reduce jitter caused by some phone’s sensors
Sensor Drift Filter: Might reduce orientation drift, you can also try changing the Sensor Mode
Sensor Mode: Different ways to manage sensor data. Switch if default creates a lot of drift / doesn’t work
Flip View Vertically: Enable view flip when rotating the phone
VR Menus: Trinus itself will be in VR mode, to control with headset on. Clear app data if you can’t restore to non-VR Menus
Internet Check: Using a tethered connection may cause your PC to attempt to go online using mobile data. Trinus will notify you to avoid mobile fees, but you can disable such notification with this option
Fake Roll: Choose roll direction when Fake Roll is enabled (for non-VR games)
Lens Correction: Lens correction distorts the image to match the lenses in your headset. Disabling it can improve performance at the cost of image quality
Performance level: Set priority between quality and speed
Connect To Trinus Wifi On Start: If active, the phone wil try to connect to the Trinus hotspot automatically. This is one of the ways to connect Trinus, but only available in certain hardware configurations. And still not as fast as USB
With SteamVR installed (but not running), start Trinus and select SteamVR mode.
Trinus will install the SteamVR driver (check for errors in the notifications area).
Then you can start SteamVR and the Room setup.
Note that SteamVR games that require VR controllers have limited compatibility (through NoloVR or PSmove).
For best results, you will need to adjust quality settings to match your setup. Here are some suggestions:
— Decrease the game resolution, either through game setup or Trinus image size option
— Connect your Android device via USB Tethering (may require manufacturer’s specific driver to get max performance). Note that some telecoms may disable USB Tethering
— Routers provided by ISPs are not always very high performance for local networking, consider using USB or a separate router (that supports AC) for Trinus
— Use Fake3D mode (with game resolution ratio at 4:3 or 8:9, not landscape 16:9)
— Try the different capture modes (Game and General usually work best, but General may require game to be windowed)
— Enable Fast Scaling (image quality will be lower, but you’ll get a performance boost)
— Check the rates shown on the top right corner (frame capture/frame delivery/sensor data rates). A low capture rate means low performance on the PC side. Low delivery rate means low performance on the network
— If using GearVR, you’ll need an app that disables the Oculus service (effectively turning it into a Google Cardboard headset). You can use this one, for example. Alternatively, you can try to put the phone in without plugging the USB port
— You can read more about each setting by hovering over it with the mouse (contextual help on the right)

These are the basic steps to get started with Trinus. Once you are familiar with how Trinus works you can explore all its features to get the most out of your VR experience. If there’s any problem, please check the Common Problems section below.
- Run SteamVR Room Setup (from the SteamVR status window)
- Select Standing Only
- Click Next (Establish tracking page)
- Click Calibrate Center and then Next
- Input the height for your sitting or standing position (choose whichever you are most frequently be using, you can still tweak it afterwards via Trinus Height option). The actual headset current location/height is only relevant for 6dof capable devices (like the Lenovo Mirage Solo). Click Calibrate Floor and then Next
- You are done! You can do this Setup anytime if you want to re-calibrate
- If necessary, adjust the Trinus performance (Resolution and Quality) settings so that they match your setup capabilities
- To get the most of your Trinus experience review the options, using the contextual help shown on the right side

Default Single Controller Button Mapping
Default Dual Controller Button Mapping (for each physical controller)
Doesn’t connect, stays on Waiting for connection or black screen
This could be for a number of reasons, mainly networking problems. Make sure PC and Android are on the same network (connected to same router) and there are no firewalls blocking communication (Trinus uses port 18086)
It is normal to sometimes get a black screen for a moment during connect/disconnect. Just give it a few seconds
For USB Tethering, a generic Windows USB driver is used but your device may require specific driver provided by the manufacturer
Stop Trinus PC/SteamVR, make sure there are no VR related processes (eg. VR Server) and try again. Restart Trinus Android if it still fails to connect
Image freezes / low framerate / compression artifacts
If image freezes try exiting Trinus Android app by pressing the home (O) button and then opening Trinus VR again
If your router is not a fast Wifi AC one, try connecting via USB. A home router may work well for internet streaming and gaming but still underperform for VR streaming. Distance to router can also be a deciding factor, it is recommended to have PC, headset and router in the same room (and PC is plugged through Ethernet cable)
Another wireless alternative is to use a PC or phone created Wifi hotspot to connect both sides
Still, USB is the fastest option. While the default USB driver installed with Windows should work fine for most hardware, it may not be optimised for your specific phone model, check your manufacturer’s support information and drivers
Lower the Trinus Resolution and Quality settings. You can also disable 3D depth option
Check Daydream controller battery
No Audio / No control of the game
Put the game window on the foreground (active window)
Note that audio is not streamed to the phone, so you’ll need to connect your headphones to the PC
Unusual height
Adjust the height in Trinus. Alternatively, re-run SteamVR Room Setup.
Steam VR Error 108 or 301
Check that your Intel Integrated Graphics card is enabled and shown in Device Manager. If it is not, you may need to activate it via BIOS settings (usually something like IGPU Enable/Disable, Multimonitor setup, . ). The Intel GPU is needed for Trinus streaming purposes, while the more powerful discrete graphics card is used for the game rendering
Make sure the Intel Graphics Card is enabled and visible from Device Manager, it is needed for encoding the 3D rendered by the discrete GPU
If enabling the Intel Graphics Card doesn’t solve the issue, stop SteamVR and Trinus VR. Make sure there’s no VR Server process running (either kill it via Task manager or restart PC)
Un-install and Re-install Trinus SteamVR driver (check the Trinus notifications for any errors)
Steam VR Error 306
Stop Steam VR and Trinus VR. Make sure there’s no VR Server process running (either kill it via Task manager or restart PC)
Overheating / Throttling
Just like with playing any other Daydream experience, your Android device may eventually overheat (specially older devices, like the Google Pixel). Do breaks more frequently or, if you are an advanced user, try some DIY cooling solution or underclocking the phone
Unresponsive mapped controls
Pressing the edges still requires touching the touchpad. Make sure you are not pressing on the outer rim of the touchpad.
Other problems / The above didn’t help
Please use the forum here to report issues
Here’s the list of games you can play with Trinus and gamepad or keyboard+mouse. You can also play SteamVR games that require VR controllers, but this has some limitations at the moment (working to improve that!). Trinus duplicates the (single) Daydream controller to have two SteamVR controllers. The second virtual controller will mimic the movements of the main one, and you can map buttons for both virtual controllers into the Daydream controller (along with some extra VR actions like crouch or move sideways). See the Controller Profiles section for more details on those custom mappings.
If you want to play non-VR games, you can do that too with Trinus. But this feature is currently in non working state (coming soon. ish). Note that Async Reprojection needs to be disabled beforehand, using the Trinus Android Config app.
Also, if you like retro gaming, you can try Dolphin VR (an emulator for GameCube and Wii games) or 3DNes (an emulator for NES). Keep in mind you should own the games you emulate.
The Daydream kit includes a single controller, which Trinus will duplicate to have to virtual controllers.
Trinus also supports connecting a second Daydream compatible controller to have two separate virtual controllers. Here are the steps to do so:
- Go to Android Bluetooth Settings
- Press the Home (O) button on the second controller and do a Bluetooth scan
- The Daydream controller will appear on the list, just tap it to pair. You should now have two Daydream controllers listed
- Start Daydream and activate the main controller as usual
- Start a Trinus session
- Once SteamVR is showing, press the Home (O) button on the second controller to activate it, then press again and hold it for 5 seconds
- Second controller will now be active. Pressing the Home button at anytime will reset its orientation
You can search online for Daydream compatible controllers. Purchase options:
[Have a suggested link? Post in the forum]
Trinus can map two virtual controllers actions to a single Daydream physical controller, one being the Main controller (right hand) and the other the Secondary controller (left hand). Both will have the same movement but handle buttons separately. You can, for example, assign Main and Secondary triggers to the left and right edges of the touchpad, for a dual wielding guns game, being able to shoot both weapons with a single physical controller. Or you could map the touchpad center to activate both triggers. Moreover, Trinus has custom mappings for actions like crouching or running (second controller inverts movement of main to simulate swinging arms).
Before exploring controller customisation, you can select any of the Default (or game specific) profiles to get started and later tweak to your preference, once you are familiar with the system. Press the Cheat Sheet button (when available) to see detailed information on the profile mappings.
When you create a new profile, current profile data is copied so you can tweak the existing one (eg. creating a DefaultMyVersion out of existing Default).
The profile system allows flexible customisation for each of your games. If you create a good profile, please share with others on the forum here.
Перед тем как начать
Перед тем как начать, важно отметить две вещи:
- Существует бесплатная пробная версия Trinus PSVR, которая имеет ограничения по времени работы. Прежде чем покупать программу за 14 долларов, вы можете убедиться в ее работоспособности и бесплатно скачать здесь
- Если вас всё устраивает, то можно покупать полнофункциональную версию.
Этой покупкой вы поддержите дальнейшую разработку Trinus PSVR. Но сами разработчики все же рекомендуют попробовать ПО перед его приобретением. На данный момент не было ни одного обновления программного обеспечения PlayStation 4, которое хоть как-то мешало бы программе работать.
Режим мыши
Если вы хотите играть во все свои игры Steam, используя PSVR, то можете сделать это в режиме мыши. Некоторые игры, такие как Crysis 3 и Doom 3, имеют встроенную параллельную поддержку, которая позволяет вам играть в них в VR. Однако большинство игр не имеют такой поддержки, поэтому придется использовать VorpX.
Для игры в обычные игры нужно переключиться в Cinematic mode. В этом режиме можно использовать мышь и PSVR:
- Перейдите на вкладку «Main» в верхней части окна Trinus PSVR.
- Нажмите стрелку раскрывающегося списка.
- Выберите Mouse
- Нажмите стрелку раскрывающегося списка рядом с Non-VR.
- Нажмите None или, если известно что игра, в которую вы играете, имеет параллельную поддержку – Side by Side.
- Нажмите стрелку раскрывающегося списка рядом с режимом PSVR.
- Выберите Cinematic.
- Нажмите Start.
- Запустите Steam-игру, не поддерживающую VR.
Для переноса изображения на экран гарнитуры нажмите на клавиатуре ПК Windows + Shift + стрелка вправо.
Может быть интересно
Как настроить PSVR для использования Trinus PSVR
Перед тем как начать играть в игры, необходимо выполнить проводное соединение PS4 и ПК:
-
Подключите кабель HDMI к порту PS4 HDMI.
Настройка Trinus PSVR
Теперь когда PSVR подключен к ПК и Trinus PSVR загружен и установлен, можно запустить его и начать работу. Перед началом этих действий убедитесь, что ваш PSVR установлен на ровной плоской поверхности.
Теперь у вас есть возможность запустить игру SteamVR и наслаждаться ею в PSVR. Чтобы заставить клавиатуру, мышь или контроллер работать в игре, используйте сочетание клавиш Alt + Tab на клавиатуре. Это сочетание откроет окно настроек на мониторе компьютера.
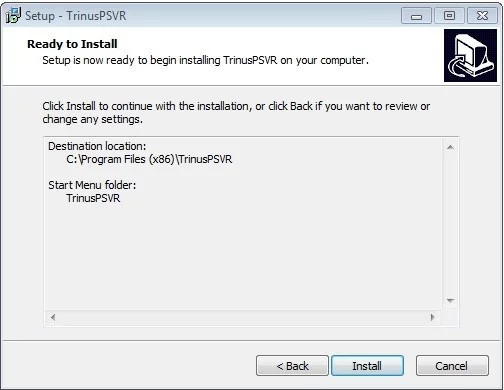
Как установить Trinus PSVR на компьютер
Прежде всего нужно настроить работу Trinus PSVR.
Теперь когда на вашем компьютере установлен Trinus PSVR, можно перейти к настройке PSVR.
Читайте также:
- Factorio как убрать провода
- Замена на монстер самп
- Subnautica системные требования
- Skyrim association как установить
- Libusb win32 install filter driver ошибка


Requirements
- Daydream compatible phone (more platforms coming soon)
- Intel chipset with Integrated GPU (better support coming soon). Important: Intel GPU needs to be enabled in BIOS
- Fast Wifi AC router recommended
- GPU requirements as specified by the game to play
Installation
- Install Trinus VR PC server
- Install Trinus VR Android client
- Install Steam and SteamVR
Connection
- Connect the phone to the same network as the PC (a fast Wifi AC router, plugged to the PC, is recommended)
- Alternatively, you can use USB for better performance. To do so, connect your phone via USB cable and enable USB Tethering from Android settings (phone USB driver for Windows may be needed). To avoid Windows using your phone’s Internet data, disable mobile data or change Windows network priority
- Check that there’s no firewall blocking Trinus network access (Trinus uses port 18086)
- Press the Start SteamVR button in Trinus. It will show a SteamVR not ready message (as seen on the screenshot below). This is normal, it’ll go green once client connects.
- Start Daydream and the Trinus app on Android
- After a few seconds, Android should be displaying the 3D view from SteamVR

SteamVR has started and will switch to Ready once client is connected
Setup
These are the basic steps to get started with Trinus. Once you are familiar with how Trinus works you can explore all its features to get the most out of your VR experience. If there’s any problem, please check the Common Problems section below.
- Run SteamVR Room Setup (from the SteamVR status window)
- Select Standing Only
- Click Next (Establish tracking page)
- Click Calibrate Center and then Next
- Input the height for your sitting or standing position (choose whichever you are most frequently be using, you can still tweak it afterwards via Trinus Height option). The actual headset current location/height is only relevant for 6dof capable devices (like the Lenovo Mirage Solo). Click Calibrate Floor and then Next
- You are done! You can do this Setup anytime if you want to re-calibrate
- For your initial setup, the Trinus default settings should be fine but…
- If necessary, adjust the Trinus performance (Resolution and Quality) settings so that they match your setup capabilities
- To get the most of your Trinus experience review the options, using the contextual help shown on the right side
- Once you have the system working smoothly you can start with some free VR experiences, like The Lab or The Night Cafe. Note that, when SteamVR loads, you might just get a simple white/grey room with lines, and you can’t do much from there. You can either start a SteamVR game from the traditional 2D Steam UI or enable SteamVR Home from SteamVR settings
- Use the Controller tab to load a suitable game profile. Default profiles as well as a few game specific profiles are included with Trinus, but you can create (and share!) your own. More details in the Controller Profiles section below

Default Single Controller Button Mapping

Default Dual Controller Button Mapping (for each physical controller)
Common Problems
Doesn’t connect, stays on Waiting for connection or black screen
This could be for a number of reasons, mainly networking problems. Make sure PC and Android are on the same network (connected to same router) and there are no firewalls blocking communication (Trinus uses port 18086)
It is normal to sometimes get a black screen for a moment during connect/disconnect. Just give it a few seconds
For USB Tethering, a generic Windows USB driver is used but your device may require specific driver provided by the manufacturer
Stop Trinus PC/SteamVR, make sure there are no VR related processes (eg. VR Server) and try again. Restart Trinus Android if it still fails to connect
Image freezes / low framerate / compression artifacts
If image freezes try exiting Trinus Android app by pressing the home (O) button and then opening Trinus VR again
If your router is not a fast Wifi AC one, try connecting via USB. A home router may work well for internet streaming and gaming but still underperform for VR streaming. Distance to router can also be a deciding factor, it is recommended to have PC, headset and router in the same room (and PC is plugged through Ethernet cable)
Another wireless alternative is to use a PC or phone created Wifi hotspot to connect both sides
Still, USB is the fastest option. While the default USB driver installed with Windows should work fine for most hardware, it may not be optimised for your specific phone model, check your manufacturer’s support information and drivers
Lower the Trinus Resolution and Quality settings. You can also disable 3D depth option
Check Daydream controller battery
No Audio / No control of the game
Put the game window on the foreground (active window)
Note that audio is not streamed to the phone, so you’ll need to connect your headphones to the PC
Unusual height
Adjust the height in Trinus. Alternatively, re-run SteamVR Room Setup.
Steam VR Error 108 or 301
Check that your Intel Integrated Graphics card is enabled and shown in Device Manager. If it is not, you may need to activate it via BIOS settings (usually something like IGPU Enable/Disable, Multimonitor setup, …). The Intel GPU is needed for Trinus streaming purposes, while the more powerful discrete graphics card is used for the game rendering

Make sure the Intel Graphics Card is enabled and visible from Device Manager, it is needed for encoding the 3D rendered by the discrete GPU
If enabling the Intel Graphics Card doesn’t solve the issue, stop SteamVR and Trinus VR. Make sure there’s no VR Server process running (either kill it via Task manager or restart PC)
Un-install and Re-install Trinus SteamVR driver (check the Trinus notifications for any errors)
Steam VR Error 306
Stop Steam VR and Trinus VR. Make sure there’s no VR Server process running (either kill it via Task manager or restart PC)
Overheating / Throttling
Just like with playing any other Daydream experience, your Android device may eventually overheat (specially older devices, like the Google Pixel). Do breaks more frequently or, if you are an advanced user, try some DIY cooling solution or underclocking the phone
Unresponsive mapped controls
Pressing the edges still requires touching the touchpad. Make sure you are not pressing on the outer rim of the touchpad.
Other problems / The above didn’t help
Please use the forum here to report issues
Supported Games
Here’s the list of games you can play with Trinus and gamepad or keyboard+mouse. You can also play SteamVR games that require VR controllers, but this has some limitations at the moment (working to improve that!). Trinus duplicates the (single) Daydream controller to have two SteamVR controllers. The second virtual controller will mimic the movements of the main one, and you can map buttons for both virtual controllers into the Daydream controller (along with some extra VR actions like crouch or move sideways). See the Controller Profiles section for more details on those custom mappings.
If you want to play non-VR games, you can do that too with Trinus. But this feature is currently in non working state (coming soon…ish). Note that Async Reprojection needs to be disabled beforehand, using the Trinus Android Config app.
Also, if you like retro gaming, you can try Dolphin VR (an emulator for GameCube and Wii games) or 3DNes (an emulator for NES). Keep in mind you should own the games you emulate.
VR Controllers
The Daydream kit includes a single controller, which Trinus will duplicate to have to virtual controllers.
Trinus also supports connecting a second Daydream compatible controller to have two separate virtual controllers. Here are the steps to do so:
- Go to Android Bluetooth Settings
- Press the Home (O) button on the second controller and do a Bluetooth scan
- The Daydream controller will appear on the list, just tap it to pair. You should now have two Daydream controllers listed
- Start Daydream and activate the main controller as usual
- Start a Trinus session
- Once SteamVR is showing, press the Home (O) button on the second controller to activate it, then press again and hold it for 5 seconds
- Second controller will now be active. Pressing the Home button at anytime will reset its orientation
You can search online for Daydream compatible controllers. Purchase options:
AliExpress
[Have a suggested link? Post in the forum]
Controller Profiles
Trinus can map two virtual controllers actions to a single Daydream physical controller, one being the Main controller (right hand) and the other the Secondary controller (left hand). Both will have the same movement but handle buttons separately. You can, for example, assign Main and Secondary triggers to the left and right edges of the touchpad, for a dual wielding guns game, being able to shoot both weapons with a single physical controller. Or you could map the touchpad center to activate both triggers. Moreover, Trinus has custom mappings for actions like crouching or running (second controller inverts movement of main to simulate swinging arms).
Before exploring controller customisation, you can select any of the Default (or game specific) profiles to get started and later tweak to your preference, once you are familiar with the system. Press the Cheat Sheet button (when available) to see detailed information on the profile mappings.
When you create a new profile, current profile data is copied so you can tweak the existing one (eg. creating a DefaultMyVersion out of existing Default).
The profile system allows flexible customisation for each of your games. If you create a good profile, please share with others on the forum here.
Mapping Options
- Crouch: Crouch while pressed
- Strafe Left/Right: Move Left/Right while pressed
- Forward: Move to a forward position while pressed
- Touch Top/Right/Bottom/Left/Center: Assign touch events (eg. the touchpad applies to the Main controller by default, but we can still do touchpad events on the Duplicated controller using these actions)
- Touchpad Toggle: Toggles touchpad control between main and duplicated controller. Handy, for example, when each touchpad is used to select weapon on each hand
- Reposition HMD: Restore original position (useful with the Slide Touch to Move if you are out of the game world bounds)
- Pitch Reach: Use this option to ‘reach’ items in VR. When active changing the pitch on the controller will change the distance. The Toggle version does the same, but you don’t need to keep the button pressed
- Reverse Pitch: Reverses the pitch on the duplicated controller to emulate a running motion (for games like Vector Velocity, Sprint Vector, Trakker, etc.) . The Toggle version does the same, but you don’t need to keep the button pressed
Есть ли здесь еще извращенцы, подключающие свой PS VR к компьютеру? Помогите пожалуйста, инфы по настройке в интернете с гулькин нос. Да и она нифига не помогает.
Если вкратце, то везде один и тот же гайд. И пошаговая настройка терпит неудачу, тк в версии Trinus PSVR, которую я нашел, вообще другой интерфейс и нет опций, о которых говорится в гайдах. В итоге, я нифига не могу понять, как настраивать эту шляпу.
Меня интересует настройка для не VR-ориентированных гамесов. Вот, у меня стоит на компе сталкер ТЧ. Я указываю путь к exe-шнику, он его «патчит», калибрует шлем. Запускаю, картинка в шлем поступает, но есть одно «НО» — такое ощущение, что «фактически» между двумя кадрами в экранах шлема есть слепая зона. То есть, изображения не полностью ложатся в глаз, потому перед глазами сдвинутая каша. Например, двигаешь мышкой из одной стороны экрана в другую и в середине мышка исчезает, попадая в эту слепую зону.
И как настраивать, выводимое в шлем изображение в этой софтине — я не понимаю. Настройки есть с всякими ползунками, но это никак вообще не изменяет картинку.
В общем, если тут есть чуваки, которые пользуются этим софтом и понимают, как его надо настраивать, помогите пожалуйста, а. Хочу побегать по Скайримчику с модами и посмотреть на стерео-Сидоровича 
Это на тот случай, когда одних только фирменных игрушек для PS VR уже мало. Стараниями специалистов компании Odd Sheep Games и разработанному ими программному решению Trinus VR-гарнитуру Sony теперь можно подключать к ПК.
Зачем подключать её к компу, если есть PS4?
Ну, скажем, если у вас уже собралась солидная коллекция тайтлов на Steam, то почему бы не поиграть в них через Trinus PSVR. Плюс, посмотреть фильм, телевизионную и/или онлайн-передачу в VR-режиме в своей VR-гарнитуре.
В этой связи о том,..
как настроить Trinus и играть в игры с PS VR на компьтере
Первым делом скачиваем клиент Trinus PSVR с официального сайта (по ссылке — бесплатная тестовая версия приложения, полнофункциональную можно скачать позже, стоит она 15 евро на один комп) и запускаем процедуру установки (включает этап установки драйверов — запрос надо подтвердить отдельно), по факту завершения которой жмем кнопку «Finish».
Вторым делом, это не сделано раньше, регистрируемся в Steam устанавливаем на комп приложение SteamVR (если клиент Steam у вас уже установлен, то просто кликните по значку сервиса в трее и в меню выберите «SteamVR»).
Попутно в каталоге Steam можно найти фирменный тест производительности и проверить машину на совместимость со SteamVR.
Не пропустите: СКРИНШОТЫ В PS VR: КАК СДЕЛАТЬ И КАК ПОЛУЧИТЬ ИХ В ХОРОШЕМ РАЗРЕШЕНИИ
Далее по порядку:
этап #1 — подключаем шлем PS VR к компьютеру
Общая схема подключения гарнитуры к ПК выглядит следующим образом:
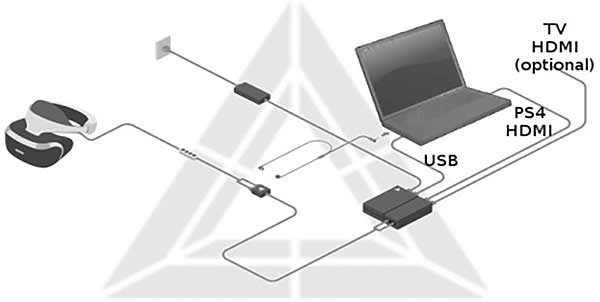
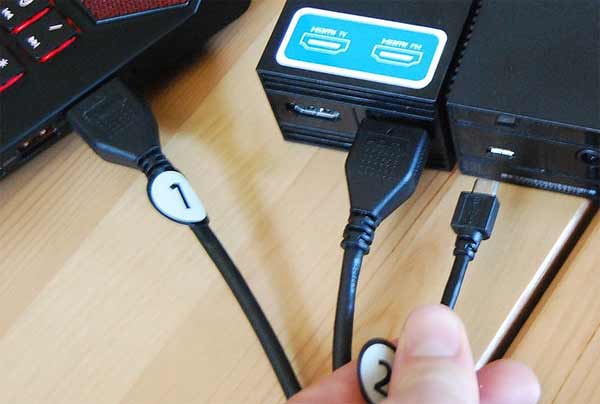
- посредством штатного HDMI-кабеля (№1) системы подключаем системный блок PS VR к компьютеру (или ноутбуку);
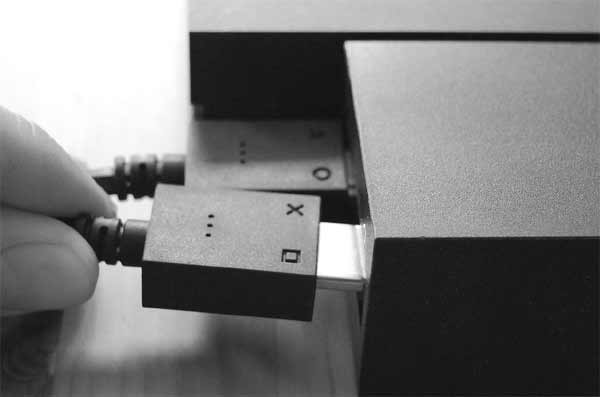
- далее кабель USB-на-MicroUSB (№2) концом со стандартным USB-штекером подключаем к USB-разъему компа (крайне желательно, чтобы это был разъём стандарта USB 3.0), а концом с MicroUSB-штекером — к разъему MicroUSB системного блока PSVR:
- к системному блоку PS VR подключаем саму гарнитуру:
- включаем блок питания PS VR в розетку и запускаем систему (кнопка питания — на пульте гарнитуры) и переходим к следующему этапу.
этап #2 — настраиваем правильное разрешение PS VR на компьютере
Для корректной работы приложения Trinus PSVR на ПК необходимо, чтобы рабочее разрешение основного экрана (монитора компа или подключенного к нему телевизора) составляло 1080p. Проверяется/настраивается разрешение следующим образом:
- включаем PSVR (если она еще не включена);
- с Рабочего стола ПК открываем меню «Параметров экрана» (правой кнопкой мыши — по пустому месту):
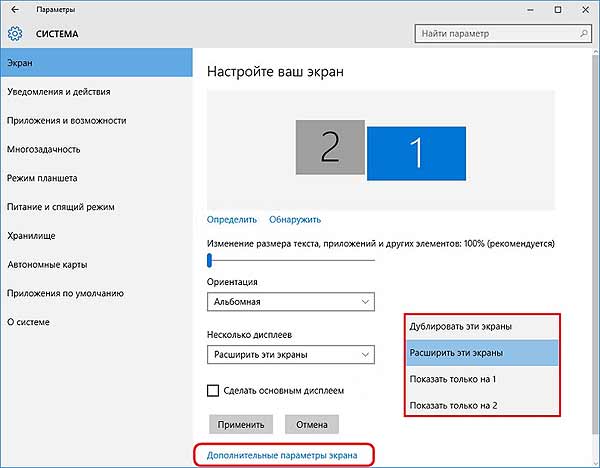
- в открывшемся окне «Настройте ваш экран» находим и кликаем меню «Несколько дисплеев» и в нём выбираем «Расширить эти экраны«;
- далее внизу окна жмем «Дополнительные параметры экрана«, прокручиваем чуть вниз, жмем меню «Разрешение«, выбираем «1920 x 1080» и кликаем кнопку «Применить«, чтобы сохранить все внесенные изменения.
Идем дальше:
этап #3 — настраиваем приложение Trinus PSVR на ПК
На данном этапе исходим из того, что к компу PS VR подключена правильно (с правильным разрешением), а приложение Trinus PSVR загружено с официального сайта (линк см. выше), корректно установлено и нормально запускается.
Теперь:
- устанавливаем PSVR на ровную и твердую горизонтальную поверхность, так чтобы гарнитура «смотрела» в ту сторону куда будете смотреть вы, когда будете играть;
- в меню «Пуск» ОС Windows 10 находим приложение Trinus PSVR, кликаем по значку правой кнопкой мышь и выбираем «Запуск от имени администратора«;
- Trinus должно автоматом обнаружить папку Steam на компе (если драйвера Steam не установлены, прога откроется на вкладке «How to«, где нужно кликнуть кнопку «Install» и установить «дрова», папку Steam);
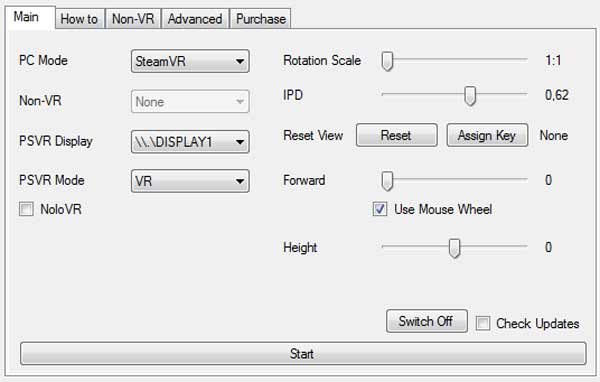
- открываем вкладку «Main» и в меню «PSVR Display» указываем «DISPLAY1«;
- затем рядом в меню «PSVR Mode» выбираем «VR» (или «Cinematic«, если в гарнитуре вы планируете только играть в 2D-игры и/или смотреть кино);
- далее в этой же вкладке жмем кнопку «Assign Key» — «Назначить клавишу» (в строке Reset View) и на клавиатуре компьютера выбираем и нажимаем клавишу, которой в дальнейшем будет осуществляться переключение изображения;
- теперь чуть ниже активируем опцию «Use Mouse Wheel» (ставим галочку), которая позволяет увеличивать/уменьшать изображение на экранах гарнитуры с помощью колесика мышки.
- в итоге вкладка «Main» настроек приложения Trinus в компе будет иметь следующий вид:
- теперь кликаем большую кнопку «Start» внизу вкладки и приложение запустит процедуру калибровки вашей PS VR (потому важно, чтобы к её началу гарнитура находилась на ровной горизонтальной поверхности).
- после калибровки гарнитуры снова открываем меню «Пуск» ОС Windows 10, находим приложение Steam, кликаем по значку правой кнопкой мышь и выбираем «Запуск от имени администратора«;
- в правом верхнем углу окна клиента находим и кликаем кнопку «VR» и в появившемся меню выбираем «Запустить настройку комнаты» и без спешки и вдумчиво выполняем инструкции системы.
После успешного завершения процедуры настройки на клавиатуре жмем одновременно клавиши Windows + Shift + Стрелка вправо и надеваем гарнитуру. С этого момента вы можете играть в игры со SteamVR. Клавиатура, мышь или игровой контроллер в игре активировать можно в окне настроек, которое открывается клавишами Alt + Tab с клавиатуры на мониторе компьютера.
Не пропустите: НЕ ЗАРЯЖАЕТСЯ AIM CONTROLLER ДЛЯ PS VR: КАК УСТРАНИТЬ ПРОБЛЕМКУ
Ну, и как говорится, чтобы два раза не ходить, еще несколько важных моментов, которые надо знать:
как подключить использовать мышь вместе с PS VR на ПК
«Режим мыши» (Mouse mode), когда вы играете на ПК в обычные игрушки в Steam, используя PS VR вместо обычного монитора (или вместе с ним). В некоторых играх (к примеру, в Crysis 3, в Doom 3 и пр.) для этого предусмотрен даже специальный параллельный режим вывода изображения (а в некоторые можно запускать с помощью VorpX).
Для обычных игрушек, как мы уже отметили, у приложения Trinus предусмотрен тоже специальный режим, который называется «Cinematic», и в котором PSVR юзать можно вместе с мышкой.
Для этого:
- запускаем Trinus PSVR и открываем вкладку «Main«;
- в меню «PC Mode» выбираем «Mouse«;
- далее в меню «Non-VR» выбираем либо «None«, либо «Side by Side» (если вам известно, что игра поддерживает такой режим);
- в меню «PSVR Mode» ставим «Cinematic» и жмем кнопку «Start» внизу окошка.
как играть в не VR-игры в гарнитуре PS VR на ПК
На клавиатуре жмем одновременно клавиши Windows + Shift + Стрелка вправо, после чего изображение с монитора компьютера переключится на экраны гарнитуры и 2D-игра будет отображаться в обычном режиме.
ПРОБЛЕМЫ Trinus PSVR
Да, они тоже случаются (и похоже, и дальше будут случаться). К тому же, решение Trinus PSVR находится на этапе разработки. Из нескольких наиболее «популярны» проблем можно выделить следующие:
- трекинг и дрифт
Перед процедурой первоначальной калибровки гарнитуры следует устанавливать её на ровную, горизонтальную, твердую и устойчивую поверхность и сориентирована в том направлении, куда будет обращено ваше лицо непосредственно в ходе игры.
Если из-за небрежного расположения PSVR система не сможет её откалибровать, то, очень вероятно, что вам придется сначала долго пытаться правильно направить курсор, а потом калибровать гарнитуру заново.
- размытое изображения в PS VR
Если устранить «размытие» картинки путем настройки резкости изображения не получается, откройте Trinus PSVR, перейдите во вкладку «Main» и уберите «размытие» с помощью слайдера IPD (в процессе регулировки не снимайте гарнитуру).
- обо всем остальном читайте в нашей статье Невиртуальные проблемы PS VR и о том, как их устранять >>>