Опубликовано в Статьи.
При обновлении операционной системы Mac OS до само последней, 10.10 столкнулся с проблемой, один из моих старых принтеров Xerox MF 3100, который стоит в офисе, не печатает. Не печатает из любой программы, любые документы. После того как открывается список задач на верху пишется ошибка Filter Failed и дальнейшие попытки что либо перевести из цифрового вида в бумажный безуспешны.
Все действия производятся на свой страх и риск. На новых версиях macos эти команды не исправят ошибку скорее всего (выше 10.10 версии).
Пробуем стандартные процедуры устранения подобных проблем:
- Найти более свежий драйвер на официальном сайте и установить его
- Удалить и добавить принтер
- Удалить старый и добавить новый драйвер
Но такие процедуры, с ошибкой Filter Failed не дают результата.
Как исправить ошибку Filter Failed
Чтобы принтер снова начал печатать надо:
- Зайдите в Finder-> Программы-> Утилиты и откройте программу «Терминал»
- Если у вас нету пароля на компьютер необходимо его поставить. (После окончания инструкции можете его снять). Это нужно чтобы в следующем пункте получить права суперпользователя для выполнения shell команд.
- Вбейте команду
1
sudo sh -c 'echo "Sandboxing Off" >> /etc/cups/cups-files.conf'
- У вас попросят пароль. Вбейте его. То что вы не видите звездочек это нормально. После ввода пароля нажмите Enter
- Вбейте команду
1
sudo launchctl stop org.cups.cupsd
После чего, можете пробовать печатать, все должно работать. Никаких перезагрузок или выхода из системы делать не надо.
Но если у вас зависает печать то
- Зайдите в Системные настройки настройки-> Принтеры и сканеры
- Нажмите на любой принтер и выберите «Сбросить систему печати»

- Добавьте принтер заново и все заработает
На этом все, но если у вас остались вопросы, вы, как всегда, можете задать их в комментариях, а я попробую вам помочь.
Если предыдущие варианты не помогли, пробуем следущее:
1) Выберите меню Apple > «Системные настройки» и нажмите «Принтеры и сканеры».
2) Дождавшись когда меню Принтеры и сканеры загрузится, Удерживая нажатой клавишу Control, нажмите в списке слева, где ранее отображались принтеры, затем выберите пункт «Сбросить систему печати» в появившемся меню.
P.S. На август 2019, у меня установлена macOS Mojavi версия 10.14.1. И к сожалению ничего не помогло, хотя за пол года до ошибки принтер работал  Мой инстаграм rinatshahmetov.
Как отменить команды прописанные выше
- Открываете Finder и нажимаете комбинацию Shift+Cmd+G и он попросит ввести путь. Вводите /etc/cups и там выбираете файл cups-files.conf и редактируете его TextEdit.
- В конец файла «/etc/cups/cups-files.conf» удалите строку Sandboxing Off. (Важно: в конце файла должен остаться перевод строки. Во многих редакторах это выглядит как пустая строка в конце.).
- Если не получается изменить, можете создать такой же файл без строки «Sandboxing Off» и заменить существующий файл на новый.
- «sudo launchctl stop org.cups.cupsd » — эта команда остановила сервис org.cups.cupsd. Надо её заново запустить, если не перезапустилась само. Меняем stop на start. «sudo launchctl start org.cups.cupsd»
Комплектующие для хакинтоша или как собрать самому MacOS
macos, не печатает принтер, filter failed
@Zheem
Let’s update the printer firmware and Mac software:
Update printer firmware
Update software on Mac
Restart the printer and the MAC
Then, follow the below steps to remove the printer and add the printer as AirPrint.
Step 1: Remove multiple printers from the printer list
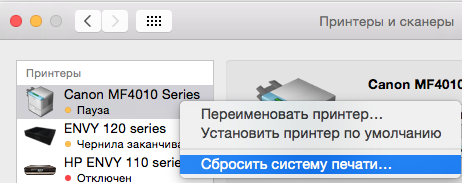
Check for multiple devices in the Printers list, and then remove any extra entries other than one in idle status.
-
Search the Mac for Print, and then click Print & Fax, Print & Scan, or Printers & Scanners in the list of results.
-
Find the printer names that match your printer from the list of devices.
Figure : Printers and Scanner window with multiple names of a printer in the list

-
If you see multiple printer queues for the same printer, remove all extra printers by selecting them one at a time, and then clicking the minus button
at the bottom of the list. Leave one ‘idle’ printer in the list that matches your printer if available and use this printer as the Default printer. -
Try printing again.
-
If the printer prints, you can stop troubleshooting.
-
If the printer remains offline or displays an error, continue to the next step.
-

 at the bottom of the list. Leave one ‘idle’ printer in the list that matches your printer if available and use this printer as the Default printer.
Step 2: Delete the existing print queue and add the printer
Remove the printer queue from the list of printers, and then add it again. Doing so creates a new printing session.
-
Make sure your Mac is connected to the Internet.
-
In the Printers list, click your HP printer, and then click the Minus button
to delete it. -
Click the Add button
. -
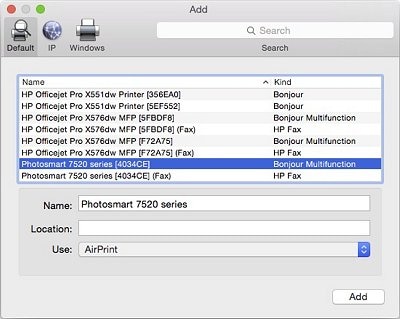
Find and select the name of your printer from the Printer list, and then click Add to add your printer. Do not select an HP Fax driver.
Figure : Example of the printer selection list
-
Click Print Using or Use.
-
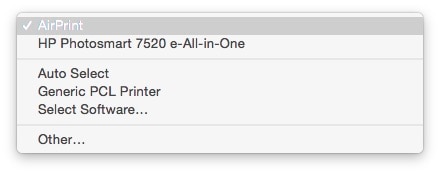
Select the name of your printer (if available) or AirPrint.
Figure : Menu showing AirPrint selected
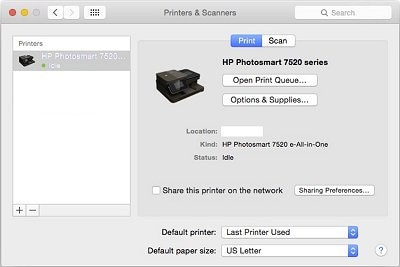
Your new printer queue displays in the Printers list in an Idle status
.Figure : Example of a newly added printer in the Printers & Scanners list
-
Try printing.
 .
.
 .
.
Keep me posted, how it goes!
If the information I’ve provided was helpful, give us some reinforcement by clicking the Accepted Solution buttons, that’ll help us and others see that we’ve got the answers!
Have a great day!
Cheers:)
Raj1788
I am an HP Employee
@Zheem
Let’s update the printer firmware and Mac software:
Update printer firmware
Update software on Mac
Restart the printer and the MAC
Then, follow the below steps to remove the printer and add the printer as AirPrint.
Step 1: Remove multiple printers from the printer list
Check for multiple devices in the Printers list, and then remove any extra entries other than one in idle status.
-
Search the Mac for Print, and then click Print & Fax, Print & Scan, or Printers & Scanners in the list of results.
-
Find the printer names that match your printer from the list of devices.
Figure : Printers and Scanner window with multiple names of a printer in the list
-
If you see multiple printer queues for the same printer, remove all extra printers by selecting them one at a time, and then clicking the minus button
at the bottom of the list. Leave one ‘idle’ printer in the list that matches your printer if available and use this printer as the Default printer. -
Try printing again.
-
If the printer prints, you can stop troubleshooting.
-
If the printer remains offline or displays an error, continue to the next step.
-
Step 2: Delete the existing print queue and add the printer
Remove the printer queue from the list of printers, and then add it again. Doing so creates a new printing session.
-
Make sure your Mac is connected to the Internet.
-
In the Printers list, click your HP printer, and then click the Minus button
to delete it. -
Click the Add button
. -
Find and select the name of your printer from the Printer list, and then click Add to add your printer. Do not select an HP Fax driver.
Figure : Example of the printer selection list
-
Click Print Using or Use.
-
Select the name of your printer (if available) or AirPrint.
Figure : Menu showing AirPrint selected
Your new printer queue displays in the Printers list in an Idle status
.Figure : Example of a newly added printer in the Printers & Scanners list
-
Try printing.
Keep me posted, how it goes!
If the information I’ve provided was helpful, give us some reinforcement by clicking the Accepted Solution buttons, that’ll help us and others see that we’ve got the answers!
Have a great day!
Cheers:)
Raj1788
I am an HP Employee
Ошибка сбоя фильтра принтера Epson на Mac довольно неприятна, поскольку она не позволяет принтеру печатать важные документы. Ошибка обычно появляется, когда есть проблема с драйвером вашего принтера. Это указывает на то, что конкретная часть вашего принтера не работает должным образом.
Тем не менее, эта ошибка создает трудности для пользователя Mac, поскольку она полностью останавливает принтер от вывода на печать или дает неверный отпечаток, если он работает. Ну нельзя одного водителя винить в другом. Другие причины также вызывают такие ошибки принтера на ваших устройствах Mac. Поэтому, после нескольких типов исследований, мы придумали эту статью, которая не только позволит вам узнать о возможных виновниках этой ошибки, но и познакомит вас с эффективными исправлениями для устранения ошибки.
Итак, приступим.
Что вызывает ошибку «Epson Printer Filter Failed»?
- Неисправный драйвер принтера. Как было подчеркнуто ранее, неисправный драйвер принтера является основным виновником ошибки. Поэтому, если драйверы вашего принтера устарели или вышли из строя из-за повреждения, эта ошибка будет отображаться на принтере Epson. Таким образом, обновление или переустановка драйвера может решить проблему в этом случае.
- Проблема совместимости. Когда принтер Epson не соответствует минимальным требованиям вашей Mac OS, это приводит к возникновению таких ошибок. Это означает, что в этой ошибке также могут быть виноваты проблемы совместимости между принтером и ОС вашего Mac. Поэтому установка совместимого драйвера может вывести вас из ситуации.
- Отключенный параметр общего доступа на принтере Epson. Если параметр общего доступа отключен на вашем принтере Epson, это может стать причиной этой ошибки. Итак, здесь вам нужно включить опцию общего доступа, чтобы избавиться от проблемы.
- Неправильные настройки бумаги. Если каким-то образом ваши настройки бумаги были выполнены неправильно, есть большая вероятность, что вы можете столкнуться с этой проблемой на своем принтере Epson. Поэтому вам нужно изменить настройки бумаги, чтобы избавиться от этой проблемной ситуации.
- Неисправное программное обеспечение принтера. Если есть проблема с программным обеспечением принтера, это может доставить вам неприятности из-за мигания этой ошибки на вашем принтере Epson. Таким образом, чтобы решить проблему, необходимо переустановить программное обеспечение.
Теперь, зная о возможных виновниках, пришло время следовать пошаговым инструкциям, чтобы исправить ошибку Epson Printer Filter failed Mac.
Существует вероятность того, что ваш принтер неправильно подключен к вашей системе Mac, и именно по этой причине вы видите ошибку на своем устройстве Mac. Таким образом, в этом случае удаление принтера с вашего устройства Mac, а затем его повторная установка могут помочь вам решить ошибку и проблему с принтером Epson в автономном режиме. Для этого вам просто нужно следовать приведенной ниже инструкции:
- Выключите принтер Epson.
- Затем перейдите на вкладку «Системные настройки» на Mac PC.
- Затем перейдите в раздел «Печать и факс» и выберите свой принтер.
- После этого нажмите на значок «_» (подчеркивание), чтобы исключить принтер из списка.
- Теперь исключите принтер Epson из списка при появлении запроса на подтверждение.
- Наконец, нажмите значок «x» в правом верхнем углу, чтобы выйти из вкладки «Печать и факс».
2. Обновите драйверы принтера
Если драйвер принтера устарел, он не будет работать специальным образом, поскольку он становится несовместимым с системой Mac и вызывает проблемы при выполнении любых действий. Итак, во-первых, предлагается обновить драйвер принтера Epson в вашей системе Mac и решить проблему в вашем случае.
Для этого выполните следующие действия:
- Нажмите на опцию «Приложения», а затем на папку Epson Software, чтобы запустить ее.
- Однако, если у вас нет Epson Software Updater, загрузите его — https://epson.com/Support/wa00590.
- После загрузки обновления выберите Epson Firmware Update, установите флажок и нажмите «Установить».
- Теперь выберите «Согласен», чтобы продолжить.
- И если требуется, введите свое имя пользователя и пароль
- Дважды щелкните значок Epson Firmware updaters в появившемся окне и запустите программу обновления.
- Нажмите «Я согласен» и нажмите кнопку «Далее».
- Теперь нажмите кнопку «Пуск», а затем нажмите кнопку «ОК».
- Убедитесь, что программное обеспечение для обновления микропрограммы завершено.
- И как только процесс будет полностью завершен, ваш принтер автоматически перезагрузится.
- Затем нажмите кнопку «Готово» и выйдите из утилиты обновления программного обеспечения Epson.
Попробуйте выполнить печать в системе Mac и проверьте, решена ли проблема, или перейдите к следующему решению.
3. Переустановите драйверы принтера.
Если обновление драйвера принтера не поможет вам решить проблему, возможно, ошибка возникает из-за какой-то внутренней проблемы или ошибок драйвера или сбоя драйвера. Поэтому переустановка драйвера поможет вам решить проблему в кратчайшие сроки. Чтобы выполнить переустановку, выполните следующие действия:
- Перезагрузите компьютер Mac.
- Теперь посетите официальный сайт Epson в своем браузере.
- Затем на вспомогательной странице введите модель вашего принтера и нажмите OK.
- Теперь в окне поддержки принтера загрузите предпочтительный драйвер.
- После загрузки установите драйвер и добавьте его на свой компьютер Mac.
Теперь ваш принтер готов к печати.
4. Удаление оставшихся файлов принтера Epson
Иногда из-за оставшихся файлов принтера Epson вы начинаете сталкиваться с ошибками при печати. Оставшиеся файлы принтера Epson конфликтуют с последним процессом печати и останавливают его печать, в результате чего вы начинаете видеть ошибки.
Поэтому проверьте и удалите оставшиеся файлы принтера Epson, чтобы решить проблему. Для этого выполните указанные ниже шаги.
- Найдите принтеры в Finder.
- Далее удалите там папку Epson, если таковые имеются.
- Теперь перейдите к файлам PPD в той же папке «Принтеры».
- После этого выберите «Содержание» и нажмите «Ресурсы».
- Найдите название вашей модели принтера Epson и удалите все связанные файлы для Epson.
- Теперь вернитесь в Finder и найдите папку Cache.
- Затем удалите все папки с названием Epson.
- Наконец, перейдите в корзину на рабочем столе и навсегда удалите оттуда все файлы и папки.
5. Включите параметр общего доступа на принтере Epson.
Во многих случаях, если параметр общего доступа отключен, принтер Epson не может печатать на вашем устройстве Mac и, как следствие, начинает показывать ошибку. Таким образом, включение опции общего доступа на принтере Epson поможет вам решить эту проблему. Для этого выполните следующие быстрые шаги:
- Сначала выберите меню Apple, а затем нажмите «Системные настройки», после чего нажмите «Общий доступ».
- Затем в разделе «Общий доступ» установите флажок «Общий доступ к принтеру».
- Теперь в разделе «Принтеры» выберите принтер Epson, которым вы хотите поделиться.
- Затем нажмите кнопку «Добавить» в списке «Пользователи», а затем добавьте нужных пользователей.
6. Измените настройки бумаги
Другой причиной возникновения этой ошибки на вашем принтере Epson на Mac являются неправильные настройки бумаги. Итак, попробуйте изменить настройки бумаги, чтобы решить проблему с принтером, не связанную с печатью. Для этого вам просто нужно выполнить следующие быстрые шаги:
- В диалоговом окне файла PDF перейдите в Главное меню.
- Затем нажмите на опцию «Предварительный просмотр», чтобы открыть файл PDF.
- После этого откройте файл, нажав «Файл», а затем нажмите кнопку «Сохранить».
- Теперь на экране появится диалоговое окно формата, выберите вариант TIFF.
- Затем перейдите к разрешению и нажмите на опцию Pixels/inch.
- На следующем шаге в пустом поле введите 600.
- Теперь нажмите на кнопку Сохранить, чтобы сохранить внесенные изменения.
- Далее перейдите в меню «Файл» и откройте его.
- Затем в главном меню нажмите Экспорт.
- После этого снова щелкните TIFF в окне «Формат».
- Теперь снимите флажок «Альфа» и сохраните изменения, нажав кнопку «Сохранить».
- Затем выберите файл и нажмите кнопку «Печать».
- Наконец, выберите правильный размер и размеры бумаги в настройках принтера Epson.
7. Сброс системы печати
Если ни одно из вышеперечисленных исправлений не работает для вас, то здесь предлагается сбросить систему печати. Возможно, вы изменили некоторые настройки, и это мешает принтеру печатать должным образом. Таким образом, сброс системных настроек принтера установит принтер в состояние по умолчанию и может помочь вам исправить ошибку Mac с фильтром принтера Epson.
Для этого выполните следующие шаги:
- Перейдите к значку Apple и нажмите «Системные настройки».
- Затем нажмите на опцию «Печать и факс» или вы также можете выбрать «Печать и сканирование»/«Принтеры и сканеры».
- Теперь щелкните правой кнопкой мыши пустое место в списке принтеров и выберите параметр «Сбросить систему печати».
- Затем нажмите «Сброс» в окне подтверждения.
- Как только система печати завершит процесс сброса и список принтеров станет пустым, перезагрузите компьютер Mac.
8. Переустановите принтер
Наконец, если ни одно из вышеперечисленных исправлений не работает, рекомендуется выполнить переустановку. Переустановка принтера решит временные проблемы, связанные с принтером, тем самым избавив вас от этой досадной ситуации.
- Сначала выключите принтер, затем перейдите в папку: нажмите «Системные настройки», а затем нажмите «Печать и факс».
- И измените имя принтера и нажмите «-» из списка и удалите имя принтера из своего списка.
- Затем выберите вариант удаления, чтобы удалить имя принтера из списка, и закройте окно «Печать и факс».
- Затем перейдите к жесткому диску и нажмите «Библиотека», затем нажмите «Принтер» и удалите папку Epson с именем.
- Снова перейдите в папку «Библиотека», нажмите «Принтеры», затем в PPD и нажмите «Содержание», нажмите «Ресурсы».
- И в списке найдите имя печатающего устройства и, найдя имя принтера Epson, исключите его из своего списка.
- Теперь перейдите в библиотеку и нажмите «Кэш», после чего удалите папку «Epson».
- И закройте окно жесткого диска и нажмите кнопку с крестиком в верхней части окна.
- Затем перезагрузите систему и включите принтер.
Надеюсь, что решения, приведенные в статье, помогут вам исправить неисправный фильтр принтера Epson на Mac. Если вы все еще видите ошибку, обратитесь в центр поддержки принтеров Epson, чтобы создать тикет с указанием проблемы. Они вернутся к вам с исправлениями для устранения ошибки.
В этом руководстве мы покажем вам различные способы исправления ошибки принтера: остановлен — «Фильтр» не работает на вашем Mac. У многочисленных пользователей выразили свою обеспокоенность что они прослушиваются с вышеупомянутой ошибкой всякий раз, когда они пытаются указать какой-либо документ — либо через беспроводную связь [WiFi] или проводной [USB] принтер.
Кроме того, некоторые пользователи также заявили, что Preview не может печатать PDF-файлы на их принтере. [even though third-party software Acrobat Reader is working well and good]. Точно так же некоторые пользователи также сообщают, что не могут печатать через Microsoft Remote Desktop и получают ту же ошибку, что и выше. Поэтому, если вы также получаете сообщение «Ошибка принтера: остановлен — сбой фильтра» на вашем Mac в любом из этих сценариев, это руководство поможет вам исправить это. Следуйте вместе.
Рекомендуется попробовать каждый из перечисленных ниже обходных путей, а затем посмотреть, какой из них принесет вам успех. Итак, имея это в виду, давайте начнем.
ИСПРАВЛЕНИЕ 1. Обновите драйверы принтера
- Для начала перейдите в «Системные настройки» > «Принтеры и сканеры».
- Выберите свой принтер из списка и нажмите знак минус рядом с ним, чтобы удалить его.
- Затем нажмите «Удалить принтер» в диалоговом окне подтверждения.
- После этого нажмите значок плюса и выберите «Добавить принтер или сканер».
- После этого выберите тип принтера: подключение USB, беспроводное или Ethernet.
- Затем выберите свой принтер в раскрывающемся списке «Использовать или печатать с помощью» и нажмите «Добавить».
- Теперь нажмите на логотип Apple и выберите «Обновление программного обеспечения» или «App Store».
- Затем перейдите на вкладку «Обновления» и загрузите и установите ожидающие обновления.
- Проверьте, исправляет ли он ошибку принтера: остановлен — «Фильтр» не работает на вашем Mac.
ИСПРАВЛЕНИЕ 2. Переустановите принтер
- Выключите принтеры и перейдите в «Системные настройки» > «Принтеры и сканеры».
- Выберите свой принтер из списка и нажмите знак минус рядом с ним, чтобы удалить его.
- Затем нажмите «Удалить принтер» в диалоговом окне подтверждения.
- Теперь откройте Finder и перейдите в «Библиотека» > «Принтеры». Затем удалите папку, названную в честь вашего принтера.
- После этого перейдите в «Библиотека» > «Принтеры» > «PPD» > «Содержание» > «Ресурсы» и удалите файл с именем вашего принтера.
- Затем перейдите в «Библиотека» > «Кэш» и удалите папку, названную в честь вашего принтера.
- Теперь перезагрузите Mac и включите принтер.
- Перейдите на сайт загрузки вашего принтера и скачайте последние версии драйверов, соответствующие номеру модели вашего продукта.
- Затем запустите файл установки драйвера и следуйте инструкциям на экране, чтобы завершить процесс.
- Теперь проверьте, исправляет ли он ошибку принтера: остановлен — «Фильтр» не работает на вашем Mac.
ИСПРАВЛЕНИЕ 3: сброс системы печати
- Для начала перейдите в «Системные настройки» > «Принтеры и сканеры».
- Затем щелкните правой кнопкой мыши пустое место в списке «Принтеры» и выберите «Сбросить систему печати».
- После этого нажмите «Сброс» в диалоговом окне подтверждения.
- Дождитесь завершения процесса [until there are no printers on the list].
- После этого перезагрузите Mac и перейдите в «Системные настройки» > «Принтеры и сканеры».
- Затем нажмите на значок плюса, выберите свой принтер из списка и нажмите «Добавить».
- Теперь нажмите «Печать с помощью…», а затем выберите свой принтер из списка. Вот и все.
Это были три разных метода, которые помогут вам исправить ошибку принтера: Остановлен — «Фильтр» не работает на вашем Mac. Если у вас есть какие-либо вопросы относительно вышеупомянутых шагов, сообщите нам об этом в комментариях. Мы вернемся к вам с решением в ближайшее время.
Содержание
- Mac OS 10.10 не печатает принтер, ошибка Filter Failed
- Как исправить ошибку Filter Failed
- Если предыдущие варианты не помогли, пробуем следущее:
- Как отменить команды прописанные выше
- Question: Q: Printer problem mac OS Big Sur
- Helpful answers
- Resolved Samsung ML-2160 and «filter failed» problem
- LaurentR2D2
- Samsung Universal Print Driver — [Download]
- BrianBaughn
- LaurentR2D2
- johncurle
- abclike123
- laira
- abclike123
- Samsung Universal Print Driver — [Download]
- BrianBaughn
- Robertilos
- gslrider
- 2PannaCotta
- jdevoto
- Nibblonian
Mac OS 10.10 не печатает принтер, ошибка Filter Failed
При обновлении операционной системы Mac OS до само последней, 10.10 столкнулся с проблемой, один из моих старых принтеров Xerox MF 3100, который стоит в офисе, не печатает. Не печатает из любой программы, любые документы. После того как открывается список задач на верху пишется ошибка Filter Failed и дальнейшие попытки что либо перевести из цифрового вида в бумажный безуспешны.
Пробуем стандартные процедуры устранения подобных проблем:
- Найти более свежий драйвер на официальном сайте и установить его
- Удалить и добавить принтер
- Удалить старый и добавить новый драйвер
Но такие процедуры, с ошибкой Filter Failed не дают результата.
Как исправить ошибку Filter Failed
Чтобы принтер снова начал печатать надо:
- Зайдите в Finder-> Программы-> Утилиты и откройте программу «Терминал»
- Если у вас нету пароля на компьютер необходимо его поставить. (После окончания инструкции можете его снять). Это нужно чтобы в следующем пункте получить права суперпользователя для выполнения shell команд.
- Вбейте команду
sudo sh -c ‘echo «Sandboxing Off» >> /etc/cups/cups-files.conf’
sudo launchctl stop org.cups.cupsd
После чего, можете пробовать печатать, все должно работать. Никаких перезагрузок или выхода из системы делать не надо.
Но если у вас зависает печать то
- Зайдите в Системные настройки настройки-> Принтеры и сканеры
- Нажмите на любой принтер и выберите «Сбросить систему печати»
- Добавьте принтер заново и все заработает
На этом все, но если у вас остались вопросы, вы, как всегда, можете задать их в комментариях, а я попробую вам помочь.
Если предыдущие варианты не помогли, пробуем следущее:
1) Выберите меню Apple > «Системные настройки» и нажмите «Принтеры и сканеры».
2) Дождавшись когда меню Принтеры и сканеры загрузится, Удерживая нажатой клавишу Control, нажмите в списке слева, где ранее отображались принтеры, затем выберите пункт «Сбросить систему печати» в появившемся меню.
P.S. На август 2019, у меня установлена macOS Mojavi версия 10.14.1. И к сожалению ничего не помогло, хотя за пол года до ошибки принтер работал 🙂 Мой инстаграм rinatshahmetov.
Как отменить команды прописанные выше
- Открываете Finder и нажимаете комбинацию Shift+Cmd+G и он попросит ввести путь. Вводите /etc/cups и там выбираете файл cups-files.conf и редактируете его TextEdit.
- В конец файла «/etc/cups/cups-files.conf» удалите строку Sandboxing Off. (Важно: в конце файла должен остаться перевод строки. Во многих редакторах это выглядит как пустая строка в конце.).
- Если не получается изменить, можете создать такой же файл без строки «Sandboxing Off» и заменить существующий файл на новый.
- «sudo launchctl stop org.cups.cupsd » — эта команда остановила сервис org.cups.cupsd. Надо её заново запустить, если не перезапустилась само. Меняем stop на start. «sudo launchctl start org.cups.cupsd»
Комплектующие для хакинтоша или как собрать самому MacOS
Источник
Question: Q: Printer problem mac OS Big Sur
Printing went well on Catalina. Now printing stopped and showed message ‘Filter failed’. Using printer Lexmark C543 and removed and entered the printer once. Same problem. Printer supply is visible in browser. Seems to be OS problem.
MacBook Pro 13″, macOS 10.12
Posted on Nov 14, 2020 3:32 AM
Excellent suggestion! After deleting, adding the same printer and using Generic PostScript Printer printing is again functioning.
Posted on Nov 16, 2020 1:11 PM
Helpful answers
The generally suggested fix for the ‘Filter failed’ problem is to delete the printer and then upload the driver yourself, not let it select from the OS builtin set. However, right now the Lexmark driver site doesn’t allow Big Sur (10.16) as an option for a driver download.
Nov 14, 2020 6:36 AM
Same problem overher with my Lexmark CX310 when i print. Printer receives nothing it even does not even wake up. Tried to install new drivers from Lexmark but this is also resulting in an error so new driver are not installed.
Nov 14, 2020 12:01 PM
After MAC OS Big Sur 11.0.1 installed, computer «unable to locate printer». Help please.
Nov 17, 2020 7:41 AM
My company we run a Canon C5035, we updated all the iMac 2019 and MacBook to OS Big Sur. Now when we print the text comes out as gray squares. This is a monumental problem for our business. Please provide support ASAP
Nov 16, 2020 8:20 AM
This error is showing when trying to add a printer. this never happened in catalina
An error occurred while trying to add the selected device.
Nov 17, 2020 10:48 PM
After the update, my Lexmark MS415dn stopped working, «Filter» Failed. I went to the Lexmark support page, no drivers available for the Big Sur update yet.
Additionally after the update when I purchase postage though PayPal, the label appears blank. If I close the page and select «reprint label, it appears and can be printed on my backup printer made by Epson.
I tried to install monochrome Lexmark printer driver and the installation failed. The only driver available was for OS 10.9, nothing yet for 11.01.
Still working on both issues.
Nov 17, 2020 2:44 PM
For Lexmark printers (is what I have. ) just install the same driver for your printer using in the «use» drop menu the Generic PostScript Printer.
Nov 16, 2020 12:38 PM
There’s more to the conversation
Loading page content
Page content loaded
Having same problem with Lexmark B2238 Mono Laser. Worked perfectly before upgrade to 11.0.1. Updated firmware, reset printing system, restarted iMac and printer. Still get » Filter Failed» message.
Nov 14, 2020 4:36 AM
The generally suggested fix for the ‘Filter failed’ problem is to delete the printer and then upload the driver yourself, not let it select from the OS builtin set. However, right now the Lexmark driver site doesn’t allow Big Sur (10.16) as an option for a driver download.
Nov 14, 2020 6:36 AM
Same problem overher with my Lexmark CX310 when i print. Printer receives nothing it even does not even wake up. Tried to install new drivers from Lexmark but this is also resulting in an error so new driver are not installed.
Nov 14, 2020 12:01 PM
In addtion on my earlier message. My Lexmark CX310 als support airprint so i turned on my WIFI on the Mac and used the airprint protocol and it worked. Amazingly even when i turned off the WIFI on the Mac but still used the airprint protocol it worked.
Nov 15, 2020 1:18 AM
My company we run a Canon C5035, we updated all the iMac 2019 and MacBook to OS Big Sur. Now when we print the text comes out as gray squares. This is a monumental problem for our business. Please provide support ASAP
Nov 16, 2020 8:20 AM
Here’s a fix that worked immediately for me».
Nov 16, 2020 8:26 AM
Here’s a fix that worked immediately for me
Nov 16, 2020 8:27 AM
Just installed Big Sur on my Mac mini 2018.
Tried to print to a Canon Image Class MF 4150 and then to a Brother HL-L2360D printers to no avail.
Had to RESET the Mac printing system to solve a problem.
If you can’t print to your printer and you’ve tried all other solutions, reset the printing system. This process deletes all printers from your list of printers, deletes information about all completed print jobs, and deletes all printer presets.
Important: First, try other troubleshooting techniques in Solve printing problems on Mac.
- On your Mac, choose Apple menu > System Preferences, then click Printers & Scanners.
- Press and hold the Control key as you click in the list at the left, then choose “Reset printing system” from the menu that appears.
- After you reset the printing system, the list of printers in Printers & Scanners preferences is empty.
- Re-add any printers.
«iMore re how to reset printing system Mac» which includes screen shots
Nov 16, 2020 8:31 AM
If this is anything like my HP printer problem, with a rebuild of my system for Big Sur, I found the drivers would not install from Apple Support and downloaded from the HP site either. It looked like the present OS build number was not entered into the driver installer knowledge base.
I eventually used «Pacifist» to install the files bypassing the OS system checks and now have a working printer again.
Nov 16, 2020 8:39 AM
Thanks for the thought on resetting the printer system: tried that, but sadly made no difference on my ‘Filter failed’ Lexmark cx517de. Fortunately our other Lexmark and Xerox printers still work before and after the reset!
Nov 16, 2020 8:44 AM
I had the same problem with a Lexmark e360dn. It’s a basic laser printer with no fancy features so I uninstalled the printer and installed it again using «Generic Postscript Printer» driver instead. It works but depending on your printer you may lose some functionality.
Lexmark has not updated the driver on this one since 2013 but it’s unlikely to be replaced until it breaks.
I hope this helps someone else out.
Nov 16, 2020 9:52 AM
I just upgraded to Big Sur today. Now I can no longer print to my Lexmark CX310dn. I get a filter failed error. Apple — what are you doing to fix this? I can’t run my business without a printer.
Nov 16, 2020 10:24 AM
Thank you so much. This did the trick. I have a Lexmark CX310dn.
Nov 16, 2020 10:28 AM
You’re not talking to Apple representatives here. We’re all users like yourself. You should contact Apple via the phone number at the bottom of this page to talk to Customer Support.
If you have problems give the free, open source print driver Gutenprint. You can see if it supports your model here: Gutenprint Supported Printers It might get you up and running till the official driver is found.
Nov 16, 2020 10:54 AM
For Lexmark printers (is what I have. ) just install the same driver for your printer using in the «use» drop menu the Generic PostScript Printer.
Nov 16, 2020 12:38 PM
Question: Q: Printer problem mac OS Big Sur More Less
Источник
Resolved Samsung ML-2160 and «filter failed» problem
LaurentR2D2
macrumors member
I have a Samsung ML-2160 and an iMac 2020 with Mac OS Big Sur. I have downloaded an universal driver from here :
Samsung Universal Print Driver — [Download]
The driver installation went fine and my printer is seen in the system preferences panel :
When I try to print a document, I get a «filter failed» error and when I look in the console, I see this error message :
erreur 00:11:51.334532+0200 sandboxd Sandbox: rastertosec(3993) deny(1) sysctl-write kern.system_version_compat
Violation: deny(1) sysctl-write kern.system_version_compat
Process: rastertosec [3993]
Path: /Library/Printers/Samsung/UPD/Filters/rastertosec
Load Address: 0x100000000
Identifier: rastertosec
Version: . (. )
Code Type: x86_64 (Native)
Parent Process: cupsd [3872]
Responsible: /usr/sbin/cupsd
User ID: 26
I’ve read in a forum that it could be a Big Sur security problem and that I should for sign «rastertosec» in the preferences pane, but I don’t understand how to do that.
I’ve tried to launch «rastertosec» and «prefilter», but I get these error messages :
ERROR: rastertopcl job-id user title copies options [file]
ERROR: unable to open print file «SSH_AUTH_SOCK=/private/tmp/com.apple.launchd.CIYmwBTWR3/Listeners» — No such file or directory
Is there something else I can do to solve my problem ? I’d like to avoid to be obliged to buy a new printer, since I’ve just bought a new Samsung toner cartridge

BrianBaughn
macrumors G3
LaurentR2D2
macrumors member
johncurle
macrumors newbie
abclike123
macrumors newbie
laira
macrumors newbie
abclike123
macrumors newbie
Samsung Universal Print Driver — [Download]
BrianBaughn
macrumors G3

Robertilos
macrumors newbie

gslrider
macrumors 6502
I upgraded my Mac Pro 2010 to High Sierra, and it’s really messed up my connection to a few peripherals. One being the Samsung ML-2160. Luckily I found this site to be able to install the driver. When I downloaded the Universal Installer, I noticed 3 different folders. MAC_Data, MAC_ICDM, and MAC_Printer. I presumed I needed to use the installer in the MAC_Printer folder. I did an Uninstall, thinking it would uninstall the old driver I was using under 10.11.x. Then I used the Printer Driver.pkg. Everything looked like it installed ok. When the window came up to «Add Printer», only the Samsung ML-2160 Series driver showed up. I checked the other drivers that were available, and ML-2060 was not there. I tried using the next model (ML-2240). But that didn’t work either. Then I noticed a Samsung M2060 (not ML-2060) driver a little further up on the list. So I decided to give that one a go. And it looks like that one worked for me. So far so good. Not having issues printing from my ML-2160.
Thanks for the link to the Universal Driver. I would have not known to look for that. I kept going to the Samsung site. Which was not helpful at all.
2PannaCotta
macrumors newbie
I upgraded my Mac Pro 2010 to High Sierra, and it’s really messed up my connection to a few peripherals. One being the Samsung ML-2160. Luckily I found this site to be able to install the driver. When I downloaded the Universal Installer, I noticed 3 different folders. MAC_Data, MAC_ICDM, and MAC_Printer. I presumed I needed to use the installer in the MAC_Printer folder. I did an Uninstall, thinking it would uninstall the old driver I was using under 10.11.x. Then I used the Printer Driver.pkg. Everything looked like it installed ok. When the window came up to «Add Printer», only the Samsung ML-2160 Series driver showed up. I checked the other drivers that were available, and ML-2060 was not there. I tried using the next model (ML-2240). But that didn’t work either. Then I noticed a Samsung M2060 (not ML-2060) driver a little further up on the list. So I decided to give that one a go. And it looks like that one worked for me. So far so good. Not having issues printing from my ML-2160.
Thanks for the link to the Universal Driver. I would have not known to look for that. I kept going to the Samsung site. Which was not helpful at all.
jdevoto
macrumors newbie

Nibblonian
macrumors newbie
I upgraded my Mac Pro 2010 to High Sierra, and it’s really messed up my connection to a few peripherals. One being the Samsung ML-2160. Luckily I found this site to be able to install the driver. When I downloaded the Universal Installer, I noticed 3 different folders. MAC_Data, MAC_ICDM, and MAC_Printer. I presumed I needed to use the installer in the MAC_Printer folder. I did an Uninstall, thinking it would uninstall the old driver I was using under 10.11.x. Then I used the Printer Driver.pkg. Everything looked like it installed ok. When the window came up to «Add Printer», only the Samsung ML-2160 Series driver showed up. I checked the other drivers that were available, and ML-2060 was not there. I tried using the next model (ML-2240). But that didn’t work either. Then I noticed a Samsung M2060 (not ML-2060) driver a little further up on the list. So I decided to give that one a go. And it looks like that one worked for me. So far so good. Not having issues printing from my ML-2160.
Thanks for the link to the Universal Driver. I would have not known to look for that. I kept going to the Samsung site. Which was not helpful at all.
I’m on a 2020 13″ MBP, Monterey (12.3.1). I found that this Samsung Universal Driver link indicated Monterey and earlier compatibility: https://www.samsung-driver.org/2022/05/samsung-universal-print-driver-mac.html
But like you and others, when I chose the ML-2160, it didn’t work. I have a Windows VM installed on my Mac, so I ended up installing the Win10 driver on the VM. That worked (oddly enough), so I thought I’d search one more time for the macOS solution and came across this forum post and your suggestion to use the M2060 driver. It worked! Who woulda thunk!?
I too registered here just so I could say thanks!
Источник
Содержание
- Mac OS 10.10 не печатает принтер, ошибка Filter Failed
- Как исправить ошибку Filter Failed
- Question: Q: Printing error Stopped — ‘Filter’ failed
- Helpful answers
- Question: Q: Printer problem mac OS Big Sur
- Helpful answers
Mac OS 10.10 не печатает принтер, ошибка Filter Failed
При обновлении операционной системы Mac OS до само последней, 10.10 столкнулся с проблемой, один из моих старых принтеров Xerox MF 3100, который стоит в офисе, не печатает. Не печатает из любой программы, любые документы. После того как открывается список задач на верху пишется ошибка Filter Failed и дальнейшие попытки что либо перевести из цифрового вида в бумажный безуспешны.
Пробуем стандартные процедуры устранения подобных проблем:
- Найти более свежий драйвер на официальном сайте и установить его
- Удалить и добавить принтер
- Удалить старый и добавить новый драйвер
Но такие процедуры, с ошибкой Filter Failed не дают результата.
Как исправить ошибку Filter Failed
Чтобы принтер снова начал печатать надо:
- Зайдите в Finder-> Программы-> Утилиты и откройте программу «Терминал»
- Если у вас нету пароля на компьютер необходимо его поставить. (После окончания инструкции можете его снять). Это нужно чтобы в следующем пункте получить права суперпользователя для выполнения shell команд.
- Вбейте команду
sudo sh -c ‘echo «Sandboxing Off» >> /etc/cups/cups-files.conf’
sudo launchctl stop org.cups.cupsd
После чего, можете пробовать печатать, все должно работать. Никаких перезагрузок или выхода из системы делать не надо.
Но если у вас зависает печать то
- Зайдите в Системные настройки настройки-> Принтеры и сканеры
- Нажмите на любой принтер и выберите «Сбросить систему печати»
- Добавьте принтер заново и все заработает

На этом все, но если у вас остались вопросы, вы, как всегда, можете задать их в комментариях, а я попробую вам помочь.
Источник
Question: Q: Printing error Stopped — ‘Filter’ failed
Message to Apple support communities and to Epson Support
I am getting the notorious ‘Filter’ failed error message. I have had this before and managed to find a way to print something simple (B+W text) first (I think). This time I have not found a way around this despite following many suggested solutions from your website and others. At one point, printing from any application would cause it to simply quit. I can’t print anything.
Is there a definitive solution for this problem? This seems to be a common problem many users are having with many other printers for other manufacturers.
I may have other issues happening and I am sure they are separate from this problem which I have had in the past. My computer has been freezing and restarting often would not result in the computer successfully coming back up. I seem to be OK for now, but I had to leave the computer all night after a Restart to find it working this morning.
MacOS High Sierra 10.13.3
MacBook Pro (15-inch, Mid 2012)
2.3 GHz Intel Core i7
8 GB 1600 MHz DDR3
Intel HD Graphics 4000 1536 MB
Epson Stylus NX510
Printing both wireless and USB
Run Disk Utility
Run virus checker
Run maintenance programs
Run optimization program
Run program to clean all caches
Reset Printing System (Control-Click on printer list) in Printers & Scanners
Set up both wireless and USB printers in Printers & Scanners
Restarted computer several times
Remove Epson folder from Libraries/Printers
Check for updates
Tried installing software from Epson website (I can’t find the ‘combo’ package mentioned the first time I tried submitting this problem and lost everything had to rewrite about my issue.
Tried making PDFs and then printing from Adobe Acrobat and from Apple Preview
MacBook Pro, macOS High Sierra (10.13.3), Epson Stylus NX510
Posted on Feb 16, 2018 9:44 AM
Helpful answers
I managed to work out the problem with the Epson tech support people. The ‘Filter’ Failed error seems to me to be the result of something corrupt, or otherwise not right, in the driver software. I do think an uninstaller script made by Epson, or better Apple, would be a good idea. In the old days of the Mac, we could uninstall components and reinstall components of the OS. Now everything is hidden, or so complex that, once something is installed and then develops an issue, it is not possible to easily figure out how to uninstall it. There is a way to Reset the Printing System (Control-Click on the printer list of Printers & Scanners in System Preferences, but a further reinstall step needs to be added. What about other components in the system? How does one do a reinstall of something that may go wrong?
In the instructions from Epson below, you can use Command-Shift G in the Finder, then, a.) Replace ‘space’>’space with /; b.) Make sure the items are moved to trash and not just copied; c.) This should work for other printers, so step 10 would be to go to the support page for your printer; d.) If the support page does not offer a downloadable file, follow the steps for Adding A Printer as you normally would in Printers & Scanners of the Systems Preferences.
If you still have a problem persists try the following:
- Power off your product.
- Open System Preferences and select Print & Fax.
- Highlight the Epson printer and click on the «-» sign to delete the printer.
- Click Delete Printer to confirm and close Print & Fax.
- On your hard drive, select Library > Printers. Delete the Epson folder.
- On your hard drive, select Library > Printers> PPD > Contents > Resources. Delete Epson Printer Name.gz
- On your hard drive, select Library > Cache and delete the Epson folder.
- Close the hard drive.
- Restart your computer and power on the printer.
- Go to http://www.epson.ca/support .
- Search for your product or select it from the list.
- Select Downloads.
- Choose the printer or scanner driver for your system and click Download Now.
- Once the download has completed, click on the file from your desktop to launch the installer.
- Follow the directions to complete the installation.
- Try Printing again. A
From the Epson support page for my printer (note – I found that the driver install was an option available when I did step 5):
The latest printer driver for this product is available from Apple’s Software Update. Here’s how to get it:
1. Do one of the following:
USB: Connect your product to your Mac using a USB cable and make sure the product is turned on.
Wireless: Make sure your product is turned on. Connect your product to your wireless network.
Ethernet: Connect your product to your Mac using an Ethernet cable and make sure the product is turned on.
2. Go to the menu on your Mac, then select System Preferences.
3. Select Printers and Scanners, Print & Scan, or Print & Fax.
4. Do one of the following:
If your printer is not on the list, go to step 5.
If your printer is on the list, select your printer model and click the «-» (minus) button. Then go to step 5.
5. Click the «+» button. (If you see the Add Printer or Scanner. option, select it.)
In the screen that appears, select your printer model as below:
USB connection: Select the EPSON Series (USB) product.
Wireless or Ethernet connection: Select the EPSON Series (Bonjour) product.
Select your EPSON Series product in the Use or Print Using drop-down list, then click the Add button.
6. Go to the menu on your Mac, select Software Update or App Store, then click the Updates tab.
7. Do one of the following:
If you see an update from Epson, select UPDATE to install it. Note: Apple Software Update may find multiple updates for your system. You may choose to install all or some of the updates.
If an update is not available, you already have the latest Epson driver for your product.
Источник
Question: Q: Printer problem mac OS Big Sur
Printing went well on Catalina. Now printing stopped and showed message ‘Filter failed’. Using printer Lexmark C543 and removed and entered the printer once. Same problem. Printer supply is visible in browser. Seems to be OS problem.
MacBook Pro 13″, macOS 10.12
Posted on Nov 14, 2020 3:32 AM
Excellent suggestion! After deleting, adding the same printer and using Generic PostScript Printer printing is again functioning.
Posted on Nov 16, 2020 1:11 PM
Helpful answers
The generally suggested fix for the ‘Filter failed’ problem is to delete the printer and then upload the driver yourself, not let it select from the OS builtin set. However, right now the Lexmark driver site doesn’t allow Big Sur (10.16) as an option for a driver download.
Nov 14, 2020 6:36 AM
Same problem overher with my Lexmark CX310 when i print. Printer receives nothing it even does not even wake up. Tried to install new drivers from Lexmark but this is also resulting in an error so new driver are not installed.
Nov 14, 2020 12:01 PM
After MAC OS Big Sur 11.0.1 installed, computer «unable to locate printer». Help please.
Nov 17, 2020 7:41 AM
My company we run a Canon C5035, we updated all the iMac 2019 and MacBook to OS Big Sur. Now when we print the text comes out as gray squares. This is a monumental problem for our business. Please provide support ASAP
Nov 16, 2020 8:20 AM
This error is showing when trying to add a printer. this never happened in catalina
An error occurred while trying to add the selected device.
Nov 17, 2020 10:48 PM
For Lexmark printers (is what I have. ) just install the same driver for your printer using in the «use» drop menu the Generic PostScript Printer.
Nov 16, 2020 12:38 PM
After the update, my Lexmark MS415dn stopped working, «Filter» Failed. I went to the Lexmark support page, no drivers available for the Big Sur update yet.
Additionally after the update when I purchase postage though PayPal, the label appears blank. If I close the page and select «reprint label, it appears and can be printed on my backup printer made by Epson.
I tried to install monochrome Lexmark printer driver and the installation failed. The only driver available was for OS 10.9, nothing yet for 11.01.
Still working on both issues.
Nov 17, 2020 2:44 PM
There’s more to the conversation
Loading page content
Page content loaded
Having same problem with Lexmark B2238 Mono Laser. Worked perfectly before upgrade to 11.0.1. Updated firmware, reset printing system, restarted iMac and printer. Still get » Filter Failed» message.
Nov 14, 2020 4:36 AM
The generally suggested fix for the ‘Filter failed’ problem is to delete the printer and then upload the driver yourself, not let it select from the OS builtin set. However, right now the Lexmark driver site doesn’t allow Big Sur (10.16) as an option for a driver download.
Nov 14, 2020 6:36 AM
Same problem overher with my Lexmark CX310 when i print. Printer receives nothing it even does not even wake up. Tried to install new drivers from Lexmark but this is also resulting in an error so new driver are not installed.
Nov 14, 2020 12:01 PM
In addtion on my earlier message. My Lexmark CX310 als support airprint so i turned on my WIFI on the Mac and used the airprint protocol and it worked. Amazingly even when i turned off the WIFI on the Mac but still used the airprint protocol it worked.
Nov 15, 2020 1:18 AM
My company we run a Canon C5035, we updated all the iMac 2019 and MacBook to OS Big Sur. Now when we print the text comes out as gray squares. This is a monumental problem for our business. Please provide support ASAP
Nov 16, 2020 8:20 AM
Here’s a fix that worked immediately for me».
Nov 16, 2020 8:26 AM
Here’s a fix that worked immediately for me
Nov 16, 2020 8:27 AM
Just installed Big Sur on my Mac mini 2018.
Tried to print to a Canon Image Class MF 4150 and then to a Brother HL-L2360D printers to no avail.
Had to RESET the Mac printing system to solve a problem.
If you can’t print to your printer and you’ve tried all other solutions, reset the printing system. This process deletes all printers from your list of printers, deletes information about all completed print jobs, and deletes all printer presets.
Important: First, try other troubleshooting techniques in Solve printing problems on Mac.
- On your Mac, choose Apple menu > System Preferences, then click Printers & Scanners.
- Press and hold the Control key as you click in the list at the left, then choose “Reset printing system” from the menu that appears.
- After you reset the printing system, the list of printers in Printers & Scanners preferences is empty.
- Re-add any printers.
«iMore re how to reset printing system Mac» which includes screen shots
Nov 16, 2020 8:31 AM
If this is anything like my HP printer problem, with a rebuild of my system for Big Sur, I found the drivers would not install from Apple Support and downloaded from the HP site either. It looked like the present OS build number was not entered into the driver installer knowledge base.
I eventually used «Pacifist» to install the files bypassing the OS system checks and now have a working printer again.
Nov 16, 2020 8:39 AM
Thanks for the thought on resetting the printer system: tried that, but sadly made no difference on my ‘Filter failed’ Lexmark cx517de. Fortunately our other Lexmark and Xerox printers still work before and after the reset!
Nov 16, 2020 8:44 AM
I had the same problem with a Lexmark e360dn. It’s a basic laser printer with no fancy features so I uninstalled the printer and installed it again using «Generic Postscript Printer» driver instead. It works but depending on your printer you may lose some functionality.
Lexmark has not updated the driver on this one since 2013 but it’s unlikely to be replaced until it breaks.
I hope this helps someone else out.
Nov 16, 2020 9:52 AM
I just upgraded to Big Sur today. Now I can no longer print to my Lexmark CX310dn. I get a filter failed error. Apple — what are you doing to fix this? I can’t run my business without a printer.
Nov 16, 2020 10:24 AM
Thank you so much. This did the trick. I have a Lexmark CX310dn.
Nov 16, 2020 10:28 AM
You’re not talking to Apple representatives here. We’re all users like yourself. You should contact Apple via the phone number at the bottom of this page to talk to Customer Support.
If you have problems give the free, open source print driver Gutenprint. You can see if it supports your model here: Gutenprint Supported Printers It might get you up and running till the official driver is found.
Nov 16, 2020 10:54 AM
For Lexmark printers (is what I have. ) just install the same driver for your printer using in the «use» drop menu the Generic PostScript Printer.
Nov 16, 2020 12:38 PM
Question: Q: Printer problem mac OS Big Sur More Less
Источник