After installing Android Studio, it doesn’t start, but it displays the following error when fetching Android SDK component information:
Internal error. Please report to https://code.google.com/p/android/issues

java.lang.RuntimeException: java.lang.IllegalArgumentException: Argument for @NotNull parameter 'name' of com/android/tools/idea/welcome/Platform.<init> must not be null
    at com.intellij.idea.IdeaApplication.run(IdeaApplication.java:178)
    at com.intellij.idea.MainImpl$1$1$1.run(MainImpl.java:52)
    at java.awt.event.InvocationEvent.dispatch(InvocationEvent.java:311)
    at java.awt.EventQueue.dispatchEventImpl(EventQueue.java:756)
    at java.awt.EventQueue.access$500(EventQueue.java:97)
    at java.awt.EventQueue$3.run(EventQueue.java:709)
    at java.awt.EventQueue$3.run(EventQueue.java:703)
    at java.security.AccessController.doPrivileged(Native Method)
    at java.security.ProtectionDomain$1.doIntersectionPrivilege(ProtectionDomain.java:75)
    at java.awt.EventQueue.dispatchEvent(EventQueue.java:726)
    at com.intellij.ide.IdeEventQueue.dispatchEvent(IdeEventQueue.java:362)
    at java.awt.EventDispatchThread.pumpOneEventForFilters(EventDispatchThread.java:201)
    at java.awt.EventDispatchThread.pumpEventsForFilter(EventDispatchThread.java:116)
    at java.awt.EventDispatchThread.pumpEventsForHierarchy(EventDispatchThread.java:105)
    at java.awt.EventDispatchThread.pumpEvents(EventDispatchThread.java:101)
    at java.awt.EventDispatchThread.pumpEvents(EventDispatchThread.java:93)
    at java.awt.EventDispatchThread.run(EventDispatchThread.java:82)
Caused by: java.lang.IllegalArgumentException: Argument for @NotNull parameter 'name' of com/android/tools/idea/welcome/Platform.<init> must not be null
    at com.android.tools.idea.welcome.Platform.<init>(Platform.java)
    at com.android.tools.idea.welcome.Platform.getLatestPlatform(Platform.java:72)
    at com.android.tools.idea.welcome.Platform.createSubtree(Platform.java:89)
    at com.android.tools.idea.welcome.InstallComponentsPath.createComponentTree(InstallComponentsPath.java:81)
    at com.android.tools.idea.welcome.InstallComponentsPath.init(InstallComponentsPath.java:215)
    at com.android.tools.idea.wizard.DynamicWizardPath.attachToWizard(DynamicWizardPath.java:97)
    at com.android.tools.idea.wizard.DynamicWizard.addPath(DynamicWizard.java:233)
    at com.android.tools.idea.welcome.FirstRunWizard.init(FirstRunWizard.java:75)
    at com.android.tools.idea.welcome.FirstRunWizardHost.setupWizard(FirstRunWizardHost.java:100)
    at com.android.tools.idea.welcome.FirstRunWizardHost.getWelcomePanel(FirstRunWizardHost.java:92)
    at com.intellij.openapi.wm.impl.welcomeScreen.WelcomeFrame.<init>(WelcomeFrame.java:68)
    at com.intellij.openapi.wm.impl.welcomeScreen.WelcomeFrame.showNow(WelcomeFrame.java:173)
    at com.intellij.idea.IdeaApplication$IdeStarter.main(IdeaApplication.java:302)
    at com.intellij.idea.IdeaApplication.run(IdeaApplication.java:172)
    ... 16 more
![]()
asked Aug 19, 2015 at 8:55
![]()
1
It occurred to me today. I think the reason is that mistakes occurred when fetching Android SDK component information. Here is my way to avoid this problem:
- Open the folder
binunder the directory where you installed your Android Studio. - Find the file
idea.propertiesand open it with Notepad++, UltraEdit, or other edit tools. - Add
disable.android.first.run=trueas the final line and save the file. - Restart Android Studio.
Then it won’t fetch any information and will be opened directly. I hope that will help you.
![]()
answered Aug 21, 2015 at 6:12
![]()
Xun ChenlongXun Chenlong
1,6222 gold badges10 silver badges14 bronze badges
4
Just turn off the Internet connection.
![]()
answered Sep 3, 2015 at 15:29
![]()
bigminionbigminion
9126 silver badges2 bronze badges
7
Simply starting Android Studio when the Internet connection is off worked for me.
It will give a warning message that it cannot initiate the first run. Just ignore that warning, and you are done.
![]()
answered Aug 26, 2015 at 13:48
![]()
Parag KadamParag Kadam
3,4085 gold badges22 silver badges45 bronze badges
1
Please press okay and restart Android Studio. It will start normally.
answered Aug 13, 2016 at 17:16
![]()
-
Delete the two folders C:UsersUSER_NAME.android and C:UsersUSER_NAME.AndroidStudio. And delete all files in C:UsersUSER_NAMEAppDataLocalTemp
-
Remove and re-install Android Studio, and I used the SDK that I downloaded before and saved it as backup. Then I opened Android Studio when the Internet connection was off.
The best way is, make sure you do the 1st step up here then
turn off the internet then restart you computer.
![]()
Steve Haley
55.1k17 gold badges77 silver badges84 bronze badges
answered Aug 24, 2015 at 10:31
![]()
Amal KronzAmal Kronz
1,6571 gold badge17 silver badges22 bronze badges
I suggest you upgrade Android Studio to the stable 1.3.1 version. From the log, it seems there is a problem with an argument which seems to be null.
answered Aug 19, 2015 at 9:53
![]()
stebakstebak
1651 silver badge7 bronze badges
На чтение 4 мин. Просмотров 1.3k. Опубликовано 03.09.2019
В самой используемой ОС в мире есть и самые активные разработчики. Конечно, мы имеем в виду Android и его приложения. Теперь большинство пользователей будут работать под управлением Android Studio под Linux, но значительное количество разрабатывают приложения для ОС Windows. В последнее время пользователям, которые обновили Windows 7/8 до Windows 10, было трудно работать с Android Studio.
Мы позаботились о том, чтобы заручиться поддержкой нескольких проблем. Если вы не можете запустить Android Studio в Windows 10 , следуйте приведенным ниже инструкциям.
Содержание
- Не удается запустить Android Studio в Windows 10? Вот что делать
- 1: убедитесь, что у вас установлен SDK
- 2. Запустите приложение от имени администратора и в режиме совместимости.
- 3: отключить UAC и антивирус
- 4: переустановите все связанные приложения
Не удается запустить Android Studio в Windows 10? Вот что делать
- Убедитесь, что вы установили SDK
- Запустите приложение от имени администратора и в режиме совместимости
- Отключить UAC и антивирус
- Переустановите все связанные приложения
1: убедитесь, что у вас установлен SDK
Странное появление приложений, работающих на Windows 7 или Windows 8 и внезапно заканчивающихся сбоем на Windows 10, не является чем-то новым. Однако в этом случае большинство пользователей смогли запустить Android Studio на Windows 10 так же легко, как и на предыдущих итерациях Windows. Просто некоторые пользователи не смогли запустить этот инструмент разработки, даже после нескольких попыток.
- ЧИТАЙТЕ ТАКЖЕ: эмулятор Android Hyper-V теперь доступен в Windows 10 v1803
Несмотря на то, что это редко, мы все равно должны посоветовать вам проверить Java SDK (Software Development Kit) от Oracle. Без этого Android Studio не будет работать. Даже если вы выполнили обновление до Windows 10 за предыдущие итерации, переустановка этого инструмента может помочь. Возможно, некоторые компоненты не были перенесены с системой, и именно это и является причиной проблемы.
2. Запустите приложение от имени администратора и в режиме совместимости.
Другим подходящим подходом, когда стороннее приложение не работает, является предоставление ему административного разрешения. Кроме того, запуск программы в режиме совместимости также может помочь. Многие сторонние приложения не будут работать так, как задумано в Windows 10, из-за более ограниченного характера системы.
- ЧИТАЙТЕ ТАКЖЕ: Windows 10 на ARM подвержена проблемам с производительностью и совместимостью приложений
Однако, как мы уже говорили, вы можете решить эту проблему, настроив параметры совместимости. Выполните следующие действия, чтобы разрешить административное разрешение для Android Studio:
- Щелкните правой кнопкой мыши ярлык Android Studio и откройте Свойства .
- Установите флажок « Запустить эту программу в режиме совместимости для ».
- Выберите « Windows 7 » в раскрывающемся меню.
-
Установите флажок « Запустить эту программу от имени администратора ».

- Подтвердите изменения и перезагрузите компьютер.

3: отключить UAC и антивирус
Даже если мы не можем открыто рекомендовать отключить UAC (контроль учетных записей) в Windows (из-за очевидных причин безопасности), вы можете попробовать его временно. Когда дело доходит до более деликатных и сложных приложений, которыми, безусловно, является Android Studio, системные ограничения могут быть слишком большими.
- ЧИТАЙТЕ ТАКЖЕ: Ошибка установки программного обеспечения «Ошибка 5: доступ запрещен» в Windows [FIX]
Вот как отключить UAC в Windows 10:
-
На панели поиска Windows введите UAC и откройте « Изменить настройки контроля учетных записей » из списка результатов.
-
Перетащите ползунок вниз и подтвердите изменения.
- Если система попросит вас ввести пароль, введите его.
- Перезагрузите компьютер.


Более того, хотя мы говорим об ограничениях, сторонний антивирус может иногда блокировать выполнение различных приложений. По этой причине, если вы доверили защиту системы стороннему решению, обязательно отключите ее временно. Некоторым пользователям удалось заставить Android Studio работать, когда защита в режиме реального времени была отключена.
4: переустановите все связанные приложения
Наконец, все оставшиеся решения, которые мы можем понять и включить в этот список, указывают на переустановку. Теперь, как мы уже упоминали, обновление системы до Windows 10 должно позволить вам использовать все приложения из предыдущей итерации Windows. Однако в этом случае мы настоятельно рекомендуем переустановить все и начать с нуля.
- ЧИТАЙТЕ ТАКЖЕ: 10 лучших программ для создания игр для пользователей ПК
Конечно, если у вас есть несколько проектов, обязательно сделайте их резервную копию перед удалением Android Studio и SDK. Надеюсь, вы сможете продолжить работу позже. Здесь можно скачать Java SE Development Kit.А последнюю версию Android Studio-совместимой версии для Windows 10 можно найти здесь.
Это должно сделать это. Не забудьте поделиться альтернативными решениями в разделе комментариев ниже. Мы будем благодарны за ваше участие в этом деле.
Потеряно хранилище ключей
If you use the same keystore when updating AndroidAPS you do not have to uninstall the previous version on your smartphone. That’s why it is recommended to store the keystore in a save place.
If you try to install the apk, signed with a different keystore than before, you will get an error message that the installation failed!
In case you cannot find your old keystore or its password anymore, proceed as follows:
-
Export settings on your phone.
-
Copy or upload the settings file from your phone to an external location (i.e. your computer, cloud storage service…).
-
Generate signed apk of new version as described on the Update guide and transfer it to your phone.
-
Деинсталлируйте предыдущую версию AAPS на вашем телефоне.
-
Установите новую версию AAPS на свой телефон.
-
Import settings to restore your objectives and configuration.
-
Check your battery optimization options and disable them again.
If you can’t find them on your phone copy them from the external storage to your phone.
-
Keep on looping.
Gradle Sync failed
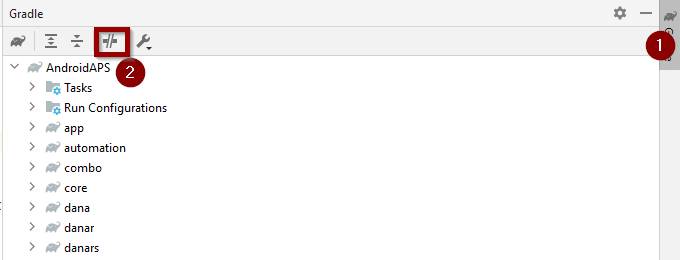
Gradle Sync can fail to various reasons. Wen you get a message saying that gradle sync failed, open the «Build» tab (1) at the bottom of Android Studio and check what error message (2) is displayed.

These are the usual gradle sync failures:
-
Неодобренные изменения
-
No cached version of … available
-
Android Gradle requires Java 11 to run
Important: After you have followed the instructions for your specific problem, you need to trigger the gradle sync again.
Неодобренные изменения
If you receive a failure message like

Step 1 — Check git installation
-
Open the terminal tab (1) at the bottom of Android Studio and copy the following text and paste or type into the terminal.
Note: There is a space and two hyphens between git and version!
-
You must receive a message saying what git version is installed, as you can see in the screenshot above. In this case, go to Step 2.
-
In case you get an message saying
your Git installation is not right.
-
Check git installation
-
if on Windows and git was just installed, you should restart your computer to make git globally available after the installation
-
If Git is installed, you have restarted (if on windows), and git still couldn’t found:
-
Search your computer for a file «git.exe».
Note for yourself, what directory it is in.
-
Go to the Environment variables in windows, select the variable «PATH» and click edit. Add the directory where you have found your git installation.
-
Save and close.
-
Restart Android Studio.

Step 2: Check for uncommitted changes.
-
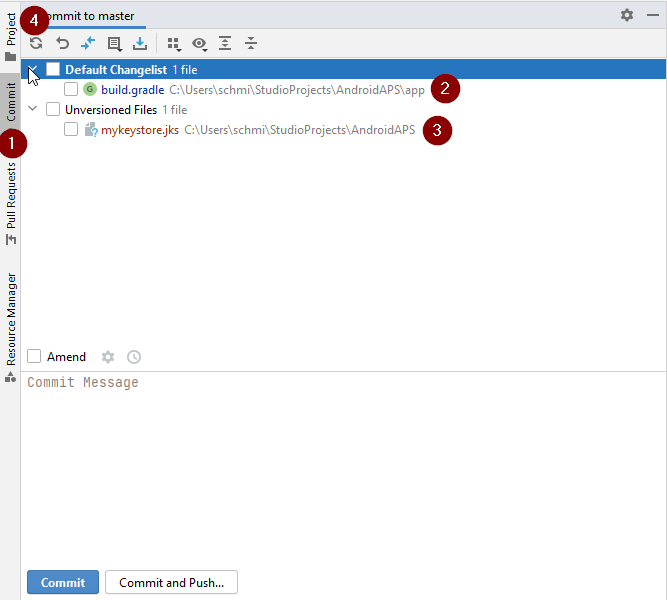
In Android Studio, oben the «Commit» Tab (1) on the left-hand side.
-
You can see either a «Default changeset» (2) or «Unversioned files» (3):
-
For «Default changeset», you probably updated gradle or changed some of the file contents by mistake.
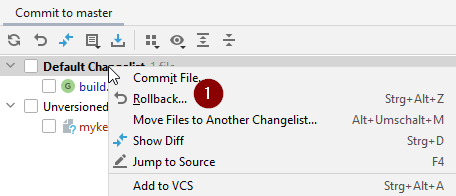
-
Right click on «Default Changeset» and select «Rollback»
-
The files are fetched again from the Git server. If there are no other changes in the commit tab, go to Step 3.
-
-
If you can see «Unversioned Files», you might have stored files in your sourecode directory which should be better places somewhere else, e.g. your keystore file.
-
Use your regular file explorer on your computer to move or cut and paste that file to a save place.
-
Go back to Android Studio and click the Refresh button (4) within the Commit tab to make sure the file is not stored in the AndroidAPS directory anymore.
If there are no other changes in the commit tab, go to Step 3.
-
Step 3: Resync Gradle (again)
Follow the instructions at Gradle Resync.
Android Gradle plugin requires Java 11 to run
You might experience this error message:

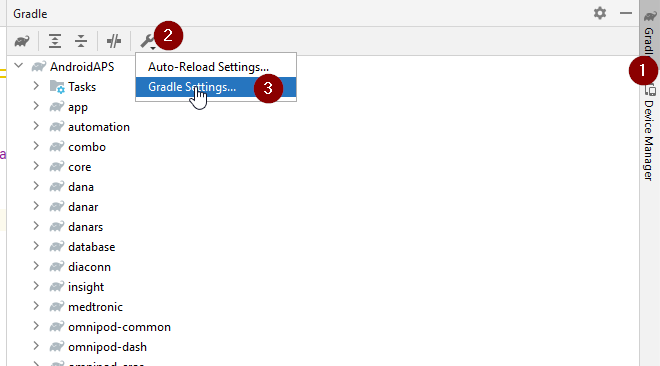
Click on «Gradle Settings» (1) to go to open the gradle settings.
If you don’t have the link to the «Gradle Settings», open the Gradle settings manually by selecting the Gradle Tab on the right border (1), select the tools icon (2) and there the item „Gradle Settings“ (3).
When you have opened the Gradle settings dialog, open the options (1) at «Gradle JDK» and selected the «Embedded JDK version» (2).
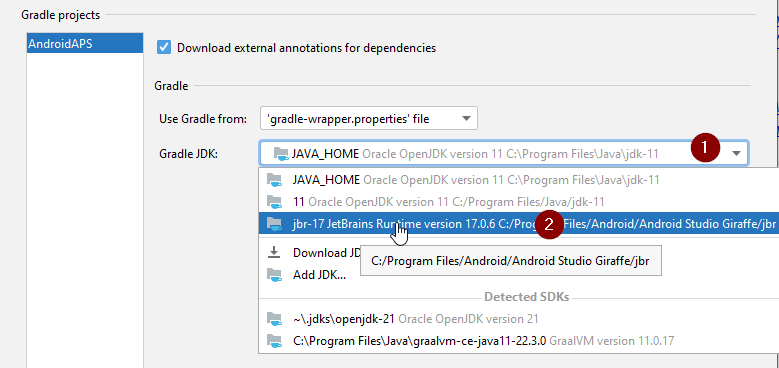
Press «OK» to save and close the settings dialog.
Important: If you don’t see the setting «Gradle JDK», you might have not updated Android Studio. Make sure you are using Android Studio 2021.1.1 Bumblebee) or newer.
Now you need to trigger a Gradle Resync
Could not resolve/No cached version
You might get this error message:

-
On the right side, open the Gradle tab (1).
Make sure the button shown at (2) is NOT selected.
-
Now you need to trigger a Gradle Resync
Не удается запустить демон процесс
If you see an error message like the one below you probably use a Windows 10 32-bit system. This is not supported by Android Studio 3.5.1 and above and unfortunately nothing the AAPS developer can do about.
If you are using Windows 10 you must use a 64-bit operating system.
There are a lot of manuals on the internet how to determine wether you have a 32-bit or 64-bit OS — i.e. this one.

Gradle Resync
If you can still see the message that the gradle sync failed, now select the Link «Try again». 
If you don’t see the a message anymore, you can still trigger this manually:
-
Open the Gradle tab (1) on the right border of Android Studio.
-
Right-click on AndroidAPS (2)
-
Click on «Reload Gradle Project» (3)

Generate Signed APK generated successfully with 0 build variants
When you generate the signed apk, you might get the notification that generation was successfully but are told that 0 build variants where generated:
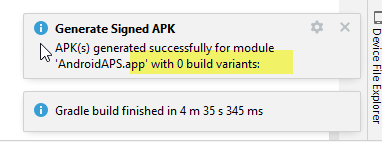
This is a false warning. Check the directory your selected as «Destination folder» for generation (step Generate Signed APK) and you will find the generated apk there!
App was created with compiler/kotlin warnings
If your build completed successfully but you get compiler or kotlin warnings (indicated by a yellow or blue exclamation mark) then you can just ignore these warnings.

Your app was build successfully and can be transferred to phone!
Key was created with errors
When creating a new keystore for building the signed APK, on Windows the following error message might appear

This seems to be a bug with Android Studio 3.5.1 and its shipped Java environment in Windows. The key is created correctly but a recommendation is falsely displayed as an error. This can currently be ignored.
No CGM data is received by AndroidAPS
-
In case you are using patched Dexcom G6 app: This app is outdated. Use the BYODA app instead.
-
In case you are using xDrip+: Identify receiver as described on xDrip+ settings page.
App not installed
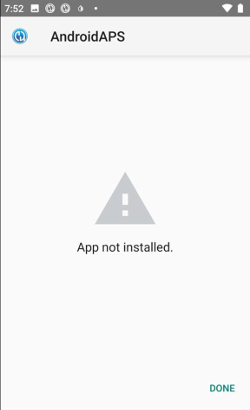
-
Make sure you have transferred the “app-full-release.apk” file to your phone.
-
If «App not installed» is displayed on your phone follow these steps:
-
Export settings (in AAPS version already installed on your phone)
-
Удалите AAPS с телефона.
-
Enable airplane mode & turn off bluetooth.
-
Установите новую версию («app-full-release.apk»)
-
Выполните импорт настроек
-
Снова включите Bluetooth и отключите режим самолета
App installed but old version
If you built the app successfully, transferred it to your phone and installed it successfully but the version number stays the same then you might have missed to update your local copy
None of the above worked
If non of the above tips helped you might consider building the app from scratch:
-
Export settings (in AAPS version already installed on your phone)
-
Подготовьте пароль ключа и пароль хранилища. In case you have forgotten passwords you can try to find them in project files as described here.
Или просто создайте новый файл хранения ключей.
-
Build app from scratch as described here.
-
Когда вы успешно собрали APK, удалите существующее приложение с телефона, перенесите новое приложение на ваш телефон и установите.
-
Import settings again to restore your objectives and settings.
-
You should check your battery optimization options and disable them again.
Worst case scenario
In case even building the app from scratch does not solve your problem you might want to try to uninstall Android Studio completely. Some Users reported that this solved their problem.
Make sure to uninstall all files associated with Android Studio. If you do not completely remove Android Studio with all hidden files, uninstalling may cause new problems instead of solving your existing one(s). Manuals for complete uninstall can be found online i.e.
https://stackoverflow.com/questions/39953495/how-to-completely-uninstall-android-studio-from-windowsv10.
Install Android Studio from scratch as described here.