Download PC Repair Tool to quickly find & fix Windows errors automatically
This post features solutions to fix “This build of Vanguard is out of compliance” while trying to launch Valorant. Valorant is a free-to-play first-person shooting developed and published by Riot Games, especially for Windows. Its storyline revolves around agents from the world tasked to defend their territories from enemies. But recently, many users have complained about some errors while playing Valorant. Fortunately, you can follow some simple methods to eliminate this issue. The complete error message reads:
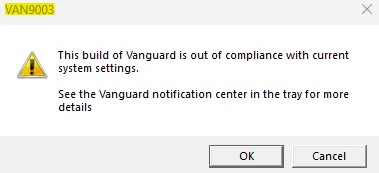
This build of Vanguard is out of compliance with current system settings.
See the Vanguard notification center in the tray for more details

Why does my Valorant say this build is Out of Compliance?
This build is out of compliance error in Valorant occurs when Riot’s AntiCheat detects that the game’s files are modified somehow. In some cases, interference from third-party software can also cause this error. Other reasons this may occur are:
- Corrupted Game Files
- Outdated Client
- Malware or Viruses on the system
To fix This build of Vanguard is out of compliance error, firstly try restarting the Riot client and relaunching the game. However, if that doesn’t work, you can try these tested methods:
- Verify the Game Files
- Enable Secure Boot
- Allow the Game through Firewall
- Troubleshoot Valorant in Clean Boot Mode
- Reinstall Riot Vanguard
Now let us see these in detail.
1] Repair the Game Files
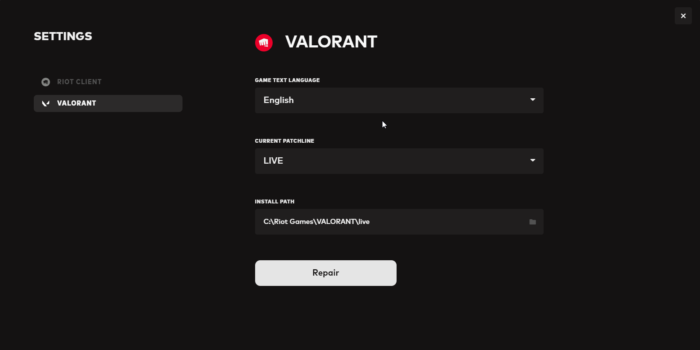
The error may occur if the game’s internal files somehow get corrupted. The Riot client offers a feature to repair corruptions like these. Here’s how:
- Open the Riot client, click on the profile icon, and select Settings.
- Navigate to Valorant and click on Repair.
2] Enable Secure Boot
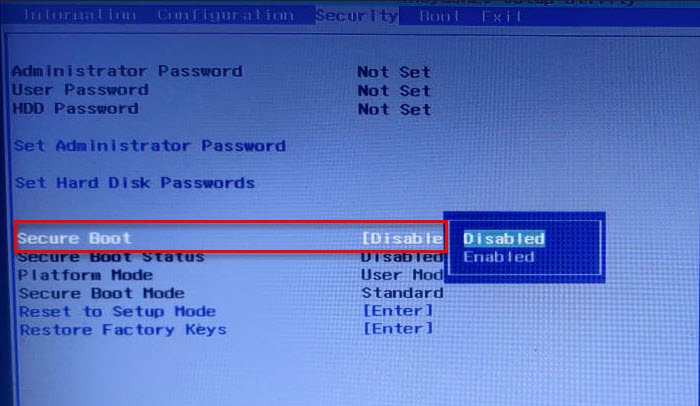
Secure boot is a security standard by Microsoft that ensures your device boots using only the software trusted by the manufacturer. Enabling secure boot can help fix the Vanguard is out of compliance error. Here’s how:
- Press the Windows key + I to open Settings.
- Navigate to System > Recovery and click on Restart now beside Advanced Startup.
- Here click on Troubleshoot > Advanced Options > UEFI Firmware Settings > Restart.
- Navigate to Security and enable Secure Boot.
- Save the changes, restart your system and check if the issue is fixed.
3] Allow the Game through Firewall
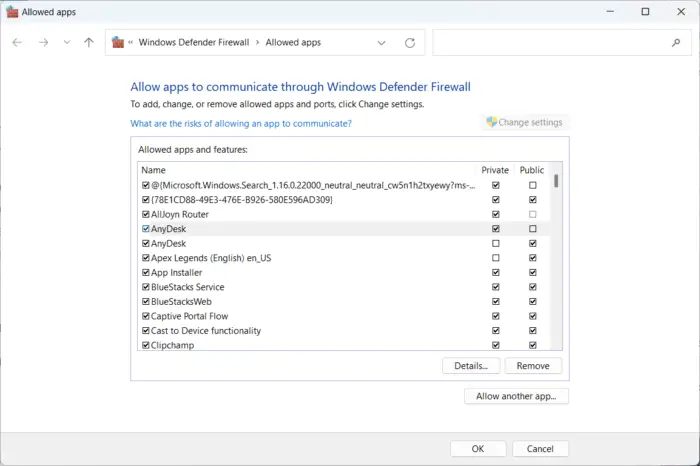
Windows Firewall sometimes interferes with Valorant’s processes and makes it malfunction. Making some exceptions in Windows Firewall can help fix the VAN 1067 Error Code on Valorant. Here’s how:
- Press the Windows key + I to open Settings.
- Navigate to Privacy & Security > Windows Security > Firewall & network protection.
- In the Firewall tab, click on Allow an app through firewall.
- On the next page, click on Change settings and select Allow another app.
- Find the Riot Vanguard folder; it’s most probably located in Program Files on the C partition (“C:Program FilesRiot Vanguard”), then select the “vgc” application, select Open and click on Add.
- On the Allowed apps window, locate the Vanguard user-mode service and check both the Private and Public boxes.
4] Troubleshoot Valorant in Clean Boot Mode
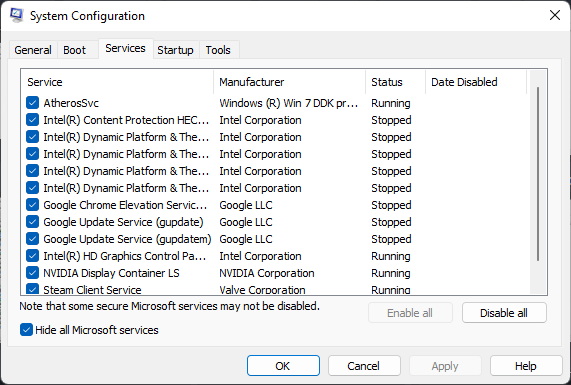
Third-party applications can sometimes cause apps and games to malfunction by blocking them. Performing a Clean Boot ensures your operating system loads with minimal system files and device drivers. Here’s how you can perform a clean boot:
- Click on Start, search for System Configuration and open it.
- Navigate to the General tab and check the Selective Startup option and the Load System Services Option under it.
- Then navigate to the Services tab and check the option Hide all Microsoft services.
- Click on Disable all at the bottom right corner and hit Apply then Ok to save changes.
If the error doesn’t appear in the Clean Boot State, you may need to manually enable one process after another and see who the culprit is. Once you’ve identified it, disable or uninstall the software.
5] Reinstall Riot Vanguard
If none of these steps can help you, consider reinstalling Riot Vanguard. This has been known to help most gamers get over this error.
How do I fix the build of Vanguard Valorant?
This error in Riot Vanguard occurs when the game isn’t able to initialise the anticheat. Usually, a simple restart can help fix the issue. However, if that doesn’t work consider enabling TPM 2.0 and reinstalling Vanguard.

Shubham is an IT graduate who likes to write about Windows Tips & Troubleshooting as well as Emerging Technologies. He’s always engaged with new tech and gadgets. Apart from writing, he likes car trips with his friends and listening to music.
С момента своего запуска Valorant быстро стала одной из лучших и самых популярных игр FPS сегодня. С учетом того, что игра сильно конкурирует с играми в жанре королевской битвы, такими как Apex Legends, и скоро появится собственный порт Valorant Mobile, все выглядит хорошо. Однако, как и во всех играх, в Valorant случаются ошибки.
Одной из наиболее распространенных проблем является ужасная ошибка Vanguard TPM 2.0, которая блокирует вас от Valorant, если на вашем ПК не включен TPM 2.0 и безопасная загрузка. Хотя вы можете подумать, что это невозможно исправить, я здесь, чтобы сказать вам, что это можно легко исправить. Так что включите свой компьютер и следуйте инструкциям, как я покажу вам, как исправить ошибку «Для этой сборки Vanguard требуется TPM 2.0 и безопасная загрузка» в Valorant.
Исправить ошибку Vanguard TPM 2.0 в Valorant (2022)
Пока я покажу вам, как исправить эту надоедливую ошибку Valorant TPM 2.0, я также объясню, почему это происходит в первую очередь.
Почему возникает ошибка Valorant Vanguard TPM 2.0?
Доверенный платформенный модуль (TPM 2.0) и безопасная загрузка — два наиболее важных требования для пользователей при установке и запуске Windows 11. Короче говоря, микросхема TPM хранит ключи, пароли и цифровые сертификаты, необходимые для безопасности вашего ПК. Таким образом, чтобы обеспечить безопасность своих игроков и держать мошенников в страхе, программное обеспечение безопасности Riot Games Vanguard внедрило те же требования. Это означает, что для того, чтобы вы могли играть в Valorant на своем компьютере, он должен соответствовать TPM 2.0 и безопасной загрузке, в противном случае вы увидите ошибку, подобную приведенной ниже.

Ошибка TPM 2.0 Valorant существует уже некоторое время, и игроки Valorant разочарованы. Однако есть простое и эффективное решение, которое мы воспользуемся и объясним в этом руководстве. Если вы беспокоитесь о потере своих данных, не беспокойтесь, так как решение не потребует сброса настроек к заводским. С учетом сказанного давайте узнаем, как исправить ошибку Valorant TPM 2.0.
Как исправить ошибку Valorant TPM 2.0 в Windows 11/10
Самый простой способ исправить ошибку Vanguard TPM 2.0 в Valorant — включить модуль TPM 2.0 и SecureBoot на вашем ПК с Windows. Вам нужно будет войти в BIOS ПК и включить функции оттуда. Если вы не уверены, есть ли на вашем ПК микросхема TPM, воспользуйтесь нашим руководством по TPM, чтобы узнать. Хотя это может показаться сложным, сделать это достаточно просто. Просто выключите компьютер и выполните следующие действия:
1. После выключения компьютера нажмите кнопку питания, а затем несколько раз нажмите кнопку BIOS. Хотя у компаний есть разные ключи BIOS, наиболее распространенными являются F2, F10 или F12. Вы можете найти ключ BIOS для вашего ноутбука или материнской платы в Интернете. Несколько раз нажмите клавишу, пока не войдете в настройки BIOS вашей системы.

2. Когда вы войдете в BIOS, найдите параметр «Безопасная загрузка». Хотя BIOS различается от системы к системе, скорее всего, его можно будет найти в категории «Конфигурация загрузки». По крайней мере, так было на моем ноутбуке Alienware.

3. Здесь найдите параметр «Безопасная загрузка» и включите его. Подтвердите любые диалоговые окна или проверки, которые появляются на вашем экране. Не перезагружайте компьютер, так как мы еще не закончили.

4. Теперь найдите настройку для включения модуля TPM. Вы можете обнаружить, что он помечен как Intel Trusted Platform Module Technology или просто как TPM-устройство. Просто включите настройку и подтвердите все появившиеся диалоговые окна.

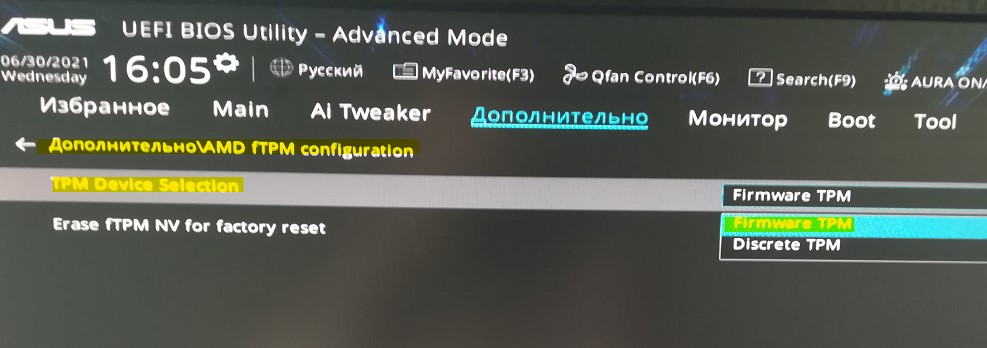
Примечание. Если у вас процессор AMD, вы, скорее всего, найдете параметр, помеченный в разделе «Конфигурация AMD fTPM». С этого момента вы можете выбрать программно реализованный TPM с микропрограммой или дискретный TPM, если у вас есть чип. Используйте Firmware TPM, чтобы включить его на своем ПК.
5. После этого нажмите кнопку «Перезагрузить», чтобы перезагрузить компьютер и войти в Riot Launcher, как обычно. Вот и все! Все, что вам нужно сделать, это дважды проверить, запущен ли Vanguard, а затем запустить игру. Поздравляем, вы исправили ошибку Valorant TPM 2.0!
Valorant все еще не работает? Попробуйте эти исправления!
Если Valorant по-прежнему отказывается работать на вашем компьютере, вы можете попробовать некоторые из этих распространенных методов, которые могут исправить ошибку. Вот некоторые из этих методов:
1. Проверьте наличие обновлений Windows
Как бы это ни раздражало, бывают случаи, когда Центр обновления Windows исправляет некоторые неуловимые ошибки, которые в противном случае не были бы устранены. Убедитесь, что у вас нет ожидающих обновлений Windows, и всегда обновляйте свое устройство.

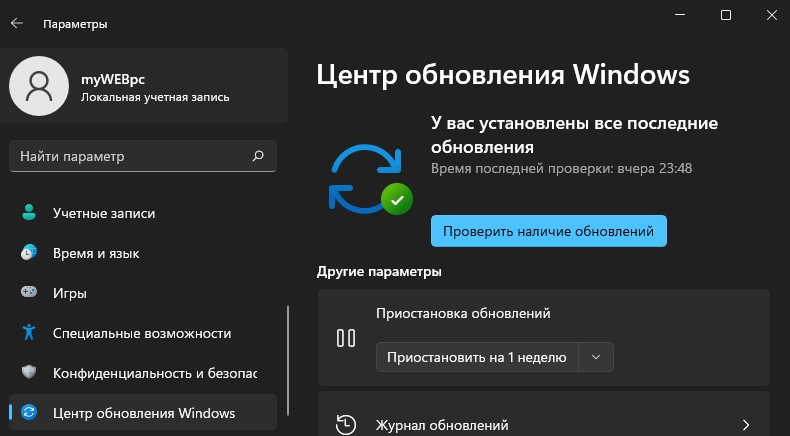
Чтобы проверить наличие обновлений Windows, перейдите в «Настройки» -> «Центр обновления Windows» и нажмите синюю кнопку «Проверить наличие обновлений», чтобы убедиться, что у вас установлены последние обновления.
2. Удалите и переустановите игровые файлы.
Повреждение установки игры — не редкость. Если в вашей копии Valorant повреждены файлы, это может быть причиной проблемы с TPM 2.0. В таком случае вам необходимо удалить, а затем установить свою копию игры. Для этого найдите «Установка и удаление программ» в поиске Windows и удалите Riot Vanguard и Valorant со своего ПК.

После этого вам нужно будет переустановить игру из Riot Launcher, чтобы увидеть, сохраняется ли проблема. После перезапуска ошибка Valorant TPM 2.0, скорее всего, будет исправлена.
3. Обратитесь в службу поддержки Valorant
Если ничего не помогает, всегда лучше обратиться прямо к источнику. К счастью, у Riot Games есть хорошая служба поддержки. Все, что вам нужно сделать, это перейти на веб-сайт поддержки Valorant, а затем отправить заявку на ошибку TPM 2.0. После этого сотрудники службы поддержки свяжутся с вами и предоставят решение вашей проблемы, которая все еще не была решена после выполнения описанных выше шагов.
Исправьте ошибку Vanguard Requires TPM 2.0 с легкостью
Я надеюсь, что это руководство помогло вам исправить ошибку Valorant TPM 2.0 в вашей игре на Windows 10/11. Если исправление сработало, то пришло время узнать о новом агенте Valorant Fade и весело провести время.
При запуске игры Valorant в Windows 11 может возникнуть ошибка VAN 9003 This build of Vanguard is out of compliance with current system settings, что сборка Vanguard не соответствует текущим системным настройкам.
Виновником ошибки This build of Vanguard is out of compliance с кодом VAN 9003 является анти-чит Vanguard, который устарел или несовместим с текущей версии игры. Кроме того, это может быть неправильные настройками Secure Boot и TPM 2.0 в BIOS.
Как исправить VAN 9003 This build of Vanguard is out of compliance
В данной инструкции разберем, как исправить ошибку This build of Vanguard is out of compliance with current system settings с кодом VAN 9003 при запуске игры Voliorant в Windows 11.
1. Обновите Windows 11
Обновите Windows 11 до последней версии, так как с обновлениями идут нужные компоненты для правильной работы игр.
- Перейдите в Центр обновления Windows
- Нажмите Проверить наличие обновлений
2. Переустановить Vanguard
Чтобы исправить ошибку VAN 9003 при запуске игры Valorant в Windows 11 нужно удалить Vanguard и установить его заново.
- Нажмите Win+R и введите appwiz.cpl
- Найдите и удалите Riot Vanguard
- Перезагрузите ПК
- Далее зайдите на официальный сайт игры и скачайте последнюю версию
- Vanguard установится автоматически после запуска Riot Games
- Перезагрузите ПК

3. Включить Secure Boot, TPM и UEFI
Для анти-чита Vanguard в Windows 11 нужна безопасная загрузка и наличие TPM 2.0 чипа для корректной работы игр от Rio Games, которые включаются в BIOS.
Чтобы зайти в BIOS, при включении ноутбука или ПК нажимайте непрерывно кнопку Delete. Кроме того, вы можете набрать в поиске Google «Как зайти в биос …» и указать модель ноутбука или материнской платы ПК. Это касается и включения ниже параметров, которые тоже придется искать самостоятельно в поиске по картинкам, так как у всех BIOS разный, но я прикреплю картинки для некоторых BIOS/UEFI.
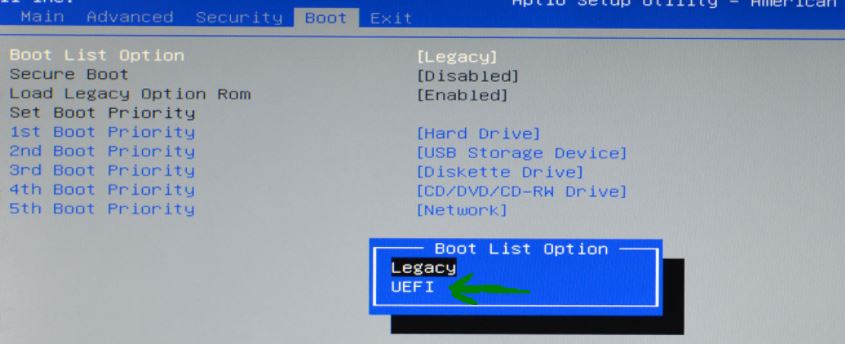
Включите ниже UEFI, Secure Boot и TPM:
- Измените режим загрузки CSM или Legacy на UEFI

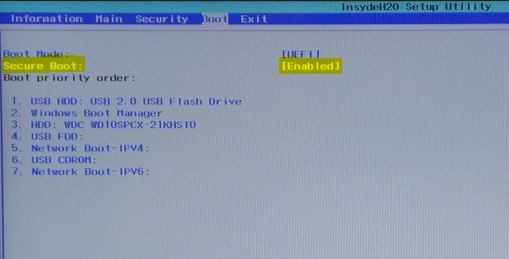
- Включите Secure Boot (Enabled)
- Включите TPM 2.0. Имеется подробное руководство по включению TPM 2.0 для разных BIOS
Смотрите еще:
- Как исправить ошибку VAN 9001 в Valorant для Windows 11
- Исправить ошибку VAN 1067 в игре Valorant на Windows 11
- Запуск Counter-Strike: Global Offensive с максимальным FPS
- Ошибка 7002.1 Rockstar Games Launcher при запуске игры
- Как понизить высокий Пинг в играх
[ Telegram | Поддержать ]
As a popular first-person shooter game, Valorant has gained a massive following of players from all around the world. However, with the release of Windows 11, many users have encountered a common error, the VAN9003 error. This error states that “This build of Vanguard is out of compliance with current system settings.”
If you’re one of the many players encountering this error, don’t worry. We’ve got you covered. In this article, we’ll provide a step-by-step guide to help you fix the VAN9003 error in Valorant on Windows 11.
Why you are getting the “This build of Vanguard is out of compliance with current system settings.” error
The “This build of Vanguard is out of compliance” error occurs when the Secure Boot is not enabled on your Windows 11 PC.
Valorant’s anti-cheat system requires a safe and secure system to run properly. And since Microsoft’s Secure Boot and TPM are security features that allow the system to programs to run with a higher level of safety and trust, Valorant relies heavily on them.
Attention Windows Users!!
Facing issues on your Windows PC every now and then? We would recommend you use the Restoro PC Repair tool.
It is a one-stop solution to repair common computer errors, protect your Windows PC from data loss, malware, hardware failure, Registry issues, BSOD errors, etc. and optimize your PC for maximum performance in just three simple steps:
- Download Restoro Tool that comes with Patented Technologies (see patents here).
- Install and click on Start Scan to find the issues on your Windows PC.
- Finally, click on Repair All to fix the issues.
475,131 readers have downloaded Restoro this month.
Now, that we know that the Secure Boot is the one whose absence is causing the VAN9003 error in Valorant, the simple way to fix it is to just enable the Secure Boot. To enable it:
1. You are first required to boot into the BIOS for your Motherboard. To boot into the BIOS, restart the PC and press the BIOS hotkey while the PC is turning on.
Now, this BIOS hotkey may differ depending on the manufacturer of your PC’s motherboard. Check the list below to know the BIOS hotkey for your PC.
- BIOS Hotkey for HP laptops: F10 or Esc
- BIOS Hotkey for Asus laptops: F2
- BIOS Hotkey for Dell laptops: F2 or F12
- BIOS Hotkey for Acer laptops: F2 or DEL
- BIOS Hotkey for Lenovo laptops: F2 or Fn + F2
- BIOS Hotkey for Samsung laptops: F2
- BIOS Hotkey for Sony laptops: F1, F2, or F3
- BIOS Hotkey for Toshiba laptops: F2
- BIOS Hotkey for Xiaomi laptops: F9 or F12
- BIOS Hotkey for Realme laptops: F2
- BIOS Hotkey for Asus motherboards: F2 or DEL
- BIOS Hotkey for MSI motherboards: DEL
- BIOS Hotkey for Gigabyte motherboards: DEL
- BIOS Hotkey for ASRock motherboards: F2
- BIOS Hotkey for Zebronics motherboards: F2
2. Once you are into the BIOS of your Windows PC, navigate to the “Security” or “System Configuration” or “Boot” section depending on your motherboard manufacturer’s BIOS layout.
3. Here, you’ll see the Secure Boot option. Navigate to it and set it to Enabled. Once the Secure Boot is enabled, save the changes and restart your PC.

4. Once the PC is restarted, check if the Secure Boot is successfully enabled or not. To check it, open the Run dialog box by pressing Win + R on your keyboard and type in msinfo32, and press enter.

5. This will open up the System Information window. Click on System Summary from the left pane and check the status of the Secure Boot Mode from the right. If it shows On then the Secure Boot is enabled for your Windows 11 PC.

Now, launch Valorant and see if the issue is fixed or not.
Is secure Boot Still Not Enabled?
In some motherboards like MSI or Gigabyte, there is kind of a BIOS glitch due to which the Secure Boot gets enabled but it also shows Not Active. In that case, you are required to follow a couple of more steps as described below.
1. Boot into BIOS, navigate to the Boot section, and set Boot Mode to UEFI.

2. Thereafter, navigate to Secure Boot and disable it.
3. Once disabled, the Secure Boot Settings. For my MSI Motherboard, it is in Settings > Advanced > Windows OS Configuration > Secure Boot.
4. Here, set the Secure Boot Mode to Custom.

5. Now, without saving the changes, change the Secure Boot Mode again to Standard.
6. This will result in BIOS asking you to reset the Secure Boot Mode to the factory default. Confirm by selecting Yes.
7. Your PC will now shut down. Boot your PC again into BIOS and finally enable the Secure Boot we just Disabled.
And by following the above steps carefully, you should be able to see the Secure Boot Mode to On in the System Information window of your PC.
Why is the Secure Boot option missing in my BIOS?
If you are not able to see the Secure Boot option in the computer BIOS then it may be becausE of the CSM being enabled. CSM stands for Compatibility Support Module that lets your UEFI system boot in legacy BIOS.
In order to enable or disable Secure Boot, you are first required to disable CSM. The process to disable may vary depending on your motherboard manufacturer.
You can refer to the list below to find out where you’ll get the CSM option for some popular motherboards.
Asus Motherboard: Boot > CMS > CMS Launch.

Gigabyte Motherboard: Boot into BIOS, go to BIOS or Security and there you’ll see the CMS option.

ASRock Motherboard: BIOS > Boot > CMS.

MSI Motherboard: Boot into BIOS, go to the Boot tab, and then go to the Boot mode select section and select UEFI only. This will disable CMS automatically.
Why is Secure Boot Greyed Out in my BIOS?
If you are able to see the Secure Boot option but it is greyed out or unselectable, you are needed to set the Administrator Password for your BIOS first. As this is the Admin passcode, you will need it every time you boot into the BIOS. To set the administrator password (also known as Supervisor Password) for your BIOS:
1. Boot into the BIOS of your PC and navigate to the Security tab.
2. Under the Security tab, look for the Administrator Password or Supervisor Password and select it.

3. Now, enter the password that you want to set and you are done.
Once the Administrator password is set successfully, you should now be able to enable or disable the Secure Boot in your BIOS.
Frequently Asked Questions (FAQs)
What causes the VAN9003 error in Valorant on Windows 11?
The VAN9003 error in Valorant on Windows 11 is typically caused by an issue with the Vanguard Anti-Cheat. This can be due to an outdated version, interference from the Windows Firewall, or a problem with the Vanguard Anti-Cheat itself.
How can I update the Vanguard Anti-Cheat in Valorant?
To update the Vanguard Anti-Cheat in Valorant, simply go to the Valorant website and download the latest version.
How can I temporarily disable the Windows Firewall?
To temporarily disable the Windows Firewall, go to the Windows Control Panel and select “Windows Defender Firewall.” Then, click “Turn Windows Defender Firewall on or off” and select “
Bottom Line
And there you go! This is how you can solve the Valorant VAN9003 error that says “This build of Vanguard is out of compliance with current system settings.” I hope this guide was successful in resolving your issue. If you have any problem or query related to the fixing guide or error, please feel free to share it with us in the comments below.
Also Read:
- How to Fix if Efficiency Mode is Greyed Out or Not Working in Windows 11
- Fix “Failed to open NVENC CODEC” OBS error
- How to Fix game_ship.exe Crashing Error in Call of Duty: Modern Warfare 2
- Download Windows Drivers for Steam Deck
- How to Stop the “Xbox Driver Installation” Popup on STEAM
- Fix: Xbox controller driver not installed error in STEAM
- Fix WSUS Import Update Error 80131509 from Microsoft Update Catalog
- Ultimate Guide to make Windows 11 look Exactly like Mac
- Fix This Installation Is Forbidden by System Policy on Windows 11, 10
- How to Fix if File Explorer Tabs are Not Showing in Windows 11
Valorant is by far one of the most popular tactical shooters in the market today. Despite being fairly new, Riot’s flagship first-person shooter has managed to amass a substantial fan following all over the world. It has also managed to build an active professional circuit, with players from almost every nation around the globe participating in it.
Although it’s a well-made game, Valorant has its own set of problems that players sometimes come across. One of the most common problems that fans will find in the game recently is the TPM 2.0 error. Whenever this error is encountered, they are locked out of the game until it is resolved.
How to enable secure boot for Valorant
The easiest way to fix the TPM 2.0 and secure boot error in Valorant is by diving into the BIOS settings of the system and enabling two features there. Generally, these features are enabled by default on each and every system. However, on the off chance that they are disabled from the get-go, here are the steps that players must take in order to enable them:
- Step 1: Players will have to restart their computer/laptop. When the device turns back on, they will have to continuously press the BIOS button. While this differs from device to device, the usual buttons are F2, F10, or F12. If performed correctly, they will be taken to the BIOS setup screen on their device.
- Step 2: Once in the BIOS setup screen, players will first have to navigate to the «Boot Configuration». This also varies from system to system, but it shouldn’t be too different. Under the «Boot Configuration» menu, they will need to navigate to the «Secure Boot» option and then turn it on.
- Step 3: With that out of the way, players will now have to make their way to the «Security» tab. Under this tab, the option to enable Trusted Platform Module can be found. For Intel chipsets, the option comes up as Intel Trusted Platform Module Technology or just TPM Device. For AMD devices, it shows up as AMD TPM Configuration. They will then have to enable this as well.
- Step 4: Once both these features have been enabled, players will now have to restart their PC, and then try to launch Valorant. The game should run smoothly now.
If the aforementioned steps fail to fix the issue, or if the above features are already enabled in the BIOS, the next best idea would be to perform a clean install of Valorant.
Why does the «TPM 2.0 and secure boot required» error occur?
It’s currently unclear as to why this error occurs, but it seems to have something to do with Riot Vanguard. Vanguard is Riot’s own anti-cheat program designed to keep cheaters and hackers at bay. For any tactical shooter, cheating is a major problem, so there is always a requirement to have an anti-cheat program in place for competitive multiplayer games. This issue seems to occur if Vanguard’s files get corrupted or damaged by other programs in some way.
For those who don’t feel confident enough to adjust their BIOS settings, as mentioned in the steps above, a clean install of Valorant and Riot Vanguard should fix this issue, should they encounter it.
Edited by Atul S
Thank You!
GIF
❯
GIF
❯
Амитеш Дхар Изменено 06 октября 2022 г., 11:55 IST

Следуйте за нами Комментировать Поделиться Valorant на сегодняшний день является одним из самых популярных тактических шутеров на рынке. Несмотря на то, что флагманский шутер от первого лица от Riot довольно новый, ему удалось собрать множество поклонников по всему миру. Ему также удалось создать активную профессиональную сеть, в которой участвуют игроки практически из всех стран мира.
Несмотря на то, что это хорошо сделанная игра, у Valorant есть свой набор проблем, с которыми иногда сталкиваются игроки. Одной из самых распространенных проблем, которые в последнее время встречаются в игре, является ошибка TPM 2.0. Всякий раз, когда возникает эта ошибка, они блокируются в игре до тех пор, пока она не будет устранена.
Как включить безопасную загрузку для Valorant
Самый простой способ исправить ошибку TPM 2.0 и безопасной загрузки в Valorant — погрузиться в настройки BIOS системы и включить там две функции. Как правило, эти функции включены по умолчанию в каждой системе. Однако, если они отключены с самого начала, вот шаги, которые должны предпринять игроки, чтобы включить их:
- Шаг 1: Игрокам придется перезагрузить свой компьютер/ноутбук. Когда устройство снова включится, им придется непрерывно нажимать кнопку BIOS. Хотя это отличается от устройства к устройству, обычно используются кнопки F2, F10 или F12. При правильном выполнении они перейдут на экран настройки BIOS на своем устройстве.
- Шаг 2: Попав на экран настройки BIOS, игрокам сначала нужно будет перейти к «Конфигурации загрузки». Это также зависит от системы к системе, но не должно сильно отличаться. В меню «Конфигурация загрузки» им нужно перейти к параметру «Безопасная загрузка», а затем включить его.
- Шаг 3. После этого игрокам теперь придется пробираться на вкладку «Безопасность». На этой вкладке можно найти параметр для включения Trusted Platform Module. Для наборов микросхем Intel эта опция представлена как Intel Trusted Platform Module Technology .или просто устройство TPM. Для устройств AMD это отображается как Конфигурация AMD TPM. Затем они также должны будут включить это.
- Шаг 4: После того, как обе эти функции будут включены, игрокам придется перезагрузить свой компьютер, а затем попытаться запустить Valorant. Теперь игра должна работать без сбоев.
Если вышеупомянутые шаги не помогли решить проблему или если вышеуказанные функции уже включены в BIOS, следующей лучшей идеей будет выполнить чистую установку Valorant.
Почему «TPM 2.0 и требуется безопасная загрузка»?
В настоящее время неясно, почему возникает эта ошибка, но, похоже, она как-то связана с Riot Vanguard. Vanguard — это собственная античитерская программа Riot, предназначенная для защиты от мошенников и хакеров. Для любого тактического шутера читерство является серьезной проблемой, поэтому всегда необходимо иметь античитерскую программу для соревновательных многопользовательских игр. Эта проблема возникает, если файлы Vanguard каким-то образом повреждены или повреждены другими программами.
Для тех, кто не чувствует себя достаточно уверенно, чтобы изменить настройки BIOS, как указано в шагах выше, чистая установка Valorant и Riot Vanguard должны решить эту проблему, если они с ней столкнутся.
Опрос:
< p class=»poll-option-text»>
0 голосов
Быстрые ссылки
Гайд по Valorant Esports Socials Еще от Fox-Guide
… а без Vanguard-а, как известно, Valorant работать не будет. И что характерно, не работает. Ошибка с кодом VAN9002 — как раз об этом.
Речь, разумеется о той печальной ситуации, когда игра пишет, что эта сборка Vanguard требует включения Control Flow Guard в настройках защиты системы от эксплойтов, и не запускается.
Для тех, кто еще совсем не в курсе, напомним, Vanguard — это специальное античитерское программное обеспечение, которое Valorant требует по умолчанию, и благодаря которому (несмотря на некоторые его недостатки) в этой игрушке читеров вроде как нет (ну, по крайней мере, так считается).
В общем,..
что делать, когда Vanguard выдает ошибку VAN9002 и требует Control Flow Guard
Если очень вкратце, то «Защита потока управления» или Control Flow Guard (или сокращенно CFG) — это одна из функций встроенной защиты от эксплойтов (то бишь, уязвимостей) операционной системы Windows (да, есть у неё еще и такая защита).
Так вот, ошибка VAN9002 указывает на то, что эта самая функция отключена (весьма вероятно для того, чтобы комп работал шустрее).
Следовательно, для устранения (а также во избежание в будущем) ошибки с кодом VAN9002 данную функцию CFG надо просто включить. Обычно делается это следующим образом:
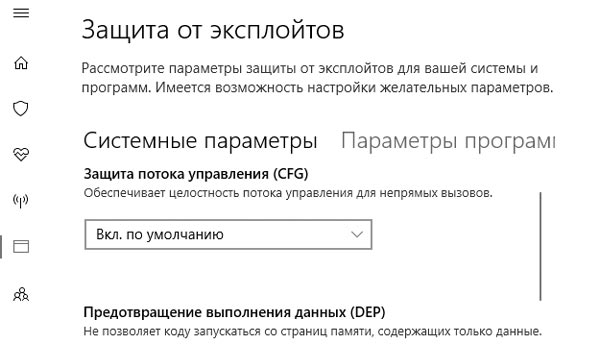
- в строке поиска Windows так и пишем защита от эксплойтов и затем кликаем «Защита от эксплойтов» в результатах выше;
- далее в одноименном окошке в меню «Защита потока управления» выбираем вариант «Вкл. по умолчанию«;
- после этого перезагружаем комп (это обязательно) и запускаем игру по новой.
Не пропустите: ОШИБКА VAN 9001 В VALORANT: ВКЛЮЧАЕМ TPM И SECURE BOOT
Если же по какой-то непонятной причине включить CFG обычным способом не удалось (вообще не получилось эту опцию найти, к примеру), то в таком случае идем другим путем:
- открываем командную строку Windows (в строке поиска системы пишем cmd > в результатах выше кликаем правой кнопкой мыши по «Командная строка» и в меню жмем «Запуск от имени администратора»);
- в командную строку поочередно вводим следующие команды (после каждой жмем Enter):
Set-ProcessMitigation -Name vgc.exe -Enable CFG
Set-ProcessMitigation -Name vgc.exe -Enable DEF
Set-ProcessMitigation -Name vgc.exe -Enable AuditDynamicCode
- и перезагружаем комп.
Теперь VAN9002 появляться не должна и Vanguard должен заработать нормально.