Vanguard — это проприетарный античит-движок VALORANT, разработанный Riot Games. Он работает с использованием драйвера уровня ядра, что позволяет ему запускаться еще до того, как Windows загрузится должным образом. Из-за такого уровня безопасности требуются функции безопасности, такие как безопасная загрузка и доверенный платформенный модуль, с которыми сборки Windows 10 до 1709 не полностью совместимы.
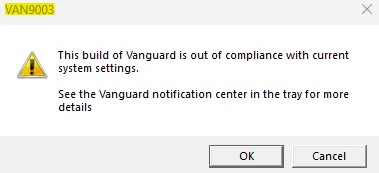
Таким образом, для обеспечения честной конкуренции Riot Games решила прекратить поддержку сборок Windows 10 до 1709. Теперь всякий раз, когда вы пытаетесь открыть VALORANT на этих старых сборках, вы получаете сообщение об ошибке «Эта сборка Vanguard не соответствует требованиям…». Этот код ошибки сопровождается «VAN9003» и «VAN 9001».
1. Установите последнюю сборку Windows
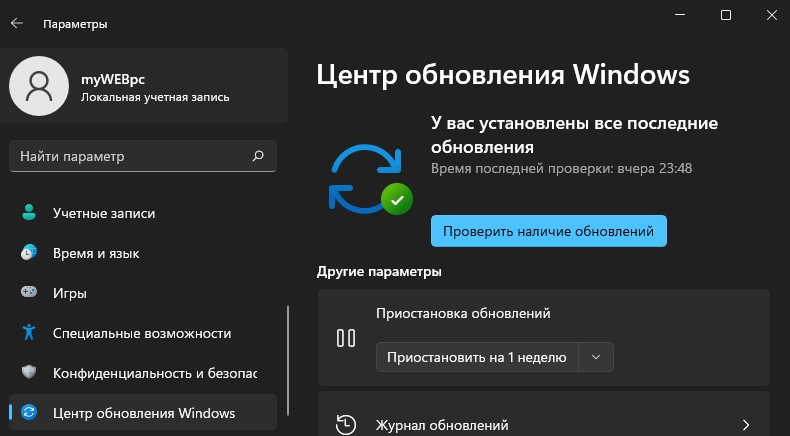
Поскольку эта проблема в основном возникает для устаревших сборок Windows 10. Перед изменением каких-либо основных настроек Windows рекомендуется обновить Windows до последней доступной сборки. Выполните следующие действия, чтобы обновить Windows:
- Нажмите клавиши Win + I вместе, чтобы открыть приложение «Параметры Windows».
- Перейдите в раздел «Обновление и безопасность» > «Центр обновления Windows».
- Теперь нажмите кнопку «Проверить наличие обновлений» и дождитесь ее проверки.
- Как только новые обновления будут найдены, просто установите их все и перезагрузите компьютер.
Проверьте, работает ли сейчас Valorant.
2. Измените устаревший BIOS на UEFI и включите безопасную загрузку.
Устаревшие BIOS не поддерживают безопасную загрузку. Безопасная загрузка работает только в режиме BIOS UEFI (Unified Extensible Firmware Interface).
Режим UEFI BIOS необходим для защиты компьютера от вирусов и вредоносного программного обеспечения, гарантируя, что в процессе загрузки запускается только доверенное программное обеспечение. Riots Vanguard, как и большинству современных приложений, требует, чтобы эта функция функционировала должным образом. Выполните следующие действия, чтобы проверить и преобразовать устаревший BIOS в UEFI и включить безопасную загрузку:
- Нажмите клавиши Win + R вместе, чтобы открыть «Выполнить».
- Введите «msinfo32» и нажмите «ОК».
- В разделе «Сводка системы» посмотрите на значение режима BIOS на правой панели. Он может иметь значение «Наследие» или «UEFI». Устаревший режим означает, что ваше оборудование не поддерживает UEFI или что оно отключено по некоторым причинам совместимости.
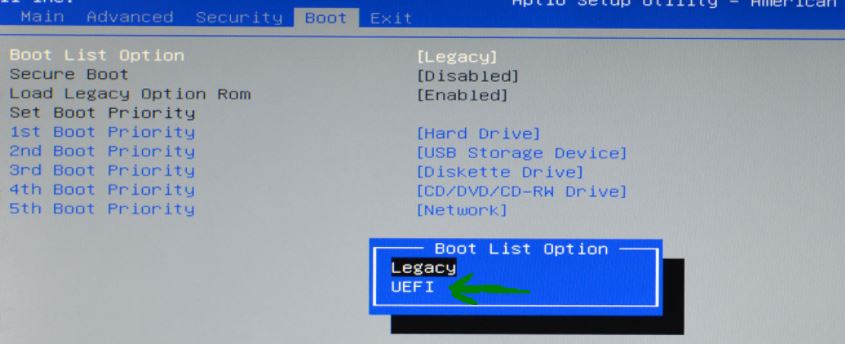
- Если в «Режиме BIOS» указано «Legacy», вам нужно будет изменить его на «UEFI» в настройках BIOS, доступ к которым, в зависимости от производителя вашей материнской платы, можно получить во время загрузки, нажав определенные клавиши.
- Когда вы входите в BIOS на Lenovo ThinkPad (может немного отличаться в зависимости от производителя), на экране главного меню BIOS перейдите к «Запуск > Загрузка».
- На экране загрузки выберите UEFI/Legacy Boot и нажмите Enter.
- Используйте стрелки вверх и вниз, чтобы выбрать режим загрузки UEFI, а затем нажмите Enter.
- Убедитесь, что в разделе «UEFI / Legacy Boot» отключена «Поддержка CSM».
- Чтобы сохранить изменения и закрыть экран, нажмите F10.
2.1 Включите безопасную загрузку
После того, как режим BIOS был установлен на UEFI, все, что вам нужно сделать, это включить безопасную загрузку. Чтобы включить его, выполните следующие действия:
- Нажмите клавиши Win + r вместе, чтобы открыть «Выполнить».
- Введите «msinfo32» и нажмите «ОК».
- В разделе «Сводка системы» посмотрите на значение «Состояние безопасной загрузки» на правой панели. Он может иметь значение «Вкл.», «Выкл.» или «Не поддерживается».
- Если в «Состоянии безопасной загрузки» указано «Нет», вам необходимо включить его в настройках «BIOS», доступ к которым, в зависимости от производителя вашей материнской платы, можно получить во время загрузки, нажав определенные клавиши.
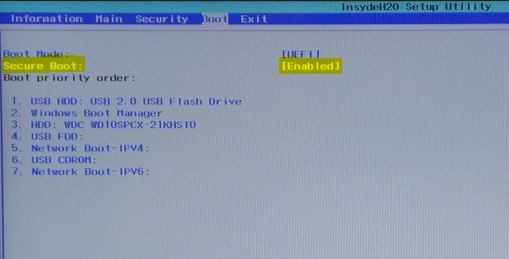
- Когда вы входите в «BIOS», на экране главного меню BIOS перейдите к «Безопасность> Безопасная загрузка».
- На вкладке «Безопасная загрузка» в разделе «Безопасность» снова выберите параметр «Безопасная загрузка» и нажмите клавишу ввода.
- Используйте стрелки вверх и вниз на клавиатуре, чтобы выбрать «Включено» и нажмите клавишу ввода.
- Если у вас также есть опция «Безопасный режим загрузки», выберите ее и нажмите «Ввод».
- Попробуйте «Пользовательский режим» и «Стандартный режим». Оставьте то, что работает для вас.
Это должно исправить проблему с кодом ошибки VAN 9003; если это не так, вам нужно будет переустановить Vanguard или установить новую сборку Windows и повторить это исправление, так как некоторые настройки или поврежденные файлы будут источником этой проблемы, которую исправит более новая и чистая сборка.
4. Переустановите Riot Vanguard
Переустановка Vanguard избавляет от любых поврежденных файлов, которые мешают его запуску. Все, что вам нужно сделать, это удалить его, а затем запустить любую игру Riot, и она автоматически загрузится и снова установится.
- Нажмите клавиши Win + I вместе, чтобы открыть приложение «Параметры Windows».
- Перейдите в «Приложения> Приложения и функции».
- Введите «Riot Vanguard» в поле «Искать в этом списке».
- Чтобы удалить Riot Vanguard, щелкните его левой кнопкой мыши и нажмите кнопку «Удалить» в правом нижнем углу вкладки.
- Нажмите «Да» во всплывающем окне «Вы уверены, что хотите продолжить». Перезагрузите компьютер, чтобы полностью удалить все его файлы.
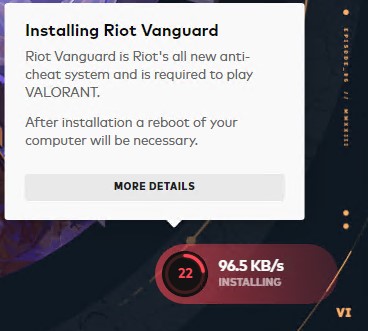
- Чтобы переустановить его еще раз, запустите одну из игр Riot, например Valorant, чтобы загрузить клиент Riot.
- После этого Riot Vanguard загрузится и начнет установку на ваш компьютер.
- Перезагрузите Windows после установки Riot Vanguard, чтобы установка была завершена.
Теперь вы можете быстро удалить и переустановить Riot Vanguard, выполнив шаги, перечисленные выше. Проверьте, работает ли сейчас Valorant.
5. Чистая установка Windows
Если ваш Vanguard по-прежнему не работает и больше ничего не работает, попробуйте выполнить чистую установку Windows. Чистая установка Windows — отличный способ вернуть компьютеры в исходное состояние.
Путем чистой установки вы можете удалить любые поврежденные файлы или настройки, которые могут вызывать проблемы, и убедиться, что программа Riot Vanguard, которую вы пытаетесь запустить, работает правильно. Процедура довольно проста, и рекомендуется выполнять ее время от времени, чтобы поддерживать компьютер в наилучшем состоянии.
При запуске игры Valorant в Windows 11 может возникнуть ошибка VAN 9003 This build of Vanguard is out of compliance with current system settings, что сборка Vanguard не соответствует текущим системным настройкам.
Виновником ошибки This build of Vanguard is out of compliance с кодом VAN 9003 является анти-чит Vanguard, который устарел или несовместим с текущей версии игры. Кроме того, это может быть неправильные настройками Secure Boot и TPM 2.0 в BIOS.
Как исправить VAN 9003 This build of Vanguard is out of compliance
В данной инструкции разберем, как исправить ошибку This build of Vanguard is out of compliance with current system settings с кодом VAN 9003 при запуске игры Voliorant в Windows 11.
1. Обновите Windows 11
Обновите Windows 11 до последней версии, так как с обновлениями идут нужные компоненты для правильной работы игр.
- Перейдите в Центр обновления Windows
- Нажмите Проверить наличие обновлений
2. Переустановить Vanguard
Чтобы исправить ошибку VAN 9003 при запуске игры Valorant в Windows 11 нужно удалить Vanguard и установить его заново.
- Нажмите Win+R и введите appwiz.cpl
- Найдите и удалите Riot Vanguard
- Перезагрузите ПК
- Далее зайдите на официальный сайт игры и скачайте последнюю версию
- Vanguard установится автоматически после запуска Riot Games
- Перезагрузите ПК
3. Включить Secure Boot, TPM и UEFI
Для анти-чита Vanguard в Windows 11 нужна безопасная загрузка и наличие TPM 2.0 чипа для корректной работы игр от Rio Games, которые включаются в BIOS.
Чтобы зайти в BIOS, при включении ноутбука или ПК нажимайте непрерывно кнопку Delete. Кроме того, вы можете набрать в поиске Google «Как зайти в биос …» и указать модель ноутбука или материнской платы ПК. Это касается и включения ниже параметров, которые тоже придется искать самостоятельно в поиске по картинкам, так как у всех BIOS разный, но я прикреплю картинки для некоторых BIOS/UEFI.
Включите ниже UEFI, Secure Boot и TPM:
- Измените режим загрузки CSM или Legacy на UEFI
- Включите Secure Boot (Enabled)
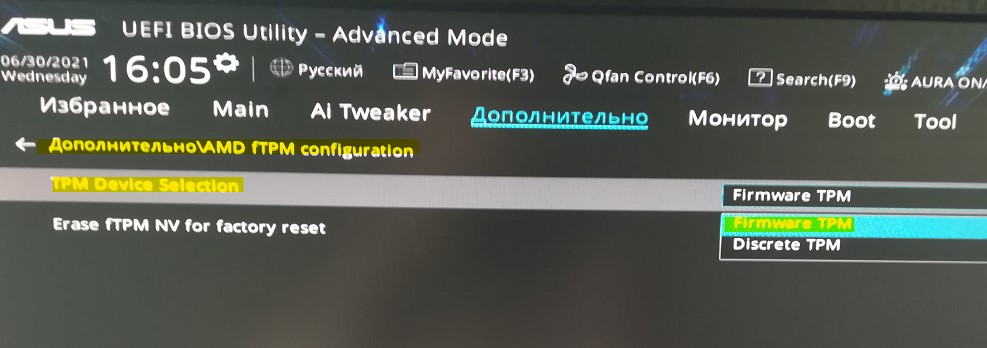
- Включите TPM 2.0. Имеется подробное руководство по включению TPM 2.0 для разных BIOS
Смотрите еще:
- Как исправить ошибку VAN 9001 в Valorant для Windows 11
- Исправить ошибку VAN 1067 в игре Valorant на Windows 11
- Запуск Counter-Strike: Global Offensive с максимальным FPS
- Ошибка 7002.1 Rockstar Games Launcher при запуске игры
- Как понизить высокий Пинг в играх
[ Telegram | Поддержать ]
С момента выхода Valorant игроки время от времени сталкивались с той или иной ошибкой, связанной с сервером. В этой связи одной из последних проблем, мешающих игрокам наслаждаться Valorant, является ошибка van9003. Это ошибка, с которой сталкиваются игроки, использующие платформу Windows 11. Некоторые из наиболее распространенных исправлений для устранения этой ошибки — обновить Windows 11, включить безопасную загрузку и включить TPM из BIOS.
Вы можете реализовать одно из следующих решений, чтобы исправить ошибку van9003 в Valorant.
Связанный: Valorant «Очередь отключена» — как исправить
- Обновление Windows 11: наиболее распространенным исправлением данной ошибки является обновление Windows 11. Найдите Настройки из панели поиска Windows в нижней части экрана и щелкните значок, когда он появится. В настройках выберите «Обновление и безопасность» и нажмите кнопку «Центр обновления Windows». Проверьте наличие последних обновлений и установите последний патч. Перезагрузите компьютер и перезапустите игру.
- Включение безопасной загрузки: Другое популярное исправление для игры — включить безопасную загрузку для вашего ПК. Сначала проверьте, включена ли безопасная загрузка, выполнив поиск Системная информация в строке поиска Windows. Щелкните значок «Информация о системе» и в новом окне проверьте Сводка системы чтобы узнать, включена ли безопасная загрузка. Если он не включен, откройте BIOS, нажав F2(стандартная кнопка для большинства материнских плат) при запуске устройства. Перейдите к UEFI настройки и включите безопасную загрузку.
- Превращение TPM 2.0: отключение TPM 2.0 также приведет к той же ошибке. Вы можете включить его, открыв BIOS и посетив Настройки доверенного платформенного модуля. Внутри этого включите Доверенный платформенный модуль вариант и сохранить все. Перезагрузите систему и попробуйте запустить Valorant.
Помните, что это некоторые из наиболее распространенных решений для исправления ошибки van9003, доступных в Интернете. Если ничего из этого не работает, мы настоятельно рекомендуем обратиться в службу поддержки Riot Games для получения дополнительных запросов и предложений.
Чтобы узнать больше о Valorant, ознакомьтесь с разделом «Как исправить ошибку голосового чата Valorant, которая не работает» или «Как исправить код ошибки 59 в руководствах по игре Valorant в Pro».
Valorant is a very popular 5v5 character-based competitive shooter game from Riot Games and has attracted players from around the world. However, because it is a live service game, it has many bugs and issues players report every so often. One of the common issues in Valorant is the error code VAN 9003 on Windows 11. According to multiple reports, when players attempt to launch the game, they get an alert that says: Error VAN 9003 “Secure boot requirements not met” on their Windows 11. If you are receiving the same error, then this guide is just right for you as we have covered the best possible solution to fix the error code VAN 9003 on Windows 11.
IMPORTANT NOTE: To fix this error, you must navigate your BIOS. So, if you are not familiar with navigating through the BIOS then it is highly recommended to approach a professional or it can cause problems with your computer because this method includes enabling TPM (Trusted Platform Module) and Secure Boot on your computer.
Here are the steps to fix the Valorant error code VAN 9003 on Windows 11.
1. First of all, at the time of starting the system, repeatedly press the ‘Delete’ button on your keyboard to access the BIOS.
2. Once you open up the BIOS, make sure that the BIOS is set to advanced mode and NOT easy mode.
3. Also, check the options for fTPM or PTT. Usually, you will find these options in the security tab or miscellaneous settings tab. When you find it, change its status from disabled to enabled.
4. Next, go to Secure Boot under boot settings or other system-related settings in BIOS. When you find it, just enable it.
5. The last step is to save the BIOS settings, reboot your system, and open up Windows. If you have completed all steps correctly, then you will be able to run Valorant without any error codes.
If the error VAN 9003 persists, then return to BIO and change OS Type from Other OS to ‘Windows UEFI’.
That’s all we have to fix the Valorant error code VAN 9003 on Windows 11.
Also check – How to fix Valorant error code 128
Fix and enjoy the first-person shooter multiplayer game
by Matthew Adams
Matthew is a freelancer who has produced a variety of articles on various topics related to technology. His main focus is the Windows OS and all the things… read more
Updated on January 25, 2023
Reviewed by
Vlad Turiceanu
Passionate about technology, Windows, and everything that has a power button, he spent most of his time developing new skills and learning more about the tech world. Coming… read more
- Some players can’t play Valorant because of two common Vanguard Windows 11 errors.
- You can fix the Van 9001 error in Windows 11 by enabling the security features required for the Vanguard anti-cheat software.
- Players might be able to fix the Windows 11 Valorant anti-cheat error by changing Windows Defender Firewall settings.
- Enabling or restarting certain services might also fix Valorant’s anti-cheat error.
XINSTALL BY CLICKING THE DOWNLOAD FILE
- Download Restoro PC Repair Tool that comes with Patented Technologies (patent available here).
- Click Start Scan to find Windows 11 issues that could be causing PC problems.
- Click Repair All to fix issues affecting your computer’s security and performance
- Restoro has been downloaded by 0 readers this month.
Valorant is still a relatively new first-person shooter multiplayer game for Windows 11/10. However, since Windows 11, more players have reported errors arising for that game on Microsoft’s latest desktop platform.
The Van9001 and Windows 11 Valorant anti-cheat errors are two of the most widely cited Valorant issues. Both of those issues are associated with Valorant’s Vanguard software. Those errors have the following messages:
Vanguard anti-cheat has encountered an error. Please relaunch the client to restore anti-cheat function.
Van 9001: This build of Vanguard requires TPM version 2.0 and secure boot to be enabled to play.
Those two Vanguard errors arise when players try to launch Valorant in Windows 11. Consequently, players can’t play Valorant because of those errors. If you need to fix one of those issues, check out its potential fixes below.
What is Vanguard?
Vanguard is the anti-cheat software for the Valorant game. That Riot software comes installed with the game to prevent players from cheating in Valorant. You can’t play Valorant without the Riot Vanguard software installed and active.
That software has been somewhat controversial because it blocks apps. Players have complained Vanguard blocks legitimate apps even when they’re not playing the game. When it blocks something, a Riot Vanguard notification appears above the Windows system tray area.
Does Valorant work in Windows 11?
Yes, Valorant is compatible with Windows 11. However, its Vanguard anti-cheat software enforces the same TPM 2.0 security system requirement as Windows 11.
The secure boot option must also enable players to play Valorant on Microsoft’s latest desktop platform.
So, you can’t play Valorant in Windows 11 if TPM 2.0 and secure boot aren’t enabled. That’s why some players have needed to fix the Van9001 error. However, the Van9001 error message makes it clear enough what needs to be enabled for Vanguard in Windows 11.
Why can’t I play Valorant on Windows 11?
Above we just explained that Valorant works on Windows 11, but this may not be the case in some cases. Here is what you must have in mind; you may not be able to play Valorant on the new OS if the following conditions are not met:
- The TPM 2.0 and Secure Boot features are not available to you
- You are running conflicting background apps
- Your system is running on outdated graphics card drivers
- There is a bad installation or corrupt game files
How can I fix the Valorant Vanguard Windows 11 errors?
Fixes for the Van 9001 error
1. Enable both secure boot and TPM 2.0
- Press the Start taskbar button.
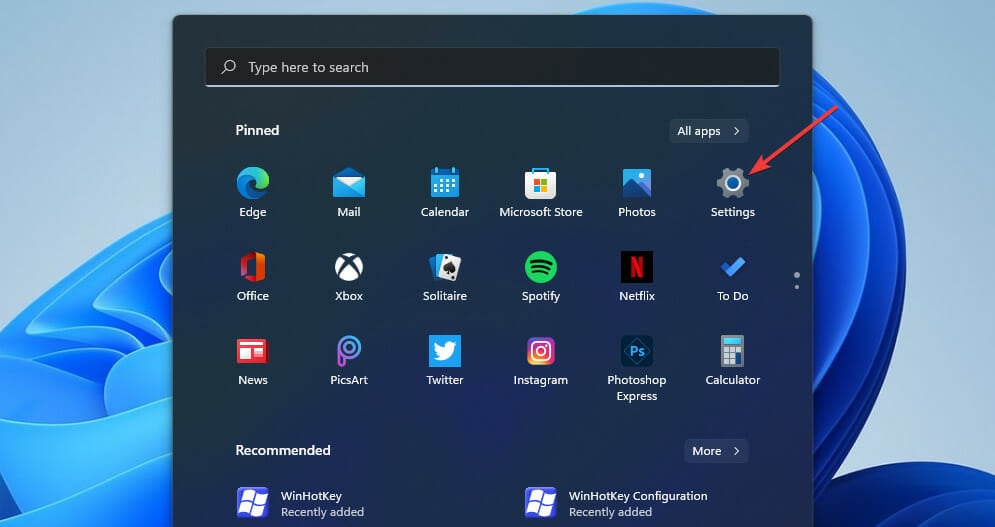
- Click the pinned Settings app to open it.
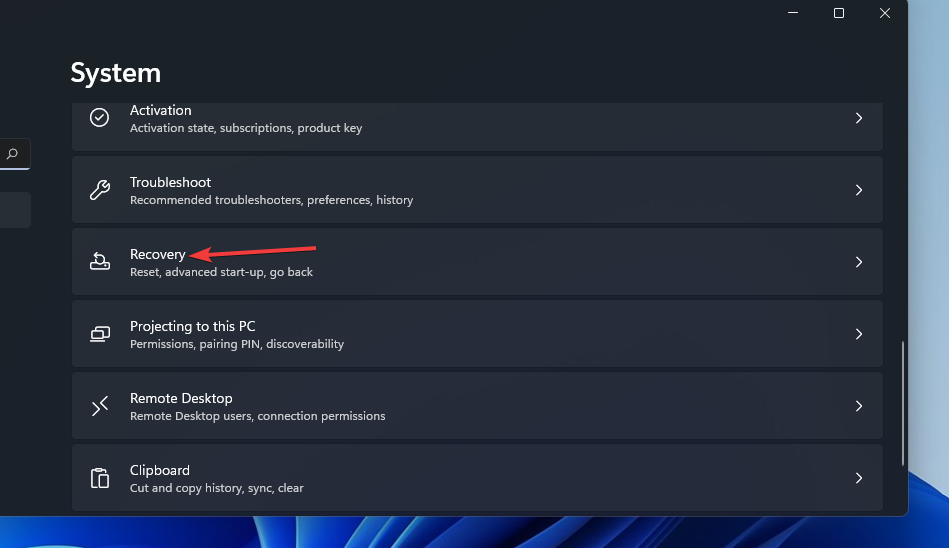
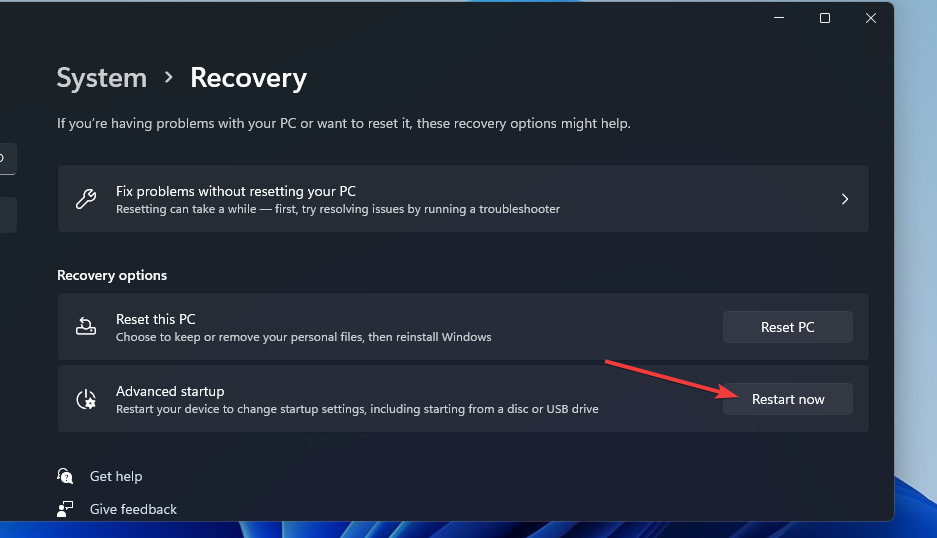
- Select Recovery on the System tab.
- Press the Restart now button for the Advanced startup option.
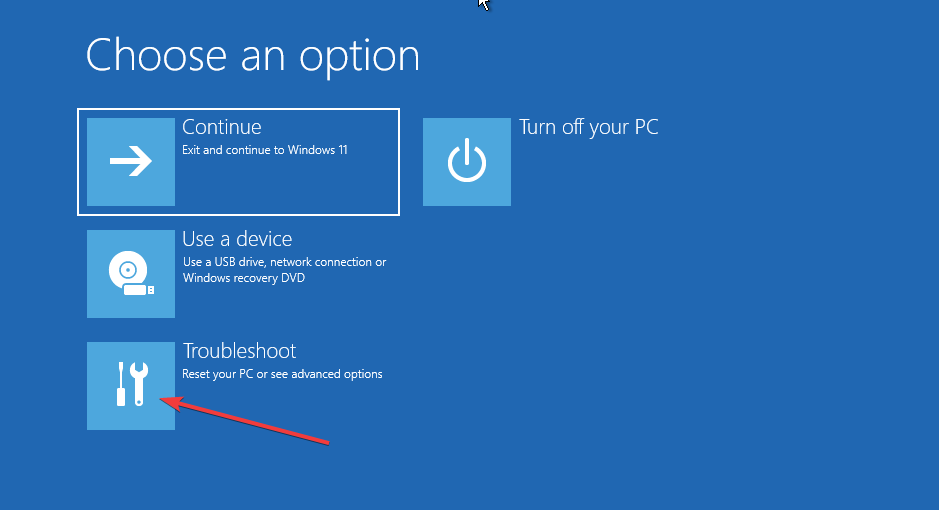
- Select Troubleshoot on the blue menu.
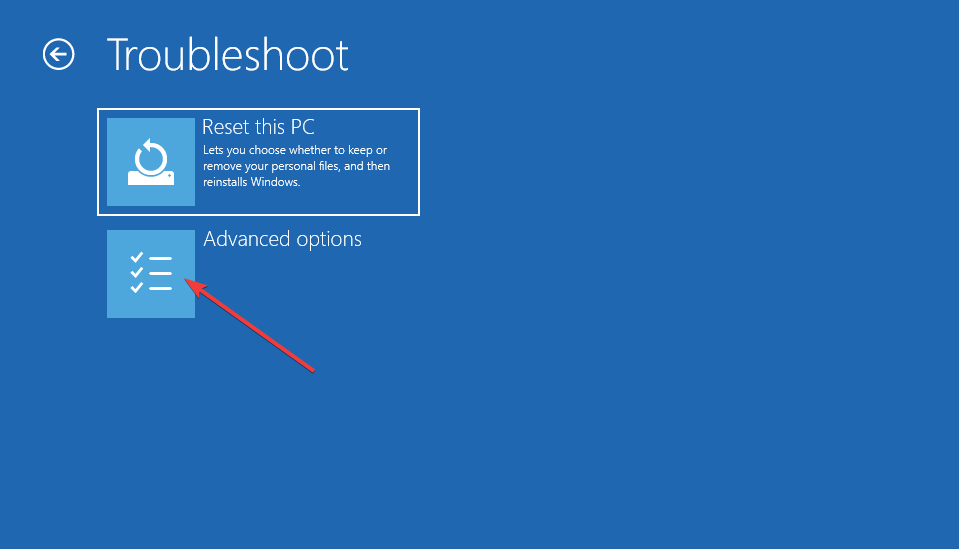
- Then select Advanced options to bring up the options shown directly below.
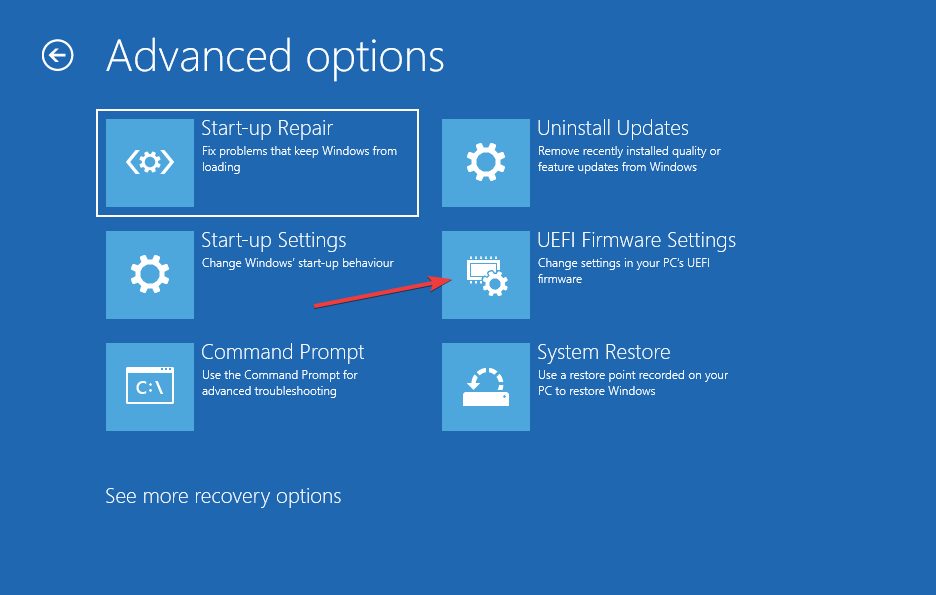
- Click UEFI Firmware Settings there.
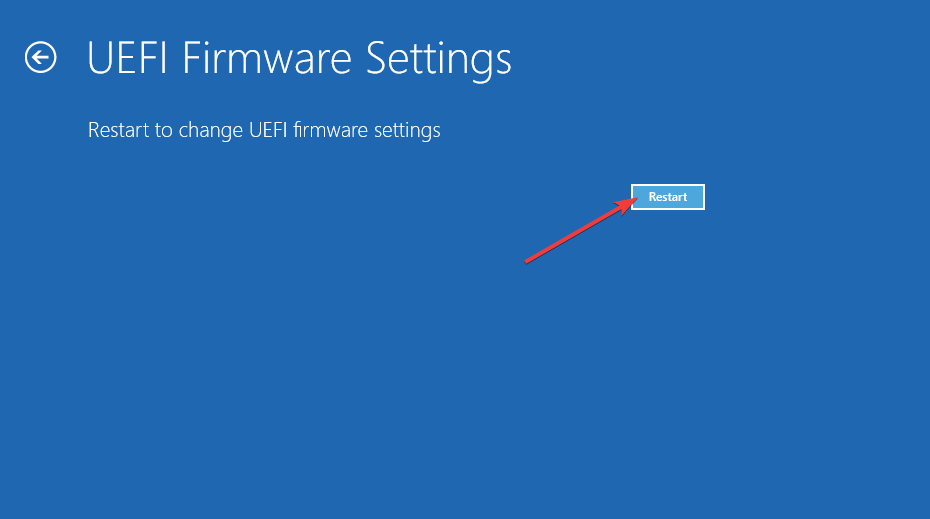
- Then select Restart to enter UEFI Firmware options.
- Locate and select Secure boot within the UEFI Firmware settings to enable that option.
- Find and enable the TPM setting, which could be on an Advanced or Security tab.
Our Fix: TPM device not detected error guide also provides details for enabling TPM within BIOS settings. However, UEFI Firmware and BIOS menu layouts vary between PCs.
Your motherboard manual might include more specific instructions for enabling TPM 2.0.
2. Select the Allow BitLocker without a compatible TPM option
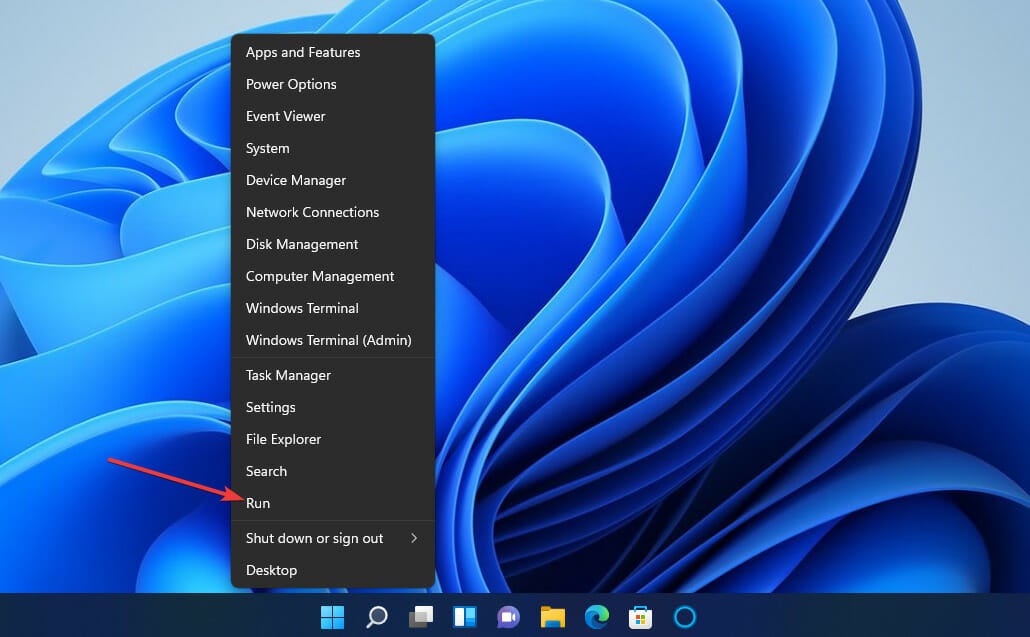
- Right-click the Start menu and select Run.
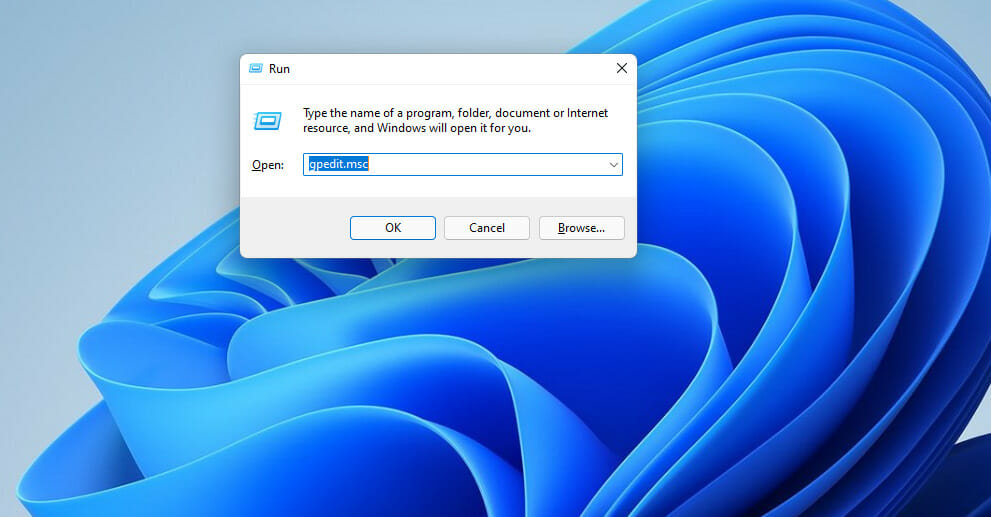
- To open Group Policy Editor, input this command and click OK:
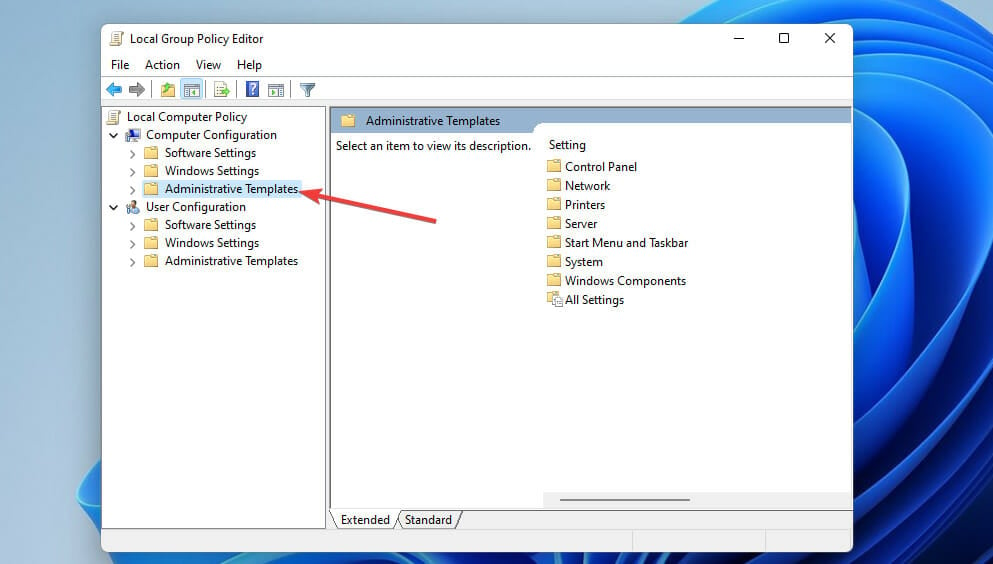
gpedit.msc - Double-click Computer Configuration and select Administrative Templates in Group Policy Editor.
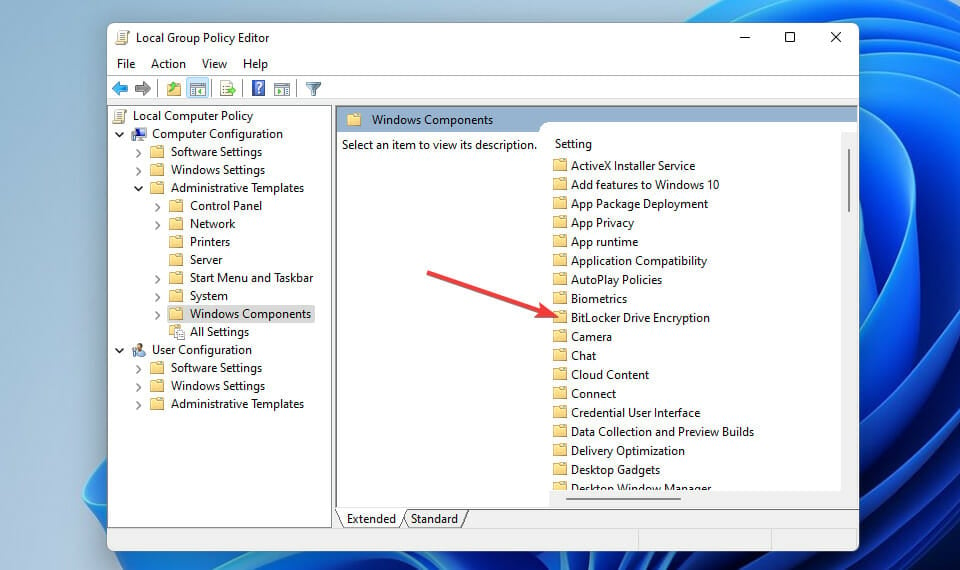
- Select Windows Components and BitLocker Drive Encryption on the right of the window.
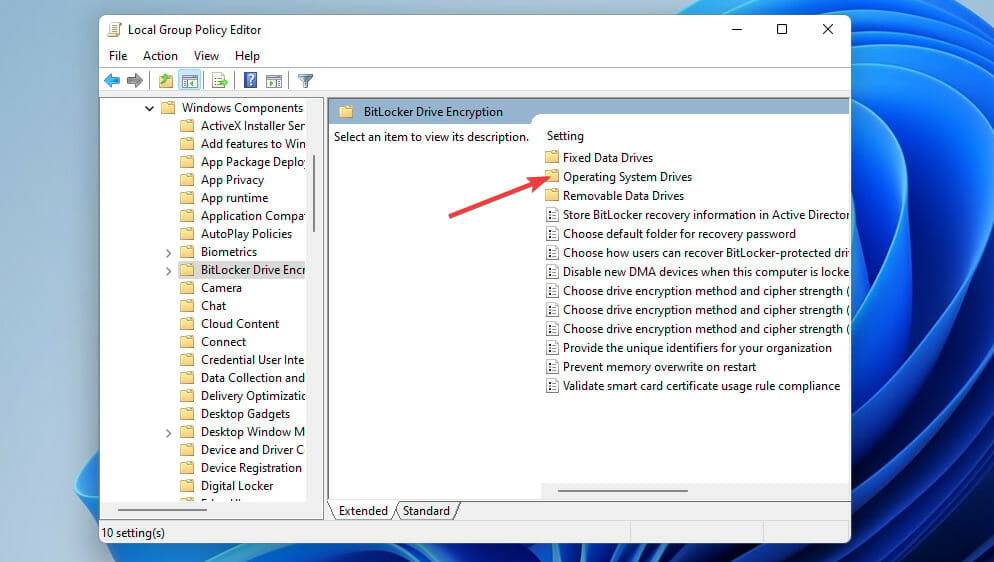
- Then double-click Operating System Drives to bring up policy settings.
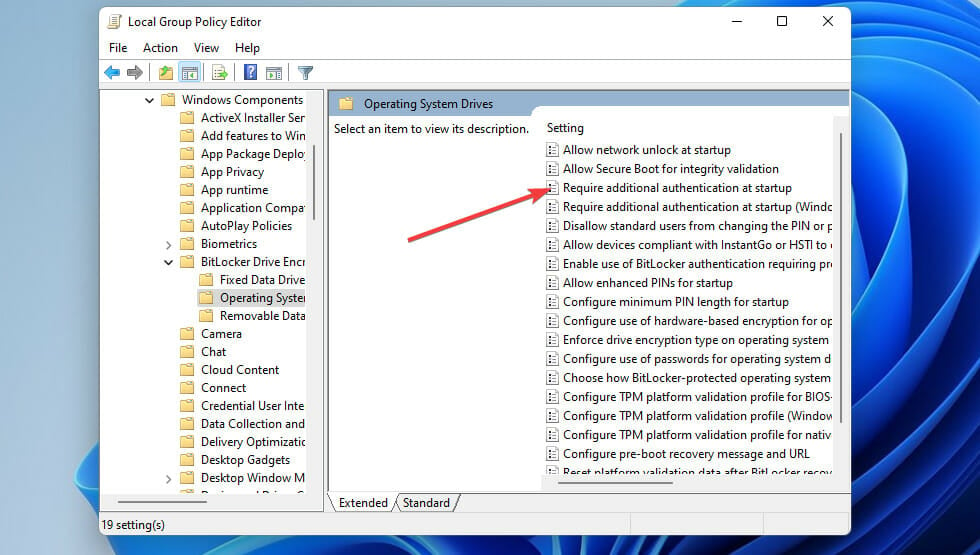
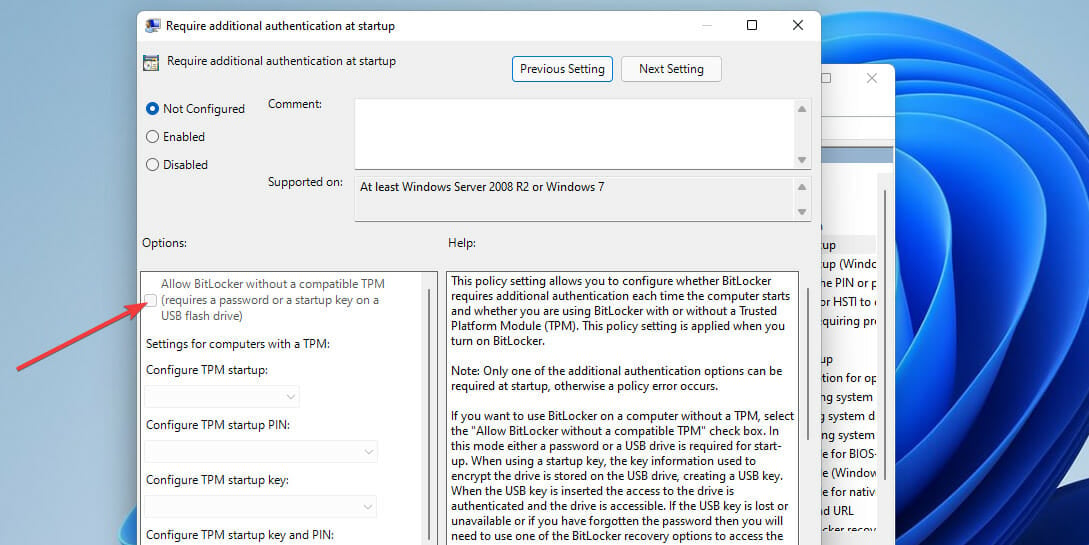
- Double-click the Require additional authentication at startup policy there.
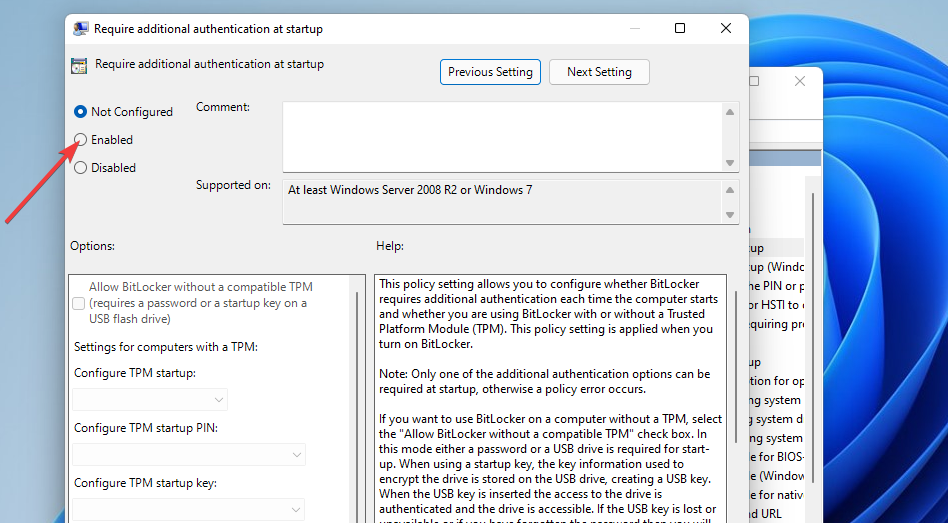
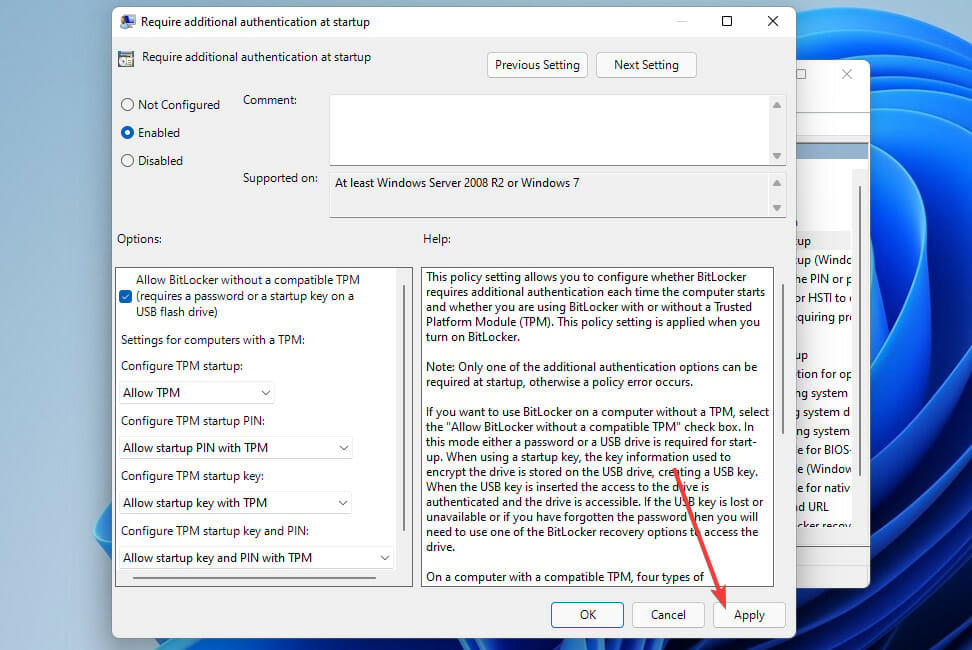
- Select the Enabled radio button.
- Then select the Allow BitLocker without a compatible TPM checkbox.
- Press the Apply button to save your new Group Policy options.
NOTE
Local Group Policy Editor is not included with Windows 11 Home edition. However, Windows 11 Pro and Enterprise users can configure Group Policy settings.
Fixes for the Windows 11 Valorant Vanguard anti-cheat error
1. Run Valorant as an administrator
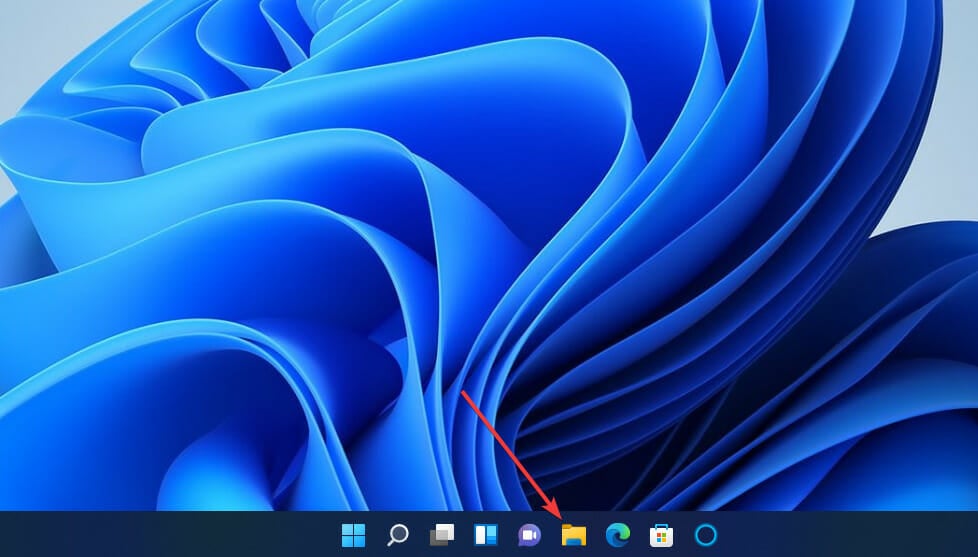
- Open File Explorer by clicking the taskbar icon shown directly below.
- Then open Valorant’s installation folder.
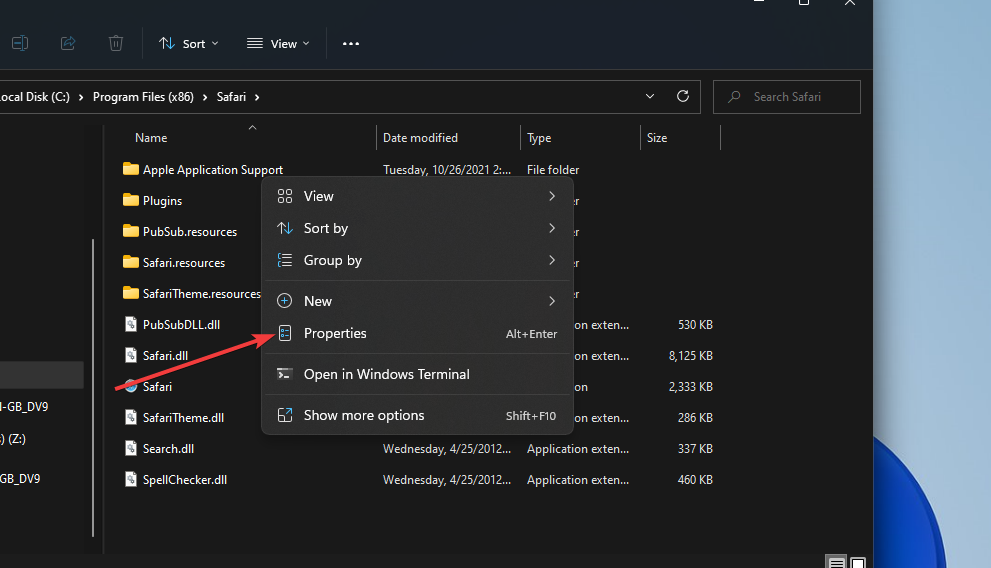
- Right-click Valorant’s EXE to select Properties.
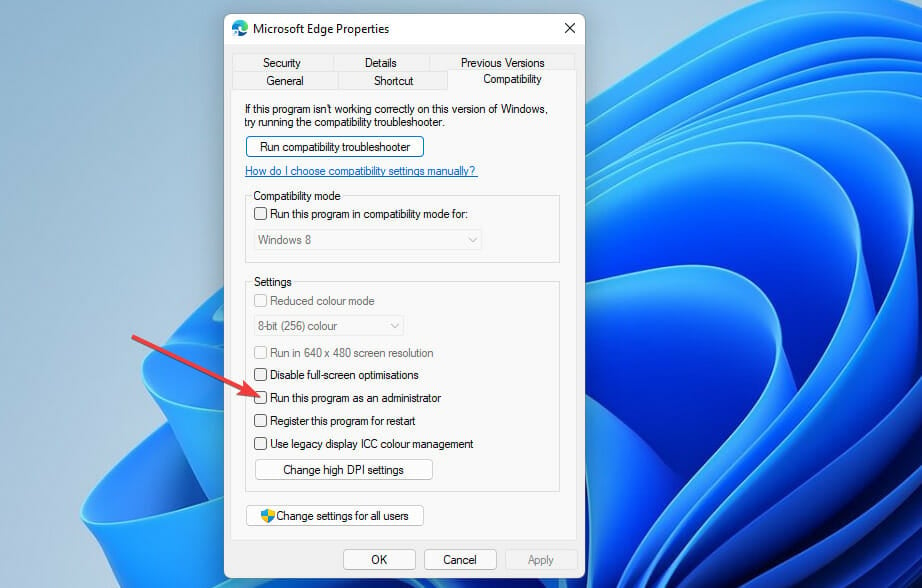
- Select Run this program as administrator on the Compatibility tab.
- It’s also recommended that you select the Disable full-screen optimizations option on that tab.
- Click Apply and OK to save the selected options.
NOTE
You can also run Valorant with elevated rights by right-clicking a shortcut for it and selecting Run as administrator. For Valorant to always run with elevated rights, however, you’ll need to configure it as outlined above.
2. Check the VGC service is enabled and running
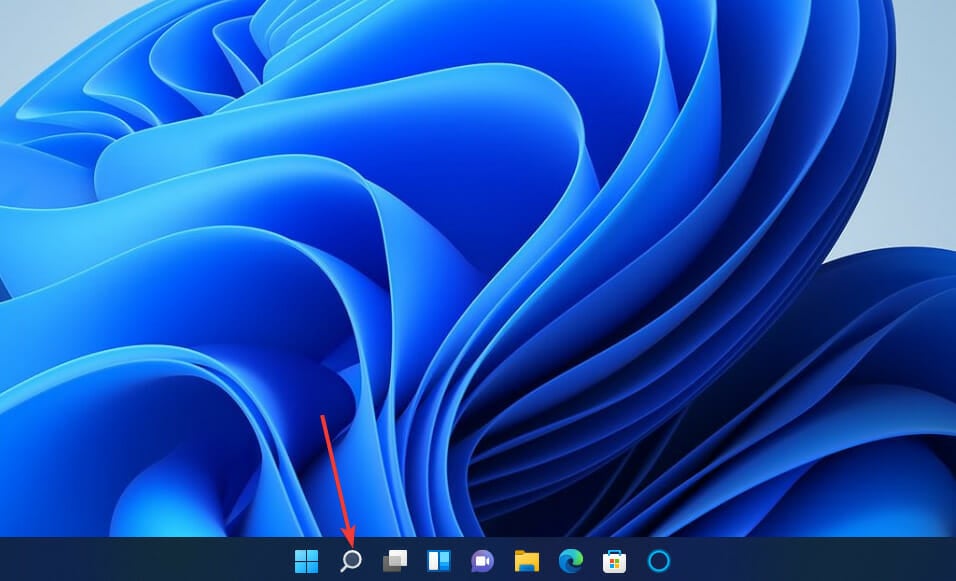
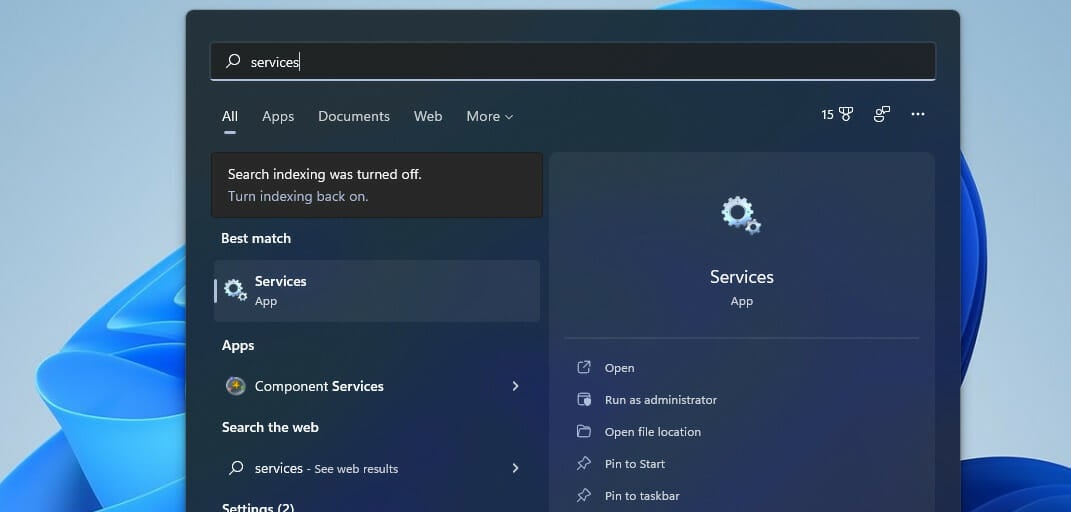
- Click the magnifying glass taskbar button, and enter services within the search box.
- Select the Services app.
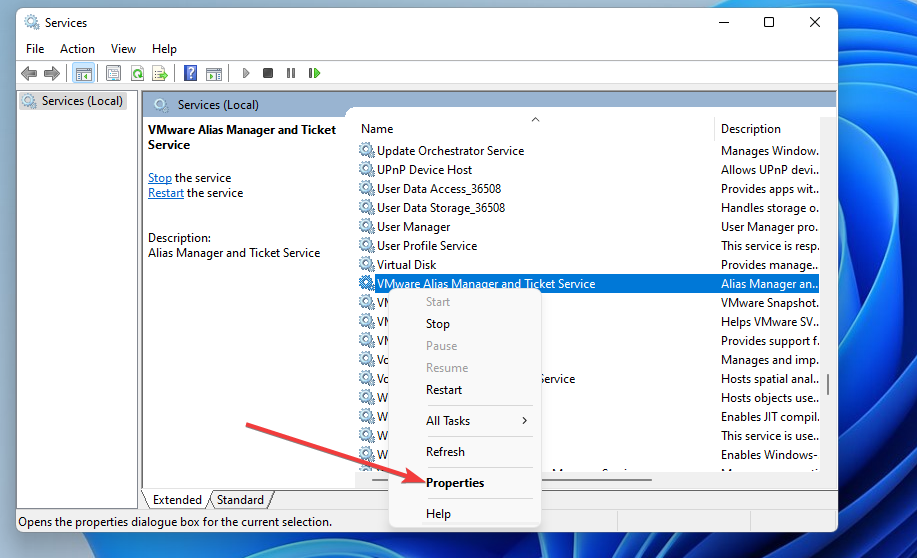
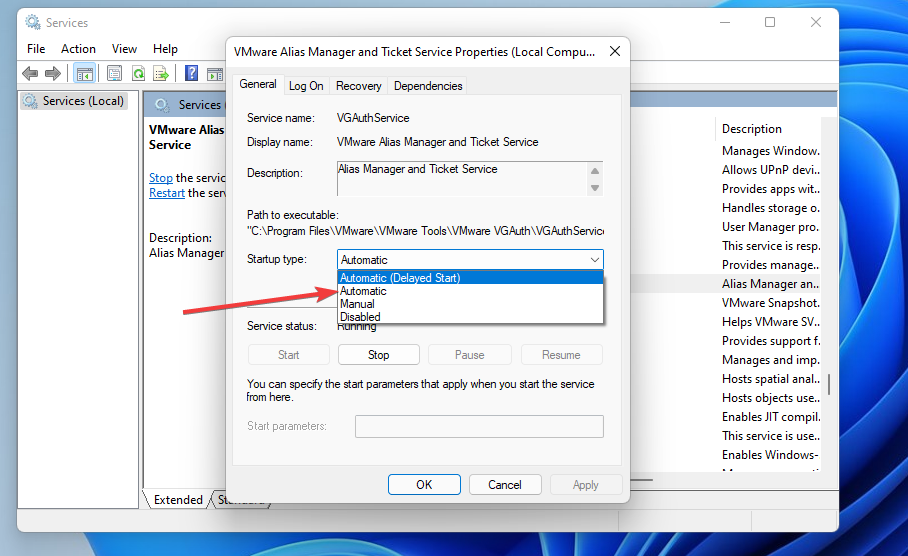
- Next, right-click the VGC service and select Properties.
- Select the Automatic startup option if it’s not selected.
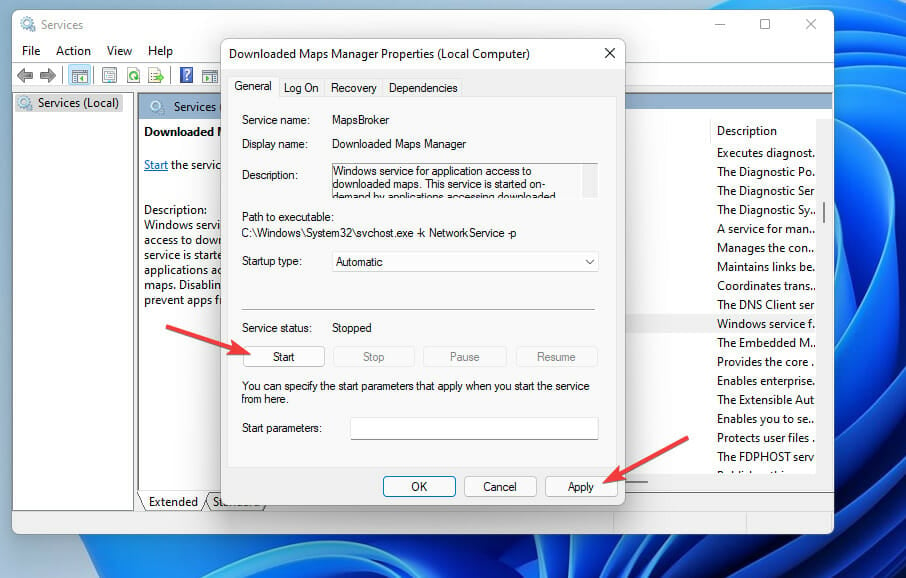
- Click Start on the properties window if the service isn’t running.
- Press the Apply button to confirm.
NOTE
If VGC is already enabled and running, try restarting that service by right-clicking it and selecting Restart.
3. Allow Valorant through Windows Defender Firewall
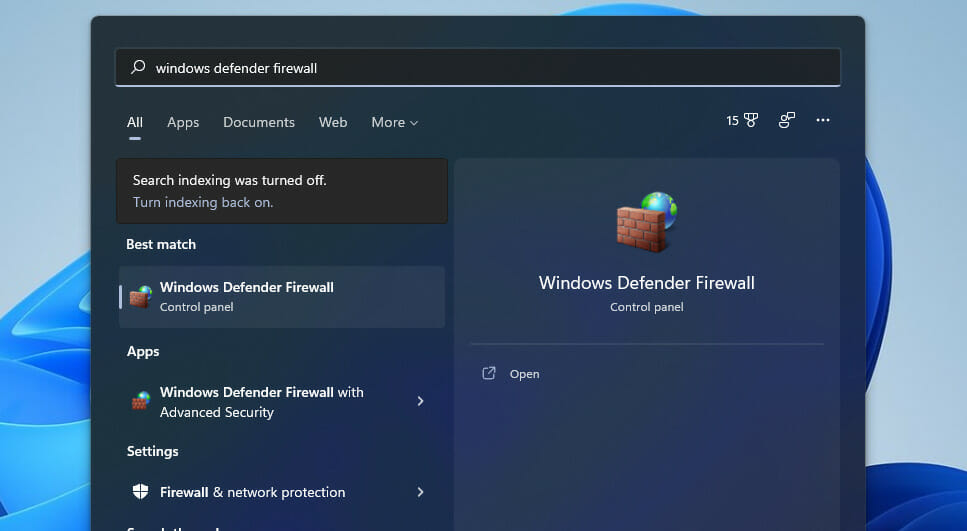
- Open the search tool in Windows 11 from the taskbar.
- Input the keyword Windows Defender Firewall within the search text box.
- Click Windows Defender Firewall to open that Control Panel applet.
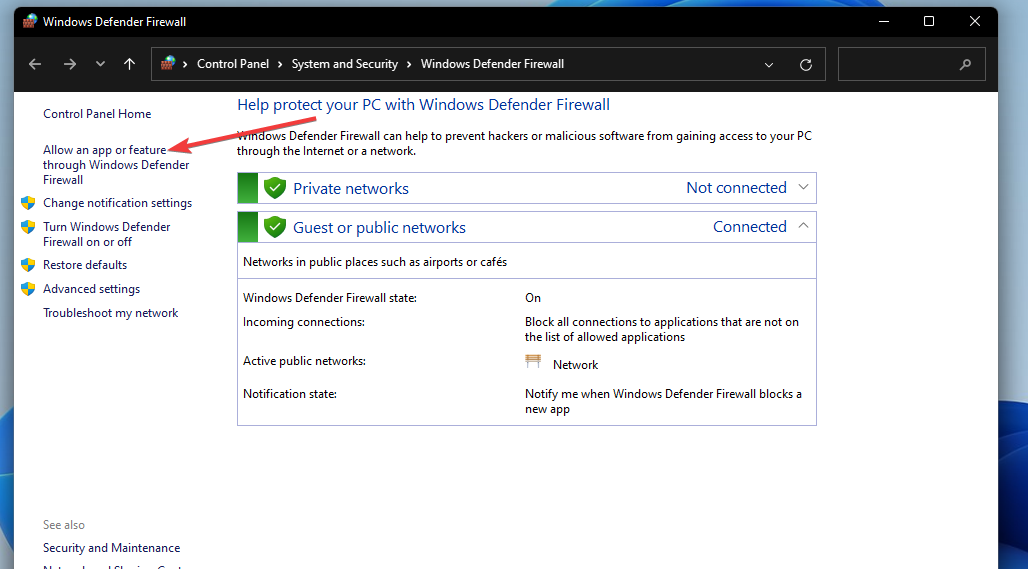
- Select the Allow an app or feature through Windows Defender Firewall option on the left side of the Control Panel.
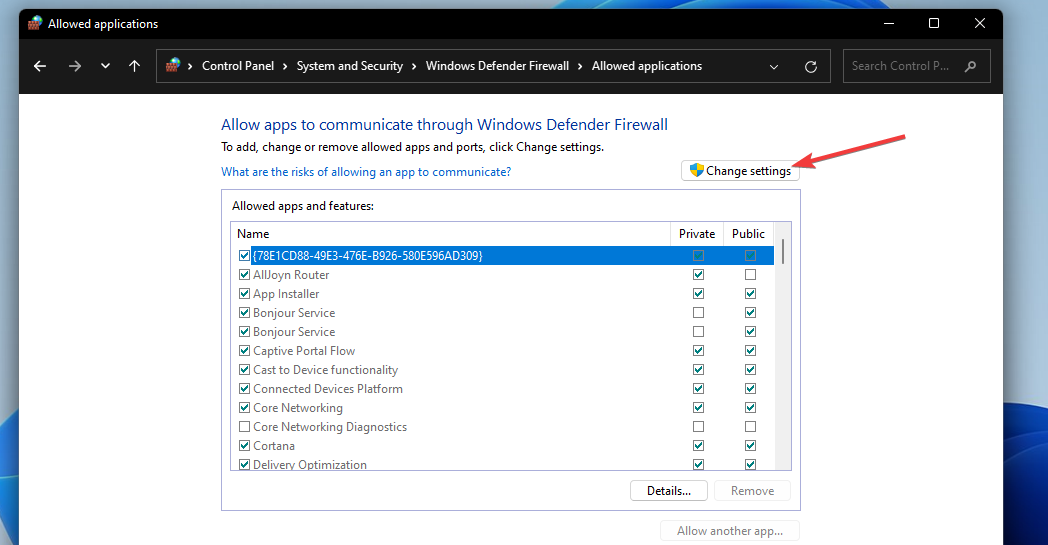
- Press the Change settings button.
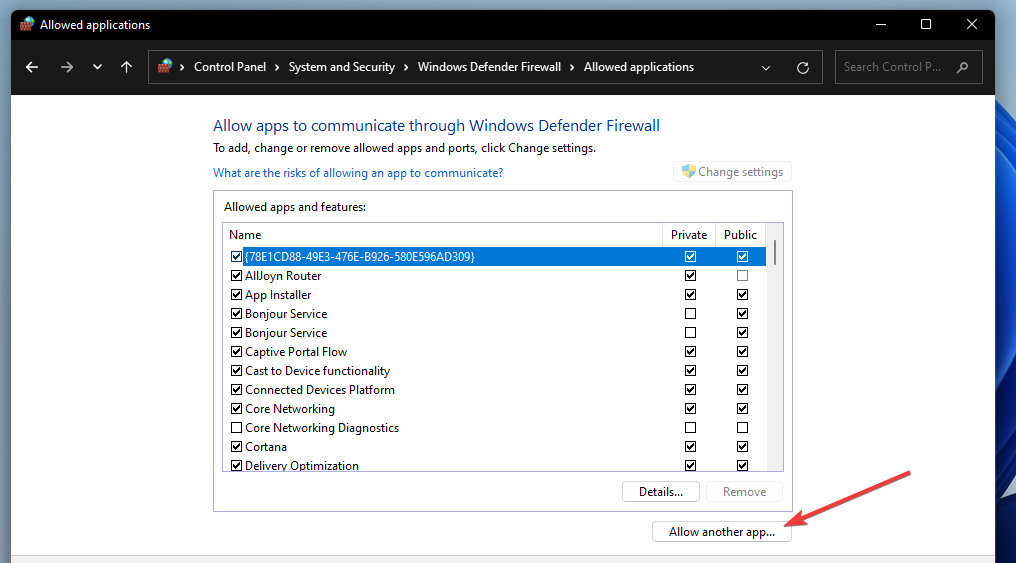
- Click the Allow another app option.
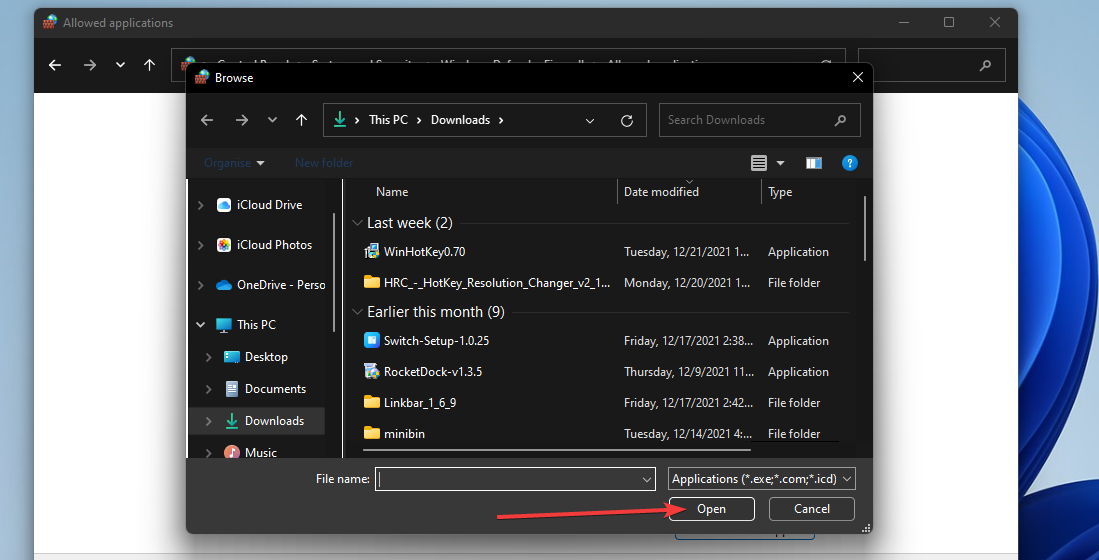
- Press the Browse button to select Valorant, and click the Open option.
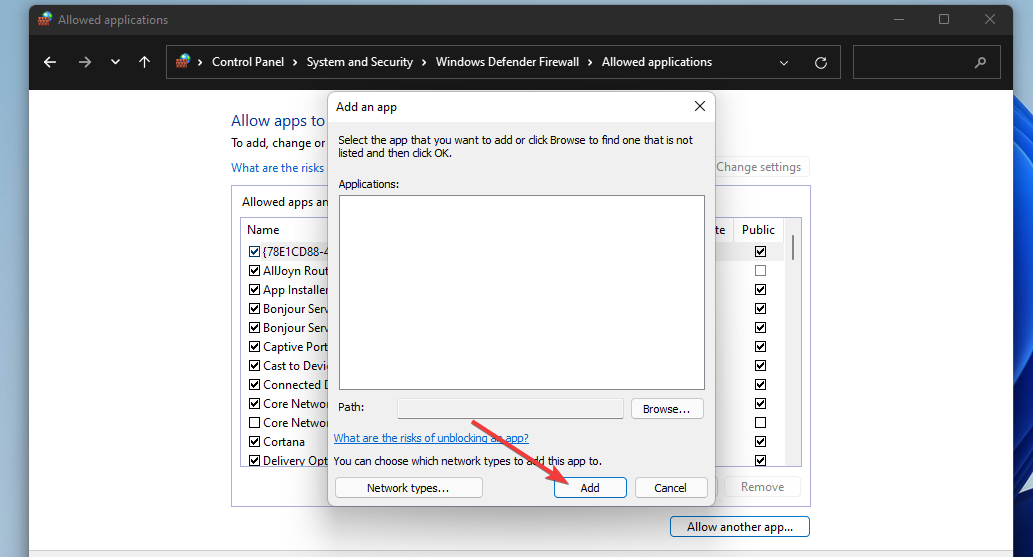
- Then click Add.
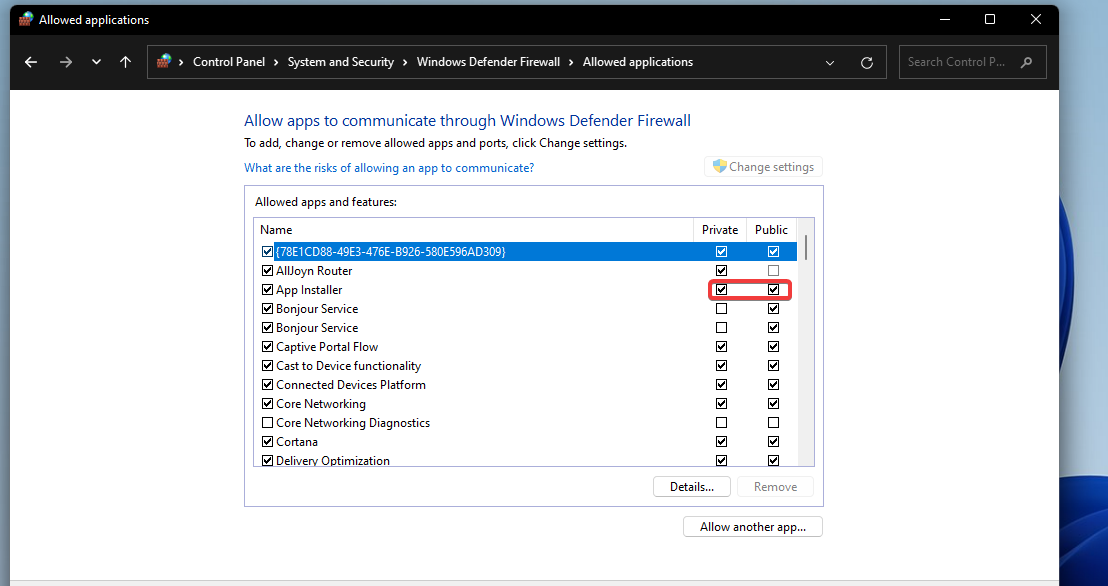
- Select the Private and Public checkboxes for Valorant within the firewall’s settings.
- Click the OK option.
4. Disable third-party antivirus software
Some PC issues are hard to tackle, especially when it comes to corrupted repositories or missing Windows files. If you are having troubles fixing an error, your system may be partially broken.
We recommend installing Restoro, a tool that will scan your machine and identify what the fault is.
Click here to download and start repairing.
If you have third-party antivirus software installed, it’s recommended that you disable that utility before playing Valorant.
To do so, right-click the system tray icon for your antivirus utility and select a disable option on the context menu. Select to disable the antivirus shield for a few hours if possible.
If you can play Valorant after disabling your antivirus software, the antivirus utility’s shield or firewall likely conflicts with the game or its anti-cheat software. In this case, consider adding Valorant and Vanguard to your antivirus utility’s exceptions list. In case that does not work, we recommend trying gaming-friendly AV software.
5. Reinstall Vanguard
- Press the Windows + I key combination.
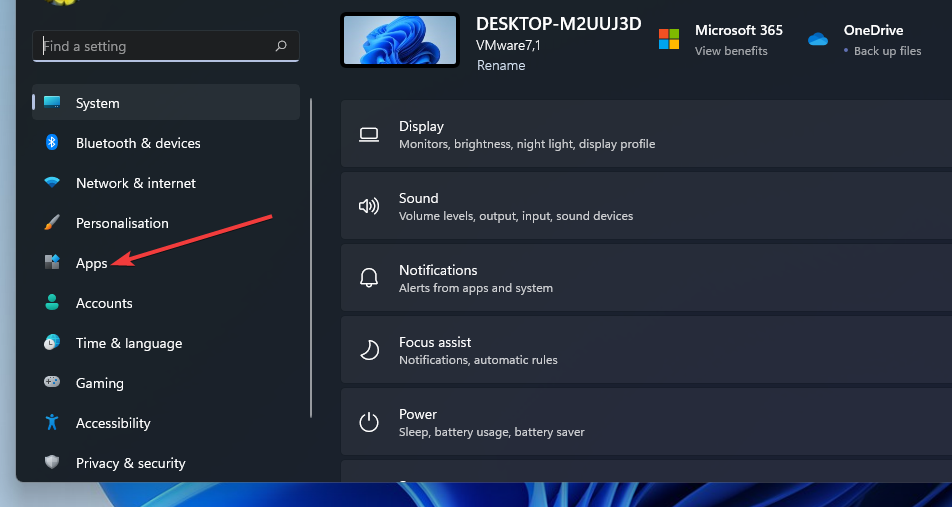
- Select Apps on the left of Settings.
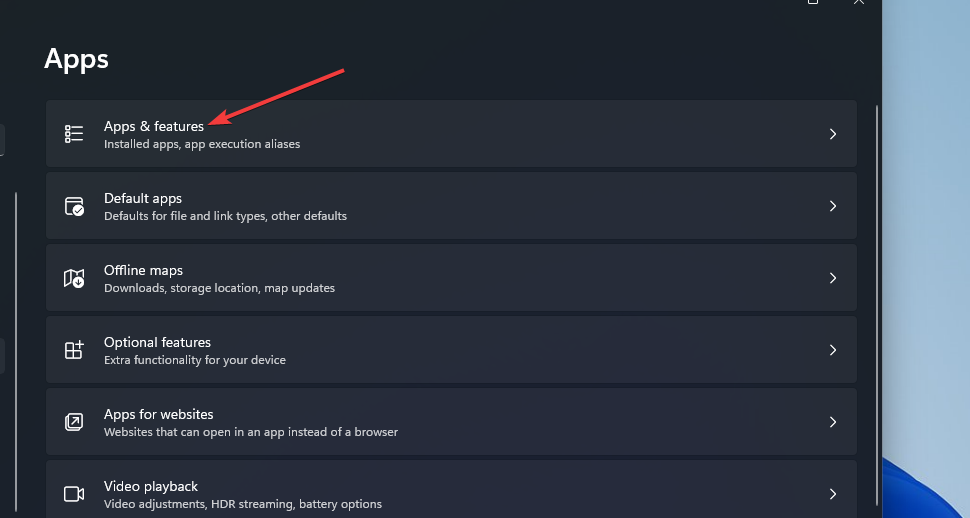
- Click the Apps & features navigation option.
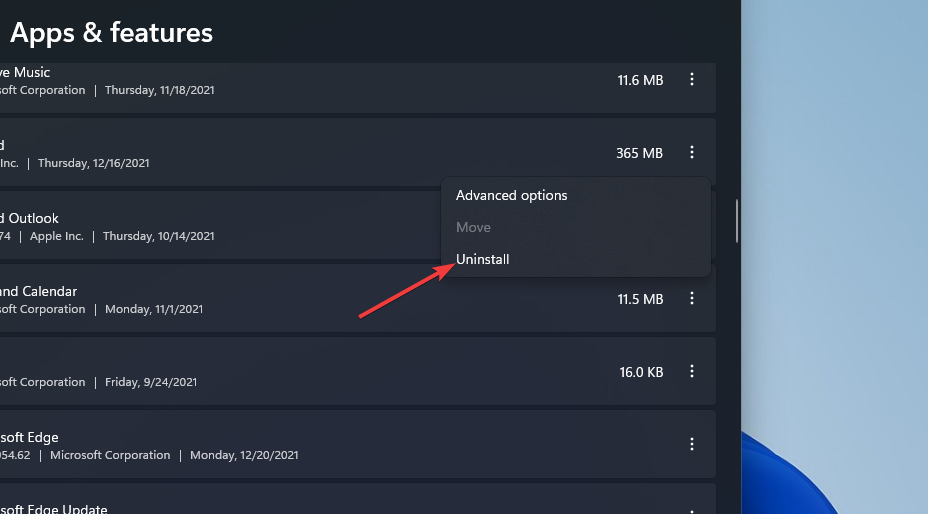
- Next, click the three-dot button for Riot Vanguard to select Uninstall.
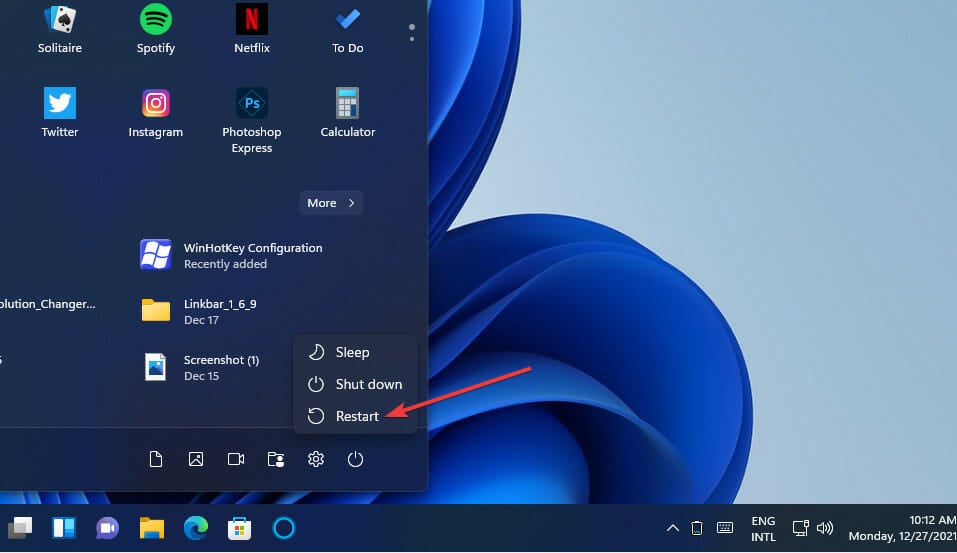
- Select Restart on the Start menu.
- After that, open the Valorant client to reinstall the Vanguard anti-cheat software.
If you can prefer, you can also utilize a third-party uninstaller app, like IObit Uninstaller, to uninstall Vanguard. IObit Uninstall includes additional options for erasing leftover residual files and registry entries from uninstalled software.
Do Valorant’s connection errors have anything to do with Vanguard?
The Valorant Connection error that arises when some players launch the game is often due to Vanguard. If you ever need to fix that error, try uninstalling and reinstalling Vanguard as outlined within the last potential resolution above.
However, that connection issue can also arise for other reasons. For example, there could be an issue with your internet connection. In this case, running the Internet Connections troubleshooter or restarting your router might also help.
Can you play Valorant without Vanguard?
Riot Vanguard would have to be enabled during VALORANT gameplay to maintain the integrity of players’ games. Your ability to play, however, might be impacted by unforeseen conflicts with either the Vanguard driver or the Vanguard client on your device.
Nevertheless, you cannot play Valorant without Riot Vanguard in Windows 11. The driver keeps going, although you aren’t playing the game.
So, that’s how you can fix the Vanguard 9001 and anti-cheat errors in Windows 11. Unfortunately, those are two of the most common issues Valorant players have needed to fix on Microsoft’s latest desktop platform.
The fix for the 9001 error is pretty clear-cut. To resolve that issue, you must enable TPM 2.0 and secure boot on your PC. If you can utilize Group Policy Editor, selecting the Allow BitLocker without a compatible TPM option might also work.
However, how you can fix the Vanguard anti-cheat error isn’t quite so obvious. That error often occurs because of firewall and antivirus software blocks. Try applying all the potential resolutions above for the Windows 11 Valorant anti-cheat error to get it fixed.
If you have questions about those Valorant Vanguard errors, feel free to add them below. In addition, you can discuss those Vanguard Windows 11 errors and share other potential resolutions for them in that comments section.
Still having issues? Fix them with this tool:
SPONSORED
If the advices above haven’t solved your issue, your PC may experience deeper Windows problems. We recommend downloading this PC Repair tool (rated Great on TrustPilot.com) to easily address them. After installation, simply click the Start Scan button and then press on Repair All.
Newsletter
Fix and enjoy the first-person shooter multiplayer game
by Matthew Adams
Matthew is a freelancer who has produced a variety of articles on various topics related to technology. His main focus is the Windows OS and all the things… read more
Updated on January 25, 2023
Reviewed by
Vlad Turiceanu
Passionate about technology, Windows, and everything that has a power button, he spent most of his time developing new skills and learning more about the tech world. Coming… read more
- Some players can’t play Valorant because of two common Vanguard Windows 11 errors.
- You can fix the Van 9001 error in Windows 11 by enabling the security features required for the Vanguard anti-cheat software.
- Players might be able to fix the Windows 11 Valorant anti-cheat error by changing Windows Defender Firewall settings.
- Enabling or restarting certain services might also fix Valorant’s anti-cheat error.
XINSTALL BY CLICKING THE DOWNLOAD FILE
- Download Restoro PC Repair Tool that comes with Patented Technologies (patent available here).
- Click Start Scan to find Windows 11 issues that could be causing PC problems.
- Click Repair All to fix issues affecting your computer’s security and performance
- Restoro has been downloaded by 0 readers this month.
Valorant is still a relatively new first-person shooter multiplayer game for Windows 11/10. However, since Windows 11, more players have reported errors arising for that game on Microsoft’s latest desktop platform.
The Van9001 and Windows 11 Valorant anti-cheat errors are two of the most widely cited Valorant issues. Both of those issues are associated with Valorant’s Vanguard software. Those errors have the following messages:
Vanguard anti-cheat has encountered an error. Please relaunch the client to restore anti-cheat function.
Van 9001: This build of Vanguard requires TPM version 2.0 and secure boot to be enabled to play.
Those two Vanguard errors arise when players try to launch Valorant in Windows 11. Consequently, players can’t play Valorant because of those errors. If you need to fix one of those issues, check out its potential fixes below.
What is Vanguard?
Vanguard is the anti-cheat software for the Valorant game. That Riot software comes installed with the game to prevent players from cheating in Valorant. You can’t play Valorant without the Riot Vanguard software installed and active.
That software has been somewhat controversial because it blocks apps. Players have complained Vanguard blocks legitimate apps even when they’re not playing the game. When it blocks something, a Riot Vanguard notification appears above the Windows system tray area.
Does Valorant work in Windows 11?
Yes, Valorant is compatible with Windows 11. However, its Vanguard anti-cheat software enforces the same TPM 2.0 security system requirement as Windows 11.
The secure boot option must also enable players to play Valorant on Microsoft’s latest desktop platform.
So, you can’t play Valorant in Windows 11 if TPM 2.0 and secure boot aren’t enabled. That’s why some players have needed to fix the Van9001 error. However, the Van9001 error message makes it clear enough what needs to be enabled for Vanguard in Windows 11.
Why can’t I play Valorant on Windows 11?
Above we just explained that Valorant works on Windows 11, but this may not be the case in some cases. Here is what you must have in mind; you may not be able to play Valorant on the new OS if the following conditions are not met:
- The TPM 2.0 and Secure Boot features are not available to you
- You are running conflicting background apps
- Your system is running on outdated graphics card drivers
- There is a bad installation or corrupt game files
How can I fix the Valorant Vanguard Windows 11 errors?
Fixes for the Van 9001 error
1. Enable both secure boot and TPM 2.0
- Press the Start taskbar button.
- Click the pinned Settings app to open it.
- Select Recovery on the System tab.
- Press the Restart now button for the Advanced startup option.
- Select Troubleshoot on the blue menu.
- Then select Advanced options to bring up the options shown directly below.
- Click UEFI Firmware Settings there.
- Then select Restart to enter UEFI Firmware options.
- Locate and select Secure boot within the UEFI Firmware settings to enable that option.
- Find and enable the TPM setting, which could be on an Advanced or Security tab.
Our Fix: TPM device not detected error guide also provides details for enabling TPM within BIOS settings. However, UEFI Firmware and BIOS menu layouts vary between PCs.
Your motherboard manual might include more specific instructions for enabling TPM 2.0.
2. Select the Allow BitLocker without a compatible TPM option
- Right-click the Start menu and select Run.
- To open Group Policy Editor, input this command and click OK:
gpedit.msc - Double-click Computer Configuration and select Administrative Templates in Group Policy Editor.
- Select Windows Components and BitLocker Drive Encryption on the right of the window.
- Then double-click Operating System Drives to bring up policy settings.
- Double-click the Require additional authentication at startup policy there.
- Select the Enabled radio button.
- Then select the Allow BitLocker without a compatible TPM checkbox.
- Press the Apply button to save your new Group Policy options.
NOTE
Local Group Policy Editor is not included with Windows 11 Home edition. However, Windows 11 Pro and Enterprise users can configure Group Policy settings.
Fixes for the Windows 11 Valorant Vanguard anti-cheat error
1. Run Valorant as an administrator
- Open File Explorer by clicking the taskbar icon shown directly below.
- Then open Valorant’s installation folder.
- Right-click Valorant’s EXE to select Properties.
- Select Run this program as administrator on the Compatibility tab.
- It’s also recommended that you select the Disable full-screen optimizations option on that tab.
- Click Apply and OK to save the selected options.
NOTE
You can also run Valorant with elevated rights by right-clicking a shortcut for it and selecting Run as administrator. For Valorant to always run with elevated rights, however, you’ll need to configure it as outlined above.
2. Check the VGC service is enabled and running
- Click the magnifying glass taskbar button, and enter services within the search box.
- Select the Services app.
- Next, right-click the VGC service and select Properties.
- Select the Automatic startup option if it’s not selected.
- Click Start on the properties window if the service isn’t running.
- Press the Apply button to confirm.
NOTE
If VGC is already enabled and running, try restarting that service by right-clicking it and selecting Restart.
3. Allow Valorant through Windows Defender Firewall
- Open the search tool in Windows 11 from the taskbar.
- Input the keyword Windows Defender Firewall within the search text box.
- Click Windows Defender Firewall to open that Control Panel applet.
- Select the Allow an app or feature through Windows Defender Firewall option on the left side of the Control Panel.
- Press the Change settings button.
- Click the Allow another app option.
- Press the Browse button to select Valorant, and click the Open option.
- Then click Add.
- Select the Private and Public checkboxes for Valorant within the firewall’s settings.
- Click the OK option.
4. Disable third-party antivirus software
Some PC issues are hard to tackle, especially when it comes to corrupted repositories or missing Windows files. If you are having troubles fixing an error, your system may be partially broken.
We recommend installing Restoro, a tool that will scan your machine and identify what the fault is.
Click here to download and start repairing.
If you have third-party antivirus software installed, it’s recommended that you disable that utility before playing Valorant.
To do so, right-click the system tray icon for your antivirus utility and select a disable option on the context menu. Select to disable the antivirus shield for a few hours if possible.
If you can play Valorant after disabling your antivirus software, the antivirus utility’s shield or firewall likely conflicts with the game or its anti-cheat software. In this case, consider adding Valorant and Vanguard to your antivirus utility’s exceptions list. In case that does not work, we recommend trying gaming-friendly AV software.
5. Reinstall Vanguard
- Press the Windows + I key combination.
- Select Apps on the left of Settings.
- Click the Apps & features navigation option.
- Next, click the three-dot button for Riot Vanguard to select Uninstall.
- Select Restart on the Start menu.
- After that, open the Valorant client to reinstall the Vanguard anti-cheat software.
If you can prefer, you can also utilize a third-party uninstaller app, like IObit Uninstaller, to uninstall Vanguard. IObit Uninstall includes additional options for erasing leftover residual files and registry entries from uninstalled software.
Do Valorant’s connection errors have anything to do with Vanguard?
The Valorant Connection error that arises when some players launch the game is often due to Vanguard. If you ever need to fix that error, try uninstalling and reinstalling Vanguard as outlined within the last potential resolution above.
However, that connection issue can also arise for other reasons. For example, there could be an issue with your internet connection. In this case, running the Internet Connections troubleshooter or restarting your router might also help.
Can you play Valorant without Vanguard?
Riot Vanguard would have to be enabled during VALORANT gameplay to maintain the integrity of players’ games. Your ability to play, however, might be impacted by unforeseen conflicts with either the Vanguard driver or the Vanguard client on your device.
Nevertheless, you cannot play Valorant without Riot Vanguard in Windows 11. The driver keeps going, although you aren’t playing the game.
So, that’s how you can fix the Vanguard 9001 and anti-cheat errors in Windows 11. Unfortunately, those are two of the most common issues Valorant players have needed to fix on Microsoft’s latest desktop platform.
The fix for the 9001 error is pretty clear-cut. To resolve that issue, you must enable TPM 2.0 and secure boot on your PC. If you can utilize Group Policy Editor, selecting the Allow BitLocker without a compatible TPM option might also work.
However, how you can fix the Vanguard anti-cheat error isn’t quite so obvious. That error often occurs because of firewall and antivirus software blocks. Try applying all the potential resolutions above for the Windows 11 Valorant anti-cheat error to get it fixed.
If you have questions about those Valorant Vanguard errors, feel free to add them below. In addition, you can discuss those Vanguard Windows 11 errors and share other potential resolutions for them in that comments section.
Still having issues? Fix them with this tool:
SPONSORED
If the advices above haven’t solved your issue, your PC may experience deeper Windows problems. We recommend downloading this PC Repair tool (rated Great on TrustPilot.com) to easily address them. After installation, simply click the Start Scan button and then press on Repair All.

