Corrupt hard disk sectors are among the chief causes of this error
by Matthew Adams
Matthew is a freelancer who has produced a variety of articles on various topics related to technology. His main focus is the Windows OS and all the things… read more
Published on September 22, 2022
Reviewed by
Vlad Turiceanu

Passionate about technology, Windows, and everything that has a power button, he spent most of his time developing new skills and learning more about the tech world. Coming… read more
- The Hyper_Error issue can be due to outdated or incompatible system drivers, bad disk sectors, and corrupted image files, among other things.
- Restoring Windows 10 can often fix BSOD errors like the Hypervisor_Error blue screen.
- The Hypervisor_Error in Windows 10 is less likely to arise when Windows 10 is fully updated.
- Windows 10 also includes built-in scanning utilities for hard drives and RAM that can feasibly resolve the Windows Hypervisor_Error BSOD error.
XINSTALL BY CLICKING THE DOWNLOAD FILE
This software will repair common computer errors, protect you from file loss, malware, hardware failure and optimize your PC for maximum performance. Fix PC issues and remove viruses now in 3 easy steps:
- Download Restoro PC Repair Tool that comes with Patented Technologies (patent available here).
- Click Start Scan to find Windows issues that could be causing PC problems.
- Click Repair All to fix issues affecting your computer’s security and performance
- Restoro has been downloaded by 0 readers this month.
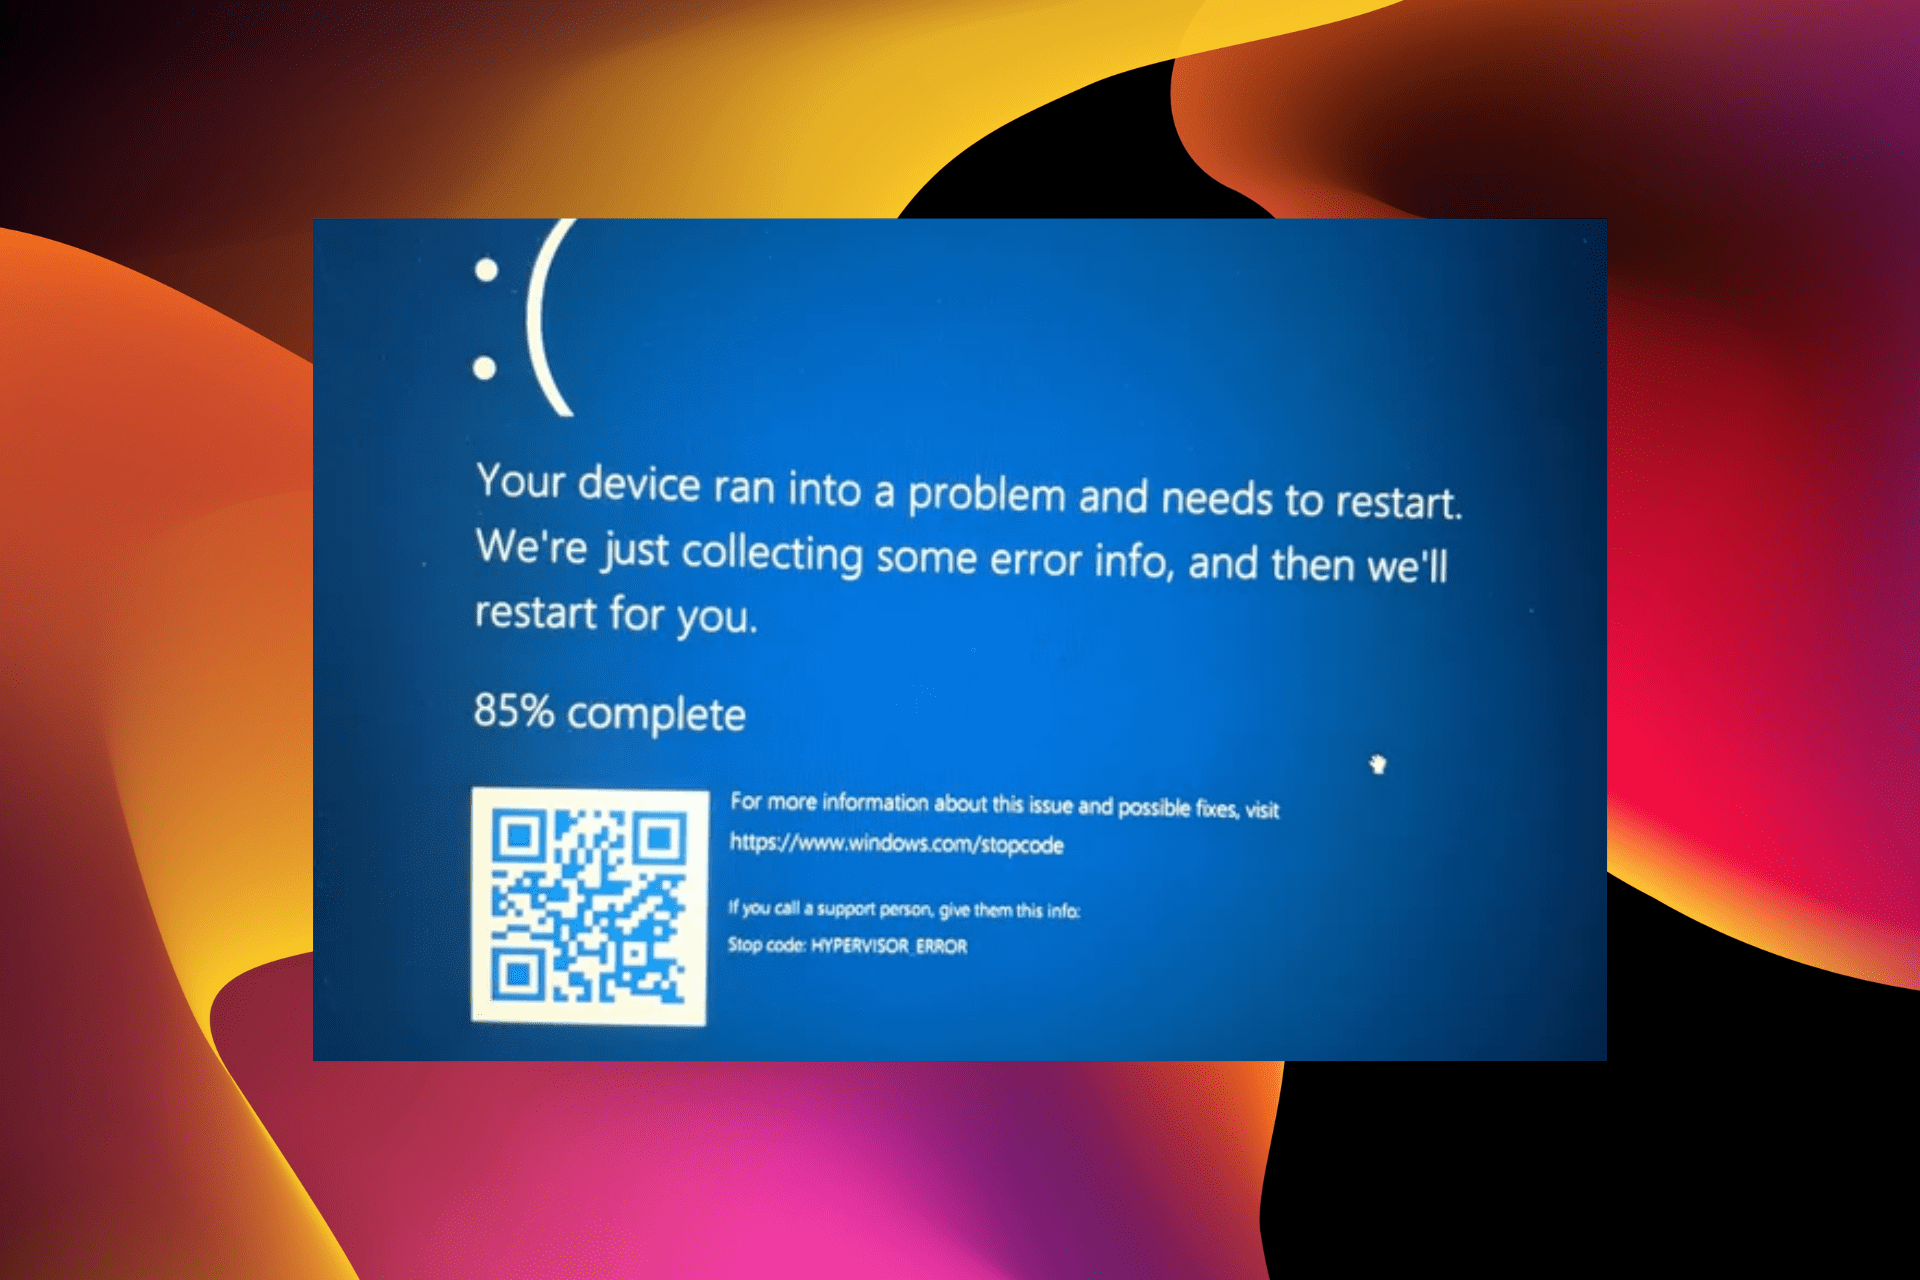
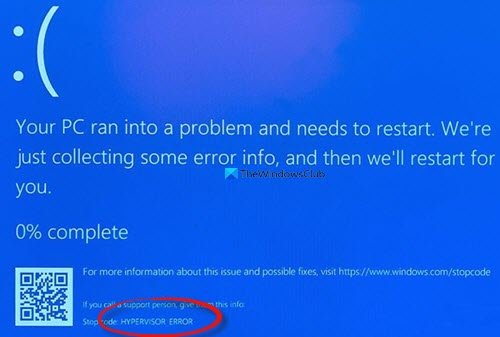
Some users have posted on Microsoft’s forum about a Hypervisor_Error BSOD (Blue Screen of Death) issue with a 0x00020001 stop code.
This BSOD error can arise for users utilizing Windows Sandbox or third-party virtual machine applications within Windows 10. For example, in one forum post, a user said:
I’ve seen this Hypervisor_Error BSOD three times in the past two weeks. Each time that it happens, I am running an AVD (Android virtual device); and I am working on a mobile application.
Read this thorough guide to explore the best ways to deal with this annoying issue.
What is Windows hypervisor platform Windows 10?
An extended user-mode API has been added to the Windows Hypervisor Platform, which allows third-party virtualization stacks and applications to create and manage partitions at the hypervisor level.
Moreover, you can configure memory mappings for the partition, and create and control the execution of virtual processors. These capabilities were previously unavailable.
What causes the hypervisor error?
The Hypervisor BSoD error usually occurs when users use an Android Virtual Device. Below are some of the causes of this frustrating error:
- Outdated drivers
- Broken or corrupt system files
- Outdated operating system
- Outdated BIOS
How do I fix the Hypervisor error?
1. Update all your system drivers
1.1. Update driver manually
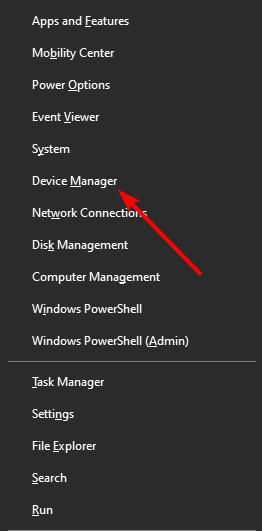
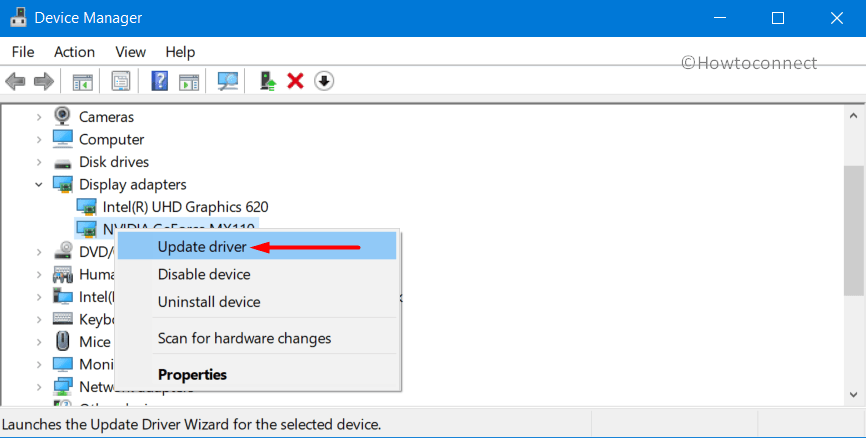
- Press the Windows key + X and select Device Manager.

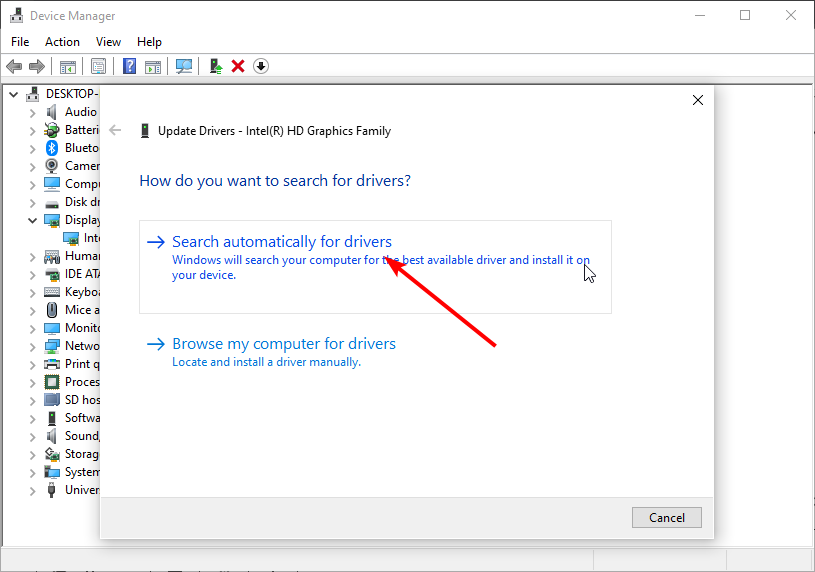
- Double-click the adapter you want to its drivers to expand it.
- Right-click the driver there and select Update driver.

- Choose the Search automatically for drivers option.
- Wait for the search to complete and install the available updates.

It might be because of outdated drivers if you are getting the Hypervisor error while trying to run games like Valorant. In this case, you need to update your graphics drivers and related ones.
1.2. Update drivers automatically
Updating all your drivers manually can be time-wasting and prone to errors. So, you should use one of the best driver updaters in DriverFix.
DriverFix is a driver updater utility with which you can quickly scan all your PC’s device drivers. In addition, this software will display a list of your PC devices with outdated, corrupted, missing drivers.
DriverFix is ideal for resolving driver issues as it lets users quickly and easily download and install drivers for PCs that need new ones.
Pro users can select an Automatically Install option to install downloaded drivers at the click of a button, which makes updating drivers very straightforward.
Other useful DriverFix features
- DriverFix backs up drivers with ZIP files before updating them
- Users can schedule scans for optimal times with DriverFix’s schedule manager
- Its download manager displays driver download progress for users
- Live chat support is available for DriverFix users

DriverFix
Easily resolve the Hypervisor_Error by using this versatile and powerful software today.
2. Fix RAM issues with Windows Memory Diagnostic
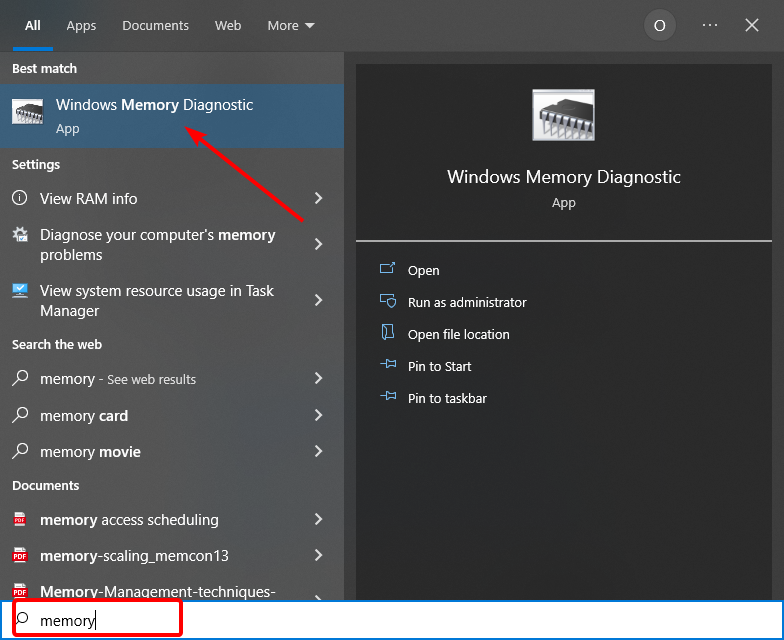
- Press the Windows + S hotkey for the search utility.
- Type memory in the search box and click Windows Memory Diagnostic to open that utility’s window.

- Click the Restart now and check for problems (recommended) option within the Windows Memory Diagnostic utility.

- After that, your desktop or laptop will restart, and the Windows Memory Diagnostic tool will check for RAM issues.
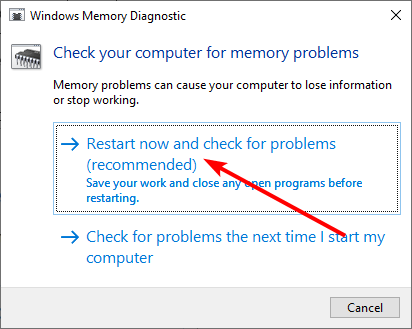
Sometimes, the Hypervisor error on Dell can be down to issues with your RAM. This can be fixed using the Windows tool. Also, if you are busy with an important task that can’t wait, you can select the second option and restart your PC when you are done.
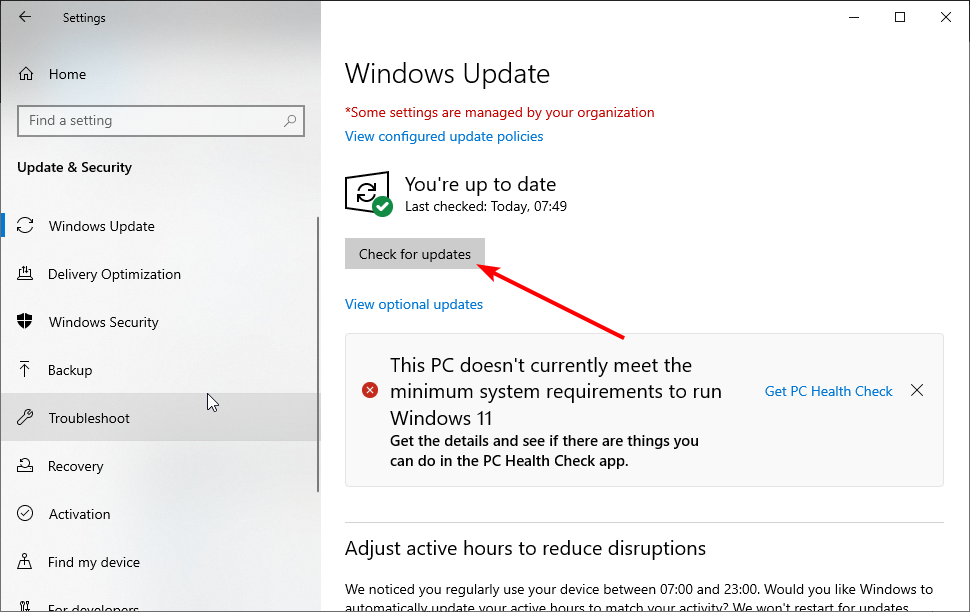
3. Update Windows 10
- Press the Windows key + I to open the Settings app.
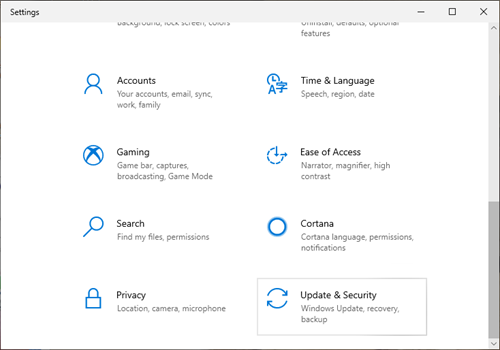
- Select the Update & Security option.

- Click the Check for updates button.
- Finally, click the Install now button after downloading the available updates.
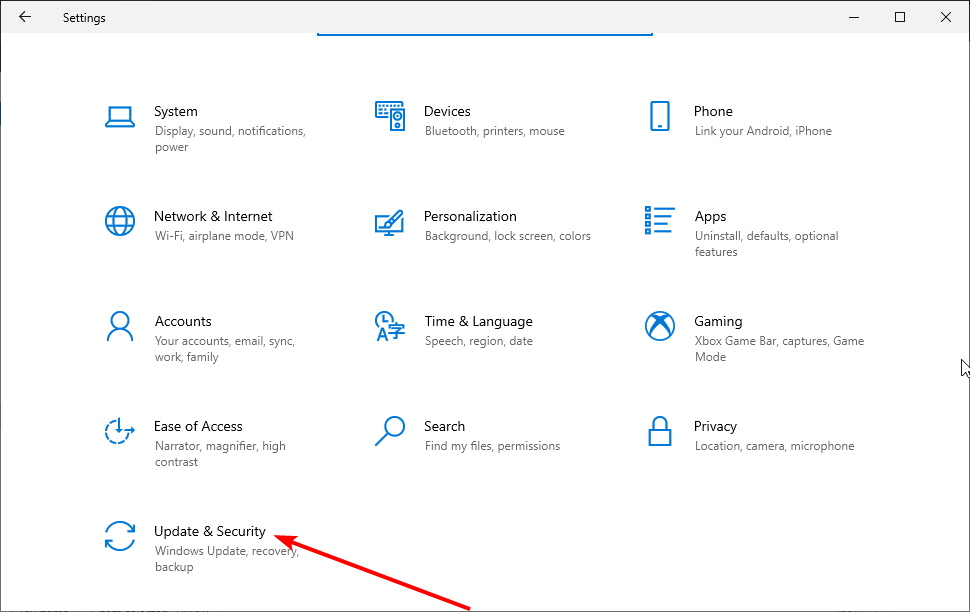

If you are getting the Hypervisor error while using the Oracle VM VirtualBox on Windows 10, it might be because your OS is outdated. Updating Windows 10 and restarting your PC should do the trick here.
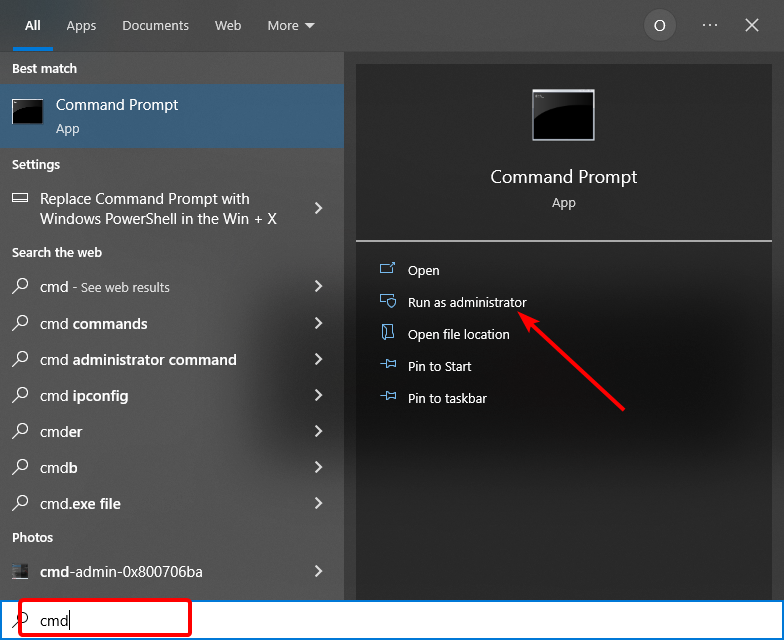
4. Run a check disk scan
- Press the Windows key + S and type cmd.
- Select Run as administrator under Command Prompt.
- Input this chkdsk command and hit Enter:
chkdsk C: /f /r /x

Some PC issues are hard to tackle, especially when it comes to corrupted repositories or missing Windows files. If you are having troubles fixing an error, your system may be partially broken.
We recommend installing Restoro, a tool that will scan your machine and identify what the fault is.
Click here to download and start repairing.
The Hypervisor error can also occur due to bad hard disk sectors. Again, running the CHKDSK command helps to repair these sectors if they can still be saved.
5. Update your BIOS (Basic Input Output System)

You’ll need to download the latest BIOS firmware from your motherboard manufacturer’s website to update an outdated BIOS.
There might also be a dedicated software utility available for updating your BIOS. Check out our How to update BIOS article for further details about updating the BIOS.
6. Run DISM scan
- Open Command Prompt as administrator.
- Input the following command and press Enter:
DISM.exe /Online /Cleanup-image /Restorehealth
- Wait for the Scan to complete and restart your PC.

Corrupt system files are among the chief causes of the Hypervisor error. You can effectively repair these files using the DISM tool.
However, to run a deep and thorough scan and repair virtually all broken system files, we recommend using a dedicated system file repairer in Restoro.
Restoro is a specialized tool that keeps your PC in top shape by detecting any faulty file and repairing it before it starts causing problems. This helps prevent file loss and ensures your PC always delivers maximum performance.
Finally, it is not just limited to file repair only. Instead, it fixes all common PC errors to help keep your device optimized.
⇒ Get Restoro
- System Thread Exception not Handled Ntfs.sys: 6 Easy Fixes
- Invalid Kernel Handle Error: Use These 9 Methods to Fix it
- Runtime Error R6025: Fix it With These 4 Easy Solutions
- Error #268D3: What Is It and How to Remove the Popup
- Stop Code Driver PNP Watchdog on Windows 11: 7 Fixes to Use
7. Restore Windows 10 to an earlier date
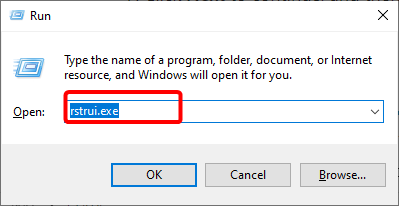
- Press the Windows key + R to open the Run utility.
- Type rstrui.exe and press Enter.

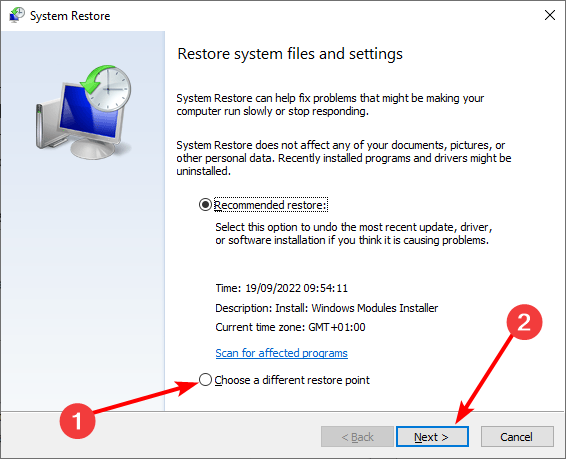
- Click the Choose a different restore point option and the Next button.

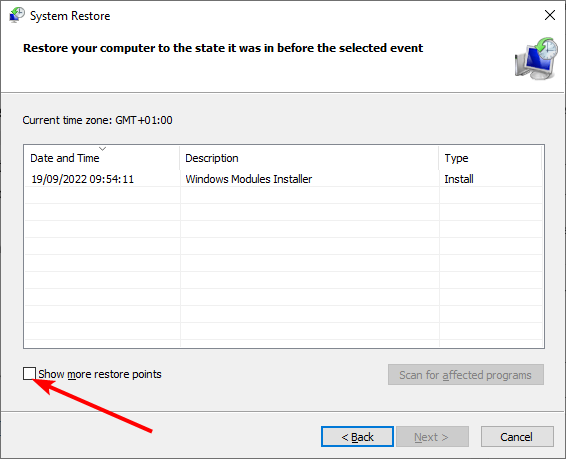
- Check the box for Show more restore points checkbox to open the complete list of dates.
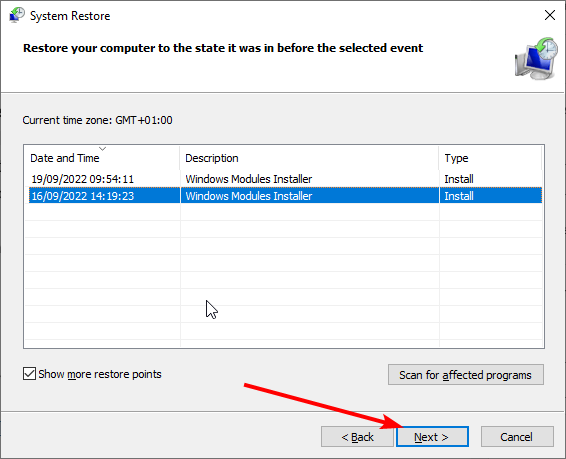
- Choose a restore point date that predates the Hypervisor error BSOD issue.
- If you’re unsure which one to choose, select the oldest restore point.
- Click Next to continue, and then select the Finish option.
If all the solutions above fail to fix the Hypervisor error, you might need to restore your PC to a later date before the issue.
Note that any software installed after the selected restore point gets deleted. Click the Scan for affected programs button on the System Restore window to see what software a selected restore point removes.
How do I fix the Hypervisor error on Windows 11?
The Hypervisor error on Windows 11 is usually caused by corrupt system files and bad disk sectors. Also, the issue can be due to some incorrect or conflicting settings on your PC.
To fix it effectively, check our detailed guide on Hypervisor errors on Windows 11.
How do I know if Hypervisor is running?
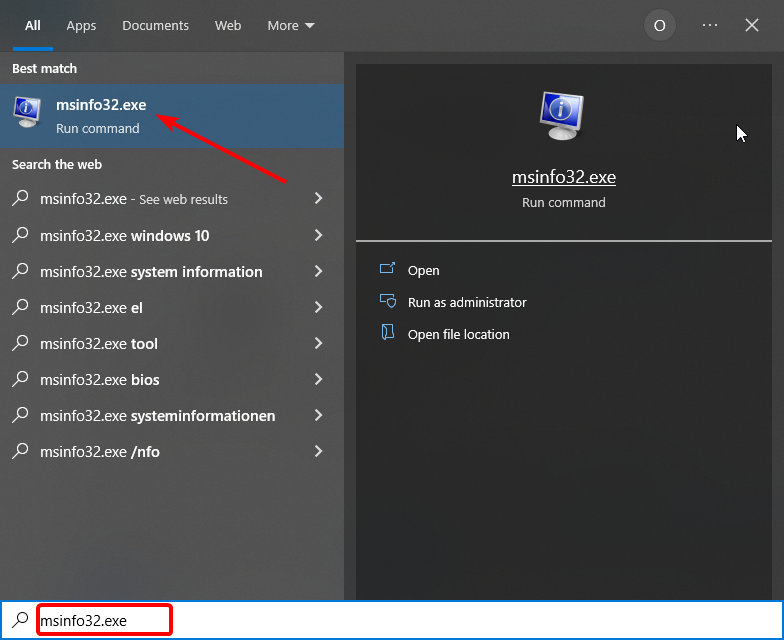
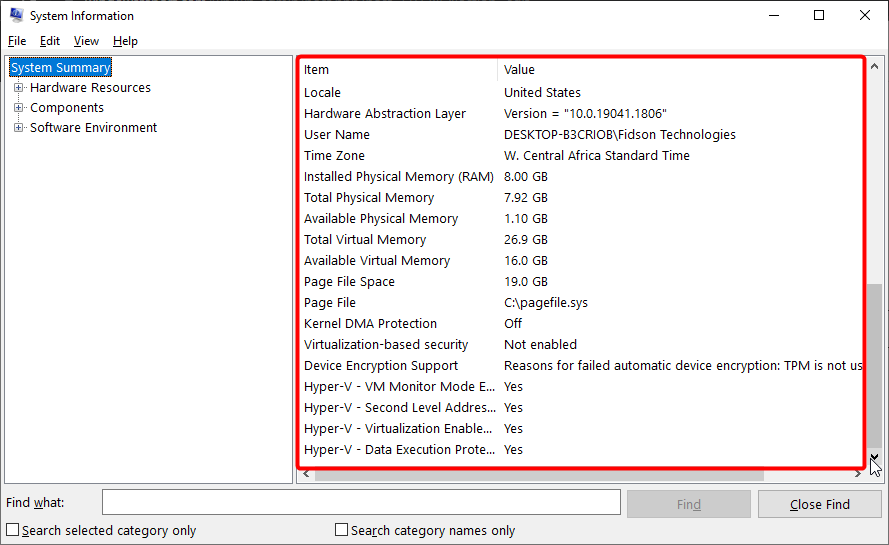
- Press the Windows key + S and type msinfo32.exe.
- Select the msinfo32.exe option.
- If Hypervisor is running, you will see A hypervisor has been detected. Features required for Hyper-V will not be displayed in the details section.

Those are likely fixes for the Hypervisor error in Windows 10. However, we hope you can fix the issue before exhausting the list.
If you need a list of the best BSoD fixers to repair blue screen errors effortlessly, check our guide for the best options that are currently available.
Feel free to let us know the solution that helped you fix the issue in the comments below.
Still having issues? Fix them with this tool:
SPONSORED
If the advices above haven’t solved your issue, your PC may experience deeper Windows problems. We recommend downloading this PC Repair tool (rated Great on TrustPilot.com) to easily address them. After installation, simply click the Start Scan button and then press on Repair All.
![]()
Newsletter
Corrupt hard disk sectors are among the chief causes of this error
by Matthew Adams
Matthew is a freelancer who has produced a variety of articles on various topics related to technology. His main focus is the Windows OS and all the things… read more
Published on September 22, 2022
Reviewed by
Vlad Turiceanu
Passionate about technology, Windows, and everything that has a power button, he spent most of his time developing new skills and learning more about the tech world. Coming… read more
- The Hyper_Error issue can be due to outdated or incompatible system drivers, bad disk sectors, and corrupted image files, among other things.
- Restoring Windows 10 can often fix BSOD errors like the Hypervisor_Error blue screen.
- The Hypervisor_Error in Windows 10 is less likely to arise when Windows 10 is fully updated.
- Windows 10 also includes built-in scanning utilities for hard drives and RAM that can feasibly resolve the Windows Hypervisor_Error BSOD error.
XINSTALL BY CLICKING THE DOWNLOAD FILE
This software will repair common computer errors, protect you from file loss, malware, hardware failure and optimize your PC for maximum performance. Fix PC issues and remove viruses now in 3 easy steps:
- Download Restoro PC Repair Tool that comes with Patented Technologies (patent available here).
- Click Start Scan to find Windows issues that could be causing PC problems.
- Click Repair All to fix issues affecting your computer’s security and performance
- Restoro has been downloaded by 0 readers this month.
Some users have posted on Microsoft’s forum about a Hypervisor_Error BSOD (Blue Screen of Death) issue with a 0x00020001 stop code.
This BSOD error can arise for users utilizing Windows Sandbox or third-party virtual machine applications within Windows 10. For example, in one forum post, a user said:
I’ve seen this Hypervisor_Error BSOD three times in the past two weeks. Each time that it happens, I am running an AVD (Android virtual device); and I am working on a mobile application.
Read this thorough guide to explore the best ways to deal with this annoying issue.
What is Windows hypervisor platform Windows 10?
An extended user-mode API has been added to the Windows Hypervisor Platform, which allows third-party virtualization stacks and applications to create and manage partitions at the hypervisor level.
Moreover, you can configure memory mappings for the partition, and create and control the execution of virtual processors. These capabilities were previously unavailable.
What causes the hypervisor error?
The Hypervisor BSoD error usually occurs when users use an Android Virtual Device. Below are some of the causes of this frustrating error:
- Outdated drivers
- Broken or corrupt system files
- Outdated operating system
- Outdated BIOS
How do I fix the Hypervisor error?
1. Update all your system drivers
1.1. Update driver manually
- Press the Windows key + X and select Device Manager.
- Double-click the adapter you want to its drivers to expand it.
- Right-click the driver there and select Update driver.
- Choose the Search automatically for drivers option.
- Wait for the search to complete and install the available updates.
It might be because of outdated drivers if you are getting the Hypervisor error while trying to run games like Valorant. In this case, you need to update your graphics drivers and related ones.
1.2. Update drivers automatically
Updating all your drivers manually can be time-wasting and prone to errors. So, you should use one of the best driver updaters in DriverFix.
DriverFix is a driver updater utility with which you can quickly scan all your PC’s device drivers. In addition, this software will display a list of your PC devices with outdated, corrupted, missing drivers.
DriverFix is ideal for resolving driver issues as it lets users quickly and easily download and install drivers for PCs that need new ones.
Pro users can select an Automatically Install option to install downloaded drivers at the click of a button, which makes updating drivers very straightforward.
Other useful DriverFix features
- DriverFix backs up drivers with ZIP files before updating them
- Users can schedule scans for optimal times with DriverFix’s schedule manager
- Its download manager displays driver download progress for users
- Live chat support is available for DriverFix users
DriverFix
Easily resolve the Hypervisor_Error by using this versatile and powerful software today.
2. Fix RAM issues with Windows Memory Diagnostic
- Press the Windows + S hotkey for the search utility.
- Type memory in the search box and click Windows Memory Diagnostic to open that utility’s window.
- Click the Restart now and check for problems (recommended) option within the Windows Memory Diagnostic utility.
- After that, your desktop or laptop will restart, and the Windows Memory Diagnostic tool will check for RAM issues.
Sometimes, the Hypervisor error on Dell can be down to issues with your RAM. This can be fixed using the Windows tool. Also, if you are busy with an important task that can’t wait, you can select the second option and restart your PC when you are done.
3. Update Windows 10
- Press the Windows key + I to open the Settings app.
- Select the Update & Security option.
- Click the Check for updates button.
- Finally, click the Install now button after downloading the available updates.
If you are getting the Hypervisor error while using the Oracle VM VirtualBox on Windows 10, it might be because your OS is outdated. Updating Windows 10 and restarting your PC should do the trick here.
4. Run a check disk scan
- Press the Windows key + S and type cmd.
- Select Run as administrator under Command Prompt.
- Input this chkdsk command and hit Enter:
chkdsk C: /f /r /x
Some PC issues are hard to tackle, especially when it comes to corrupted repositories or missing Windows files. If you are having troubles fixing an error, your system may be partially broken.
We recommend installing Restoro, a tool that will scan your machine and identify what the fault is.
Click here to download and start repairing.
The Hypervisor error can also occur due to bad hard disk sectors. Again, running the CHKDSK command helps to repair these sectors if they can still be saved.
5. Update your BIOS (Basic Input Output System)
You’ll need to download the latest BIOS firmware from your motherboard manufacturer’s website to update an outdated BIOS.
There might also be a dedicated software utility available for updating your BIOS. Check out our How to update BIOS article for further details about updating the BIOS.
6. Run DISM scan
- Open Command Prompt as administrator.
- Input the following command and press Enter:
DISM.exe /Online /Cleanup-image /Restorehealth - Wait for the Scan to complete and restart your PC.
Corrupt system files are among the chief causes of the Hypervisor error. You can effectively repair these files using the DISM tool.
However, to run a deep and thorough scan and repair virtually all broken system files, we recommend using a dedicated system file repairer in Restoro.
Restoro is a specialized tool that keeps your PC in top shape by detecting any faulty file and repairing it before it starts causing problems. This helps prevent file loss and ensures your PC always delivers maximum performance.
Finally, it is not just limited to file repair only. Instead, it fixes all common PC errors to help keep your device optimized.
⇒ Get Restoro
- System Thread Exception not Handled Ntfs.sys: 6 Easy Fixes
- Invalid Kernel Handle Error: Use These 9 Methods to Fix it
- Runtime Error R6025: Fix it With These 4 Easy Solutions
- Error #268D3: What Is It and How to Remove the Popup
7. Restore Windows 10 to an earlier date
- Press the Windows key + R to open the Run utility.
- Type rstrui.exe and press Enter.
- Click the Choose a different restore point option and the Next button.
- Check the box for Show more restore points checkbox to open the complete list of dates.
- Choose a restore point date that predates the Hypervisor error BSOD issue.
- If you’re unsure which one to choose, select the oldest restore point.
- Click Next to continue, and then select the Finish option.
If all the solutions above fail to fix the Hypervisor error, you might need to restore your PC to a later date before the issue.
Note that any software installed after the selected restore point gets deleted. Click the Scan for affected programs button on the System Restore window to see what software a selected restore point removes.
How do I fix the Hypervisor error on Windows 11?
The Hypervisor error on Windows 11 is usually caused by corrupt system files and bad disk sectors. Also, the issue can be due to some incorrect or conflicting settings on your PC.
To fix it effectively, check our detailed guide on Hypervisor errors on Windows 11.
How do I know if Hypervisor is running?
- Press the Windows key + S and type msinfo32.exe.
- Select the msinfo32.exe option.
- If Hypervisor is running, you will see A hypervisor has been detected. Features required for Hyper-V will not be displayed in the details section.
Those are likely fixes for the Hypervisor error in Windows 10. However, we hope you can fix the issue before exhausting the list.
If you need a list of the best BSoD fixers to repair blue screen errors effortlessly, check our guide for the best options that are currently available.
Feel free to let us know the solution that helped you fix the issue in the comments below.
Still having issues? Fix them with this tool:
SPONSORED
If the advices above haven’t solved your issue, your PC may experience deeper Windows problems. We recommend downloading this PC Repair tool (rated Great on TrustPilot.com) to easily address them. After installation, simply click the Start Scan button and then press on Repair All.
![]()
Newsletter
Проблема HYPERVISOR_ERROR может быть связана, среди прочего, с устаревшими или несовместимыми драйверами системы, поврежденными секторами диска и поврежденными файлами изображений. Некоторые пользователи разместили на форуме Microsoft сообщение о проблеме HYPERVISOR_ERROR BSOD (синий экран смерти) с кодом остановки ниже:
Проверка ошибки HYPERVISOR_ERROR имеет значение 0x00020001.
Это указывает на то, что гипервизор обнаружил фатальную ошибку. Код ошибки 0x00020001.
Эта ошибка BSOD может возникнуть у пользователей, использующих Windows Sandbox или сторонние приложения для виртуальных машин в Windows 10. В этой статье мы рассмотрим способы решения этой неприятной проблемы.
HYPERVISOR_ERROR можно исправить с помощью следующих шагов:
- Устранение проблем с ОЗУ с помощью диагностики памяти Windows.
- Обновите драйверы устройств.
- Запустите сканирование обслуживания образов развертывания.
- Обновите BIOS (базовую систему ввода-вывода).
- Используйте расширение отладки! Analysis.
Эти описанные шаги должным образом объяснены ниже.
1]Устранение проблем с ОЗУ с помощью диагностики памяти Windows.
Для этого нажмите горячую клавишу Windows + S для утилиты поиска. Введите память в поле поиска.
Щелкните Диагностика памяти Windows, чтобы открыть окно этой утилиты.
Нажмите кнопку «Перезагрузить сейчас» в программе диагностики памяти Windows.
Когда это будет сделано, ваш настольный компьютер или ноутбук перезагрузится, и средство диагностики памяти Windows проверит наличие проблем с оперативной памятью.
2]Обновите драйверы устройств
Обновление драйверов устройств может устранить HYPERVISOR_ERROR. Пользователи могут обновить драйверы устройств в своей системе, открыв «Настройки», затем перейдите в раздел «Обновление и безопасность» и щелкните его, чтобы открыть страницу Центра обновления Windows.
Сразу под ним пользователи увидят интерактивную ссылку «Просмотреть дополнительные обновления», нажмите на нее.
В разделе «Обновления драйверов» будет доступен список обновлений, которые вы можете установить. поставив отметку рядом с обновлением, которое хотите установить, нажмите «Загрузить и установить».
Читайте: Как отключить гипервизор в Windows 10.
3]Запустите сканирование обслуживания образов развертывания.
DISM можно запустить, набрав cmd в поле поиска Windows 10. Затем щелкните правой кнопкой мыши «Командная строка» и выберите «Запуск от имени администратора» в открывшемся контекстном меню.
Затем введите следующую команду службы образов развертывания в окне подсказки:
DISM.exe / Online / Cleanup-image / Restorehealth
Нажмите кнопку Enter, чтобы запустить команду Deployment Image Service.
После этого перезапустите Windows, когда сканирование будет завершено.
4]Обновите BIOS (базовую систему ввода-вывода).
Чтобы обновить устаревшую версию BIOS, вам необходимо загрузить последнюю версию прошивки BIOS с веб-сайта производителя материнской платы.
Также может быть доступна специальная программная утилита для обновления BIOS:
- Утилита Dell Update поможет вам загрузить или обновить микропрограмму и драйверы Dell.
- Lenovo System Update помогает загрузить драйверы Lenovo, программное обеспечение, прошивку и обновить BIOS.
- Пользователи AMD могут использовать AMD Driver Autodetect.
- Пользователи Intel могут использовать Intel Driver & Support Assistant.
5]Используйте расширение отладки! Analysis.
Расширение! analysis отображает информацию о текущем исключении или проверке ошибок. Он предназначен только для разработчиков.
В пользовательском режиме! Анализировать отображает информацию о текущем исключении, тогда как в режиме ядра! Анализировать отображает информацию о последней проверке ошибок.
Пользовательский режим:
! анализировать [-v] [-f | -hang] [-D BucketID]
! анализировать -c [-load KnownIssuesFile | -unload | -help ]
Режим ядра:
! анализировать [-v] [-f | -hang] [-D BucketID]
! анализировать -c [-load KnownIssuesFile | -unload | -help ]
! analysis -show BugCheckCode [BugParameters]
Если вы разработчик, то воспользуйтесь ! анализировать расширение отладки — Он отображает информацию о проверке ошибок и может быть полезен для определения основной причины.
С помощью этих шагов пользователи могут исправить ошибку Hypervisor_Error в Windows 10.
.
Have you ever come across any error text on display relating to HYPERVISOR_ERROR? This is a Blue Screen of Death error in the system having a bug check value of 0x00020001. The case study says that the possible reasons behind this issue are malware taking over system elements, missing DLL files and Windows components, corruption on the registry, using a third-party anti-virus program, running two or more similar applications, and more.
Apart from these, hardware issues can also be equally responsible for this error to occur. Some might also get this error after installing a new additional HDD or having bad sectors in the drive. But the most annoying issue is restarting of Windows automatically quite often. HYPERVISOR_ERROR BSOD in Windows 11 or 10 has long term effect in the computers if not eliminated in the first place. You might face frequent hanging of the desktop, continuous error messages manipulating ongoing tasks. Necessary steps are mandatory to recover the device from its dangerous grasp. So, today, we will discuss all these processes elaborately here and try to resolve this HYPERVISOR ERROR. Let not waste any more time, better be started!
Here is how to fix HYPERVISOR_ERROR BSOD in Windows 11 or 10 –
Way-1: Prevent Windows From Restarting Automatically
First thing first, as the computer might repeatedly restart automatically, we can heal that at the beginning. This will not actually bypass the error but you will get an efficient arena of deploying resolutions. Here is the method –
- Press Win+D and head to Desktop area straightway.
- Right click on This PC and select Properties.
- When in a separate window, choose Advanced system settings.
- From System properties wizard next, move into Advanced tab.
- Reach down to the Startup and Recovery area.
- Select Settings option from this place.
- In the following popup, reach out to the System failure section.
- Uncheck Automatically restart option.

- Hit the OK button to proceed on.
Now, Windows will not restart automatically and you can make the proper environment for applying other processes. Head to the next resolutions.
Way-2: Use the Safe Boot Mood as Rescuer of HYPERVISOR_ERROR
Starting from very old times to now, whenever any critical issue like HYPERVISOR ERROR raises up for windows system, booting in Safe Mode came out as the savior. In fact, like all of you, the next resolution we are taking up is to perform it. Let’s see the method in below section –
- Hover the mouse pointer and reach the left bottom of the taskbar.
- Perform a click on the Start menu icon.
- Hit a click on Power icon from there and select Restart option holding Shift key at the same time.
- Once Windows completes the first cycle of restarting, there will be a blue screen holding a few options. Choose Troubleshoot from there.
- Moving ahead to the next page, select “Advanced options” followed by a hit on “Startup Settings“.
- Now, you need to click on the Power cog icon. Located at the right bottom corner followed by choosing Restart.
- Windows after restarting for the second time will offer you a menu at the startup including options to “Boot in Safe Mode“.
- Press the “F4” button from keyboard continuously and enter into the Safe Mode.
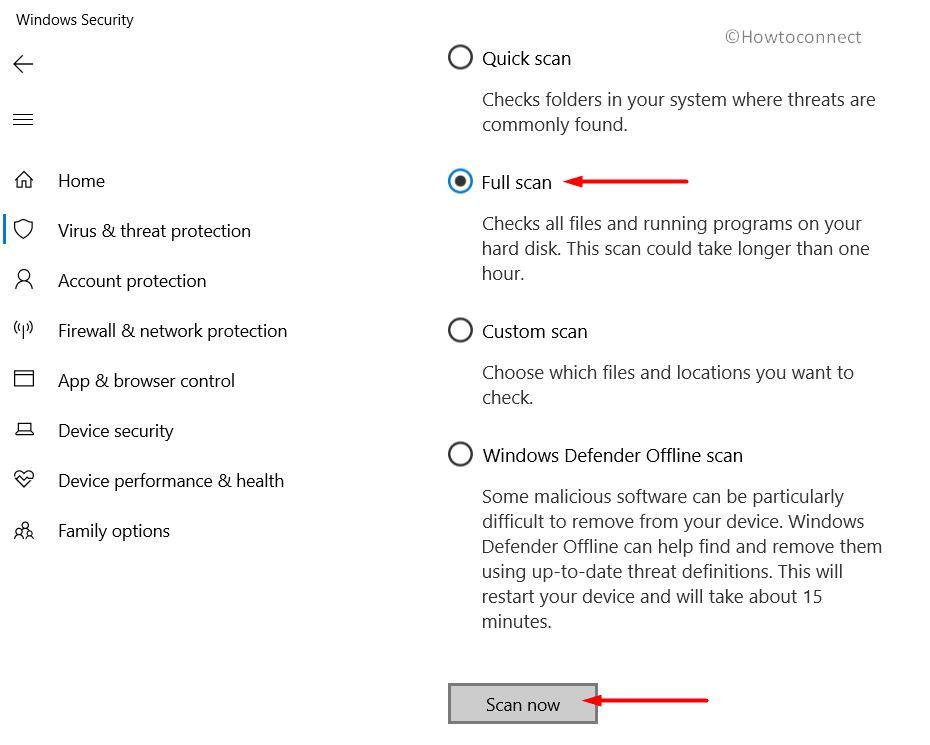
Way-3: Protect from Virus using Windows Security
Missing system elements stay in the front row for causing HYPERVISOR_ERROR in Windows 11 or 10. The question is, how do these go missing? Well, there might be malware or virus attacks and once they get into the system, erase necessary data. We all are well familiar with the fact that it’s very rare to stay away from them. What we can easily do is perform a regular check and dismiss these. The steps are as follows –
Step-1: Press Win+S hotkeys together and invoke Taskbar search on display.
For reference, read How to Remove Windows Security System Tray Icon in Windows 10.
Step-2: In the empty text space, type Security and when Windows Security arrives in the result, choose to launch.
Step-3: In the App UI, select Virus and threat protection from the left-hand side and switch to the adjacent wing.
Step-4: On the right, perform a click on the link Scan options and discover all the processes.
Step-5: Mark the radio button conjoint with Full scan and from down, hit Scan now option.
Step-6: The process will start immediately and once it gets over, you can see the result in front. Now, hit on Clean threats option in order to dismiss those sharply.
Step-7: On the following window, you will be delivered three more options. Choose Remove and finally hit Start actions button from down.
Step-8: Restart Windows 10 PC as you normally do.
Once, all the malware will get disappeared, this HYPERVISOR_ERROR in Windows 10 o 11 will not appear anytime again.
Way-4: Download and Install all available patches
Microsoft releases regular patches and these files contain fixes for bugs and problems as well as amazing features. This is quite important to keep Windows updated even have no issues. Since outdated patches often call in HYPERVISOR ERROR issue, we can consider it as a resolution and proceed with following.
- Press on the Start button from keyboard and let the menu spread up.
- Perform a click on the Settings sign and call in the Windows Settings app.
- Being in the app area, proceed to Update & Security and click on it.
- Once the next page is visible on display, select Windows Update and move to the corresponding side.
- On this spot, hit a click on Check for updates link even there is a visible dialog “You’re up to date”.
- Upon all the patches being shown on screen, choose the Download button and get the files in the system.
- Installation begins automatically when downloading gets finished. You might have to keep the device manned always to attend to timely restarting.
When the Windows is finally updated, HYPERVISOR_ERROR BSOD error will dismiss away.
Way-5: Make the Outdated Drivers Updated with Device Manager
We have seen many cases based on BSOD errors and came to the conclusion that outdated device drivers do the maximum damage. Hence, we need to step up immediately to update them. The Built-in Device manager will do the task for you. We need to just move ahead with below proceedings.
- Open the Run dialog box by pressing the “Win+R” keys combined.
- In the space provided here, type “devmgmt.msc” and hit Enter key from the keyboard.
- Device Manager will show up after a while and you need to look for an exclamation mark in the full console.
- If there is any present, expand the device by clicking on it and again see deeply for any yellow indication mark in the drivers.
- Right click on each once discovered and select Update driver option.
- Follow the directions coming on the display to complete the task properly.
After all the drivers being updated, there should not be HYPERVISOR ERROR in the system.
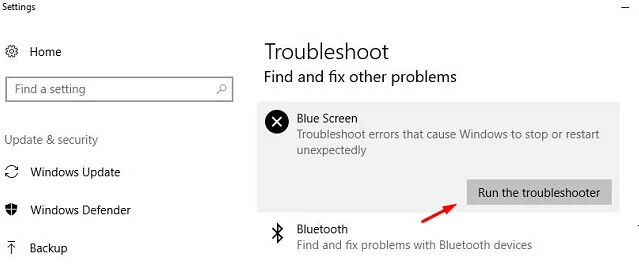
Way-6: Windows Blue Screen Troubleshooter to solve HYPERVISOR_ERROR
Microsoft being so dedicated to the users considered customer satisfaction most. As HYPERVISOR ERROR keeps on haunting badly, they came up with a new utility called Windows Blue Screen Troubleshooter. If you have the updated version of Windows 10 same as Fall Creators Update, can enjoy this awesome privilege. Move ahead with the following procedure –
- Do a joint press of Win+I hotkeys and let Windows launch Settings app.
- Slide over the app area and click on Update & security once reached.
- Moving ahead to the following window, do select Troubleshoot and jump ahead to adjacent overlay.
- Locate the Blue Screen option and click on it.
- Choose Run the Troubleshooter option to start the curing.
This is an automatic process. Once detection finished, fixing will start by its own. After the process end, you might not face any errors in the system and use the device with the utmost ease.
Read Blue Screen Troubleshooter Windows 10 to Fix BSOD.
Way-7: Throw away all the problematic Windows update files
Updating process in Windows operating system is autonomous and it generally doesn’t end up into any manipulation. But sometimes, people experience abnormal termination of this process and hence HYPERVISOR ERROR takes place in the system. The best remedy in this respect is to delete them all from the computer. Here are the steps to be followed –
Step-1: Move the pointer to the extreme left bottom end of the screen and do click on the Start menu.
Step-2: Once it opens up, hit a click on Settings cog. And let the app open in the display.
Step-3: When in the accessible area, head to Update & Security tile and click on it.
Step-4: On the next page, choose Windows Update from the left pane and switch to the right.
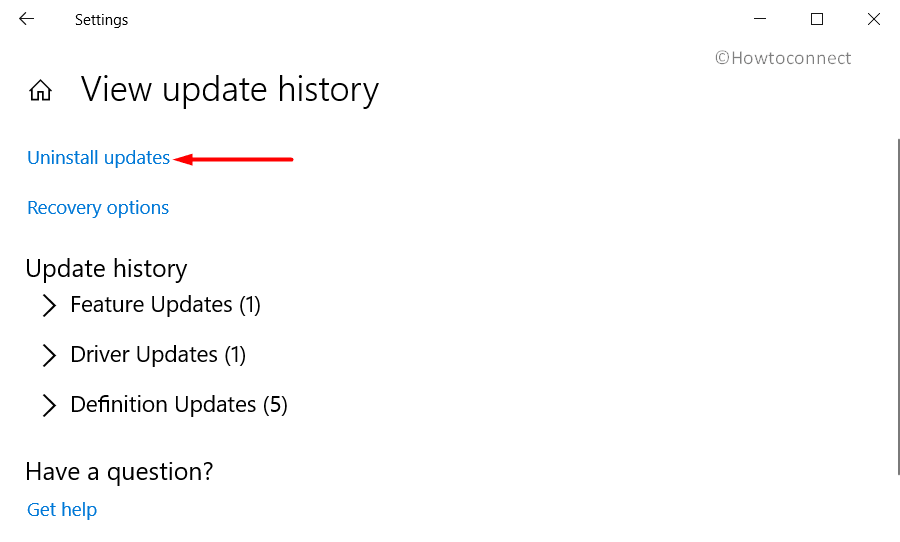
Step-5: After shifting, click on the link saying View update history and unveil the past update files.
Step-6: When the following page unrolls, select “Uninstall updates” and wait until Program and features window fleshes from Control Panel.
Step-7: Next in the process, right click on the last patch you have downloaded and choose Uninstall.
Step-8: Wait until the uninstalling process gets over and finally, reboot the device normally.
Step-9: When coming back to operation, hopefully, there will be no HYPERVISOR_ERROR BSOD in Windows 11 and 10.
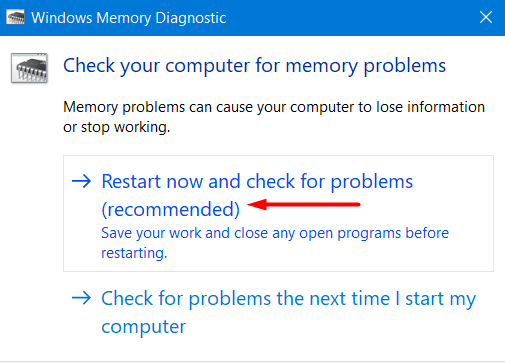
Way-8: Run the Memory Diagnostic Tool and fix RAM issues
The wrong allotment of Memory, corruption in the Random Access Memory (RAM) has active participation in causing the HYPERVISOR_ERROR in Windows 10 or 11. Therefore, the default Windows Memory Diagnostic Tool will be super handy in fixing those bad areas. See the method below –
- Get access to the Settings app using any of the above-mentioned ways.
- After the app interface comes in the screen, type memory in the search box provided here.
- Once the result shows up, select Diagnose your computer’s memory problems from the list.
See more ways to Open Memory Diagnostic Tool in Windows 10.
- When Windows Memory Diagnostic Tool pops-up, choose the option namely “Restart now and check for problems (recommended)“.
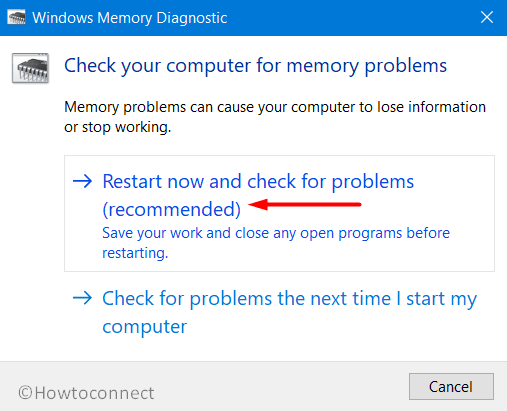
- Windows will now reboot automatically and when it turns back again to operation, you will observe a blue screen taking over the process and detecting Memory issues in the system.
- The progress will be indicated in percentage and when it becomes 100%, the system will restart again for the second time.
- Upon startup, the result of the diagnosis will be available in the system tray- notification area.
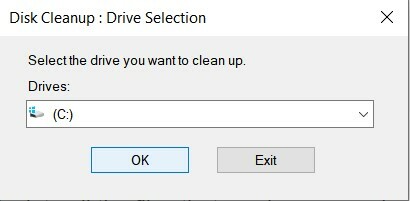
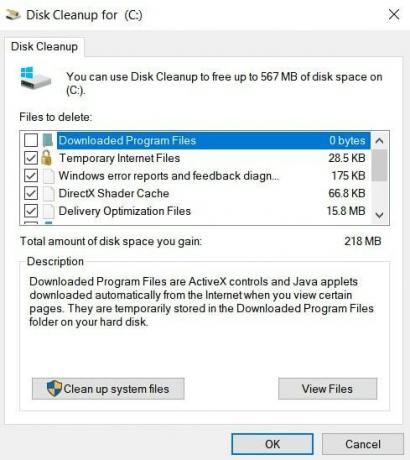
Way-9: Use the Disk Cleanup Utility to wipe junk and recover space
For the sake of completing tasks we perform, the computer needs to create junk files every time. These are temporary files and have no use after completing the tasks. However, as they get stored in the Disk Drive, occupies space and slowly gets bigger in volume. Eventually, the system runs out of enough space in it and makes the operation slower. In the process, HYPERVISOR_ERROR BSOD rises. So, we need to clean them using Disk Cleanup Utility. Guidelines are as follows –
- Do a combined press of Windows key and S from keyboard to invoke Taskbar search.
- In the box provided for typing here, write cleanmgr and also when Disk Cleanup utility hits on the result, select it.
- Moving ahead, the utility will throw a small popup dialog asking the drive name where Cleanup will be carried out.
- Select C: by clicking on the dropdown menu and hit Ok button.
- The tool will first go for calculating the amount of space in Drive C: it can recover and then shows a popup wizard.
- Moving ahead to the wizard, come down to the bottom left end of it and select Clean up system files.
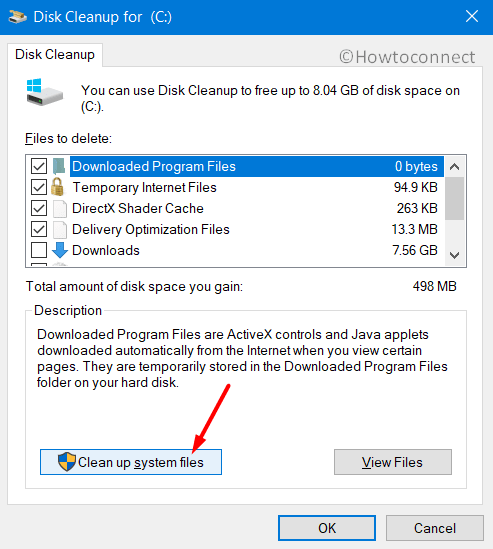
- One more time the small popup will float up asking for the preferable drive. Choose C: again and hit Enter key.
- After calculating retrievable space in it, again the Disk Cleanup for (C:) will appear.
- On the window, check all the items under Files to delete, and don’t touch Downloads only.
- Make a check in the Recycle Bin and also move any important files to their designated location.
- Now, coming back to wizard again, do select Ok button to initiate cleanup.
- This is a little bit slower process and might take a good amount of time to accomplish. Wait until it finishes normally and does not terminate in the middle.
- Once finished, Restart the device and once come back to display, see if HYPERVISOR_ERROR is there.
Way-10: Remove Programs colliding with one another
If the computer has two or more programs for serving similar purposes, they might be stuck in the collision between them and eventually deletes the necessary elements for OS. However, as of being the same purpose, the wise decision is to remove them as they call BSOD errors frequently. You can install again once the HYPERVISOR_ERROR BSOD in Windows 11 or 10 goes away.
- Perform a right click on the Start menu and later on, select Run from the menu.
- On the Run dialog, type appwiz.cpl in the void text field.
- Select OK button under the box and let Program and features window hit upon the screen from Control Panel.
- Moving ahead to the new window, look closely for the programs causing HYPERVISOR_ERROR BSOD in Windows 10 or 11 in the list visible here.
- Once found, do a right click on each and at the same time hit Uninstall button appearing.
- Follow the onscreen guidelines available afterward to complete Uninstallation.
- Upon finishing the process, Reboot the computer and when it returns to action, see if there is any trace of error in the system.
- If nothing is present, download and install the programs you have deleted before and use them normally.
Way-11: Detect and fix the Bad sectors in the Hard Disk Drive
Due to prolonged use, HDD runs in manipulation and has poor sectors developed in it. These areas cause permanent damage in the long run and obviously play a big role in making HYPERVISOR_ERROR in Windows 11 or 10. There is a Built-in Tool introduced by Microsoft to deal with it and that is the Disk Checking Utility. In the Elevated Command Prompt, CHKDSK will perform this task.
- Get access to Cortana, type cmd. On the results, execute a right-click on Command Prompt and select “Run as Administrator”.
- User Account Control (or UAC) will ask for permission immediately and you have to select Yes to proceed.
- Type the command in below arrangement in the Command Prompt –
chkdsk [Drive:] [parameters]
- When you hit Enter, you can see the Disk status only. Since we are up to a target of fixing the bad areas, the command needs some notations like-
/f /r /x
- Here, “f “will fix the brought-up issues in the disk. “r” will detect the issues present and the last one “x” will split up the whole Disk volume before the utility take action.
- After inserting all the characters in the Command, it will look finally like-
chkdsk C: /f /r /x
Important- C: is present here as we have OS installed in this drive. If you have done it in another one, use that drive letter.
- When you press Enter key, the process will initiate and it will take almost 10 minutes to accomplish fully.
- Wait patiently and when ends, do a normal Restart to Windows so that all changes are effective.
- When the PC powers up next, check if there are any issues like HYPERVISOR_ERROR BSOD in Windows 11 or 10.
Way-12: Measure for External Hardware Device to resolve HYPERVISOR_ERROR
Hardware issues causing BSOD error such as HYPERVISOR_ERROR are a little dangerous and often leave no room for you. A group of people comes across the issue after connecting the external HDD with the device. We all know, how much important it is for these days and cannot really ignore. Therefore the best way is to disconnect the drive or Hardware material and then re-plug again once HYPERVISOR ERROR eliminates.
- Unplug all the devices from ports and keep beside you in order.
- Perform a Fresh Restarting to the System.
- Once it comes back to the desktop, check if there are any issues.
- If resolved successfully, visit Manufacturer page for each Hardware item, then download and install the latest device driver for each one of them.
Way-13: Stop Using Third-Party Anti-virus Programs
Malware is ruling out everywhere on the internet and we can be prey to them anytime. As a preventive measure, we often use a Third party tool and thus end up calling HYPERVISOR_ERROR BSOD in Windows 10 or 11. Microsoft has the best utility is this aspect as Windows Security. So, you can uninstall others using below steps –
Step-1: Open the Settings app by pressing Windows key and I.
Step-2: In the layout, run to Apps tile and also select to bring up more settings.
Step-3: Moving ahead, select Apps & features from the left pane and jump to adjacent overlay.
Step-4: Reach out to the program in the list of Installed apps and select it.
Step-5: Hit Uninstall option.
Step-6: UAC will prompt for permission immediately and you need to select Yes to move ahead.
Step-7: Again click the Uninstall button from the program to finish the uninstallation procedure.
Way-14: Perform System Restore to Undo Current Changes
We try new things on the machine every day such as installing a program or removing something. Often we do it without concerning the changes and thus HYPERVISOR_ERROR shows up. To resolve it, System Restore can be an eligible savior.
Note- This process needs a Pre-created Restore Point. If you don’t have, skip this method and move ahead to the next resolution.
- Open Run dialog on display and type “rstrui” in the box for searching.
- Hit Enter and let the System Restore wizard show up on the screen.
- Hit Next option from wizard to move ahead.
- On the following page, do select Show more restore points to reveal all points.
- Perform a click on the latest one and select the Next button.
- Once the next screen hits display, come down to the bottom and select Finish.
- The process will start and revert changes to the previous state.
This will hopefully cure HYPERVISOR_ERROR BSOD in Windows 11 or 10.
Way-15: Activate DISM Tool to fix up Windows Image Files
Windows Image files may sometime run into corruption and end up causing HYPERVISOR_ERROR BSOD in Windows 10 or 11. The best way to resolve this is to run the “Deployment Image Servicing and Management” (DISM) utility.
- Move the mouse pointer to Taskbar area and perform a right-click on it.
- Select Task Manager from the list and allow it to open.
- Moving ahead, select File from top left end and choose “Run new task” option.
- Once Run dialog appears, type “cmd” in the search field and also check the dialog saying “Create this task with administrative privileges”.
- Press Enter key and let the Elevated Command Prompt window to take place.
- Now, at the base of blinking cursor, type the following command line tool. Hit Enter key to start actions. This process will take a little longer. So wait patiently to end up.
DISM.exe /Online /Cleanup-image /Restorehealth

Once the process finishes, Restart the computer, and afterward, see if there are any issues. Hopefully, you will not come across anything.
These are all the workarounds necessary to resolve HYPERVISOR_ERROR BSOD in Windows 10 or 11. However, as you have come to this area, you have successfully done that we guess. Unfortunately, if that’s not true, there is a last resort for all issues and errors. The solution is to do a complete installation of the Operating System. If you want to proceed with that, make sure you are confident enough or seeking help from professional. This will save from lots of problems happening afterward. Obviously, save backup for important files, images, and data in a safe place outside of the computer to avoid loss. Hope, you can recover the device from the grasp of HYPERVISOR_ERROR BSOD in Windows 11 or 10 finally.
Methods:
Way-1: Prevent Windows From Restarting Automatically
Way-2: Use the Safe Boot Mood as Rescuer of HYPERVISOR_ERROR
Way-3: Protect from Virus using Windows Security
Way-4: Download and Install all available patches
Way-5: Make the Outdated Drivers Updated with Device Manager
Way-7: Throw away all the problematic Windows update files
Way-8: Run the Memory Diagnostic Tool and fix RAM issues
Way-9: Use the Disk Cleanup Utility to wipe junk and recover space
Way-10: Remove Programs colliding with one another
Way-11: Detect and fix the Bad sectors in the Hard Disk Drive
Way-12: Measure for External Hardware Device to resolve HYPERVISOR_ERROR
Way-13: Stop Using Third-Party Anti-virus Programs
Way-14: Perform System Restore to Undo Current Changes
Way-15: Activate DISM Tool to fix up Windows Image Files
That’s all!!
Repair any Windows problems such as Blue/Black Screen, DLL, Exe, application, Regisrty error and quickly recover system from issues using Reimage.
Windows продолжает получать новые функции и исправления безопасности с каждым обновлением, и это причина, по которой пользователям это нравится. Что ж, это действительно отличная ОС, но все же бывают случаи, когда пользователи сталкиваются с различными проблемами и сталкиваются с ошибками. Здесь мы говорим об одной такой ошибке, которая называется HYPERVISOR_ERROR BSOD Stop Code Error.
В большинстве случаев эта ошибка возникает, когда пользователь пытается запустить песочницу Windows, а также какую-либо другую виртуальную машину. Не только это, но иногда это происходит при выполнении некоторых более простых задач, таких как просмотр веб-страниц. Кроме того, использование сторонней антивирусной программы, отсутствие файлов DLL и компонентов Windows, запуск двух или более похожих приложений, повреждение реестра также может вызвать ошибку.
Наконец, в некоторых случаях ошибка BSOD HYPERVISOR_ERROR возникает, когда вредоносное ПО захватывает элементы системы. Какой бы ни была причина, в этой статье мы даем вам решения для всех возможных причин этой ошибки.

Содержание страницы
-
1 Как исправить ошибку кода остановки BSOD HYPERVISOR_ERROR
- 1.1 Метод 1: обновить Windows
- 1.2 Метод 2: обновите драйверы
- 1.3 Метод 4: используйте средство устранения неполадок Windows, чтобы исправить ошибку кода остановки BSOD HYPERVISOR_ERROR
- 1.4 Метод 5: запустите средство диагностики памяти, чтобы исправить проблемы с ОЗУ
- 1.5 Метод 6: используйте утилиту очистки диска, чтобы удалить ненужные файлы и освободить место
- 1.6 Метод 6. Удалите стороннее антивирусное программное обеспечение.
- 2 Заключение
Как исправить ошибку кода остановки BSOD HYPERVISOR_ERROR
Это один из необходимых шагов, прежде чем перейти к решениям. Поскольку мы получали отчеты от пользователей, в большинстве случаев ваши окна перезапускаются автоматически, как только вы сталкиваетесь с этой ошибкой. Это происходит не со всеми пользователями, но большинство пользователей сталкиваются с этим.
Чтобы исправить это, сначала нажмите Windows + D, а затем щелкните правой кнопкой мыши на ЭТОМ ПК и выберите в меню Свойства. Откроется новое окно, в котором выберите Дополнительные параметры системы.
В-третьих, нажмите на опцию Advance, чтобы перейти на вкладку Advanced. Теперь найдите область «Запуск и восстановление» и нажмите «Настройки» под ней.

Откроется окно настроек. Теперь в окне настроек вам нужно снять флажок с опции Автоматический перезапуск, как показано на следующем изображении. Нажмите ОК, чтобы завершить процесс.
Метод 1: обновить Windows
Как мы уже говорили ранее, обновления Windows содержат различные исправления. Не каждый раз сталкиваешься с ошибкой по указанным выше причинам. Чтобы быть более конкретным, могут быть некоторые ошибки, которые вызывают такие ошибки, и в таких случаях последнее обновление — это все, что вам нужно. Поэтому обновите свои окна, чтобы предотвратить ошибку.
Метод 2: обновите драйверы
Это простой и эффективный способ решения этой ошибки. Если причиной этой ошибки является несовместимость драйверов или какая-либо ошибка драйвера, их обновление является способом решения ошибки.
Чтобы обновить драйверы, сначала нажмите Windows + R, введите «devmgmt.msc» в диалоговом окне и нажмите Enter.

Теперь вы увидите здесь окна диспетчера драйверов. Вы можете обновить все драйверы вручную. Для этого щелкните правой кнопкой мыши драйвер, который вы хотите обновить, и выберите вариант обновления драйвера.

С помощью этого метода вы можете обновлять все драйверы один за другим, и если драйвер вызывает ошибку, она будет устранена. Вы также можете использовать сторонние пакеты драйверов для обновления драйверов.
Метод 4: используйте средство устранения неполадок Windows, чтобы исправить ошибку кода остановки BSOD HYPERVISOR_ERROR
Как я уже сказал, Microsoft стремится решать проблемы своих пользователей. Поскольку многие пользователи столкнулись с ошибкой кода остановки BSOD HYPERVISOR_ERROR, Microsoft представила служебный инструмент под названием Windows Blue Screen Troubleshooter. Все, что вам нужно, это последнее обновление Windows 10, чтобы использовать эту утилиту.
Чтобы использовать эту утилиту, сначала нажмите Windows + I, чтобы открыть приложение настроек.

Во-вторых, щелкните параметр «Обновление и безопасность», а затем выберите параметр устранения неполадок.
В-третьих, найдите вариант синего экрана и выберите вариант запуска средства устранения неполадок.
Наконец, дайте утилите завершить свою работу. Это автоматический процесс, поскольку он обнаруживает проблему и начинает ее исправлять. Так что расслабьтесь и расслабьтесь, пока выполняет работу.
Метод 5: запустите средство диагностики памяти, чтобы исправить проблемы с ОЗУ
Поврежденная оперативная память и неправильное выделение памяти играют активную роль в возникновении BSOD HYPERVISOR_ERROR. В Windows есть средство диагностики памяти по умолчанию, которое может помочь вам в решении этих проблем с памятью.
Чтобы запустить инструмент диагностики памяти, прежде всего откройте приложение настроек так же, как мы делали в последнем методе.

Во-вторых, введите «Память» в строке поиска окна настроек и выберите «Диагностика проблем с памятью вашего компьютера» в результатах поиска. Откроется окно средства диагностики.
В-третьих, нажмите кнопку «Перезагрузить сейчас и проверьте наличие проблем» (рекомендуется) в окне.
Теперь ваша система перезагрузится автоматически, и после перезапуска инструмент начнет свою работу. Вы увидите процентный индикатор, и как только этот показатель достигнет 100%, ваш компьютер снова перезагрузится.
Наконец, после второй перезагрузки вы увидите результат диагностики на экране. Надеюсь, вы больше не столкнетесь с кодом остановки BSOD HYPERVISOR_ERROR.
Метод 6: используйте утилиту очистки диска, чтобы удалить ненужные файлы и освободить место
Если у вас мало места и вы столкнулись с кодом остановки BSOD HYPERVISOR_ERROR, то это ваше решение. Windows создает ненужные файлы, когда мы выполняем с ними задачи. Со временем эти файлы будут становиться все больше и больше, если мы не будем их удалять. Эти файлы не опасны для вашего ПК, но если у вас мало памяти, рекомендуется их удалить. Это легко сделать с помощью утилиты очистки диска.
Для этого сначала нажмите Windows + S, чтобы открыть окно поиска, после чего напишите «cleanmgr» в поле поиска и нажмите Enter.

Откроется диалоговое окно, в котором вас попросят выбрать диск для очистки. Выберите диск C оттуда, используя раскрывающееся меню, и нажмите ОК.
Как только вы нажмете ОК, инструмент вычислит все файлы, которые можно удалить, и покажет вам всплывающее окно. Нажмите на опцию Очистить системные файлы.
Когда вы это сделаете, вы увидите новое всплывающее окно с просьбой указать предпочтительный диск. Выберите C и нажмите Enter.
После этого вы снова увидите окно очистки диска для C. Теперь проверьте все элементы в разделе «Файлы для удаления», кроме «Загрузить». После этого нажмите «ОК», чтобы запустить очистку.
Это запустит очистку. Это долгий процесс, и потребуется немало времени, чтобы набраться терпения и не останавливать процесс на середине. Как только процесс будет завершен, перезагрузите компьютер и, надеюсь, вы больше не столкнетесь с HYPERVISOR_ERROR.
Метод 6. Удалите стороннее антивирусное программное обеспечение.
Все мы используем то или иное антивирусное программное обеспечение, чтобы обеспечить безопасность нашей системы. Однако есть антивирусное программное обеспечение, которое портит системные файлы и, таким образом, может вызывать код остановки BSOD HYPERVISOR_ERROR.
Такое случается редко, поэтому мы предлагаем вам попробовать другие методы перед этим, и если ни один из них не работает, то. Используйте только этот метод. Вам не нужно беспокоиться о безопасности вашей системы, поскольку Windows уже имеет свой инструмент безопасности, то есть безопасность Windows.
Заключение
Подводя итог, это были все возможные решения для устранения ошибки кода остановки BSOD HYPERVISOR_ERROR. Вы можете использовать любой из этих методов для решения вашей ошибки. Кроме того, вы можете обратиться в службу поддержки Windows, если столкнетесь с ошибкой даже после попытки всех решений. Служба поддержки Windows предоставит вам необходимое решение, чтобы помочь вам с ошибкой. Мы надеемся, что это развеет все ваши сомнения по этому поводу.
Выбор редактора:
- Исправить ошибку ОЗУ при проверке безопасности ядра в Windows 10
- Как исправить BSOD повреждения кучи режима ядра в Windows 10
- Исправить ошибку BSOD кода остановки управления памятью
- Исправлено: Неустранимая системная ошибка C000021A в Windows 7 и 8.1.
- Как включить или отключить диалоговое окно подтверждения удаления в Windows 10?
Рекламные объявления В этом уроке мы покажем вам, как исправить код ошибки Steam 2: Серверы…
Рекламные объявления В последнее время цифровой мир заполнен многочисленными пользователями ПК, которые заявляют о том, что «сканирование DISM завершается неудачно с…
Рекламные объявления Windows 10 — самая продвинутая и умная версия Microsoft Windows, которая порождает большие ожидания…
Download PC Repair Tool to quickly find & fix Windows errors automatically
The HYPERVISOR_ERROR issue can be due to outdated or incompatible system drivers, bad disk sectors, and corrupted image files among other things. Some users have posted on Microsoft’s forum about a HYPERVISOR_ERROR BSOD (blue screen of death) issue with the stop code below-
The HYPERVISOR_ERROR bug check has a value of 0x00020001.
This indicates that the hypervisor has encountered a fatal error. Error code 0x00020001.

This BSOD error can arise for users utilizing Windows Sandbox or third-party virtual machine applications within Windows 10. In this article, we will explore the ways to deal with this frustrating issue.
The HYPERVISOR_ERROR can be fixed with the help of these steps:
- Fix RAM issues with Windows Memory Diagnostic.
- Update device drivers.
- Run a Deployment Image Servicing scan.
- Update your BIOS (Basic Input Output System).
- Use the !analyze debug extension.
These outlined steps are properly explained below.
1] Fix RAM issues with Windows Memory Diagnostic.
To do this, press the Windows + S hotkey for the search utility. Type memory in the search box.
Click on Windows Memory Diagnostic to open that utility’s window.
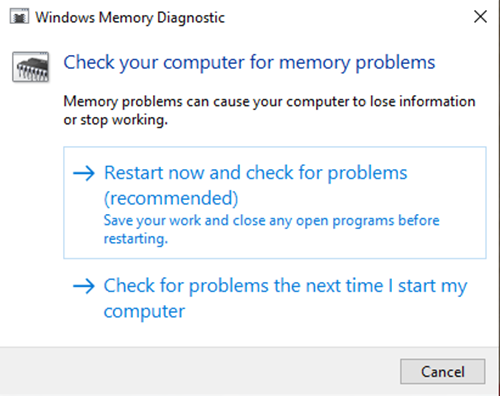
Click on the Restart now button within the Windows Memory Diagnostic utility.
When this is done, your desktop or laptop will restart and the Windows Memory Diagnostic tool will check for RAM issues.
2] Update device drivers
Updating device drivers may resolve the HYPERVISOR_ERROR. Users can update device drivers on their system by opening Settings, then navigate to Update & security and click on it to open the Windows Update page.
Just under it, users will see a clickable link View optional updates, click on it.
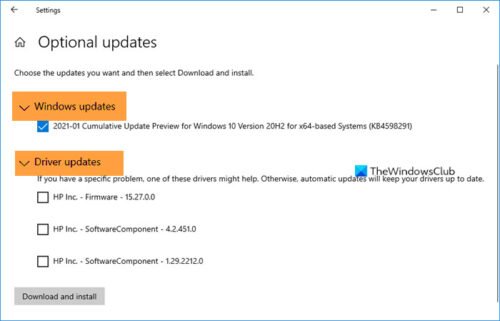
Under Driver Updates, a list of updates will be available, which you can choose to install. when you have checked the box of the update you want to install, then click on Download and install.
Read: How to disable Hypervisor in Windows.
3] Run a Deployment Image Servicing scan
DISM can be run done by typing cmd in Windows search box. Then right-click Command Prompt and select Run as administrator on the context menu that opens.
Next, input the following Deployment Image Service command in the Prompt’s window:
DISM.exe /Online /Cleanup-image /Restorehealth
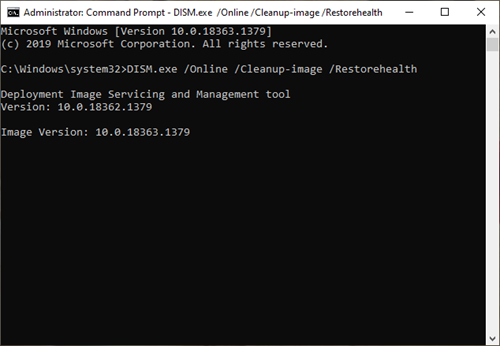
Click the Enter button to run the Deployment Image Service command.
Thereafter, restart Windows when the scan is complete.
4] Update your BIOS (Basic Input Output System)
To update an outdated BIOS, you’ll need to download the latest BIOS firmware from your motherboard manufacturer’s website.
There might also be a dedicated software utility available for updating your BIOS:
- Dell Update utility will help you download or update Dell Firmware & Drivers
- Lenovo System Update helps you download Lenovo Drivers, Software, Firmware, Update BIOS.
- AMD users may use AMD Driver Autodetect.
- Intel users may use Intel Driver & Support Assistant.
5] Use the !analyze debug extension
!analyze extension displays information about the current exception or bug check. It is meant for developers only.
In user mode, !analyze displays information about the current exception whereas in kernel mode, !analyze displays information about the most recent bug check.
User-Mode:
!analyze [-v] [-f | -hang] [-D BucketID]
!analyze -c [-load KnownIssuesFile | -unload | -help ]
Kernel-Mode:
!analyze [-v] [-f | -hang] [-D BucketID]
!analyze -c [-load KnownIssuesFile | -unload | -help ]
!analyze -show BugCheckCode [BugParameters]
If you are a developer, then use the !analyze debug extension – It displays information about the bug check and can be helpful in determining the root cause.
With these steps, users can fix the Hypervisor_Error in Windows 11/10.

Anand Khanse is the Admin of TheWindowsClub.com, a 10-year Microsoft MVP (2006-16) & a Windows Insider MVP (2016-2022). Please read the entire post & the comments first, create a System Restore Point before making any changes to your system & be careful about any 3rd-party offers while installing freeware.
New issue
Have a question about this project? Sign up for a free GitHub account to open an issue and contact its maintainers and the community.
By clicking “Sign up for GitHub”, you agree to our terms of service and
privacy statement. We’ll occasionally send you account related emails.
Already on GitHub?
Sign in
to your account
Open
ad-on-is opened this issue
May 29, 2020
· 41 comments
Open
HYPERVISOR_ERROR after Windows update
#5288
ad-on-is opened this issue
May 29, 2020
· 41 comments
Comments
![]()
I don’t know if this is realted to WSL or not, but since a view Windows versions back, I am getting a green screen when updating Windows. The error message is HYPERVISOR_ERROR.
Althouh, after I force-restart my PC the update finishes successfully and everything works just fine, I’m still worried that something more serious and unexpected might happen in the future.
![]()
![]()
![]()
And you see the error only during the build install and then never again until next build install? I guess disabling Virtualization on BIOS would prevent the GSOD but you will need to enable it again for WSL2.
![]()
@onomatopellan Exaclty, the last reboot of the build install causes the GSOD. Toggeling virtualization in BIOS is not the solution, since I never had this issue before. It started 3-4 builds ago.
![]()
If it’s on last reboot then it could be a driver that crashes with virtualization enabled. You could look at Event viewer if there was some error by that time.
![]()
The error message is HYPERVISOR_ERROR.
I’ve seen one of these second hand. You can try sending a minidump per the template if have one. Usually (historically) GSODs do sort themselves in forthcoming insider builds eventually (often pretty quick).
Please direct all Windows crashes and security issues to secure@microsoft.com. Ideally, please configure your machine to capture minidumps, repro the issue, and send the minidump from «C:Windowsminidump».
![]()
@therealkenc Automatic memory dump was already enabled in the settings. The MEMORY.DMP is 2GB. I assume, I should change it to Small memory dump, wait until the next GOSOD happens and then provide that 256kb file to Microsoft, right?
BTW: Yesterday I installed 2 builds, the first one resulted in a GSOD, the second one did not.
![]()
and then provide that 256kb file to Microsoft, right?
Yes, if you’d like.
![]()
![]()
![]()
I am having the same issue as well for the last few fast ring flight builds. Intel Core i7-9700K, docker running inside WSL2
As reported, the first try at installing a new insider gives the green screen, but you get a successful update on the second attempt.
![]()
I am having same issue with Build 19635, it is not updating further as every windows update crashes with BSOD — «HYPERVISOR_ERROR» , I too have docker for Windows with WSL enabled.
Update — I switched the docker from WSL(disable WSL from docker settings, and switch back to default Hyper-V based). This actually helped to get rid off the error. I believe WSL is not ready yet. One time it killed my docker completely, i couldn’t get it working. So I had to reinstall windows freshly. WSL is so much unstable with docket on Windows.
![]()
I’m on insiders fast ring build 19640 + wsl 2 + docker desktop. My laptop is a Dell G3 with i7 8750H.
I did NOT have this error while I was on slow ring build 19041.264 + wsl 2 + docker desktop.
I’m having a green screen of death with HYPERVISOR ERROR. It hapens on first boot, right after login screen appears or in the first minutes of usage. After a reboot, the computer works flawlessly without any green screen of death.
So basically it happens on 90% of first boot of a day, and it almost certainly does not hapen on the next couple of boots at the same day. On the next day, however, there is a 90% chance of getting a GSOD on the first boot.
Disabled docker desktop initialization, but keep getting GSOD.
If I would guess, maybe something is running a daily task (or some sort of task) that is causing the crash.
![]()
yes I also have the same issue. First boot of the day, even if i’ve been up overnight and restart the computer that morning. Windows insiders fast ring 2004 build 19640.1
One way with dealing with this problem is when I see that docker isn’t starting, or when it pops up giving me a seemingly different but similar error (can’t connect, no response, etc) I just preemptively restart the computer and docker will start upon boot and I won’t get the sudden devastation of having my work taken away from me with a GSOD
![]()
I’m having a green screen of death with HYPERVISOR ERROR. It hapens on first boot, right after login screen appears or in the first minutes of usage. After a reboot, the computer works flawlessly without any green screen of death.
So basically it happens on 90% of first boot of a day, and it almost certainly does not hapen on the next couple of boots at the same day. On the next day, however, there is a 90% chance of getting a GSOD on the first boot.
The only GSOD I see, is, as I already described, while updating. After that, I never experience GSODs again, no matter how often I restart the PC.
![]()
I got one during an update to 19645.1 last night, same error. Luckily the pc wasn’t «bricked» and i just had to restart the update upon restart for it to work
![]()
What’s the CPU?
i7-8750H
@ad-on-is I have the same CPU on my notebook and I’m also having green screen of death with hypervisor error usually on first boot.
![]()
I also have same issue. My processor is i5-4440. The error started after I updated WSL Kernel for use Docker Desktop with WSL2 backend.
I uninstalled docker, but my WSL2 (Ubuntu) become unstable. Terminal freeze on some commands and every time I try to restart WSL using wsl --shutdown command, the green screen appears with HYPERVISOR_ERROR.

![]()
I also have same issue. My processor is i5-4440. The error started after I updated WSL Kernel for use Docker Desktop with WSL2 backend.
I uninstalled docker, but my WSL2 (Ubuntu) become unstable. Terminal freeze on some commands and every time I try to restart WSL usingwsl --shutdowncommand, the green screen appears with HYPERVISOR_ERROR.
I did «reset» on my Ubuntu following the procedure described in this article and ubuntu terminal become stable again: https://petri.com/how-to-uninstall-and-reset-windows-subsystem-for-linux-distributions
![]()
I uninstalled docker desktop, all wsl distros installed by the windows store, disabled the windows features of WSL and virtualization plataform.
Previously I had with no success downloaded updated drivers and reinstalled all drivers. Also got the latest version of wsl kernel and same issues persisted.
And I’m testing now re-enabling wsl 2 and installed docker desktop again. I will report back in a couple of days if it SOLVED the Green Screen Of Death for me.
EDIT: No problems so far. Uninstalling all distros and disabling wsl2 then re-enabling it solved it for me! 😁
![]()
I am getting this gsod error as well on build 20161. I do not use docker for windows since I have a home edition. However, I did recently upgrade the WSL 2 kernel, so it may have to do with that.
![]()
Disabling the hypervisor helped me (win 10 pro 2004 20161.1000)
Disable-WindowsOptionalFeature -Online -FeatureName Microsoft-Hyper-V-Hypervisor
![]()
There was some traffic in today’s 20175 announce:

That might be us. If folks still experience the HYPERVISOR ERROR GSOD in 20175 or better (but not before) please add a comment to help track whether we can call this nominally addressed. [Noting it is tough to prove a negative.]
![]()
@therealkenc I just upgraded to 20175 and got the HYPERVISOR_ERROR again. Is this supposed to
happen with this update, while all future updates should be fixed? Or shouldn’t it even happen on this update?
![]()
Hmm… I suppose one could be an optimist and plausibly imagine one last GSOD hurrah before the fix was actually applied by the update. But I wouldn’t deign to give odds on that until the next roll. Thanks for the feedback: very good to know either way.
![]()
@therealkenc I just upgraded to 20175 and got the HYPERVISOR_ERROR again. Is this supposed to
happen with this update, while all future updates should be fixed? Or shouldn’t it even happen on this update?
If hypervisor error persists,
try uninstalling any distros (and docker desktop if you use it) and disabling virtualization platform and wsl on Windows features.
Then restart and install wsl again.
This worked for me.
![]()
This worked for me.
Noting it is tough to prove a negative (an absence of GSOD).
try uninstalling any distros
There is no particular reason why uninstalling especially a distro would have any effect whatso on a kernel bugcheck (it wouldn’t). Likewise while you’ve got nothing to lose (in the hydroxychloroquine sense) by doing a disable/enable Virtual Machine Platform rain dance, there is no particular reasoning to support doing that would actually help (versus whatever the 20175 Windows Update does by itself).
You have a point about that.
I’m on older windows version, and what can I say, It worked for me.
I was having daily GSOD with hypervisor_error code and removing distros, disabling WSL on windows features and re-installing it stopped those daily GSODs I was having. This was the only change I made to my system that actually stopped those GSODs.
Remember it will take a while until everybody gets the new build 20175.
![]()
While it would seem I am no longer getting this (I’ll update if I do), wsl2 still doesn’t work «first boot of the day» and I have to restart the computer. Previously I could tell that the GSOD was coming as nothing wsl2 would start, I’d restart and all was well (for the most part). Now, I still have to restart the computer to get wsl2 working. Docker-desktop gives me stdout: The operation timed out because a response was not received from the virtual machine or container. and Ubuntu just sits in black window i.e. won’t start. There is something else going on and it’s related to this, somehow.
Update: I left the computer running for a while and it eventually started. It’s still broken, and I find it super disruptive, but so far still no GSOD
Update: This doesn’t appear to be a problem for me anymore
Windows 10 version 2004 build 20175.1000
AMD Ryzen 7 2700X
![]()
Presumably this will be fixed soon? This has gotten worse after I moved to an insider build hoping for a fix as it’s been an ongoing issue already but it’s been exponentially getting worse. My computer barely runs for 10 minutes before blowing up. I’m going to have to clean install to another operating system since I keep crashing all over the place including in the middle of meetings with this specific problem. First boot of the day is the least of the problems if it crashes by time I get all my software in order. The only time the system is remotely stable (and it’s still not on this build perfect as I expected) is if hypervisor is off at a hardware level. Disabling the additional options in the software made no impact. I’m using WSL2. Had to reboot 3 times in the time it took me to type this.
Last boot crashed before I could even finish typing the build number.
Build 20241
AMD Ryzen 5 3600
Woops. Happened again before I could hit send.
![]()
I have Dev channel preview Windows 10 Pro build 21354.1 installed, to be able to run Hyper-V with AMD Ryzen 5 series CPU.
The VM was created ‘version 10’, from PowerShell (Admin) as:
New-Vm -VMName "Win10 10" -Version 10.0 -Generation 2 -MemoryStartupBytes 10220MB
Set-VMProcessor "Win10 10" -Count 6
Add-VMHardDiskDrive -VMName "Win10 10" -Path "PathVMdisk.vhdx"
Set-VMProcessor "Win10 10" -ExposeVirtualizationExtensions $true
I needed the nested virtualization on, for the sake of running WSL2 linux.
Unfortunately I was getting HYPERVISOR_ERROR and a complete halt of the host machine, with the Green Screen of Death, and 0% progress collecting debug data.
The VM became stable only after switching off the nested virtualization feature.
Set-VMProcessor "Win10 10" -ExposeVirtualizationExtensions $false
![]()
hmm, this is happening on a brand new Surface Laptop 4, i7/32gb/1TB 15″…
Be great to get an update. I’m NOT on Insiders
I can provide the minidump files as well, see the !analyze -v output below:

Microsoft (R) Windows Debugger Version 10.0.21349.1004 AMD64
Copyright (c) Microsoft Corporation. All rights reserved.


Loading Dump File [C:WindowsMinidump50121-15734-01.dmp]
Mini Kernel Dump File: Only registers and stack trace are available

Symbol search path is: srv*
Executable search path is:
Windows 10 Kernel Version 19041 MP (8 procs) Free x64
Product: WinNt, suite: TerminalServer SingleUserTS
Machine Name:
Kernel base = 0xfffff804`1c000000 PsLoadedModuleList = 0xfffff804`1cc2a130
Debug session time: Sat May  1 21:58:59.301 2021 (UTC - 4:00)
System Uptime: 1 days 23:53:36.430
Loading Kernel Symbols
...............................................................
................................................................
................................................................
.........................................................
Loading User Symbols
Loading unloaded module list
................................
For analysis of this file, run !analyze -v
nt!KeBugCheckEx:
fffff804`1c3f6cf0 48894c2408      mov     qword ptr [rsp+8],rcx ss:0018:fffff804`1fad2ca0=0000000000020001
0: kd> !analyze -v
*******************************************************************************
*                                                                             *
*                        Bugcheck Analysis                                    *
*                                                                             *
*******************************************************************************

HYPERVISOR_ERROR (20001)
The hypervisor has encountered a fatal error.
Arguments:
Arg1: 0000000000000011
Arg2: 0000000000241a42
Arg3: 0000000000001005
Arg4: fffff84c4b651a30

Debugging Details:
------------------


KEY_VALUES_STRING: 1

    Key  : Analysis.CPU.mSec
    Value: 2468

    Key  : Analysis.DebugAnalysisManager
    Value: Create

    Key  : Analysis.Elapsed.mSec
    Value: 8348

    Key  : Analysis.Init.CPU.mSec
    Value: 609

    Key  : Analysis.Init.Elapsed.mSec
    Value: 20271

    Key  : Analysis.Memory.CommitPeak.Mb
    Value: 77


TAG_NOT_DEFINED_202b:  *** Unknown TAG in analysis list 202b


DUMP_FILE_ATTRIBUTES: 0x8
  Kernel Generated Triage Dump

BUGCHECK_CODE:  20001

BUGCHECK_P1: 11

BUGCHECK_P2: 241a42

BUGCHECK_P3: 1005

BUGCHECK_P4: fffff84c4b651a30

BLACKBOXBSD: 1 (!blackboxbsd)


BLACKBOXNTFS: 1 (!blackboxntfs)


BLACKBOXPNP: 1 (!blackboxpnp)


BLACKBOXWINLOGON: 1

CUSTOMER_CRASH_COUNT:  1

PROCESS_NAME:  System

BAD_STACK_POINTER:  fffff8041fad2c98

STACK_TEXT:
fffff804`1fad2c98 fffff804`1c4f3f5b     : 00000000`00020001 00000000`00000011 00000000`00241a42 00000000`00001005 : nt!KeBugCheckEx
fffff804`1fad2ca0 fffff804`1c50da38     : 00000000`00000001 00000000`ffffffff fffff804`1707b180 fffff804`1c520330 : nt!HvlSkCrashdumpCallbackRoutine+0x6b
fffff804`1fad2ce0 fffff804`1c402382     : 00000000`00000001 fffff804`1fad2ef0 00000000`00000000 00000000`00000000 : nt!KiProcessNMI+0xe8
fffff804`1fad2d30 fffff804`1c402152     : 00000000`00000001 00000000`00000000 00000000`00000000 00000000`00000000 : nt!KxNmiInterrupt+0x82
fffff804`1fad2e70 fffff804`1c38d96d     : 00000191`765fa87b fffff804`1707b180 00000000`00000000 0000d067`aeff0943 : nt!KiNmiInterrupt+0x212
fffff804`1faadfb0 fffff804`1c2184b6     : 00000000`000030cc 00000000`00000000 00000000`00000000 00000000`00000000 : nt!PpmIdleGuestExecute+0x1d
fffff804`1faadff0 fffff804`1c217274     : ffffffff`ffffffff ffff950a`c0182840 00000000`00405a04 00000000`00000002 : nt!PpmIdleExecuteTransition+0x10c6
fffff804`1faae3f0 fffff804`1c3fa814     : 00000000`00000000 fffff804`1cd26a00 ffff950a`b9b9e0c0 00000000`00000b74 : nt!PoIdle+0x374
fffff804`1faae560 00000000`00000000     : fffff804`1faaf000 fffff804`1faa8000 00000000`00000000 00000000`00000000 : nt!KiIdleLoop+0x54


SYMBOL_NAME:  nt!HvlSkCrashdumpCallbackRoutine+6b

MODULE_NAME: nt

IMAGE_NAME:  ntkrnlmp.exe

IMAGE_VERSION:  10.0.19041.964

STACK_COMMAND:  .thread ; .cxr ; kb

BUCKET_ID_FUNC_OFFSET:  6b

FAILURE_BUCKET_ID:  0x20001_11_241a42_STACKPTR_ERROR_nt!HvlSkCrashdumpCallbackRoutine

OSPLATFORM_TYPE:  x64

OSNAME:  Windows 10

FAILURE_ID_HASH:  {044f697d-6895-07dc-beac-40a8b0f2945a}

Followup:     MachineOwner
---------

![]()
@cicorias I got exactly the same error with my brand new Surface Laptop 4. With or without Hyper-V enabled. All Surface Checks are Fine with the diagnostigs Tool and with the Memtest. I got this BSOD 3 Times dayli .
I tried with the Cloud Reset and Local Wipe&Load with 20H1 and 20H2. Even with windows 11 I got the same error every time.
Did you find a solution? Is there a Case opened by Microsoft?
I have a problem report open; I have not seen an update nor was there a fix.
I’ll follow up and see if they have an update. Give me some time.
![]()
Same issues on Windows 11 with my AMD FX 8320. Already made an issue, craigloewen was kind to try helping me, my bsod have been sent to Hypervisor Teams, they said that my CPU has an internal issue.. but’s that not the case, WSL / Hyper -V in general works fine on W10 on my side, so i don’t see any issues with my processor…
![]()
MiniDumps.zip
Hypervisior_Error don’t come alone. It’s like a BSOD Bingo with the 4 following outputs:
HYPERVISOR_ERROR (20001)
INTERRUPT_EXCEPTION_NOT_HANDLED (3d)
DRIVER_IRQL_NOT_LESS_OR_EQUAL (d1)
MEMORY_MANAGEMENT (1a)
# Any other values for parameter 1 must be individually examined.
In the ZIP File are some Minidumps from the last few days.. happens up to 5 Times dayli.
Very frustrating to work with this Surface Laptop 4. It happens on AC/DC, with External LG USB-C Monitor and without External LG Screen. Really a BSOD Bingo, can happens with any circumstances.
![]()
@SimonHofmann1 I’m getting the exact same thing except that the screen hangs at 100% and never writes a dump file.
![]()
I am running Windows 11 Build 22000.184 for my amd processor and this issue is still not resolved. If you don’t enable WSL2 features and hypervisor, this build runs great without it. However, if you do install WSL2 and hypervisor issues, you get the GSOD with the hypervisor error! Even after the error shows up and you reboot, the Windows 11 runs very slow and will crash intermittently. I don’t know if this is due to AMD processors specifically or what….!
![]()
@SimonHofmann1 I’m getting the exact same thing except that the screen hangs at 100% and never writes a dump file.
I believe I experienced the same issue. Windows 10 fully updated as of today on Lenovo laptop with Ryzen CPU.
![]()
6: kd> !analyze -v
*******************************************************************************
*                                                                             *
*                        Bugcheck Analysis                                    *
*                                                                             *
*******************************************************************************

HYPERVISOR_ERROR (20001)
The hypervisor has encountered a fatal error.
Arguments:
Arg1: 0000000000000011
Arg2: 0000000000307cf9
Arg3: 0000000000001004
Arg4: 0000010002005800

Debugging Details:
------------------


KEY_VALUES_STRING: 1

    Key  : Analysis.CPU.mSec
    Value: 1952

    Key  : Analysis.DebugAnalysisManager
    Value: Create

    Key  : Analysis.Elapsed.mSec
    Value: 1921

    Key  : Analysis.Init.CPU.mSec
    Value: 1374

    Key  : Analysis.Init.Elapsed.mSec
    Value: 8427

    Key  : Analysis.Memory.CommitPeak.Mb
    Value: 86

    Key  : WER.OS.Branch
    Value: co_release

    Key  : WER.OS.Timestamp
    Value: 2021-06-04T16:28:00Z

    Key  : WER.OS.Version
    Value: 10.0.22000.1


DUMP_FILE_ATTRIBUTES: 0x800

BUGCHECK_CODE:  20001

BUGCHECK_P1: 11

BUGCHECK_P2: 307cf9

BUGCHECK_P3: 1004

BUGCHECK_P4: 10002005800

BLACKBOXBSD: 1 (!blackboxbsd)


BLACKBOXNTFS: 1 (!blackboxntfs)


BLACKBOXPNP: 1 (!blackboxpnp)


BLACKBOXWINLOGON: 1

PROCESS_NAME:  System

BAD_STACK_POINTER:  ffff930036206ca8

STACK_TEXT:
ffff9300`36206ca8 fffff806`5b3474db     : 00000000`00020001 00000000`00000011 00000000`00307cf9 00000000`00001004 : nt!KeBugCheckEx
ffff9300`36206cb0 fffff806`5b257c36     : 00000000`00000000 fffff806`5b00b05c ffff9300`360fc3c0 ffff9300`36206d30 : nt!HvlSkCrashdumpCallbackRoutine+0x6b
ffff9300`36206cf0 fffff806`5b21eb82     : 00000000`00000000 ffff9300`36206ef0 00000000`00000000 00000000`00000000 : nt!KiProcessNMI+0x24d666
ffff9300`36206d30 fffff806`5b21e903     : 00000000`00000000 00000000`00000000 00000000`00000000 00000000`00000000 : nt!KxNmiInterrupt+0x82
ffff9300`36206e70 fffff806`5b1964cd     : 00000000`00000000 00000000`0ad7d9f2 00000000`00000000 0000006c`fe775d5e : nt!KiNmiInterrupt+0x243
fffff883`5547f510 fffff806`5b0eaa41     : 00000000`0000029c ffff9300`36180100 00000000`00000000 00000000`0000029c : nt!PpmIdleGuestExecute+0x1d
fffff883`5547f550 fffff806`5b0ea256     : 00000000`00000000 fffff806`5b12b07a ffffffff`ffffffb1 fffff806`5b219ced : nt!PpmIdleExecuteTransition+0x661
fffff883`5547f9f0 fffff806`5b216a74     : 00000000`00000000 ffff9300`3618c440 ffffd286`9caad040 00000000`000005f4 : nt!PoIdle+0x3a6
fffff883`5547fbc0 00000000`00000000     : fffff883`55480000 fffff883`55479000 00000000`00000000 00000000`00000000 : nt!KiIdleLoop+0x54


SYMBOL_NAME:  nt!HvlSkCrashdumpCallbackRoutine+6b

MODULE_NAME: nt

IMAGE_NAME:  ntkrnlmp.exe

STACK_COMMAND:  .thread ; .cxr ; kb

BUCKET_ID_FUNC_OFFSET:  6b

FAILURE_BUCKET_ID:  0x20001_11_307cf9_STACKPTR_ERROR_nt!HvlSkCrashdumpCallbackRoutine

OS_VERSION:  10.0.22000.1

BUILDLAB_STR:  co_release

OSPLATFORM_TYPE:  x64

OSNAME:  Windows 10

FAILURE_ID_HASH:  {b3065167-1c4a-54a5-1ca5-d1a56b1755a3}

Followup:     MachineOwner
---------
![]()
Содержание
- Что делать, если гипервизор не работает под управлением Windows 10
- Гипервизор не работает на Windows 10, как это исправить?
- Решение 1. Убедитесь, что в BIOS включена виртуализация
- Решение 2. Обновите свой BIOS
- Решение 3. Обновите драйверы до последней версии.
- Решение 4 – Переустановите функцию HyperV
- Решение 5 – Удалить проблемные обновления
- Решение 6. Используйте команду bcdedit
- Решение 7. Используйте команду DISM
- Решение 8. Проверьте, поддерживает ли ваш процессор виртуализацию
- Решение 9 – Используйте сторонние приложения
- Что такое «синий экран смерти Windows 10» и какие есть методы решения проблемы?
- Что это такое?
- Почему появляется Blue Screen?
- Критические ошибки
- Таблица: 10 распространённых критических ошибок Windows 10
- Способы решения проблемы синего экрана
- Как загрузиться в Safe Mode?
- Удаление вирусов и вредоносных программ
- Обновление драйверов
- Используем точку восстановления
- Blue Screen возникает во время работы приложения
- Проверка жёстких дисков
- Проверка ОЗУ на ошибки
- Сброс до заводских настроек
- Дополнительная полезная информация по устранению BSOD
Что делать, если гипервизор не работает под управлением Windows 10
Многие пользователи используют виртуализацию, но иногда они могут столкнуться с сообщением Hypervisor не запущен на их ПК. Это сообщение не позволит вам использовать виртуализацию, но в сегодняшней статье мы покажем вам, как правильно решить эту проблему.
Виртуализация является полезной функцией, но иногда могут возникнуть проблемы с ней. Говоря о проблемах виртуализации, вот некоторые распространенные проблемы, о которых сообщили пользователи:
- Гипервизор не работает под управлением Windows 10 Pro, BIOS . Эта проблема может возникнуть, если виртуализация не включена в BIOS, поэтому обязательно найдите эту функцию и включите ее.
- Запуск гипервизора отключен с помощью параметра bcdedit типа hypervisorlaunch . Иногда функцию Hyper-V можно отключить, но вы можете запустить ее, просто запустив одну команду в командной строке.
- Не удалось запустить Hyper-V. Гипервизор не работает . Эта проблема может возникнуть, если ваша BIOS устарела. Чтобы устранить проблему, обновите BIOS и проверьте, решает ли это проблему.
- Ошибка виртуальной машины. Гипервизор не работает . Иногда эта проблема может возникать из-за проблемных обновлений, и для решения этой проблемы рекомендуется найти и удалить эти обновления вручную.
- Гипервизор не включен, присутствует, работает . Это некоторые распространенные проблемы, которые могут возникнуть в Hyper-V, но вы должны быть в состоянии исправить их с помощью одного из наших решений.
Гипервизор не работает на Windows 10, как это исправить?
- Убедитесь, что в BIOS включена виртуализация
- Обновите свой BIOS
- Обновите драйверы до последней версии
- Переустановите функцию HyperV
- Удалить проблемные обновления
- Используйте команду bcdedit
- Используйте команду DISM
- Проверьте, поддерживает ли ваш процессор виртуализацию
- Используйте сторонние приложения
Решение 1. Убедитесь, что в BIOS включена виртуализация
Если вы получаете сообщение Гипервизор не запущен , возможно, проблема связана с настройками BIOS. Как вы знаете, чтобы использовать виртуализацию, эта функция должна быть фактически включена в BIOS.
Чтобы проверить, включена ли виртуализация, просто войдите в BIOS и найдите эту функцию. Чтобы узнать, как правильно получить доступ к BIOS и найти эту функцию, мы советуем вам ознакомиться с руководством по материнской плате для получения дополнительной информации. Как только вы включите эту функцию, вернитесь в Windows и проверьте, сохраняется ли проблема.
- ЧИТАЙТЕ ТАКЖЕ: 5 лучших программ для резервного копирования, которые Hyper-V сможет использовать в 2019 году
Решение 2. Обновите свой BIOS
Как мы уже упоминали в нашем предыдущем решении, проблемой с виртуализацией может быть ваша BIOS. Если вы получаете сообщение Гипервизор не запущен на вашем компьютере, возможно, проблема в устаревшей BIOS.
Несколько пользователей сообщили, что они исправили эту проблему, обновив их BIOS до последней версии. Это сложный процесс, и если вы его не выполните должным образом, вы можете нанести непоправимый вред вашему ПК, поэтому мы советуем вам быть особенно осторожными.
Мы уже написали краткое руководство о том, как прошить BIOS, но если вы знаете, как правильно обновить BIOS на материнской плате, рекомендуем вам ознакомиться с руководством по материнской плате для получения подробной информации.
Решение 3. Обновите драйверы до последней версии.
Если вы не можете использовать виртуализацию из-за сообщения Hypervisor не запущен , возможно, проблема связана с вашими драйверами. Несколько пользователей сообщили, что драйвер Bluetooth вызвал эту проблему, но после обновления проблема была решена.
Чтобы обновить драйверы, вам просто нужно зайти на сайт производителя и загрузить последние версии драйверов для вашей модели. Это довольно просто, если вы знаете, где искать и какие драйверы обновлять, но этот процесс может быть немного утомительным, если вам нужно обновить несколько драйверов.
Если вы хотите обновить все драйверы на вашем компьютере, возможно, лучше использовать стороннее решение, такое как TweakBit Driver Updater . Используя этот инструмент, вы можете автоматически обновить все ваши драйверы всего за пару кликов, поэтому обязательно попробуйте.
- Загрузите программу обновления драйверов Tweakbit
Отказ от ответственности: некоторые функции этого инструмента не бесплатны
Решение 4 – Переустановите функцию HyperV
По словам пользователей, если вы получаете сообщение Hypervisor не запущен , возможно, есть проблема с функцией HyperV. Иногда могут возникать различные сбои Windows, но большинство проблем с HyperV можно устранить, просто переустановив его.Это довольно просто, и вы можете сделать это, выполнив следующие действия:
- В строке поиска введите функции Windows . Теперь выберите Включить или выключить функции Windows в списке результатов.

- Найдите функцию HyperV и снимите ее. Теперь нажмите ОК , чтобы сохранить изменения. Если вас попросили перезагрузить компьютер, обязательно сделайте это.
- После перезагрузки компьютера вернитесь в окно Функции Windows и включите функцию Hyper-V . Вас могут попросить перезагрузить компьютер еще раз, поэтому обязательно сделайте это.
Как только ваша система перезагрузится, проблема с Hyper-V должна быть решена, и все снова начнет работать.
- ЧИТАЙТЕ ТАКЖЕ: исправлено: не удается установить Hyper-V в Windows 10
Решение 5 – Удалить проблемные обновления
Если сообщение Гипервизор не работает недавно появилось, возможно, проблема в обновлении Windows. Как вы знаете, Windows устанавливает обновления автоматически, и, если проблема начала появляться недавно, возможно, это вызвало обновление.
Для решения проблемы рекомендуется найти проблемное обновление и удалить его. Для этого выполните следующие действия:
- Откройте приложение Настройки и перейдите в раздел Обновление и безопасность . Чтобы сделать это быстро, вы можете просто использовать ярлык Windows Key + I .
- Выберите Просмотреть историю обновлений .
- Теперь вы должны увидеть список последних обновлений. Обратите внимание на последние обновления и запомните их или запишите. Теперь нажмите Удалить обновления .
- Список последних обновлений появится в новом окне. Чтобы удалить обновление, дважды щелкните его и следуйте инструкциям на экране.
После удаления обновления проверьте, не устранена ли проблема. Возможно, вам придется повторить этот шаг пару раз, прежде чем вы найдете обновление, которое вызывает проблему. Как только вы найдете проблемное обновление, обязательно запишите его название.
Windows имеет тенденцию устанавливать отсутствующие обновления автоматически, поэтому, чтобы предотвратить повторное появление этой проблемы, мы советуем вам заблокировать автоматическую установку этого обновления.
Решение 6. Используйте команду bcdedit
Если у вас есть проблемы с виртуализацией, возможно, вы можете решить эту проблему, просто запустив одну команду в командной строке. Для этого выполните следующие действия:
- Нажмите Windows Key + X , чтобы открыть меню Win + X. Выберите в меню Командная строка (Администратор) или PowerShell (Администратор) .
- Когда откроется Командная строка , введите следующую команду:
- bcdedit/store c: BootBCD/установить гипервизор запуска типа Авто
После выполнения команды проверьте, решена ли проблема с виртуализацией. Кроме того, вы также можете использовать команду bcdedit/set hypervisorlaunchtype auto .
Решение 7. Используйте команду DISM
Иногда вы можете получить сообщение Hypervisor не запущен , потому что некоторые компоненты не работают должным образом. Чтобы решить эту проблему, рекомендуется запустить команду DISM, чтобы включить функцию HyperV. Для этого просто выполните следующие действия:
- Запустите Командную строку от имени администратора.
- При запуске Командная строка выполните эту команду:
- dism/online/enable-feature/namename: Microsoft-Hyper-V -Все
После выполнения команды необходимо включить функцию Hyper-V и устранить проблему с виртуализацией.
Решение 8. Проверьте, поддерживает ли ваш процессор виртуализацию
Чтобы использовать встроенную виртуализацию в Windows 10, необходимо, чтобы ваш процессор поддерживал определенные функции. Если у него нет этих функций, вы не сможете использовать встроенную виртуализацию.
Чтобы узнать, поддерживает ли ваш процессор виртуализацию, вам нужно проверить его спецификации на веб-сайте производителя. Кроме того, вы можете использовать сторонние инструменты для проверки, поддерживает ли ваш процессор виртуализацию.
Многие пользователи сообщили, что виртуализация не будет работать на их ПК, так как процессор не поддерживает функцию SLAT. Если ваш процессор не поддерживает необходимые функции, вам, возможно, придется изменить его, чтобы использовать встроенную виртуализацию.
Решение 9 – Используйте сторонние приложения

Если вам не удалось исправить ошибку Hypervisor не работает , возможно, вы захотите использовать стороннее решение в качестве обходного пути. Даже если ваш процессор не поддерживает функции виртуализации, вы сможете создать виртуальную машину в Windows с помощью программного обеспечения VMware Workstation .
VMWare специализируется на виртуализации, и их программное обеспечение предлагает все необходимые функции как для опытных, так и для начинающих пользователей, поэтому мы настоятельно рекомендуем вам попробовать его.
Загрузите VMware Workstation 15 Player с официальной страницы .
Сообщение Гипервизор не работает может вызвать проблемы, но мы надеемся, что вам удалось исправить это с помощью одного из наших решений.
Что такое «синий экран смерти Windows 10» и какие есть методы решения проблемы?
Так называемый «синий экран смерти» в Windows 10 видоизменился в сравнении с более ранними выпусками операционной системы. Однако, причины его появления и принципы решения проблемы (за исключением некоторых моментов) остались прежними.
Что это такое?
Синим экраном смерти (Blue Screen или BSOD) называется окно с уведомлением для пользователей и специалистов по IT с информацией о возникшей критической ошибке. Как и в прошлых редакциях, в десятой версии ОС от Microsoft BSOD сопутствует серьёзным системным проблемам, аппаратным конфликтам и фатальным сбоям.
При этом появляется сообщение, извещающее, что компьютер испытывает проблемы и будет перезагружен, а также краткое описание критической ошибки. В последних редакциях Windows 10 дополнительно появился QR-code, отсканировав который пользователь может подробнее узнать о конкретной ошибке и изучить рекомендации по её исправлению.
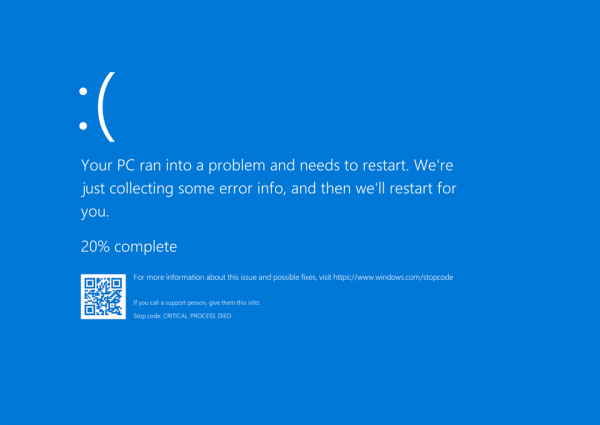
Почему появляется Blue Screen?
Окно с Blue Screen в Windows 10 может возникнуть, как во время загрузки системы перед появлением экрана приветствия или рабочего стола и после входа в учётную запись, так и спустя определённый интервал времени после начала работы, а также во время запуска какого-либо приложения или игры и во многих других ситуациях.
Основные возможные причины появления BSOD, это:
- вирусные атаки;
- использование двух и более антивирусных приложений (утилит) одновременно;
- несовместимые драйверы, вызывающие аппаратный конфликт;
- драйверы работают некорректно;
- повреждённые драйверы и другие системные файлы операционной системы;
- проблемы в обновлении Windows 10 (особенно последние самые современные «апдейты»);
- некорректные настройки БИОС;
- неадекватный разгон компьютера;
- перегрев компонентов ПК (часто связанный с предыдущим пунктом);
- конфликт аппаратных составляющих (например, по причине несовместимости компонентов «железа»);
- различные аппаратные неисправности элементов компьютера (к примеру, bad-секторы на жёстком диске).
Такое большое количество факторов возникновения синего экрана смерти не подразумевает простых и универсальных вариантов решения проблемы. Тем не менее, при желании в Windows 10 разобраться с BSOD сможет и не особо продвинутый пользователь.
Критические ошибки
Чтобы начать действовать, прежде всего следует разобраться в описании конкретной критической ошибки. Сделать это иногда бывает проблематично по той причине, что ПК перезагружается сразу же после появления синего экрана. Если после сбоя система хоть какое-то время работает в нормальном режиме, необходимо отключить перезагрузку вручную:
- Для этого дождитесь перезапуска системы после сбоя.
- После появления рабочего стола, зайдите в меню «Пуск». Активируйте «Панель управления», которая находится в папке «Служебные — Windows».
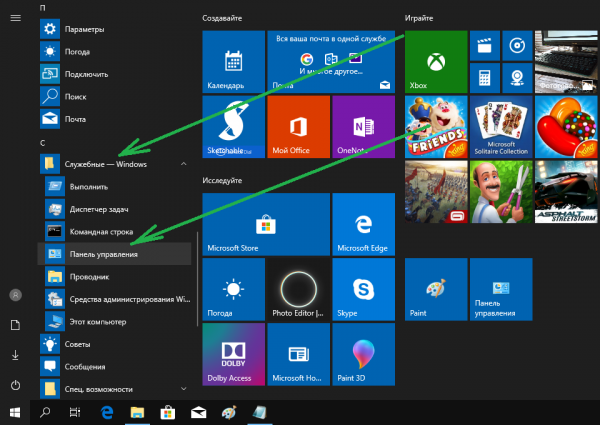
Поставьте просмотр на «Мелкие значки». Выберите пункт «Система».
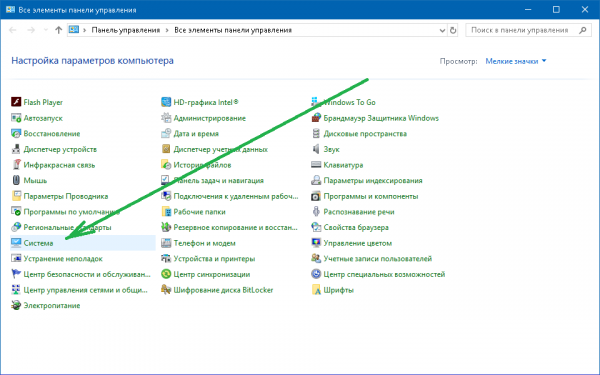
Теперь вам необходимо пройти в «Дополнительные параметры…».
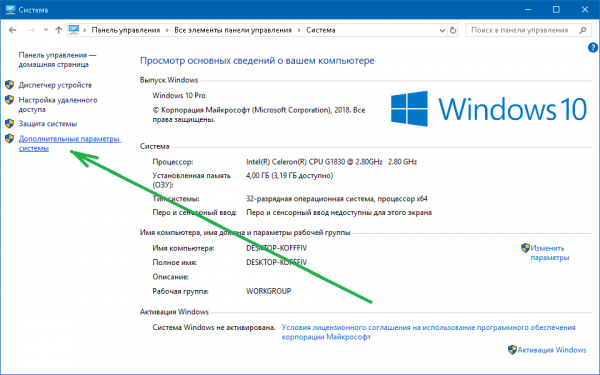
В открывшемся окне перейдите во вкладку «Дополнительно», а в «Загрузке и восстановлении» — «Параметры».
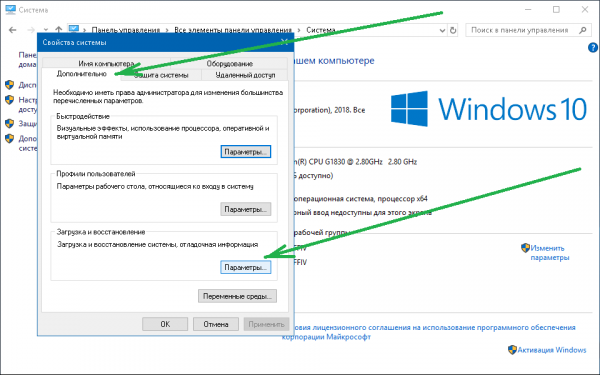
Далее уберите отметку с «Выполнения автоматической перезагрузки». Щёлкните «ОК» для подтверждения сделанных изменений.
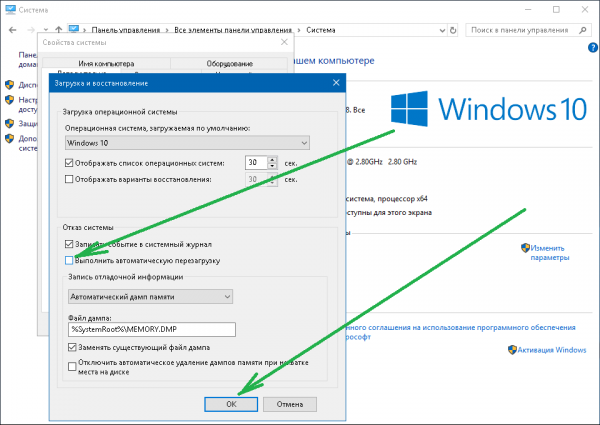
Описанные манипуляции позволят детально прочитать сообщение синего экрана. Решения по конкретным стоп-кодам (которых, на самом деле, очень много) можно посмотреть в интернете. Наиболее распространённые критические ошибки представлены ниже.
Таблица: 10 распространённых критических ошибок Windows 10
Описание и вероятные причины возникновения DEVICE QUEUE NOT BUSY Устройство не заняло очередь. Скорее всего, имеются неполадки «железа» либо драйверов. INVALID DATA ACCESS TRAP Неверный доступ к данным. Возможно, нарушена работа аппаратной составляющей ПК либо драйверов. MAXIMUM WAIT OBJECTS EXCEEDED Превышено максимальное ожидание объекта. Ошибка вызывается работающими программами, чаще играми. MEMORY MANAGEMENT Ошибка управления памятью. Причины чаще аппаратные (неисправность, конфликт модулей ОЗУ), иногда неполадки связаны с программами, драйверами, системными файлами. FILE SYSTEM Файловая система нарушена. Может быть связано с состоянием системных файлов Windows. FATAL UNHANDLED HARD ERROR Фатальный сбой системы. Среди причин появления — повреждение файлов реестра. INACCESSIBLE BOOT DEVICE Недоступен Boot-девайс. Вероятно, не инициализирован загрузочный диск, либо считываемый при загрузке файл. UNABLE TO LOAD DEVICE DRIVER Невозможна загрузка драйверов устройства. Повреждены либо отсутствуют драйверы. UNKNOWN HARD ERROR Серьёзная неизвестная ошибка. Повреждение системного реестра в результате неисправности жёсткого диска. CRITICAL PROCESS DIED Критический процесс мёртв. Происходит при удалении, неправильном изменении или повреждении системных файлов.
Способы решения проблемы синего экрана
Как показывает практика, устранение BSOD с использованием стоп-кода зачастую не приводит к положительному результату. Данный путь слишком «тернист» и малоэффективен при отсутствии достаточных познаний в области IT. Действия неопытного пользователя могут привести вплоть до полной неработоспособности Windows.
Решить проблему синего экрана можно относительно просто и эффективно, но для этого рекомендуется действовать, придерживаясь изложенных далее методик и их последовательности. После каждого из вариантов выполните перезагрузку, запустите браузер, игру, «Фотошоп» или несколько тяжёлых приложений одновременно. Если система опять «падает» в BSOD, переходите к следующей инструкции.
Как загрузиться в Safe Mode?
Довольно часто синий экран смерти появляется прежде, чем пользователь успевает что-либо сделать после входа в Windows (выполнить проверку на вирусы, переустановить драйверы, сбросить или восстановить систему). Если ваш компьютер ведёт себя именно таким образом, попробуйте настроить загрузку системы в безопасном режиме:
- Для этого щёлкните мышью (правая кнопка) по иконке «Пуск» и активируйте программу «Выполнить».
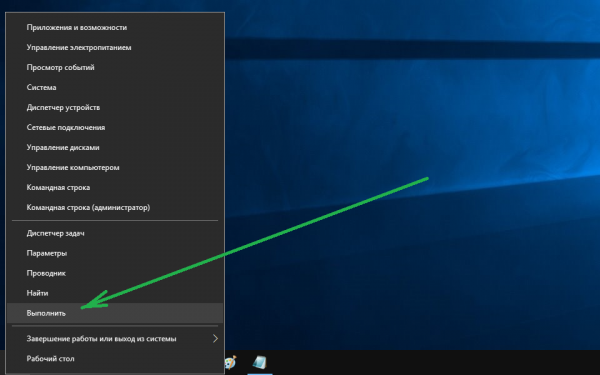
Введите msconfig для вызова служебной консоли конфигурации системы и нажмите «ОК».

В новом окне перейдите на вкладку «Загрузка», затем отметьте «Безопасный режим» и поддержку сети.
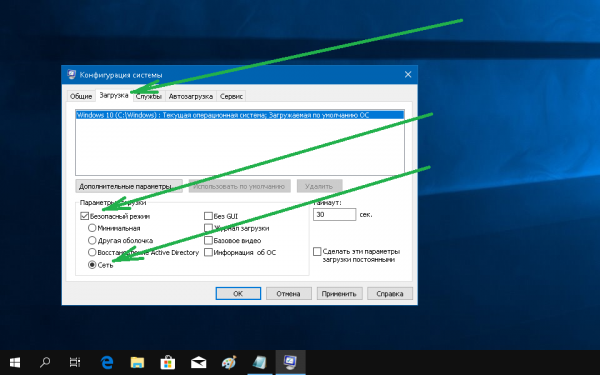
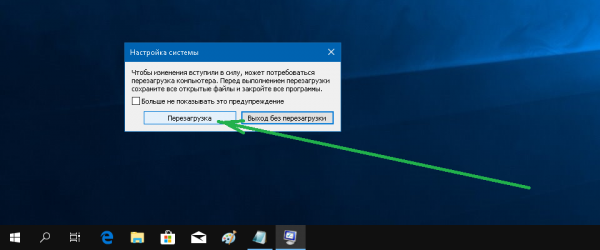
В режиме Safe Mode операционная система работает с низким разрешением экрана и без поддержки основных служб и опций. Таким образом обеспечивается минимальная загруженность ПК. Лучше ничего не менять и сразу переходить к устранению Blue Screen.
Удаление вирусов и вредоносных программ
В современном интернете вредоносные программы широко распространены и опасность заражения ими ПК довольно высока даже при наличии мощной антивирусной поддержки. По этой причине, в случае с синим экраном (так же как и во многих других ситуациях, связанных с работоспособностью ПК), проверка компьютера на вирусы является приоритетной.
Для выполнения поставленной задачи можно воспользоваться любым сканером-антивирусом. Проверку лучше выполнять в расширенном режиме, такая опция, как «Быстрая проверка» не всегда эффективна. Ниже перечислены некоторые из наиболее мощных утилит-сканеров:
- COMODO Cleaning Essentials;
- Dr.Web CureIt!;
- F-Secure Online Scanner;
- Emsisoft Emergency Kit;
- Norton Power Eraser;
- Microsoft Safety Scanner;
- ESET Online Scanner;
- Kaspersky Virus Removal Tool.
Все указанные программы портативны, то есть не требуют установки. Некоторые из них работают только в онлайн-режиме, впрочем, подключение к интернету необходимо всем приложениям для обновления баз антивирусных сигнатур. Встроенные в Windows 10 и в последние версии Google Chrome сканеры, по отзывам и тестам, менее эффективны в сравнении с перечисленным выше софтом.
Обновление драйверов
Если в сообщении синего экрана вы видите название проблемного компонента, это несколько облегчает задачу. Вам необходимо найти данные о модуле, скачать драйвер, например, с официального сайта его производителя, и затем установить через диспетчер устройств.
При невозможности найти обеспечение на сбойный модуль или узнать, что именно вызывает критическую ошибку (в данном случае драйверы вам придётся переустановить на все основные устройства, начав с видеокарты). Действуйте следующим образом:
- Вновь зайдите в «Панель управления» — «Система». Активируйте «Диспетчер устройств».
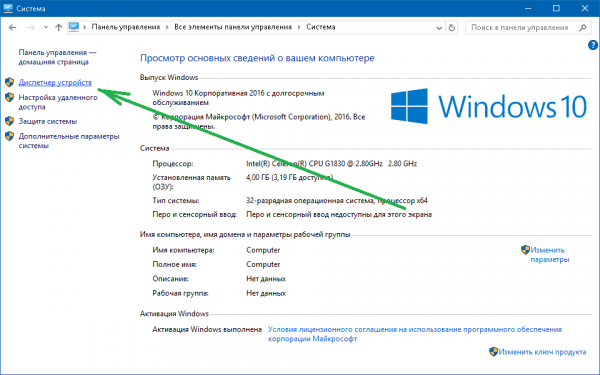
Выберите модуль, для которого необходимо обновить драйвер, кликните по нему мышью (правая кнопка). Нажмите «Свойства».
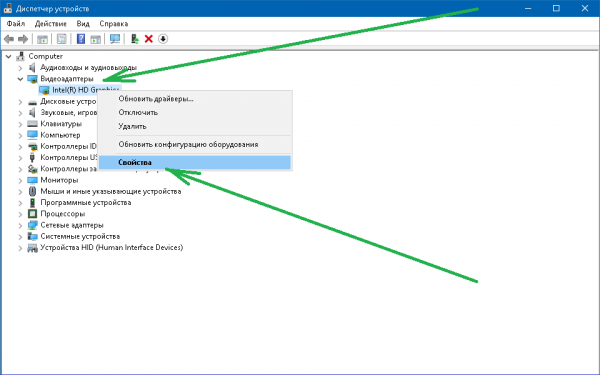
В новом окне переместитесь в «Сведения». В блоке «Свойство» нужно выбрать «ИД оборудования».
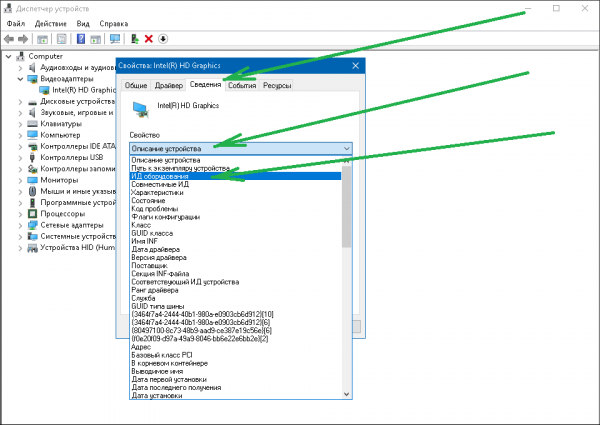
В поле «Значение» скопируйте первую строку.
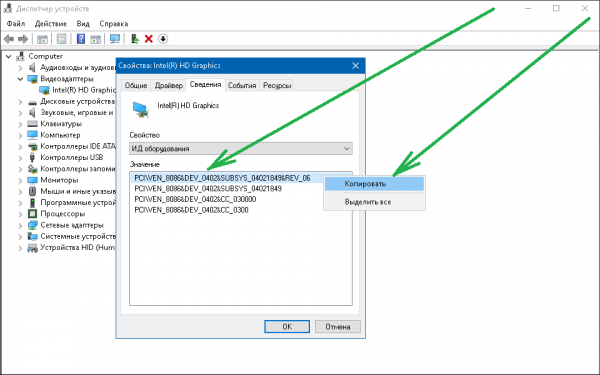
В браузере откройте ресурс DriverPack Solution и щёлкните «Поиск драйверов».
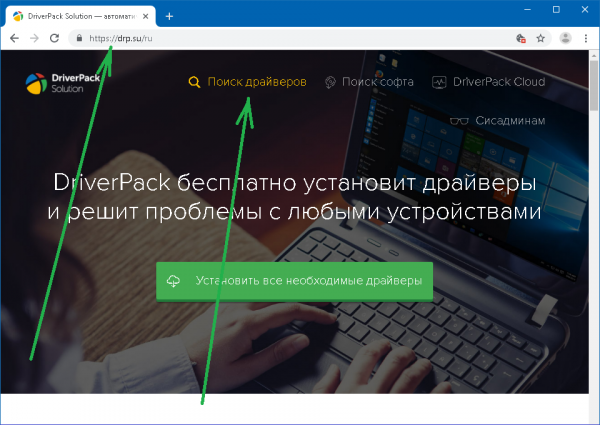
Вставьте скопированный код в строку поиска и нажмите «Найти».
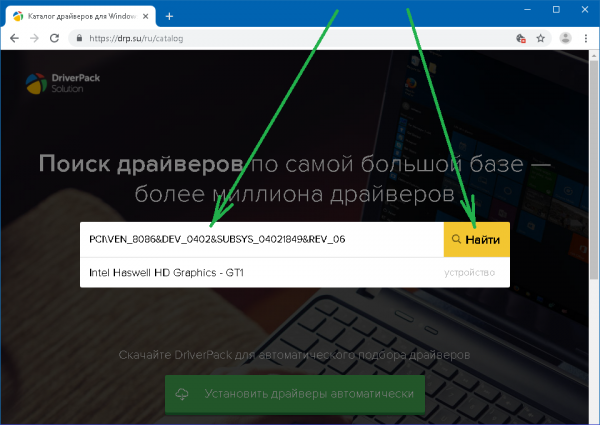
В случае положительного результата выберите вашу версию Windows и скачайте необходимый драйвер.
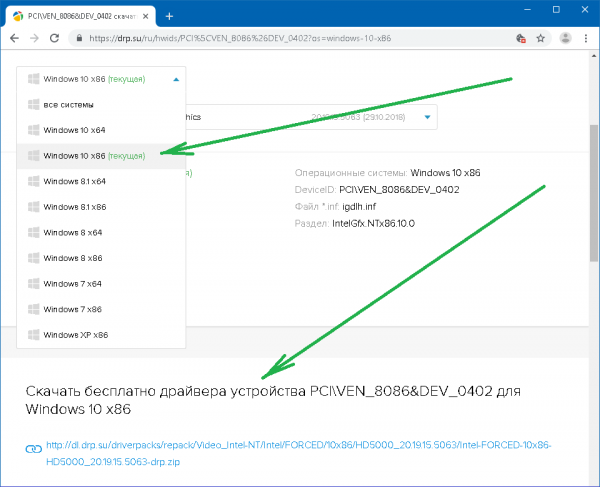
Вернитесь в «Диспетчер». Правой кнопкой выберите нужное устройство, а затем — «Обновить драйвер».
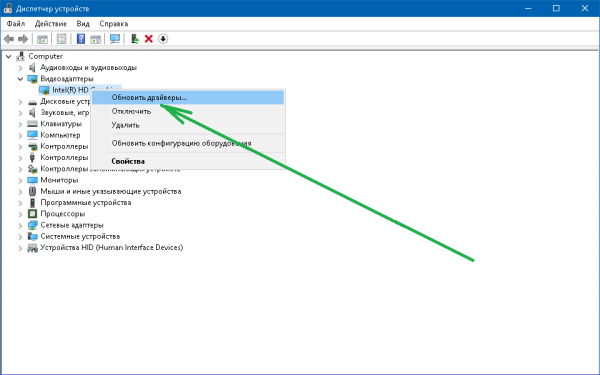
Активируйте нахождение и инсталляцию драйверов вручную.
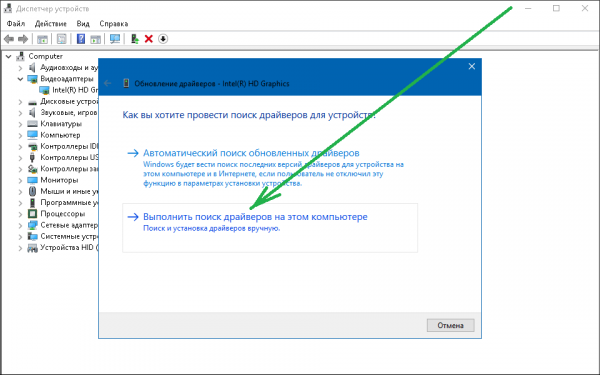
Щёлкните «Обзор», чтобы выбрать папки с драйвером. Отметьте её и подтвердите — «ОК».
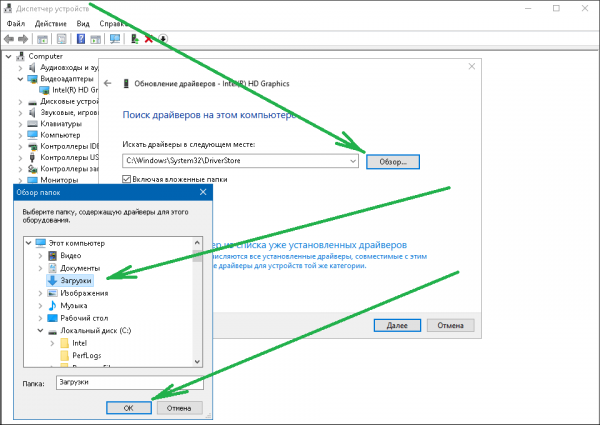
Для продолжения — «Далее». Система автоматически инсталлирует драйвер и запросит перезагрузку компьютера при необходимости.
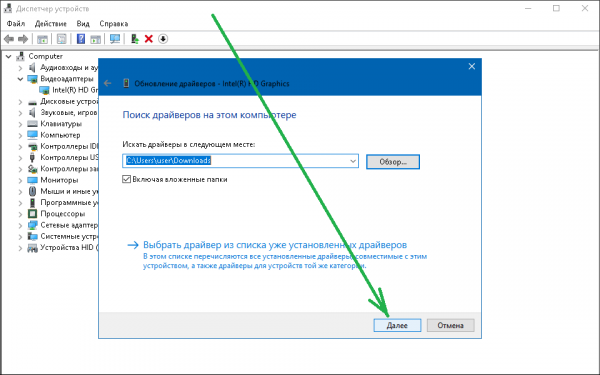
Также вы можете попытаться откатить драйверы, иногда это тоже срабатывает (например, после системных обновлений или установки на какое-либо устройство новых версий драйверов).
Используем точку восстановления
Ещё один метод решения проблемы синего экрана — откат Windows 10 через точку восстановления. Обычно ваша операционная система автоматически создаёт файл для отката при установке новых программ или драйверов (с работоспособными параметрами), поэтому этот вариант весьма эффективный. Восстановление настраивается следующим образом:
- Откройте «Панель управления» — «Система». Активируйте пункт «Защита системы».
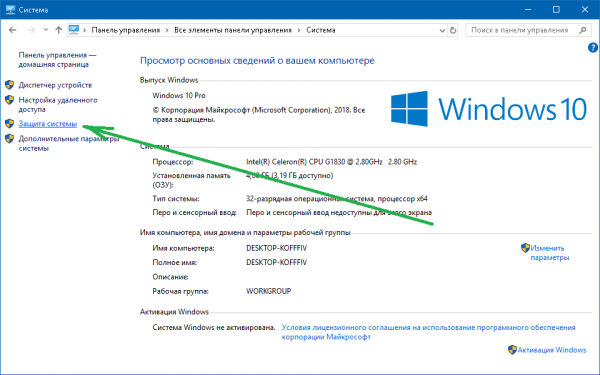
В одноимённой вкладке выделите системный диск (обычно это «Локальный диск C») и нажмите «Восстановить».
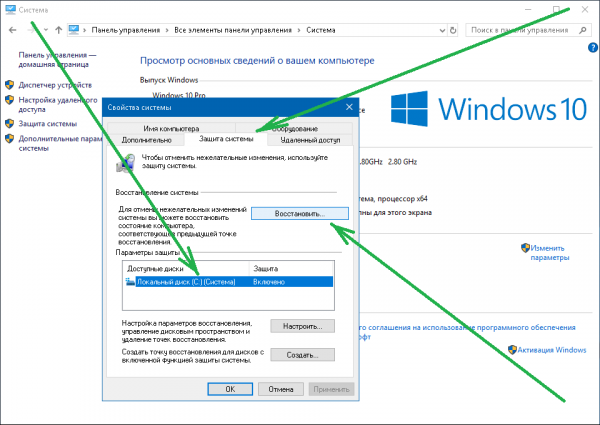
В новом окне отметьте «Рекомендуемое восстановление», при этом будут отменены последние обновления, установки драйверов и другого ПО. Нажмите «Далее».
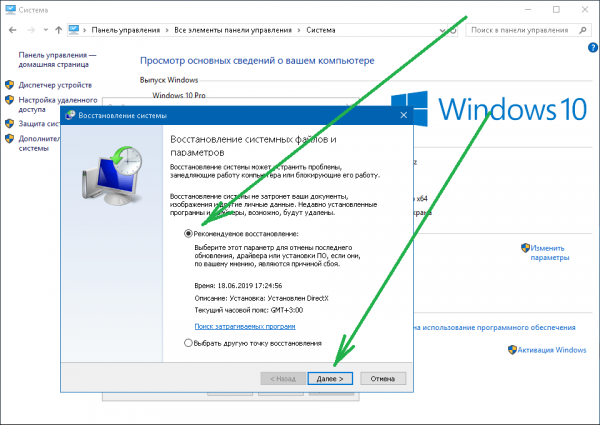
При необходимости можно посмотреть, какие драйверы и программы затронет восстановление системы, щёлкнув по соответствующему пункту.
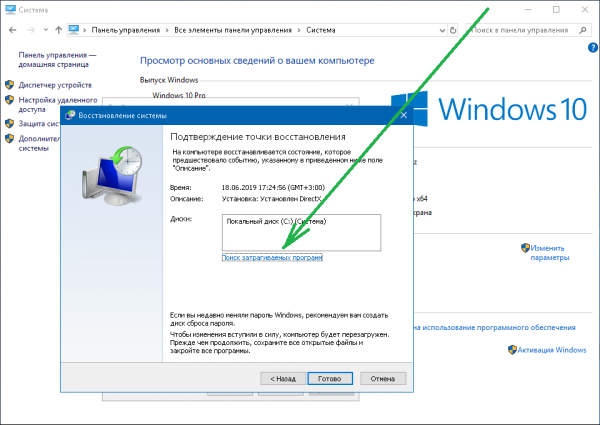
Закройте окно с описанием удаляемого ПО для продолжения.
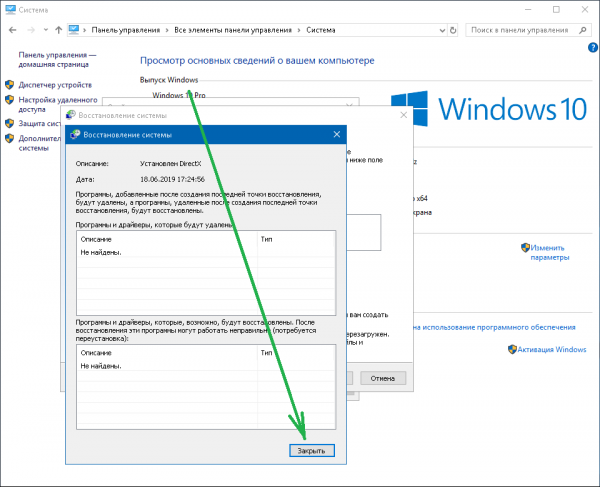
Нажмите кнопку «Готово». Дождитесь окончания процесса восстановления системы и перезагрузки компьютера.

Blue Screen возникает во время работы приложения
Если BSOD беспокоит при запуске или во время работы какого-либо приложения (частая проблема с играми), а переустановка драйверов не помогает, попробуйте для записи отладочной информации поставить меньший дамп памяти:
- Из «Панели управления» перейдите в «Систему», где выберите её «Дополнительные параметры системы».
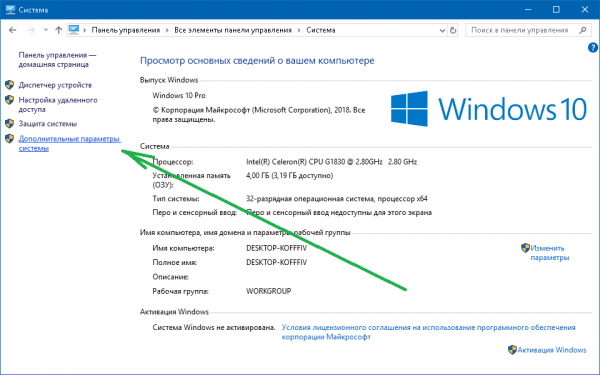
В «Дополнительно» вам понадобятся «Параметры» из третьего пункта («Загрузка и восстановление»).
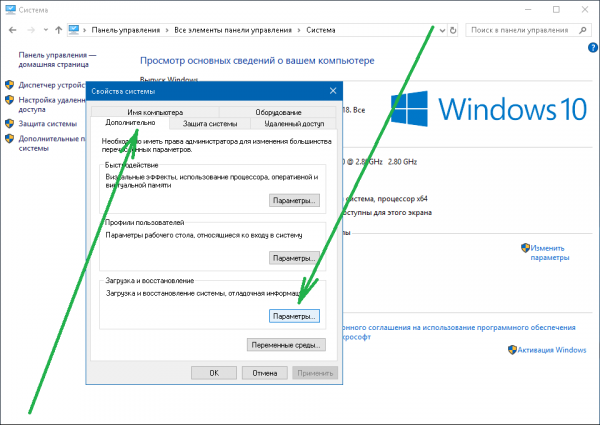
В «Записи отладочной информации» автоматический дамп поменяйте на малый.
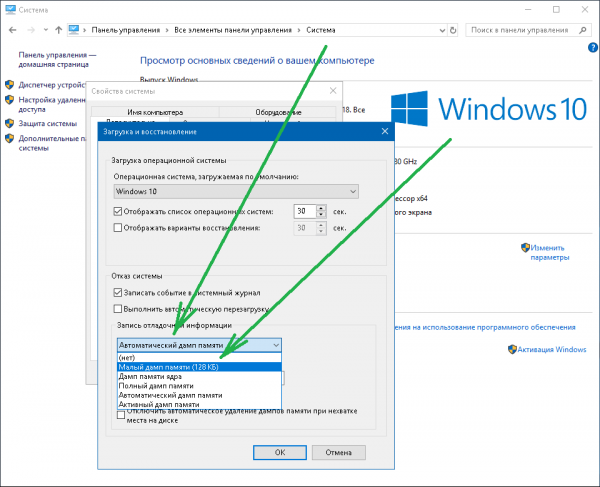
По завершении нажмите «ОК».
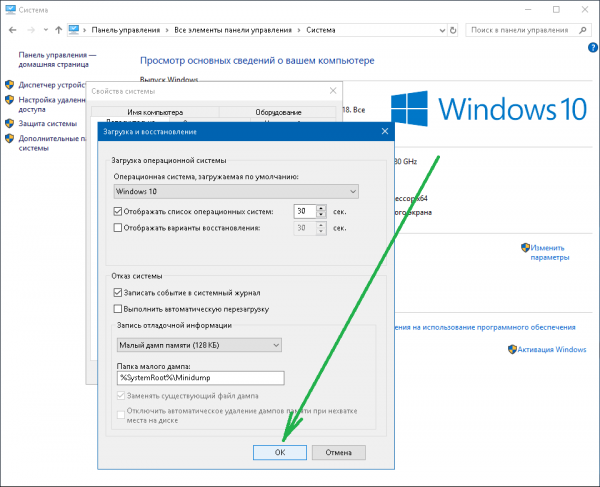
Подтвердите сохранение внесённых изменений («Применить» и «ОК» в свойствах системы). Перезагрузите компьютер и попробуйте вновь запустить сбойную программу или игру.
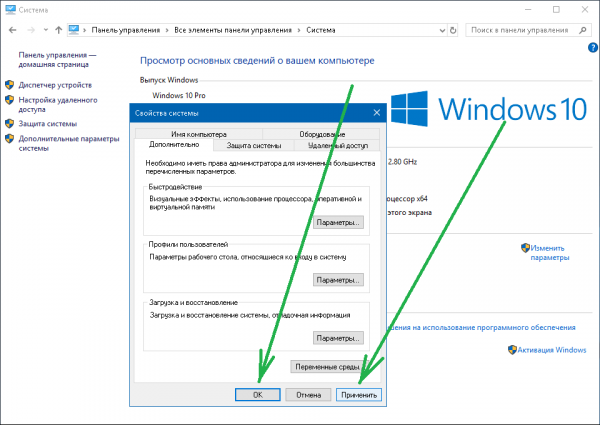
Альтернативные варианты — обновление проблемного приложения до последней версии или, в крайнем случае, его деинсталляция.
Проверка жёстких дисков
Утилита chkdsk — системный инструмент, встроенный в Windows, проверяющий на ошибки жёсткие диски. Проверяем следующим образом:
- Запустите «Проводник» и откройте свойства диска C (системного).
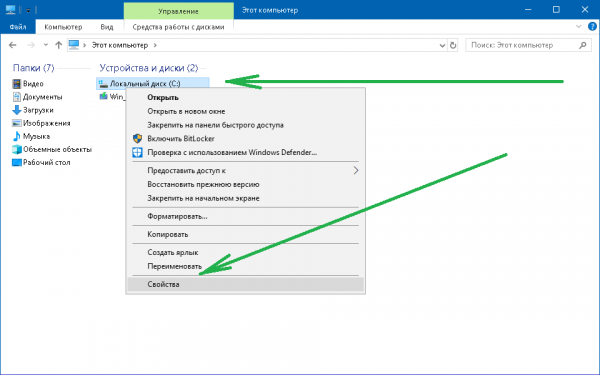
После перехода в сервис «Сервис» в «Проверке на наличие ошибок» активируйте соответствующую кнопку.
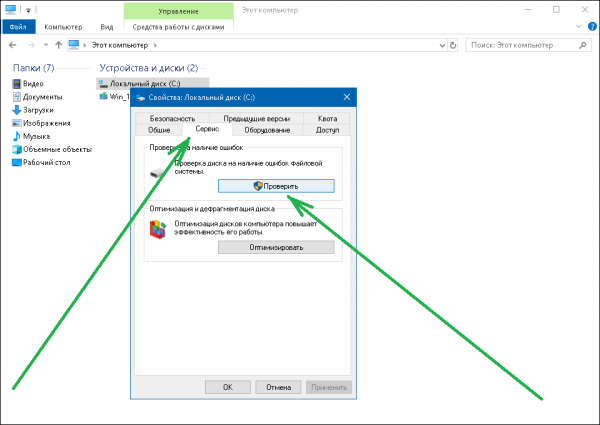
Проверьте диск. При сканировании желательно не пользоваться ПК, хоть рекомендация разработчиков Microsoft и гласит иное.
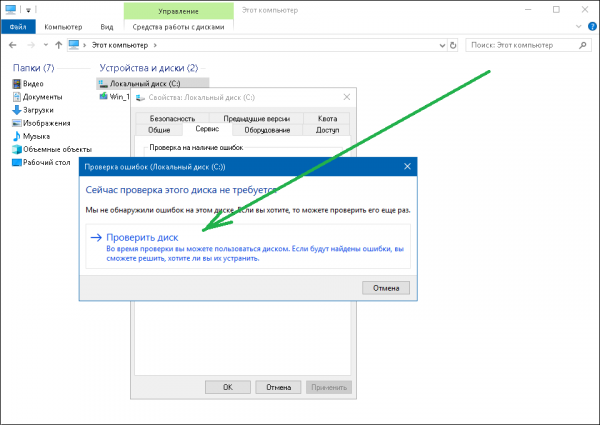
Проверка и устранение ошибок (если таковые имеются) может занять до нескольких минут.
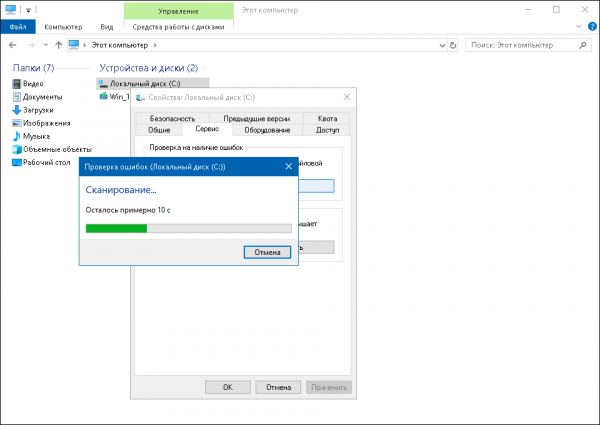
По окончании сканирования закройте системное средство проверки. Возможно, компьютер потребуется перезагрузить.
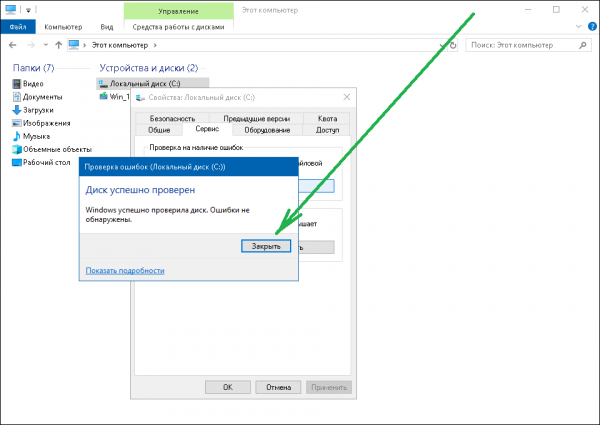
Аналогичная операция выполняется и в консоли. Для этого в «Пуске» выбирается «Командная строка (Администратор)», затем вводится chkdsk и нажимается Enter.
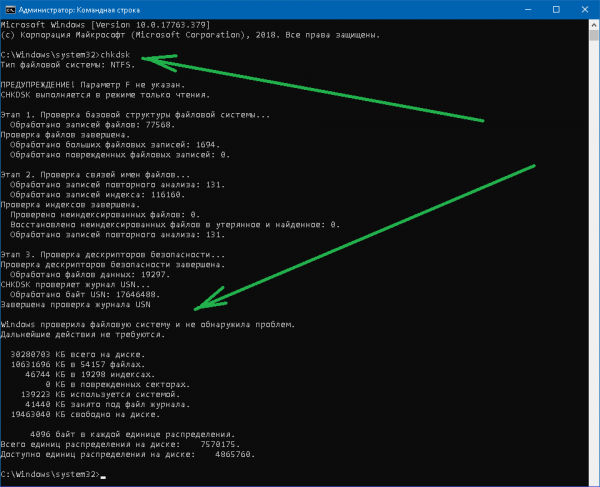
Более полная проверка диска на наличие «битых» секторов и ошибки осуществляется с программой Victoria.
Проверка ОЗУ на ошибки
Возникновение синего экрана по причине ошибок оперативной памяти встречается реже, но также возможно. Инструкция по проверке ОЗУ:
- Откройте окно программы «Выполнить» (как это сделать, рассмотрено в начале статьи). Введите mdsched.exe и щёлкните «ОК».

В окне с названием «Средство проверки памяти Windows» активируйте первый пункт и дождитесь перезагрузки системы.

Сброс до заводских настроек
Если не помогли предыдущие методы, рекомендуется откатить систему к исходным настройкам. Имейте в виду, что при этом удалятся всё программное обеспечение плюс драйверы, которые устанавливали вы. Личная информация — документы, медиа и прочие файлы — не пострадает. Для запуска восстановления:
- Активируйте «Параметры» (значок с шестерёнкой) из меню «Пуск».
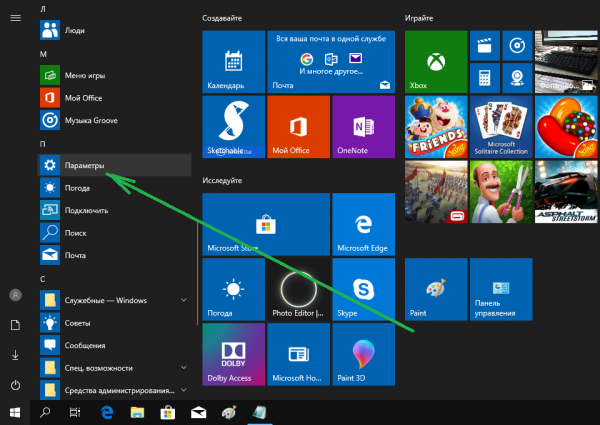
В стартовом окне программы щёлкните «Обновление и безопасность».
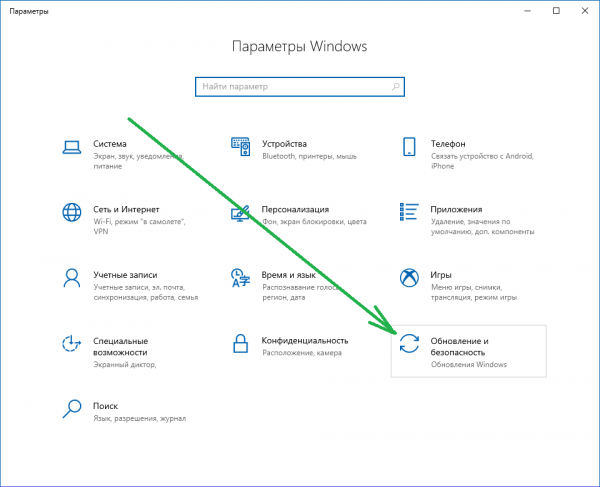
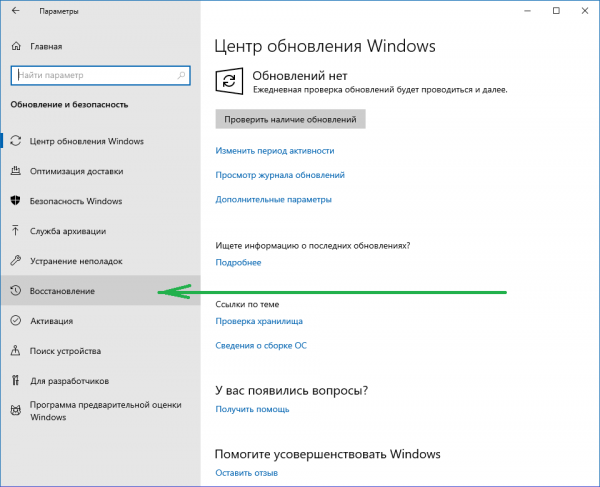
Начните возвращение компьютера в исходное состояние соответствующей кнопкой.
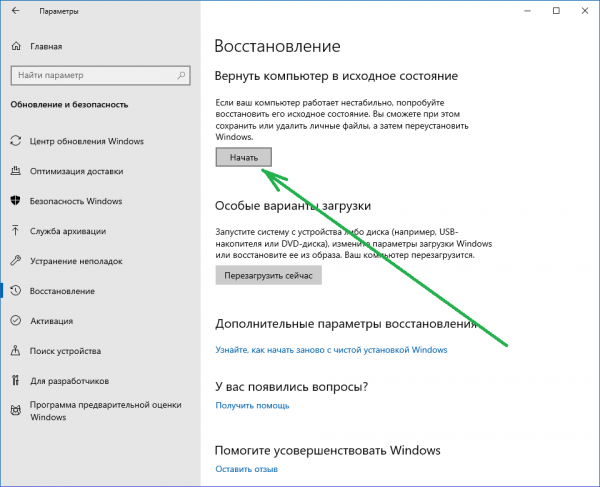
Если хотите сохранить свои файлы, выбирайте в следующем окне нужный параметр, при котором удаление ограничится параметрами и приложениями.
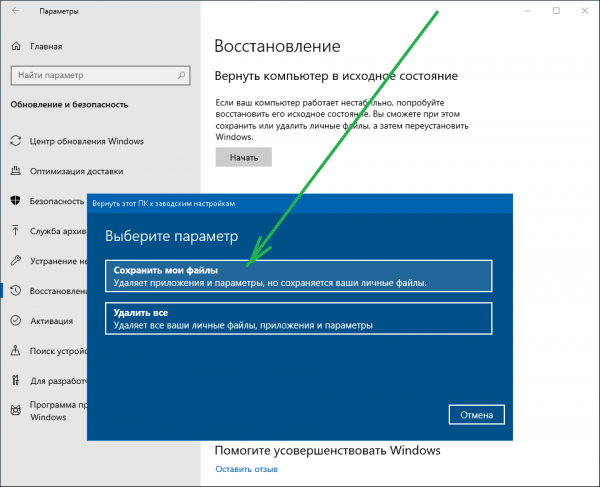
Подтвердите возврат ПК к заводским настройкам.
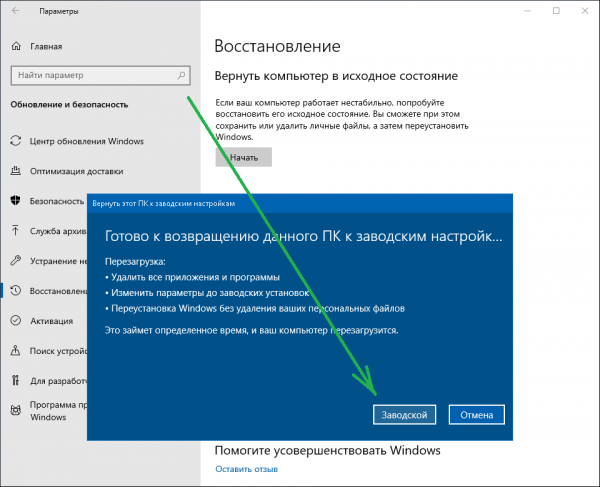
Дополнительная полезная информация по устранению BSOD
Когда вышеописанные способы не срабатывают и ваш компьютер всё так же вываливается в BSOD, с большой долей вероятности можно предположить, что причина синего экрана кроется в «железе».
Примерный алгоритм действий поиска и устранения неисправностей таков:
- проверьте уровни выходных напряжений с блока питания (номинальные значения указаны на корпусе БП или ищутся в интернете, они соответствуют цветам проводов);
- почистите, продуйте сжатым воздухом контакты разъёмов на системной плате;
- проверьте IDE, SATA кабели — они не должны иметь повреждений или заломов;
- выполните глубокий тест HDD или SSD программой Victoria — особое внимание уделите нагреву и состоянию секторов жёстких дисков;
- используя программу Memtest86, протестируйте оперативную память — возможно, имеются ошибки ОЗУ или банально несовмещаются модули;
- если вы разгоняли компьютер, сбросьте его настройки на значения по умолчанию через БИОС;
- в BIOS обратите внимание на режим работы жёсткого диска — старые винчестеры работают в режиме IDE, более современные — в AHCI, RAID;
- выполните проверку температуры центрального процессора, чипсета и видеокарты через БИОС, либо с помощью программы AIDA64;
- изредка источником проблем может являться сетевая карта (особенно, если интернет-подключение реализовано напрямую без роутер) — проверьте и замените модуль в случае его неисправности;
- ещё более детальную проверку ПК при синем экране смерти позволяет осуществить программа BlueScreenView, однако это достаточно сложный, требующий внимательного изучения и анализа системных дампов, инструмент.
На самом деле в Windows 10 «синий экран смерти» по существу таковым не является. Это сообщение пользователю с указанием проблемы и подсказкой по её решению. Описанные в статье методы, как правило, позволяют просто и эффективно нейтрализовать все неполадки.
Question
Issue: How to fix HYPERVISOR ERROR BSOD in Windows 10?
Hi, today I started getting repeated HYPERVISOR ERROR Blue Screen of Death crashes. It mainly happens when I play games, although it also happened a few times when the PC was basically idle. I am using Windows 10.
Solved Answer
HYPERVISOR ERROR Blue Screen of Death can occur suddenly and make Windows reboot immediately, interrupting all the work. Without a doubt, such interruption can cause significant inconvenience to people In most cases, the system can recover from the error after the restart, and computer work can continue without any problems.
Blue Screen errors, while annoying and sometimes damaging, play a vital role within the Windows environment. Essentially, this occurrence stops the system from being critically damaged, which results in an immediate PC restart. As mentioned already, a reboot is usually enough to recover from a stop error.
However, the problem starts when users start experiencing the same BSOD several times. In most cases, there is a user action that triggers it, although it can also be related to underlying Windows processes running in the background. Users who are looking for ways how to fix HYPERVISOR ERROR are typically those that experience the issue several times.
Unfortunately, all Windows provides is a standard BSOD message along with an error code – there is not enough information on what caused the issue or how to fix it. The message reads:
Your PC ran into a problem and needs to restart. We’re just collecting some error info, and then we’ll restart for you.
Stop code: HYPERVISOR ERROR
While the error can occur at any time, users reported that most commonly, it happens when performing graphic-intensive tasks such as gaming. This makes a lot of sense as Hypervisor is a component within a processor that handles virtualization technologies.
The reason for HYPERVISOR ERROR BSOD can be many, including outdated/corrupt system drivers, corrupted system files, outdated operating systems, and much more. Below you will find all the information needed in order to stop the Blue Screen from appearing on your system once and for all.

Method 1. Use an automatic repair tool
Fix it now!
Fix it now!
To repair damaged system, you have to purchase the licensed version of Reimage Reimage.
Blue Screen errors might be relatively harmless. In some cases, BSODs can indicate a serious malfunctions, e.g., hardware failure or a presence of a rootkit[1] or another malware. In any case, if you notice Blue Screen errors such as APC_INDEX_MISMATCH or BAD_POOL_HEADER more and more often, you should never ignore them, as it could just make matters much worse than they are.
Finding the culprit of the error, however, might be rather difficult, considering that every Windows machine has a different configuration, and same BSOD might indicate something completely different. In many cases, troubleshooting takes a long time, and those less tech savvy individuals struggle to perform fixes themselves.
If you want to save time, we highly recommend you try using ReimageMac Washing Machine X9 instead of performing troubleshooting yourself. The app can quickly diagnose the underlying Windows problems and quickly fix BSODs, missing DLLs, registry[2] errors, and much more. Besides, it can remove junk, clean browsers, remove malware and fix virus-caused damage.

Method 2. Update Windows to the latest version
Fix it now!
Fix it now!
To repair damaged system, you have to purchase the licensed version of Reimage Reimage.
Windows updates often include bug fixes, security patches, and various other improvements. There is simply no point in keeping your OS outdated, so make sure all the updates are applied accordingly:
- Type Updates in Windows search and press Enter
- Click Check for Updates on the right

- Wait till Windows downloads all the necessary files
- Install all available updates and restart your computer.
Method 3. Check your disk for errors
Fix it now!
Fix it now!
To repair damaged system, you have to purchase the licensed version of Reimage Reimage.
- Type cmd in Windows search
- Right-click on Command Prompt search result and select Run as administrator
- Copy and paste the following command, pressing Enter after:
chkdsk C: /f /r /x
- If the check disk does not start but instead shows and error, type in Y and hit Enter

- Restart your PC to begin the scan.
Method 4. Run SFC and DISM
Fix it now!
Fix it now!
To repair damaged system, you have to purchase the licensed version of Reimage Reimage.
- Open Command Prompt as administrator as explained above
- Type the following command and press Enter:
sfc /scannow
- Wait till scan finishes and restart your PC
- If SFC delivers an error, you should run DISM – paste the following commands and press Enter every time:
dism /online /cleanup-image /scanhealth
dism /online /cleanup-image /checkhealth
dism /online /cleanup-image /restorehealth

Method 5. Turn off Virtual Machine and Hypervisor
Fix it now!
Fix it now!
To repair damaged system, you have to purchase the licensed version of Reimage Reimage.
If for some reason Virtual Machine Platform or Hypervisor Platform are turned on while you are not using them, disable them:
- Type Control Panel in Windows search bar and press Enter
- Pick Programs > Uninstall a program
- Select Turn Windows features on or off on the left
- Scroll down and remove ticks from Virtual Machine Platform and Hypervisor Platform

- Click OK and reboot.
Method 6. Update your BIOS
Fix it now!
Fix it now!
To repair damaged system, you have to purchase the licensed version of Reimage Reimage.
Warning: do not perform this step if you are not sure what you are doing. Messing this process up might negatively affect your device.[3]
- Type System Information in search bad and press Enter
- Check the BIOS Version/Date and BaseBoard Product sections

- Open your web browser and navigate to its manufacturer’s website
- Go to Download section and look for relevant BIOS update download file
- Proceed with on-screen guide and restart your device.
Method 7. Update all drivers
Fix it now!
Fix it now!
To repair damaged system, you have to purchase the licensed version of Reimage Reimage.
- Right-click on Start and pick Device Manager
- Expand the section you want to update, for example, Display adapters
- Right-click on the device and select Update driver
- Select Search automatically for drivers

- Now perform the same for every other device on your PC
- Restart Windows.
It might take you a while to update all drivers on your machine, and it also does not help that the Device Manager might not find all the relevant updates. Therefore, either visit the manufacturer’s website and download drivers from there or employ DriverFix for a quick solution – all drivers can be updated within just a few minutes.
Repair your Errors automatically
ugetfix.com team is trying to do its best to help users find the best solutions for eliminating their errors. If you don’t want to struggle with manual repair techniques, please use the automatic software. All recommended products have been tested and approved by our professionals. Tools that you can use to fix your error are listed bellow:
do it now!
Download Fix
Happiness
Guarantee
do it now!
Download Fix
Happiness
Guarantee
Compatible with Microsoft Windows
Compatible with OS X
Still having problems?
If you failed to fix your error using Reimage, reach our support team for help. Please, let us know all details that you think we should know about your problem.
Reimage — a patented specialized Windows repair program. It will diagnose your damaged PC. It will scan all System Files, DLLs and Registry Keys that have been damaged by security threats.Reimage — a patented specialized Mac OS X repair program. It will diagnose your damaged computer. It will scan all System Files and Registry Keys that have been damaged by security threats.
This patented repair process uses a database of 25 million components that can replace any damaged or missing file on user’s computer.
To repair damaged system, you have to purchase the licensed version of Reimage malware removal tool.

To stay completely anonymous and prevent the ISP and the government from spying on you, you should employ Private Internet Access VPN. It will allow you to connect to the internet while being completely anonymous by encrypting all information, prevent trackers, ads, as well as malicious content. Most importantly, you will stop the illegal surveillance activities that NSA and other governmental institutions are performing behind your back.
Unforeseen circumstances can happen at any time while using the computer: it can turn off due to a power cut, a Blue Screen of Death (BSoD) can occur, or random Windows updates can the machine when you went away for a few minutes. As a result, your schoolwork, important documents, and other data might be lost. To recover lost files, you can use Data Recovery Pro – it searches through copies of files that are still available on your hard drive and retrieves them quickly.