| Автор | Сообщение | ||
|---|---|---|---|
|
|||
|
Member Статус: Не в сети |
Люди подскажите пожалуйста как при помощи этой проги создавать точки восстановления или резервные копии ОС. |
| Реклама | |
|
Партнер |
|
}{UNTE® |
|
|
Member Статус: Не в сети |
ну во первых тебе надо не диск директор,а Acronis True Image Home |
|
Zlobon |
|
|
Member Статус: Не в сети |
}{UNTE®Спасибо,извиняюсь. |
|
rasta_boy |
|
|
Member Статус: Не в сети |
Люди, у меня Acronis Disk Director 11 Home. Пытаюсь через него, у профильного террабайтника оттяпать кусок в 50Гб (хочу macOs поставить). В общем отделяю, нажимаю кнопку «Применить ожидающие операции», продолжить, и он пишет «Ошибка записи на диск, запустите проверку диска…». Что делать? Как отделить нужный кусочек? |

|
Cider |
|
|
Member Статус: Не в сети |
rasta_boyОтделяешь от системного? |
|
G’Kar |
|
|
Member Статус: Не в сети |
Cider писал(а): Отделяешь от системного? Под систему у него SSDNow Kingston 30Gb, написано же в профиле. rasta_boy писал(а): пишет «Ошибка записи на диск, запустите проверку диска…». Что делать? Запустить проверку диска. |
|
rasta_boy |
|
|
Member Статус: Не в сети |
Cider Нет. Системный у меня ссд. Это файлопомойка. Но в акронисе написано в скобках «система» Добавлено спустя 57 секунд: Airt_Reg писал(а): Запустить проверку диска. А как в cmd написать? |
 , а на ссд просто «загрузка». Ничего не понимаю… Почему у меня всё попутано.
 А то когда просто пишу CHKDSK он проверяет системный.
|
G’Kar |
|
|
Member Статус: Не в сети |
Ничего не напутано, диск проверяй на ошибки. Добавлено спустя 3 минуты 39 секунд: Вместо с указать нужный раздел. |
|
Куба |
|
|
Member Статус: Не в сети |
Загрузочным в DOSe, а не в винде. |
|
rasta_boy |
|
|
Member Статус: Не в сети |
Куба писал(а): Загрузочным в DOSe, а не в винде. А это как сделать? Добавлено спустя 5 минут 2 секунды: |

|
Куба |
|
|
Member Статус: Не в сети |
rasta_boy Добавлено спустя 1 минуту 58 секунд: |
|
rasta_boy |
|
|
Member Статус: Не в сети |
Не, все равно та же фигня Куба писал(а): В данной программе создаешь загрузочный диск и вперёд… Ааа… Понял. Блин для этого диск нужен Последний раз редактировалось rasta_boy 28.08.2011 19:48, всего редактировалось 1 раз. |

|
cure72 |
|
|
Advanced member Статус: Не в сети |
rasta_boy |

|
rasta_boy |
|
|
Member Статус: Не в сети |
cure72 писал(а): rasta_boy Уже создаю… Сейчас попробую разделить. Если сегодня больше не отпишусь, значит что то не то сделал Добавлено спустя 13 минут 30 секунд: |
|
cure72 |
|
|
Advanced member Статус: Не в сети |
rasta_boy http://savepic.org/2187539.png 2) http://savepic.org/2194707.png |
|
rasta_boy |
|
|
Member Статус: Не в сети |
cure72У меня чуть по другому, так как у меня хоум версия а не адвансед. Но смысл уловил. Сделал. Сейчас опять пробовать буду. Спасибо. |
|
33LeD31 |
|
|
Member Статус: Не в сети |
Лучше иметь Boot CD Acronis под рукой,в нужный час пригодится. |
|
rasta_boy |
|
|
Member Статус: Не в сети |
Мучился, мучился с флешкой, так и не вышло. Скачал акронис постарее. 10ой версии. Нажал разделить диски. Выбрал размер нового куска 56гб. Нажал ок. Окно закрылось, я перезагрузился сам. Ничего не произошло, нового раздела не добавилось. Зато от старого оттяпался всё таки кусок, который теперь нигде не видно. Что делать? Нужна срочная помощь! |
|
33LeD31 |
|
|
Member Статус: Не в сети |
Всё просто,нужно вспомнить,что вы уже давно научились это делать и не бредить в эфире. |
|
cure72 |
|
|
Advanced member Статус: Не в сети |
rasta_boy Последний раз редактировалось cure72 29.08.2011 19:17, всего редактировалось 1 раз. |
—
Кто сейчас на конференции |
|
Сейчас этот форум просматривают: нет зарегистрированных пользователей и гости: 3 |
| Вы не можете начинать темы Вы не можете отвечать на сообщения Вы не можете редактировать свои сообщения Вы не можете удалять свои сообщения Вы не можете добавлять вложения |
Лаборатория
Новости
Проблема a disk read error occurred press может не на шутку напугать любого пользователя ПК. Проблема заключается в следующем, во время запуска Windows, система пытается считать файлы необходимые для этого действия, расположенные в скрытом разделе. Такие данные крайне важны, поэтому в случае их отсутствия или неисправности, как раз и встретим такую ошибку. Какие же варианты сложившейся ситуации поддаются исправлению, а какие нет, рассмотрим далее.
Возможные источники неисправности
Сперва следует определиться с источниками проблемы, когда пишет a disk read error occurred. Их существует немало, но некоторые легко диагностируются, поэтому приступим:
- Вирус повредил загрузочный сектор системы;
- Антивирус, что-то напутал и стёр нужные записи;
- Ошибка проявилась после неправильной установки Windows или инсталляции одной ОС поверх другой;
- Вы производили разбивку HDD на логические диски. Вообще, это не является проблемой, но при наличии битых секторов, может случиться какой-либо сбой;
- Возможно, вы роняли системный блок/ноутбук или же сам жесткий диск;
- Отошли или перебиты шлейфы, их всего два и поэтому проверить легко;
- Вероятной причиной бывает наличие изношенного блока питания, если не достаточно напряжения, диск не сможет работать правильно;
- Иногда ломаются контролеры на материнке;
- Восстановление или откат системы, в случаи с недостаточным местом на носителе. Таким образом часть файлов перебивается, а другая остаются прежними, создавая проблемы.
- Поломка жесткого диска или наличие большого количества нестабильных секторов.
Большинство ситуаций с a disk read error occurred исправить удаётся, в основном те, что связаны с программными сбоями или шлейфами подключения.
Для начала борьбы с недугом необходим установочный диск Windows, иначе ничего не получится. Также, нужно быть готовыми, что может потребоваться полная переустановка ОС.
Читайте также: Как переустановить Windows 8 на ноутбуке?
Определение работоспособности жесткого диска
Простой диагностической мерой по борьбе, где ошибка a disk read error occurred не оставляет возможности получить доступ к Windows, является просмотр его отображения в БИОС. Если в нём отображается HDD правильно, то большая доля вероятности, что причина всё же в программной части, если же не определяется или показывается неправильно, то жесткий диск не исправлен. Можно попытаться восстановить его работоспособность через сервисный центр, но это актуально только для копирования важной информации с него. Итак, нужно:
- В момент запуска системы нажать Del;
- Теперь перейдите с помощью стрелочек в раздел «Advanced BIOS features»;
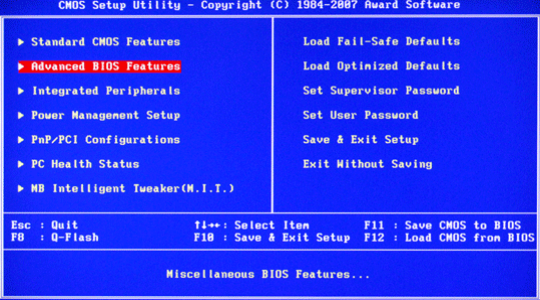
- Затем нажмите на «Hard Disk Boot Priority» или «Boot Device Priority».
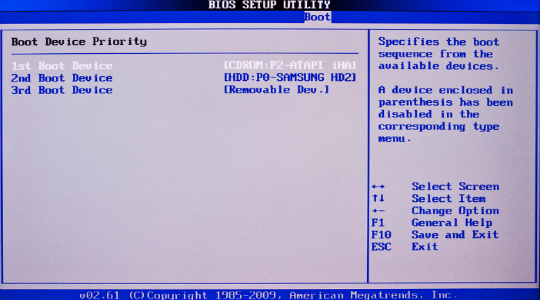
Проверьте правильность отображения наименования жесткого диска, а после этого можно проследовать дальше (в случае успеха).
Читайте также: Как зайти в BIOS в Windows 10?
Ошибка a disk read error occurred, как исправить с помощью Acronis Disk Director
Для выполнения проверки и устранения неисправности через эту программу у вас должен быть загрузочный диск Acronis, также подойдёт Paragon или другие. Теперь следует просмотреть такие разделы:
- Запуститесь через ваше приложение, делается это с помощью нажатия F9 или F8, когда показывается окно с возможностью перехода в BIOS;
- Проверьте, чтобы раздел «Зарезервировано системой» был в активном состоянии. Если это не так, то кликните правой кнопкой и выберите «Отметить как активный»;
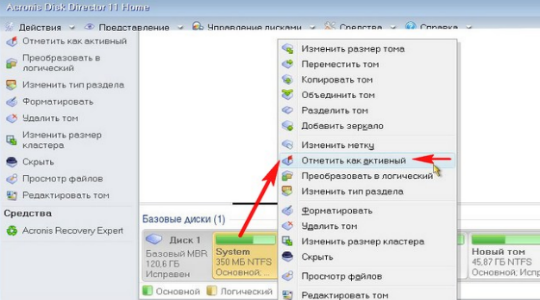
- Также проверьте наличие на диске папки Boot и файла bootmgr, они изначально скрыты, так как, являются системными. Сперва включите их отображение.
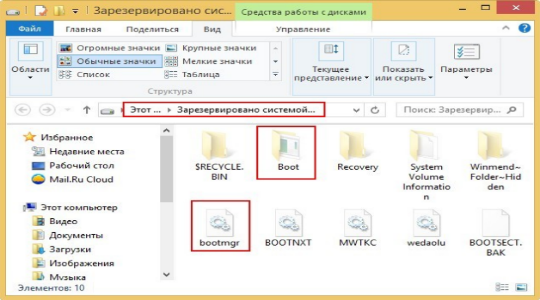
В случае отсутствия папки или файла их придется восстановить, как это сделать показано в следующем разделе.
Восстановление работы раздела загрузки
Для решения проблемы a disk read error occurred Windows 7, нужен соответствующий установочный диск с ОС, для других версий тоже самое. Процедура должна помочь системе проанализировать HDD на ошибки и, в случаи их наличия, попытаться исправить.
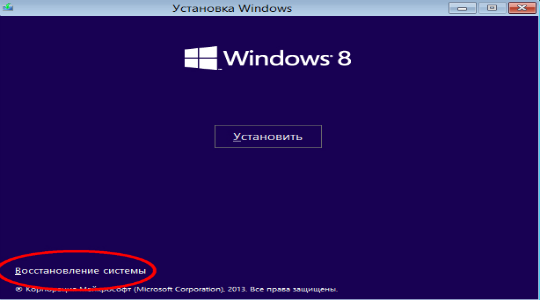
1.Теперь вставьте диск или флеш накопитель и запустите его;
2.Нажмите на ссылке «Восстановление системы»;
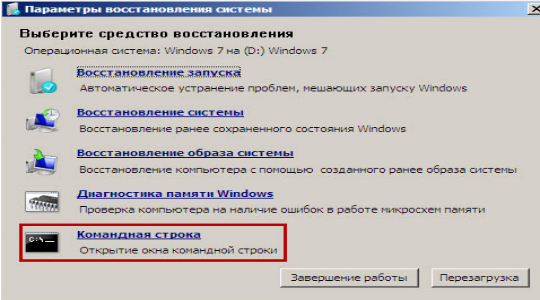
3.Далее пройдите в раздел «Диагностика»;
4.Теперь «Дополнительные параметры»;
5.Затем выберите пункт «Командная строка»;
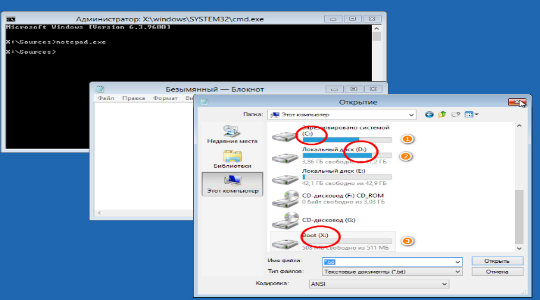
6.Сперва нужно запустить блокнот, благодаря которому мы сможем узнать распределение букв для логических дисков. Для этого:
- Введите notepad.exe и нажмите ввод;
- Клик по вкладке «Файл» и выберите опцию «Открыть»;
- В «Мой компьютер» важно запомнить или записать, буквы для разделов «Зарезервировано системой», содержащий файлы Windows и загрузочный сектор.
7.Для восстановления файлов Windows нужно ввести команду bcdboot С:/Windows, где C – это буква соответствующего раздела;
8.Для произведения проверки зарезервированной области введите поочерёдно chkdsk D: /r и chkdsk D: /f, где D – буква вашего раздела и она может отличаться.
9.Затем выполните пункт 8 для раздела, который содержит Windows.
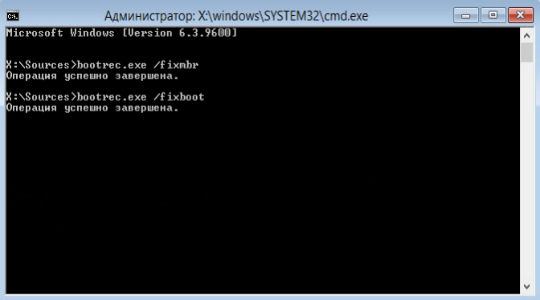
10.Если проверка прошла успешно, следует восстановить MBR записи с помощью следующих команд bootrec.exe /fixmbr и bootrec.exe /fixboot;
11.В конце необходимо провести поиск ОС и включить их в список загрузки, с помощью bootrec.exe /rebuildBcd.
Читайте также: Как преобразовать диск gpt в mbr?
Вероятно, что после показанных действий ошибка исчезнет, но Windows так и не захочет запускаться (не часто, но бывает). Тогда после исправления ошибки a disk read error occurred что делать очевидно, просто переустановить систему заново. Лучше сначала перекинуть все файлы на другой диск и отформатировать изначальный HDD и после установить чистую Windows.
Если у Вас остались вопросы по теме «Как исправить ошибку a disk read error occurred?», то можете задать их в комментариях
The error ‘Windows cannot Run Disk Checking on this Volume Because it is Write Protected’ is caused when your volume/drive is damaged or attributed to Read Only. CHKDSK is a command-line utility in Windows that lets you search for bad sectors in your volume and verify the integrity of system files stored on your drive.
Depending on the reason why you receive «Windows cannot run disk checking on this volume because it is write protected», the solutions to the problem vary. Five Fixes for Chkdsk Write Protected:
| Workable Solutions | Step-by-step Troubleshooting |
|---|---|
| Case 1. Chkdsk Write Protected Because Hard Drive Is Write Protected |
Fix 1. Remove Write Protection via CMD…Full steps |
| Case 2. Chkdsk Write Protected Because File System Corrupted |
Fix 4. Recover Files from Corrupted Hard Drive…Full steps |
«Tried to boot up my computer this morning and was given the message: ‘Startup Repair cannot repair this computer automatically.’ And it wouldn’t let me boot into the Safe Mode. Having no system restore points, then I ran the chkdsk command. But it gave me the ‘Windows cannot run disk checking on this volume because it is write protected’ error message. Is there any way to fix the issue? I’m running Windows 10 Professional.»
Chkdsk is a built-in Check Disk utility for Windows PC to help you fix disk errors or startup issues. But usually, when you run ‘chkdsk /r’ via a Command Prompt after getting the message: ‘Startup Repair cannot repair this computer automatically’, it will not work and at most times will give you the error message reads:
‘The type of the file system is NTFS.
Cannot lock current drive.
Windows cannot run disk checking on this volume because it is write protected’.

Why did you receive this error message? Generally, there are two common causes:
- The disk volume attribute is set to read-only
- The file system of the partition is corrupted or damaged.
If you happened to be caught in one of the two situations where you were unable to run CHKDSK to check and repair your disk, don’t get frustrated. We will show you effective ways to cope with it.
To enable chkdsk running again, you just need to remove write protection from your hard drive so to get rid of the «Windows cannot run disk checking on this volume because it is write protected» error.
Follow to learn how to remove write protection on a hard drive and make CHKDSK work properly in Windows 10/8/7. Except for PC hard disk, the tutorial is also applicable to an SD card, USB drive or other external memory devices.
Fix 1. Remove Write Protection via CMD
Step 1. Press «Windows + X» buttons to bring up the power users menu.
Step 2. In the power users menu, select the «Command Prompt (Admin)» option.
Step 3. Click «Yes» when you are presented with a UAC window requesting permission to launch the Command Prompt as Administrator.
Step 4. In the new Command Prompt window, type chkdsk E: /f /r /x and press «Enter». Here you should replace «E» with the drive letter of your PC hard drive, SD card or USB drive.
This command will unmount the disk, SD card or USB drive and remove any write protection status on the device. In this case, you can get CHKDSK working again and will no longer see ‘Windows cannot run disk checking on this volume because it is write protected’ error message.
If this tip won’t work, no worry. There are other ways to remove write protection.
Fix 2. Remove Write Protection via Diskpart
Via diskpart, you can clean the read-only attribute on your hard drive.
Step 1. Run «Command Prompt» as an administrator.
Step 2. Enter diskpart and click «Yes» in the prompt asking for notification.
Step 3. Enter the following command in order:
list disk
select disk X (Replace «X» with the number of your write-protected hard drive.)
attributes disk clear readonly
Step 4. If you get the message «Disk attributes cleared successfully», enter exit and then go back to CMD to run the chkdsk command. This time, you will be able to check and fix your disk error easily.
If you are not a professional in computing management and not familiar with command lines, don’t worry. EaseUS R&D team has promoted a fresh kit for helping you resolve the write-protection issue on your hard drive, external hard drive, USB or SD card, etc., devices.
EaseUS CleanGenius is a practical computer fixing tool that is safe and light-weighted. It’s a perfect alternative to the command line.
Use this one-click tool to solve the write-protection issues on your own:
If you don’t consider yourself a pro-computer user and you’re not familiar with command-lines, don’t worry. There are graphical-based solutions to help you remove write-protection from your hard drives, USB drives, and even SD cards.
EaseUS CleanGenius is one of these tools that helps you fix aforementioned issues on your drives without knowing a thing about command-line.
Here’s an easy-to-follow guide on how to use this tool to get your issues sorted:
Step 1: DOWNLOAD and install EaseUS CleanGenius (free) on your computer.
Step 2: Run EaseUS CleanGenius on your PC, select Optimization and choose the Write Protection mode.
Step 3: Select the device that is write-protected and click Disable to remove the protection.
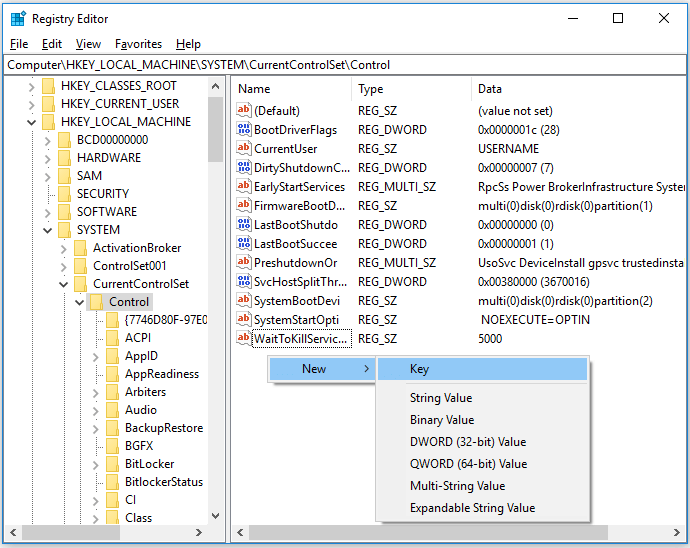
Fix 3. Clear Read-Only in Registry Editor
Method 2 still won’t work? Don’t get upset, here is another way worth trying.
Step 1. Press «Windows + R» simultaneously and enter regedit. In the window asking for permission, click «Yes».
Step 2. Go to HKEY_LOCAL_MACHINESYSTEMCurrentControlSetControlStorageDevicePolicies.
Step 3. Find and right-click the «WriteProtect» key and set the value as «0».
Don’t see «StorageDevicePolicies» in the specific path? No worry, follow the steps below to achieve the same goal.
Step 1. In Registry Editor, go to HKEY_LOCAL_MACHINESYSTEMCurrentControlSetControl.
Step 2. On the right pane, right-click in the space and choose «New» > «Key». Name it as «StorageDevicePolicies».
Step 3. Make sure «StorageDevicePolicies» is selected. Go to the right pane, right-click and choose «DWORD (32-bit) Value».
Step 4. Input the name as «WriteProtect» and set its value as «0».
These are all the possible ways to remove write protection on a hard drive. In most of the cases, using one of the methods above could help to solve the issue «Windows cannot run disk checking on this volume because it is write protected». If the issue remains after trying the fixes, you should consider whether the chkdsk reports write protected due to file system errors or hard drive corruption.
Since the ways to repair corrupted hard drive have been provided, here you can only find the fixes for a hard drive with file system errors. When the file system of your hard drive is corrupted or damaged, you have no access to the data on it. It’s likely that you will receive the message «Windows cannot run disk checking on this volume because it is write protected» in such a case. To make your hard drive work normally again, you need to assign a file system to the hard drive by formatting. However, since the formatting will erase all the existing files on your disk, you are recommended to recover files first.
Fix 4. Recover Files from Hard Drive
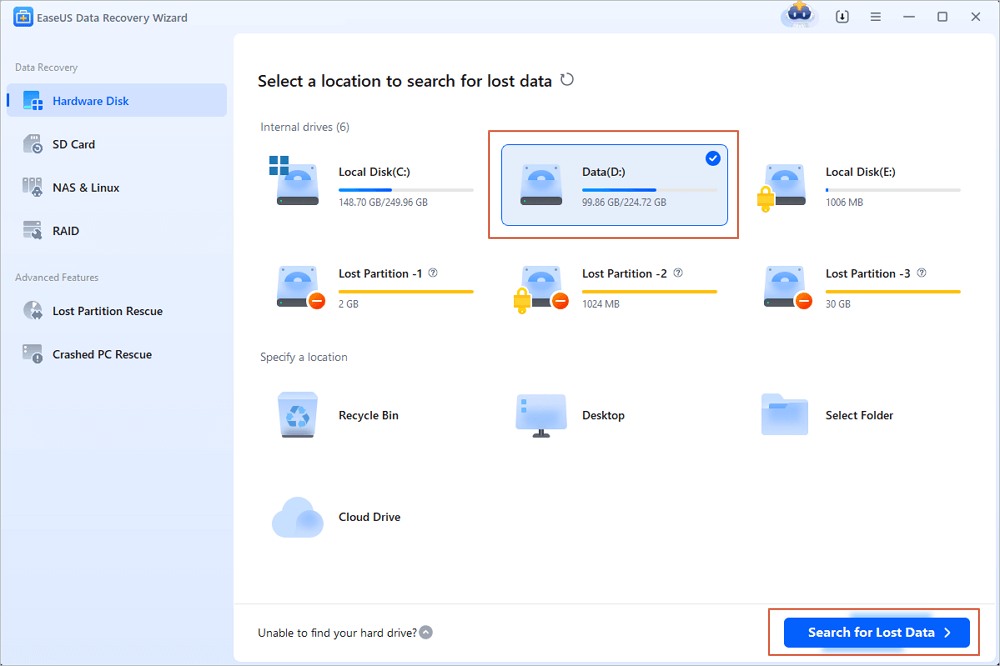
With the EaseUS Data Recovery Wizard — EaseUS Data Recovery Wizard, you are able to retrieve files from disk with file system errors like disk becoming RAW, file system missing, and more. This professional software can rescue almost all existing file types from a computer, external hard drive, USB, memory card, and more after deletion, formatting, file system becoming RAW, etc.
Step 1. Select the drive where you lose your data and click «Scan».
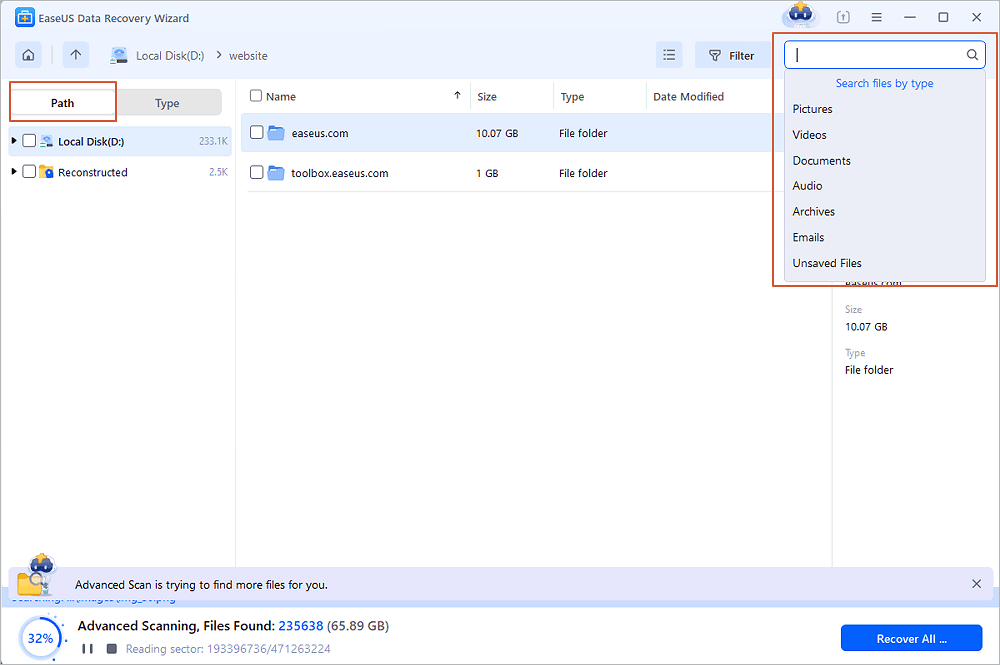
Step 2. Use «Filter» or «Search» to find the lost files when the scan completes.
Step 3. Select all the files you want and click «Recover». Then, browse another secure location to save them.

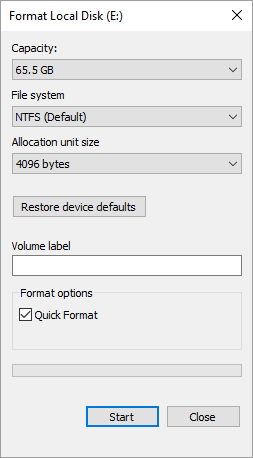
Fix 5. Format the Volume
As you may know, there are many ways to format a hard drive. The easiest one is:
Step 1. Go to «This PC».
Step 2. Find and right-click your problematic hard drive partition.
Step 3. Choose «Format».
Step 4. Set the new file system and other options, then click «Start».
Conclusion
The causes leading to «Windows cannot run disk checking on this volume because it is write protected» are relatively specific. Thus, the ways to fix the error are clear, either by removing write protection or fixing file system errors. Hope one of the methods above can help you fix your problematic hard drive perfectly.
FAQs About Windows Cannot Run Disk Checking On This Volume
If you have more questions about Windows Disk Checking or CHKDSK on a locked drive, check the following questions and you may find the answers to listed questions may interest you somehow.
1. How do you fix Windows Cannot run checking on this volume because it is write protected?
The basic cause of this error is that the Windows disk checking command is disallowed for executing as the target device is write-protected. So the best way to resolve this issue is to remove write protection from your device.
There are 5 ways that can help to unlock a write-protected drive or device. For a detailed guide, you may revert back to the detailed operations of 5 Fixes on this page for help.
2. How do I remove write protection from a hard drive from command prompt?
To remove the write protection of a hard drive from Command Prompt, you should be careful while executing the following steps:
Step 1. Open Command Prompt as Administrator.
Step 2. Type diskpart in Command Prompt and hit Enter.
Step 3. Click «Yes» to open DiskPart.
Step 4. Type list volume, select volume X, attributes disk clear readonly and hit Enter each time. (Replace X with the volume drive of your hard drive.)
3. How do I run chkdsk on a locked drive?
To run CHKDSK on a locked drive, you should first unlock the drive by using CMD command or a third-part write-protection removal tool. You may refer to Remove Write Protection on Windows 10/8/7 for a guide.
After this, you can follow the next steps to run CHKDSK:
Step 1. Open Command Prompt as Administrator.
Step 2. Type: chkdsk E: /f /r /x and press «Enter». (Replace «E» with the drive letter of your hard drive.)
The error ‘Windows cannot Run Disk Checking on this Volume Because it is Write Protected’ is caused when your volume/drive is damaged or attributed to Read Only. CHKDSK is a command-line utility in Windows that lets you search for bad sectors in your volume and verify the integrity of system files stored on your drive.
Depending on the reason why you receive «Windows cannot run disk checking on this volume because it is write protected», the solutions to the problem vary. Five Fixes for Chkdsk Write Protected:
| Workable Solutions | Step-by-step Troubleshooting |
|---|---|
| Case 1. Chkdsk Write Protected Because Hard Drive Is Write Protected |
Fix 1. Remove Write Protection via CMD…Full steps |
| Case 2. Chkdsk Write Protected Because File System Corrupted |
Fix 4. Recover Files from Corrupted Hard Drive…Full steps |
«Tried to boot up my computer this morning and was given the message: ‘Startup Repair cannot repair this computer automatically.’ And it wouldn’t let me boot into the Safe Mode. Having no system restore points, then I ran the chkdsk command. But it gave me the ‘Windows cannot run disk checking on this volume because it is write protected’ error message. Is there any way to fix the issue? I’m running Windows 10 Professional.»
Chkdsk is a built-in Check Disk utility for Windows PC to help you fix disk errors or startup issues. But usually, when you run ‘chkdsk /r’ via a Command Prompt after getting the message: ‘Startup Repair cannot repair this computer automatically’, it will not work and at most times will give you the error message reads:
‘The type of the file system is NTFS.
Cannot lock current drive.
Windows cannot run disk checking on this volume because it is write protected’.
Why did you receive this error message? Generally, there are two common causes:
- The disk volume attribute is set to read-only
- The file system of the partition is corrupted or damaged.
If you happened to be caught in one of the two situations where you were unable to run CHKDSK to check and repair your disk, don’t get frustrated. We will show you effective ways to cope with it.
To enable chkdsk running again, you just need to remove write protection from your hard drive so to get rid of the «Windows cannot run disk checking on this volume because it is write protected» error.
Follow to learn how to remove write protection on a hard drive and make CHKDSK work properly in Windows 10/8/7. Except for PC hard disk, the tutorial is also applicable to an SD card, USB drive or other external memory devices.
Fix 1. Remove Write Protection via CMD
Step 1. Press «Windows + X» buttons to bring up the power users menu.
Step 2. In the power users menu, select the «Command Prompt (Admin)» option.
Step 3. Click «Yes» when you are presented with a UAC window requesting permission to launch the Command Prompt as Administrator.
Step 4. In the new Command Prompt window, type chkdsk E: /f /r /x and press «Enter». Here you should replace «E» with the drive letter of your PC hard drive, SD card or USB drive.
This command will unmount the disk, SD card or USB drive and remove any write protection status on the device. In this case, you can get CHKDSK working again and will no longer see ‘Windows cannot run disk checking on this volume because it is write protected’ error message.
If this tip won’t work, no worry. There are other ways to remove write protection.
Fix 2. Remove Write Protection via Diskpart
Via diskpart, you can clean the read-only attribute on your hard drive.
Step 1. Run «Command Prompt» as an administrator.
Step 2. Enter diskpart and click «Yes» in the prompt asking for notification.
Step 3. Enter the following command in order:
list disk
select disk X (Replace «X» with the number of your write-protected hard drive.)
attributes disk clear readonly
Step 4. If you get the message «Disk attributes cleared successfully», enter exit and then go back to CMD to run the chkdsk command. This time, you will be able to check and fix your disk error easily.
If you are not a professional in computing management and not familiar with command lines, don’t worry. EaseUS R&D team has promoted a fresh kit for helping you resolve the write-protection issue on your hard drive, external hard drive, USB or SD card, etc., devices.
EaseUS CleanGenius is a practical computer fixing tool that is safe and light-weighted. It’s a perfect alternative to the command line.
Use this one-click tool to solve the write-protection issues on your own:
If you don’t consider yourself a pro-computer user and you’re not familiar with command-lines, don’t worry. There are graphical-based solutions to help you remove write-protection from your hard drives, USB drives, and even SD cards.
EaseUS CleanGenius is one of these tools that helps you fix aforementioned issues on your drives without knowing a thing about command-line.
Here’s an easy-to-follow guide on how to use this tool to get your issues sorted:
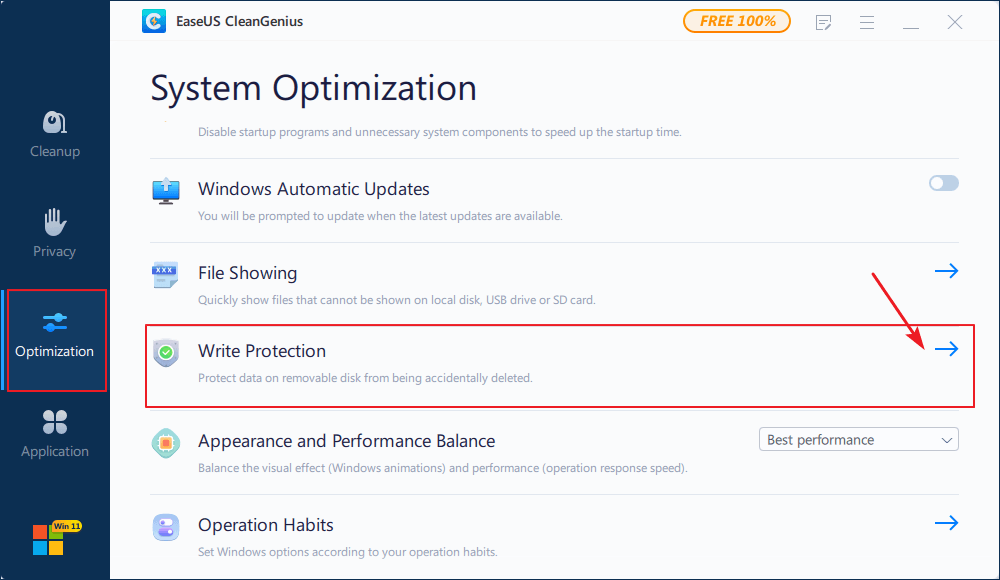
Step 1: DOWNLOAD and install EaseUS CleanGenius (free) on your computer.
Step 2: Run EaseUS CleanGenius on your PC, select Optimization and choose the Write Protection mode.
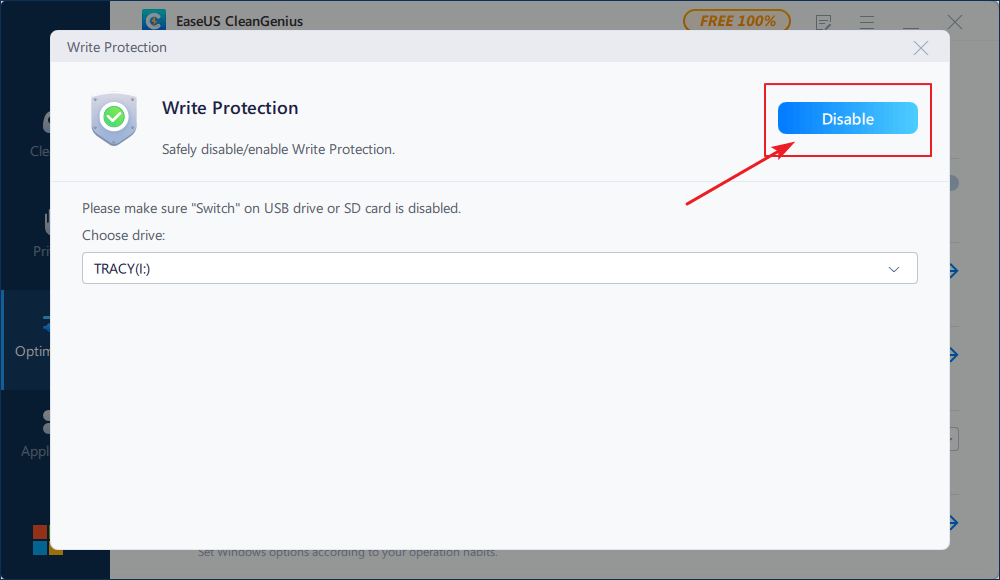
Step 3: Select the device that is write-protected and click Disable to remove the protection.
Fix 3. Clear Read-Only in Registry Editor
Method 2 still won’t work? Don’t get upset, here is another way worth trying.
Step 1. Press «Windows + R» simultaneously and enter regedit. In the window asking for permission, click «Yes».
Step 2. Go to HKEY_LOCAL_MACHINESYSTEMCurrentControlSetControlStorageDevicePolicies.
Step 3. Find and right-click the «WriteProtect» key and set the value as «0».
Don’t see «StorageDevicePolicies» in the specific path? No worry, follow the steps below to achieve the same goal.
Step 1. In Registry Editor, go to HKEY_LOCAL_MACHINESYSTEMCurrentControlSetControl.
Step 2. On the right pane, right-click in the space and choose «New» > «Key». Name it as «StorageDevicePolicies».
Step 3. Make sure «StorageDevicePolicies» is selected. Go to the right pane, right-click and choose «DWORD (32-bit) Value».
Step 4. Input the name as «WriteProtect» and set its value as «0».
These are all the possible ways to remove write protection on a hard drive. In most of the cases, using one of the methods above could help to solve the issue «Windows cannot run disk checking on this volume because it is write protected». If the issue remains after trying the fixes, you should consider whether the chkdsk reports write protected due to file system errors or hard drive corruption.
Since the ways to repair corrupted hard drive have been provided, here you can only find the fixes for a hard drive with file system errors. When the file system of your hard drive is corrupted or damaged, you have no access to the data on it. It’s likely that you will receive the message «Windows cannot run disk checking on this volume because it is write protected» in such a case. To make your hard drive work normally again, you need to assign a file system to the hard drive by formatting. However, since the formatting will erase all the existing files on your disk, you are recommended to recover files first.
Fix 4. Recover Files from Hard Drive
With the EaseUS Data Recovery Wizard — EaseUS Data Recovery Wizard, you are able to retrieve files from disk with file system errors like disk becoming RAW, file system missing, and more. This professional software can rescue almost all existing file types from a computer, external hard drive, USB, memory card, and more after deletion, formatting, file system becoming RAW, etc.
Step 1. Select the drive where you lose your data and click «Scan».
Step 2. Use «Filter» or «Search» to find the lost files when the scan completes.
Step 3. Select all the files you want and click «Recover». Then, browse another secure location to save them.
Fix 5. Format the Volume
As you may know, there are many ways to format a hard drive. The easiest one is:
Step 1. Go to «This PC».
Step 2. Find and right-click your problematic hard drive partition.
Step 3. Choose «Format».
Step 4. Set the new file system and other options, then click «Start».
Conclusion
The causes leading to «Windows cannot run disk checking on this volume because it is write protected» are relatively specific. Thus, the ways to fix the error are clear, either by removing write protection or fixing file system errors. Hope one of the methods above can help you fix your problematic hard drive perfectly.
FAQs About Windows Cannot Run Disk Checking On This Volume
If you have more questions about Windows Disk Checking or CHKDSK on a locked drive, check the following questions and you may find the answers to listed questions may interest you somehow.
1. How do you fix Windows Cannot run checking on this volume because it is write protected?
The basic cause of this error is that the Windows disk checking command is disallowed for executing as the target device is write-protected. So the best way to resolve this issue is to remove write protection from your device.
There are 5 ways that can help to unlock a write-protected drive or device. For a detailed guide, you may revert back to the detailed operations of 5 Fixes on this page for help.
2. How do I remove write protection from a hard drive from command prompt?
To remove the write protection of a hard drive from Command Prompt, you should be careful while executing the following steps:
Step 1. Open Command Prompt as Administrator.
Step 2. Type diskpart in Command Prompt and hit Enter.
Step 3. Click «Yes» to open DiskPart.
Step 4. Type list volume, select volume X, attributes disk clear readonly and hit Enter each time. (Replace X with the volume drive of your hard drive.)
3. How do I run chkdsk on a locked drive?
To run CHKDSK on a locked drive, you should first unlock the drive by using CMD command or a third-part write-protection removal tool. You may refer to Remove Write Protection on Windows 10/8/7 for a guide.
After this, you can follow the next steps to run CHKDSK:
Step 1. Open Command Prompt as Administrator.
Step 2. Type: chkdsk E: /f /r /x and press «Enter». (Replace «E» with the drive letter of your hard drive.)
Проверка жёсткого диска на битые сектора
05.04.2017

Жёсткий диск (HDD) — устройство для записи и хранения данных. Это довольно хрупкая вещь. Механические повреждения и ошибки в его системе могут повлечь за собой нарушения в работе компьютера вплоть до отказа запуска. Нередко пользователи сталкиваются с проблемой «битых» секторов винчестера, которые вызывают проблемы в работе ПК.
Битые сектора
Стандартный винчестер имеет вращающиеся магнитные диски и магнитную головку, с помощью которой происходит функция записи данных. Так вот, эти диски разделяются на «дорожки», а области, образованные этими дорожками, называются секторами.
Для наглядности приведём пример логической структуры диска:

При любых причинах повреждения сектора винчестер не может прочитать оттуда информацию. Из-за этого происходит попытка восстановления неисправного участка. В случае невозможности исправить неполадку, диск обращается к запасным секторам. Такие действия, естественно, сильно ухудшают скорость работы программ или же самой системы.
Симптомы повреждения секторов
Вы можете самостоятельно узнать о наличии на устройстве записи битых секторов. На это указывает много сбоев в работе:
- Очень медленный запуск операционной системы.
- Лаги и подтормаживания в ходе работы.
- Самопроизвольный перезапуск компьютера.
- Полный отказ в запуске системы.
При наличии таких проблем, вероятно, ваш винчестер имеет повреждённые области.
Важно! Не всегда эти симптомы означают неполадки самого HDD. Существует вероятность, что их могут вызывать и другие ошибки, связанные с программной или аппаратной составляющей компьютера.
Причины возникновения
Рассмотрим несколько причин появления данной проблемы:
- Механическое вмешательство (внешнее повреждение).
- Неверное завершение работы компьютера (отключения кабеля питания, выключение с помощью кнопки на системном блоке).
- Постепенный износ магнитных дисков.
- Нестабильность сети (низкое или высокое напряжение).
Проверка на наличие битых секторов
Для проверки винчестера на поврежденные области существует множество способов, в основном, с использованием стороннего ПО. Давайте рассмотрим несколько из них поближе:
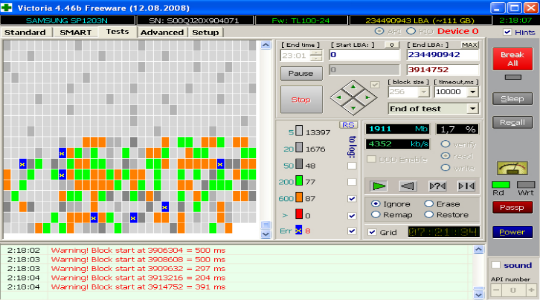
Способ 1: Victoria
Victoria — популярнейшая бесплатная программа для проверки и исправления повреждённых участков винчестера. В её эффективности убедились как владельцы проблемных HDD, так и опытные специалисты по ремонту. Огромный плюс данной программы в режиме «Smart». Эта функция позволяет подробно и тщательно следить за работоспособностью накопителя. Чтобы произвести проверку необходимо выполнить такие шаги:
- Скачайте программу и установите её.
- Откройте скачанную папку и запустите приложение «vcr447».
- В разделе «Standard» кликните по «API».
- Найдите свой HDD в списке и кликните по нему.
- Далее перейдите в раздел «Tests».
- Выберите пункт «Ignore» и нажмите «Start».

Откроется окно программы. Не пугайтесь, что оно на английском языке. Проверка выполняется в несколько действий.


В ходе анализа можно увидеть количество найденных поврежденных участков. За это отвечают три последних пункта.

На этом проверка завершена. Чтобы исправить найденные ошибки выберите пункт «Remap» и нажмите «Start».
Способ 2: Acronis Disk Director
Acronis Disk Director — отличное средство для анализа и исправления ошибок HDD. Имеет очень удобный интерфейс и мощный функционал. Единственный минус — программа платная, однако имеется пробная версия. Чтобы проверить винчестер этим способом, проделайте следующее:
- Скачайте программу с официального сайта.
- Установите и запустите её.
- В новом окне выберите нужный раздел и нажмите «Проверить».
- Подтвердите проверку


По завершению вы сможете ознакомиться с результатами анализа, а также исправить ошибки, если они имеются. В нашем случае Windows не обнаружила неполадок.

Способ 3: HDD Regenerator
HDD Regenerator — профессиональный инструмент для проверки и восстановления ошибок жёсткого диска. Одна из лучших утилит в своем роде. К сожалению программа платная Для запуска проверки выполните нижеприведённые манипуляции:
- Запустите утилиту.
- Кликните по вкладке «Regeneration» и нажмите «Start Process under Windows».
- Выберите HDD и нажмите «Start Process».
- В открывшемся окне выберите пункт «Normal Scan» кнопкой «2» .Подтвердите клавишей «Enter».
- Нажмите кнопку «1» и подтвердите клавишей «Enter».
- Нажмите «1», затем «Enter».
- Дождитесь завершения анализа.


Вот и всё! Проверка завершена.
Способ 4: Использование стандартных средств
Если у вас нет возможности использовать стороннее ПО, тогда можно воспользоваться стандартными инструментами Windows. Для этого нужно проделать такие шаги:
- Кликните ПКМ по значку «Мой компьютер» и выберите «Управление».
- Выберите раздел «Управление дисками».
- Щелкните ПКМ по нужному разделу накопителя и нажмите «Свойства».
- Выберите вкладку «Сервис» и нажмите «Проверить».


После проверки вы можете ознакомиться с её результатами. По необходимости, исправьте найденные ошибки.
На этом способы проверки подошли к концу. Будем рады, если оставите свой отзыв. Большое спасибо за внимание!