Code:
[Configuration]
BasedOn=..UDKGameConfigDefaultGameUDK.ini

[Engine.GameInfo]
DefaultGame=UDKBase.SimpleGame
DefaultServerGame=UDKBase.SimpleGame
PlayerControllerClassName=UDKBase.SimplePC
GameDifficulty=+00.0
MaxPlayers=32
DefaultGameType="UTGame.UTDeathmatch";
+DefaultMapPrefixes=(Prefix="DM",bUsesCommonPackage=FALSE,GameType="UTGame.UTDeathmatch")
+DefaultMapPrefixes=(Prefix="CTF",bUsesCommonPackage=FALSE,GameType="UTGameContent.UTCTFGame_Content")
+DefaultMapPrefixes=(Prefix="VCTF",bUsesCommonPackage=FALSE,GameType="UTGameContent.UTVehicleCTFGame_Content")
+DefaultMapPrefixes=(Prefix="TM01",bUsesCommonPackage=FALSE,GameType="TestMap01.TestMap01Game")

[Engine.AutoTestManager]
NumAutomatedMapTestingCycles=0
+AutomatedMapTestingList=CTF-Hydrosis
+AutomatedMapTestingList=DM-Defiance
+AutomatedMapTestingList=VCTF-Kargo
+AutomatedMapTestingList=WAR-Avalanche
+AutomatedMapTestingList=WAR-Torlan

[Engine.WorldInfo]
DecalManagerClassPath="UTGame.UTDecalManager"
bNoMobileMapWarnings=False

[UTGame.UTPawn]
Bob=0.010
bWeaponBob=true

[UTGame.UTPlayerController]
bAutoTaunt=false
bLandingShake=true
PawnShadowMode=SHADOW_All
AutoObjectivePreference=AOP_NoPreference
bUseVehicleRotationOnPossess=true
bFirstPersonWeaponsSelfShadow=true

[UTGame.UTConsolePlayerController]
bTargetAdhesionEnabled=TRUE
bDebugTargetAdhesion=FALSE

[UTGame.DemoRecSpectator]
bLockRotationToViewTarget=false
bAutoSwitchPlayers=false
AutoSwitchPlayerInterval=0

[UTGame.UTDeathMessage]
bNoConsoleDeathMessages=false

[UTGame.UTTeamDeathMessage]
bNoConsoleDeathMessages=true

[UTGame.UTAnnouncer]
AnnouncerLevel=2

[UTGame.UTMusicManager]
MusicVolume=0.36
StingerVolumeMultiplier=1.1

[UTGame.UTGame]
BotRatio=+1.0
GoalScore=25
bTournament=false
bPlayersMustBeReady=false
NetWait=15
ClientProcessingTimeout=30
RestartWait=30
MinNetPlayers=1
bWaitForNetPlayers=true
LateEntryLives=1
TimeLimit=20
GameDifficulty=+100.0
EndTimeDelay=4.0
GameSpecificMapCycles=(GameClassName="UTDeathmatch",Maps=("DM-Sanctuary","DM-Deck","DM-Gateway"))
GameSpecificMapCycles=(GameClassName="UTTeamGame",Maps=("DM-Sanctuary","DM-Deck","DM-Gateway"))
GameSpecificMapCycles=(GameClassName="UTVehicleCTFGame_Content",Maps=("VCTF-Necropolis","VCTF-SandStorm"))
bLogGameplayEvents=false

[UTGame.UTTeamGame]
GoalScore=60
bPlayersBalanceTeams=true
bWeaponStay=true
MaxLives=0

[UTGame.UTCTFGame]
GoalScore=3
bWeaponStay=true

[UTGame.UTHUDBase]
ConsoleIconFontClassName=UI_Fonts.Fonts.UI_Fonts_Xbox18

[UTGame.UTHUD]
ConsoleMessageCount=16
SafeRegionPct=1.0
bShowMap=false
MapDefaultSize=220
bShowClock=false
bShowDoll=true
bShowAmmo=true
bShowPowerups=true
PowerupDims=(X=48,Y=52);
bShowScoring=true
bShowLeaderboard=true
bShowVehicle=true
bShowDamage=true
bShowMap=true
DamageIndicatorSize=384
bShowMobileHud=true
bShowVehicleArmorCount=True

[UTGame.UTInventoryManager]
bAutoSwitchWeaponOnPickup=true

[UTGame.UTMutator_Arena]
ArenaWeaponClassPath="UTGame.UTWeap_ShockRifle"

[UTGame.UTUIScene_COptions]
FirstCinematicMapName="UTCin-Intro"

[UTGame.UTUIFrontEnd_LoginScreen]
bSavePassword=True

[UTGame.UTUIDataStore_StringList]
+StringData=(Tag="ServerType",DefaultValueIndex=1)
+StringData=(Tag="ServerType360",DefaultValueIndex=1)
+StringData=(Tag="MatchType",DefaultValueIndex=1)
+StringData=(Tag="MatchType360",DefaultValueIndex=1)
+StringData=(Tag="BotTeams",DefaultValueIndex=0)
+StringData=(Tag="RecordDemo",DefaultValueIndex=0)
+StringData=(Tag="PlayerName",DefaultValueIndex=0)

[UTGame.UTUIDataStore_MenuItems]
+ElementProviderTypes=(ProviderTag="MultiplayerMenu",ProviderClassName="UTGame.UTUIDataProvider_MultiplayerMenuItem")
+ElementProviderTypes=(ProviderTag="GameModes",ProviderClassName="UTGame.UTUIDataProvider_GameModeInfo")
+ElementProviderTypes=(ProviderTag="Maps",ProviderClassName="UTGame.UTUIDataProvider_MapInfo")
+ElementProviderTypes=(ProviderTag="Mutators",ProviderClassName="UTGame.UTUIDataProvider_Mutator")
+ElementProviderTypes=(ProviderTag="Weapons",ProviderClassName="UTGame.UTUIDataProvider_Weapon")
+ElementProviderTypes=(ProviderTag="DropDownWeapons",ProviderClassName="UTGame.UTUIDataProvider_Weapon")

;///////////////
; Weapons
;///////////////
[UTWeap_RocketLauncher UTUIDataProvider_Weapon]
ClassName=UTGameContent.UTWeap_RocketLauncher_Content
AmmoClassPath=UTGame.UTAmmo_RocketLauncher

[UTWeap_LinkGun UTUIDataProvider_Weapon]
ClassName=UTGame.UTWeap_LinkGun
AmmoClassPath=UTGame.UTAmmo_LinkGun

[UTWeap_ShockRifle UTUIDataProvider_Weapon]
ClassName=UTGameContent.UTWeap_ShockRifle
AmmoClassPath=UTGame.UTAmmo_ShockRifle

;///////////////
; Possible Key Bindings
;///////////////
[MoveForward UTUIDataProvider_KeyBinding]
Command="GBA_MoveForward"
bIsCrucialBind=true

[MoveBackward UTUIDataProvider_KeyBinding]
Command="GBA_Backward"
bIsCrucialBind=true

[StrafeLeft UTUIDataProvider_KeyBinding]
Command="GBA_StrafeLeft"
bIsCrucialBind=true

[StrafeRight UTUIDataProvider_KeyBinding]
Command="GBA_StrafeRight"
bIsCrucialBind=true

[TurnLeft UTUIDataProvider_KeyBinding]
Command="GBA_TurnLeft"

[TurnRight UTUIDataProvider_KeyBinding]
Command="GBA_TurnRight"

[Jump UTUIDataProvider_KeyBinding]
Command="GBA_Jump"
bIsCrucialBind=true

[Duck UTUIDataProvider_KeyBinding]
Command="GBA_Duck"
bRemoveOnPS3=1
bRemoveOn360=1
bIsCrucialBind=true

[Fire UTUIDataProvider_KeyBinding]
Command="GBA_Fire"
bIsCrucialBind=true

[AltFire UTUIDataProvider_KeyBinding]
Command="GBA_AltFire"
bIsCrucialBind=true

[Use UTUIDataProvider_KeyBinding]
Command="GBA_Use"
bIsCrucialBind=true

[FeignDeath UTUIDataProvider_KeyBinding]
Command="GBA_FeignDeath"

[SwitchToBestWeapon UTUIDataProvider_KeyBinding]
Command="GBA_SwitchToBestWeapon"

[PreviousWeapon UTUIDataProvider_KeyBinding]
Command="GBA_PrevWeapon"

[NextWeapon UTUIDataProvider_KeyBinding]
Command="GBA_NextWeapon"

[SwitchWeapon1 UTUIDataProvider_KeyBinding]
Command="GBA_SwitchWeapon1"

[SwitchWeapon2 UTUIDataProvider_KeyBinding]
Command="GBA_SwitchWeapon2"

[SwitchWeapon3 UTUIDataProvider_KeyBinding]
Command="GBA_SwitchWeapon3"

[SwitchWeapon4 UTUIDataProvider_KeyBinding]
Command="GBA_SwitchWeapon4"

[SwitchWeapon5 UTUIDataProvider_KeyBinding]
Command="GBA_SwitchWeapon5"

[SwitchWeapon6 UTUIDataProvider_KeyBinding]
Command="GBA_SwitchWeapon6"

[SwitchWeapon7 UTUIDataProvider_KeyBinding]
Command="GBA_SwitchWeapon7"

[SwitchWeapon8 UTUIDataProvider_KeyBinding]
Command="GBA_SwitchWeapon8"

[SwitchWeapon9 UTUIDataProvider_KeyBinding]
Command="GBA_SwitchWeapon9"

[SwitchWeapon10 UTUIDataProvider_KeyBinding]
Command="GBA_SwitchWeapon10"

[ToggleTranslocator UTUIDataProvider_KeyBinding]
Command="GBA_ToggleTranslocator"
bIsCrucialBind=true

[TransmitVoice UTUIDataProvider_KeyBinding]
Command="GBA_ToggleSpeaking"

[Talk UTUIDataProvider_KeyBinding]
Command="GBA_Talk"
bRemoveOnPS3=True
bRemoveOn360=1

[TeamTalk UTUIDataProvider_KeyBinding]
Command="GBA_TeamTalk"
bRemoveOnPS3=True
bRemoveOn360=1

[Taunt1 UTUIDataProvider_KeyBinding]
Command="GBA_Taunt1"

[Taunt2 UTUIDataProvider_KeyBinding]
Command="GBA_Taunt2"

[Horn UTUIDataProvider_KeyBinding]
Command="GBA_Horn"

[ShowMenu UTUIDataProvider_KeyBinding]
Command="GBA_ShowMenu"
bIsCrucialBind=true

[ShowCommandMenu UTUIDataProvider_KeyBinding]
Command="GBA_ShowCommandMenu"

[ShowScores UTUIDataProvider_KeyBinding]
Command="GBA_ShowScores"

[ShowMap UTUIDataProvider_KeyBinding]
Command="GBA_ShowMap"

[ToggleMinimap UTUIDataProvider_KeyBinding]
Command="GBA_ToggleMinimap"

;[GrowHud UTUIDataProvider_KeyBinding]
;Command="GBA_GrowHud"

;[ShrinkHud UTUIDataProvider_KeyBinding]
;Command="GBA_ShrinkHud"

;///////////////
; Multiplayer Menu
;///////////////
[JoinGame UTUIDataProvider_MultiplayerMenuItem]
bRemoveOnPC=0
bRemoveOn360=0
bRemoveOnPS3=0

[HostGame UTUIDataProvider_MultiplayerMenuItem]
bRemoveOnPC=0
bRemoveOn360=0
bRemoveOnPS3=0

;///////////////
; UT3 Mutators
;///////////////
[UTMutator_SlowTimeKills UTUIDataProvider_Mutator]
ClassName=UTGame.UTMutator_SlowTimeKills
GroupNames=GAMESPEED
bStandaloneOnly=1
bRemoveOn360=False
bRemoveOnPC=False
bRemoveOnPS3=False

[UTMutator_BigHead UTUIDataProvider_Mutator]
ClassName=UTGame.UTMutator_BigHead
GroupNames=BIGHEAD
bRemoveOn360=False
bRemoveOnPC=False
bRemoveOnPS3=False

[UTMutator_FriendlyFire UTUIDataProvider_Mutator]
ClassName=UTGame.UTMutator_FriendlyFire
GroupNames=FRIENDLYFIRE
bRemoveOn360=False
bRemoveOnPC=False
bRemoveOnPS3=False

[UTMutator_Handicap UTUIDataProvider_Mutator]
ClassName=UTGame.UTMutator_Handicap
GroupNames=HANDICAP
bRemoveOn360=False
bRemoveOnPC=False
bRemoveOnPS3=False

[UTMutator_LowGrav UTUIDataProvider_Mutator]
ClassName=UTGame.UTMutator_LowGrav
GroupNames=JUMPING
bRemoveOn360=False
bRemoveOnPC=False
bRemoveOnPS3=False

[UTMutator_NoPowerups UTUIDataProvider_Mutator]
ClassName=UTGame.UTMutator_NoPowerups
GroupNames=POWERUPS
bRemoveOn360=False
bRemoveOnPC=False
bRemoveOnPS3=False

[UTMutator_Slomo UTUIDataProvider_Mutator]
ClassName=UTGame.UTMutator_Slomo
GroupNames=GAMESPEED
bRemoveOn360=False
bRemoveOnPC=False
bRemoveOnPS3=False

[UTMutator_SpeedFreak UTUIDataProvider_Mutator]
ClassName=UTGame.UTMutator_SpeedFreak
GroupNames=GAMESPEED
bRemoveOn360=False
bRemoveOnPC=False
bRemoveOnPS3=False

[UTMutator_SuperBerserk UTUIDataProvider_Mutator]
ClassName=UTGame.UTMutator_SuperBerserk
GroupNames=FIRINGSPEED
bRemoveOn360=False
bRemoveOnPC=False
bRemoveOnPS3=False

[UTMutator_WeaponsRespawn UTUIDataProvider_Mutator]
ClassName=UTGame.UTMutator_WeaponsRespawn
GroupNames=WEAPONRESPAWN
bRemoveOn360=False
bRemoveOnPC=False
bRemoveOnPS3=False

[UTMutator_Survival UTUIDataProvider_Mutator]
ClassName=UTGame.UTMutator_Survival
GroupNames=
UIConfigScene=
bRemoveOn360=False
bRemoveOnPC=False
bRemoveOnPS3=False

;///////////////
; UT3 Game Modes
;///////////////
[UTDeathmatch UTUIDataProvider_GameModeInfo]
GameMode=UTGame.UTDeathmatch
GameSettingsClass=UTgameSettingsDM
GameSearchClass=UTGameSearchDM
PreviewImageMarkup=UI_FrontEnd_Art.GameTypes.___Deathmatch
DefaultMap=DM-Deck
Prefixes=DM
OptionSet=DM
IconImage=UI_HUD.HUD.UI_HUD_BaseD
IconU=442
IconV=76
IconUL=129
IconVL=104

[UTTeamGame UTUIDataProvider_GameModeInfo]
GameMode=UTGame.UTTeamGame
GameSettingsClass=UTGameSettingsTDM
GameSearchClass=UTGameSearchTDM
PreviewImageMarkup=UI_FrontEnd_Art.GameTypes.___TeamDeathmatch
DefaultMap=DM-Deck
Prefixes=DM
OptionSet=TDM
IconImage=UI_HUD.HUD.UI_HUD_BaseD
IconU=571
IconV=76
IconUL=149
IconVL=105

[UTVehicleCTFGame_Content UTUIDataProvider_GameModeInfo]
GameMode=UTGameContent.UTVehicleCTFGame_Content
GameSettingsClass=UTGameSettingsVCTF
GameSearchClass=UTGameSearchVCTF
PreviewImageMarkup=UI_FrontEnd_Art.GameTypes.___VCTF
DefaultMap=VCTF-Necropolis
Prefixes=VCTF
OptionSet=VCTF
IconImage=UI_HUD.HUD.UI_HUD_BaseD
IconU=230
IconV=76
IconUL=104
IconVL=113

;///////////////
; UT3 Maps
;///////////////
[vCTF-Necropolis UTUIDataProvider_MapInfo]
MapName=vCTF-NECROPOLIS
PreviewImageMarkup=UI_FrontEnd_Art.MapPics.___Map-Pic-vCTF-Necropolis
Description=<Strings:UTGAMEUI.CampaignBriefing.BriefDesc38>

[vCTF-Sandstorm UTUIDataProvider_MapInfo]
MapName=vCTF-SANDSTORM
PreviewImageMarkup=UI_FrontEnd_Art.MapPics.___Map-Pic-vCTF-Sandstorm
Description=<Strings:UTGAMEUI.CampaignBriefing.BriefDesc35>

[DM-Deck UTUIDataProvider_MapInfo]
MapName=DM-DECK
PreviewImageMarkup=UI_FrontEnd_Art.MapPics.___Map-Pic-DM-Deck
Description=<Strings:UTGAMEUI.CampaignBriefing.BriefDesc139>

[DM-Sanctuary UTUIDataProvider_MapInfo]
MapName=DM-SANCTUARY
PreviewImageMarkup=UI_FrontEnd_Art.MapPics.___Map-Pic-DM-Sanctuary
Description=<Strings:UTGAMEUI.CampaignBriefing.BriefDesc36>

[UTGame.UTUIDataStore_Options]
+ElementProviderTypes=(ProviderTag="OptionSets",ProviderClassName="UTGame.UTUIDataProvider_MenuOption")

;///////////////
; Instant Action Options
;///////////////

[BotSkill_Common UTUIDataProvider_MenuOption]
OptionSet=Common
DataStoreMarkup=<UTGameSettings:BotSkill>
bReadOnlyCombo=1

[NumBots_Common UTUIDataProvider_MenuOption]
OptionSet=Common
DataStoreMarkup=<UTGameSettings:NumBots>
OptionType=UTOT_Slider
RangeData=(MinValue=0.0,MaxValue=15.0,bIntRange=1,NudgeValue=1.0,CurrentValue=4.0)

[GoalScore_Common UTUIDataProvider_MenuOption]
OptionSet=Common
DataStoreMarkup=<UTGameSettings:GoalScore>
bEditableCombo=1
bNumericCombo=1

[TimeLimit_Common UTUIDataProvider_MenuOption]
OptionSet=Common
DataStoreMarkup=<UTGameSettings:TimeLimit>
bEditableCombo=1
bNumericCombo=1

[BotTeam_Common UTUIDataProvider_MenuOption]
OptionSet=Common
DataStoreMarkup=<UTStringList:BotTeams>
bRemoveOn360=1
bRemoveOnPC=1
bRemoveOnPS3=1

; Disabled
;[RecordDemo_Common UTUIDataProvider_MenuOption]
;OptionSet=Common
;DataStoreMarkup=<UTStringList:RecordDemo>
;bRemoveOn360=1
;OptionType=UTOT_CollectionCheckBox

;///////////////
; Deathmatch Options
;///////////////

[BotSkill_DM UTUIDataProvider_MenuOption]
+OptionSet=DM
+OptionSet=TDM
+OptionSet=VCTF
DataStoreMarkup=<UTGameSettings:BotSkill>

[NumBots_DM UTUIDataProvider_MenuOption]
+OptionSet=DM
+OptionSet=TDM
+OptionSet=VCTF
DataStoreMarkup=<UTGameSettings:NumBots>
OptionType=UTOT_Slider
RangeData=(MinValue=0.0,MaxValue=15.0,bIntRange=1,NudgeValue=1.0,CurrentValue=0.0)

[VsBots_DM UTUIDataProvider_MenuOption]
+OptionSet=TDM
+OptionSet=VCTF
DataStoreMarkup=<UTGameSettings:VsBots>
bOnlineOnly=1

[GoalScore_DM UTUIDataProvider_MenuOption]
+OptionSet=DM
+OptionSet=TDM
+OptionSet=VCTF
DataStoreMarkup=<UTGameSettings:GoalScore>
bEditableCombo=1
bNumericCombo=1

[TimeLimit_DM UTUIDataProvider_MenuOption]
+OptionSet=DM
+OptionSet=TDM
+OptionSet=VCTF
DataStoreMarkup=<UTGameSettings:TimeLimit>
bEditableCombo=1
bNumericCombo=1

[BotTeam_DM UTUIDataProvider_MenuOption]
+OptionSet=TDM
+OptionSet=VCTF
DataStoreMarkup=<UTStringList:BotTeams>
bRemoveOn360=1
bRemoveOnPC=1
bRemoveOnPS3=1

[ForceRespawn_DM UTUIDataProvider_MenuOption]
+OptionSet=DM
+OptionSet=TDM
+OptionSet=VCTF
DataStoreMarkup=<UTGameSettings:ForceRespawn>
OptionType=UTOT_CollectionCheckBox


;///////////////
; Server Options
;///////////////
[ServerType UTUIDataProvider_MenuOption]
+OptionSet=Server
DataStoreMarkup=<UTStringList:ServerType>
bRemoveOn360=1

[ServerType360 UTUIDataProvider_MenuOption]
OptionSet=Server
DataStoreMarkup=<UTStringList:ServerType360>
bRemoveOnPC=1
bRemoveOnPS3=1

[MaxPlayers_PC UTUIDataProvider_MenuOption]
+OptionSet=Server
DataStoreMarkup=<UTGameSettings:MaxPlayers>
OptionType=UTOT_Slider
RangeData=(MinValue=2,MaxValue=24,bIntRange=1,NudgeValue=1,CurrentValue=24)
bRemoveOn360=1
bRemoveOnPS3=1

[MaxPlayers_Console UTUIDataProvider_MenuOption]
+OptionSet=Server
DataStoreMarkup=<UTGameSettings:MaxPlayers>
OptionType=UTOT_Slider
RangeData=(MinValue=2,MaxValue=16,bIntRange=1,NudgeValue=1,CurrentValue=16)
bRemoveOnPC=1

[MinNumPlayers_PC UTUIDataProvider_MenuOption]
+OptionSet=Server
DataStoreMarkup=<UTGameSettings:MinNetPlayers>
OptionType=UTOT_Slider
RangeData=(MinValue=0,MaxValue=24,bIntRange=1,NudgeValue=1,CurrentValue=24)
bRemoveOn360=1
bRemoveOnPS3=1

[MinNumPlayers_Console UTUIDataProvider_MenuOption]
+OptionSet=Server
DataStoreMarkup=<UTGameSettings:MinNetPlayers>
OptionType=UTOT_Slider
RangeData=(MinValue=0,MaxValue=16,bIntRange=1,NudgeValue=1,CurrentValue=16)
bRemoveOnPC=1

[PrivateSlots UTUIDataProvider_MenuOption]
+OptionSet=Server
DataStoreMarkup=<UTGameSettings:NumPrivateConnections>
OptionType=UTOT_Slider
RangeData=(MinValue=0,MaxValue=23,bIntRange=1,NudgeValue=1,CurrentValue=0)
bRemoveOnPS3=1
bRemoveOnPC=1

[AllowKeyboard UTUIDataProvider_MenuOption]
+OptionSet=Server
DataStoreMarkup=<UTGameSettings:AllowKeyboard>
OptionType=UTOT_CollectionCheckBox
bRemoveOnPC=true
bRemoveOn360=true

[ServerDescription UTUIDataProvider_MenuOption]
+OptionSet=Server
DataStoreMarkup=<OnlinePlayerData:ServerDescription>
OptionType=UTOT_EditBox
EditBoxMaxLength=32
bRemoveOn360=true
bRemoveOnPS3=1

[ServerMOTD UTUIDataProvider_MenuOption]
+OptionSet=Server
DataStoreMarkup=<Registry:ServerMOTD>
OptionType=UTOT_EditBox
EditBoxMaxLength=512
bRemoveOn360=true
bRemoveOnPS3=1

[ServerPassword UTUIDataProvider_MenuOption]
+OptionSet=Server
DataStoreMarkup=<Registry:ServerPassword>
OptionType=UTOT_EditBox
EditBoxMaxLength=16
bRemoveOn360=true
bRemoveOnPS3=1

;///////////////
; Client Options
;///////////////
[MatchType UTUIDataProvider_MenuOption]
+OptionSet=Client
DataStoreMarkup=<UTStringList:MatchType>
bRemoveOn360=1

[MatchType360 UTUIDataProvider_MenuOption]
+OptionSet=Client
DataStoreMarkup=<UTStringList:MatchType360>
bRemoveOnPC=1
bRemoveOnPS3=1

[GameMode_Client UTUIDataProvider_MenuOption]
+OptionSet=Client
DataStoreMarkup=<UTMenuItems:GameModeFilter>

;///////////////
; PS3 Keybinding Presets
;///////////////
[StickConfiguration_PresetsPS3 UTUIDataProvider_MenuOption]
OptionSet=PresetsPS3
DataStoreMarkup=<OnlinePlayerData:ProfileData.GamepadBinding_AnalogStickPreset>

[ButtonPreset_PresetsPS3 UTUIDataProvider_MenuOption]
OptionSet=PresetsPS3
DataStoreMarkup=<UTStringList:PS3ButtonPresets>

;///////////////
; PS3 Keybinding
;///////////////
[StickConfiguration_KeysPS3 UTUIDataProvider_MenuOption]
OptionSet=KeysPS3
DataStoreMarkup=<OnlinePlayerData:ProfileData.GamepadBinding_AnalogStickPreset>

[X_KeysPS3 UTUIDataProvider_MenuOption]
OptionSet=KeysPS3
DataStoreMarkup=<OnlinePlayerData:ProfileData.GamepadBinding_ButtonA>

[Circle_KeysPS3 UTUIDataProvider_MenuOption]
OptionSet=KeysPS3
DataStoreMarkup=<OnlinePlayerData:ProfileData.GamepadBinding_ButtonB>

[Square_KeysPS3 UTUIDataProvider_MenuOption]
OptionSet=KeysPS3
DataStoreMarkup=<OnlinePlayerData:ProfileData.GamepadBinding_ButtonX>

[Triangle_KeysPS3 UTUIDataProvider_MenuOption]
OptionSet=KeysPS3
DataStoreMarkup=<OnlinePlayerData:ProfileData.GamepadBinding_ButtonY>

[R1_KeysPS3 UTUIDataProvider_MenuOption]
OptionSet=KeysPS3
DataStoreMarkup=<OnlinePlayerData:ProfileData.GamepadBinding_RightBumper>

[R2_KeysPS3 UTUIDataProvider_MenuOption]
OptionSet=KeysPS3
DataStoreMarkup=<OnlinePlayerData:ProfileData.GamepadBinding_RightTrigger>

[R3_KeysPS3 UTUIDataProvider_MenuOption]
OptionSet=KeysPS3
DataStoreMarkup=<OnlinePlayerData:ProfileData.GamepadBinding_RightThumbstickPressed>

[L1_KeysPS3 UTUIDataProvider_MenuOption]
OptionSet=KeysPS3
DataStoreMarkup=<OnlinePlayerData:ProfileData.GamepadBinding_LeftBumper>

[L2_KeysPS3 UTUIDataProvider_MenuOption]
OptionSet=KeysPS3
DataStoreMarkup=<OnlinePlayerData:ProfileData.GamepadBinding_LeftTrigger>

[L3_KeysPS3 UTUIDataProvider_MenuOption]
OptionSet=KeysPS3
DataStoreMarkup=<OnlinePlayerData:ProfileData.GamepadBinding_LeftThumbstickPressed>

[DPadUp_KeysPS3 UTUIDataProvider_MenuOption]
OptionSet=KeysPS3
DataStoreMarkup=<OnlinePlayerData:ProfileData.GamepadBinding_DPadUp>

[DPadDown_KeysPS3 UTUIDataProvider_MenuOption]
OptionSet=KeysPS3
DataStoreMarkup=<OnlinePlayerData:ProfileData.GamepadBinding_DPadDown>

[DPadLeft_KeysPS3 UTUIDataProvider_MenuOption]
OptionSet=KeysPS3
DataStoreMarkup=<OnlinePlayerData:ProfileData.GamepadBinding_DPadLeft>

[DPadRight_KeysPS3 UTUIDataProvider_MenuOption]
OptionSet=KeysPS3
DataStoreMarkup=<OnlinePlayerData:ProfileData.GamepadBinding_DPadRight>


[UTGame.UTUIDataStore_StringAliasMap]
FakePlatform=0
+MenuInputMapArray=(FieldName="None",MappedText="")

; Terminology
+MenuInputMapArray=(FieldName="Term_Controller",Set="PC",MappedText="<Strings:UDKGameUI.Terms.Controller_PC>")
+MenuInputMapArray=(FieldName="Term_Controller",Set="PS3",MappedText="<Strings:UDKGameUI.Terms.Controller_PS3>")
+MenuInputMapArray=(FieldName="Term_Controller",Set="360",MappedText="<Strings:UDKGameUI.Terms.Controller_360>")

+MenuInputMapArray=(FieldName="Term_GamerCard",Set="PS3",MappedText="<Strings:UDKGameUI.Terms.GamerCard_PS3>")
+MenuInputMapArray=(FieldName="Term_GamerCard",Set="PC",MappedText="<Strings:UDKGameUI.Terms.GamerCard_PC>")
+MenuInputMapArray=(FieldName="Term_GamerCard",Set="360",MappedText="<Strings:UDKGameUI.Terms.GamerCard_360>")

; Button Mappings

+MenuInputMapArray=(FieldName="CycleTabs",Set="PS3",MappedText="CYCLE TABS")
+MenuInputMapArray=(FieldName="CycleTabs",Set="360",MappedText="CYCLE TABS")

+MenuInputMapArray=(FieldName="AnyKey",Set="PC",MappedText="<Strings:UDKGameUI.Generic.Fire> ")

+MenuInputMapArray=(FieldName="Accept",Set="360",MappedText="<Strings:UDKGameUI.ButtonFont.Xenon_A> ")
+MenuInputMapArray=(FieldName="Cancel",Set="360",MappedText="<Strings:UDKGameUI.ButtonFont.Xenon_B> ")
+MenuInputMapArray=(FieldName="Conditional1",Set="360",MappedText="<Strings:UDKGameUI.ButtonFont.Xenon_Y> ")
+MenuInputMapArray=(FieldName="Conditional2",Set="360",MappedText="<Strings:UDKGameUI.ButtonFont.Xenon_X> ")
+MenuInputMapArray=(FieldName="Start",Set="360",MappedText="<Strings:UDKGameUI.ButtonFont.Xenon_Start> ")
+MenuInputMapArray=(FieldName="ShiftUp",Set="360",MappedText="<Strings:UDKGameUI.ButtonFont.Xenon_LeftBumper> ")
+MenuInputMapArray=(FieldName="ShiftDown",Set="360",MappedText="<Strings:UDKGameUI.ButtonFont.Xenon_RightBumper> ")
+MenuInputMapArray=(FieldName="ShiftUpTrigger",Set="360",MappedText="<Strings:UDKGameUI.ButtonFont.Xenon_LeftTrigger> ")
+MenuInputMapArray=(FieldName="ShiftDownTrigger",Set="360",MappedText="<Strings:UDKGameUI.ButtonFont.Xenon_RightTrigger> ")
+MenuInputMapArray=(FieldName="ShiftBothTrigger",Set="360",MappedText="<Strings:UDKGameUI.ButtonFont.Xenon_LeftTrigger><Strings:UDKGameUI.ButtonFont.Xenon_RightTrigger> ")
+MenuInputMapArray=(FieldName="Defaults",Set="360",MappedText="<Strings:UDKGameUI.ButtonFont.Xenon_LeftTrigger> ")
+MenuInputMapArray=(FieldName="AnyKey",Set="360",MappedText="<Strings:UDKGameUI.ButtonFont.Xenon_A> ")

+MenuInputMapArray=(FieldName="Accept",Set="PS3",MappedText="<Strings:UDKGameUI.ButtonFont.PS3_X> ")
+MenuInputMapArray=(FieldName="Cancel",Set="PS3",MappedText="<Strings:UDKGameUI.ButtonFont.PS3_Circle> ")
+MenuInputMapArray=(FieldName="Conditional1",Set="PS3",MappedText="<Strings:UDKGameUI.ButtonFont.PS3_Triangle> ")
+MenuInputMapArray=(FieldName="Conditional2",Set="PS3",MappedText="<Strings:UDKGameUI.ButtonFont.PS3_Square> ")
+MenuInputMapArray=(FieldName="Start",Set="PS3",MappedText="<Strings:UDKGameUI.ButtonFont.PS3_Start> ")
+MenuInputMapArray=(FieldName="Select",Set="PS3",MappedText="<Strings:UDKGameUI.ButtonFont.PS3_Select> ")
+MenuInputMapArray=(FieldName="ShiftUp",Set="PS3",MappedText="<Strings:UDKGameUI.ButtonFont.PS3_L1> ")
+MenuInputMapArray=(FieldName="ShiftDown",Set="PS3",MappedText="<Strings:UDKGameUI.ButtonFont.PS3_R1> ")
+MenuInputMapArray=(FieldName="ShiftUpTrigger",Set="PS3",MappedText="<Strings:UDKGameUI.ButtonFont.PS3_L2> ")
+MenuInputMapArray=(FieldName="ShiftDownTrigger",Set="PS3",MappedText="<Strings:UDKGameUI.ButtonFont.PS3_R2> ")
+MenuInputMapArray=(FieldName="ShiftBothTrigger",Set="PS3",MappedText="<Strings:UDKGameUI.ButtonFont.PS3_L2><Strings:UDKGameUI.ButtonFont.PS3_R2> ")
+MenuInputMapArray=(FieldName="LeftTrigger",Set="PS3",MappedText="<Strings:UDKGameUI.ButtonFont.PS3_L2> ")
+MenuInputMapArray=(FieldName="Defaults",Set="PS3",MappedText="<Strings:UDKGameUI.ButtonFont.PS3_L2> ")
+MenuInputMapArray=(FieldName="RightTrigger",Set="PS3",MappedText="<Strings:UDKGameUI.ButtonFont.PS3_R2> ")
+MenuInputMapArray=(FieldName="AnyKey",Set="PS3",MappedText="<Strings:UDKGameUI.ButtonFont.PS3_X> ")
and finally here is whats in my custom package (the rest are either from default UDK packages or packages that i imported myself from UT3.. not sure if this is what could be killing the cooker. it plays fine in the editor though.) :
-Dr.J.
Out-of-memory (OOM) errors take place when the Linux kernel can’t provide enough memory to run all of its user-space processes, causing at least one process to exit without warning. Without a comprehensive monitoring solution, OOM errors can be tricky to diagnose.
In this post, you will learn how to diagnose OOM errors in Linux kernels by:
- Analyzing different types of OOM error logs
- Choosing the most revealing metrics to explain low-memory situations on your hosts
- Using a profiler to understand memory-heavy processes
- Setting up automated alerts to troubleshoot OOM error messages more easily
Identify the error message
OOM error logs are normally available in your host’s syslog (in the file /var/log/syslog). In a dynamic environment with a large number of ephemeral hosts, it’s not realistic to comb through system logs manually—you should forward your logs to a monitoring platform for search and analysis. This way, you can configure your monitoring platform to parse these logs so you can query them and set automated alerts. Your monitoring platform should enrich your logs with metadata, including the host and application that produced them, so you can localize issues for further troubleshooting.
There are two major types of OOM error, and you should be prepared to identify each of these when diagnosing OOM issues:
- Error messages from user-space processes that handle OOM errors themselves
- Error messages from the kernel-space OOM Killer
Error messages from user-space processes
User-space processes receive access to system memory by making requests to the kernel, which returns a set of memory addresses (virtual memory) that the kernel will later assign to pages in physical RAM. When a user-space process first requests a virtual memory mapping, the kernel usually grants the request regardless of how many free pages are available. The kernel only allocates free pages to that mapping when it attempts to access memory with no corresponding page in RAM.
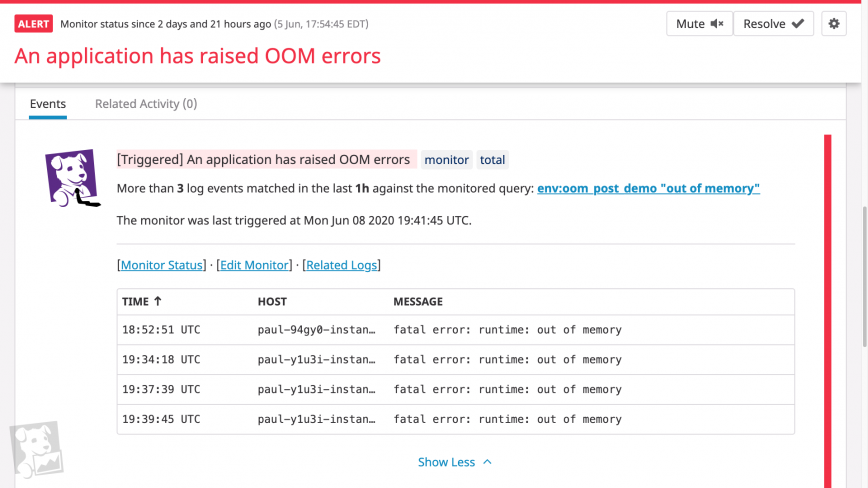
When an application fails to obtain a virtual memory mapping from the kernel, it will often handle the OOM error itself, emit a log message, then exit. If you know that certain hosts will be dedicated to memory-intensive processes, you should determine in advance what OOM logs these processes output, then set up alerts on these logs. Consider running game days to see what logs your system generates when it runs out of memory, and consult the documentation or source of your critical applications to ensure that your log management system can ingest and parse OOM logs.
The information you can obtain from error logs differs by application. For example, if a Go program attempts to request more memory than is available on the system, it will print a log that resembles the following, print a stack trace, then exit.
fatal error: runtime: out of memory
In this case, the log prints a detailed stack trace for each goroutine running at the time of the error, enabling you to figure out what the process was attempting to do before exiting. In this stack trace, we can see that our demo application was requesting memory while calling the *ImageProcessor.IdentifyImage() method.
goroutine 1 [running]:
runtime.systemstack_switch()
/usr/local/go/src/runtime/asm_amd64.s:330 fp=0xc0000b9d10 sp=0xc0000b9d08 pc=0x461570
runtime.mallocgc(0x278f3774, 0x695400, 0x1, 0xc00007e070)
/usr/local/go/src/runtime/malloc.go:1046 +0x895 fp=0xc0000b9db0 sp=0xc0000b9d10 pc=0x40c575
runtime.makeslice(0x695400, 0x278f3774, 0x278f3774, 0x38)
/usr/local/go/src/runtime/slice.go:49 +0x6c fp=0xc0000b9de0 sp=0xc0000b9db0 pc=0x44a9ec
demo_app/imageproc.(*ImageProcessor).IdentifyImage(0xc00000c320, 0x278f3774, 0xc0278f3774)
demo_app/imageproc/imageproc.go:36 +0xb5 fp=0xc0000b9e38 sp=0xc0000b9de0 pc=0x5163f5
demo_app/imageproc.(*ImageProcessor).IdentifyImage-fm(0x278f3774, 0x36710769)
demo_app/imageproc/imageproc.go:34 +0x34 fp=0xc0000b9e60 sp=0xc0000b9e38 pc=0x5168b4
demo_app/imageproc.(*ImageProcessor).Activate(0xc00000c320, 0x36710769, 0xc000064f68, 0x1)
demo_app/imageproc/imageproc.go:88 +0x169 fp=0xc0000b9ee8 sp=0xc0000b9e60 pc=0x516779
main.main()
demo_app/main.go:39 +0x270 fp=0xc0000b9f88 sp=0xc0000b9ee8 pc=0x66cd50
runtime.main()
/usr/local/go/src/runtime/proc.go:203 +0x212 fp=0xc0000b9fe0 sp=0xc0000b9f88 pc=0x435e72
runtime.goexit()
/usr/local/go/src/runtime/asm_amd64.s:1373 +0x1 fp=0xc0000b9fe8 sp=0xc0000b9fe0 pc=0x463501
Since this behavior is baked into the Go runtime, Go-based infrastructure tools like Consul and Docker will output similar messages in low-memory conditions.
In addition to error messages from user-space processes, you’ll want to watch for OOM messages produced by the Linux kernel’s OOM Killer.
Error messages from the OOM Killer
If a Linux machine is seriously low on memory, the kernel invokes the OOM Killer to terminate a process. As with user-space OOM error logs, you should treat OOM Killer logs as indications of overall memory saturation.
How the OOM Killer works
To understand when the kernel produces OOM errors, it helps to know how the OOM Killer works. The OOM Killer terminates a process using heuristics. It assigns each process on your system an OOM score between 0 and 1000, based on its memory consumption as well as a user-configurable adjustment score. It then terminates the process with the highest score. This means that, by default, the OOM Killer may end up killing processes you don’t expect. (You will see different behavior if you configure the kernel to panic on OOM without invoking the OOM Killer, or to always kill the task that invoked the OOM Killer instead of assigning OOM scores.)
The kernel invokes the OOM Killer when it tries—but fails—to allocate free pages. When the kernel fails to retrieve a page from any memory zone in the system, it attempts to obtain free pages by other means, including memory compaction, direct reclaim, and searching again for free pages in case the OOM Killer had terminated a process during the initial search. If no free pages are available, the kernel triggers the OOM Killer. In other words, the kernel does not “see” that there are too few pages to satisfy a memory mapping until it is too late.
OOM Killer logs
You can use the OOM Killer logs both to identify which hosts in your system have run out of memory and to get detailed information on how much memory different processes were using at the time of the error. You can find an annotated example in the git commit that added this logging information to the Linux kernel. For example, the OOM Killer logs provide data on the system’s memory conditions at the time of the error.
Mem-Info:
active_anon:895388 inactive_anon:43 isolated_anon:0
active_file:13 inactive_file:9 isolated_file:1
unevictable:0 dirty:0 writeback:0 unstable:0
slab_reclaimable:4352 slab_unreclaimable:7352
mapped:4 shmem:226 pagetables:3101 bounce:0
free:21196 free_pcp:150 free_cma:0
As you can see, the system had 21,196 pages of free memory when it threw the OOM error. With each page on the system holding up to 4 kB of memory, we can assume that the kernel needed to allocate at least 84.784 MB of physical memory to meet the requirements of currently running processes.
Understand the problem
If your monitoring platform has applied the appropriate metadata to your logs, you should be able to tell from a wave of OOM error messages which hosts are facing critically low memory conditions. The next step is to understand how frequently your hosts reach these conditions—and when memory utilization has spiked anomalously—by monitoring system memory metrics. In this section, we’ll review some key memory metrics and how to get more context around OOM errors.
Choose the right metrics
As we’ve seen, it’s difficult for the Linux kernel to determine when low-memory conditions will produce OOM errors. To make matters worse, the kernel is notoriously imprecise at measuring its own memory utilization, as a process can be allocated virtual memory but not actually use the physical RAM that those addresses map to. Since absolute measures of memory utilization can be unreliable, you should use another approach: determine what levels of memory utilization correlate with OOM errors in your hosts and what levels indicate a healthy baseline (e.g. by running game days).
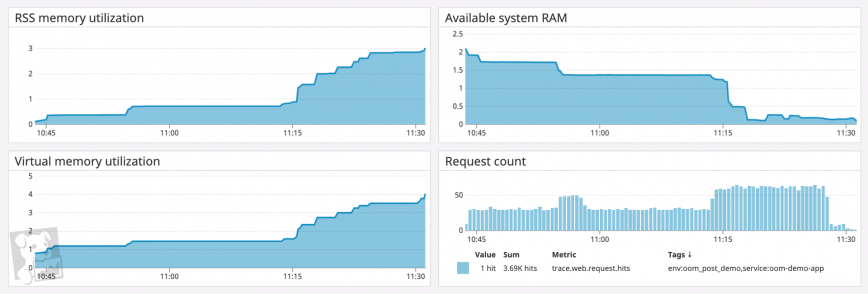
When monitoring overall memory utilization in relation to a healthy baseline, you should track both how much virtual memory the kernel has mapped for your processes and how much physical memory your processes are using (called the resident set size). If you’ve configured your system to use a significant amount of swap space—space on disk where the kernel stores inactive pages—you can also track this in order to monitor total memory utilization across your system.
Determine the scope
Your monitoring platform should tag your memory metrics with useful metadata about where those metrics came from—or at least the name of the associated host and process. The host tag is useful for determining if any one host is consuming an unusual amount of memory, whether in comparison to other hosts or to its baseline memory consumption.
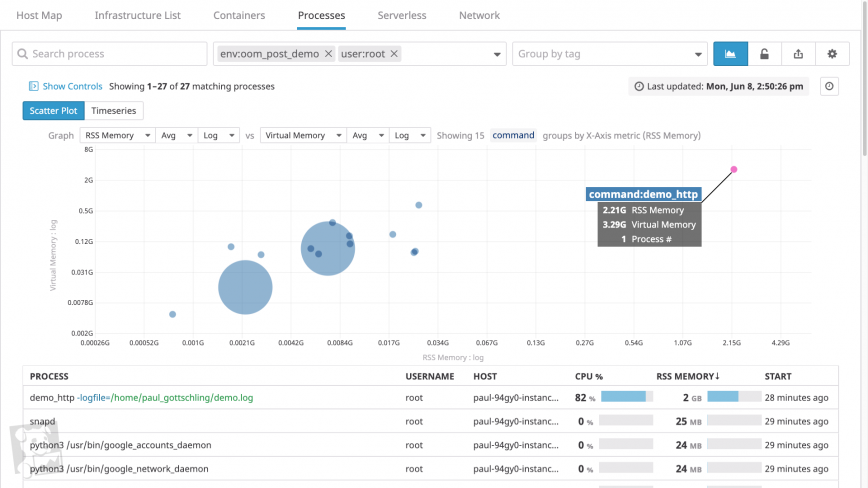
You should also be able to group and filter your timeseries data either by process within a single host, or across all hosts in a cluster. This will help you determine whether any one process is using an unusual amount of memory. You’ll want to know which processes are running on each system and how long they’ve been running—in short, how recently your system has demanded an unsustainable amount of memory.
Find aggravating factors
If certain processes seem unusually memory-intensive, you’ll want to investigate them further by tracking metrics for other parts of your system that may be contributing to the issue.
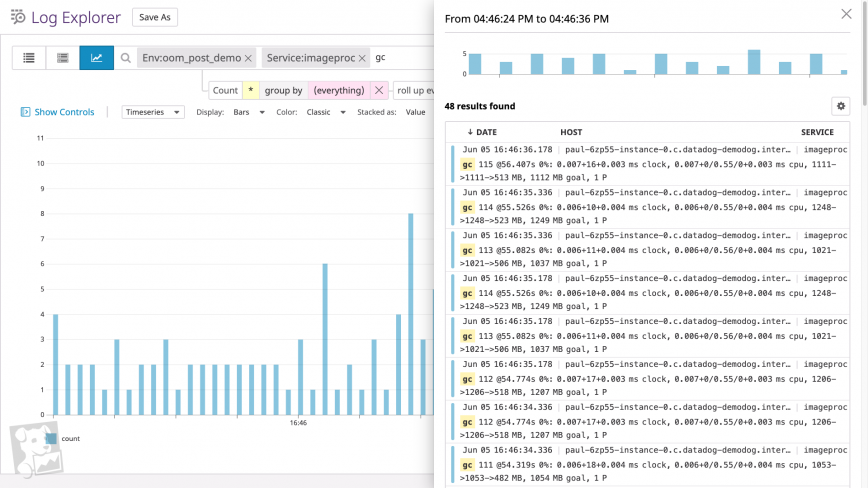
For processes with garbage-collected runtimes, you can investigate garbage collection as one source of higher-than-usual memory utilization. On a timeseries graph of heap memory utilization for a single process, garbage collection forms a sawtooth pattern (e.g. the JVM)—if the sawtooth does not return to a steady baseline, you likely have a memory leak. To see if your process’s runtime is garbage collecting as expected, graph the count of garbage collection events alongside heap memory usage.
Alternatively, you can search your logs for messages accompanying the “cliffs” of the sawtooth pattern. If you run a Go program with the GODEBUG environment variable assigned to gctrace=1, for example, the Go runtime will output a log every time it runs a garbage collection. (The screenshot below shows a graph of garbage collection log frequency over time, plus a typical list of garbage collection logs.)
Another factor has to do with the work that a process is performing. If an application is managing memory in a healthy way (i.e. without memory leaks) but still using more than expected, the application may be handling unusual levels of work. You’ll want to graph work metrics for memory-heavy applications, such as request rates for a web application, query throughput for a database, and so on.
Find unnecessary allocations
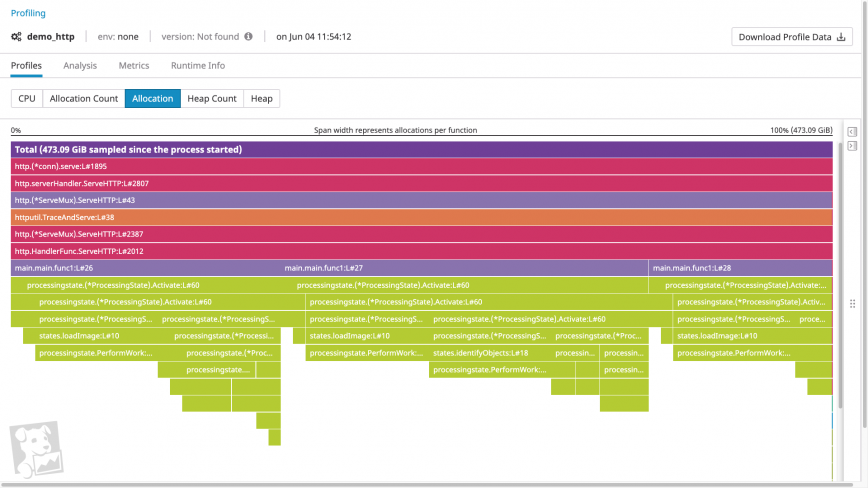
If a process doesn’t seem to be subject to any aggravating factors, it’s likely that the process is requesting more memory than you anticipate. One tool that helps you identify these memory requests is a memory profile.
Memory profiles visualize both the order of function calls within a call stack and how much heap memory each function call allocates. Using a memory profiler, you can quickly determine whether a given call is particularly memory intensive. And by examining the call’s parents and children, you can determine why a heavy allocation is taking place. For example, a profile could include a memory-intensive code path introduced by a recent feature release, suggesting that you should optimize the new code for memory utilization.
Get notified on OOM errors
The most direct way to find out about OOM errors is to set alerts on OOM log messages: whenever your system detects a certain number of OOM errors in a particular interval, your monitoring platform can alert your team. But to prevent OOM errors from impacting your system, you’ll want to be notified before OOM errors begin to terminate processes. Here again, knowing the healthy baseline usage of virtual memory and RSS utilization allows you to set alerts when memory utilization approaches unhealthy levels. Ideally, you should be using a monitoring platform that can forecast resource usage and alert your team based on expected trends, and flag anomalies in system metrics automatically.
Investigate OOM errors in a single platform
Since the Linux kernel provides an imprecise view of its own memory usage and relies on page allocation failures to raise OOM errors, you need to monitor a combination of OOM error logs, memory utilization metrics, and memory profiles.
A monitoring service like Datadog unifies all of these sources of data in a single platform, so you get comprehensive visibility into your system’s memory usage—whether at the level of the process or across every host in your environment. To stay on top of memory saturation issues, you can also set up alerts to automatically notify you about OOM logs or projected memory usage. By getting notified when OOM errors are likely, you’ll know which parts of your system you need to investigate to prevent application downtime. If you’re curious about using Datadog to monitor your infrastructure and applications, sign up for a free trial.
About Datadog
Datadog is a SaaS-based monitoring and analytics platform for cloud-scale infrastructure, applications, logs, and more. Datadog delivers complete visibility into the performance of modern applications in one place through its fully unified platform. By reducing the number of tools needed to troubleshoot performance problems, Datadog reduces the time needed to detect and resolve issues. With vendor-backed integrations for 400+ technologies, a world-class enterprise customer base, and focus on ease of use, Datadog is the leading choice for infrastructure and software engineering teams looking to improve cross-team collaboration, accelerate development cycles, and reduce operational and development costs.
Tags: devops, linux, memory, sysadmins
Overview
An out of memory error in Java formally known as java.lang.OutOfMemoryError is a runtime error that occurs when the Java Virtual Machine (JVM) cannot allocate an object in the Java heap memory. In this article, we will be discussing several reasons behind “out of memory” errors in Java and how you can avoid them.
The JVM manages the memory by setting aside a specific size of the heap memory to store the newly allocated objects. All the referenced objects remain active in the heap and keep that memory occupied until their reference is closed. When an object is no longer referenced, it becomes eligible to be removed from the heap by the Garbage collector to free up the occupied heap memory. In certain cases, the Java Garbage Collector (GC) is unable to free up the space required for a new object and the available heap memory is insufficient to support the loading of a Java class, this is when an “out of memory” error occurs in Java.
What causes the out of memory error in Java?
An “out of memory” error in Java is not that common and is a direct indication that something is wrong in the application. For instance, the application code could be referencing large objects for too long that is not required or trying to process large amounts of data at a time. It is even possible that the error could have nothing to do with objects on the heap and the reason behind it like because of third-party libraries used within an application or due to an application server that does not clean up after deployment.
Following are some of the main causes behind the unavailability of heap memory that cause the out of memory error in Java.
· Java heap space error
It is the most common out of memory error in Java where the heap memory fills up while unable to remove any objects.
See the code snippet below where java.lang.OutOfMemoryError is thrown due to insufficient Java heap memory available:
public class OutOfMemoryError01 {
    public static void main(String[] args) {
        Integer[] arr = new Integer[1000 * 1000 * 1000];
    }
}
Output:
Exception in thread "main" java.lang.OutOfMemoryError: Java heap space
    at OutOfMemoryErrorExample.main(OutOfMemoryErrorExample.java:8)
In the above code, an array of integers with a very large size is attempted to be initialized. As the Java heap is insufficient to allocate such a huge array, it will eventually throw a java.lang.OutOfMemoryError: Java heap space error. Initially, it might seem fine but over time, it will result in consuming a lot of Java heap space and when it fills all of the available memory in the heap, Garbage Collection will not be able to clean it as the code would still be in execution and the no memory can be freed.
Another reason for a Java heap space error is the excessive use of finalizers. If a class has a finalize() method, the GC will not clean up any objects of that class, instead, they all will be queued up for finalization at a later stage. If a finalizer thread cannot keep up with the finalization queue because of excessive usage of finalizers, the Java heap will eventually fill up resulting in an “out of memory” error in Java.
Prevention:
Developers need to use the finalize methods only when required and they must monitor all the objects for which finalization would be pending.
· GC Overhead limit exceeded:
This error indicates that the garbage collector is constantly running due to which the program will also be running very slowly. In a scenario where for minimum consecutive 5 garbage collection cycles, if a Java process utilizes almost 98% of its time for garbage collection and could recover less than 2% of the heap memory then a Java Out of Memory Error will be thrown.
This error typically occurs because the newly generated data could barely fit into the Java heap memory having very little free space for new object allocations.
Prevention:
Java developers have the option to set the heap size by themselves. To prevent this error, you must Increase the heap size using the -Xmx attribute when launching the JVM.
· PermGen space error:
JVM separates the memory into different sections. One of the sections is Permanent Generation (PermGen) space. It is used to load the definitions of new classes that are generated at the runtime. The size of all these sections, including the PermGen area, is set at the time of the JVM launch. If you do not set the sizes of every area yourself, platform-specific defaults sizes will be then set. If the Permanent Generation’s area is ever exhausted, it will throw the java.lang.OutOfMemoryError: PermGen space error.
Prevention:
The solution to this out of Memory Error in Java is fairly simple. The application just needs more memory to load all the classes to the PermGen area so just like the solution for GC overhead limit exceeding error, you have to increase the size of the PermGen region at the time of Java launch. To do so, you have to change the application launch configuration and increase or if not used, add the –XX:MaxPermSize parameter to your code.
· Out of MetaSpace error:
All the Java class metadata is allocated in native memory (MetaSpace). The amount of MetaSpace memory to be used for class metadata is set by the parameter MaxMetaSpaceSize. When this amount exceeds, a java.lang.OutOfMemoryError exception with a detail MetaSpace is thrown.
Prevention:
If you have set the MaxMetaSpaceSize on the command line, increasing its size manually can solve the problem. Alternatively, MetaSpace is allocated from the same address spaces as the Java heap memory so by reducing the size of the Java heap, you can automatically make space available for MetaSpace. It should only be done when you have excess free space in the Java heap memory or else you can end up with some other Java out of memory error.
· Out of swap space error:
This error is often occurred due to certain operating system issues, like when the operating system has insufficient swap space or a different process running on the system is consuming a lot of memory resources.
Prevention:
There is no way to prevent this error as it has nothing to do with heap memory or objects allocation. When this error is thrown, the JVM invokes the error handling mechanism for fatal errors. it generates an error log file, which contains all the useful information related to the running threads, processes, and the system at the time of the crash. this log information can be very useful to minimize any loss of data.
How to Catch java.lang.OutOfMemoryError?
As the java.lang.OutOfMemoryError is part of the Throwable class, it can be caught and handled in the application code which is highly recommended. The handling process should include the clean up the resources, logging the last data to later identify the reason behind the failure, and lastly, exit the program properly.
See this code example below:
public class OutOfMemoryError02 {
    public void createArr (int size) {
        try {
            Integer[] myArr = new Integer[size];
        } catch (OutOfMemoryError ex) {
            //creating the Log
            System.err.println("Array size is too large");
            System.err.println("Maximum JVM memory: " +
Runtime.getRuntime().maxMemory());
        }
    }
    public static void main(String[] args) {
        OutOfMemoryError02 oomee = new OutOfMemoryError02();
        ex.createArr (1000 * 1000 * 1000);
    }
}
In the above code, as the line of code that might cause an out of Memory Error is known, it is handled using a try-catch block. In case, if the error occurs, the reason for the error will be logged that is the large size of the array and the maximum size of the JVM, which will be later helpful for the caller of the method to take the action accordingly.
In case of an out of memory error, this code will exit with the following message:
Array size is too large
Maximum JVM memory: 9835679212
It is also a good option to handle an out of Memory Error in Java when the application needs to stay in a constant state in case of the error. This allows the application to keep running normally if any new objects are not required to be allocated.
See Also: CompletableFuture In Java With Examples
Conclusion
In this article, we have extensively covered everything related to the “out of memory” error in Java. In most cases, you can now easily prevent the error or at least will be able to retrieve the required information after the crashing of the program to identify the reason behind it. Managing errors and exceptions in your code is always challenging but being able to understand and avoid these errors can help you in making your applications stable and robust.

