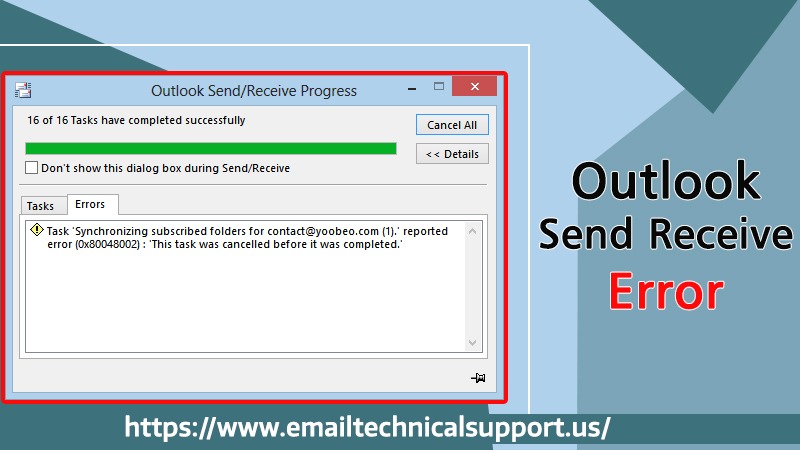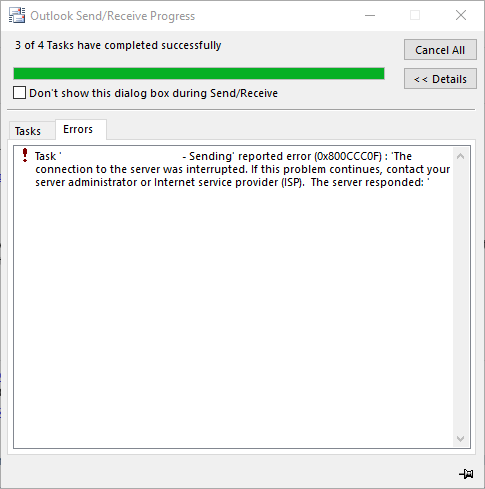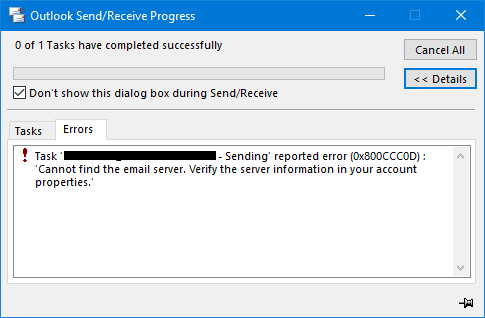
Outlook Send/Receive error is one of the most common Outlook errors across its user community. There are many reasons why you might encounter this send/receive error but the end result is you cannot send or receive an email. This can harm your work efficiency. But do you know Outlook error code 0x80040610 obstructing sending and receiving of emails can be fixed easily? Yes, this article is compiled with 6 simple methods that can help you fix Outlook send receive error easily.
| Common Reasons for Outlook Send/Receive error: |
|---|
| 1. Poor internet connection is one of the main reasons for Send or Receive error. Make sure bad internet connectivity is not causing this issue. 2. Incorrect email account settings can avoid receiving or sending an email. 3. Third-party add-ins or anti-virus software prevents you to receive an Outlook email. 4. The Outlook data file is corrupt. This makes all your Outlook items including emails, contacts, notes, etc., inaccessible. |
Here are the 6 most reliable and safest methods to fix your Outlook send and receive error with ease. You can either try the DIY methods first or you can directly utilize reliable Outlook PST Repair tool mentioned at the end of this article to fix any issue related to send/receive error.
1. Disable Windows Firewall and Antivirus Program.
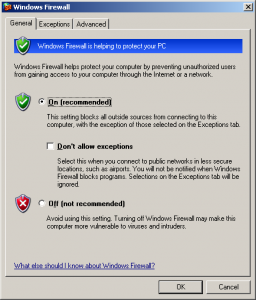
Windows Firewall and any other third-party antivirus program can affect the sending and receiving of emails on Outlook. This can result in Outlook send receive error. Hence to fix this error 0x80040610, consider disabling Firewall and Antivirus program.
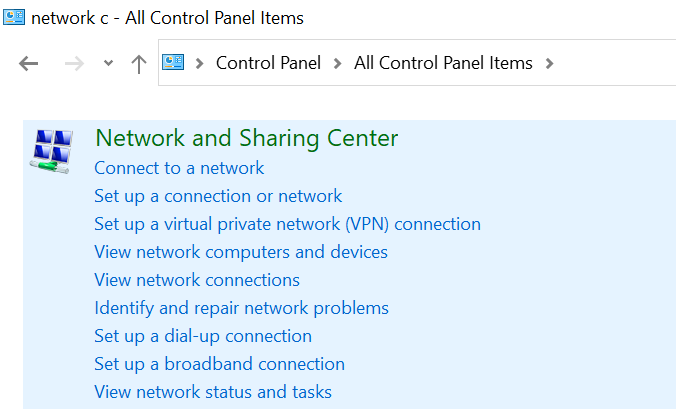
- Open Control Panel and click on Network Connections.
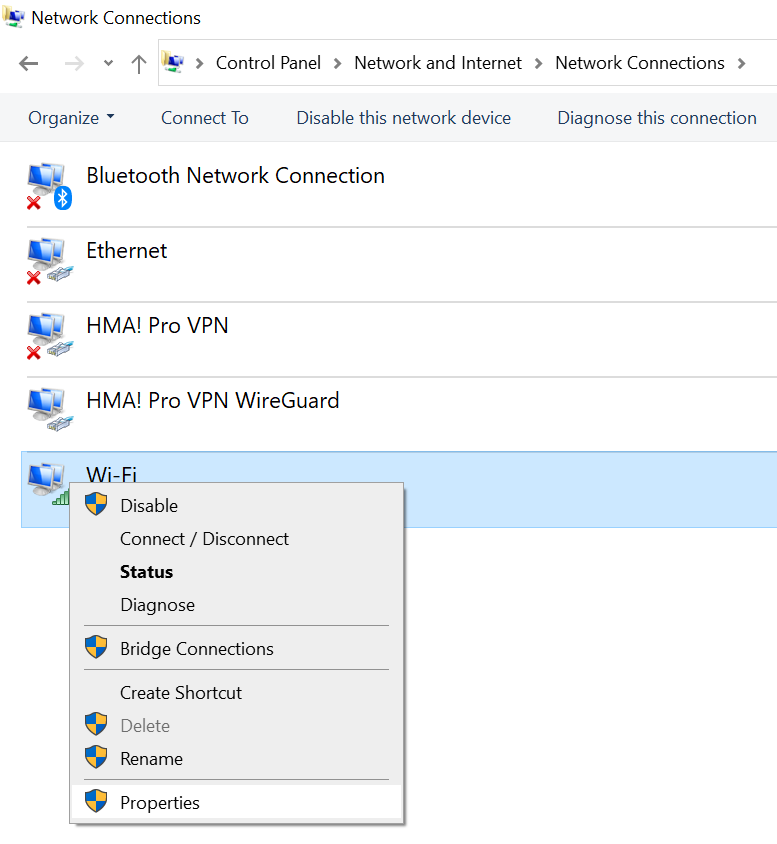
- Right-click on the network connection you are connected to and click on Properties.
- Under the Security tab, turn off Firewall.
- Once the problem is fixed and the inbox is updated, enable the Windows Firewall.
2. Check for Suspicious Emails
The Outlook send receive error can also occur due to some suspicious mails that dropped into your inbox. So clearing those suspicious spam emails can help you fix Outlook send receive error that stops you from sending or receiving emails.
If this doesn’t stop your Outlook from throwing the Send/Receive error 0x80040610, try the next method.
3. Correct the Outlook Email Settings
If the above methods didn’t fix Outlook send receive error, then you should verify your Outlook email settings. Improperly configured Outlook email settings can make your Outlook throw this error 0x80040610.
- Open Outlook and Click on File.
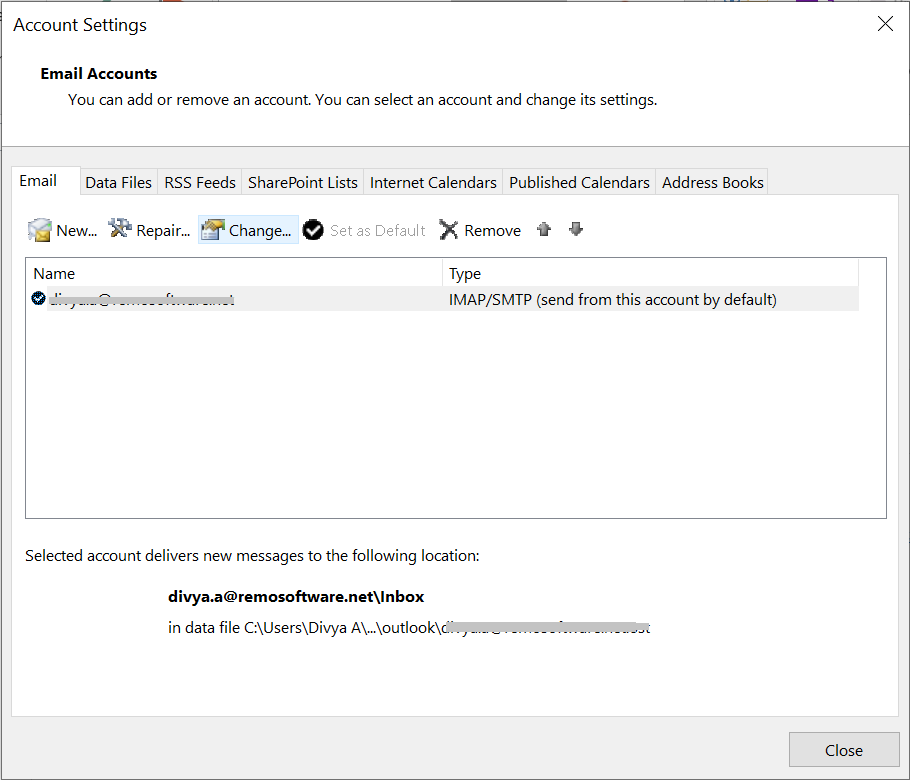
- Click on Account Settings -> Account Settings.
- Under the Account Settings window, click on Change
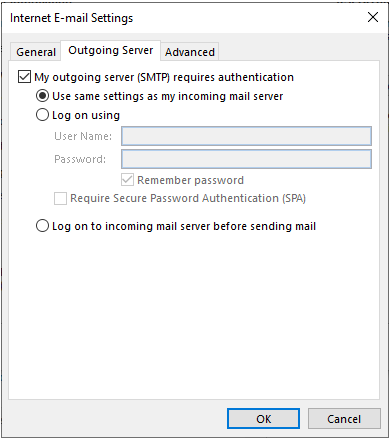
- Now, click on More Settings and select Outgoing Server
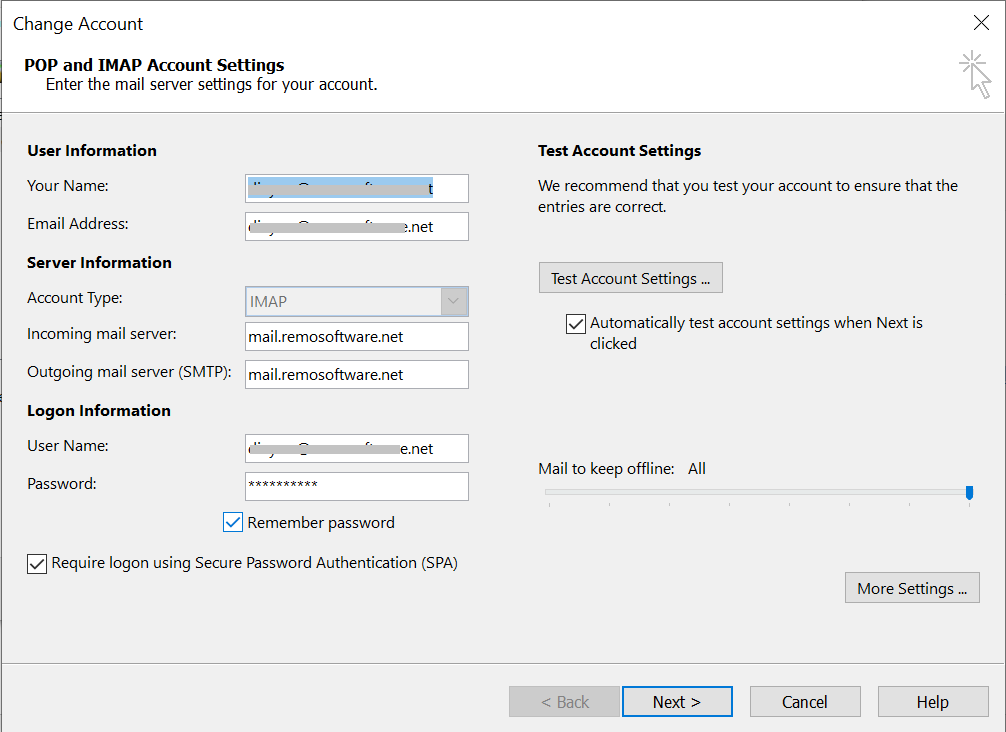
- Click the checkbox next to My outgoing server (SMTP) requires authentication.
- Also, select the checkbox next to Log on to incoming server before sending mail.
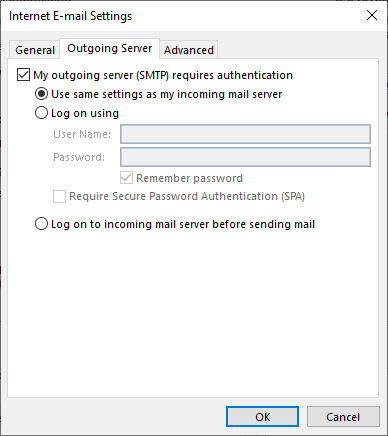
Restart Outlook and see if you are able to send emails. If you are still facing Outlook Send Receive error, then move on to the next method.
4. Clear Outbox and Change Server Time-out
The server time-out duration is 1 min by default in Outlook. When you try to send emails with attachments of large size, the default server timeout will be insufficient. This leaves your emails stuck in the outbox. Hence clearing outbox and increasing the Server timeout duration can help to fix Outlook send receive error.
To change Outlook server timeout, follow the steps below:
- Start Outlook and click on File
- Follow this path: Account Settings -> Account Settings -> Change -> More Settings -> Advanced
- Under Advanced, increase the Server Timeouts slider based on your need.
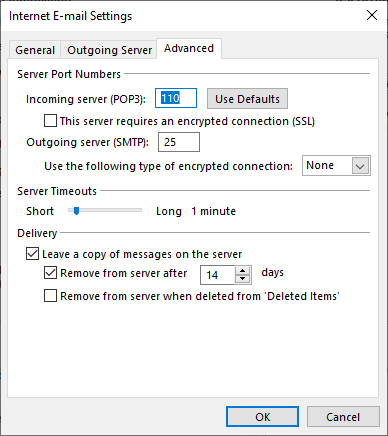
This will allow Outlook to send or receive emails of large size. If you are still facing the Outlook Send Receive error, then try starting Outlook in safe mode. If you have trouble starting MS outlook, check this article to know how to fix cannot start Microsoft Outlook error.
5. Run Outlook in Safe Mode
Outlook Send/Receive error occurs with different error codes. And running Outlook in Safe mode can easily fix most of them including 0x80040610.
Many a time incompatible add-ins stop your Outlook to send or receive any email. Therefore, you should try sending emails after launching Outlook in safe mode.
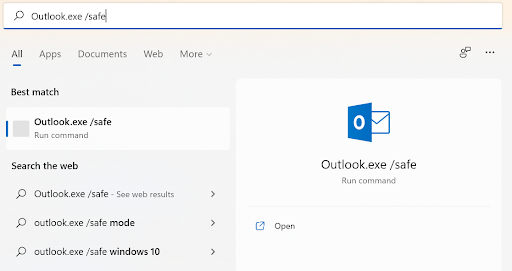
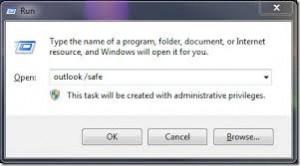
To launch Outlook in safe mode just type Outlook.exe /safe in the search box and press Enter.
If this doesn’t fix Outlook send receive error, then it can be a corrupt or damaged PST file causing this error.
Note: Check out this article if you want to know how to repair OST file using 3 different methods.
6. Repair PST file to Fix Outlook Send Receive Error
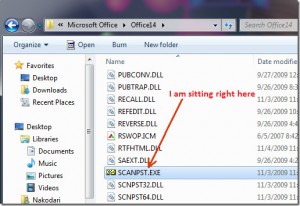
Now that you have tried all the above-mentioned methods to solve Outlook send receive error, it’s time to repair the corrupt PST file. You can repair corrupt PST file using the built-in inbox repair tool.
Manually repairing the PST file using ScanPST.exe comes with its own disadvantages since the inbox repair tool directly works on the original PST file. And the chances of losing your Outlook data while repairing the PST file manually are high. Hence it is recommended to make use of a trusted tool like Remo PST Repair software that can repair your corrupt PST file to fix Outlook Send Receive error.
Remo Repair PST is your best bet at repairing corrupt or damaged PST file. The tool is designed with powerful PST file repairing algorithms that work on a copy of the original PST file, prioritizing the safety of Outlook data. The easy-to-use interface of the software makes the repair process a walk in the park even for a novice user.
- Launch the Remo Repair PST tool.

- Select Open Default PST File.

- Select the Smart Scan option and click on the Browse button to provide the destination path to save the repaired PST file.

- Finally, click the Repair button.

Watch Video Tutorial to fix Outlook Send/Receive Errors by using Remo PST Repair tool:
Benefits of using Remo Repair PST:
- Ensures quick repair of PST file with all Outlook items intact.
- Designed to easily repair even password-protected or compressed PST files.
- Tailor-made to fix CRC errors in PST files along with Outlook error codes 0x80040610, 0x800ccc0e, 0x80040600 etc.
- Facilitates a preview of repaired Outlook data in Outlook-style browser.
- Supports all versions of Outlook 2003, 2007, 2010, 2013, 2016, 2019.
- Available across all versions of Windows operating systems including the latest Windows 10.
Conclusion:
The Outlook send receive error can be easily fixed using the above-mentioned methods. It is not too often that a PST corruption leads to the Outlook error 0x80040610. However, if you fail to fix the issue with the manual methods, it is recommended to make use of Remo Repair PST. Do let us know in the comments section below if you were successful in fixing the Outlook send receive error.
Outlook for Microsoft 365 Outlook 2019 Outlook 2016 Outlook 2013 Microsoft Outlook 2010 Еще…Меньше
Важно! Эта статья содержит сведения о том, как снизить параметры безопасности или отключить функции безопасности на компьютере. Эти действия позволяют решить определенные проблемы. Однако перед внесением изменений рекомендуется взвесить их последствия для безопасности системы. При реализации этого метода обхода примите все необходимые дополнительные меры для защиты своей системы.
Аннотация
В этой статье перечислены распространенные методы устранения проблем, которые могут возникнуть при получении или отправке сообщения электронной почты в Outlook или Outlook Express.
Эти методы следует использовать при возникновении следующих ошибок:
Примечание. Если распространенные методы не помогли устранить проблему, можно попробовать дополнительные методы, перечисленные в таблице.
|
Сообщения об ошибках или коды ошибок |
Дополнительные способы |
|---|---|
|
Подключение не может быть установлено, так как целевой компьютер активно отказался от него. |
|
|
Не удалось найти сервер. (Account:account name, POPserver:’mail’, Error Number: 0x800ccc0d). |
|
|
Задача «имя сервера — отправка и получение» сообщила об ошибке (0x800ccc0f): «Подключение к серверу прервано. Если эта проблема сохранится, обратитесь к администратору сервера или поставщику услуг Интернета . Сервер ответил: ? K’. |
|
|
Сервер неожиданно прервал подключение. Возможные причины этого включают проблемы с сервером, проблемы с сетью или длительный период бездействия. Учетной записи. имя учетной записи, сервер: «имя сервера», протокол: POP3, ответ сервера: «+ОК», порт: 110, secure(SSL): Нет, номер ошибки: 0x800ccc0f. |
|
|
Задача «Имя SMTP-сервера — отправка и получение» сообщила об ошибке (0x80042109): «Outlook не удается подключиться к серверу исходящей почты (SMTP). Если вы продолжаете получать это сообщение, обратитесь к администратору сервера или поставщику услуг Интернета.’ |
|
|
Истекло время ожидания ответа от принимающего сервера (POP) 0x8004210a. |
Увеличьте время ожидания сервера. |
|
Истекло время ожидания при обмене данными с сервером 0x800ccc19. |
Увеличьте время ожидания сервера. |
|
Коды ошибок: 0x800ccc15; 0x80042108; 0x800ccc0e; 0x800ccc0b; 0x800ccc79; 0x800ccc67; 0x80040900; 0x800ccc81; 0x80040119; 0x80040600. |
|
|
Код ошибки: 0x8007000c |
Запустите средство восстановления MAPI. |
|
Код ошибки: 0x800C013b |
Повторно создайте файл Sent Items.dbx. |
|
Код ошибки: 0x8004210b |
Проверьте SMTP-адреса электронной почты в списке рассылки. |
Решение
Чтобы устранить эту проблему, используйте один или несколько из следующих методов. После завершения каждого метода отправьте себе тестовое сообщение электронной почты, чтобы убедиться, что вы можете отправлять и получать сообщения без получения сообщения об ошибке. Если вы продолжаете получать ошибки, попробуйте следующий метод.
Для этого выполните следующие действия:
-
Запустите интернет-браузер. Например, запустите Internet Explorer.
-
Введите один из следующих адресов в адресной строке и нажмите клавишу ВВОД.
-
http://www.microsoft.com
-
http://www.msn.com
Если у вас по-прежнему возникают проблемы с подключением к Интернету, см. статью Устранение неполадок с сетевым подключением в Internet Explorer.
-
Чтобы проверить параметры учетной записи электронной почты Outlook, ознакомьтесь со следующими статьями в базе знаний Майкрософт:
Подозрительные сообщения электронной почты могут блокировать получение сообщения об ошибке в Outlook. Если у вас есть подозрительные сообщения электронной почты, удалите их одним из следующих способов:
-
Получите доступ к почтовому ящику с помощью веб-программы электронной почты поставщика услуг Интернета. Затем удалите сообщения электронной почты.
-
Обратитесь к поставщику услуг Интернета и попросите его удалить сообщения электронной почты.
Если антивирусная программа включает функцию сканирования электронной почты, возможно, потребуется выполнить дополнительные задачи настройки, чтобы использовать Outlook или Outlook Express вместе с антивирусной программой. Например, может потребоваться настроить подключаемый модуль Norton AntiVirus Office для работы с Outlook.
Дополнительные сведения о том, как использовать Outlook вместе с антивирусной программой, перейдите на один из следующих веб-сайтов, в соответствии с установленными антивирусными программами:
-
Symantec
-
Mcafee
-
Trend Micro
-
Панда
Предупреждение. Это решение может сделать компьютер или сеть более уязвимыми для атак злоумышленников или вредоносных программ, таких как вирусы. Мы не рекомендуем это обходное решение, но предоставляем эти сведения, чтобы вы могли реализовать это решение по своему усмотрению. Применяя этот метод обхода проблемы, вы действуете на собственный риск.
Настройте программное обеспечение брандмауэра, чтобы разрешить доступ к Интернету следующим файлам:
-
Outlook.exe (для Outlook)
-
Msimn.exe (для Outlook Express)
По умолчанию порт 25 предназначен для исходящего доступа, а порт 110 — для входящего доступа. Если вы не уверены в портах, обратитесь к поставщику услуг Интернета или системному администратору.
Дополнительные сведения о McAfee Personal Firewall и Norton Personal Firewall (Symantec)
Перейдите на веб-сайт McAfee для получения инструкций по настройке Личного брандмауэра McAfee.
Вы также можете удалить и переустановить McAfee Personal Firewall. Этот процесс переустановки гарантирует, что Outlook и Outlook Express имеют доступ к Интернету, так как процесс повторно создает файл сигнатуры программы, используемый брандмауэром.
Если вы используете Norton Personal Firewall 2002, Norton Internet Security или программное обеспечение Norton SystemWorks от Symantec, обратитесь в службу поддержки Symantec для обновления или перенастройки, чтобы устранить проблему.
Исправление Outlook или Outlook Express также может устранить проблему.
Восстановление Outlook и Outlook Express
Примечание Если Outlook Express был удален с компьютера или установка Outlook Express повреждена, Outlook 2000 будет работать неправильно и может создать одно из сообщений об ошибках, упомянутых в разделе «Дополнительные сведения».
Примечание. Следующие методы предназначены только для Outlook.
Чтобы проверить правильность работы профиля электронной почты, попробуйте создать новый профиль электронной почты. Если вы можете отправлять и получать сообщения электронной почты с помощью созданного профиля электронной почты, следует настроить новый профиль Outlook в качестве профиля по умолчанию.
Шаг 1. Поиск файла данных Outlook по умолчанию
-
На панели управления выберите Почта.
-
В диалоговом окне Настройка почты – Outlook нажмите кнопку Показать профили.
-
Выберите текущий профиль Outlook и нажмите кнопку Свойства.
-
В диалоговом окне Настройка почты – Outlook выберите Файлы данных.
-
Выберите вкладку Файлы данных в диалоговом окне Параметры учетной записи , а затем запишите имя и расположение файла данных по умолчанию для профиля. (Флажок указывает на файл данных по умолчанию.)
-
Нажмите кнопку Закрыть.
Шаг 2. Создание профиля Outlook
Теперь, когда вы знаете имя и расположение файла данных по умолчанию для профиля, используйте только один из следующих методов, чтобы создать новый профиль Outlook.
Видео: подключение Outlook к личной учетной записи электронной почты
Метод A. Использование автоматической настройки учетной записи для создания учетной записи электронной почты IMAP или POP3
Важно! По умолчанию при автоматической настройке учетной записи создается учетная запись IMAP, если ваш почтовый сервер поддерживает как IMAP, так и POP3. Чтобы создать учетную запись POP3, необходимо выполнить действия вручную. Однако если сервер электронной почты поддерживает только POP3, автоматическая настройка учетной записи создаст учетную запись POP3.
-
Откройте панель управления и щелкните Почта.
-
В диалоговом окне Настройка почты – Outlook нажмите кнопку Показать профили.
-
На вкладке Общие в диалоговом окне Почта нажмите кнопку Добавить.
-
В диалоговом окне Новый профиль введите имя нового профиля и нажмите кнопку OK.
-
В диалоговом окне Добавить новую учетную запись введите сведения об учетной записи электронной почты и нажмите кнопку Далее.
-
После успешной настройки учетной записи нажмите кнопку Готово.
Метод Б. Создание учетной записи электронной почты IMAP или POP3 вручную
-
Откройте панель управления и щелкните Почта.
-
В диалоговом окне Настройка почты – Outlook нажмите кнопку Показать профили.
-
На вкладке Общие в диалоговом окне Почта нажмите кнопку Добавить.
-
В диалоговом окне Новый профиль введите имя нового профиля и нажмите кнопку OK.
-
В диалоговом окне Добавить новую учетную запись установите флажок Настроить вручную параметры сервера или дополнительные типы серверов и нажмите кнопку Далее.
-
В диалоговом окне Выбор службы выберите вариант Электронная почта Интернета и нажмите кнопку Далее.
-
В диалоговом окне Параметры электронной почты Интернета введите сведения об учетной записи.
-
Нажмите кнопку Проверка настройки учетной записи для проверки учетной записи.
Примечание. Если вы не уверены в правильности сведений об учетной записи, обратитесь к поставщику услуг Интернета.
-
Выберите пункт Существующий файл данных Outlook и нажмите кнопку Обзор.
-
В диалоговом окне Открытие файла данных Outlook найдите и выберите файл данных Outlook, который вы нашли ранее, а затем нажмите кнопку ОК.
-
Щелкните Далее.
-
В диалоговом окне Проверка настройки учетной записи нажмите кнопку Закрыть.
-
Нажмите кнопку Готово.
Шаг 3. Настройка нового профиля Outlook в качестве профиля по умолчанию
Если новый профиль электронной почты Outlook работает правильно, задайте новый профиль Outlook в качестве профиля по умолчанию, а затем переместите сообщения электронной почты в новый профиль.
-
На вкладке Общие в диалоговом окне Почта выберите пункт Всегда использовать этот профиль.
-
Щелкните раскрывающийся список под пунктом Всегда использовать этот профиль и выберите новый профиль.
-
Нажмите кнопку OK, чтобы закрыть диалоговое окно Почта.
-
Используйте мастер импорта и экспорта, чтобы экспортировать сообщения электронной почты в файл данных Outlook (PST) из старого профиля электронной почты Outlook, а затем импортировать файл данных Outlook (PST) в новый профиль электронной почты Outlook.
Примечание. Если вы не знакомы с функцией импорта и экспорта в Outlook, ознакомьтесь со следующими статьями:
Чтобы запустить Outlook в безопасном режиме, выполните следующие действия в соответствии с установленной операционной системой.
Windows 10, Windows 8.1 Windows 8, Windows 7 или Windows Vista
-
В Windows 10 выберите поле поиска на панели задач. В Windows 8.1 или Windows 8 проведите пальцем от правого края экрана и выберите Поиск. Либо, если вы используете мышь, переместите указатель в правый нижний угол экрана и щелкните кнопку Поиск. В Windows 7 или Windows Vista нажмите кнопку Пуск.
-
В поле Поиск введите outlook.exe /safe.
-
Нажмите клавишу ВВОД.
Windows Server 2003, Windows 2000 или Windows XP
-
Нажмите кнопку Пуск.
-
Выберите пункт Выполнить.
-
Введите outlook.exe /safe.
-
Нажмите кнопку ОК.
Если появится уведомление о том, что профиль электронной почты поврежден или что установлены конфликтующие сторонние приложения или надстройки, выполните действия, описанные в методе 3, чтобы создать новый профиль электронной почты.
PST-файл — это файл личных папок, в котором хранятся сообщения электронной почты, контакты, заметки, элементы календаря и другие данные. Если PST-файл поврежден, возможно, вы не сможете отправлять или получать сообщения электронной почты в Outlook.
Чтобы устранить эту проблему, восстановите файл личной папки Outlook (PST-файл).
Щелкните папку «Исходящие», а затем проверьте, зависли ли сообщения электронной почты в папке «Исходящие». Если какие-либо сообщения зависли, выполните следующие действия, чтобы очистить эти сообщения:
-
В Outlook откройте вкладку Отправка и получение , а затем щелкните Работать в автономном режиме.
Примечание. Это не позволяет Outlook отправлять все сообщения электронной почты.
-
Выберите папку Исходящие. Теперь можно выполнить одно из следующих действий:
-
Переместить сообщение. Переместите сообщение в папку Черновики . Вы можете перетащить сообщение в папку Черновики или щелкнуть его правой кнопкой мыши, выбрать Пункт Переместить, Выбрать другую папку, а затем выбрать папку Черновики из списка.
Примечание. Это позволяет открыть большое сообщение электронной почты, а затем удалить, изменить размер и повторно добавить вложения, прежде чем пытаться повторно отправить сообщение.
-
Удалите сообщение: щелкните его правой кнопкой мыши и выберите удалить.
Важно! Если появляется сообщение «Outlook передает сообщение», закройте Outlook и дождитесь его выхода. Возможно, вам придется использовать диспетчер задач в Windows, чтобы убедиться, что процесс Outlook.exe завершен. Перезапустите Outlook еще раз, а затем повторите шаг 2. -
-
Перейдите на вкладку Отправка и получение , а затем нажмите кнопку Работать в автономном режиме , чтобы удалить ее.
Дополнительная информация
К сторонним продуктам, которые, как известно, вызывают эту проблему, относятся следующие:
-
Интернет-акселератор Marketscore (Netsetter)
-
Чистая няня
-
Пробка Pop-Up panicware
Если файл Mapi32.dll поврежден или неправильный, при отправке или получении сообщений электронной почты в Outlook может появилось следующее сообщение об ошибке:
Сообщение об ошибке отправки и получения (0x8007000E): нехватка памяти или системных ресурсов. Закройте некоторые окна или программы и повторите попытку.
Чтобы устранить эту проблему, запустите средство восстановления MAPI (Fixmapi.exe). Файл Fixmapi.exe находится в одной из следующих папок:
-
C:WinntSystem32
-
C:WindowsSystem32
Если файл Sent Items.dbx поврежден, при отправке сообщения в Outlook Express может появилось следующее сообщение об ошибке:
Произошла неизвестная ошибка. Протокол: SMTP, порт: 0, secure(SSL): Нет, номер ошибки: 0x800C013B.
Чтобы устранить эту проблему, переименуйте файл Sent Items.dbx из файлов электронной почты Outlook Express. Для этого выполните следующие действия:
-
Нажмите кнопку Пуск, наведите указатель на пункт Найти, а затем — Файлы или папки.
-
В поле Имя введите Отправленные элементы.dbx.
-
В поле Поиск выберите основной жесткий диск (обычно диск C) и нажмите кнопку Найти.
-
Щелкните правой кнопкой мыши файл Sent Items.dbx и выберите команду Переименовать.
-
Введите Отправленные элементы.old и нажмите кнопку ОК.
-
Перезапустите Outlook Express. Это действие автоматически создает файл Sent Items.dbx.
Если один SMTP-адрес в списке рассылки поврежден или неправильно сформирован, может возникнуть ошибка 0x8004210b. Проверьте все адреса электронной почты в списке рассылки, чтобы убедиться, что они правильные. Кроме того, вы можете отправлять отдельные тестовые сообщения электронной почты каждому участнику списка рассылки, чтобы определить недопустимые адреса электронной почты.
Если сообщение об ошибке сопровождается сообщением об ошибке с истечением времени ожидания, вы можете устранить эту проблему, увеличив параметр времени ожидания сервера в Outlook или Outlook Express. Чтобы увеличить время ожидания сервера, используйте один из следующих методов в соответствии с установленной версией Outlook или Outlook Express.
Outlook 2010 и более поздние версии
-
Запустите приложение Outlook.
-
В меню Файл выберите пункт Сведения.
-
Щелкните Параметры учетной записи, а затем выберите Параметры учетной записи в списке.
-
Щелкните, чтобы выбрать целевую учетную запись POP3, а затем нажмите кнопку Изменить.
-
Нажмите кнопку Другие настройки.
-
Откройте вкладку Дополнительно.
-
Постепенно увеличивайте время ожидания сервера, пока проблема не будет устранена.
Outlook 2007
-
Запустите Outlook.
-
В меню Сервис выберите команду Настройки учетной записи.
-
Щелкните, чтобы выбрать целевую учетную запись POP3, а затем нажмите кнопку Изменить.
-
Нажмите кнопку Другие настройки.
-
Откройте вкладку Дополнительно.
-
Постепенно увеличивайте время ожидания сервера, пока проблема не будет устранена.
Outlook 2003 и Outlook 2002
-
Запустите Outlook.
-
В меню Сервис выберите пункт Учетные записи электронной почты.
-
Щелкните Просмотр или изменение существующих учетных записей электронной почты, а затем нажмите кнопку Далее.
-
Щелкните учетную запись POP3 и нажмите кнопку Изменить.
-
Нажмите кнопку Другие настройки.
-
Откройте вкладку Дополнительно.
-
Постепенно увеличивайте время ожидания сервера, пока проблема не будет устранена.
Outlook 2000 Корпоративный или режим рабочей группы (CW)
-
Запустите приложение Outlook.
-
В меню Сервис выберите пункт Службы.
-
На вкладке Службы щелкните Электронная почта в Интернете, а затем щелкните Свойства.
-
Откройте вкладку Дополнительно.
-
Постепенно увеличивайте время ожидания сервера, пока проблема не будет устранена.
Outlook 2000 Internet Mail (IMO)
-
Запустите приложение Outlook.
-
В меню Сервис выберите пункт Учетные записи.
-
Выберите целевую учетную запись и нажмите кнопку Свойства.
-
Откройте вкладку Дополнительно.
-
Постепенно увеличивайте время ожидания сервера, пока проблема не будет устранена.
Outlook Express 6.0 и 5.x
-
Запустите Outlook Express.
-
В меню Сервис выберите пункт Учетные записи.
-
Перейдите на вкладку Почта .
-
Щелкните учетную запись POP3 и нажмите кнопку Свойства.
-
Откройте вкладку Дополнительно.
-
Постепенно увеличивайте время ожидания сервера, пока проблема не будет устранена.
Контактные данные сторонних организаций предоставляются для того, чтобы помочь пользователям получить необходимую техническую поддержку. Эти данные могут быть изменены без предварительного уведомления. Корпорация Майкрософт не дает гарантий относительно верности приведенных контактных данных независимых производителей.
Сторонние продукты, которые рассматриваются в этой статье, производятся компаниями, не зависящими от корпорации Майкрософт. Корпорация Майкрософт не дает никаких гарантий, подразумеваемых и прочих, относительно производительности и надежности этих продуктов.
Нужна дополнительная помощь?

Although there are a multitude of error codes that you could be presented with, there are a couple of common solutions that work for many cases.
Aside from offering common solutions, this guide also contains a list of send/receive error codes which you may encounter and their meaning. For certain error codes, a more specific solution is mentioned.
- Check your email account settings
- Disable virus scanner integration
- Check your firewall settings
- Issues with add-ins
- Check data store integrity
- Stuck message or hidden read receipt
- Other send/receive issues
- Send/Receive error codes
- Enhanced Mail System Status Codes
- Other error codes
Check your email account settings.

When you are trying to send a message from another network than the network where the mailbox is located (for instance, from a hotel or a Wi-Fi hotspot, then you need to enable authentication for the configured SMTP server as well.
When Outlook worked before and you’re suddenly presented with send/receive errors, it is still good practice to verify your account settings and make sure that they are current. For example, several ISPs have increased their email security settings which could require you to enable TLS/SSL or make port changes. Also, sometimes they have merged with other ISPs and decommission the old account settings over time requiring you to make changes.
Trying your account settings on another computer or creating an additional mail profile for testing could help you determining if it is an issue with your current account configuration settings.
Disable virus scanner integration.

- The operation timed out waiting for a response from the receiving (POP) server.
- A time-out occurred while communicating with the server.
Other issues that are often caused by having a virus scanner integrated with Outlook are;
- Outlook being very slow in collecting your email.
- Messages ending up stuck in your Outbox (also see below).
- Messages being sent but never received.
- Sending or receiving blank messages.
- General message corruption;
- Font too big/small.
- Message not displaying at all.
- Meeting invitations being converted into regular emails.
Disabling your virus scanner’s integration with Outlook does not compromise your security as you’d still be sufficiently protected by the on-access scanner part of the virus scanner. For more details see; Disable virus scanner integration?
Check your firewall settings.

If you are presented with send/receive errors after updating Outlook, you probably need to reconfigure your firewall to re-allow Outlook to pass-through again.
This is because several firewall solutions verify via a hash that it is indeed the correct outlook.exe that is trying to pass through the firewall and not some virus which named itself outlook.exe. As with most updates the outlook.exe gets updated as well, you’ll need to accept it as safe again. You can find more information about this in the manual of your firewall solution.
Issues with add-ins

To further troubleshoot add-ins, manually disable each of them and re-enable them one-by-one to find the culprit.
Check data store integrity

Checking the integrity of your delivery location can be done with scanpst.exe. Also verify that the data store isn’t full or that it needs to be converted from ANSI to the Unicode format.
If you are using an Exchange account, then you could also try it with Cached Exchange Mode disabled and see if it works correctly now. If it does, rename the ost-file to .old and have Outlook rebuild the ost-file or verify that the configured location for the ost-file in your account settings is valid.
Stuck message or hidden read receipt

While it is easy enough to spot a message stuck in your Outbox, in some cases the stuck message can be a Read Receipt which are hidden messages and thus much harder to recognize as the issues and to delete.
Other send/receive issues

- Password prompts
In some cases Outlook can not remember your password for your mail account which results in being prompted for it.
- Receiving duplicates
When you receive multiple copies of a message or receiving the same message(s) over and over again see this guide.
- Rules not being processed automatically
When you have rules configured but they are not executed automatically when you receive new emails, see this guide.
- No automatic send/receive upon starting Outlook or cannot edit Send/Receive settings.
In those cases, reset your srs-file by renaming it to .old.
Send/Receive error codes
Searching in the error list below probably goes best with the Find function of your browser. For most browsers the keyboard shortcut for the Find function is CTRL+F.
When typing in the error code, please note that the error code starts with the digit 0 and not with the letter O.
General Errors
| Error Code | Description | Error Type |
|---|---|---|
| 0x800CCC00 | Authentication did not load | LOAD_SICILY_FAILED |
| 0x800CCC01 | Invalid certificate content | INVALID_CERT_CN |
| 0x800CCC02 | Invalid certificate date. | INVALID_CERT_DATE |
| 0x800CCC03 | User already connected. | ALREADY_CONNECTED |
| 0x800CCC04 | – | CONN |
| 0x800CCC05 | Not connected to server. | NOT_CONNECTED |
| 0x800CCC06 | – | CONN_SEND |
| 0x800CCC07 | – | WOULD_BLOCK |
| 0x800CCC08 | – | INVALID_STATE |
| 0x800CCC09 | – | CONN_RECV |
| 0x800CCC0A | Message download incomplete | INCOMPLETE |
| 0x800CCC0B | Server or maildrop is busy. | BUSY |
| 0x800CCC0C | – | NOT_INIT |
| 0x800CCC0D | Cannot locate server. | CANT_FIND_HOST |
| 0x800CCC0E | Cannot connect to server. | FAILED_TO_CONNECT |
| 0x800CCC0F | Connection closed. | CONNECTION_DROPPED |
| 0x800CCC10 | Address not known on server. | INVALID_ADDRESS |
| 0x800CCC11 | Mailing list not known on server | INVALID_ADDRESS_LIST |
| 0x800CCC12 | Unable to send Winsock request. | SOCKET_READ_ERROR |
| 0x800CCC13 | Unable to read Winsock reply | SOCKET_WRITE_ERROR |
| 0x800CCC14 | Unable to initialize Winsock. | SOCKET_INIT_ERROR |
| 0x800CCC15 | Unable to open Windows Socket | SOCKET_CONNECT_ERROR |
| 0x800CCC16 | User account not recognized. | INVALID_ACCOUNT |
| 0x800CCC17 | User canceled operation | USER_CANCEL |
| 0x800CCC18 | Logon attempt failed. | SICILY_LOGON_FAILED |
| 0x800CCC19 | A time-out occurred while communicating with the server | TIMEOUT |
| 0x800CCC1A | Unable to connect using SSL. | SECURE_CONNECT_FAILED |
Winsock Errors
| Error Code | Description | Error Type |
|---|---|---|
| 0x800CCC40 | Network subsystem is unusable. | WINSOCK_WSASYSNOTREADY |
| 0x800CCC41 | Windows Sockets cannot support this application. | WINSOCK_WSAVERNOTSUPPORTED |
| 0x800CCC42 | – | WINSOCK_WSAEPROCLIM |
| 0x800CCC43 | Bad address. | WINSOCK_WSAEFAULT |
| 0x800CCC44 | Unable to load Windows Sockets. | WINSOCK_FAILED_WSASTARTUP |
| 0x800CCC45 | Operation now in progress. This error appears if a Windows Sockets API is called while a blocking function is in progress. | WINSOCK_WSAEINPROGRESS |
SMTP Errors
| Error Code | Description | Error Type |
|---|---|---|
| 0x800CCC60 | Invalid response. | SMTP_RESPONSE_ERROR |
| 0x800CCC61 | Unknown error code. | SMTP_UNKNOWN_RESPONSE_CODE |
| 0x800CCC62 | Syntax error returned. | SMTP_500_SYNTAX_ERROR |
| 0x800CCC63 | Parameter syntax incorrect. | SMTP_501_PARAM_SYNTAX |
| 0x800CCC64 | Command not implemented. | SMTP_502_COMMAND_NOTIMPL |
| 0x800CCC65 | Improper command sequence. | SMTP_503_COMMAND_SEQ |
| 0x800CCC66 | Command not implemented. | MTP_504_COMMAND_PARAM_NOTIMPL |
| 0x800CCC67 | Command not available. | SMTP_421_NOT_AVAILABLE |
| 0x800CCC68 | Mailbox is locked and busy. | SMTP_450_MAILBOX_BUSY |
| 0x800CCC69 | Mailbox not found. | SMTP_550_MAILBOX_NOT_FOUND |
| 0x800CCC6A | Error processing request. | SMTP_451_ERROR_PROCESSING |
| 0x800CCC6B | User mailbox is known but mailbox not on this server. | SMTP_551_USER_NOT_LOCAL |
| 0x800CCC6C | No space to store messages. | SMTP_452_NO_SYSTEM_STORAGE |
| 0x800CCC6D | Storage limit exceeded. | SMTP_552_STORAGE_OVERFLOW |
| 0x800CCC6E | Invalid mailbox name syntax. | SMTP_553_MAILBOX_NAME_SYNTAX |
| 0x800CCC6F | Transaction failed. | SMTP_554_TRANSACT_FAILED |
| 0x800CCC78 | Unknown sender. This is caused by having the incorrect e-mail address in the Reply-To field. | SMTP_REJECTED_SENDER |
| 0x800CCC79 | Server rejected recipients. | SMTP_REJECTED_RECIPIENTS |
| 0x800CCC7A | No sender address specified. | SMTP_NO_SENDER |
| 0x800CCC7B | No recipients specified. | SMTP_NO_RECIPIENTS |
POP3 Errors
| Error Code | Description | Error Type |
|---|---|---|
| 0x800420CB | Mail cannot be stored on server. | POP3_NO_STORE |
| 0x800CCC90 | Client response invalid. | POP3_RESPONSE_ERROR |
| 0x800CCC91 | Invalid user name or user not found. | POP3_INVALID_USER_NAME |
| 0x800CCC92 | Password not valid for account. | POP3_INVALID_PASSWORD |
| 0x800CCC93 | Unable to interpret response. | POP3_PARSE_FAILURE |
| 0x800CCC94 | STAT Command required. | POP3_NEED_STAT |
| 0x800CCC95 | No messages on server. | POP3_NO_MESSAGES |
| 0x800CCC96 | No messages marked for retrieval. | POP3_NO_MARKED_MESSAGES |
| 0x800CCC97 | Message ID out of range. | POP3_POPID_OUT_OF_RANGE |
IMAP Errors
| Error Code | Description | Error Type |
|---|---|---|
| 0x800CCCD1 | Login failed. | IMAP_LOGINFAILURE |
| 0x800CCCD2 | Message tagged. | IMAP_TAGGED_NO_RESPONSE |
| 0x800CCCD3 | Invalid response to request. | IMAP_BAD_RESPONSE |
| 0x800CCCD4 | Syntax error. | IMAP_SVR_SYNTAXERR |
| 0x800CCCD5 | Not an IMAP server. | IMAP_NOTIMAPSERVER |
| 0x800CCCD6 | Buffer limit exceeded. | IMAP_BUFFER_OVERFLOW |
| 0x800CCCD7 | Recovery error. | IMAP_RECVR_ERROR |
| 0x800CCCD8 | Incomplete data. | IMAP_INCOMPLETE_LINE |
| 0x800CCCD9 | Connection not allowed. | IMAP_CONNECTION_REFUSED |
| 0x800CCCDA | Unknown response. | IMAP_UNRECOGNIZED_RESP |
| 0x800CCCDB | User ID has changed. | IMAP_CHANGEDUID |
| 0x800CCCDC | User ID command failed. | IMAP_UIDORDER |
| 0x800CCCDD | Unexpected disconnect. | IMAP_UNSOLICITED_BYE |
| 0x800CCCDE | Invalid server state. | IMAP_IMPROPER_SVRSTATE |
| 0x800CCCDF | Unable to authorize client. | IMAP_AUTH_NOT_POSSIBLE |
| 0x800CCCE0 | No more authorization types. | IMAP_OUT_OF_AUTH_METHODS |
NNTP (News Server) Errors
| Error Code | Description | Error Type |
|---|---|---|
| 0x800CCCA0 | News server response error. | NNTP_RESPONSE_ERROR |
| 0x800CCCA1 | Newsgroup access failed. | NNTP_NEWGROUPS_FAILED |
| 0x800CCCA2 | LIST command to server failed. | NNTP_LIST_FAILED |
| 0x800CCCA3 | Unable to display list. | NNTP_LISTGROUP_FAILED |
| 0x800CCCA4 | Unable to open group. | NNTP_GROUP_FAILED |
| 0x800CCCA5 | Group not on server. | NNTP_GROUP_NOTFOUND |
| 0x800CCCA6 | Message not on server. | NNTP_ARTICLE_FAILED |
| 0x800CCCA7 | Message header not found. | NNTP_HEAD_FAILED |
| 0x800CCCA8 | Message body not found. | NNTP_BODY_FAILED |
| 0x800CCCA9 | Unable to post to server. | NNTP_POST_FAILED |
| 0x800CCCAA | Unable to post to server. | NNTP_NEXT_FAILED |
| 0x800CCCAB | Unable to display date. | NNTP_DATE_FAILED |
| 0x800CCCAC | Unable to display headers. | NNTP_HEADERS_FAILED |
| 0x800CCCAD | Unable to display MIME headers. | NNTP_XHDR_FAILED |
| 0x800CCCAE | Invalid user or password. | NNTP_INVALID_USERPASS |
RAS (Remote Access) Errors
| Error Code | Description | Error Type |
|---|---|---|
| 0x800CCCC2 | RAS/DUN not installed. | RAS_NOT_INSTALLED |
| 0x800CCCC3 | RAS/DUN process not found. | RAS_PROCS_NOT_FOUND |
| 0x800CCCC4 | RAS/DUN error returned. | RAS_ERROR |
| 0x800CCCC5 | ConnectOID damaged or missing. | RAS_INVALID_CONNECTOID |
| 0x800CCCC6 | Error getting dial settings. | RAS_GET_DIAL_PARAMS |
Enhanced Mail System Status Codes
Aside from getting the reported errors, there usually also is another error code listed. These error codes consist of 3 digits which could be separated by a dot. For instance; 553 or 5.5.3
These errors could also be sent to you in an email (usually from System Administrator) with a Delivery Status Notification code in it.
The first number will tell you the general status of the message;
- 2
Success. The message has been delivered. - 4
Persistent Transient Failure. This means that the message was valid and accepted by the server but there is a temporary problem which prevents it from being delivered. The mail server will usually try to send it again later until a time out is reached. Until you get the a message that the server is giving up (see “5” below), there is no direct need to resend the message. - 5
Permanent. This is a fatal error and the message sent cannot be delivered. It’s unlikely that the message can be delivered by a simple resend. A change must be made either within the message (wrong address, too big, too many recipients, etc), within the account settings or at the mail server of the sender or receiver.
The second 2 numbers will give you more details about why the message is delayed or failed;
- X.0.0 Other undefined Status
- X.1.0 Other address status
- X.1.1 Bad destination mailbox address
- X.2.0 Bad destination system address
- X.1.3 Bad destination mailbox address syntax
- X.1.4 Destination mailbox address ambiguous
- X.1.5 Destination mailbox address valid
- X.1.6 Mailbox has moved
- X.1.7 Bad sender’s mailbox address syntax
- X.1.8 Bad sender’s system address
- X.1.9 Message relayed to non-compliant mailer
- X.2.0 Other or undefined mailbox status
- X.2.1 Mailbox disabled, not accepting messages
- X.2.2 Mailbox full
- X.2.3 Message length exceeds administrative limit.
- X.2.4 Mailing list expansion problem
- X.3.0 Other or undefined mail system status
- X.3.1 Mail system full
- X.3.2 System not accepting network messages
- X.3.3 System not capable of selected features
- X.3.4 Message too big for system
- X.3.5 System incorrectly configured
- X.4.0 Other or undefined network or routing status
- X.4.1 No answer from host
- X.4.2 Bad connection
- X.4.3 Routing server failure
- X.4.4 Unable to route
- X.4.5 Network congestion
- X.4.6 Routing loop detected
- X.4.7 Delivery time expired
- X.5.0 Other or undefined protocol status
- X.5.1 Invalid command
- X.5.2 Syntax error
- X.5.3 Too many recipients
- X.5.4 Invalid command arguments
- X.5.5 Wrong protocol version
- X.5.6 Authentication Exchange line is too long
- X.6.0 Other or undefined media error/bad content
- X.6.1 Media not supported
- X.6.2 Conversion required and prohibited/bad domain or alias
- X.6.3 Conversion required but not supported
- X.6.4 Conversion with loss performed
- X.6.5 Conversion failed
- X.6.6 Message content not available
- X.7.0 Other or undefined security status/authentication failure/violating site policy
- X.7.1 Delivery not authorized, message refused
- X.7.2 Mailing list expansion prohibited
- X.7.3 Security conversion required but not possible
- X.7.4 Security features not supported
- X.7.5 Cryptographic failure
- X.7.6 Cryptographic algorithm not supported
- X.7.7 Message integrity failure
- X.7.8 Trust relationship required/Authentication credentials invalid
- X.7.9 Authentication mechanism is too weak
- X.7.10 Encryption Needed
- X.7.11 Encryption required for requested authentication mechanism
- X.7.12 A password transition is needed
- X.7.13 User Account Disabled
- X.7.14 Trust relationship required
- X.7.15 Authentication credentials invalid
- X.7.16 Future release per-user message quota exceeded
- X.7.17 Future release system message quota exceeded
Common combinations are;
| 421 or 4.2.1 | Service not available, the connection will be closed (the server could be about to be restarted) |
|---|---|
| 450 or 4.5.0 | Requested action failed: mailbox unavailable (for instance, the mailbox is busy or locked) |
| 451 or 4.5.1 | Requested action aborted due to an error on the server (contact your ISP) |
| 452 or 4.5.2 | Requested action not taken due to insufficient system storage on the server (contact your ISP) |
| 453 or 4.5.3 | Requested action not taken due to policy settings (for instance, too many recipients specified) |
| 500 or 5.0.0 | Syntax error, command unrecognized (This may include errors such as command line too long) |
| 501 or 5.0.1 | Syntax error in parameters or arguments |
| 502 or 5.0.2 | Command not implemented |
| 503 or 5.0.3 | Bad sequence of commands |
| 504 or 5.0.4 | Command parameter not implemented (for instance, Helo command rejected: need fully-qualified hostname) |
| 550 or 5.5.0 | Requested action not taken: mailbox unavailable (for instance, mailbox not found, no access due to policy reasons) |
| 551 or 5.5.1 | User not local and an issue occurred when the server tried to forward the message. |
| 552 or 5.5.2 | Requested mail action aborted: exceeded storage allocation |
| 553 or 5.5.3 | Requested action not taken: mailbox name not allowed for instance, the mailbox name is invalid) |
| 554 or 5.5.4 | Transaction failed |
More details about the individual error codes can be found within the base RFC document and its listed updates at the top.
Other error codes
Aside from the above listed error codes, there are many more error codes which you could encounter during send/receive. These usually refer to internal errors from Outlook, are specific to a certain mail server or are actually coming from your virus scanner or another add-in that integrates with your send/receive or networking process.
Due to the nature and origins of these error codes, the list below will probably always remain incomplete. If you encounter a new send/receive error, have a better description or even a solution for it, please email it to me (preferably with a screenshot of the error attached) and I’ll update the list accordingly.
| Error Code | Description | Cause/Possible solution |
|---|---|---|
| 0x0004b9 | ||
| 0x000501 | ||
| 0x80000003 | ||
| 0x80004001 | Not implemented | |
| 0x80004005 | The operation failed | Virus scanner integration issue usually related to script blocking. |
| 0x800300FD | Unknown Error | Indicates that there is insufficient space in the Temp folder -Empty your Deleted Items folder -Empty your Temp folder; C:WindowsTemp |
| 0x80040109 | The Operation cannot be performed because the message has been changed | Virus scanner integration issue. Some add-in may have altered the message upon sending. |
| 0x8004010F | Microsoft Exchange offline address book. Not downloading Offline address book files. A server (URL) could not be located. |
Verify the publication address for the Offline Address Book (OAB) in Exchange. |
| 0x80040115 | The connection to the Microsoft Exchange server is unavailable. Outlook must be online or connected to complete this action. | The server is not reachable, check your connection and verify that Outlook is in on-line mode. This issue could also occur with other mail servers, not just Exchange. |
| 0x80040119 | An unknown error has occurred. Messaging interface has caused an unknown error. |
Virus scanner integration issue usually related to authentication. This issue could also occur when there are errors in your pst-file. |
| 0x8004011D | Task “Microsoft Exchange Server” reported error (0×8004011D): “The server is not available. Contact your administrator if this condition persists.” | The server is not reachable, check your connection and verify that Outlook is in on-line mode. This issue could also occur with other mail servers, not just Exchange. |
| 0x80040126 | The operation cannot be performed because the connection to the server is offline. | This issue is an Outlook Connector issue. If there is no general issues with Hotmail itself, make sure you have the latest version installed. Removing and re-adding your Hotmail account might help. |
| 0x80040305 | Your server administrator has limited the number of items you can open simultaneously. Email too big (Google Apps Sync) |
These limitations can be set on the mail server. Contact your mail admin to find out which limitations are in affect. |
| 0x80040600 | An unknown error has occurred. | Virus scanner integration issue usually related to authentication. This issue could also occur when there are errors in your pst-file. |
| 0x80040607 | An unknown error occurred | Virus scanner integration issue. Authentication not enabled for the configured SMTP server. |
| 0x8004060C | Unknown Error | |
| 0x80040900 | ||
| 0x80040FB3 | Error encountered. Check documentation. | This issue is related to BlackBerry accounts. It appears that your account is not associated with a BES or Exchange account. Other causes could be a corrupted item that is trying to be synched. Remove this item and try again. |
| 0x80042108 | Outlook is unable to connect to your incoming (POP) e-mail server. If you continue to receive this message, contact your server administrator or ISP. |
|
| 0x80042109 | Outlook cannot connect to your outgoing (SMTP) e-mail server. If you continue to receive this message, contact your server administrator or ISP. |
|
| 0x8004210A | The operation timed out waiting for a response from the receiving (POP) server. If you continue to receive this message, contact your server administrator or Internet service provider (ISP). |
Virus scanner integration issue |
| 0x8004210B | The operation timed out waiting for a response from the sending (SMTP) server. If you continue to receive this message, contact your server administrator or Internet service provider (ISP). |
An address in the distribution list might be malformed or corrupted. Update/remove the address or recreate the distribution list. |
| 0x80042112 | ||
| 0x8004218 | ||
| 0x80048002 | This task was cancelled before it was completed. | Virus scanner integration issue. Some add-in may have altered the message upon sending. |
| 0x8004DF0B | ||
| 0x80070005 | You don’t have appropriate permissions to perform this operation | Refers to issues with the delivery location; -scan it for errors with scanpst.exe or scanost.exe -verify that you have read/write permissions on the pst-/ost-file -verify that the path to the pst-/ost-file is valid -verify that the ost-file belongs to the correct user and mailbox |
| 0x8007000E | ||
| 0x80070021 | ||
| 0x80070057 | Could not complete operation. One or more parameter values are not valid. Sending reported error parameters not correct. |
Virus scanner integration issue. This error could also occur with Google Apps Sync trying to sync your RSS folders to the server. |
| 0x80072F17 | Synchronization could not be completed. Try again later. | This issue is usually caused by issues with the SSL certificate. |
| 0x8007007E | Unknown error | |
| 0x80090FB3 | ||
| 0x800C0131 | Unknown error has occurred. | data storage issue |
| 0x800C0133 | data storage issue virus scanner integration issue |
|
| 0x800C013B | ||
| 0x800CCC33 | Task ‘Hotmail: Folder:Inbox Synchronizing headers.’ reported error (0×800CCC33) : ‘Access to the account was denied. Verify that your username and password are correct. The server responded ‘Forbidden’. | This error is encountered when you are trying to make a connection to a Live Hotmail account without the Outlook Connector installed. |
| 0x800CCC7D | Unknown Error | The outgoing SMTP server does not support secure connections. Verify your account settings or contact your ISP. |
| 0x800CCC80 | None of the authentication methods supported by this client are supported by your server. | |
| 0x800CCCF7 | ||
| 0x81FC0005 | Close and reopen Outlook | |
| 0x834005 | ||
| 0xC0000005 | ||
| 0xD4904005 |
Outlook is a well-known email launched by Microsoft with several features such as webmail, task manager, contact manager, calendar, and note taking. Outlook’s amazing features will not only let you to compose or send your email but also help you to manage your email account more efficiently.
But due to some technical glitch you may confront Outlook Send Receive Error and then it will be nightmare to spend even a single day. Every problem has a specific reason behind it, so there are some factors due to which you find difficulties while sending or receiving. To learn what causes this error and how to resolve it, obtain reliable Email Support from tech-savvy or else glimpse on the blog-post.
Reasons for Outlook Send Receive Error
- Poor internet connection take you to experiencing the Outlook Send Receive Error
- Antivirus or firewall software installed in PC can be the one reason
- Due to incorrect Outlook email account settings
- Due to large attachments
- If there is an Outlook data file error
Various Methods to Fix Outlook Send/Receive Error
In order to get rid of this issue, use one or more following methods accordingly. Once you complete each given method, try to send yourself a test email message to ensure whether you can send and receive messages without confronting any error. Let’s begin the process:
Method 1: Make Sure You Are Connected To the Internet
First and foremost, you are suggested to check-out the speed of your internet when receiving Send/Receive Error Outlook. Due to poor connection or if you are not connected on internet, it is definitely that you can’t either send or receive any emails. To check whether your system is connected on internet or not, follow the below steps:
- First, open web browser on your computer window
- Type one of the following address in the address bar and then press Enter key on your keyboard
- http://www.microsoft.com
- http://www.msn.com
- If the site is accessible, it means internet is connected on the system
Method 2: Correct the Outlook Email Account Settings
If internet speed is high but yet facing Outlook Send Receive and Error, then correct the configuration settings of your Outlook email. Here is the right way to verify the settings:
- Open Outlook first and login with your valid email address and password
- Now, go to the “File” menu
- After that, go to the “Info” column and click on “Account Settings”
- Under “Account Settings” window click on “Change” tab
- Now click on “More Settings” tab and select “Outgoing Server”
- Click the checkbox which is in front of My outgoing server (SMTP) requires authentication
- Also, select the checkbox of Log on to incoming server before sending mail
- Now, click on “OK” tab and “Finish” button
Method 3: Uninstall Antivirus Software
Most of the time Outlook Send/Receive Error occurs when there is any antivirus installed on your system. Windows Firewall and any other third party Antivirus program can prevent you from accessing an Outlook. This can result in Outlook send receive error. Therefore, disable the Firewall and Antivirus program for a time being and then start using Outlook to send or receive emails. Consider the following steps to disable:
- Open Control Panel and click on “Network Connections” tab
- Right-click on the network connection on which you are connected and then tap “Properties” option
- Under the “Security” tab turn off Firewall
Once the problem is fixed and the inbox is updated, enable the Windows Firewall to protect your system.
Method 4: Check the Suspicious Emails
The Outlook Send Receive Error can also occur due to some suspicious mails that dropped into your inbox. So, check-out those suspicious spam emails and clear it out immediately if finding any. After deleting the suspicious email, you will be able to send or receive messages with no error issue. If this doesn’t helpful, go ahead.
Method 5: Repair PST File to Run the Inbox
In outlook, a private folder/ file consisting of email contacts, messages, memos, notes, and other personal data, that file is called pst file. If the PST file is corrupted, you may not send any email nor will not be received the new emails in Outlook. To repair the PST file, follow the subsequent guides:
- Log out from your outlook account first and then start repairing the file
- Open your system and go to “Setting”
- Click on “Update and Security” tab
- Select “Troubleshoot” – let the troubleshot run on its own and tool will be repaired
- Open your pst file and look for the following options
- Restore the pst file
- Move the pst file
- Backup of the pst file
Select any one of these given options as per your preference and transfer your data from the current outlook account to the spare email address and refresh the system. Afterwards, access to your outlook account and you will receive the new emails and also will be able to send the pending emails. If Outlook still not sending emails, continue reading.
Method 6: Clean Outlook Mails
Outlook mails need to be deleted or cleared after every few months. Lots of mail stored in inbox can be creating a problem in sending or receiving mails. Go through the noted steps for this:
- Go to your outlook account and click on “Send Receive” tab
- Select the option to work from Offline
- Select all the emails from Outbox and move all of them to the Draft folder
Your Outbox folder is now clean & clear. Now this will be enabled for sending the pending emails and receiving the new mails.
Avail Blue-Chip Email Customer Service for One-Stop Solution
We are a technical team of engineer working day to night continuously to deliver the best Email Customer Service to everybody. So, if your Outlook Send Receive Error is yet not sorted out, don’t panic! Contact us through helpline number. We guide you properly over phone call so that you can remotely fix the problem in a couple of second.
Summary:-Being Outlook users many individuals come across a common error known as Send/Receiver Error. Therefore, we have discussed some easy methods to get rid of this error. You can check out some of the easy methods that you can apply to resolve this issue otherwise use the PST Recovery Tool if you are an Outlook User.
Microsoft Outlook and Outlook Express are both known email clients in today’s world which not only helps us in connecting with the outer world but also is an efficient tool in making our day-to-day work easy. But like other applications, it also faces various types of issues. If something doesn’t work accordingly your Microsoft Outlook and OE will show an error. One of the major errors that most OE and Outlook users face is Outlook Send Receive Error. So with this article, you will come to know how to resolve this Outlook send and receive Error.
Why Outlook Send Receive Error Occurs
Send receive an error in Outlook is nothing but a small error which occurs due to various syncing and other issues. There are various types of send & receive errors in MS Outlook that you may see like:
- Outlook receiving error 0x80042108
- Microsoft Outlook send receive error 0x800ccc0f
- Outlook send receive error 0x8004060c
- Send receive error 0x80040600
- Outlook send receive error 0x8004010f
- MS Outlook send receive error 0x80040610
- No connection could be made because the target machine actively refused it
- A time-out occurred while communicating with the server
- The server could not be found
- Bug in update KB2412171 for Outlook 2007
Microsoft Outlook Send error is a common and annoying phenomenon and resolving it is not an easy task. But here, I would be telling you some of the best manual techniques to resolve this Microsoft Outlook Express & Outlook issue
Method 1: Checking Your Internet Connection
One of the first steps that you may need to take is to check your internet connectivity. For this, just open the browser that you use and go to any website. If the webpage opens at a normal speed. Then it is an indication that your internet connection is Ok. In this case, you need to move on to the second method.
Method 2: Deleting Spam or Suspecting Emails
Although Outlook and Outlook Express are quite good is detecting spam emails but there are sometimes when your email client may virus or a malware-ridden email which is causing this Outlook Send Receive Error. So try to delete spam messages and emails
Method 3: Disabling Anti-Virus Email Scanning
Integrating an anti-virus with Microsoft Outlook or OE has some disadvantages so it is always suggested not to use or integrate an anti-virus in email clients.
But if it is integrated then follow these steps to disable it:
For Outlook 2003 & Older Versions:
- Click on “Tools”
- Scroll down to “Options”
- Click on “Advance Settings”
- Now select “Add-In Manager” or click on the “COM Add-Ins” button
- And disable the required add-in
Note: Most probably the anti-virus add-in is located in “COM Add-ins”
In Outlook 2007
- Go to “Tools”
- Scroll down to “Trust centre” and choose “Add-ins” which is shown on the left pane
- Now scroll down to the bottom of the page and click “Manage” and disable the add-in
For Outlook 2010 And 2013
- Go to the “File” menu
- Go to “Options” and select “Add-ins”
- Click on “Manage” and scroll down to “add-in category” and disable the anti-virus add-in
Method 4: Review Firewall Settings
Sometimes firewall blocks incoming and outgoing emails from MS Outlook and Outlook Express which causes send receive errors in outlook. So do have a look whether your email clients are kept under exceptions or not.
Method 5: Reviewing Email Settings
If your account is not configured properly then there are good chance that you will receive this Outlook send receive error.
- Check the email address with which the account is integrated
- Review the type of email account: IMAP, POP3 or HTTP
- Review your email id and password
- Check the name and address of the email account: IMPA or HTTP or POP3
- Review email port numbers
If everything seems ok then I would suggest you reconfigure it again from scratch after deleting your profile.
Method 6: Starting In Safe Mode
Starting in safe mode help users detecting and fixing problems generated during a fault startup. To start Microsoft Outlook or Outlook Express in safe mode, the user has to hold on the CTRL key and click on the application shortcut. As soon as you will click, you will be asked whether you want to start the application in safe mode or not. Click “Yes”
Method 7: Deleting Outbox Emails
Sometimes when you send a heavy file through MS Outlook or Outlook Express, it gets stuck in the outbox. And deleting it becomes hard. And sometimes these unsent files may create Outlook error 0x80040610. To make that possible, first, enable the “Offline mode” of MS Outlook / OE and then delete the file.
Method 8: Changing Server Time-Out
Server time-out is basically the time limit defined for Outlook to wait for its server to respond when sending or receiving a file. By default, the time mentioned is only 1 minute which is very low for big files. So increasing the server time-out to 2 or 3 minutes is always a good option.
Method 9: Repair Using MAPI Repair Tool
If your mapi32.dll file is corrupt then there are chances that you will be facing Outlook Express Send Receive Error. To resolve this, run MAPI Repair Tool which you will find under C:WinntSystem32 or C:WindowsSystem32 folder.
Conclusion
The above share methods are one of the best methods to fix send receive the error in Outlook. However, these techniques might not work, if your Outlook files are corrupted. For that, you might have to go for a recovery tool. Outlook Express users can go for the DBX recovery tool or you may check out this article Outlook Express: Repair Corrupted DBX File. On the other hand, MS Outlook Users may opt for the Outlook PST Repair Tool or may check out this article How to Repair PST File if SCANPST.EXE Fails? Hope you liked this article and if you have any questions regarding how to fix the outlook send receive error, you may mention it in the comment section.
Fix Outlook Send Receive Error To The Simple Steps
In the technical world, it becomes very necessary to know the root causes of any serious problematic errors occurring in an Outlook account. One harmful error is Outlook Send Receive Error. Most times users experience especially when sending/receiving any mails or messages. Due to several factors, this can make trouble around your work. However, we better understand what you feel and how much you get infuriated when all set to send the urgent emails but unfortunately receive an unknowing error issue. That’s why we have compiled here the most reliable and safest methods to solve such a send/receive error in a short while. So, why waste more time if the solution is in front of you guys. Let’s begin!
What Are The Causes Of The Outlook Send Receive Error?
- Poor or no internet connection available in the operating system.
- Incorrect Settings of the Outlook email account.
- Mistakenly deleted the suspicious email messages from the mailbox.
- Email Profile might not work correctly.
- Inappropriate configuration of Outlook.
- Outlook cannot connect to the server.
- Outlook data file issue.
- Large attachments.
- Unpleasant files.
- Bad Synchronization.
A constant failure in Outlook 2010 Send Receive Error can impact your business. Many of you might have tried various possible ways by yourself to fix this issue but unluckily still facing the same problem. The blog post provides different product solutions for this type of error. Continue following each one until you send emails without any barriers and receive mails or messages without any kind of disruption in Outlook.
Different Types of Outlook Error Codes
- Incomplete message download- 0x8004210a
- Server is busy- 0x8004210b
- Can’t identify or locate the server- 0x800ccc0d
- Cannot connect to the server- 0x800ccc0e
- Connection closed- 0x800ccc0f
- When the address is unknown on the server- 0x80040610
Simply, you are suggested to go through the instructions noted underneath. So, let’s follow One after another unless you reach the right solution and fix the send/receive error Outlook:
Method 1: Temporary Disable Windows Firewall and Antivirus Program
Sometimes Windows Firewall and any other third-party Antivirus program can trouble in sending and receiving emails on Outlook. Hence, to get rid of it, for the time being, make the Windows Firewall and Antivirus program disabled. Here is how to do that with ease:
- Open Control Panel in your Windows System and click on Network Connections tab.
- Right-click on the network connection at which your system is connected and then click the “Properties” tab.
- Under the Security tab turn off Firewall.
For Outlook 2013 send receive error, follow the steps given below:-
- Firstly, go to Files and then click Options >> Add-ins.
- Next, click on Manage and go to the Add-in category.
- Turn off the Anti-virus add-in.
Once the Send/Receive Error Outlook gets terminated and the inbox is updated, enable the Windows Firewall for safety and security purposes. If the Microsoft Outlook send/receive error yet exists, then continue following the next method.
Method 2: Check For Suspicious Emails
The Outlook 2016 Send Receive Error can also sometimes arise when there is any suspicious mail dropped into your inbox. Suspected emails or messages can block your receiving error message in Outlook. So deleting those suspicious spam emails from the mailbox will be effective in solving this issue. Use one of the following methods to clear the mailbox from any doubtful emails or messages:
- Access your mailbox using your ISP’s web-based email program. Then, delete the email messages.
- Contact your ISP and ask them to delete the email messages.
If this also isn’t helpful in fixing Send Receive Error Outlook, move to the next method.
Method 3: Correct The Outlook Email Account Settings
Verify your Outlook Email Settings and if they are inappropriately configured, correct the settings first and then start again sending or receiving emails in Outlook. Let’s do it:
- Open Outlook and give a tap on “File”.
- Click on Account Settings -> Account Settings.
- Under the “Account Settings” window click the option “Change”.
- Now click on the “More Settings” tab and select “Outgoing Server”.
- Click the checkbox next to “My outgoing server (SMTP) requires authentication”.
- Also, click the checkbox next to the “Log on to incoming server before sending mail” option.
- Now, click the “OK” tab to save the changes.
- Restart Outlook and check if you are able to send emails.
If you are still facing this error, then move on to the next method.
Method 4: Clear Outbox And Change Server Time-out
The server time-out duration is 1 min by default in Outlook. When you send an email with an attachment of large size, the default server timeout will be insufficient which leaves your mails stuck in Outbox. So, in such a condition, what you should actually do is to clear the outbox ASAP and increase the Server timeout duration as this can help to fix Microsoft Outlook Send and Receive Error. To change Outlook server timeout, follow the beneath guideline:
- Launch Outlook and tap on the “File” button.
- Follow this path: File -> Account Settings -> Account Settings -> Change -> More Settings -> Advanced.
- Under the “Advanced” section you can increase the Server timeout.
Fortunately, this will allow Outlook to send or receive emails. But if yet the problem is unsolved, keep following the next solution method.
Method 5: Run Outlook in Safe Mode
Running Outlook in Safe mode is the most wanted and productive solution to fix Outlook error 0x80040610. To launch Outlook in safe mode just type Outlook.exe /safe in the search box and then hit the “Enter” key. Try sending emails after launching Outlook in safe mode. If this doesn’t fix Outlook Send and Receive Error, then there could be a corrupt or damaged PST file in Outlook.
Method 6: Repair PST File
A .pst file is a personal-folders file that stores your email messages, contacts, notes, calendar items, and other data. If the .pst file is corrupt or damaged, you won’t be able to send or receive any emails or messages until and unless you perform Outlook.pst repair. You can repair the corrupt PST file using the built-in inbox repair tool.
Conclusion
The Outlook Send Receive Error can effortlessly be eradicated using the aforementioned problem-solving methods. But if you fail to fix the Outlook send/receive error, do let us know via dialing the helpline number. We have deft and skilled Outlook Support experts for providing you assistance.
Being a provoking email user, it becomes necessary to tackle the root causes of harmful errors like Fix Send/Receive Error in MS Outlook, which can make trouble around your work. This strategy helps you to prevent the entire email communication network as well as the local machine. If you make some changes in control panel settings or somewhere, then evaluate the risk factor on other application like email, PC update and firewall. However, Support of entire Windows PC, as well as its component is available on Microsoft Technical centre, but users have a lack of awareness. So, we should consider the predefined steps for fixing Outlook send/receive error/bug/degraded performance through authenticating resources available on the web.
Real-Time Case of Email Error (Send/Receive):
Let us discuss a live scenario where a user gets ‘Outlook send/receive error’ in email application.
Applied to Email Clients & Corresponding Versions:
MS Outlook: 2016, 2013, 2010, 2007, 2003, 2002, 2000, 98 and 97
Outlook Express: 6.0, 5.5, 5.01, 5.0 and 4.0
Observation: The entire email application is not responding with click action to send/receive button as well as failed to complete desired operations when we send an email.
Reason behind Outlook Not Receiving Emails:
There are some possible factors responsible for reported threats like error attack, bad synchronization, Outlook data file error or unknown bug.
Handling Error Technique:
There are multiple methods available to fix email issues like send/receive error in Outlook, timed out connection, protocol adjustment, and damage in Outlook PST file. Try Outlook PST repair tool if the issue occurs due to corrupt PST file.
How to resolve Outlook send/receive error?
If we receive the error with known reason, then we can go through the particular method for fixing occurred problem. But, most Outlook users are reported on online tech support communities that they are facing bad experience in email with an unknown error. Then how could we proceed with the right path to fix real-time errors.
To get back lost performance of email application, it is advised to apply resolution methods from beginning to end through the predefined process. But, you should make sure the status of the email application after completion of each method. If your email application is working properly, then stop to proceed with successor method. Otherwise, move towards next phase of error handling method.
Take a note in the ascending order of error resolving process, given below:
Check Point 1: Assure the availability of Internet Connection
It is a primary analysis before proceeding to the next step. Just open internet explorer in Windows PC, then goes through any website to make sure the presence of an Internet connection.
Check Point 2: Remove the bad settings of Outlook email accounts
MS Outlook/Express has different versions which are available in the market as well as the user’s end. In this situation, there is a separate method for setting each version of MS Outlook as well as Outlook Express. However, these processes slightly deviate from one version to another in same email client, but the probability of settings error is higher at the user’s end.
So, resolve any bad settings if available application. At this level, you can manipulate server settings also. If you are not interested in storing messages on server location, then uncheck the option “Leave a copy of messages on this server”. It also prevents your Outlook mailbox from duplicate email items.
Check Point 3: Remove Garbage/Suspicious Emails
Sometimes, we receive some malicious code on mailbox through unreliable senders. At this moment, we should delete such kind of emails as soon possible.
Check Point 4: Avoid Clash with Antivirus Software
Sometimes Antivirus plugin in MS Outlook/Express creates a barrier for the incoming/outgoing server. In this situation, we should follow the guideline of Antivirus manufacture for enabling error free compatibility between antivirus and email client. Most of the trusted antivirus companies are providing proper guidelines on their official website or resource.
Check Point 5: Set Right Priority for Firewall Software
If we set high priority with firewall then it can block the access of message transfer protocol and system. To avoid such kind of access barrier, there is a need to set adequate priority with MS Outlook and Express email client.
We need to allow access for two kinds of file, mentioned below:
- Outlook.exe (in MS Outlook)
- Msimn.exe (for Outlook Express)
Check Point 6: Check Email Profile in MS Outlook
Sometimes, corrupt email profile is the root cause for underlying errors in MS Outlook. So, we should check the Outlook email profile carefully. If you find Outlook profile in damage status, then create a new Outlook profile by following steps:
Step 1: Place the default Outlook Data Files
- Go through Control Panel, click Mail.
- Mail Setup – Outlookdialog box appears then click Show Profiles.
- Now need to check current Outlook profile, and then clickProperties.
- In Mail Setup – Outlookdialog box, now click on Data Files.
- Follow theData Files tab in the Account Settings dialog box then mention the name and location of the default Outlook email profile
- Now, Click Close.
Step 2: Create a new Outlook email account profile
- Control Panel then click Mail.
- Via Mail Setup – Outlookdialog box then click Show Profiles.
- Go throughGeneral tab which is available in Mail dialog box, and then click Add.
- New Profiledialog box is created then type a new profile name, and then click OK.
- Proceed with Add New Accountdialog box then select “Manually configure server settings or additional server types” then click ‘Next’.
- Choose Servicedialog box is opening then select Internet E-mail, and then click Next.
- Through “Internet E-mail Settings”dialog box, type your account details.
- Now you can click on “Test Account Settings”to test your account.
- Selecting Existing Outlook Data File, and then click Browse.
- In “Open Outlook Data File”dialog box, locate and then select the Outlook data file which is located in past, and then click OK.
- Click Next.
- In Test Account Settingsdialog box, click Close.
- Click Finish.
Steps 3: Make your newly created Outlook profile as a default profile
If Outlook email is working fine with newly created profile, then you should set this one profile as a default profile. Apart from setting new profile as a default profile, you can transfer old emails to new one Outlook profile.
Follow the predefined steps to perform the configure process for new Outlook profile as an old Outlook profile, given below:
- Via General tab of the Mail dialog box, select ‘Always use this profile’.
- Then Click the drop-down under Always use this profile then select the new profile.
- Click on “OK”
- Follow the Import and Export wizard for transferring emails of Outlook data files corresponding old email profile
- Now, import PST file into new Outlook email profile
Check Pont 7: Run Outlook email client in Safe Mode
You can start an Outlook email application in safe mode through predefined following steps:
- Go through Start Button of Windows PC. If you are using Windows 8/8.1 then search through metro interface on lower-right corner of screen.
- In search box, type exe /safe
- Then press “Enter” command
Note: If you receive an error message of corrupt Outlook profile then go through the creation of building new Outlook email profile
Check Point 8: Use ScanPST.exe for re-construction of damage Outlook database (PST) file
In the final phase, we can use ScanPST.exe for eliminating error of Outlook email. It doesn’t deal with Outlook Express file. It is available at local Windows PC. It removed database related problems which are also responsible for send/receive error in MS Outlook.
Version-wise the locations of Inbox Repair tool (ScanPST.exe), as follows:
MS Outlook 2016
64-bit Outlook C:Program FilesMicrosoft OfficeOffice16
MS Outlook 2013
64-bit Outlook C:Program FilesMicrosoft OfficeOffice15
Direct Running Instance C:Program FilesMicrosoft Office 15rootoffice15
MS Outlook 2010
64-bit Outlook client C:Program FilesMicrosoft OfficeOffice14
MS Outlook 2007
For 32-bit Windows PC C:Program FilesMicrosoft OfficeOffice12
For 64-bit Windows PC C:Program Files (x86)Microsoft OfficeOffice12
MS Outlook 2003
32-bit Windows PC C:Program FilesCommon FilesSystemMSMAPI<locale ID>
64-bit Windows PC C:Program Files (x86)Common FilesSystemMSMAPI<locale ID>
MS Outlook 2002 on Windows XP Machine
C:Program FilesCommon FilesSystemMAPI<locale ID>scanpst.exe
MS Outlook 2000
C:Program FilesCommon FilesSystemMAPI<locale ID>NTscanpst.exe
MS Outlook 97 / MS Outlook 98
C:Program FilesCommon FilesWindows Messagingscanpst.exe
Check Point 9: Check DBX files Status in Outlook Express
If you face send/receive problem in Outlook Express then check the database file corresponding each folder available in email application. You can see the following files at local PC, must see:
- Inbox.dbx
- sent items.dbx
- folder.dbx ( Created by User )
If you find the above files in damaged condition then need to repair as soon possible.
To fix Error When you send or receive an email: Refer to this Manual Guide
Conclusion :
The above checkpoints are covering all corners of email application which can raise “Outlook Send/Receive error” or other problems in MS Outlook/Outlook Express.
Points to Remember (Caution):
- Never try ScanPST.exe on original Outlook data files. So, you should execute this one utility on duplicate copy of the PST file.
- Creation of new Outlook profile is not applicable for Outlook Express.
- Technical support for Outlook Express is no longer available. So, you can try third-party Outlook Express repair software.
- In major cases of damage in Outlook data files, ScanPST.exe is failing to complete Outlook email recovery process.
- Experts are recommending to use authenticate PST repair tool which is provided by Microsoft Gold certified vendors.
- Always try safe toolkit for MS Outlook to keep data loss scenario far away.
In case, if ScanPST.exe couldn’t fix the PST file issue, then you need a prominent software to repair PST file and recover all the data. Try Stellar Repair for Outlook Tool, and say goodbye to all the issues occurred by PST file corruption.
Also Read:
Outlook PST cannot be accessed
Cannot open PST File
10 Tips to trouble shoot PST Problems
How to fix Inbox Repair Tool?
Microsoft Outlook is the most popular and preferred email client for users to send and receive emails, manage their calendars, schedule meetings, save contacts, and do other tasks. It also includes the benefits of accessing and managing Microsoft Exchange Server emails. But what happens if you suddenly find an error message that You can’t send or receive an email message. The procedure to send and receive emails along with the attachments files gets stuck, and your working efficiency also gets stopped.
So, we have researched and found that multiple reasons are responsible for this Outlook Send Receive Error message. In this article, we will discuss the best methods to fix the Fix Outlook Send and Receive error. But suppose the corruption of the PST file is responsible for the error. In that case, we suggest you download Aryson PST Recovery Utility and restore all the mailbox data with its full structure and folders, including Inbox, contacts, drafts, journals, tasks, deleted items, outbox, notes, etc.
Why Does Outlook Send/Receive Error Occur?
There are lists of reasons behind outlook send and receive Errors like:
- Unstable Internet connectivity.
- Wrong login credentials of Outlook account
- It may be possible that third-party add-ins or anti-virus block processes.
- Due to Corrupt or damaged Outlook data file(.pst)
- The connection to the server was interrupted
- MS Outlook cannot connect to your outgoing(SMTP) and incoming (POP) server.
- The Outlook application needs to be updated
Different Methods to Fix Outlook Send Receive Error
Here are the common methods to help you resolve or troubleshoot an issue you may be facing when you send or receive an email message in MS Outlook 2019, 2016, 2013 and other older versions. You can try any of these methods to fix Outlook’s send/receive error.
Method 1: Turn-Off Windows Firewall and Antivirus Program
Windows Firewall and Antivirus Program may also be responsible for the Outlook send or receive the error. It blocks the process of sending and receiving email messages. Thus, follow the given steps to disable Windows Firewall and Antivirus applications.
- Search for the Control Panel and open it.
- Go to Network Connections.
- Here, right-click on the network connection and move to the Properties.
- In the Security tab, you will find the option to turn off the Firewall. Disable it.
- Once done, try to send or receive email messages and check whether your issue is fixed or not.
Method 2: Try to check the Phishing Emails
One of the common reasons behind the Outlook send receive error is the drop of suspicious emails from an unknown source. Its main target is to steal users’ personal information, but sometimes it also affects sending and receiving emails. Thus, it is always suggested to delete the spam emails from the mailbox before it harms you.
Common ways to detect the suspicious emails
- Email message dropped from a public email domain
- A domain name is misspelled.
- The email is written badly.
- Have suspicious attachments or links.
- The message creates a sense of urgency
Method 3: Update or Change your email settings in Outlook
It may also be possible that your Outlook email setting needs to be corrected. Thus, check out these mentioned points to correct the Outlook Email Settings:
- Start the Outlook app and Click on File.
- Go to Account Settings>> Account Settings.
- In the Account Settings window, click on Change.
- Here, opt for More Settings and choose the Outgoing Server.
- Tick the My outgoing server (SMTP) requires authentication option.
- Also, enable the Log on to the incoming server before sending the mail option.
- Click Ok to finish the process.
- Now, restart the Outlook application and check if you can send emails or not.
Method 4: Open Outlook in Safe Mode
You can also fix the Outlook send/receive error message by running the MS Outlook in safe mode. It is a built-in feature of Outlook that lets users run the application with a limited set of features and has no extensions, so it will be helpful to troubleshoot issues. If your Outlook application shows some errors, you may launch it in safe mode to resolve them.
- Click on the Start button, and type Run.
- Open the Run app.
- Here, enter Outlook.exe /safe, and click OK.
Method 5: Clear Outbox and Change Server Timeout
By clearing the Outbox and changing the server timeout duration, you can fix the send or receive error in Outlook for Office 365. Follow the steps below to change the Outlook server timeout:
- Run the Outlook application and click on the File.
- Go to Account Settings>>Account Settings>>Change>>More Settings>>Advanced.
- In the Advanced tab, go to the Server Timeouts section and increase the Server Timeouts slider according to your requirement.
Method 6: Fix PST file Corruption Using Inbox Repair Tool
Sometimes, PST file corruption or damage is responsible for Outlook Outlook Send/Receive Error. So, you must repair an Outlook data file to resolve the Outlook error message.
Steps to Repair an Outlook Data file (.pst) file
- Exit Outlook and go to the location according to your Outlook version.
- Outlook 2019: C:Program Files (x86)Microsoft OfficerootOffice16
- Outlook 2016: C:Program Files (x86)Microsoft OfficerootOffice16
- Outlook 2013: C:Program Files (x86)Microsoft OfficeOffice15
- Outlook 2010: C:Program Files (x86)Microsoft OfficeOffice14
- Outlook 2007: C:Program Files (x86)Microsoft OfficeOffice12
- Double-click on SCANPST.EXE to run it.
- Click on the Browse button to select the .pst file.
- Tap Start to initiate the scanning process.
- If the scanning process finds any errors, go for the Repair option.
- Note:- You can make a backup of scanned files before repairing.
- Click on the Repair button.
- Finally, the Outlook data file is repaired successfully.
The built-in inbox repair tool( ScanPST.exe) will help you to repair the Outlook PST file but on the smaller one. If you have a large PST file, your file may not be fixed manually. Therefore, you need a tested and secured tool to help you repair corrupt or damaged Outlook PST files, which are large.
Method 7: Repair PST file to Fix Outlook Send Receive Error
Aryson Outlook PST Repair Tool is the best and standalone utility to repair corrupt, damaged or inaccessible PST files. The software is tested up to 80GB file size and restored all the mailbox items like email messages, contact, calendar, tasks, and journals into a new PST file. It keeps the original folder structure and repairs PST files within a few simple clicks. In addition, you can save your recovered data into multiple formats like PST, MSG, MBOX, DBX, and EML. Plus, you can use the PST file of any Outlook versions like 2019, 2016, 2013, 2010, 2007, 2003, 2002, 2000, 98, and 97.
Steps to Resolve Outlook Send Receive Error By Repairing PST file
- Download & Run the Outlook PST Recovery Tool.
- Click the Open button to browse the Outlook data file(.pst).
- Choose the PST file from your system and click Open.
- Select the Recovery as per the level of PST file corruption.
- Check out the PST file details and click the Ok button.
- The software scans your selected PST file and shows the recovered folders.
- Check the folders in the preview panel you want to restore.
- Click Save to select the saving path and format.
- Once you have completed the selection process, click Ok.
- Finally, you have recovered data from the selected PST file.
Conclusion
Outlook send receive error can be easily fixed using the above-mentioned methods. All of them were performed and tested; thus, you should not worry about data deletion or corruption. However, if your PST file is already corrupted, you will have to use the PST File Repair Tool, which many professionals recommend to restore the PST file’s mailbox data.
Realted Post
-
Partition Wizard
-
Partition Manager
- 7 Ways to Fix Outlook Send Receive Error
7 Ways to Fix Outlook Send Receive Error [Partition Manager]
By Linda | Follow |
Last Updated December 02, 2020
When you use Outlook to send and receive emails, various errors may pop up to prevent you sending and receiving emails. How to fix these Outlook send receive errors? In this post, MiniTool Partition Wizard offers you 7 solutions.
When you receive or send an email message in Outlook or Outlook Express, you may encounter various error codes or error messages to prevent you from sending or receiving emails, which are called Outlook send receive error.
The Outlook send receive error including the following error codes and error messages:
- Error codes: 0x800ccc15; 0x80042108; 0x800ccc0e; 0x800ccc0b; 0x800ccc79; 0x800ccc67; 0x80040900; 0x800ccc81; 0x80040119; 0x80040600, 0x8004210b.
- 0x8007000e: Sending and Receiving reported error. Out of memory or system resources.
- 0x800C013b: An unknown error has occurred.
- 0x800ccc19: A time-out occurred while communicating with the server.
- 0x8004210a: The operation timed out waiting for a response from the receiving (POP) server.
- 0x80042109: Task ‘SMTP server name — Sending and Receiving’ reported error. Outlook is unable to connect to your outgoing (SMTP) e-mail server.
- 0x800ccc0f: Your server has unexpectedly terminated the connection. Possible causes of this include server problems, network problems, or a long period of inactivity. 2. Task ‘server name — Sending and Receiving’ reported error. The connection to the server was interrupted.
- 0x800ccc0d: The server could not be found.
- No connection could be made because the target machine actively refused it.
How to Fix Outlook Send Receive Error
To solve the Outlook send receive error, you can use the following solutions. But before proceeding these solutions, please make sure your device is connected to a well-running Internet.
Fix 1. Delete Suspicious Emails from Your Mailbox
Suspicious email messages may block your receiving error message in Outlook. If you have any suspicious email message, deleting them may solve the Outlook send receive error.
Fix 2. Correct the Outlook Email Settings
Incorrect Outlook settings may also prevent you from sending or receiving emails. You can correct its settings through the following steps:
- Open Outlook and Click on File.
- Click on Account Settings > Account Settings.
- Under Account Settings window click on Change.
- Now click on More Settingsand select Outgoing Server.
- Click the checkbox next to My outgoing server (SMTP) requires authentication.
- Also, select the checkbox next to Log on to incoming server before sending mail.
Fix 3. Disable Windows Firewall and Antivirus Program
Windows Firewall and any other third party Antivirus program can affect the sending and receiving of emails on Outlook. To solve the Outlook send receive error, you can consider disabling Windows Firewall and antivirus program temporarily.
In addition, some third-party programs like Marketscore (Netsetter) Internet Accelerator, Net Nanny, and Panicware Pop-Up Stopper may also cause this error. You can disable or shut down them temporarily, too.
Fix 4. Repair Outlook and Outlook Express
- Right-click the Startbutton, and select Apps and Features on the pop-up menu.
- Select the Microsoft Office product you want to repair, and select Modify.
- Depending if your copy of Office is Click-to-run or MSI-based install, you’re offered different options to proceed with the repair. Follow the steps for your installation type.
- Follow the instructions on the screen to complete the repair.
Fix 5. Run Outlook in Safe Mode
This method is very simple, you just need to search Outlook.exe /safe and press Enter to run it.
Fix 6. Repair PST File
A .pst file is a personal-folders file that stores your email messages, contacts, notes, calendar items, and other data. If the .pst file is corrupted, you may not be able to send or receive email messages in Outlook.
To repair the .pst file, here is the guide:
- Start the Inbox Repair tool (Scanpst.exe). Then select Openor Run in the File Download dialog box, and follow the steps in the easy fix wizard.
- In the Inbox Repair tool, type the path and the file name of your personal folders (.pst) file or select Browseto locate the file by using the Windows file system, and then select Start.
- After you run the Inbox Repair tool, you can start Outlook and recover repaired items or recover additional repaired items from the backup personal folder.
Fix 7. Clear Outbox and Change Server Time-out
The server time-out duration is 1 min by default in Outlook. When you try to send emails with attachments of large size, the default server timeout will be insufficient which leaves your mails stuck in outbox.
To solve the problem, you can clear outbox and increase the Server timeout duration. Here is the guide on how to change Outlook server timeout:
- Start Outlook and click on File.
- Follow this path: File > Account Settings > Account Settings > Change > More Settings > Advanced.
- Under Advanced you can increase the Server timeout.
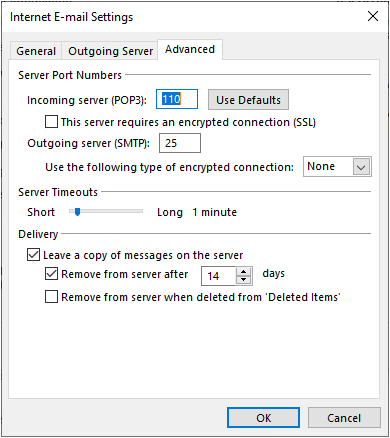
About The Author
Position: Columnist
Author Linda has been working as an editor at MiniTool for 1 year. As a fresh man in IT field, she is curious about computer knowledge and learns it crazily. Maybe due to this point, her articles are simple and easy to understand. Even people who do not understand computer can gain something.
By the way, her special focuses are data recovery, partition management, disk clone, and OS migration.


