New issue
Have a question about this project? Sign up for a free GitHub account to open an issue and contact its maintainers and the community.
By clicking “Sign up for GitHub”, you agree to our terms of service and
privacy statement. We’ll occasionally send you account related emails.
Already on GitHub?
Sign in
to your account
Closed
nickeubank opened this issue
Apr 17, 2017
· 7 comments
Comments
![]()
I’m trying to compile a doc with the minted package (for code syntax highlighting), and I’m getting the error:
Package minted Error: You must invoke LaTeX with the -shell-escape flag. []
At the moment my builder is set to simple.
Is there any easy way to add this flag?
Sublime Text 3, Mac OSX
![]()
The easiest way is to add % !TEX options=--shell-escape at the top of your root document and switch the builder to basic or traditional (the simple builder is just a demonstration and basic is a better alternative).
![]()
![]()
hi @r-stein maybe you can help me again,
I have added % !TEX options=--shell-escape at the top of my root document but in the log file it still gives me runsystem(inkscape -z -D --file=gfx/Versuchsstand/test.svg --export-pdf=gfx/Ver suchsstand/test.pdf --export-latex)...disabled (restricted).
When i run pdflatex -shell-escape my-thesis.tex in a normal terminal (Debian) everything works just fine.
Do you know how to fix that problem?
![]()
![]()
I am using the TraditionalBuilder, but I tried different builders. None of them working regarding my problem. Seems like there is a problem with write18 which gives me restricted write18 enabled. in my logfile. Compiling from terminal just gives write18 enabled. I have solved the issue with adding "options": ["--shell-escape"], to my settings file.
![]()
hi, I have the same problem, where did you add that option ?
![]()
@assombrance If adding % !TEX options=--shell-escape to the top of the root file does not work you can add that line ("options": ["--shell-escape"],) in the LaTeXTools settings inside builder_settings.
This post serves as an introduction to minted, a pygments-based syntax highlighter for LaTeX. Adding pygments to LaTeX streamlines so many things. The post provides a few examples of things you can do with minted, details the installation process, and covers some basic security.
- Code
- Overview
- Installing
- Python
pippygments- TeX Dependencies
minted
-shell-escape- Useful features
- What’s Next
Code
You can view the code related to this post under the post-01-overview tag.
Overview
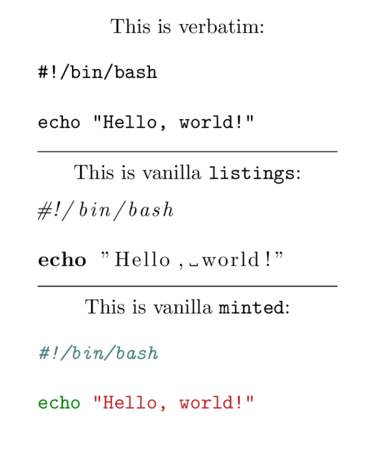
The easiest way to present code in LaTeX is to use the verbatim environment. It’s quick, it preserves formatting, and it requires no set up. It’s also very bland. Its ease of use comes at the cost of basically all the context clues well-formatted and styled code can provide.
The next step up (or rather many steps up) is the listings package. Out the box, it supports a broad range of languages. It’s eminently configurable. You can define new languages yourself, add different keywords, and style to your heart’s content. It’s very good at being straightforward. Moving beyond its predefined scopes (or easily discoverable internet styles) is a challenge, though, because parsing and tokenizing code in LaTeX is just about as hard and ridiculous as it sounds.
minted has become a solid competitor. It uses the pygments project to parse and highlight. You’ve probably seen pygments in action already. It’s a beast of an application that can do just about anything you want re: syntax highlighting. minted isn’t quite as flexible, but it does have access to most of the pygments features. Recognizable styles, a massive library of lexers, and simple customization through Python make minted, by way of pygments, a veritable utility knife.
|
sample.tex |
|
1 2 3 4 5 6 7 8 9 10 11 12 13 14 15 16 17 18 19 20 21 22 23 24 25 26 27 28 29 30 31 32 33 34 35 36 37 38 39 40 41 42 43 44 45 46 |
documentclass{article} |
There’s a bit more to the listings vs. minted debate. Essentially it boils down to where you want to customize. Personally, I feel like a general-purpose scripting language used in all areas of tech is a stronger contender than a typesetting system many of my peers have struggled to learn. I don’t know, though (and if I’m wrong, I’d love to hear about it). At its core, TeX tokenizes everything. I’m just not sure that it can achieve the same level of regex wizardry that goes into some of the pygments code.
Installing
minted requires a few things to get up and running.
Python
You’ll need Python to get started. Pygments needs >=2.6 or >=3.3, depending on your version of Python. You can lazily install both with any trouble. For example, via dnf,
$ sudo dnf install python{2,3}
pip
Next you’ll need pip, a wonderful package manager for Python. It’s ridiculously easy to install. Rather than install it globally (i.e. to /usr/bin), we’re going to install it locally via the --user flag.
$ wget https://bootstrap.pypa.io/get-pip.py; python get-pip.py --user; rm get-pip.py
This should be sufficient
$ wget https://bootstrap.pypa.io/get-pip.py; python2 get-pip.py --user; rm get-pip.py
This will install for Python 2 explicitly
$ wget https://bootstrap.pypa.io/get-pip.py; python3 get-pip.py --user; rm get-pip.py
This will install for Python 3 explicitly
However, this doesn’t put pip on our path.
$ which pip
/usr/bin/which: no pip in (<path directories>)
The --user flag installed pip to our user site packages. We can check the base directory, which should have the desired bin, via
$ python -m site --user-base
~/.local
Since we have an easy way to discover the directory, we have an easy way to add it to our .whateverrc:
$ echo 'export PATH="$(python -m site --user-base)/bin:$PATH"' >> .whateverrc
You can also manually add it, which might be a good idea if you’re doing other PATH manipulations.
pygments
With pip installed, we can quickly install pygments.
$ pip install --user pygments
This should be sufficient
$ pip2 install --user pygments
This will install for Python 2 explicitly
$ pip3 install --user pygments
This will install for Python 3 explicitlyInstalling both isn't necessary. As of writing, Pygments is compatible with
both major versions of Python.
TeX Dependencies
minted provides a list of its dependencies. If you’ve got access to something like tlmgr, it should be pretty easy to update them.
keyval kvoptions fancyvrb fvextra upquote float ifthen calc ifplatform pdftexcmds etoolbox xstring xcolor lineno framed shellesc
If you don’t (e.g. modern RHEL derivatives, I think), you’ll have to get creative. This is the easiest route:
$ sudo dnf install 'texlive-*'
...
Install  >5779 PackagesTotal download size: >2.4 G
Installed size: >3.8 G
Is this ok [y/N]:
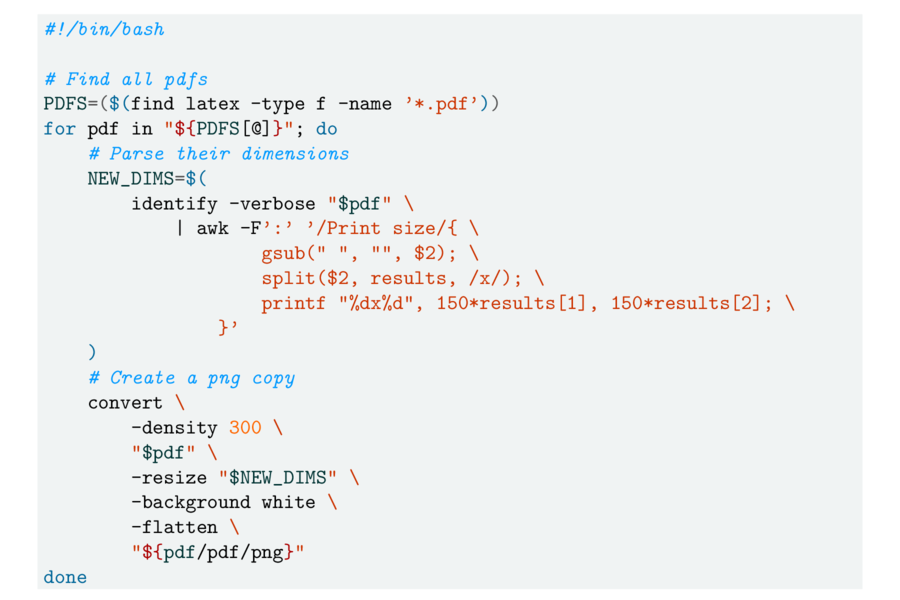
If, like me, you’re running an SSD on a budget, the easiest isn’t very convenient. Maybe you just don’t feel like warehousing all of TeX Live to snag 16 dependencies. If you’re not going to install everything, you need to figure out what you have to install. dnf/yum makes this somewhat trivial. If you’re stuck with dpkg/dpkg-query, the discovery will be much more involved (but also I think you can run tlmgr so there’s that).
|
install-texlive-dependencies |
|
1 2 3 4 5 6 7 8 9 10 11 12 13 14 15 16 17 18 19 20 21 22 23 24 25 26 27 28 29 30 31 32 33 34 |
#!/bin/bash |
minted
Convoluted dependency resolution aside, minted itself is a breeze to install (like pygments; we’ve already done all the hard work).
$ sudo dnf install texlive-minted
-shell-escape
Because minted relies on an external application (pygments) to highlight, it can’t just run in a tiny, neatly contained environment. TeX essentially exposes streams but, by default, access to the operating system is locked down. -shell-escape neatly sidesteps those restrictions, but it doesn’t come without risk. Just like anything else, it’s probably not a great idea to provide shell access until you understand what’s going on. Don’t download random things off the internet and execute them blindly. Don’t run in superuser mode all the time. You know, basic stuff.
This is what happens when you try to run minted without -shell-escape. Notice at the beginning that external actions are limited (restricted write18 enabled). The document will not compile (even without -halt-on-error).
$ pdflatex -interaction=nonstopmode -halt-on-error sample.tex
This is pdfTeX, Version 3.14159265-2.6-1.40.17 (TeX Live 2016) (preloaded format=pdflatex)
restricted write18 enabled.
entering extended mode
(./sample.tex
LaTeX2e <2016/03/31>
...Package ifplatform Warning:
shell escape is disabled, so I can only detect ifwindows....
! Package minted Error: You must invoke LaTeX with the -shell-escape flag.
See the minted package documentation for explanation.
Type H <return> for immediate help.
...l.9
! ==> Fatal error occurred, no output PDF file produced!
Transcript written on sample.log.
With -shell-escape, any external action is available (write18 enabled) and the document compiles.
$ pdflatex -interaction=nonstopmode -halt-on-error -shell-escape sample.tex
This is pdfTeX, Version 3.14159265-2.6-1.40.17 (TeX Live 2016) (preloaded format=pdflatex)
 write18 enabled.
entering extended mode
(./sample.tex
LaTeX2e <2016/03/31>
...
Output written on sample.pdf (1 page, 48380 bytes).
Transcript written on sample.log.
Chances are you’re not actually building from the CLI every time. You’ve probably got an editor with some build commands stored. Don’t add -shell-escape to all of your build profiles. It’s a pain to toggle custom builds off and on, but having to rebuild your system after an attack is worse. Look for something like User Builds, Custom Commands, or the like.
For example, in TeXstudio, you can add custom builds via Configure TeXstudio > Builds > User Commands. In Texmaker, the same menu is available via User > User Commands > Edit User Commands.
Similarly, in Sublime via the LaTeXTools package, you can add custom builds to your project file (or anywhere else, for that matter).
|
posts-latex-minted.sublime-project |
|
1 2 3 4 5 6 7 8 9 10 11 12 13 14 15 16 17 18 19 20 21 22 23 24 25 26 |
{ |
Useful features
You’ve already seen how simple it is to add code to a tex file. minted also makes it easy to include external source code without worrying about getting it to play well with your editor. The inputminted macro lets you load any file while specifying the lexer.
|
input.tex |
|
1 2 3 4 5 6 7 8 9 10 11 12 13 14 15 |
documentclass{article} |
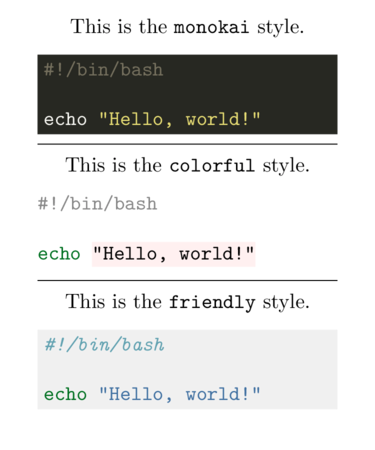
The default style is one of many available to minted. You can check the styles available on your system via
$ pygmentize -L styles
Pygments version 2.2.0, (c) 2006-2017 by Georg Brandl.Styles:
~~~~~~~
* default:
The default style (inspired by Emacs 22).
* emacs:
The default style (inspired by Emacs 22).
* friendly:
A modern style based on the VIM pyte theme.
* colorful:
A colorful style, inspired by CodeRay.
* autumn:
A colorful style, inspired by the terminal highlighting style.
* murphy:
Murphy's style from CodeRay.
* manni:
A colorful style, inspired by the terminal highlighting style.
* monokai:
This style mimics the Monokai color scheme.
* perldoc:
Style similar to the style used in the perldoc code blocks.
* pastie:
Style similar to the pastie default style.
* borland:
Style similar to the style used in the borland IDEs.
* trac:
Port of the default trac highlighter design.
* native:
Pygments version of the "native" vim theme.
* fruity:
Pygments version of the "native" vim theme.
* bw:* vim:
Styles somewhat like vim 7.0
* vs:* tango:
The Crunchy default Style inspired from the color palette from the Tango Icon Theme Guidelines.
* rrt:
Minimalistic "rrt" theme, based on Zap and Emacs defaults.
* xcode:
Style similar to the Xcode default colouring theme.
* igor:
Pygments version of the official colors for Igor Pro procedures.
* paraiso-light:* paraiso-dark:
* lovelace:
The style used in Lovelace interactive learning environment. Tries to avoid the "angry fruit salad" effect with desaturated and dim colours.
* algol:* algol_nu:
* arduino:
The Arduino® language style. This style is designed to highlight the Arduino source code, so exepect the best results with it.
* rainbow_dash:
A bright and colorful syntax highlighting theme.
* abap:
You can preview any of the styles by visiting the pygments demo and trying out a highlighter. Once pygments has parsed the code, you’ll be able to change the style at whim.
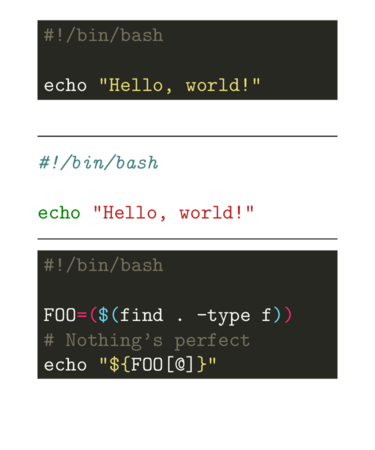
The default styles alone add a tremendous amount of utility to minted. There are many other settings that may be tweaked. Sharing style changes is an easy way to underscore minted‘s versatility.
|
style.tex |
|
1 2 3 4 5 6 7 8 9 10 11 12 13 14 15 16 17 18 19 20 21 22 23 24 25 26 27 28 29 30 31 32 33 34 35 36 37 38 39 40 41 42 43 44 45 46 47 48 49 50 51 52 53 54 55 56 57 |
documentclass{article} |

If you want to use the same style throughout your document, minted makes that simple too. The newminted macro defines a configuration for a specific language, e.g. python. It can then be used as an environment in place of minted by appending code to the end, e.g. pythoncode.
|
newminted.tex |
|
1 2 3 4 5 6 7 8 9 10 11 12 13 14 15 16 17 18 19 20 21 22 23 24 25 26 27 28 29 30 31 32 33 34 35 36 37 38 39 40 41 42 43 44 45 46 47 48 49 |
documentclass{article} |
You can use the same logic with inputminted via newmintedfile. Rather than defining a new environment, newmintedfile creates a new macro. It has an optional name parameter to make things easier (otherwise the macro is called <language>file).
|
newmintedfile.tex |
|
1 2 3 4 5 6 7 8 9 10 11 12 13 14 15 16 17 18 19 20 21 22 23 |
documentclass{article} |
What’s Next
Sometime very soon I hope to look explore minted in combination with some other tools to build on its features. I’ve got some examples in use right now but I need to break them out and annotate them.
fwrite: Broken pipe xelatex.exe:
The generated PDF is open
XeTeX is required to compile this document
Xelatex is required to compile this document
! LaTeX Error: Too many unprocessed floats.
Boss: there is a floating problem in some pictures. You can remove the floating environment. Testing. Generally, this kind of problem is caused by the image format
Mr. L: latex can handle up to 18 floating bodies at the same time. If there are too many floating bodies, this error will be reported. The solution is to force the output of all floats with the clear page command
File ended while scanning use of @xdblarg.
Error code: section {Title}
because section is a composite command, its inner definition calls @xdblarg, which is responsible for checking the completeness of the parameters. It is mostly because of the reason for the loss of} (or more {). Section {Title} curly brackets should be used for English input method
! file ended while scanning use of @writefile
It indicates that an incomplete parameter appears in a command that writes. Aux. You must check it
Fatal format file error; I'm stymied.
This means that the format you want to preload cannot be used because it is made for another version of tex
The error of “returned exit code (1)” caused by the error of driver option
Latex - dvips: by default, you can give the driver option dvips or not
Latex - dvipdfmx: unable to detect automatically, you must give the driver option dvipdfm or dvipdfmx manually (refer to the corresponding macro package document for details)
Pdfflatex: it can be detected automatically, so you can not give the driver option, you can also give the driver option pdftex
Xelatex: it can be detected automatically, so you can not give the driver option, you can also give the driver option xetex
Reference https://liam.page/2015/06/01/returned-exit-code-not-0/
! File ended while scanning use ofxxxxxx
Warning you that there is an error (usually an "incomplete" error) in the XXXXXX command
Package minted Error: You must invoke LaTeX with the -shell-escape flag. usepackage
% ! TeX TXS- program:compile = txs:///pdflatex/[--shell-escape]
Missing number, treated as zero. end{tabu}
%usepackage{colortbl}
%usepackage{tabu}
begin{tabu}{|X|X|}
begin{tabu}{|X|X|}
a & c
end{tabu}
& b \
end{tabu}
Solutions
%usepackage{colortbl}
%usepackage{tabu}
newsaveboxgrumblesaveboxgrumble
{begin{tabu}{|X|X|}
		a & c
end{tabu}}

begin{tabu}{|X|X|}
	usebox{grumble} & b \
end{tabu}
Similar Posts:
- LaTex Error:Unknown graphics extension:.eps (la…
- How to Solve Latex Error: File ended while scanning use of frac
- [Solved] Latex error: Undefined control sequence. …bm
- Install texlive 2018 in Ubuntu and complete macro package update (some screenshots and code are 2016 version)
- Solution to the problem of “undefined control sequence” when using latex to edit IEEE template [insert picture]
- Ubuntu Resolution Change xrandr Failed to get size of gamma for output default
- How to Solve LaTex Error: Undefined citation warnings
- Latex: “missing $inserted” solution
- How to Solve Mac Sed Error: command c expects followed by text
- Text (latex) output PDF setting us letter or letter paper method
I regularly use Anki, a wonderful flashcards program for spaced repetition learning. Recently I found myself wanting to create flashcards that contain code snippets. Now, I find code snippets really useful, but only when properly formatted and with syntax highlighting. I wanted both in my flashcards, but they didn’t seem directly supported in Anki.
This seemed logical as Anki is “content-agnostic”. However, Anki does provide excellent support for Latex, and that seemed the way to go.
After a bit of research, I found the following combination that should work:
Pygments: A fine syntax highlighting engine written in Python that supports Latex among its many output formats. It can also be run directly via the pygmentize command-line tool. Incredibly useful!
minted: A Latex package that wraps Pygments, so you only need to wrap your snippet in begin{minted}<snippet>end{minted} to get syntax highlighting.
begin{minted}{cpp}
#include
using namespace std;
int main()
{
 return 0;
}
end{minted}
These are the steps I followed to get these tools to work with Anki.
Install Pygments: I followed instructions given on the Pygments page and used easy_install. I had to install the python-setuptools package to get easy_install on my machine. (i.e. sudo aptitude install python-setuptools)
Install Latex: On Ubuntu, this is the texlive (or texlive-full) package. Check here for detailed instructions on setting up Latex. I already had it installed (for another project; I don’t think it’s installed by default on a Ubuntu box).
Install minted: This is a Latex package that uses Pygments for syntax highlighting a code snippet. I downloaded the zip file from the package downloads and used the below instructions to incorporate it into my Latex installation.
$ cp ~/Downloads/minted-v1.7.zip .
$ unp minted-v1.7.zip
 Archive: minted-v1.7.zip
 inflating: minted.dtx
 inflating: minted.ins
 inflating: minted.pdf
 inflating: README
 inflating: Makefile
$ latex minted.ins
$ sudo mkdir /usr/share/texmf/tex/latex/minted
$ sudo cp minted.sty /usr/share/texmf/tex/latex/minted
$ sudo texhash
 Updating /usr/local/share/texmf/ls-R...
 texhash: Updating /var/lib/texmf/ls-R-TEXMFMAIN...
 texhash: Updating /var/lib/texmf/ls-R-TEXLIVE...
 texhash: Updating /var/lib/texmf/ls-R...
 texhash: Done.
At this point, I needed to verify that I had the package correctly installed.
I created the below test.tex Latex file:
documentclass[12pt]{article}
special{papersize=3in,5in}
usepackage[utf8]{inputenc}
usepackage{amssymb,amsmath}
usepackage{minted}
pagestyle{empty}
setlength{parindent}{0in}
begin{document}
begin{minted}{cpp}

#include
using namespace std;
int main()
{
 return 0;
}

end{minted}

end{document}
I ran on the command line: “latex test.tex” to be greeted with this error:
Package ifplatform Warning:
 shell escape is disabled, so I can only detect ifwindows.

))

! Package minted Error: You must invoke LaTeX with the -shell-escape flag.

See the minted package documentation for explanation.
Type H  for immediate help.
 ...

l.7 pagestyle
 {empty}
?
So, I ran it again with the “-shell-escape” argument and this time it ran successfully.
To be doubly sure, I ran the pdflatex command with the same arguments (“pdflatex -shell-escape test.tex“) and checked the pdf output file.
Now that I had minted working on my machine, it was time to get Anki to support this. I could either add this to the Latex environment for all the decks, or choose to add it for individual decks. The former is a lot more involved than the latter so I will describe that first.
Anki provides a plugin to configure the Latex environment it uses. Go to File > Download > Shared Plugin, and download the “Configure latex” plugin. Restart Anki. Now, go to Settings > Plugins > “Open Plugin Folder…”. You should the “Configure latex.py” file in this folder. Open it.
In the “latex.latexPreamble” section, add this line: “\usepackage{minted}n” below the existing usepackage line. Close the file and restart Anki. This makes the minted package available in the Latex environment used for the decks. Note that this seems to affect only newly created decks.
Verify this by creating a new deck and checking the Latex tab in Settings > Deck Properties. You should see the additional line in the Header text area.
To make the minted package available in already existing decks, or make it selectively available to decks that need it, open the deck and manually add the line (“usepackage{minted}“) in the Latex tab in Settings > Deck Properties instead of changing it via the “Configure Latex” plugin.
Now, I was almost there. I knew that when I tried to use minted in a flashcard I would likely get the same error as when I tried the command-line version:
! Package minted Error: You must invoke LaTeX with the -shell-escape flag.

See the minted package documentation for explanation.
Type H  for immediate help.
 ...

l.7 pagestyle
 {empty}
?
Go on, try it (In case Anki has changed since I wrote this).
So, how do I make Anki invoke the latex command with the -shell-escape flag? Well, I looked around and couldn’t find an option to pass parameters to the latex command. I finally tracked down Anki’s latex plugin file to /usr/share/anki/anki/latex.py. The actual call to the latex command, within this file, was:
if call(["latex", "-interaction=nonstopmode",
 "tmp.tex"], stdout=log, stderr=log, startupinfo=si):
 return (False, errmsg("latex"))
I backed up this file, and edited it (via sudo vim /usr/share/anki/anki/latex.py) to pass the -shell-escape argument. This is the diff:
G61-Ubuntu> cd /usr/share/anki/anki/
G61-Ubuntu> diff latex.py latex.py_original
99c99
< if call(["latex", "-shell-escape", "-interaction=nonstopmode",
---
> if call(["latex", "-interaction=nonstopmode",
G61-Ubuntu>
That’s it. I now could enter the first snippet in this post in an Anki flash card and it would correctly display the syntax-highlighted C++ source code.
Note: On Windows, you typically install MiKTeX as the Latex distribution. I found that if you set the option to “Ask me” for the “Download packages as needed” option (paraphrasing here; I don’t remember the exact commands) it didn’t download and install the minted package as I expected, but returned an error. After looking at how Anki invokes the latex command on Ubuntu, I assume it’s the “-interaction=nonstopmode” option that’s preventing this. I googled and found that changing the option to either “Yes” or “No” prevents this error.
Note2: I am not very familiar with the components I describe above, and this may not be the best or easiest way to get syntax highlighting in Anki. If you have any suggestions or updates to what I have above, please drop me a comment.
Note3: I also added a feature request for Anki to allow arguments to the latex command via the Configure Latex plugin, so please check if that is supported in your version before hacking at the file directly.