Skip to content
Как убрать PASSIVE_INTERRUPT_ERROR (0x0000013B)?
Как убрать « PASSIVE_INTERRUPT_ERROR» ( 0x0000013B)?
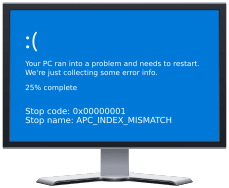
На компьютере или ноутбуке под управлением Windows появился «синий экран смерти»? После появления сообщения «
PASSIVE_INTERRUPT_ERROR» (
0x0000013B) система перезагружается? Ищите как исправить
0x0000013B: «
PASSIVE_INTERRUPT_ERROR»?
Как просмотреть информацию об ошибках, исправить ошибки в Windows 10, 8 или 7
Причины появления ошибки
- На жестком диске компьютера или ноутбука не достаточно места. Для правильной работы ОС Windows 10 на системном диске должно быть свободно 2 — 10 ГБ.
- На компьютер был установлен не совместимый BIOS или прошивка была повреждена.
- Установлены не совместимые с ОС драйвера устройств.
- Реестр Windows был поврежден или удален. Возможно в результате очистки были удалены системные ключи реестра.
- Ативирусное программное обеспечение или компьютерные вирусы могут заблокировать системные файлы или удалить важные ключи реестра.
- В результате ошибок в работе программы для резервного копирования.
- В результате обновления ОС Windows.
Актуально для ОС: Windows 10, Windows 8.1, Windows Server 2012, Windows 8, Windows Home Server 2011, Windows 7 (Seven), Windows Small Business Server, Windows Server 2008, Windows Home Server, Windows Vista, Windows XP, Windows 2000, Windows NT.
Вот несколько способов исправления ошибки «
PASSIVE_INTERRUPT_ERROR»:
Восстановите удаленные файлы
Часто появление BSoD ошибок приводит к утери важных файлов. Блокировка файлов компьютерными вирусами, ошибки в работе программ для резервного копирования, повреждение или перезапись системных файлов, ошибки файловой системы или наличие битых секторов диска – это не далеко полный список причин удаления данных.
Исправление соответствующих ошибок восстановит работоспособность устройства, но не всегда восстановит повреждённые или утерянные файлы. Не всегда имеется возможность устранить ту или иную ошибку без форматирования диска или чистой установки операционной системы, что также может повлечь за собой утерю файлов.
Загрузите бесплатно и просканируйте ваше устройство с помощью Hetman Partition Recovery. Ознакомьтесь с возможностями программы и пошаговой инструкцией.
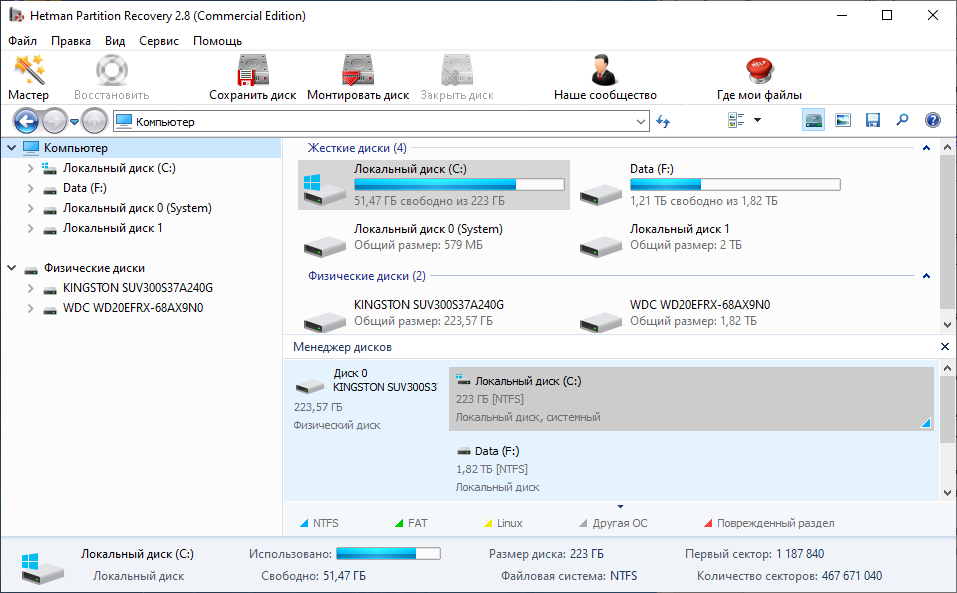
Программа для восстановления данных
Запустите компьютер в «безопасном режиме»
Если ошибка «PASSIVE_INTERRUPT_ERROR» (0x0000013B) возникает в момент загрузки Windows и блокирует любую возможность работы с системой, попробуйте включить компьютер в «безопасном режиме». Этот режим предназначен для диагностики операционной системы (далее ОС), но функционал Windows при этом сильно ограничен. «Безопасный режим» следует использовать только если работа с системой заблокирована.
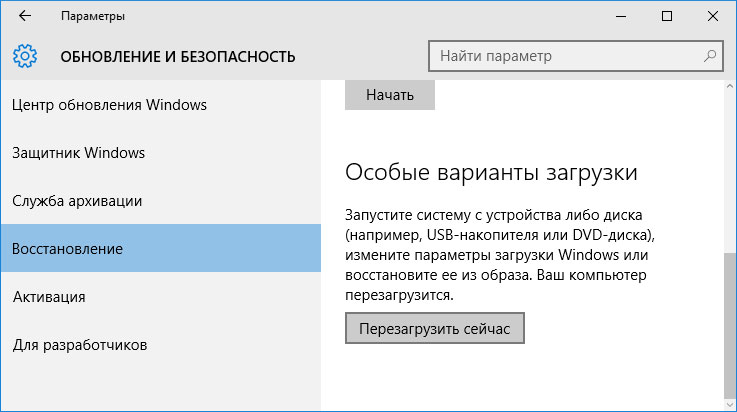
Чтобы запустить безопасный режим сделайте следующее:
- Перейдите в меню Пуск и выберите Параметры.
- В открывшемся окне параметров перейдите в меню Обновление и Безопасность и выберите раздел Восстановление.
- В разделе Восстановление найдите Особые варианты загрузки и нажмите кнопку Перезагрузить сейчас.
- После этого Windows перезагрузится и предложит выбрать следующее действие. Выберите Поиск и устранение неисправностей.
- В меню Поиск и устранение неисправностей кликните на Дополнительные параметры, далее — Параметры загрузки.
- Далее Windows уведомит вас о том, что компьютер можно перезагрузить с использованием дополнительных параметров загрузки. Укажите — Включить безопасный режим. Нажмите Перезагрузить.
- После перезагрузки выберите Включить безопасный режим нажав клавишу F4.
Как загрузить Windows в безопасном режиме
Обновите драйвер через Диспетчер устройств
Вы установили новое аппаратное обеспечение на компьютере? Возможно вы начали использовать новое USB-устройство с вашим компьютером. Это могло привести к ошибке «PASSIVE_INTERRUPT_ERROR». Если вы установили драйвер устройства используя диск, который поставляется вместе с ним, или использовали драйвер не c официального сайта Microsoft, то причина в нем. Вам придется обновить драйвер устройства, чтобы устранить эту проблему.
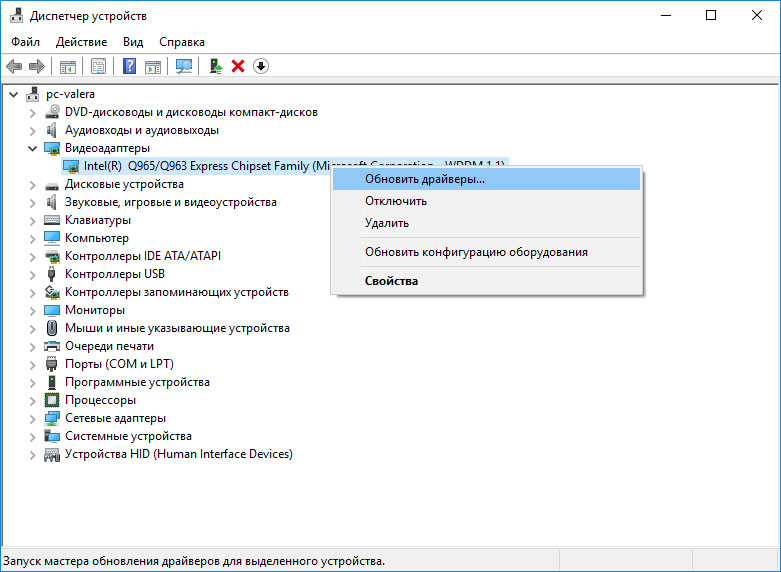
Вы можете сделать это вручную в диспетчере устройств Windows, для того выполните следующие инструкции:
- Нажмите кнопку Windows, затем введите диспетчер устройств с клавиатуры.
- Выберите Диспетчер устройств из списка.
- Просмотрите список категорий устройств, нажмите на стрелочку рядом с категорией вашего нового устройства. Драйвер может быть отмечен желтым треугольником.
- Кликните правой кнопкой мыши на имя устройства и нажмите Обновить драйвер.
- Далее откроется окно Мастера обновления драйверов с двумя опциями:
- Автоматический поиск обновленных драйверов. Windows проверит наличие наиболее подходящего драйвера для этого устройства в автоматическом режиме.
- Выполнить поиск драйверов на этом компьютере. Используйте эту опцию, что бы самостоятельно указать ОС файлы драйвера.
Перезагрузите компьютер после установки драйвера.
Используйте sfc /scannow для проверки всех файлов системы
Повреждение или перезапись системных файлов может привести к ошибке «PASSIVE_INTERRUPT_ERROR». Команда sfc находит поврежденные системные файлы Windows и заменяет их.
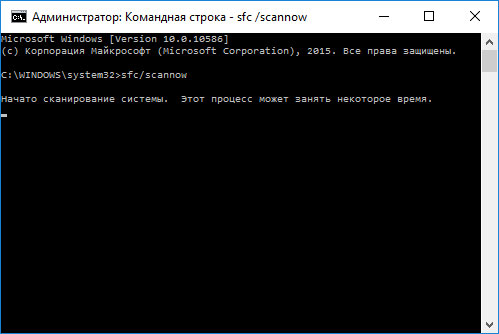
- Нажмите кнопку Windows, затем введите cmd с клавиатуры.
- Правой кнопкой мышки кликните на CMD и запустите от имени администратора.
- В окне командной строки введите sfc /scannow и нажмите Enter.
Этот процесс может занять несколько минут.
Как восстановить системные файлы Windows 10

Проверьте диск с Windows на наличие ошибок командой chkdsk c: /f
Возможно к синему экрану с «PASSIVE_INTERRUPT_ERROR» привела ошибка файловой системы или наличие битых секторов диска. Команда CHKDSK проверяет диск на наличие ошибок файловой системы и битых секторов. Использование параметра /f заставит программу автоматически исправлять найденные на диске ошибки, а параметр /r позволяет найти и «исправить» проблемные сектора диска. Для запуска следуйте инструкциям:
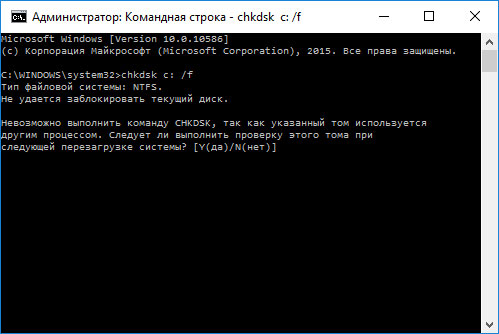
- Нажмите кнопку Windows, затем введите CMD с клавиатуры.
- Правой кнопкой мышки кликните на CMD и запустите от имени администратора.
- В окне командной строки введите chkdsk c: /f и нажмите Enter (используйте ту букву диска, на котором установлена ОС).
Дождитесь окончания процесса и перезагрузите компьютер.
Используйте режим совместимости со старой версией Windows
Отключите лишние программы из автозагрузки Windows
Программное обеспечение, вызывающее «PASSIVE_INTERRUPT_ERROR» (0x0000013B), может быть прописано в автозагрузку Windows и ошибка будет появляться сразу после запуска системы без вашего участия. Удалить программы из автозагрузки можно с помощью Диспетчера задач.

- Загрузитесь в Безопасном режиме.
- Кликните правой кнопкой мышки на Панели задач, затем на пункте Диспетчер задач.
- Перейдите на вкладку Автозагрузка.
- Чтобы убрать ту или иную программу из автозагрузки выберите её из списка и отключите, нажав кнопку Отключить в правом нижнем углу окна.
Обратитесь в поддержку Microsoft
Microsoft предлагает несколько решений удаления ошибки «голубого экрана». «PASSIVE_INTERRUPT_ERROR» (0x0000013B) можно убрать с помощью Центра обновления или обратившись в поддержку Windows.
- Перейдите на сайт технической поддержки Microsoft.
- Введите код и сообщение об ошибке в поисковую строку и следуйте найденным рекомендациям.
- Если вы не найдете готового решения, то задайте вопрос в сообществе — возможно вам ответит сертифицированный системный администратор.
Установите последние обновления системы
С обновлениями Windows дополняет базу драйверов, исправляет ошибки и уязвимости в системе безопасности. Загрузите последние обновления, что бы избавиться от ошибки «PASSIVE_INTERRUPT_ERROR» (0x0000013B).
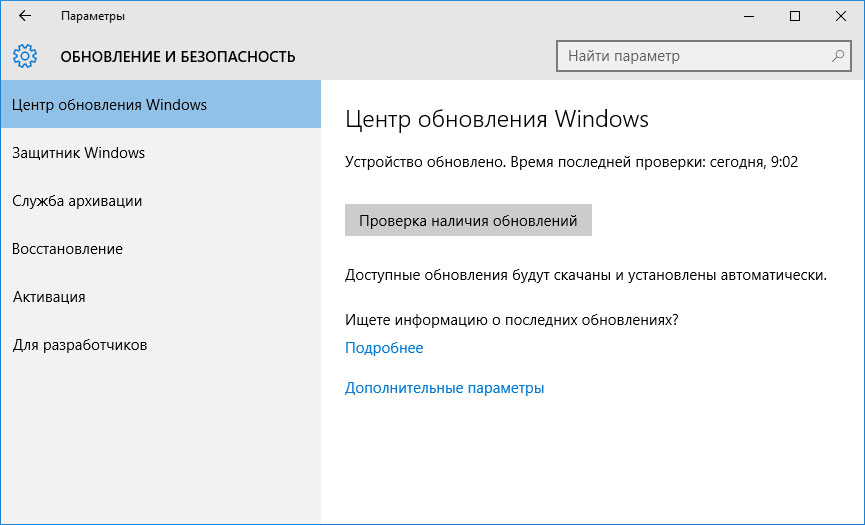
Запустить Центр обновления Windows можно следующим образом:
- Перейдите в меню Пуск и выберите Параметры.
- В окне Параметров перейдите в меню Обновление и Безопасность.
- Для установки последних обновлений Windows нажмите кнопку Проверка наличия обновлений и дождитесь окончания процесса их поиска и установки.
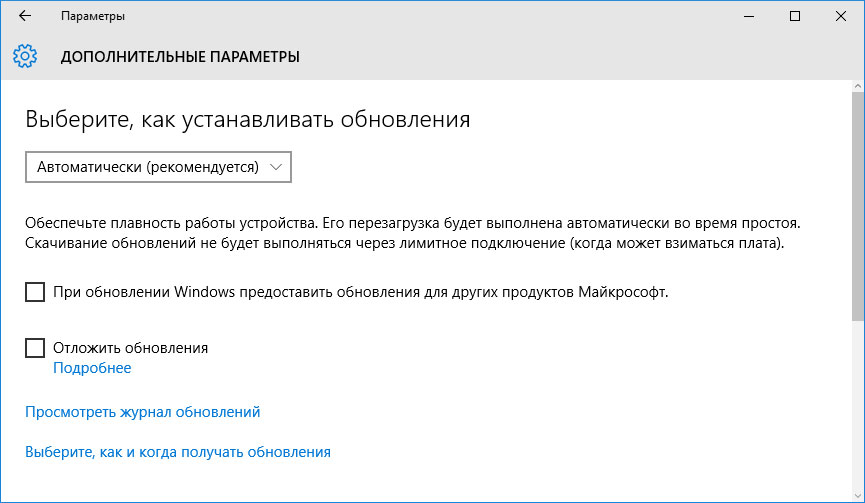
Рекомендуется настроить автоматическую загрузку и установку обновлений операционной системы с помощью меню Дополнительные параметры.
Чтобы включить автоматическое обновление системы необходимо запустить Центр обновления Windows:
- Перейдите в меню Пуск и выберите Параметры.
- В окне Параметров перейдите в меню Обновление и Безопасность и выберите подменю Центр обновления Windows. Для установки последних обновлений Windows нажмите кнопку Проверка наличия обновлений и дождитесь окончания процесса их поиска и установки.
- Перейдите в Дополнительные параметры и выберите, как устанавливать обновления — Автоматически.
Запустите проверку системы на вирусы
«Синий экран смерти» с ошибкой «PASSIVE_INTERRUPT_ERROR» 0x0000013B может вызывать компьютерный вирус, заразивший систему Windows.
Для проверки системы на наличие вирусов запустите установленную на компьютере антивирусную программу.
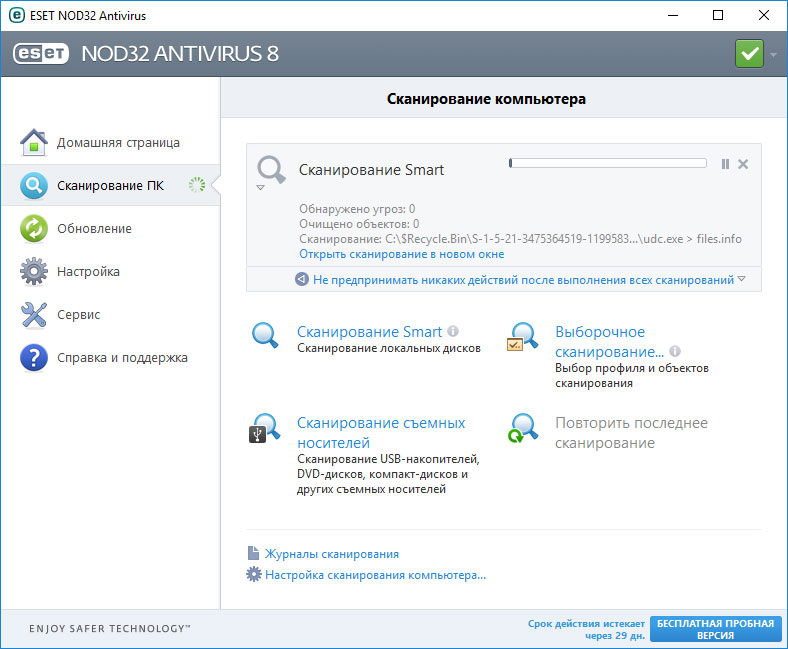
Современные антивирусы позволяют проверить как жесткие диски, так и оперативную память. Выполните полную проверку системы.
Выполните проверку оперативной памяти
Неполадки с памятью могут привести к ошибкам, потере информации или прекращению работы компьютера.
Прежде чем проверять оперативную память, отключите её из разъёма на материнской плате компьютера и повторно вставьте в него. Иногда ошибка PASSIVE_INTERRUPT_ERROR» вызвана неправильно или не плотно вставленной в разъём планкой оперативной памяти, или засорением контактов разъёма.
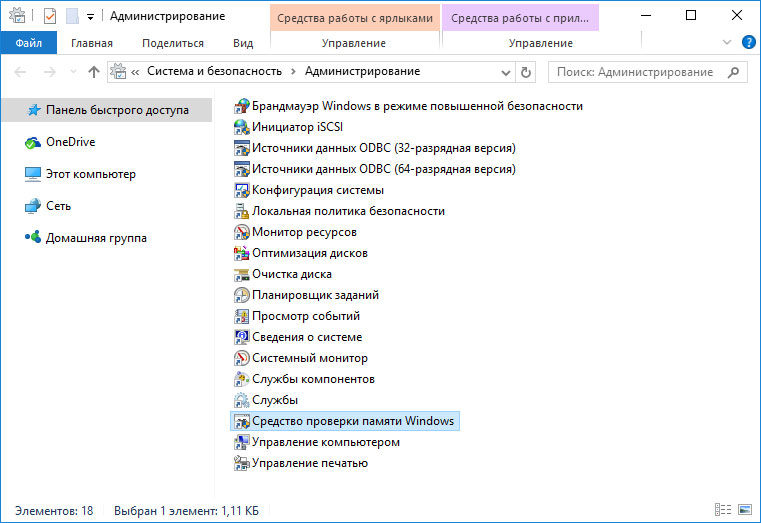
Если предложенные действия не привели к положительному результату, исправность оперативной памяти можно проверить средствами операционной системы, с помощью средства проверки памяти Windows.
Запустить средство проверки памяти Windows можно двумя способами:
- С помощью Панели управления:

Перейдите в Панель управления / Система и безопасность / Администрирование. Запустите приложение Средство проверки памяти Windows.
- С помощью средства Выполнить:

Запустите средство Выполнить с помощью комбинации клавиш Windows + R. Наберите mdsched и нажмите Enter. После чего откроется средство проверки Windows.
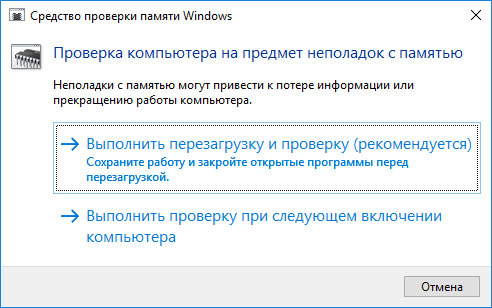
Для начала проверки выберите один из предлагаемых вариантов, проверка оперативной памяти в соответствии с которым будет запущена после перезагрузки компьютера.
Если в результате проверки будут определены ошибки, исправить которые не представляется возможным, то такую память необходимо заменить (замене подлежит модуль памяти с неполадками).
Выполните «чистую» установку Windows
Если не один из перечисленных методов не помог избавиться от PASSIVE_INTERRUPT_ERROR», попробуйте переустановить Windows. Для того чтобы выполнить чистую установку Windows необходимо создать установочный диск или другой носитель с которого планируется осуществление установки операционной системы.
Загрузите компьютер из установочного диска. Для этого может понадобиться изменить устройство загрузки в BIOS или UEFI для более современных компьютеров.
Следуя пунктам меню установщика укажите диск, на который вы хотите установить Windows. Для этого понадобится отформатировать его. Если вас не устраивает количество или размер локальных дисков, их можно полностью удалить и заново перераспределить.
Помните, что форматирование, удаление или перераспределения дисков удалит все файлы с жесткого диска.
После указания диска для установки Windows запуститься процесс копирования системных файлов и установки операционной системы. Во время установки от вас не потребуется дополнительных действий. В течении установки экран компьютера будет несколько раз гаснуть на непродолжительное время, и для завершения некоторых этапов установки компьютер будет самостоятельно перезагружаться.
В зависимости от версии Windows на одном из этапов от вас может понадобиться выбрать или внести базовые параметры персонализации, режим работы компьютера в сети, а также параметры учётной записи или создать новую.
После загрузки рабочего стола чистую установку Windows можно считать законченной.
Примечание. Прежде чем приступить к выполнению чистой установки Windows заранее побеспокойтесь о наличии драйверов ко всем установленным устройствам и сохранности ваших файлов. Загрузите и сохраните драйвера на отдельный носитель информации, а для важных данных создайте резервную копию.
Как сбросить Windows 10 к исходному состоянию
Как сбросить Windows 10, 8, 7 если компьютер не загружается
PASSIVE INTERRUPT ERROR is a Blue screen of Death issue in Windows 10 which can cause severe damage to a system. The main reason for this issue is usually outdated device drivers and missing system components. But some other relatively less likely causes may play greater roles in causing the same like RAM issues, bad areas in Hard Disk, outdated BIOS or even unnecessary hardware accessories. The error has a bug check code of 0x0000013B which clearly indicates the Kernel has detected some drawbacks with the passive-level interrupt.
While a user attempts to open a newly installed program, some abnormal error messages appear along with the error. Sometimes, the desktop area freezes and makes the whole thing complicated. But the most annoying trouble occurs when Windows starts rebooting frequently to minimize the effect of damage. The stop code is undoubtedly a dangerous one and needs immediate fixes to eliminate. Hence today, we will discuss some of the most comprehensive workarounds to resolve this Blue Screen error from Windows 10. Let’s begin –
Here is how to fix PASSIVE INTERRUPT ERROR Blue Screen in Windows 10 –
The above list of solutions when applied perfectly in Windows, PASSIVE INTERRUPT ERROR Blue Screen error will resolve as expected. Before we go to try any workaround, the system needs to be a stable one. Blue Screen error will cause potential harm to a system and it will automatically reboot frequently to reduce the effect of damage. Therefore, we cannot really deploy the resolution process unless disabling the automatic restarting. Hence, follow the below guidelines to disable this automatic feature –
- First of all, save and preferably close any ongoing process to avoid unwanted data loss.
- Head over to the Desktop area pressing Win+D together.
- From the visible area, click the This PC icon and select Properties option.
- In a moment, System window cuts your view, select Advanced system settings located at the left pane.
- Moving to the System Properties, highlight its Advanced tab.
- Hover down a little and click on the Settings button located under Startup and Recovery section.
- Move to System failure section and eventually deselect the box before Automatically restart option.
- In the end, click the OK button from bottom to save the changes in Windows 10.
Once the changes are effective in Windows 10, it will not reboot anymore automatically. Its time, we can try the following workarounds one after another and resolve PASSIVE INTERRUPT ERROR in Windows 10.
1] Update all the drivers in Windows 10
In the beginning, we have already mentioned that outdated drivers have a great role in causing the PASSIVE INTERRUPT ERROR Blue Screen in Windows 10. The issue will resolve automatically once the drivers are up to date. True that updating drivers take place automatically when the device is connected to an active internet connection. In lieu of that, we can proceed manually using Device Manager to avoid some unexpected issues to happen. To accomplish the task, follow the below process –
- Press Win+R hotkey together and invoke the Run dialog.
- Type devmgmt.msc in the text field of this wizard and press Enter key.
- When the new Device Manager window comes in the view, reach out to the device having mark of exclamation.
- Double click on the same and spread the devices list.
- Do a right-click on the driver and choose the Update driver option from the appearing menu.
- Complete the process complying with the guidelines available on display.
- Repeat the same for all the outdated drivers.
- Finally, Restart the Windows upon finishing the process.
2] Fix up memory issues residing in Windows 10
Windows confronting memory issues will be at severe risk of getting affected with Blue Screen Error with code 0x0000013B. A majority of these issues are originated from bad RAM after a device falls on the ground. Usually, a bad ram demands full replacement which will cost a bulk amount of money. Before proceeding to that, we recommend resolving other related problems using Windows Memory Diagnostic tool. The guideline is as follows –
- Launch Settings app by pressing Win+I key at once.
- On the interface, type memory in the search box provided there.
- Choose “Diagnose your computer’s memory problems” when it appears in the result.
- Windows Memory Diagnostic tool will open up.
- From the wizard, click “Restart now and check for problems (recommended)”.
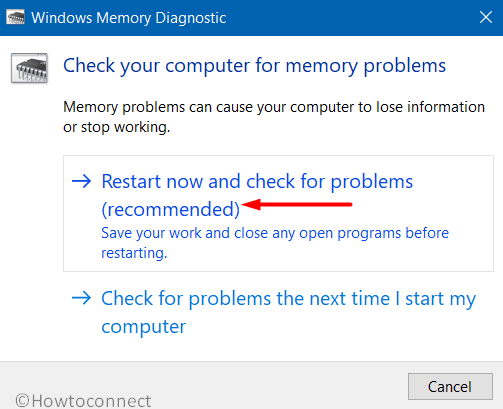
- Windows after completing the first cycle of rebooting, a blue screen will be visible and it will detect memory issues.
- Once the progress hits 100%, the device will restart again.
- When the session starts, a result of the carried out diagnostic will be available in the System tray- notification area.
3] Install all the latest Updates to fix PASSIVE INTERRUPT ERROR
Updating the operating system enables users to experience the latest modifications in features. Besides, the new patches contain probable fixes for the existing bugs. Thus, updating Windows makes the operating system healthy and it will be less likely to gets affected by bugs and issues. Every after a closed interval, Microsoft releases the update files and you can get them in the system easily by checking Windows Update section in the Settings app. Whenever the device is connected to a valid internet connection, these files will be installed automatically. However, the autonomous system found to cause some complications as well. Therefore, let’s proceed to install the available updates for the OS moving through below steps –
- Press Windows key and select gear icon from Start menu.
- When the Settings app UI unfolds, click on Update & Security and move to the next page.
- Choose Windows Update from the left ribbon here and jump to alongside right.
- Click on Check for updates button and initiate searching Update files.
- When all the new patches are available, hit Download button located there.
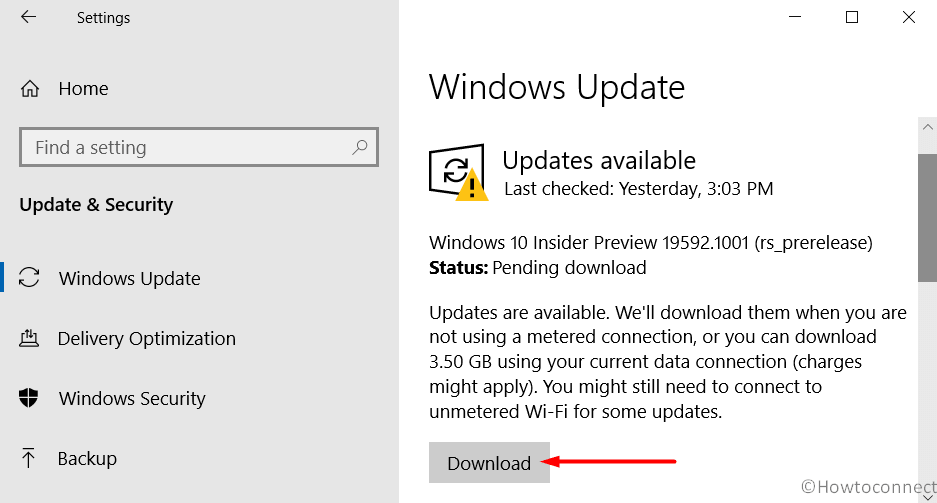
- Once the download finishes, installation will commence automatically
- This process will require consecutive restarting of Windows. Attend all the tasks to complete the updates.
4] Perform System Restore to load the previous state of Windows
PASSIVE INTERRUPT ERROR Blue Screen in Windows 10 may occur after installing a new program. Same may also occur when a user attempts to cancel uninstalling a program forcibly. These abnormal processes will have an adverse effect on Windows registry and thus, blue screen error will show up. To avoid this unwanted setback, we can turn back the present state of Windows to a previous point. The process is well known as System Restore where windows will load back its previous state on implementation. Here are the guidelines to accomplish this task –
- Open the Power user menu by pressing “Win+X” hotkey together.
- Select Run from the menu to invoke the wizard.
- Type ‘rstrui’ in the blank text field and click Ok.
- When the System Restore wizard floats up, click select Show more restore points.
- Choose the latest point and click the Next button from bottom.
- Finally hit Finish from the succeeding page and start the process.
5] Detect the malware threats in Windows Security and eliminate them
The biggest threat on internet nowadays is malware residing in disguise in some links. Whenever a user clicks that, these bugs manage to sneak through the defense and enters into the system. Since they have a replicating character, can easily transform them into other system files. Thus, many of the Windows core components go missing and few lose their originality. This action causes PASSIVE INTERRUPT ERROR Blue Screen in Windows 10.
In order to protect these files, we need to strengthen the security system and also eliminate any potential threat using an anti-virus solution. Windows Security is assured to be the best and Microsoft introduced this software a default in OS. The program has a robust architecture and real time protection against malware. Here is how to detect and eliminate the virus invaders using Windows Security –
- Press Windows key and type security in the blank space provided.
- Select Windows Security when displayed and open the app.
- On the left pane, click Virus & threat protection and move on to right.
- Hit Scan options link and select radio button set for Full scan option when all methods are available.
- Start the detection process by selecting click Scan now button.
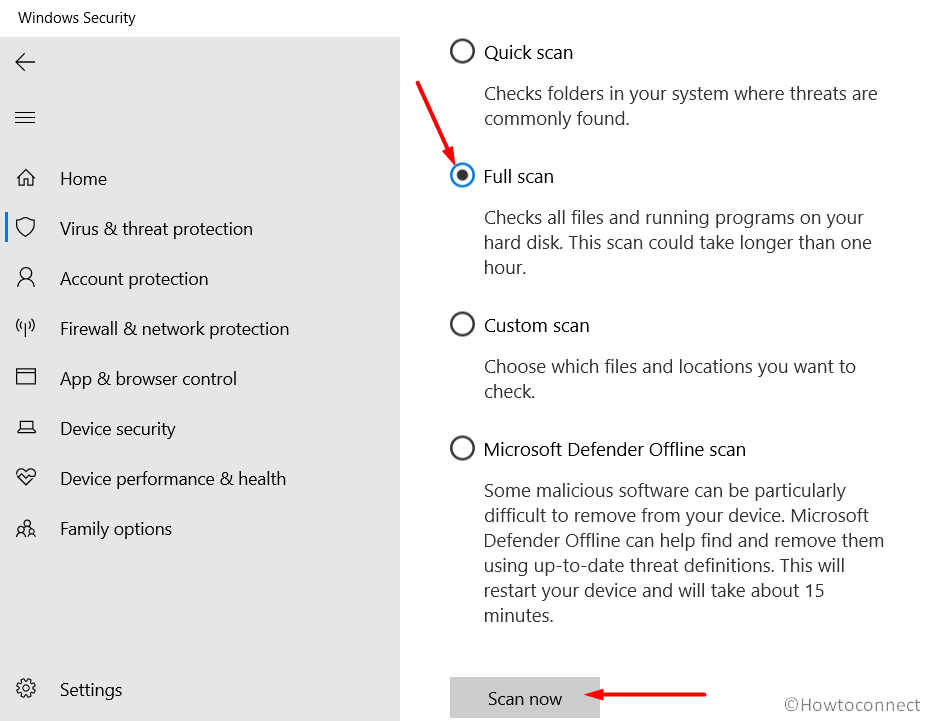
- If there is any virus present in the system, it will be displayed. Click the Clean Threat option to get rid of them.
- When moved to next window, select Remove followed by clicking Start actions to resolve the threats
6] Limit the risk of Software collision in Windows 10
The more this world is getting tech savvy, the more we are becoming dependent on software programs. Plenty of applications are made every day to serve a variety of purposes. We often see many programs come with a slight different name but same functionality. There is a little hiccup here in installing applications unnecessarily especially the dual ones. Similar programs often come in conflict with each other and cause a software collision. As a result of that, lots of windows core components can go missing and eventually cause blue screen error with bug check code 0x0000013B. We need to uninstall unnecessary programs from the system to avoid happening that using below instructions –
- Press Windows key and type “appwiz.cpl” in the provided text space for searching.
- Hit the Enter key to unfold the Programs and Features window on display.
- Head over to the similar application that you opt to remove.
- Do a right click on the program and select Uninstall option.
- When UAC asks for permission, click Yes to proceed.
- Follow the guidelines on-screen until the process ends completely.
- Later on, restart the Windows and make these changes effective.
7] Scan the system components and rectify the dreadful ones
Windows operating system depends on some core components to run smoothly. These system files may often get corrupted or go missing due to infection from malicious bugs or after a software collision. At that moment, PASSIVE INTERRUPT ERROR Blue Screen error may show up in Windows 10. To rectify these components thereby resolving the BSOD error, System File Checker tool can be handy. As the utility is effective in the elevated command prompt only, we need to proceed as follows –
- Press Win+R hotkeys together to open Run dialog box first.
- Type “cmd.exe” in the provided text box provided of it.
- Now press Ctrl + Shift + Enter keys together once more to directly open Command Prompt as Admin from Run dialog.
- When the User Account Control floats up for permission, click Yes to continue.
- After being directed to the Elevated Command Prompt enter the below text –
sfc /scannow
- Hit Enter key to activate System file checker tool in there.
- Now the utility will start looking for corrupted and missing system components in the device.
- It will automatically resolve the dreadful system files and the process might be a little lengthy.
- Once it finishes and reboot the Windows once done.
8] Roll Back a defectively installed device driver to Fix PASSIVE INTERRUPT ERROR
After the driver updating process is made autonomous with installing latest Windows patches, few new issues came into play. Some defective drivers are getting installed unnoticed. In a while, they are also causing PASSIVE INTERRUPT ERROR Blue Screen in Windows 10. To recover the device from this trouble, we have to disable that specific device driver or roll back it to default. The process is as following –
- Press Windows key and Q at once to open Taskbar Search.
- Type device manager in the provided text box and hit Enter.
- When the Device Manager is upfront, reach to the dreadful device whose drier you opt to disable or restore to default.
- Double click to spread its driver list.
- Do a right-click on the suspected driver and choose Properties option.
- After a new popup window comes up, enter into its Driver tab
- Hover down a little and click Disable Device or Roll Back Driver.
- Repeat the same for all defective drivers in the system.
- Finally, Reboot Windows 10 to make these changes effective.
9] Disable Fast Boot to fix PASSIVE INTERRUPT ERROR
Two very prominent power options for a computer are Shut Down and Hibernate. Fast Startup is a combination of these power options which collects the information when the device is running. The idea is to save these data from an ongoing process to boot the device faster in the next session of Windows. The fast boot process will carry over the blue screen error from previous session if not disabled. Therefore, disable this feature in the first place using below guidelines –
- Move the cursor to the right corner of Taskbar followed by making a right-click on Battery icon.
- Select Power Options from the appearing menu.
- When a new window opens, choose What the power buttons does link from left pane.
- Moving forward to the next page, click on Change settings that are currently unavailable to unveil the hidden options.
- Hover downward and uncheck the box that reads Turn on fast startup (recommended).
- Finally, click the Save Changes button from the bottom.
10] Boot Windows 10 in the most reliable Safe Mode
When most of the resolutions failed to recover the computer from PASSIVE INTERRUPT ERROR Blue Screen in Windows 10, a simple technique can serve the best. We are talking about booting Windows in the Safe Mode. This is a very much reliable resolution found to be effective in every critical issue of Windows. In this special type of startup method, the device powers up with default applications and set up only. This will remove BSOD error existing in the system very effectively. Even the setback exists also, you can be sure that any third party program is causing the trouble. To boot the device in safe mode, follow the below steps –
- Open Run dialog and type msconfig in void text area.
- Click on OK button from the wizard to open System Configuration.
- Get into the Boot tab and scroll down to the second half where Boot Options is visible.
- Proceeding ahead, mark the checkbox saying Safe Boot.
- After the grayed options be functional, choose radio button before Minimal.
- Click on Apply button followed by hitting Ok to save the changes.
- Now, close the System Configuration wizard and Restart the Windows in usual way.
- In the succeeding startup, press F8 key until the Advanced Boot menu comes in.
- From the appearing menu, choose Safe Mode from here and enter.
11] Clean the junk files and make space in Hard Disk
Temporary files, browsers cache, Recycle Bin, old Windows installation files, etc are generated for specific tasks in the operating system. These files though become useless after finishing the tasks, occupy same space in the disk just like an original one. Since they keep on producing in large numbers; a huge space in the disk becomes full due to unnecessary junk. In the process, the device functionality deteriorates drastically and cause a few critical issues as well. Blue Screen error with bug check code 0x0000013B may too show up. To clean this bulk amount of junks, Disk Cleanup utility will be helpful. Here are the guidelines to use the default utility –
- Fire up the Run dialog pressing Win+R hotkeys together.
- Type in cleanmgr in its text area and press Enter key.
- In a second, a small pop-up will rise up immediately asking to choose the drive name.
- Select C: and click on OK button.
- After some time, Disk Cleanup for (C:) will arrive.
- Hover down to its bottom left end and click Clean up system files option.
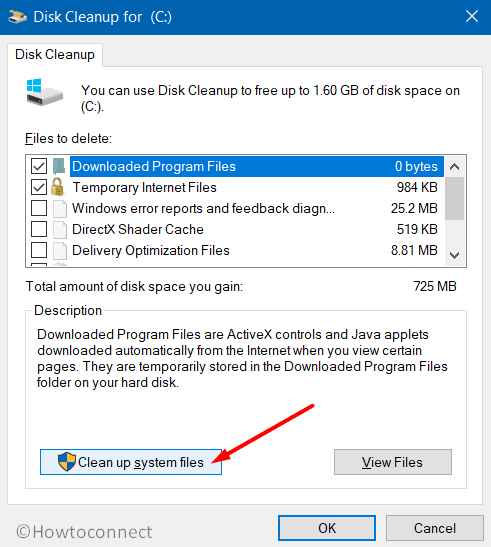
- Choose C: again and hit Enter key when prompt.
- In the upcoming window, check all the options residing under Files to delete section.
Note – Make sure no necessary file remains in the Downloads and Recycle Bin folder before deleting all the junk files.
- Finally, hit the OK button to initiate cleanup.
12] Fix PASSIVE INTERRUPT ERROR by Temporarily disconnecting hardware devices
PASSIVE INTERRUPT ERROR Blue Screen in Windows 10 may occur from wide range of reasons. You may often come across BSOD error after connecting any hardware accessory like mouse, keyboard, speaker or a printer. The truth is, these accessories are inseparable parts of a system. In absence of them, even a simple task appears horrible.
The good news is, this drawback has a very efficient and quick fix according to many of the users. Only disconnecting them for some time may offer great relief to the users. De-port the hardware items with best care and place them in a safe location. After doing so, restart Windows 10 and check for the blue screen error after coming back to a new session. If no setback shows up, connect all the accessories and use them for functionality.
13] Use DISM tool to rectify dreadful Windows image files
Windows image files are the components of a major update and they are very sensitive in most cases. Once these components are corrupted by some reasons, Blue Screen error with bug check code 0x0000013B may appear in the system. To rectify these files eventually saying goodbye to BSOD error, DISM tool comes handy. This tool will be activated in the elevated command prompt when proceeding through the below guidelines –
- Open the taskbar Search pressing Win+Q hotkeys.
- Edit the empty text space and type in cmd.exe.
- When the Command Prompt appears in the result, make a right-click on it.
- Select Run as administrator option.
- Hit Yes when a UAC prompts for permission.
- When the dark window unfolds, enter following command tool –
DISM.exe /Online /Cleanup-image /Restorehealth
- Hit Enter key to run the DISM tool.
- Wait a while until the process finishes completely, it might be a little lengthy.
- Once done, Restart Windows 10 to put changes into effect.
14] Install the latest version of BIOS
A Firmware that runs initially when a computer starts for the first time is known as the BIOS. This is a very important part of an operating system that controls hardware initialization and provides runtime services for various installed programs. The BIOS needs to keep updated every time to stay away from any bugs and problems like PASSIVE INTERRUPT ERROR Blue Screen in Windows 10. To accomplish the task, here are the guidelines to follow –
- Press Win+S hotkeys to open up Taskbar search.
- Type “System” in the provided search box and select System Information app from results.
- When a new page opens, come down to bottom part and write BIOS in the search box provided here.
- Press Enter key and you can see information before BIOS Version/Date on the right-side pane.
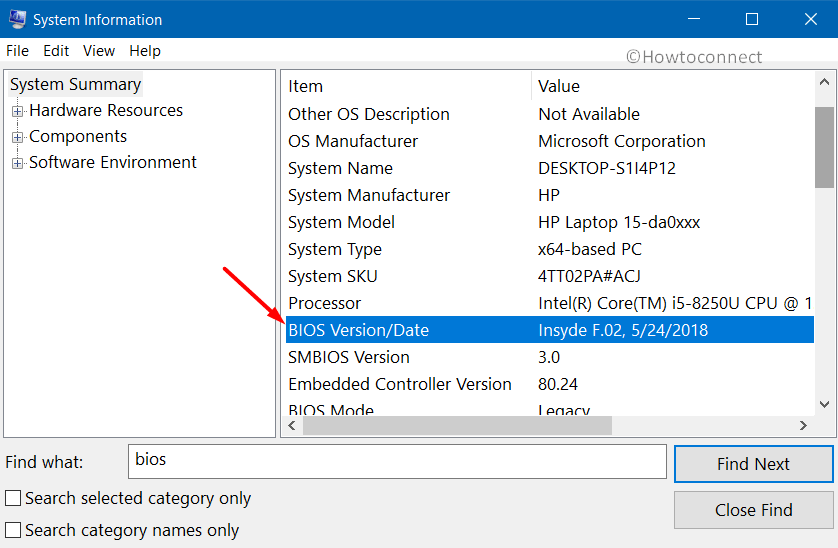
- Note down the information and close the window.
- Launch the web browser and visit the manufacturer site for the BIOS of your computer using information collected before.
- Once you find the latest version of BIOS, download the compatible ones and install it.
15] Fix up bad areas from Hard Disk to Resolve PASSIVE INTERRUPT ERROR
Hard Disk is one of the most important parts of the computer often compared to soul of the device. People seldom intend to replace it as it doesn’t cause many problems. But using the same thing for long time may end up getting some snags one of which can be blue screen error with bug check code 0x0000013B. There are bunch of ways to keep it healthy but only one tool can help when bad areas are formed. Talking about Disk Checking Tool which activates in the Elevated Command Prompt. Here is how to use the tool –
- Manage access to the Elevated Command Prompt using same guidelines shown before.
- When in the black window, enter following command at the base of blinking cursor –
chkdsk C: /f /r /x
- Hit the Enter key to activate the Disk Checking Tool in this window.
- The utility will find out bad areas in the disk and finally fix them automatically. This process might take long time than expected, schedule the task accordingly.
- When the process ends, restart Windows 10 to save these changes to system.
16] Involve Windows Blue Screen Troubleshooter
Windows Blue Screen Troubleshooter is one of the most trusted resolution processes having the capability to eliminate the BSOD error. This is a default tool and introduced in Windows 10 first with Fall Creators Update edition. Initially, it was available in Windows Settings app but later on shifted to Control Panel based on public demand. Now, you can also use a direct online troubleshooter to fix the PASSIVE INTERRUPT ERROR Blue Screen in Windows 10. Here is how to use the default tool –
- Open the Run dialog and type control panel in the void text box provided here.
- Press Enter key and let the app to arrive on display.
- In case, the UI shows only Categories, click on dropdown menu beside View by and select Large icons/ Small icons.
- After the window readjusts, select Troubleshooting from first column.
- Moving to the next window, choose View all option from left pane
- After the following page unrolls, make a double click the Blue Screen option from second place.
- From the Troubleshooter wizard appearing next followed by a click on Advanced link.
- Select the option Apply repairs automatically.
- Now, click on the Next button to initiate the process.
- Upon the completion of troubleshooting you will see the measure to be taken if any BSOD issue is detected. Ensure to have an active internet connection to the device beforehand.
Users can also use the direct Online tool for this Blue Screen issue using any web browser. For that, proceed with below guidelines –
Using Direct Online Tool
- Launch a browser form Windows and visit the webpage dedicated to Microsoft’s online troubleshooting by clicking this link.
- When a new page arrives, hover down to When did you get the error? Section.
- Select one of the radio buttons from here based on your case.
- Once the page reveals stepwise tasks to resolve an existing issue.
- Follow them to the point and fix the error eventually.
17] Remove any Third Party anti-malware software
Virus components nowadays are strongly coded and most of them can easily sneak through security defense. To defend them, you can have many anti-malware solutions beforehand. But the most trustworthy one is the Windows Security developed by Microsoft. Other third-party tools can also be used but now in parallel with the default Windows Security. Keeping two programs side by side increases probability to cause a software collision. The result will end up causing PASSIVE INTERRUPT ERROR Blue Screen in Windows 10. Therefore, we recommend removing the third party security solution using below guidelines –
- Open the Start menu pressing Windows key.
- Click on the Settings cog to open the app.
- When the layout loads fully, select Apps and shift to the consequent page.
- From the succeeding page, choose Apps & Features from the left side pane and eventually jump to the right.
- Hover to the third-party anti-malware tool when the list of installed apps is available.
- Click the same followed by choosing Uninstall from the expanded pane.
- If UAC prompts, choose Yes to continue.
- Follow the next steps from display until the uninstallation finishes.
- Restart Windows 10 upon ending the process.
18] Uninstall the defective Windows update
As the Windows updating process is autonomous, often it may entangle in a close loop. When the unfinished files or some defective patches are installed in the system, Blue Screen error may evolve there. If you are getting the PASSIVE INTERRUPT ERROR Blue Screen after a Windows update, it might be due to the faulty update files. In such cases, these files need to be removed immediately using below guidelines –
- Right-click on Start menu and select Settings from there.
- From the app UI, select Update & Security and pass forward to more settings.
- Select the Windows Update option located on the left side when the next page loads.
- Jump to the right and click View Update history link available there.
- Upon opening subsequent window, make a click on Uninstall updates link.
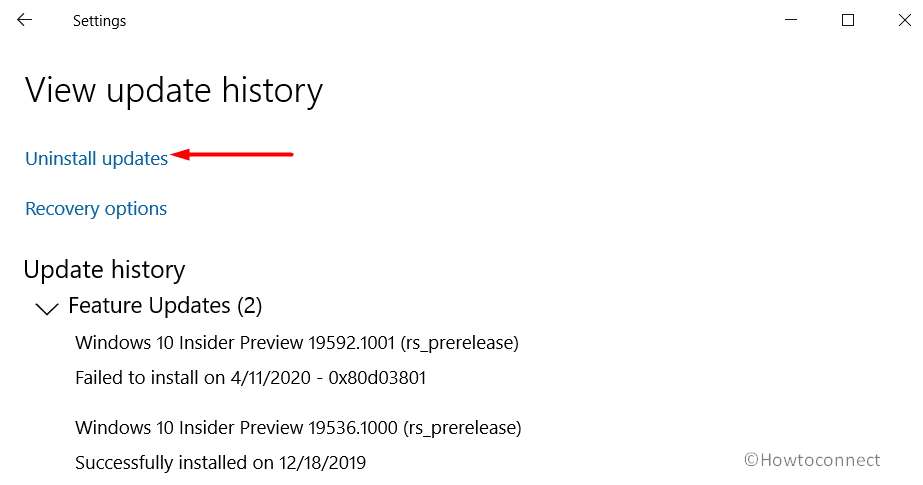
- In a moment, you will be redirected to a new window from Control panel, look for the latest installed update you opt to remove.
- Select the defective patch and click Uninstall option from top ribbon.
- Follow the guidelines coming up on display until the process ends.
19] Run the Automatic Repair to solve PASSIVE INTERRUPT ERROR
Whenever complex issues like Blue Screen error shows up in the system, Automatic Repair is welcomed in the third boot. Here, a good number of diagnoses are carried out to detect the actual problem. The process may be lengthy and time-consuming when proceeded automatically, hence we can do it manually using below guidelines –
- Manage to open the Settings app using guidelines stated in above workaround.
- Select the Update & Security tile once the app is loaded.
- From the consequent page, click Recovery option on left pane.
- Shift to the corresponding right side and head over to Advanced startup section.
- Do click Restart now button located under it.
- After Windows finishes rebooting, select Troubleshoot =>Advanced options => Startup Repair.
- Once Automatic Repair page comes in the view, provide your Microsoft account credentials.
- Finally, choose Continue button to initiate the process.
20] Perform a Clean Boot to Fix PASSIVE INTERRUPT ERROR
Clean Boot is a troubleshooting method that allows the device to perform some diagnosis to detect which program is causing the error during normal booting process. Basically, both the Clean Boot and Safe Boot may appear similar and often create conflict in the system. Clean Boot is a bit advanced in case of troubleshooting by isolating performance issues. Performing a Clean Boot may resolve PASSIVE INTERRUPT ERROR Blue Screen in Windows 10 as well. Here is how to accomplish the task –
- Get access to Run dialog pressing Win+R hotkeys.
- Type msconfig in the empty text space and click Ok button.
- When the System Configuration window comes up, click the radio button set aside Selective startup.
- When the grayed out options are visible, untick the box against Load startup items.
- Enter into Services tab and put a tick mark on the box assigned for Hide all Microsoft services.
- Click the Disable all button.
- Move back to the Startup tab and click the link says Open Task Manager.
- Perform a right-click on each program listed here and choose Disable for all.
- Go back to System Configuration window.
- Click on Apply button first and then Ok to save the changes.
Methods:
1] Update all the drivers
2] Fix up memory issues residing
3] Install all the latest Updates
4] Perform System Restore
5] Detect malware threats
6] Limit the risk of Software conflict
7] Scan the system components
8] Roll Back a defectively installed device driver
9] Disable Fast Startup
10] Boot Windows 10 in the most reliable Safe Mode
11] Clean the junk files
12] Temporarily disconnect hardware devices
13] Use DISM tool to rectify dreadful Windows image files
14] Install the latest version of BIOS
15] Fix up bad areas from Hard Disk
16] Involve Windows Blue Screen Troubleshooter
17] Remove any Third Party anti-malware software
18] Uninstall the defective Windows update
19] Run the Automatic Repair in Windows 10
20] Perform a clean Boot to Windows
That’s all!!
Repair any Windows problems such as Blue/Black Screen, DLL, Exe, application, Regisrty error and quickly recover system from issues using Reimage.
Contents
- Causes of The Error
- Restore Deleted Files
- Start The Computer in Safe Mode
- Update a Driver With The Device Manager
- Use sfc /scannow To Check All System Files
- Check for Errors The Disk Where Windows Is Installed By Using The Command chkdsk c: /f
- Use The Mode of Compatibility With an Old Version of Windows
- Disable Unnecessary Programs in Windows Startup Menu
- Consult Microsoft Support Service
- Install Latest System Updates
- Scan The System For Viruses
- Test Your RAM
- Make a Clean Installation of Windows
Causes of The Error
-
There is not enough free space in the hard disk of your computer/laptop. For Windows 10 to operate correctly you need to have from 2 to 10 Gb of free space in your system disk.
-
An incompatible version of BIOS was installed or the firmware was damaged.
-
Device drivers incompatible with the OS were installed.
-
Windows registry was damaged or deleted, or cleaning operations accidentally deleted system keys.
-
Antivirus software or viruses may block system files or delete important registry keys.
-
An error occurred in the work of backup software.
-
It can also happen as a result of a Windows update.
Read more how to fix 0x0000013B: «PASSIVE_INTERRUPT_ERROR» in Windows 11, Windows 10, Windows 8.1, Windows Server 2012, Windows 8, Windows Home Server 2011, Windows 7 (Seven), Windows Small Business Server, Windows Server 2008, Windows Home Server, Windows Vista, Windows XP, Windows 2000, Windows NT.
Here are some ways of eliminating the problem with «PASSIVE_INTERRUPT_ERROR»:
Restore Deleted Files
Often BSoD errors cause loss of important files. Files blocked by computer viruses, backup software errors, damaged or overwritten system files, file system errors or bad hard disk sectors – these are only some of the causes that can make your data lost.
Corrections of the corresponding errors will restore the normal operation of your devices, but it does not always restore damaged or lost files. Also, it is not always possible to eliminate an error without formatting the hard disk or clean installation of the operating system, which can also involve loss of files.
The tool recovers data from any devices, regardless of the cause of data loss.
Download for free and scan your device with the help of Hetman Partition Recovery. Learn about the program features and step-by-step guide.

Start The Computer in Safe Mode
If the error «PASSIVE_INTERRUPT_ERROR» (0x0000013B) occurs when loading Windows and blocks any attempts to work with the system, try loading the computer in Safe Mode. This mode is meant for operating system (OS) diagnostics, but OS functions are very limited in this mode. Safe Mode should only be used if the system is blocked otherwise.

In order to start Safe Mode you should do the following:
-
Go to Start menu and choose Settings.
-
In the settings window that appears go to Update & Security menu and choose the Recovery tab.
-
In the tab Recovery find Advanced startup and click the button Restart now.
-
As your Windows restarts, it will ask you to choose the next step. Choose Troubleshoot.
-
In the Troubleshoot menu click on Advanced Options and then on Startup Settings.
-
Then Windows will inform you that the computer can be restarted with the use of additional settings one of which is Enable Safe Mode. Press Restart.
-
After restarting choose Enable Safe Mode by pressing F4.
Go to view

How to Boot Windows 10 in Safe Mode (All Methods)
Update a Driver With The Device Manager
Have you installed new hardware to your computer? Are you using a new USB device? These can be the causes for the error «PASSIVE_INTERRUPT_ERROR». If you installed your device driver from the disk you have found in the device delivery package or if you are using a driver which was downloaded from a place other than Microsoft official website, this can be the core of the problem. You will have to update the device driver to fix it.

You can do it manually in the Windows device manager by taking the following steps:
-
Press Windows button and type device manager on the keyboard.
-
Choose Device Manager from the list.
-
View the list of device categories and click on the arrow nest to the category in which your new device falls. The driver can be marked with a yellow triangle.
-
Right-click on the device name and press Update Driver Software.
-
Then a window of Update Driver Software with two options will appear:
-
Search automatically for updated driver software. Windows will automatically check availability of the best suitable driver for this device.
-
Browse my computer for driver software. Use this option to show the OS where the driver files are kept.
-
Restart the computer after the driver is installed.
Use sfc /scannow To Check All System Files
Damaged or rewritten system files may cause the error «PASSIVE_INTERRUPT_ERROR». The command sfc finds damaged Windows system files and replaces them.

-
Press Windows button and enter cmd from the keyboard.
-
Right-click on CMD and launch it as administrator.
-
In the command prompt window, type in sfc /scannow and press Enter.
This process may take several minutes.
Go to view
How to Recover Windows 10, 8, 7 System Files (SFC, DISM)
Check for Errors The Disk Where Windows Is Installed By Using The Command chkdsk c: /f
The blue screen with «PASSIVE_INTERRUPT_ERROR» may be caused by a file system error or by bad sectors in your disk. The command CHKDSK will check the disk for file system errors and bad sectors. Using the setting /f will make the program to automatically correct the detected errors, and the setting /r allows finding and fixing problem disk sectors. To launch it, follow these steps:

-
Press Windows, then enter CMD from the keyboard.
-
Right-click on CMD and launch it as administrator.
-
In the command prompt window type chkdsk c: /f and press Enter (use the letter of the drive where your OS is installed).
Wait until the process is over and restart your computer.
Use The Mode of Compatibility With an Old Version of Windows
A error with the code «PASSIVE_INTERRUPT_ERROR» may be caused by outdated software. If this error occurs after launching a program, then using Windows compatibility mode can help you get rid of the problem. To fix it, do the following:

-
Find a program executable file (it has .exe extension) and right-click on it.
-
In the quick menu, select Troubleshoot compatibility.
-
At the next stage, you will see the window Program Compatibility Troubleshooter. You will have two troubleshooting options to choose from:
-
Try recommended settings. Select this variant to start a test run of the program using recommended compatibility settings.
-
Troubleshoot program. Select this variant to choose compatibility settings based on what problems you have encountered.
-
-
After testing the program under various versions of Windows and startup settings save the suitable settings for your program.


Go to view
How to Run a Program in Compatibility Mode With Windows 10, 8 and 7
Disable Unnecessary Programs in Windows Startup Menu
The software causing «PASSIVE_INTERRUPT_ERROR» (0x0000013B) may be written to Windows Startup list so the error occurs immediately after the system starts without any user activity. You can delete programs from Startup by using Task Manager.

-
Load the computer in Safe Mode.
-
Right-click on Task Bar and then on Task Manager.
-
Go to Startup tab.
-
To delete a program from the startup list select it and disable by clicking Disable in the right lower corner of the window.
Consult Microsoft Support Service
Microsoft offers several solutions to eliminate the blue screen error. «PASSIVE_INTERRUPT_ERROR» (0x0000013B) can be fixed with the help of Windows Update or by addressing Windows Support.

-
Go to Microsoft Support Service.
-
Enter your error code and message into the search field and follow the directions.
-
If you don’t find a ready solution as the community where your query can be answered by a certified system administrator.
Install Latest System Updates
Windows provides updates that extend your driver database and correct errors or security vulnerabilities. Download the latest updates to get rid of the error «PASSIVE_INTERRUPT_ERROR» (0x0000013B).

You can launch Windows Update like this:
-
Go to Start menu and select Settings.
-
In the Settings window go to Update and Security tab.
-
To install the latest Windows updates click on Check for updates and wait until they are found and installed.

It is recommended to set up automatic download and installation of system updates with the help of Advanced Options.
To enable automatic system update you need to start Windows Update:
-
Go to Start menu and choose Settings.
-
In the Settings window go to the Update and Security menu and select Windows Update. To install the latest Windows updates click on Check for updates and wait until they are found and installed.
-
Go to Advanced Options and choose the mode of update installation — Automatic.
Scan The System For Viruses
The blue screen of death with the error «PASSIVE_INTERRUPT_ERROR» 0x0000013B can be caused by computer viruses that infected your system.
To check the computer for viruses launch your antivirus program.
Modern antiviruses allow checking both hard disks and RAM. Run a full system scan.
Test Your RAM
System memory problems may cause errors, loss of data or even make your computer stop working.
Before you start checking RAM, take it out of the slot on the motherboard and then stick it back again. Sometimes the error «PASSIVE_INTERRUPT_ERROR» can be caused by the memory stick which was set into the slot incorrectly or not tight enough, and sometimes by the slot contacts covered with dust.
If the above actions did not make things better, you can check your RAM with the means of your operating system – Windows Memory Diagnostic.
JYou can start this tool in two ways:
-
With the help of Control Panel:
Go to Control Panel / System and Security / Administrative Tools. Launch the application Windows Memory Diagnostic.
-
With the use of Run:

Launch the Run tool with the combination of keys Windows + R. Type in mdsched and press Enter. The Windows Diagnostic tool will start.


To start the checking select one of the suggested variants to decide how your RAM will be tested after the computer is restarted.
If the diagnostic tool finds errors that cannot be corrected, such memory should be replaced (that is, you have to replace the memory stick where errors were found).
Make a Clean Installation of Windows
If none of the methods helped you to get rid of «PASSIVE_INTERRUPT_ERROR», try reinstalling Windows. In order to make a clean installation of Windows you need to create a setup disk or another media which you are going to use to install the OS.
Start the computer with the setup disk. To do it you may need to change boot priority in BIOS or UEFI for newer computers.
Following the installer menu stages, specify the disk where you want your Windows installed. You will have to format it then. If you are not satisfied with the number or size of the local disks they can be deleted and repartitioned.
Remember that formatting, deleting or partitioning your disks will destroy all files in the hard disk.
After specifying the disk to install Windows to, the process of copying system files and installing the operating system will start. During the installation, no additional action is required. In the process, the screen will go off for a while several times, and the computer will restart on its own to complete certain stages of installation.
Depending on the version of Windows at one of the stages you may have to select or enter basic personalization settings, choose how the computer works with networks and select settings of your account or create a new one.
As the computer loads the desktop, a clean installation of Windows is finished.
Note. Before you start a clean installation of Windows make sure you have drivers for all your hardware and that your files are safe. Download and save drivers to a separate media, and create a backup copy of important data.
Go to view
How to Reset Windows 10 or 8 PC to Factory Default Settings (All Methods)
Go to view
How to Reset Windows 10 or 8 PC If The Operating System Won’t Boot
Синий экран смерти 0x0000013B означает, что ядро обнаружило проблемы с прерыванием на пассивном уровне.
Довольно редкая ошибка.
Параметры PASSIVE_INTERRUPT_ERROR:
— Тип обнаруженной ошибки. 0x1: Драйвер пытался получить спинлок прерывания, но миновал объект прерывания на пассивном уровне.
— Адрес объекта KINTERRUPT для прерывания с пассивным уровнем.
— Зарезервировано.
— Зарезервировано.
РЕШЕНИЕ
ОБЩИЕ СВЕДЕНИЯ ОБ АВАРИЙНОМ ДАМПЕ ПАМЯТИ
Все Windows-системы при обнаружении фатальной ошибки делают аварийный дамп (снимок) содержимого оперативной памяти и сохраняет его на жесткий диск. Существуют три типа дампа памяти:
Полный дамп памяти – сохраняет все содержимое оперативной памяти. Размер снимка равен размеру оперативной памяти + 1 Мб (заголовок). Используется очень редко, так как в системах с большим объемом памяти размер дампа будет слишком большим.
Дамп памяти ядра – сохраняет информацию оперативной памяти, касающуюся только режима ядра. Информация пользовательского режима не сохраняется, так как не несет в себе информации о причине краха системы. Объем файла дампа зависит от размера оперативной памяти и варьируется от 50 Мб (для систем с 128 Мб оперативной памяти) до 800 Мб (для систем с 8 Гб оперативной памяти).
Малый дамп памяти (мини дамп) – содержит довольно небольшое количество информации: код ошибки с параметрами, список драйверов загруженных в оперативную память на момент краха системы и т.д., но этих сведений достаточно, для определения сбойного драйвера. Еще одним преимуществом данного вида дампа является маленький размер файла.
или
Для устранения ошибки воспользуйтесь одним или несколькими способами.
1. Сперва необходимо проверите наличие свободного места на системном разделе жесткого диска. Если свободного места мало, то необходимо его увеличить, удалив ненужные данные;
2. Просканируйте операционную систему антивирусными программами для удаления всевозможного нежелательного программного обеспечения, коими являются вирусы, трояны и т.д.;
3. Большое количество BSoD появляется вследствие ошибок кода самой операционной системы. Компания Microsoft постоянно работает над исправлением таких ошибок, выпуская патчи и пакеты обновления. Установленный последний пакет обновлений (Service pack) и постоянное обновление системы избавят от большого количества ошибок. Рекомендую установить радиокнопку автоматического обновления системы.
4. Если ошибка появилась после недавно установленного драйвера устройства или программы. Необходимо откатить драйвер на более раннюю версию. С программами дела обстоят проще, их удаление устранит причину сбоя. Может пригодиться опция “Запуск последней удачной конфигурации” системы.
5. Если синий экран начал появляться после того как Вы подключили новое устройство к системе, то необходимо проверить его на совместимость с Вашей операционной системой. Если устройство совместимо, то необходимо скачать свежие драйвера с официального сайта производителя и установить их. Если установлена последняя версия драйверов, то необходимо установить более раннюю версию драйверов. Если устройство несовместимо с операционной системой, то необходимо, либо поменять данное устройство, либо поменять операционную систему, поддерживающую данное устройство.
6. Установите настройки BIOS по умолчанию. Неправильные настройки BIOSа могут привести к печальным последствиям. И экран смерти это не самый худший вариант. Если Вы не уверенны в своих навыках, то в BIOSе лучше ничего не менять.
7. Очень часто причиной появления BSoD является неисправность оперативной памяти. Для её проверки можно использовать тестирующие программы, например memtest86+. В случае выявления битой линейки памяти, её необходимо заменить. При использовании в компьютере двух планок памяти и более, устранение неисправной устранит сбой.
8. Проверьте жесткий диск на наличие битых секторов и ошибок. По возможности исправьте ошибки и восстановите битые сектора стандартными средствами системы.
9. Необходимо избавиться от перегрева компонентов ПК. Почистите Ваш компьютер от пыли, смажьте специальным маслом все кулеры (процессорный, чипсетный, видеокарты, блока питания). При необходимости, установите дополнительные кулера, для организации правильного потока воздуха в системном блоке.
10. Проверьте правильность подключения кабелей и комплектующих. Посмотрите на их контакты, при необходимости смажьте их.
11. Переустановите операционную систему. Используйте только лицензионный диск операционной системы. Использование различных сборок приводит к постоянным проблемам.
———
В благодарность за информацию посмотрите рекламу, может что-то заинтересует) Отключите антибаннер в вашем браузере.