★★ Novice
июня 2015
Ошибка
Игра отключена: вы были исключены PunkBuster. Указана причина: PunkBuster kicked player ‘Leonidas20002’ (for 0 minutes) … No Packet Flow
Что делать?
Сообщение 1 из 12
(1 119 просмотров)
Champion (Retired)
июня 2015
— последнее изменение
июня 2015
@Leonidas20002 , доброго времени суток , попробуйте обновить PunkBuster (видео-инструкция) , если это вам не поможет , то вам будет нужно внести в список исключений антивируса службы PunkBusterA и PunkBusterB , потому что эта ошибка также возникает из-за блокировки PunkBustera антивирусом.
___________________________________________________________________________________
Если мой совет был полезен , Вы можете поблагодарить меня , нажав и
У вас есть вопросы ко мне ? Связаться со мной можете здесь .
Thank you for using Answer HQ
Сообщение 2 из 12
(1 114 просмотров)
★★ Novice
Сообщение 3 из 12
(1 111 просмотров)
Champion (Retired)
июня 2015
@Leonidas20002 , я редактировал свой пост, попробуйте следующий совет .
___________________________________________________________________________________
Если мой совет был полезен , Вы можете поблагодарить меня , нажав и
У вас есть вопросы ко мне ? Связаться со мной можете здесь .
Thank you for using Answer HQ
Сообщение 4 из 12
(1 106 просмотров)
★★ Novice
июня 2015
Ошибка
Игра отключена: вы были исключены PunkBuster. Указана причина: PunkBuster kicked player ‘Leonidas20002’ (for 0 minutes) … RESTRICTION: Service Communication Failure: PnkBstrB.exe initialization failed
новая ошибка
Сообщение 5 из 12
(1 100 просмотров)
Champion (Retired)
июня 2015
@Leonidas20002 , есть такой вариант : полностью удалите PunkBuster и игру (через «Установка и удаление программ») и скачайте заново игру , не убирая галочки «Установить PunkBuster» , при скачивании отключите брандмауэр и антивирус . Это должно помочь .
___________________________________________________________________________________
Если мой совет был полезен , Вы можете поблагодарить меня , нажав и
У вас есть вопросы ко мне ? Связаться со мной можете здесь .
Thank you for using Answer HQ
Сообщение 6 из 12
(1 095 просмотров)
★★ Novice
июня 2015
Можно скопировать игру, переместить, удалить, а потом обратно вернуть?
(Интернет очень плох и кроме того куча дополнений)
Сообщение 7 из 12
(1 093 просмотров)
Champion (Retired)
июня 2015
@Leonidas20002 , это не даст результата , попробуйте удалить полностью PunkBuster и заново его установить , при этом выключите антивирус и брандмауэр .
___________________________________________________________________________________
Если мой совет был полезен , Вы можете поблагодарить меня , нажав и
У вас есть вопросы ко мне ? Связаться со мной можете здесь .
Thank you for using Answer HQ
Сообщение 8 из 12
(1 079 просмотров)
★★ Novice
июня 2015
Не помогло
Также есть ошибка
Pbsvc Error
can’t open file
‘C:Windowssystem32LogFilesPunkBuster\PnkBstrB.log’ (error 2: Не удается найти указанный файл.)
Сообщение 9 из 12
(1 059 просмотров)
★ Pro
июня 2015
запустить файл pbsvc.exe, выбрать пункт инстал/реинстал, NEXT , i agree, ждёшь окончания проверки. пробуешь играть.
потом отпишешься .
Сообщение 10 из 12
(1 047 просмотров)
Содержание
- Ошибка PunkBuster при установке
- Изначальное сообщение
- Ошибка PunkBuster при установке
- Re: Ошибка PunkBuster при установке
- Как исправить ошибку BF4 Kicked by PunkBuster в Windows?
- Причины Ошибка BF4 Kicked by PunkBuster в Windows?
- Решение 1. Переустановите PunkBuster
- Windows 10:
- Старые версии Windows:
- Решение 2. Убедитесь, что служба PunkBuster работает правильно
- Решение 3. Исключите PunkBuster из брандмауэра Защитника Windows
Ошибка PunkBuster при установке
Изначальное сообщение
Ошибка PunkBuster при установке
- Отметить как новое
- Закладка
- Подписаться
- Подписка на RSS-канал
- Ссылка на сообщение
- Печать
- Пожаловаться
При установке Battlefield 4 выдает ошибку:
**ERROR: Failed to create PunkBuster service: Невозможно создать файл, так как он уже существует.
После нажатия «ОК»
Ошибка. Распространяемый пакет (PunkBuster) не установлен. Невозможно продолжить установку. (5)
Пытался и качать PB с официального сайта,и удалять,Все равно одно и то же
Re: Ошибка PunkBuster при установке
- Отметить как новое
- Закладка
- Подписаться
- Подписка на RSS-канал
- Ссылка на сообщение
- Печать
- Пожаловаться
Попробуйте переустановить PB таким путем через «Установка и удаление программ» а потом:
1) Открываем диспетчер задач и завершаем процессы PnkBstrA.exe и PnkBstrB.exe если они есть
2) Идем в C:WindowsSysWOW64. Удаляем файлы PnkBstrA.exe,PnkBstrB.exe, PnkBstrB.xtr, PnkBstrB.ex0
3) Идем в C:Users*Имя пользователя*AppDataLocal И удаляем папку PunkBuster
4) Идем в C:Program Files (x86)Origin GamesBattlefield 4 и удаляем папку pb
Затем правильно его устанавливаем:
1) Скачиваем pbsetup.exe
2) Скачиваем pbsvc.exe
3) Устанавливаем PunkBuster с помощью pbsetup.exe. В открывшемся лицензионном соглашении нажать кнопку «I Agree», после нажать на кнопку Add a Game, выбрать из списка BF4 и нажать «Chek For Updates» ждем и после установки закрываем pbsetup.
4. Запускаем pbsvc.exe тоже соглашаемся, устанавливаем и после установки, если выскочит окно, что произошла ошибка и т.д., нажимаем «Ок» и идем в C:WindowsSysWOW64. Запускаем в ручную файлы PnkBstrA.exe и PnkBstrB.exe
Но до этого сделайте чистую загрузку системы и отключите антивирусное ПО
Источник
Как исправить ошибку BF4 Kicked by PunkBuster в Windows?
PunkBuster – это движок, используемый многими играми (включая Battlefield 4) для обнаружения игроков, которые незаконно используют что-либо для улучшения своей игровой производительности. Однако PunkBuster иногда может иметь неприятные последствия и вызывать всевозможные проблемы даже для пользователей, которые не используют читы. Они просто получают сообщение «Kicked by PunkBuster» без объяснения причин.
Если вы действительно не используете читы , вы можете ознакомиться с методами, которые мы подготовили ниже, чтобы решить вашу проблему. Их методы и раньше помогали другим пользователям, поэтому убедитесь, что вы внимательно следуете инструкциям.
Причины Ошибка BF4 Kicked by PunkBuster в Windows?
Существует не так много различных причин этой конкретной проблемы, но те, которые были подтверждены другими игроками, могут быть решены относительно простыми методами. Обязательно ознакомьтесь со списком причин, который мы подготовили ниже!
- PunkBuster не работает – переустановка PunkBuster и рекомендуется обновление до последней версии. Неисправность программы является одной из наиболее распространенных причин, и многие пользователи извлекли выгоду из удаления текущей и установки последней версии.
- Служба PunkBuster не работает должным образом – The PunkBuster служба должна работать постоянно и должна открываться снова, как только будет закрыта. Это можно настроить в свойствах службы, и это может легко решить проблему.
- Брандмауэр Защитника Windows . Программа может быть заблокирована брандмауэром Защитника Windows, и мы рекомендую вам сделать исключение для его исполняемого файла!
Решение 1. Переустановите PunkBuster
Первый метод, вероятно, наиболее очевиден, но он также помог большинству игроков Battlefield 4 по всему миру. Переустановка PunkBuster может решить многие проблемы, связанные с вашей текущей настройкой, и вы можете сделать это, просто следуя приведенным ниже инструкциям!
Прежде всего, вам нужно будет удалить его со своего компьютера!
Windows 10:
- Убедитесь, что вы открыли приложение Настройки на своем ПК с Windows 10, нажав кнопку меню «Пуск» и щелкнув значок шестеренки в правом нижнем углу. В меню «Пуск» вы также можете выполнить поиск по запросу Настройки и щелкнуть левой кнопкой мыши первый появившийся вариант.
- В качестве альтернативы вы можете просто использовать комбинацию клавиш Windows Key + I . Откройте раздел Приложения в настройках, чтобы просмотреть список всех программ, установленных на вашем компьютере.. Прокрутите вниз, пока не дойдете до записи PunkBuster Services , щелкните ее левой кнопкой мыши и выберите появившуюся кнопку Удалить .
- Убедитесь, что вы следуете инструкциям на экране, чтобы удалить его со своего компьютера.
Старые версии Windows:
- PunkBuster можно удалить через Панель управления в более старых версиях Windows. Просто нажмите одновременно клавиши Windows Key + R и введите « control.exe » в Выполнить , которое появится. Вы также можете выполнить поиск панели управления в меню Пуск или в окне Поиск/Кортана .
- Нажмите влево -пункт Просмотр по в правом верхнем углу Панель управления и установите для него значение Категория . Щелкните ссылку Удалить программу под заголовком
- Найдите запись PunkBuster Services . в списке установленных программ щелкните его один раз левой кнопкой мыши и нажмите кнопку Удалить в меню выше. Вы также можете щелкнуть его правой кнопкой мыши и выбрать Удалить в появившемся контекстном меню.
- В любом случае следуйте инструкциям, которые появятся на экране, чтобы полностью удалить его.
После удаления PunkBuster с вашего компьютера, пора его переустановить. Вам не нужно загружать его, так как на вашем компьютере уже есть установочный файл в папке установки игры. Следуйте инструкциям ниже, чтобы установить его!
- Перейдите по этой ссылке в своем браузере и загрузите последнюю версию программы для Windows . Перейдите в папку Downloads , щелкните правой кнопкой мыши файл pbsetup.zip внутри и выберите Извлечь здесь из контекстного меню.
- Найдите файл pbsetup.exe в папке «Загрузки» и дважды щелкните его, чтобы открыть. После прочтения Лицензионного соглашения с конечным пользователем PunkBuster на начальном экране нажмите кнопку Я согласен .
- После этого нажмите кнопку Добавить игру в левой верхней части окна. В диалоговом окне Добавить игру выберите Battlefield 4 из игры . Проверьте автоматически сгенерированный Путь к игре , если он появляется. Убедитесь, что он действителен. Если это не так, нажмите кнопку Обзор и установите ее вручную.
- После этого нажмите кнопку Проверить наличие обновлений и дождитесь завершения проверки и установки новых обновлений. Закройте программу установки.
- Перейдите в папку установки вашей игры. Она должна находиться в вашей библиотеке Origin. Если вы изменили расположение библиотеки со значения по умолчанию, убедитесь, что вы перешли к нему. Если вы не изменили его, путь по умолчанию должен быть:
- Оказавшись внутри, найдите и дважды щелкните _Installer . Внутри этой папки перейдите к PunkBuster >> redist и дважды щелкните pbsvc . Дважды щелкните его, чтобы открыть.
- Не снимайте отметку с переключателя Установить/переустановить PunkBuster Service . прежде чем нажать Далее . Подождите, пока он переустановит службу!
- Снова откройте игру и проверьте, не получает ли вас PunkBuster кик, даже если вы не используете читы!
Решение 2. Убедитесь, что служба PunkBuster работает правильно
Если служба PunkBuster не запускается автоматически, это может вызвать проблемы с игровыми серверами, которые думаете, что используете неавторизованную версию игры. Служба должна работать все время и автоматически перезапускаться, если она каким-либо образом завершается. Этого можно довольно легко добиться, выполнив ряд шагов, которые мы подготовили ниже.
- Убедитесь, что вы открыли диалоговое окно Выполнить с помощью комбинации клавиш Windows + R . В текстовом поле рядом с кнопкой «Открыть» введите « services.msc » без кавычек и нажмите кнопку OK . ниже, чтобы открыть
- Кроме того, вы можете ввести « control.exe » в поле Выполнить выше или просто выполнить поиск по запросу Control. Панель в меню Пуск. Установите для параметра Просмотр по значение Большие или Маленькие значки , щелкнув его в правой верхней части окна и нажав параметр Администрирование в верхней части окна.
- Убедитесь, что в этом разделе вы нашли запись Services и дважды щелкните, чтобы открыть его.
- Внутри списка службы, которые вы установили на свой компьютер, найдите PunkBuster . Он также может называться PnkBstrA . Щелкните правой кнопкой мыши его запись в списке и выберите Свойства в появившемся меню Context ..
- Если Статус службы отображается как Выполняется , убедитесь, что вы нажали кнопку Остановить кнопка ниже. В разделе Тип запуска щелкните раскрывающееся меню и выберите в списке Автоматически .
- После этого перейдите на вкладку Восстановление внутри свойств службы . Вы должны увидеть три варианта в верхней части окна: Первый сбой , Второй сбой и Последующие сбои .
- Щелкните левой кнопкой мыши раскрывающееся меню рядом со всеми тремя из этих параметров и выберите Перезапустить службу из списка параметров, прежде чем вернуться к Общие.
- На вкладке “Общие” , щелкните левой кнопкой мыши кнопку Пуск , дождитесь запуска службы и нажмите кнопку OK , чтобы применить все внесенные вами изменения. Убедитесь, что проблема «Kicked by PunkBuster» по-прежнему появляется во время игры!
Примечание: вы можете получить следующую ошибку, когда вы нажмите «Пуск» или «Стоп»:
В этом случае следуйте инструкциям ниже, чтобы исправить это.
- Выполните шаги 1–4 из набора шагов выше, чтобы открыть свойства службы. Перейдите на вкладку Войти и нажмите кнопку Обзор… .
- В поле ввода « Введите имя объекта для выбора » , введите имя учетной записи вашего ПК, нажмите Проверить имена и дождитесь, пока имя станет доступным.
- Нажмите ОК когда вы закончите, введите пароль в поле Пароль , когда вам будет предложено его ввести (только если вы установили пароль для текущей учетной записи). Проблема должна исчезнуть.
Решение 3. Исключите PunkBuster из брандмауэра Защитника Windows
Если ваша служба PunkBuster заблокирован брандмауэром Защитника Windows, игра может подумать, что вы пытаетесь предотвратить доступ к вашему интернет-соединению, и вы будете заблокированы любым сервером, к которому вы попытаетесь подключиться. Правильный способ решить эту проблему – просто добавить ее в список исключений. Сделайте это, следуя инструкциям ниже!
Если на вашем компьютере запущен сторонний брандмауэр, вам следует открыть его и найти раздел «Исключения/исключения».. Если вы используете брандмауэр Защитника Windows, вы можете выполнить следующие действия!
- Откройте Панель управления на своем компьютере, выполнив поиск в меню «Пуск» . Вы также можете использовать комбинацию Windows Key + R , чтобы открыть диалоговое окно «Выполнить» и ввести « control.exe » внутри, чтобы открыть его в качестве альтернативы.
- Установите Просмотр по в окне Панели управления на Большие или Маленькие значки и прокрутите вниз до конца списка для Брандмауэр Защитника Windows
- Щелкните левой кнопкой мыши, чтобы открыть этот раздел, и нажмите кнопку Разрешить приложение через брандмауэр Защитника Windows слева – боковое меню нового окна.
- Нажмите Изменить настройки в верхней правой части окна, чтобы предоставить администратору права на добавление новых программ. Запись PnkBstrA может уже быть в списке Разрешенных приложений и функций , чтобы убедиться, что вы установили флажки рядом с Private и Public. столбцов в окне.
- Если службы PunkBuster нет, нажмите кнопку Разрешить другое приложение внизу. Нажмите кнопку Обзор внутри и перейдите в папку расположения исполняемого файла. Расположение по умолчанию:
- Выберите этот файл. Нажмите кнопку Типы сети и установите флажки рядом с Private и Public Нажмите Добавить , чтобы разрешить игру. Нажмите ОК, запустите Battlefield 4 и проверьте, не перестает ли проблема появляться на вашем компьютере!
Источник
Насчет ошибочек ПБ.
Вот гайд по ошибочкам.Взят с форума моего провайдера,а тот,в свою очередь,взял с код.бай
За правильность не отвечаю,но несколько ошибок помогло исправить.
PunkBuster — FAQ — 08.03.2009
Ищем в причину, по которой вас кикает с сервера, и выполняем требования для устранения ошибки.
1.Как обновить ?
1 вариант.
Зайдите в игру и впишите в консоли /pb_lan 1 (консоль открывается нажатием на Ё слева от 1) и обновление будет проходить автоматически
2 вариант.
В каталоге установки игры найдите папку PB и запустите pbsetup.exe
Нажмите «Add Game». Выберите «CoD4» и нажмите «Check for updates».
Дождитесь окна «All available updates have been applied.»
Готово.
Если pbsetup.exe в папке PB не оказалось, то скачайте отсюда pbsetup
Разархивируйте и положите ее в папку PB в директории игры. Запустите.
Нажмите «Add Game». Выберите «CoD4» и нажмите «Check for updates».
Дождитесь окна «All available updates have been applied.»
2.Если вас выкидывает с ошибками типа:
PB INIT FAILURE
PunkBuster kicked player ‘NOOB’ (for 0 minutes)…
Time Out trying to Update PB Client
no packet flow
NOOB has been kicked via PunkBaster(for 0 minutes) RESTRICTION:
NOOB PunkBuster kicked player «Lacoste» (for 0 minutes)… General PB Client
Authentication Failure — Reinstall PB if problem persists
Punkbuster kicked player … (for 0 minut) ……… Failure: PnkBstrb.exe initializating failed
RESTRICTION: Service Communication Failure: PnkBstrB.exe handshaking failed.
RESTRICTION: Service Communication Failure: PnkBstrB.exe initialization failed.
RESTRICTION: Service Communication Failure: PB.exe driver failure (PB) ffao.
1. В первую очередь в фаерволе (брэндмауере) или в антивирусе разрешите процессы pnkbstrA.exe, pnkbstrB.exe, pnkbstrK.sys (критично при ошибке losing key packets)
2. Проверьте ПБ, с помощью pbsvc.exe
(скачать здесь pbsvc )
Для этого файл разархивируйте и положите в папку PB. Запустите. Откроется программа. Поставьте галочку на строке Install/Re-Install Punkbuster Service, а потом внизу нажмите Next. Эта программа проверит Ваш ПБ и если напишет Without Errors, то все в порядке. Можно переходить к пункту три. Если же нет, то пробуйте переустановить ПБ и попробовать еще раз.
3. Обновите PB с помощью утилиты pbsetup.exe
(Скачать отсюда pbsetup )
Разархивируйте и положите ее в папку PB в директории игры. Запустите. Нажмите «Add Game». Выберите «CoD4» и нажмите «Check for updates».
Дождитесь окна «All available updates have been applied.»
Готово.
4. Можно так же зайти в игру и прописать в консоле(~) pb_security 0 и pb_lan 1 и обновления будут происходить автоматически.
Либо найдите папку …/Call of Duty 4/pb, там найти файл pbcl.cfg, откройте его с помощью блокнота или другого текстового редактора и добавьте строки —
pb_lan 1
pb_security 0
После этого обновление ПБ будет происходить автоматически.
5. Если все это не помогло, то переустановите PunkBuster
Как переустановить Pb?
1. Делаем Пуск-Выполнить-services.msc
2. Ищем там пункты PnkBstrA и PnkBstrB — останавливаем их.
3. Идем в папку «Windows(или смотря как она у вас названа)/system32/» находим и удаляем там фаилы PnkBstrA.exe и PnkBstrB.exe.
4. Идем в папку с игрой, находим там папку pb и удаляем её
5. Заново устанавливаем PB. Для этого:
6. Скачайте и разархивируйте папку PB в директорию игры (скачать с РВ или взять у кого-нибудь)
7) Запустите pbsetup.exe из папки Pb. Нажмите «Add Game». Выберите «CoD4» и нажмите «Check for updates». Дождитесь окна «All available updates have been applied.»

(скачать здесь pbsvc)
Для этого файл разархивируйте и положите в папку PB. Запустите. Откроется программа. Поставьте галочку на строке Install/Re-Install Punkbuster Service, а потом внизу нажмите Next. Эта программа проверит и Ваш Pb.
9) При заходе в Call of Duty 4 будут автоматически запущены 2 службы: PnkBstrB.exe и PnkBstrA.exe. ВАЖНО!!! : Если установлен фаерволл, добавить в исключения PnkBstrB.exe и PnkBstrA.exe (они лежат в C:WINDOWSsystem32), либо совсем отключить фаерволл на время игры.
10. Перезагрузите компьютер
По возможности, все что вы меняете и заменяете, вначале бэкапте, для того что бы можно было откатиться назад!
Ошибки типа: «gnoring MD5Tool Queries»
«MD5Tool Mismatch: iw3mp.exe «(или какой-либо другой файл игры)
Неправильные файлы игры папки main . Эти ошибки могут объясняться вирусами, проникшими в файлы игры, различными модификациями (в т.ч. запрещенными), а также читами. Игра сравнивает размеры и хэш (контрольную сумму) правильного файла и Вашего, и если найдет несоответствие — следует кик. Поэтому следует держать игру «в чистоте».
В любом случае начните с обновления ПБ.
Pb кикает за «Losing Key Packets» Что делать?
Прописать в командной строке (Пуск-Выполнить):
sc config PnkBstrK start= auto
sc config PnkBstrB start= demand
sc config PnkBstrA start= auto
Ошибка типа:»Global Guid Ban»
Ваш «пиратский» ключ забанен Pb. Смените ключ игры.
CoD4_keygen
Ошибка «cvar r_lodscalerigid=2»
Открываем консоль и пишем: r_lodscalerigid 1
Ошибка Cvar fx_sort = 0 –
Неправильное значение переменной. В данном случае, нужно открыть консоль в игре и прописать
/ Cvar fx_sort 0
Ошибка с «maxpackets»
Открыть консоль в игре и прописать
/cl_maxpackets xx (где xx, это цифры от 60 до 100), например /cl_maxpackets 100
VALID CDkey is not reaching GuidAuth Server
При подключению к игровому серверу клиент ПБ должен отправить свой ключ на авторизацию Мастеру, где его проверят и затем представят игровому серверу. В ряде ситуаций, когда нет доступа к GuidAuth серверу, может возникать указанная ошибка.
«kicked by punkbuster (for 0 minutes) violation (???????) #134»
1. Нужно включить фаэрвол, на висте обязательно, ну а в список разрешённых программ Pb добавляеться сам.
2. Запустить мультиплеер от имени администратора что бы избежать AUC запросы, которые Pb не понимает.
WARNING! PB Server running Old Version.
На сервере стоит более древняя версия Pb, по сравнению с вашей.
Решение
Перейти в папку …/Call of Duty 4/pb, там найти файл pbcl.cfg, открыть его с помощью блокнота или другого текстового редактора и добавить строки —
pb_lan 1
pb_security 0
либо в игре открыть консоль и прописать
/pb_lan 1
/pb_security 0
Если файла pbcl.cfg в папке /Call of Duty 4/pb не оказалось, то
1. Запустить игру
2) В основном меню вызвать консоль (клавишей ~ ) и ввести команду pb_writecfg
3) Затем перейти в папку …/Call of Duty 4/pb, там найти файл pbcl.cfg, открыть его с помощью блокнота или другого текстового редактора и добавить строки —
pb_lan 1
pb_security 0
либо в игре открыть консоль и прописать
/pb_lan 1
/pb_security 0
Inadequate O/S Privileges
Последние версии PunkBuster требуют для своей работы части администраторских полномочий в ОС, то есть запускать игру надо, имея права Администратора. Если Вы по каким-либо соображениям не хотите играть под аккаунтом администратора, назначьте пользователю, под учетной записью которого Вы играете, права на следующие действия:
# Debug Programs
# Load and unload device drivers
# Manage auditing and security log
# Modify Firmware environment values
# Profile Single Process
Под Windows XP Pro это делается в оснастке Local Security Policy (Control Panel => Administrative Tools => Local Security Policy)
Расшифровка наиболее часто встречающихся кодов нарушений в момент кика/бана
#101 — Communication Failure — Отказ связи
#102 — Communication Failure — Отказ связи
#131 — Initialization Failure — Ошибка инициализации
#132 — Protocol Error — Ошибка протокола
#141 — Distress — Затруднения (эта надпись показывает, что существует проблема с обновлением последней версии, PunkBuster™ или существуют проблемы доступа к одному из Master PB Servers, находящихся в интернете, и возможно обусловлена проблемами фаервола, роутера и т.д.).
Разные Нарушения:
#111 — Bad Name — Неверное (неразрешенное) имя(ник).
Решение: Сменить имя (ник).
#112 — Too Many Bad Names — Слишком много неверных имен.
#113 — Too Many Name Changes — Слишком много изменений имени/ника (обычно допускается не более одной смены за игру)
Решение: Прекратить неоднократные смены игрового ника.
#114 — Protected Name — Защищенное имя
Решение: Сменить имя.
#121 — Negative Score Too Low — Отрицательный счет (обычно из-за тимкилла).
Решение: Прекратить тимкилл.
#151 — Extended ASCII Characters in Player Name — Использование ASCII знаков в имени игрока
Решение: используйте обычные буквы.
#9001 — CVAR value failed range check (see the FAQ for more info) — Нарушения игрового процесса.
Нарушения целостности:
Когда PunkBuster не имеет возможности проверить, что игровая обстановка игрока функционирует правильно и(или) не была изменена, тогда и возникает ошибка нарушения целостности. Эту ошибку также вызывает обнаружение изменений в игре или файлов PunkBuster .
Эта ошибка имеет диапазон номеров от #10000 до #29999
ЧитХак Нарушения:
Когда PunkBuster обнаруживает читы или хаки при повторной положительной идентификации на компьютере игрока, то появляется это нарушение. Это нарушение имеет номер от #50000 и выше. cписок читов/хаков приводится ниже.
#50000s — Aimbot
#60000s — Wallhack
#70000s — Multihack
#80000s — Gamehack
#90000s — Cheat Video Drivers
#100000s — Speedhack
#110000s — Autofire
#120000s — Game Hook
#130000s — Attempted PunkBuster™ Hack
Решение: удалите читы/хаки с вашего компьютера и больше их не используйте, т.к. в противном случае, вы лишитесь своего CD-Key (если он у вас лицензионный) и будете НАВСЕГДА забанены по GUID на сервере PunkBuster!
Мне кажется, что меня сильно «лагает» на серверах с активированным ПБ
Прежде всего убедитесь, что лаг вызван именно ПБ, попробовав поиграть на других серверах, в том числе и на серверах, где ПБ отключен. Лаг может быть обусловлен конфликтом прерываний, различным ПО, загружающим систему или сетевой канал, лагами самого игрового сервера и т.д и т.п. Если же Вы полагаете, что лаг вызван именно клиентом ПБ, что тоже вполне вероятно, ввиду его достаточно «вздорного» характера, то попробуйте перед подключением к серверу в консоли написать следующие команды:
pb_system 1
pb_writecfg
Команда pb_system управляет функцией, специально разработанной для уменьшения конфликтов ПБ с установленным ПО. По команде pb_writecfg её значение будет запомнено в файл pbsys.cfg, так что повторять эти действия каждый раз не придется. К сожалению, pb_system 1 не способна решить все проблемы, обусловленные конфликтом ПБ с другим программным обеспечением, и часто приходится искать конфликтующие программы и сервисы самому.
Разработчики также рекомендуют поэкспериментировать с параметром pb_Sleep, который по умолчанию равен 60, однако наиболее распространенное значение для него
pb_Sleep 500
то есть максимально возможное. Подчеркну, что оптимальное значение этого параметра для конкретной системы лучше подбирать индивидуально. Часто меньшие значения (pb_Sleep 20) подходят лучше (запомнить значение pb_Sleep можно также по команде pb_writecfg).
Иногда для уменьшения лагов бывает полезно понизить приоритет, с которым запускается игра до BelowNornal или Low.
Ошибки службы PnkBstrA в Windows 10
Служба PnkBstrA является одним из компонентов клиента «PunkBuster», который устанавливается на компьютеры пользователей вместе с некоторыми играми, поддерживающими многопользовательский режим. Основным назначением службы является слежка за действиями игроков с целью предотвращения использования читов и ботов.
Работает всё это в режиме клиент-серверной архитектуры, то есть клиент периодически собирает информацию о действиях игрока, шифрует и отсылает на сервер. Там данные расшифровываются и принимается решение — нарушаются игровые правила или нет.
- Название файла: «Pnkbstra.exe».
- Место размещения: «System32».
- Приложение: «PunkBuster».
- Компания разработчик: «Even Balance».
Ошибка «Service Communication Failure: PnkBstrA.exe»
Корректная работа приложения PunkBuster является обязательным условием для запуска многих игр в онлайн режиме. Иначе могут возникнуть ошибки, например «Service Communication Failure: PnkBstrA.exe», что переводится как сбой службы связи. Причин возникновения подобной ошибки много, рассмотрим самые распространённые.
- Не соответствие требуемой версии клиента и игры.
- Блокирование работы приложения антивирусом или файрволом (брандмауэром).
- Инфицирование файла вирусом.
- Повреждение файла или приложения в целом.
- Возникновение конфликтов в профиле игроков.
По статистике приложение PunkBuster чаще всего устанавливается на компьютер вместе с играми «Call of Duty» и «Battlefield».
Лучшим способом для устранения ошибок является переустановка клиента. Для начала удалите текущую версию. Это можно сделать в настройках Windows «Программы и компоненты». Теперь необходимо найти установщик клиента. В первую очередь его стоит поискать в файлах инсталлятора игры. Например, в «Battlefield 4» он лежит по пути «/Battlefield4/_Installer/punkbuster/redist/pbsvc.exe». Для других игр воспользуйтесь поиском и ищите по названию приложения.
Если инсталлятор не найден, например по причине удаления файлов установки, то скачайте его с официального сайта разработчиков. После запуска приложения надо нажать на кнопку «Add a Game» и выбрать игру. Во втором поле укажите правильный путь к игре. Должно начаться обновление клиента. Если этого не случилось, нажмите в верхнем меню кнопку «Update PunkBuster».
После переустановки рекомендую проверить публичное разрешение доступа приложения к сети. Смысл в том, что брандмауэр Windows может блокировать работу процессов приложения с сетью. Это недопустимо, поэтому переходим в настройки брандмауэра.
- Открываем «Панель управления».
- Ищем «Брандмауэр Windows».
- В левом меню пункт «Разрешение взаимодействия с приложением или компонентом в брандмауэр Windows».
- Ищем процессы «PnkBstrA» и «PnkBstrB». Проверяем чтобы для них были установлены разрешения на обмен данными и в частных и в публичных сетях.
Ошибка «Игра отключена: Punkbuster kicked player»
Ещё одна распространённая ошибка при игре онлайн «Игра отключена: Punkbuster kicked player». Это значит что сервер посчитал что игрок нарушает какие-то правила, хотя на деле этого может и не быть. Переустановка клиента в этом случае может не дать результата, хотя в первую очередь стоит попробовать именно этот способ. Так же предлагаются следующие варианты решения проблемы.
- Если установлен антивирус попробуйте отключить его и переустановить приложение в режиме администратора (правой кнопкой мыши на установочный файл и выбрать «Запуск от имени администратора»). Не включая антивирус посмотрите, появляется ошибка или нет.
- Если игра лицензионная, то в «Origin» в свойствах игры, выберите запуск в 86*. Очистите кеш «Origin», удалив папки:
- «C:Users(user name)AppDataLocalOriginOrigin».
- «C:Users(user name)AppDataRoamingOrigin».
- «C:ProgramDataOrigin».
- Если при переустановке «Punkbuster» возникают ошибки, то следует их изучить и перевести, а после искать проблему.
Исправление ошибок для Windows 7 можете посмотреть в англоязычном видео.
by Milan Stanojevic
Milan has been enthusiastic about technology ever since his childhood days, and this led him to take interest in all PC-related technologies. He’s a PC enthusiast and he… read more
Updated on March 3, 2022
- The system cannot find the file specified error on Windows 10 is pretty common and it really contains the description. We’ve got the complete solution for you in the article below.
- First step to fix this error is to scan the registry. You can choose another one from our top 12 registry cleaners for Windows 10.
- If you encounter any other system errors, you will probably find a solution in our System Errors hub.
- Check out our Windows 10 errors hub for more solutions to such issues.
XINSTALL BY CLICKING THE DOWNLOAD FILE
This software will repair common computer errors, protect you from file loss, malware, hardware failure and optimize your PC for maximum performance. Fix PC issues and remove viruses now in 3 easy steps:
- Download Restoro PC Repair Tool that comes with Patented Technologies (patent available here).
- Click Start Scan to find Windows issues that could be causing PC problems.
- Click Repair All to fix issues affecting your computer’s security and performance
- Restoro has been downloaded by 0 readers this month.
Computer errors can prevent you from running your favorite applications or from accessing your files.
Speaking of errors, users reported The system cannot find the file specified error on Windows 10.
According to users, they are getting this error while trying to access certain files, so today we’re going to show you how to fix it.
- Change your registry
- Open the Libraries folder
- Install the latest updates
- Format your USB flash drive
- Use chkdsk
- Use WinRAR
- Delete ProfileImagePath key
- Enable Automount
- Check if your system partition is active
- Change shadowcopy storage area
- Add a printer manually
- Copy the files manually
- Uninstall all HP applications
- Change the drive letter for System Reserved partition
- Delete the Config value from the registry
- Use download manager
- Check if necessary services are running
- Check if your USB port is powered
- Remove Windows.old folder
- Restart Windows Backup service
- The system cannot find the file specified cmd
- Fix – The system cannot find the file specified uTorrent
- The system cannot find the file specified virtual disk manager
How can I fix The system cannot find the file specified on Windows 10?
Solution 1 – Change your registry
According to users, you can fix this error simply by making few changes to your registry.
Modifying the registry comes with certain risks, therefore we strongly advise that you export your registry and create its backup, just in case. To modify the registry, do the following:
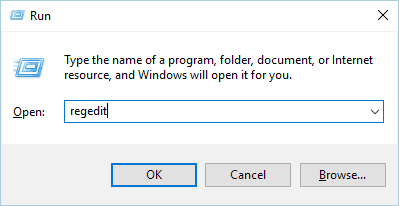
- Press Windows Key + R and enter regedit. Press Enter or click OK.
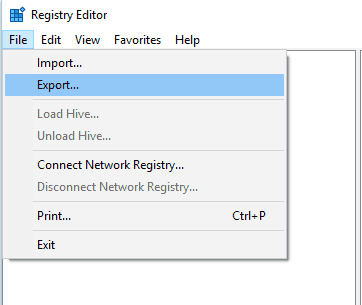
- Optional: To export your registry, click File > Export.
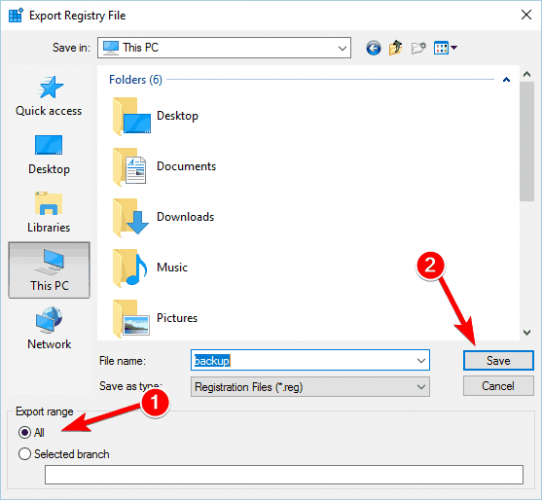
Now enter the file name for your backup, and select All in Export range section. Click the Save button to export your registry.
In case anything goes wrong, you can simply run this file in order to restore your registry to its original state. - Once Registry Editor opens, navigate to the HKEY_LOCAL_MACHINESOFTWAREMicrosoftWindowsCurrentVersion key in the left pane.
- Expand the key and look for RunOnce key. If this key isn’t available, you need to create it. To do that, just right click the CurrentVersion key and choose New > Key from the menu.
- Enter RunOnce as the name of the new key.
- Navigate to the HKEY_CURRENT_USERSoftwareMicrosoftWindowsCurrentVersion key in the left pane.
- Expand the key and check if RunOnce key is available. If not, repeat the procedure from Step 4 to create it.
- Close Registry Editor and restart your PC.
After your PC restarts, The system cannot find the file specified error should be resolved completely.
Once again, we have to mention that modifying the registry can lead to certain issues, so be extra cautious and be sure to create a backup.
If you can’t edit your Windows 10’s registry, read this handy guide and find the quickest solutions to the issue.
Solution 2 – Open the Libraries folder
According to users, you might be able to fix this problem simply by navigating to the Libraries folder.
This folder is hidden by default in Windows 10, and in order to access it, you need to do the following:
- Open File Explorer.
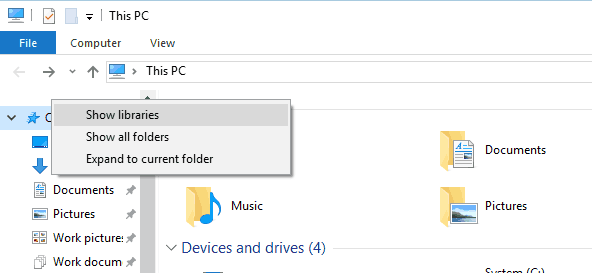
- In the left pane, right click the empty space and choose Show libraries option.
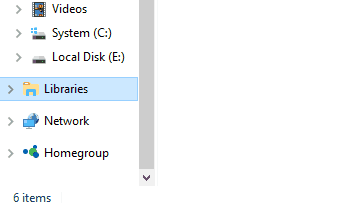
- After doing that, Libraries folder will appear in the left pane, and you’ll be able to access it easily.
Users reported that accessing the Libraries folder fixed the issue for them, so be sure to try this simple solution.
If you need more info on how to enable Libraries in Windows 10, check out this simple guide.
Solution 3 – Install the latest updates
According to users, this was an issue in the past, but you can easily fix it by installing the latest updates.
Windows updates often fix both hardware and software errors, therefore we strongly suggest that you install the latest updates.
Windows 10 usually installs the updates automatically, but you can also check for updates manually by following these steps:
- Press Windows Key + I to open the Settings app.
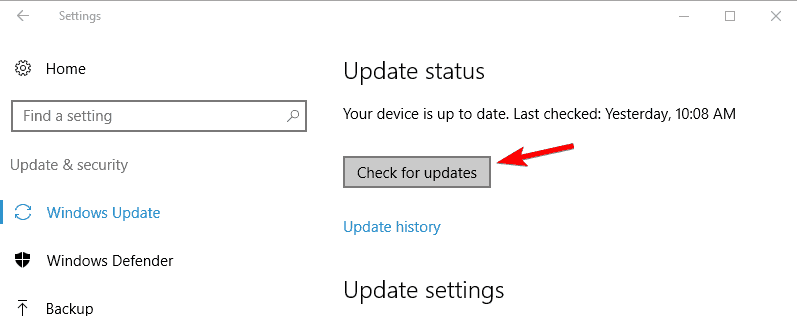
- Navigate to the Update & security section and click Check for updates button.
Windows 10 will now check if updates are available. If so, it will download and install the updates automatically.
If you can’t open the Setting app, take a look at this article to solve the issue.
Having trouble updating your Windows? Check out this guide that will help you solve them in no time.
Solution 4 – Format your USB flash drive
Users reported The system cannot find the file specified error while inserting their USB flash drive. This issue can also appear with any removable storage, and in order to fix it, you need to format your drive.
To do that, follow these steps:
- Switch to a different computer that can recognize your USB flash drive. Connect the USB flash drive. If you can, be sure to back up all your files.
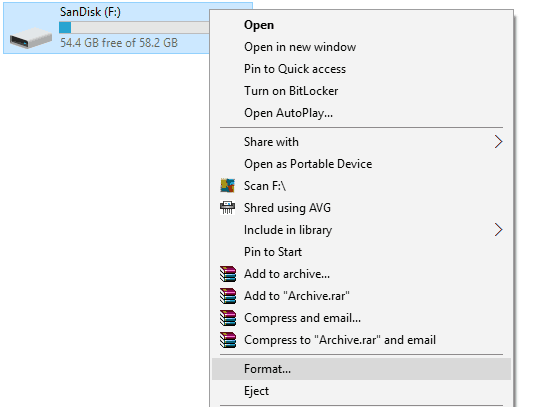
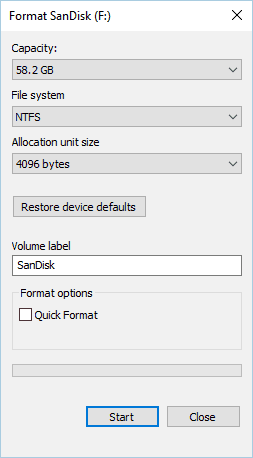
- Open This PC and locate your USB flash drive. Right-click the USB flash drive and choose Format from the list.
- When the Format window opens, make sure to uncheck Quick Format option.
- Now click the Start button to start the formatting process. Wait for the formatting process to finish.
By disabling the Quick Format option all your files will be completely removed and unrecoverable.
Some users are also suggesting to use ImageUSB software.
This software will format your drive and fill it with zeroes thus fixing this problem. Keep in mind that this process can take a while, so you’ll have to be patient.
If you encounter the Windows cannot format this drive error, follow the quick steps from this guide to solve the issue.
Solution 5 – Use chkdsk
If you’re getting The system cannot find the file specified error, that might be because the file is damaged or corrupted. To fix this problem, you need to run chkdsk command and scan your files.
This is relatively simple, and you can do it by following these steps:
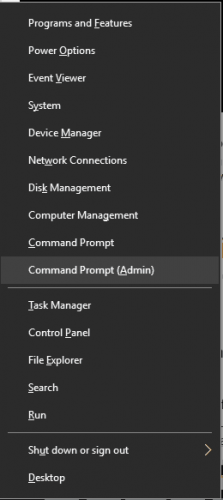
- Press Windows Key + X to open Win + X menu and choose Command Prompt (Admin) from the list.
- When Command Prompt opens, enter chkdsk /f X:. Be sure to replace X with the appropriate letter that matches your partition. Press Enter to run the command.
- Wait while chkdsk tries to repair your files.
chkdsk is giving you headaches? Check out this quick guide to fix any issues with it.
Solution 6 – Use WinRAR
According to users, The system cannot find the file specified error appears when trying to delete a specific file or folder.
If that’s the case, you might be able to fix the problem by using WinRAR. To fix the problem, do the following:
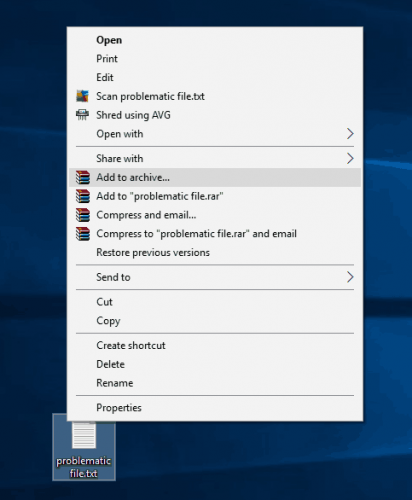
- Locate the problematic file and right click it. Choose Add to archive option from the menu.
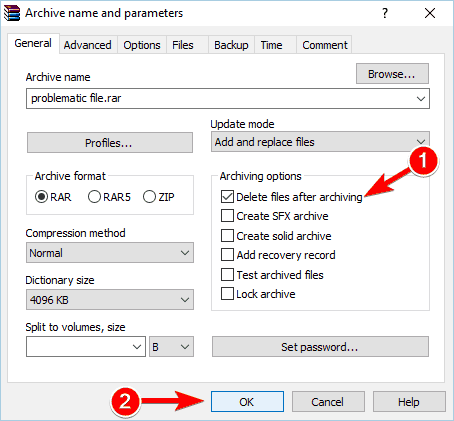
- Check Delete files after archiving option and then click the OK button.
Your file will be moved to the archive and the original will be deleted from the hard drive. Now you can just delete the archive to completely remove the file.
Solution 7 – Delete ProfileImagePath key
The system cannot find the file specified error can occur while using Windows Backup, and it will prevent you from creating your backup.
According to users, you might be able to fix this problem by deleting certain values from your registry.
Changing the registry can lead to stability issues, so before you make these changes, we strongly advise you to back up your registry and create a System Restore point.
To delete this key from the registry, do the following:
- Open Registry Editor. You can do that by following steps from Solution 1.
- Once Registry Editor opens, navigate to HKEY_LOCAL_MACHINESOFTWAREMicrosoftWindows NTCurrentVersionProfileList path in the left pane.
- Expand the ProfileList key. You’ll see several subkeys available. Navigate through each subkey and check if the key has ProfileImagePath value available on the right pane.
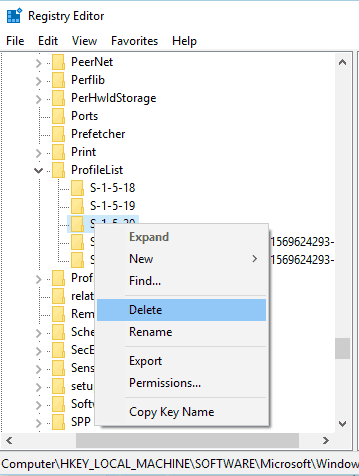
- If certain subkey doesn’t have ProfileImagePath value available or if its Data is empty, you need to delete that subkey. To do that, right click it and choose Delete from the menu.
After deleting the problematic profile, close Registry Editor and check if the issue is resolved.
As we already mentioned, modifying the registry can lead to certain issues, therefore we strongly recommend that you create a backup before making any changes.
Can’t access the Registry Editor? Things aren’t as scary as they seem. Check out this guide and solve the issue quickly.
Solution 8 – Enable Automount
If this problem appears while using Windows Backup, you can fix it by using diskpart and automount commands.
Diskpart is a powerful tool for hard drive management, so be extra cautious while using it.
By using this tool you can cause damage to your system, so keep in mind that you’re using this tool at your own risk. To run diskpart on Windows 10, follow these steps:
- Open Command Prompt as administrator. For detailed instructions on how to do that, check Solution 5.
- When Command Prompt opens, enter diskpart and press Enter.
- Enter the following lines into Command Prompt:
- automount
- automount enable
- Close Command Prompt and restart your PC.
If the issue still persists, you need to do the following:
- Open Command Prompt and start diskpart again.
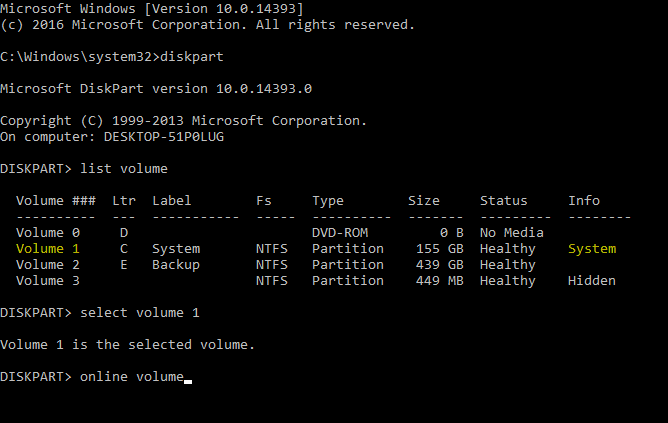
- When diskpart starts, enter list volume. List of all partitions will now appear.
- Select your system volume. In our case, that’s Volume 1, so we need to enter select volume 1. If your system volume is labeled by a different number, be sure to use that number to select it.
- Type online volume and press Enter.
- Close Command Prompt and restart your PC.
After your PC restarts, check if the issue is resolved. Once again, diskpart is powerful tool, and if you’re not careful you can delete files or make your system unbootable, so be extra cautious with it.
If you’re having trouble accessing Command Prompt as an admin, then you better take a closer look at this guide.
Solution 9 – Check if your system partition is active
The system cannot find the file specified error can occur while using Windows Backup. To fix the issue, you need to check if your system partition is set to active. To do that, follow these simple steps:
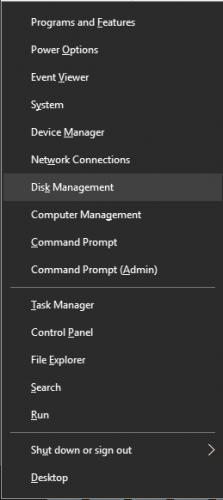
- Press Windows Key + X and choose Disk Management from the menu.
- Disk Management will now start. Locate your System drive, in most cases it should have a C label assigned to it, and right-click it. Choose Mark Partition as Active option. If you can’t select this option, it means that your system drive is already set to active.
- Close Disk Management and restart your PC.
Disk Management won’t load on Windows 10? Count on us to solve the problem.
Solution 10 – Change shadowcopy storage area
If The system cannot find the file specified error appears on your PC, you can fix it by changing the shadowcopy storage area size.
This can be a risky procedure, so we advise you to create a backup just in case.
To change shadowcopy storage area, you need to do the following:
- Open Command Prompt as administrator.
- When Command Prompt opens, enter the following line vssadmin list shadowstorage.
- Now you’ll be able to see shadowstorage area and the amount of space that it takes. To increase its size, enter vssadmin resize shadowstorage /For=C: /MaxSize=5%.
- After doing that, restart your PC.
If the issue still persists, open Command Prompt again and enter vssadmin delete shadows /all command.
Solution 11 – Add a printer manually
Few users reported that this issue occurs while trying to add a printer. If you have the same problem, you might want to try adding the printer manually.
This is a simple procedure, and you can do it by following these steps:
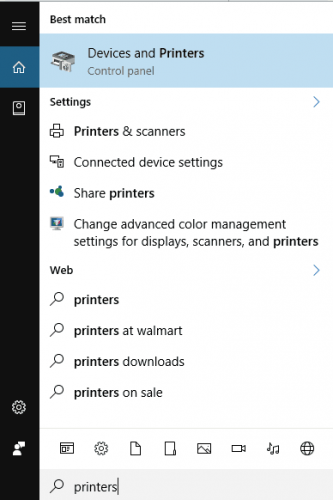
- Press Windows Key + S and enter printers. Select Devices and Printers from the menu.
- From the menu on the top select Add a printer option.
- Now you just need to follow the instructions on the screen to add your printer manually.
According to users, this error occurs while installing HP printers, but if you have this problem with any other printer, be sure to try this solution.
Solution 12 – Copy the files manually
Apparently this error can occur while trying to install certain devices, and users reported The system cannot find the file specified error while installing an Epson scanner.
Few users were able to solve this issue simply by finding the missing file in Windows folder and copying it to the appropriate location.
According to users, they fixed the problem with their device by finding the usbscan.sys file in Windows folder and copying it to Windowsinfsetupapi.dev folder.
This solution only works for particular devices, and you’ll mostly need to transfer a different file on your PC.
We have to warn you that making changes in Windows folder can be dangerous, so be sure to create a backup if you plan to make changes to Windows directory.
Can’t use copy paste in Windows 10? Follow this guide and fix the issue quickly.
Solution 13 – Uninstall all HP applications
According to users, this error appears while installing a printer driver on some HP laptops.
If you’re getting The system cannot find the file specified error, you might be able to fix it by uninstalling all HP applications. To do that, follow these steps:
- Download Microsoft’s Program Install and Uninstall tool.
- Run the application and remove all HP applications from your PC.
- After doing that, try to download and install the driver again.
Need more info on how to uninstall programs and apps in Windows 10? Take a look at this guide.
Few users reported the same problem, and according to them, the error is caused by McAfee antivirus. To fix the issue, you need to disable McAfee by following these steps:
- Open McAfee Internet Security.
- Click on Change settings.
- Now click on Real Time Scanning.
- Turn Real Time Scanning off and try to download and install the drivers again.
Solution 14 – Change the drive letter for System Reserved partition
The system cannot find the file specified error can appear while trying to use Windows Backup. If that’s the case, you might be able to fix the problem by revealing System Reserved partition.
We have to mention that changing System Reserved partition settings can lead to certain issues, so keep in mind that this procedure isn’t risk-free. To make the necessary changes, follow these steps:
- Press Windows Key + X and select Disk Management.
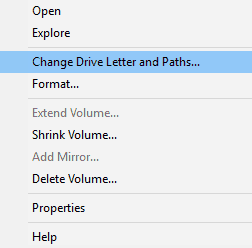
- Locate the System Reserved partition and right click it. Choose Change Drive Letter and Paths from the menu.
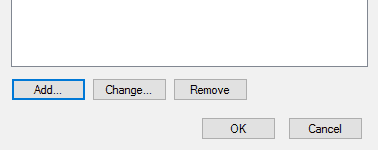
- Click the Add button.
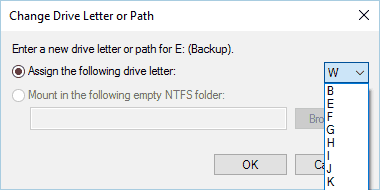
- Select Assign the following drive letter and choose a letter from the drop down menu. We suggest that you use letter such as Z or W.
- Once you’re done, click OK to save changes.
Close Disk Management and check if the issue is resolved. We have to mention that System Reserved partition will remain visible, so don’t make any changes to it.
This isn’t the best solution, but it’s a solid workaround that might work for some users.
Solution 15 – Delete the Config value from the registry
According to users, The system cannot find the file specified error can appear while trying to reinstall network driver. If that’s the case, you need to open Registry Editor and delete a single value from it.
Before making any changes, we advise you to check Solution 1 to see how to back up your registry. To remove the problematic key, do the following:
- Open Registry Editor.
- In the left pane, navigate to the HKEY_LOCAL_MACHINESYSTEMCurrentControlSetControlNetworkConfig key. If you can’t find this key in your registry, we advise you to skip this solution.
- Right click the Config key and choose Delete from the menu.
- After doing that, restart your PC and check if the issue is resolved.
If you need to undo any registry changes in Windows 10, check out this guide and learn how you can do it.
Solution 16 – Use download manager
Few users reported that this problem appears while trying to install downloaded applications.
If you’re getting The system cannot find the file specified error while trying to install certain application, you might want to redownload the setup file.
Users reported that using a download manager such as Internet Download Manager fixed the issue for them so we advise you to try that.
Sometimes your download can become damaged or corrupted, so be sure to try using a download manager.
Looking for the best download managers for Windows 10? Check out this list with our top picks.
Solution 17 – Check if necessary services are running
This error can appear with almost any software, and users reported The system cannot find the file specified error while using VMware.
To fix the problem, you need to start appropriate VMware services, and you can do that by following these steps:
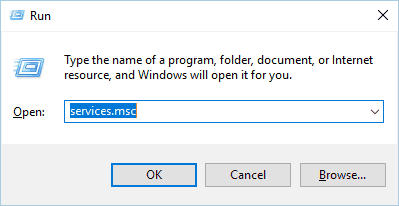
- Press Windows Key + R and enter services.msc. Press Enter or click OK.
- When Services window opens, locate VMware Authorization Service on the list. Right-click this service and choose Start from the menu.
- After starting the service, close the Services window and check if the issue is resolved.
Another way to start VMware services is to use Command Prompt. This method is faster, and you can perform it by following these steps:
- Start Command Prompt as administrator.
- When Command Prompt opens, enter net start vmx86 and press Enter to run it.
- After the command is executed, close the Command Prompt and check if the problem is resolved.
If the issue still persists, you might have to completely reinstall VMware and check if that solves the problem.
Solution 18 – Check if your USB port is powered
Apparently this issue appears while using Windows Backup feature. To fix The system cannot find the file specified error, it’s advised to connect any external hard drives to powered USB ports.
Few users reported that you can fix the issue simply by connecting an external hard drive to a different port.
Some PC issues are hard to tackle, especially when it comes to corrupted repositories or missing Windows files. If you are having troubles fixing an error, your system may be partially broken.
We recommend installing Restoro, a tool that will scan your machine and identify what the fault is.
Click here to download and start repairing.
It seems that Windows Backup feature requires external storage to be connected to a powered USB port.
After connecting the device to a different USB port, check if the issue is resolved.
USB not working in Windows 10? Don’t let that ruin your day. Fix it quickly with the help of this guide.
Solution 19 – Remove Windows.old folder
According to users, The system cannot find the file specified error can appear due to Windows.old folder.
Windows.old folder appears if you upgrade your Windows or if you perform a clean install of Windows 10.
This folder holds your previous Windows installation, and it allows you to restore it.
Windows.old folder can cause this error to appear while using Windows Backup feature, and to fix the problem, you need to remove Windows.old folder.
This is relatively simple, and you can do it by following these steps:
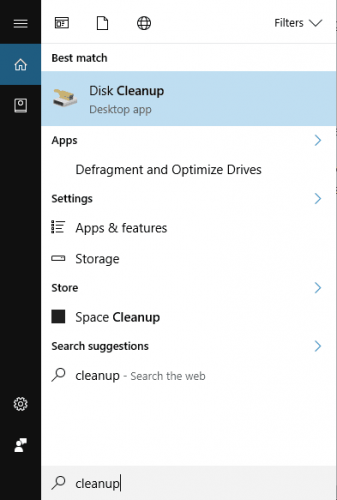
- Press Windows Key + S and enter cleanup. Select Disk Cleanup from the list of results.
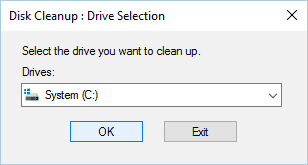
- Select your C drive and click OK. Windows 10 will now scan your PC.
- Select Previous Windows installation(s) option and click OK.
- Wait while Windows removes the selected files.
After removing Windows.old folder from your PC, check if the problem is resolved.
If you need more info on how to delete the Windows.old folder on Windows 10, check out this dedicated guide.
Problems deleting all your junk files? Follow this guide to solve Disk Cleanup issues and save your drive.
Solution 20 – Restart Windows Backup service
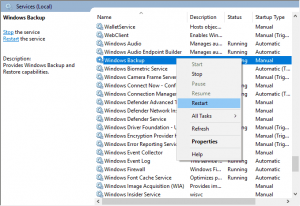
If you’re getting The system cannot find the file specified error message while trying to run Windows Backup, we recommend that you restart Windows Backup service. To do that, follow these steps:
- Open the Services window by following steps from Solution 18.
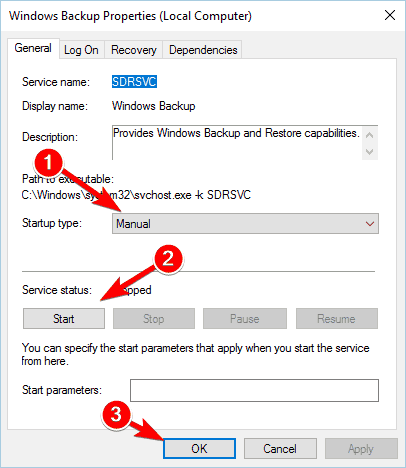
- When Services window opens, locate Windows Backup service and double click it.
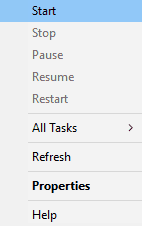
- Set the Startup type of this service to Manual. If the service isn’t running, click the Start button to start it again. Now click Apply and OK to save changes.
- In Services window, right click Windows Backup and choose Restart from the menu. After doing that, close Services window.
Some users are also recommending to remove Samsung Magician software from your PC. +If you have this software installed, remove it and check if that solves the issue.
How can I fix The system cannot find the file specified error?
Solution 1 – Move the problematic file
According to some users, you might be able to fix this problem simply by moving the problematic file to a different folder.
Users reported that moving the problematic file to the root folder, such as C: for example, fixed the issue for them. This is a simple workaround, but it might fix the issue for you, so feel free to try it out.
Can’t move a certain file in Windows 10? Follow this guide and solve the problem easily.
Solution 2 – Remove problematic software
Some users reported that The system cannot find the file specified error appears every time they start their PC. This can be quite annoying, and according to users, you can fix this problem simply by removing the problematic applications.
It seems that this problem is caused by Apple software, Real Player and Spybot Search & Destroy. If you have any of these programs installed, we advise you to remove them in order to fix this problem. To do that, you need to follow these steps:
- Press Windows Key + I to open the Settings app.
- Navigate to the System section and choose Apps & features tab.
- Locate any of the previously mentioned applications and remove it from your PC.
After uninstalling the problematic applications, you can run CCleaner and use it to remove any remaining files related to these apps. Lastly, restart your PC and check if the error message appears again.
If you want to get rid of any software leftovers from your Windows 10 PC, this guide will certainly help you do that.
Solution 3 – Use bcdedit command properly
Several users reported The system cannot find the file specified error message while trying to run bcdedit command in Command Prompt. This usually occurs if you’re not starting this command properly. To fix the issue, you need to do the following:
- Open Command Prompt as administrator.
- Now enter bcdedit /store c:BootBCD followed by a command that you want to perform. In order to use bcdedit command in Windows 10, you need to enter bcdedit /store c:BootBCD instead of bcdedit every time.
Solution 4 – Show file extensions
Sometimes you might get The system cannot find the file specified error message in Command Prompt if you don’t know the file’s exact extension.
By default, Windows 10 hides file extensions from the user, and this can sometimes lead to certain problems. For example, let’s assume that you have a file called file.txt.
This might look like a normal text file, but let’s see what happens if we enable file extensions for files. To do that, simply click the View tab and check File name extensions.


Now let’s see how our file.txt looks like. After revealing the file extensions, the full name of the file is file.txt.txt.
If you try to access file.txt.txt instead of file.txt in Command Prompt, you’ll see that it works without any issues. There’s also another way to check the file extension of your files in Command Prompt.
Simply navigate to the desired folder in Command Prompt and enter dir command.
List of all directories and files in that folder will now appear. As you can see, you can now easily find the full name and extension of any file in that directory.
This isn’t an error, and it’s more of a beginner’s mistake. In the future, before trying to access a certain file, be sure to check for its full name by using the dir command or by revealing file extensions.
Need more info on how to show file extensions in Windows 10? Take a look at this useful guide.
How can I fix The system cannot find the file specified error in uTorrent?
Solution 1 – Delete the problematic torrent
If you’re getting The system cannot find the file specified error while using uTorrent, you might be able to temporary fix it by using this solution. To fix the problem, follow these simple steps:
- Open uTorrent.
- Now locate the torrent that is giving you this message, right click it and choose Remove And Delete .torrent + Data option.
- After doing that, try to download the same torrent again.
Keep in mind that this is just a temporary workaround, so it’s quite possible that the same error message will appear again.
We also have to warn you that this method will completely delete the torrent and all associated files from your PC.
If you’re getting the System cannot find path uTorrent error in Windows 10, follow this article to solve the problem.
Solution 2 – Check the torrent’s download folder
Sometimes The system cannot find the file specified error occurs if your download folder path isn’t correct. To fix this issue, be sure to manually select the download folder for each torrent.
To do that, follow these steps:
- Right click the problematic torrent.
- From the menu select Advanced > Set Download Location.
- Now select the correct download folder.
- Repeat these steps for all affected torrents.
Alternatively, you can set a default download folder for all torrents by doing the following:
- Open uTorrent and choose Options > Preferences.
- Now navigate to the Directories tab.
- Select Put new downloads in option and choose the desired folder.
After doing that, the error message should be completely resolved.
Solution 3 – Perform a Disk Cleanup
According to users, you can fix The system cannot find the file specified in uTorrent simply by performing a Disk Cleanup.
Sometimes temporary files or old Windows installations can interfere with uTorrent and cause this error to appear.
Several users reported that Disk Cleanup fixed their problem, so we suggest that you try it out.
Regarding Disk Cleanup, we already explained how to perform it in one of our previous solutions, so be sure to check it out.
While performing Disk Cleanup be sure to select all available options in order to remove all unnecessary and old files.
Can’t get rid of the temporary files? After following these easy steps, you’ll delete them like a pro.
Solution 4 – Delete uTorrent installation manually
Sometimes The system cannot find the file specified error can appear if your uTorrent installation is corrupted.
According to users, uTorrent isn’t available on the list of installed applications, and it starts on its own.
If you have the same problem, and you can’t remove uTorrent, you need to follow these steps:
- Open Task Manager by pressing Ctrl + Shift + Esc.
- When Task Manager opens, locate uTorrent in the Processes tab. Right click it and choose Open file location from the menu.
- uTorrent installation directory will appear, and you’ll be able to remove it manually.
Can’t open Task Manager? Don’t worry, we’ve got the right solution for you.
How can I fix The system cannot find the file specified?
Solution 1 – Use Chromebook Recovery utility
According to users, this error can appear while trying to format specific USB flash drives.
It seems that The system cannot find the file specified affects USB flash drives that are used as Chromebook recovery image holders.
In order to fix the problem, users are suggesting to use Chromebook Recovery utility to erase the USB drive.
After doing that, the flash drive will start working in Windows 10, and the error will be resolved. To fix the problem, follow these steps:
- First, download the Chromebook Recovery utility.
- Connect the problematic USB flash drive to your PC.
- Start the Chromebook Recovery utility.
- Click on Settings and choose Erase recovery media.
- From the dropdown menu select your USB flash drive.
- Click Continue > Erase now.
- Wait for the process to finish and click Done.
After doing that, you’ll be able to format the flash drive once again from your operating system. Keep in mind that this solution only works with USB drives that are used as recovery media for Chromebook.
Solution 2 – Use clean command in diskpart tool
If you’re having The system cannot find the file specified error while using your USB flash drive, you might need to use diskpart to fix it.
This process will remove all files from your flash drive, so create a backup if you need to.
To clean the USB flash drive, do the following:
- Start Command Prompt as administrator.
- When Command Prompt opens, enter diskpart and press Enter.
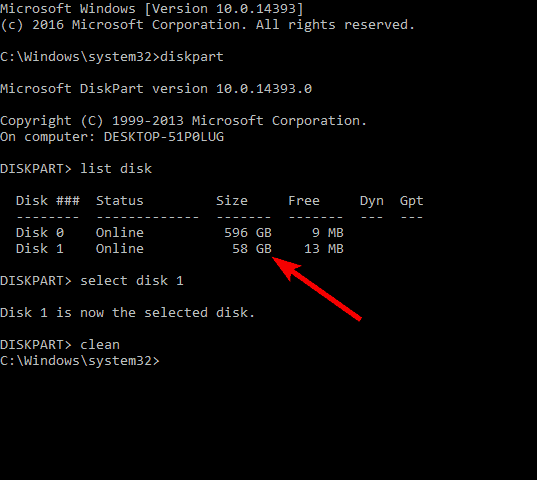
- Now enter list disk command. List of storage devices will appear. Check the size of each drive and be sure to locate your USB flash drive. It’s crucial to select the correct drive or else you’ll delete all files from your hard drive permanently.
- Enter select disk X to select your USB flash drive. In our example we used select disk 1 since disk 1 matches our USB flash drive. Once again, be sure to double check everything and select the correct USB flash drive.
- Now enter clean and diskpart will remove all files from your flash drive.
- Close Command Prompt.
Now your USB flash drive is clean from any files, and in order to use it, you need to format it. To do that, follow these steps:
- Press Windows Key + X and choose Disk Management from the list.
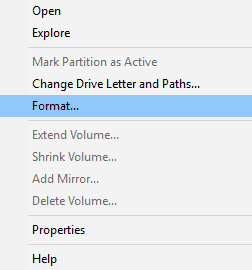
- When Disk Management opens, locate your USB flash drive, right click it and choose Format from the menu.
- Select the desired options and format your drive.
- After the formatting process is completed, close Disk Management.
As you can see, this process is relatively simple, but you need to be extra cautious while using diskpart tool.
Solution 3 – Make changes to your registry
The system cannot find the file specified error appears for some users while inserting a USB flash drive to their PC. To fix this problem, you need to make some changes to your registry.
Before making any changes, we advise you to create a backup of the registry, just in case.
- Start Registry Editor. To see how to do that, be sure to check some of our previous solutions.
- Now navigate to HKEY_LOCAL_MACHINESYSTEMCurrentControlSetServicesvds key in the left pane.
- In the right pane, look for ImagePath. By default, it should have a value of %SystemRoot%System32vds.exe. According to users, the problem can sometimes be %SystemRoot% variable, and you need to change it manually.
- Double click ImagePath to edit it. Replace %SystemRoot% with C:Windows in Value data field. After making the changes, Value data field will look like this: C:WindowsSystem32vds.exe. Click OK to save changes.
- Close Registry Editor.
In some rare cases %SystemRoot% variable might not work properly, and that will cause this error to appear.
After making the necessary changes and replacing the value with the absolute path, the issue should be resolved.
Solution 4 – Format the drive on Mac or Linux
If you can’t access your flash drive on Windows due to The system cannot find the file specified error, you might need to format it on Mac or Linux first.
According to users, they solved the issue simply by connecting their flash drive to any Mac or Linux computer and formatting the drive using FAT32 file system.
After formatting the drive, connect it to your Windows 10 PC and follow the Solution 2 to clean the drive using diskpart tool.
Solution 5 – Disable automount
In one of our previous solutions, we mentioned how enabling the automount feature can fix The system cannot find the file specified when inserting a USB flash drive.
However, it seems that in some cases you can fix this error by disabling automount in diskpart. To do that, you need to follow these steps:
- Open Command Prompt as administrator.
- Enter diskpart and press Enter.
- Now enter automount disable.
- Close Command Prompt and check if the error is resolved.
After disabling automount, you should be able to format your removable storage without any errors. After you’re done, you might want to enable the automount feature.
To see how to do that, check out one of our previous solutions.
- Windows cannot find: Fix this error for good [Full Guide]
- Windows 10 Undoing Changes Made to Your Computer [Fix]
- Circular Kernel Context Logger 0xc0000035: 6 Easy Fixes
Solution 6 – Delete and format all partitions
This solution will delete all files from your hard drive, so if you’re going to use it, be sure to back up all your important files.
Since this solution will delete all files, we suggest that you use it only with a new PC that doesn’t have any important files stored on it.
Users reported that after reinstalling their operating system they are unable to initialize their additional hard drive.
According to them, they are unable to initialize it due to The system cannot find the file specified error message.
If you have this or any other similar issue, you can fix it by using Partition Wizard software.
Simply create a bootable flash drive with this tool and start your PC from it. After the tool starts, you need to delete all your partitions on the drive that you can’t initialize and format them again.
After that, initialize partitions as GPT.
If you want to convert MBR to GPT disk without data loss, check out this awesome guide.
Want to create a Windows 10 bootable UEFI USB drive? Follow the steps from this article and do it in no time.
Once again, this solution will delete all files from the problematic drive, so be sure to use this solution as a last resort or only with a new PC or an empty hard drive.
The system cannot find the file specified error can affect your PC in many different ways. This can be an annoying error, but we hope that you solved it by using one of our solutions.
If you have any other questions, feel free to leave them in the comments section below and we’ll surely check them out.
- Could not find this item this is no longer located?
Still having issues? Fix them with this tool:
SPONSORED
If the advices above haven’t solved your issue, your PC may experience deeper Windows problems. We recommend downloading this PC Repair tool (rated Great on TrustPilot.com) to easily address them. After installation, simply click the Start Scan button and then press on Repair All.
Newsletter
by Milan Stanojevic
Milan has been enthusiastic about technology ever since his childhood days, and this led him to take interest in all PC-related technologies. He’s a PC enthusiast and he… read more
Updated on March 3, 2022
- The system cannot find the file specified error on Windows 10 is pretty common and it really contains the description. We’ve got the complete solution for you in the article below.
- First step to fix this error is to scan the registry. You can choose another one from our top 12 registry cleaners for Windows 10.
- If you encounter any other system errors, you will probably find a solution in our System Errors hub.
- Check out our Windows 10 errors hub for more solutions to such issues.
XINSTALL BY CLICKING THE DOWNLOAD FILE
This software will repair common computer errors, protect you from file loss, malware, hardware failure and optimize your PC for maximum performance. Fix PC issues and remove viruses now in 3 easy steps:
- Download Restoro PC Repair Tool that comes with Patented Technologies (patent available here).
- Click Start Scan to find Windows issues that could be causing PC problems.
- Click Repair All to fix issues affecting your computer’s security and performance
- Restoro has been downloaded by 0 readers this month.
Computer errors can prevent you from running your favorite applications or from accessing your files.
Speaking of errors, users reported The system cannot find the file specified error on Windows 10.
According to users, they are getting this error while trying to access certain files, so today we’re going to show you how to fix it.
- Change your registry
- Open the Libraries folder
- Install the latest updates
- Format your USB flash drive
- Use chkdsk
- Use WinRAR
- Delete ProfileImagePath key
- Enable Automount
- Check if your system partition is active
- Change shadowcopy storage area
- Add a printer manually
- Copy the files manually
- Uninstall all HP applications
- Change the drive letter for System Reserved partition
- Delete the Config value from the registry
- Use download manager
- Check if necessary services are running
- Check if your USB port is powered
- Remove Windows.old folder
- Restart Windows Backup service
- The system cannot find the file specified cmd
- Fix – The system cannot find the file specified uTorrent
- The system cannot find the file specified virtual disk manager
How can I fix The system cannot find the file specified on Windows 10?
Solution 1 – Change your registry
According to users, you can fix this error simply by making few changes to your registry.
Modifying the registry comes with certain risks, therefore we strongly advise that you export your registry and create its backup, just in case. To modify the registry, do the following:
- Press Windows Key + R and enter regedit. Press Enter or click OK.
- Optional: To export your registry, click File > Export.
Now enter the file name for your backup, and select All in Export range section. Click the Save button to export your registry.
In case anything goes wrong, you can simply run this file in order to restore your registry to its original state. - Once Registry Editor opens, navigate to the HKEY_LOCAL_MACHINESOFTWAREMicrosoftWindowsCurrentVersion key in the left pane.
- Expand the key and look for RunOnce key. If this key isn’t available, you need to create it. To do that, just right click the CurrentVersion key and choose New > Key from the menu.
- Enter RunOnce as the name of the new key.
- Navigate to the HKEY_CURRENT_USERSoftwareMicrosoftWindowsCurrentVersion key in the left pane.
- Expand the key and check if RunOnce key is available. If not, repeat the procedure from Step 4 to create it.
- Close Registry Editor and restart your PC.
After your PC restarts, The system cannot find the file specified error should be resolved completely.
Once again, we have to mention that modifying the registry can lead to certain issues, so be extra cautious and be sure to create a backup.
If you can’t edit your Windows 10’s registry, read this handy guide and find the quickest solutions to the issue.
Solution 2 – Open the Libraries folder
According to users, you might be able to fix this problem simply by navigating to the Libraries folder.
This folder is hidden by default in Windows 10, and in order to access it, you need to do the following:
- Open File Explorer.
- In the left pane, right click the empty space and choose Show libraries option.
- After doing that, Libraries folder will appear in the left pane, and you’ll be able to access it easily.
Users reported that accessing the Libraries folder fixed the issue for them, so be sure to try this simple solution.
If you need more info on how to enable Libraries in Windows 10, check out this simple guide.
Solution 3 – Install the latest updates
According to users, this was an issue in the past, but you can easily fix it by installing the latest updates.
Windows updates often fix both hardware and software errors, therefore we strongly suggest that you install the latest updates.
Windows 10 usually installs the updates automatically, but you can also check for updates manually by following these steps:
- Press Windows Key + I to open the Settings app.
- Navigate to the Update & security section and click Check for updates button.
Windows 10 will now check if updates are available. If so, it will download and install the updates automatically.
If you can’t open the Setting app, take a look at this article to solve the issue.
Having trouble updating your Windows? Check out this guide that will help you solve them in no time.
Solution 4 – Format your USB flash drive
Users reported The system cannot find the file specified error while inserting their USB flash drive. This issue can also appear with any removable storage, and in order to fix it, you need to format your drive.
To do that, follow these steps:
- Switch to a different computer that can recognize your USB flash drive. Connect the USB flash drive. If you can, be sure to back up all your files.
- Open This PC and locate your USB flash drive. Right-click the USB flash drive and choose Format from the list.
- When the Format window opens, make sure to uncheck Quick Format option.
- Now click the Start button to start the formatting process. Wait for the formatting process to finish.
By disabling the Quick Format option all your files will be completely removed and unrecoverable.
Some users are also suggesting to use ImageUSB software.
This software will format your drive and fill it with zeroes thus fixing this problem. Keep in mind that this process can take a while, so you’ll have to be patient.
If you encounter the Windows cannot format this drive error, follow the quick steps from this guide to solve the issue.
Solution 5 – Use chkdsk
If you’re getting The system cannot find the file specified error, that might be because the file is damaged or corrupted. To fix this problem, you need to run chkdsk command and scan your files.
This is relatively simple, and you can do it by following these steps:
- Press Windows Key + X to open Win + X menu and choose Command Prompt (Admin) from the list.
- When Command Prompt opens, enter chkdsk /f X:. Be sure to replace X with the appropriate letter that matches your partition. Press Enter to run the command.
- Wait while chkdsk tries to repair your files.
chkdsk is giving you headaches? Check out this quick guide to fix any issues with it.
Solution 6 – Use WinRAR
According to users, The system cannot find the file specified error appears when trying to delete a specific file or folder.
If that’s the case, you might be able to fix the problem by using WinRAR. To fix the problem, do the following:
- Locate the problematic file and right click it. Choose Add to archive option from the menu.
- Check Delete files after archiving option and then click the OK button.
Your file will be moved to the archive and the original will be deleted from the hard drive. Now you can just delete the archive to completely remove the file.
Solution 7 – Delete ProfileImagePath key
The system cannot find the file specified error can occur while using Windows Backup, and it will prevent you from creating your backup.
According to users, you might be able to fix this problem by deleting certain values from your registry.
Changing the registry can lead to stability issues, so before you make these changes, we strongly advise you to back up your registry and create a System Restore point.
To delete this key from the registry, do the following:
- Open Registry Editor. You can do that by following steps from Solution 1.
- Once Registry Editor opens, navigate to HKEY_LOCAL_MACHINESOFTWAREMicrosoftWindows NTCurrentVersionProfileList path in the left pane.
- Expand the ProfileList key. You’ll see several subkeys available. Navigate through each subkey and check if the key has ProfileImagePath value available on the right pane.
- If certain subkey doesn’t have ProfileImagePath value available or if its Data is empty, you need to delete that subkey. To do that, right click it and choose Delete from the menu.
After deleting the problematic profile, close Registry Editor and check if the issue is resolved.
As we already mentioned, modifying the registry can lead to certain issues, therefore we strongly recommend that you create a backup before making any changes.
Can’t access the Registry Editor? Things aren’t as scary as they seem. Check out this guide and solve the issue quickly.
Solution 8 – Enable Automount
If this problem appears while using Windows Backup, you can fix it by using diskpart and automount commands.
Diskpart is a powerful tool for hard drive management, so be extra cautious while using it.
By using this tool you can cause damage to your system, so keep in mind that you’re using this tool at your own risk. To run diskpart on Windows 10, follow these steps:
- Open Command Prompt as administrator. For detailed instructions on how to do that, check Solution 5.
- When Command Prompt opens, enter diskpart and press Enter.
- Enter the following lines into Command Prompt:
- automount
- automount enable
- Close Command Prompt and restart your PC.
If the issue still persists, you need to do the following:
- Open Command Prompt and start diskpart again.
- When diskpart starts, enter list volume. List of all partitions will now appear.
- Select your system volume. In our case, that’s Volume 1, so we need to enter select volume 1. If your system volume is labeled by a different number, be sure to use that number to select it.
- Type online volume and press Enter.
- Close Command Prompt and restart your PC.
After your PC restarts, check if the issue is resolved. Once again, diskpart is powerful tool, and if you’re not careful you can delete files or make your system unbootable, so be extra cautious with it.
If you’re having trouble accessing Command Prompt as an admin, then you better take a closer look at this guide.
Solution 9 – Check if your system partition is active
The system cannot find the file specified error can occur while using Windows Backup. To fix the issue, you need to check if your system partition is set to active. To do that, follow these simple steps:
- Press Windows Key + X and choose Disk Management from the menu.
- Disk Management will now start. Locate your System drive, in most cases it should have a C label assigned to it, and right-click it. Choose Mark Partition as Active option. If you can’t select this option, it means that your system drive is already set to active.
- Close Disk Management and restart your PC.
Disk Management won’t load on Windows 10? Count on us to solve the problem.
Solution 10 – Change shadowcopy storage area
If The system cannot find the file specified error appears on your PC, you can fix it by changing the shadowcopy storage area size.
This can be a risky procedure, so we advise you to create a backup just in case.
To change shadowcopy storage area, you need to do the following:
- Open Command Prompt as administrator.
- When Command Prompt opens, enter the following line vssadmin list shadowstorage.
- Now you’ll be able to see shadowstorage area and the amount of space that it takes. To increase its size, enter vssadmin resize shadowstorage /For=C: /MaxSize=5%.
- After doing that, restart your PC.
If the issue still persists, open Command Prompt again and enter vssadmin delete shadows /all command.
Solution 11 – Add a printer manually
Few users reported that this issue occurs while trying to add a printer. If you have the same problem, you might want to try adding the printer manually.
This is a simple procedure, and you can do it by following these steps:
- Press Windows Key + S and enter printers. Select Devices and Printers from the menu.
- From the menu on the top select Add a printer option.
- Now you just need to follow the instructions on the screen to add your printer manually.
According to users, this error occurs while installing HP printers, but if you have this problem with any other printer, be sure to try this solution.
Solution 12 – Copy the files manually
Apparently this error can occur while trying to install certain devices, and users reported The system cannot find the file specified error while installing an Epson scanner.
Few users were able to solve this issue simply by finding the missing file in Windows folder and copying it to the appropriate location.
According to users, they fixed the problem with their device by finding the usbscan.sys file in Windows folder and copying it to Windowsinfsetupapi.dev folder.
This solution only works for particular devices, and you’ll mostly need to transfer a different file on your PC.
We have to warn you that making changes in Windows folder can be dangerous, so be sure to create a backup if you plan to make changes to Windows directory.
Can’t use copy paste in Windows 10? Follow this guide and fix the issue quickly.
Solution 13 – Uninstall all HP applications
According to users, this error appears while installing a printer driver on some HP laptops.
If you’re getting The system cannot find the file specified error, you might be able to fix it by uninstalling all HP applications. To do that, follow these steps:
- Download Microsoft’s Program Install and Uninstall tool.
- Run the application and remove all HP applications from your PC.
- After doing that, try to download and install the driver again.
Need more info on how to uninstall programs and apps in Windows 10? Take a look at this guide.
Few users reported the same problem, and according to them, the error is caused by McAfee antivirus. To fix the issue, you need to disable McAfee by following these steps:
- Open McAfee Internet Security.
- Click on Change settings.
- Now click on Real Time Scanning.
- Turn Real Time Scanning off and try to download and install the drivers again.
Solution 14 – Change the drive letter for System Reserved partition
The system cannot find the file specified error can appear while trying to use Windows Backup. If that’s the case, you might be able to fix the problem by revealing System Reserved partition.
We have to mention that changing System Reserved partition settings can lead to certain issues, so keep in mind that this procedure isn’t risk-free. To make the necessary changes, follow these steps:
- Press Windows Key + X and select Disk Management.
- Locate the System Reserved partition and right click it. Choose Change Drive Letter and Paths from the menu.
- Click the Add button.
- Select Assign the following drive letter and choose a letter from the drop down menu. We suggest that you use letter such as Z or W.
- Once you’re done, click OK to save changes.
Close Disk Management and check if the issue is resolved. We have to mention that System Reserved partition will remain visible, so don’t make any changes to it.
This isn’t the best solution, but it’s a solid workaround that might work for some users.
Solution 15 – Delete the Config value from the registry
According to users, The system cannot find the file specified error can appear while trying to reinstall network driver. If that’s the case, you need to open Registry Editor and delete a single value from it.
Before making any changes, we advise you to check Solution 1 to see how to back up your registry. To remove the problematic key, do the following:
- Open Registry Editor.
- In the left pane, navigate to the HKEY_LOCAL_MACHINESYSTEMCurrentControlSetControlNetworkConfig key. If you can’t find this key in your registry, we advise you to skip this solution.
- Right click the Config key and choose Delete from the menu.
- After doing that, restart your PC and check if the issue is resolved.
If you need to undo any registry changes in Windows 10, check out this guide and learn how you can do it.
Solution 16 – Use download manager
Few users reported that this problem appears while trying to install downloaded applications.
If you’re getting The system cannot find the file specified error while trying to install certain application, you might want to redownload the setup file.
Users reported that using a download manager such as Internet Download Manager fixed the issue for them so we advise you to try that.
Sometimes your download can become damaged or corrupted, so be sure to try using a download manager.
Looking for the best download managers for Windows 10? Check out this list with our top picks.
Solution 17 – Check if necessary services are running
This error can appear with almost any software, and users reported The system cannot find the file specified error while using VMware.
To fix the problem, you need to start appropriate VMware services, and you can do that by following these steps:
- Press Windows Key + R and enter services.msc. Press Enter or click OK.
- When Services window opens, locate VMware Authorization Service on the list. Right-click this service and choose Start from the menu.
- After starting the service, close the Services window and check if the issue is resolved.
Another way to start VMware services is to use Command Prompt. This method is faster, and you can perform it by following these steps:
- Start Command Prompt as administrator.
- When Command Prompt opens, enter net start vmx86 and press Enter to run it.
- After the command is executed, close the Command Prompt and check if the problem is resolved.
If the issue still persists, you might have to completely reinstall VMware and check if that solves the problem.
Solution 18 – Check if your USB port is powered
Apparently this issue appears while using Windows Backup feature. To fix The system cannot find the file specified error, it’s advised to connect any external hard drives to powered USB ports.
Few users reported that you can fix the issue simply by connecting an external hard drive to a different port.
Some PC issues are hard to tackle, especially when it comes to corrupted repositories or missing Windows files. If you are having troubles fixing an error, your system may be partially broken.
We recommend installing Restoro, a tool that will scan your machine and identify what the fault is.
Click here to download and start repairing.
It seems that Windows Backup feature requires external storage to be connected to a powered USB port.
After connecting the device to a different USB port, check if the issue is resolved.
USB not working in Windows 10? Don’t let that ruin your day. Fix it quickly with the help of this guide.
Solution 19 – Remove Windows.old folder
According to users, The system cannot find the file specified error can appear due to Windows.old folder.
Windows.old folder appears if you upgrade your Windows or if you perform a clean install of Windows 10.
This folder holds your previous Windows installation, and it allows you to restore it.
Windows.old folder can cause this error to appear while using Windows Backup feature, and to fix the problem, you need to remove Windows.old folder.
This is relatively simple, and you can do it by following these steps:
- Press Windows Key + S and enter cleanup. Select Disk Cleanup from the list of results.
- Select your C drive and click OK. Windows 10 will now scan your PC.
- Select Previous Windows installation(s) option and click OK.
- Wait while Windows removes the selected files.
After removing Windows.old folder from your PC, check if the problem is resolved.
If you need more info on how to delete the Windows.old folder on Windows 10, check out this dedicated guide.
Problems deleting all your junk files? Follow this guide to solve Disk Cleanup issues and save your drive.
Solution 20 – Restart Windows Backup service
If you’re getting The system cannot find the file specified error message while trying to run Windows Backup, we recommend that you restart Windows Backup service. To do that, follow these steps:
- Open the Services window by following steps from Solution 18.
- When Services window opens, locate Windows Backup service and double click it.
- Set the Startup type of this service to Manual. If the service isn’t running, click the Start button to start it again. Now click Apply and OK to save changes.
- In Services window, right click Windows Backup and choose Restart from the menu. After doing that, close Services window.
Some users are also recommending to remove Samsung Magician software from your PC. +If you have this software installed, remove it and check if that solves the issue.
How can I fix The system cannot find the file specified error?
Solution 1 – Move the problematic file
According to some users, you might be able to fix this problem simply by moving the problematic file to a different folder.
Users reported that moving the problematic file to the root folder, such as C: for example, fixed the issue for them. This is a simple workaround, but it might fix the issue for you, so feel free to try it out.
Can’t move a certain file in Windows 10? Follow this guide and solve the problem easily.
Solution 2 – Remove problematic software
Some users reported that The system cannot find the file specified error appears every time they start their PC. This can be quite annoying, and according to users, you can fix this problem simply by removing the problematic applications.
It seems that this problem is caused by Apple software, Real Player and Spybot Search & Destroy. If you have any of these programs installed, we advise you to remove them in order to fix this problem. To do that, you need to follow these steps:
- Press Windows Key + I to open the Settings app.
- Navigate to the System section and choose Apps & features tab.
- Locate any of the previously mentioned applications and remove it from your PC.
After uninstalling the problematic applications, you can run CCleaner and use it to remove any remaining files related to these apps. Lastly, restart your PC and check if the error message appears again.
If you want to get rid of any software leftovers from your Windows 10 PC, this guide will certainly help you do that.
Solution 3 – Use bcdedit command properly
Several users reported The system cannot find the file specified error message while trying to run bcdedit command in Command Prompt. This usually occurs if you’re not starting this command properly. To fix the issue, you need to do the following:
- Open Command Prompt as administrator.
- Now enter bcdedit /store c:BootBCD followed by a command that you want to perform. In order to use bcdedit command in Windows 10, you need to enter bcdedit /store c:BootBCD instead of bcdedit every time.
Solution 4 – Show file extensions
Sometimes you might get The system cannot find the file specified error message in Command Prompt if you don’t know the file’s exact extension.
By default, Windows 10 hides file extensions from the user, and this can sometimes lead to certain problems. For example, let’s assume that you have a file called file.txt.
This might look like a normal text file, but let’s see what happens if we enable file extensions for files. To do that, simply click the View tab and check File name extensions.


Now let’s see how our file.txt looks like. After revealing the file extensions, the full name of the file is file.txt.txt.
If you try to access file.txt.txt instead of file.txt in Command Prompt, you’ll see that it works without any issues. There’s also another way to check the file extension of your files in Command Prompt.
Simply navigate to the desired folder in Command Prompt and enter dir command.
List of all directories and files in that folder will now appear. As you can see, you can now easily find the full name and extension of any file in that directory.
This isn’t an error, and it’s more of a beginner’s mistake. In the future, before trying to access a certain file, be sure to check for its full name by using the dir command or by revealing file extensions.
Need more info on how to show file extensions in Windows 10? Take a look at this useful guide.
How can I fix The system cannot find the file specified error in uTorrent?
Solution 1 – Delete the problematic torrent
If you’re getting The system cannot find the file specified error while using uTorrent, you might be able to temporary fix it by using this solution. To fix the problem, follow these simple steps:
- Open uTorrent.
- Now locate the torrent that is giving you this message, right click it and choose Remove And Delete .torrent + Data option.
- After doing that, try to download the same torrent again.
Keep in mind that this is just a temporary workaround, so it’s quite possible that the same error message will appear again.
We also have to warn you that this method will completely delete the torrent and all associated files from your PC.
If you’re getting the System cannot find path uTorrent error in Windows 10, follow this article to solve the problem.
Solution 2 – Check the torrent’s download folder
Sometimes The system cannot find the file specified error occurs if your download folder path isn’t correct. To fix this issue, be sure to manually select the download folder for each torrent.
To do that, follow these steps:
- Right click the problematic torrent.
- From the menu select Advanced > Set Download Location.
- Now select the correct download folder.
- Repeat these steps for all affected torrents.
Alternatively, you can set a default download folder for all torrents by doing the following:
- Open uTorrent and choose Options > Preferences.
- Now navigate to the Directories tab.
- Select Put new downloads in option and choose the desired folder.
After doing that, the error message should be completely resolved.
Solution 3 – Perform a Disk Cleanup
According to users, you can fix The system cannot find the file specified in uTorrent simply by performing a Disk Cleanup.
Sometimes temporary files or old Windows installations can interfere with uTorrent and cause this error to appear.
Several users reported that Disk Cleanup fixed their problem, so we suggest that you try it out.
Regarding Disk Cleanup, we already explained how to perform it in one of our previous solutions, so be sure to check it out.
While performing Disk Cleanup be sure to select all available options in order to remove all unnecessary and old files.
Can’t get rid of the temporary files? After following these easy steps, you’ll delete them like a pro.
Solution 4 – Delete uTorrent installation manually
Sometimes The system cannot find the file specified error can appear if your uTorrent installation is corrupted.
According to users, uTorrent isn’t available on the list of installed applications, and it starts on its own.
If you have the same problem, and you can’t remove uTorrent, you need to follow these steps:
- Open Task Manager by pressing Ctrl + Shift + Esc.
- When Task Manager opens, locate uTorrent in the Processes tab. Right click it and choose Open file location from the menu.
- uTorrent installation directory will appear, and you’ll be able to remove it manually.
Can’t open Task Manager? Don’t worry, we’ve got the right solution for you.
How can I fix The system cannot find the file specified?
Solution 1 – Use Chromebook Recovery utility
According to users, this error can appear while trying to format specific USB flash drives.
It seems that The system cannot find the file specified affects USB flash drives that are used as Chromebook recovery image holders.
In order to fix the problem, users are suggesting to use Chromebook Recovery utility to erase the USB drive.
After doing that, the flash drive will start working in Windows 10, and the error will be resolved. To fix the problem, follow these steps:
- First, download the Chromebook Recovery utility.
- Connect the problematic USB flash drive to your PC.
- Start the Chromebook Recovery utility.
- Click on Settings and choose Erase recovery media.
- From the dropdown menu select your USB flash drive.
- Click Continue > Erase now.
- Wait for the process to finish and click Done.
After doing that, you’ll be able to format the flash drive once again from your operating system. Keep in mind that this solution only works with USB drives that are used as recovery media for Chromebook.
Solution 2 – Use clean command in diskpart tool
If you’re having The system cannot find the file specified error while using your USB flash drive, you might need to use diskpart to fix it.
This process will remove all files from your flash drive, so create a backup if you need to.
To clean the USB flash drive, do the following:
- Start Command Prompt as administrator.
- When Command Prompt opens, enter diskpart and press Enter.
- Now enter list disk command. List of storage devices will appear. Check the size of each drive and be sure to locate your USB flash drive. It’s crucial to select the correct drive or else you’ll delete all files from your hard drive permanently.
- Enter select disk X to select your USB flash drive. In our example we used select disk 1 since disk 1 matches our USB flash drive. Once again, be sure to double check everything and select the correct USB flash drive.
- Now enter clean and diskpart will remove all files from your flash drive.
- Close Command Prompt.
Now your USB flash drive is clean from any files, and in order to use it, you need to format it. To do that, follow these steps:
- Press Windows Key + X and choose Disk Management from the list.
- When Disk Management opens, locate your USB flash drive, right click it and choose Format from the menu.
- Select the desired options and format your drive.
- After the formatting process is completed, close Disk Management.
As you can see, this process is relatively simple, but you need to be extra cautious while using diskpart tool.
Solution 3 – Make changes to your registry
The system cannot find the file specified error appears for some users while inserting a USB flash drive to their PC. To fix this problem, you need to make some changes to your registry.
Before making any changes, we advise you to create a backup of the registry, just in case.
- Start Registry Editor. To see how to do that, be sure to check some of our previous solutions.
- Now navigate to HKEY_LOCAL_MACHINESYSTEMCurrentControlSetServicesvds key in the left pane.
- In the right pane, look for ImagePath. By default, it should have a value of %SystemRoot%System32vds.exe. According to users, the problem can sometimes be %SystemRoot% variable, and you need to change it manually.
- Double click ImagePath to edit it. Replace %SystemRoot% with C:Windows in Value data field. After making the changes, Value data field will look like this: C:WindowsSystem32vds.exe. Click OK to save changes.
- Close Registry Editor.
In some rare cases %SystemRoot% variable might not work properly, and that will cause this error to appear.
After making the necessary changes and replacing the value with the absolute path, the issue should be resolved.
Solution 4 – Format the drive on Mac or Linux
If you can’t access your flash drive on Windows due to The system cannot find the file specified error, you might need to format it on Mac or Linux first.
According to users, they solved the issue simply by connecting their flash drive to any Mac or Linux computer and formatting the drive using FAT32 file system.
After formatting the drive, connect it to your Windows 10 PC and follow the Solution 2 to clean the drive using diskpart tool.
Solution 5 – Disable automount
In one of our previous solutions, we mentioned how enabling the automount feature can fix The system cannot find the file specified when inserting a USB flash drive.
However, it seems that in some cases you can fix this error by disabling automount in diskpart. To do that, you need to follow these steps:
- Open Command Prompt as administrator.
- Enter diskpart and press Enter.
- Now enter automount disable.
- Close Command Prompt and check if the error is resolved.
After disabling automount, you should be able to format your removable storage without any errors. After you’re done, you might want to enable the automount feature.
To see how to do that, check out one of our previous solutions.
- Windows cannot find: Fix this error for good [Full Guide]
- Windows 10 Undoing Changes Made to Your Computer [Fix]
- Circular Kernel Context Logger 0xc0000035: 6 Easy Fixes
- Error Opening File for Writing: 9 Methods to Fix This Issue
Solution 6 – Delete and format all partitions
This solution will delete all files from your hard drive, so if you’re going to use it, be sure to back up all your important files.
Since this solution will delete all files, we suggest that you use it only with a new PC that doesn’t have any important files stored on it.
Users reported that after reinstalling their operating system they are unable to initialize their additional hard drive.
According to them, they are unable to initialize it due to The system cannot find the file specified error message.
If you have this or any other similar issue, you can fix it by using Partition Wizard software.
Simply create a bootable flash drive with this tool and start your PC from it. After the tool starts, you need to delete all your partitions on the drive that you can’t initialize and format them again.
After that, initialize partitions as GPT.
If you want to convert MBR to GPT disk without data loss, check out this awesome guide.
Want to create a Windows 10 bootable UEFI USB drive? Follow the steps from this article and do it in no time.
Once again, this solution will delete all files from the problematic drive, so be sure to use this solution as a last resort or only with a new PC or an empty hard drive.
The system cannot find the file specified error can affect your PC in many different ways. This can be an annoying error, but we hope that you solved it by using one of our solutions.
If you have any other questions, feel free to leave them in the comments section below and we’ll surely check them out.
- Could not find this item this is no longer located?
Still having issues? Fix them with this tool:
SPONSORED
If the advices above haven’t solved your issue, your PC may experience deeper Windows problems. We recommend downloading this PC Repair tool (rated Great on TrustPilot.com) to easily address them. After installation, simply click the Start Scan button and then press on Repair All.
Newsletter
На чтение 26 мин. Просмотров 18.5k. Опубликовано 03.09.2019
Компьютерные ошибки могут помешать вам запускать ваши любимые приложения или доступ к вашим файлам. Говоря об ошибках, пользователи сообщили, что Система не может найти указанный файл , ошибка в Windows 10. По словам пользователей, они получают эту ошибку при попытке доступа к определенным файлам, поэтому сегодня мы собираемся показать вам как это исправить.
Содержание
- Как исправить Система не может найти файл, указанный в Windows 10?
- Решение 1 – Измените свой реестр
- Решение 2. Откройте папку «Библиотеки»
- Решение 3 – Установите последние обновления
- Решение 4 – отформатируйте флешку
- Решение 5 – Используйте chkdsk
- Решение 6 – Используйте WinRAR
- Решение 7 – Удалить ключ ProfileImagePath
- Решение 8 – Включить Automount
- Решение 9. Проверьте, активен ли системный раздел
- Решение 10 – Изменить область хранения shadowcopy
- Решение 11. Добавьте принтер вручную
- Решение 12. Скопируйте файлы вручную
- Решение 13 – Удалите все приложения HP
- Решение 14. Измените букву диска для раздела «Зарезервировано системой»
- Решение 15 – Удалить значение Config из реестра
- Решение 16 – Используйте менеджер загрузок
- Решение 17. Проверьте, запущены ли необходимые службы
- Решение 18. Проверьте, включен ли ваш USB-порт
- Решение 19 – Удалить папку Windows.old
- Решение 20. Перезапустите службу резервного копирования Windows
- Исправлено – «Система не может найти указанный файл» cmd
- Решение 1. Переместите проблемный файл
- Решение 2 – Удалить проблемное программное обеспечение
- Решение 3. Используйте команду bcdedit правильно
- Решение 4 – Показать расширения файлов
- Исправлено – «Система не может найти указанный файл» uTorrent
- Решение 1 – Удалить проблемный торрент
- Решение 2. Проверьте папку загрузки торрента
- Решение 3. Выполните очистку диска
- Решение 4 – Удалить установку uTorrent вручную
- Исправлено – «Система не может найти указанный файл» менеджер виртуальных дисков
- Решение 1. Используйте утилиту Chromebook Recovery
- Решение 2. Используйте команду clean в инструменте diskpart
- Решение 3 – внести изменения в ваш реестр
- Решение 4. Отформатируйте диск на Mac или Linux
- Решение 5 – отключить автомонтирование
- Решение 6 – Удалить и отформатировать все разделы
Как исправить Система не может найти файл, указанный в Windows 10?
- Изменить свой реестр
- Откройте папку «Библиотеки»
- Установите последние обновления
- Отформатируйте флешку
- Используйте chkdsk
- Используйте WinRAR
- Удалить ключ ProfileImagePath
- Включить автомонтаж
- Проверьте, активен ли системный раздел
- Изменить область хранения shadowcopy
- Добавить принтер вручную
- Скопируйте файлы вручную
- Удалите все приложения HP
- Изменить букву диска для раздела «Зарезервировано системой»
- Удалить значение Config из реестра
- Используйте менеджер загрузок
- Проверьте, работают ли необходимые службы
- Проверьте, включен ли ваш USB-порт
- Удалить папку Windows.old
- Перезапустите службу резервного копирования Windows.
- «Система не может найти указанный файл» cmd
- Исправлено – «Система не может найти указанный файл» uTorrent
- «Система не может найти указанный файл» менеджер виртуальных дисков
Решение 1 – Измените свой реестр
По словам пользователей, вы можете исправить эту ошибку, просто сделав несколько изменений в вашем реестре. Изменение реестра сопряжено с определенными рисками, поэтому мы настоятельно рекомендуем вам экспортировать реестр и создать его резервную копию на всякий случай. Чтобы изменить реестр, сделайте следующее:
-
Нажмите Windows Key + R и введите regedit . Нажмите Enter или нажмите ОК .
-
Необязательно: Чтобы экспортировать реестр, нажмите Файл> Экспорт .
Теперь введите имя файла для резервной копии и выберите Все в разделе диапазона Экспорт . Нажмите кнопку Сохранить , чтобы экспортировать реестр.
Если что-то пойдет не так, вы можете просто запустить этот файл, чтобы восстановить реестр до исходного состояния. - Когда откроется Редактор реестра , перейдите к клавише HKEY_LOCAL_MACHINESOFTWAREMicrosoftWindowsCurrentVersion на левой панели.
-
Разверните ключ и найдите ключ RunOnce . Если этот ключ недоступен, вам нужно его создать. Для этого просто нажмите правую кнопку CurrentVersion и выберите в меню Новый> Ключ .
- Введите RunOnce в качестве имени нового ключа.
- Перейдите к клавише HKEY_CURRENT_USERSoftwareMicrosoftWindowsCurrentVersion на левой панели.
- Разверните ключ и проверьте, доступен ли ключ RunOnce . Если нет, повторите процедуру, начиная с Шаг 4 , чтобы создать ее.
- Закройте Редактор реестра и перезагрузите компьютер.
- ЧИТАЙТЕ ТАКЖЕ: адресная строка реестра обновлена в последней сборке Windows 10
После перезагрузки компьютера Система не может найти указанный файл . Ошибка должна быть полностью устранена. Еще раз отметим, что изменение реестра может привести к определенным проблемам, поэтому будьте предельно осторожны и обязательно создайте резервную копию.
Решение 2. Откройте папку «Библиотеки»
По словам пользователей, вы можете решить эту проблему, просто перейдя в папку «Библиотеки». Эта папка по умолчанию скрыта в Windows 10, и для доступа к ней вам необходимо сделать следующее:
- Откройте Проводник .
-
На левой панели щелкните правой кнопкой мыши пустое место и выберите параметр Показать библиотеки .
-
После этого на левой панели появится папка Libraries , и вы сможете легко получить к ней доступ.
Пользователи сообщили, что доступ к папке «Библиотеки» решил проблему, поэтому обязательно попробуйте это простое решение.
Решение 3 – Установите последние обновления
По словам пользователей, это было проблемой в прошлом, но вы можете легко исправить ее, установив последние обновления. Обновления Windows часто исправляют как аппаратные, так и программные ошибки, поэтому мы настоятельно рекомендуем вам установить последние обновления.Windows 10 обычно устанавливает обновления автоматически, но вы также можете проверить наличие обновлений вручную, выполнив следующие действия:
- Нажмите Windows Key + I , чтобы открыть приложение настроек .
-
Перейдите в раздел Обновления и безопасность и нажмите кнопку Проверить обновления .
Windows 10 теперь проверит наличие обновлений. Если это так, он будет загружать и устанавливать обновления автоматически.
Решение 4 – отформатируйте флешку
Пользователи сообщили Системе не удалось найти указанный файл при установке флэш-накопителя USB. Эта проблема также может возникать при использовании любого съемного хранилища, и для ее устранения необходимо отформатировать диск. Для этого выполните следующие действия:
- Переключитесь на другой компьютер, который может распознать ваш USB-накопитель. Подключите флешку. Если вы можете, обязательно сделайте резервную копию всех ваших файлов.
-
Откройте Этот компьютер и найдите флэш-накопитель USB. Щелкните правой кнопкой мыши флэш-накопитель USB и выберите в списке Формат .
- Когда откроется окно Формат , снимите флажок Быстрый формат .
-
Теперь нажмите кнопку Пуск , чтобы начать процесс форматирования. Дождитесь окончания процесса форматирования.
- Читайте также: как зашифровать USB-накопитель в Windows
Отключив параметр Быстрое форматирование , все ваши файлы будут полностью удалены и не подлежат восстановлению. Некоторые пользователи также предлагают использовать программное обеспечение ImageUSB . Это программное обеспечение отформатирует ваш диск и заполнит его нулями, тем самым решая эту проблему. Имейте в виду, что этот процесс может занять некоторое время, поэтому вам придется набраться терпения.
Решение 5 – Используйте chkdsk
Если вы получаете сообщение Системе не удается найти указанный файл , это может быть связано с тем, что файл поврежден или поврежден. Чтобы решить эту проблему, вам нужно запустить команду chkdsk и просканировать ваши файлы. Это относительно просто, и вы можете сделать это, выполнив следующие действия:
-
Нажмите Windows Key + X , чтобы открыть меню Win + X, и выберите в списке Командная строка (Администратор) .
- Когда откроется Командная строка , введите chkdsk/f X: . Обязательно замените X соответствующей буквой, соответствующей вашему разделу. Нажмите Enter , чтобы запустить команду.
- Подождите, пока chkdsk попытается восстановить ваши файлы.
Решение 6 – Используйте WinRAR
По словам пользователей, Системе не удается найти указанный файл появляется ошибка при попытке удалить определенный файл или папку. Если это так, вы можете решить проблему с помощью WinRAR. Чтобы устранить проблему, сделайте следующее:
-
Найдите проблемный файл и щелкните его правой кнопкой мыши. Выберите в меню Добавить в архив .
-
Установите флажок Удалить файлы после архивации , а затем нажмите кнопку ОК .
Ваш файл будет перемещен в архив, а оригинал будет удален с жесткого диска. Теперь вы можете просто удалить архив, чтобы полностью удалить файл.
Решение 7 – Удалить ключ ProfileImagePath
Системе не удается найти указанный файл. может возникнуть ошибка при использовании резервного копирования Windows, и это не позволит вам создать резервную копию. По словам пользователей, вы можете решить эту проблему, удалив определенные значения из вашего реестра.
- Читайте также: как изменить шрифт по умолчанию для редактора реестра в Windows 10
Изменение реестра может привести к проблемам со стабильностью, поэтому, прежде чем вносить эти изменения, мы настоятельно рекомендуем создать резервную копию реестра и создать точку восстановления системы. Чтобы удалить этот ключ из реестра, выполните следующие действия:
- Откройте реестр редактор . Это можно сделать, выполнив шаги из Решения 1 .
- Когда откроется Редактор реестра , перейдите к пути HKEY_LOCAL_MACHINESOFTWAREMicrosoftWindows NTCurrentVersionProfileList в левой панели.
-
Разверните ключ ProfileList . Вы увидите несколько доступных подразделов. Перейдите по каждому подразделу и убедитесь, что ключ имеет значение ProfileImagePath на правой панели.
-
Если у определенного подраздела нет значения ProfileImagePath или если его Данные пустые, вам необходимо удалить этот подраздел. Для этого нажмите правой кнопкой мыши и выберите в меню Удалить .
После удаления проблемного профиля закройте Редактор реестра и проверьте, решена ли проблема. Как мы уже упоминали, изменение реестра может привести к определенным проблемам, поэтому мы настоятельно рекомендуем вам создать резервную копию, прежде чем вносить какие-либо изменения.
Решение 8 – Включить Automount
Если эта проблема возникает при использовании резервного копирования Windows, вы можете исправить ее с помощью команд diskpart и automount . Diskpart – это мощный инструмент для управления жесткими дисками, поэтому будьте особенно осторожны при его использовании. Используя этот инструмент, вы можете нанести ущерб вашей системе, поэтому имейте в виду, что вы используете этот инструмент на свой страх и риск. Чтобы запустить diskpart в Windows 10, выполните следующие действия:
- Откройте Командную строку от имени администратора. Подробные инструкции о том, как это сделать, см. В разделе Решение 5 .
- Когда откроется Командная строка , введите diskpart и нажмите Enter .
-
Введите следующие строки в Командная строка :
- автомонтирования
- включение автомонтирования
- Закройте Командную строку и перезагрузите компьютер.
- ЧИТАЙТЕ ТАКЖЕ: PyCmd является альтернативой консоли командной строки Windows
Если проблема не устранена, вам необходимо сделать следующее:
- Откройте Командную строку и снова запустите diskpart .
- Когда diskpart запустится, введите список томов . Список всех разделов теперь появится.
- Выберите системный том. В нашем случае это Том 1 , поэтому нам нужно ввести выбрать том 1 . Если системный том помечен другим номером, обязательно используйте этот номер, чтобы выбрать его.
-
Введите онлайн-объем и нажмите Enter .
- Закройте Командную строку и перезагрузите компьютер.
После перезагрузки компьютера проверьте, устранена ли проблема. Еще раз, Diskpart является мощным инструментом, и если вы не будете осторожны, вы можете удалить файлы или сделать вашу систему не загружаемой, поэтому будьте особенно осторожны с этим.
Решение 9. Проверьте, активен ли системный раздел
Системе не удается найти указанный файл. Ошибка может возникнуть при использовании резервного копирования Windows. Чтобы решить эту проблему, вам нужно проверить, активен ли системный раздел. Для этого выполните следующие простые шаги:
-
Нажмите Windows Key + X и выберите в меню Управление дисками .
-
Управление дисками теперь запустится. Найдите системный диск, в большинстве случаев ему должен быть присвоен ярлык C, и щелкните его правой кнопкой мыши. Выберите Пометить раздел как активный . Если вы не можете выбрать эту опцию, это означает, что ваш системный диск уже активирован.
- Закройте Управление дисками и перезагрузите компьютер.
Решение 10 – Изменить область хранения shadowcopy
Если Система не может найти указанный файл , появляется ошибка на вашем ПК, вы можете исправить ее, изменив размер области хранения shadowcopy. Это может быть рискованной процедурой, поэтому мы советуем вам создать резервную копию на всякий случай. Чтобы изменить область хранения shadowcopy, вам нужно сделать следующее:
- Откройте Командную строку от имени администратора.
- Когда откроется Командная строка , введите следующую строку vssadmin list shadowstorage .
-
Теперь вы сможете увидеть область теневого хранилища и количество места, которое оно занимает. Чтобы увеличить его размер, введите vssadmin resize shadowstorage/For = C:/MaxSize = 5% .
- После этого перезагрузите компьютер.
Если проблема не устранена, снова откройте Командную строку и введите команду vssadmin delete shadows/all .
- ЧИТАЙТЕ ТАКЖЕ: Исправлено: «Возникла проблема с перезагрузкой ПК»
Решение 11. Добавьте принтер вручную
Немногие пользователи сообщили, что эта проблема возникает при попытке добавить принтер. Если у вас возникла та же проблема, вы можете попробовать добавить принтер вручную. Это простая процедура, и вы можете сделать это, выполнив следующие действия:
-
Нажмите Windows Key + S и введите принтеры . Выберите в меню Устройства и принтеры .
-
В верхнем меню выберите вариант Добавить принтер .
- Теперь вам нужно просто следовать инструкциям на экране, чтобы добавить принтер вручную.
По словам пользователей, эта ошибка возникает при установке принтеров HP, но если у вас есть проблема с любым другим принтером, обязательно попробуйте это решение.
Решение 12. Скопируйте файлы вручную
По-видимому, эта ошибка может возникать при попытке установить определенные устройства, и пользователи сообщили, что Система не может найти указанный файл , ошибка при установке сканера Epson. Немногие пользователи смогли решить эту проблему, просто найдя отсутствующий файл в папке Windows и скопировав его в соответствующее место.
По словам пользователей, они устранили проблему со своим устройством, найдя файл usbscan.sys в папке Windows и скопировав его в папку Windowsinfsetupapi.dev. Это решение работает только для определенных устройств, и вам, в основном, потребуется перенести другой файл на ваш компьютер. Мы должны предупредить вас, что внесение изменений в папку Windows может быть опасным, поэтому обязательно создайте резервную копию, если вы планируете внести изменения в каталог Windows.
Решение 13 – Удалите все приложения HP
По словам пользователей, эта ошибка появляется при установке драйвера принтера на некоторых ноутбуках HP. Если вы получаете сообщение Системе не удается найти указанный файл , вы можете исправить ее, удалив все приложения HP. Для этого выполните следующие действия:
- ЧИТАЙТЕ ТАКЖЕ: Исправлено: ошибка обновления Windows 10 0x80072af9
- Загрузите программу установки и удаления программ Microsoft.
- Запустите приложение и удалите все приложения HP с вашего ПК.
- После этого попробуйте загрузить и установить драйвер еще раз.
Немногие пользователи сообщили об этой проблеме, и, по их словам, ошибка вызвана антивирусом McAfee. Чтобы устранить эту проблему, необходимо отключить McAfee, выполнив следующие действия:
- Откройте McAfee Internet Security .
- Нажмите Изменить настройки .
- Теперь нажмите Сканирование в реальном времени .
- Выключите сканирование в реальном времени и попробуйте снова загрузить и установить драйверы.
Решение 14. Измените букву диска для раздела «Зарезервировано системой»
Системе не удается найти указанный файл . Ошибка может появиться при попытке использовать Windows Backup. Если это так, вы можете решить проблему, открыв раздел «Зарезервировано системой». Следует отметить, что изменение настроек раздела «Зарезервировано системой» может привести к определенным проблемам, поэтому имейте в виду, что эта процедура не без риска. Чтобы внести необходимые изменения, выполните следующие действия:
- Нажмите Ключ Windows + X и выберите Управление дисками .
-
Найдите раздел System Reserved и щелкните его правой кнопкой мыши. Выберите в меню Изменить букву диска и пути .
-
Нажмите кнопку Добавить .
-
Выберите Назначить следующую букву диска и выберите букву в раскрывающемся меню. Мы предлагаем вам использовать такие буквы, как Z или W.
- Закончив, нажмите ОК , чтобы сохранить изменения.
Закройте Управление дисками и проверьте, решена ли проблема. Следует отметить, что раздел «Зарезервировано системой» останется видимым, поэтому не вносите в него никаких изменений. Это не лучшее решение, но это надежный обходной путь, который может работать для некоторых пользователей.
Решение 15 – Удалить значение Config из реестра
По словам пользователей, Система не может найти указанный файл . Ошибка может появиться при попытке переустановить сетевой драйвер. Если это так, вам нужно открыть редактор реестра и удалить из него одно значение. Прежде чем вносить какие-либо изменения, мы рекомендуем вам проверить Решение 1 , чтобы узнать, как сделать резервную копию вашего реестра.
- ЧИТАЙТЕ ТАКЖЕ: как отменить изменения в реестре в Windows 10
Чтобы удалить проблемный ключ, сделайте следующее:
- Откройте редактор реестра .
- На левой панели перейдите к ключу HKEY_LOCAL_MACHINESYSTEMCurrentControlSetControlNetworkConfig . Если вы не можете найти этот ключ в своем реестре, мы советуем вам пропустить это решение.
- Нажмите правой кнопкой мыши клавишу Конфигурация и выберите в меню Удалить .
- После этого перезагрузите компьютер и проверьте, устранена ли проблема.
Решение 16 – Используйте менеджер загрузок
Мало кто сообщил, что эта проблема возникает при попытке установить загруженные приложения. Если вы получаете сообщение Системе не удается найти указанный файл при попытке установить определенное приложение, возможно, вы захотите снова загрузить установочный файл. Пользователи сообщали, что использование диспетчера загрузки, такого как Internet Download Manager, решило эту проблему, поэтому мы советуем вам попробовать это.Иногда ваша загрузка может быть повреждена или повреждена, поэтому обязательно попробуйте использовать менеджер загрузки.
Решение 17. Проверьте, запущены ли необходимые службы
Эта ошибка может появиться практически с любым программным обеспечением, и пользователи сообщили Системе не удалось найти указанный файл при использовании VMware. Чтобы решить эту проблему, вам нужно запустить соответствующие службы VMware, и вы можете сделать это, выполнив следующие действия:
-
Нажмите Windows Key + R и введите services.msc . Нажмите Enter или нажмите ОК .
-
Когда откроется окно «Службы», найдите Служба авторизации VMware в списке. Нажмите правой кнопкой мыши на этот сервис и выберите в меню Пуск .
- После запуска службы закройте окно Службы и проверьте, решена ли проблема.
Другой способ запустить службы VMware – использовать командную строку. Этот метод быстрее, и вы можете выполнить его, выполнив следующие действия:
- Запустите Командную строку от имени администратора.
- Когда откроется Командная строка , введите net start vmx86 и нажмите Enter , чтобы запустить его.
- После выполнения команды закройте Командную строку и проверьте, решена ли проблема.
Если проблема все еще сохраняется, вам, возможно, придется полностью переустановить VMware и проверить, решает ли это проблему.
- ЧИТАЙТЕ ТАКЖЕ: новое обновление Windows устраняет критическую уязвимость в Adobe Flash Player
Решение 18. Проверьте, включен ли ваш USB-порт
Видимо эта проблема возникает при использовании функции резервного копирования Windows. Чтобы исправить Системе не удалось найти указанный файл , рекомендуется подключать любые внешние жесткие диски к USB-портам с питанием. Немногие пользователи сообщили, что вы можете решить эту проблему, просто подключив внешний жесткий диск к другому порту. Похоже, что функция резервного копирования Windows требует подключения внешнего хранилища к USB-порту с питанием. После подключения устройства к другому USB-порту проверьте, устранена ли проблема.
Решение 19 – Удалить папку Windows.old
По словам пользователей, Система не может найти указанный файл. может появиться ошибка из-за папки Windows.old. Папка Windows.old появляется, если вы обновляете Windows или выполняете чистую установку Windows 10. Эта папка содержит вашу предыдущую установку Windows и позволяет вам восстановить ее. Папка Windows.old может привести к появлению этой ошибки при использовании функции резервного копирования Windows, и для устранения проблемы необходимо удалить папку Windows.old. Это относительно просто, и вы можете сделать это, выполнив следующие действия:
-
Нажмите Windows Key + S и введите cleanup . Выберите Очистка диска из списка результатов.
-
Выберите диск C и нажмите ОК . Windows 10 теперь будет сканировать ваш компьютер.
- Выберите Предыдущие установки Windows и нажмите ОК .
- Подождите, пока Windows удалит выбранные файлы.
После удаления папки Windows.old с вашего ПК, проверьте, решена ли проблема.
Решение 20. Перезапустите службу резервного копирования Windows
Если вы получаете сообщение Системе не удается найти указанный файл при попытке запустить Windows Backup, мы рекомендуем вам перезапустить службу Windows Backup. Для этого выполните следующие действия:
- Откройте окно Службы , выполнив шаги из Решения 18 .
-
Когда откроется окно Службы , найдите службу Резервное копирование Windows и дважды щелкните ее.
-
Установите для Тип запуска этой службы значение Вручную . Если служба не работает, нажмите кнопку Пуск , чтобы запустить ее снова. Теперь нажмите Применить и ОК , чтобы сохранить изменения.
-
В окне Службы нажмите правой кнопкой мыши Резервное копирование Windows и выберите в меню Перезагрузить . После этого закройте окно Службы .
- ЧИТАЙТЕ ТАКЖЕ: Исправлено: ошибка службы поддержки Bluetooth 1079
Некоторые пользователи также рекомендуют удалить программное обеспечение Samsung Magician с вашего компьютера. + Если у вас установлено это программное обеспечение, удалите его и проверьте, решает ли это проблему.
Исправлено – «Система не может найти указанный файл» cmd
Решение 1. Переместите проблемный файл
По мнению некоторых пользователей, вы можете решить эту проблему, просто переместив проблемный файл в другую папку. Пользователи сообщили, что перемещение проблемного файла в корневую папку, например, C: , устранило проблему для них. Это простой обходной путь, но он может решить эту проблему для вас, поэтому не стесняйтесь попробовать его.
Решение 2 – Удалить проблемное программное обеспечение
Некоторые пользователи сообщали, что Система не может найти указанный файл . Ошибка появляется каждый раз, когда они запускают свой компьютер. Это может быть довольно раздражающим, и, по мнению пользователей, вы можете решить эту проблему, просто удалив проблемные приложения. Похоже, что эта проблема вызвана программным обеспечением Apple, Real Player и Spybot Search & Destroy. Если у вас установлена какая-либо из этих программ, мы советуем вам удалить их, чтобы решить эту проблему. Для этого вам необходимо выполнить следующие шаги:
- Нажмите Windows Key + I , чтобы открыть приложение настроек .
- Перейдите в раздел Система и выберите вкладку Приложения и функции .
- Найдите любое из ранее упомянутых приложений и удалите его с вашего ПК.
После удаления проблемных приложений вы можете запустить CCleaner и использовать его для удаления любых оставшихся файлов, связанных с этими приложениями. Наконец, перезагрузите компьютер и проверьте, появляется ли сообщение об ошибке снова.
Решение 3. Используйте команду bcdedit правильно
Несколько пользователей сообщили, что Система не может найти указанный файл , сообщение об ошибке при попытке запустить команду bcdedit в командной строке. Обычно это происходит, если вы не запускаете эту команду должным образом. Чтобы решить эту проблему, вам нужно сделать следующее:
- Откройте Командную строку от имени администратора.
- Теперь введите bcdedit/store c: BootBCD и команду, которую вы хотите выполнить. Чтобы использовать команду bcdedit в Windows 10, вам нужно каждый раз вводить bcdedit/store c: BootBCD вместо bcdedit .
- ЧИТАЙТЕ ТАКЖЕ: Исправлено: папка WindowsApps отсутствует в Windows 10
Решение 4 – Показать расширения файлов
Иногда вы можете получить сообщение Система не может найти указанный файл в командной строке, если вы не знаете точное расширение файла. По умолчанию Windows 10 скрывает расширения файлов от пользователя, и это иногда может привести к определенным проблемам. Например, предположим, что у вас есть файл с именем file.txt . Это может выглядеть как обычный текстовый файл, но давайте посмотрим, что произойдет, если мы включим расширения файлов для файлов. Для этого просто перейдите на вкладку Вид и выберите Расширения имен файлов .

Теперь давайте посмотрим, как выглядит наш file.txt . После выявления расширений файлов полное имя файла будет file.txt.txt .

Если вы попытаетесь получить доступ к file.txt.txt вместо file.txt в командной строке, вы увидите, что он работает без проблем. Существует также другой способ проверить расширение файлов в командной строке. Просто перейдите к нужной папке в командной строке и введите команду dir . Появится список всех каталогов и файлов в этой папке. Как видите, теперь вы можете легко найти полное имя и расширение любого файла в этом каталоге.

Это не ошибка, а скорее ошибка новичка. В будущем, прежде чем пытаться получить доступ к определенному файлу, обязательно проверьте его полное имя, используя команду dir или открыв расширения файлов.
Исправлено – «Система не может найти указанный файл» uTorrent
Решение 1 – Удалить проблемный торрент
Если вы получаете сообщение Системе не удается найти указанный файл во время использования uTorrent, возможно, вы сможете временно исправить это с помощью этого решения. Чтобы устранить проблему, выполните следующие простые действия:
- Откройте uTorrent .
- Теперь найдите торрент, который дает вам это сообщение, щелкните его правой кнопкой мыши и выберите параметр Удалить и удалить .torrent + Данные .
- После этого попробуйте снова загрузить тот же торрент.
- ЧИТАЙТЕ ТАКЖЕ: Исправлено: система не может найти путь uTorrent ошибка в Windows 10
Имейте в виду, что это всего лишь временное решение, поэтому вполне возможно, что то же сообщение об ошибке появится снова. Мы также должны предупредить вас, что этот метод полностью удалит торрент и все связанные файлы с вашего ПК.
Решение 2. Проверьте папку загрузки торрента
Иногда Системе не удается найти указанный файл , возникает ошибка, если путь к папке загрузки загружен неверно. Чтобы решить эту проблему, не забудьте вручную выбрать папку для загрузки для каждого торрента. Для этого выполните следующие действия:
- Щелкните правой кнопкой мыши проблемный торрент.
- В меню выберите Дополнительно> Установить местоположение для загрузки .
- Теперь выберите правильную папку для загрузки.
- Повторите эти шаги для всех затронутых торрентов.
Кроме того, вы можете установить папку загрузки по умолчанию для всех торрентов, выполнив следующие действия:
- Откройте uTorrent и выберите Параметры> Настройки .
- Теперь перейдите на вкладку Каталоги .
- Выберите Добавить новые загрузки в и выберите нужную папку.
После этого сообщение об ошибке должно быть полностью устранено.
Решение 3. Выполните очистку диска
По словам пользователей, вы можете исправить Системе не удается найти указанный файл в uTorrent, просто выполнив Очистку диска. Иногда временные файлы или старые установки Windows могут мешать работе uTorrent и вызывать появление этой ошибки. Несколько пользователей сообщили, что программа «Очистка диска» устранила их проблему, поэтому мы рекомендуем вам попробовать ее. Что касается очистки диска, мы уже объяснили, как выполнить это в одном из наших предыдущих решений, поэтому обязательно ознакомьтесь с ним. При выполнении очистки диска обязательно выберите все доступные параметры, чтобы удалить все ненужные и старые файлы.
Решение 4 – Удалить установку uTorrent вручную
Иногда Система не может найти указанный файл . Может возникнуть ошибка, если ваша установка uTorrent повреждена. По словам пользователей, uTorrent недоступен в списке установленных приложений и запускается сам по себе. Если у вас возникла та же проблема, и вы не можете удалить uTorrent, вам необходимо выполнить следующие действия:
- ЧИТАЙТЕ ТАКЖЕ: 12 лучших инструментов для удаления ненужных файлов с вашего ПК с Windows 10
- Откройте Диспетчер задач , нажав Ctrl + Shift + Esc .
-
Когда откроется Диспетчер задач , найдите uTorrent на вкладке Процессы . Нажмите на него правой кнопкой мыши и выберите в меню Открыть местоположение файла .
- uTorrent установочный каталог появится, и вы сможете удалить его вручную.
Исправлено – «Система не может найти указанный файл» менеджер виртуальных дисков
Решение 1. Используйте утилиту Chromebook Recovery
По словам пользователей, эта ошибка может появиться при попытке форматирования определенных USB-накопителей. Похоже, система не может найти указанный файл влияет на флэш-накопители USB, которые используются в качестве держателей образов для восстановления Chromebook. Чтобы решить эту проблему, пользователи предлагают использовать утилиту Chromebook Recovery для стирания USB-накопителя. После этого флешка начнет работать в Windows 10, и ошибка будет устранена. Чтобы устранить проблему, выполните следующие действия.
- Сначала загрузите утилиту Chromebook Recovery.
- Подключите проблемный USB-накопитель к компьютеру.
- Запустите утилиту восстановления Chromebook.
- Нажмите Настройки и выберите Стереть носитель для восстановления .
- В раскрывающемся меню выберите свой USB-накопитель.
- Нажмите Продолжить> Стереть сейчас .
- Дождитесь окончания процесса и нажмите Готово .
После этого вы сможете снова отформатировать флэш-накопитель в операционной системе. Помните, что это решение работает только с USB-накопителями, которые используются в качестве носителя для восстановления Chromebook.
Решение 2. Используйте команду clean в инструменте diskpart
Если у вас возникла ошибка Системе не удалось найти указанный файл во время использования флэш-накопителя USB, вам может потребоваться использовать diskpart для ее исправления. Этот процесс удалит все файлы с вашей флешки, поэтому создайте резервную копию, если вам нужно. Чтобы очистить USB-накопитель, выполните следующие действия:
- ЧИТАЙТЕ ТАКЖЕ: зарезервируйте место на жестком диске: что нужно знать
- Запустите Командную строку от имени администратора.
- Когда откроется командная строка, введите diskpart и нажмите Enter .
- Теперь введите команду список дисков . Список устройств хранения появится. Проверьте размер каждого диска и не забудьте найти свой USB-накопитель. Крайне важно выбрать правильный диск, иначе вы удалите все файлы с жесткого диска навсегда.
- Введите выберите диск X , чтобы выбрать USB-накопитель. В нашем примере мы использовали выберите диск 1 , поскольку диск 1 соответствует нашему USB-накопителю.Еще раз, обязательно перепроверьте все и выберите правильный USB-накопитель.
-
Теперь введите clean , и diskpart удалит все файлы с вашей флешки.
- Закройте Командную строку .
Теперь ваш USB-накопитель очищен от любых файлов, и для его использования необходимо отформатировать его. Для этого выполните следующие действия:
- Нажмите Ключ Windows + X и выберите Управление дисками из списка.
-
Когда откроется Управление дисками , найдите флэш-накопитель USB, щелкните его правой кнопкой мыши и выберите в меню Формат .
- Выберите нужные параметры и отформатируйте ваш диск.
- После завершения процесса форматирования закройте Управление дисками .
Как видите, этот процесс относительно прост, но вы должны быть особенно осторожны при использовании инструмента diskpart .
Решение 3 – внести изменения в ваш реестр
Системе не удается найти указанный файл . У некоторых пользователей появляется ошибка при подключении флэш-накопителя USB к их ПК. Чтобы решить эту проблему, вам нужно внести некоторые изменения в свой реестр. Прежде чем вносить какие-либо изменения, мы советуем вам создать резервную копию реестра, на всякий случай.
- Запустите Редактор реестра . Чтобы увидеть, как это сделать, обязательно ознакомьтесь с некоторыми из наших предыдущих решений.
- Теперь перейдите к клавише HKEY_LOCAL_MACHINESYSTEMCurrentControlSetServicesvds на левой панели.
-
На правой панели найдите ImagePath . По умолчанию он должен иметь значение % SystemRoot% System32vds.exe. По словам пользователей, иногда проблема может быть в переменной% SystemRoot%, и вам нужно изменить ее вручную.
-
Дважды нажмите ImagePath , чтобы изменить его. Замените % SystemRoot% на C: Windows в поле Значение данных . После внесения изменений поле «Значение» будет выглядеть следующим образом: C: WindowsSystem32vds.exe . Нажмите ОК , чтобы сохранить изменения.
- Закройте Редактор реестра .
- ЧИТАЙТЕ ТАКЖЕ: Исправлено: «Ошибка подключения с ошибкой 868»
В некоторых редких случаях переменная% SystemRoot% может работать неправильно, и это приведет к появлению этой ошибки. После внесения необходимых изменений и замены значения абсолютным путем проблема должна быть решена.
Решение 4. Отформатируйте диск на Mac или Linux
Если вы не можете получить доступ к флеш-накопителю в Windows из-за Системе не удается найти указанный файл , возможно, вам сначала нужно отформатировать ее на Mac или Linux. По словам пользователей, они решили эту проблему, просто подключив флэш-диск к любому компьютеру Mac или Linux и отформатировав диск с помощью файловой системы FAT32. После форматирования диска подключите его к ПК с Windows 10 и выполните Решение 2 , чтобы очистить диск с помощью инструмента diskpart .
Решение 5 – отключить автомонтирование
В одном из наших предыдущих решений мы упоминали, как можно разрешить включение функции автоматического монтирования. Система не может найти указанный файл при установке флэш-накопителя USB. Однако, похоже, что в некоторых случаях вы можете исправить эту ошибку, отключив автомонтирование в diskpart. Для этого вам необходимо выполнить следующие шаги:
- Откройте Командную строку от имени администратора.
- Введите diskpart и нажмите Enter .
- Теперь введите отключить автонастройку .
- Закройте Командную строку и проверьте, устранена ли ошибка.
После отключения автомонтирования вы сможете форматировать съемное хранилище без ошибок. После этого вы можете включить функцию автоматического монтирования. Чтобы увидеть, как это сделать, посмотрите одно из наших предыдущих решений.
Решение 6 – Удалить и отформатировать все разделы
Это решение удалит все файлы с вашего жесткого диска, поэтому, если вы собираетесь его использовать, обязательно сделайте резервную копию всех ваших важных файлов. Поскольку это решение удалит все файлы, мы рекомендуем использовать его только на новом ПК, на котором нет важных файлов. Пользователи сообщили, что после переустановки операционной системы они не могут инициализировать свой дополнительный жесткий диск.
По их словам, они не могут инициализировать его из-за сообщения Система не может найти указанный файл . Если у вас есть эта или любая другая подобная проблема, вы можете исправить ее с помощью программного обеспечения Partition Wizard. Просто создайте загрузочную флешку с помощью этого инструмента и запустите с нее компьютер. После запуска инструмента вам необходимо удалить все разделы на диске, которые вы не можете инициализировать, и снова отформатировать их. После этого инициализируйте разделы как GPT.
Еще раз, это решение удалит все файлы с проблемного диска, поэтому обязательно используйте это решение в качестве крайней меры или только с новым ПК или пустым жестким диском.
Система не может найти указанный файл. Ошибка может по-разному повлиять на ваш компьютер. Это может быть досадной ошибкой, но мы надеемся, что вы решили ее с помощью одного из наших решений.
Примечание редактора . Этот пост был первоначально опубликован в марте 2017 года и с тех пор был полностью переработан и обновлен для обеспечения свежести, точности и полноты.


