Когда необходимо регулировать двери шкафа на петлях и как это сделать?
Содержание
- Когда нужна регулировка?
- Что потребуется?
- Как настроить?
- Как ухаживать?
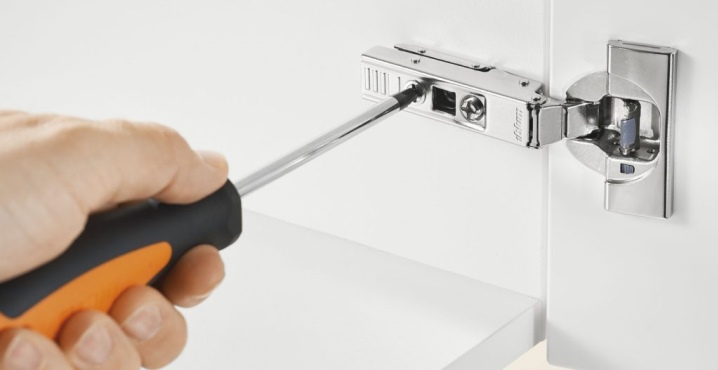
Если дверцы кухонного гарнитура или гардероба плохо закрываются, нужно взять отвёртку и начать осмотр. Отрегулировать навесы можно и без особых навыков, для этого не потребуется много времени – достаточно иметь под рукой инструменты и соблюдать определённые правила. Остановимся на некоторых тонкостях этого дела и рассмотрим отдельные случаи, поскольку есть несколько методов корректировки навесов.
Когда нужна регулировка?
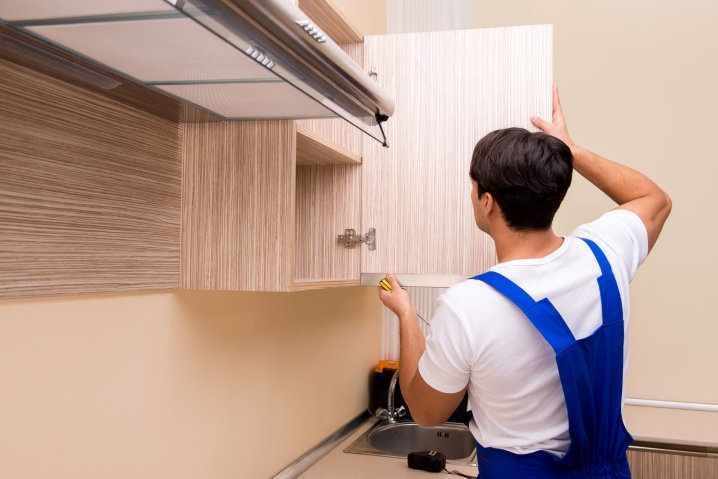
Регулировка петель, прежде всего, может понадобиться сразу после покупки шкафа.
После его установки следует проверить прочность петель, ровно ли закреплены дверцы, правильно ли они закрываются, и в случае выявления дефектов, сразу их исправить.
Эту же процедуру проводят и после переезда с одного места жительства на другое. Во время транспортировки может произойти деформация дверей, они могут разболтаться, поэтому после перевозки мебели, возможно, предстоит заняться регулировкой петель.
Ну и в домашних условиях периодически нужно проверять, насколько хорошо закрываются шкафчики, не болтаются ли дверцы: неисправность навесов может быть связана с резкими изменениями температурного режима, постоянной влажностью или неправильными действиями в ходе эксплуатации.
Что потребуется?
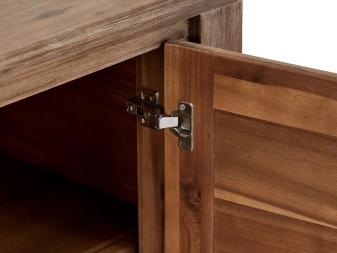
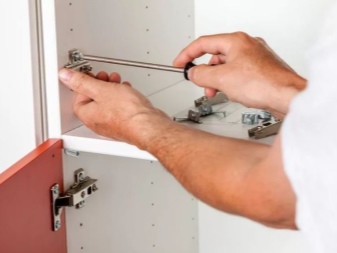
Главные инструменты при регулировке дверных петель – обычная и крестовидная отвёртка. Иногда может понадобиться отвес или уровень для строительных работ, с помощью которых предстоит выяснить, насколько ровно выставлены конструкции.
Перекосы могут быть из-за того, что шкаф был собран неправильно либо поставлен на неровную поверхность.
Вот для таких случаев нужен отвес – он поможет мастеру определить геометрию конструкции и при необходимости поставить её по уровню. Как правило, после таких манипуляций отпадает необходимость в регулировке петель, искривление устраняется, всё становится на свои места.
Для дальнейших работ потребуется понимание того, чем предстоит заняться. Вначале надо выявить масштаб проблемы и определиться со способом регулировки. При осмотре навесов может обнаружиться ослабленное крепление – в этом случае речь идёт не о регулировке, нужно лишь плотнее прикрутить саморезы.

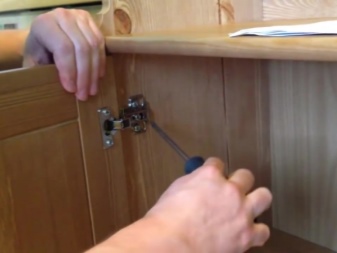
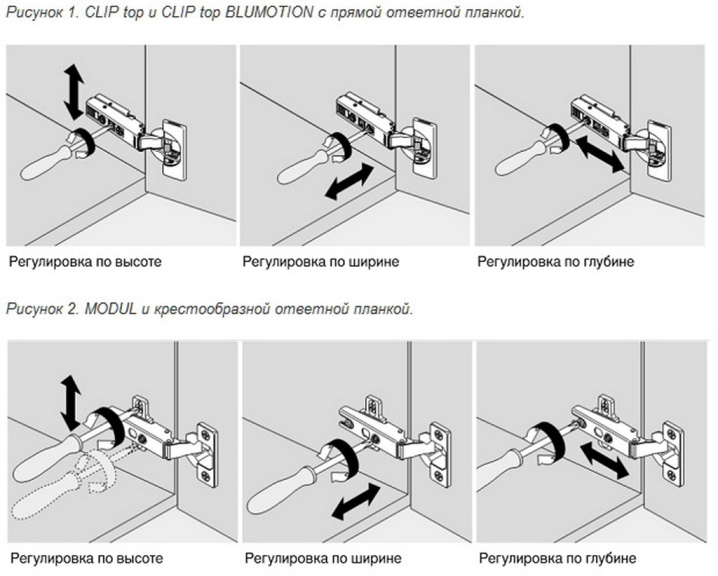
Предстоит рассмотреть место образования зазора, оценить размер, радиус смещения и обозначить область зацепа. Это обязательные правила, которые нужно выполнить перед тем, как взяться за дело. Они помогут понять, каким методом осуществить регулировку: по ширине (когда виднеется неровный зазор между полотнами), глубине либо по высоте (когда одно полотно расположено ниже либо выше относительно другого).
Как настроить?
Начать стоит с вертикальной корректировки навеса: находят на нём верхнюю и нижнюю петли, удаляют заглушки, если они есть. После чего отвёрткой ослабляют шурупы и фиксируют створки шкафа на нужную позицию, приподнимая либо опуская их до нужного положения.
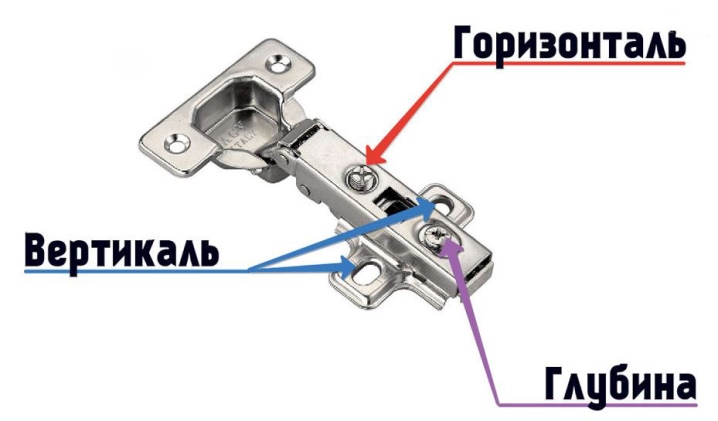
Болты закручивают, придерживая полотно на оптимальном уровне. После того как дверные полотна отрегулировали по вертикали, приступают к работам по глубине и горизонтали. Если пойти от обратного, всё равно к такой последовательности придётся вернуться, поэтому не стоит терять время.
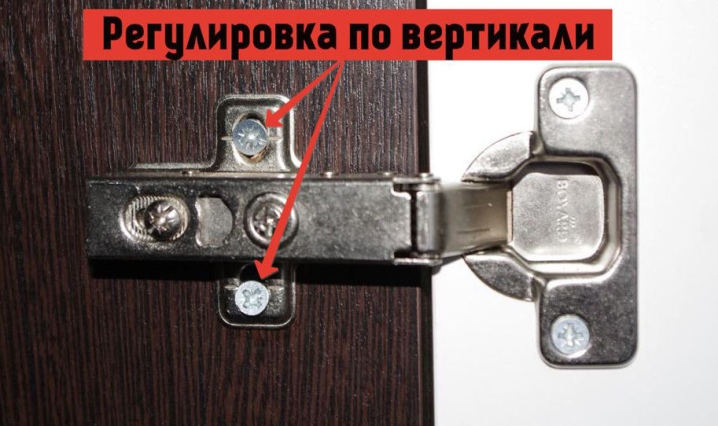
Чтобы отрегулировать двери шкафа на петлях по высоте и устранить трение полотен о нижние планки, необходимо ослабить отвёрткой шурупы, насаженные на два продолговатых ушка, и проследить за тем, чтобы не было перекоса двери.
При необходимости фасадную дверцу приподнимают и закручивают шурупы: орудуют отвёрткой осторожно, чувствуя резьбу, чтобы её не сломать.
Вглубь регулируют петли, когда одно из полотен отходит или дверцы расходятся в противоположные стороны. Для таких работ необходима отвёртка «крест». Подкручивают регулировочный винт по отношению к себе до полного выравнивания дверцы: если 2-3 мм недостаточно, действие продолжают.
В данном случае этот регулировочный винт хорошо проворачивают, его вдавливают сильнее остальных, так как он поддерживает основную часть конструкции. Главное, не допустить образования зазоров и щелей между полотнами.
Работа эта требует терпения. Возможно, для нужного результата придётся по нескольку раз примерять створку, но это не должно вас раздражать – опыт придёт со временем.
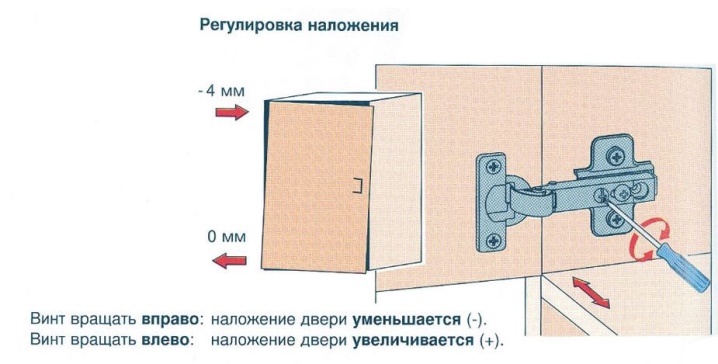
Независимо от способа, есть общие правила, которых нужно придерживаться при проведении регулировки двери шкафа.
- Действовать чётко и последовательно – так получится сделать всё быстрее и допустить меньше ошибок. Вначале проводят регулировку по высоте, а после по отношению к другим полотнам.
- Нужно убедиться, что конструкция выставлена по уровню. Если есть перекос по геометрии, исправляют вначале этот момент, чтобы понять: нужно работать дальше или проблема исчезла в результате правильной установки мебели.
- Стоит учесть и такой момент, как излишняя забитость шкафа (характерно для платяного) – в таком случае зазор между дверными полотнами увеличится. Но есть допустимая норма – размер щели не должен быть больше 5 миллиметров.
- Есть случаи, когда предварительно нужно произвести настройку петель, а уж потом заняться регулировкой дверей. В таком случае проверяют присадку фасада под чашку либо выявляют при осмотре.
Как ухаживать?
Чтобы не ходить постоянно с отвёрткой и не заниматься только настраиванием шкафных дверей, рекомендован ряд мероприятий по уходу.
- После сбора и установки мебельных конструкций 2-3 раза за год проводят профилактическую подкрутку болтов на дверных петлях. Это в том случае, когда шкафом пользуются нечасто. При интенсивной эксплуатации, например, кухонного гарнитура, это делают хотя бы 1 раз в течение месяца.
- Регулярно надо осматривать конструкции на предмет обнаружения перекосов, различных дефектов, отхождений и так далее. Вовремя устранять все неполадки.
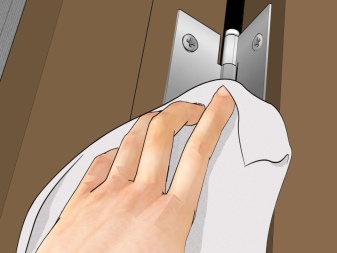
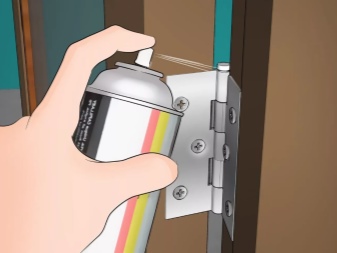
- Регулировочный механизм нужно смазывать – так он лучше и дольше по сроку будет работать. Для смазки берут моторное масло или другое подходящее средство. После процедуры дверцу нужно пошатать туда-обратно (закрыть-открыть), чтобы смазывающее вещество глубже проникло в устройство. Если хоть 1 раз за год смазывать петли, то дверца не будет скрипеть и издавать другие шумы.
- Защитить навес можно с помощью масляного доводчика, который полностью закроет регулировочный механизм, а под таким колпаком и болты меньше будут расшатываться.
Металлические петли довольно надёжны, при правильной эксплуатации могут прослужить до 15, а то и более лет.
Есть один «недуг» у навесов кухонных гарнитуров, особенно шкафов, расположенных вблизи газовых плит либо варочных поверхностей. На них откладывается вязкое смолоподобное вещество – продукт сгорания газа. От этого петли залипают, не давая возможности нормально открываться дверцам. К таким местам требуется повышенное внимание, следует как можно чаще прочищать их.
Поддерживать облик фасадов мебели в привлекательном виде можно без особого труда и усилий. Чтобы справиться с перекосами дверных конструкций, много времени не понадобится, а на осмотры и профилактику его уйдёт ещё меньше.
Как отрегулировать дверцы шкафов и мебели в целом, смотрите в видео.
Download Article
Download Article
Kitchen cabinet doors don’t always fit perfectly without some adjustments, and over time they can become loose or misaligned. Luckily, almost all kitchen cabinet doors have a set of screws and hinges that are easy to adjust when you know what you’re doing! Tighten all of the door and cupboard screws on the inside to fix loose cabinet doors, adjust specific screws to realign the doors, and adjust doors outwards when they are binding against the cupboards and not closing properly.
-
1
Open the cabinet doors and locate the hinge screws on the inside. The cabinet doors will have 2 vertical fixed door screws that attach each hinge to each door. There are 2 vertical adjustable cupboard screws and 2 horizontal screws on the inside of the cupboard for each hinge. The leftmost screw is the adjusting screw, and the screw on the right is the locking screw.[1]
[2]
- If your cupboard doors are loose, don’t assume you need to replace the hinges. Oftentimes, all you need to do is tighten or adjust the various screws to tighten the doors again.
-
2
Tighten the locking screw all the way if it is loose. The horizontal screw furthest to the right on the hinges inside the cupboard is the locking screw. Use a screwdriver to screw it clockwise as far as it will go to tighten it and check if the cabinet doors are still loose.[3]
[4]
- If the door is tight at this point, then you don’t need to do anything else. If it is still loose, then proceed with tightening the rest of the screws.
Advertisement
-
3
Tighten the fixed door screws and adjustable cupboard screws next. Screw all the vertical screws as tight as they will go if the cupboard door is still loose after tightening the locking screw. The only screw you will not have touched at this point is the leftmost horizontal screw on the inside of the cupboard (this screw is only used for adjusting the doors side-to-side).[5]
- After tightening all of these screws, your cabinet doors will be tight again, but they might be slightly misaligned. Proceed to make adjustments to align them properly.
Advertisement
-
1
Open the cabinet door and locate the screws used for aligning the door. Cabinet door hinges have 2 vertical fixed door screws that attach the hinge to the door and 2 vertical adjustable cupboard screws that attach the hinges to the cupboard. Each hinge has a horizontal adjusting screw (closest to the front of the cupboard) and a horizontal locking screw (closest to the back of the cupboard).
- You will be using all of the screws for adjustments except for the screws that hold the hinges to the doors. In other words, you will only be adjusting the screws that hold the hinges to the inside of the cupboard.
-
2
Use the horizontal adjusting screw to adjust a door side to side. Turn the adjusting screws clockwise with a screwdriver in each set of hinges to move the door closer to the edge of the cabinet. Turn them counterclockwise to move the door further away from the edge of the cabinet.[6]
- You might have to slightly unscrew the locking screw to use the adjusting screw. Make sure to tighten it completely after you align the door.
-
3
Adjust a door up or down with the vertical adjustable cupboard screws. Loosen both of the adjustable cupboard screws in each set of hinges until you can move the door up and down. Align the door vertically how you want it and tighten the screws again.[7]
- These screws are usually in slotted holes that make it easy to slide the door up and down to adjust it without having to remove the screws completely.
-
4
Adjust the angle of a door by turning 1 of the adjustable cupboard screws. Use the adjusting screw on just 1 set of hinges to correct the angle of a crooked cabinet door. Turn 1 screw in 1 direction and the other in the other direction to make large adjustments.[8]
- For example, if there is more space between the cabinet door and the edge of the cabinet at the top of the door, then turn the adjusting screw in the top hinge clockwise to move the door closer to the edge of the cabinet at the top.
-
5
Close the cabinet doors to check the alignment. The cabinet doors will be symmetrical and close properly if you made the correct adjustments. Note any misalignment that is still occurring, open the cabinet doors back up, and make adjustments with the necessary screws.[9]
- Try making 1 minor adjustment at a time to perfect the alignment of the cabinet doors.
Advertisement
-
1
Close the door and look on the side where the hinges are to see if it is binding. Binding means the cupboard door is touching the cupboard frame as it closes and is too tight. Your cabinet doors will not close properly when they are binding.[10]
- If your cabinet doors make a lot of creaking noises when you open and close them, then it could be a sign they are binding and you should check them and fix them.
-
2
Locate and loosen the locking screws with a screwdriver. Open up the cupboard doors and locate the locking screws; which are the horizontal screws on the part of the hinges closest to the back of the cupboard. Use a screwdriver to loosen them so that you can adjust the cabinet doors.[11]
- You won’t need to adjust any other screws to fix binding cabinet doors.
-
3
Pull the door towards you and away from the cupboard frame to create a gap. The ideal gap between a cabinet door and the frame of the cupboard is no more than 1 millimetre (0.039 in). This will allow your cabinet doors to close properly.[12]
- You won’t notice a big difference in the position of the door while you pull it towards you, but all it takes is a small adjustment to stop a cabinet door from binding against the cupboard.
-
4
Tighten the locking screws again to hold the cabinet doors in position. Use a screwdriver to turn the locking screws clockwise. Tighten them as much as you can to secure the cabinet doors in their new position.[13]
- It may be helpful to have a helper hold each door in place for you so you can tighten the screws again without shifting the position of the cabinet doors.
-
5
Close and open the cabinet doors to see if the binding is fixed. The doors will close flush against the frame and there will be no creaking if you have adjusted the doors correctly. Repeat the process if the doors are still not closing properly yet.[14]
- This is the final type of adjustment you can make to fix cabinet door alignment problems. When you know how to tighten loose cabinet doors, adjust poorly aligned doors, and fix binding, you will be able to get almost any kitchen cabinet door to work properly!
Advertisement
Ask a Question
200 characters left
Include your email address to get a message when this question is answered.
Submit
Advertisement
Video
Things You’ll Need
- Screwdriver
About This Article
Thanks to all authors for creating a page that has been read 106,556 times.
Did this article help you?
Download Article
Download Article
Kitchen cabinet doors don’t always fit perfectly without some adjustments, and over time they can become loose or misaligned. Luckily, almost all kitchen cabinet doors have a set of screws and hinges that are easy to adjust when you know what you’re doing! Tighten all of the door and cupboard screws on the inside to fix loose cabinet doors, adjust specific screws to realign the doors, and adjust doors outwards when they are binding against the cupboards and not closing properly.
-
1
Open the cabinet doors and locate the hinge screws on the inside. The cabinet doors will have 2 vertical fixed door screws that attach each hinge to each door. There are 2 vertical adjustable cupboard screws and 2 horizontal screws on the inside of the cupboard for each hinge. The leftmost screw is the adjusting screw, and the screw on the right is the locking screw.[1]
[2]
- If your cupboard doors are loose, don’t assume you need to replace the hinges. Oftentimes, all you need to do is tighten or adjust the various screws to tighten the doors again.
-
2
Tighten the locking screw all the way if it is loose. The horizontal screw furthest to the right on the hinges inside the cupboard is the locking screw. Use a screwdriver to screw it clockwise as far as it will go to tighten it and check if the cabinet doors are still loose.[3]
[4]
- If the door is tight at this point, then you don’t need to do anything else. If it is still loose, then proceed with tightening the rest of the screws.
Advertisement
-
3
Tighten the fixed door screws and adjustable cupboard screws next. Screw all the vertical screws as tight as they will go if the cupboard door is still loose after tightening the locking screw. The only screw you will not have touched at this point is the leftmost horizontal screw on the inside of the cupboard (this screw is only used for adjusting the doors side-to-side).[5]
- After tightening all of these screws, your cabinet doors will be tight again, but they might be slightly misaligned. Proceed to make adjustments to align them properly.
Advertisement
-
1
Open the cabinet door and locate the screws used for aligning the door. Cabinet door hinges have 2 vertical fixed door screws that attach the hinge to the door and 2 vertical adjustable cupboard screws that attach the hinges to the cupboard. Each hinge has a horizontal adjusting screw (closest to the front of the cupboard) and a horizontal locking screw (closest to the back of the cupboard).
- You will be using all of the screws for adjustments except for the screws that hold the hinges to the doors. In other words, you will only be adjusting the screws that hold the hinges to the inside of the cupboard.
-
2
Use the horizontal adjusting screw to adjust a door side to side. Turn the adjusting screws clockwise with a screwdriver in each set of hinges to move the door closer to the edge of the cabinet. Turn them counterclockwise to move the door further away from the edge of the cabinet.[6]
- You might have to slightly unscrew the locking screw to use the adjusting screw. Make sure to tighten it completely after you align the door.
-
3
Adjust a door up or down with the vertical adjustable cupboard screws. Loosen both of the adjustable cupboard screws in each set of hinges until you can move the door up and down. Align the door vertically how you want it and tighten the screws again.[7]
- These screws are usually in slotted holes that make it easy to slide the door up and down to adjust it without having to remove the screws completely.
-
4
Adjust the angle of a door by turning 1 of the adjustable cupboard screws. Use the adjusting screw on just 1 set of hinges to correct the angle of a crooked cabinet door. Turn 1 screw in 1 direction and the other in the other direction to make large adjustments.[8]
- For example, if there is more space between the cabinet door and the edge of the cabinet at the top of the door, then turn the adjusting screw in the top hinge clockwise to move the door closer to the edge of the cabinet at the top.
-
5
Close the cabinet doors to check the alignment. The cabinet doors will be symmetrical and close properly if you made the correct adjustments. Note any misalignment that is still occurring, open the cabinet doors back up, and make adjustments with the necessary screws.[9]
- Try making 1 minor adjustment at a time to perfect the alignment of the cabinet doors.
Advertisement
-
1
Close the door and look on the side where the hinges are to see if it is binding. Binding means the cupboard door is touching the cupboard frame as it closes and is too tight. Your cabinet doors will not close properly when they are binding.[10]
- If your cabinet doors make a lot of creaking noises when you open and close them, then it could be a sign they are binding and you should check them and fix them.
-
2
Locate and loosen the locking screws with a screwdriver. Open up the cupboard doors and locate the locking screws; which are the horizontal screws on the part of the hinges closest to the back of the cupboard. Use a screwdriver to loosen them so that you can adjust the cabinet doors.[11]
- You won’t need to adjust any other screws to fix binding cabinet doors.
-
3
Pull the door towards you and away from the cupboard frame to create a gap. The ideal gap between a cabinet door and the frame of the cupboard is no more than 1 millimetre (0.039 in). This will allow your cabinet doors to close properly.[12]
- You won’t notice a big difference in the position of the door while you pull it towards you, but all it takes is a small adjustment to stop a cabinet door from binding against the cupboard.
-
4
Tighten the locking screws again to hold the cabinet doors in position. Use a screwdriver to turn the locking screws clockwise. Tighten them as much as you can to secure the cabinet doors in their new position.[13]
- It may be helpful to have a helper hold each door in place for you so you can tighten the screws again without shifting the position of the cabinet doors.
-
5
Close and open the cabinet doors to see if the binding is fixed. The doors will close flush against the frame and there will be no creaking if you have adjusted the doors correctly. Repeat the process if the doors are still not closing properly yet.[14]
- This is the final type of adjustment you can make to fix cabinet door alignment problems. When you know how to tighten loose cabinet doors, adjust poorly aligned doors, and fix binding, you will be able to get almost any kitchen cabinet door to work properly!
Advertisement
Ask a Question
200 characters left
Include your email address to get a message when this question is answered.
Submit
Advertisement
Video
Things You’ll Need
- Screwdriver
About This Article
Thanks to all authors for creating a page that has been read 106,556 times.


