17 авг. 2022 г.
читать 1 мин
Одна распространенная ошибка, с которой вы можете столкнуться при использовании Python:
no module named ' matplotlib '
Эта ошибка возникает, когда Python не обнаруживает библиотеку matplotlib в вашей текущей среде.
В этом руководстве представлены точные шаги, которые вы можете использовать для устранения этой ошибки.
Шаг 1: pip устанавливает matplotlib
Поскольку matplotlib не устанавливается автоматически вместе с Python, вам нужно будет установить его самостоятельно. Самый простой способ сделать это — использовать pip , менеджер пакетов для Python.
Вы можете запустить следующую команду pip для установки matplotlib:
pip install matplotlib
В большинстве случаев это исправит ошибку.
Шаг 2: Установите пип
Если вы все еще получаете сообщение об ошибке, вам может потребоваться установить pip. Используйте эти шаги , чтобы сделать это.
Вы также можете использовать эти шаги для обновления pip до последней версии, чтобы убедиться, что он работает.
Затем вы можете запустить ту же команду pip, что и раньше, чтобы установить matplotlib:
pip install matplotlib
На этом этапе ошибка должна быть устранена.
Шаг 3: проверьте версии matplotlib и pip
Если вы все еще сталкиваетесь с ошибками, возможно, вы используете другую версию matplotlib и pip.
Вы можете использовать следующие команды, чтобы проверить, совпадают ли ваши версии matplotlib и pip:
which python
python --version
which pip
Если две версии не совпадают, вам нужно либо установить более старую версию matplotlib, либо обновить версию Python.
Шаг 4: Проверьте версию matplotlib
После того, как вы успешно установили matplotlib, вы можете использовать следующую команду, чтобы отобразить версию matplotlib в вашей среде:
pip show matplotlib

Name: matplotlib
Version: 3.1.3
Summary: Python plotting package
Home-page: https://matplotlib.org
Author: John D. Hunter, Michael Droettboom
Author-email: matplotlib-users@python.org
License: PSF
Location: /srv/conda/envs/notebook/lib/python3.7/site-packages
Requires: cycler, numpy, kiwisolver, python-dateutil, pyparsing
Required-by: seaborn, scikit-image
Note: you may need to restart the kernel to use updated packages.
Примечание. Самый простой способ избежать ошибок с версиями matplotlib и Python — просто установить Anaconda , набор инструментов, предустановленный вместе с Python и matplotlib и бесплатный для использования.
Дополнительные ресурсы
В следующих руководствах объясняется, как исправить другие распространенные проблемы в Python:
Как исправить: нет модуля с именем numpy
Как исправить: нет модуля с именем plotly
Как исправить: имя NameError ‘pd’ не определено
Как исправить: имя NameError ‘np’ не определено
One common error you may encounter when using Python is:
no module named 'matplotlib'
This error occurs when Python does not detect the matplotlib library in your current environment.
This tutorial shares the exact steps you can use to troubleshoot this error.
Step 1: pip install matplotlib
Since matplotlib doesn’t come installed automatically with Python, you’ll need to install it yourself. The easiest way to do so is by using pip, which is a package manager for Python.
You can run the following pip command to install matplotlib:
pip install matplotlib
In most cases, this will fix the error.
Step 2: Install pip
If you’re still getting an error, you may need to install pip. Use these steps to do so.
You can also use these steps to upgrade pip to the latest version to ensure that it works.
You can then run the same pip command as earlier to install matplotlib:
pip install matplotlib
At this point, the error should be resolved.
Step 3: Check matplotlib and pip Versions
If you’re still running into errors, you may be using a different version of matplotlib and pip.
You can use the following commands to check if your matplotlib and pip versions match:
which python
python --version
which pip
If the two versions don’t match, you need to either install an older version of matplotlib or upgrade your Python version.
Step 4: Check matplotlib Version
Once you’ve successfully installed matplotlib, you can use the following command to display the matplotlib version in your environment:
pip show matplotlib

Name: matplotlib
Version: 3.1.3
Summary: Python plotting package
Home-page: https://matplotlib.org
Author: John D. Hunter, Michael Droettboom
Author-email: matplotlib-users@python.org
License: PSF
Location: /srv/conda/envs/notebook/lib/python3.7/site-packages
Requires: cycler, numpy, kiwisolver, python-dateutil, pyparsing
Required-by: seaborn, scikit-image
Note: you may need to restart the kernel to use updated packages.
Note: The easiest way to avoid errors with matplotlib and Python versions is to simply install Anaconda, which is a toolkit that comes pre-installed with Python and matplotlib and is free to use.
Additional Resources
The following tutorials explain how to fix other common problems in Python:
How to Fix: No module named numpy
How to Fix: No module named plotly
How to Fix: NameError name ‘pd’ is not defined
How to Fix: NameError name ‘np’ is not defined
Contents
- Installation
- Report a compilation problem
- matplotlib compiled fine, but nothing shows up when I use it
- How to completely remove matplotlib
- Source install
- How to Install
- Source install from git
- Linux Notes
- OS-X Notes
- Which python for OS X?
- Installing OSX binary wheels
- Python.org Python
- Macports
- Homebrew
- Pip problems
- Installing via OSX mpkg installer package
- Checking your installation
- Windows Notes
matplotlib compiled fine, but nothing shows up when I use it
The first thing to try is a clean install and see if
that helps. If not, the best way to test your install is by running a script,
rather than working interactively from a python shell or an integrated
development environment such as IDLE which add additional
complexities. Open up a UNIX shell or a DOS command prompt and cd into a
directory containing a minimal example in a file. Something like
simple_plot.py for example:
import matplotlib.pyplot as plt
fig, ax = plt.subplots()
ax.plot([1,2,3])
plt.show()
and run it with:
python simple_plot.py --verbose-helpful
This will give you additional information about which backends matplotlib is
loading, version information, and more. At this point you might want to make
sure you understand matplotlib’s configuration
process, governed by the matplotlibrc configuration file which contains
instructions within and the concept of the matplotlib backend.
If you are still having trouble, see Getting help.
How to completely remove matplotlib
Occasionally, problems with matplotlib can be solved with a clean
installation of the package.
The process for removing an installation of matplotlib depends on how
matplotlib was originally installed on your system. Follow the steps
below that goes with your original installation method to cleanly
remove matplotlib from your system.
Source install
Unfortunately:
does not properly clean the build directory, and does nothing to the
install directory. To cleanly rebuild:
- Delete the caches from your .matplotlib configuration directory.
- Delete the
builddirectory in the source tree. - Delete any matplotlib directories or eggs from your installation
directory.
How to Install
Source install from git
Clone the main source using one of:
git clone git@github.com:matplotlib/matplotlib.git
or:
git clone git://github.com/matplotlib/matplotlib.git
and build and install as usual with:
> cd matplotlib
> python setup.py install
Note
If you are on debian/ubuntu, you can get all the dependencies
required to build matplotlib with:
sudo apt-get build-dep python-matplotlib
If you are on Fedora/RedHat, you can get all the dependencies
required to build matplotlib by first installing yum-builddep
and then running:
su -c "yum-builddep python-matplotlib"
This does not build matplotlib, but it does get all of the
build dependencies, which will make building from source easier.
If you want to be able to follow the development branch as it changes
just replace the last step with (make sure you have setuptools
installed):
> python setup.py develop
This creates links in the right places and installs the command
line script to the appropriate places.
Then, if you want to update your matplotlib at any time, just do:
When you run git pull, if the output shows that only Python files have been
updated, you are all set. If C files have changed, you need to run the python command again to compile them.
setup.py develop
There is more information on using git in
the developer docs.
Linux Notes
Because most Linux distributions use some sort of package manager,
we do not provide a pre-built binary for the Linux platform.
Instead, we recommend that you use the “Add Software” method for
your system to install matplotlib. This will guarantee that everything
that is needed for matplotlib will be installed as well.
If, for some reason, you can not use the package manager, Linux usually
comes with at least a basic build system. Follow the instructions found above for how to build and install matplotlib.
OS-X Notes
Which python for OS X?
Apple ships OS X with its own Python, in /usr/bin/python, and its own copy
of matplotlib. Unfortunately, the way Apple currently installs its own copies
of numpy, scipy and matplotlib means that these packages are difficult to
upgrade (see system python packages). For that reason we strongly suggest
that you install a fresh version of Python and use that as the basis for
installing libraries such as numpy and matplotlib. One convenient way to
install matplotlib with other useful Python software is to use one of the
excellent Python scientific software collections that are now available:
- Anaconda from Continuum Analytics
- Canopy from Enthought
These collections include Python itself and a wide range of libraries; if you
need a library that is not available from the collection, you can install it
yourself using standard methods such as pip. Continuum and Enthought offer
their own installation support for these collections; see the Ananconda and
Canopy web pages for more information.
Other options for a fresh Python install are the standard installer from
python.org, or installing
Python using a general OSX package management system such as homebrew or macports. Power users on
OSX will likely want one of homebrew or macports on their system to install
open source software packages, but it is perfectly possible to use these
systems with another source for your Python binary, such as Anaconda, Canopy
or Python.org Python.
Installing OSX binary wheels
If you are using recent Python from https://www.python.org, Macports or
Homebrew, then you can use the standard pip installer to install matplotlib
binaries in the form of wheels.
Python.org Python
Install pip following the standard pip install instructions. For the impatient,
open a new Terminal.app window and:
curl -O https://bootstrap.pypa.io/get-pip.py
Then (Python 2.7):
or (Python 3):
You can now install matplotlib and all its dependencies with:
Macports
For Python 2.7:
sudo port install py27-pip
sudo pip-2.7 install matplotlib
For Python 3.4:
sudo port install py34-pip
sudo pip-3.4 install matplotlib
Homebrew
For Python 2.7:
For Python 3.4:
You might also want to install IPython; we recommend you install IPython with
the IPython notebook option, like this:
- Python.org Python:
pip install ipython[notebook] - Macports
sudo pip-2.7 install ipython[notebook]orsudo pip-3.4
install ipython[notebook] - Homebrew
pip2 install ipython[notebook]orpip3 install
ipython[notebook]
Pip problems
If you get errors with pip trying to run a compiler like gcc or clang,
then the first thing to try is to install xcode and
retry the install. If that does not work, then check
Getting help.
Installing via OSX mpkg installer package
matplotlib also has a disk image (.dmg) installer, which contains a
typical Installer.app package to install matplotlib. You should use binary
wheels instead of the disk image installer if you can, because:
- wheels work with Python.org Python, homebrew and macports, the disk image
installer only works with Python.org Python. - The disk image installer doesn’t check for recent versions of packages that
matplotlib depends on, and unconditionally installs the versions of
dependencies contained in the disk image installer. This can overwrite
packages that you have already installed, which might cause problems for
other packages, if you have a pre-existing Python.org setup on your
computer.
If you still want to use the disk image installer, read on.
Note
Before installing via the disk image installer, be sure that all of the
packages were compiled for the same version of python. Often, the download
site for NumPy and matplotlib will display a supposed ‘current’ version of
the package, but you may need to choose a different package from the full
list that was built for your combination of python and OSX.
The disk image installer will have a .dmg extension, and will have a name
like matplotlib-1.4.0-py2.7-macosx10.6.dmg.
The name of the installer depends on the versions of python and matplotlib it
was built for, and the version of OSX that the matching Python.org installer
was built for. For example, if the mathing Python.org Python installer was
built for OSX 10.6 or greater, the dmg file will end in -macosx10.6.dmg.
You need to download this disk image file, open the disk image file by double
clicking, and find the new matplotlib disk image icon on your desktop. Double
click on that icon to show the contents of the image. Then double-click on
the .mpkg icon, which will have a name like
matplotlib-1.4.0-py2.7-macosx10.6.mpkg, it will run the Installer.app,
prompt you for a password if you need system-wide installation privileges, and
install to a directory like
/Library/Frameworks/Python.framework/Versions/2.7/lib/python2.7/site-packages
(exact path depends on your Python version).
Checking your installation
The new version of matplotlib should now be on your Python “path”. Check this
with one of these commands at the Terminal.app command line:
python2.7 -c 'import matplotlib; print matplotlib.__version__, matplotlib.__file__'
(Python 2.7) or:
python3.4 -c 'import matplotlib; print(matplotlib.__version__, matplotlib.__file__)'
(Python 3.4). You should see something like this:
1.4.0 /Library/Frameworks/Python.framework/Versions/2.7/lib/python2.7/site-packages/matplotlib/__init__.pyc
where 1.4.0 is the matplotlib version you just installed, and the path
following depends on whether you are using Python.org Python, Homebrew or
Macports. If you see another version, or you get an error like this:
Traceback (most recent call last):
  File "<string>", line 1, in <module>
ImportError: No module named matplotlib
then check that the Python binary is the one you expected by doing one of
these commands in Terminal.app:
or:
If you get the result /usr/bin/python2.7, then you are getting the Python
installed with OSX, which is probably not what you want. Try closing and
restarting Terminal.app before running the check again. If that doesn’t fix
the problem, depending on which Python you wanted to use, consider
reinstalling Python.org Python, or check your homebrew or macports setup.
Remember that the disk image installer only works for Python.org Python, and
will not get picked up by other Pythons. If all these fail, please let us
know: see Getting help.
A common error you may encounter when using Python is modulenotfounderror: no module named ‘matplotlib’. This error occurs when Python cannot detect the Matplotlib library in your current environment. This tutorial goes through the exact steps to troubleshoot this error for the Windows, Mac and Linux operating systems.
Table of contents
- ModuleNotFoundError: no module named ‘matplotlib’
- What is ModuleNotFoundError?
- What is Matplotlib?
- How to Install Matplotlib on Windows Operating System
- How to Install Matplotlib on Mac Operating System
- How to Install Matplotlib on Linux Operating Systems
- Installing pip for Ubuntu, Debian, and Linux Mint
- Installing pip for CentOS 8 (and newer), Fedora, and Red Hat
- Installing pip for CentOS 6 and 7, and older versions of Red Hat
- Installing pip for Arch Linux and Manjaro
- Installing pip for OpenSUSE
- Check Matplotlib Version
- Installing Matplotlib Using Anaconda
- Importing matplotlib.pyplot
- Summary
ModuleNotFoundError: no module named ‘matplotlib’
What is ModuleNotFoundError?
The ModuleNotFoundError occurs when the module you want to use is not present in your Python environment. There are several causes of the modulenotfounderror:
The module’s name is incorrect, in which case you have to check the name of the module you tried to import. Let’s try to import the re module with a double e to see what happens:
import ree---------------------------------------------------------------------------
ModuleNotFoundError Traceback (most recent call last)
1 import ree
ModuleNotFoundError: No module named 'ree'To solve this error, ensure the module name is correct. Let’s look at the revised code:
import re

print(re.__version__)2.2.1You may want to import a local module file, but the module is not in the same directory. Let’s look at an example package with a script and a local module to import. Let’s look at the following steps to perform from your terminal:
mkdir example_package

cd example_package

mkdir folder_1

cd folder_1

vi module.py
Note that we use Vim to create the module.py file in this example. You can use your preferred file editor, such as Emacs or Atom. In module.py, we will import the re module and define a simple function that prints the re version:
import re

def print_re_version():

    print(re.__version__)
Close the module.py, then complete the following commands from your terminal:
cd ../

vi script.py
Inside script.py, we will try to import the module we created.
import module

if __name__ == '__main__':

    mod.print_re_version()
Let’s run python script.py from the terminal to see what happens:
Traceback (most recent call last):
  File "script.py", line 1, in <module>
    import module
ModuleNotFoundError: No module named 'module'
To solve this error, we need to point to the correct path to module.py, which is inside folder_1. Let’s look at the revised code:
import folder_1.module as mod

if __name__ == '__main__':

    mod.print_re_version()
When we run python script.py, we will get the following result:
2.2.1Lastly, you can encounter the modulenotfounderror when you import a module that is not installed in your Python environment.
What is Matplotlib?
Matplotlib is a data visualization and graphical plotting library for Python. Matplotlib is an open-source alternative to MATLAB. Pyplot is a Matplotlib module, which provides a MATLAB-like interface. You can use pyplot to create various plots, including line, histogram, scatter, 3D, image, contour, and polar.
The simplest way to install Matplotlib is to use the package manager for Python called pip. The following installation instructions are for the major Python version 3.
How to Install Matplotlib on Windows Operating System
First, you need to download and install Python on your PC. Ensure you select the install launcher for all users and Add Python to PATH checkboxes. The latter ensures the interpreter is in the execution path. Pip is automatically on Windows for Python versions 2.7.9+ and 3.4+.
You can check your Python version with the following command:
python3 --versionYou can install pip on Windows by downloading the installation package, opening the command line and launching the installer. You can install pip via the CMD prompt by running the following command.
python get-pip.pyYou may need to run the command prompt as administrator. Check whether the installation has been successful by typing.
pip --versionTo install matplotlib with pip, run the following command from the command prompt.
pip3 install matplotlibHow to Install Matplotlib on Mac Operating System
Open a terminal by pressing command (⌘) + Space Bar to open the Spotlight search. Type in terminal and press enter. To get pip, first ensure you have installed Python3:
python3 --versionPython 3.8.8Download pip by running the following curl command:
curl https://bootstrap.pypa.io/get-pip.py -o get-pip.pyThe curl command allows you to specify a direct download link. Using the -o option sets the name of the downloaded file.
Install pip by running:
python3 get-pip.pyFrom the terminal, use pip3 to install Matplotlib:
pip3 install matplotlibHow to Install Matplotlib on Linux Operating Systems
All major Linux distributions have Python installed by default. However, you will need to install pip. You can install pip from the terminal, but the installation instructions depend on the Linux distribution you are using. You will need root privileges to install pip. Open a terminal and use the commands relevant to your Linux distribution to install pip.
Installing pip for Ubuntu, Debian, and Linux Mint
sudo apt install python-pip3Installing pip for CentOS 8 (and newer), Fedora, and Red Hat
sudo dnf install python-pip3Installing pip for CentOS 6 and 7, and older versions of Red Hat
sudo yum install epel-release

sudo yum install python-pip3
Installing pip for Arch Linux and Manjaro
sudo pacman -S python-pipInstalling pip for OpenSUSE
sudo zypper python3-pipOnce you have installed pip, you can install Matplotlib using:
pip3 install matplotlibCheck Matplotlib Version
Once you have successfully installed Matplotlib, you can use two methods to check the version of Matplotlib. First, you can use pip show from your terminal. Remember that the name of the package is Matplotlib.
pip show matplotlibName: matplotlib
Version: 3.3.4
Summary: Python plotting package
Home-page: https://matplotlib.orgSecond, within your python program, you can import Matlotlib and then reference the __version__ attribute:
import matplotlib

print(matplotlib.__version__)3.3.4Installing Matplotlib Using Anaconda
Anaconda is a distribution of Python and R for scientific computing and data science. You can install Anaconda by going to the installation instructions. Once you have installed Anaconda, you can install Matplotlib using the following command:
conda install -c conda-forge matplotlibImporting matplotlib.pyplot
You can import the Pyplot API to create plots using the following lines in your program
import matplotlib.pyplot as pltIt is common to abbreviate the pyplot import to plt.
Summary
Congratulations on reading to the end of this tutorial. The modulenotfounderror occurs if you misspell the module name, incorrectly point to the module path or do not have the module installed in your Python environment. If you do not have the module installed in your Python environment, you can use pip to install the package. However, you must ensure you have pip installed on your system. You can also install Anaconda on your system and use the conda install command to install Matplotlib.
Go to the online courses page on Python to learn more about Python for data science and machine learning.
Have fun and happy researching!
In today’s post i would like to provide some troubleshooting information for people installing the matplotlib library package in their computers.
ModuleNotFoundError: no module named ‘matplotlib’ pyplot
This error is thrown when Python can’t find the Matplotlib package in your development environment. Most probably you’ll be able to troubleshoot this error by downloading the library from the Python repository using the PIP utility.
Install matplotlib with pip
In order to troubleshoot this error follow this process (explained for Windows, might require minor adjustments for MAC and Linux). Note that the process is identical for most Python add on libraries / packages such as Seaborn, NumPy, Pandas and many others.
- Save your work, and close your Jupyter Notebooks/Lab, Spyder or other development environment you might be using.
- Open your Command Prompt.
- Type cmd.
- Then in the command prompt type, type the following command:
pip install matplotlib- Now, go ahead and hit Enter.
- Python will download the latest version of the matplotlib library from the Python package repository.
- Once done, open your development environment and import matplotlib.
- That’s it!
Anaconda environments
If you are have installed Anaconda, then by default, the basic Data Analysis packages, including Pandas and Matplotlib are already installed in your base environment. If for some reason you still receive an import error proceed as following.
- From the Start mane, open Anaconda Navigator.
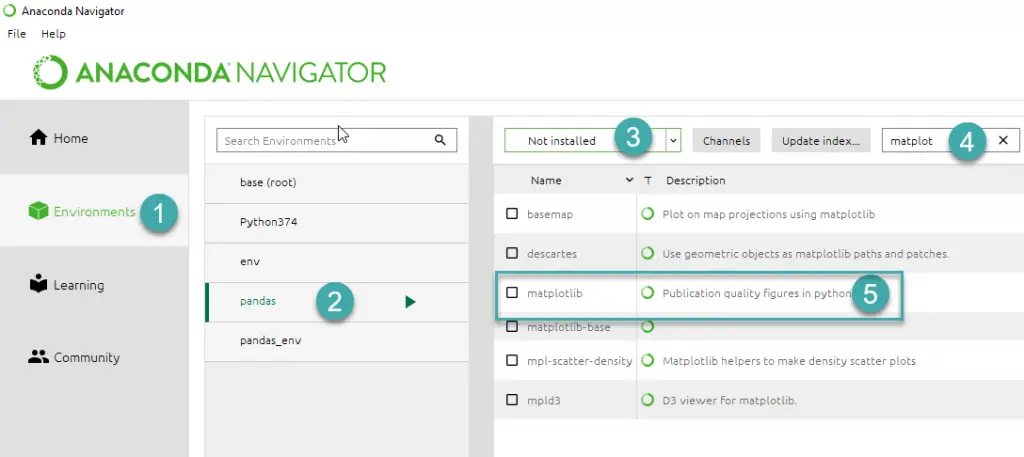
- On the left hand side, hit the Environments tab (step 1)
- Then highlight your Anaconda environment (step 2).
- Then in the dropdown box (step 3), select Not Installed.
- In the Search box, type matplotlib and hit Enter.
- Then check the box near the package and hit Apply.
- Then in the Install Packages dialog, click Apply again.
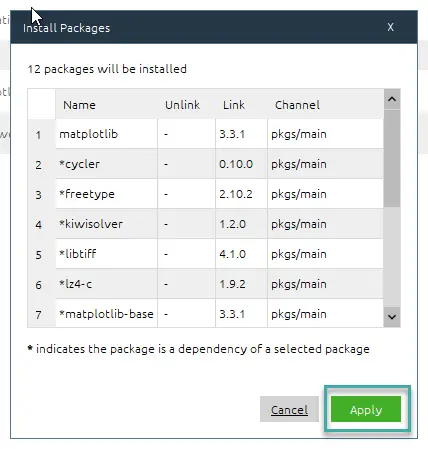
- Once Anaconda Navigator is done, close it and reopen your development environment and download matplotlib.
Note: for completeness, you can also update your Anaconda environment manually (this is specially useful if you use MiniConda.
- From the Windows Start Menu open the Anaconda Prompt
- Type the following command
conda activate <path_to_your_environment>
- Hit Enter.
- Now type
conda install matplotlib- Hit Enter.
- Matplotlib will be downloaded and installed.
- That’s it.
Importerror no module named matplotlib.pyplot / matplotlib.path
This error is the base class of the ModuleNotFound error, and available since Python 3.3. The troubleshooting process we just described will remedy this error as well.
Questions? Feel free to leave us a comment

The error “ModuleNotFoundError: No module named matplotlib» is a common error experienced by data scientists when developing in Python. The error is likely an environment issue whereby the matplotlib package has not been installed correctly on your machine, thankfully there are a few simple steps to go through to troubleshoot the problem and find a solution.
Your error, whether in a Jupyter Notebook or in the terminal, probably looks like one of the following:
No module named 'matplotlib'ModuleNotFoundError: No module named 'matplotlib'
In order to find the root cause of the problem we will go through the following potential fixes:
- Upgrade pip version
- Upgrade or install matplotlib package
- Check if you are activating the environment before running
- Create a fresh environment
- Upgrade or install Jupyer Notebook package
Are you installing packages using Conda or Pip package manager?
It is common for developers to use either Pip or Conda for their Python package management. It’s important to know what you are using before we continue with the fix.
If you have not explicitly installed and activated Conda, then you are almost definitely going to be using Pip. One sanity check is to run conda info in your terminal, which if it returns anything likely means you are using Conda.
Upgrade or install pip for Python
First things first, let’s check to see if we have the up to date version of pip installed. We can do this by running:
pip install --upgrade pip
Upgrade or install matplotlib package via Conda or Pip
The most common reason for this error is that the matplotlib package is not installed in your environment or an outdated version is installed. So let’s update the package or install it if it’s missing.
For Conda:
# To install in the root environment
conda install matplotlib

# To install in a specific environment
conda install -n MY_ENV matplotlib
For Pip:
# To install in the root environment
python3 -m pip install -U matplotlib

# To install in a specific environment
source MY_ENV/bin/activate
python3 -m pip install -U matplotlib
Activate Conda or venv Python environment
It is highly recommended that you use isolated environments when developing in Python. Because of this, one common mistake developers make is that they don’t activate the correct environment before they run the Python script or Jupyter Notebook. So, let’s make sure you have your correct environment running.
For Conda:
conda activate MY_ENV
For virtual environments:
source MY_ENV/bin/activate
Create a new Conda or venv Python environment with matplotlib installed
During the development process, a developer will likely install and update many different packages in their Python environment, which can over time cause conflicts and errors.
Therefore, one way to solve the module error for matplotlib is to simply create a new environment with only the packages that you require, removing all of the bloatware that has built up over time. This will provide you with a fresh start and should get rid of problems that installing other packages may have caused.
For Conda:
# Create the new environment with the desired packages
conda create -n MY_ENV python=3.9 matplotlib

# Activate the new environment
conda activate MY_ENV

# Check to see if the packages you require are installed
conda list
For virtual environments:
# Navigate to your project directory
cd MY_PROJECT

# Create the new environment in this directory
python3 -m venv MY_ENV

# Activate the environment
source MY_ENV/bin/activate

# Install matplotlib
python3 -m pip install matplotlib
Upgrade Jupyter Notebook package in Conda or Pip
If you are working within a Jupyter Notebook and none of the above has worked for you, then it could be that your installation of Jupyter Notebooks is faulty in some way, so a reinstallation may be in order.
For Conda:
conda update jupyter
For Pip:
pip install -U jupyter
Best practices for managing Python packages and environments
Managing packages and environments in Python is notoriously problematic, but there are some best practices which should help you to avoid package the majority of problems in the future:
- Always use separate environments for your projects and avoid installing packages to your root environment
- Only install the packages you need for your project
- Pin your package versions in your project’s requirements file
- Make sure your package manager is kept up to date
References
Conda managing environments documentation
Python venv documentation
The ImportError: No module named matplotlib.pyplot occurs if you have not installed the Matplotlib library in Python and trying to run the script which has matplotlib related code. Another issue might be that you are not importing the matplotlib.pyplot properly in your Python code.
In this tutorial, let’s look at installing the matplotlib module correctly in different operating systems and solve No module named matplotlib.pyplot.
Matplotlib is a comprehensive library for creating static, animated, and interactive visualizations in Python.
Matplotlib is not a built-in module (it doesn’t come with the default python installation) in Python, you need to install it explicitly using the pip installer and then use it.
If you looking at how to install pip or if you are getting an error installing pip checkout pip: command not found to resolve the issue.
Matplotlib releases are available as wheel packages for macOS, Windows and Linux on PyPI. Install it using pip:
Install Matplotlib in OSX/Linux
The recommended way to install the matplotlib module is using pip or pip3 for Python3 if you have installed pip already.
Using Python 2
$ sudo pip install matplotlibUsing Python 3
$ sudo pip3 install matplotlibAlternatively, if you have easy_install in your system, you can install matplotlib using the below command.
Using easy install
$ sudo easy_install -U matplotlibFor CentOs
$ yum install python-matplotlibFor Ubuntu
To install matplotlib module on Debian/Ubuntu :
$ sudo apt-get install python3-matplotlibInstall Matplotlib in Windows
In the case of windows, you can use pip or pip3 based on the Python version, you have to install the matplotlib module.
$ pip3 install matplotlibIf you have not added the pip to the environment variable path, you can run the below command in Python 3, which will install the matplotlib module.
$ py -m pip install matplotlibInstall Matplotlib in Anaconda
Matplotlib is available both via the anaconda main channel and it can be installed using the following command.
$ conda install matplotlib
You can also install it via the conda-forge community channel by running the below command.
$ conda install -c conda-forge matplotlib
In case you have installed it properly but it still throws an error, then you need to check the import statement in your code.
In order to plot the charts properly, you need to import the matplotlib as shown below.
# importing the matplotlib
import matplotlib.pyplot as plt
import seaborn as sns

# car sales data
total_sales = [3000, 2245, 1235, 5330, 4200]

location = ['Bangalore', 'Delhi', 'Chennai', 'Mumbai', 'Kolkatta']

# Seaborn color palette to plot pie chart
colors = sns.color_palette('pastel')

# create pie chart using matplotlib
plt.pie(total_sales, labels=location, colors=colors)
plt.show()
Srinivas Ramakrishna is a Solution Architect and has 14+ Years of Experience in the Software Industry. He has published many articles on Medium, Hackernoon, dev.to and solved many problems in StackOverflow. He has core expertise in various technologies such as Microsoft .NET Core, Python, Node.JS, JavaScript, Cloud (Azure), RDBMS (MSSQL), React, Powershell, etc.
Sign Up for Our Newsletters
Subscribe to get notified of the latest articles. We will never spam you. Be a part of our ever-growing community.
By checking this box, you confirm that you have read and are agreeing to our terms of use regarding the storage of the data submitted through this form.