Содержание
- Pip install psutil error
- ModuleNotFoundError: No module named ‘psutil’ in Python #
- Conclusion #
- Pip install psutil error
- ERROR: Could not build wheels for psutil in Python #
- Create a virtual environment #
- Check if your Python version is supported by the package #
- Try running pip install in verbose mode #
- Conclusion #
- Linux/Python3 pip install fails on compilation error with _psutil_common.o #1482
- Comments
Pip install psutil error
Reading time В· 4 min
ModuleNotFoundError: No module named ‘psutil’ in Python #
The Python «ModuleNotFoundError: No module named ‘psutil’» occurs when we forget to install the psutil module before importing it or install it in an incorrect environment. To solve the error, install the module by running the pip install psutil command.
Open your terminal in your project’s root directory and install the psutil module.
After you install the psutil package, try importing it as follows.
The Python error «ModuleNotFoundError: No module named ‘psutil’» occurs for multiple reasons:
- Not having the psutil package installed by running pip install psutil .
- Installing the package in a different Python version than the one you’re using.
- Installing the package globally and not in your virtual environment.
- Your IDE running an incorrect version of Python.
- Naming your module psutil.py which would shadow the official module.
- Declaring a variable named psutil which would shadow the imported variable.
If the error persists, get your Python version and make sure you are installing the package using the correct Python version.
For example, my Python version is 3.10.4 , so I would install the psutil package with pip3.10 install psutil .
Notice that the version number corresponds to the version of pip I’m using.
If the PATH for pip is not set up on your machine, replace pip with python3 -m pip :
If the «No module named ‘psutil’» error persists, try restarting your IDE and development server/script.
You can check if you have the psutil package installed by running the pip show psutil command.
The pip show psutil command will either state that the package is not installed or show a bunch of information about the package, including the location where the package is installed.
If the package is not installed, make sure your IDE is using the correct version of Python.
For example, In VSCode, you can press CTRL + Shift + P or ( вЊ + Shift + P on Mac) to open the command palette.
Then type «Python select interpreter» in the field.
Then select the correct python version from the dropdown menu.
If you are using a virtual environment, make sure you are installing psutil in your virtual environment and not globally.
You can try creating a virtual environment if you don’t already have one.
If the python3 -m venv venv command doesn’t work, try the following 2 commands:
- python -m venv venv
- py -m venv venv
Your virtual environment will use the version of Python that was used to create it.
You also shouldn’t be declaring a variable named psutil as that would also shadow the original module.
If the error is not resolved, try to uninstall the psutil package and then install it.
Try restarting your IDE and development server/script.
You can also try to upgrade the version of the psutil package.
This one is for using virtual environments (VENV) on Windows :
This one is for using virtual environments (VENV) on MacOS and Linux :
Conclusion #
The Python «ModuleNotFoundError: No module named ‘psutil’» occurs when we forget to install the psutil module before importing it or install it in an incorrect environment. To solve the error, install the module by running the pip install psutil command.
Источник
Pip install psutil error
Reading time В· 5 min
ERROR: Could not build wheels for psutil in Python #
To solve the error «Could not build wheels for psutil», run the pip install —upgrade pip command to upgrade your pip version and rerun the pip install psutil command.
The most common cause of the error is having an outdated version of pip .
Here are the commands for upgrading pip on all operating systems.
Which command works depends on your operating system and your version of Python.
Now that pip is upgraded, try to run the pip install psutil command.
If the error is not resolved, upgrade the setuptools and wheel packages as well.
Try to rerun the pip install command after upgrading setuptools and wheel .
As the installation page of psutil notes, pre-compiled wheels are available for Linux, Windows and macOS, so you don’t have to install a C compiler.
Running the pip install psutil command should be sufficient.
If that doesn’t work, try installing from sources if you are on Linux.
If that didn’t help, try to run the pip install command with the —upgrade option.
If the error is not resolved, try installing the package with the —no-cache-dir option to disable the cache.
If that didn’t help, use the —pre option to include pre-release and development versions of the package.
The —pre option makes it so pip includes pre-release and development versions of the package. By default pip only finds stable versions.
If the error is not resolved, try running the pip install command with the —no-use-pep517 option.
If that didn’t help, try installing another version of psutil .
You can check the available versions of a package by running the pip install package== command.
The output contains a tuple of all of the versions of the package from the oldest to the most recent version.
Pick another version of the package and try installing it. Here is an example.
If that didn’t help, try creating a virtual environment.
Create a virtual environment #
To solve the «Could not build wheels for psutil» error:
- Create a virtual environment.
- Activate the virtual environment.
- Run the pip install command with the virtual environment active.
If the python3 -m venv venv command doesn’t work, try the following 2 commands:
- python -m venv venv
- py -m venv venv
Make sure to use the correct command to activate your virtual environment depending on your operating system and your shell.
Your virtual environment will use the version of Python that was used to create it.
Check if your Python version is supported by the package #
The error «ERROR: Could not build wheels for psutil» is sometimes caused when the package you are trying to install doesn’t have available wheels for your version of Python.
You can check your Python version with the python —version command.
You can check if a package has wheels available for a specific Python version in the Download files section of the package’s pypi page.
If the .whl files are not available for your version of Python, you can download an older version.
You can download a specific Python version that is supported by the package if the package doesn’t support the latest Python version.
Different versions are available in the «Looking for a specific release» table.
Make sure to tick the following options if you get prompted:
- Install launcher for all users (recommended)
- Add Python to PATH (this adds Python to your PATH environment variable)
Try running pip install in verbose mode #
If none of the suggestions helped, try running the pip install command in verbose mode.
The -v option stands for verbose mode and can be used up to 3 times.
When the pip install command is run in verbose mode, the command shows more output and how the error occurred.
Conclusion #
To solve the error «Could not build wheels for psutil», run the pip install —upgrade pip command to upgrade your pip version and rerun the pip install psutil command.
Источник
Linux/Python3 pip install fails on compilation error with _psutil_common.o #1482
Platform: Linux
- OS version : Arch Linux (Antergos — all packages updated on Apr 7)
- Using miniconda (python 3.6.8)
- psutil version : 5.6.1
- gcc version: 8.2.1
Hi @giampaolo,
Just stepped on this while installing using pip install psutil .
pip install failed due to compilation error with gcc while linking with _psutil_common.o
Fixing #824 would be really helpful.
Installation logs
psutil/_psutil_posix.c: In function ‘psutil_net_if_mtu’: psutil/_psutil_posix.c:376:5: warning: ‘strncpy’ specified bound 16 equals destination size [-Wstringop-truncation] strncpy(ifr.ifr_name, nic_name, sizeof(ifr.ifr_name)); ^
gcc -pthread -B /home/himanshu/.miniconda3/compiler_compat -Wl,—sysroot=/ -Wsign-compare -DNDEBUG -g -fwrapv -O3 -Wall -Wstrict-prototypes -fPIC -DPSUTIL_POSIX=1 -DPSUTIL_VERSION=561 -DPSUTIL_LINUX=1 -I/home/himanshu/.miniconda3/include/python3.6m -c psutil/_psutil_linux.c -o build/temp.linux-x86_64-3.6/psutil/_psutil_linux.o psutil/_psutil_linux.c: In function ‘psutil_net_if_duplex_speed’: psutil/_psutil_linux.c:539:5: warning: ‘strncpy’ specified bound 16 equals destination size [-Wstringop-truncation] strncpy(ifr.ifr_name, nic_name, sizeof(ifr.ifr_name)); ^
gcc -pthread -shared -B /home/himanshu/.miniconda3/compiler_compat -L/home/himanshu/.miniconda3/lib -Wl,-rpath=/home/himanshu/.miniconda3/lib -Wl,—no-as-needed -Wl,—sysroot=/ build/temp.linux-x86_64-3.6/psutil/_psutil_common.o build/temp.linux-x86_64-3.6/psutil/_psutil_posix.o build/temp.linux-x86_64-3.6/psutil/_psutil_linux.o -o build/lib.linux-x86_64-3.6/psutil/_psutil_linux.cpython-36m-x86_64-linux-gnu.so /home/himanshu/.miniconda3/compiler_compat/ld: build/temp.linux-x86_64-3.6/psutil/_psutil_common.o: unable to initialize decompress status for section .debug_info /home/himanshu/.miniconda3/compiler_compat/ld: build/temp.linux-x86_64-3.6/psutil/_psutil_common.o: unable to initialize decompress status for section .debug_info /home/himanshu/.miniconda3/compiler_compat/ld: build/temp.linux-x86_64-3.6/psutil/_psutil_common.o: unable to initialize decompress status for section .debug_info /home/himanshu/.miniconda3/compiler_compat/ld: build/temp.linux-x86_64-3.6/psutil/_psutil_common.o: unable to initialize decompress status for section .debug_info build/temp.linux-x86_64-3.6/psutil/_psutil_common.o: file not recognized: file format not recognized collect2: error: ld returned 1 exit status error: command ‘gcc’ failed with exit status 1 —————————————- Failed building wheel for psutil Running setup.py clean for psutil Failed to build psutil Installing collected packages: psutil Running setup.py install for psutil . error Complete output from command /home/himanshu/Downloads/learning-airflow/venv/bin/python3 -u -c «import setuptools, tokenize;__file__=’/tmp/pip-install-97_h0006/psutil/setup.py’;f=getattr(tokenize, ‘open’, open)(__file__);code=f.read().replace(‘rn’, ‘n’);f.close();exec(compile(code, __file__, ‘exec’))» install —record /tmp/pip-record-317tvpc9/install-record.txt —single-version-externally-managed —compile —install-headers /home/himanshu/Downloads/learning-airflow/venv/include/site/python3.6/psutil: running install running build running build_py creating build creating build/lib.linux-x86_64-3.6 creating build/lib.linux-x86_64-3.6/psutil copying psutil/_pswindows.py -> build/lib.linux-x86_64-3.6/psutil copying psutil/_pssunos.py -> build/lib.linux-x86_64-3.6/psutil copying psutil/_psposix.py -> build/lib.linux-x86_64-3.6/psutil copying psutil/_psosx.py -> build/lib.linux-x86_64-3.6/psutil copying psutil/_pslinux.py -> build/lib.linux-x86_64-3.6/psutil copying psutil/_psbsd.py -> build/lib.linux-x86_64-3.6/psutil copying psutil/_psaix.py -> build/lib.linux-x86_64-3.6/psutil copying psutil/_compat.py -> build/lib.linux-x86_64-3.6/psutil copying psutil/_common.py -> build/lib.linux-x86_64-3.6/psutil copying psutil/__init__.py -> build/lib.linux-x86_64-3.6/psutil creating build/lib.linux-x86_64-3.6/psutil/tests copying psutil/tests/test_windows.py -> build/lib.linux-x86_64-3.6/psutil/tests copying psutil/tests/test_unicode.py -> build/lib.linux-x86_64-3.6/psutil/tests copying psutil/tests/test_system.py -> build/lib.linux-x86_64-3.6/psutil/tests copying psutil/tests/test_sunos.py -> build/lib.linux-x86_64-3.6/psutil/tests copying psutil/tests/test_process.py -> build/lib.linux-x86_64-3.6/psutil/tests copying psutil/tests/test_posix.py -> build/lib.linux-x86_64-3.6/psutil/tests copying psutil/tests/test_osx.py -> build/lib.linux-x86_64-3.6/psutil/tests copying psutil/tests/test_misc.py -> build/lib.linux-x86_64-3.6/psutil/tests copying psutil/tests/test_memory_leaks.py -> build/lib.linux-x86_64-3.6/psutil/tests copying psutil/tests/test_linux.py -> build/lib.linux-x86_64-3.6/psutil/tests copying psutil/tests/test_contracts.py -> build/lib.linux-x86_64-3.6/psutil/tests copying psutil/tests/test_connections.py -> build/lib.linux-x86_64-3.6/psutil/tests copying psutil/tests/test_bsd.py -> build/lib.linux-x86_64-3.6/psutil/tests copying psutil/tests/test_aix.py -> build/lib.linux-x86_64-3.6/psutil/tests copying psutil/tests/__main__.py -> build/lib.linux-x86_64-3.6/psutil/tests copying psutil/tests/__init__.py -> build/lib.linux-x86_64-3.6/psutil/tests running build_ext building ‘psutil._psutil_linux’ extension creating build/temp.linux-x86_64-3.6 creating build/temp.linux-x86_64-3.6/psutil gcc -pthread -B /home/himanshu/.miniconda3/compiler_compat -Wl,—sysroot=/ -Wsign-compare -DNDEBUG -g -fwrapv -O3 -Wall -Wstrict-prototypes -fPIC -DPSUTIL_POSIX=1 -DPSUTIL_VERSION=561 -DPSUTIL_LINUX=1 -I/home/himanshu/.miniconda3/include/python3.6m -c psutil/_psutil_common.c -o build/temp.linux-x86_64-3.6/psutil/_psutil_common.o gcc -pthread -B /home/himanshu/.miniconda3/compiler_compat -Wl,—sysroot=/ -Wsign-compare -DNDEBUG -g -fwrapv -O3 -Wall -Wstrict-prototypes -fPIC -DPSUTIL_POSIX=1 -DPSUTIL_VERSION=561 -DPSUTIL_LINUX=1 -I/home/himanshu/.miniconda3/include/python3.6m -c psutil/_psutil_posix.c -o build/temp.linux-x86_64-3.6/psutil/_psutil_posix.o psutil/_psutil_posix.c: In function ‘psutil_net_if_flags’: psutil/_psutil_posix.c:415:5: warning: ‘strncpy’ specified bound 16 equals destination size [-Wstringop-truncation] strncpy(ifr.ifr_name, nic_name, sizeof(ifr.ifr_name)); ^
psutil/_psutil_posix.c: In function ‘psutil_net_if_mtu’: psutil/_psutil_posix.c:376:5: warning: ‘strncpy’ specified bound 16 equals destination size [-Wstringop-truncation] strncpy(ifr.ifr_name, nic_name, sizeof(ifr.ifr_name)); ^
gcc -pthread -B /home/himanshu/.miniconda3/compiler_compat -Wl,—sysroot=/ -Wsign-compare -DNDEBUG -g -fwrapv -O3 -Wall -Wstrict-prototypes -fPIC -DPSUTIL_POSIX=1 -DPSUTIL_VERSION=561 -DPSUTIL_LINUX=1 -I/home/himanshu/.miniconda3/include/python3.6m -c psutil/_psutil_linux.c -o build/temp.linux-x86_64-3.6/psutil/_psutil_linux.o psutil/_psutil_linux.c: In function ‘psutil_net_if_duplex_speed’: psutil/_psutil_linux.c:539:5: warning: ‘strncpy’ specified bound 16 equals destination size [-Wstringop-truncation] strncpy(ifr.ifr_name, nic_name, sizeof(ifr.ifr_name)); ^
gcc -pthread -shared -B /home/himanshu/.miniconda3/compiler_compat -L/home/himanshu/.miniconda3/lib -Wl,-rpath=/home/himanshu/.miniconda3/lib -Wl,—no-as-needed -Wl,—sysroot=/ build/temp.linux-x86_64-3.6/psutil/_psutil_common.o build/temp.linux-x86_64-3.6/psutil/_psutil_posix.o build/temp.linux-x86_64-3.6/psutil/_psutil_linux.o -o build/lib.linux-x86_64-3.6/psutil/_psutil_linux.cpython-36m-x86_64-linux-gnu.so /home/himanshu/.miniconda3/compiler_compat/ld: build/temp.linux-x86_64-3.6/psutil/_psutil_common.o: unable to initialize decompress status for section .debug_info /home/himanshu/.miniconda3/compiler_compat/ld: build/temp.linux-x86_64-3.6/psutil/_psutil_common.o: unable to initialize decompress status for section .debug_info /home/himanshu/.miniconda3/compiler_compat/ld: build/temp.linux-x86_64-3.6/psutil/_psutil_common.o: unable to initialize decompress status for section .debug_info /home/himanshu/.miniconda3/compiler_compat/ld: build/temp.linux-x86_64-3.6/psutil/_psutil_common.o: unable to initialize decompress status for section .debug_info build/temp.linux-x86_64-3.6/psutil/_psutil_common.o: file not recognized: file format not recognized collect2: error: ld returned 1 exit status error: command ‘gcc’ failed with exit status 1 —————————————- Command «/home/himanshu/Downloads/learning-airflow/venv/bin/python3 -u -c «import setuptools, tokenize;__file__=’/tmp/pip-install-97_h0006/psutil/setup.py’;f=getattr(tokenize, ‘open’, open)(__file__);code=f.read().replace(‘rn’, ‘n’);f.close();exec(compile(code, __file__, ‘exec’))» install —record /tmp/pip-record-317tvpc9/install-record.txt —single-version-externally-managed —compile —install-headers /home/himanshu/Downloads/learning-airflow/venv/include/site/python3.6/psutil» failed with error code 1 in /tmp/pip-install-97_h0006/psutil/»>
The text was updated successfully, but these errors were encountered:
Источник
I’m having the same problem, using python 3.5.4 on Ubuntu 14.04, install logs below:
 pip3 install psutil
Collecting psutil
  Using cached psutil-5.3.1.tar.gz
Building wheels for collected packages: psutil
  Running setup.py bdist_wheel for psutil ... error
  Complete output from command /PlexMediaServer/hass/bin/python3.5 -u -c "import setuptools, tokenize;__file__='/tmp/pip-build-45z8bzr6/psutil/setup.py';f=getattr(tokenize, 'open', open)(__file__);code=f.read().replace('rn', 'n');f.close();exec(compile(code, __file__, 'exec'))" bdist_wheel -d /tmp/tmp59_mmtqmpip-wheel- --python-tag cp35:
  running bdist_wheel
  running build
  running build_py
  creating build
  creating build/lib.linux-i686-3.5
  creating build/lib.linux-i686-3.5/psutil
  copying psutil/_psposix.py -> build/lib.linux-i686-3.5/psutil
  copying psutil/__init__.py -> build/lib.linux-i686-3.5/psutil
  copying psutil/_pswindows.py -> build/lib.linux-i686-3.5/psutil
  copying psutil/_common.py -> build/lib.linux-i686-3.5/psutil
  copying psutil/_pslinux.py -> build/lib.linux-i686-3.5/psutil
  copying psutil/_psosx.py -> build/lib.linux-i686-3.5/psutil
  copying psutil/_compat.py -> build/lib.linux-i686-3.5/psutil
  copying psutil/_psbsd.py -> build/lib.linux-i686-3.5/psutil
  copying psutil/_pssunos.py -> build/lib.linux-i686-3.5/psutil
  creating build/lib.linux-i686-3.5/psutil/tests
  copying psutil/tests/__init__.py -> build/lib.linux-i686-3.5/psutil/tests
  copying psutil/tests/test_misc.py -> build/lib.linux-i686-3.5/psutil/tests
  copying psutil/tests/test_posix.py -> build/lib.linux-i686-3.5/psutil/tests
  copying psutil/tests/test_system.py -> build/lib.linux-i686-3.5/psutil/tests
  copying psutil/tests/test_windows.py -> build/lib.linux-i686-3.5/psutil/tests
  copying psutil/tests/test_memory_leaks.py -> build/lib.linux-i686-3.5/psutil/tests
  copying psutil/tests/test_osx.py -> build/lib.linux-i686-3.5/psutil/tests
  copying psutil/tests/test_connections.py -> build/lib.linux-i686-3.5/psutil/tests
  copying psutil/tests/test_sunos.py -> build/lib.linux-i686-3.5/psutil/tests
  copying psutil/tests/__main__.py -> build/lib.linux-i686-3.5/psutil/tests
  copying psutil/tests/test_process.py -> build/lib.linux-i686-3.5/psutil/tests
  copying psutil/tests/test_bsd.py -> build/lib.linux-i686-3.5/psutil/tests
  copying psutil/tests/test_linux.py -> build/lib.linux-i686-3.5/psutil/tests
  copying psutil/tests/test_unicode.py -> build/lib.linux-i686-3.5/psutil/tests
  copying psutil/tests/test_contracts.py -> build/lib.linux-i686-3.5/psutil/tests
  running build_ext
  building 'psutil._psutil_linux' extension
  creating build/temp.linux-i686-3.5
  creating build/temp.linux-i686-3.5/psutil
  i686-linux-gnu-gcc -pthread -DNDEBUG -g -fwrapv -O2 -Wall -Wstrict-prototypes -g -fstack-protector --param=ssp-buffer-size=4 -Wformat -Werror=format-security -D_FORTIFY_SOURCE=2 -fPIC -DPSUTIL_POSIX=1 -DPSUTIL_VERSION=531 -DPSUTIL_LINUX=1 -I/usr/include/python3.5m -I/PlexMediaServer/hass/include/python3.5m -c psutil/_psutil_common.c -o build/temp.linux-i686-3.5/psutil/_psutil_common.o
  psutil/_psutil_common.c:9:20: fatal error: Python.h: No such file or directory
   #include <Python.h>
                      ^
  compilation terminated.
  error: command 'i686-linux-gnu-gcc' failed with exit status 1

  ----------------------------------------
  Failed building wheel for psutil
  Running setup.py clean for psutil
Failed to build psutil
Installing collected packages: psutil
  Running setup.py install for psutil ... error
    Complete output from command /PlexMediaServer/hass/bin/python3.5 -u -c "import setuptools, tokenize;__file__='/tmp/pip-build-45z8bzr6/psutil/setup.py';f=getattr(tokenize, 'open', open)(__file__);code=f.read().replace('rn', 'n');f.close();exec(compile(code, __file__, 'exec'))" install --record /tmp/pip-r3gpqlml-record/install-record.txt --single-version-externally-managed --compile --install-headers /PlexMediaServer/hass/include/site/python3.5/psutil:
    running install
    running build
    running build_py
    creating build
    creating build/lib.linux-i686-3.5
    creating build/lib.linux-i686-3.5/psutil
    copying psutil/_psposix.py -> build/lib.linux-i686-3.5/psutil
    copying psutil/__init__.py -> build/lib.linux-i686-3.5/psutil
    copying psutil/_pswindows.py -> build/lib.linux-i686-3.5/psutil
    copying psutil/_common.py -> build/lib.linux-i686-3.5/psutil
    copying psutil/_pslinux.py -> build/lib.linux-i686-3.5/psutil
    copying psutil/_psosx.py -> build/lib.linux-i686-3.5/psutil
    copying psutil/_compat.py -> build/lib.linux-i686-3.5/psutil
    copying psutil/_psbsd.py -> build/lib.linux-i686-3.5/psutil
    copying psutil/_pssunos.py -> build/lib.linux-i686-3.5/psutil
    creating build/lib.linux-i686-3.5/psutil/tests
    copying psutil/tests/__init__.py -> build/lib.linux-i686-3.5/psutil/tests
    copying psutil/tests/test_misc.py -> build/lib.linux-i686-3.5/psutil/tests
    copying psutil/tests/test_posix.py -> build/lib.linux-i686-3.5/psutil/tests
    copying psutil/tests/test_system.py -> build/lib.linux-i686-3.5/psutil/tests
    copying psutil/tests/test_windows.py -> build/lib.linux-i686-3.5/psutil/tests
    copying psutil/tests/test_memory_leaks.py -> build/lib.linux-i686-3.5/psutil/tests
    copying psutil/tests/test_osx.py -> build/lib.linux-i686-3.5/psutil/tests
    copying psutil/tests/test_connections.py -> build/lib.linux-i686-3.5/psutil/tests
    copying psutil/tests/test_sunos.py -> build/lib.linux-i686-3.5/psutil/tests
    copying psutil/tests/__main__.py -> build/lib.linux-i686-3.5/psutil/tests
    copying psutil/tests/test_process.py -> build/lib.linux-i686-3.5/psutil/tests
    copying psutil/tests/test_bsd.py -> build/lib.linux-i686-3.5/psutil/tests
    copying psutil/tests/test_linux.py -> build/lib.linux-i686-3.5/psutil/tests
    copying psutil/tests/test_unicode.py -> build/lib.linux-i686-3.5/psutil/tests
    copying psutil/tests/test_contracts.py -> build/lib.linux-i686-3.5/psutil/tests
    running build_ext
    building 'psutil._psutil_linux' extension
    creating build/temp.linux-i686-3.5
    creating build/temp.linux-i686-3.5/psutil
    i686-linux-gnu-gcc -pthread -DNDEBUG -g -fwrapv -O2 -Wall -Wstrict-prototypes -g -fstack-protector --param=ssp-buffer-size=4 -Wformat -Werror=format-security -D_FORTIFY_SOURCE=2 -fPIC -DPSUTIL_POSIX=1 -DPSUTIL_VERSION=531 -DPSUTIL_LINUX=1 -I/usr/include/python3.5m -I/PlexMediaServer/hass/include/python3.5m -c psutil/_psutil_common.c -o build/temp.linux-i686-3.5/psutil/_psutil_common.o
    psutil/_psutil_common.c:9:20: fatal error: Python.h: No such file or directory
     #include <Python.h>
                        ^
    compilation terminated.
    error: command 'i686-linux-gnu-gcc' failed with exit status 1

    ----------------------------------------
Command "/PlexMediaServer/hass/bin/python3.5 -u -c "import setuptools, tokenize;__file__='/tmp/pip-build-45z8bzr6/psutil/setup.py';f=getattr(tokenize, 'open', open)(__file__);code=f.read().replace('rn', 'n');f.close();exec(compile(code, __file__, 'exec'))" install --record /tmp/pip-r3gpqlml-record/install-record.txt --single-version-externally-managed --compile --install-headers /PlexMediaServer/hass/include/site/python3.5/psutil" failed with error code 1 in /tmp/pip-build-45z8bzr6/psutil/
EDIT: I just updated from python 3.4.3, which did correctly install
A common error you may encounter when using Python is modulenotfounderror: no module named ‘psutil’.
This error occurs if you do not install psutil before importing it into your program or install the library in the wrong environment.
You can install psutil in Python 3 with python3 -m pip install psutil.
Or conda install -c conda-forge psutil for conda environments.
This tutorial goes through the exact steps to troubleshoot this error for the Windows, Mac and Linux operating systems.
Table of contents
- What is ModuleNotFoundError?
- What is psutil?
- Always Use a Virtual Environment to Install Packages
- How to Install psutil on Windows Operating System
- How to Install psutil on Mac Operating System using pip
- How to Install psutil on Linux Operating Systems
- Installing psutil Using Anaconda
- Check psutil Version
- Using psutil Example
- Summary
What is ModuleNotFoundError?
The ModuleNotFoundError occurs when the module you want to use is not present in your Python environment. There are several causes of the modulenotfounderror:
The module’s name is incorrect, in which case you have to check the name of the module you tried to import. Let’s try to import the re module with a double e to see what happens:
import ree
---------------------------------------------------------------------------
ModuleNotFoundError                       Traceback (most recent call last)
1 import ree

ModuleNotFoundError: No module named 'ree'
To solve this error, ensure the module name is correct. Let’s look at the revised code:
import re

print(re.__version__)
2.2.1
You may want to import a local module file, but the module is not in the same directory. Let’s look at an example package with a script and a local module to import. Let’s look at the following steps to perform from your terminal:
mkdir example_package

cd example_package

mkdir folder_1

cd folder_1

vi module.py
Note that we use Vim to create the module.py file in this example. You can use your preferred file editor, such as Emacs or Atom. In module.py, we will import the re module and define a simple function that prints the re version:
import re

def print_re_version():

    print(re.__version__)
Close the module.py, then complete the following commands from your terminal:
cd ../

vi script.py
Inside script.py, we will try to import the module we created.
import module

if __name__ == '__main__':

    mod.print_re_version()
Let’s run python script.py from the terminal to see what happens:
Traceback (most recent call last):
  File "script.py", line 1, in ≺module≻
    import module
ModuleNotFoundError: No module named 'module'
To solve this error, we need to point to the correct path to module.py, which is inside folder_1. Let’s look at the revised code:
import folder_1.module as mod

if __name__ == '__main__':

    mod.print_re_version()
When we run python script.py, we will get the following result:
2.2.1
You can also get the error by overriding the official module you want to import by giving your module the same name.
Lastly, you can encounter the modulenotfounderror when you import a module that is not installed in your Python environment.
What is psutil?
psutil (process and system utilities) is a cross-platform library for retrieving information on running processes and system utilization (CPU, memory, disks, networks, sensors) in Python.
The simplest way to install psutil is to use the package manager for Python called pip. The following installation instructions are for the major Python version 3.
Always Use a Virtual Environment to Install Packages
It is always best to install new libraries within a virtual environment. You should not install anything into your global Python interpreter when you develop locally. You may introduce incompatibilities between packages, or you may break your system if you install an incompatible version of a library that your operating system needs. Using a virtual environment helps compartmentalize your projects and their dependencies. Each project will have its environment with everything the code needs to run. Most ImportErrors and ModuleNotFoundErrors occur due to installing a library for one interpreter and trying to use the library with another interpreter. Using a virtual environment avoids this. In Python, you can use virtual environments and conda environments. We will go through how to install psutil with both.
How to Install psutil on Windows Operating System
First, you need to download and install Python on your PC. Ensure you select the install launcher for all users and Add Python to PATH checkboxes. The latter ensures the interpreter is in the execution path. Pip is automatically on Windows for Python versions 2.7.9+ and 3.4+.
You can check your Python version with the following command:
python3 --version
You can install pip on Windows by downloading the installation package, opening the command line and launching the installer. You can install pip via the CMD prompt by running the following command.
python get-pip.py
You may need to run the command prompt as administrator. Check whether the installation has been successful by typing.
pip --version
virtualenv env
You can activate the environment by typing the command:
envScriptsactivate
You will see “env” in parenthesis next to the command line prompt. You can install psutil within the environment by running the following command from the command prompt.
python3 -m pip install psutil
We use python -m pip to execute pip using the Python interpreter we specify as Python. Doing this helps avoid ImportError when we try to use a package installed with one version of Python interpreter with a different version. You can use the command which python to determine which Python interpreter you are using.
How to Install psutil on Mac Operating System using pip
Open a terminal by pressing command (⌘) + Space Bar to open the Spotlight search. Type in terminal and press enter. To get pip, first ensure you have installed Python3:
python3 --version
Python 3.8.8
Download pip by running the following curl command:
curl https://bootstrap.pypa.io/get-pip.py -o get-pip.py
The curl command allows you to specify a direct download link. Using the -o option sets the name of the downloaded file.
Install pip by running:
python3 get-pip.py
To install psutil, first, create the virtual environment:
python3 -m venv env
Then activate the environment using:
source env/bin/activate
You will see “env” in parenthesis next to the command line prompt. You can install psutil within the environment by running the following command from the command prompt.
python3 -m pip install psutil
How to Install psutil on Linux Operating Systems
All major Linux distributions have Python installed by default. However, you will need to install pip. You can install pip from the terminal, but the installation instructions depend on the Linux distribution you are using. You will need root privileges to install pip. Open a terminal and use the commands relevant to your Linux distribution to install pip.
Installing pip for Ubuntu, Debian, and Linux Mint
sudo apt install python-pip3
Installing pip for CentOS 8 (and newer), Fedora, and Red Hat
sudo dnf install python-pip3
Installing pip for CentOS 6 and 7, and older versions of Red Hat
sudo yum install epel-release

sudo yum install python-pip3
Installing pip for Arch Linux and Manjaro
sudo pacman -S python-pip
Installing pip for OpenSUSE
sudo zypper python3-pip
psutil installation on Linux with Pip
To install psutil, first, create the virtual environment:
python3 -m venv env
Then activate the environment using:
source env/bin/activate
You will see “env” in parenthesis next to the command line prompt. You can install psutil within the environment by running the following command from the command prompt.
Once you have activated your virtual environment, you can install psutil using:
python3 -m pip install psutil
Installing psutil Using Anaconda
Anaconda is a distribution of Python and R for scientific computing and data science. You can install Anaconda by going to the installation instructions. Once you have installed Anaconda, you can create a virtual environment and install psutil.
To create a conda environment you can use the following command:
conda create -n project python=3.8
You can specify a different Python 3 version if you like. Ideally, choose the latest version of Python. Next, you will activate the project container. You will see “project” in parentheses next to the command line prompt.
source activate project
Now you’re ready to install psutil using conda.
Once you have installed Anaconda and created your conda environment, you can install psutil using the following command:
conda install -c conda-forge psutil
Check psutil Version
Once you have successfully installed psutil, you can check its version. If you used pip to install psutil, you can use pip show from your terminal.
python3 -m pip show psutil
Name: psutil
Version: 5.8.0
Summary: Cross-platform lib for process and system monitoring in Python.
Home-page: https://github.com/giampaolo/psutil
Second, within your python program, you can import psutil and then reference the __version__ attribute:
import psutil
print(psutil.__version__)
5.8.0
If you used conda to install psutil, you could check the version using the following command:
conda list -f psutil
# Name                    Version                   Build  Channel
psutil                    5.9.1            py38h0dd4459_0    conda-forge
Using psutil Example
Let’s look at an example of using the psutil module to retrieve CPU statistics as a named tuple.
import psutil

print("CPU Statistics", psutil.cpu_stats())
CPU Statistics scpustats(ctx_switches=82582, interrupts=674761, soft_interrupts=61633675, syscalls=1680809)
Summary
Congratulations on reading to the end of this tutorial.
Go to the online courses page on Python to learn more about Python for data science and machine learning.
For further reading on missing modules in Python, go to the article:
- How to Solve ModuleNotFoundError: no module named ‘plotly’.
- How to Solve Python ModuleNotFoundError: no module named ‘pymongo’
- How to Solve Python ModuleNotFoundError: no module named ‘six’
Have fun and happy researching!
pip install psutil
The Python psutil library is among the top 100 Python libraries, with more than 26,414,759 downloads. This article will show you everything you need to get this installed in your Python environment.
- Library Link
Alternatively, you may use any of the following commands to install psutil, depending on your concrete environment. One is likely to work!
💡 If you have only one version of Python installed:pip install psutil💡 If you have Python 3 (and, possibly, other versions) installed:pip3 install💡 If you don't have PIP or it doesn't workpsutilpython -m pip install💡 If you have Linux and you need to fix permissions (any one):psutilpython3 -m pip installpsutilsudo pip3 install💡 If you have Linux with aptpsutilpip3 installpsutil--usersudo apt install💡 If you have Windows and you have set up thepsutilpyaliaspy -m pip install💡 If you have Anacondapsutilconda install -c anaconda💡 If you have Jupyter Notebookpsutil!pip installpsutil!pip3 installpsutil
How to Install psutil on Windows?
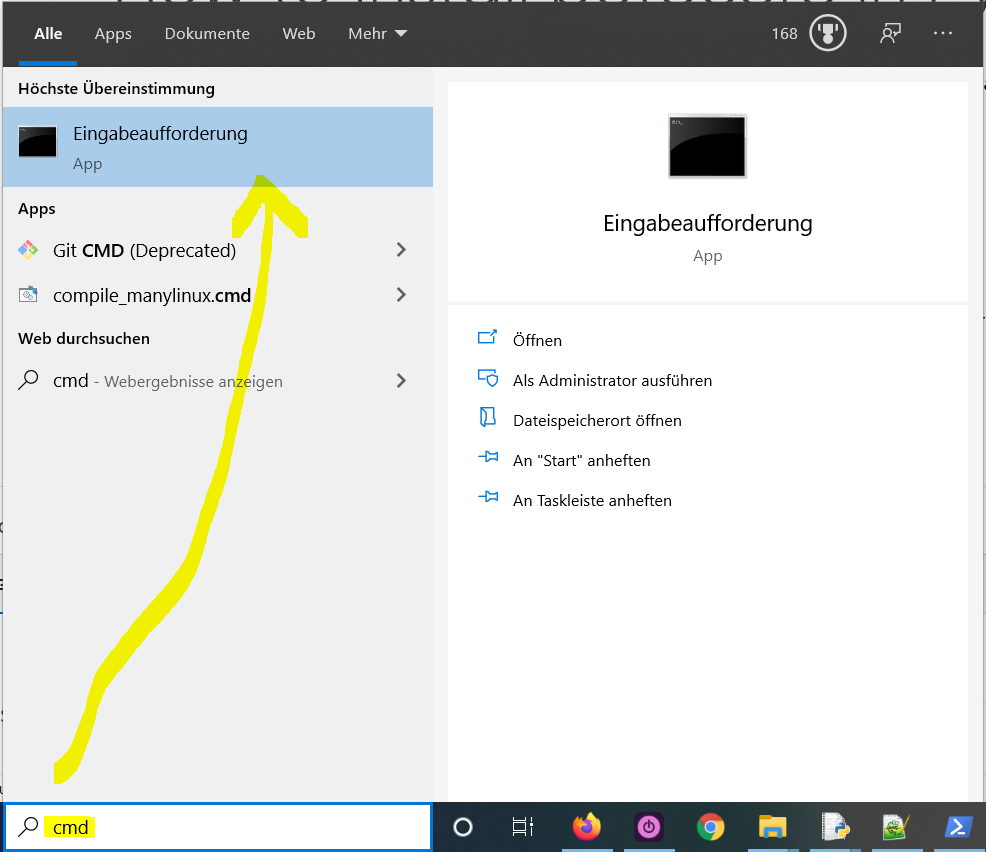
- Type
"cmd"in the search bar and hitEnterto open the command line. - Type “
pip install psutil” (without quotes) in the command line and hitEnteragain. This installs psutil for your default Python installation. - The previous command may not work if you have both Python versions 2 and 3 on your computer. In this case, try
"pip3 install psutil"or “python -m pip install psutil“. - Wait for the installation to terminate successfully. It is now installed on your Windows machine.
Here’s how to open the command line on a (German) Windows machine:
First, try the following command to install psutil on your system:
pip install psutil
Second, if this leads to an error message, try this command to install psutil on your system:
pip3 install psutil
Third, if both do not work, use the following long-form command:
python -m pip install psutil
The difference between pip and pip3 is that pip3 is an updated version of pip for Python version 3. Depending on what’s first in the PATH variable, pip will refer to your Python 2 or Python 3 installation—and you cannot know which without checking the environment variables. To resolve this uncertainty, you can use pip3, which will always refer to your default Python 3 installation.
How to Install psutil on Linux?
You can install psutil on Linux in four steps:
- Open your Linux terminal or shell
- Type “
pip install psutil” (without quotes), hit Enter. - If it doesn’t work, try
"pip3 install psutil"or “python -m pip install psutil“. - Wait for the installation to terminate successfully.
The package is now installed on your Linux operating system.
How to Install psutil on macOS?
Similarly, you can install psutil on macOS in four steps:
- Open your macOS terminal.
- Type “
pip install psutil” without quotes and hitEnter. - If it doesn’t work, try
"pip3 install psutil"or “python -m pip install psutil“. - Wait for the installation to terminate successfully.
The package is now installed on your macOS.
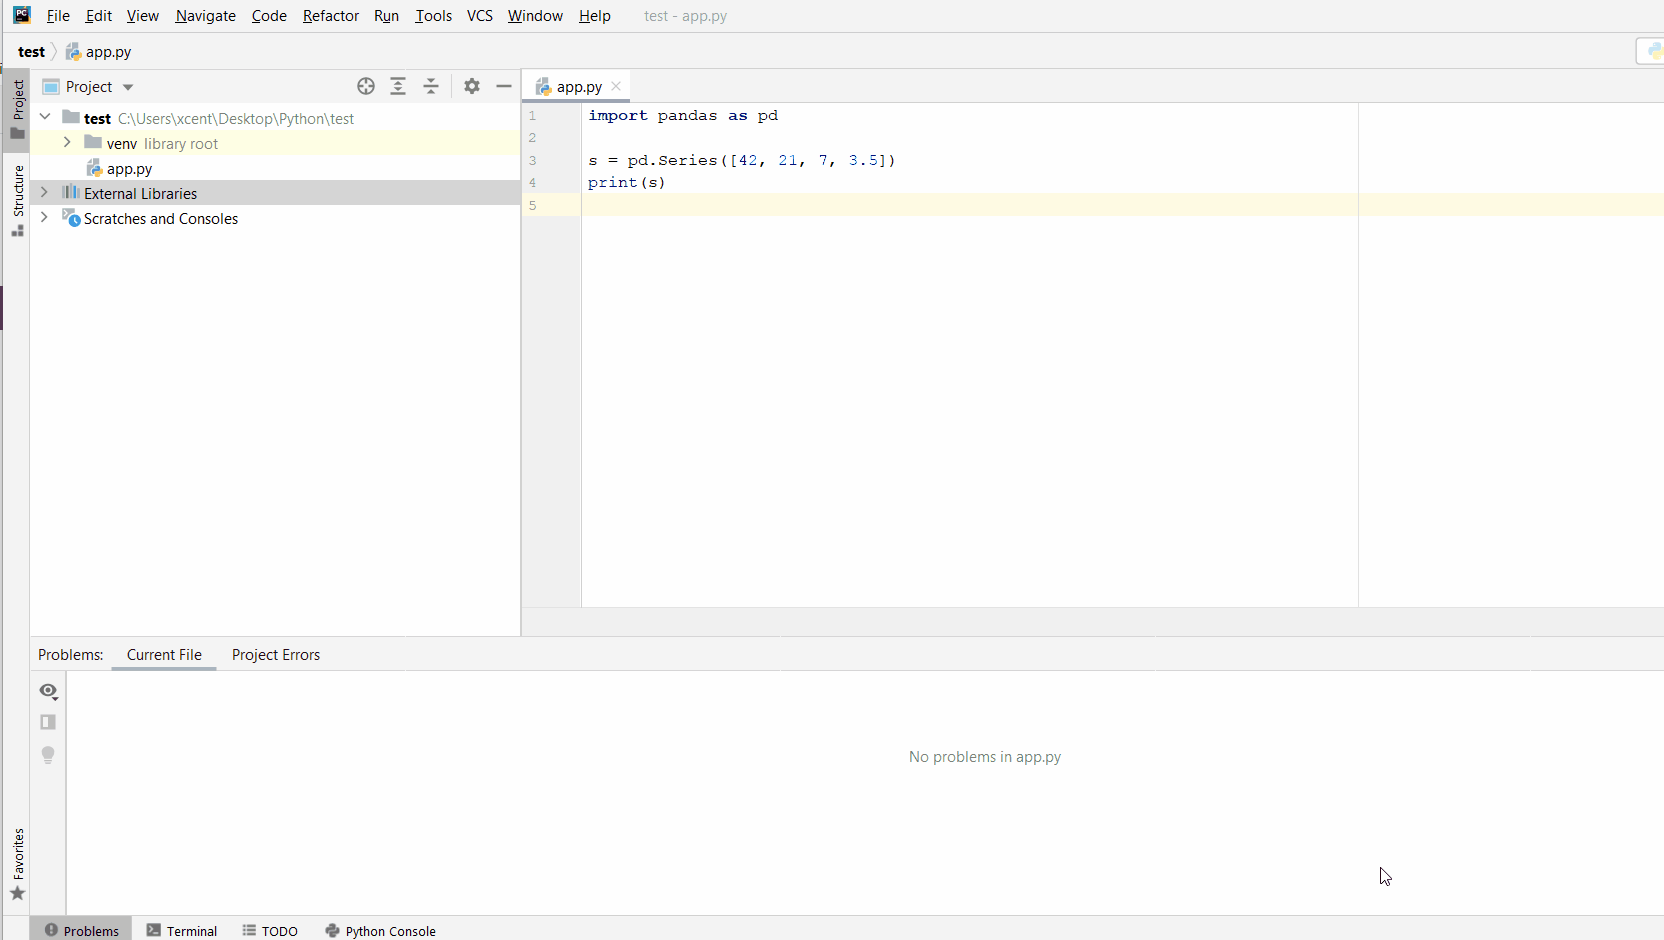
Given a PyCharm project. How to install the psutil library in your project within a virtual environment or globally? Here’s a solution that always works:
- Open
File > Settings > Projectfrom the PyCharm menu. - Select your current project.
- Click the
Python Interpretertab within your project tab. - Click the small
+symbol to add a new library to the project. - Now type in the library to be installed, in your example
"psutil"without quotes, and clickInstall Package. - Wait for the installation to terminate and close all pop-ups.
Here’s the general package installation process as a short animated video—it works analogously for psutil if you type in “psutil” in the search field instead:
Make sure to select only “psutil” because there may be other packages that are not required but also contain the same term (false positives):
How to Install psutil in a Jupyter Notebook?
To install any package in a Jupyter notebook, you can prefix the !pip install my_package statement with the exclamation mark "!". This works for the psutil library too:
!pip install my_package
This automatically installs the psutil library when the cell is first executed.
How to Resolve ModuleNotFoundError: No module named ‘psutil’?
Say you try to import the psutil package into your Python script without installing it first:
import psutil
# ... ModuleNotFoundError: No module named 'psutil'
Because you haven’t installed the package, Python raises a ModuleNotFoundError: No module named 'psutil'.
To fix the error, install the psutil library using “pip install psutil” or “pip3 install psutil” in your operating system’s shell or terminal first.
See above for the different ways to install psutil in your environment.
Improve Your Python Skills
If you want to keep improving your Python skills and learn about new and exciting technologies such as Blockchain development, machine learning, and data science, check out the Finxter free email academy with cheat sheets, regular tutorials, and programming puzzles.
Join us, it’s fun! 🙂

While working as a researcher in distributed systems, Dr. Christian Mayer found his love for teaching computer science students.
To help students reach higher levels of Python success, he founded the programming education website Finxter.com. He’s author of the popular programming book Python One-Liners (NoStarch 2020), coauthor of the Coffee Break Python series of self-published books, computer science enthusiast, freelancer, and owner of one of the top 10 largest Python blogs worldwide.
His passions are writing, reading, and coding. But his greatest passion is to serve aspiring coders through Finxter and help them to boost their skills. You can join his free email academy here.