If you are a developer either pro or novice and getting «Pip command not found error«. You have landed on the right page to find the solution. Majorly the reason is either you have not installed pip or the environment variable of pip is not set correctly. Based on the operating system, look for step by step solution to fix your pip command error.
Table of Contents
- 1 What are the common errors, related to pip?
- 2 What are the quick fixes for «pip command not found error»?
- 3 What are Python and pip?
- 4 How to fix pip command not found error in Ubuntu Linux
- 5 How to fix ‘pip’ is not recognized as an internal or external command, operable program or batch file in Windows 10
- 6 Solution4 — Setup the python Environment variable in Windows 10, in case forgot to select the option during installation
- 7 Solution5 — Permission issues, exit root login to fix «pip command not found error»
- 8 Conclusion
Below mentioned are very common errors you may encounter while working with Python and based on your operating system.
- Bash: pip: command not found
- Sudo pip command not found in Ubuntu
- Pip command not found in mac
- ‘pip’ is not recognized as an internal or external command, operable program or batch file
- pip command not found in Windows
- pyenv pip command not found
- pip command not found mac python 3
- zsh: command not found: pip
What are the quick fixes for «pip command not found error»?
- Check for the existing installation of Python and pip versions in your system. Also, try the pip3 command instead of the pip
- If pip is not installed, then install pip in the right way
- If pip is installed, then make sure you have Path or environment variable set up correctly
- Validate whether you are running python2 or python3 code and select your pip version accordingly. The recommendation is to move the codebase to Python and pip3 as Python2 is obsolete now.
- Reinstall or upgrade Python and pip both, in case still getting pip command not found error
- Exit out of the root user and run the pip command
What are Python and pip?
Python is a simple, Object-oriented, interpreted, high-level programming language with dynamic semantics. Due to its non-complicated syntax and fast edit-test-debug cycle, the Programmer community loves it. Python also reduces the cost of software management due to its simple nature. Python2 and Python3 are the two versions available, while Python2 is already obsolete and it’s suggested to move your codebase to Python3.
Pip is a package manager for python, it allows you to install and manage additional libraries and dependencies that are not distributed or part of the standard library.
*** For Windows10 and macOS, pip gets installed automatically with python3 as an option is available during installation. But in the case of Linux, you need to install pip3 after python3 installation separately.
If you are getting «bash: pip command not found error» in Ubuntu or any other Linux distro. You can fix it easily by following methods —
Solution 1- Check Whether Python and Pip are installed already or not?
I will take Ubuntu as a Linux distro for this post —
1.1 — Open Terminal in Ubuntu
Press <Ctrl + Alt + t> on your keyboard to open terminal.
1.2 — Check for the Python version installed in your Linux system
- For python2. Python 2 is obsolete and it is recommended to move your codebase to python3.
$ python --version
- For Python3 which is by default installed in Ubuntu 20.04 or Ubuntu 21.04. In all new Linux distros, you get Python installed by default.
$ python3 --version
In my case, Python 3.8.5 is installed by default. Visit my other article if you want to install the latest python and pip in Ubuntu Linux.
1.3 — Check for the existing pip version in Ubuntu 21.04
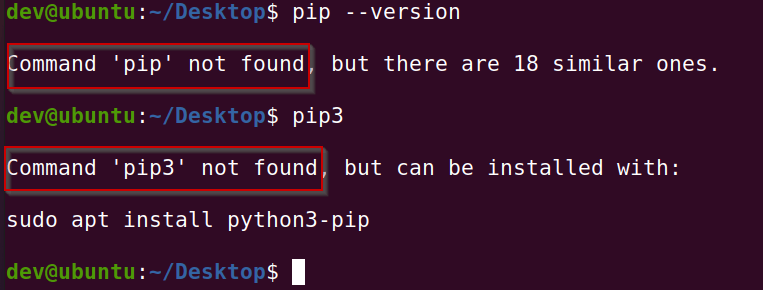
Run pip —version command to check, whether pip is also installed. Try running both commands, generally pip3 works in most cases.
$ pip --version
OR
$ pip3 --version
As you can see, I have got command ‘pip’ not found error. Because I have python 3 installed by default but not pip. So in Ubuntu make sure you always install pip as it’s not available by default.
- To install pip you can simply run —
$ sudo apt update

$ sudo apt install python3-venv python3-pip
Check out this post, in case you get the sudo: command not found error. Once you are done with the installation, check the pip version again. Now you will not get the «pip command not found error» as it has been fixed already.
For alternate pip installation methods, you can refer to this official guide also.
1.4 (Optional) — Setup alias of pip3 as pip if required
In the case of Linux, you get pip and pip3 commands both after installing Python and Pip. If this is not the case, creating an alias is the only solution.
Add the following alias in $HOME/.bash_aliases in some cases, files may be hidden. You can also create it, in the case file doesn’t exist. Here option -m stands for the Module name.
alias pip="/usr/bin/python3 -m pip "
Refresh current terminal session
$ . ~/.profile
Solution2 — Setup path variable in Linux or macOS, in case pip3 is installed but still getting pip error
The path variable is set up by default during pip installation, but in case it doesn’t. Follow these steps to set up path variables in Linux or macOS.
- Add this line to ~/.bash_profile using vi or nano editor.
export PATH="export PATH=/usr/bin/:/usr/local/bin:/usr/local/sbin:$PATH"
- In a terminal window, run
source ~/.bash_profile
In the case of macOS, if you are using the zsh shell, then you can add it into the «.zshrc» file. Check out my other article, in case you get the zsh command not found error.
How to fix ‘pip’ is not recognized as an internal or external command, operable program or batch file in Windows 10
If you are getting the «pip command not found error» in Windows 10, follow these steps —
Solution3 — Install Pip during Python3 installation and setup path variable automatically
Step3.1- Python and pip download
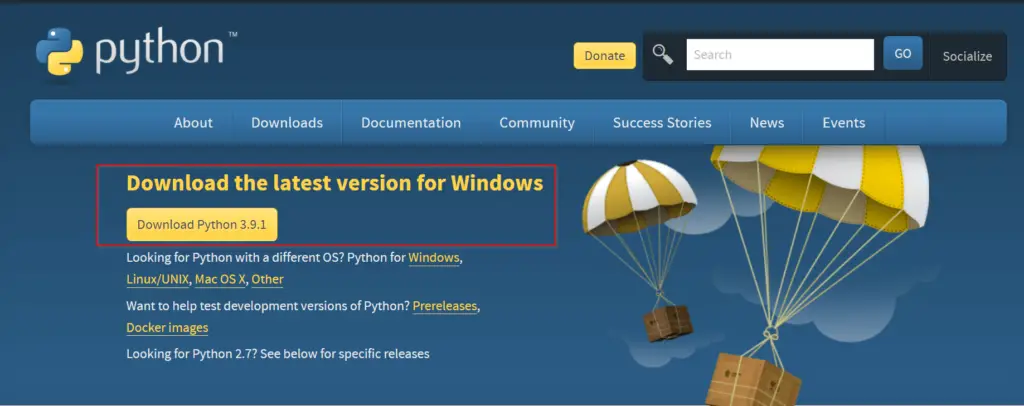
You can download the latest python version 3.9.1 for windows or your respective operating system from the python.org website.
Otherwise, you can simply click on the below-mentioned button to download python for windows 10.
Click here to download an older release of Python like 3.8 or 2.7, for your project. Once you click on this link, scroll down and select your old python version as shown in the image.
You don’t need to download pip separately as it’s part of Python 3.9.1 software. You will know it while following this post further.
Step3.2- Run Python 3.9.1 (64-bit) installer
Once your download completes, visit your «download» directory. Then double click python-3.9.1-amd64 file to start the python setup wizard.
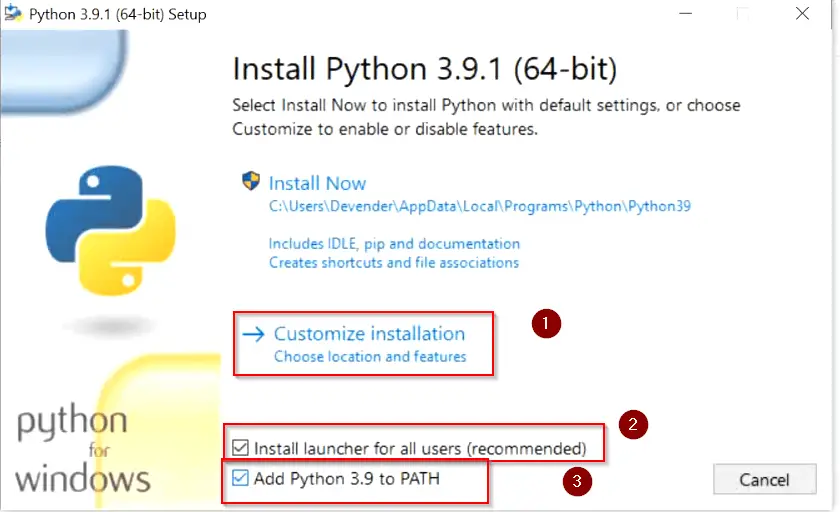
Step3.3- Choose «Install Now» or «Customize» installation
At this point, You will get two installation options —
- Install Now — This option is helpful if you are a newbie. Just select «Install now» and it will install Python 3.9 with default settings. Python default installation directory would be «C:users»your-username»AppDataProgramsPythonPython39». It will also install IDLE, pip, documentation and shortcuts.
- Customize installation — If you are a pro and need to know, what all features will be installed with python. Also, in case you already have python installed and want to test the latest version. Using the Customize installation option, you can choose a different installation folder and can keep both python versions.
Keep following this post, if you want to see options covered in Customize installation.
There are two more checkboxes to look into —
- «Install launcher for all users (recommended)» — Select this check box and it will make a python launcher shortcut for all user profiles that exist on your machine. Whomsoever will login to your system will be able to use python 3.9.
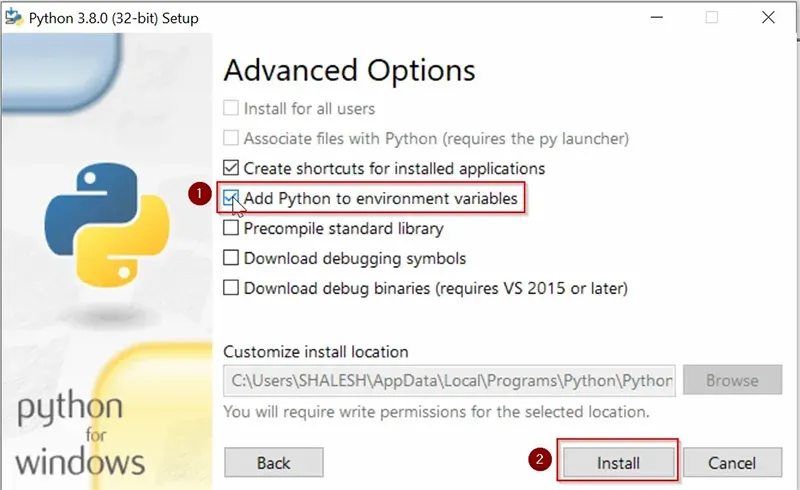
- Add python 3.9 to the path — Select this check box to add Python and pip «Path Variables» in the system environment automatically. If you will not select this option now, you need to add the path variable manually later after installation. My recommendation is to select it here itself.
Step3.4- Add or remove «Optional Features«
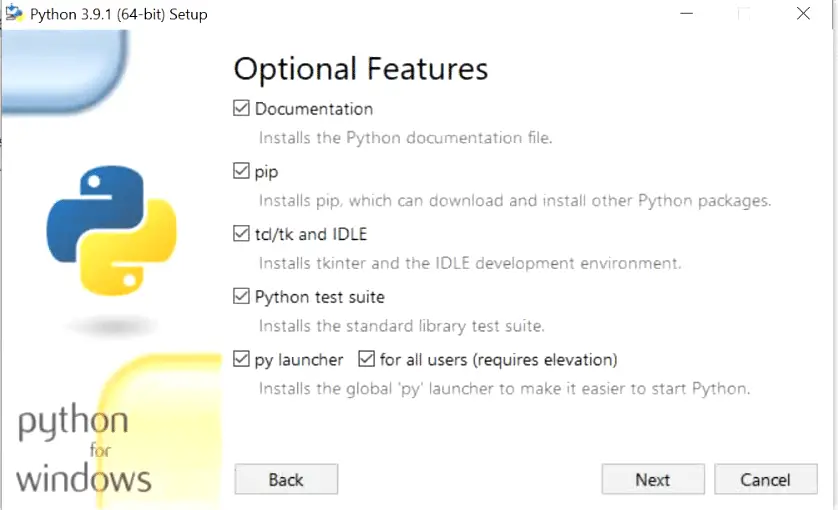
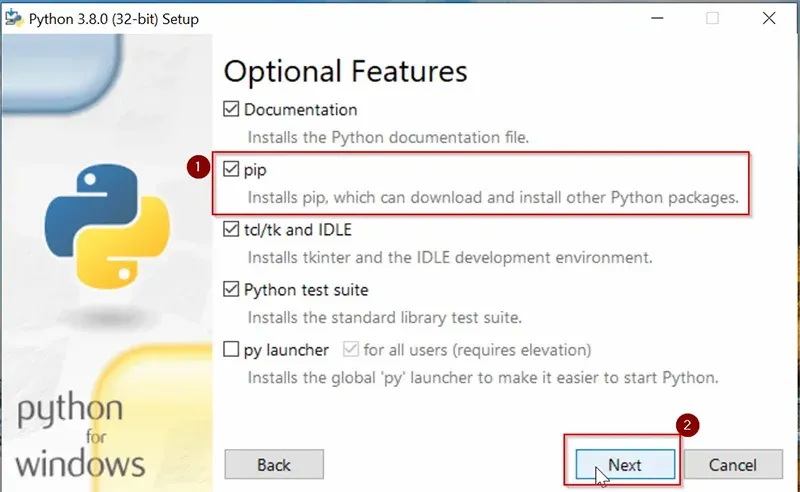
On this window, you can add or remove optional features, available with python 3.9. Let’s see a few details of each optional feature available —
- Documentation:- Selecting this box will install all the Python documentation and manuals.
- pip:- As I informed you in Step 1 download section. Pip is already part of python 3.9. Select this check box, If you want to install pip automatically with Python 3.9 (which I strongly recommend).
- tcl/tk and IDLE:- Selecting this check box will install Tkinter and the IDLE development environment. You don’t need to install it separately then.
- Python test suite:- Installs the standard library suite.
- py launcher for all users (requires elevation):- Installs the global ‘py launcher for all users. It requires admin rights (elevation) to perform it. Because it will allow all users to launch python easily from their user profiles.
Choose your required optional features and click Next. I will suggest you keep all options checked.
- Select Next and complete the installation with default options.
Step3.5- Validate Python and pip versions
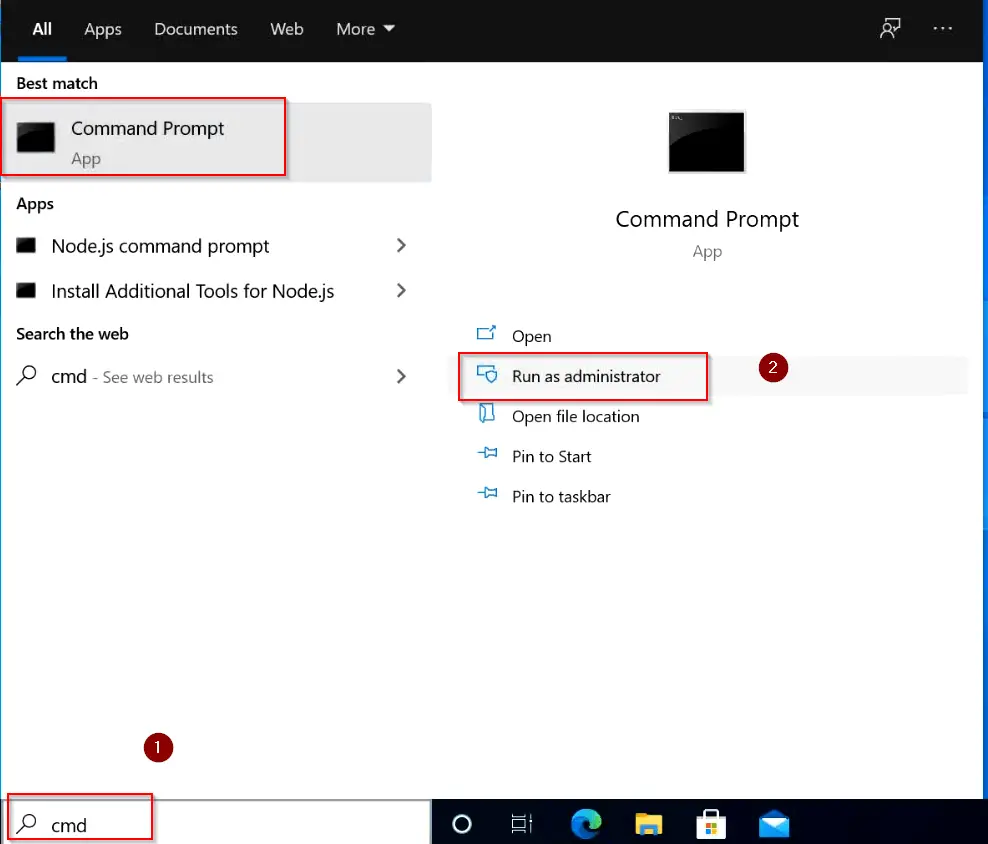
- Open the elevated command prompt «as administrator» by typing «cmd» in the search bar of Windows 10.
- Run the python or py (short form) command to check the Python version. You can see its version 3.9.1 installed in my case. You will see your installed version.
C:> py
### OR ###
C:> python
Type exit() or press «Ctrl + Z» on your keyboard to exit from the python prompt.
- To check the Python-pip version, type the pip —version command. it will show you the pip version. it’s pip 20.2.3 in my case.
C:> pip --version
Running the pip and python version command successfully also validates, that your python and pip path variables are added successfully in windows 10.
Solution4 — Setup the python Environment variable in Windows 10, in case forgot to select the option during installation
It’s very common to ignore options during the installation of any software in Windows 10. So if you are getting a «pip command not found» error in Windows 10, while you already have Python and pip installed. Then setting the environment up variables can fix this error.
Follow these steps —
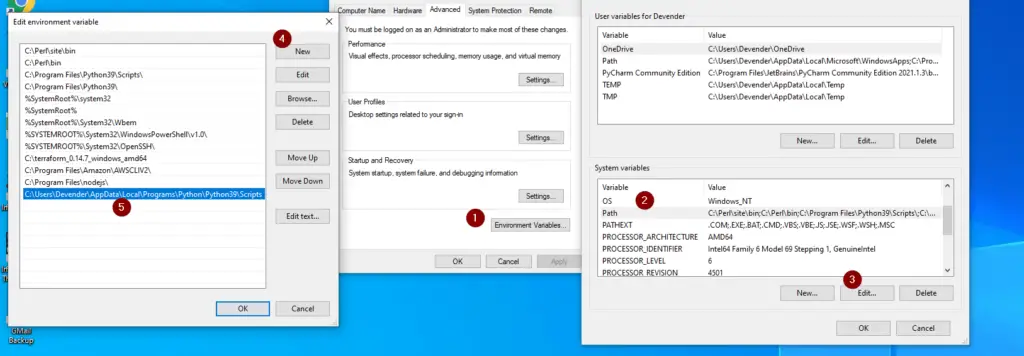
- Search for environment variables in Windows 10 search box and select «Edit environment variables»
- Click Open
- Select the «Environment variables» tab
- Click on «PATH» in system variables and choose the «Edit» button.
- Click New
- Add this path, replace «Your_Username» with your user and Python39 with the python version, you have installed.
C:UsersYOUR_USERNAMEAppDataLocalProgramsPythonPython39Scripts
In my case, this path would be —
C:UsersdevenderAppDataLocalProgramsPythonPython39Scripts
- Save and close all open Windows of environment variable
- Open a command prompt and run the pip —version command as shown in step 3.5 above. It will fix your issue of «pip’ is not recognized as an internal or external command, operable program or batch file in Windows 10«.
Refer to this image for further details —
Solution5 — Permission issues, exit root login to fix «pip command not found error»
$ sudo su -l rootThen run the pip command, you will not get the «pip command» errors.
pip <command>
Conclusion
Generally, pip is available with Python in all the latest versions for Windows. For Linux Python is installed by default, you just need to install the pip version.
If you have installed Python correctly, then the pip command not found error is rare. But if you are still having this error, I hope you would be able to fix it by following this article.
Let me know via your comments, in case you still face any issues, I will try to get this solved.
-
MiniTool
-
MiniTool News Center
- How to Fix PIP Is Not Recognized in Windows Command Prompt?
By Vera | Follow |
Last Updated November 29, 2020
When installing Python packages in Command Prompt, you may get the error message saying “’pip’ is not recognized as an internal or external command, operable program or batch file”. How can you fix the issue? MiniTool will show you some methods in this post.
PIP Is Not Recognized
PIP, Pip Installs Package, is a standard package management system. It is used to install and handle software packages written in Python. By default, most versions of Python have PIP installed.
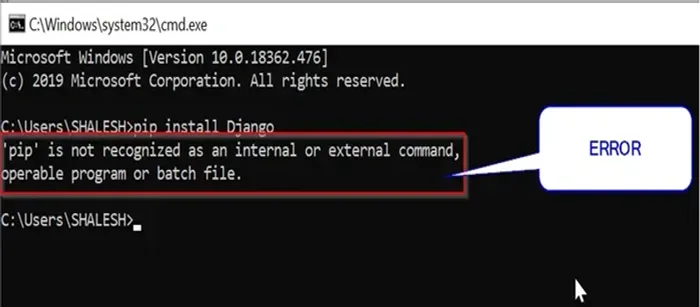
When installing Python packages in the Command Prompt window, Windows will show you an error saying “’pip’ is not recognized as an internal or external command, operable program or batch file”.
The main reasons for PIP not recognized are because PIP installation is not added to the system variable or the installation is incorrectly added in your PATH. To fix this issue, you can follow some methods below.
Tip: Not recognized as an internal or external command is a common issue and it doesn’t only occur with PIP. This related article may be helpful to you — Not recognized Fix “Not Recognized As an Internal or External Command” Win 10.
Fixes for PIP Not Recognized
Check if PIP Is Added to the PATH Variable
Firstly you should know if your PIP installation is added to your PATH variable. Just do this thing through the following steps:
Step 1: Launch Command Prompt as administrator.
Step 2: Type echo %PATH% and press Enter. You can see a list of all the locations added to the PATH variable.
Step 3: Try to search for something similar to C:Python37Scripts. If you find one, this means the installation path has already been added to the PATH variable. If not, you need to add it to the variable.
Add PIP to the PATH Variable
Here are three options for you to do this work – use Windows GUI, a command line, and a Python executable installer.
Windows GUI
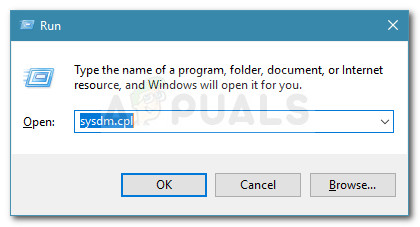
Step 1: Press Win + X, click Run, type sysdm.cpl, and click OK.
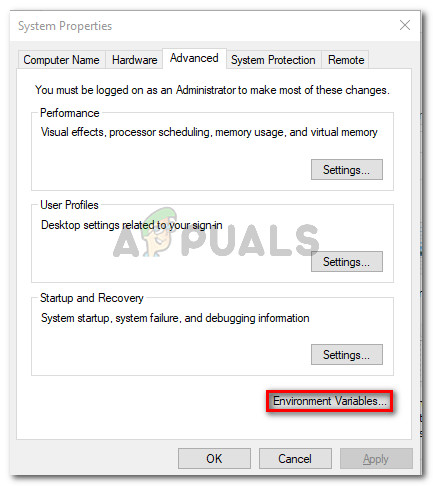
Step 2: Under the Advanced tab, click Environment Variables.
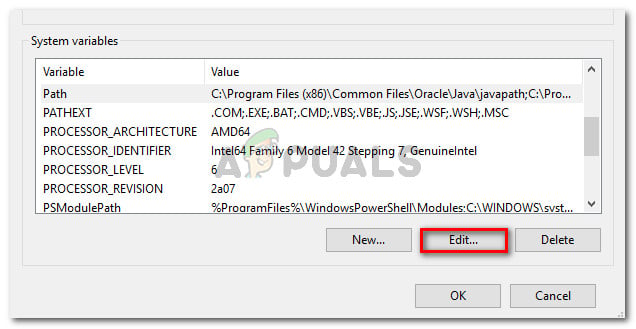
Step 3: Go to System variables, click Path > Edit.
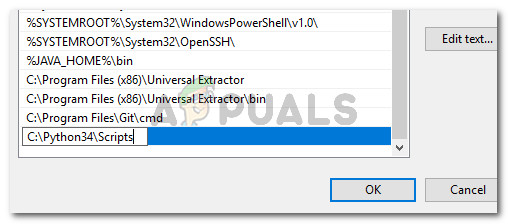
Step 4: Click New and type in C:Python34Scripts.
CMD
A quick way to add PIP to the PATH variable is using Command Prompt and now let’s see it.
Step 1: Run Command Prompt.
Step 2: Type setx PATH “%PATH%;C:Python37Scripts” and press Enter. Replace Python37 with your Python version.
Step 3: Then, run a Python installation package to see if “PIP is not recognized as an internal or external command” is fixed.
Use Python Executable Installer
Step 1: Run python –version in the CMD window to check the Python version installed.
Step 2: Go to Python.org to download the same version of the executable installer.
Step 3: Run the setup and choose Modify.
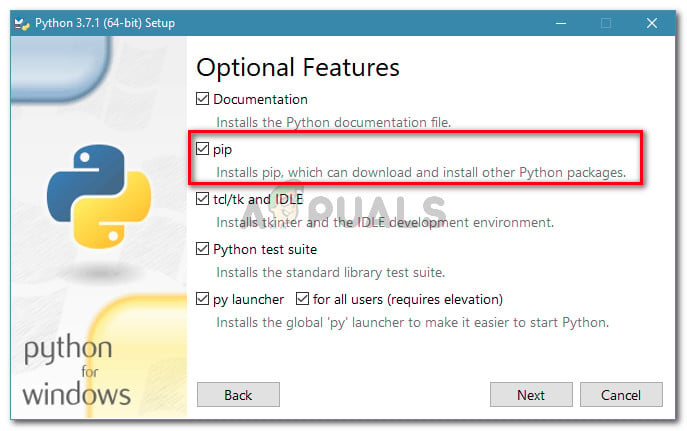
Step 4: Make sure the option of pip is selected.
Step 5: In the Advanced Options window, choose Add Python to environment variables and click Install.
Final Words
Have you got “PIP is not a recognized command”? Try to fix it by following the above methods and we hope you can easily get rid of the trouble.
About The Author
Position: Columnist
Vera is an editor of the MiniTool Team since 2016 who has more than 5 years’ writing experiences in the field of technical articles. Her articles mainly focus on disk & partition management, PC data recovery, video conversion, as well as PC backup & restore, helping users to solve some errors and issues when using their computers. In her spare times, she likes shopping, playing games and reading some articles.
In order to run a python program through command prompt, windows must know the location of the PIP installation directory, if windows is not able to find the executable PIP command then it will generate the error “‘pip’ is not recognized as an internal or external command”.
The error “‘pip’ is not recognized as an internal or external command” is encountered because of two main reasons that are.
- PIP Installation path is not added to the system variables:
If you have installed python through prompt then you need to configure PIP path manually.
- Wrong system path added:
If you have installed multiple versions of python, which can affect the installation path, In this case we need to fix this manually.
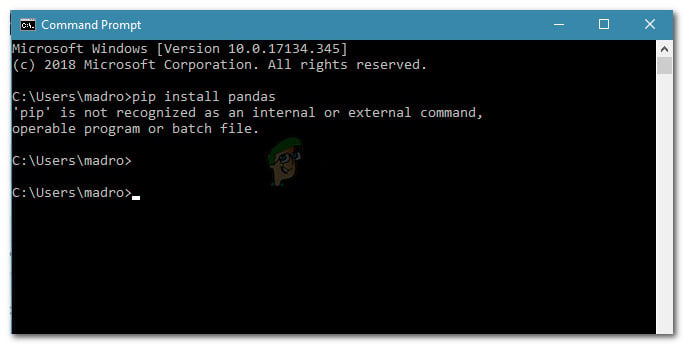
‘pip’ is not recognized as an internal or external command, operable program or batch file.
What is PIP?
PIP is the name of the package manager or the standard package management system used for the Python programming language. It is used for installing and handling packages written in Python. Most versions of Python have PIP installed by default.
Check if PIP Path is Added to Windows Environment Variables
By running following command in windows we can check the PIP installation path variable whether it is added in windows environment variable or not.
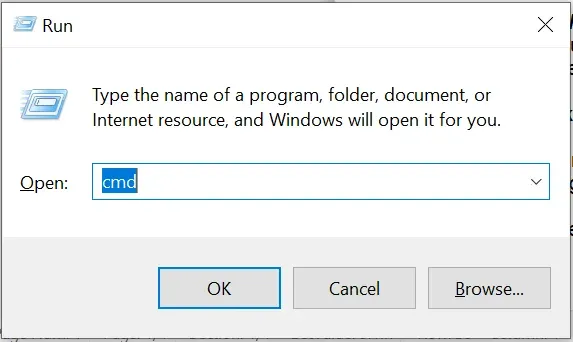
1. Open windows CMD by pressing Windows key + R and type cmd and then press enter.
2. Once the command prompt has opened, run the command “echo %path%”, it will list all the path entry added in windows excrement variable.
Now search for the python installation path variable “C:Python38-32” its depend on the python version.
In our case we did not find any entry with the name of python, which means python installation variable is not added in windows system variable.
Method 1: Adding PIP to the Windows environment variable using CMD
The easiest way to add PIP path variable is through cmd, but this method is only applicable if we know the correct path of PIP or Python Installation directory.
As we have already open the command prompt to run the following command
setx PATH “%PATH%;C:Python38-32Scripts;C:Python38-32”
In the above command C:Python38-32 is our Python installation directory.
Method 2: Adding PIP to the Windows environment variable using GUI
Here is the step by step process to add PIP to Windows environment variable:
1. Open Computer/System Properties
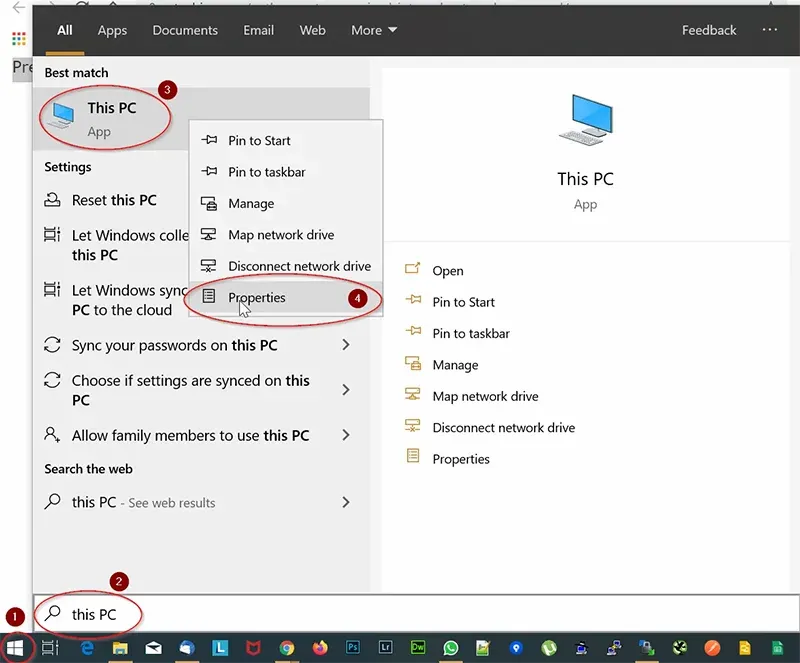
To open Computer/System Properties Press (Windows Key) and Type «This PC» then Right-Click on Computer (This PC) and select Properties.
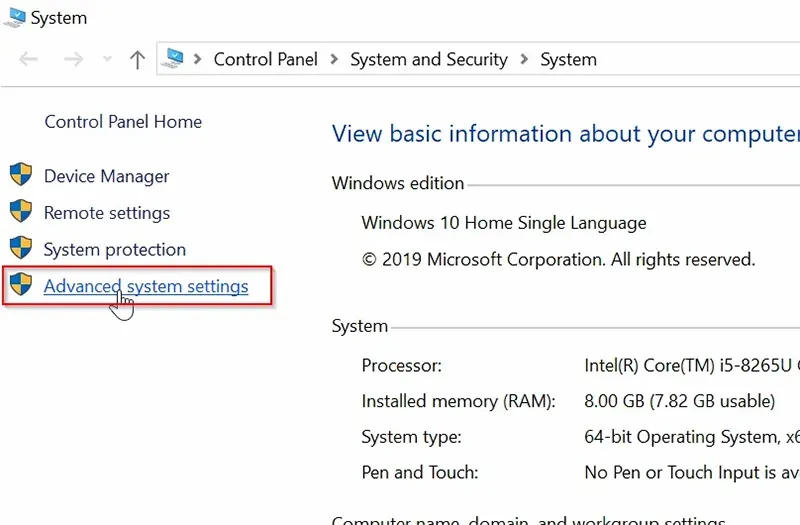
2. Inside ‘Property’ window click on ‘Advanced system settings’.
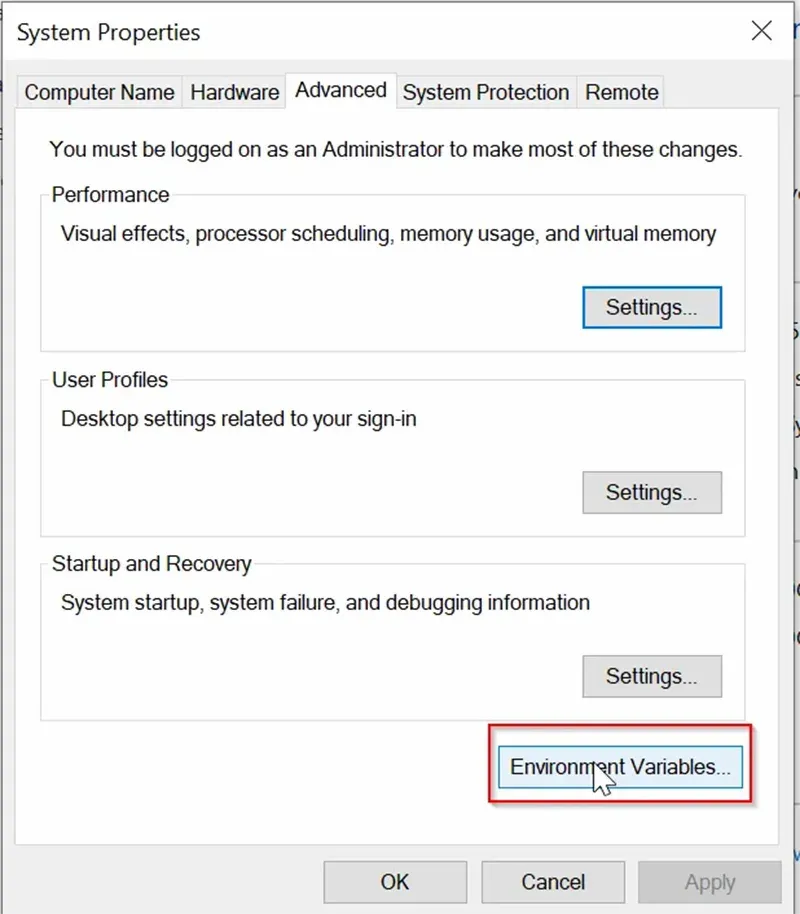
3. Now click on Environment Variables button at the bottom (here we will add the full path of PIP installation).
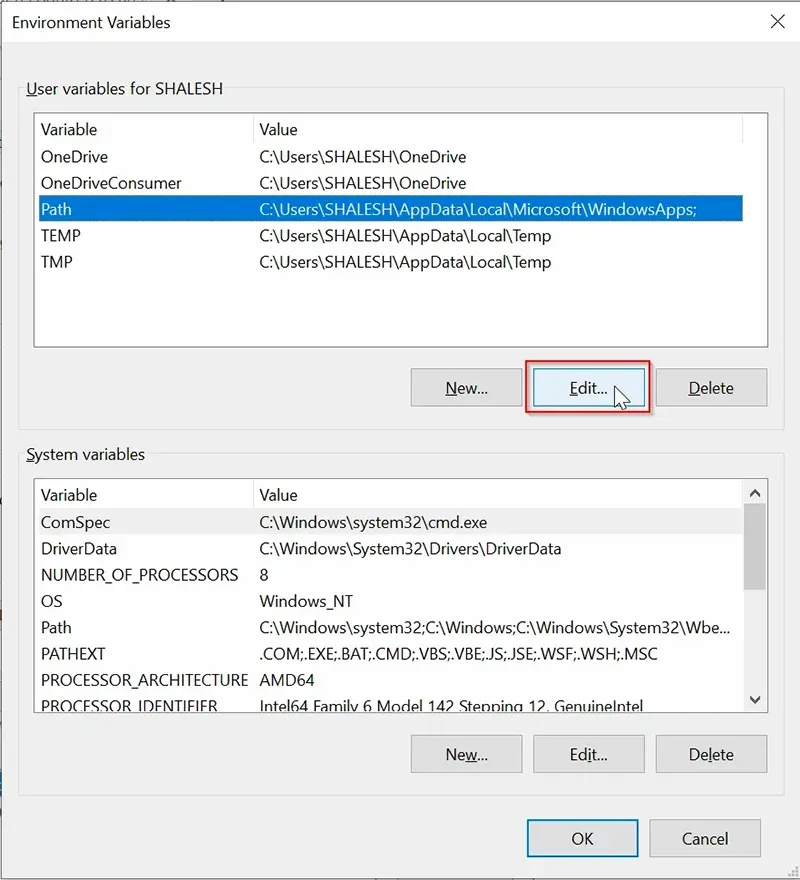
4. In the ‘Environment Variables’ window select the ‘Path’ variable and click on ‘Edit’.
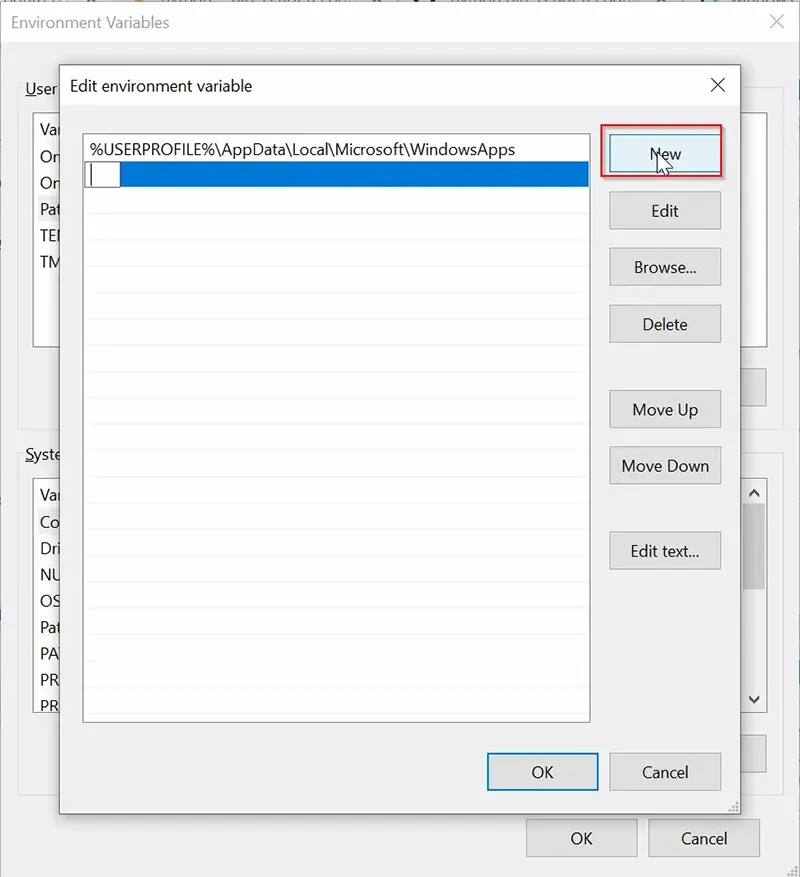
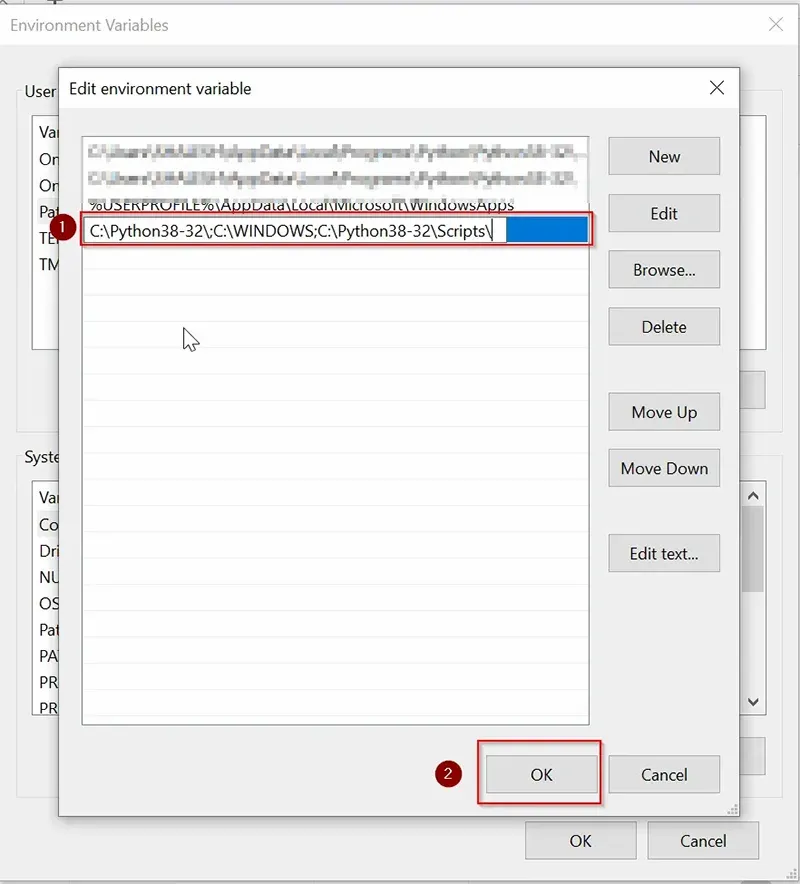
5. In Edit Environment Variable Window click on “New” button to add PIP path to Windows Environment Variables.
For Example: «C:Python38-32;C:WINDOWS;C:Python38-32Scripts”
Note: C:Python38-32: is your python installation directory.
In the latest version of Python the setup get installed in
«C:Python38-32Scripts»
6. Click ‘OK’ to save the changes.
Method 3: Adding PIP to Windows Environmental Variable using Python executable Installer.
This is this easiest and safest way to add or correct Python & PIP path variable to windows system variables.
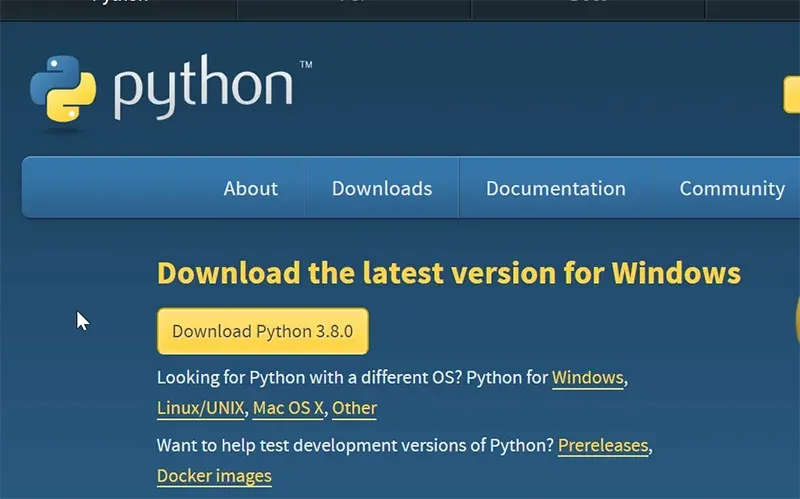
1. To do so download the same version of executable installer from Python.org.
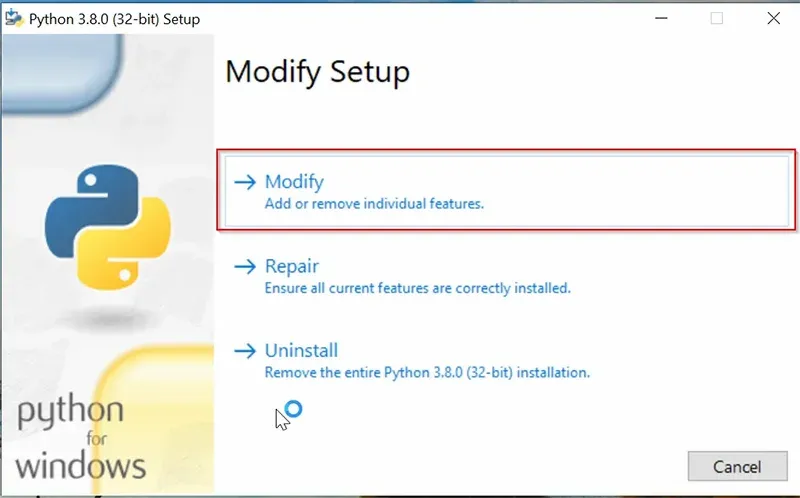
2. Run Python Setup and select the ‘Modify’ button:
3. In the next window please make sure that PIP checkbox is checked and then click on ‘Next’ button. As shown below.
4. In ‘Advanced Options’ window, check the ‘Add Python to environment variables’ option and click on ‘Install’ button.
Now it will modify the Python and PIP path variables to Windows system Variables.
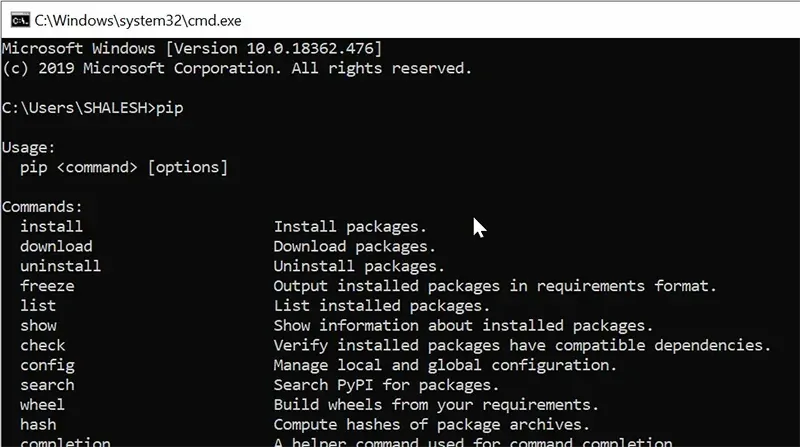
Check the PIP Path Variable by Running «pip» Command in CMD
C:UsersSHALESH > pip
Usage:
pip <command> [options]
Commands:
install to Install packages.
download to Download packages.
uninstall to Uninstall packages.
As we can see there is no error, our python and PIP is ready to run.
Some users trying to install Python packages using a Command Prompt window report seeing the “pip is not recognized as an internal or external command” error. Most affected users report that the issue occurs even after installing the Python distribution and making sure that Python is added to the path variable. The issue is not specific to a certain OS since it’s reported on Windows 7, Windows 8 and Windows 10.
What is PIP?
PiP is a recursive acronym for “Pip Installs Packages“. It’s essentially a package management system used to install and manage software packages written in Python. Most users make use of PiP to install and manage Python packages found in the Python Package Index.
The latest Python versions (Python 2.7.9 and later and Python 3.4) include Pip by default.
What is causing the ‘pip’ is not recognized as an internal or external command error?
We investigated this issue by looking at various user reports and trying to replicate the issue on our computers. From what we gathered, there are several scenarios that are known to trigger this particular error message:
- PIP installation is not added to the system variable – In order to be able to run Python commands from a CMD window, you will need to add the path of your PiP installation to your PATH in the system variable. If you installed Python using the installation executable, it should be added automatically.
- The installation is incorrectly added in your PATH – It’s easy to mess up the PATH if you add it manually. Additional space or the missing of a semicolon before the new PATH will end up producing the error.
If you’re currently trying to resolve this particular error message that prevents you from using Python command in CMD, follow the methods advertised in this article. All the potential fixes below are confirmed to be working by at least one affected users.
For the best results, follow the methods below in order until you find a fix that helps you to resolve the issue in your particular scenario.
Method 1: Checking if PIP is added to your PATH variable
Let’s start by finding out where we stand. If you don’t know if your PIP installation is added to your PATH variable, you can find it out easily by using a certain command at a CMD prompt.
Knowing this will point you in the right direction and save you from trying out unnecessary steps.
Note: If you already know if the path of your PIP installation is added to your PATH variable, move down to the next methods below.
Here’s a quick guide on checking if the PIP installation is already in your PATH variable:
- Press Windows key + R to open up a Run dialog box. Then, type “cmd” and press Enter to open up Command Prompt.
Run dialog: cmd - Inside the command prompt window, type echo %PATH% and press Enter to get a listing with all locations added to the PATH variable.
Checking to see if the PIP installation is present in the PATH variable - If you manage to find a path similar to C:Python37Scripts (this depends on your Python version), it means that the installation path is already added to your PATH variable. In this case, you can skip next to methods below and jump straight to Method 4 where we start troubleshooting for problems related to the PiP installation path.
If you weren’t able to find the PiP installation path using the test above, move down to the next methods below (Method 2 and Method 3) to add PIP to the PATH environment variable.
Method 2: Adding PIP to the PATH environment variable using the Windows GUI
If Method 1 revealed that the PIP installation is not set to the PATH as an environment variable and you already installed the Python distribution, you’ll need to do it manually.
After completing the procedure below, you will be able to input PiP commands from a Command Prompt window. Here’s a quick guide on Adding the PiP installation to the Path environment variable using the Windows GUI:
- Press Windows key + R to open up a Run dialog box. Then, type “sysdm.cpl” and press Enter to open up the System Properties screen.
Run dialog: sysdm.cpl - Inside the System Properties screen, go to the Advanced tab, then click on Environment Variables.
Go to the Advanced tab and click on Environment Variables - In the Environment Variables screen, go to System variables and click on Path to select it. Then with the Path selected, click the Edit… button.
Select the Path entry under System variables and click Edit - In the Edit environment variable screen, click on New and add the path where the PiP installation is located. For Python 3.4, the default location is C:Python34Scripts.
Adding the PiP installation location - Once the path is added, open a fresh CMD window and try to install a python package that comes with PiP. You should no longer see the “pip is not recognized as an internal or external command” error.
If you’re looking for a quicker way to add the PiP location to the environment variable, follow Method 3.
Method 3: Adding PIP to the PATH environment variable using CMD
A quicker way to set up the PIP path environment variable is to do it directly from a CMD window. This will save you some time, but it can be a little more intimidating if you’re not used to using the terminal.
Here’s a quick guide on setting the PiP path environment directly from a Command Prompt window:
- Press Windows key + R to open up a Run dialog box. Then, type “cmd” and press Enter to open a Command Prompt window.
Run dialog: cmd - In the Command Prompt window, run the following command to set the PIP installation to the environment variable:
setx PATH “%PATH%;C:Python37Scripts”
Note: Keep in mind that in this command, we used the default location for Python 3.7. If you’re using a different Python version or you installed it in a custom location, change the path after ‘;‘ accordingly.
- See if this method was successfully by running a Python installation package (one that uses PIP) from the same CMD window. If you’re still encountering the error message, move down to the next method below.
Method 4: Opening the Python package without adding the PiP variable
If you’re looking for a way to install a Python package from CMD without adding PiP to the PATH environment variable, you can use a couple of different commands to install it. This also works if you used the methods above to configure the environment PATH variable but you’re still encountering the error message.
Here’s a couple of ways that you can use to open Python install packages in CMD without adding the PIP variable:
The Short Method:
- Press Windows key + R to open up a Run dialog box. Then, type “cmd” and press Enter to open a Command Prompt Window.
Run dialog: cmd - Type the following commands and make sure to change the placeholder to your own package name:
python -m pip install [packagename]
Note: Change [packagename] with the name of the package you’re trying to install.
The Long Method:
- Open a Run dialog box by pressing Windows key + R. Then, type “cmd” and hit Enter to open a Command Prompt window.
Run dialog: cmd - In the CMD window, use the following command to navigate to the directory where the python .whl file is located.
cd C:python installs
Note: In our example, the Python install package was located in a folder called python installs. Adapt this command to navigate to the directory where the wheel is located.
- Next, run the following command to install the Python package using PiP:
c:python37scriptspip.exe install [package].whl
Note: Keep in mind need to change the location of your python installation if you have an older version or if you installed into a custom location. Also, make sure to change the [package] placeholder to your own package name.
If these two last methods didn’t enable you to install the Python package from the CMD window, follow the last method below where we ensure that PiP is installed.
Method 5: Ensuring that PiP is included in your Python installation
Before we go ahead and reinstall the whole Python environment, let’s see whether PiP was not omitted from the Python installation. Certain Python installers will leave PiP out of the default installation.
Luckily, you can rectify this by modifying the Python installation and modifying it to install PIP. Here’s a quick guide on how to do this:
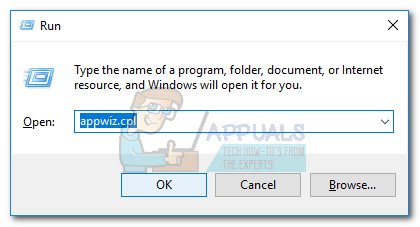
- Press Windows key + R to open up a Run dialog box. Then, type “appwiz.cpl” and press Enter to open Programs and Features.
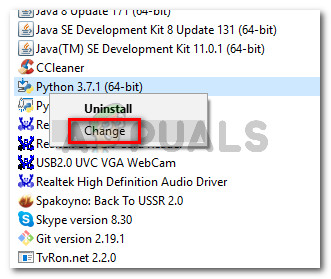
Run dialog: appwiz.cpl - Inside Programs and Features, right-click on the Python installation and click Change.
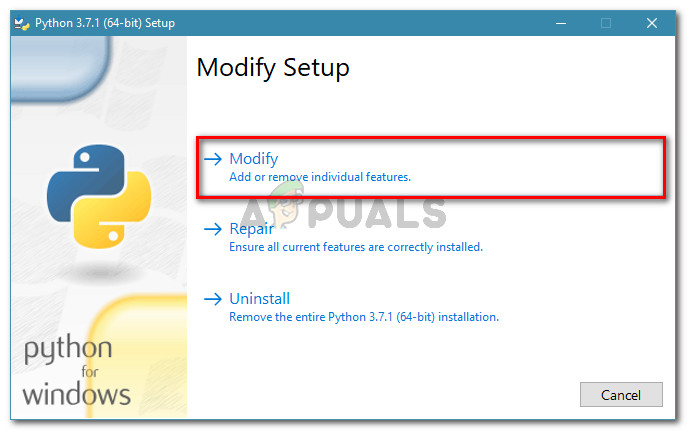
Change the Python installation - At the Modify Setup screen, click on Modify.
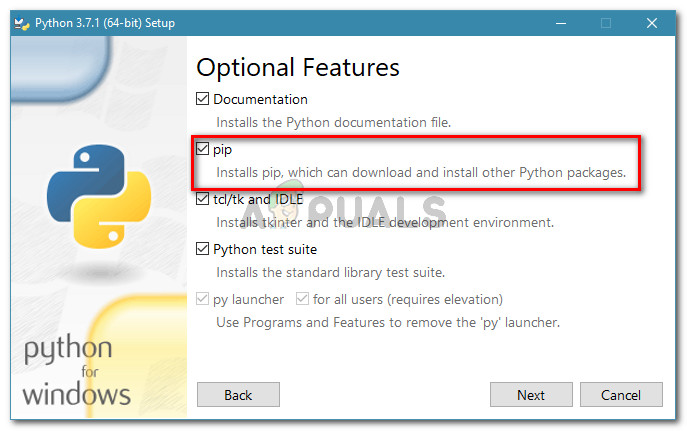
Click on Modify to ensure that PiP is installed - In the Optional Features screen, check the box associated with pip and click Next.
Modifying the Python installation to include PiP - Hit the Install button to make the changes to the Python installation.
Changing the Python installation - Once the Python installation is modified, open a CMD window and see if you’re able to install a Python package with PiP without seeing the “pip is not recognized as an internal or external command” error.
Method 6: Installing Python via the executable installer
If you’ve come this far without a result, reinstalling Python along with its components will likely resolve the “pip is not recognized as an internal or external command” error.
The easiest way to do this is by using the Python executable installer. If you configure it correctly, it will install PiP automatically. Here’s a quick guide on how to do this:
- Press Windows key + R to open up a Run dialog box. Then, type “appwiz.cpl” and press Enter to open Programs and Features.
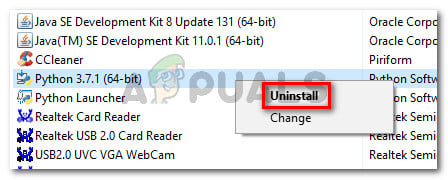
Run dialog: appwiz.cpl - Inside Programs and Features, scroll down to the programs list to find the Python installation. Once you find it, right-click on it and choose Uninstall, then follow the on-screen prompts to remove it from your system. Once the Python distribution is removed from your computer, restart your machine.
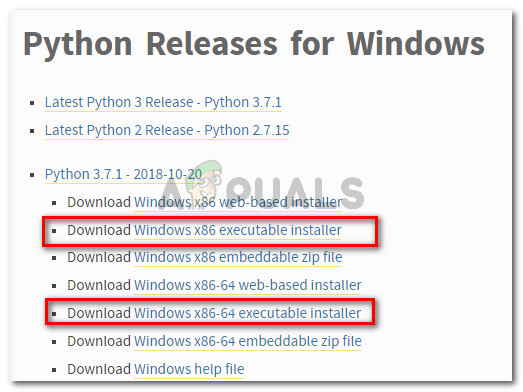
Uninstalling Python from your machine - At the next startup, visit this link (here) and download the latest Python executable installer according to your Os architecture.
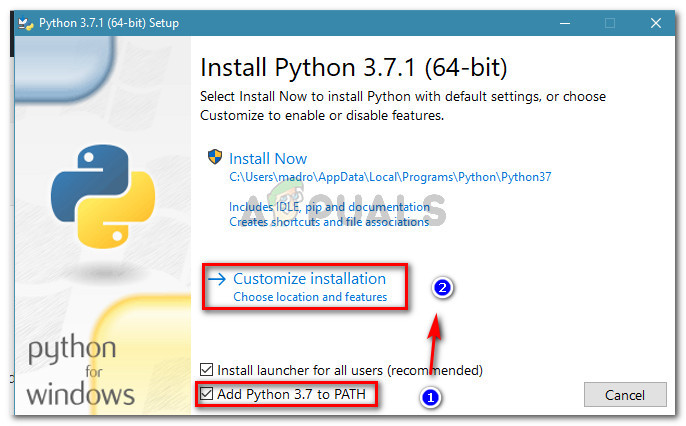
Downloading the right Python executable installer - Open the installation executable and start by making sure that the box associated with Add Python to PATH is checked – This ensures that you can run Python commands in Command Prompt. Then, click on Customize installation.
Ensure that Python is added to PATH, then click on Customize installation - In the Optional Features window, make sure that the box associated with pip is checked, then click Next.
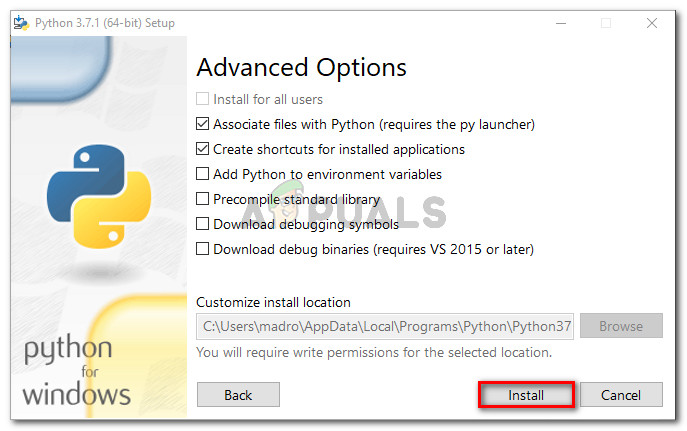
Make sure that pip is checked under optional features - Leave the default location and Advanced Options, then click Install to commence the installation.
Installing Python - Once the installation is complete, restart your computer manually if you’re not automatically prompted to do so.
- At the next startup, see if the issue has been resolved by trying to install a Python package via a CMD window.
- If you’re still seeing the “pip is not recognized as an internal or external command” error, type the following command in a CMD window:
python -m ensurepip --default-pip
Note: With certain Python distributions (particularly 3.6), it’s possible that PiP doesn’t get installed by default. One of the official fixes for this included in the documentation is this command.
Kevin Arrows
Kevin is a dynamic and self-motivated information technology professional, with a Thorough knowledge of all facets pertaining to network infrastructure design, implementation and administration. Superior record of delivering simultaneous large-scale mission critical projects on time and under budget.
‘pip’ is not recognized as an internal or external command, operable program or batch file.
If that looks familiar then you’ve come to the right place. I’m going to show you how to fix it. This is a common issue if you didn’t install Python properly. Note that you are not alone – experienced users can also run into this issue!
Python Installation
You will need a Python IDE (Integrated Development Environment). There are many different ones out there, so feel free to use any one of them. I’m going to use the vanilla Python IDE, and it can be found here: https://www.python.org/downloads/.
I highly recommend getting the 64-bit version of Python.
The 64-bit Python will allow you to use more RAM than the 32-bit version, kind of similar to Excel. Generally speaking, more RAM = more processing power.
If you are not sure, the ones in red box are the 64-bit version of Python. Pick one that suits your operating system.
I’m installing the most recent version as of today (April 16, 2020), which is v3.8.2. Once you open up the installer, here’s what you’ll see.
You can just click on “Install Now”, which will install Python with all the default settings. But I like to install Python to a different folder, so I’ll go with Customize installation, feel free to skip this step if you like.
Make sure you check the “Add Python 3.8 to PATH” box, this will save you a lot of trouble down the road. However, if you missed it, that’s also fine, and we can fix that later. I intentionally omitted the checkbox on this step.
Click on Install, and wait for it to complete.
Setup was successful – YAY! Well, you wish it was that simple. Now, your Python will work, but the setup isn’t complete, you’ll get an error when trying to install libraries. Let’s take a look at that next.
Library installation/setup
The easiest way to install 3rd party Python libraries is to use pip install, which should be already available to you from the standard Python installation.
Bring up a Command Prompt. Now if you are using a company laptop, chances are there are other user profiles on your laptop. So you want to run the Command Prompt as administer. This way you’ll have more flexibility with the pip install.
I’m going to install our favorite library – pandas. To do that, I just need to type pip install pandas in the Command Prompt, and then press enter.
So why is it telling me that “pip is not recognized” when I just installed it???
This is because we missed the “Add Python to PATH” checkbox during the Python installation stage. pip is a program written in Python, the computer doesn’t know yet where to find this pip program. So we have to tell the computer where to look.
Add PATH
Go to your Python installation folder. For me, it’s C:Program FilesPython38. Your Python folder might be different if you used the default installation setup. The pip program is stored in C:Program FilesPython38Scripts
Copy the current folder location. Next, go to your Windows search bar, type “PATH”, the following window will pop up. Open it, and click on the “Edit the system environment variables”.
Then click on “Environment Variables”.
Under User variables, select “PATH”, then “Edit”. Then click on “New” to add a new environment variable.
Here we are going to add two new variables. One is Your Python installation folder, the other one is the folder that contains the pip program. In my case:
Hit “Ok” a couple of times to save the changes. Now, you need to restart the Command Prompt to make sure the new environment variables get picked up. Now let’s re-run the command pip install pandas.
It worked!
Library folder
But where did pandas get installed to? Go to your Python installation folder. Again, it’s C:Program FilesPython38 for me. Then, go to Lib -> site-packages. You can find pandas here. In fact, the site-packages folder is the home for all the 3rd party libraries. This folder is likely to grow as you use Python more.
Let’s review…
- First of all, make sure you check Add Python to PATH box during installation.
- If you missed it, manually add the Python folder (and the Script folder) to PATH environment variable.
- And use
pip installto get any 3rd party Python library.
Now you have Python, enjoy!
We come across the error, PiP is not recognized as an internal or external command when we try to install Python packages using a Command Prompt window.
As part of our Server Management Services, we assist our customers with several Python queries.
Today, let us discuss the error, PiP is not recognized as an internal or external command.
PiP is not recognized as an internal or external command
Most users make use of PiP to install and manage Python packages found in the Python Package Index.
This error means that the Python is either not installed or the system variable path has not been set.
Some customers report that the issue occurs even after installing the Python distribution and making sure that Python is in the path variable.
The major causes of this error include:
- PIP installation is not added to the system variable
In order to run Python commands from a CMD window, we need to add the path of PiP installation to our PATH in the system variable.
- The installation is incorrectly added in our PATH
When we add the PATH manually, additional space or a missing semicolon before the new PATH will end up in the error.
Solutions
Moving ahead, let us see the solutions our Support Techs employ in order to fix the error.
Method 1: Check if PIP is added to our PATH variable
- Type “cmd” in the Run prompt and press Enter.
- Inside the command prompt window, type echo %PATH% and press Enter to list all locations in the PATH variable.
- A path similar to C:Python37Scripts means that the installation path already exists in the PATH variable.
Method 2: Add PIP to the PATH environment variable using the Windows GUI
- Type “sysdm.cpl” in the Run prompt and press Enter.
- Inside the System Properties screen, go to Advanced tab >> Environment Variables.
- In there, go to System variables and click on Path to select it. Then click Edit…
- In the Edit environment variable screen, click on New and add the path where the PiP installation is located.
- Once done, we open a fresh CMD window install a python package that comes with PiP.
Method 3: AddPIP to the PATH environment variable using CMD
An easy way is to do it directly from a CMD window.
We follow the following steps to set the PiP path environment directly from a Command Prompt window:
- Type “cmd” in the Run prompt and press Enter to open a Command Prompt window.
- Then, run the following command to set the PIP installation to the environment variable:
setx PATH “%PATH%;C:Python37Scripts”
In the command, we can change the Python version after ‘;‘ accordingly.
Method 4: Open the Python package without adding the PiP variable
In order to do this, we can use a couple of different commands. This also works if we use the methods above to configure the environment PATH variable but still stuck with the error.
The Short Method:
- Type “cmd” in the Run prompt and press Enter.
- Then type the following commands and make sure to change the placeholder to our own package name:
python -m pip install [packagename]
The Long Method:
- Type “cmd” in the Run prompt and hit Enter.
- In the CMD window, use the following command to navigate to the directory where the python .whl file is.
cd C:python installs
- Next, run the following command to install the Python package using pip:
c:python37scriptspip.exe install [package].whl
We change the location of our python installation according to the version or if we install it in a custom location. Also, make sure to change the [package] placeholder to our own package name.
Method 5: Ensure that PiP is included in Python installation
Before reinstalling the whole Python environment, we need to check whether PiP was not omitted from the Python installation. Certain Python installers will leave PiP out of the default installation.
We can rectify this by modifying the Python installation and modifying it to install PIP. Follow the steps given below:
- Type “appwiz.cpl” in the Run prompt and press Enter to open Programs and Features.
- Then, right-click on the Python installation and click Change.
- At the Modify Setup screen, click on Modify.
- In the Optional Features screen, check the box associated with pip and click Next.
- Then hit the Install button to make the changes to the Python installation.
Once done, open a CMD window and see if we are able to install a Python package with PiP without the error.
Method 6: Install Python via the executable installer
Reinstalling Python along with its components will likely resolve this error.
The easiest way is to use the Python executable installer. If we configure it correctly, it will automatically install PiP.
- Type “appwiz.cpl” in the Run prompt and press Enter to open Programs and Features.
- Scroll down to find the Python installation. Once we find it, right-click and choose Uninstall, then follow the on-screen prompts to remove it from our system. Once done, restart the machine.
- At the next startup, visit the URL given below and download the latest Python executable installer according to our OS architecture.
https://www.python.org/downloads/windows/ - Open the installation executable and check the box near Add Python to PATH. Then, click on Customize installation.
- In the Optional Features window, make sure to check the box associated with pip, then click Next.
- Leave the default location and Advanced Options, then click Install to commence the installation.
- Once done, restart the computer manually.
- Then, try to install a Python package via a CMD window.
- If we are still seeing the error, type the following command in a CMD window:
python -m ensurepip --default-pip
[Couldn’t solve the error? We are here for you]
Conclusion
In short, the error, “PiP is not recognized as an internal or external command” occurs when we try to install Python packages via a Command Prompt window.
PREVENT YOUR SERVER FROM CRASHING!
Never again lose customers to poor server speed! Let us help you.
Our server experts will monitor & maintain your server 24/7 so that it remains lightning fast and secure.
GET STARTED
var google_conversion_label = «owonCMyG5nEQ0aD71QM»;


