Ключевой особенностью Powershell, которая отличает его от других языков, это работа с конвейером. Дело в том, что каждая команда в Powershell возвращает множество объектов, а не один объект типа строка. Такой метод дает дополнительные возможности для работы с языком. Конвейер так же называют pipe или pipeline. В это статье будут рассмотрены примеры работы конвейера, его сравнение с bash, отличие от циклов и создание функции принимающей данные с конвейера.
Как работает конвейер
Конвейер (pipline, pipe) — это возможность, которая позволяет удобно обменяться данными между командами. В большинстве языков пайплайн определяется символом ‘|’. Значения, которые указаны в левой части, передаются на чтения справа.
Если бы мы использовали конвейер с буквами, то получилось бы следующее:
'а' | 'б' | 'в' = 'абв'
В примере ниже слева указана строка, которая выводится через команду справа:
'привет' | Write-OutputПредыдущий пример идентичен, по функциональности и результату, следующему выполнению:
Write-Output 'привет'
Суть в том, что мы можем указать несколько значений в левой части. Каждое из этих значений будет передаваться асинхронно (т.е. отдельно). Значения, которые разделяются запятыми в Powershell, образуют массив:
'привет', 'пока' | Write-OutputВ командах без конвейера мы редко можем использовать массивы в качестве значений. Что бы получить результат аналогичный предыдущей команде мы должны вызвать ее дважды:
Write-Output 'привет'
Write-Output 'пока' 
Учитывая, что Powershell называют языком команд (или сценариев), нам просто удобнее использовать конвейер совмещая несколько команд. Чаще всего он используется в связке с «Select-Object» (выбор ‘колонки’) и/или с «Where-Object» (условие).
Так мы получим только день из сегодняшней даты:
Get-Date | Select Daystdin, stdout и stderr
Если вам сложно понять работу конвейера с примеров выше вы можете ознакомиться с понятием потоков (streams). Потоки реализованы в *nix системах и Windows. В Powershell реализовано 7 потоков, но основная концепция понятна в 3 потоках, которые так же реализованы в *nix системах. Это:
- stdin — ввод данных. Этот поток используется, когда вы печатаете текст или, например, когда результат работы одной команды принимает следующая. На уровне Powershell этого потока нет (в документациях не указывается, но скорее всего он реализован на уровне ОС);
- stdout — вывод результата. Этот результат может быть направлен на экран консоли, в файл, в другую команду и т.д. В powershell этот поток называется «Success Stream»;
- stderr — вывод ошибок. В Powershell называется «Error Stream».
Пример работы этих потоков в обычном виде:

В 1-ом случае мы используем stdin т.к. напечатали команду с клавиатуры. После вызова команды мы получили stdout (2). При ошибках мы получаем stderr.
В конвейере работает такой же принцип:

Мы так же напечатали текст использовав stdin. Затем был использован конвейер, который направил результат первой команды ( stdout) в stdin другой команды (3). Так как команда ‘echo’ тоже использует stdout — он был выведен на экран.
Разница конвейеров bash и Powershell
Разница работы конвейеров в типе объектов, которые через них проходят. В Powershell, в подавляющем большинстве, возвращается (попадают в stdout) массивы следующего вида:
# массив ключ-значение
$data = [PSCustomObject]@{Name='WinRM'; status='disabled'}
# или массив массивов
$data = @(
   @[PSCustomObject]@{Name='WinRM'; status='disabled'}
   @[PSCustomObject]@{Name='VSS'; status='enabled'}
)
# обычные массивы
$data = @(1,2,3)
Благодаря этому мы можем сразу получать нужное свойство не использовав сложные конструкции и регулярные выражения:

Bash же отправляет в stdout информацию в виде строки:
data='
Name   Status
WinRM  disabled
VSS    enabled
'
Так как это сплошной текст — нам приходится использовать дополнительные механизмы для поиска нужных данных. Например grep:

Есть и другие отличия. Например в Powershell есть переменные, в которые и помещаются данные конвейера: $PSItem или $_. Часть из таких возможностей будет рассмотрена далее.
Различия с циклом
Пайп схож с циклами, но более автоматизирован. Что бы с помощью цикла получить название дисков, а затем изменить цвет вывода, мы должны сделать следующее:
foreach ($item in Get-PSDrive){
  Write-Host $item.Name -ForegroundColor Red
}
У нас использован совершенно обычный цикл, который есть во всех языках. Мы объявляем переменную «$item», в которую помещается временное значение. Это значение мы отдельно выводим. Т.е. мы выполняем 3 действия:
- Объявление цикла;
- Объявление переменной с текущим значением;
- Вывод переменной (или другие действия, например сохранение данных в файл).
В Powershell реализован так же команда-цикл «ForEach-Object». Особенность этой команды в том, что используется только часть возможности конвейера и часть от обычного цикла:
Get-PSDrive | ForEach-Object {
  Write-Host $PSItem.Name -ForegroundColor Red
}
Как можно увидеть с примера выше у нас исчез шаг под номером 2. Мы больше не объявляем временную переменную — она формируется автоматически под именем «PSItem». Эта переменная появляется во время передачи данных через pipeline. В нее помещается результат работы «Get-PSDrive».
Конвейер убирает еще, как минимум, один шаг. Нам не нужно объявлять цикл — мы просто вызываем переменную:
Get-PSDrive | Write-Host $PSItem.Name -ForegroundColor Red
В некоторых случаях мы можем не указывать «PSItem» вовсе. Обычно это команды одного типа, например, работы с сервисом:
Get-Service -Name 'WinRM' | Restart-Service
'WinRM' | Restart-Service
Конвейер — отличный выбор когда вам нужно сделать что-то единожды. Если вы пишете скрипт, а тем более используете ‘where-object’ на больших данных, всегда лучше использовать циклы. Это будет работать быстрее.
Как принимаются данные с конвейера
Если мы выполним следующую команду, то увидим, что у нее есть множество свойств (левая колонка), которые мы можем вернуть:
Get-Service -Name 'WinRM' | Select *
Вопрос в том, как конвейер узнает, что нам нужно использовать свойство «Name» в «Restart-Service»? В одной команде множество свойств и значений, а другой множество параметров и они могут не совпадать. У нас так же не возвращаются какие-либо ошибки.
Что бы понять как будут распределены свойства и значения нам нужно посмотреть справку по этой команде:
Get-Help Restart-Service -Parameter *
Строка «Принимать входные данные конвейера?» (или «Accept pipeline input») говорит, может ли в этот параметр (‘-Name’) попадать значение через пайплайн. Кроме этого он указывает каким образом это может произойти:
- ByPropertyName — по свойству (должен быть использован массив ключ-значение);
- ByValue — по значению (одномерный массив).
Значение ‘<string[]>’ говорит, что все данные будут преобразованы в массив из строк. Если какой-то объект не может быть преобразован — будет ошибка. Более наглядный пример был бы со значением ‘<int[]>’ т.к. в этом случае вы бы не смогли использовать строки.
Не все параметры у команд так очевидны. У некоторых команд можно увидеть работу через конвейер с ‘InputObject’. Такой параметр подразумевает более сложную обработку поступающих данных. Процесс привязки параметров так же называется ‘parameter binding’.
Простые примеры, где использовался принцип ‘ByValue’, мы уже рассматривали. Он выглядит так:
$names = @('WinRM','VSS')
$names | Restart-Service
# или
'WinRM','VSS' | Restart-Service

Работа ‘ByPropertyName’ — подразумевает, что вы используете массив ключ-значение. Например PSCustomObject и в нем есть ключ (в нашем случае ключ ‘Name’) с аналогичным названием:
$hash = [PSCustomObject]@{
  'Name'='WinRM';
  'State'='Restarted';
}
$hash | Get-Service
Не все команды возвращают PSCustomObject. Это говорит о том, что вы можете использовать и другие типы объектов:

Главный принцип, по которому значение может таким образом успешно попасть в конвейер, это быть итерируемым. В hashtable такого по умолчанию нет.
hashtable
Не все объекты Powershell могут проходить через конвейер. Как написано в документации у всех типов Powershell, кроме hashtable, есть поддержка работы через конвейеры (IEnumerable). При попытке пропустить хэш-таблицу через конвейер возникнет ошибка:
- Get-Service : Не удается найти службу с именем службы «System.Collections.Hashtable».
$hash = @{
  'Name'='WinRM';
  'State'='Restarted';
}
$hash | Get-Service
Исправить ее можно несколькими способами. Самый простой — использовать метод ‘GetEnumerator()’. Благодаря этому методу хэш-таблица становится итерируемой и вы сможете использовать индексы и ключи в следующем виде:
$hash = @{
  'Name'='WinRM';
  'State'='Restarted';
}
$hash.GetEnumerator() | Get-Service -Name {$PSItem.Value} -ErrorAction SilentlyContinue
Параметр «ErrorAction» нужен т.к. у нас произойдет ошибка из-за ключа ‘State’. Значения хэш таблицы передаются не как целый массив (как в случае с PSCustomObject), а по отдельности. Сначала передается ключ ‘Name’ со значением ‘WinRM’, а затем ‘State’ со значением ‘Restarted’.
Еще два способа получить только ключи или только значения:
$hash = @{
  'Name'='WinRM';
  'State'='Restarted';
}
$hash.Values | Get-Service -ErrorAction SilentlyContinue
# вывод только ключей (нет смысла применять в этом сценарии)
$hash.Keys
Создание функции работающей через Pipeline
Еще один способ понять работу конвейера — это создать собственную команду (функцию). Мы можем объявить два параметра, которые могут быть использованы вместе, так и отдельно:
- ValueFromPipeline — подразумевает, что вы передаете обычные массивы (например ‘1’,’2′,’3′). Этот параметр может быть установлен только один раз на функцию;
- ValueFromPipelineByPropertyName — принимает массив ключ-значение и ищет совпадающее свойство (ключ). Этот параметр можно использовать множество раз.
Эти параметры мы можем совмещать, так и указывать отдельно:
function Test-Command {
    [CmdletBinding()]
    param
    (
        [Parameter(ValueFromPipeline)]
        $data
    )
    $data
}

Test-Command -data 'Hello there'
'Hello there' | Test-Command
В отличие от предыдущего способа, ValueFromPipelineByPropertyName мы можем использовать множество раз. Самое главное использовать правильные названия переменных и ключей:
function Test-Command {
    [CmdletBinding()]
    param
    (
        [Parameter(ValueFromPipelineByPropertyName)]
        $name,
        [Parameter(ValueFromPipelineByPropertyName)]
        $age
    )
    Write-Host "Пользователю $name $age лет"
}

Test-Command -name 'Masha' -age 39
[PSCustomObject]@{name='Dimitry'; age=18} | Test-Command
Мы можем комбинировать параметры ValueFromPipelineByPropertyName и ValueFromPipeline. Я бы рекомендовал избегать таких способов т.к. в них легко запутаться:
function Get-Srv {
    [CmdletBinding()]
    param
    (
        [Parameter(ValueFromPipeline, ValueFromPipelineByPropertyName)]
        [string]$Name,

        [Parameter(ValueFromPipelineByPropertyName)]
        [string]$ip
    )
    Write-Host "Сервер $Name работает $ip"
}
Get-Srv -Name 'SRV01'
'SRV01' | Get-Srv
[PSCustomObject]@{Name='SRV02';ip='1.0.0.1'} | Get-Srv
'SRV01', 'SRV02' | Get-Srv
Обратите внимание на помеченные фрагменты. Мы должны определять тип данных, который ожидается (случай 1 и 2) иначе конвейер не будет обрабатывать некоторые данные корректно. Так же, в случае 3, у нас выводится только последний элемент. Это происходит из-за отсутствия Process.
Блок Process
При создании функций в Powershell вы можете использовать блоки: begin, process и end. В большинстве случаев это не требуется и вы можете писать функцию по принципам описанным выше. В случае конвейеров эти блоки приобретают дополнительный смысл:
- begin — значение, переданное через конвейер, этому блоку не известно. Оно будет равно $null либо другому значению по умолчанию, которое вы установите;
- process — обрабатывает каждый элемент переданные через конвейер отдельно;
- end — обрабатывает только последний элемент переданный через конвейер. Если вы не указывали какие-то блоки, как в примере выше, по умолчанию используется именно этот блок. Из-за этого выводится только последний элемент массива.
Пример работы всех блоков:
function Test-Block {
    [CmdletBinding()]
    param
    (
        [Parameter(ValueFromPipeline, ValueFromPipelineByPropertyName)]
        [int]$param
    )
    begin {
        # Повторится 1 раз.
        Write-Host "Блок Begin. Передано значение $param" -ForegroundColor DarkBlue
   }
    process {
        # Повторится для каждого элемента.
        Write-Host "Блок Process. Передано значение $param" -ForegroundColor DarkBlue
   }
    end {
        # Повторится 1 раз.
        Write-Host "Блок End. Передано значение $param" -ForegroundColor DarkBlue
   }
}

Test-Block -param 1
1, 2, 3 | Test-Block
[PSCustomObject]@{param=1} | Test-Block
Видно, что передача параметров без использования пайплайна вывела ‘1’ во всех блоках.
Там, где использовался конвейер, появился 0. Это связано с тем, что блоку begin не известна эта переменна, т.е. это значение равно $Null. Т.к. эта переменная должна хранить число, а не строку, этот тип преобразовывается в 0:
Write-Host ([int]$sssddasda)![]()
Если для вас это слишком сложная конструкция, то вы можете использовать только блок Process. В случае обычных использований команды он вызывается единожды, а в случае конвейера — для каждого значения отдельно. Важно отметить, что вы не должны писать код вне Process:
function Test-Block {
    [CmdletBinding()]
    param
    (
        [Parameter(ValueFromPipeline, ValueFromPipelineByPropertyName)]
        [int]$param
    )
    process {
        # Повторится для каждого элемента.
        Write-Host "Блок Process. Передано значение $param" -ForegroundColor DarkBlue
   }
}

Test-Block -param 1
1, 2, 3 | Test-Block
[PSCustomObject]@{param=1} | Test-Block
Массивы
Вы наверняка использовали команды, которые позволяют использовать следующую конструкцию:
Invoke-Command -ComputerName 1,2,3
1,2,3 | Invoke-Command
$obj = [PSCustomObject]@{ComputerName=1}
$obj | Invoke-Command
Используя примеры выше у вас не получится организовать такую возможность. У вас появится ошибка в первом случае т.к. ожидается число, а вы передаете массив:

- Не удается обработать преобразование аргументов для параметра «param». Не удается преобразовать значение.
Вы можете это исправить объявив в функции, что вы принимаете массив строк и реализовав цикл:
function Test-Array {
    [CmdletBinding()]
    param
    (
        [Parameter(ValueFromPipeline)]
        # создаем массив строк используя []
        [string[]]$Name
    )
    process {
        # проходим по массиву
        foreach ($item in $Name){
            "Подключаемся к компьютеру $item"
       }
   }
}

Test-Array -Name 1,2,3
1,2,3 | Test-Array
Если вам нужно передавать именованные параметры, то нужно будет организовывать дополнительные проверки. Я не рекомендую использовать такие сложные конструкции.
Асинхронное выполнение
Конвейер Powershell передает значения асинхронно. Это значит, что несколько функций будут работать друг с другом еще до завершения своей работы. Это так же может быть важно в отдельных случаях.
В примере ниже видно, что мы передаем значения из массива постепенно, а не целиком. У нас чередуется выполнение функций (a,b,a…):
function a {
    begin {
        Write-Host 'Начало функции A'
    }
    process {
        Write-Host "Блок Progress функции A: $_"; $_
    }
    end {
        Write-Host 'Конец блока A'
    }
}
function b {
    begin {
        Write-Host 'Начало функции B'
    }
    process {
        Write-Host "Блок Progress функции B: $_"; $_
    }
    end {
        Write-Host 'Конец функции B'
    }
}
function c {
    Write-Host 'Функция C'
    }

1..3 | a | b | c
Ошибки
При создании конвейеров легко запутаться и получить странную ошибку. Часть из них рассмотрена ниже.
Если вы будете передавать данные с ‘ValueFromPipelineByPropertyName’, при этом ни один из ключей не совпадает, у вас появятся следующие ошибки (они выводятся и при других обстоятельствах тоже):
- Не удается привязать объект ввода к любым параметрам команды, так как команда не принимает входные данные конвейера, либо входные данные и их свойства не совпадают с любыми из параметров, принимающих входные данные конвейера;
- The input object cannot be bound to any parameters for the command either because the command does not take pipeline input or the input and its properties do not match any of the parameters that take pipeline input.

Если вы укажете код вне блока Process, то так же получите странную ошибку:
- Get-Process : Не удается вычислить параметр «Name», так как его аргумент задан как блок сценария, а входные данные отсутствуют. Блок сценария не может быть вычислен без входных данных.
- Get-Process : Cannot evaluate parameter ‘Name’ because its argument is specified as a script block and there is no input. A script block cannot be evaluated without input

Другие проблемы можно распознать использовав Trace-Command.
…
Теги:
#powershell
| Previous | Table of Contents | Next |
| Windows PowerShell 1.0 Comparison and Containment Operators | Windows PowerShell 1.0 Flow Control with if, else and elseif |
| Purchase and download the full PDF version of this PowerShell eBook for only $8.99
|

Two features of PowerShell which will no doubt be familiar to users of UNIX and Linux based shell environments are pipes and redirection. The primary purpose of pipes is to chain commands together, passing the output from one command through to the next command. Redirection, on the other hand, allows the output from a command to be sent to a file. Unfortunately, whilst UNIX and Linux based shells allow input to be redirected to a commands (such as input from the keyboard), version 1.0 of PowerShell does not yet support this feature.
Contents
Contents
|
||
PowerShell Pipes
Pipelines in PowerShell are essentially a sequence of commands in which the result of each command is passed through to the subsequent command for processing. One point to note is that, unlike other shell environments, the result passed from one command to the next need not be a string, in fact it can be any type of object. Each command in a pipe is separated by the pipe character (|).
A common example of the use of pipes involves piping output from a command through to a second command which in turn formats that output. In the following example the output from the Get-Childitem command is piped through to the format-table command:
PS C:UsersAdministrator> get-childitem mydata.txt | fl


    Directory: Microsoft.PowerShell.CoreFileSystem::C:UsersAdministrator


Name           : mydata.txt
Length         : 30
CreationTime   : 11/14/2008 12:33:23 PM
LastWriteTime  : 12/1/2008 12:39:44 PM
LastAccessTime : 11/14/2008 12:33:23 PM
VersionInfo    :

Windows PowerShell Redirection Operators
The operators implemented by Windows PowerShell to facilitate redirection are similar to those used in other shell environments. The full complement of these operators is outlined in the following table:
<google>ADSDAQBOX_FLOW</google>
| Operator | Description |
|---|---|
| > | Redirects output to specified file. If the file already exists, current contents are overwritten. |
| >> | Redirects output to specified file. If the file already exists, the new output is appended to the current content. |
| 2> | Redirects error output to specified file. If the file already exists, current contents are overwritten. |
| 2>> | Redirects error output to specified file. If the file already exists, the new output is appended to the current content. |
| 2>&1 | Redirects error output to the standard output pipe instead of to the error output pipe. |
Windows PowerShell Redirection
The operators outlined above are, perhaps, best demonstrated using some examples, the first of which sends output to a file, deleting any pre-existing content:
PS C:UsersAdministrator> get-date > date.txt
The file, date.txt, now contains the output from the get-date command, as demonstrated by displaying the contents of the file:
PS C:UsersAdministrator> type date.txt

Monday, December 01, 2008 1:11:36 PM
Having created the file, it is also possible to append more output to the end of the existing content using the >> operator as follows:
PS C:UsersAdministrator> get-date >> date.txt
This time, the original content remains in the file, with the new output added to the end:
PS C:UsersAdministrator> type date.txt

Monday, December 01, 2008 1:11:36 PM

Monday, December 01, 2008 1:13:45 PM
As mentioned previously, other shell environments allow input to be redirected. This would ordinarily be achieved using the < operator to read input from a file or even the keyboard. As of version 1.0 of Windows PowerShell this feature has not been implemented, although there is every reason to expect it will appear in subsequent versions.
Redirecting Error Output
Windows PowerShell has the concept of different output streams for standard output and error messages. The main purpose of this is to prevent error messages from being included within legitimate output. In the following example, only the valid output is redirected to the file. Since we have not redirected the error output, it is displayed in the console:
PS C:UsersAdministrator> dir mydata.txt, myfiles.txt > error.txt
Get-ChildItem : Cannot find path 'C:UsersAdministratormyfiles.txt' because it does not exist.
At line:1 char:4
+ dir  <<<< mydata.txt, myfiles.txt > output.txt
In the above console output, PowerShell is telling us in the error message that the file named myfiles.txt does not exist in the current directory. Since there was no complaint about the mydata.txt file it is safe to assume that part of the command worked and we should expect some valid output to have been written to the output.txt file:
PS C:UsersAdministrator> type output.txt


    Directory: Microsoft.PowerShell.CoreFileSystem::C:UsersAdministrator


Mode                LastWriteTime     Length Name
----                -------------     ------ ----
-a---         12/1/2008  12:39 PM         30 mydata.txt
An alternative approach is to redirect the error output to a file so that it is not visible in the console using the 2> redirection operator:
PS C:UsersAdministrator> dir mydata.txt, myfiles.txt 2> error.txt


    Directory: Microsoft.PowerShell.CoreFileSystem::C:UsersAdministrator


Mode                LastWriteTime     Length Name
----                -------------     ------ ----
-a---         12/1/2008  12:39 PM         30 mydata.txt
In this case, the error did not appear on the console. Instead, it was sent to the file named error.txt:
PS C:UsersAdministrator> type error.txt
Get-ChildItem : Cannot find path 'C:UsersAdministratormyfiles.txt' because it does not exist.
At line:1 char:4
+ dir  <<<< mydata.txt, myfiles.txt 2> error.txt
If error output is to be discarded entirely it may be redirected to $null:
PS C:UsersAdministrator> dir myfiles.txt 2> $null
The 2>&1 operator redirects the error stream to the standard output stream, enabling both the regular output and any error messages to be directed to the same file:
PS C:UsersAdministrator> dir mydata.txt, myfiles.txt > output.txt 2>&1
If we now take a look at the contents of the output.txt it is clear that output to both streams was redirected to the file:
PS C:UsersAdministrator> type output.txt


    Directory: Microsoft.PowerShell.CoreFileSystem::C:UsersAdministrator


Mode                LastWriteTime     Length Name
----                -------------     ------ ----
-a---         12/1/2008  12:39 PM         30 mydata.txt
Get-ChildItem : Cannot find path 'C:UsersAdministratormyfiles.txt' because it does not exist.
At line:1 char:4
+ dir  <<<< mydata.txt, myfiles.txt > output.txt 2>&1
<google>BUY_WPS_BOTTOM</google>
Did you know you can natively run scripts like PowerShell in Azure DevOps (AzDo) pipelines creating a PowerShell pipeline? By using the tips and techniques you’ll learn in this article, you’ll be well on your way to scripting your way to automation greatness.
Not a reader? Watch this related video tutorial!
Not seeing the video? Make sure your ad blocker is disabled.
If you’re building pipelines with Azure Pipelines, you’re familiar with tasks. Tasks are the building blocks of Azure DevOps (AzDo) pipelines. AzDo has many built-in tasks and also allows you to download other tasks via an extension in the extension marketplace. But, there will inevitably come a time when you need to perform some action that doesn’t have a task available.
It’s time to break out a script.
AzDo can natively run three types of scripts – PowerShell, Bash, and batch files. Using one or more of these scripting languages/techniques, you can get just about anything done.
In this in-depth tutorial, you’re going to learn how PowerShell scripts work in AzDo pipelines creating a PowerShell pipeline. You’ll learn all about how to invoke code, saved scripts in your source control repositories, and also how to work with pipeline variables in scripts.
How Scripts Work in AzDo Pipelines
Inside of each AzDo pipeline is a series of tasks. A task is defined as a step. These tasks represent a particular action like running a .NET build, deploying a web application, running a test, etc. Tasks are the building blocks for a pipeline.
AzDo uses the concept of a task to run existing scripts or code in the YAML pipeline itself. More specifically, a task can run a PowerShell, Bash, or batch file script on pipeline agents like Windows, Linux, and macOS. When a task is invoked, you can specify what agent (OS) to run the script on and any parameters the code/script has.
You can find PowerShell or Bash script tasks in the task picker in the web interface, just like any other task.
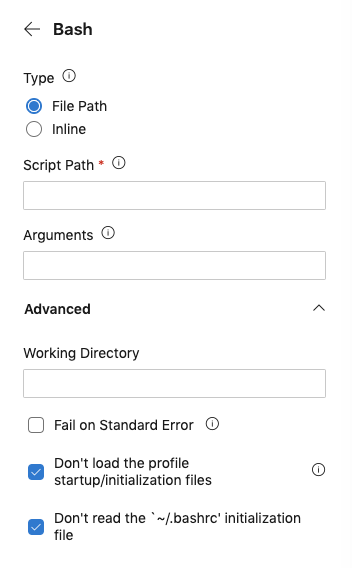
You can run a PowerShell task on Windows with Windows PowerShell, Linux, and macOS with PowerShell (Core).
Each scripting task is defined as a step in the pipeline, and you have a few different ways to assign tasks to execute a script like passing in parameters, failing on error, getting the last exit code, and so on. You’ll learn, in detail, how to build these tasks in the following sections.
Another essential concept to learn is how pipeline variables integrate with scripts. You can still define and manage “script variables” like $var = 123 in PowerShell and maintain environment variables without AzDo being involved. However, AzDo allows you to set and reference pipeline variables in scripts too.
Inline Code vs. Scripts
Throughout this article, you’ll see references to running “scripts.” Although accurate, it reads like you have to create your own text file, insert the code you’d like to execute, and only then the pipeline will run that script. That’s not true.
You can also run inline code. Inline code runs directly in the YAML pipeline. You don’t have to create a script ahead of time to run PowerShell or Bash code. Instead, you can insert the code directly in YAML. There’s no reference to a PS1 file. AzDo creates a temporary script when the pipeline runs.
One-Line
You can run inline code one of two ways in a pipeline either via a single line or multi-line. If you have a short code snippet as a single line, you can specify the task type followed by the code in quotes, as shown below.
- powershell: "I'm running PowerShell on a pipeline agent. Woohoo!!"Multi-Line Code
If you have a code snippet that spans a few lines or perhaps you don’t want to use quotes, you can define a multi-line code snippet by using a pipe (|) symbol followed by one or more lines right below it as shown below.
- powershell: |
      This is script line 1
        This is script line 2
It’s typically best to only use inline code for small tasks with less than five lines or so. Any other task that requires more than that should probably go in a script in your source control repository.
The upside of using inline code is keeping all functionality in a single place, making it easier to see everything that’s going on. But, this approach can soon get confusing if you have a large pipeline.
Where to Store your Scripts
If you’re not using an inline code task to run a script, you’ll have to save a script somewhere. You’ve got a few options where to store scripts executed via the pipeline.
A Source Control Repository
If you’re using a pipeline trigger from a GitHub or AzDo source control repository running a CI pipeline, try to store your scripts in the same repo. It’s easier to manage all files related to a project this way. By default, AzDo will check out all code in the source repo. Checking out the code will download all files from the repo onto the pipeline agent, making them immediately available for execution.
If you have scripts located in another GitHub repo, you can also check out multiple repos to download and run scripts stored in other repos too.
Once the scripts are downloaded to the pipeline agent, you can then reference them in a task via the [System.DefaultWorkingDirectory predefined variable.
For example, if you have a PowerShell script called script.ps1 stored in the root of your source repo, AzDo will check out the file placing it in the System.DefaultWorkingDirectory folder path. It can then be referenced using the PowerShell task, as shown below.
- task: [email protected]
    inputs:
        filePath: "$(System.DefaultWorkingDirectory)script.ps1"
Somewhere Else
If a script isn’t located in a source control repo, you can still run it in a pipeline. How you do this, though, highly depends on the situation. For example, you could use a PowerShell task to download another script and run it.
steps:
- powershell: |
    Invoke-WebRequest -Uri <https://somesite.com/script.ps1> -OutFile script.ps1
    .script.ps1
It doesn’t matter where the script is stored. As long as you can use a task or run a script to authenticate (if necessary) and download the script, the PowerShell task will run it for you.
Pipeline Variables in PowerShell CI/CD pipelines
Just like you have variables in a script, you also have variables in a pipeline. Variables are defined a few different ways and their value can be accessed differently depending on the context.
Not only can you define and read variable values in the YAML pipeline, you can also do so within scripts.
Reading Pipeline Variables
When a script is run via a pipeline, the pipeline exposes all currently-defined variables as environment variables on each pipeline agent. This means that you can read pipeline variables in a script just like any other environment variable.
For example, perhaps you have defined a variable called foo under the variables section of the pipeline.
variables:
    - name: foo
      value: 'bar'
Since the pipeline exposes this variable as an environment variable, you can then reference the value of that variable in your scripts like usual e.g. $env:foo.
For pipeline variables defined with a dot (
.), AzDo will automatically convert these dots to underscores as environment variables. If a pipeline variable is defined asfoo.barfor example, the environment variable will befoo_bar.
Setting Pipeline Variables
Setting pipeline variables isn’t quite as straightforward as reading them. To set a pipeline variable via script, you must use a logging command. A logging command is how a script communicates with the pipeline agent.
To set pipeline variables via a script, you must output a specifically-crafted string to standard out in the script. The string must have the format of "##vso[task.setvariable variable=[variable_name];][variable_value]".
For example, to set a pipeline variable foo to the value of bar, a PowerShell or Bash script would have to output a string like below.
echo "##vso[task.setvariable variable=foo;]bar"Custom Script Extensions
AzDo provides the PowerShell and Bash script tasks by default. But you can also download or even build your own script-based tasks in the form of an extension making your PowerShell CI/CD pipeline customizable.
Using the standard script tasks, you’re writing all of the code yourself and invoking it in one shot. There’s no real “interface” to the code. AzDo gives you a box saying, “Insert code here,” you put in the code, and then the pipeline executes it. There’s no real structure around it.
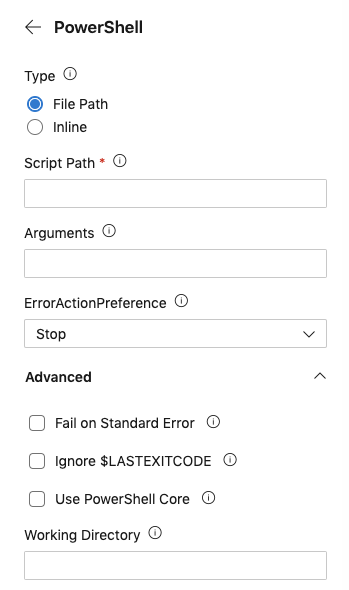
Notice when you create a PowerShell task below, you don’t have many options. The parameters for this task are minimal. There’s an Arguments field to pass parameters to the script, but wouldn’t it be easier to understand if Arguments wasn’t some generic name?
Maybe you have a script you regularly use for querying a set of machines and returning some report. The script is called Get-AcmeServerReport. It has parameters like ServerName to specify the servers to run against and ReportFilePath for where to save the report.
Wouldn’t having fields in the web UI matching the script parameters be a lot more intuitive like you can see below?
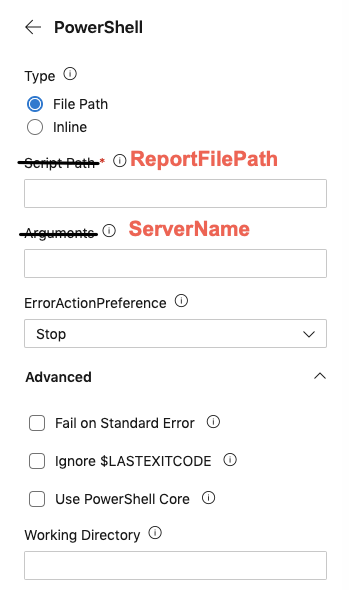
This article isn’t going to cover building custom AzDo extensions, but you should know this is possible. You can move the “interface” up to the pipeline level instead of down at the script level, allowing you to reuse existing scripts easily.
Building a PowerShell Pipeline
Enough talk. Let’s now actually build an example AzDo PowerShell pipeline!
Before You Start
This article will be a combination of teaching and hands-on tutorial. If you intend to try out any of the examples for yourself, be sure to have a few prerequisites set up ahead of time.
- An existing AzDo pipeline created linked to a repo – Learn how to create a pipeline via the web interface or using the Az CLI in this Azure Pipelines article.
What You’re Going to Learn
In this hands-on tutorial, you’re going to learn everything there is to know about running PowerShell and Bash scripts in AzDo Pipelines. Using the PowerShell and Bash tasks, you’ll see how to invoke scripts, pass parameters to them, control errors and how to fail a task in the pipeline should a problem arise in the script.
You’re also going to learn how to use AzDo pipeline variables in scripts and also how to set them using AzDo logging commands.
The PowerShell Task is Your Friend
To run a PowerShell script in a pipeline requires using the PowerShell task. The PowerShell task takes a script or PowerShell code from the pipeline and runs it on a pipeline agent. Depending on the options chosen, the pipeline agent will either be on Windows or Linux.
You can also use more specific use case tasks like the Azure PowerShell task too but those won’t be covered here.
PowerShell Task Schema
The PowerShell task is called [email protected] and has a schema that looks like below. You can see you’ve got a few options at your disposal for running scripts under the inputs section.
- task: [email protected]
  inputs:
    targetType:
    filePath:
    arguments:
    script:
    errorActionPreference:
    failOnStderr: true
    ignoreLASTEXITCODE: true
    pwsh: true
    workingDirectory:
Each attribute you decide to use in inputs affects the behavior of how the PowerShell code/script runs.
| Name | Mandatory | Options | Used with | Default Value | Description |
| targetType | No | filePath, inline | All | The PowerShell task allows you to add PowerShell code directly within the YAML pipeline or execute an existing script in the source repo. Here you can specify either filePath providing the path to the script to run or use inline which indicates that you’ll be adding the PowerShell code directly int the YAML pipeline. | |
| filePath | Yes | targetType: filePath | This attribute is where you specify the path of the script to execute. This path typically points to a script in your source repo that the pipeline checks out when it runs. For example, to tell the PowerShell task to execute a script called script.ps1 in the root of the source repo, you’d use a predefined variable like $(System.DefaultWorkingDirectory)\script.ps1. | ||
| arguments | No | targetType: filePath | If you’ve provided a script via the filePath attribute and that script is built with parameters, this is where you would pass in values to those parameters. Note that when using inline code, this option is not used. You should specify named parameters like `-Name someName -Path -Value “some value”` | ||
| script | Yes | inline | Enclosed in quotes, this is where you provide the PowerShell code to execute. | ||
| errorActionPreference | No | SilentlyContinue, Continue, Inquire, Stop | All | Stop | Use this to set $ErrorActionPreference in the script if you haven’t done so already. |
| failOnStderr | No | true | All | false | Setting this value to true will fail the PowerShell task in the pipeline is an error is thrown via PowerShell. Otherwise, the task will only fail if the scripts exits with a non-zero exit code. |
| ignoreLASTEXITCODE | No | true | All | false | If set to false, the line `if ((Test-Path -LiteralPath variable:\\LASTEXITCODE)) { exit $LASTEXITCODE }` is appended to the end of the script. This will cause the last exit code from an external command to be propagated as the exit code of PowerShell. |
| pwsh | No | true | All | false | If the pipeline agent is running on Windows, this will force the code/script to be executed using pwsh.exe (PowerShell Core). If not set to true, the task will default to Windows PowerShell on Windows pipeline agents. |
| workingDirectory | No | All | $(Build.SourcesDirectory) | The working directory to execute the script in. This affects paths in the script like _.\command.ps1_. | |
| env | No | All | A list of additional items to map into the process’s environment. By default, pipeline variables are mapped but secret variables are not. Here is where you would specify them like `MySecret: $(Foo)`. |
Now that you have an idea of what’s possible, let’s dive into each attribute and see what’s possible.
Running Simple One-Liners
In the PowerShell task’s most simplest form, you can run a single line of PowerShell using a targetType of inline and by specifying the code to run via the script attribute as shown below.
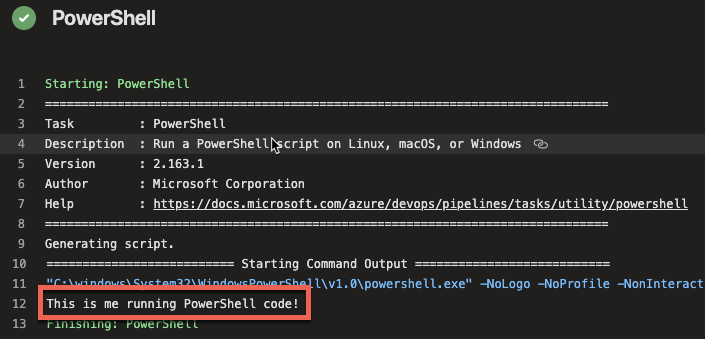
- task: [email protected]
    inputs:
      targetType: 'inline'
      script: 'Write-Host "This is me running PowerShell code!"'
When the pipeline is run, you’ll then see the output shown in the log.
If you’d like to take a shortcut to this approach, you can save yourself a few lines but using the optional powershell shortcut task too.
To perform the exact same function as above, you can also simply use the powershell term followed by the code to run as shown below.
- powershell: 'Write-Host "This is me running PowerShell code!"'If you’d like to learn more about running PowerShell code inline, check out this the Code vs. Scripts section of the first article in this series.
Sidenote: Windows PowerShell vs. PowerShell (Core)
Before you get too much farther, it’s important to point out some behavioral differences in Windows PowerShell vs. PowerShell (Core) and how to control what version of PowerShell your scripts run on.
In the example above, the version of PowerShell that the code executed on completely depended on the pipeline agent the code was running on. The pipeline is smart enough to handle this for you but you will get caught by this at some point.
For example, what if you have a Windows PowerShell-specific code and use the powershell task assuming that it will run on Windows? It might but what if you’ve got a big pipeline defined and you forgot you added a pool: ubunbu-latest line for that job? The task will still run on Linux but it has no choice but to run PowerShell (Core).
Using the task above as an example, let’s now say you’ve specifically defined the pipeline agent to run on Linux like below. The tasks are exactly the same but the pipeline agent is not.
pool:
  vmImage: "ubuntu-latest"

steps:
  - task: [email protected]
    inputs:
      targetType: 'inline'
      script: 'Write-Host "This is me running PowerShell code!'
	- powershell: 'Write-Host "This is me running PowerShell code!"'
You’ll then see in the job log, the pipeline automatically chose pwsh. You’ll see the same in Windows where the pipeline executes powershell.exe.

Be Explicit about PowerShell Versions
If there might ever be a possibility that you’re running code that depends on a specific version of PowerShell, always be explicit about the version you’d like to run on.
To run PowerShell (Core), always use the pwsh: true attribute on the [email protected] task or the pwsh shortcut task. Don’t assume that the pipeline will pick the right version for you. You’ll probably never remember you made that “quick change to troubleshoot a thing” by changing the pipeline agent before it’s too late.
- task: [email protected]
    inputs:
      targetType: 'inline'
      script: 'Write-Host "This is me running PowerShell code!'
      pwsh: true

- pwsh: 'Write-Host "This is me running PowerShell code!"'
Running Scripts
If you need to run some PowerShell code longer than a few lines or need to pass parameters to your code, you’ll need to step up to executing scripts. Using the PowerShell task, you can do this by setting the targetType to filePath and then specifying the path of the script to run via the filePath attribute.
For example, perhaps you have a PowerShell script called script_no_params.ps1 in the root of your source repo. Below you can see an example of calling the script.ps1 script located in the System.DefaultWorkingDirectory pipeline variable path. This is the directory where the source repo files are downloaded to when the pipeline runs.
- task: [email protected]
    inputs:
      targetType: 'filePath'
      filePath: '$(System.DefaultWorkingDirectory)script_no_params.ps1'
Watch out for forward and backslash inconsistencies! If you’re running a script on Linux, use forward slashes. On Windows, use backslashes when specifying the
filePath.
The script contains a single line.
[CmdletBinding()]
param()

Write-Host "I'm running in a PowerShell script!!"
When the pipeline is run, you’ll see that the pipeline reads the code inside of the script, creates its own PowerShell script and then executes the code.

If you intend to run an existing PowerShell script, be sure you don’t have the
- checkout: noneline in your pipeline. Otherwise, the script will never be downloaded to the agent.
Passing Parameters
If you have a script that has one or more parameters, you can pass parameters to those scripts using the arguments attribute.
Note that you cannot pass parameters to inline code using the
argumentsattribute.
The arguments attribute accepts parameters the exact same way you’d specify a named parameter within PowerShell itself using -[parameter_name] [parameter_value].
For example, perhaps you have a script called script.ps1 in the root of your source repo. That script contains two parameters called $foo and $bar as shown below.
[CmdletBinding()]
param(
  $foo,
  $bar
)

Write-Host "Value of foo is $foo and value of bar is $bar"
You can provide values to the $foo and $bar parameters via the arguments attribute in the YAML pipeline like below.
- task: [email protected]
    inputs:
      targetType: 'filePath'
      filePath: '$(System.DefaultWorkingDirectory)/script.ps1'
      arguments: "-foo 'foovalue' -bar 'barvalue'"
You can then see the values were passed to the script in the job output log.

Handing Errors and Warnings
When a PowerShell is invoked via a pipeline and returns an error or warning, the pipeline behavior greatly depends on how you configure it. A PowerShell script can “error out” in a few different ways such as soft-terminating, hard-terminating errors and exiting with a non-zero exit code. Also, don’t forget about that warning stream!
Errors
When the PowerShell task encounters an error, it may or may not fail the task in the pipeline. If you have a script that may return an error but it’s not serious enough to fail the entire pipeline task, you can manage this behavior with the errorActionPreference attribute.
By default, the pipeline sets all PowerShell scripts to an $ErrorActionPreference value to Stop. This means that all soft and hard-terminating errors will force PowerShell to return a non-zero exit code thus failing the pipeline task.
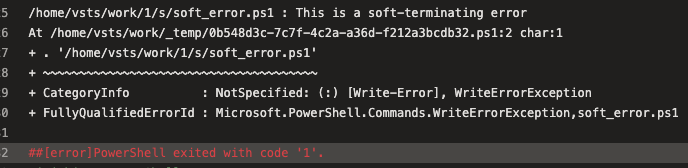
To demonstrate, perhaps you have a script that returns a soft-terminating error like Write-Error does or a hard-terminating error like throw does.
## Soft
Write-Error -Message 'This is a soft-terminating error'

## Hard
throw 'This is a hard-terminating error'
When the pipeline encounters this script, the task will fail because PowerShell didn’t return a zero exit code as you can see below.
Although not recommended, if you’d like the script to fail but not fail the pipeline task, you can do so by setting the errorActionPreference attribute to SilentyContinue.
- task: [email protected]
    inputs:
			targetType: 'filePath'
      filePath: '$(System.DefaultWorkingDirectory)/script.ps1'
			errorActionPreference: SilentlyContinue
Modifying Exit Code Behavior
By default, the PowerShell task fails if PowerShell returns a non-zero exit code. You saw an example of this above. However, if you need to manipulate that behavior, you can do so using the ignoreLASTEXITCODE attribute.
Whenever a PowerShell script turns, it always populates a variable called $LASTEXITCODE. This exit code, coincidentally, returns the last exit code the PowerShell script returned. This is what the pipeline task reads to indicate success or failure.
Perhaps you have a situation where a command you’re running inside of a script returns a non-zero exit code but you know it was successful anyway. Don’t get me started on software installers! If you’d like the pipeline task to succeed, you can force your own exit code.
Let’s say you have a script called script.ps1 like below that modifies the exit code the PowerShell scripts quits with. In the example below, maybe the command returns a zero exit code which typically indicates success but you know that’s actually a failure.
$output = ./some-command.exe
if ($LASTEXITCODE -eq 0) {
	exit 1
}
If you’d run this task without using the ignoreLastExitCode attribute, you’d find the task still shows success. Why? Because the task doesn’t care what exit code PowerShell actually returns. It uses the value of $LASTEXITCODE to determine that.
To remove the dependency on the $LASTEXITCODE variable, use the ignoreLastExitCode attribute as shown below.
- task: [email protected]
    inputs:
      targetType: 'filePath'
      filePath: '$(System.DefaultWorkingDirectory)/script.ps1'
      ignoreLastExitCode: true
Showing Custom Errors and Warnings in Job Logs
Although less frequently used, you can also use logging commands to write warnings and errors into the job log using PowerShell. Below is an example.
- task: [email protected]
    inputs:
      targetType: 'inline'
      script: |
        Write-Host "##vso[task.LogIssue type=warning;]This is the warning"
        Write-Host "##vso[task.LogIssue type=error;]This is the error"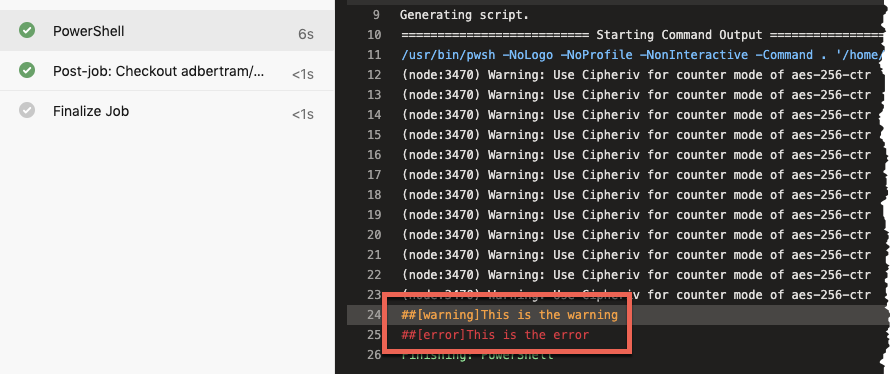
Adding warnings and errors directly into the job log doesn’t effect the success/failure status of the task itself. This feature is useful for logging information to the job log.
Managing Pipeline Variables
The final topic you’re going to learn is managing pipeline variables. AzDo makes it easy to set and reference pipeline variables in PowerShell scripts.
We’re not going to go deep with variables in this section. If you’d like to learn more about pipeline variables, be sure to check out Understanding Azure DevOps Variables [Complete Guide].
Reading Pipeline Variables
When you’ve defined variables in the pipeline, you can read the values of those variables in PowerShell scripts using environment variables.
Perhaps you’ve declared a variable in a pipeline like below. The project_name variable is now available throughout the YAML pipeline.
variables:
   - name: project_name
     value: "foo"
To reference this variable’s value in a script, simply reference the same name but as an environment variable as shown below. That’s all there is to it. All pipeline variables will always be mapped to environment variables in the pipeline agents.
Write-Host "The value of project_name is $env:project_name"Setting Pipeline Variables
Perhaps you need to set a pipeline variable in a PowerShell script. Although not quite as intuitive, you can do so using logging commands. Logging commands are how the pipeline talks to the agent. By writing a specifically-crafted string to the “console”, you can define variables as shown below.
## Creates a standard pipeline variable called foo and sets the value to bar
Write-Host "##vso[task.setvariable variable=foo;]bar"

## Creates an output variable called foo and sets the value to bar
Write-Host "##vso[task.setvariable variable=foo;isOutput=true]bar"
Troubleshooting
Things don’t always go the way you’d like so it’s important to know a few tips to troubleshoot your way out of a jam.
Watch Your Quotes!
If you’re running inline code, quotes will apply two places – in the YAML pipeline and in PowerShell. It’s easy to place a quote in the wrong spot making the pipeline think the quote is for it and the other way around.
One of the easiest ways to prevent this is by using multi-line inline code. Instead of invoking PowerShell code in a single line with quotes and having to keep something like this straight:
powershell: '"This is some code."'Instead, you can remove the required quotes from the pipeline all together by using a pipe (|) symbol and adding the code below it. This way removes some complexity.
powershell: |
	"This is some code"
Debugging
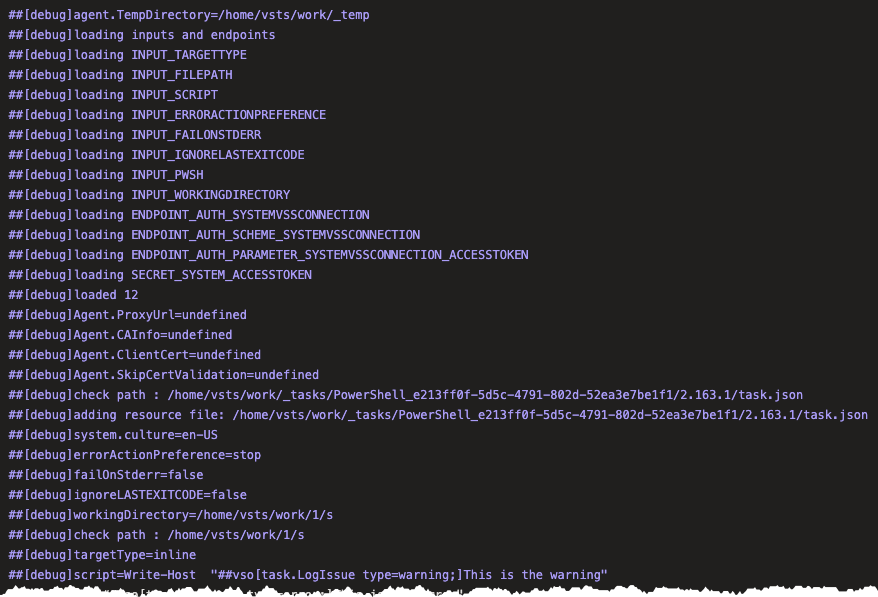
If you’d like to dig deeper into what the pipeline agent is doing in the background, you can debug pipelines using the system.debug variable. If you set the system.debug variable to true in a pipeline, you’ll see a much more verbose output in the job log as shown below.
Enumerating Environment Variables
When working with complex YAML pipelines, you’ll probably come across a situation where you need to see what PowerShell is seeing as values for one or more pipeline variables.
Since the pipeline maps all pipeline variables to environment variables, you can list all of the current environment variables including their values using Get-ChildItem.
PowerShell stores all environment variables in a PS Drive called Env. You can then read all environment variables by listing out the contents of this PS drive as shown below.
Get-ChildItem -Path Env:Recall that piping is a mechanism for performing multiple steps in a single expression. A pipe consists of 2 or more command steps separated by the pipe operator, |. The output object from the previous command is piped to be used as an input in the next command.
A pipeline can be read from left to right as at least 3 steps:
- First step: command produces an output object
|: carries the output object to the next step- Next step: uses the output object as an input to the command
This process can be extended to any number of steps (using the | operator between them) needed to accomplish the goal of the pipeline.
We will start with some examples to get comfortable with the general flow of piping in PowerShell. Then we will dig into some of the details that enable this powerful feature.
9.7.1. Piping in Action
9.7.1.1. Piping to Sort Directory Contents
Before entering the following pipeline into your PowerShell terminal, take a moment to read it out loud:
Get the ChildItem list from (the current directory) then take that list and sort it by each item’s Name Property
Windows/PowerShell
> Get-ChildItem | Sort-Object -Property Name
# sorted directory contents
This expression has three steps:
Get-ChildItem: outputs anArrayofDirectoryInfoandFileInfoobjects|: transfers theArrayto the next commandSort-Object -Property Name: Sorts the inputArrayalphabetically by each element’sNameproperty
When the Get-ChildItem cmdlet is executed, it evaluates to an Array object. However, as you noticed, the sorting step (Sort-Object) operated on each element that is inside, not the Array itself. This is a key aspect of how piping works when working with collections of objects, like an Array.
Tip
When a collection of objects is piped from a command the next command receives and processes each object in the collection one at a time.
You can see more detailed examples of this behavior in this Microsoft pipelining article.
9.7.1.2. Adding Contents to a File
In this example, we will add the contents of a string to a file using the Add-Content cmdlet. The Add-Content cmdlet will either add the content to the end of an existing file, or create a new one and put the contents in it.
First, let’s look at a traditional execution of the single command. Here we explicitly assign, or bind, the values for the -Value and -Path options:
Windows/PowerShell
> Add-Content -Value "You found me!" -Path "find-me.txt"

# confirm addition
> Get-Content .find-me.txt
You found me!

# remove the file
> Remove-Item .find-me.txt
Now let’s see how this can be accomplished with a simple pipeline:
Windows/PowerShell
> "You found me!" | Add-Content -Path "find-me.txt"
> Get-Content .find-me.txt
You found me!
In this pipeline, the string "You found me!" was piped, or carried over to, the Add-Content cmdlet. Notice, unlike the traditional execution, that the -Value parameter is implicitly bound to the string object, "You found me!".
9.7.2. Pipeline Parameter Binding
In Bash, because everything is a string, piping can be performed between any two commands. However, the format of those strings is often manipulated through additional steps in the pipeline.
Because PowerShell is object-oriented, the command compatibility is shifted from string formats to the types of objects used as inputs and outputs. In PowerShell, piping between commands is a mechanism that requires, at minimum, for the next command to have parameters that accept pipeline input.
Before we discuss the mechanism in detail, let’s explore the example we saw earlier:
Windows/PowerShell
> "You found me!" | Add-Content -Path "find-me.txt"
In this pipeline, the string "You found me!" was piped, or carried over to, the Add-Content cmdlet. As mentioned earlier, the -Value option was assigned implicitly as a piped input.
When a command receives piped input it goes through the process of parameter binding.
Parameter binding is PowerShell’s mechanism of aligning the output object (by its type) or its properties (by their names) with the parameters of the cmdlet receiving it. This process is performed automatically but how it binds is controlled by the binding type of each parameter.
There are two binding types available in piping, ByValue and ByPropertyName. In the previous example, the piped string object was successfully bound to the -Value option because it accepts piped input through the ByValue mechanism.
Note
ByValue does not mean the option name must be -Value, in fact it means just the opposite! This is just a coincidence of our simplistic example.
9.7.2.1. Binding ByValue
When a cmdlet’s parameter accepts input ByValue it will bind based on the type of the piped object.
PowerShell will only attempt parameter binding for parameters that haven’t been assigned yet. Unassigned means the positional or named parameters that haven’t been explicitly set in the command or from previous binding process.
The following steps are a simplified description of the ByValue binding process:
- Check the type of the piped object
- Check the next unassigned cmdlet parameter that accepts piped input ByValue
- Check if this parameter accepts the same type of object (or can be easily converted to it, like a number to a string)
- Bind the piped object to the matched parameter
9.7.2.2. Binding ByPropertyName
Before we discuss ByPropertyName, let’s consider an example that shows its difference from ByValue binding. Here we attempt to assign the -Value option explicitly and pass the -Path as a piped input instead:
Windows/PowerShell
> ".find-me.txt" | Add-Content -Value "You found me!"
Add-Content: The input object cannot be bound to any parameters for the command either
because the command does not take pipeline input or the input and its properties
do not match any of the parameters that take pipeline input.
In this case, the command error message gives us clues as to what went wrong: ...the input and its properties do not match any of the parameters....
The -Path option does accept input binding, but it does so ByPropertyName not ByValue. Given this information and clues from the error message, can you think of how ByPropertyName binding works? It must have something to do with the properties of the piped object.
ByPropertyName binding binds the property of the piped object to the parameter with the same name.
PowerShell will first try to bind ByValue before going through the following simplified steps:
- Check the next unassigned cmdlet parameter that accepts piped input ByPropertyName
- Check the names for each property of the piped object
- Bind the piped object’s property with the same name as the parameter
The error message from before indicated that the piped object could not satisfy a binding to the required parameter (like -Path) of the next command. Our piped string does not have a property called Path that aligns with the named parameter -Path, so the binding fails.
9.7.2.3. Parameter Discovery
Before you can pipe between commands you need to check for compatibility between the piped object and next command’s input parameters. The Get-Member cmdlet and the getType() method are two tools you have learned about for discovery of a command’s output object. For understanding the requirements of the next command’s inputs, we can use the Get-Help cmdlet with an additional filtering option.
The Get-Help cmdlet includes an option called -Parameter which will list the details about the parameter of the target cmdlet.
Let’s look at the -Value and -Path parameters in particular. In the parameter output you want to check first line, for its input type, and the Accept pipeline input? line, for its binding type(s):
Windows/PowerShell
> Get-Help Add-Content -Parameter Value, Path

-Value <Object[]>

   Required?                    true
   Position?                    1
   Accept pipeline input?       true (ByValue, ByPropertyName)
   Parameter set name           (All)
   Aliases                      None
   Dynamic?                     false

-Path <string[]>

   Required?                    true
   Position?                    0
   Accept pipeline input?       true (ByPropertyName)
   Parameter set name           Path
   Aliases                      None
   Dynamic?                     false
Tip
When the Get-Help option -Parameter is given a wildcard character (*) it will list the details for all the parameters of the cmdlet.
Windows/PowerShell
> Get-Help Add-Content -Parameter *
# details of all parameters
9.7.3. Using Pipelines to Learn About Pipelines
Searching file contents for a matching search term is a common operational task. For example, you may need to search through server logs or other files for terms of interest. In this example, we will introduce another utility cmdlet, Where-Object. As its name implies, it is used to filter a collection where [each] object satisfies some criteria.
When discovering the parameters of a cmdlet, it is a tedious process to manually search through the results of all the parameters. To plan your pipeline, you are most concerned with the parameters that accept pipeline input. We can use the Where-Object cmdlet to filter the list of parameters down to only those that can be piped to.
Let’s use Where-Object and piping to learn about the Where-Object cmdlet!
First, we need to see what properties are of the parameter help objects that the Get-Help command outputs. For this task, we can pipe them into Get-Member and view the available properties and methods on the object:
Windows/PowerShell
> Get-Help Where-Object -Parameter * | Get-Member

TypeName: MamlCommandHelpInfo#parameter

Name           MemberType   Definition
----           ----------   ----------
# ...trimmed output
name           NoteProperty System.String name=CContains
pipelineInput  NoteProperty string pipelineInput=False
required       NoteProperty string required=true
These are the property names that correspond to the table output you saw in the previous section. Our goal is to filter out all of the parameters that have a pipelineInput property with a value of true (Binding Type,...). Recall that the the (Binding Type,...) can be one or both of ByValue and ByPropertyName.
We can generalize our search term to the string true followed by any other text to account for the 3 scenarios that could come after it. This is another use case for a wildcard. The expression true* matches the loose pattern of our search criteria.
When we are searching for something that is like a string we can use the -Like option of Where-Object:
Windows/PowerShell
> Get-Help Where-Object -Parameters * | Where-Object -Property pipelineInput -Like "true*"

-InputObject <PSObject>
   Specifies the objects to be filtered. You can also pipe the objects to `Where-Object`.

   When you use the InputObject parameter with `Where-Object`, instead of piping command results to `Where-Object`, the InputObject value is treated as a single object.
   This is true even if the value is a collection that is the result of a command, such as `-InputObject (Get-Process)`. Because InputObject cannot return individual
   properties from an array or collection of objects, we recommend that, if you use `Where-Object` to filter a collection of objects for those objects that have specific
   values in defined properties, you use `Where-Object` in the pipeline, as shown in the examples in this topic.

   Required?                    false
   Position?                    named
   Default value                None
   Accept pipeline input?       True (ByValue)
   Accept wildcard characters?  false
9.7.4. Pipeline Planning
When designing a pipeline, it can help to organize the commands and the path the objects will take. Over time, you will grow comfortable using common cmdlets. But in the beginning you can use this checklist to help plan your approach:
- Which command is first and what is its output type?
- What is the final output type and where should it go (terminal, file, program input)?
- Which logical steps (Verbs and Nouns) do you need to get from the first output to the last?
- How do the command steps need to be ordered for the parameters to bind properly?
Tip
The cmdlets Where-Object and Sort-Object that you saw in the examples are utility cmdlets. They can be used as transitions, or interjections, between steps, to coordinate the behavior of a pipeline.
They make up a small part of the PowerShell Utilities module. This module is a gold mine for piping with other utilities to help with steps like formatting, converting, and mutating objects.
- PowerShell 101 for Exchange Administrators
- How to Resolve a PowerShell Kerberos Issue
- PowerShell Tip: Easily Manage all of Your “BYOD” Devices
- Troubleshooting Unknown PowerShell Error Messages
- Enhance your PowerShell Experience by Automatically Loading Scripts
PowerShell was publicly released to the public in 2006 and since then is experiencing a growing interest among the Microsoft World Community IT Pros. The main reason for this success is that it empowers administrators due to its ease of use and powerful scripting capabilities.
It is the successor of the command-line utility and tries to compete with all the shell scripting that the Unix guys benefit from. In this blog post, you will find tips related to all basics required to start learning PowerShell and ease your day-to-day life as an administrator.
Enable hybrid end-user experience monitoring to ensure the hybrid services are up and performing well. Get it a test run today!
Basics
The first thing you need to know is that PowerShell commands (called commandlets, and usually referred as “cmdlets”) are always named in the same way of a verb and a noun:
Verb-noun
Therefore it is usually quick and easy to remember commands, especially the ones you will be using on a regular basis. The absolutely first cmdlet you have to know is how to get help and you might have already guessed its name:
Get-Help
Thanks to aliases, Unix guys can keep their old habits and use “man” if they prefer?
It starts to get very easy finding the most basics cmdlets to get system info like processes and windows services:
Get-Service
Get-Process
And PowerShell is (almost) the same for every application that leverages it, therefore you can start the Exchange Management Shell and enjoy the same fun:
Get-Mailbox
Get-MailboxServer
Get-MailboxStatistics
In order to extend the scripting capabilities, cmdlets can be combined with one another using the magical pipe character “|”. When using pipelining in PowerShell every object that is returned from the first cmdlet is passed on to the right side of the pipe. It is important to notice that in PowerShell what is transferred through the pipe are objects and not characters:
Get-Service “Martello*” | Stop-Service -WhatIf
oliv1 resized 600Here what would happen is that every Windows Service that starts with “Martello” will be transferred to the “Stop-Service” cmdlet that will tell what it would do IF we were to run it, as the parameter “WhatIf” was used. Very useful parameter to check and anticipate what will happen before it does. Once you want to execute the cmdlets just remove that parameter.
Formatting and Exporting Results
In order to format the result you can use the well-named “Format-Table” or “Format-List” cmdlets, and choose which properties to return:
Get-Service | Format-Table Name, Status, CanStop -AutoSize
For exporting your results it might be more convenient to convert to a CSV format and write it into a file on disk:
Get-Service | ConvertTo-Csv | Out-File “C:tempServices.csv”
You can also refine results using the “Where-Object” cmdlets. In order to use that cmdlet you need to know how to point to the object passed through the pipe, and the object can be referred to as “$_” as in this example if we want only the “stopped” services:
Get-Service | Where {$_.Status -eq “Stopped”}
If you need more operators you can click here.
You get the idea, it is very easy to do anything you want now.
Exchange Administration
So now let’s take a closer look at what you can achieve with these simple cmdlets for your Exchange organization.
Top 10 Mailboxes with the most items:
Get-Mailbox -ResultSize unlimited| Get-MailboxStatistics | Sort-Object “ItemCount” -Descending | Select-Object -First 10 | Format-Table DisplayName, ItemCount, TotalItemSize
Last 20 Entries in the event log that were Errors related to Exchange:
Get-EventLog Application | Where { $_.Source -Ilike “*Exchange*” -and $_.EntryType -eq “Error”} | select -last 20
Total number of Mailboxes in my organization:
(Get-Mailbox -Resultsize unlimited).count
Number of Mailboxes grouped per Mailbox Database:
Get-Mailbox | Group-Object -Property:Database | Select-Object name, count
List of all emails received by a specific email address in the last hour:
Get-MessageTrackingLog -Start (Get-Date).AddHours(-1) -EventId DELIVER -Recipients username@domain.com
So that was not too complicated to get all this information for your Exchange organization. Therefore I would greatly encourage you to get more familiar with PowerShell cmdlets, leveraging scripts is quickly becoming the new standard for managing servers and collecting data.
For those of you eager to learn more about PowerShell for Exchange here are some great resources I would like to recommend:
- PowerShell for Beginners
- PowerShell for Exchange 2010–Cheat Sheet
- Generate Exchange Environment Reports using PowerShell
How to Resolve a PowerShell Kerberos Issue
Today I was trying to connect to an Exchange 2013 server using remote PowerShell, and I had this strange error come up:
Connecting to remote server SERVERNAME failed with the following error message: WinRM cannot process the request. The following error with errorcode 0x80090311 occurred while using Kerberos authentication: There are currently no logon servers available to service the logon request.
Possible causes are:
- The user name or password specified are invalid.
- Kerberos is used when no authentication method and no user name are specified.
- Kerberos accepts domain user names, but not local user names.
- The Service Principal Name (SPN) for the remote computer name and port does not exist.
- The client and remote computers are in different domains and there is no trust between the two domains.
After checking for the above issues, try the following:
- Check the Event Viewer for events related to authentication.
- Change the authentication method; add the destination computer to the WinRM TrustedHosts configuration setting or use HTTPS transport. Note that computers in the TrustedHosts list might not be authenticated.
For more information about WinRM configuration, run the following command: winrm help config. For more information, see the about_Remote_Troubleshooting Help topic.
When I researched this error on the Internet, every case mentioned that this can happen when there is no trust between the domain or when no trusted host is set. In my case, everything was set properly. I tried addressing the issue on other computers and it was working fine. My computer was the only one failing to connect remotely with PowerShell…
After looking over the Exchange server event log, I found out that I could not see the successful logon event. Then, I tried to connect using the Negotiate authentication and found that NTLM was used in the event log instead of Kerberos…That’s when I thought the issue had to be related to Kerberos.
Once I started to install Network monitors to look at the network frames on both ends, I found a TechNet article explaining the steps on how to troubleshoot Kerberos. The article instructed me to clear all the caches, including Kerberos tickets. I started immediately with the Kerberos tickets cache, and it solved the issue!
So, in case you encounter similar issues with Kerberos, this could be your solution (in cmd.exe):
KList purge
I hope this will save you time someday, as I spent several hours finding the issue myself. For any other PowerShell errors, this article will help you find even more solutions.
PowerShell Tip: Easily Manage all of Your “BYOD” Devices
The “Bring Your Own Device” Trend (BYOD) has been making significant contributions to the enterprise for quite a few years now. About 44% of developed markets have already adopted their own devices at work!
The biggest headache with BYOD is how to easily manage and organize all of those devices. Policies help, but the final goal is to collect information on these devices to better understand how everything is working. In this article, I will show you some useful PowerShell functions to monitor Devices, and some dedicated specifically to Apple devices!
Step 1: List all of the devices including owners and the OS
Get-ActiveSyncDevice | select-object DeviceModel,FriendlyName,DeviceOS,UserDisplayName | sort-object devicemodel | Ft -autosize –wrap
Step 2: Control which devices are used on Exchange
I will not go into too much detail here because there are some great articles already available online. But, here are some really important steps to follow:
- Choose a restrictive organization policy (Are you not allowed? Get out dude!)
- Create Device Rules Access if you already know some accepted models (Windows Phone or others)
- Create a rule for unknown devices (To go in quarantine)
- Setup a quarantine notification email
- Check the quarantine devices to see all blocked devices (in the ECP)
- Allow devices that you have accepted and create rules for similar devices to prevent repetitive operations
If you prefer PowerShell, you can set this up by using a command like this:
Set-ActiveSyncOrganizationSettings –DefaultAccessLevel Quarantine -AdminMailRecipients adminmotan@letsexchange.com, messaging.team@letsexchange.com –UserMailInsert “Your mobile device is temporarily blocked from synchronizing with the server while permissions are verified.”In order to set rules, you will need to get model devices. The best way to do this is by looking in the IIS logs. As EAS uses HTTP, every request is recorded via the IIS weblogs.
By default, it’s saved in C:inetpublogslogfilesW3SVC1. There, we can search for ActiveSync entries where we will have entries to see the username, DeviceID, and DeviceType among other types of information.
A good command to easily receive your logs is by using the PowerShell command: Export-ActiveSyncLog
Export-ActiveSyncLog –Filename c:intepublogslogfilesW3SVCxxxxxxxx.log –OutputPath c:TempLogsThis command will give you six logs in CSV format:
- Users.csv
- Servers.csv
- Hourly.csv
- StatusCode.csv
- PolicyCompliance.csv
- UserAgents.csv
Devices Models can be found in the UserAgents.csv file.
Step 3: Evaluate the population by device to get a good overview of the park.
The best option is to use PowerShell for a list of devices to get the amount and deploy it for each one. This command will help you:
(Get-CASMailbox –ResultSize Unlimited -Filter {HasActiveSyncDevicePartnership -eq $True} | Get-Mailbox) | ForEach {Get-ActiveSyncDeviceStatistics -Mailbox $_} | group DeviceModel | sort count -descending | Select count, nameOk now you have a good overview of your devices currently connected to ActiveSync. We should check for some resources to monitor our Apple devices.
A good script from Jan Ring, that lists them and lets you see registered devices, can be found here.
This script is very flexible and permits you to export results in the CSV format.
If you have old devices in your organization and need to clean them, use this script:
Get-ActiveSyncDevice -ResultSize unlimited | Get-ActiveSyncDeviceStatistics | where {$_.LastSyncAttemptTime -lt (get-date).adddays(-30)}Then remove it. To do this you can pipe the previous command with this one:
foreach-object {Remove-ActiveSyncDevice ([string]$_.Guid) -confirm:$false}That’s it! Now you have the tools you need to easily manage all your devices at once. Let me know if you followed my directions and how it worked out for you. Have any questions for me? Just leave your comment below!
Troubleshooting Unknown PowerShell Error Messages
Dealing with PowerShell remotely can cause many headaches when it comes to troubleshooting issues. Therefore, I have gathered the “best” PowerShell errors I have encountered so far in which the error messages returned are not always very meaningful…
1. Memory Issue
When initializing or executing cmdlets on a remote PowerShell session, you receive one of the following errors:
Exception of type ‘System.OutOfMemoryException’ was thrown.
+ CategoryInfo : OpenError: (SERVENAME:String) [], RemoteException
+ FullyQualifiedErrorId : PSSessionStateBroken
[SEVERNAME] Processing data from remote server SERVERNAME failed with the following error message: The WSMan provider host process did not return a proper response. A provider in the host process may have behaved improperly. For more information, see the about_Remote_Troubleshooting Help topic.
+ CategoryInfo : OpenError: (SERVERNAME:String) [], PSRemotingTransportException
+ FullyQualifiedErrorId : 1726,PSSessionStateBroken
New-PSSession : [SEVERNAME] Remoting data is missing TargetObject property.
+ $s = New-PSSession -computername $computername -Credential:$cred -Authenticati …+ ~~~~~~~~~~~~~~~~~~~~~~~~~~~~~~~~~~~~~~~~~~~~~~~~~~~~~~~~~~~~~~~~~~
+ CategoryInfo : OpenError: (System.Manageme….RemoteRunspace:RemoteRunspace) [New-PSSession], PSRemotingTransportException + FullyQualifiedErrorId : PSSessionOpenFailed
As the first error message specifies, an overflow of memory in the remote session has occurred. Open a PowerShell prompt on the remote server and display the configuration of winrs using:
winrm get winrm/config/winrs
Check the “MaxMemoryPerShellMB” value. It is set by default to 150 MB on Windows Server 2008 R2 and Windows 7. This is something that Microsoft changed in Windows Server 2012 and Windows 8 to 1024 MB.
In order to resolve this issue, you need to increase the value to at least 512 MB with the following command:
winrm set winrm/config/winrs `@`{MaxMemoryPerShellMB=`”512`”`}
2. SPNs Issues
While enabling the remote PowerShell using “winrm quickconfig” or enabling CredSSP using “Enable-WSManCredSSP”, you might encounter the following error:
WSManFault Message = WinRM cannot process the request. The following error occurred while using Negotiate authentication: An unknown security error occurred. Possible causes are:
- The user name or password specified are invalid.
- Kerberos is used when no authentication method and no user name are specified.
- Kerberos accepts domain user names, but not local user names.
- The Service Principal Name (SPN) for the remote computer name and port does not exist.
- The client and remote computers are in different domains and there is no trust between the two domains. After checking for the above issues, try the following:
- Check the Event Viewer for events related to authentication.
- Change the authentication method; add the destination computer to the WinRM TrustedHosts configuration setting or use HTTPS transport.
Note that computers in the TrustedHosts list might not be authenticated.
-For more information about WinRM configuration, run the following command: winrm help config.
Error number: -2144108387 0x8033809D An unknown security error occurred.
This can come from an existing SPN for HTTP. So check the following in a command prompt:
setspn.exe -L COMPUTERNAME
Eventually, you might have to query it directly using:
setspn.exe -Q http/COMPUTERNAME
If it does exist, then you have to remove it:
setspn.exe -D http/COMPUTERNAME
Then, proceed to whatever you were configuring. And finally, re-enable your SPN:
setspn.exe -A http/COMPUTERNAME
3. Network Interface in Public domains
[SEVERNAME] Processing data from remote server SERVERNAME failed with the following error message: The WSMan provider host process did not return a proper response. A provider in the host process may have behaved improperly. For more information, see the about_Remote_Troubleshooting Help topic.
+ CategoryInfo : OpenError: (SERVERNAME:String) [], PSRemotingTransportException
+ FullyQualifiedErrorId : 1726,PSSessionStateBroken
This common PowerShell error can also occur when one of the network interfaces of the local computer is set to Public Domain, which is very frequent when configuring your local virtual machine (e.g. “VirtualBox Host-Only Network adapter”). In this case, you will have to disable the Network Adapter that is in the Public domain during the configuration.
I am sure that we will discover new, amazing messages to come from PowerShell, especially with remote use.
If you are interested in enhancing your PowerShell experience by automatically loading scripts, we think you will find this article very useful.
Did we not cover an issue you’re having? Check out how we can make your wish for a solution come true!
Do not hesitate to let us know your “favourite” error messages in the comments below and we will do our best to help you troubleshoot them.
Enhance your PowerShell Experience by Automatically Loading Scripts
Ever wanted to customize your PowerShell terminal so you can have all your custom functions or scripts loaded automatically? Although it is possible to create aliases, functions, or variables, everything is only kept for the current PowerShell session, meaning that those changes will be lost after you close the shell.
In order to store the information PowerShell, you can use a “Profile” that is loaded at every session. We’ll now explain how to enable your PowerShell profile and customize it.
The Different Profiles
You can have four different profiles in Windows PowerShell, listed below in load order, the most specific having precedence over less specific profiles where they apply:
- %windir%system32WindowsPowerShellv1.0profile.ps1
This profile applies to all users and all shells.
- %windir%system32WindowsPowerShellv1.0Microsoft.PowerShell_profile.ps1
This profile applies to all users, but only to the Microsoft.PowerShell shell.
- %UserProfile%My DocumentsWindowsPowerShellprofile.ps1
This profile applies only to the current user, but affects all shells.
- %UserProfile%My DocumentsWindowsPowerShellMicrosoft.PowerShell_profile.ps1
This profile applies only to the current user and the Microsoft.PowerShell shell.
Enabling A Profile
Open a PowerShell terminal and type in
$profile
This should display the path that would be used to store your profile. However, it might not be created yet, so in order to find out, type the following:
test-path $profile
If the result is true, you’re all set, else type the following to create the profile:
new-item -path $profile -itemtype file -force
You’re now all set with your profile, and can customize it, by launching the PowerShell ISE:
powershell_ise $profile
Auto-Load Scripts on PowerShell Startup
In the ps1 file of your profile, usually named “Microsoft.PowerShell_profile.ps1”, you can enter the following code, so that the folder of your choice will contain scripts that will be executed on startup:
# directory where my scripts are stored
$psdir=“D:DocumentsPowershellScriptsautoload”
# load all ‘autoload’ scripts
Get-ChildItem “${psdir}*.ps1” | %{.$_}
Write-Host “Custom PowerShell Environment Loaded”
This script will browse the folder given in input, and load all the files. The files I have in this folder are “.ps1” files that contain a PowerShell function.
In order for those scripts to be executed, the policy needs to be updated to something else than “restricted”, at least “remotesigned” by running the following:
Set-ExecutionPolicy remoteSigned
Here you go, you can now put as many “.ps1” files as you need in your “autoload” folder, and these will be executed everytime you launch your PowerShell session.
Sources
- Windows PowerShell Profiles (MSDN) –
http://msdn.microsoft.com/en-us/library/bb613488%28VS.85,loband%29.aspx - PowerShell Startup Auto-Load Scripts –
http://noahcoad.com/post/66/powershell-startup-auto-load-scripts
Learn more about Martello’s Microsoft Exchange Hybrid monitoring solution here.
Automation solutions rarely consist of a single command. More often, they combine a number of commands that resemble the steps it takes to automate what you want.
PowerShell supports two ways of combining commands: you can either use classic variables to store the result from one command and feed it to a parameter of another one. Or you can use the modern streaming pipeline.
A pipeline is not the evolution of variables nor is it always the better choice. As you will see in this article, both approaches have distinct advantages and disadvantages and complement each other well.
Classic variables are similar to “downloading” data which is fast but resource-intense.
The pipeline works like “streaming” data which provides results almost momentarily and minimizes resources, yet overall it’s slower than using variables.
Scriptblocks resemble the fundamental building blocks of pipeline-aware commands. In this article, I am focusing on how the PowerShell pipeline works and what its benefits and drawbacks are from a users perspective.
In an upcoming article, I’ll switch focus and look at the same from a developers aspect, showing how you can best support the PowerShell pipeline in your own functions and scripts.
Pipeline: Streaming Data
The PowerShell pipeline is a mechanism provided by the PowerShell engine to pass information from one command to another one. That’s important to know. The commands that you use inside a pipeline are completely unaware that the pipeline even exists. The pipeline is a service provided by the PowerShell engine to easily combine two or more commands:

Thanks to the pipeline, commands can be combined without the need to use variables, and without manually passing values to parameters.
Many PowerShell code examples follow this scheme. Here is a PowerShell one-liner combining three commands to read the latest 20 errors and warnings from the system eventlog and output them to a text report, making sure that all text is visible and extra long text lines are wrapped instead of cut off:
Get-EventLog -LogName System -EntryType Error,Warning -Newest 20 | Format-Table -AutoSize -Wrap | Out-File -FilePath $env:tempreport.txt -Width 120
Commands Are Lone Wolves
Any command working in a pipeline is working in its own universe and knows nothing about the upstream and downstream commands in the pipeline. It receive its input via its regular parameters, just as if you had called the command stand-alone.
It is the PowerShell engine that takes the results from the upstream command and feeds it to the parameters of the following downstream command. So a pipeline is always just one option of many, and you could always rewrite a pipeline one-liner and have it use classic variables and individual command calls instead:
# get latest 20 errors and warnings from system eventlog:
$events = Get-EventLog -LogName System -EntryType Error, Warning -Newest 20

# format output to produce a table, do not cut off extra long lines but instead wrap them:
$formatting = Format-Table -AutoSize -Wrap -InputObject $events

# write output to file with a maximum width of 120 characters:
Out-File -FilePath $env:tempreport.txt -Width 120 -InputObject $formatting

# open produced output file in notepad editor:
notepad $env:tempreport.txt
As you immediately recognize, classic variables work like messengers and carry the results from one command to the next in a typical criss-cross pattern:

Parameter Binding
With classic variables, you decide which parameter of the following command receives the variable: you simply assign values manually to command parameters.
In a pipeline, it is the PowerShell engine that automatically binds the results from one command to the parameter(s) of the next. How does PowerShell know which parameter to pick?
The PowerShell parameter binder is taking care of this and probably one of the most complex parts of the PowerShell engine. It relies in part on information provided by the commands. That’s why you cannot pipe data to just any command. A command needs to actively support pipeline input and declare which parameters can accept pipeline input, and when.
Expose Pipeline-Aware Parameters
Get-PipelineAwareParameter is a test function that exposes this parameter binding information. Specify the name of any valid command, and it returns the parameters that can accept pipeline input:
function Get-PipelineAwareParameter
{
  param
  (
    # Name of command to examine:
    [Parameter(Mandatory)]
    [string]
    $CommandName
  )

  # exclude common parameter:
  $commonParameter = 'Verbose',
  'Debug',
  'ErrorAction',
  'WarningAction',
  'InformationAction',
  'ErrorVariable',
  'WarningVariable',
  'InformationVariable',
  'OutVariable',
  'OutBuffer',
  'PipelineVariable'

  # get command information:
  $commandInfo = Get-Command -Name $CommandName

  # identify unique parameters
  $hash = [System.Collections.Generic.Dictionary[[string],[int]]]::new()
  $CommandInfo.ParameterSets.Foreach{$_.Parameters.Foreach{$hash[$_.Name]++}}

  # look at each parameterset separately...
  $CommandInfo.ParameterSets | ForEach-Object {
    # ...list the unique parameters that are allowed in this parameterset:
    if ($_.IsDefault)
    {
      $parameters = '(default)'
    }
    else
    {
      $parameters = $_.Parameters.Name.Where{$commonParameter -notcontains $_}.Where{$hash[$_] -eq 1}.Foreach{"-$_"} -join ', '
    }

    # check each parameter in this parameterset...
    $_.Parameters |
      # include only those that accept pipeline input:
      Where-Object { $_.ValueFromPipeline -or $_.ValueFromPipelineByPropertyName} |
      ForEach-Object {
        # if the parameter accepts pipeline input via object properties...
        if ($_.ValueFromPipelineByPropertyName)
        {
          # list the property names in relevant order:
          [System.Collections.Generic.List[string]]$aliases = $_.Aliases
          $aliases.Insert(0, $_.Name)
          $propertyNames = '$input.' + ($aliases -join ', $input.')
        }
        else
        {
          $propertyNames = ''
        }

        # return info about parameter:
        [PSCustomObject]@{
          # parameter name:
          Parameter = '-{0}' -f $_.Name
          # required data type
          Type = '[{0}]' -f $_.ParameterType
          # accepts pipeline input directly?
          ByValue = $_.ValueFromPipeline
          # reads property values?
          ByProperty = $propertyNames
          # list of parameters in this parameterset
          TriggeredBy = $parameters
        }
      }
  }
}
This is how you examine a command like Stop-Service with Get-PipelineAwareParameter:
Get-PipelineAwareParameter -CommandName Stop-Service
The result lists two pipeline-aware parameters: -InputObject and -Name:
Parameter   : -InputObject
Type        : [System.ServiceProcess.ServiceController[]]
ByValue     : True
ByProperty  :
TriggeredBy : (default)

Parameter   : -Name
Type        : [System.String[]]
ByValue     : True
ByProperty  : $input.Name, $input.ServiceName
TriggeredBy : -Name
Binding Parameters Via Pipeline
Based on the information exposed by Get-PipelineAwareParameter, Stop-Service apparently accepts pipeline information on two of its parameters:
- -InputObject expects input of type [System.ServiceProcess.ServiceController[]] which represents one or more actual services, for example the results of
Get-Service. These services can be processed directly (ByValue). This parameter is the default parameter. - -Name expects input of type [System.String[]] which represents one or more service names (strings). This parameter accepts both plain strings (ByValue) and input objects with the properties Name or ServiceName that contain strings.
Let’s test this and try some sample calls, feeding different information into Stop-Service. All of the below pipeline bindings work and produce the exact same result:
# using -InputObject and ServiceController objects (ByValue):
Get-Service -Name Spooler | Stop-Service -WhatIf

# using strings (ByValue):
'Spooler' | Stop-Service -WhatIf

# using objects with property "Name" (ByPropertyName)
[PSCustomObject]@{Name='Spooler'} | Stop-Service -WhatIf

# using objects with property "ServiceName" (ByPropertyName)
[PSCustomObject]@{ServiceName='Spooler'} | Stop-Service -WhatIf
Contracts: ISA and HASA
Assume for a second you want to cook apple pie. For this you obviously need apples. To enable others to provide you with apples, you can generally receive them via two routes:
- ISA: Either you accept apples directly. That is a so-called ISA (or “is a”) contract. PowerShell calls this type of contract ByValue: you get exactly the value you are looking for.
Stop-Serviceuses a ISA contract for the parameters -InputObject (which accepts ServiceController objects directly) and -Name (which accepts string arrays directly). - HASA: You can accept of course an entire apple tree, too, and pick the apples yourself. This is the so-called HASA (or “has a”) contract where you list the properties of an object that you’ll accept. PowerShell calls this type of contract ByPropertyName: you get a complex object and take the value from one of its properties.
Stop-Serviceuses a HASA contract for its parameter -Name: it accepts any object and “picks” the service name from the properties Name or ServiceName, in this order.
Contracts Turn Commands Into Lego Pieces
The ISA and HASA pipeline contracts turn commands into flexible lego pieces that can be combined in numerous ways as long as the results of one command meet the contracts of the following command. That’s why PowerShell is so insanely flexible, and all commands peacefully work together regardless of who created them. They all adhere to the same input contracts.
That’s coincidentally also the reason why PowerShell was initially code-named Monad: this code name is a tribute to Leibniz’ Monadology, a philosophical approach to explain the world: a Monads is a simple base unit, and Leibniz explains it to be “one, has no parts and is therefore indivisible”. Anything substantial in the world is — according to this philosophy — composed by a combination of these Monads and can be recombined to other things.
In PowerShells ecosystem, pipeline-aware commands are “Monads”. The pipeline combines them to create something complex. The same basic commands (Monads) can produce different things when rearranged differently. The lego company picked up this concept as well.
Combining Commands Made Simple
Since Stop-Service happily accepts string arrays, you can use Get-Content (which produces string arrays) to read a text file with service names, and pipe these directly to Stop-Service:
$path = "C:servicesToStop.txt"
Get-Content -Path $path | Where-Object { $_.Trim() } | Stop-Service -WhatIf
The example just adds
Where-Objectto filter out any blank lines.
Likewise, you can use the comma operator to produce string arrays yourself and pipe these to Stop-Service to stop all of them:
'wuauserv', 'spooler' | Stop-Service -WhatIf
Or, you could dump the dependent services from a running service which turn out to be rich servicecontroller objects:
Get-Service -Name Winmgmt | Select-Object -ExpandProperty DependentServices
Status   Name               DisplayName
------   ----               -----------
Running  MBAMService        Malwarebytes Service
Stopped  NcaSvc             Network Connectivity Assistant
Running  jhi_service        Intel(R) Dynamic Application Loader...
Running  iphlpsvc           IP Helper
Since Stop-Service also accepts servicecontroller objects, you could again pipe these dependent services directly to Stop-Service:
Get-Service -Name Winmgmt | Select-Object -ExpandProperty DependentServices | Stop-Service -WhatIf
No Mind Reader Included
The PowerShell pipeline does not come with a mind reader, and you can’t just combine commands and hope for the best. The pipeline contracts just make sure that commands can pass data to each other. This doesn’t necessarily mean that combining commands actually makes sense, even if the contract allows it.
You can for example technically pipe the results from Get-ChildItem to Stop-Service:
# works but produces errors:
Get-ChildItem -Path 'c:windows' | Stop-Service -WhatIf
The contract defined by Stop-Service accepts objects with a property Name when this property contains strings. This is true for the file system objects provided by Get-ChildItem. Still there are of course no services with such names, so Stop-Service throws exceptions complaining it can’t find the services.
That’s just as if you feed a text file into Stop-Service using Get-Content (see above): PowerShell and the command contracts allow this, however it is your responsibility to make sure the actual data makes sense.
Real-Time Processing
The PowerShell pipeline isn’t just a convenient way for users to take results from one command and automatically bind them to a parameter of another command. That’s fun and the basis of a lot of powerful one-liners, but the pipeline has a way more important technical feature: it is a highly efficient real-time streaming mechanism that saves resources and can speed up producing results.
Like outlined in the intro, you can automate anything either by using variables or by using the pipeline. This is a choice you have, and you shouldn’t base this choice on how you feel today. There are technical reasons when you should use variables and when a pipeline works better.
The following section helps you understand what the benefits and disadvantages are so you can make an educated choice the next time you write some PowerShell code.
Comparing To Classic Variables
When you use variables, your script strictly executes one command after the next. Not only do you have to wait for all data to be collected. You also need to always store all data in memory. Here is a classic example that looks for all log files in your windows folder and displays only the files that have changed within the past 12 hours:
# get all log files
$logFiles = Get-ChildItem -Path $env:windir -Recurse -Filter *.log -Include *.log -File -ErrorAction Ignore

# filter those that have changed in the past 12 hours:
$12HoursAgo = (Get-Date).AddHours(-12)
$latestChanges = foreach($file in $logFiles)
{
  if ($file.LastWriteTime -gt $12HoursAgo)
  {
    # return file
    $file
  }
}

# display files
$latestChanges | Out-GridView -Title 'LogFiles With Recent Changes'
When you run this, you’ll notice that it takes forever. PowerShell first searches the entire windows folder for log files, then filters out the ones with recent changes, and then finally displays them. Plus when you keep an eye on a resource monitor, you’ll see your script burn a lot of memory because $logFiles keeps all files in memory.
Pipeline Produces Faster Results
If you do the same with the pipeline, the code is shorter but you’ll also get results much quicker. Actually, you receive results in real-time: the moment Get-ChildItem discovers a suitable log file, it is already displayed by Out-GridView, and you can see the file list grow that the gridview shows as more results come in:
# filter those that have changed in the past 12 hours:
$12HoursAgo = (Get-Date).AddHours(-12)

Get-ChildItem -Path $env:windir -Recurse -Filter *.log -Include *.log -File -ErrorAction Ignore |
  Where-Object LastWriteTime -gt $12HoursAgo |
  Out-GridView -Title 'LogFiles With Recent Changes'
Variables Are Faster Overall
Even though the pipeline appears to be faster because first results appear in real-time, if you measure the total time, variables win. The time penalty you pay for the pipeline grows exponentially with the number of passed objects:
# with a few objects, both approaches work equally well:
Get-Random -InputObject (1..49) -Count 7
1..49 | Get-Random -Count 7

# piping many objects exposes an exponential time penalty:
$manyObjects = 1..10000000
# this is still fast:
Get-Random -InputObject $manyObjects -Count 7
# very slow now:
$manyObjects | Get-Random -Count 7
There is a reason for this, and part of the time is caused by a long-standing PowerShell bug that bites both Windows PowerShell and PowerShell 7. You can read more and even work around it and remove the pipeline time penalty.
Executing Many Command At The Same Time
As you have seen with the log file example, the PowerShell pipeline manages to execute all commands inside the pipeline at the same time: while Get-ChildItem was still producing results, Out-GridView could already display some.
begin, process, end
The pipeline is not doing parallel processing, though. It just cleverly interweaves the code of all commands. That’s why pipeline-aware PowerShell commands can provide up to three different code blocks: begin, process, and end:
- begin: This code executes once before the pipeline starts to process data. Code can be used to initialize things that only need to be set up once.
- process: This code executes repeatedly like a loop, once per incoming pipeline object.
- end: This code executes once after all pipeline elements have been processed. Code can be used to clean up things, i.e. delete temporary files.
So when you combine three commands in a pipeline…

…PowerShell recombines the code from all three commands and executes the code in this fashion:

The process block is repeated for each object travelling through the pipeline. The illustration shows two objects travelling the pipeline.
To better understand how the three code sections play together, use Test-Pipeline. It is a simple pipeline-aware PowerShell function that visualizes when and how often the three code sections are running:
function Test-Pipeline
{
  param
  (
    [Parameter(Mandatory)]
    [string]
    $Name,

    [Parameter(ValueFromPipeline)]
    [object]
    $InputObject
  )

  begin   { Write-Host "BEGIN   ${Name}" -ForegroundColor Green }
  process
  {
    Write-Host "PROCESS ${Name}: $InputObject" -ForegroundColor DarkYellow
    # pass received object on to next command:
    $InputObject
  }
  end     { Write-Host "END     ${Name}" -ForegroundColor Red }
}
As you will discover in just a moment, the PowerShell pipeline works like a huge loop and always processes only one object. So when a command emits a number of results, the pipeline operator takes only the first result object and guides it through the process blocks of all commands. The next result object enters the pipeline only when the previous result object is completely processed and returned.
This explains both why results become visible so quickly (as they are produced), and why the pipeline requires only very little memory (only one object is held in memory at any given time).
Processing One Pipeline Element
Let’s get practical: combine a number of calls to Test-Pipeline in a pipeline:
1 | Test-Pipeline -Name A | Test-Pipeline -Name B | Test-Pipeline -Name C
The result clearly shows how PowerShell combines the code of all three commands:
BEGIN   A
BEGIN   B
BEGIN   C
PROCESS A: 1
PROCESS B: 1
PROCESS C: 1
1
END     A
END     B
END     C
- First, the begin section of all three commands execute.
- Next, the process section processes the input data, and at the end the data is returned.
- Finally, the end section of all three commands execute.
Processing Many Pipeline Elements
Now check out what happens when you submit more than one piece of data to the pipeline:
1..3 | Test-Pipeline -Name A | Test-Pipeline -Name B | Test-Pipeline -Name C
This time, three objects float through the pipeline:
BEGIN   A
BEGIN   B
BEGIN   C
PROCESS A: 1
PROCESS B: 1
PROCESS C: 1
1
PROCESS A: 2
PROCESS B: 2
PROCESS C: 2
2
PROCESS A: 3
PROCESS B: 3
PROCESS C: 3
3
END     A
END     B
END     C
-
Again, begin executes only once for all three commands.
-
This time, process processes each incoming data object, so there is only one instance of a data object processed inside the pipeline at any given time. This reduces the memory footprint, and as you can see, processed results are emitted in real-time, while all commands are still busy producing and processing data.
-
At the end, end executes once for all three commands.
So a pipeline can process as many objects as you want. The process block acts like a loop and repeats for each incoming pipeline object.
Processing NULL Values
When a pipeline command emits no results, the result looks different. I am using Get-Service with a service name that does not exist to simulate a command that does not emit any results:
Get-Service -Name None -ErrorAction Ignore | Test-Pipeline -Name A | Test-Pipeline -Name B | Test-Pipeline -Name C
The result visualizes that now the process block is skipped:
BEGIN   A
BEGIN   B
BEGIN   C
END     A
END     B
END     C
Which makes total sense: the begin block executes before any pipeline data is processed so PowerShell cannot know at this time if any results need to be processed. The process block processes each incoming object, so when no results are fed to the pipeline commands, this block never executes. The end block then executes and does all necessary cleanup.
There is a strange phenomenon that occasionally causes confusion: when you pipe
$nullto a command, this null value is processed by the pipeline:$null | Test-Pipeline -Name A | Test-Pipeline -Name B | Test-Pipeline -Name CBEGIN A BEGIN B BEGIN C PROCESS A: PROCESS B: PROCESS C: END A END B END CCompare this result to a slightly different call:
@() | Test-Pipeline -Name A | Test-Pipeline -Name B | Test-Pipeline -Name CThis time, the process block is skipped. When you pipe an empty array, PowerShell unwraps the array and feeds each array element to the commands, one at a time, which coincidentally is — nothing. With an empty array, no elements are fed into the pipeline thus process is skipped.
So
$null(or any other variable with a null content) really is a special case: while this variable represents nothing and can be used to identify undefined or empty values……the instance of
$nullitself (or any empty variable) is not nothing. Therefore, a true nothing is not carried through the pipeline, but the physical instance of$nullis, even multiple times:$null, $null, $null | Test-Pipeline -Name A | Test-Pipeline -Name B | Test-Pipeline -Name C # assuming the three variables are undefined: $undefined1, $undefined2, $undefined3 | Test-Pipeline -Name A | Test-Pipeline -Name B | Test-Pipeline -Name CIf you wanted to exclude empty values from passing through the pipeline, either make the pipeline-aware parameter mandatory, or explicitly exclude null values:
$null | Where-Object { $_ -ne $null } | Test-Pipeline -Name A | Test-Pipeline -Name B | Test-Pipeline -Name C
Using Commands Stand-Alone
Let’s finally see how Test-Pipeline behaves when you run it outside the pipeline as a stand-alone command:
Test-Pipeline -Name A -InputObject 1
Outside the pipeline, the command still works, and the three code blocks are executed in consecutive order:
BEGIN   A
PROCESS A: 1
1
END     A
Guidelines
So when should you use a PowerShell pipeline, and when would you want to use classic variables? Of course, this is to a large extent simply a matter of taste, but there are also a few non-negotiable hard facts to consider:
The Pipeline benefits are:
- Save Resources: when you need to process a lot of complex objects, streaming them through a pipeline saves memory because only one object needs to be held in memory at any given time.
This assumes of course that you did not save results in variables: starting a pipeline with a variable instead of a command destroys this advantage: you already burned the memory. - Fast User Responses: if a command takes a long time to produce the complete set of results, streaming them through a pipeline emits results in real-time as they become available. The user gets the fastest-possible feedback time.
Without a pipeline, you’d have to wait for all results to be collected before you could go on and present results to the user.
The Variable benefits are:
- Reusable: Once you save data to variables, the data is reusable and can be read as often as you want. The original data that is streamed through a pipeline is not available for other purposes, and you’d have to execute the command again that produced the original data.
- Faster Overall: If total speed matters to you, using variables and avoiding the pipeline can speed up the total execution time tremendously. This is largely due to a bug in PowerShell that can seriously slow down pipeline processing in some scenarios. You can work around this bug and make the pipeline execute just as quickly as the variable approach, though.
There are a few different kinds of errors in PowerShell, and it can be a little bit of a minefield on occasion.
There are always two sides to consider, too: how you write code that creates errors, and how you handle those errors in your own code.
Let’s have a look at some ways to effectively utilise the different kinds of errors you can work with in PowerShell, and how to handle them.
Different Types of Errors
Terminating Errors
Terminating errors are mostly an «exactly what it sounds like» package in general use.
They’re very similar to C#’s Exception system, although PowerShell uses ErrorRecord as its base error object.
Their common characteristics are as follows:
- Trigger
try/catchblocks - Return control to the caller, along with the exception, if they’re not handled using a try/catch block.
There are a couple different ways to get a terminating error in PowerShell, and each has its own small differences that make them more useful in a tricky situation.
Throw
First is your typical throw statement, which simply takes an exception message as its only input.
throw "Something went wrong"
throw creates an exception and an ErrorRecord (PowerShell’s more detailed version of an exception) in a single, simple statement, and wraps them together.
Its exceptions display the entered error message, a generic RuntimeException, and the errorID matches the entered exception message.
The line number and position displayed from a throw error message point back to the throw statement itself.
throw exceptions are affected by -ErrorAction parameters of their advanced functions.
throw should generally be used for simple runtime errors, where you need to halt execution, but typically only if you plan to catch it yourself later.
There is no guarantee a user will not elect to simply ignore your error with -ErrorAction Ignore and continue with their lives if it is passed up from your functions.
ThrowTerminatingError()
Next, we have a more advanced version of the throw statement. ThrowTerminatingError() is a method that comes directly from PowerShell’s PSCmdlet .NET class.
It is accessible only in advanced functions via the $PSCmdlet variable.
using namespace System.Management.Automation;
$Exception = [Exception]::new("error message")
$ErrorRecord = [System.Management.Automation.ErrorRecord]::new(
    $Exception,
    "errorID",
    [System.Management.Automation.ErrorCategory]::NotSpecified,
    $TargetObject # usually the object that triggered the error, if possible
)
$PSCmdlet.ThrowTerminatingError($ErrorRecord)
As you can see, these require a little more manual labor.
You can bypass some of this by deliberately using the throw statement and then later catching the generated ErrorRecord to pass it into the ThrowTerminatingError() method directly.
This saves a decent amount of the code involved, and offloads the work to PowerShell’s engine instead.
However, this will still involve essentially the same work being done, without necessarily giving you a chance to specify the finer details of the error record.
ThrowTerminatingError() creates a terminating error (as the name implies), however unlike throw its errors are unaffected by -ErrorAction parameters applied to the parent function.
It will also never reveal the code around it.
When you see an error thrown via this method, it will always display only the line where the command was called, never the code within the command that actually threw the error.
ThrowTerminatingError() should generally be used for serious errors, where continuing to process in spite of the error may lead to corrupted data, and you want any specified -ErrorAction parameter to be ignored.
Non-Terminating Errors
Non-terminating errors are PowerShell’s concession demanded by the fact that it is a shell that supports pipelines.
Not all errors warrant halting all ongoing actions, and only need to inform the user that a minor error occurred, but continue processing the remainder of the items.
Unlike terminating errors, non-terminating errors:
- Do not trigger
try/catchblocks. - Do not affect the script’s control flow.
Write-Error
Write-Error is a bit like the non-terminating version of throw, albeit more versatile.
It too creates a complete ErrorRecord, which has a NotSpecified category and some predefined Exception and ErrorCode properties that both refer to Write-Error.
This is a very simple and effective way to write a non-terminating error, but it is somewhat limited in its use.
While you can override its predefined default exception type, error code, and essentially everything about the generated ErrorRecord, Write-Error is similar to throw in that it too points directly back to the line where Write-Error itself was called.
This can often make the error display very unclear, which is rarely a good thing.
Write-Error is a great way to emit straightforward, non-terminating errors, but its tendency to muddy the error display makes it difficult to recommend for any specific uses.
However, as it is itself a cmdlet, it is also possible to make it create terminating errors as well, by using the -ErrorAction Stop parameter argument.
WriteError()
WriteError() is the non-terminating cousin of ThrowTerminatingError(), and is also available as one of the members of the automatic $PSCmdlet variable in advanced functions.
It behaves similarly to its cousin in that it too hides the code that implements it and instead points back to the point where its parent function was called as the source point of the error.
This is often preferable when dealing with expected errors such as garbled input or arguments, or simple «could not find the requested item» errors in some cases.
$Exception = [Exception]::new("error message")
$ErrorRecord = [System.Management.Automation.ErrorRecord]::new(
    $Exception,
    "errorID",
    [System.Management.Automation.ErrorCategory]::NotSpecified,
    $TargetObject # usually the object that triggered the error, if possible
)
$PSCmdlet.WriteError($ErrorRecord)
Emit Errors Responsibly
There are no true hard-and-fast rules here.
If one solution works especially well for what you happen to be putting together, don’t let me deter you.
However, I would urge you to consider both the impact to your users as well as yourself or your team before selecting a single-minded approach to error creation.
Not all error scenarios are created equal, so it’s very rare that I would recommend using one type over all others.
WriteError() is generally preferred over its cmdlet form Write-Error, because it offers more control over how you emit the error.
Both tend to be used for expected and technically avoidable errors that occur, but the $PSCmdlet method has the additional benefit of not divulging implementation details unnecessarily.
If you expect the error to occur sometimes, I would generally advise using WriteError() unless the error’s presence significantly impairs your cmdlet’s ability to process the rest of its input, in which case I would use ThrowTerminatingError().
throw is generally nice as a quick way to trigger a try/catch block in your own code, but I would also recommend using it for: those truly unexpected errors, that last-ditch catch clause after several more specific catch blocks have been put in place and bypassed.
At this point, a final ending catch block that simply triggers a throw $_ call to re-throw the caught exception into the parent scope and quickly pass execution back to the caller.
It’s a very quick and very effective way to have the error be noticed, but should usually be kept internal to the function more than anything else, except in the last scenario mentioned.
Use of Write-Error -ErrorAction Stop may potentially also be substituted for that purpose if you personally prefer.
Thanks for reading!

Welcome to my Getting Started with Windows PowerShell series!
Why Handle Errors?
Error handling may take some extra time to create, however, it can really save you time in the long run. Let’s say you have a script that performs the following tasks:
-
Takes information from a database / file and stores it in $userAccounts
-
Uses a loop to perform processing on each $user in $userAccounts
-
Update a user’s AD information if the user is in the list
-
Disable any accounts that are not in the list
-
The script runs, and seems to be working great for a few weeks. Then, all of a sudden, the database server goes down, and $userAccounts is empty. The script runs, doesn’t see any users, and what likely happens next is all user accounts are deleted. While this example is a little extreme, it is something that can happen. There are also a lot of in-between cases that can make error handling worth it. It’s a good mindset to have when you’re writing scripts as you can write to incorporate it off the bat.
Errors in PowerShell
Errors in PowerShell are stored in the automatic variable $error. You can see how many errors you’ve encountered in your session by using:
$error.count

This is essentially an array of errors, to access the first value you can use:
$error[0]
Let’s take a look at $error[0] more closely, via:
$error[0] | Get-Member

We can view information on the command that raised the error via:
$error[0].InvocationInfo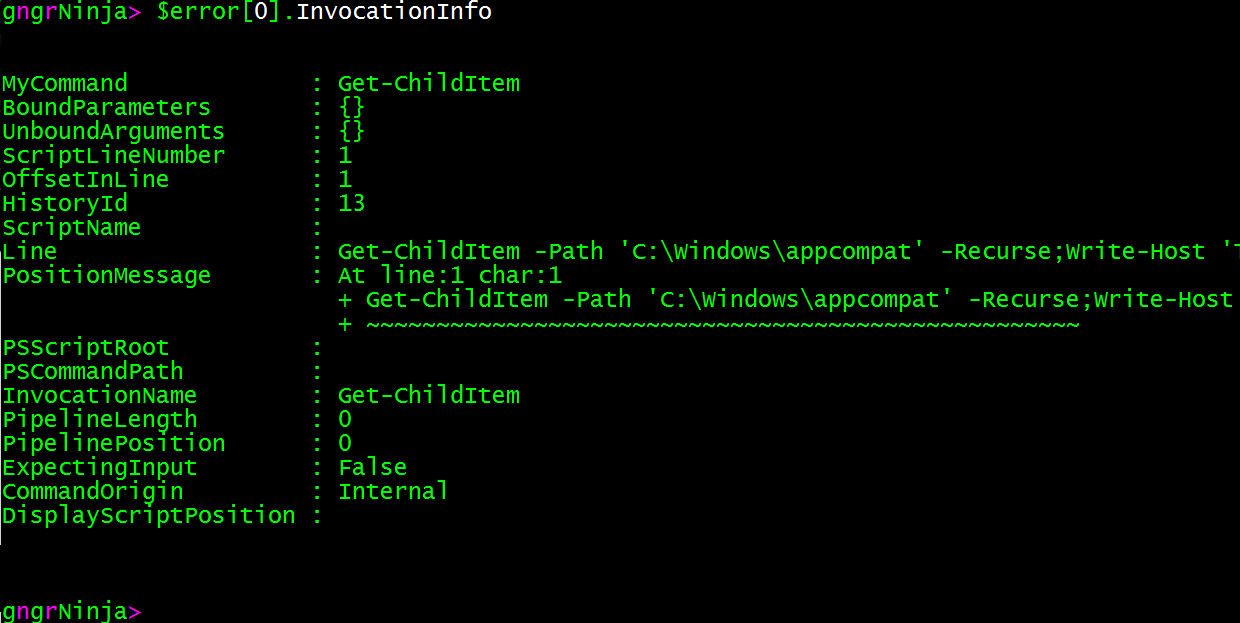
It looks like the line property contains the full command we used when the error was encountered.
$error[0].InvocationInfo.Line
The exception that raised the error can be accessed via:
$error[0].Exception
We can also get more information about the exception via:
$error[0].Exception | Get-Member
Here you can see the TypeName: [System.UnauthorizedAccessException], and the various methods and properties of the exception. The exception TypeName is used later when we catch specific errors.
Looks like to get the exception’s message in string format we’d use:
$error[0].Exception.Message
Now that we’ve dug into the automatic variable $error, let’s move on to the different types of errors we can encounter.
Terminating Errors
Terminating errors in PowerShell mean that the script can no longer continue to run with the information it has encountered, or has been given. If you do not have a way to catch the error, it will likely display the nasty red error text you’ve likely seen before. Terminating errors halt anything running in the pipeline. This terminates output, aside from the error message of the terminating error.
Here’s an example of a terminating error that was caused by calling a command that does not exist:
Get-TerminatingError
Non-Terminating Errors
Non-terminating errors in PowerShell do not stop the pipeline from executing. These errors are handled internally by the Cmdlet, and are not able to be captured via error handling. There are ways, however, to make PowerShell treat non-terminating errors like terminating errors. That way we can use error handling to capture what’s going on.
Here’s an example of a non-terminating error (access denied to a subfolder), when attempting to list all folders and subfolders in «C:Windowsappcompat».
Get-ChildItem -Path 'C:Windowsappcompat' -Recurse
Force Non-Terminating Errors to Terminate
You can force non-terminating errors to become terminating errors in PowerShell. There are a couple ways you can do this. Why would you want to do this, you ask? Since non-terminating errors cannot be handled by us, we need to force them to terminate, and gain the functionality of handling the error ourselves. This is not always needed, but it is good to know that you can do it if you come across a use case for yourself.
$errorActionPreference
You can do it at a global way for the session via the $ErrorActionPreference variable. This is a special variable in PowerShell that allows you to control what happens when a non-terminating error is encountered.
Here are the values for $ErrorActionPreference.
-
Stop
-
Display error, and stop execution.
-
-
Inquire
-
Display error, and ask to continue.
-
-
Continue (Default)
-
This is the default setting. Display error, then continue execution.
-
-
Suspend
-
This one is for workflows. A workflow job is suspended to investigate what happened, then the workflow can be resumed.
-
-
SilentlyContinue
-
No error is displayed, execution is continued.
-
Let’s see this in action.
Get-ChildItem -Path 'C:Windowsappcompat' -Recurse;Write-Host 'Test'
As you can see, with a non-terminating error, the next command in the sequence is executed. Therefore we see ‘Test’. Let’s set the $errorActionPreference automatic variable to Stop, and re-run the same command.
$ErrorActionPreference = 'Stop'
Get-ChildItem -Path 'C:Windowsappcompat' -Recurse;Write-Host 'Test'

Use the Command’s -ErrorAction Parameter
Cmdlet’s and functions/scripts/modules that use [cmdletbinding()] enable utilization of the -ErrorAction common parameter. This parameter allows you to specify different actions to take when an error is encountered.
-
Stop
-
Display error, and stop execution.
-
-
Inquire
-
Display error, and ask to continue.
-
-
Continue (Default)
-
This is the default setting. Display error, then continue execution.
-
-
Suspend
-
This one is for workflows. A workflow job is suspended to investigate what happened, then the workflow can be resumed.
-
-
SilentlyContinue
-
No error is displayed, execution is continued.
-
-
Ignore
-
The same as SilentlyContinue, but as SilentlyContinue still adds the message to the $error automatic variable, Ignore does not do this.
-
Let’s set our $errorActionPreference to Continue, and then look at using the Cmdlet Get-ChildItem‘s -ErrorAction parameter.
We’re setting $errorActionPreference back to Continue as earlier we set it to Stop for our other example. Continue is the default value.
$ErrorActionPreference = 'Continue'
Get-ChildItem -Path 'C:Windowsappcompat' -Recurse -ErrorAction Stop;Write-Host 'Test'
Error Handling
There are a few different ways to to handle errors in PowerShell. The best way of course, is to never let them happen in the first place! To do that, it is good to have some data validation in place via an if statement, or whichever method suites your needs.
If a terminating error occurs, we can use Try/Catch/Finally blocks to perform different actions. If it is non-terminating, we can force it to become a terminating error, and then choose how to continue.
Validation
The simplest method of validation is the if statement.
If you’d like to run these examples yourself, go ahead and fire up the PowerShell ISE. Save a file in C:PowerShell as part11.ps1.
An if statement is constructed as follows:
if (condition -eq $true) {

Do-Stuff

} else {

Do-Other-Stuff

}
The condition can be anything that resolves to a true value. That includes running a command that output (other than and error) occurs! Check this out:
if (Get-ChildItem Z: -ErrorAction SilentlyContinue) {

    Write-Host 'I can list the contents of Z:!'

} else {

    Write-Host 'I cannot list the contents of Z:!'

}

This does not return true, as expected, and thus we see the message from the code in the else portion of the if statement. We use the -ErrorAction common parameter with the value SilentlyContinue to suppress the error from being displayed to the end user of the script. No need in this case, as we’re simply using the command for validation.
You can also use variables with the if statement to see if they are blank.
$myVariable = $null

if ($myVariable) {

    Write-Host "We have information! Let's do stuff."

} else {

    Write-Host "`$myVariable is empty :("

}
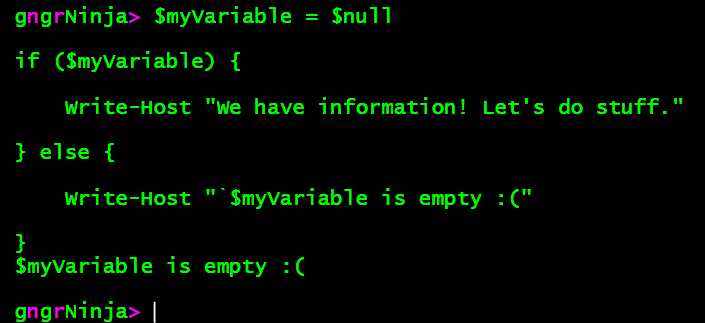
The variable is empty, so the code in the else portion of the if statement is executed.
Try/Catch/Finally
The Try, Catch, and Finally blocks in PowerShell allow us to capture terminating errors.
The Try block contains the code you’d like to execute, and catch any potential errors that happen.
The Catch block contains the code you’d like to execute after a terminating error has occurred. The current error will be accessible via the automatic variable $_.
The Finally block contains the code you’d like to run after the event has occurred. This is good for cleanup tasks.
It is worth noting that finally block is not required.
Here is an example using Try/Catch/Finally:
Try {

    $command = 'Invoke-FakeCommand'

    Write-Host "Attempting to run: [Invoke-Expression -Command $command]"`n

    Invoke-Expression -Command $command

}

Catch {

    Write-Host $_.Exception.Message`n

}

Finally {

    Write-Host "Clean up: `$commmand = `$null"`n

    $commmand = $null

}
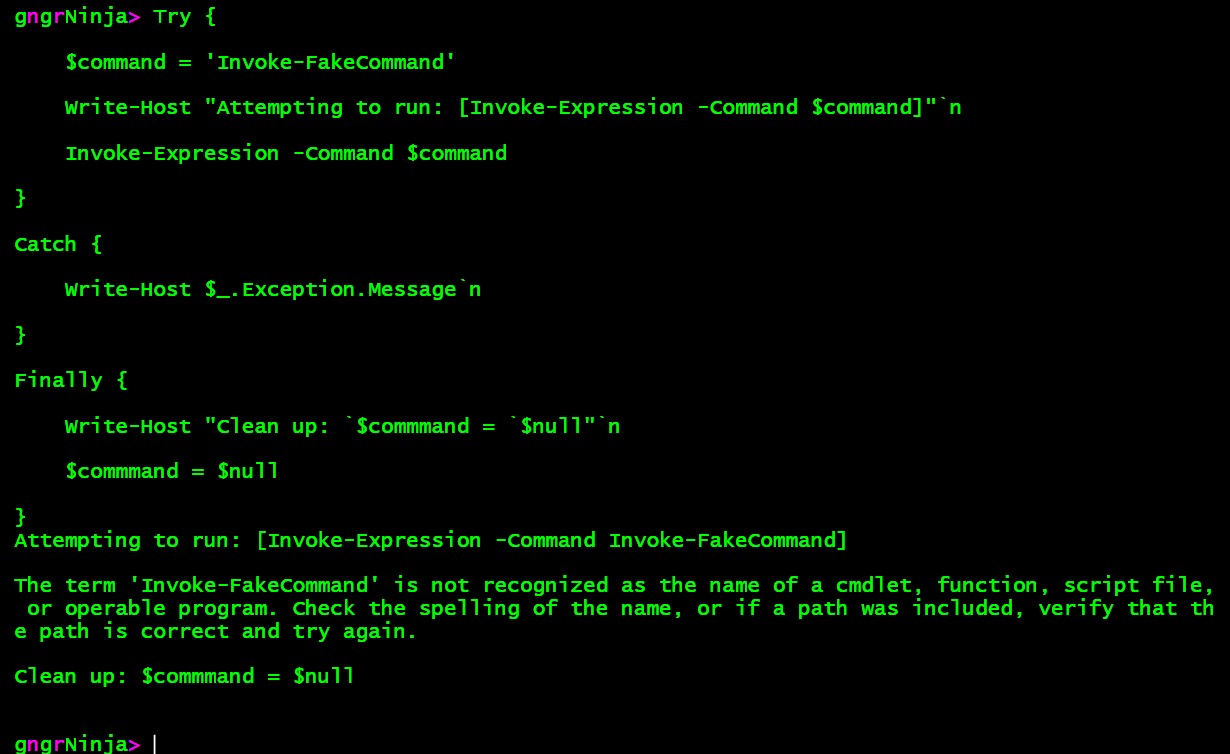
The code in the Try block executes and we see the output of Write-Host. We then see the error message that occurs, as our Catch block is writing out $_.Exception.Message. As we learned earlier, that is the string value of the exception that raised the error.
We then see the output from the Write-Host command in our Finally block. We use the finally block to free up the $command variable.
This version of Try/Catch will catch any terminating errors that are raised. To capture specific exceptions, you’ll want to use the exception’s TypeName.
Catch Specific Errors
Let’s take a look at the following:
Try {

    Get-ThisWontWork

}

Catch [System.Management.Automation.CommandNotFoundException] {

    Write-Host "Command not found!"`n -ForegroundColor Red
    Write-Host "Message: [$($_.Exception.Message)"] -ForegroundColor Red -BackgroundColor DarkBlue

}

The exception was caught, and the code in the Catch block was executed.
Now let’s try this…
Try {

    Get-ChildItem -Path Z: -ErrorAction Stop
    Get-ThisWontWork

}

Catch [System.Management.Automation.CommandNotFoundException] {

    Write-Host "Command not found!"`n -ForegroundColor Red
    Write-Host "Message: [$($_.Exception.Message)"] -ForegroundColor Red -BackgroundColor DarkBlue

}
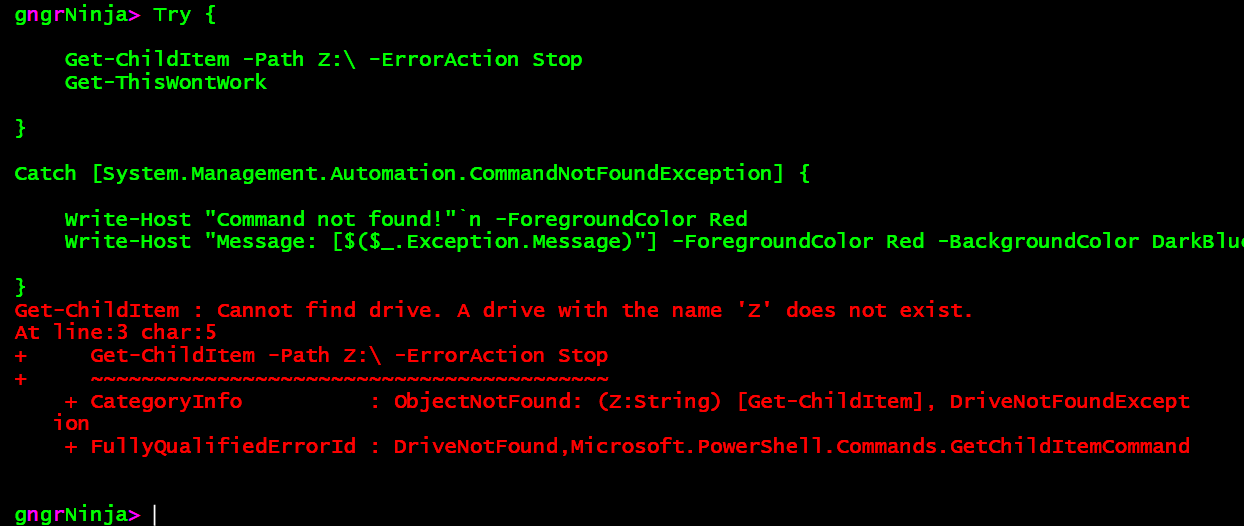
Ahh! An error that wasn’t handled! Luckily we can add multiple catch blocks.
Let’s add another Catch block.
Catch {

Write-Host $_.Exception.Message

}
Try { Get-ChildItem -Path Z: -ErrorAction Stop Get-ThisWontWork } Catch [System.Management.Automation.CommandNotFoundException] { Write-Host "Command not found!"`n -ForegroundColor Red Write-Host "Message: [$($_.Exception.Message)"] -ForegroundColor Red -BackgroundColor DarkBlue } Catch { Write-Host $_.Exception.Message }

Now the exception from Get-ChildItem command is caught since the catch-all Catch block code is executed.
Getting Error Information
It can be handy to have a shortcut that shows you error information, which you can use to create specific Catch blocks. To do this, I created a function that I call in the Catch block which utilizes some validation itself! Here is the function:
function Get-ErrorInformation {
    [cmdletbinding()]
    param($incomingError)

    if ($incomingError -and (($incomingError| Get-Member | Select-Object -ExpandProperty TypeName -Unique) -eq 'System.Management.Automation.ErrorRecord')) {

        Write-Host `n"Error information:"`n
        Write-Host `t"Exception type for catch: [$($IncomingError.Exception | Get-Member | Select-Object -ExpandProperty TypeName -Unique)]"`n

        if ($incomingError.InvocationInfo.Line) {

            Write-Host `t"Command                 : [$($incomingError.InvocationInfo.Line.Trim())]"

        } else {

            Write-Host `t"Unable to get command information! Multiple catch blocks can do this :("`n

        }

        Write-Host `t"Exception               : [$($incomingError.Exception.Message)]"`n
        Write-Host `t"Target Object           : [$($incomingError.TargetObject)]"`n

    }

    Else {

        Write-Host "Please include a valid error record when using this function!" -ForegroundColor Red -BackgroundColor DarkBlue

    }

}
Here is the full code I’ll be running for this example:
function Get-ErrorInformation {
    [cmdletbinding()]
    param($incomingError)

    if ($incomingError -and (($incomingError| Get-Member | Select-Object -ExpandProperty TypeName -Unique) -eq 'System.Management.Automation.ErrorRecord')) {

        Write-Host `n"Error information:"`n
        Write-Host `t"Exception type for catch: [$($IncomingError.Exception | Get-Member | Select-Object -ExpandProperty TypeName -Unique)]"`n

        if ($incomingError.InvocationInfo.Line) {

            Write-Host `t"Command                 : [$($incomingError.InvocationInfo.Line.Trim())]"

        } else {

            Write-Host `t"Unable to get command information! Multiple catch blocks can do this :("`n

        }

        Write-Host `t"Exception               : [$($incomingError.Exception.Message)]"`n
        Write-Host `t"Target Object           : [$($incomingError.TargetObject)]"`n

    }

    Else {

        Write-Host "Please include a valid error record when using this function!" -ForegroundColor Red -BackgroundColor DarkBlue

    }

}

Try {

    Get-ChildItem -Path Z: -ErrorAction Stop

    Get-ThisWontWork

}

Catch [System.Management.Automation.CommandNotFoundException] {

    Write-Host 'Command not found Catch block executed!'

}

Catch {

   Get-ErrorInformation -incomingError $_

}

So now, if we wanted to catch this exception on it’s own, we would need to add a catch block for [System.Management.Automation.DriveNotFoundException].
Catch [System.Management.Automation.CommandNotFoundException] {

Write-Host 'Command not found Catch block executed!'

}
Let’s add that to our code and run the following:
function Get-ErrorInformation {
    [cmdletbinding()]
    param($incomingError)

    if ($incomingError -and (($incomingError| Get-Member | Select-Object -ExpandProperty TypeName -Unique) -eq 'System.Management.Automation.ErrorRecord')) {

        Write-Host `n"Error information:"`n
        Write-Host `t"Exception type for catch: [$($IncomingError.Exception | Get-Member | Select-Object -ExpandProperty TypeName -Unique)]"`n

        if ($incomingError.InvocationInfo.Line) {

            Write-Host `t"Command                 : [$($incomingError.InvocationInfo.Line.Trim())]"

        } else {

            Write-Host `t"Unable to get command information! Multiple catch blocks can do this :("`n

        }

        Write-Host `t"Exception               : [$($incomingError.Exception.Message)]"`n
        Write-Host `t"Target Object           : [$($incomingError.TargetObject)]"`n

    }

    Else {

        Write-Host "Please include a valid error record when using this function!" -ForegroundColor Red -BackgroundColor DarkBlue

    }

}

Try {

    Get-ChildItem -Path Z: -ErrorAction Stop

    Get-ThisWontWork

}

Catch [System.Management.Automation.CommandNotFoundException] {

    Write-Host 'Command not found Catch block executed!'

}

Catch [System.Management.Automation.DriveNotFoundException] {

    Write-Host 'Get-ChildItem drive not found Catch block executed!'

}

Catch {

   Get-ErrorInformation -incomingError $_

}

There we go! Now all our errors are handled, minus the ones we don’t know about yet.
Homework
-
Figure out why when multiple Catch blocks are used, it doesn’t pass along the execution information (unable to get command/line).
-
Let me know why this is!
-
-
Where else could I have added error handling in any of these examples?
I hope you’ve enjoyed the series so far! As always, leave a comment if you have any feedback or questions!
-Ginger Ninja
[Back to Top]