We love streaming online, especially on our favorite online streaming platforms. YouTube streaming can sometimes be hassling. One of the most popular and a common error is playback ID error Google chrome can be quite annoying when we concentrating on our favorite scenes of the videos that are streaming on YouTube.

As mentioned earlier, it is the common error generally occurs on these popular streaming platforms and the websites.
You don’t need an expert to resolve this Playback ID error Google Chrome, or even you don’t have to be a tech professional to fix these errors. It is quite easy; you can easily solve it with the help of basic computer and internet knowledge. Every internet and the movie lover will be using these online streaming channels, especially YouTube. It is for any generation works on almost all the operating systems and the platforms.
We use YouTube for various streaming purposes and of course on a daily basis. The website has billions of users logging in at the same time, same day and the same minute. Streaming the contents on YouTube is completely free. However, the features of the YouTube platform is quite great, but even this platform can cross paths with the Playback ID Error Google Chrome. You can simply fix these issues with the help of simple methods.
YouTube cannot be watched or view with these kinds of browser errors; it is quite disturbing. You can try some of these to fix the playback ID error on Google Chrome.
You can also read: Chrome installation failure
1. Clear Browsing Data
Yes, this is one of the popular methods that is tried or applied when there is an issue with the browser or with the website that you are trying to access. When you clean and clear the browsing history or the caches, you will see that the browser’s performance has been indeed improved and have become better.
Usually, this memory or the browser clearance solves the software or the browser issue altogether. You just have to enter the chrome settings, go to history and clear them all. You will also see the advanced settings in the same page- just click it, you will see clear browsing data option- just click over it and there you go, your Chrome is now clear.
2. Update Chrome browser
Being updated is the necessity in today’s tech era. If we don’t update our mobile apps that may generally cause glitches with the apps and its features too. Same is the case with the browser (any browser) when you don’t update the browsers timely.
Sometimes, your browser may have some bugs that are probably causing an error when you are streaming online. Hence, updating the browser regularly will help you to remove all the bugs and the errors that are associated with it. Make sure that your Google chrome browser is up-to-date.
3. Uninstall/Reinstall Chrome
Not just updating, you can also try uninstalling the Google Chrome browser and again reinstalling it. If the above-mentioned methods don’t work, you can try with uninstalling and reinstalling the Google Chrome once again. It would be a fresh or a refreshing setup for your computer system ultimately. This can be another solution to fix the Playback ID Error Google chrome.
Playback ID error is now resolved!
You can now resolve the playback ID error with the help of the above-mentioned methods. These are some common methods that are generally preferred even by the top techs. It is quite simple and easy to perform. As mentioned- you ultimately don’t have to be a tech expert. Just try these methods, of course, there are other certain solutions to help you with the fix. You can also refer to other methods if these don’t work for you.
Содержание
- Ошибка воспроизведения аудио Перезагрузите компьютер в YouTube — как исправить?
- Способы решения проблемы «Ошибка воспроизведения аудио» в YouTube
- Видео
- Ошибка воспроизведения на Youtube? 5 Решения, которые вы можете попробовать исправить эту ошибку.
- Метод 1: выйдите из своей учетной записи Google на Youtube
- Метод 2: сбросьте настройки маршрутизатора
- Метод 3: удалите Youtube, затем переустановите его
- Метод 4: обновите прошивку маршрутизатора
- Метод 5: изменить DNS-адрес
- Ошибка идентификатора воспроизведения (Playback ID Error) в YouTube
- Что вызывает ошибку «YouTube: ошибка идентификатора воспроизведения»?
- Ошибка идентификатора воспроизведения YouTube – решения
- Очистите файлы cookie и кеш браузера и приложения YouTube
- Приложение YouTube. (Android, iOS.)
- Отключить расширение AdBlock
- Перезагрузите модем или маршрутизатор
- Очистить кеш DNS
- Установите адреса публичных DNS-серверов Google.
- Установите качество видео на Авто
- Включить / отключить автозапуск
Ошибка воспроизведения аудио Перезагрузите компьютер в YouTube — как исправить?
 Иногда при просмотре видео на YouTube вы можете столкнуться с ошибкой: «Ошибка воспроизведения аудио. Перезагрузите компьютер» или, на английском: Audio renderer error. Please restart your computer.
В этой инструкции подробно о том, как исправить ошибку воспроизведения аудио в YouTube на черном экране и что можно попробовать сделать, чтобы проблема не появлялась в дальнейшем. Решения подойдут для Windows 11 и Windows 10, независимо от того, используете вы Google Chrome или какой-либо другой браузер.
Способы решения проблемы «Ошибка воспроизведения аудио» в YouTube

Сам YouTube в сообщении об ошибке предлагает «Перезагрузите компьютер». Действительно, перезагрузка обычно помогает. Но, если ошибка появляется часто, выполнять каждый раз перезагрузку — не самое удобное решение. Далее перечислены способы исправить ошибку воспроизведения аудио без перезагрузки:
- Закройте браузер, в котором возникла ошибка. Нажмите клавиши Win+R на клавиатуре (или правый клик по кнопке «Пуск» — «Выполнить»), введите команду mmsys.cpl в окно «Выполнить» и нажмите Enter. Выберите устройство воспроизведения по умолчанию и нажмите кнопку «Свойства». На вкладке «Дополнительно» снимите обе отметки в разделе «Монопольный режим» и примените настройки.

- Если в окне настроек устройства воспроизведения есть вкладки, отвечающие за дополнительные эффекты и пространственный звук, отключите все эффекты такого рода.
- Если ошибка до недавнего времени не возникала, попробуйте откатить драйвер звуковой: нажмите правой кнопкой мыши по кнопке «Пуск» и выберите пункт «Диспетчер устройств». В разделе «Звуковые, игровые и видеоустройства» дважды нажмите по вашей звуковой карте, например — Realtek Audio и посмотрите, активна ли кнопка «Откатить» на вкладке «Драйвер». Если да, используйте её и проверьте, будет ли снова появляться ошибка после отката.
- Для однократного исправления ошибки воспроизведения аудио без перезагрузки можно использовать следующий метод: закройте браузер, нажмите клавиши Win+R, введите services.msc и нажмите Enter. В списке служб найдите «Windows Audio», нажмите правой кнопкой мыши по имени службы и выберите пункт «Перезапустить» в контекстном меню. Снова откройте видео после перезапуска службы.
- Попробуйте выполнить отключение аппаратного ускорения в браузере.
- Можно попробовать использовать автоматическое устранение неполадок со звуком (правый клик по значку динамика в области уведомлений — устранение неполадок), но оно редко помогает.


Это базовые варианты, которые обычно помогают в решении проблемы. Но не всегда. Если ошибка продолжает появляться или не была исправлена, обратите внимание на следующие нюансы и возможные подходы:
- Попробуйте вручную установить оригинальный драйвер на звук, скачав его с сайта производителя материнской платы или ноутбука именно для вашей модели устройства (даже если драйвер предназначен для одной из предыдущих версий ОС, а не для Windows 11 и 10).
- Если вы используете драйверы ASIO (ASIO4ALL), на вкладке «Audio» выставьте те же параметры частоты, что и на вкладке «Дополнительно» в свойствах выходного аудиоустройства в устройствах записи и воспроизведения.
- Если на компьютере используется какое-либо ПО для добавления эффектов к воспроизводимому звуку, выравнивания громкости, программные микшеры — всё это потенциально может приводить к рассматриваемой ошибке.
- Попробуйте очистить кэш браузера. В Google Chrome это можно сделать, перейдя на страницуСпособы очистки для других браузеров в статье Как очистить кэш браузера.
Видео
Надеюсь, одно из предложенных решений подойдет в вашем случае и позволит избежать проблемы в дальнейшем.
Источник
Ошибка воспроизведения на Youtube? 5 Решения, которые вы можете попробовать исправить эту ошибку.
Playback Error Youtube
Если вы не можете воспроизвести видео Youtube на своем iPhone и возникла ошибка «Ошибка воспроизведения. Нажмите, чтобы повторить попытку», воспользуйтесь описанными здесь методами, чтобы решить проблему. После этого вам следует снова посмотреть видео. Есть 5 решений, которые вы можете попробовать. Возможно, вам не придется пробовать их все; просто двигайтесь вниз по списку, пока (& hellip;)

Если вы не можете воспроизвести видео Youtube на своем iPhone и возникла ошибка «Ошибка воспроизведения. Нажмите, чтобы повторить попытку», воспользуйтесь описанными здесь методами, чтобы решить проблему. После этого вам следует снова посмотреть видео.
Есть 5 решений, которые вы можете попробовать. Возможно, вам не придется пробовать их все; просто продвигайтесь вниз по списку, пока не найдете тот, который работает.
Метод 1: выйдите из своей учетной записи Google на Youtube
Если вы вошли в Youtube с помощью своей учетной записи Google, выйдите из системы и попробуйте снова использовать Youtube. Он работает, если проблема была вызвана проблемной учетной записью Google.
Метод 2: сбросьте настройки маршрутизатора
Попробуйте перезагрузить маршрутизатор, и это может сработать для вас.
Метод 3: удалите Youtube, затем переустановите его
Если с приложением Youtube что-то не так, проблема может возникнуть. Итак, чтобы решить проблему, вы можете попробовать удалить его, а затем переустановить.
Метод 4: обновите прошивку маршрутизатора
Многие пользователи iPhone сообщили, что им помогает обновление прошивки роутера. Так что стоит попробовать этот метод. Что касается обновления прошивки маршрутизатора, вам необходимо проверить модель модема, после чего вы сможете найти подробные инструкции на веб-сайте производителя маршрутизатора.
Метод 5: изменить DNS-адрес
Следуйте инструкциям ниже:
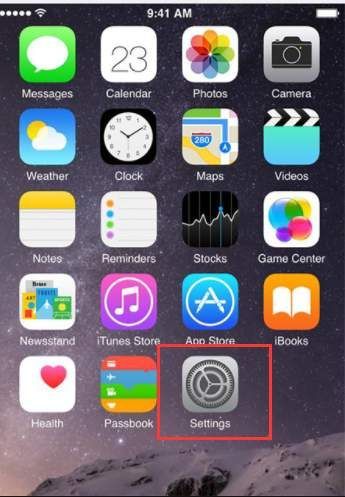
1. Нажмите на Настройки .
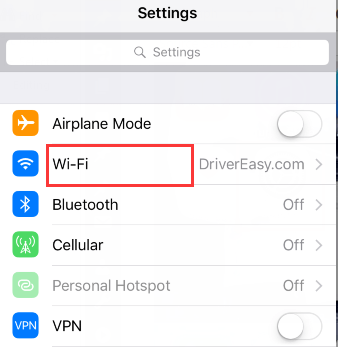
2. Нажмите на Вай-фай . (Убедитесь, что у вашего iPhone есть доступ к вашей сети Wi-Fi.)
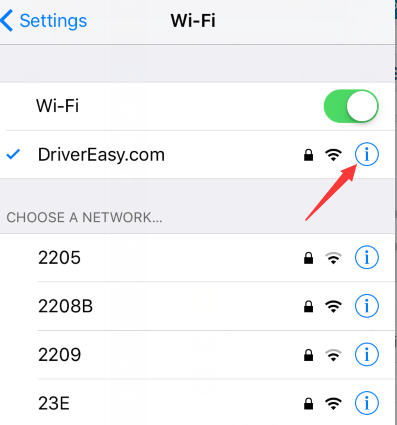
3. Нажмите на значок информации, как показано на скриншоте ниже.
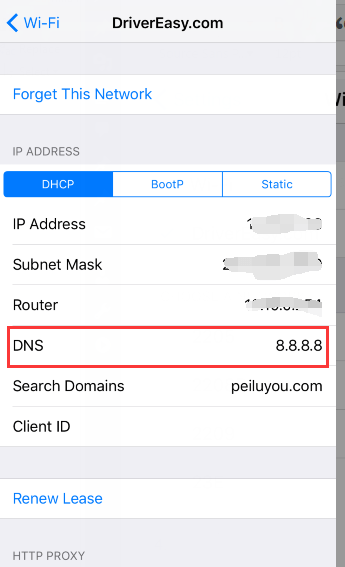
4. Измените DNS к 8.8.8.8 .
Методы надежды здесь помогут вам решить проблему с видео на YouTube, которое не воспроизводится.
Источник
Ошибка идентификатора воспроизведения (Playback ID Error) в YouTube
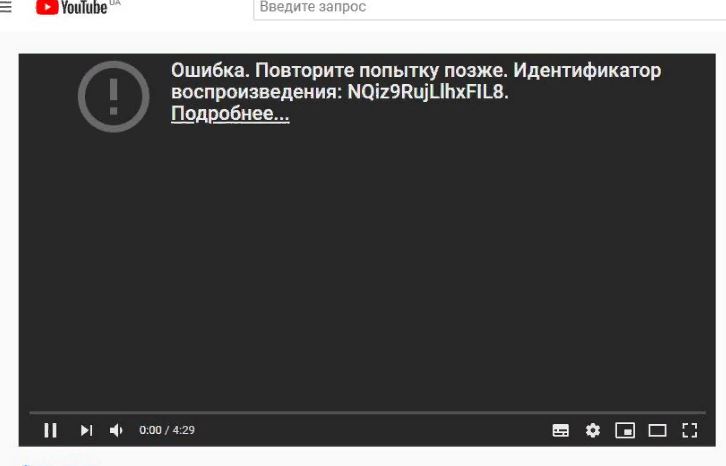
Несомненно, YouTube стал самым предпочтительным сервисом потокового видео для большинства людей. И почему бы и нет, YouTube – это бесплатная онлайн-платформа для обмена видео. Значит, любой желающий может бесплатно создавать и загружать видео на YouTube. Тем не менее, воспроизведение видео на YouTube не так безупречно, как кажется. В последнее время многие пользователи сталкиваются с ошибкой идентификатора воспроизведения или Playback ID Error в YouTube. Каждый раз, когда пользователь воспроизводит видео, появляется черный экран с этим сообщением об ошибке:
У некоторых пользователей эта ошибка возникает в нескольких видео, но большинство пользователей сталкивались с этой проблемой во всех видео. Что ж, ошибка воспроизведения на YouTube может возникать в ОС Android, iOS, iPad, а также на Windows и Mac. Даже некоторые пользователи сообщают об ошибке воспроизведения YouTube по телевизору.
Что вызывает ошибку «YouTube: ошибка идентификатора воспроизведения»?
Судя по отчетам пользователей в Справочном сообществе YouTube, у этой ошибки нет единой причины. Хотя, согласно моему исследованию, мне удалось найти несколько распространенных сценариев, которые могут вызвать эту ошибку на YouTube.
Проблема с браузером – если ошибка воспроизведения возникает особенно в определенном браузере. Тогда возможно, что в вашем браузере отсутствуют некоторые важные файлы или он поврежден. Это также может произойти из-за некорректных кэшированных данных. Все мы ежедневно посещаем тонны новых веб-сайтов. И не все сайты безопасны, поэтому вполне возможно, что вы стали жертвой инструмента угонщика браузера. Что ж, в этом случае чистая переустановка может исправить эту ошибку.
Динамическая IP-конфигурация (проблема ISP) – IP-адреса, назначенные интернет-провайдерами, являются динамическими IP-адресами. Потому что это более выгодно для провайдера и для вас. Динамические IP-адреса постоянно меняются при каждом подключении к Интернету. И, возможно, YouTube сочтет это подозрительным и покажет вам ошибку. Вы можете попросить своего интернет-провайдера предоставить статический IP-адрес или просто обновить конфигурацию сети, перезапустив маршрутизатор или модем.
Проблема, связанная с DNS. Система доменных имен – это, по сути, телефонная книга Интернета. И, если кеш DNS Resolver хранит данные, это может мешать исходящим соединениям. Тогда также YouTube показывает эту ошибку.
Есть еще одна проблема, связанная с DNS, которая может вызвать эту конкретную ошибку. Если ваш интернет-провайдер по умолчанию назначил автоматический DNS. Затем изменение его на общедоступный DNS Google для вашего соединения может исправить эту ошибку.
Определенно, есть еще много причин, которые нужно упомянуть. Но я думаю, вам интересно узнать решение, а не читать о причинах. Итак, в этой статье я добавляю все возможные решения, чтобы исправить ошибку «YouTube: ошибка идентификатора воспроизведения».
Ошибка идентификатора воспроизведения YouTube – решения
Очистите файлы cookie и кеш браузера и приложения YouTube
Прежде чем перейти к шагам по очистке кеша и файлов cookie. Сначала попробуйте воспроизвести видео с YouTube в другом браузере. Потому что, если видео с YouTube нормально воспроизводятся в других браузерах, проблема определенно связана с самим браузером. И, если ошибка сохраняется в других браузерах, проблема связана с вашим интернет-соединением.
Как я уже упоминал ранее, поврежденные кэшированные данные в вашем браузере могут стать настоящей проблемой. И, независимо от того, какое устройство вы используете, вам следует очищать файлы кеша один раз в месяц.
Рекомендуется – в качестве альтернативы я бы посоветовал вам полностью удалить браузер и установить последнюю версию этого браузера.
Хром
1. В браузере Chrome щелкните значок ⋮ (три вертикальные точки).
2. После этого перейдите в Дополнительные инструменты> Очистить данные просмотров.
(Или вы можете нажать сочетание клавиш Ctrl + Shift + Delete.)
3. Выберите «Все время» во временном диапазоне, а затем нажмите «Очистить данные».
Microsoft Edge
1. Щелкните значок с тремя точками по горизонтали> Настройки.
2. Щелкните «Конфиденциальность и безопасность»> «Выбрать, что очистить».
3. Выберите История просмотров, Файлы cookie, Кэшированные данные и файлы. (Вы можете оставить все остальное неотмеченным.)
И нажмите Очистить.
Fire Fox
1. Нажмите Ctrl + Shift + Delete.
2. Выберите «Все» во временном диапазоне.
3. Убедитесь, что в разделе «История» выбраны все параметры, нажмите «ОК» для подтверждения.
Сафари
1. Щелкните Safari в строке меню, затем щелкните «Настройки».
2. Щелкните вкладку «Конфиденциальность»> «Управление данными веб-сайта».
3. Подождите, пока появятся все данные, нажмите «Удалить все».
4. После этого нажмите «Удалить сейчас» для подтверждения.
После очистки кеша и файлов cookie перезапустите браузер и проверьте, произошла ли ошибка YouTube. Устранена ошибка идентификатора воспроизведения.
Приложение YouTube. (Android, iOS.)
Если ошибка воспроизведения возникает в приложении YouTube. Затем вы можете попробовать очистить кеш приложения в настройках. Если вы являетесь пользователем iPhone или iPad, удалите приложение со своего устройства. И переустановите из App Store.
Для пользователей Android.
1. Перейдите в «Настройки Android»> «Приложения и уведомления»> «Просмотреть все приложения».
2. Нажмите на приложение YouTube> Хранилище и кэш.
3. Нажмите Очистить кеш.
4. После этого нажмите Очистить хранилище> Нажмите ОК для подтверждения.
Измените учетную запись Google или войдите снова
Это странно, но, по мнению многих пользователей, после изменения учетной записи Google ошибка автоматически устраняется. Хорошо, если у вас нет дополнительной учетной записи Google. Если вы являетесь премиум-участником YouTube, вы можете выйти и снова войти, чтобы исправить это.
1. На сайте YouTube нажмите значок изображения профиля и затем нажмите «Выйти».
2. Теперь просто войдите снова, используя те же учетные данные Google, чтобы смотреть видео на YouTube. Если это не сработает, попробуйте другую учетную запись Google.
Отключить расширение AdBlock
Это наиболее частая причина ошибки. Если вы используете расширение, которое блокирует рекламу на YouTube. Тогда вам следует немедленно прекратить его использование. Microsoft недавно подтвердила, что ошибка воспроизведения была вызвана конфликтом между браузером Microsoft Edge и расширением AdBlock. То же самое относится и к браузеру Chrome. Итак, какое бы расширение AdBlock вы ни установили, отключите его. Что ж, я предлагаю вам отключить все сторонние расширения, чтобы выяснить виновника.
В браузере Chrome, открыв следующий адрес, вы можете управлять всеми установленными расширениями.
chrome://extensions/
Вы можете отключить расширение или полностью удалить его.
В Microsoft Edge щелкните значок с тремя горизонтальными точками, затем щелкните Расширения. (Отсюда вы можете управлять всеми расширениями.)
Пользователи Firefox могут нажимать Ctrl + Shift + сочетание клавиш для управления надстройками (расширениями). Или просто откройте следующий адрес.
about:addons
Перезагрузите модем или маршрутизатор
Что ж, если переустановка браузера, удаление расширения и изменение учетной записи Google не работают для вас. Затем, чтобы исправить ошибку идентификатора воспроизведения YouTube, вы можете попробовать перезапустить маршрутизатор. Также убедитесь, что ваш Интернет работает. Маршрутизатор – это своего рода мини-компьютер, ну на самом деле это сетевое устройство. Есть два способа перезапустить роутер.
1. Маршрутизатор и модем поставляются с кнопкой питания на задней панели. Вы можете нажать эту кнопку, чтобы выключить маршрутизатор и модем. (А другой способ – просто выключить маршрутизатор и модем.)
Примечание. Не нажимайте кнопку сброса. Потому что эта кнопка может сбросить все ваши сетевые настройки, такие как перенаправленные порты, подробности сетевого журнала, пользовательские настройки и т. д.
2. После того, как вы выключите маршрутизатор и модем, подождите 10 секунд, чтобы все конденсаторы полностью разрядились.
3. Через 10 секунд перезагрузите маршрутизатор, нажав ту же кнопку питания. Подождите, пока заработает Интернет, а затем попробуйте воспроизвести видео YouTube, чтобы узнать, устранена ли ошибка или нет.
Очистить кеш DNS
Без сомнения, очистка кеша DNS может решить множество проблем, связанных с браузером. Многие пользователи сообщают, что после очистки кеша браузера и очистки кеша DNS ошибка была немедленно устранена. Это конкретное решение полезно, когда ошибка появляется в каждом браузере.
Система доменных имен означает DNS. Кэш DNS – это временное хранилище информации о предыдущих поисках DNS в веб-браузере. Сохранение локальной копии поиска DNS помогает браузеру быстро разрешить адрес сайта. И когда вы очищаете DNS, все записи DNS в кеше становятся недействительными. Таким образом, компьютер повторно выбирает новые комбинации.
Вот как можно очистить кеш DNS. И может исправить «Произошла ошибка. Пожалуйста, повторите попытку позже. (Идентификатор воспроизведения 🙂 ».
1. Нажмите кнопку «Пуск», найдите CMD. И откройте командную строку от имени администратора.
Появится окно UAC, нажмите Да.
2. Когда откроется командная строка, введите следующую команду и нажмите клавишу ВВОД.
ipconfig/flushdns
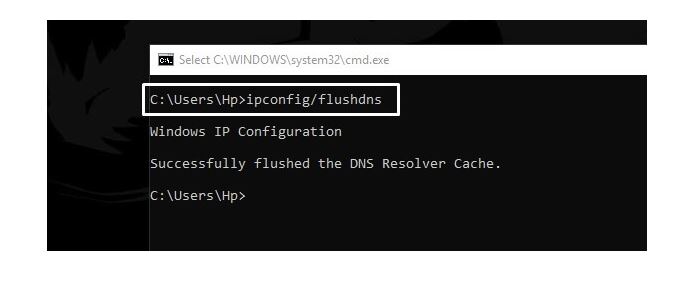
Вот и все, теперь вы получите сообщение “Successfully flushed the DNS Resolver Cache“.
Установите адреса публичных DNS-серверов Google.
Большинство интернет-провайдеров использует протокол динамической конфигурации хоста (DHCP) для автоматической настройки DNS. Поэтому, изменив его на адреса общедоступных DNS-серверов Google, возможно, можно навсегда решить эту проблему. Если ваш интернет-провайдер предоставил адрес DNS-сервера, запишите его на листе бумаги.
1. Нажмите клавиши Windows + R, чтобы открыть диалоговое окно «Выполнить».
Введите в нем ncpa.cpl и нажмите клавишу ввода, чтобы открыть окно сетевого подключения панели управления.
Открытые сетевые подключения
2. Теперь выберите активное интернет-соединение, которое вы хотите настроить, и щелкните его правой кнопкой мыши. И затем щелкните по свойствам. (Я использую Ethernet в качестве основного подключения к Интернету, поэтому я меняю его общедоступные адреса DNS-серверов.)
3. Теперь выберите «Протокол Интернета версии 4 (TCP / IPv4)» и щелкните свойства.
4. В окне «Свойства» выберите «использовать следующие адреса DNS-серверов». И введите следующие данные.
Предпочтительный DNS-сервер: 8.8.8.8
Альтернативный DNS-сервер: 8.8.4.4
Адреса DNS-серверов Google IPv4
После этого нажмите ОК.
5. Теперь прокрутите вниз в окне свойств Ethernet / Wi-Fi, выберите «Протокол Интернета версии 6 (TCP / IPv6)», нажмите «Свойства».
Теперь повторите шаг 4 и на этот раз введите следующие данные.
Предпочтительный DNS-сервер: 2001: 4860: 4860 :: 8888
Альтернативный DNS-сервер: 2001: 4860: 4860 :: 8844
Адреса DNS-серверов Google IPv6
Теперь откройте браузер и загрузите видео YouTube, которое раньше показывало ошибку идентификатора воспроизведения.
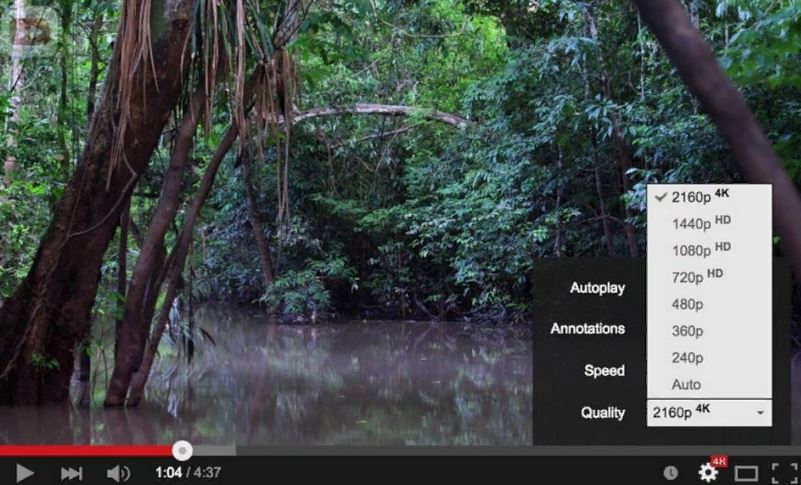
Установите качество видео на Авто
На YouTube вы можете транслировать контент в разрешении 8K. И, как правило, YouTube устанавливает качество видео в зависимости от доступной скорости Интернета. Но, если вы хотите вручную настроить качество видео на более высокое разрешение. И, если у вас нет такой большой пропускной способности интернета для загрузки видео. Тогда YouTube может пройти через ошибку без непрерывной загрузки видео. Итак, чтобы исправить это, просто уменьшите качество видео или установите его на Авто.
Включить / отключить автозапуск
Я не знаю, как работает это решение. Но многие пользователи сообщают, что после включения функции автозапуска ошибка была устранена. Итак, щелкните значок настроек, а затем включите «Автозапуск». После этого обновите страницу YouTube. Надеюсь, теперь ошибка будет решена.
Итак, это решения, которые вы можете попробовать исправить ошибку воспроизведения. Если какое-либо решение сработало для вас, сообщите нам об этом в разделе комментариев. И, если вы нашли другое решение, то также можете оставить комментарий.
Источник
It isn’t uncommon for browsers to stall at times when opening a specific website, rendering an image, or playing a video. A common error one may see during video playback in the Chrome browser is «The media could not be loaded, either because the server or network failed or because the format is not supported«.
The error stems from your browser rather than the website where you’re trying to watch the video. Here, we have compiled a list of fixes you can use to resolve the issue if you are experiencing the same problem.
1. Rule Out Internet Issues
First, rule out internet issues. Try playing anything else on the same browser to see if it works. In cases where the culprit is the internet, restarting the router, reconnecting the internet, or contacting the ISP for major connectivity issues will fix the problem.
Start implementing the below fixes when it is not an internet issue and only occurs on one web page.
2. Rule Out Server Issues
The error could be caused by a problem with the server on which the video you’re playing is hosted. Therefore, you must rule out this possibility.
For that, open a different browser on your device and play the video there. If the video fails to play, you can try to play it on another device (if you have one) instead. It is most likely a server-side issue if you encounter the same error on other browsers and devices.
There is nothing you can do about server-related issues. Therefore, you’ll have to wait until the problem is resolved.
3. Refresh the Webpage
Refresh the webpage where you’re seeing this error. Give the video a fresh start after refreshing. If the error persists after refreshing the webpage and restarting the video, it may be more severe and require further investigation. Continue with the rest of the fixes in that case.
4. Change Your DNS Server
You may also encounter the «the media could not be loaded» error because of restrictions from your ISP. This is more likely to happen if you’re using Wi-Fi in a library or college, where administrators might have imposed restrictions.
You need to change your DNS server to eliminate this possibility. If you’re using a device running Windows, it’s easy to change DNS servers on Windows 11. And those on macOS are able to change their DNS settings on a Mac just as easily.
5. Update Chrome
An outdated browser can often lead to the issue in question. Consequently, if you keep the Chrome auto-update setting disabled, it might be time to activate it and update your browser manually.
- If you are unsure if your browser is updated, click on the three vertical dots in Chrome’s top-right corner.

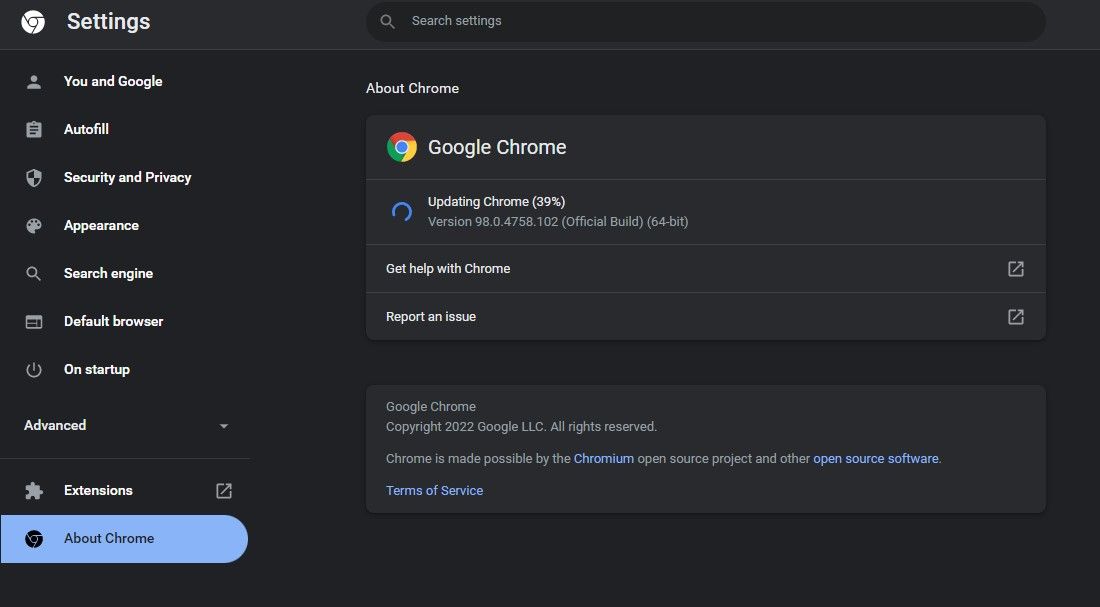
- Navigate to Help > About Google Chrome.
- If the browser isn’t updated with the auto-updates not turned off, it will automatically search for available updates and update itself to the latest version.

- Enable Chrome auto-updates to prevent the same issue from occurring again. If Chrome is already on the latest version, you will see a message saying, «Chrome is up to date.»


The message ensures that outdated Chrome wasn’t causing the trouble. The next step would be to check whether you’re accessing the video on the webpage using a VPN.
6. Disable or Enable Your VPN
Even though VPNs protect your privacy, they can sometimes impede your browsing experience. So, if you’re accessing the video while the VPN is enabled on your browser, disable it. This fix also works the other way around, so you can access the video by using a VPN if you weren’t using one before.
Sometimes, access to specific media embeds is restricted from certain locations. Using a VPN connection will eliminate this possibility. When disabling or enabling the VPN fails to fix the problem, it’s time to clear the browser’s cache and history.
7. Clear Your Browser’s Cache and History
The cached data speeds up the loading of webpages by storing some on-site elements from the previous visit. However, it piles up when left unchecked and adversely impacts browser performance. Hence, it is imperative to clear the cache to prevent cache inference.
To clear Chrome’s cache and history, follow these steps:
- Press CTRL + H to open Chrome’s History page.
- Click on Clear browsing data on the left-sidebar.
- Check the boxes for Browsing history, Cookies and other site data, and Cached images and files.
- Hit the Clear data button.

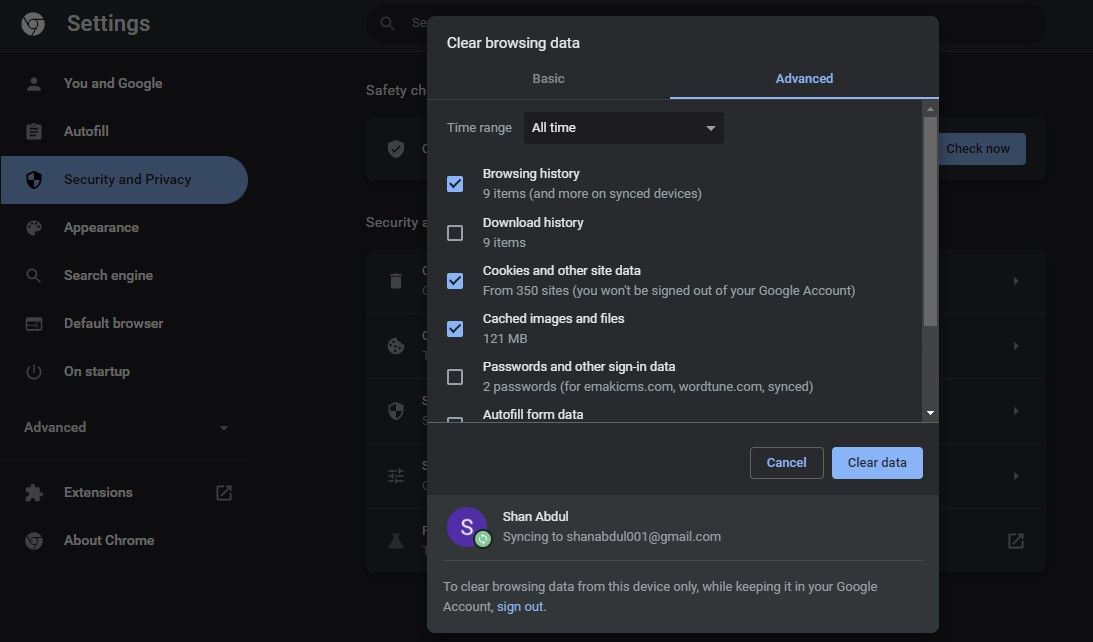
It is also possible to clear history in other browsers similarly. After clearing it, access the video on the webpage again. Is the error persisting? If so, the next step is to disable the ad-blockers.
8. Check for Profile-Specific Issues
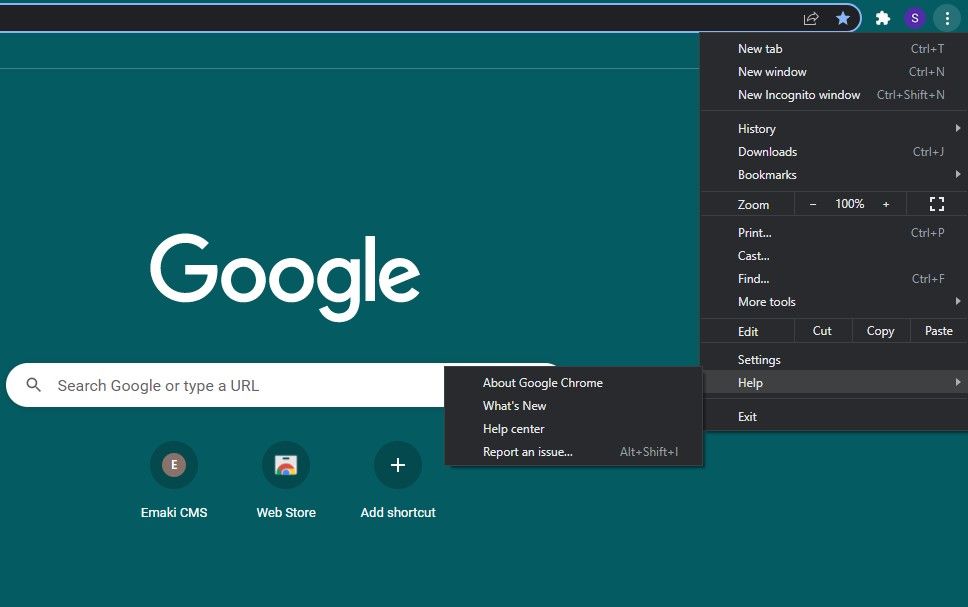
In some cases, the issue can be specific to your browser profile. To rule it out, try playing the video in an Incognito window.
To open an Incognito window, click on the three vertical dots in the top-right corner of Chrome, then click New Incognito window. Afterward, visit the same website and play the video.
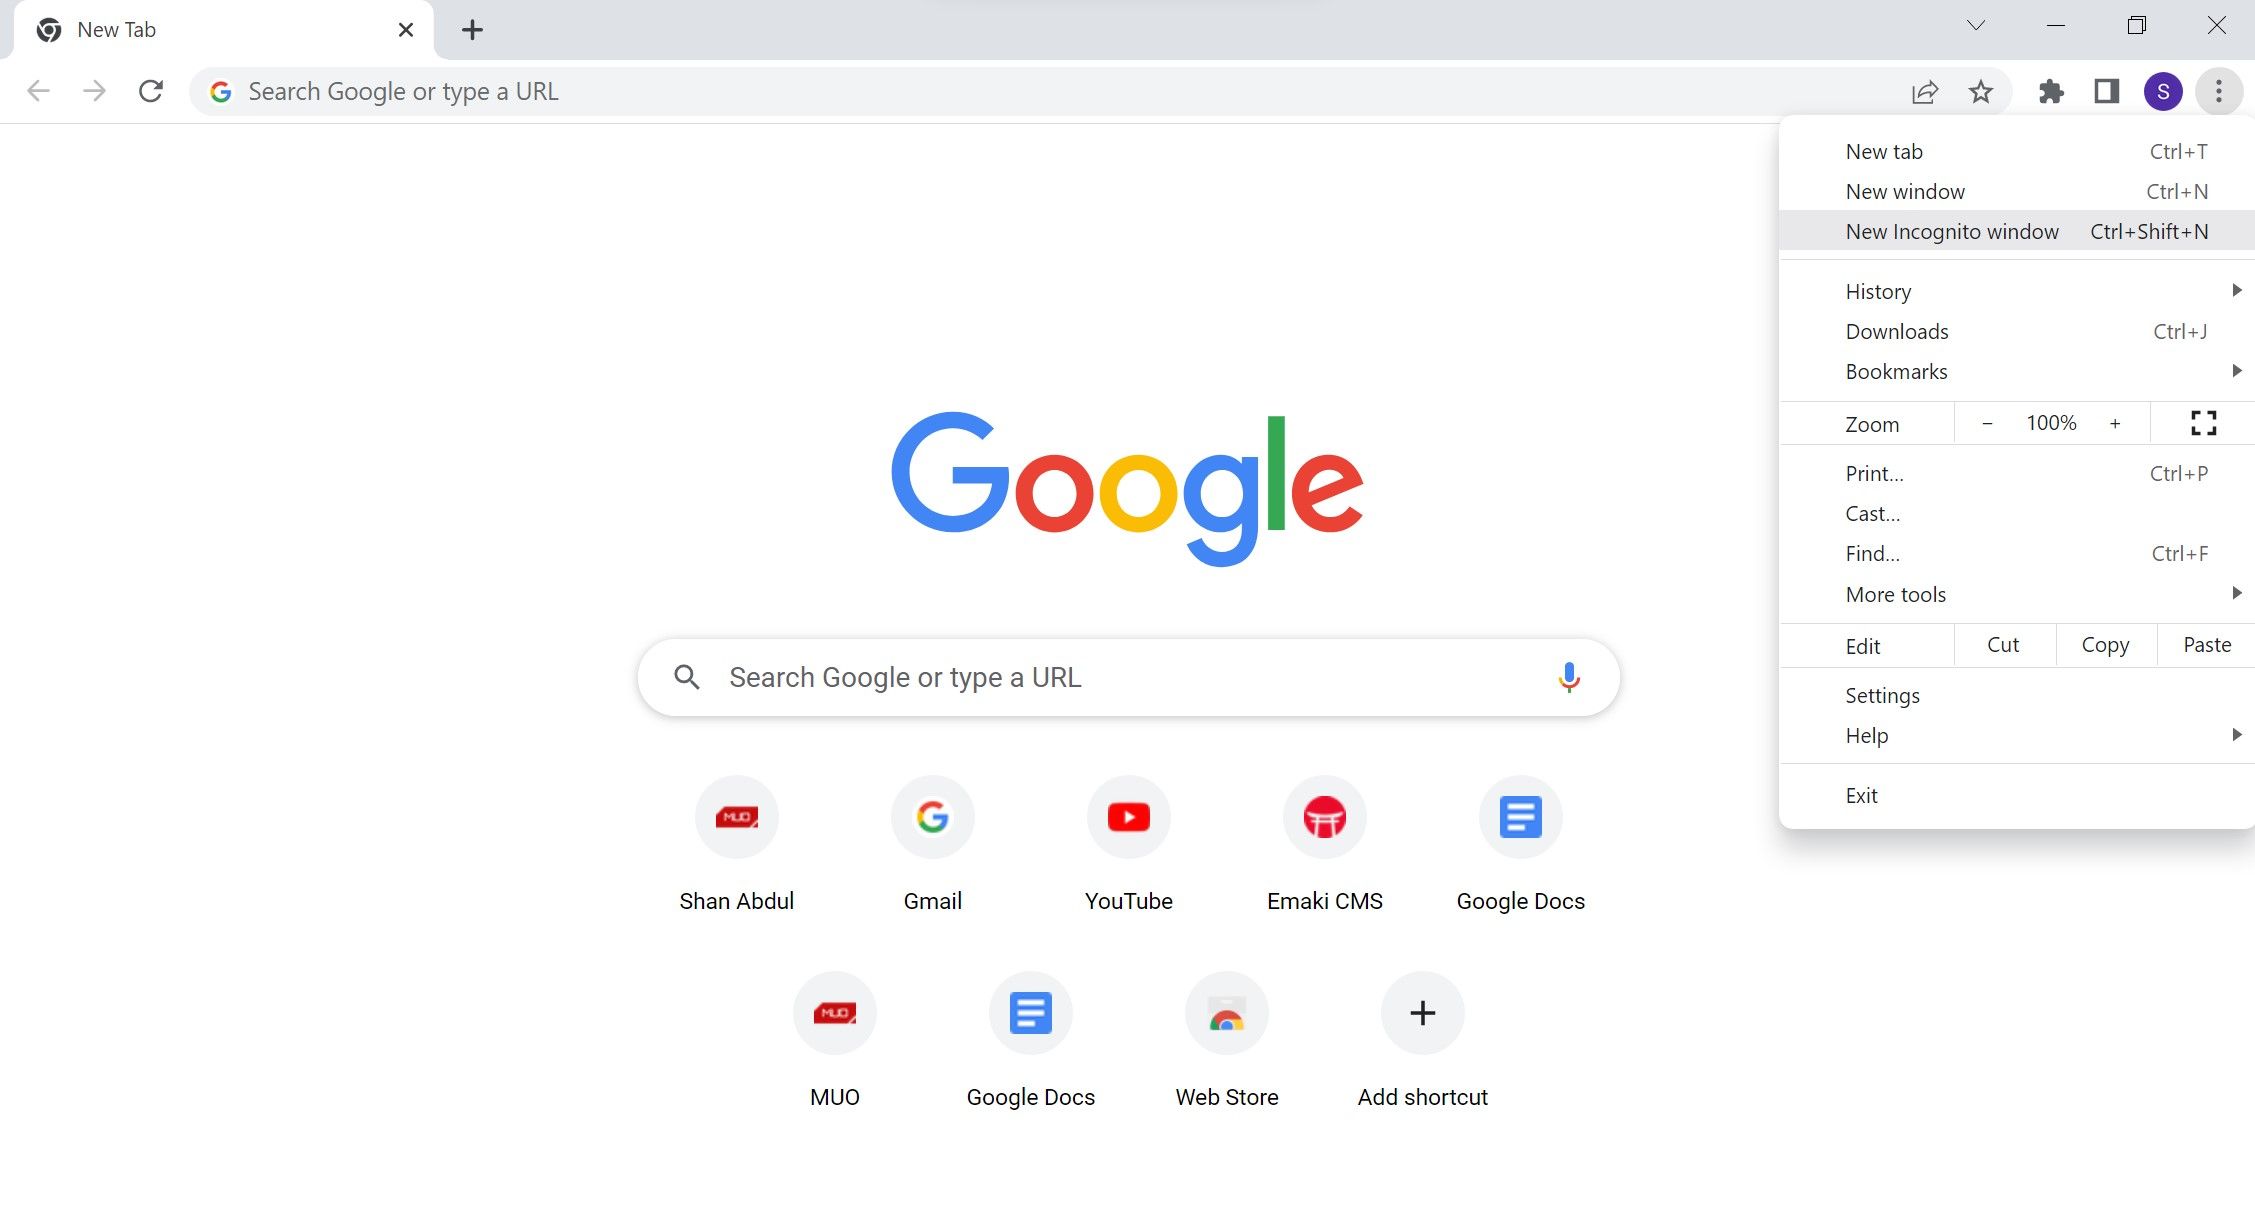
If the video plays successfully this time, this suggests that the problem is profile-specific. So, log in with another profile on your browser and play the video again.
If you do not encounter any errors on the new profile, you should abandon your old profile and switch permanently to the new one. However, If switching profiles or using an Incognito window does not help, try applying the next fix.
Ad-blocker extensions block the advertisements on websites by directly interfering with the site’s script. Such interference can also result in some site content not loading correctly or preventing HTML tags such as <video> tag from running, resulting in the error we’re discussing. Temporarily disabling such extensions may help resolve the problem.
To disable an ad-blocker extension, follow these steps:
- Click on the three vertical dots in the top-right corner.
- Go to More tools > Extensions.
- Find the ad-blocker extensions in the installed extensions.
- Use the toggle to disable the extension, or hit Remove to uninstall it from Chrome.

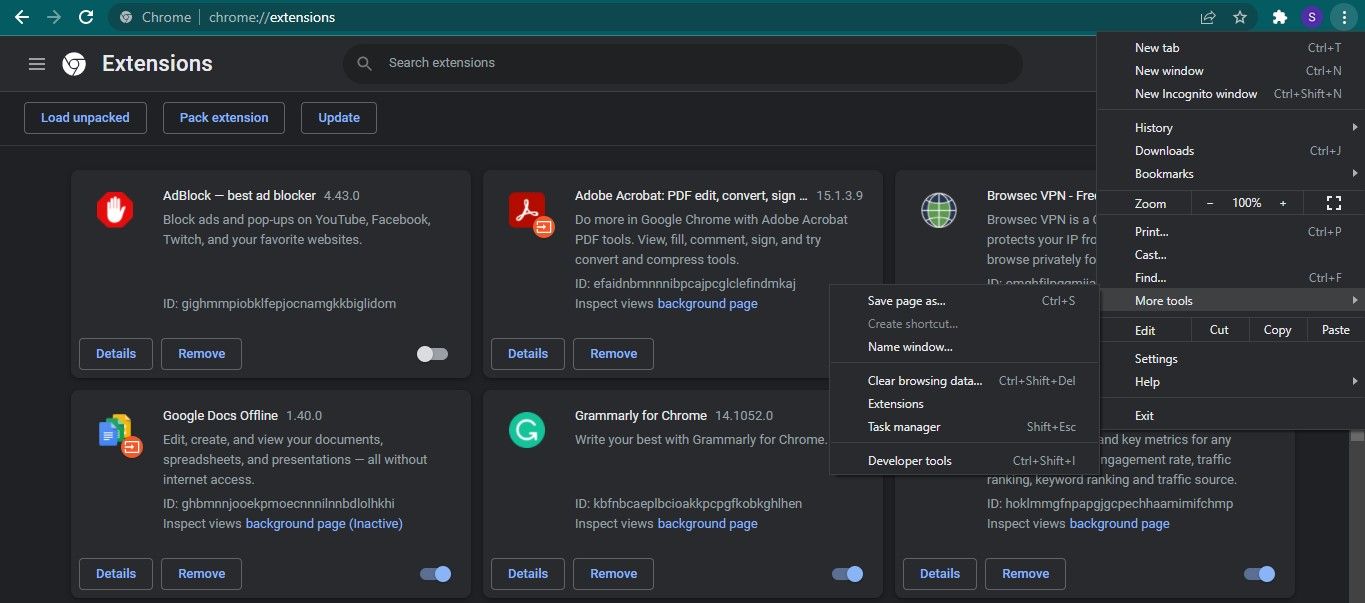
If disabling ad-blocker extensions fails to resolve the issue, you should carry out a browser reset.
10. Download the Video
If none of the fixes has worked for you, you should consider downloading the video you’re having trouble playing. Many video downloaders allow users to download videos from websites. Choose one of them and try to download the video.
With this alternative, you can watch the video after downloading it. However, if you want to avoid downloading videos every time you want to watch an embedded video, you should fix the root cause. To achieve that, continue to implement the remaining fixes.
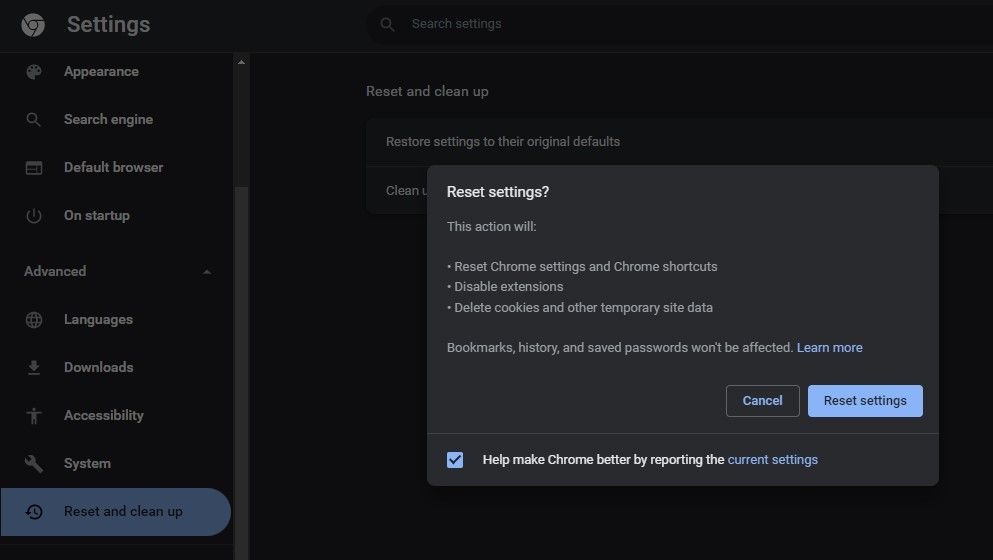
11. Reset Chrome
If none of the above fixes work, it’s best to reset Chrome. It will revert all the changes you’ve made to the settings so far, eliminating the possibility that customizing them is causing the problem. It will, however, revert all customizations, so you’ll have to start setting up the browser from scratch. Be aware of that risk before you reset it.
To reset Chrome, follow these steps:
- Click on the three vertical dots in the top-right corner.
- Go to Settings.
- On the left sidebar, click the Advanced drop-down menu.
- Click on the Reset and clean up button.
- Click on Restore settings to their original defaults.
- Then click on Reset settings.

When resetting the browser doesn’t work, consider reinstalling the browser from scratch as a last resort.
12. Reinstall Chrome
Even though resetting the browser will give it a fresh start, reinstalling it will nullify the possibility of restrictions on both the browser and the OS side. But before you do that, uninstall it properly.
Follow these steps to uninstall Chrome in Windows:
- Open the Windows Settings app.
- Navigate to the Apps section.
- In the Apps & features settings, type Chrome in the search box.
- Click on it and hit Uninstall.

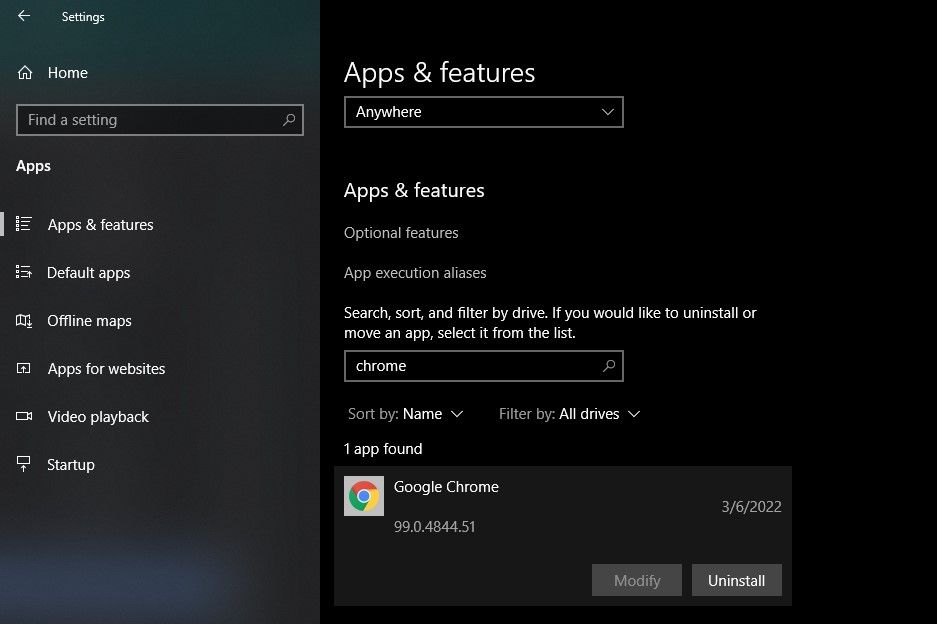
Uninstalling Chrome in macOS requires some slightly different steps, but is just as easy.
After you uninstall Chrome, grab a fresh copy of the browser and install it again. A fresh reinstall will likely resolve the issue and improve your browser’s performance as a whole.
Still Unable to Resolve the Error?
Hopefully, you fix the browser issue and watch the video you were trying to play with these fixes. If none of the troubleshooting steps resolved the issue, consider switching to another browser as a last resort. You may consider permanently switching from Chrome if the web page’s video works fine in a different browser.
Is your Chrome browser always lagging? By tweaking some Chrome flags, including GPU rasterization and zero-copy rasterization, you can speed it up.
Troubleshoot Chrome and get your videos playing again
Updated on September 23, 2022
What to Know
- The easiest and fastest way to fix Chrome not playing videos is to ensure that Chrome is completely updated and restarted.
- If updating doesn’t work, try clearing your cache and enabling Adobe Flash or Javascript.
- If all else fails and Chrome is still not playing videos, you may need to completely reset your Chrome browser.
When videos stop working, it can be frustrating. If your version of Chrome is not playing videos from sites like YouTube or Vimeo, here’s how to troubleshoot it, starting with the simplest and most common methods.
This guide is for desktop Chrome users who are using the most up to date version of the browser. If you’re not sure if you’re using the current version, see the first troubleshooting tip below.
-
Check if you need to update Chrome. The browser gets regular updates, and often video websites will update in tandem to comply with Chrome’s new standards.
Updating Chrome will generally require restarting the browser, so save any work you’ve been doing before you start the update.
-
See if the video is publicly available. If you’ve been sent a link by a friend to a video, that video may have restrictions regarding who views it, or there may be tools such as an “age gate” in place, which requests your birth date in order to see the content.
Enter the name of the video into Google or the hosting website’s search bar and see if a result comes up. If you don’t find it, it’s likely only available to a select few people.
-
Enable JavaScript. For security, Chrome or external software may sometimes disable plug-ins like JavaScript. This is especially true if you’ve been subject to an attempted hack or a malicious website.
To re-enable JavaScript:
- Click the three-dotted menu button in the top right of the Chrome browser.
- Select Settings.
- Select Privacy and security from the left pane.
- Choose Site Settings from the right side.
- Scroll down a bit and select JavaScript
- Select the button next to Blocked so that JavaScript is enabled. The text will change to Allowed.
- Restart Chrome and try loading the video again.
-
Enable Adobe Flash in Chrome. Google and other browser developers have phased Adobe Flash out since it’s a legacy program with some security issues. However, some websites haven’t updated their videos. If Flash isn’t working, there a few fixes you can try.
Flash can be risky and has multiple security issues. You should only enable it for websites you trust.
-
Run a speed test. Videos are broadband intensive and if your connection has slowed down for some reason, it can leave videos endlessly loading. There are several sites that can do this, and should tell you if there’s a problem with your internet speed.
-
Clear your cache. Doing so can solve a lot of problems. Before you clear the cache, you can try using an incognito window to verify that’s the issue.
To test this:
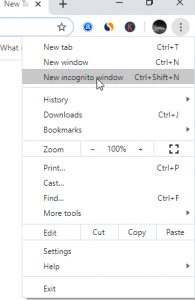
- Copy the web address of the video you’d like to view.
- Select the three vertical dots in the upper-right corner, then select New incognito window. Alternatively, you can press Ctrl+Shift+N.
- Paste the web address into the browser bar and see if the video works.
-
Disable your extensions and plug-ins one-by-one. If clearing your cache didn’t work, and the video functions in incognito mode, an extension may be the culprit.
-
Disable hardware acceleration. Chrome will sometimes use your computer’s graphics processing unit, or GPU, to help render web pages. If your GPU is being used for other tasks, if its drivers need to be updated, or if it’s simply incompatible with the video format, it may struggle to play videos on the web.
Disabling hardware acceleration might affect how quickly Chrome loads resource intensive webpages. You may want to consider re-enabling hardware acceleration after you watch the video.
If disabling hardware acceleration works, use a free driver updater tool o see if a new driver is available for your graphics card. It may resolve the issue.
-
Reset your Chrome browser. If all else fails, you can completely reset Chrome. This may be necessary if programs or extensions have changed settings and you can’t easily reach them.
FAQ
-
How do you clear the cache in Chrome?
To clear the cache, press the three-dot menu. Select Settings > Privacy and Security > Clear browsing data.
-
How do you update Chrome?
To manually update Chrome on a computer, open the browser and select More > Help > About Google Chrome > Relaunch.
Thanks for letting us know!
Get the Latest Tech News Delivered Every Day
Subscribe
Summary: This post shares methods to fix video playback error – ‘The media playback was aborted due to a corruption problem’ that occurs while watching online videos. It also recommends effective solution for corrupt videos not playing when you upload them on Facebook, YouTube, etc.


Table of Content
- Simple hacks to fix ‘video playback was aborted…’ error
- Methods to fix error – ‘video playback was aborted due to a corruption problem’
- In Steps: How to fix video playback error in Mozilla Firefox
- In Steps: How to fix video playback error in Google Chrome
Not being able to watch your favorite videos online can be frustrating. There can be a number of simple as well as complex reasons for this issue, such as,
- Browser issues
- Poor Internet connection
- Website plugins not supported by browser
- Cached data in the system.
Whatever the reason, you can fix the webpage video playback error easily unless the uploaded video file itself is corrupt.
Hacks to fix ‘video playback was aborted…’ error
Irrespective of the browser you’re using – Chrome, Mozilla Firefox, or Opera – try the below fixes first to resolve the issue:
- Refresh your webpage
- Try opening the page in another browser
- Check your Internet connection
- Delete cookies, cache and browsing history
- Disable all plugins on your browser
- Restart the browser
If none of the above quick fixes work, there may be some deeper issues with the video. Let’s delve deeper into the problem.
Don’t worry if the above ways did not work. Just troubleshoot the video playback error as explained in the methods below:
Methods to fix error – ‘video playback was aborted due to a corruption problem’
- Disable graphics hardware acceleration
- Start browser in Safe Mode
- Switch to the default browser theme
- Update computer’s graphics drive
- Reset your browser settings
- Repair corrupt video, if saved in drive
-
Solution 1: Disable graphics hardware acceleration
Hardware Acceleration uses PC hardware to perform some tasks faster. It speeds up the graphic performance by moving from CPU to GPU. It is always on by default in the system. If your videos are not playing on webpage, you can try turning the hardware acceleration off to run the application in software rendering mode.’
Steps to disable graphics hardware acceleration:
1. Right-click on your desktop. Click Display settings.
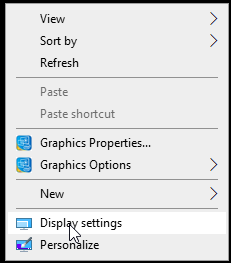
2. Click Advanced display settings.
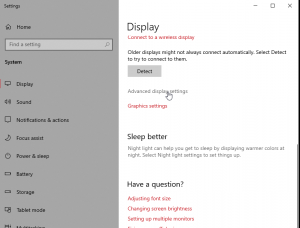
3. Click Display adapter properties for display 1.
4. In the graphics properties window, select Troubleshoot tab.
5. Click Change Settings.
6. In the Display Adapter Troubleshooter bar, slide the Hardware acceleration to None.
7. Click OK and close the dialog box.
-
Solution 2: Start browser in Safe Mode
When you open your browser in Safe Mode, hardware acceleration is put off; all extensions are temporarily disabled; and the default theme is applied. If your video is not playing due to any of these reasons, see if you can still watch the video in Safe Mode.
-
Solution 3: Switch to the default browser theme
A specified browser theme uses special extensions that change the appearance of the browser. If you are using a certain browser theme other than the default one, there is a possibility that the new theme extensions are not supporting your videos. So try switching to the default browser theme.
-
Solution 4: Update Graphics driver in the system
A graphics driver also known as GPU or video card, increases the graphics’ performance on your system along with fixing bugs. You can try updating the graphics driver to fix the‘The media playback was aborted due to a corruption’ error.
In Windows 10, graphic drivers are automatically downloaded and installed through Windows Update, while you can also manually search and update your system graphics driver.
Steps to update Graphics card drivers on Windows PC:
- Go to Start menu.
- Click on Settings > Update and Security
- Click Check for Updates The system will check for new drivers and update them.
If you are a Mac user, you can update only by upgrading to the latest operating system as the Graphics card driver is part of the Mac OS.
-
Solution 5: Reset your browser settings
Try resetting your browser to fix the video not playing error on webpage. Resetting your browser to default may remove pop-ups, toolbars, unnecessary extensions, and other browser issues. There are chances the attempt would fix the browser video error too. You can reset web browser via the Settings tab.
-
Solution 6: Repair corrupt video, if saved in drive
If your uploaded video on Facebook, YouTube, or Reddit etc., but it isn’t playing properly or showing playback errors, there are chances that your uploaded video is corrupt or damaged. In such a situation, use Stellar Video Repair software. The tool can repair any type of video corruption, such as video playback errors, no sound, choppy, flickering, broken, black screen, etc.
This DIY tool can safely repair all MOV, MP4, M4V, 3G2, 3GP F4V and other video file formats.
Steps to Repair corrupt videos saved in computer drive or media
- Download & launch Stellar Repair for Video on your PC/ Mac.
2. Click Add file to upload the corrupt video file.

3. Now, click the Repair button.
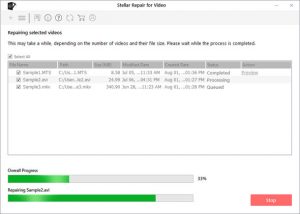
4. After repair process finishes, Preview the repaired video.
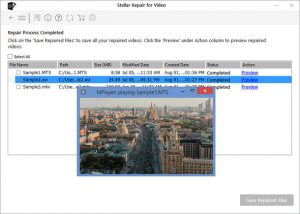
5. Click on Save Repaired Files to save your repaired videos at the desired location.
In Steps: How to fix video playback error in Mozilla Firefox
Method 1: Disable graphics hardware acceleration in Firefox
- Open Options window in Firefox (Preferences on Mac) by clicking on menu. If you cannot find Options button, visit Tools >
- In Options window, click on Advanced > General.
- In the settings, uncheck Use hardware acceleration checkbox.
- Restart Firefox and see if the video playback error is solved.
Method 2: Start Firefox in Safe Mode
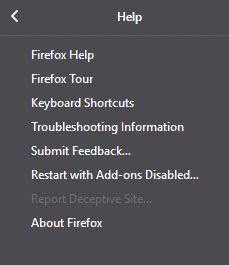
- Open Firefox web browser and click on the three dots at the top right.
- Click Help > Restart with Add-ons Disabled.
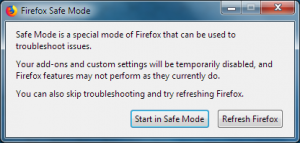
3. Click Restart in the pop up window
4. In the Firefox Safe Mode dialog box, click Start in Safe Mode button.
Now, play the video on the website and check if the error is resolved.
Method 3: Switch to the default Firefox theme
- Click the menu and choose Add-ons to open Add-ons Manager.
- Select the Themes
- Choose the default theme and click
- Click Restart Firefox.
In Steps: How to fix video playback error in Chrome
Method 1: Disable Hardware acceleration in Chrome
- On the extreme right, click Menu. Go to Settings.
- Click Show advanced settings, scroll down, and select System.
- Uncheck Use hardware acceleration when available checkbox.
- Restart Google Chrome.
Method 2: Reset the Chrome settings
- Open Chrome web browser.
- At the top-right, click on the three dots icon and select Settings.
- Click Show advanced settings.
- Under Reset browser settings, click Reset browser
- In the dialog box, click Reset.
Method 3: Open Chrome in Safe Mode
- Open Chrome web browser.
- Click on three dots icon on the top-right and choose New Incognito Window.
This will open a new Chrome window, which is without the add-ons and extensions.
Method 4: Restore default theme
- Open Chrome web browser.
- At the top-right, click on three dots and select Settings.
- Click on Default Browser.
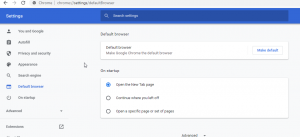
4. On the right pane, select Make Default.
Now try viewing your video again in the browser to see if the video playing error is resolved.
End Note
The online video error -‘video playback was aborted due to a corruption problem error,’ is usually resolved through simple hacks like refreshing the web browser; playing the video in a different browser; deleting the cookies and cache data. But when these ways fail, try other troubleshooting methods mentioned in this post. If the video file itself is corrupt, then take help of a professional video repair software such as Stellar Repair for Video. But for that, the video must be located in your local drive or media. We recommend a free trial of the software to see how it works.