

Сообщения: 9
Всем привет!
Разбираюсь с мешами. Возникла проблема при билде проекта, вылезают ошибки Warning Object has overlapping UVs и затем Info kitchen Lightmap UV are overlapping by 10.3%. Please adjust content — Enable Error Coloring to visualize.
Прав ли я, что это связанно с:
1. У меня UV превышает по размерам текстуру 
2. UV lightmap не совпадает с UV?
Исправить это можно вписав UV в размер текстуры, НО у моего объекта нужно использовать тайлящуюся текстуру, как пример это стол и на нем текстура дерева.
И теперь вопрос, как можно сохранить тайлющуюся текстуру вместе с корректным lightmap UV?
Сообщения: 403
Текстура идет по первому каналу, а лайтмапа по второму.
При создании развертки под лайтмапу поставь в UVWMap канал 2

Сообщения: 4068
abdus писал(а):
1. У меня UV превышает по размерам текстуру
из этого следует что текстура у тебя вообще не корректно ляжет, или UV уменьшай, или текстуру увеличивай.
![]()
Сообщения: 2319
я наверное присоединюсь с вопросами…

планарные стыки с артефактами
это лечится? или тупо прятать надо?
вроде уже читал на форуме обсуждение такого, но у нас тут свалка, и быстро не найдешь…
_________________
we need to go deeper
Сообщения: 403
Цитата:
планарные стыки с артефактами
это лечится? или тупо прятать надо?
Да лечится парой способов
1. Нужно чтобы расстояние между островками было более пикселя в развертке. Чтобы пиксель расчета одного островка не попадал на островок другой.
2. Нужно увеличить разрешение развертки…
Посмотри вот эти видео. Там UDK, но принцивы в Анриале не изменились с тех времен ))
![]()
Сообщения: 2319
спасибки, я как раз первое видео уже смотрел. А тут уже подборка.
_________________
we need to go deeper
![]()
Сообщения: 2319
Я основную проблему понял.
есть два дополнительных вопроса.
за что отвечает 1? разрешения лайтмапы вроде там пониже в свитке.
2 — это насколько я понимаю индекс ЮВи для лайтмапы, правильно?
3 — не понимаю за что оно отвечает.
предположительно лайтмапа берет ЮВи с Source и строит его на новом канале которы указал в 3(пункте)
_________________
we need to go deeper
Сообщения: 403
1 — Это разрешение
2-3 — какой-то из них канал развертки на которую делается расчет лайтмапы
В мою бытность этого вроде не было, посмотри в доках для уточнения.
![]()
Сообщения: 2319
КреБотолий, еще момент. Нужен-ли отступ от края ЮВи (тоесть когда вершины лежат на 0 или 1)? Скорей всего не нужен но уточнить хочется
И подверди мои соображения:
При создании развертки я должен понимать разрешение lightmap назовем его lightmap.size, и соответсвено
отступ между кусками = 1/lightmap.size , или нужно все же двойной оступ: 2/lightmap.size ?
и привязка вершин к границам пиксела для прямоугольных елементов (самая неприятная муторная часть) — насколько принципиален этот момент?
_________________
we need to go deeper
Сообщения: 403
Цитата:
КреБотолий, еще момент. Нужен-ли отступ от края ЮВи (тоесть когда вершины лежат на 0 или 1)? Скорей всего не нужен но уточнить хочется
Лучше сделай потому что все эти лайтмапы собираются потом на большую и там они (островки развертки) могут оказаться на расстоянии меньше пикселя друг от друга. То есть отступы по тем же принципам что и расстояния между островками.
Цитата:
При создании развертки я должен понимать разрешение lightmap назовем его lightmap.size, и соответсвено
отступ между кусками = 1/lightmap.size , или нужно все же двойной оступ: 2/lightmap.size ?
Я не уверен. А когда не уверен то делаю тест на минимальном разрешении лайтмапы — самый простой способ проверить.Вообще всегда делай тесты на разрешениях 8-16 будет очевидно где у тебя что не так. Да и экономия опять же и времени рассчета и памяти на хранение лайтмап.
Цитата:
и привязка вершин к границам пиксела для прямоугольных елементов (самая неприятная муторная часть) — насколько принципиален этот момент?
Принципиален, потому что это именно расстояние в пикселях. Если ты выйдешь в другую область то этот пискель будет уже использоваться. Каждая клетка (как на видео) это пиксель )) Потому привязка важна.
Содержание
- Unwrapping UVs for Lightmaps
- Techniques and guidelines for properly setting up UVs for static meshes
- Creating a Lightmap
- Auto-Generating Lightmap UVs
- Custom Lightmap UVs
- Texture UV versus Lightmap UV
- Contiguous UVs and Padding
- Lightmap UV Examples
- Simple Object
- Complex Object
- Organic Object
- The Importance of Lightmap Resolution
- Inspecting Lightmaps and Settings
- Static Mesh Editor
- Enabling the UV Overlay
- Setting the Lightmap Coordinate Index
- Setting the Lightmap Resolution
- Level Viewport
- Using the Lightmap Density View Mode
- Lighting Only View Mode
- World Settings
- Compress Lightmaps
- Packed Light and Shadow Map Texture Size
- Troubleshooting and Optimization
- Error Coloring
- Overlapping Lightmap UVs
Unwrapping UVs for Lightmaps
Techniques and guidelines for properly setting up UVs for static meshes
Choose your operating system:

When creating assets for your game, you will often go through the process of setting up a UV that is laid out for your textures. If your project intends to use any form of baked lighting (static or stationary), you will also need to set up a UV channel that stores lighting information. This UV is called a Lightmap UV,В which is similar to a texture UV in that it consists of laid-out UV charts (or UV islands) that are unique to each static mesh except this particular UV is used to store baked lighting and shadow information. The process of lightmapping is one of the more challenging areas of environment art creation because, unlike texture UVs, each face of the model needs to have its own unique space on the lightmap with no overlapping faces, and UV charts need to ensure that there is enough padding (or spacing) between them to avoid artifacts.
Lightmaps are only required when a static mesh will be lit using any form of baked (or precomputed) lighting. If your game or project only uses dynamic lighting, there is no need to set up lightmaps for each static mesh.
Creating a Lightmap
There are two ways you can create a lightmap:
Using Unreal Engine 4’s Lightmap Auto-Generation tool
Creating a custom one with UV editing tools
Auto-Generating Lightmap UVs
Creating custom lightmap UVs can be a time-consuming process, especially if you have projects requiring thousands or ten of thousands of assets.В An auto-generated lightmap can be a quick way to pack a lightmap UV to save you a significant time investment of manually setting one up and padding it correctly. We’ve adopted this process into our own workflow here at Epic.
When importing your own assets, a lightmap UV will be generated for you automatically (unless disabled) in the FBX Import Options window.

A lightmap will be automatically generated based on the UV for the texture layout (UV channel 0). The generated lightmap UV repacks the islands so that they meet the requirements of a good lightmap with no errors: no overlapping or wrapping islands, and enough padding between islands to limit artifacts based on the targeted lightmap resolution.
Once a lightmap UV has been generated for a static mesh, it can be adjusted in the Static Mesh Editor, using the lightmap generation settings in the Details panel Build Settings, but there is no requirement to ever touch these settings once the lightmap UV has been generated.

These settings can be used at any time to generate a lightmap UV or repack existing ones. The tool uses a repacking algorithm to generate the lightmap based on aВ Source Lightmap Index (or UV channel) and then stores it in a new specified by theВ Destination Lightmap Index. The algorithm repacks the UV charts from theВ specified source lightmap index but does not cut or split them in the process. Keep this in mind when creating lightmap UVs and by doing a little bit of upfront work in your modeling software or UV editing software, you can get a good result by splitting the UV charts before import into UE4.
For additional information, see Generating Lightmap UVs .
Custom Lightmap UVs
For the majority of static meshes that you import into UE4, you’ll be able to use an auto-generated lightmap UV because a good result can be achieved withВ minimal effort. However, for those times when it’s not possible to adequately use an auto-generated UV, you’ll want to create a custom lightmap unwrap in your modeling software or UV editing tool.
Depending on the capabilities of your UV editing tools and the type of asset you’re creating, you may find that a custom lightmap is the ideal choice since it may require more attention to detail than other assets. A lot of UV editing tools, like the one pictured below from Autodesk 3ds Max have a range of features that enable you to easily flatten, reshape, connect, and break apart UV charts in ways that make sense. These are options that are not available withВ UE4’s lightmap generation.

Autodesk 3ds Max UV Editing Tools.
Later parts of this page will cover the basics unwrapping UVs to get specific results and this is a process that can be combined with auto-generate lightmaps. If you’d like to jump ahead, you can see the Contiguous UVs and Padding section of this page.
Texture UV versus Lightmap UV
Setting up a texture UV often requires a different approach to laying out the UV charts to get the best result than how you would for lightmap UV. Lightmaps must be laid out flat without any overlapping areas and they need enough padding between each UV chart to ensure that there isn’t any light leaking. Setting up a texture UV doesn’t have these stipulations because it only matters how you want the texture mapped to those UV charts. It’s acceptable for themВ to have islands that are overlapping or even wrapping, because you can haveВ tiling textures or ones assigned to different parts of the geometry.В В
For example, the building facade below has four sides that have the same texture mapped to its different faces. Instead of using UV space for each side, a single texture has been created and each side’s UV charts have been laid on top of one another. This enables space to be used efficiently for a single texture that is mapped to all faces without having to use a higher resolution due toВ less texel density.
When the lightmap is laid out (right), all faces are represented with their own UV space so that aВ proper light bake can be generated. Some parts have been separated and are given enough padding between the other charts to ensure fewer artifacts or light leaks.

Texture UV Layout

](LightmapUVLayout.png » Lightmap UV Layout»)
Lightmap UV Layout
Contiguous UVs and Padding
One approach to setting up lightmapping UVs is to have contiguous (or connected) groupings of the geometry. To generate a smooth lighting result, it’s ideal to connect faces in ways that make sense to represent the geometry.
For example, the UV charts below have connected all the front and side faces of the geometry into a single UV chart and the top has been separated into its own island.

UV Charts for the static mesh geometry.
Once unwrapped, it’s necessary to include a minimum amount of padding between UV charts to prevent light and shadow bleed artifacts. A minimum of four texels is usually required to avoid all bleeding artifacts since DXT texture compression operates on 4×4 texel blocks.
If you are setting up a custom lightmap for padding, use the following equation to determine the proper texel spacing for your grid:
Example of the formula above using a resolution ofВ 64:
UE4 uses a pixel for padding meaning that we need to subtract one from each side when trying to find out snapping grid to manually snap UV charts to the grid.В Using the auto-generated lightmap UVs will pack them with the appropriate padding.

Wasted UV Padding
Necessary UV Padding
The edges of the lightmap UV do not need additional padding because Lightmass already pads around the edges of the lightmap to prevent any sort of light and shadow bleeding when combining the lightmap texture atlas for the level. This leads to unnecessary padding and wasted UV space.
Using the UV space efficiently can require you to force some UVs together with brute force and scaling to fit them within the UV space.

(From left to right) Lighting only view in Unreal Engine; static mesh with texture; texture UV layout, lightmap UV layout.
It’s more important that we have a clean contiguous surface without interruption for the lighting result than to worry about 1:1 scaling. A lightmap that has a 1:7 scaled ratio whereby it has twice the coverage will produce a better result even if the islands areВ non-uniformly scaled.В Areas that are too thin but maintain a 1:1 ratio will not light correctly because it cannot capture a good result. Another key takeaway from this example is that the negative interior cuts have been separated (highlighted red) to prevent them from sharing light and shadow information for the contiguous UV charts where a smooth lighting result is important.
Lightmap UV Examples
The following examples explore custom lightmap UV layouts for simple, complex, and organically structured geometry. These can give you an idea of how to approach and maintain a smooth lighting result.
Simple Object
This building facade represents a simple modular piece that is a good example of a contiguous geometry that when unwrapped mirrors its low-poly geometry.
Texture UV Layout
Lightmap UV Layout
Using contiguous faces make it much easier to maximize coverage in the UV space for better light bakes at lower lightmap resolutions with a nearly perfect lightmap. Notice that there are no seams and no subtle dark lines caused by split UV charts.

Click image for full size.
Complex Object
For designs that do not adhere to any of the rules of thumb for contiguous UVs, like ones that have a lot of geometry or negative space with few elements, you will need to split the UV charts and add much more padding to prevent artifacts.В
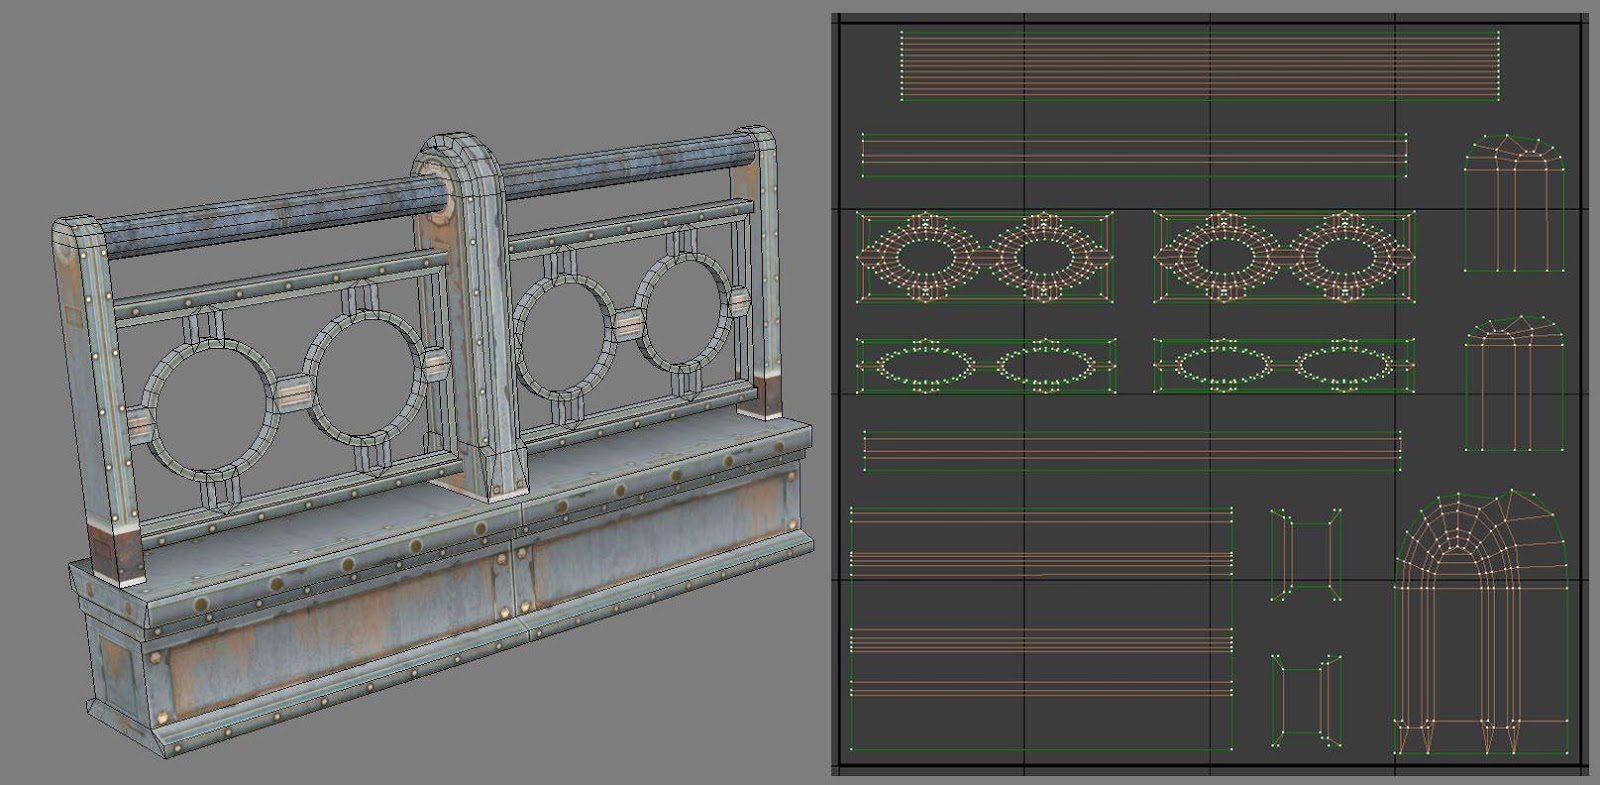
Static mesh and lightmap UV layout

Light bake result
The railings lightmap shows some distortion on the vertical pieces that hold the rail together (middle image, right side). The two sides and middle section of those pieces were forced together. Even though it has distortion in the UV, it still has enough coverage to generate a good result.
The interiors of the circular pieces on the railing have been split for the front and the back sides into their own contiguous islands.В The side that will be visible to the player has the inner and outer faces grouped so that three-quarters of those areas have smooth lighting. The back side of the railing is its own island since it’s most likely not something that would be easily visible in the level. Instead, focusing on the majority that is visible to players is most important to have a good result for.
Sometimes, you may have complex geometry that works against what works best for a Lightmap UV. In addition to the medium-sized asset, this one has a lot of negative space, which only adds to its complexity.

Static mesh and lightmap UV layout
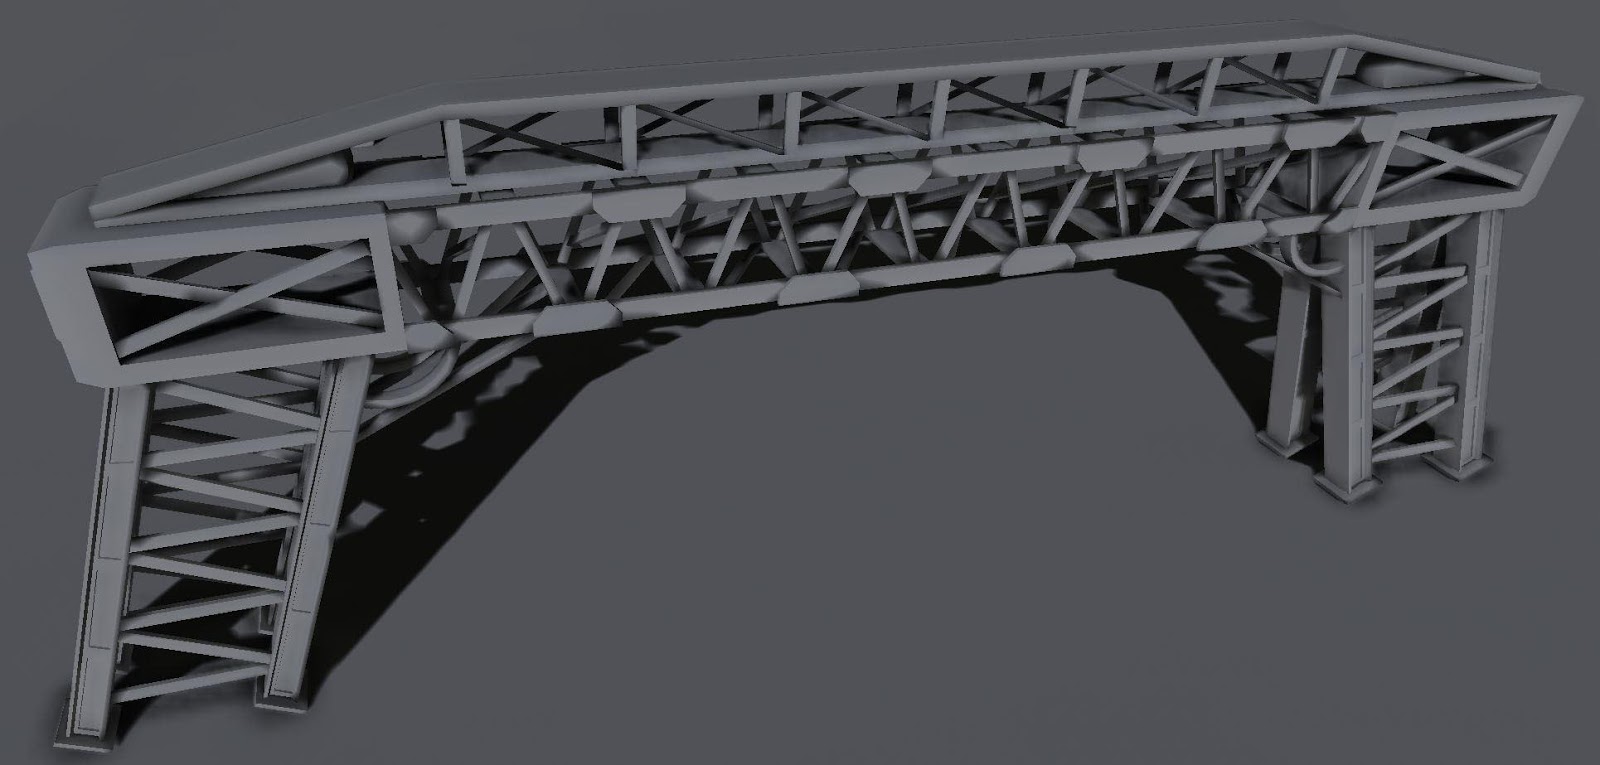
Light bake result
When there are so many separate elements, there is a potential for a lot of wasted UV space due to padding. In this instance, there is no choice but to use a higher lightmap resolution to ensure that quality is maintained. By using a little forethought, this example planned to use a higher lightmap resolution by combining UV charts that made sense and also knowing that it would still not look perfect. There will be some bleed but not so much that it would ruin the lighting result.
Depending on your memory budget, you could use a higher lightmap resolution to reduce some artifacts, but it’s always better to use as low a resolution as possible for performance and optimization. Also, keep in mind that a good material with an interesting diffuse and normal texture can hide some lightmap issues.
Organic Object
For geometry that has a lot of rounded shapes or that is more organic in design, it’s better to project the surface flat and relax the UVs as needed.
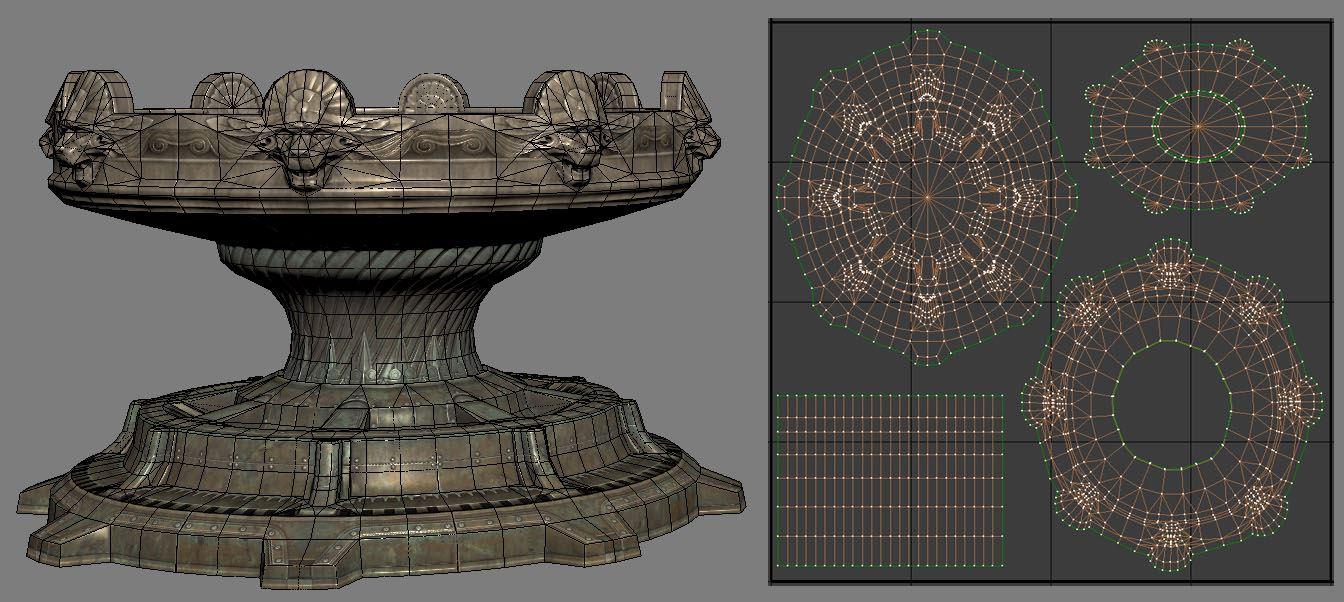
Static mesh lightmap UV layout

Baked Lighting Result
For organic shapes, look at how the geometry can be broken apart in a way that makes sense, like splitting UV charts at places that would naturally work. The biggest concern when doing this is that any edge split will break the smoothness of the lighting result. So, in the case of this fountain, breaking the top of the fountain into its top and bottom halves, the center being its own, and the bottom base as its own island make the most sense to reduce visible seams in the light bake. A good rule-of-thumb is to split your lightmap UVs at sections where there are deep recesses or crevices.
The UV chart for the center column doesn’t look like its mesh, instead, it’s been straightened out to use the UV space more efficiently. For a lightmap UV, this is perfectly acceptable to enable a nice, smooth lighting result.
The Importance of Lightmap Resolution
An effective lightmap will fill the majority of the UV space as efficiently as possible in orderВ to use the lowest resolution that obtains a good lighting result. Most lightmapping issues can be mitigated by using the UV space to maximize coverage while maintaining enough padding between the UV charts.
If your project is built for desktop platforms, they can typically afford to use higher resolutions since they have a larger memory budget to pull from. However, for consoles and mobile platforms, memory budgets need to be tightly controlled. It’s common to sacrifice some lightmap resolution quality to stay within budget.
Depending on the geometry and its complexity, it may be helpful to break the mesh into smaller pieces so that each can have a unique lightmap with good coverage and use a lower lightmap resolution while doing so.
Inspecting Lightmaps and Settings
Static Mesh Editor
The Static Mesh Editor enables you to inspect any UVs attached to your Static Mesh,В generate your own Lightmap UVs , set the resolution of the lightmap texture for this mesh, and more.
Enabling the UV Overlay
Use the UV dropdown in theВ toolbar to select a UV channel to display.В

Once selected, the UV channelВ displays an overlay in the Static Mesh Editor Viewport.

The currently displayed UV channel is indicated above the overlay.

Setting the Lightmap Coordinate Index
TheВ Lightmap Coordinate Index specifies which UV channel should be used for this static mesh when Lightmass generates a lightmap texture during a lighting build.В
In the Static Mesh EditorВ General SettingsВ section, locate theВ Lightmap Coordinate Index.

UE4 will attempt to assign the proper UV channel where possible when importing a static mesh that currently has a lightmap channel (UV Channel 1) or if a lightmap is generated during import. However, if you generate a lightmap UV after import for a static mesh that did not already have one, you’ll need to manually assign the correct UV Channel to the Lightmap Coordinate Index.
Setting the Lightmap Resolution
TheВ Lightmap Resolution enables you to set the default texture resolution for the baked light and shadow texture generated by Lightmass В during a lighting build. This resolution will be used for all instances of this Static Mesh placed in a level.
In the Static Mesh EditorВ General SettingsВ section, locate theВ Lightmap Resolution.

You can also override a static mesh’s lightmap resolution in any level by enablingВ Overridden Light Map Res and plugging in a resolution size. This setting overrides this particular instance of the Static Mesh.В

Setting Light Map Resolution or Overridden Light Map Res lower than the Min Lightmap Resolution used for a generated Lightmap UV will cause seams and potential light leaks once lighting is built. The Min Lightmap ResolutionВ should be the lowest resolution you ever intend to set for this Static Mesh to ensure that enough padding is maintained between UV Charts.
Level Viewport
TheВ Level viewport enables you to use differentВ view modes to inspect your lighting builds and lightmap resolution densities relative to other Static Meshes. These view modes help you inspect the final results as well as troubleshoot lightmap and lighting build issues.В
Using the Lightmap Density View Mode
The Lightmap Density view mode enables you to visualize the density of the assigned lightmaps resolution with a checkered grid relative to other Static Mesh Actors in the level based on an «ideal» (or max) density setting. It’s important to have an even density across your scene to get consistent lighting when using baked lighting.

A scene from Epic’s Infiltrator demonstrating the Lightmap Density view mode.
Enable this view by using the Level viewport to select View Modes > Optimization Viewmodes > Lightmap Density.

Once enabled, a color grid will overlay all Static Meshes in the scene based on their current Lightmap Resolution.В
The following density colors indicate how the ideal lightmap resolution for the level relates to the lightmap resolution set for the static meshes in the level.В


Less than ideal texel density
Ideal texel density
Max or greater than ideal texel density
Note that any Static Mesh with its mobility set toВ Movable will display Brown in the Lightmap Density view mode since it doesn’t require a lightmap UV or need to be optimized within this regard.
The default density is an average one to get you started. Depending on your game’s texture budget, you may need to adjust the color ranges to be more strict or loose to make this view mode useful to your project. Use the Lightmap Density Rendering Options found in the main toolbarВ under the Build > Lighting Info to set them.

Ideal Density
Sets the ideal density at which texel density should be for objects in the scene. The ideal texel density is green.
Maximum Density
Sets the maximum density at which texel density is considered too dense for the scene. The texel density is red.
Color Scale
ScalesВ the color for the scene when using Lightmap Density view mode.
Grayscale Scale
Scales the brightness level of theВ grayscale factor for the scene based on the IdealВ andВ Maximum density values.
Render Grayscale
Enables grayscale to be used for the lightmap density view mode.
Lighting Only View Mode
TheВ Lighting Only view mode is useful to inspect lighting in your scene without material textureВ information. This is extremely useful when looking at the light build result.В

Use this view mode with Error Coloring to visualize lightmap errors in your scene resulting from overlapping or wrapping UVs.
World Settings
The World Settings panel contains settings specific to the level currently loaded, it includes some additional settings specific to lightmaps, like choosing whether they should be compressed to save memory, setting the maximum size of the packed texture atlas that stores the lightmaps, and access to the packed lightmap textures generated for the level.

Compress Lightmaps
By default, UE4В already compresses generated lightmap textures for optimization. When the Compress Lightmaps checkbox is unchecked, the packed lightmap texture atlas will not use compression. It will increase memory usage significantly (by four times) when doing so, but it can reduce artifacts caused by compression algorithms.
For surfaces that do not use a normal map, compression artifacts can be visible for smaller lightmaps packed into the texture atlas.В By using good textures and normal maps, the baked lighting result is improved. For some problematic lightmap UVs where you’re increasing lightmap resolution, keep in mind that re-working the UV charts to have additional coverage within the UV space can improve these types of compression artifacts.
Directly Lit Areas
In directly lit areas with high contrast, compression artifacts may be easier to spot. With compression disabled, the lightmap result is smoother, without the blotchiness but at a much higher cost.


Indirectly Lit Areas
In indirectly lit areas, compression artifacts are less noticeable. While the result is smoother when compression is disabled, it’s less likely to be noticed when textures and normal maps are applied.


Directly Lit Areas with Increased Lightmap Resolution
The lightmap resolution of the trim mesh at the base of the wallВ (centered between the columns against the floor) has been increased to demonstrate that similar results can be achieved by simply increasing the lightmap resolution rather than disabling compression. By doubling the original lightmap resolution, the majority of artifacts have been eliminated and the texture memory usage is minimal to non-existent for this small of a change.


Packed Light and Shadow Map Texture Size
When lightmaps are generated for the level for individual Actors, they will be packed and stored into multiple texture atlas’. Loading individual lightmap textures per-Actor is not very efficient and would increase the GPU workload to load and unload them continuously.

The number of Static Mesh Actors used in a level and their lightmap resolution will determine the number of texture atlas’ that will be used. Larger lightmap resolutions increase the amount of space they use in the atlas. The size of the texture atlas can be adjusted by using a power of two (512, 1024, 2048, or 4096) value for the setting Packed Light and Shadow map Texture Size.

Troubleshooting and Optimization
Error Coloring
Error Coloring enables any warnings that appear in the Message Log under Map Check to be visualized after a lighting build by overlaying a color in the lightmap where the error is occurring.

When Use Error Coloring is enabled, the Lighting Quality must be set to Medium or Preview to visualize the results.

Using the Lighting Only view mode can make it easier to look for and find these types of issues.
Overlapping Lightmap UVs
An Overlapping Lightmap UV warning indicates that the UV charts are overlapping another part of the geometry within the UV space of the lightmap. All UVs must have their own space in the UV when being used for a Lightmap.В The error coloring overlays Orange for any of these UV charts. Note that Texture UVs do not have to adhere to this.
Источник
I will be taking 3ds Max and Vray lighting workflow as a reference to recreate the same in Unreal Engine 4. Main focus will be on Unreal Engine, just giving reference to 3ds max and Vray settings. (It’s not a 3ds Max and Vray Tutorial)
General Lighting methods prevailing in Arch-Vis industry using 3ds Max and Vray –
- Exteriors (Combinations)
- VraySun + VraySky
- VrayDomelight with HDRI + Directional Light (For simulating sun, if required)
- Artificial Lights as per requirement (mainly in Dusk shots)
- Interiors (Combinations)
- VraySun + VraySky + Vray Skyportals
- VrayDomelight with HDRI
- Artificail lights as per requirement (used as fill lights or sometime required to create a desired mood)
* Artificial lights – Any Vray light (Area, point, IES etc) used as fill light or to create any specific mood.
I will be recreating this workflow concerned with HDRI and Directional light as SUN light for Interiors and Exteriors. It is imperative that we first know how to use HDRI correctly to simulate proper lighting with correct exposure.
In above scenarios (Exterior and Interior) VrayPhysical Camera plays a vital role in simulating DSLR exposure with physically accurate lighting values (Real life light intensity values in Luminance or Radiance).
It is important to know why we use Physical Camera features in any Rendering Engine. In real life, human eye plays a critical role in compensating for difference in light intensities we encounter on daily basis by controlling amount of light entering, through increasing or decreasing iris size.
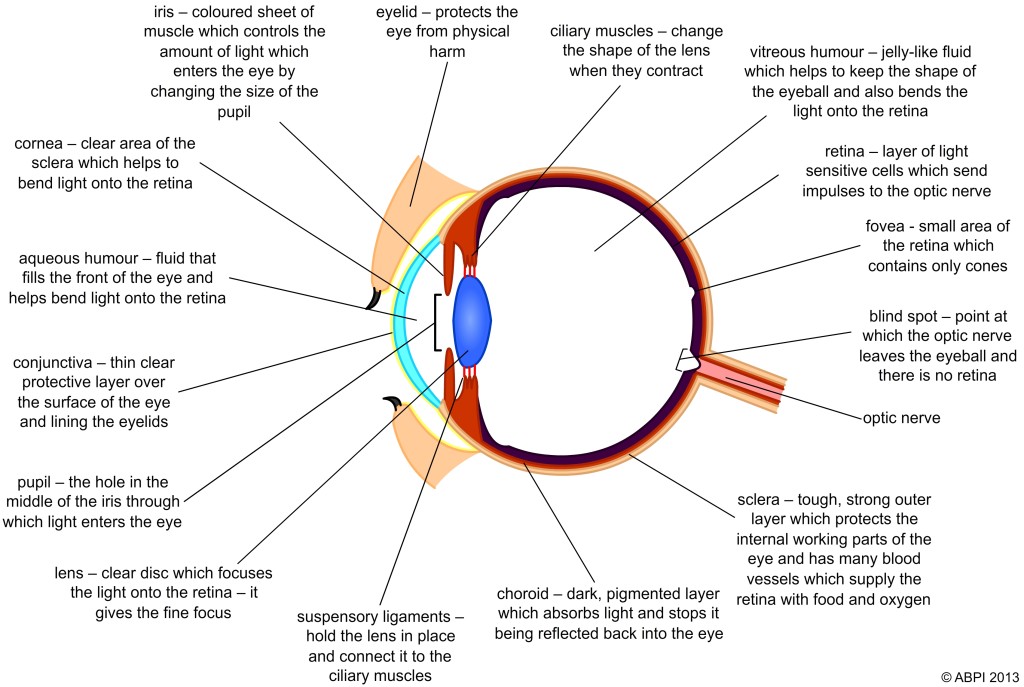 Image Source – http://www.abpischools.org.uk/page/modules/nervoussystem/nervous7.cfm?coSiteNavigation_allTopic=1
When it comes to simulating human eye behavior technically, DSLR Cameras come really close to do so with ample amount of control and as we are already using these cameras to take photographs of our surroundings, it is easy if we recreate those settings virtually in our rendering engines also. It’s a well-known fact that to render virtual images/environments, basic knowledge of photography and light behavior plays a critical role.
Reading these articles will certainly help a lot (highly recommended)
http://www.cambridgeincolour.com/tutorials/cameras-vs-human-eye.htm
http://petapixel.com/2012/11/17/the-camera-versus-the-human-eye/
When we take photographs with DSLR camera on “Manual mode”, we start to get an idea about the settings concerned to capture “what we are seeing in real time” and “what we are getting as photograph” ( not too bright or too dark). I will not be divulging much into DSLR and Manual settings more, but that does not mean I will leave it here as it is – for all the techno freak guys, reading this material will certainly help (I highly recommend going through this) –
Question – Why the hell I am reading about human eye and DSLR camera in a blog concerned with light setup in Unreal Engine?
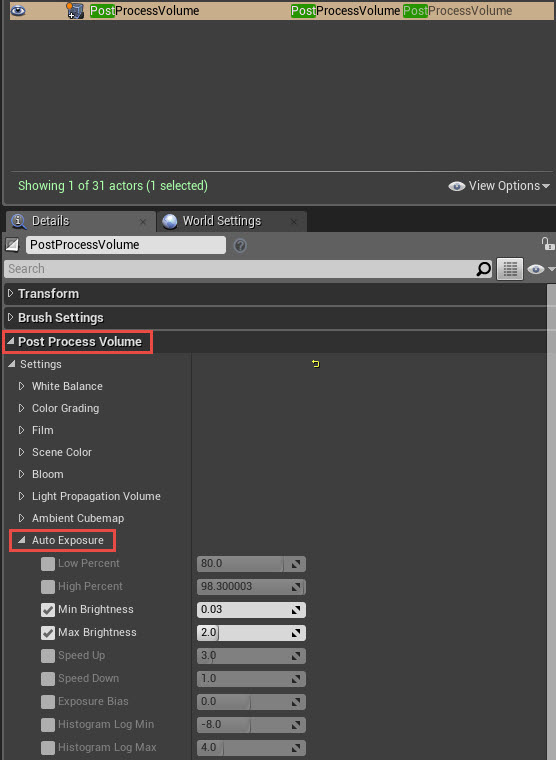
Answer – It’s always important to understand basics that are concerned with lighting workflow irrespective of application and also Unreal Engine got this awesome “Eye Adaptation” already incorporated in the form of “Auto Exposure”. But to understand that properly, it’s important to get some basic idea first.
In Unreal Engine when we create a scene, which covers both exteriors and interiors simultaneously, controlling light balance becomes somewhat difficult due to variation in light intensities concerning exterior and interior environment. Also as character moves like a real human being in interactive environment, it’s wise to simulate human eye adaption in Engine itself to create realistic feel and workflow. All the information regarding the Auto exposure is given in the following link –
https://docs.unrealengine.com/latest/INT/Engine/Rendering/PostProcessEffects/AutomaticExposure/index.html
“Auto Exposure” settings are in the Post Process Volume.
“I will try to persuade EPIC to include Physical Camera settings in Engine. It will make the Engine’s Lighting workflow as per with other render engines, which in turn will be super easy to migrate and understand.”
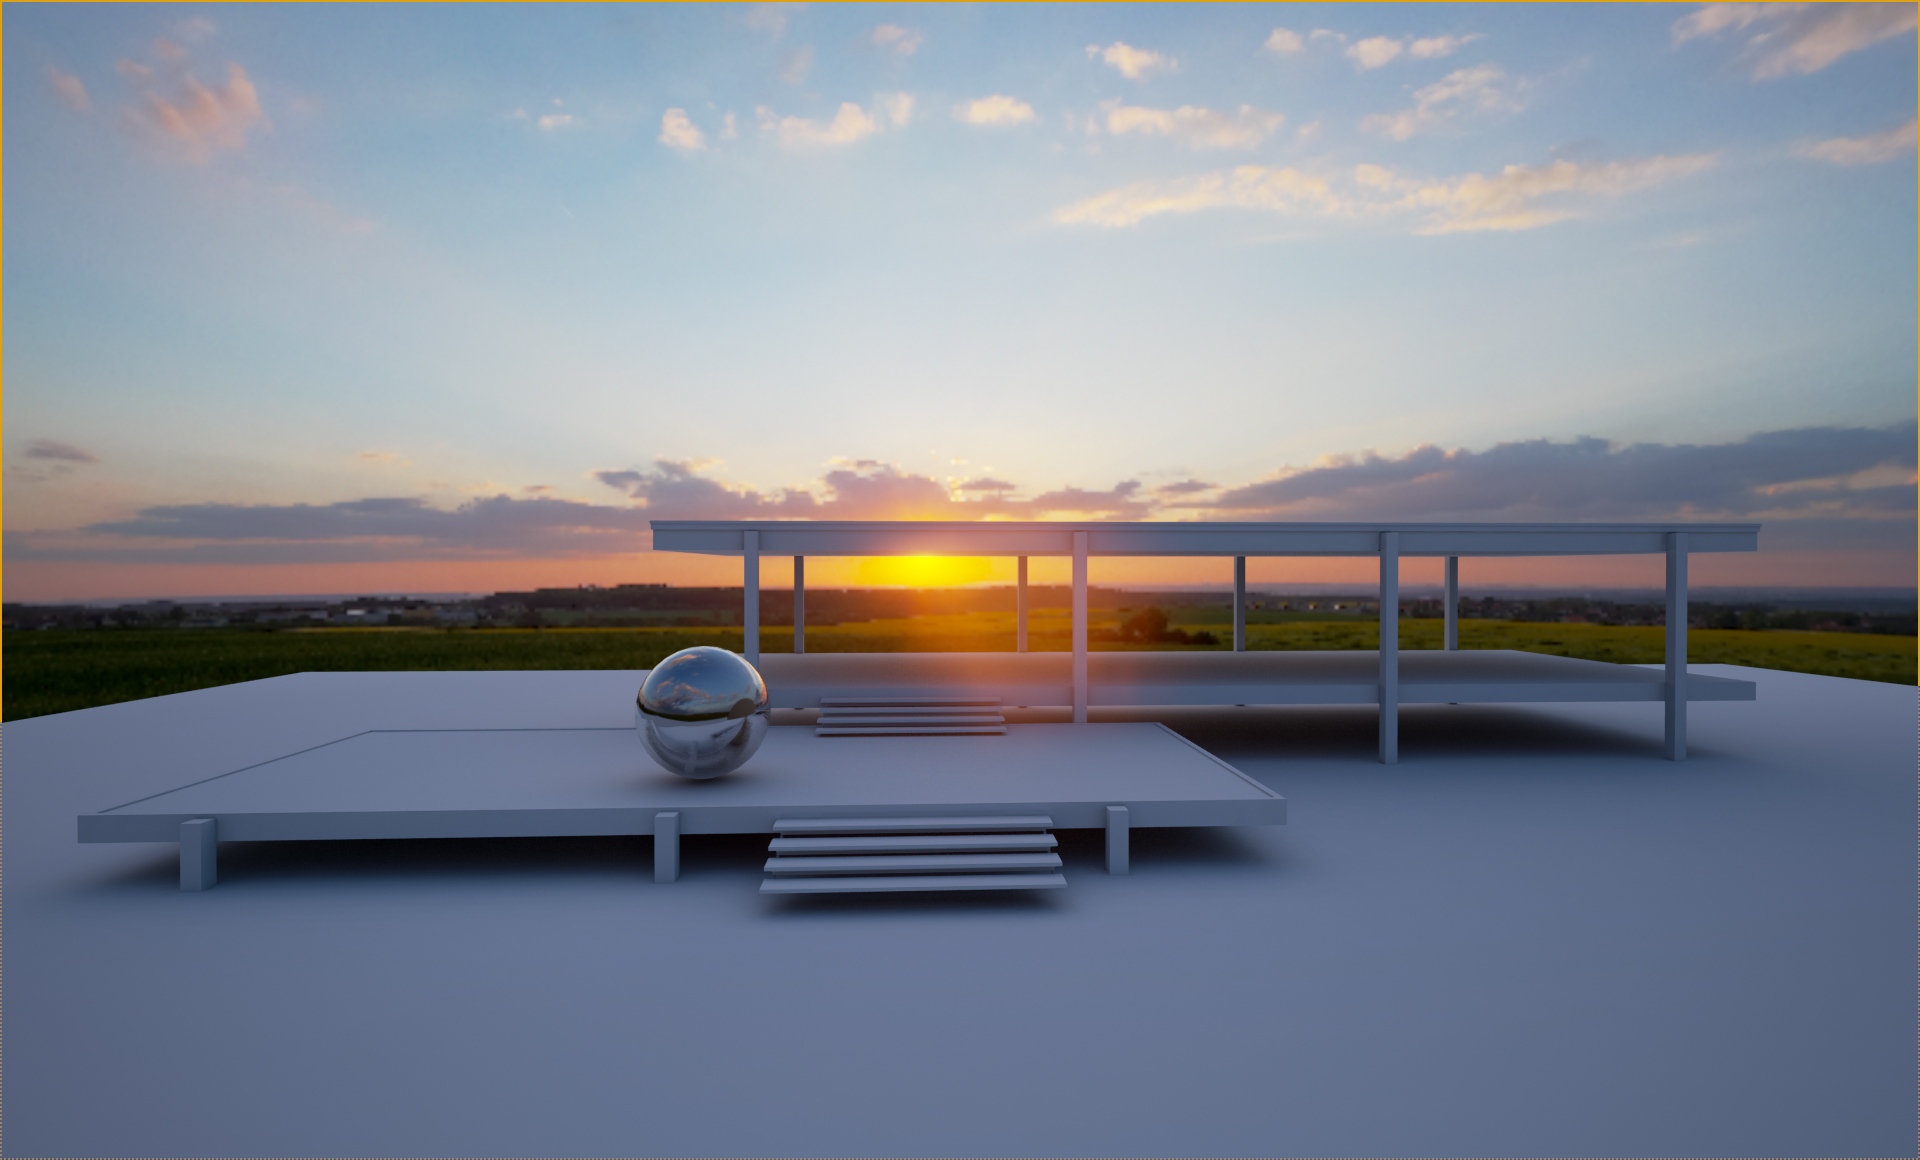
Now as we have some basic understating about the exposure settings in the Engine, we will proceed with creating a simple scene only lit by HDRI. I am assuming that my readers have some basic knowledge of Unreal Engine, so will skip some fundamental steps.
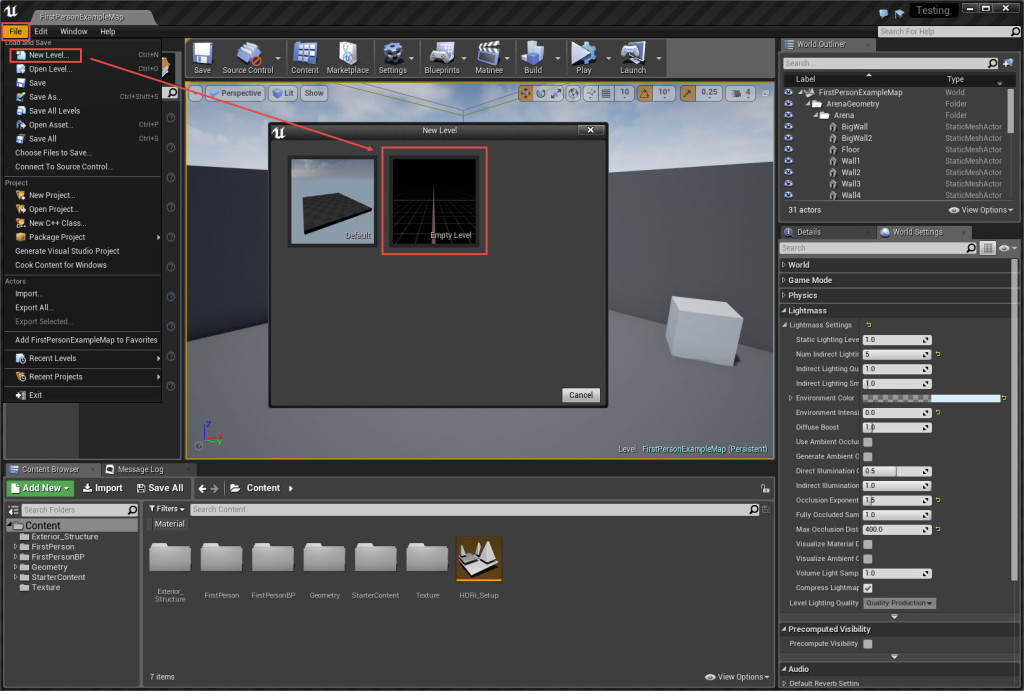
Open Unreal Engine and create a new project by selecting “First Person Template”

In this project we will create a new “empty level” for our HDRI workflow (save it before starting work).
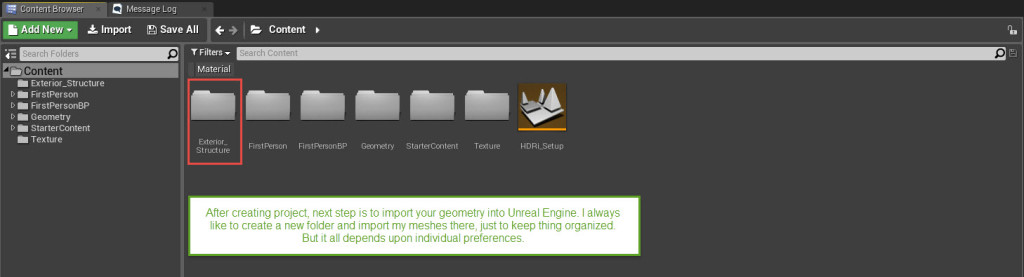
Now import your geometry/meshes into content folder of Unreal Engine (For more details about elaborate steps involved – see this tutorial)
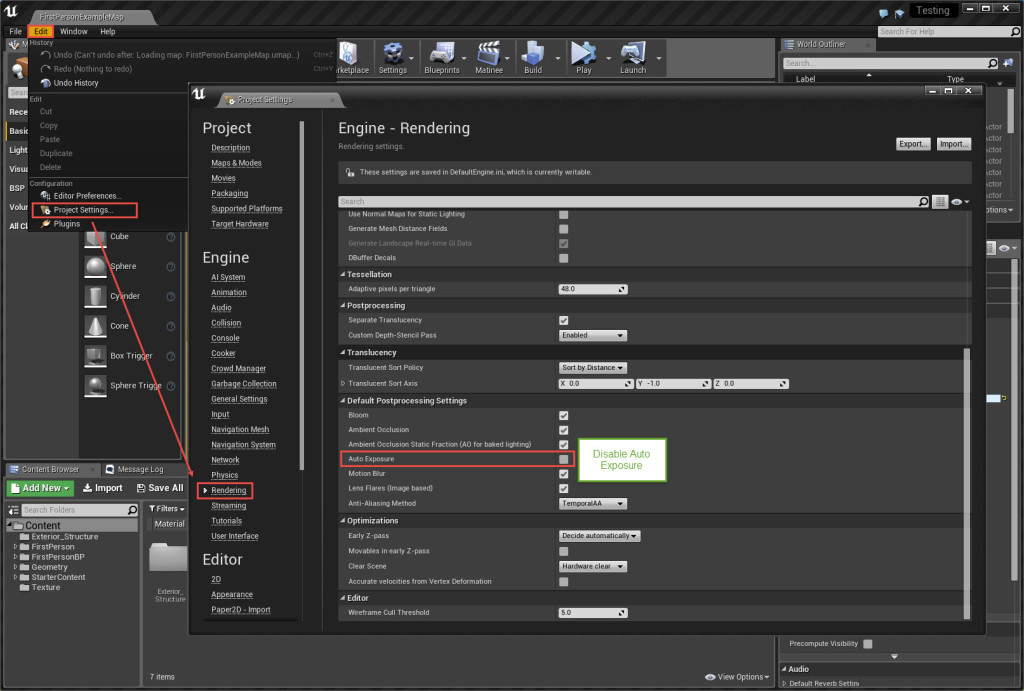
Disable Auto Exposure from project settings
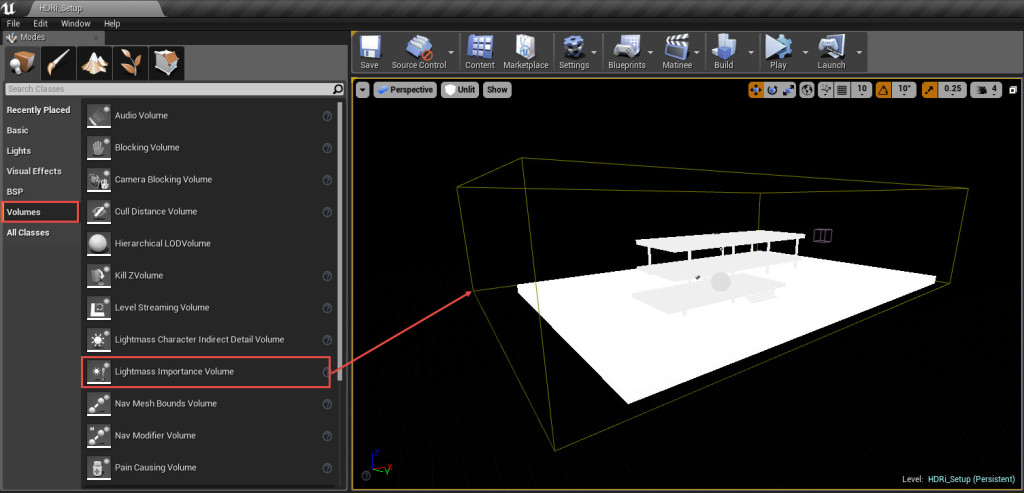
After that we will create “Lightmass Importance Volume” covering all of our meshes in the level which are going to render.
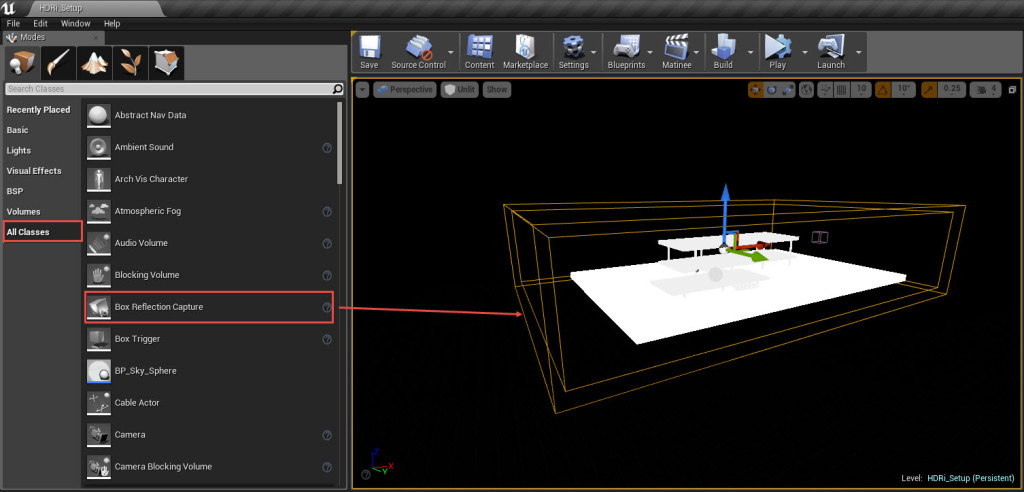
 Next step will be of creating Box Reflection Capture wrapping entire meshes. This is very important for simulating correct reflections on objects inside and outside the building, you can also use large sphere reflection capture in exteriors (results want change that much).
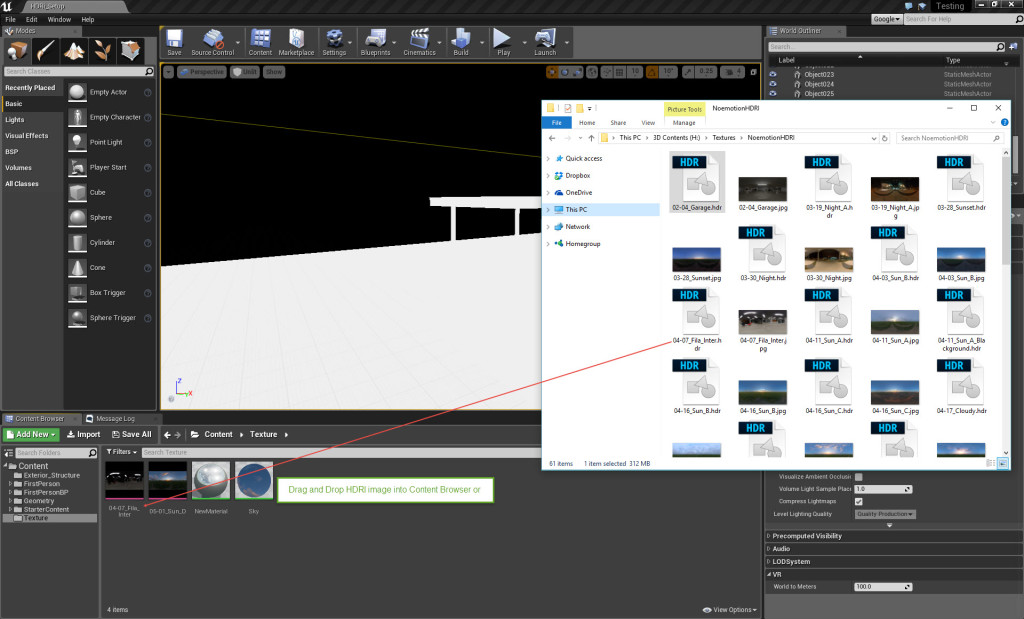
 Now it’s time setup HDRI as our environment background and create “Skylight” that will use the same HDRI for lighting but before that we have to import our HDRI into Engine. There are several methods to do so but we will go for the easiest one i.e. Drag and Drop.
I am using HDRI’s from – http://noemotionhdrs.net/ It’s one of the best free resource for HDRI.
Related
Pages: 1 2
2015-12-25
HOW TO FIX OBJECT HAS WRAPPING UVS UE4 — YOUTUBE

How to fix Object has wrapping UVs UE4
From youtube.com
Author Dallas Doan
Views 17K
UV LIGHTMAP ARE OVERLAPPING — RESOLVE ISSUE — UE4 …
This is how to resolve issues with the UV light map overlapping error message+++++Donate — Paypal — paypal.me/markom3dwww.markom3d.comhttps://w…
From youtube.com
Author Markom3D
Views 27K
MANUAL: FIXING LIGHTMAP UV OVERLAP — UNITY
If Unity detects overlapping UVs, it prints a warning message with a list of affected GameObjects The fundamental object in Unity scenes, which can represent characters, props, scenery, cameras, waypoints, and more. A …
From docs.unity3d.com
OBJECT HAS OVERLAPPING UVS — ASSET CREATION — UNREAL …
When it does this if there are any UVs that are overlapping it will throw out this warning. Same with the second UV. If the lightmap bakes and sees there are overlapping UVs it will give the warning. This is to let you know the shadows will not look correct because of this on some parts of the mesh. World of Level Design has a great series of tutorials that show you …
From forums.unrealengine.com
NON-OVERLAPPING UVS — 3D MODELING RESOURCES
If you work for non-overlapping-UVs right from the start, you won’t have a great deal of extra work to do. By survey, many of our customers want non-overlapping UVs in their unwrapped UVs. At right are the results of a survey TurboSquid conducted among 3D model customers in December 2010. With symmetrical 3D models or models with repeating textures, it’s less work …
From resources.turbosquid.com
IMPLEMENTING «SELECT OVERLAPPING» FOR THE UV EDITOR (RE …
You can see the WIP patch at ⚙ D3701 Blender 2.8: WIP: Implement UV select overlapping. The issue is that the BVH is detecting overlaps for faces that have shared vertices, i.e. adjacent ones. The patch has a TODO in the place where I think I need to account for this, but I’m unsure of the best approach. I know the patch is assigned to you but I’ve been hesitant to …
From devtalk.blender.org
PRESERVING OVERLAPPED UVS WHEN USING UV LAYOUT SOP …
Hey all, I’m optimizing a game asset that has overlapping UVs. I want to take advantage of the UV layout tool but I can’t find a way that respects the overlapped UVs. I think the ‘Connectivity’ over ride might give me what I’m looking for, but I’m not sure what/how to assign the ‘island’ vertex attribute.
From sidefx.com
UNITYCSREFERENCE/RENDERERLIGHTINGSETTINGS.CS AT MASTER …
TrTextContent (» This GameObject has overlapping UVs. Please adjust Mesh Importer settings or increase chart padding in your modeling package. «); public static readonly GUIContent atlas = EditorGUIUtility. TrTextContent (» Baked Lightmap «); public static readonly GUIContent realtimeLM = EditorGUIUtility.
From github.com
SOLVED: DETECTING OVERLAPPING UVS ON A CERTAIN UVSET …
Hi, I am trying to write some code that will detect if there are overlapping Uvs only on the 2nd uvset (not map1). I did find this command polyUVOverlap(selected_uvs, oc=True), and it appears to work if there is only one uvset, and will properly return any uvs that are overlapping. However when I am working with 2 uv_sets on a mesh, and i select that second …
From forums.autodesk.com
GAMEOBJECT WITH OVERLAPPING UVS (BUT I HAVE «GENERATE …
GameObject with overlapping uvs (but I have «generate Lightmap Uvs» checked already) Discussion in ‘Universal Render Pipeline’ started by yusefkerr, Apr 18, 2020. yusefkerr . Joined: Apr 5, 2011 Posts: 179. Hello, I’m having trouble getting global illumination and light-baking to work in URP. I was having the same issues earlier in LWRP, and I was hoping that …
From forum.unity.com
OVERLAPPING UV’S QUESTION/EXPLANATION PLEASE — POLYCOUNT
Basically, I was curious as to overlapping uv’s in games and the correct way to do them (in Maya specifically.) I do know how to set my uv layouts to overlap by whatever distance, however my question comes in the shaded view that Maya has to offer. As with the attached image as an example, I’m wanting to overlap the uv’s on the right to match the left. I know that I can flip the …
From polycount.com
UV — LIGHTMAP OVERLAPPING ERROR WHEN IMPORTING TO UE4 …
It looks like you have overlapping areas in the packed UV map. You can see these long diagonal streaks going in your layouts that intersect other UV faces. But it’s hard to tell what’s going on there without seeing the .blend. One pointer is if you use N-gons in modeling make sure to convert them to quads and tris before using pack in UV editor because it seems to often screw …
From blender.stackexchange.com
HOW DO I FIX UV OVERLAPPING ISSUE? : UNITY3D — REDDIT
UV overlaps mainly cause problems when baking lightmaps. You can have Unity auto-generate lightmap UVs by enabling the option in the mesh import settings, which should resolve this warning. 3. level 2. pschon. · 3y. Indeed. And as far as I know, that’s also the only reason why Unity might actually complain about the overlap.
From reddit.com
BRIDGE TO UE4 4.25 «OBJECT HAS WRAPPING UVS … — QUIXEL
«Object has wrapping UVs» This has been occurring for me in UE4 v 4.25.3. I’ve checked the light map destination, they’re all fine. It’s not a UV map tiling issue. It’s specifically a UV Wrapping Error, after taking a look at the 0 and 1 UV maps provided it doesn’t seem like they are overlapping. If they are it’s not by much. This has been the …
From help.quixel.com
BLENDER — GAME DEVELOPMENT STACK EXCHANGE
You have a warning in the next-to-last screenshot which says «This GameObject has overlapping UVs». I also see that you’ve tried the suggested fix — to check «Generate Lightmap UVs» — but often this, in itself, is not enough to fix overlap because Unity’s lightmap generation is not great. To see if UV overlap is indeed the problem in this case, it may help to turn on the …
From gamedev.stackexchange.com
HOW TO FIX OVERLAPPING LIGHTS UNREAL ENGINE? – MCNALLY …
How Do I Fix My Uv Overlap? Margins are added using the modelling package that you provide to the UVs you provide yourself. The pack margins of models can be increased if Unity automatically generates UVs based on an unlimited model’s lightmap. Extend the zoom range of the entire lightmap. The resolution of the GameObject should increase.
From mcnallyinstitute.com
DISPLAY OVERLAPPING UVS | MAYA | AUTODESK KNOWLEDGE NETWORK
The Shade UVs feature lets you see whether any UVs or UV shells overlap when viewed in the UV Editor. When activated, all selected UV shells appear shaded in a semitransparent way. However, areas that appear more opaque than normal indicate regions of overlap. Overlapping UVs are often undesirable because any associated texture maps will also overlap on the …
From knowledge.autodesk.com
UNITY ISSUE TRACKER — WRONG URL SHOWN IN UV OVERLAP …
[Animation] The ability to change children local scale is intermittent when toggling off and on the root GameObject [IL2CPP] Option to use LLD linker is missing when using «UNITY_IL2CPP_ANDROID_USE_LLD_LINKER» Environment Variable; Object cannot be picked from the Object Picker when calling UnityEngine.GUI.FocusControl(null) in custom Editor GUI
From issuetracker.unity3d.com
HOW DO YOU FIX UV OVERLAP IN UNITY? – CHETUMENU.COM
With the cube selected go to the UV texture editor and select Polygons>Cut UV Edges then go to Polygons>Unitize. This will make them all share the same UV space. How do you fix overlapping UVs in Maya? Press 5. In the UV Editor menu, select View > Shaded > . Click the Shade UVs icon ( ) located on the View options bar of the UV Editor.
From chetumenu.com
OVERLAPPING UV’S: DO YOU CARE? — MATERIALS AND TEXTURES …
If the model they bought has non-overlapping UV, then part of the work they’ll need to do is already solved. I don’t know exactly what obsessed means in this context, but it makes perfect sense to me that a model with a high quality, non-overlapping UV map has added value over one without. But of course, Turbosquid doesn’t have opinions; people have opinions. …
From blenderartists.org
EXPORT MODEL UVS AS IMAGES — ADOBE HELP CENTER
Overlapping the UVs means that the image in that area will also be overlapped. To resolve overlapping UVs, you can use the Object > Generate UV menu option. Dimension will auto-generate UVs that do not overlap, though they may still have distortion and illogical seams. Distortion. UVs can be squashed and stretched. Usually the artists and UV unwrapping …
From helpx.adobe.com
OBJECT HAS OVERLAPPING UV’S AND LIGHTMAP UV ARE …
Simple searches use one or more words. Separate the words with spaces (cat dog) to search cat,dog or both. Separate the words with plus signs (cat +dog) to search for items that may contain cat but must contain dog.
From answers.unrealengine.com
«LIGHTMAP UVS ARE OVERLAPPING» ERROR NOT GOING … — POLYCOUNT
Are you using 4.5.1? I ask because I never had this sort of issue until then. I read on a few of the Unreal Answers topics that this is a known issue (they are doing an auto generate lightmap UVs starting in 4.5 and apparently it has a few bugs).
From polycount.com
MANUAL: UV OVERLAP FEEDBACK — UNITY
Increase the resolution of a single GameObject. This allows you to increase lightmap resolution only for GameObjects that have overlapping UVs. Though less likely, this can also increase your lightmap size. You can change a GameObject’s lightmap resolution inside its Mesh Renderer under Lightmap Settings. Same mesh as before, but without bleeding artifacts . Progressive …
From docs.unity3d.com
MANQUBE.COM
manqube.com
From manqube.com
UE4 OVERLAPPING UVS
Static Mesh object has overlapping UVs — Content Creation … › Top Law From www.unrealengine.com. Law Details: Jul 07, 2021 · The erros are: Static Mesh object has overlapping UVs Static Mesh lightmap UV are overlapping by 50% The color of the texture of the maze is white and it has became black!!! please help me [ATTACH=JSON]{“data-align”…
From lawlibraries.net
OBJECT HAS OVERLAPPING UV’S AND LIGHTMAP UV ARE …
Object has Overlapping UV’s and Lightmap UV are overlapping. 0. Hello there, So I’m still fairly inexperienced with creating static meshes in Unreal engine 4. All of the tables in this area have been made in the unreal engine from brushes and converted into static meshes. As such, I’ve had no opportunities to create a UV for any of the models. I don’t even know what a UV is. When I …
From answers.unrealengine.com
UV OVERLAP FEEDBACK — UNITY MANUAL
There are three ways to identity overlaps: Keep an eye on Unity’s console. If Unity detects overlapping UVs, it prints a warning message with a list of affected GameObjects. Use the UV Overlap draw mode in the Scene View (see GI visualizations in the Scene View for more information). When you have this mode enabled, Unity adds a red highlight …
From docs.unity.cn
HOW DO I STOP UVS FROM OVERLAPPING ON A NEWLY CREATED …
Unity is the ultimate game development platform. Use Unity to build high-quality 3D and 2D games, deploy them across mobile, desktop, VR/AR, consoles or the Web, and connect with loyal and enthusiastic players and customers.
From answers.unity.com
MEANING OF THE TERM NON-OVERLAPPING UVS? | CGTRADER
So yes, non-overlapping UV’s means every polygon has its own space on the map and with overlapping UV’s we have multiple polygons sharing the same texture space. Note however its possible a model consists of two parts or more having multiple texture maps applied to it. 3D models can have multiple UV channels on them (for example, map 1 …
From cgtrader.com
JUST WHAT ARE OVERLAPPING UVS, ANYWAY? — DAZ 3D FORUMS
Overlapping UVs are when the islands are all layed out on top of one another rather than sprawled out in a single layer. To put it in general terms, take a pile of laundry. Lay them out neatly so you can clearly see each item and they don’t touch each other. This is how UVs should look. Now, throw it all into one giant pile so you can’t tell one from the other. This is what …
From forum.daz3d.com
THE BUILT-IN CUBE PRIMITIVE HAS OVERLAPPING UVS WHEN …
The issue is not a bug and is due to the low lightmap resolution, resulting in the overlapping lightmap UV faces of the baked cube mesh. To fix this issue I would recommend setting the Scale In Lightmap value on the Cube gameobject (in the Inspector) to ‘1.33’ or higher and rebaking lighting. Doing this would fit all the unwrapped cube UV faces into the lightmap …
From issuetracker.unity3d.com
IS THERE A WAY TO FIX OVERLAPPING UVS ? — AUTODESK COMMUNITY
The Uv are overlapping each other. Is there anyway I can fix this? Thanks a lot! Tags (3) Tags: modeling. smooth. uv. Report. 0 Likes Reply. Back to Topic Listing; Previous; Next; 2 REPLIES 2. Message 2 of 3 Fovvl. in reply to: daisy5663803 03-18-2019 01:37 AM. Mark as New; Bookmark; Subscribe; Mute; Subscribe to RSS Feed; Permalink; Print ; Report 03-18 …
From forums.autodesk.com
UVS OVERLAPPING BY 87% WHEN EXPORTING FOR UNREAL ENGINE 4 …
The UVs overlapping drastically decreased to 5.7% but the problem persisted. I have also attempted to repack the islands multiple times, also trying cube and cylinder methods. This is the image of the UV mapping (Warning it looks monstrous): The extreme amount of mapping is due to the repetition of rooftop shingles which each have their own …
From blender.stackexchange.com
UNITY烘焙光照贴图出现OVERLAPPING UVS警告的解决方法_勾栏瓦肆 …
最近烘焙场景时物体出现了莫名其妙的阴影。光照贴图出现Overlapping UVs警告。导致这个问题的原因很多,记录一下我的解决方式。点击Scene窗口下的下拉窗选择UV Overlap查看重叠的UV信息。红色的就是发生重叠的地方。解决方法:选择模型的资源文件,在Model栏下的GenerateLightmap UVs打勾,展开下边的 …
From blog.csdn.net
OVERLAPPING UVS AND BAKING AMBIENT OCCLUSION MAPS
Overlapping UVs and baking Ambient Occlusion maps « Previous Topic Next Topic » Pages: [1] Go Down. Author Topic: Overlapping UVs and baking Ambient Occlusion maps (Read 1360 times) DustyShinigami. Okay, this is something that has completely stumped me. I’ve recently made Tiny Tina from Borderlands 2 as part of a university assignment. I’ve even been …
From forum.substance3d.com
R/UE4DEVS — «OBJECT HAS OVERLAPPING UVS.» HOW DO … — REDDIT
Here you can set options for spacing and stretching of the UVs, and choose which UV channel to apply them to. I think channel 1 is a good choice for light maps. Just hit apply and save your mesh. Play with the settings until you got good surface area vs. spacing between UV islands. You can see the UV map by making sure UV is selected in top menu of the static mesh editor (and …
From reddit.com
UNITY3D — HOW TO AVOID OVERLAPPING OF GAMEOBJECT WITHOUT …
How to avoid overlapping of GameObject without rigidbody? Ask Question Asked 4 years ago. Modified 3 years, 1 month ago. Viewed 409 times 0 I was looking for a way to make my gameobject not overlap to the another gameobject but all …
From stackoverflow.com
OVERLAPPING LIGHTMAP UV’S IN UE4 — SPEEDTREE FORUM
In the modeler, when you are looking at the mesh in the ‘Meshes’ tab, do you see a ‘Overlapping UV’s’ error? If so, this would cause some issues with lighting in UE4. You have to make sure when the UVs are unwrapped, that they don’t overlap. Also, you want to make sure the are contained inside the 0 to 1 UV space. When in Light Map mode in the modeler, you want …
From forum.speedtree.com
STRANGE ARTIFACTS IN UNITY LIGHTMAPS — GAME DEVELOPMENT …
You have a warning in the next-to-last screenshot which says «This GameObject has overlapping UVs». I also see that you’ve tried the suggested fix — to check «Generate Lightmap UVs» — but often this, in itself, is not enough to fix overlap because Unity’s lightmap generation is not great. To see if UV overlap is indeed the problem in this case, it may help to …
From gamedevelopment.forumming.com
HOW TO FIX/RELAX OVERLAPPING UVS, PROCEDURALLY? | FORUMS …
And in my current case I can’t get these UV’s to stop overlapping when there’s no reason for them to be overlapping in the first place. Report. Andr Member 686 posts Joined: Feb. 2016 Offline Nov. 8, 2018 4:15 p.m. if you conform your geometry to its UVs, you can try to append an “attribute blur” node and uncheck “pin border points”. But maybe there’s a better …
From sidefx.com
WHAT IS THE BEST WAY TO FIX THE OVERLAPPING UVS WARNINGS …
I am using Progressive LM for my new project but I noticed that it always complain about overlapping UVs, even on the built in Unity’s 3D meshes (Sphere, Cube etc). I just bought an asset from the asset store and according to Prog LM, 95% of the meshes have overlapping UVs. I wanted to know what is the best way to fix these warnings or should I just ignore them. The …
From answers.unity.com
DISPLAY OVERLAPPING UVS | MAYA LT 2016 | AUTODESK …
Overlapping UVs are often undesirable because any associated texture maps will also overlap on the related surface meshes. To display overlapping UVs in the UV Editor. In the UV Editor, select any UVs or UV shells whose display you want to appear as shaded. Do one of the following: In the UV Editor menu, select Image > Shade UVs > . The UV Map Shading Options …
From knowledge.autodesk.com
OVERLAPPING UVS — NORMAL PROBLEM — SUBSTANCE3D
Your overlapping UVs (duplicates) should be placed in the 1-2 space, mostly in the quadrant right next to the default one. It’s still quite difficult to ‘overlap’ normal map UVs this way, because it could lead to normal errors in some renderers. Best Regards. Reply #3 on: October 05, 2015, 11:25:18 pm. Environment Artist — Twitter. eric9036. Now i tried without normal map and …
From forum.substance3d.com
DB/GAMEOBJECT/COSMETIC: OVERLAPPING WATER BARRELS/FOOD …
Description Barrel of Milk does overlapping on Food Crate 32287 (Entry: 3662) — [Food Crate X:-8822.549805 Y:727.073975 Z:98.299400 MapId:0] 32742 (Entry: 3705) — [Barrel of Milk X:-8822.549805 Y:7…
From github.com
C# — HOW DO I STOP OBJECTS FROM OVERLAPPING IN UNITY …
1 Answer1. Show activity on this post. Check if colliders are trigger or remove all components from gameobject and just leave only rigidbody and colliders. Rigidbody and colliders should be of the same type rigidbody 2d collider2d.
From stackoverflow.com
OVERLAPPING UVS — MATERIALS AND TEXTURES — BLENDER ARTISTS …
Overlapping UVs. Support Materials and Textures. julesfromspace July 13, 2021, 2:24pm #1. I UV unwrapped the mesh of this shirt and am surprised that I end up with overlapping UVs …. I really want to avoid having to split the UVs because the texture is a repeating pattern and it will be hard for me to apply the texture properly with split UVs
From blenderartists.org