Узнайте, как исправить ошибки настройки (ошибка 1, 15 или 16), которые могут возникнуть при запуске приложения Creative Cloud.
Устранение ошибок настройки при запуске приложения Creative Cloud
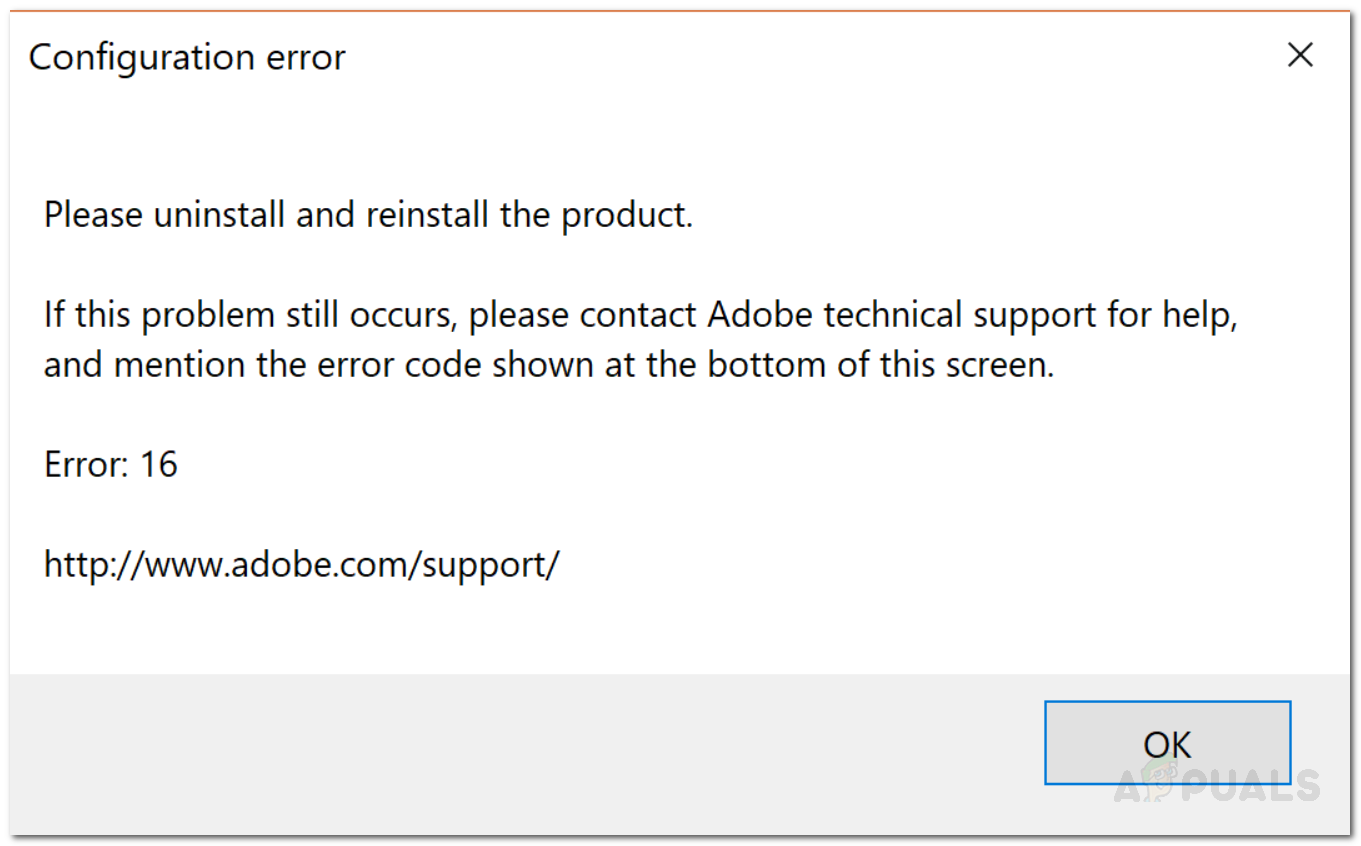
При запуске приложения Creative Cloud отображается ошибка настройки (ошибка 1, 15 или 16), где вам предлагается удалить, а затем переустановить продукт.
Появление этой ошибки означает, что неправильно заданы права доступа к папкам приложения (Adobe PCD или SLStore). Следуйте инструкциям, приведенным ниже, чтобы правильно задать права доступа для вашей операционной системы.
macOS
Windows 10
Windows 8
Windows Vista/7
Windows XP Professional
Windows XP Home
macOS
Задайте права доступа к папкам SLStore и Adobe PCD.
-
В окне Finder найдите папку Library/Application Support/Adobe/SLStore.
-
Нажмите клавишу Control и выберите папку. Выберите команду Get Info (Свойства).
-
Разверните раздел Sharing & Permissions (Общий доступ и права доступа).
-
Щелкните на значке замка в нижнем правом углу. При появлении запроса введите имя пользователя и пароль администратора и нажмите кнопку ОК.
-
Задайте права доступа:
- Система: чтение/запись
- Администратор: чтение/запись
- Все: чтение/запись
-
Щелкните значок шестеренки и выберите Apply to Enclosed Items (Применить к вложенным объектам).
-
Закройте диалоговое окно «О программе».
-
В окне Finder найдите папку Library/Application Support/Adobe/Adobe PCD.
-
Нажмите клавишу Control и выберите папку. Выберите команду Get Info (Свойства).
-
Разверните раздел Sharing & Permissions (Общий доступ и права доступа).
-
Щелкните на значке замка в нижнем правом углу. При появлении запроса введите имя пользователя и пароль администратора и нажмите кнопку ОК.
-
Задайте права доступа:
- Система: чтение/запись
- Администратор: только для чтения
- Все: только для чтения
-
Щелкните значок шестеренки и выберите Apply to Enclosed Items (Применить к вложенным объектам).
-
Закройте диалоговое окно «О программе».
Windows 10
Чтобы устранить ошибку в ОС Windows 10, выполните все указанные ниже действия.
-
Откройте окно Проводника.
-
Перейдите на вкладку Вид, после чего выберите Скрытые элементы.
Выполните эти действия для каждой из папок Adobe PCD и SLStore.
|
ProgramDataAdobeSLStore |
|
|
32-разрядная ОС Windows: Program FilesCommon FilesAdobeAdobe PCD 64-разрядная ОС Windows: Program Files (x86)Common FilesAdobe Adobe PCD |
-
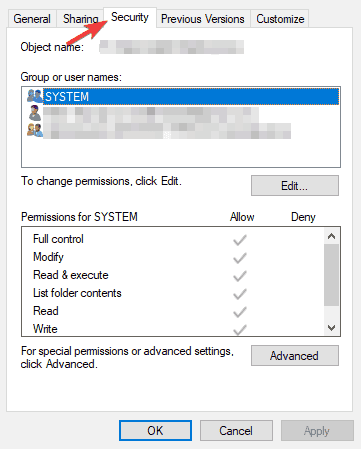
В Проводнике щелкните правой кнопкой мыши папку Adobe PCD или SLStore и выберите Свойства.
-
Перейдите на вкладку Защита, после чего щелкните Редактировать, чтобы задать права доступа:
Adobe PCD
- Администраторы: полный доступ
SLStore
- Администраторы: полный доступ
- Система: полный доступ
- Пользователи: чтение и особые разрешения
-
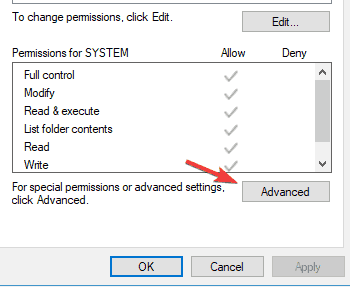
Нажмите кнопку ОК, чтобы закрыть диалоговое окно.
-
В диалоговом окне «Свойства» нажмите Дополнительно.
-
Установите флажок Заменить все разрешения дочернего объекта на разрешения, наследуемые от этого объекта. Нажмите кнопку ОК, а затем Да.
-
Нажмите кнопку ОК, чтобы закрыть диалоговое окно «Свойства SLStore» или «Свойства Adobe PCD».
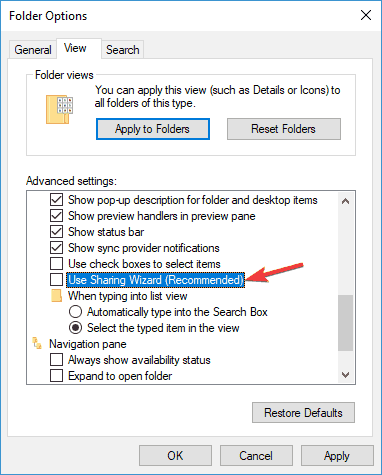
Windows 8
Чтобы устранить ошибку в ОС Windows 8, выполните три указанных ниже действия.
-
Откройте окно Проводника.
-
Перейдите на вкладку Вид и выберите Параметры.
-
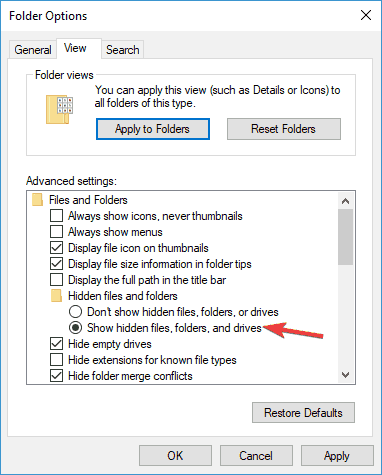
Снимите флажок Использовать мастер общего доступа (рекомендуется) в нижней части раздела Дополнительные параметры.
-
Установите флажок Показывать скрытые файлы, папки и диски.
-
В Проводнике откройте папку ProgramDataAdobeSLStore.
-
Щелкните правой кнопкой мыши папку SLStore и выберите Свойства.
-
В разделе Атрибуты снимите флажок Только чтение.
-
Нажмите кнопку Применить, а затем нажмите кнопку ОК, чтобы закрыть диалоговое окно «Подтверждение изменения атрибутов».
Выполните эти действия для каждой из папок Adobe PCD и SLStore.
|
ProgramDataAdobeSLStore |
|
|
32-разрядная ОС Windows: Program FilesCommon FilesAdobeAdobe PCD 64-разрядная ОС Windows: Program Files (x86)Common FilesAdobe Adobe PCD |
-
В Проводнике щелкните правой кнопкой мыши папку Adobe PCD или SLStore и выберите Свойства.
-
Перейдите на вкладку Безопасность и задайте права доступа:
Adobe PCD
- Администраторы: полный доступ
- Система: полный доступ
SLStore
- Администраторы: полный доступ
- Опытные пользователи: все кроме полного доступа и особых разрешений
- Система: полный доступ
- Пользователи: Чтение и особые разрешения
-
Нажмите кнопку Дополнительно и примите запрос на повышение прав контроля учетных записей пользователей (UAC), если он появится.
-
Откройте вкладку Владелец, выберите Администраторы и нажмите Изменить.
-
Установите флажок Заменить владельца подконтейнеров и объектов. Нажмите кнопку Применить, а затем кнопку ОК.
-
Перейдите на вкладку «Разрешения» и нажмите кнопку Изменить разрешения.
-
Установите флажок Заменить все разрешения дочернего объекта на разрешения, наследуемые от этого объекта. Нажмите кнопку ОК, а затем Да.
-
Нажмите кнопку ОК, а затем нажмите кнопку ОК в диалоговом окне Безопасность Windows.
-
Нажмите кнопку ОК, чтобы закрыть диалоговое окно «Дополнительные параметры безопасности».
Windows Vista/7
Чтобы устранить ошибку в ОС Windows Vista/7, выполните три указанных ниже действия.
-
Выберите Пуск > Компьютер.
-
Выберите Упорядочить > Параметры папок и поиска, затем откройте вкладку Вид.
-
Снимите флажок Использовать мастер общего доступа (рекомендуется) в нижней части раздела Дополнительные параметры.
-
Установите флажок Показывать скрытые файлы, папки и диски.
-
В Проводнике откройте папку ProgramDataAdobeSLStore.
-
Щелкните правой кнопкой мыши папку SLStore и выберите Свойства.
-
В разделе Атрибуты снимите флажок Только чтение.
-
Нажмите кнопку Применить, а затем нажмите кнопку ОК, чтобы закрыть диалоговое окно «Подтверждение изменения атрибутов» .
Выполните эти действия для каждой из папок Adobe PCD и SLStore.
|
ProgramDataAdobeSLStore |
|
|
32-разрядная ОС Windows: Program FilesCommon FilesAdobeAdobe PCD 64-разрядная ОС Windows: Program Files (x86)Common FilesAdobe Adobe PCD |
-
В Проводнике щелкните правой кнопкой мыши папку Adobe PCD или SLStore и выберите Свойства.
-
Перейдите на вкладку Безопасность и задайте права доступа:
Adobe PCD
- Администраторы: Полный доступ
- Система: Полный доступ
SLStore
- Администраторы: Полный доступ
- Опытные пользователи: Все кроме полного доступа и особых разрешений
- Система: Полный доступ
- Пользователи: Чтение и особые разрешения
-
Нажмите кнопку Дополнительно и примите запрос на повышение прав контроля учетных записей пользователей (UAC), если он появится.
-
Откройте вкладку Владелец, выберите Администраторы и нажмите Изменить.
-
Установите флажок Заменить владельца подконтейнеров и объектов. Нажмите кнопку Применить, а затем кнопку ОК.
-
Перейдите на вкладку «Разрешения» и нажмите кнопку Изменить разрешения.
-
Установите флажок Заменить все разрешения дочернего объекта на разрешения, наследуемые от этого объекта. Нажмите кнопку ОК, а затем Да.
-
Нажмите кнопку ОК, а затем нажмите кнопку ОК в диалоговом окне Безопасность Windows.
Windows XP Professional
Чтобы устранить ошибку в ОС Windows XP Pro, выполните три указанных ниже действия.
-
Выберите Пуск > Панель управления.
-
Дважды щелкните пункт Свойства папки, а затем перейдите на вкладку Вид.
-
Снимите флажок Использовать простой общий доступ к файлам (рекомендуется) в нижней части раздела Дополнительные параметры.
-
Установите флажок Показывать скрытые файлы, папки и диски.
-
В Проводнике откройте папку Documents and SettingsAll UsersApplication DataAdobeSLStore.
-
Щелкните правой кнопкой мыши папку SLStore и выберите Свойства.
-
В разделе Атрибуты снимите флажок Только чтение.
-
Нажмите кнопку Применить, а затем нажмите кнопку ОК, чтобы закрыть диалоговое окно Подтверждение изменения атрибутов.
Выполните эти действия для каждой из папок Adobe PCD и SLStore.
|
C:Documents and SettingsAll UsersApplication DataAdobeSLStore |
|
|
32-разрядная ОС Windows: Program FilesCommon FilesAdobeAdobe PCD 64-разрядная ОС Windows: Program Files (x86)Common FilesAdobe Adobe PCD |
-
В Проводнике щелкните правой кнопкой мыши папку Adobe PCD или SLStore и выберитеСвойства.
-
Перейдите на вкладку Безопасность и задайте права доступа:
Adobe PCD
- Администраторы: Полный доступ
- Система: Полный доступ
SLStore
- Администраторы: Полный доступ
- Опытные пользователи: Все кроме полного доступа и особых разрешений
- Система: Полный доступ
- Пользователи: Чтение и особые разрешения
-
Выберите пункт Дополнительно.
-
Откройте вкладку Владелец и выберите Администраторы.
-
Установите флажок Заменить владельца подконтейнеров и объектов. Нажмите кнопку Применить.
-
Перейдите на вкладку Разрешения.
-
Выберите Заменить разрешения для всех дочерних объектов заданными здесь разрешениями, применимыми к дочерним объектам. Нажмите кнопку ОК, а затем Да.
-
Нажмите кнопку ОК, чтобы закрыть диалоговое окно Свойства.
-
Нажмите кнопку ОК, чтобы закрыть диалоговое окно «Дополнительные параметры безопасности».
Windows XP Home
Чтобы устранить ошибку в ОС Windows XP Home, выполните четыре указанных ниже действия.
-
Во время перезагрузки компьютера, но до загрузки Windows нажмите и удерживайте клавишу F8.
-
В списке вариантов загрузки выберите Безопасный режим.
-
Надпись Безопасный режим должна отображаться в каждом углу рабочего стола. Если надпись не отображается, повторите шаги 1–3.
-
Войдите в Windows, используя учетную запись с правами администратора.
-
Выберите Пуск > Панель управления.
-
Дважды щелкните пункт Свойства папки, а затем перейдите на вкладку Вид.
-
Снимите флажок Использовать простой общий доступ к файлам (рекомендуется) в нижней части раздела Дополнительные параметры.
-
Установите флажок Показывать скрытые файлы, папки и диски.
-
В Проводнике откройте папку Documents and SettingsAll UsersApplication DataAdobeSLStore.
-
Щелкните правой кнопкой мыши папку SLStore и выберите Свойства.
-
В разделе Атрибуты снимите флажок Только чтение.
-
Нажмите кнопку Применить, а затем нажмите кнопку ОК, чтобы закрыть диалоговое окно «Подтверждение изменения атрибутов».
Выполните эти действия для каждой из папок Adobe PCD и SLStore.
|
ProgramDataAdobeSLStore |
|
|
32-разрядная ОС Windows: Program FilesCommon FilesAdobeAdobe PCD 64-разрядная ОС Windows: Program Files (x86)Common FilesAdobe Adobe PCD |
-
В Проводнике щелкните правой кнопкой мыши папку Adobe PCD или SLStore и выберите Свойства.
-
Перейдите на вкладку Безопасность и задайте права доступа:
Adobe PCD
- Администраторы: Полный доступ
- Система: Полный доступ
SLStore
- Администраторы: Полный доступ
- Опытные пользователи: Все кроме полного доступа и особых разрешений
- Система: Полный доступ
- Пользователи: Чтение и особые разрешения
-
Выберите пункт Дополнительно.
-
Откройте вкладку Владелец и выберите Администраторы.
-
Выберите Заменить владельца подконтейнеров и объектов и нажмите кнопку Применить.
-
Перейдите на вкладку Разрешения.
-
Выберите Заменить разрешения для всех дочерних объектов заданными здесь разрешениями, применимыми к дочерним объектам. Нажмите кнопку ОК, а затем Да.
-
Нажмите кнопку ОК, чтобы закрыть диалоговое окно Свойства.
-
Нажмите кнопку ОК, а затем нажмите кнопку Да в диалоговом окне Безопасность. Нажмите кнопку ОК еще раз, чтобы закрыть диалоговое окно «Свойства».
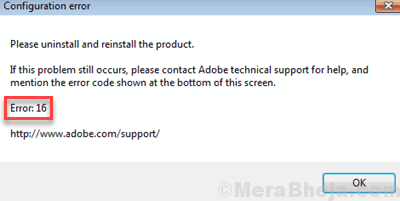
Ошибка 16 в Adobe возникает при попытке запустить любое приложение Creative Cloud – Photoshop, Acrobat и прочие. В сообщении об ошибке указывается что нужно удалить этот продукт, а затем установить его заново. Но после переустановки проблема остается, и снова будут предложены те же действия. Во многих случаях причиной может быть недостаточное разрешение на папку Adobe PCD, в некоторых случаях на каталог SLStore.

С этой неполадкой сталкиваются пользователи не только Windows, но и macOS. Тем не менее, ее просто решить.
Чем вызвана ошибка?
Как было отмечено, проблема вызвана недостаточными разрешениями на каталоги. Когда приложение не может выполнить требуемые операции с файлами из-за ограниченного к ним доступа, прекращает загрузку и выбрасывает сообщение об ошибке 16.
Чтобы ее устранить предоставьте полный доступ на эти каталоги. Также проблему можно решить путем запуска исполняемого файла приложения с администраторскими правами.
Изменение разрешений
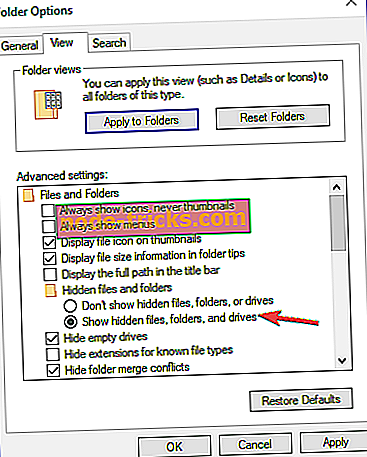
Для устранения ошибки конфигурации с кодом 16 нужно расширить разрешения для папок лицензирования, Adobe PCD и SLStore. Перед выполнением этого решения в проводнике включите опцию просмотра скрытых элементов.
Перейдите в меню Вид и щелкните на стрелку под кнопкой Параметры. Из выпадающего списка выберите «Изменить параметры папок и поиска» и откройте вкладку Вид.
Прокрутите вниз до пункта «Показывать скрытые файлы, папки и диски». Отметьте ее флажком и примените изменения.
Теперь перейдите по пути:
Adobe PCD:
Program Files (x86)Common FilesAdobe Adobe PCD
SLStore:
ProgramDataAdobeSLStore
После выполните следующие шаги:
Кликните правой кнопкой мыши поочередно на каталогах и перейдите в Свойства.
На вкладке Безопасность нажмите на «Изменить».
Для Adobe PCD выделите группу Администраторы и назначьте ему полный доступ.
Относительно SLStore, выделите группы пользователей Система и Администраторы и разрешите полный доступ.
Затем выберите группу Пользователи и разрешите ей Чтение и Особые разрешения. Сохраните изменения на «ОК».
На вкладке Безопасность нажмите «Дополнительно».
В окне дополнительных параметров безопасности нужно сменить владельца, для этого нажмите на «Изменить». В открывшемся окне кликните на «Дополнительно – Найти» и укажите свою учетную запись. Примените изменения на «ОК».
Теперь установите флажок в поле «Замените все записи дочернего объекта наследуемыми…» и нажмите на «ОК».
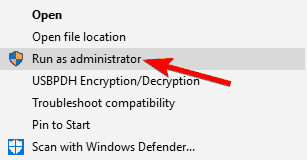
Запуск с правами администратора
Попробуйте запустить приложение, которое вызывает ошибку 16, от имени администратора. Если открывается без каких-либо проблем, то можно настроить так, чтобы постоянно запускалось с администраторскими правами.
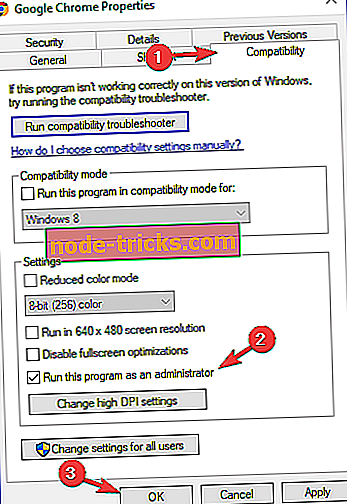
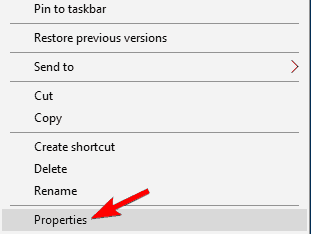
Щелкните правой кнопкой мыши на программе и выберите Свойства.
На вкладке Совместимость отметьте флажком поле «Запускать эту программу от имени администратора» и сохраните на «ОК».
Эта статья будет посвящена тому, как исправить ошибку Adobe 16 в Windows 10, и, надеюсь, многие пользователи Windows 10, использующие программные пакеты Adobe, найдут эту часть очень полезной и поучительной.
Ошибка Adobe 16 может помешать вам запускать ваши любимые приложения Adobe, и, говоря об этой ошибке, вот некоторые похожие проблемы, о которых сообщили пользователи:
- Ошибка Adobe 16, пожалуйста, удалите и переустановите продукт. Иногда эта ошибка может появляться при попытке запуска определенных приложений Adobe. Если это произойдет, полностью удалите проблемное приложение и установите его снова.
- Ошибка Adobe 16 Windows 10, 8.1, 7 — эта ошибка может появляться в любой версии Windows, и более старые версии, такие как Windows 8.1 и 7, не являются исключениями. Даже если вы не используете Windows 10, вы сможете применить почти все наши решения к более старым версиям Windows.
- Ошибка 16 Adobe Photoshop CS6, Adobe InDesign CS6, Adobe Premiere Pro CC — многие пользователи сообщали об этой проблеме в таких приложениях, как Photoshop, InDesign и Premiere Pro. Если у вас возникла эта проблема, попробуйте запустить приложения от имени администратора и проверьте, помогает ли это.
- Adobe Reader, Adobe After Effects, ошибка Adobe XD 16 — эта ошибка иногда может появляться в таких приложениях, как Reader, After Effects и XD. Если это произойдет, попробуйте создать каталог SLStore и проверьте, решает ли это проблему.
Решение 1. Запустите приложение Creative Cloud с правами администратора.
По словам пользователей, иногда ошибка Adobe 16 может появляться, если у вас нет необходимых привилегий. Пользователи утверждают, что вам нужны административные привилегии для запуска приложений Creative Cloud. Однако вы всегда можете запустить приложение с правами администратора, выполнив следующие действия:
- Найдите приложение Creative Cloud на своем ПК.
- Щелкните правой кнопкой мыши приложение и в меню выберите « Запуск от имени администратора» .

Если этот метод работает для вас, вам придется повторять его каждый раз, когда вы хотите запустить Creative Cloud. Однако вы можете принудительно запустить приложение с правами администратора, выполнив следующие действия:
- Щелкните правой кнопкой мыши приложение Creative Cloud и в меню выберите « Свойства» .
- Когда откроется окно « Свойства», перейдите на вкладку « Совместимость » и установите флажок « Запустить эту программу от имени администратора» . Теперь нажмите Apply и OK, чтобы сохранить изменения.
После этого приложение всегда должно запускаться с правами администратора, и проблема должна быть решена.
Решение 2. Восстановите разрешения для папок лицензирования
Приведенные ниже инструкции помогут вам установить разрешения для папок Adobe PCD и SLStore в Windows 10. Для этого выполните следующие действия:
- Откройте окно проводника.
- Перейдите на вкладку « Вид », а затем нажмите « Параметры» .
- Снимите флажок « Использовать мастер общего доступа» (рекомендуется) в нижней части раздела «Дополнительные настройки».
- Выберите Показать скрытые файлы, папки и диски .
- Нажмите Ok .


Выполните следующую процедуру дважды, по одному для папок Adobe PCD и SLStore . Выполните эту процедуру два раза, по одному для папок Adobe PCD и SLStore . Вы можете найти эти папки в следующих местах:
- SLStore : ProgramDataAdobeSLStore
- Adobe PCD: 32-разрядная версия Windows: программные файлыОбщие файлы AdobeAdobe PCD или 64-разрядная версия Windows: программные файлы (x86) Общие файлы Adobe Adobe PCD
- В Проводнике файлов щелкните правой кнопкой мыши на Adobe PCD или в папке SLStore и выберите « Свойства» .
- Перейдите на вкладку « Безопасность » и установите разрешения:
Adobe PCD
- Администраторы: полный контроль
- Система: Полный контроль
SLStore
- Администраторы: Полный контроль Опытные пользователи: все, кроме полного контроля и специальных
- Система: Полный контроль
- Пользователи: чтение и специальные
Теперь вам просто нужно сменить владельца, выполнив следующие действия:
- Нажмите « Дополнительно» и, если потребуется, примите запрос на повышение прав контроля учетных записей (UAC).
- Нажмите раздел « Владелец », выберите « Изменить» .
- Введите желаемое имя пользователя и нажмите « Проверить имена» . Теперь нажмите ОК .
- Выберите « Заменить владельца» на подконтейнерах и объектах . Теперь установите флажок Заменить все записи разрешений объекта Chide и нажмите Применить и OK, чтобы сохранить изменения.

Решение 3. Обновите драйвер видеокарты
По словам пользователей, иногда вы можете исправить ошибку Adobe 16, просто обновив драйверы видеокарты. Многие пользователи утверждают, что им удалось решить проблему, просто обновив свои драйверы, поэтому вы можете попробовать это.
Обновление драйвера вашей видеокарты довольно просто, и для этого вам просто нужно зайти на сайт производителя вашей видеокарты и загрузить последнюю версию для вашей модели. У нас также есть подробное руководство по обновлению драйвера видеокарты, так что вы можете проверить его.
Если вы не хотите загружать драйверы вручную, вы также можете использовать автоматизированное программное обеспечение, которое загружает необходимые драйверы для вас одним щелчком мыши.
Решение 4 — Создайте новую папку SLStore
По словам пользователей, иногда ошибка Adobe 16 может возникнуть, если на вашем компьютере нет каталога SLStore. Этот каталог должен находиться в каталоге установки вашего продукта Adobe, но если по какой-либо причине он отсутствует, вы можете столкнуться с этой ошибкой. Чтобы решить проблему, вам нужно сделать следующее:
- Перейдите в C: Program FilesAdobe и перейдите в каталог приложения, которое вы пытаетесь запустить.
- Теперь щелкните правой кнопкой мыши пустое пространство и выберите « Создать»> «Папка» в меню.
- Введите SLStore в качестве имени новой папки.
Теперь попробуйте снова запустить приложение и проверьте, решена ли проблема.
Решение 5 — Установите Adobe Application Manager
Если вы продолжаете получать ошибку Adobe 16, вы можете решить проблему, просто установив Adobe Application Manager. Это инструмент, созданный Adobe, и вы можете бесплатно загрузить его с веб-сайта Adobe.
После загрузки и установки Adobe Application Manager проблема должна быть полностью решена, и вы сможете без проблем запускать приложения.
Решение 6 — Вставьте adbeape.dll в установочный каталог
Иногда отсутствующие файлы DLL могут вызвать ошибку Adobe 16, но вы можете решить проблему, скопировав adbeape.dll в установочный каталог. Чтобы получить этот файл, лучше всего скопировать его вручную с другого компьютера, на котором установлены продукты Adobe.
После того, как вы скопируете этот файл в каталог установки, просто запустите проблемное приложение от имени администратора, и проблема должна быть решена.
Решение 7 — Изменить атрибуты каталога SLStore
Как мы уже упоминали в одном из наших предыдущих решений, каталог SLStore может иногда вызывать ошибку Adobe 16 . Однако вы можете решить эту проблему, просто изменив несколько атрибутов папки SLStore.
Для этого просто выполните следующие действия:
- Найдите каталог SLStore . Он должен находиться в каталоге установки Adobe CC.
- Найдя его, щелкните правой кнопкой мыши SLStore и выберите « Свойства» в меню.
- Теперь найдите раздел « Атрибуты » и убедитесь, что опция « Только чтение» не включена. Теперь нажмите Apply и OK, чтобы сохранить изменения.
После внесения этих изменений, попробуйте снова запустить приложение и проверьте, сохраняется ли проблема.
Решение 8. Переустановите продукты Adobe
Если вы продолжаете получать ошибку Adobe 16, вы можете решить эту проблему, просто переустановив приложение. Иногда ваша установка может быть повреждена, что может привести к этой и многим другим ошибкам.
Чтобы решить эту проблему, рекомендуется удалить проблемный продукт Adobe с вашего ПК. Помимо удаления приложения, вам также необходимо удалить следующие каталоги:
- C: Программные файлы Adobe
- C: Program FilesCommon Files. Adobe
- C: Программные файлы (x86) Adobe
- C: Программные файлы (x86) Общие файлы Adobe
- C: ProgramDataAdobe
Удалив эти каталоги, вы убедитесь, что все оставшиеся файлы удалены. После этого просто установите приложение еще раз, и проблема должна быть полностью решена.
Удаление оставшихся файлов вручную может быть проблемой, но есть специальные инструменты, которые могут помочь вам в этом. Если вы хотите полностью удалить приложение с вашего компьютера, включая оставшиеся файлы и записи реестра, вы можете легко сделать это с помощью специализированных приложений.
Программное обеспечение деинсталлятора — это специальное приложение, которое удаляет выбранное приложение вместе со всеми его файлами и записями реестра. Если вы ищете хорошее программное обеспечение для удаления, мы рекомендуем вам попробовать Revo Uninstaller .
После удаления проблемного приложения с помощью этого инструмента просто установите его снова, и проблема должна быть полностью решена.
Как видите, исправить ошибку Adobe 16 относительно просто, и мы надеемся, что вы решили эту проблему с помощью одного из наших решений.
Adobe Error 16 — это обычная ошибка, возникающая в приложениях Adobe CC (Creative Cloud) или Adobe CS (Creative Suite). Эта ошибка может возникнуть при запуске любого из приложений Adobe CC или CS, таких как Adobe Photoshop, Illustrator, Acrobat Reader, Dreamweaver, Indesign, Lightroom и т. д. Появится 16 всплывающих окон.
В этой статье я помогу вам найти решения для исправления ошибки Adobe 16, которая в основном не позволяет вам использовать какие-либо приложения Adobe.
Но прежде чем мы приступим к решениям, давайте разберемся, каковы причины, которые могут привести к ошибке Adobe 16. Это поможет вам решить проблему более удобно. Причины могут быть:
- Приложения Adobe не имеют надлежащих разрешений для работы.
- Загружен поврежденный или несовместимый установочный файл.
- Поврежденные или отсутствующие файлы реестра Windows.
Давайте попробуем исправить проблему Adobe Error 16 с помощью различных методов, которые оказались полезными для других пользователей.
#1 – Запустите приложение Adobe с правами администратора
Adobe Error 16 — это обычная ошибка, возникающая в приложениях Adobe CC (Creative Cloud) или Adobe CS (Creative Suite). Эта ошибка может возникнуть при запуске любого из приложений Adobe CC или CS, таких как Adobe Photoshop, Illustrator, Acrobat Reader, Dreamweaver, Indesign, Lightroom и т. д. Появится 16 всплывающих окон.
В этой статье я помогу вам найти решения для исправления ошибки Adobe 16, которая в основном не позволяет вам использовать какие-либо приложения Adobe.
Но прежде чем мы приступим к решениям, давайте разберемся, каковы причины, которые могут привести к ошибке Adobe 16. Это поможет вам решить проблему более удобно. Причины могут быть:
- Приложения Adobe не имеют надлежащих разрешений для работы.
- Загружен поврежденный или несовместимый установочный файл.
- Поврежденные или отсутствующие файлы реестра Windows.
Давайте попробуем исправить проблему Adobe Error 16 с помощью различных методов, которые оказались полезными для других пользователей.
Как исправить ошибку Adobe 16 в Windows 10 и Windows 11
#1 – Запустите приложение Adobe с правами администратора
Шаг 1: Найдите приложение в окне поиска Windows 10 и нажмите на местоположение открытого файла.
Шаг 2: Теперь щелкните правой кнопкой мыши значок приложений Adobe и выберите параметр «Свойства» в контекстном меню.
Шаг 3: Перейдите на вкладку «Совместимость» в окне «Свойства». Здесь установите флажок «Запускать эту программу от имени администратора».
Теперь нажмите «ОК», чтобы применить изменения. Программа Adobe будет открываться с правами администратора каждый раз, когда вы открываете ее сейчас. Вы можете выполнить тот же процесс для других приложений Adobe, которые отображают ошибку Adobe 16 при открытии.
Если запуск приложения Adobe с правами администратора не помог, попробуйте следующее решение.
#2 – Установите Adobe Application Manager
Менеджер приложений Adobe это бесплатное программное обеспечение, предназначенное для устранения ошибки Adobe 16 и различных других проблем, которые могут возникнуть в приложениях Adobe. Чтобы решить эту проблему, вы можете загрузить Adobe Application Manager на свой компьютер. После загрузки запустите и посмотрите, решит ли это проблему. Если нет, перейдите к следующему способу.
№3 — Создание новой папки SLStore для исправления Adobe Error 16
Некоторые пользователи, проходящие через Способ №2 упомянутые выше также жаловались, что у них нет папки SLStore. Недоступность папки SLStore также может вызвать ошибку Adobe 16 в Windows 10. Этот каталог обычно присутствует в каталоге установки (диск, на котором установлено приложение) продуктов Adobe, но если каталог отсутствует по какой-либо причине , вы можете выполнить следующие действия, чтобы решить эту проблему:
Прежде чем продолжить, убедитесь, что скрытые файлы отображаются. Просто откройте проводник, а затем нажмите «Просмотр» и отметьте скрытые элементы.
Шаг 1: Сначала откройте диск C: на своем ПК, затем перейдите в ProgramData. Там вы найдете папку с именем Adobe. Дважды щелкните по нему, чтобы открыть.
Шаг 2: Теперь каталог приложения Adobe находится там, где находится SLStore. Если папки SLStore нет, щелкните правой кнопкой мыши пустое место и выберите «Новая папка» в параметрах. Назовите новую папку как SLStore.
Теперь попробуйте запустить приложение. Надеюсь, вы сможете получить к нему доступ. Но если вы все еще получаете ошибку Adobe 16, попробуйте следующий метод.
#4 – Восстановление прав доступа к папкам Adobe PCD и SLStore
Если папки Adobe PCD и SLStore не имеют разрешения apt, они могут вызвать ошибку Adobe 16 в окне 10. Ниже приведены шаги, которые помогут вам предоставить разрешение папкам Adobe PCD и SLStore:
Шаг 1: Откройте окно проводника (окно проводника — это просто любая папка, которую вы открываете). Теперь в верхней части окна вы найдете несколько вкладок, щелкните вкладку «Вид».
Шаг 2: Теперь в крайнем правом углу вы найдете «Параметры», нажмите на него.
Шаг 3: Откроется новое окно. Перейдите на вкладку «Вид» и на панели «Дополнительные параметры» вы найдете множество параметров. Снимите флажок «Использовать мастер общего доступа».
Шаг 4: Выберите «Показать скрытые файлы, папки и диски» и нажмите «ОК».
Теперь вам нужно предоставить некоторые разрешения для обеих папок, чтобы исправить постоянно появляющуюся ошибку Adobe 16. Вы можете найти обе эти папки по адресам папок, указанным ниже:
Для папки SLStore перейдите по адресу: —
C: > ProgramData > Adobe > SLStore
Для папки Adobe PCD перейдите по адресу: –
В 32-разрядной версии Windows: Диск Windows (C:) > Program Files > Common Files > Adobe > AdobePCD
В 64-разрядной версии Windows: Диск Windows (C:) > Program Files (x86) > Общие файлы > Adobe > AdobePCD
Перейдите в каждое из мест, чтобы найти папку SLStore и Adobe PCD, и отредактируйте разрешения для обеих папок по одному, как показано ниже.
Щелкните правой кнопкой мыши папку и выберите «Свойства».
Перейдите на вкладку «Безопасность» и установите разрешения пользователя.
Предоставьте разрешения каждому пользователю в соответствующих папках, как указано ниже в разделах «Папка Adobe PCD» и «Папка SLStore».
Для этого нажмите кнопку «Изменить».
Откроется новое окно. Здесь выберите пользователя, как указано ниже, затем выберите соответствующее разрешение в разделе «Разрешение для всех»:
Папка Adobe PCD:
Администраторы: полный доступ
Система: Полный контроль
Папка SLStore:
Администраторы: полный доступ
Опытные пользователи: все, кроме полного доступа и специального
Система: Полный контроль
Пользователи: читающие и специальные
Чтобы окончательно исправить ошибку Adobe 16, вам также необходимо изменить владельца, выполнив следующие действия:
На вкладке «Безопасность», где мы предоставили разрешения выше, вы найдете поле «Дополнительно». Нажмите на нее и, если будет предложено, примите запрос на повышение прав контроля учетных записей (UAC).
Теперь перейдите в раздел «Владелец» и выберите «Изменить» рядом с именем владельца. Выберите имя текущего пользователя и нажмите «Проверить имена», чтобы выбрать пользователя из списка. После этого нажмите ОК.
Выберите «Заменить владельца подконтейнеров и объектов». Теперь вам нужно установить флажок «Заменить все записи разрешений дочерних объектов», доступный в нижней части окна. Затем нажмите OK, чтобы сохранить изменения.
Теперь проверьте, сохраняется ли проблема после этого метода или нет. Если да, читайте дальше, чтобы найти другие решения.
№ 5. Добавьте отсутствующий файл DLL в каталог установки Adobe.
Отсутствие файлов DLL может быть еще одной серьезной причиной, по которой вы можете получить ошибку Adobe 16. Обычно файл adbeape.dll отсутствует в папке установки Adobe и вызывает ошибку. Вы можете легко решить эту проблему, вставив файл adbeape.dll в папку, где установлено приложение Adobe.
Вы должны получить этот файл .dll с другого компьютера, на котором установлен и успешно работает продукт Adobe.
После вставки файла .dll попробуйте запустить приложение от имени администратора.
Если проблема не решена, попробуйте следующий метод.
№ 6. Переустановите приложения Adobe, чтобы исправить ошибку Adobe 16 в Windows 10.
Если вы постоянно получаете ошибку Adobe 16, было бы неплохо переустановить приложения Adobe на вашем ПК. Установленное приложение или файлы могут быть повреждены, что приводит к ошибке.
Просто перейдите в «Панель управления» > «Программы и компоненты», затем удалите все программы Adobe, установленные на вашем ПК.
Но прежде чем вы снова установите программы Adobe, вам также придется навсегда удалить следующие каталоги с вашего ПК. Удаление этих файлов гарантирует, что вы избавились от всех поврежденных файлов Adobe.
Чтобы навсегда удалить папку или файл, выполните следующие действия:
1. Один раз щелкните папку или файл.
2. Нажмите одновременно клавишу Shift и клавишу Delete.
3. Нажмите Да, и папка или файл будут удалены навсегда.
Примечание. Безвозвратное удаление папки или файла означает, что они не будут найдены ни в папке, содержащей их, ни в корзине.
Теперь, чтобы удалить все существующие файлы Adobe на вашем компьютере. Следующие каталоги и файлы в них подлежат удалению:
C: > Программные файлы > Adobe
C: > Program Files > Common Files > Adobe
C: > Program Files (x86) > Adobe
C:> Program Files (x86)> Общие файлы> Adobe
C: > Программа > Данные > Adobe
Как только вы удалите все эти папки, на вашем компьютере не будет поврежденных файлов Adobe.
Теперь сделайте новую установку приложений Adobe по вашему выбору, и ошибка Adobe 16 больше не появится.
Существует несколько других общих методов, которые вы можете использовать для исправления ошибки Adobe 16 в Windows 10. Говорят, что эти методы исправили ошибку, но они могут не работать в большинстве сценариев. Вот некоторые из этих методов:
1. Обновление драйвера видеокарты. Если драйвер видеокарты вашего ПК устарел, вы можете попробовать обновить его до последней версии. Эта статья об обновлении драйвера в Windows 10 может помочь.
2. Обновите Windows. Все проблемы могут быть вызваны устаревшей версией Windows. Если ваше обновление Windows ожидает обновления, попробуйте обновить его, чтобы узнать, как обстоят дела с исправлением ошибки Adobe 16 в Windows 10.
3. Очистите временные файлы Windows. Излишние временные файлы также могут вызвать эту ошибку. Попробуйте очистить папки с временными файлами и проверьте, устранена ли ошибка.
Я надеюсь, что эти методы исправления Adobe Error 16 помогли вам. Если это так, пожалуйста, укажите в комментариях, какой из них помог вам.
by Milan Stanojevic
Milan has been enthusiastic about technology ever since his childhood days, and this led him to take interest in all PC-related technologies. He’s a PC enthusiast and he… read more
Updated on August 31, 2022
- This article will focus on how to fix Adobe error 16 on Windows 10 that can prevent you from using your Adobe products.
- This error can occur on any Adobe product. For instance, you can have a Photoshop error 16.
- You can fix an Adobe Photoshop error 16 try uninstalling and reinstalling Adobe Creative Cloud.
- Another solution is to look at the administrative rights for the Creative Cloud app.

XINSTALL BY CLICKING THE DOWNLOAD FILE
This software will repair common computer errors, protect you from file loss, malware, hardware failure and optimize your PC for maximum performance. Fix PC issues and remove viruses now in 3 easy steps:
- Download Restoro PC Repair Tool that comes with Patented Technologies (patent available here).
- Click Start Scan to find Windows issues that could be causing PC problems.
- Click Repair All to fix issues affecting your computer’s security and performance
- Restoro has been downloaded by 0 readers this month.
This article will focus on how to fix Adobe error 16 on Windows 10 and hopefully, a lot of Windows 10 users using Adobe software suites will find this piece very helpful and instructive.
Adobe error 16 can prevent you from running your favorite Adobe applications, and speaking of this error, here are some similar issues that users reported:
- Adobe error 16 please uninstall and reinstall the product – Sometimes this error can appear while trying to run certain Adobe applications. If that happens, completely remove the problematic application and install it again.
- Adobe error 16 Windows 10, 8.1, 7 – This error can appear on any version of Windows, and older versions such as Windows 8.1 and 7 aren’t exceptions. Even if you don’t use Windows 10, you should be able to apply almost all of our solutions to older versions of Windows.
- Error 16 Adobe Photoshop CS6, Adobe InDesign CS6, Adobe Premiere Pro CC – Many users reported this problem in applications such as Photoshop, InDesign, and Premiere Pro. If you have this problem, try running the applications as an administrator and check if that helps.
- Adobe Reader, Adobe After Effects, Adobe XD error 16 – This error can sometimes appear in applications such as Reader, After Effects, and XD. If this happens, try creating a SLStore directory and check if that solves the problem.
How can I fix the Adobe error 16 on Windows 10?
1. Uninstall and re-install Adobe Creative Cloud
1.1 Uninstalling Adobe Creative Cloud
- Hold Win+X buttons and click on App and Features
- Search for the Adobe Creative Cloud and click on uninstall.
- Follow the instructions to complete the uninstallation process.
1.2 Reinstalling Adobe Creative Cloud
- Download Adobe Creative Cloud.
- Sign in with your login details.
- Click the Download button and follow the instructions.
Having a problematic installation of an Adobe product can be sometimes linked to the Creative Cloud. That is why the first and the safest way is to remove and re-install the Creative Cloud.
2. Launch the Creative Cloud app with Administrator rights
2.1 Use a recurrent method
- Locate Creative Cloud application on your PC.
- Right-click the application and choose Run as administrator from the menu.

If nothing happens when you click on Run as administrator, your may need to take care of that issue before moving any further. Try to run an antivirus scan or create a different user account.
If this method works for you, you’ll have to repeat it every time you want to run Creative Cloud. However, you can force the application to always run with administrative privileges by doing the following step.
2.2 Run Creative Cloud as an administrator all the time
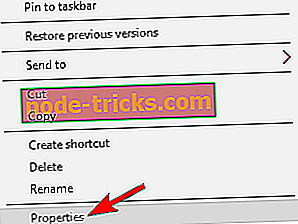
- Right-click Creative Cloud application and choose Properties from the menu.

- Go to the Compatibility tab and check Run this program as an administrator. Now click Apply and OK to save the changes.

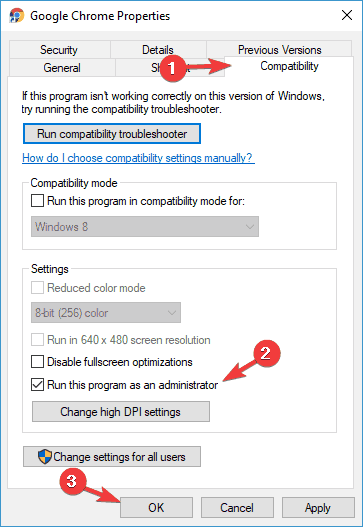
After doing that the application should always start with administrative privileges and the problem should be resolved.
According to users, sometimes Adobe error 16 can appear if you don’t have the necessary privileges. Users claim that you need administrative privileges in order to run Creative Cloud applications.
3. Restore permissions to licensing folders
3.1 Show hidden files and folders
- Open a File Explorer window.
- Click the View tab and then click Options.

- Deselect Use Sharing Wizard (Recommended) at the bottom of the Advanced Settings section.

- Select Show hidden files, folders and drives.
- Click Ok.

3.2 Change permissions for Adobe PCD and SLStore
- In File Explorer, right-click the Adobe PCD or the SLStore folder, and choose Properties.
- Click the Security tab and set permissions:

Adobe PCD
- Administrators: Full Control
- System: Full Control
SLStore
- Administrators: Full Control Power Users: Everything but Full Control and Special
- System: Full Control
- Users: Read and Special
Perform this procedure two times, once each for the Adobe PCD and the SLStore folders. You can find these folders in the following locations:
- SLStore: ProgramDataAdobeSLStore
- Adobe PCD: Windows 32 bit: Program FilesCommon FilesAdobeAdobe PCD or Windows 64 bit: Program Files (x86)Common FilesAdobe Adobe PCD
3.3 Change ownership
- Click Advanced and, if asked, accept the User Account Control (UAC) elevation prompt.

- Click the Owner section, select Change.

- Enter the desired username and click Check Names. Now click OK.
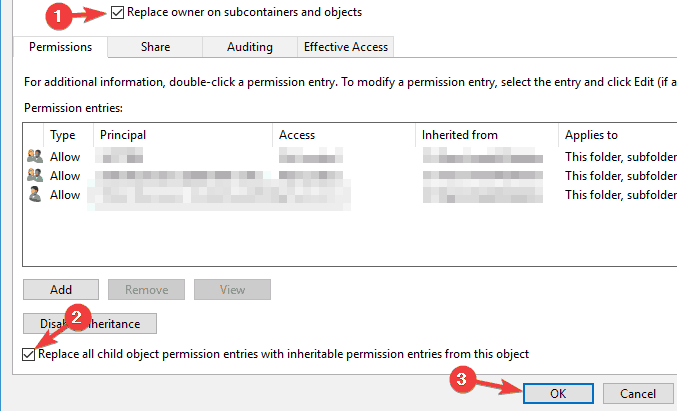
- Select Replace Owner on Subcontainers and Objects. Now check Replace all chide object permission entries and click Apply and OK to save the changes.


The instructions above will help you set permissions to the Adobe PCD and SLStore folders in Windows 10.
4. Update your graphics card driver
According to users, sometimes you might be able to fix Adobe error 16 simply by updating your graphics card drivers.
Many users claim that they managed to solve the issue simply by updating their drivers, so you might want to try that.
Updating your graphics card driver is quite simple, and in order to do it, you just have to visit your graphics card manufacturer’s website and download the latest version for your model.
We also have a detailed guide on how to update the graphics card driver, so you might want to check it out.
If you don’t want to download drivers manually, you can also use automated software that will download the necessary drivers for you with just a single click.
5. Create a new SLStore folder
- Go to the following folder and navigate to the directory of the application you’re trying to run:
C:Program FilesAdobe - Now right-click the empty space, and choose New, then select Folder from the menu.
- Enter SLStore as the name of the new folder.
Now try to start the application again and check if the problem is resolved.
Some PC issues are hard to tackle, especially when it comes to corrupted repositories or missing Windows files. If you are having troubles fixing an error, your system may be partially broken.
We recommend installing Restoro, a tool that will scan your machine and identify what the fault is.
Click here to download and start repairing.
According to users, sometimes Adobe error 16 can occur if you don’t have the SLStore directory on your PC.
This directory should be located in the installation directory of your Adobe product, but if the directory is missing for some reason, you might encounter this error.
If you experience the cannot create a new folder in Windows 10 error, check your antivirus or try to fix your registry.
If you keep getting Adobe error 16, you might be able to fix the problem simply by installing Adobe Application Manager. This is a tool created by Adobe, and you can download it for free from Adobe’s website.
Once you download and install Adobe Application Manager, the issue should be completely resolved and you’ll be able to run applications without any problems.
7. Paste adbeape.dll into the installation directory
Sometimes missing DLL files can cause Adobe error 16 to appear, but you might be able to solve the problem by copying adbeape.dll to the installation directory.
To obtain this file, it’s best to copy it manually from another PC that has Adobe products installed.
Once you copy this file to the installation directory, simply run the problematic application as an administrator and the issue should be resolved.
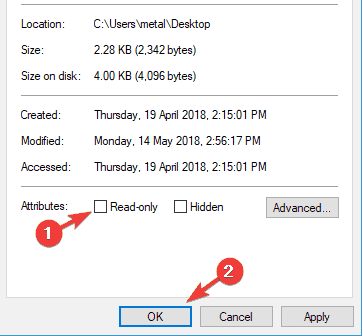
8. Change the attributes of the SLStore folder
- Locate the SLStore folder It should be located in the Adobe CC installation folder.
- Once you locate it, right-click SLStore and choose Properties from the menu.
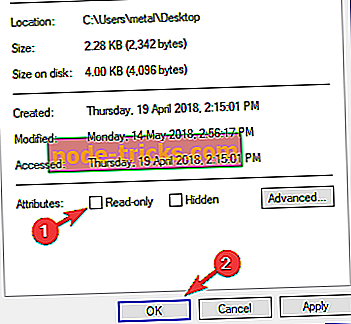
- Locate the Attributes section and make sure that the Read-only option isn’t enabled. Now click Apply and OK to save the changes.

After making these changes, try to start the application again and check if the problem is still there.
As we already mentioned in one of our previous solutions, the SLStore directory can sometimes cause the Adobe error 16 to appear.
However, you can fix the issue simply by changing a few attributes from the SLStore folder.
9. Reinstall your Adobe products
If you keep getting Adobe error 16, you might be able to solve the problem simply by reinstalling the application. Sometimes your installation might be corrupted and that can lead to this and many other errors.
To fix the problem, it’s advised to remove the problematic Adobe product from your PC. In addition to uninstalling the application, you also need to remove the following directories:
C:Program FilesAdobe
C:Program FilesCommon FilesAdobe
C:Program Files (x86)Adobe
C:Program Files (x86)Common FilesAdobe
C:ProgramDataAdobe
By removing these directories you’ll ensure that all leftover files are removed. After doing that, simply install the application again and the issue should be resolved completely.
Removing leftover files manually can be a problem, but there are special tools that can help you with that.
If you want to completely remove an application from your PC, including both leftover files and registry entries, you can do that easily with specialized applications.
Uninstaller software are specialized tools that will remove the selected application along with all of its files and registry entries.
Manual uninstallations from the apps GUI or from Windows settings may leave these unwanted files behind, cluttering your PC and preventing you from properly reinstalling the application in the future.
The best uninstaller software available are equipped with forced uninstall features that can remove stubborn or malicious apps without having any negative impact on your system.
After you remove the problematic application with a specialized tool, simply install it again and the issue should be completely resolved.
If you have any difficulties, we have a complete guide on how you can remove software leftovers from your Windows 10 PC.
As you can see, fixing the Adobe error 16 is relatively simple, and we hope that you solved this problem by using one of our solutions.
If you have any other suggestions or questions, don’t hesitate to leave them in the comments section below and we’ll be sure to check them out.
Still having issues? Fix them with this tool:
SPONSORED
If the advices above haven’t solved your issue, your PC may experience deeper Windows problems. We recommend downloading this PC Repair tool (rated Great on TrustPilot.com) to easily address them. After installation, simply click the Start Scan button and then press on Repair All.
![]()
Newsletter
-

-
May 4 2010, 13:57
Многие сейчас усиленно пробуют установить CS5 (ибо пираты не дремлют, торенты раскалены до предела :-)) И у кого до этого стоит CS4 одна и та же проблема — Error 16, переустановите заново.
На официальном сайте есть подсказка, но мало кто до неё доходит и мало кто оказывается понимает. А надо всего лишь снять атрибут «только для чтения» C:Program FilesCommon FilesAdobeAdobe PCDcache
…
Этот атрибут советовали ставить (а некоторые активаторы CS4-го ставили автоматом сами) чтобы Адоба во время обновления продукта не засекла крякнутый серийник. Но если сейчас прописаны все 127.0.0.0 на сервера обновления Adobe в файле hosts (в каждой инструкции с CS5 есть), то это уже не требуется.
…
У КОГО УЖЕ С УСТАНОВЛЕННЫМ И РАБОТАВШИМ РАНЕЕ ФОТОШОПОМ CS5 ВЫДАЕТ «ОШИБКУ 16» НА СТАРТЕ:
1)Перейдите в папку Program FilesCommon FilesAdobe
2)Найдите папку Adobe PCD и нажав правой кнопкой мыши зайдите в её свойства.
3)На вкладке «общие» снимите галочку напротив пункта «Только для чтения»
4)Перейдите в вкладку «Безопасность»
5)Выберите в листе «Группы и пользователи» пункт «Все»
6)Нажмите «Изменить»
7)Установите галочку напротив «Полный доступ — Разрешить»
8)Тоже самое следует сделать для групп «System» и «Администратор»
9)Запустите приложение.
…
Чтобы не слетел серийник добавляем следующее
содержимое в файл hosts в папке C:Windowssystem32driversetchosts
127.0.0.1 activate.adobe.com
127.0.0.1 static3.cdn.ubi.com
127.0.0.1 ubisoft-orbit.s3.amazonaws.com
127.0.0.1 onlineconfigservice.ubi.com
127.0.0.1 orbitservice.ubi.com
127.0.0.1 ubisoft-orbit-savegames.s3.amazonaws.com
127.0.0.1 activate.adobe.com
127.0.0.1 activate-sjc0.adobe.com
127.0.0.1 adobeereg.com
127.0.0.1 practivate.adobe.com
127.0.0.1 ereg.adobe.com
127.0.0.1 www.adobeereg.com
127.0.0.1 activate.wip3.adobe.com
127.0.0.1 wip3.adobe.com
127.0.0.1 3dns-3.adobe.com
127.0.0.1 3dns-2.adobe.com
127.0.0.1 adobe-dns.adobe.com
127.0.0.1 adobe-dns-2.adobe.com
127.0.0.1 adobe-dns-3.adobe.com
127.0.0.1 ereg.wip3.adobe.com
127.0.0.1 activate-sea.adobe.com
127.0.0.1 wwis-dubc1-vip60.adobe.com
127.0.0.1 activate-sjc0.adobe.com
127.0.0.1 wwis-dubc1-vip60.adobe.com
127.0.0.1 192.150.18.108
127.0.0.1 adobeereg.com
127.0.0.1 http://www.adobeereg.com
127.0.0.1 activate.adobe.com
127.0.0.1 http://activate.adobe.com
127.0.0.1 http://www.activate.adobe.com
127.0.0.1 activate-sea.adobe.com
127.0.0.1 http://activate-sea.adobe.com
127.0.0.1 http://www.activate-sea.adobe.com
127.0.0.1 activate-sjc0.adobe.com
127.0.0.1 http://activate-sjc0.adobe.com
127.0.0.1 http://www.activate-sjc0.adobe.com
127.0.0.1 wwis-dubc1-vip60.adobe.com
127.0.0.1 http://wwis-dubc1-vip60.adobe.com
127.0.0.1 http://www.wwis-dubc1-vip60.adobe.com
127.0.0.1 192.150.18.108
127.0.0.1 http://192.150.18.108
127.0.0.1 http://www.192.150.18.108
127.0.0.1 activate.adobe.com:443
127.0.0.1 http://activate.adobe.com:443
127.0.0.1 http://www.activate.adobe.com:443
.
ВНИМАНИЕ!
У кого софт установлен в офисе и где интернет идет через прокси-сервер (при коллективном пользовании) — редактирование файла Hosts — НЕ ПОМОЖЕТ!
В таких случаях надо найти в папке Program Files/Adobe ввсе файлы amtlib.dll и заменить вот этим: (по ссылке есть и 32, и 64-разрядная версия) — xttp://ifolder.ru/22604586 (если ссылка пропала — пишите коммент с просьбой в любой мой пост в мой дневник)
UPD: Добавлен текст файла hosts чтоб не слетал серийник.
UPD-2: Добавлена информация для тех у кого слетел серийник ни-с-того-ни-с-сего на уже установленном Фотошопе.
UPD-3: Добавлен метод кряка для тех кто сидит в офисе и у кого интернет через прокси-сервер идет: им не поможет файл hosts, надо заменять в каждой папке приложения файл amtlib.dll
When you launch Adobe Photoshop application, you see a Photoshop configuration error 16, asking you to uninstall and reinstall your Adobe application.
Using the following steps, this adobe configuration Error 16, Error 15, and Error 1 can be easily solved on both Windows and macOS including Windows 11 and macOS Monterey.
Reasons For Photoshop Error 16
- The most probable cause for Photoshop error 16 is incorrect permission settings to the Adobe application folders (SLStore and Adobe PCD).
- When Adobe Photoshop installation is improperly performed then you may come across multiple errors on Photoshop.
- If the Photoshop application registry is corrupted, it can lead to error 16.
- This error 16 can occur if any important files related to Adobe application, such as DLL File go missing.
2 ways to fix Photoshop Error 16, Error 15, and Error 1
Error 16 is one of the most commonly encountered error messages associated with the Adobe Photoshop application. The occurrence of such error doesn’t allow you to access your Photoshop application and you will not be able to access the PSD file data, making you frustrated!
On Windows PC:
This Photoshop error 16 can be easily fixed by altering the permissions to the SLStore and Adobe PCD folders. Do not worry if these terms sound unfamiliar, just follow the steps to set the permissions to fix Photoshop configuration error 15 instantly.
- Open File Explorer.
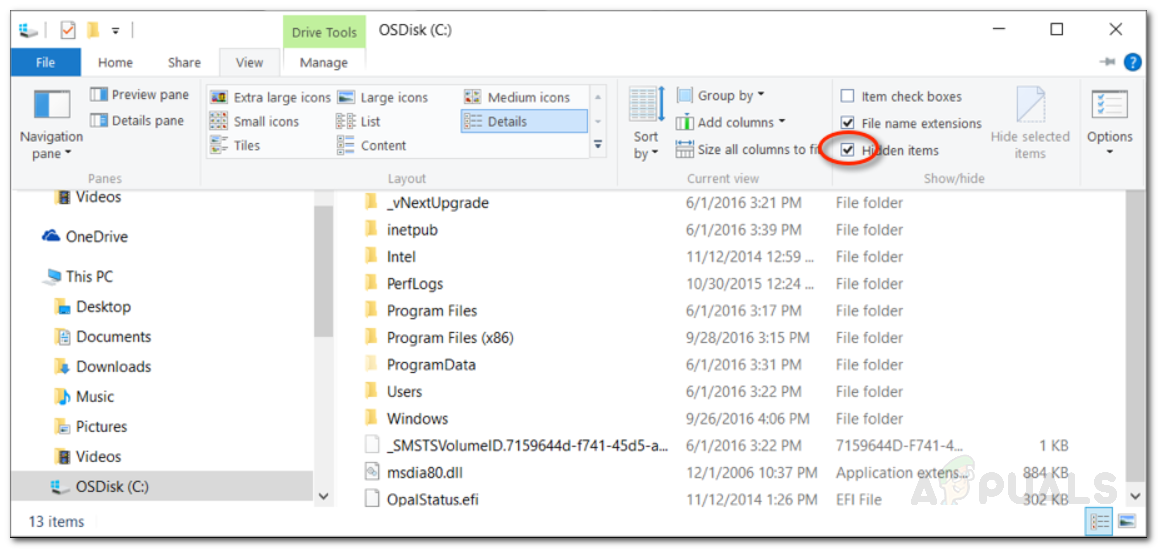
- Click on the View tab and then check Hidden items box

- The below steps will help you navigate to SLStore and PCD folders. After locating these folders, setting the permission of these folders will help you fix the Photoshop error 16.

| Sl.no. | SLStore | Adobe PCD |
| 1 | Navigate to ProgramDataAdobeSLStore | Navigate to
|
| 2 | In Windows File Explorer, right-click the SLStore folder and select Properties option | In Windows File Explorer, right-click the Adobe PCD folder and select Properties option |
| 3 | Now, select the Security tab | Now, select the Security tab |
| 4 | Choose Edit to change permissions | Choose Edit to change permissions |
| 5 |
|
|
| 6 | Now, click OK to terminate the Permissions Window | Now, click OK to terminate the Permissions Window. |
| 7 | Select Advanced in the Properties dialog box. | Select Advanced in the Properties dialog box. |
| 8 | Select Replace all child object permission entries with inheritable permission entries from this object. Click OK, and then click Yes. | Select Replace all child object permission entries with inheritable permission entries from this object. Click OK, and then click Yes. |
| 9 | Now, click OK to close the SLStore Properties dialog box. | Click OK to close the Adobe PCD Properties dialog box |
On Mac:
This Photoshop error 16 can also be seen on Mac. Follow the below steps to fix photoshop error 16 on Mac
1. Set permissions for the SLStore folder on Mac
- Go to the Finder to navigate to Library/Application Support/Adobe/SLStore.
- Control-click the SLStore folder and click Get Info.
- Now click on the arrow to expand the Sharing & Permissions option.
- Click on the lock icon on the bottom right corner of the Sharing & Permissions section. Now, a new dialog box will open. In this, enter your administrator password and click OK.
- Now, set permissions by expanding the Up-Down arrow next to the User:
- System: Read/write
- Admin: Read/write
- Everyone: Read/write
- Select the Gear button, and click Apply to enclosed items.
- Click OK to confirm the same and close the Get Info dialog box.
2. Set permissions for the Adobe PCD folder on Mac
- Go to the Finder to navigate to Library/Application Support/Adobe/Adobe PCD.
- Control-click the Adobe PCD folder and select Get Info.
- Expand the Sharing & Permissions section by clicking on the rightwards arrow.
- Click on the lock icon on the bottom right corner of the Sharing & Permissions section. Now, a new dialog box will open. In this, enter your administrator password and click OK.
- Now, set permissions by opening the Up-Down arrow next to the User:
- System: Read/write
- Admin: Read-only
- Everyone: Read-only
- Hit the Gear button, and click Apply to enclosed items.
- Now, click OK to confirm the same and close the Get Info dialog box.
Method 2: Reinstall Adobe Photoshop to fix Error code 16
If you are constantly getting this photoshop error 16, please uninstall and reinstall the product error 16 photoshop cs6. This will help you fix photoshop cs6 configuration error 16 regularly prompting on your Windows 10 computer. The constant photoshop error 16 messages could be due to either corruption in the application or the corrupt permission files.
How to Reinstall Adobe Photoshop to Fix Error 16?
- Go to the Control Panel > select Programs and Features > Uninstall the Adobe Photoshop Program.
- Before you reinstall Adobe Photoshop, make sure you have permanently deleted the following Adobe files:
-
- C: > Program Files > Adobe
- C: > Program Files > Common Files > Adobe
- C: > Program Files (x86) > Adobe
- C: > Program Files (x86) > Common Files > Adobe
- C: > Program > Data > Adobe
Note: Permanently delete the above adobe files using shift+delete keys means deleting the corrupt Photoshop files permanently.
-
- Now, you can safely install the Adobe Photoshop application without error 16.
Note: Sometimes, Photoshop error code 16 can damage your PSD/PDD files. If you have recognized that your Photoshop files are corrupt, inaccessible, or damaged due to Photoshop error 16, error 1, or error 15, then utilize Remo Repair PSD software. This tool is compatible with all the latest versions of Windows and Mac operating systems including Windows 11 and macOS Monterey.
About Remo Repair PSD Tool?
Remo Repair PSD is a Photoshop File Repair tool that comes in handy to fix damaged PSD or PDD files due to Photoshop errors. This tool repairs PSD or PDD files with its color mode i.e. Bitmap, gray-scale, indexed color, RGB color, and many more. Apart from this, you can make use of this tool to repair Photoshop error 6, damaged Photoshop files due to abrupt termination of Photoshop utility, or imperfect up-gradation of the application.
How to fix the Runtime Code 16 Adobe Photoshop Elements Error 16
This article features error number Code 16, commonly known as Adobe Photoshop Elements Error 16 described as Please uninstall and reinstall the product.
About Runtime Code 16
Runtime Code 16 happens when Adobe Photoshop Elements fails or crashes whilst it’s running, hence its name. It doesn’t necessarily mean that the code was corrupt in some way, but just that it did not work during its run-time. This kind of error will appear as an annoying notification on your screen unless handled and corrected. Here are symptoms, causes and ways to troubleshoot the problem.
Definitions (Beta)
Here we list some definitions for the words contained in your error, in an attempt to help you understand your problem. This is a work in progress, so sometimes we might define the word incorrectly, so feel free to skip this section!
- Adobe — Adobe Systems is a software company headquartered in San Jose, California, USA
- Elements — Entities that are single members of a bigger collection set, list, group….
- Photoshop — Adobe Photoshop is an industry-standard graphics creatoreditor
- Product — A product is a good that can be bought or sold
- Uninstall — The process of completely removing an application from a system.
- Elements — In metadata, the term data element is an atomic unit of data that has precise meaning or precise semantics.
Symptoms of Code 16 — Adobe Photoshop Elements Error 16
Runtime errors happen without warning. The error message can come up the screen anytime Adobe Photoshop Elements is run. In fact, the error message or some other dialogue box can come up again and again if not addressed early on.
There may be instances of files deletion or new files appearing. Though this symptom is largely due to virus infection, it can be attributed as a symptom for runtime error, as virus infection is one of the causes for runtime error. User may also experience a sudden drop in internet connection speed, yet again, this is not always the case.
 Repair Tool")
(For illustrative purposes only)
Causes of Adobe Photoshop Elements Error 16 — Code 16
During software design, programmers code anticipating the occurrence of errors. However, there are no perfect designs, as errors can be expected even with the best program design. Glitches can happen during runtime if a certain error is not experienced and addressed during design and testing.
Runtime errors are generally caused by incompatible programs running at the same time. It may also occur because of memory problem, a bad graphics driver or virus infection. Whatever the case may be, the problem must be resolved immediately to avoid further problems. Here are ways to remedy the error.
Repair Methods
Runtime errors may be annoying and persistent, but it is not totally hopeless, repairs are available. Here are ways to do it.
If a repair method works for you, please click the upvote button to the left of the answer, this will let other users know which repair method is currently working the best.
Please note: Neither ErrorVault.com nor it’s writers claim responsibility for the results of the actions taken from employing any of the repair methods listed on this page — you complete these steps at your own risk.
Method 1 — Close Conflicting Programs
When you get a runtime error, keep in mind that it is happening due to programs that are conflicting with each other. The first thing you can do to resolve the problem is to stop these conflicting programs.
- Open Task Manager by clicking Ctrl-Alt-Del at the same time. This will let you see the list of programs currently running.
- Go to the Processes tab and stop the programs one by one by highlighting each program and clicking the End Process buttom.
- You will need to observe if the error message will reoccur each time you stop a process.
- Once you get to identify which program is causing the error, you may go ahead with the next troubleshooting step, reinstalling the application.
Method 2 — Update / Reinstall Conflicting Programs
Using Control Panel
- For Windows 7, click the Start Button, then click Control panel, then Uninstall a program
- For Windows 8, click the Start Button, then scroll down and click More Settings, then click Control panel > Uninstall a program.
- For Windows 10, just type Control Panel on the search box and click the result, then click Uninstall a program
- Once inside Programs and Features, click the problem program and click Update or Uninstall.
- If you chose to update, then you will just need to follow the prompt to complete the process, however if you chose to Uninstall, you will follow the prompt to uninstall and then re-download or use the application’s installation disk to reinstall the program.
Using Other Methods
- For Windows 7, you may find the list of all installed programs when you click Start and scroll your mouse over the list that appear on the tab. You may see on that list utility for uninstalling the program. You may go ahead and uninstall using utilities available in this tab.
- For Windows 10, you may click Start, then Settings, then choose Apps.
- Scroll down to see the list of Apps and features installed in your computer.
- Click the Program which is causing the runtime error, then you may choose to uninstall or click Advanced options to reset the application.
Method 3 — Update your Virus protection program or download and install the latest Windows Update
Virus infection causing runtime error on your computer must immediately be prevented, quarantined or deleted. Make sure you update your virus program and run a thorough scan of the computer or, run Windows update so you can get the latest virus definition and fix.
Method 4 — Re-install Runtime Libraries
You might be getting the error because of an update, like the MS Visual C++ package which might not be installed properly or completely. What you can do then is to uninstall the current package and install a fresh copy.
- Uninstall the package by going to Programs and Features, find and highlight the Microsoft Visual C++ Redistributable Package.
- Click Uninstall on top of the list, and when it is done, reboot your computer.
- Download the latest redistributable package from Microsoft then install it.
Method 5 — Run Disk Cleanup
You might also be experiencing runtime error because of a very low free space on your computer.
- You should consider backing up your files and freeing up space on your hard drive
- You can also clear your cache and reboot your computer
- You can also run Disk Cleanup, open your explorer window and right click your main directory (this is usually C: )
- Click Properties and then click Disk Cleanup
Method 6 — Reinstall Your Graphics Driver
If the error is related to a bad graphics driver, then you may do the following:
- Open your Device Manager, locate the graphics driver
- Right click the video card driver then click uninstall, then restart your computer
Method 7 — IE related Runtime Error
If the error you are getting is related to the Internet Explorer, you may do the following:
- Reset your browser.
- For Windows 7, you may click Start, go to Control Panel, then click Internet Options on the left side. Then you can click Advanced tab then click the Reset button.
- For Windows 8 and 10, you may click search and type Internet Options, then go to Advanced tab and click Reset.
- Disable script debugging and error notifications.
- On the same Internet Options window, you may go to Advanced tab and look for Disable script debugging
- Put a check mark on the radio button
- At the same time, uncheck the «Display a Notification about every Script Error» item and then click Apply and OK, then reboot your computer.
If these quick fixes do not work, you can always backup files and run repair reinstall on your computer. However, you can do that later when the solutions listed here did not do the job.
Other languages:
Wie beheben Fehler 16 (Adobe Photoshop Elements-Fehler 16) — Bitte deinstalliere und re-installiere das Produkt.
Come fissare Errore 16 (Errore 16 di Adobe Photoshop Elements) — Si prega di disinstallare e reinstallare il prodotto.
Hoe maak je Fout 16 (Adobe Photoshop Elements-fout 16) — Verwijder het product en installeer het opnieuw.
Comment réparer Erreur 16 (Erreur 16 d’Adobe Photoshop Elements) — Veuillez désinstaller et réinstaller le produit.
어떻게 고치는 지 오류 16 (어도비 포토샵 요소 오류 16) — 제품을 제거하고 다시 설치하십시오.
Como corrigir o Erro 16 (Erro 16 do Adobe Photoshop Elements) — Desinstale e reinstale o produto.
Hur man åtgärdar Fel 16 (Adobe Photoshop Elements Error 16) — Avinstallera och installera om produkten.
Как исправить Ошибка 16 (Adobe Photoshop Elements Ошибка 16) — Удалите и переустановите продукт.
Jak naprawić Błąd 16 (Błąd Adobe Photoshop Elements 16) — Odinstaluj i ponownie zainstaluj produkt.
Cómo arreglar Error 16 (Error 16 de Adobe Photoshop Elements) — Desinstale y vuelva a instalar el producto.
![]() About The Author: Phil Hart has been a Microsoft Community Contributor since 2010. With a current point score over 100,000, they’ve contributed more than 3000 answers in the Microsoft Support forums and have created almost 200 new help articles in the Technet Wiki.
About The Author: Phil Hart has been a Microsoft Community Contributor since 2010. With a current point score over 100,000, they’ve contributed more than 3000 answers in the Microsoft Support forums and have created almost 200 new help articles in the Technet Wiki.
Follow Us: ![]()
![]()
![]()
Last Updated:
06/08/19 09:02 : A iPhone user voted that repair method 4 worked for them.

This repair tool can fix common computer problems such as blue screens, crashes and freezes, missing DLL files, as well as repair malware/virus damage and more by replacing damaged and missing system files.
STEP 1:
Click Here to Download and install the Windows repair tool.
STEP 2:
Click on Start Scan and let it analyze your device.
STEP 3:
Click on Repair All to fix all of the issues it detected.
DOWNLOAD NOW
Compatibility
![]()
Requirements
1 Ghz CPU, 512 MB RAM, 40 GB HDD
This download offers unlimited scans of your Windows PC for free. Full system repairs start at $19.95.
Article ID: ACX02238EN
Applies To: Windows 10, Windows 8.1, Windows 7, Windows Vista, Windows XP, Windows 2000
Speed Up Tip #50
Convert Windows into a Virtual Machine:
Save yourself from malware, spyware, and other viruses by converting your Windows PC into a Virtual Machine. Browse the internet or install any program and games you want with confidence in your Virtual Machine by using free tools like Hyper-V. Your host operating system will be safe from troubles.
Click Here for another way to speed up your Windows PC
The Adobe error code 16 pops up when you are trying to launch a Creative Cloud application; be it Photoshop, Lightroom or any other software offered by Adobe. The error message prompts the user to uninstall and then reinstall whatever product they are trying to open. However, should you try reinstalling the software, the issue persists and you will be prompted with the same error message once again. The most common cause of the issue seems to be insufficient permissions of the Adobe PCD folder or in some cases, the SLStore directory.
This issue is not restricted to a certain version of Windows rather it has been reported to be caused on all of the versions by various users. Furthermore, the issue seems to emerge on macOS as well. Nonetheless, the solutions for the said error message are quite straightforward and you will be able to execute them regardless of your operating system. Before we jump into the solutions, let us go through the causes of the error message once again.
What causes the ‘Adobe Error Code 16’ Error?
The cause of the error message is pretty apparent. As we highlighted earlier, the error code appears when some of the directories i.e Adobe PCD and SLStore of the Adobe Creative Cloud do not have the required permissions. Since the files are stopped from operating properly due to insufficient permissions, hence, as a result, the application that you are trying to open crashes and you are shown the said error message.
As obvious from the cause, solving the issue is pretty easy. Other than assigning the said folders the right permissions, one can also fix the issue by forcing the product to run as an administrator every time it is executed.
With that said, let us get into the solutions.
Solution 1: Changing the Permissions for Adobe PCD and SLStore Directories
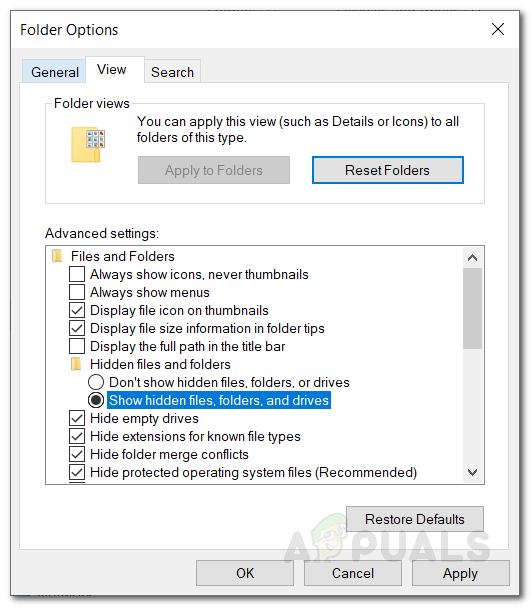
To fix the issue, you will have to change the permissions of the licensing folders i.e Adobe PCD and SLStore. To do this, make sure that you have tweaked Windows to show hidden files and folders. If you don’t know how to do this, don’t worry. We’ll be showing you how to do it down below.
To show hidden files and folders, do the following:
- Open up the Windows Explorer.
- Click on the View tab under the windowpane. There, click on Options and choose ‘Change folder and show options’ from the drop-down menu. Or just switch to the View tab when the Options window pops up.
- Scroll down until you see the ‘Show hidden files, folders and drive’ option.

Showing Hidden Folders - Click on it, hit Apply and then click OK to show hidden files and folders.
- Alternatively, you can just select the ‘Hidden items’ checkbox under the View tab. However, you might not be able to locate this depending on your Windows version.

Showing Hidden Folders
Now that you have done that, you will have to locate the Adobe PCD and SLStore directories. To do this, navigate to the following paths:
Adobe PCD:
Windows 32-bit: Program FilesCommon FilesAdobeAdobe PCD

Windows 64-bit: Program Files (x86)Common FilesAdobe Adobe PCD
SLStore:
ProgramDataAdobeSLStore
If you are using macOS, please use the Finder to navigate to the following locations:
SLStore:
Library/Application Support/Adobe/SLStore
Adobe PCD:
Library/Application Support/Adobe/Adobe PCD
Once you have made your way to the specified locations, do the following to change the permissions:
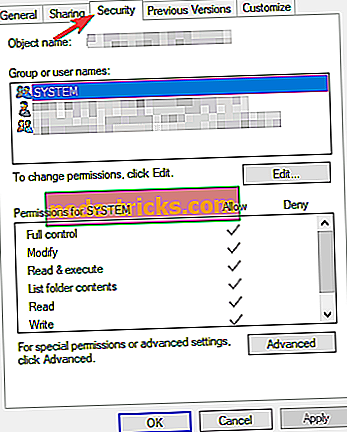
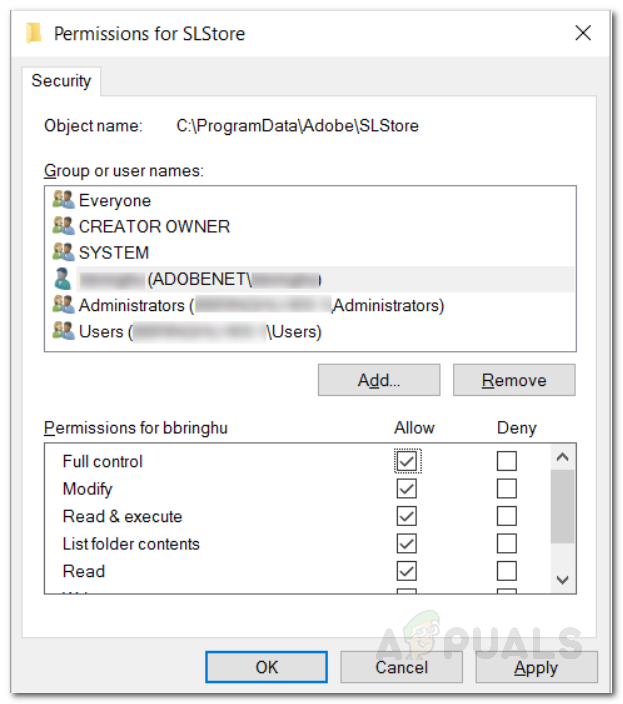
- Right-click on either Adobe PCD or SLStore and select Properties.
- Go to the Security tab and then click Edit to alter the permissions.
- For Adobe PCD, highlight the administrator user and assign it Full Control.
- As for SLStore, highlight the SYSTEM and administrator user groups and allow Full Control.

Changing Permissions - Afterward, select the Users group and allow it Read and Special.
- Once done, click the OK button to close the permissions window.
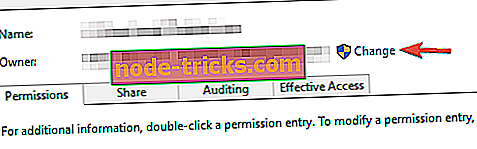
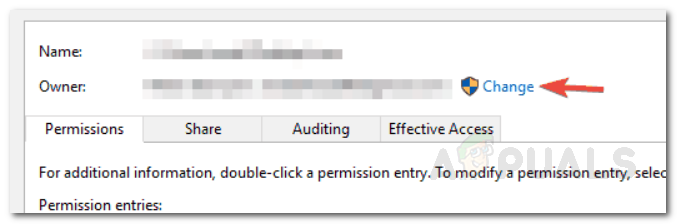
- Now, on the Security tab, click on the Advanced button.
- Here, you will have to change the ownership. Click on the Change button and enter the desired user account and then click Check Names so that it is detected by the system. Then, click OK.

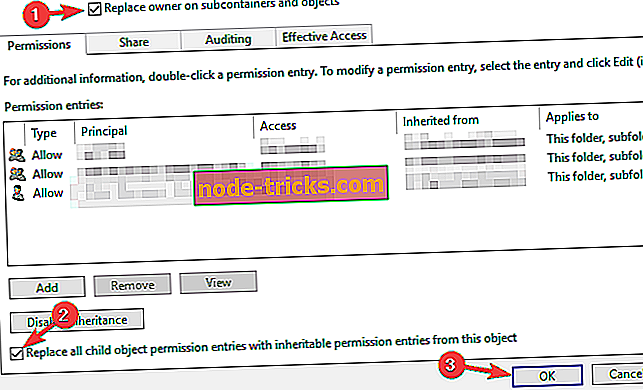
Changing Ownership - Now, at the bottom, tick the ‘Replace all child object permission entries with inheritable permission entries from this object’ checkbox and then click Apply.
- Finally hit the OK button to close the window.
- Do it for both the Adobe PCD and SLStore folders.
For macOS, do the following:
- Control-click the folder and select Get Info.
- Expand the permissions section by clicking the ‘Sharing and Permissions’ section.
- Unlock the permissions for editing by clicking the lock icon in the lower-right corner. Enter the administrator username and password when you are asked and then click OK.
- For SLStore, set the following permissions:
System: Read/Write

Admin: Read/Write

Everyone: Read/Write
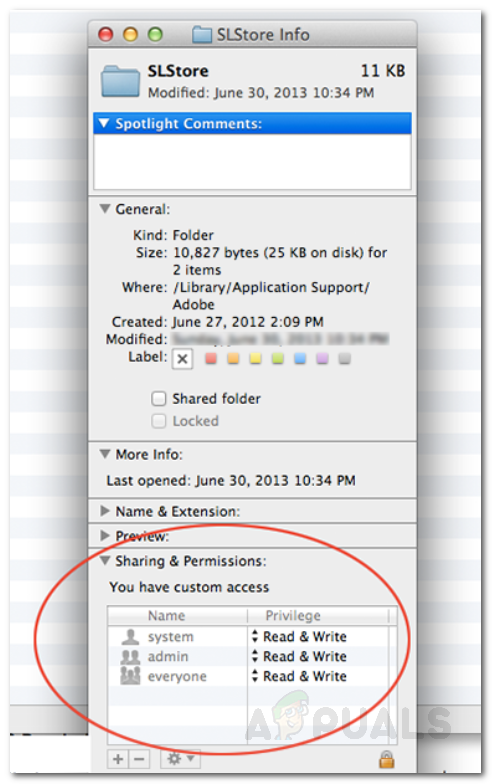
- For Adobe PCD, set the following permissions:
System: Read/Write

Admin: Read-only

Everyone: Read-only
- Click the Gear icon in the lower-left corner and then select ‘Apply to enclosed items.’
- Finally, you can close the Get Info box.
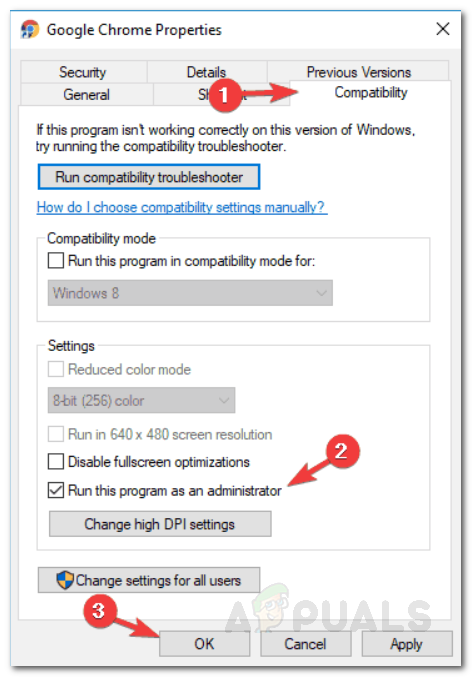
Solution 2: Run Creative Cloud as an Administrator
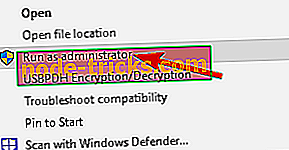
Another thing that you can try to fix the issue would be to force the Creative Cloud application to run as an administrator every time it is executed. Before you set the program to run as an administrator every single time, you should check whether doing so solves the problem for you or not. Just right-click on the Creative Cloud application and select ‘Run as an administrator’. If the application starts up without any issues, you can now force it to be run as an administrator every time. To do this, do the following steps:
- Right-click the Creative Cloud application and select Properties to open up the properties window.
- Now, switch to the Compatibility tab.
- There, tick the ‘Run this program as an administrator’ checkbox and then click Apply.

Running as an Administrator – Adobe CC - Finally, click OK.

Kevin Arrows
Kevin is a dynamic and self-motivated information technology professional, with a Thorough knowledge of all facets pertaining to network infrastructure design, implementation and administration. Superior record of delivering simultaneous large-scale mission critical projects on time and under budget.