Один и тот же BSOD может быть вызван разными причинами, поэтому более или менее корректно установить источник неполадки можно разве что проанализировав файл дампа. Правда, подсказка даётся уже в названии ошибки, что сразу позволяет сузить круг поиска. Ошибка, которую мы сегодня рассмотрим, имеет название PNP DETECTED FATAL ERROR, отсылающее нас к Диспетчеру PNP — компоненту операционной системы, обеспечивающему взаимодействие с системными модулями, драйверами и приложениями, необходимое для подключения и работы устройств. Сама PnP же — это технология, которая позволяет автоматизировать в системе идентификацию и конфигурирование разных устройств.
Простейшим примером работы PnP может послужить автоматическое монтирование в Проводнике подключаемых по USB накопителей, эта же технология используется для идентификации устройств периферии — USB-мышек, клавиатур и так далее. Вам не нужно отдельно устанавливать для этих устройств драйвера, так как Windows сама их определяет, сама ставит их драйвера, сама их настраивает. Если драйвер подключённого PNP-устройства по какой-то причине оказывается повреждённым, удалённым или просто несовместимым, происходит системный сбой, результатом которого становится синий экран смерти PNP DETECTED FATAL ERROR. Были, однако, отмечены случаи, когда ошибка возникала вследствие неполадок в работе жёсткого диска.
Если ошибка появилась вскоре после подключения к компьютеру любого нового устройства с поддержкой технологии PnP, отключите его. Если мера кажется вам слишком радикальной, можно попробовать удалить его из Диспетчера устройств, а затем перезагрузить компьютер, чтобы устройство смогло установиться повторно с драйверами по умолчанию.
Аналогичным образом поступаем, если ошибка стала появляться после установки какого-нибудь программного обеспечения, работающего в фоновом режиме. Поскольку чаще всего источником подобных проблем становятся антивирусы, попробуйте отключить используемый на компьютере антивирус и понаблюдайте за системой. Если BSOD с указанной ошибкой перестал появляться, значит всё дело в антивирусе. Замените его.
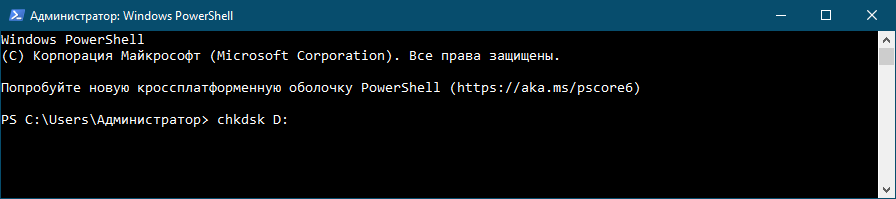
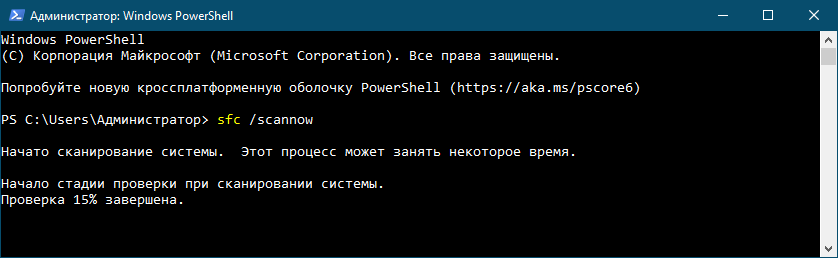
Поскольку ошибка PNP DETECTED FATAL ERROR может быть связана с неполадками в работе диска, проверьте последний встроенной утилитой chkdsk. Если есть такая возможность, снимите диск, подключите его к другому ПК, откройте на нём командную строку и выполните команду chkdsk X:, где X — буква диска. В случае обнаружения ошибок повторите команду с параметрами /f и /r. Если возможность подключения диска отсутствует, проверяем его «на месте» указывая буквы логических разделов. Заодно стоит проверить целостность системных файлов, для чего в той же командной строке необходимо выполнить команду sfc /scannow.
Мы не рекомендуем обновлять драйвера ради самого обновления, но это такой случай, когда обновиться всё же стоит. Ручное обновление драйверов — процесс долгий и утомительный, поэтому лучше всего воспользоваться какой-нибудь программой для обновления драйверов, например, Snappy Driver Installer. И наоборот, если ошибка стала появляться после установки новых версий драйверов, откатываемся к предыдущим версиям.
Некоторые пользователи сообщают, что им удалось устранить проблему отключением кэширования содержимого БИОС в кэш-память. Такое вполне возможно, если эта опция включена, чего по идее быть не должно, так как в современных версиях операционных систем она не используется. Зайдите в вашем BIOS в раздел дополнительных настроек (Advanced), найдите опцию System BIOS Cacheable (она может называться также System ROM Cacheable) и установите для неё значение Disabled.

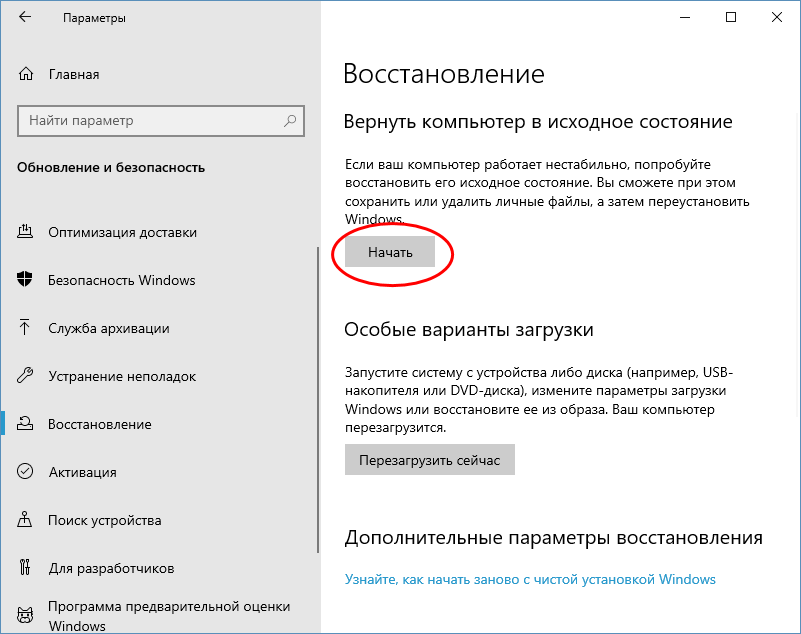
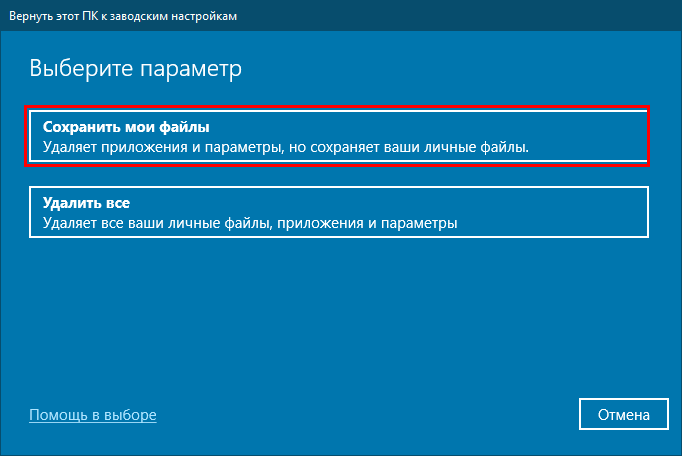
Если на компьютере включена защита дисков и имеются точки восстановления, выполните откат к предыдущей точке (для вызова мастера выполняем команду rstrui в окошке Win + R). Наконец, вы можете пойти на радикальные меры и сбросить Windows к изначальному состоянию. Для этого переходим в приложении Параметры в раздел Обновление и безопасность → Восстановление, жмём «Начать» и следуем указаниям мастера. Сброс приведёт к обнулению системных настроек и удалению всех установленных на компьютере сторонних программ, зато с немалой долей вероятности положит конец появлению BSOD с ошибкой PNP Detected Fatal Error.

Did you know what has PNP DETECTED FATAL ERROR Windows Blue Screen PC Error code problem is? And why you are getting or facing this error problem on your Windows PC? If you fall into this error and couldn’t find any right or natural, simple guide or methods for getting rid out of it then you must have to check our this website blog post once, because today here we are going to show you that how to get back from this error Windows PNP_DETECTED_FATAL_ERROR Windows problem and fix your this blue screen problem from your Windows PC permanently.
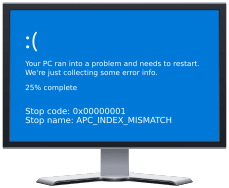
Your PC ran into a problem and needed to restart. We’re just collecting some error info and then restart for you. (25% complete)
If you’d like to know more about PNP_DETECTED_FATAL_ERROR Windows, you can search online later for this error PNP DETECTED FATAL ERROR Windows
In this PNP_DETECTED_FATAL_ERROR Windows error, It shows like a problem has been detected & Windows has been shut down to prevent the crash of your PC. This Blue screen of death error is very frustrating and irritating error problem & this can also cause many problems on your Windows (Operating System) O.S. This PNP DETECTED FATAL ERROR Windows error problem occurs when your computer restarts and then it is showing a Blue screen with a sad face on it. This blue screen error problem also caused by a damaged hard disk. This error also may appear on your PC when you unplug any device from your Windows PC. This error also means that the ‘Plug & Play’ feature of your Windows is failing due to the installation of a device. This PNP_DETECTED_FATAL_ERROR Windows error also occurs when your Upgrade your Windows to Windows 10.
Causes of PNP_DETECTED_FATAL_ERROR Windows Issue:
- Windows PC error issue
- Windows server error
So, here are some quick tips and tricks for efficiently fixing and solving this type of PNP_DETECTED_FATAL_ERROR Windows Blue Screen PC Error Code problem from you permanently.
How to Fix & Solve PNP_DETECTED_FATAL_ERROR Windows Problem
1. Fix by MSConfig Command on your Windows PC –

- Go to the start menu
- Search for ‘msconfig.exe‘ in the search box and press Enter there
- Click on the User Account Control permission
- & click on the Continue option there
- On the General tab there,
- Click on the ‘Selective Startup‘ option there
- Under the Selective Startup tab, click on ‘Clear the Load Startup‘ items checkbox
- Click on the services tab there,
- Click to select the “Hide All Microsoft Services” checkbox
- Then, click on the ‘Disable All‘ & press Ok button there
- After that, close the tab
- & restart your PC
- That’s it, done
By cleaning the boot, you can quickly get back from this PNP_DETECTED_FATAL_ERROR Windows 10 code problem.
2. Run your Windows PC in the Safe Mode –
- Go to the start menu
- Click on the Shutdown drop-down menu &
- Select Restart option there
- Now, remove the battery & reinsert in
- Afterward, restart your PC again
- Just after the restarting,
- Select the “Safe Mode” option there
- Now wait for some minutes to reset it
- That’s it, done
By running Windows in the safe mode can get rid out of this error, PNP_DETECTED_FATAL_ERROR Windows 8 code problem.
3. Install an Automatic Repair Tool on your Windows –
- Go & Search for Automatic Repair Tool on the Internet
- Download it from there
- Now, Click on ‘RUN‘ & Install it
- Open it and use the automatic repair tool
- After finish, close the tab
- That’s it, done
It will fix this Error Code Windows 8 PNP_DETECTED_FATAL_ERROR Windows problem quickly from you.
4. Scan your Full Windows for Malware/Virus Errors with Good Antivirus –
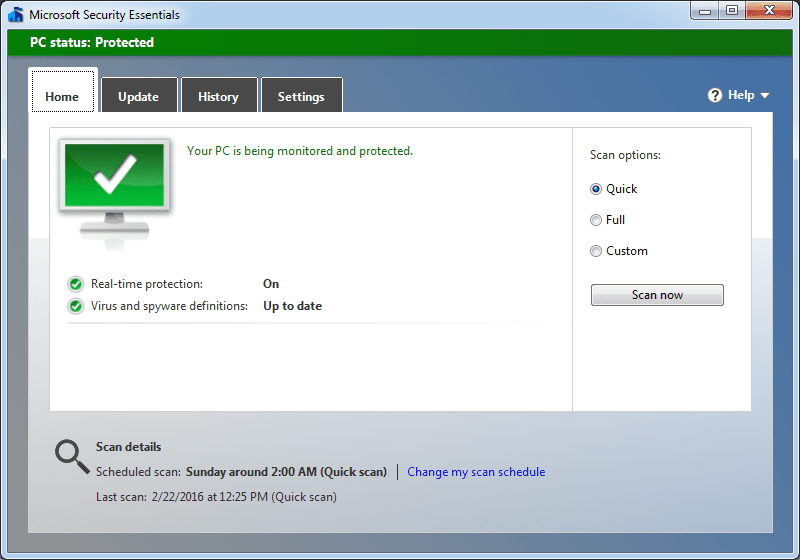
Sometimes the file & registry permissions may get changed by malware.
- Search for a Powerful Antivirus
- Download it
- Run it & Scan your full PC
- After completing, close the tab
- That’s it, done
By scanning your PC with antivirus may quickly get rid out of this PNP_DETECTED_FATAL_ERROR fix Windows 10 code problem.
5. Update the Windows Drivers of your Windows –

- Go to the start menu
- Search or go to the Control Panel
- Click on it and opens it there
- After that, scroll down and go to the “Windows Update” section there
- Click on it & Check if any newly latest driver update is available or not
- If any, Update it fast
- Or, you can set it as ‘automatically update.’
- For that, go to the left side
- & click on the “Changes Settings” option there
- After open, click on the drop-down menu there
- Select the “Install Updates Automatically” option there
- & click on the OK button to save this configuration
- After completing, close the tab
- That’s it, done
So by trying this above, a suitable method, you can resolve this type of PNP_DETECTED_FATAL_ERROR Server 2012 problem issue.
” OR “
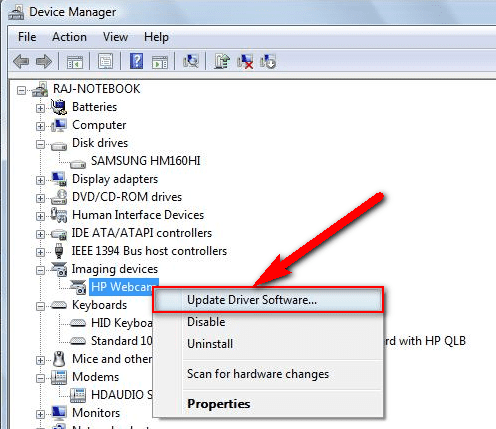
- Go to the start menu
- Search or go to the Control Panel or direct go to Device Manager
- Click on it and opens it there
- After going to device Manager there,
- check if any driver has error sign there
- If any, then right-click on it
- & Click on the “Update driver software” there
- Wait for some minutes to update it
- After updating, close the tab
- That’s it, done
Updating your driver by any of these two methods can quickly fix and solve this PNP_DETECTED_FATAL_ERROR Windows server 2012 r2 code problem from your PC.
6. Disable or Reinstall Windows Antivirus Software on your PC –
- Open the start menu
- Go to the Control Panel
- Now, go to Security & there go to the security center
- If Windows can detect your antivirus software,
- It will give Virus protection (If the software is ON)
- Check the help for information on ‘Disabling‘ it
- That’s it, Done
Disabling or Reinstalling the Antivirus software will fix this error PNP_DETECTED_FATAL_ERROR Windows Server 2012 code problem from your PC.
7. Boot your Windows System PC –
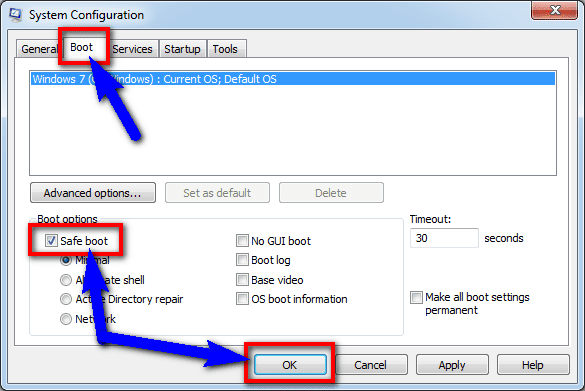
- Go to the start menu
- Search or go to the ‘RUN‘ their
- Type the ‘MSConfig‘ command there
- Now, press Enter or press OK there
- Click on the boot tab there
- Under boot options, tick the Safe Boot option there
- & Press OK button there
- After that, click on the restart
- That’s it, done
By booting your system, you can get rid out of this error PNP_DETECTED_FATAL_ERROR Windows server 2012 r2 code problem.
8. Uninstall the Problematic Windows Drivers on your Windows –
- Go to the start menu
- Search or go to the ‘RUN‘ their
- Click on it and opens it
- Type the “devmgmt.msc” command there
- Press OK or press Enter there
- Now, a pop-up will open there
- Expand the category & check if any devices have yellow error sign
- If any, right-click on the error device
- Click on the ‘uninstall‘ to uninstall it
- After uninstalling, restart your PC
- That’s it, done
By uninstalling the problematic drivers, you can quickly fix and solve this error PNP_DETECTED_FATAL_ERROR Windows 10 code problem.
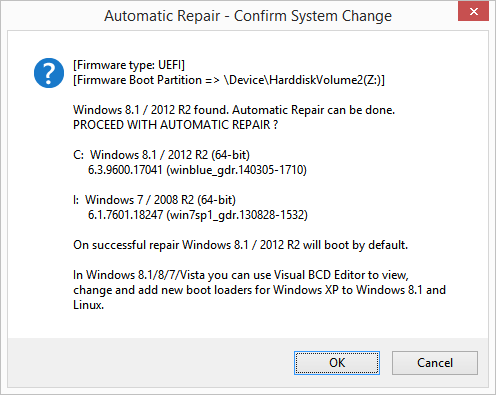
9. Troubleshoot & Run an Automatic Windows Repair on your PC –
- Go to the start menu
- Search or go to the PC settings there
- Click on the ‘Troubleshoot‘ option there
- After opening, click on the ‘Advanced options‘ there
- Then, click on the “Automatic Repair” option there
- After troubleshooting, close the tab
- That’s it, done
By running an automatic repair of your PC can get rid out of this error PNP_DETECTED_FATAL_ERROR Windows 10 code problem from your PC.
These are quick, and the best way methods to get quickly rid out of this PNP_DETECTED_FATAL_ERROR Windows Blue Screen PC Error Code problem from you entirely. I hope these solutions will surely help you to get back from this PNP DETECTED FATAL ERROR Windows error problem.
If you are facing or falling in this PNP_DETECTED_FATAL_ERROR Windows Blue Screen PC Error Code problem or any error problem, then comment down the error problem below so that we can fix and solve it too by our top best quick methods guides.
Summary: Sometimes, users witness an error, called PNP_DETECTED_FATAL_ERROR in Windows 10. This is a Blue Screen of Death (BSOD) error that occurs due to incompatible software or hardware on the system. The error causes the system to restart suddenly, interrupting any work. In worst case scenarios, it may result in data loss. In this post, we’ve mentioned the solutions to fix this error.
Lost critical data due to PNP_DETECTED_FATAL_ERROR? Download Stellar Data Recovery Professional for Windows to recover the lost data in minutes.

Contents
- 1. BSOD PNP_DETECTED_FATAL_ERROR
- 2. PNP Error due to Outdated Driver
- 3. Antivirus Causing PNP_DETECTED_FATAL_ERROR
- 4. Outdated Windows or an Update Error
- 5. Errors in a Pre-installed Software
- 6. Faulty Hardware or Storage Issues
- End Note
Blue Screen of Death (BSOD) errors, like PNP_DETECTED_FATAL_ERROR can cause multiple issues, such as slow down your PC, make it crash or restart suddenly, and turn your system inaccessible or inoperable.

Some users have reported different problems arising due to this error. Let’s address some of these issues and explore their solutions.
1. BSOD PNP_DETECTED_FATAL_ERROR
Since this is a BSOD error, the first step should be to run the Windows 10 built-in BSOD troubleshooter on your system. Here’s how to run the program on your Windows 10 system:
- Open Settings menu and go to Update & Security.

- Select the Troubleshoot option on the left pane.
- On the right pane, select BSOD and then click on Run the troubleshooter.

Running the BSOD troubleshooter will help to figure out the underlying cause of this error.
2. PNP Error due to Outdated Driver
The PNP_DETECTED_FATAL_ERROR may also be the result of an outdated driver. Make sure all your system drivers are updated. Follow these steps to update or install a driver. Some users have also reported that the issue is being caused by the Intel DPTF Manager driver. If this driver is causing the issue, roll back the driver to the previous version.
3. Antivirus Causing PNP_DETECTED_FATAL_ERROR
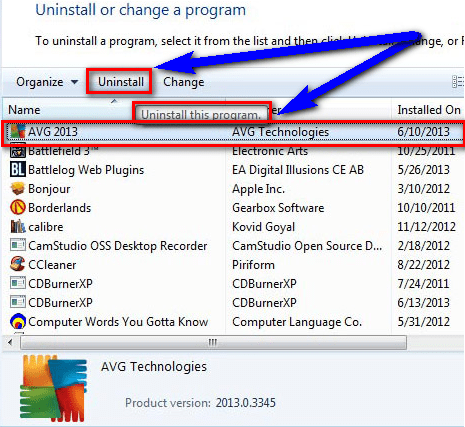
An outdated antivirus can bring about many unexpected errors on your system. Compromised antivirus security of your system should be addressed at the earliest to prevent errors, like PNP_DETECTED_FATAL_ERROR.Surprisingly,some Windows 10 users have reported that the error is being caused by antivirus tools, like Norton, Avira, and McAfee. If you’re using any of these software, try uninstalling them and then check whether the error is resolved. Here’s how to uninstall an existing antivirus or application on Windows 10.
4. Outdated Windows or an Update Error
A problematic or improper Windows update may also result in this error. You need to check first whether you’re using the latest version of Windows. Here’s how to make sure your Windows version is up-to-date.
- Press Windows + I to open the Settings menu.
- In the Windows Settings menu, go to Update & Security > Windows Update.

- Next, click the Check for updates option.

Your Windows PC will scan for updates and download them. After the updates are downloaded on the system, restart your PC. Now, check if the error still persists.
Note: Microsoft keeps releasing security patches and other updates for Windows. Make sure your Windows 10 is up-to-date.
Reset your Windows
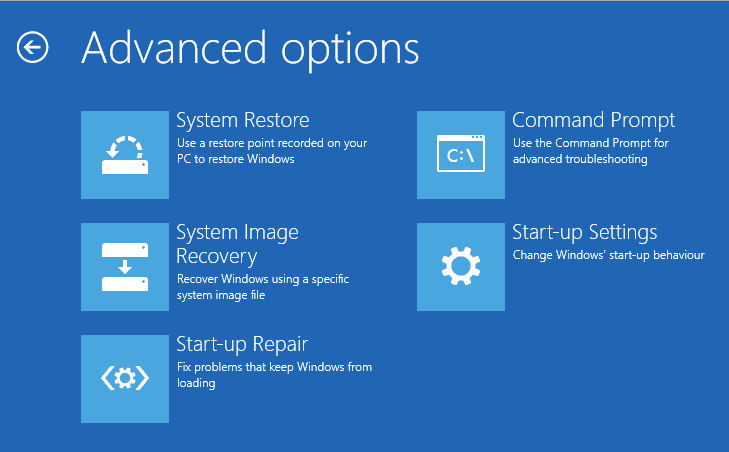
The error may also occur if a Windows update is not installed properly. To deal with this problem, try resetting your Windows 10 altogether. Here’s what to do:
- Open the Start menu, long press the Shift key, and then click Restart.
- Now, in the Advanced Startup options, navigate to Troubleshoot.

- Click the Reset this PC button and then select Remove everything.
- Now, you can reinstall Windows 10 on your system.
- Follow the on-screen instructions to finish the reset process.
Remember that resetting your PC will lead to data loss as it reverts to a previous version. So it’s always advised to keep a backup of your important files to safeguard yourself from any type of data loss. However, if you fail to keep a backup and end up losing critical system data after a Windows Reset, use a professional data recovery software to recover the lost data.
5. Errors in a Pre-installed Software
A problematic software on your computer may also cause the PNP_DETECTED_FATAL_ERROR. So you must find and uninstall such software from your system immediately.
If you have installed any software recently or downloaded an update of an existing software, try uninstalling the software or rolling back the update from your computer. If a new application or update is causing the error, this should effectively fix the problem. You may also get help from an uninstaller software to remove all traces of a problematic app or software from your system.
6. Faulty Hardware or Storage Issues
PNP_DETECTED_FATAL_ERROR can be caused by a faulty RAM module as well. Check whether your system’s RAM is running properly. Also, check whether the motherboard, graphics card, and hard drive are showing any signs of trouble. You may run the built-in BSOD troubleshooter (as discussed above) to detect any potential problems with your RAM. You may also run the chkdsk command on your system to troubleshoot any disk-related errors.
End Note
PNP_DETECTED_FATAL_ERROR may occur due to various reasons, such as a faulty or outdated driver, a problematic Windows update, outdated antivirus, etc. You may easily fix this error by running the BSOD troubleshooter or the chkdsk scan. You can also try uninstalling a problematic Windows update or a device driver. If nothing works, simply try resetting your Windows 10. In case you lost the data, use a professional data recovery tool, such Stellar Data Recovery to recover your data.
About The Author
Mansi
Mansi Verma is a Technology Writer at Stellar®. She is a Tech enthusiast, holding over 7 years of experience in Data Recovery, IoT, Artificial Intelligence, and the Robotics technology domain. She loves researching and providing DIY solutions and tips & tricks to solve Windows technical issues. In her spare time, she likes reading novels, and poetry. She also enjoys traveling and trekking.
Best Selling Products

Stellar Data Recovery Premium
Stellar Data Recovery Premium for Window
Read More

Stellar Data Recovery Technician
Stellar Data Recovery Technician intelli
Read More

Stellar Data Recovery Toolkit
Stellar Data Recovery Toolkit is an adva
Read More

BitRaser File Eraser
BitRaser File Eraser is a 100% secure so
Read More
-
Leitner
- Influencer
- Posts: 22
- Liked: never
- Joined: Mar 23, 2016 8:20 am
- Location: Austria
- Contact:
BSOD PNP_DETECTED_FATAL_ERROR
Hi,
I’m using a Server with several disks (some are NTFS formated, some are ReFS formated). OS is Server 2019.
I back up the whole machine with Veeam Agent 3.0.2.1170 on an external NTFS drive.
Every time when I want to restore files from this backup with FLR on a Win 10 1903 Enterprise (which also support ReFS 3.4 like server 2019) I got a BSOD «PNP_DETECTED_FATAL_ERROR».
Is there any way, how can I fix this?
I’ve also opened a support case (#03983208). But I didn’t get any response since days.
Best Regards
Patrick
-
asdffdsa6131
- Expert
- Posts: 117
- Liked: 23 times
- Joined: Sep 30, 2018 9:03 pm
- Contact:
Re: BSOD PNP_DETECTED_FATAL_ERROR
Post
by asdffdsa6131 » Feb 17, 2020 2:58 pm
hello,
at what point do you get that BSOD?
are you running the exact same versions of vagent on both the server and w10?
about the refs and ntfs, i do not think that matters.
the backup drive is ntfs and both ws2019 and w10 can read ntfs.
as a test, on the ws2019, can you recover files?
-
Dima P.
- Product Manager
- Posts: 13751
- Liked: 1395 times
- Joined: Feb 04, 2013 2:07 pm
- Full Name: Dmitry Popov
- Location: Prague
-
Contact:
Re: BSOD PNP_DETECTED_FATAL_ERROR
Post
by Dima P. » Feb 17, 2020 5:54 pm
Hello Patrick,
Any chance you have any antivirus software installed? AV software may block file level restore functionality, so if you have it installed — try to run file level recovery with antivirus being disabled (for testing purposes only). Thank you in advance!
-
Mildur
- Veeam Software
- Posts: 4914
- Liked: 1474 times
- Joined: May 13, 2017 4:51 pm
- Full Name: Fabian K.
- Location: Switzerland
- Contact:
Re: BSOD PNP_DETECTED_FATAL_ERROR
Post
by Mildur » Feb 17, 2020 6:24 pm
I have the same problem.
All windows 10 devices can‘t do a FLR from a restore Point which contains reFS Volumes.
I‘m looking forward to veeam V10. With B&R v10, the mounting process should be done on the backup server conponents and not on the client, if I‘m correct.
#edit:
I had a case for that problem last August:
#03699821
Solution was to install a specific windows update
Product Management Analyst @ Veeam Software
-
asdffdsa6131
- Expert
- Posts: 117
- Liked: 23 times
- Joined: Sep 30, 2018 9:03 pm
- Contact:
Re: BSOD PNP_DETECTED_FATAL_ERROR
Post
by asdffdsa6131 » Feb 17, 2020 7:07 pm
someone wrote «All windows 10 devices can‘t do a FLR from a restore Point which contains reFS Volumes.»
i respectfully disagree,
on my w10.pro, not w10.workstation, not w10.enterprise running community edition of vagent, thanks veeam for free edition!
the source files of the backup are stored on a refs filesystem.
the veeam backup files, stored on a server, use refs filesystem.
the backup was performed using community edition of vbar, again, thanks veeam for the free edition!
so it is end to end, refs on the source and refs on the dest.
to be clear, my w10.pro agent was able to mount that backup, as a shared folder.
and i was able to recover files.
-
asdffdsa6131
- Expert
- Posts: 117
- Liked: 23 times
- Joined: Sep 30, 2018 9:03 pm
- Contact:
Re: BSOD PNP_DETECTED_FATAL_ERROR
Post
by asdffdsa6131 » Feb 17, 2020 7:53 pm
i take back my last post.
to be clear, that backup, of files on refs, was a file backup, not a volume backup.
i better understand that the issue is restore from a backup containg a refs volume.
sorry for my last post, i tried to delete it but could not.
-
Mildur
- Veeam Software
- Posts: 4914
- Liked: 1474 times
- Joined: May 13, 2017 4:51 pm
- Full Name: Fabian K.
- Location: Switzerland
-
Contact:
Re: BSOD PNP_DETECTED_FATAL_ERROR
Post
by Mildur » Feb 17, 2020 8:06 pm
„i better understand that the issue is restore from a backup containg a refs volume.„
Yes ![]()
My Hope is in Veeam V10 and centralized restore point mounting.
Product Management Analyst @ Veeam Software
-
Leitner
- Influencer
- Posts: 22
- Liked: never
- Joined: Mar 23, 2016 8:20 am
- Location: Austria
- Contact:
Re: BSOD PNP_DETECTED_FATAL_ERROR
Post
by Leitner » Feb 18, 2020 7:56 am
Hi Folks,
Thanks for your answer.
@asdffdsa6131:
At the end of FLR I click on «open». Then the BackupBrowser opens and I can see a Popup with the message «Please wait». After few seconds the computer crash with the BSOD.
Server 2019 and Win 10 using the exact same version of Veeam Agent.
Server 2019 can restore the files with FLR without any issues.
I’m almost sure, that ReFS is responsible for the BSOD.
@Dima P.:
This was my first suspicion.
But disabling AV Software doesn’t fix it.
@Mildur:
could you tell me the Windows KB number?
Best Regards
Patrick
-
Mildur
- Veeam Software
- Posts: 4914
- Liked: 1474 times
- Joined: May 13, 2017 4:51 pm
- Full Name: Fabian K.
- Location: Switzerland
- Contact:
Re: BSOD PNP_DETECTED_FATAL_ERROR
Post
by Mildur » Feb 18, 2020 9:04 am
@Leitner
My testing was with two windows builds last august.
1809 —> KB4505658
1903 —> no update available
Windows 10 1909 has the same BSOD problem now. No solution until now.
Product Management Analyst @ Veeam Software
-
Leitner
- Influencer
- Posts: 22
- Liked: never
- Joined: Mar 23, 2016 8:20 am
- Location: Austria
- Contact:
Re: BSOD PNP_DETECTED_FATAL_ERROR
Post
by Leitner » Feb 18, 2020 9:14 am
Thanks for this information.
Did you get any reasonable answer from veeam about this issue?
Regards
Patrick
-
Mildur
- Veeam Software
- Posts: 4914
- Liked: 1474 times
- Joined: May 13, 2017 4:51 pm
- Full Name: Fabian K.
- Location: Switzerland
- Contact:
Re: BSOD PNP_DETECTED_FATAL_ERROR
Post
by Mildur » Feb 18, 2020 9:46 am
No problem.
Support told me only about the new «mounting process». It should be released with Veeam V10 today/next few days.
I will test the process sometime after upgrading our backup environment.
Veeam Support:
From Veeam side — in internal thread I’ve mentioned while on phone call — there is a discussion that development team is planning to rewrite Veeam driver that is in charge for that mount operation, which could possibly improve state. But I don’t have any ETA, sorry.
So current plan is to check KB4505658 MS part.
Product Management Analyst @ Veeam Software
-
Dima P.
- Product Manager
- Posts: 13751
- Liked: 1395 times
- Joined: Feb 04, 2013 2:07 pm
- Full Name: Dmitry Popov
- Location: Prague
-
Contact:
Re: BSOD PNP_DETECTED_FATAL_ERROR
Post
by Dima P. » Feb 18, 2020 10:50 am
Hello folks,
Thank you for sharing the updates. We’ll check both cases with the QA folks, meanwhile please download the latest version of Veeam Agent for Windows v4 (should become available at the website today) and check if the issue persists while using the FLR with the latest version. Cheers!
-
adault
- Lurker
- Posts: 1
- Liked: 1 time
- Joined: Nov 03, 2009 8:30 pm
- Full Name: Andre Dault
- Contact:
Re: BSOD PNP_DETECTED_FATAL_ERROR
Post
by adault » Feb 18, 2020 7:40 pm
1 person likes this post
Hello,
I had the same problem, I will explain what my setup and how I ended up restoring my files.
Workstation: Windows 10 Ent 1909 (Build 18363.657)
reFS.sys driver version: 10.0.18362.449
Two volumes: one NTFS and one ReFS (going to be changing that)
Client version: was 3.0.2, now is 4.0.0.1811
Backup target: Windows Share
When I tried to do a FLR, I get the same blue screen everyone seems to be getting.
Steps I tried:
- disable AV, get a BSOD.
- tried to do a FLR from a fresh install of Windows with same version of client, same BSOD.
- upgraded client to version 4, did same 2 tests again with same outcome.
- Tried on a Windows 7 Pro workstation was able to mount the backup but could not see drive that was formatted reFS.
How I managed to restore files:
- Installed client version 4 on Windows Server 2019 1809 (build 17763.973)
- refs.sys driver version: 10.0.17763.831
- system was able to mount and restore files from reFS formatted volume.
So it seems that the problem might be related to changes in the newer reFS driver.
Hope this can be helpful to others.
-
Dima P.
- Product Manager
- Posts: 13751
- Liked: 1395 times
- Joined: Feb 04, 2013 2:07 pm
- Full Name: Dmitry Popov
- Location: Prague
- Contact:
Re: BSOD PNP_DETECTED_FATAL_ERROR
Post
by Dima P. » Feb 19, 2020 2:15 pm
Thanks for the details Andre!
UPDATE: Based on the discussion with RnD folks the issue is related to ReFS driver version (specifically the latest version of the driver) and since our file level recovery relies on ReFS functionality during recovery we got this problem. For now it looks like the workaround would be, indeed, to perform a file level recovery on 1809 machine with the 10.0.17763.831 ReFS driver version. I’ll update this thread once I have more details. Stay tuned.
-
Leitner
- Influencer
- Posts: 22
- Liked: never
- Joined: Mar 23, 2016 8:20 am
- Location: Austria
- Contact:
Re: BSOD PNP_DETECTED_FATAL_ERROR
Post
by Leitner » Feb 19, 2020 2:22 pm
@Dima P.
Is Veeam now getting in touch with MS or should we report this MS (last probably won’t help us to fix this)?
Regards
Patrick
-
Leitner
- Influencer
- Posts: 22
- Liked: never
- Joined: Mar 23, 2016 8:20 am
- Location: Austria
- Contact:
Re: BSOD PNP_DETECTED_FATAL_ERROR
Post
by Leitner » Feb 20, 2020 10:28 am
Answer from Support at my ticket:
It looks as if the behavior seems quite similar to one known issue found in the FLR VDK driver we rely one — Bug 180011 — WinFLR (Item restore) cause BSOD of Console server where restore is initiated.
It’s been reported for Backup & Replication, whereas it seems that our standalone Agent driver may have the same behavior. At the moment we’re clarifying if there are any possible workarounds.
I’ll let you know those as soon as we get them.
@Dima P.:
Now I’m confused.
You told, that the problem is the windows ReFS driver. Your colleague told me, that this is a Veeam bug.
-
Dima P.
- Product Manager
- Posts: 13751
- Liked: 1395 times
- Joined: Feb 04, 2013 2:07 pm
- Full Name: Dmitry Popov
- Location: Prague
- Contact:
Re: BSOD PNP_DETECTED_FATAL_ERROR
Post
by Dima P. » Feb 20, 2020 10:42 am
Leitner,
The deal is that during file level recovery ReFS driver of the Operating System is used. Stay tuned, still checking the details with QA folks.
-
Dima P.
- Product Manager
- Posts: 13751
- Liked: 1395 times
- Joined: Feb 04, 2013 2:07 pm
- Full Name: Dmitry Popov
- Location: Prague
- Contact:
Re: BSOD PNP_DETECTED_FATAL_ERROR
Post
by Dima P. » Feb 26, 2020 5:06 pm
Patrick,
Thank you for the confirmation that the mentioned workaround helps!
Who is online
Users browsing this forum: No registered users and 5 guests
Skip to content
Как убрать PNP_DETECTED_FATAL_ERROR (0x000000CA)?
Как убрать « PNP_DETECTED_FATAL_ERROR» ( 0x000000CA)?
На компьютере или ноутбуке под управлением Windows появился «синий экран смерти»? После появления сообщения «
PNP_DETECTED_FATAL_ERROR» (
0x000000CA) система перезагружается? Ищите как исправить
0x000000CA: «
PNP_DETECTED_FATAL_ERROR»?
Как просмотреть информацию об ошибках, исправить ошибки в Windows 10, 8 или 7
Причины появления ошибки
- На жестком диске компьютера или ноутбука не достаточно места. Для правильной работы ОС Windows 10 на системном диске должно быть свободно 2 — 10 ГБ.
- На компьютер был установлен не совместимый BIOS или прошивка была повреждена.
- Установлены не совместимые с ОС драйвера устройств.
- Реестр Windows был поврежден или удален. Возможно в результате очистки были удалены системные ключи реестра.
- Ативирусное программное обеспечение или компьютерные вирусы могут заблокировать системные файлы или удалить важные ключи реестра.
- В результате ошибок в работе программы для резервного копирования.
- В результате обновления ОС Windows.
Актуально для ОС: Windows 10, Windows 8.1, Windows Server 2012, Windows 8, Windows Home Server 2011, Windows 7 (Seven), Windows Small Business Server, Windows Server 2008, Windows Home Server, Windows Vista, Windows XP, Windows 2000, Windows NT.
Вот несколько способов исправления ошибки «
PNP_DETECTED_FATAL_ERROR»:
Восстановите удаленные файлы
Часто появление BSoD ошибок приводит к утери важных файлов. Блокировка файлов компьютерными вирусами, ошибки в работе программ для резервного копирования, повреждение или перезапись системных файлов, ошибки файловой системы или наличие битых секторов диска – это не далеко полный список причин удаления данных.
Исправление соответствующих ошибок восстановит работоспособность устройства, но не всегда восстановит повреждённые или утерянные файлы. Не всегда имеется возможность устранить ту или иную ошибку без форматирования диска или чистой установки операционной системы, что также может повлечь за собой утерю файлов.
Загрузите бесплатно и просканируйте ваше устройство с помощью Hetman Partition Recovery. Ознакомьтесь с возможностями программы и пошаговой инструкцией.
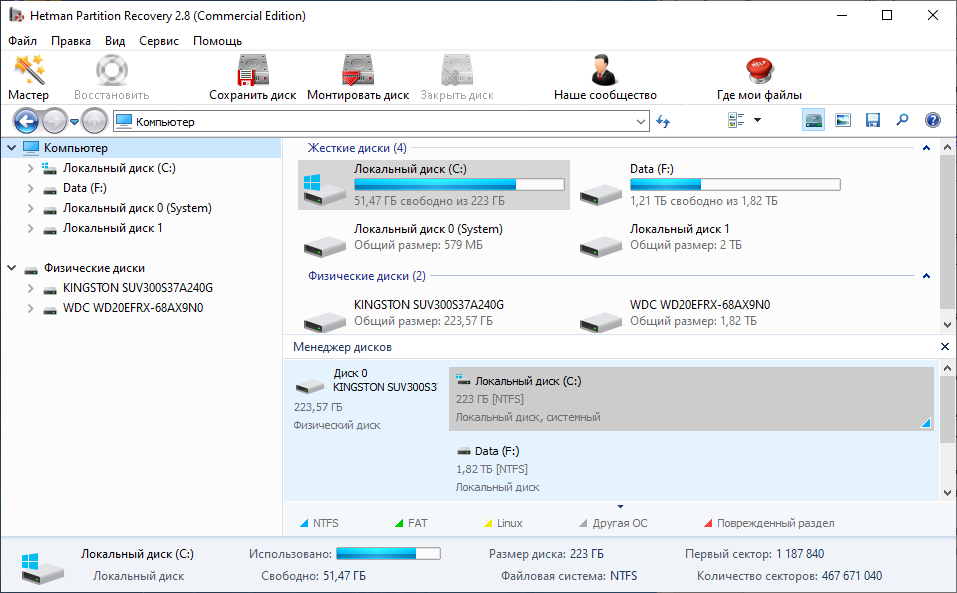
Программа для восстановления данных
Запустите компьютер в «безопасном режиме»
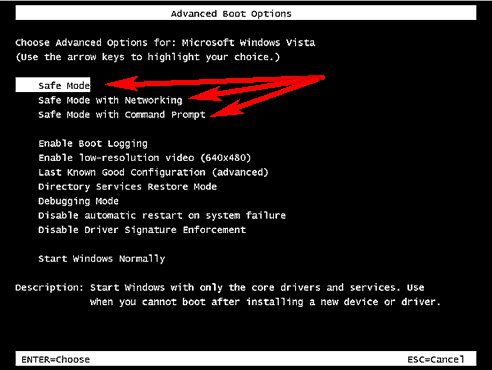
Если ошибка «PNP_DETECTED_FATAL_ERROR» (0x000000CA) возникает в момент загрузки Windows и блокирует любую возможность работы с системой, попробуйте включить компьютер в «безопасном режиме». Этот режим предназначен для диагностики операционной системы (далее ОС), но функционал Windows при этом сильно ограничен. «Безопасный режим» следует использовать только если работа с системой заблокирована.
Чтобы запустить безопасный режим сделайте следующее:
- Перейдите в меню Пуск и выберите Параметры.
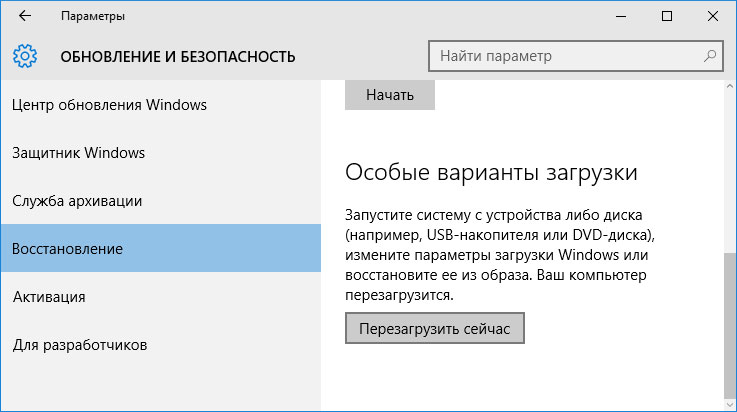
- В открывшемся окне параметров перейдите в меню Обновление и Безопасность и выберите раздел Восстановление.
- В разделе Восстановление найдите Особые варианты загрузки и нажмите кнопку Перезагрузить сейчас.
- После этого Windows перезагрузится и предложит выбрать следующее действие. Выберите Поиск и устранение неисправностей.
- В меню Поиск и устранение неисправностей кликните на Дополнительные параметры, далее — Параметры загрузки.
- Далее Windows уведомит вас о том, что компьютер можно перезагрузить с использованием дополнительных параметров загрузки. Укажите — Включить безопасный режим. Нажмите Перезагрузить.
- После перезагрузки выберите Включить безопасный режим нажав клавишу F4.
Как загрузить Windows в безопасном режиме
Обновите драйвер через Диспетчер устройств
Вы установили новое аппаратное обеспечение на компьютере? Возможно вы начали использовать новое USB-устройство с вашим компьютером. Это могло привести к ошибке «PNP_DETECTED_FATAL_ERROR». Если вы установили драйвер устройства используя диск, который поставляется вместе с ним, или использовали драйвер не c официального сайта Microsoft, то причина в нем. Вам придется обновить драйвер устройства, чтобы устранить эту проблему.
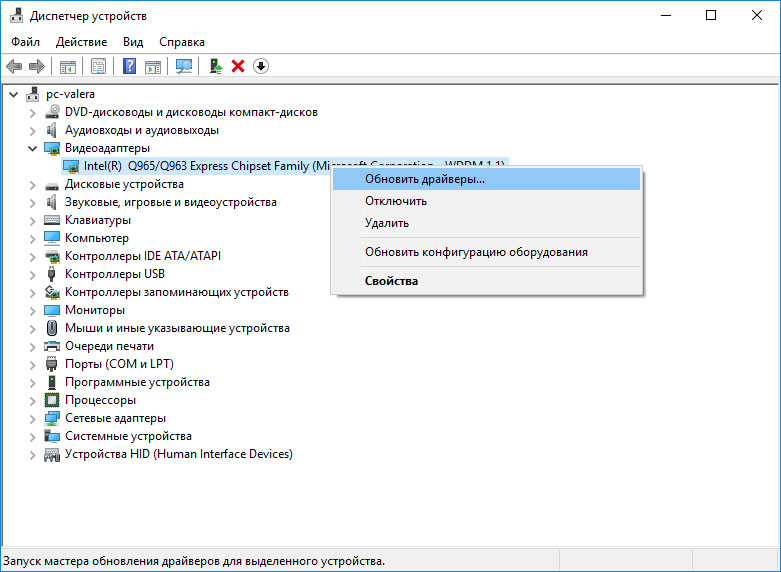
Вы можете сделать это вручную в диспетчере устройств Windows, для того выполните следующие инструкции:
- Нажмите кнопку Windows, затем введите диспетчер устройств с клавиатуры.
- Выберите Диспетчер устройств из списка.
- Просмотрите список категорий устройств, нажмите на стрелочку рядом с категорией вашего нового устройства. Драйвер может быть отмечен желтым треугольником.
- Кликните правой кнопкой мыши на имя устройства и нажмите Обновить драйвер.
- Далее откроется окно Мастера обновления драйверов с двумя опциями:
- Автоматический поиск обновленных драйверов. Windows проверит наличие наиболее подходящего драйвера для этого устройства в автоматическом режиме.
- Выполнить поиск драйверов на этом компьютере. Используйте эту опцию, что бы самостоятельно указать ОС файлы драйвера.
Перезагрузите компьютер после установки драйвера.
Используйте sfc /scannow для проверки всех файлов системы
Повреждение или перезапись системных файлов может привести к ошибке «PNP_DETECTED_FATAL_ERROR». Команда sfc находит поврежденные системные файлы Windows и заменяет их.
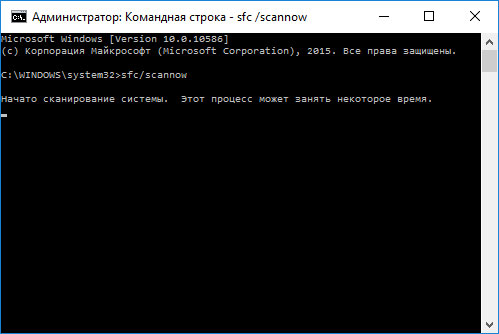
- Нажмите кнопку Windows, затем введите cmd с клавиатуры.
- Правой кнопкой мышки кликните на CMD и запустите от имени администратора.
- В окне командной строки введите sfc /scannow и нажмите Enter.
Этот процесс может занять несколько минут.
Как восстановить системные файлы Windows 10

Проверьте диск с Windows на наличие ошибок командой chkdsk c: /f
Возможно к синему экрану с «PNP_DETECTED_FATAL_ERROR» привела ошибка файловой системы или наличие битых секторов диска. Команда CHKDSK проверяет диск на наличие ошибок файловой системы и битых секторов. Использование параметра /f заставит программу автоматически исправлять найденные на диске ошибки, а параметр /r позволяет найти и «исправить» проблемные сектора диска. Для запуска следуйте инструкциям:
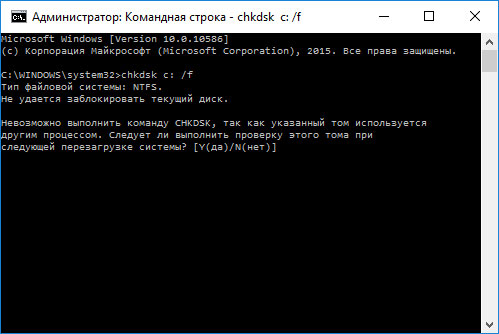
- Нажмите кнопку Windows, затем введите CMD с клавиатуры.
- Правой кнопкой мышки кликните на CMD и запустите от имени администратора.
- В окне командной строки введите chkdsk c: /f и нажмите Enter (используйте ту букву диска, на котором установлена ОС).
Дождитесь окончания процесса и перезагрузите компьютер.
Используйте режим совместимости со старой версией Windows
Отключите лишние программы из автозагрузки Windows
Программное обеспечение, вызывающее «PNP_DETECTED_FATAL_ERROR» (0x000000CA), может быть прописано в автозагрузку Windows и ошибка будет появляться сразу после запуска системы без вашего участия. Удалить программы из автозагрузки можно с помощью Диспетчера задач.

- Загрузитесь в Безопасном режиме.
- Кликните правой кнопкой мышки на Панели задач, затем на пункте Диспетчер задач.
- Перейдите на вкладку Автозагрузка.
- Чтобы убрать ту или иную программу из автозагрузки выберите её из списка и отключите, нажав кнопку Отключить в правом нижнем углу окна.
Обратитесь в поддержку Microsoft
Microsoft предлагает несколько решений удаления ошибки «голубого экрана». «PNP_DETECTED_FATAL_ERROR» (0x000000CA) можно убрать с помощью Центра обновления или обратившись в поддержку Windows.
- Перейдите на сайт технической поддержки Microsoft.
- Введите код и сообщение об ошибке в поисковую строку и следуйте найденным рекомендациям.
- Если вы не найдете готового решения, то задайте вопрос в сообществе — возможно вам ответит сертифицированный системный администратор.
Установите последние обновления системы
С обновлениями Windows дополняет базу драйверов, исправляет ошибки и уязвимости в системе безопасности. Загрузите последние обновления, что бы избавиться от ошибки «PNP_DETECTED_FATAL_ERROR» (0x000000CA).
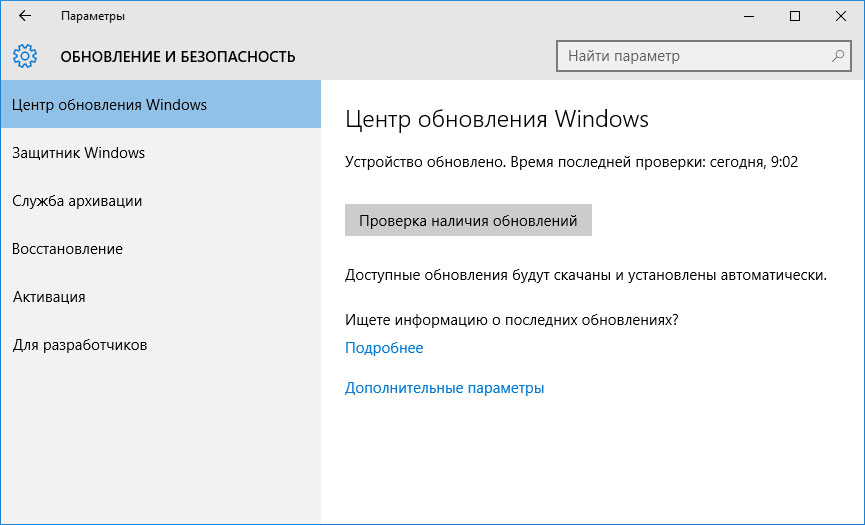
Запустить Центр обновления Windows можно следующим образом:
- Перейдите в меню Пуск и выберите Параметры.
- В окне Параметров перейдите в меню Обновление и Безопасность.
- Для установки последних обновлений Windows нажмите кнопку Проверка наличия обновлений и дождитесь окончания процесса их поиска и установки.
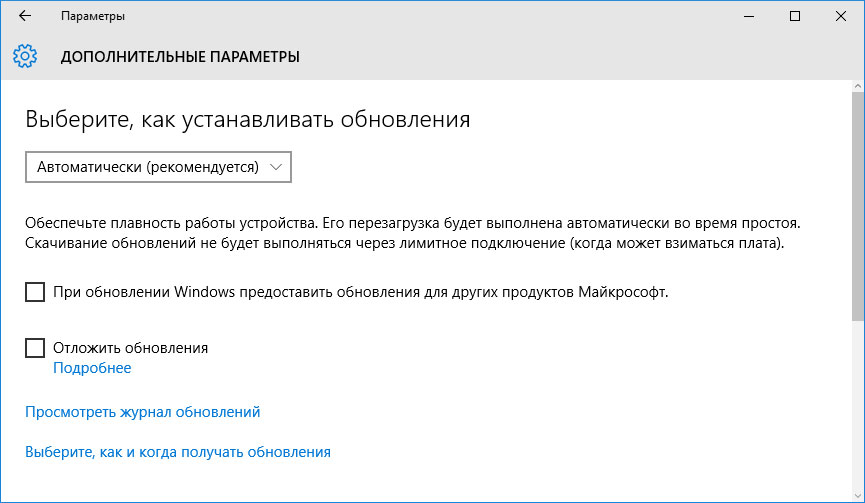
Рекомендуется настроить автоматическую загрузку и установку обновлений операционной системы с помощью меню Дополнительные параметры.
Чтобы включить автоматическое обновление системы необходимо запустить Центр обновления Windows:
- Перейдите в меню Пуск и выберите Параметры.
- В окне Параметров перейдите в меню Обновление и Безопасность и выберите подменю Центр обновления Windows. Для установки последних обновлений Windows нажмите кнопку Проверка наличия обновлений и дождитесь окончания процесса их поиска и установки.
- Перейдите в Дополнительные параметры и выберите, как устанавливать обновления — Автоматически.
Запустите проверку системы на вирусы
«Синий экран смерти» с ошибкой «PNP_DETECTED_FATAL_ERROR» 0x000000CA может вызывать компьютерный вирус, заразивший систему Windows.
Для проверки системы на наличие вирусов запустите установленную на компьютере антивирусную программу.
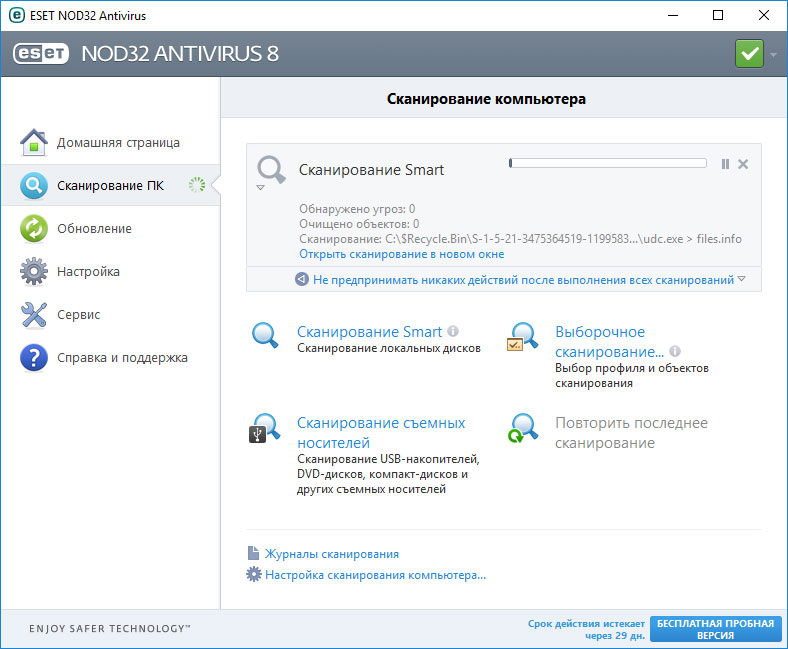
Современные антивирусы позволяют проверить как жесткие диски, так и оперативную память. Выполните полную проверку системы.
Выполните проверку оперативной памяти
Неполадки с памятью могут привести к ошибкам, потере информации или прекращению работы компьютера.
Прежде чем проверять оперативную память, отключите её из разъёма на материнской плате компьютера и повторно вставьте в него. Иногда ошибка PNP_DETECTED_FATAL_ERROR» вызвана неправильно или не плотно вставленной в разъём планкой оперативной памяти, или засорением контактов разъёма.
Если предложенные действия не привели к положительному результату, исправность оперативной памяти можно проверить средствами операционной системы, с помощью средства проверки памяти Windows.
Запустить средство проверки памяти Windows можно двумя способами:
- С помощью Панели управления:

Перейдите в Панель управления / Система и безопасность / Администрирование. Запустите приложение Средство проверки памяти Windows.
- С помощью средства Выполнить:

Запустите средство Выполнить с помощью комбинации клавиш Windows + R. Наберите mdsched и нажмите Enter. После чего откроется средство проверки Windows.
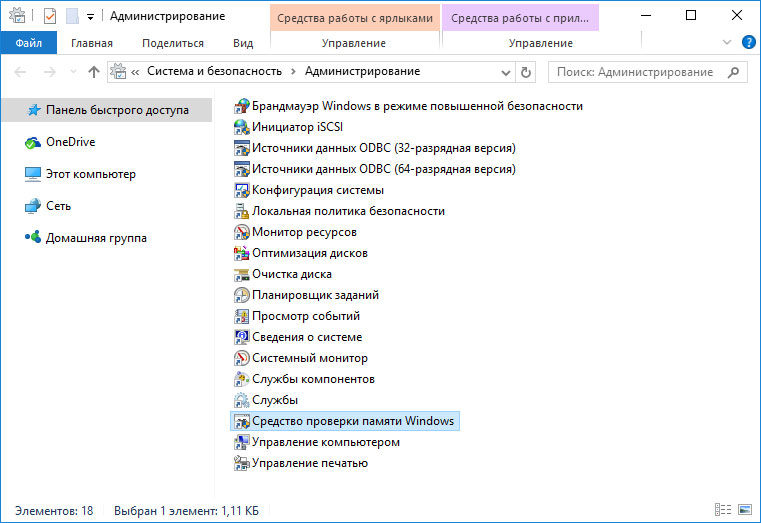
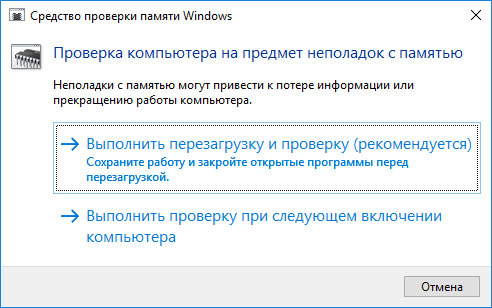
Для начала проверки выберите один из предлагаемых вариантов, проверка оперативной памяти в соответствии с которым будет запущена после перезагрузки компьютера.
Если в результате проверки будут определены ошибки, исправить которые не представляется возможным, то такую память необходимо заменить (замене подлежит модуль памяти с неполадками).
Выполните «чистую» установку Windows
Если не один из перечисленных методов не помог избавиться от PNP_DETECTED_FATAL_ERROR», попробуйте переустановить Windows. Для того чтобы выполнить чистую установку Windows необходимо создать установочный диск или другой носитель с которого планируется осуществление установки операционной системы.
Загрузите компьютер из установочного диска. Для этого может понадобиться изменить устройство загрузки в BIOS или UEFI для более современных компьютеров.
Следуя пунктам меню установщика укажите диск, на который вы хотите установить Windows. Для этого понадобится отформатировать его. Если вас не устраивает количество или размер локальных дисков, их можно полностью удалить и заново перераспределить.
Помните, что форматирование, удаление или перераспределения дисков удалит все файлы с жесткого диска.
После указания диска для установки Windows запуститься процесс копирования системных файлов и установки операционной системы. Во время установки от вас не потребуется дополнительных действий. В течении установки экран компьютера будет несколько раз гаснуть на непродолжительное время, и для завершения некоторых этапов установки компьютер будет самостоятельно перезагружаться.
В зависимости от версии Windows на одном из этапов от вас может понадобиться выбрать или внести базовые параметры персонализации, режим работы компьютера в сети, а также параметры учётной записи или создать новую.
После загрузки рабочего стола чистую установку Windows можно считать законченной.
Примечание. Прежде чем приступить к выполнению чистой установки Windows заранее побеспокойтесь о наличии драйверов ко всем установленным устройствам и сохранности ваших файлов. Загрузите и сохраните драйвера на отдельный носитель информации, а для важных данных создайте резервную копию.
Как сбросить Windows 10 к исходному состоянию
Как сбросить Windows 10, 8, 7 если компьютер не загружается
If you suddenly encounter a PNP_DETECTED_FATAL_ERROR Blue Screen error, then this post can help you out. The PNP_DETECTED_FATAL_ERROR BSOD usually occurs when any new hardware that is mostly the Plug and Play type is attached. In such cases, when the device is plugged, and the driver for that device crashes or isn’t found or is not compatible, you will most likely encounter this particular BSOD error.
There are several error codes that come under this category, some of them are 0x000000CA (0x01681690, 0xEA96A7BE, 0x938A81AD, 0xF8362881. This BSOD error can also occur at any time. However, the only constant thing here is when you plug a PNP device like earphones, microphones, USB drives, and many more.
The PNP_DETECTED_FATAL_ERROR bug check has a value of 0x000000CA which indicates that the Plug and Play Manager encountered some severe error which is most likely have something to do with a problematic Plug and Play driver. To fix this error, here are some possible solutions that could help.
Option 1 – Run the Blue Screen Troubleshooter
The Blue Screen troubleshooter is a built-in tool in Windows 10 that helps users in fixing BSOD errors like PNP_DETECTED_FATAL_ERROR Blue Screen error. It can be found on the Settings Troubleshooters page. To use it, refer to these steps:
- Tap the Win + I keys to open the Settings panel.
- Then go to Update & Security > Troubleshoot.
- From there, look for the option called “Blue Screen” on your right-hand side and then click the “Run the troubleshooter” button to run the Blue Screen Troubleshooter and then follow the next on-screen options. Note that you might have to boot your PC into Safe Mode.
Option 2 – Try disabling or removing newly installed hardware
In this option, you will have to disable or remove the hardware you’ve just installed recently since external devices could be the one that’s causing the Blue Screen of Death error to appear. To do that, just disconnect any external device that’s connected to your computer physically and then check if it fixes the PNP_DETECTED_FATAL_ERROR Blue Screen error.
Option 3 – Try disabling BIOS Memory options namely Caching Shadowing
Disabling the BIOS Memory options such as Caching and Shadowing can help you in fixing the PNP_DETECTED_FATAL_ERROR Blue Screen error. All you have to do is enter the BIOS first and then use the Arrow and Enter keys to select your choices. And if you can’t seem to find it, look for specific instructions from your OEM or you could also look out for instructions from the manufacturer of your motherboard.
Option 4 – Try to run the CHKDSK utility
Running the CHKDSK utility might also help you resolve the PNP_DETECTED_FATAL_ERROR Blue Screen error. If your hard drive has issues with integrity, the update will really fail as the system will think that it’s not healthy and that’s where the CHKDSK utility comes in. The CHKDSK utility repairs hard drive errors that might be causing the problem.
- Open Command Prompt with admin privileges.
- After opening Command Prompt, execute the following command and hit Enter:
chkdsk /f /r
- Wait for the process to be completed and then restart your computer.
Option 5 – Try to uninstall programs you’ve installed recently
Chances are, some programs that you just installed might be the one that’s causing the BSOD error. Thus, you need to uninstall the program to resolve the problem.
- In the search box, type in “control” and then click on Control Panel (desktop app) among the search results.
- After that, select Programs and Features from the list which will give you a list of all the programs installed on your computer.
- From there, look for the concerned program and select it and then uninstall it.
Option 6 – Update the Device drivers
- Tap the Win + R keys to launch Run.
- Type in devmgmt.msc into the box and tap Enter or click OK to open the Device Manager.
- After that, a list of device drivers will be displayed. Look for the device driver you and then select either “Update driver” or “Uninstall device”. And if you find any “Unknown device”, you need to update it as well.
- Select the “Search automatically for updated driver software” option and then follow the instructions to complete the process.
- If you have chosen to uninstall the driver, follow the screen options to complete the process and then restart your PC.
- Connect the device and Scan for hardware changes – you can see this option under Device Manager > Action.
Option 7 – Perform a System Restore
Performing System Restore might help you in fixing the PNP_DETECTED_FATAL_ERROR Blue Screen error. You can do this option either by booting into Safe Mode or in System Restore. If you are already in the Advanced Startup Options, just directly select System Restore and proceed with the next steps. And if you have just booted your PC into Safe Mode, refer to the steps below.
- Tap the Win + R keys to open the Run dialog box.
- After that, type in “sysdm.cpl” in the field and tap Enter.
- Next, go to the System Protection tab then click the System Restore button. This will open a new window where you have to select your preferred System Restore point.
- After that, follow the on-screen instructions to finish the process and then restart your computer and check if the problem is fixed or not.
Advanced System Repair Pro
One-click automated PC repair solution
![]()
With Advanced System Repair Pro you can easily
DOWNLOAD
Advanced System Repair Pro is compatible with all versions of Microsoft Windows including Windows 11
Share this article:
You might also like
Error in Loading DLL — What is it?
This is a Dynamic Link Library (DLL) error. It results when a program calls upon a DLL file to perform a certain task and the file fails to load as it is damaged. In a nutshell, DLL is a collection of small programs. DLL is called upon by the executable program (EXE) that is running.
The DLL file allows the executable program to run on the system. For example this error may occur when you try to run wizards in Microsoft Office Access such as the Import Wizard, the Report Wizard or the Control Wizard. This error is usually displayed as:
“Error in loading dll”
“Object library not registered”
Solution
 Error Causes
 Error Causes
The error in loading DLL occurs due to numerous reasons. Some of the most common causes include:
- The DLL or the referenced DLL is not in a directory specified in the path.
- DLL File is damaged due to hard disk errors and registry corruption
- Registry key may not exist
- Malware errors add malicious codes to the application
- Spyware and adware infections
When you come across error in loading DLL, it is advisable to fix it right away as this error can pose serious threats and lead to your PC malfunctioning. It can corrupt programs and put you at risk of data security and privacy threats.
Further Information and Manual Repair
To resolve this error in loading DLL files, you don’t always have to hire a technician even if you don’t have technical knowledge. This error is quite easy to repair.
Here are two ways to resolve error in loading DLL without any professional assistance:
Solution 1: Reinstall the Program
Reinstalling the program can help you resolve this issue. However, when doing this you will first have to uninstall the program and also remove the DLL files from the registry to ensure the update is carried successfully.
In addition to this, you will also have to uninstall some programs that share DLL files with the program that you are removing from your system to reinstall it again. Windows will prompt the DLL shared message if it is being shared by other software on your system.
Though this is a method used to resolve errors in loading DLL this can be slightly tricky and confusing for many.
Solution 2: Repair the Registry and Remove Malware
This is the best, easiest and most efficient way to repair error in loading DLL files.
Did you know 94% of the PC-related errors are triggered by registry corruption and malware infection? To repair the registry and remove malware from your system, you don’t have to download a separate registry cleaner and an anti-virus. Simply download Restoro.
Restoro is a cutting-edge and multi-functional repair tool integrated with powerful utilities like a registry cleaner, system optimizer, and an anti-virus. By running Restoro on your computer you can resolve all the underlying causes for error in loading DLL files in seconds.
Whether the error results from registry corruption or viral infection, Restoro is the only tool you need to run to repair.
It is a safe, efficient and a super functional tool. It has a neat layout, easy navigation, and a user-friendly interface embedded with advanced technology and automated algorithms that scan your entire PC and repair all kinds of PC issues right away. It can be easily operated by even novice users.
Restoro features
The registry cleaner feature repairs DLL errors and corrupt registry. It removes all the unnecessary and obsolete files that have overloaded and damaged the hard disk. It scans and wipes out such files clearing up the disk space. It fixes mis-configured registry keys and settings thus resolving errors in loading DLL files.
If your system is infected by malware it may create Dll.exe malicious files on your system.
If these are viruses, they can damage your system. Malicious software like Trojan and spyware are detected and removed with the help of the privacy error detector module integrated into Restoro.
Other features that are worth mentioning are its backup feature and outstanding Windows compatibility. With Restoro users can create backup files for data recovery in the event of data loss during repair. Also, it is compatible with all Windows versions.
To resolve error in loading DLL files on your system you just have to perform 3 simple steps:
- Click here to download Restoro.
- Run it on your system to scan for errors in loading DLL files
- Click repair to fix the issues.
Read More
Receiving a screen of death is not a pleasant experience at all and most users would agree that they would very much like not to face one during their work with the computer. Sadly PC is not a perfect machine and it is not working in a perfect environment so errors happen.
The most famous and well-known death screen is blue which is also the most common one, my bet would be that there is not a user which has not been faced with this blue error screen. There is no simple explanation why these stop errors occur as several factors can be involved. However, it is known that the malfunctioning of hardware drivers or drivers that are installed by third-party software drive this unwanted change.
But did you know that there is more colors for infamous death screens and not just blue one?
Microsoft has coded different errors to different colors in the goal for the technical team to be aware right away of what type and kind of error they are dealing with.
Color for screen errors are: Blue, Black, Pink, Brown, Yellow, Red, Orange, Green and White
If you are interested in what color represents what keep reading.
BLUE
 A stop error or exception error commonly called the blue screen of death (BSoD) or blue screen, is an error screen displayed on Windows computers following a fatal system error. It indicates a system crash, in which the operating system has reached a condition where it can no longer operate safely. This is caused by many different problems, such as a general hardware failure or a crucial process terminating unexpectedly.
BLACK
 On Windows 10 systems, a Black Screen of Death can be caused by an unfinished Windows Update. To resolve this problem, simply hold the power button down on your PC or laptop to switch off the computer. A cold start should result in the system booting properly.
PINK
 It is a diagnostic screen with a white type on a pink background. Pink Screen is mainly seen when the VMkernel of an ESX/ESXi host experiences a critical error, becomes inoperative, and terminates any virtual machines that are running. It is not fatal and generally considered more of a developer testing issue. When encountered, it can be fixed quickly by following the simple action of pressing and holding your computer’s power button to shut down the device.
BROWN
 The Microsoft Windows 10 Operating System Brown Screen of Death is an on-screen fatal error notification with bug check codes which is seen when a computer crashes due to graphics hardware or software-related problems (failing graphics drivers).
YELLOW
 It affects the functioning of a browser, particularly Mozilla Firefox. The Yellow Screen of Death makes the appearance with a weird buzzing sound in the background when the XML parser refuses to process an XML document causing a parsing error and a weird buzzing sound. The issue persists unless the computer is manually rebooted.
RED
 Commonly the Windows 10 red screen is caused due to the hardware error, particularly if you overclock your Windows PC/laptop. Despite this, sometimes the red screen of death is also caused by outdated or incompatible drivers or due to BIOS issues.
ORANGE
 The Orange Screen of Death on Windows occurs due to fatal hardware errors. Multiple reasons have been reported for the Orange Screen of Death. Some had this issue when watching a YouTube video, some were not able to boot into Windows. It can even occur when waking up from Sleep.
GREEN
 The green screen of death only appears when you’re running an Insider Preview version of Windows 10. It’s the same as the blue screen of death, and it will show the same error messages. … If you see a green screen of death (GSOD) on your PC, that’s a sign you’re using an Insider Preview build of Windows 10.
WHITE
 The White Screen on Windows is also an error where the screen of the computer just turns white and freezes. There can be several things that can cause the white screen to appear on the Windows laptop monitor. But the main issue could be because of malfunctioning of the graphics hardware.
Read More
If you’ve tried resetting your Windows 10 computer using the Reset This PC option in order to restore your computer’s factory settings and the process suddenly fails for some reason and you got an error message instead stating, “There was a problem resetting your PC, No changes were made on your Windows 10 computer”, then this post might help you resolve the problem.
Carefully follow each one of the options given below to resolve the “There was a problem resetting your PC error on Windows 10.
Option 1 – Try renaming the System and Software hive
- If you’re still able to boot to the desktop of your Windows 10 PC, open an elevated Command Prompt from the WinX menu.
- Now use the CD command and change the directory to WindowsSystem32config folder. Simply type in the following command and hit Enter:
cd %windir%system32config
- After that, you have to rename the System and Software registry hives to “System.001” and “Software.001”, respectively. To do that, just type each one of the following commands and hit Enter after you type each of them.
- ren system system.001
- ren software software.001
On the other hand, if your Windows 10 PC isn’t able to boot to the desktop, you can just access Command Prompt from the Advanced Startup options or you can also boot into Sage Mode and open Command Prompt from there and then run the given commands above.
Note: If you only want to use the Refresh your PC option, you must only rename System hive and not Software hive. On the other hand, if the Software hive is really corrupted, you might not be able to use the Refresh your PC option in such a case. Thus, you really need to rename the Software hive as well. Once you’ve renamed the Software hive, you won’t be able to use the Refresh your PC option but only the Reset your PC option.
- Type “exit” to close the Command Prompt and then restart your PC and try resetting your PC again.
Option 2 – Try to disable and re-enable the Windows Recovery Environment
If the first option didn’t help, you can try disabling the Windows Recovery Environment and then enable it back again. To configure a Windows Recovery Environment or Windows RE boot image and recovery options, you have to use the REAgentC.exe tool.
- Tap the Win + S key and type “REAgentC.exe” to open the REAgentC.exe tool.
- After that, type the following command and hit Enter to disable the Windows RE:
reagentc /disable
- After disabling the Windows RE, you need to enable it back by typing the following command:
reagentc /enable
Option 3 – Try to boot the USB recovery drive
If the two previous options failed, you need to try another workaround which is to boot to the USB recovery drive > Troubleshoot > Recover from a drive. From there, follow the on-screen instructions and you should be good to go.
Read More
Dsound.dll Error Code — What is it?
Dsound.dll is a type of Dynamic Link Library. This is one of the many files that are associated with DirectX software. And DirectX software is used by most Windows-based games.
Dsound.dll contains small programs that help run and load Windows-based games on your system.
The Dsound.dll error pops when Windows-based games are unable to load and run on the computer.
The error code appears on the screen in one of the following formats:
- «The file dsound.dll is missing»
- «File dsound.dll not found»
- «Dsound.dll not found. Reinstalling might help fix this.»
- «Dsound.DLL Not Found»
Solution
Error Causes
Dsound.dll error is generated due to multiple reasons. These include:
- Corrupt, damaged, or missing Dsound.dll file
- Malware infection
- Outdated drivers
To play the games on your computer, it is important to fix the Dsound.dll error immediately.
Further Information and Manual Repair
To resolve Dsound.dll error at home on your own without hiring a professional and spending hundreds of dollars in repair, here are some methods you can try:
Method 1 — Restart Your PC to Resolve
Sometimes the error may be a fluke and can be resolved by simply restarting your PC. So, before you try other methods, it is recommended that you restart your system first.
If it resolves the issue, then that’s great. If it doesn’t, then try other methods given below!
Method 2 — Reinstall the Deleted Dsound.dll File
Since DLL files are shared files, there is a possibility that while uninstalling a game on your PC, you might have accidentally deleted this file too.
If so, check your recycle bin and search for the deleted file. If you locate it, simply restore it. But if you can’t, then download the Dsound.dll file from a reliable DLL website. Make sure that the site is authentic because the last thing you want is to download malware instead of a DLL file.
Method 3 — Update Driver for Your Video Card
If Dsound.dll error occurs because of outdated drivers, then update them to resolve. You can do this by using a driver update wizard from within Device Manager. The wizard will guide you through the process, making updates simple.
Method 4 — Remove Malware
Download a powerful antivirus to scan and remove malware from your system. A malware infection can trigger a Dsound.dll error too.
Method 5 — Uninstall the Game and then reinstall it again
Try uninstalling the game during which you experienced this error. Sometimes the error may pop because of improper game installation. Uninstall it and then reinstall it. Once you’ve reinstalled it, try accessing it again. If it is accessible, the error is resolved.
Method 6 — Repair the Registry
DLL errors are also related to the registry. These files can get damaged if the registry gets loaded with junk files and cookies. In such as situation clean and repair the registry. You can do this manually but it can be time-consuming and tricky if you are not technically sound.
Therefore download Restoro. It is a powerful and user-friendly PC Fixer embedded with a registry cleaner. The registry cleaner scans and removes all junk files clean the registry and repairs damaged DLL files immediately.
Click here to download Restoro and resolve error Dsound.dll today!
Read More
Error Code 0xC1900200, 0x20008 (Code 0xC1900202 – 0x20008) – What is it?
Error Code 0xC1900200, 0x20008 (Code 0xC1900202 – 0x20008) is an error that occurs when you attempt to upgrade to Microsoft Windows 10, but the minimum requirements have not been met by your computer. You will therefore be unable to upgrade to Microsoft Windows 10 until your computer is updated or upgraded to meet those requirements.
Common symptoms include:
- When attempting to upgrade a dialog box with Code 0xC1900200 – 0x20008 (Code 0xC1900202 – 0x20008) is displayed.
- Your computer is unable to begin the Microsoft Windows 10 upgrade process.
Solution
Error Causes
Error Code 0xC1900200 – 0x20008 (Code 0xC1900202 – 0x20008) occurs when you are unable to begin the Microsoft Windows 10 upgrade because your computer does not meet the minimum requirements to run Microsoft Windows 10.
- You are unable to begin the upgrade because your computer does not meet the required system or hardware specifications.
- You are not running the correct version of Microsoft Windows to be able to begin the upgrade.
- You are not running the latest updated version of Microsoft Windows 7 SP1 or Microsoft Windows 8.1.
Error Code 0xC1900200 – 0x20008 (Code 0xC1900202 – 0x20008) as stated, simply means your computer does not meet the requirements to update and does not indicate a permanent problem or inability to continue to use your computer. This error only means that you will not be able to upgrade to Microsoft Windows 10 until your computer is made to meet these requirements.
Further Information and Manual Repair
There are several solutions that the user can complete at home that should fix the problem resulting in a manifestation of Error Code 0xC1900200 – 0x20008 (Code 0xC1900202 – 0x20008). Below are several options that should resolve this error.
Method 1:
Verify what version of Microsoft Windows you are currently running, older, outdated, or no longer supported versions of Microsoft Windows are not able to upgrade to Microsoft Windows 10. If you are not running one of the following versions you will have to update before being able to upgrade.
- The most current version of Microsoft Windows 7 SP1
- The most current version of Microsoft Windows 8.1
Method 2:
Your computer’s system specifications do not meet the requirements to be able to upgrade to and run Microsoft Windows 10. To check your system specifications do the following.
- Click on the start button in the bottom left corner, then locate the control panel on the menu, click on it to open.
- Once it opens, locate system and security on the menu and click to open, click on system and this will show you your amount of RAM and processor speed.
- Find device manager on the left-hand side click this then select display adapter, and it will show you your current video card.
- Click on the start button again, then click on the computer in the menu, this will show you your hard drive size, and available space.
If you have the option available you can simply run the get Microsoft Windows 10 app to check compatibility. Once you have your system specs make sure they meet or exceed the following.
- 1 GHz or higher processor or SoC
- 1 gig of RAM for 32 bit and 2 gigs of RAM for 64 bit
- 16 GB available hard drive space for 32 bit, 20 GB for 64 bit
- Minimum of DirectX9 that has 1.0 WDDM
- At least an 800x600display
If your computer does not meet these minimum requirements, upgrade the components necessary to meet them. If you do not possess the technical expertise required to accomplish this yourself or do not feel comfortable doing so, download and install a powerful automated tool to get the job done.
Method 3:
Your computer might not meet the aforementioned requirements to make an upgrade because of insufficient hard drive space or resources. Learn how to create or make space on your computer here.
Method 4:
Many people hold on to and use the same computer for a very long time. It is possible that your computer cannot be upgraded to meet the requirements, or that the cost to do so would be so high that a new computer would be cheaper. If that is the case, your only option may be to replace your computer.
Read More
Error 10013 — What is it?
Error 10013 is a type of Socket Windows PC error. Socket error 10013 occurs when the attempt to access the server is denied. This indicates that the needed socket connection is denied which further implies that a port is blocked or unreachable.
Solution
Error Causes
The socket error 10013 can occur due to multiple reasons:
- Antivirus or firewall software
- Incompatible drivers
- Registry corruption
- Misconfigured files
Further Information and Manual Repair
To resolve the socket error 10013 on your PC, here are some methods that you can try:
1. Disable Firewall
To resolve this issue on your PC, you may have to temporarily disable Firewall. Sometimes Firewall can stop you from connecting to the server. Try doing this; it is most likely to resolve the error. If the Firewall is the reason for the denied access, turning it off will surely help.
2. Disable your Antivirus Software
If disabling the Firewall doesn’t resolve the issue, try disabling your antivirus software temporarily. If the error still persists, then try other solutions listed below.
3. Upgrade Drivers
Incompatible drivers could be a reason too for denied server access.
Your server may no longer be using the drivers that you have on your PC which is why you may not be getting permission to access it. If this is the cause, then the best way to resolve it is to upgrade drivers. To find out about new drivers, visit the software manufacturer’s website for new drivers and then download them to your PC.
4. Registry Issues
Sometimes the underlying cause of the error could be registry issues and misconfigured files.
If you don’t wipe out unnecessary and obsolete files from your systems like junk files, cookies, internet history, temporary files, and other files from your PC, it can damage and corrupt the registry and misconfigured files thereby causing socket error 10013 on your system.
To resolve registry issues and repair your PC, download Restoro. It is an advanced, easy to use, and highly functional PC fixer embedded with multiple utilities including a powerful registry cleaner. It is deployed with an intuitive algorithm that scans and detects all registry issues in seconds.
It removes all the unnecessary and obsolete files stored in your PC overloading your registry. This registry cleaner repairs the damaged and misconfigured files and restores the registry, thereby resolving socket error 10013 on your system right away.
It has simple navigations and a user-friendly interface which makes it very easy for all levels of users to work around and use it to its maximum advantage. Furthermore, it can be installed on all Windows PC.
Restoro is compatible with all Windows versions.
In addition to this, it also includes several other value-added features such as an antivirus, a system optimizer, and an Active X controls and class scanner. These utilities can be used to resolve numerous other PC-related errors.
Click here to download Restoro today and resolve socket error 10013 on your PC right away.
Read More
Error Code 0xc004f210 – What is it?
Error code 0xc004f210 occurs when Windows 8 users fail to activate their Windows operating system. Users will be able to identify error code 0xc004f210 because of the following common symptoms which occur:
- Inability to activate Windows 8 operating system
- Message box with error code 0xc004f210
Solution
Error Causes
If you enter an invalid product key or do not have a digital entitlement for the edition of Windows you are attempting to activate, you may experience error code 0xc004f210. Since this error usually occurs due to these main reasons, you will most likely find success resolving this issue by ensuring you use a valid product key or activate an appropriate edition of Windows based on the edition of your digital entitlement.
Further Information and Manual Repair
Error codes can be resolved through manual repair procedures that seek to fix the underlying issues causing the error. In the case of error code 0xc004f210, you should be able to resolve this error by using the methods below. You may also consider contacting a Windows repair technician if you have difficulty resolving the error code.
Method One: Enter Valid Product Key
To successfully activate your operating system and resolve error code 0xc004f210, you will need to enter a valid product key in the Update & security section of Windows. Follow the instructions below to enter the product key.
- Step one: Click the Start button then select Settings
- Step two: Select Update & security then Activation
- Step three: Click the Change product key
- Step four: Enter a valid product key
If the issue causing error code 0xc004f210 is related to the use of an invalid product key, you should be able to successfully activate your Windows operating system. Should the problem persist, however, you will need to attempt the next manual repair method explained below? Note: Failure to fix this error code might result in other Windows 10 error messages.
Method Two: Ensure Edition of Windows Matches Your Digital Entitlement
Digital entitlement allows Windows users to access activation without using a product key. This digital entitlement only affects Windows 8 users who are attempting to activate versions of Windows 10 that include Windows 10 Pro. Once you are using a genuine copy of Windows 8.1 and your edition of Windows matches your entitlement, you may proceed with the instructions below.
- Step one: Click the Start button then select Settings
- Step two: After selecting Settings, click Update & Security
- Step three: Select Windows Update then the Check for updates tab
- Step four: Click activate Windows 10 update
You should be able to activate your Windows update once you follow the instructions above. Remember error code 0xc004f210 is an activation code related to product keys or your digital entitlement so once these issues are rectified, you should have no problem activating your operating system of choice and enjoying the benefits it offers. If, however, the problem remains unresolved after you have attempted both manual repair methods, there may be unusual issues affecting your system. Contact Microsoft to rectify the issue or get help from a Windows repair technician.
Method Three: Download an Automated Tool
If you wish to always have at your disposal a utility tool to fix these Windows 8 and other related issues when they do arise, download and install a powerful automated tool.
Read More
This Unresponsive Script problem information is most frequent on Firefox, which is among the top browsers worldwide.
Firefox might show you these errors with the information, «Warning: Unresponsive Script». It is going to subsequently inform you that software to the web page you’re trying to open is unresponsive, or has quit reacting.
This means that the script has ceased functioning and may freeze or hang Firefox if not immediately resolved. You can easily solve this problem.
Solution
Error Causes
Before you can fix this error, you need to understand its primary cause.
The biggest risk is that if left unchecked, Unresponsive Scripts will hang your browser and to an extension of your computer thus limiting your productivity. You may have to uninstall and re-install Firefox if the problem persists.
Listed here are several of the very most typical reasons for unresponsive script:
- Programming Errors
- Interference by other Softwares
- Using an older outdated version of the program.
Further Information and Manual Repair
Most times, you have to do very little to fix this problem. Furthermore, a lot of the remedies supplied here do not require the assistance of a qualified professional technician. You can easily perform them and completely solve the error.
-
If you wish to stop the error, keep your browser and add-ons up to date.
It’s easy to update your browser and any add-ons therein. In most cases it’s free. By upgrading your browser and add-ons frequently, you are effectively eliminating the risk of Unresponsive Script occurring and interfering with your work.
-
 Check for a poorly functioning background process
 Check for a poorly functioning background process
The sorts of background procedures that might result in the Unresponsive Software error include Javascript code, media plugin, and browser extension.
You can stop the script from running while using Firefox thus eliminating the Unresponsive script error.
Shutting the dialog box is just another easy way of eliminating the unresponsive script error information. Firefox offers you two choices in case of this malfunction. Either «Continue» or «Stop Script». Whatever alternative you pick, you can be certain the dialog box shuts, thus allowing you to continue browsing.
 The final solution. Contact Firefox about these errors on your browser. Oftentimes, these errors occur when you attempt to visit particular websites. Mark the offending websites’ URLs and include them in your communications with Firefox.
Sometimes you can also contact the website owner yourself and request them to check their website’s code.
Following are additional measures you can take to resolve the Unresponsive Script error.
- Waiting longer for the error to resolve itself automatically
- Blocking the offending script
- Yanking the guilty add-ons
- Disabling the hardware acceleration tool.
With one of these few steps, you won’t have to worry about the Unresponsive Script error, can continue enjoying your browsing activities on Firefox.
Read More
Can not open and run EXE file in Windows is not a new issue and sadly it can still happen from time to time, luckily this step by step solution will help you to resolve this problem fast and effective in no time.
Try the below solutions in no particular order and I hope that you will solve the issue fast and be able to return to using the computer like it never happened
-
Run SFC scan
As the EXE file not opening issue lies in the Windows OS, the SFC tool will be able to identify the cause and fix this issue.
Press ⊞ WINDOWS + X and choose command prompt (admin)
in command prompt type: sfc /scannow
Press ENTER -
Check registry and modify if needed
Sometimes value in the registry key is wrong and can cause this error, in order to check if this is the case, we will open the registry editor and find out
Press ⊞ WINDOWS + R to bring run dialog up
type in it: RegEdit and press ENTER
In the left pane of the Registry Editor window, click on the HKEY_CLASSES_ROOT to expand the section
Scroll down to find out the .exe registry and click on it
Go to the right pane of the window and double-click on the Default and set the Value Data as exefile
Click on the OK button
Next, located the given in the window: HKEY_CLASSES_ROOT>exefile>shell>open>command
Click on the “Command” in the left pane of the window
In the right pane of the window double-click on the Default and set Value Data as “%1” %*
Click on the OK button
Restart your computer and check if the issue persists -
Turn off Firewall and defender
If you have a firewall and antivirus active there might be a chance of a conflict and that firewall or antivirus is preventing the EXE file from starting, disable your firewall and anti-virus and try again to open the EXE file.
-
Turn off user account control
User account control can also like a firewall prevent some files from executing, go into accounts and turn off user account control to see if this might be an issue preventing you from opening the file.
Read More
If you encounter an error saying, “error accessing the registry” when you try to merge a registry key on your Windows 10 computer, you’re not alone as some users also experienced the same problem. According to these users, they encounter the error after they’ve re-installed their Windows version and tried to open a .reg file.
Based on the reports, this error could occur if the registry file does not have administrative privileges. Meaning to say, the program does not have the necessary permission to merge the .reg file. This is common with fresh installs as well as reinstalls. Moreover, this kind of issue could also occur due to system file corruption. Whichever the case may be, here are some troubleshooting tips you can check out to resolve the error.
Option 1 – Try to import the .reg file with admin privileges
As pointed out, the error may be due to a lack of admin privileges. It could be that the Registry Editor does not have admin privileges to merge the registry file. This is common with new Windows installations especially since the Registry Editor hasn’t been opened before. So you need to import the .reg file again and this time, with admin privileges.
- Tap the Win + R keys to open the Run dialog box.
- Then type “Regedit” in the field and tap the Ctrl + Shift + Enter keys to open the Registry Editor with admin privileges.
- A User Account Control or UAC prompt will appear where you have to click Yes to proceed.
- After opening the Registry Editor, go to File > Import using the ribbon bar at the top.
- Next, use the import menu to go to the location of the file you were trying to merge. Once you’ve found it, click Open to merge it with your current registry. This should fix the problem. If not, refer to the next options below.
Option 2 – Try performing a System Restore
Running System Restore can also help you fix the error when accessing the Registry. You can do this option either by booting into Safe Mode or in System Restore. If you are already in the Advanced Startup Options, just directly select System Restore and proceed with the next steps. And if you have just booted your PC into Safe Mode, refer to the steps below.
- Tap the Win + R keys to open the Run dialog box.
- After that, type in “sysdm.cpl” in the field and tap Enter.
- Next, go to the System Protection tab then click the System Restore button. This will open a new window where you have to select your preferred System Restore point.
- After that, follow the on-screen instructions to finish the process and then restart your computer and check if the problem is fixed or not.
- Once the next startup is complete, you have to merge or import the file again and see if the error is now fixed or not.
Option 3 – Try to perform repair install by creating a Windows 10 installation media
- Click this link and then click the Download Tool Now button.
- Next, click the “Use the tool to create installation media (USB flash drive, DVD, or ISO file)…” option and follow the next given instructions on the screen.
- Now select the ISO file option in step 5.
- After that, you should now have an ISO file.
- Next, go to the location where you’ve downloaded the ISO file.
- Then right-click on the Windows 10 ISO file and select the Open with option and then select File Explorer.
- Now click on “setup.exe” and follow the next instructions that appear on the screen. When asked, you have to select either Nothing (clean install) or Keep personal files only option. Take note that you must not select the “Keep personal files, apps, and Windows settings since it doesn’t really work.
Option 4 – Try running the System File Checker Scan
As mentioned, the error when accessing the Registry might be caused by file corruption. And that’s where the SFC scan comes in. The SFC or System File Checker scan could detect and automatically repair damaged system files. SFC is a built-in command utility that helps in restoring corrupted files as well as missing files. It replaces bad and corrupted system files with good system files. To run the SFC command, follow the steps given below.
- Tap Win + R to launch Run.
- Type in cmd in the field and tap Enter.
- After opening Command Prompt, type in sfc /scannow
The command will start a system scan which will take a few whiles before it finishes. Once it’s done, you could get the following results:
- Windows Resource Protection did not find any integrity violations.
- Windows Resource Protection found corrupt files and successfully repaired them.
- Windows Resource Protection found corrupt files but was unable to fix some of them.
- Now restart your computer.
Read More
![]()
Copyright © 2022, ErrorTools. All Rights Reserved
Trademarks: Microsoft Windows logos are registered trademarks of Microsoft. Disclaimer: ErrorTools.com is not affiliated with Microsoft, nor claim direct affiliation.
The information on this page is provided for information purposes only.
![]()
Repair your PC with one click
Please be aware that our software needs to be installed on a PC system with Windows on it, Open this website on a desktop PC and download the software for easy and quick elimination of your issues.