Hi all,
I’m joining in on this discussion…
I’m having a RAID10 with 4 disks. Problem I had…my nephew lost him out of site for a sec and he managed to pull disk 3 and 4…I know, believe it or not…
Anyway, I’ve plugged them back in and rebuilding began. Until this afternoon when the status light blinked red and no access via web interface was possible and all drives were quiet for a long time. So, I’ve powered down the NAS, holding the pwr button. This morning I’ve had access to the NAS, seeing that all my data was still there. Now, I see some known folders/files and short cuts to my shares but the shares them selves aren’t there… I suppose the rebuilding got interrupted for some reason.
MD_Checker reports:
[/etc] # md_checker
Welcome to MD superblock checker (v1.4) — have a nice day~
Scanning system…
HAL firmware detected!
Scanning Enclosure 0…
RAID metadata found!
UUID: 34f18f98:c15319a0:661e1906:44e77c10
Level: raid10
Devices: 4
Name: md1
Chunk Size: 512K
md Version: 1.0
Creation Time: Jul 19 12:08:54 2018
Status: OFFLINE
===============================================================================
Disk | Device | # | Status | Last Update Time | Events | Array State
===============================================================================
3 /dev/sda3 0 Active Jul 31 16:37:42 2018 10038728 AARA
4 /dev/sdb3 1 Active Jul 31 16:37:42 2018 10038728 AARA
5 /dev/sde3 2 Rebuild Jul 31 16:37:42 2018 10038728 AARA
6 /dev/sdd3 3 Rebuild Jul 31 16:37:42 2018 10038728 AARA
===============================================================================
And the init_lvm.sh:
[/etc] # /etc/init.d/init_lvm.sh
Changing old config name…
Reinitialing…
Detect disk(8, 0)…
dev_count ++ = 0Detect disk(8, 16)…
dev_count ++ = 1Detect disk(8, 32)…
ignore non-root enclosure disk(8, 32).
Detect disk(8, 48)…
dev_count ++ = 2Detect disk(8, 64)…
dev_count ++ = 3Detect disk(8, 0)…
Detect disk(8, 16)…
Detect disk(8, 32)…
ignore non-root enclosure disk(8, 32).
Detect disk(8, 48)…
Detect disk(8, 64)…
sys_startup_p2:got called count = -1
Done
After this command, I checked again in the Storage manager, it says that there’s no volume…
Before the above two commands I also did a mdadm command:
First:
[/] # mdadm —assemble /dev/md0 /dev/sda3 /dev/sdb3 /dev/sdc3 /dev/sdd3
mdadm: no RAID superblock on /dev/sdc3
mdadm: /dev/sdc3 has no superblock — assembly aborted
Then I’ve found on the internet I could leave sdc3 out so:
[/] # mdadm —assemble /dev/md0 /dev/sda3 /dev/sdb3 /dev/sdd3 —verbose
mdadm: looking for devices for /dev/md0
mdadm: failed to get exclusive lock on mapfile — continue anyway…
mdadm: /dev/sda3 is identified as a member of /dev/md0, slot 0.
mdadm: /dev/sdb3 is identified as a member of /dev/md0, slot 1.
mdadm: /dev/sdd3 is identified as a member of /dev/md0, slot 3.
mdadm: added /dev/sdb3 to /dev/md0 as 1
mdadm: no uptodate device for slot 4 of /dev/md0
mdadm: added /dev/sdd3 to /dev/md0 as 3
mdadm: added /dev/sda3 to /dev/md0 as 0
mdadm: /dev/md0 assembled from 3 drives — need 5 to start (use —run to insist). <===== This is very strange to me because I only have 4 drives in my setup.
If anybody has any suggestions on how to handle, would be great! I’m not an expert, but I do my best.
Thanks in advance for all your answers and help!
==================================================
QNAP TVS-473
— 4x WD Red Pro 6TB (RAID 10)
— 2x Samsung 970 Evo plus m.2 1TB (RAID 1)
— 16GB Memory
— Firmware: QTS 5.0.0.1891
Stop all of services and umount all of volumes
Step1: Stop all of services
/etc/init.d/services.sh stop
/etc/init.d/qsnapman.sh stop
/sbin/daemon_mgr lvmetad stop “/sbin/lvmetad” rm /var/run/lvm/lvmetad.socket
Step2: Confirm which volume group or pool need to repair
pvs # list all of volume groups
lvs -a # list all of volumespools and volume groups
lvs -o+time # can list the created date/time of volumespools lvs -o+thin_id # can list the devices id of volumes
Check Volume Groups using “pvs” command
PV VG Fmt Attr PSize PFree
/dev/drbd1 vg1 lvm2 a– 7.24t 0 # /dev/drbd1 indicates md1(RAID group 1)
/dev/drbd2 vg2 lvm2 a– 7.26t 0 # /dev/drbd2 indicates md1(RAID group 2)
.
.
.
# One Volume Group may include >= 2 RAID groups
Check devices on the volume group/pool which we need to repair using “lvs -a” command
|
LV |
VG |
Attr |
LSize |
Pool Origin |
Data% Meta% |
Move Log Cpy%Sync |
|
Convert |
||||||
|
lv1 |
vg1 |
Vwi-aot— |
6.00t |
tp1 |
100.00 |
# Data volume 1 |
|
lv1312 |
vg1 |
-wi-ao—- |
756.00m |
# snapshots pool |
||
|
lv2 |
vg1 |
Vwi-aot— 200.00g tp1 |
100.00 |
# Data volume 2 |
||
|
lv544 |
vg1 |
-wi——- 74.14g |
# Reserved to repairing temporary |
|||
|
snap10001 |
vg1 |
Vwi-aot— |
6.00t tp1 |
lv1 |
100.00 |
# Snapshot volume |
|
snap10002 |
vg1 |
Vwi-aot— |
6.00t tp1 |
lv1 |
100.00 |
# Snapshot volume |
|
. |
||||||
|
. |
||||||
|
. |
Step3: Assume vg1 need to repair, we need to umount the volumes which belong to the vg1(lv1 will be mounted in /share/CACHEDEV1_DATA….. and so on….)
If there is any volumes or snapshots which is mounted and the mounted volumes belong to the volume group which need to repair, please umount them
# below umount all of data volumes umount /share/CACHEDEV1_DATA
umount /share/CACHEDEV2_DATA
.
.
umount /share/CACHEDEV${#}_DATA
# below umount snapshots umount /dev/mapper/vg1-snap*
if can not umount, lsof /share/CACHEDEV{#}_DATA to check, and “kill -9” these process. Try to umount the volumes again.
Remove all of cache devices and inactivate volume group
Step1: You can list which cache devices on the pool:
ls -l /dev/mapper/ # will list all of devices on the pool
Step2: The result of the above command looks like below(below assume vg1 is the volume group which need to repair)
|
brw——- |
1 |
admin |
administrators |
253, |
9 |
2020-02-15 |
10:16 |
cachedev1 |
|
brw——- |
1 |
admin |
administrators |
253, |
50 |
2020-02-15 |
10:16 |
cachedev2 |
|
crw——- |
1 |
admin |
administrators |
10, |
236 |
2020-02-15 |
18:14 |
control |
|
brw——- |
1 |
admin |
administrators |
253, |
7 |
2020-02-15 |
10:16 |
vg1-lv1 |
|
brw——- |
1 |
admin |
administrators |
253, |
8 |
2020-02-15 |
10:16 |
vg1-lv1312 |
|
brw——- |
1 |
admin |
administrators |
253, |
10 |
2020-02-15 |
10:16 |
vg1-lv2 |
|
brw——- |
1 |
admin |
administrators |
253, |
11 |
2020-02-18 |
01:00 |
vg1-snap10001 |
|
brw——- |
1 |
admin |
administrators |
253, |
13 |
2020-02-19 |
01:00 |
vg1-snap10002 |
|
brw——- |
1 |
admin |
administrators |
253, |
15 |
2020-02-20 |
01:00 |
vg1-snap10003 |
|
brw——- |
1 |
admin |
administrators |
253, |
17 |
2020-02-21 |
01:00 |
vg1-snap10004 |
|
brw——- |
1 |
admin |
administrators |
253, |
19 |
2020-02-22 |
01:00 |
vg1-snap10005 |
|
. |
||||||||
|
. |
||||||||
|
. |
Step3: Find cachedev${#} and remove them using dmsetup
dmsetup remove cachedev1 dmsetup remove cachedev2
.
.
.
dmsetup remove cachedev${#}
Step4: Inactivate the volume group which need to repair
lvchange -an vg1 # Assume vg1 is the volume group which need to repair
Step5: Please check again with “ls -l /dev/mapper” command to confirm there is no any block device of vg1. The result should be the below:
crw——- 1 admin administrators 10, 236 2020-02-15 18:14 control
Collect logs of thin pool metadata and backup metadata of the thin pool
Step1: Download collect tools
wget http://download.qnap.com/Storage/tsd/utility/tp_collect.sh
Step2: Execute collect tools to collect logs of the metadata or backup metadata of the pool
sh tp_collect.sh
When the tp_collect.sh start running, please remember enter “pool id”. The pool id is the id of the pool which we want to repair. For examples: vg1/tp1, please input 1vg2/tp2, please input 2……and so on…..
If execute tp_collect fail, you need to let the customer plug one USB external drive(about 100G or more) in the NAS to backup metadata
# assume vg1/tp1 need to collect or repair lvchange -ay vg1/tp1_tmeta
# Change directory to the USB external device cd /share/external/DEVXXXXXX
# backup metadata using dd command
dd if=/dev/mapper/vg1-tp1_tmeta of=tmeta.bin bs=1M
If tp_collect is executed completely or successfully, you can skip the above flow and please backup collect.tgz.
Step 3: Please confirm the backup of metadata is correct
# A. thin check original metadata
pdata_tools_8192(or 4096) thin_check /dev/mapper/vg1-tp1_tmeta
# B. thin check backup metadata
pdata_tools_8192(or 4096) thin_check /mnt/collect/tmeta.bin # If the metadata is backup in the USB external drive, please pdata_tools_8192(or 4096) thin_check /share/external/DEVXXXXXX/tmeta.bin
The result of the above A, B need to be the same. If the A, B is the same, Please be sure to backup the tmeta.bin to another storage or USB
external drive!!! If the vg{#}-tp{#} repaired fail, the vg{#}-tp{#}_tmeta can be restored using tmeta.bin.
Loading…
I – Introduction;
II -How to Fix if RAID seems “In Degreed”
III -How to Fix if RAID seems “In Degreed Mode, Read Only, Failed Drive(s) x” Cases;
IV – How to Fix if RAID Becomes “Unmounted” or “Not Active”
V – “Recover” Doesnt Work, How to Fix if RAID Becomes “Unmounted” or “Not Active”
VI – Stuck at Booting / Starting Sevices, Please Wait / Cant Even Login Qnap Interface
VII – IF “config_util 1″ Command gives “Mirror of Root Failed” Eror;
VIII – How to Fix “Broken RAID” Scenario
IX – If None of These Guides Works;
..
I – Introduction;
Warning : This documents are recomended for Professional users only. If you dont know what you’r doing, you may damage your RAID which cause loosing data. Qnapsupport Taiwan works great to solve this kind of RAID corruptions easly, and My advice is directly contact with them at this kind of cases.
1 – If documetn says “Plug out HDD and Plug in” always use original RAID HDD at the same slot. Dont use new HDDs!
2 – If you can access your data after these process, backup them quickly.
3 – You can loose data on Hardware RAID devices and other NAS brands, but nearly you cant loose data on Qnap, but recovering your datas may cause time lost, so Always double backup recomended for future cases.
4 – If one of your HDD’s cause Qnap to restart itself when you plug in to NAS, Dont use that HDD to solve these kind of cases.
This document is not valid for Qnap Ts-109 / Ts-209 / Ts-409 & Sub Models.
..
II -How to Fix if RAID seems “In Degreed”
If your RAID system seems as down below, use this document. If not, Please dont try anything in this document:
In this case, RAID information seems “RAID 5 Drive 1 3″ so, your 2.th HDD is out of RAID. Just plug out broken HDD from 2.Th HDD slot, wait around 15 seconds, and Plug in new HDD with the same size.
..
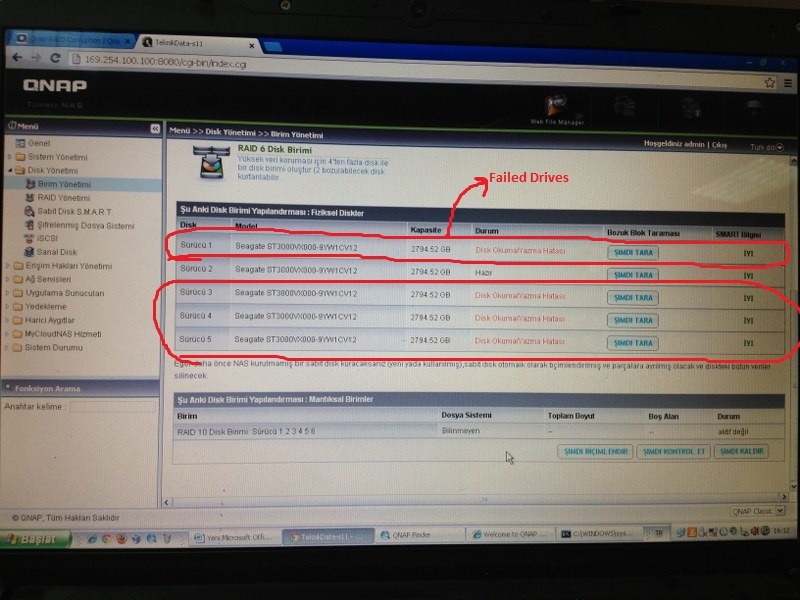
III -How to Fix if RAID seems “In Degreed Mode, Read Only, Failed Drive(s) x” Cases;
If your system seems In Degraded, Failed Drive X, you probably loose more HDD than RAID tolerated, so;
1 – Take your Backup,
2 – Re-Install Qnap From Begining.
Qnap data protection features doesnt let you loose data even if your 5 HDD gives Bad sector errors in 6 HDD RAID Systems.
..
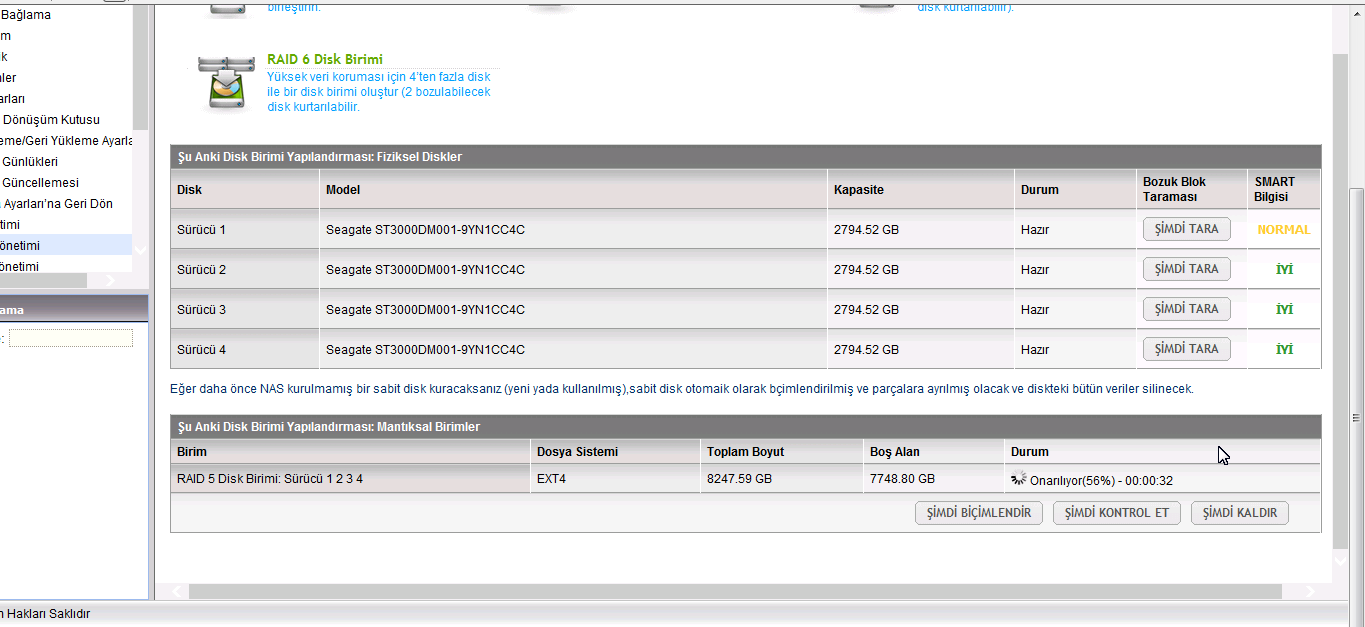
IV – How to Fix if RAID Becomes “Unmounted” or “Not Active”
If your RAID system seems as the picture down below, fallow this document. If not, Please dont try anything in this document:

1 – Update your Qnap fimware with Qnapfinder 3.7.2 or higher firmware. Just go to Disk Managment -> RAID managment. Choose your RAID and press “Recover” to fix.
If this doesnt work and “Recover” button is still avaible, just fullow these steps;
1 – While device is still working, Plug out HDD that you suspect which maybe broken, and press Recover button again.

Plug out Broken HDD, which lights Shines RED, or which HDD seems “Normal” / “Abnormal” / “Read-Write Error”
On HDD information Screen, than Press Recover. If doesnt work, Plug in HDD again, And Press Recover once Again
2 – If you plug out HDD —> then Plug it in the same slot again —> Press “Recover” Once Again and it should repair RAID;
3 – Here is log files;
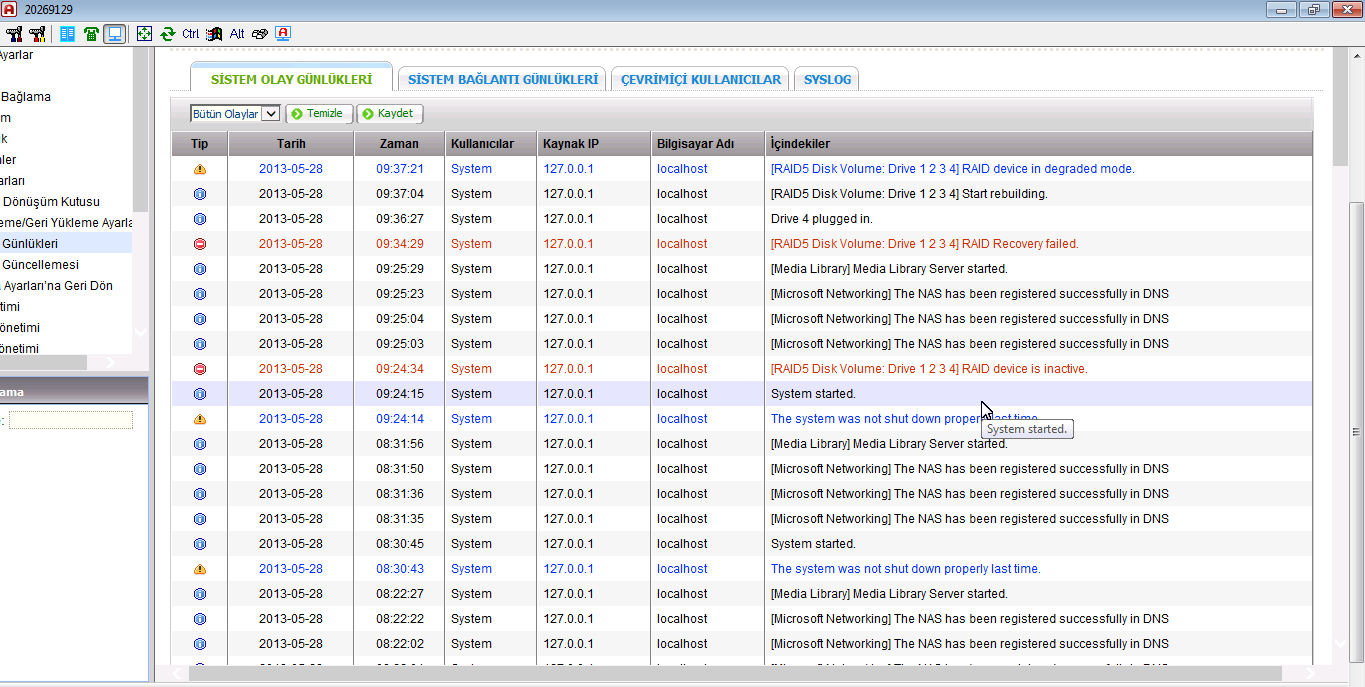
4 – And RAID systems comes back with “Indegreed Mode”, so just quickly backup your datas, and Reinstall Qnap without broken HDD again.
We loose 2 HDD from RAID 5, so its impossable to fix this RAID again. Just Re-install.
..
V – “Recover” Doesnt Work, How to Fix if RAID Becomes “Unmounted” or “Not Active”
1 – Download Putty & login Qnap,
2 – Make sure the raid status is active
To understant, type :
#more /proc/mdstat
Also If you want to Stop Running Services;
# /etc/init.d/services.sh stop
Unmount the volume:
# umount /dev/md0
Stop the array:
# mdadm -S /dev/md0
Now Try This command
For RAID 5 with 4 HDD’s
mdadm -CfR –assume-clean /dev/md0 -l 5 -n 4 /dev/sda3 /dev/sdb3 /dev/sdc3 /dev/sdd3
-l 5 : means RAID 5. If its RAID 6, try -l 6;
-n 4 means number of your HDDs, If you have 8 HDD, try —n 8
/dev/sda3 means your first HDD.
/dev/sdd3 means your 4.th HDD
Example;
If you have RAID 6 with 8 HDD, change command line with this;
mdadm -CfR –assume-clean /dev/md0 -l 6 -n 8 /dev/sda3 /dev/sdb3 /dev/sdc3 /dev/sdd3 /dev/sde3 /dev/sdf3 /dev/sdg3 /dev/sdh3
If one of your HDD has Hardware Error, which cause Qnap restart itself, plug out that HDD, and type “missing” command for that HDD;
Example, if your 2.th HDD is broken, use this command;
# mdadm -CfR –assume-clean /dev/md0 -l 5 -n 4 /dev/sda3 missing /dev/sdc3 /dev/sdd3
3 – try manually mount
# mount /dev/md0 /share/MD0_DATA -t ext3
# mount /dev/md0 /share/MD0_DATA -t ext4
# mount /dev/md0 /share/MD0_DATA -o ro (read only)
4 – So, Result Should be Like That;

..
VI – Stuck at Booting / Starting Sevices, Please Wait / Cant Even Login Qnap Interface
Just Plug out broken HDD and restart Qnap again. This should restarts Qnap back again.
If you’r not sure which HDD is broken, Please follw this steps;
1 – Power Off the NAS.
2 – Plug out All HDDs,
3 – Start Qnap without HDDs,
4 – Qnapfinder Should find Qnap in a few minutes. Now, Plug in all HDD’s back again same slots.
5 – Download Putty from this link and login with admin / admin usernam / password;
http://www.chiark.greenend.org.uk/~sgta … nload.html
6 – Type this command lines which I marked blue;
# config_util 1 -> If result of this command give “Root Failed” dont go on and contact with Qnapsupport team
# storage_boot_init 1 ->
# df -> IF dev/md9 (HDA_ROOT) seems full, please contact with Qnapsupport.
(Now, you can Reboot your device with this command. ıf you want to reset your configration, please skip this.)
# reboot
..
VII – IF “config_util 1″ Command gives “Mirror of Root Failed” Eror;
1 – Power Off the NAS.
2 – Plug out All HDDs,
3 – Start Qnap without HDDs,
4 – Qnapfinder Should find Qnap in a few minutes. Now, Plug in all HDD’s back again same slots.
5 – Download Putty from this link and login with admin / admin usernam / password;
http://www.chiark.greenend.org.uk/~sgta … nload.html
6 – Type this command lines which I marked blue;
# storage_boot_init 2 -> (this time type storage_boot_init 2, not storage_boot_init 1)
This command should turn Qnap back to last “Indegreed” Mode and you should get this kind of information after this command:

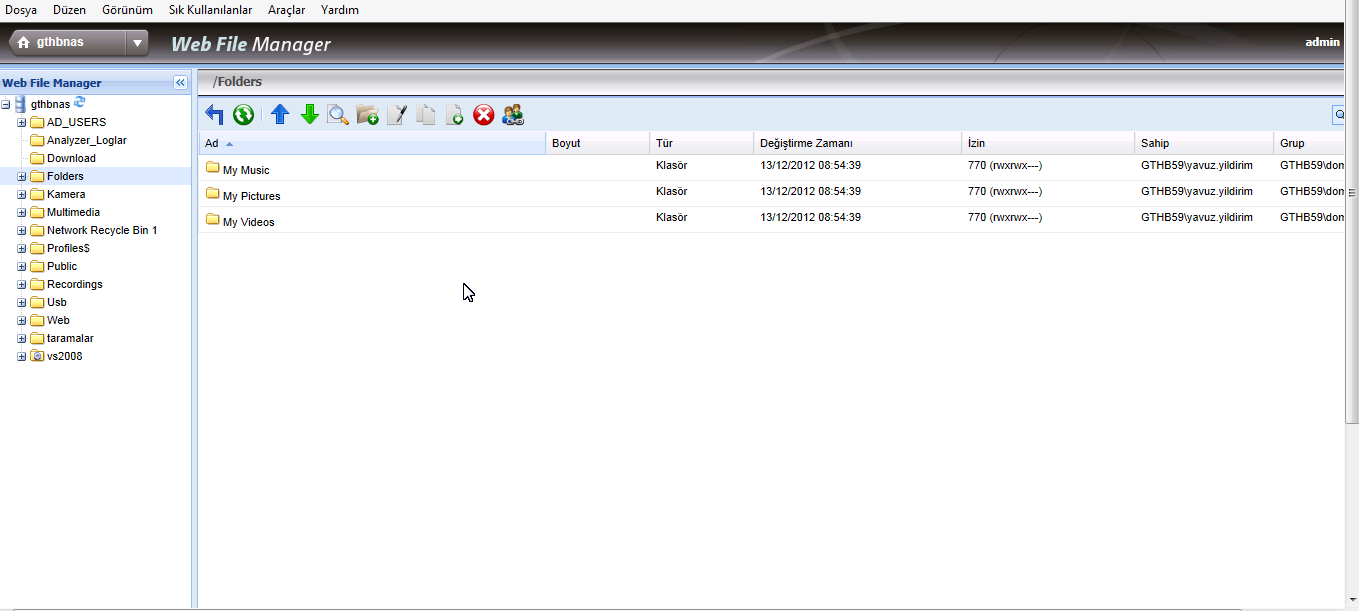
7 – Download Winscp and Login Qnap. Go to ->share ->MD0_DATA folder, and backup your datas Quickly.
..
VIII – How to Fix “Broken RAID” Scenario
First, I try to fix “Recovery” method, but doesnt work. At Qnap RAID managment menu, I check All HDDs, But all of them seems good. So I Login with Putty, and type these commands;
mdadm -E /dev/sda3
mdadm -E /dev/sdb3
mdadm -E /dev/sdc3
mdadm -E /dev/sdd3

Except first HDD, other 3 HDD’s doesn have md superblock; Also I try “config_util 1” & “storage_boot_init 2” commands, but both of them gives error;

Costumer got RAID 5 (-l 5) with 4 HDD (-n 4), so ı type this command;
# mdadm -CfR –assume-clean /dev/md0 -l 5 -n 4 /dev/sda3 /dev/sdb3 /dev/sdc3 /dev/sdd3
then mount with this command;
# mount /dev/md0 /share/MD0_DATA -t ext4
And works perfect.
Also here is Putty Steps;
login as: admin
admin@192.168.101.16′s password:
[~] # mdadm -E /dev/sda3
/dev/sda3:
Magic : a92b4efc
Version : 00.90.00
UUID : 2d2ee77d:045a6e0f:438d81dd:575c1ff3
Creation Time : Wed Jun 6 20:11:14 2012
Raid Level : raid5
Used Dev Size : 1951945600 (1861.52 GiB 1998.79 GB)
Array Size : 5855836800 (5584.56 GiB 5996.38 GB)
Raid Devices : 4
Total Devices : 4
Preferred Minor : 0
Update Time : Fri Jan 11 10:24:40 2013
State : clean
Active Devices : 4
Working Devices : 4
Failed Devices : 0
Spare Devices : 0
Checksum : 8b330731 – correct
Events : 0.4065365
Layout : left-symmetric
Chunk Size : 64K
Number Major Minor RaidDevice State
this 0 8 3 0 active sync /dev/sda3
0 0 8 3 0 active sync /dev/sda3
1 1 8 19 1 active sync /dev/sdb3
2 2 8 35 2 active sync /dev/sdc3
3 3 8 51 3 active sync /dev/sdd3
[~] # mdadm -E /dev/sdb3
mdadm: No md superblock detected on /dev/sdb3.
[~] # mdadm -CfR –assume-clean /dev/md0 -l 5 -n 4 /dev/sda3 /dev/sdb3 /dev/sdc3 /dev/sdd3
mdadm: /dev/sda3 appears to contain an ext2fs file system
size=1560869504K mtime=Fri Jan 11 10:22:54 2013
mdadm: /dev/sda3 appears to be part of a raid array:
level=raid5 devices=4 ctime=Wed Jun 6 20:11:14 2012
mdadm: /dev/sdd3 appears to contain an ext2fs file system
size=1292434048K mtime=Fri Jan 11 10:22:54 2013
mdadm: array /dev/md0 started.
[~] # more /proc/mdstat
Personalities : [linear] [raid0] [raid1] [raid10] [raid6] [raid5] [raid4] [multipath]
md0 : active raid5 sdd3[3] sdc3[2] sdb3[1] sda3[0]
5855836800 blocks level 5, 64k chunk, algorithm 2 [4/4] [UUUU]
md4 : active raid1 sda2[2](S) sdd2[0] sdc2[3](S) sdb2[1]
530048 blocks [2/2] [UU]
md13 : active raid1 sda4[0] sdc4[3] sdd4[2] sdb4[1]
458880 blocks [4/4] [UUUU]
bitmap: 0/57 pages [0KB], 4KB chunk
md9 : active raid1 sda1[0] sdc1[3] sdd1[2] sdb1[1]
530048 blocks [4/4] [UUUU]
bitmap: 1/65 pages [4KB], 4KB chunk
unused devices:
[~] # mount /dev/md0 /share/MD0_DATA -t ext4
[~] #
Here is Result;
..
IX – If None of These Guides Works;
For rarely, I cant solve these kind of problems on Qnap. and sometimes I plug HDD’s to another Qnap to solve these kind of problems.
User different Qnap which has different hardware to solve this kind of cases!;
When you plug HDD, and restart device, Qnap will ask you to to Migrate or Reinstall Qnap, choose “Migrate” Option.
In this case, Qnap coulnt boot at Ts-659 Pro, putty commands doesnt work and we cant even enter Qnap admin interface;
How To Fix HDD Based Problems With Another Qnap
HDD’s couldnt boot from Ts-659 Pro, but after installing different device (At this case, I plug them to Ts-509 Pro) device boots fine. But of course you must use 6 or more HDD supported Qnap to save your datas.
So, If evertything fails, Just try these process with another Qnap.
I – Introduction
II -How to Fix if RAID seems “In Degreed”
III- How to Fix if RAID seems “Unmounted”
IV – How to Fix if RAID seems Not Active
V – RAID HDD order seems wrong just like “RAID 5 – Drives : 2 4 3″and device seems Not Active
VI – How to Fix if RAID seems as “Single Disk”
VII – User Remove the RAID Volume
VIII – How to Fix if 2 HDD gives error on RAID 5, 3 HDD gives error on RAID 6
IX – Raid fail – HDDs have no partitions;
X – RAID fail – Partitions have no md superblock
XI – No md0 for array
XII – NAS fail –MountHDD(s)with another QNAP NAS
I – Introduction;
Warning : This documents are recommended for Professional users only. If you don’t know what you’r doing, you may damage your RAID which cause loosing data. Qnapsupport Taiwan works great to solve this kind of RAID corruptions easily, and My advice is directly contact with them at this kind of cases.
You can download QNAP NAS Data Recovery Document Down Below:
QNAP_NAS_Data_Recovery
NAS is OK but cannot access data
- raidtab is broken or missing
- Check raid settings and configure right raidtab
HDD have no partitions
- Use parted to recreate the partitions
Partitions have no MD superblock
- omdadm -CfR –assume-clean
RAID array can’t be assembled or status is inactive
- check above and make sure every disks on raid exist
RAID array can’t been mounted
- e2fsck, e2fsck -b
Able to mount RAID but data is disappear
- umount and e2fsck, if not work, try data recovery
RAID is in degraded, read-only
- backup the data then mdadm -CfR, it not work, recreate the RAID
NAS fail
- MountHDD(s)with another QNAP NAS (System Migration)
- MountHDD(s)with PC ( R-Studio/ ext3/4 reader) (3rd party tool )
Data are deleted by user/administrator accidentally
- data recovery company, photorec, r-studio/r-linux
Introduction of mdadm command
#mdadm -E /dev/sda3 > that will tell if it is md disk
#mdadm -Af /dev/md0 /dev/sd[a-d]3 > that will get available md disk into raid array
———————————–
#mdadm -CfR -l5 -n8 –assume-clean /dev/md0 /dev/sd[a-h]3 > that will overwrite the mdstat on each disk
> -CfR force to create the raid array
> -l5 = raid 5array
> -n8 = available md disk
> –assume-clean without data partition syncing
Introduction of Two Scripts;
# config_util
Usage: config_util input
input=0: Check if any HD existed.
input=1: Mirror ROOT partition.
input=2: Mirror Swap Space (not yet).
input=4: Mirror RFS_EXT partition.
>> usually we have config_util 1 to get the md9 ready
# storage_boot_init
Usage: storage_boot_init phase
phase=1:mountROOTpartition.
phase=2: mount DATA partition, create storage.conf and refresh disk.
phase=3: Create_Disk_Storage_Conf.
>> usually we have storage_boot_init 1 to mount the md9
II -How to Fix if RAID seems “In Degreed”
If your RAID system seems as down below, use this document. If not, Please dont try anything in this document:
A – Qnap FAQ Advice;
Login to Qnap. Disk Management ->Volume management. One of your HDD should give “Read/write” or “Normal” error, or Qnap doesn’t Recognize there is a HDD on on slot.
Just plug out Broken HDD, wait over 20 seconds, and plug in new HDD. If more than one HDD seems broken, dont change 2 HDD at the same time. Wait Qnap finish to Synchronize first HDD, and after it completes, change other broken HDD.
If you loose more HDD than RAID HDD lost tolerance, Backup your datas quickly to another Qnap or External HDD.
Note : New HDD must be same size with your other HDDs. Qnap doesnt accept lower size new HDD. Also I don’t advice to use Higher size HDD at this kind of cases. You can use another brand of HDD, or different sata speed HDDs.
Also, If your HDD seems doesnt plugged in HDD port even if you change it with a new one, it may be an Hardware problem about Qnap sata cable or Mainboard. Send device for Repair to vendor, or open device and plug out sata cable from mainboard, then plug it back.
B – Qnap RAID Recovery Document;
RAID fail – RAID is degraded, read-only
•When degraded, read-only status, there is more disk failure than the raid can support, need to help the user to check which disks are faulty if Web UI isn’t helpful
– Check klog or dmesg to find the faulty disks
•Ask user to backup the data first
•If disks looks OK, after backup, try “mdadm -CfR –assume-clean” to recreate the RAID
•If above doesn’t work, recreate the RAID
C – My Advice;
If your system seems In Degraded, Failed Drive X, you probably loose more HDD thatn RAID tolerated, so Take your Backup, and Re-Install Qnap From Beginning.
III – How to Fix if RAID Becomes “Unmounted”
If your RAID system seems as down below, fallow this document. If not, Please dont try anything in this document:
IF YOU HAVE CRİTİCAL DATA ON QNAP, PLEASE CONTACT WİTH QNAP TAIWAN SUPPORT
A – Qnap FAQ Solution;
Q : My NAS lost all its settings, and all HDDs are shown as unmounted.
A : In case of corrupt/lost config:
1. Power off the NAS. Remove the HDD(s)
2. Power on the NAS
3. After a short beep and a long beep, plug the HDD back into the NAS
4. Run QNAP Finder, it will find the NAS, do NOT configure it!
5. Connect to the NAS by telnet port 13131 (e.g. with Putty)
6. Run the MFA Degree following commands to recover with default config
Use the following commands if using 1 drive (if you have more than 1 HDD, please skip this document)
#mount /dev/sda1 /mnt
# cd /mnt/.config/
# cp /etc/default_config/uLinux.conf /mnt/.config/
# reboot
Use the following command if using 2 drives (not tested) (if you have more than 2 HDD, please skip this document)
# mdadm -A /dev/md9 /dev/sda1 /dev/sdb1
# mount /dev/md9 /mnt
# cd /mnt/.config/
# cp /etc/default_config/uLinux.conf /mnt/.config/
# reboot
8. Above procedure will reset the configuration back to default and then you need to reconfigure it. But all the share should be available now.
Please remember NOT to re-initialize the HDD. Since this will format your HDD and all your data will be lost.
9. To be prepared next time this happens, always make sure you have a working backup of your personal uLinux.conf!
Note: uLinux.conf is the main settings configuration
Taken From : Qnap FAQ
If you have 4 or more HDD, fallow this document. Dont start Qnap wihtout HDDs just like first 2 documents:
RAID fail – Cann’t be mounted, status unmount
(from Offical Qnap RAID recovery document)
1. Make sure the raid status is active (more /proc/mdstat)
2. try manually mount
# mount /dev/md0 /share/MD0_DATA -t ext3
# mount /dev/md0 /share/MD0_DATA -t ext4
# mount /dev/md0 /share/MD0_DATA -o ro (read only)
3. use e2fsck / e2fsck_64 to check
# e2fsck -ay /dev/md0 (auto and continue with yes)
4. If there are many errors when check, memory may not enough, need to create more swap space;
Use the following command to create more swap space
[~] # more /proc/mdstat
…….
md8 : active raid1 sdh2[2](S) sdg2[3](S) sdf2[4](S) sde2[5](S) sdd2[6](S) sdc2[7](S) sdb2[1] sda2[0]
530048 blocks [2/2] [UU]
……….
[~] # swapoff /dev/md8
[~] # mdadm -S /dev/md8
mdadm: stopped /dev/md8
[~] # mkswap /dev/sda2
Setting up swapspace version 1, size = 542859 kB
no label, UUID=7194e0a9-be7a-43ac-829f-fd2d55e07d62
[~] # mkswap /dev/sdb2
Setting up swapspace version 1, size = 542859 kB
no label, UUID=0af8fcdd-8ed1-4fca-8f53-0349d86f9474
[~] # mkswap /dev/sdc2
Setting up swapspace version 1, size = 542859 kB
no label, UUID=f40bd836-3798-4c71-b8ff-9c1e9fbff6bf
[~] # mkswap /dev/sdd2
Setting up swapspace version 1, size = 542859 kB
no label, UUID=4dad1835-8d88-4cf1-a851-d80a87706fea
[~] # swapon /dev/sda2
[~] # swapon /dev/sdb2
[~] # swapon /dev/sdc2
[~] # swapon /dev/sdd2
[~] # e2fsck_64 -fy /dev/md0
If there is no file system superblock or the check fail, you can try backup superblcok.
1. Use the following command to find backup superblock location
# /usr/local/sbin/dumpe2fs /dev/md0 | grep superblock
Sample output:
Primary superblock at 0, Group descriptors at 1-6
Backup superblock at 32768, Group descriptors at 32769-32774
Backup superblock at 98304, Group descriptors at 98305-98310
..163840…229376…294912…819200…884736…1605632…2654208…4096000… 7962624… 11239424… 20480000…
23887872…71663616…78675968..102400000..214990848..512000000…550731776…644972544
2. Now check and repair a Linux file system using alternate superblock # 32768:
# e2fsck -b 32768 /dev/md0
Sample output:
fsck 1.40.2 (12-Jul-2007)
e2fsck 1.40.2 (12-Jul-2007)
/dev/sda2 was not cleanly unmounted, check forced.
Pass 1: Checking inodes, blocks, and sizescf
…….
Free blocks count wrong for group #241 (32254, counted=32253).
Fix? yes
………
/dev/sda2: ***** FILE SYSTEM WAS MODIFIED *****
/dev/sda2: 59586/30539776 files (0.6% non-contiguous), 3604682/61059048 blocks
3. Now try to mount file system using mount command:
# mount /dev/md0 /share/MD0_DATA -t ext4
RAID fail – able to mount but data disappear
•If the mount is OK, but data is disappear, unmount the RAID and run e2fsck again (can try backup superblock)
•If still fail, try data recovery program (photorec, R-Studio) or contact data recovery company
IV – How to Fix if RAID seems Not Active
If your RAID system seems as down below, fallow this document. If not, Please dont try anything in this document:
Update your Qnap firmware with Qnapfinder 3.7.2 or higher firmware. Just go to Disk Management -> RAID management Choose your RAID and press “Recover” to fix. If It doesn’t work, please check In active RAID scenarios or directly contat with Qnap SupportTaiwan.
If ıt Doesnt Work;
IF YOU HAVE CRİTİCAL DATA ON QNAP, PLEASE CONTACT WİTH QNAP TAIWAN SUPPORT
RAID fail – RAID can’t be assembled or status is inactive:
1.Check partitions, md superblock status
2.Check if there is any RAID disk missing / faulty
3. Use “mdadm -CfR –assume-clean” to recreate the RAID
V – RAID HDD order seems wrong just like “RAID 5 – Drives : 2 4 3″and device seems Not Active
If your RAID order seems like this:
First try RAID recovery. İf its still failes:
Follow this document:
Download Winscp and Login to your Qnap. Go to etc -> raidtab and first take backup of this file!
Then double click on this file. At this table, sda means your first HDD, sdb is your second and sdc means your 3.th HDD, and their order seems wrong.
Right table should be like down below so modify RAID like this:
RAID-5
raiddev /dev/md0
raid-level 5
nr-raid-disks 3
nr-spare-disks 0
chunk-size 4
persistent-superblock 1
device /dev/sda3
raid-disk 0
device /dev/sdb3
raid-disk 1
device /dev/sdc3
raid-disk 2
At this case I have 4 HDD, so modify nr-raid-disks 4 and also add this line :
device /dev/sdd3
raid-disk 3
It should be look like this:
Now, save this file, and restart your Qnap.
VI – “How to Fix” if all of your HDDs seems as “Single Disk” even you have a RAID structure or accedently RAID Removed;
I Highly Recommended you to contact with Qnap SupportTaiwan, but I you know what you are doing, here is how to fix document;
RAID Issue – raidtab is broken
- raidtab is used to check if the disk is in RAID group or single and show the RAID information on web UI.
- If the disk is in RAID but Web UI show it is single, or the RAID information is different to the actual disk RAID data ( checked by mdadm -E), then the raidtab should be corrupt. Then you need to manually edit the raidtab file to comply the actual RAID status.
- Check the following slides for raidtab contents
Single
No raidtab
RAID 0 Stripping
raiddev /dev/md0
raid-level 0
nr-raid-disks 2
nr-spare-disks 0
chunk-size 4
persistent-superblock 1
device /dev/sda3
raid-disk 0
device /dev/sdb3
raid-disk 1
RAID-1 Mirror
raiddev /dev/md0
raid-level 1
nr-raid-disks 2
nr-spare-disks 0
chunk-size 4
persistent-superblock 1
device /dev/sda3
raid-disk 0
device /dev/sdb3
raid-disk 1
JBOD Linear
raiddev /dev/md0
raid-level linear
nr-raid-disks 3
nr-spare-disks 0
chunk-size 4
persistent-superblock 1
device /dev/sda3
raid-disk 0
device /dev/sdb3
raid-disk 1
device /dev/sdc3
raid-disk 2
RAID-5
raiddev /dev/md0
raid-level 5
nr-raid-disks 3
nr-spare-disks 0
chunk-size 4
persistent-superblock 1
device /dev/sda3
raid-disk 0
device /dev/sdb3
raid-disk 1
device /dev/sdc3
raid-disk 2
RAID-5 + Hot spare
raiddev /dev/md0
raid-level 5
nr-raid-disks 3
nr-spare-disks 1
chunk-size 4
persistent-superblock 1
device /dev/sda3
raid-disk 0
device /dev/sdb3
raid-disk 1
device /dev/sdc3
raid-disk 2
device /dev/sdd3
spare-disk 0
RAID-5 + Global Spare
raidtab is same as RAID-5
On uLinux.conf, add a line if global spare disk is disk 4:
[Storage]
GLOBAL_SPARE_DRIVE_4 = TRUE
RAID-6
raiddev /dev/md0
raid-level 6
nr-raid-disks 4
nr-spare-disks 0
chunk-size 4
persistent-superblock 1
device /dev/sda3
raid-disk 0
device /dev/sdb3
raid-disk 1
device /dev/sdc3
raid-disk 2
device /dev/sdd3
raid-disk 3
RAID-10
raiddev /dev/md0
raid-level 10
nr-raid-disks 4
nr-spare-disks 0
chunk-size 4
persistent-superblock 1
device /dev/sda3
raid-disk 0
device /dev/sdb3
raid-disk 1
device /dev/sdc3
raid-disk 2
device /dev/sdd3
raid-disk 3
VII – User Remove the RAID Volume
# more /proc/mdstat
**Check if the RAID is really removed
# mdadm -E /dev/sda3
** Check if the MD superblock is really removed
# mdadm -CfR –assume-clean /dev/md0 -l 5 -n 3 /dev/sda3 /dev/sdb3 /dev/sdc3
**Create the RAID, assume it is 3 HDDs raid-5
# e2fsck -y /dev/md0
**check file system, Assume “yes” to all questions. If 64-bit, e2fsck_64
# mount /dev/md0 /share/MD0_DATA -t ext4
** mount the RAID back
# vi raidtab
** manually create the raid table
# reboot
** Need to add the removed network share(s) back after reboot
VIII – How to Fix if 2 HDD gives error on RAID 5, 3 HDD gives error on RAID 6
If you cant reach your datas on Qnap, Plug HDDs to another Qnap (I save my 2 costumer all of datas by this way before)
If you can reach your datas, Quickly Backup your datas to another Qnap orExternal Drive. After it completes, Install Qnap RAID System again.
IX – Raid fail – HDDs have no partitions;
When use the following commands to check the HDD, there is no partition or only one partition.
# parted /dev/sdx print
The following is sample.
# blkid ** this command show all partitions on the NAS
Note: fdisk -l cannot show correct partition table for 3TB HDDs
The following tool (x86 only) can help us to calculate correct partition size according to the HDD size. Please save it in your NAS (x86 model) and make sure the file size is 10,086 bytes.
ftp://csdread:csdread@ftp.qnap.com/NAS/utility/Create_Partitions
1. Get every disk size:
# cat /sys/block/sda/size
625142448
2. Get the disk partition list. It should contain 4 partitions if normal;
# parted /dev/sda print
Model: Seagate ST3320620AS (scsi)
Disk /dev/sda: 320GB
Sector size (logical/physical): 512B/512B
Partition Table: msdos
Number Start End Size Type File system Flags
1 32.3kB 543MB 543MB primary ext3 boot
2 543MB 1086MB 543MB primary linux-swap(v1)
3 1086MB 320GB 318GB primary ext3
4 320GB 320GB 510MB primary ext3
3. Run the tool in your NAS to get the recover commands:
# Create_Partitions /dev/sda 625142448
/dev/sda size 305245
disk_size=625142448
/usr/sbin/parted /dev/sda -s mkpart primary 40s 1060289s
/usr/sbin/parted /dev/sda -s mkpart primary 1060296s 2120579s
/usr/sbin/parted /dev/sda -s mkpart primary 2120584s 624125249s
/usr/sbin/parted /dev/sda -s mkpart primary 624125256s 625121279s
If the disk contains none partition, run the 4 commands.
If the disk contains only 1 partition, run the last 3 commands.
If the disk contains only 2 partition, run the last 2 commands.
If the disk contains only 3 partition, run the last 1 commands.
4. Check the disk partition after recover. And it should contain 4 partitions now.
# parted /dev/sda print
Model: Seagate ST3320620AS (scsi)
Disk /dev/sda: 320GB
Sector size (logical/physical): 512B/512B
Partition Table: msdos
Number Start End Size Type File system Flags
1 32.3kB 543MB 543MB primary ext3 boot
2 543MB 1086MB 543MB primary linux-swap(v1)
3 1086MB 320GB 318GB primary ext3
4 320GB 320GB 510MB primary ext3
5. Please then run “sync” or reboot the NAS for the new partition to take effect.
X – RAID fail – Partitions have no md superblock
•If one or all HDD partitions are lost, or the partitions have no md superblock for unknown reason, use the mdadm -CfR command to recreate the RAID.
# mdadm -CfR –assume-clean /dev/md0 -l 5 -n 4 /dev/sda3…
Note:
1.Make sure the disk is in correct sequence. Use “mdadm -E” or check raidtab to confirm
2.If one of the disk is missing or have problem, replace the disk with “missing”.
For example:
# mdadm -CfR –assume-clean /dev/md0 -l 5 -n 4 /dev/sda3 missing /dev/sdc3 /dev/sdd3
XI – No md0 for array
manually create the md0 with mdadm -CfR
XII – NAS fail – Mount HDD(s) with another QNAP NAS
- User can plug the HDD(s) to another same model name NAS to access the data
- User can plug the HDD(s) to other model name NAS to access the data by perform system migration
ohttp://docs.qnap.com/nas/en/index.html?system_migration.htm
onote: TS-101/201/109/209/409/409U series doesn’t support system migration
- Since the firmware is also stored on the HDD(s), its firmware version may be different to the firmware on NAS. Firmware upgrade may be required required after above operation
-
- #1
Hallo,
ich wollte heute mein NAS neustarten bevor ich ein Firmware Updatemache, leider fährt mein NAS nach dem Neustart nicht mehr hoch undzeigt «Error Message Pool Error» in der LED Status Anzeige an. DieLED ist dauerhaft rot.
Per SSH komme ich noch auf das System. Leider kann hier auf keineShares zugreifen.
Das System war mit 6 Festplatten im Raid 5 bestückt.
-
- #2
Hallo,
bitte etwas mehr Infos!
Um welches NAS handelt es sich?
Welche Firmware incl. Build ist auf dem NAS installiert?
Welche HDDs (Hersteller/Modell) werden verwendet?Du solltest mal alle HDDs an/in einem PC mit dem Diagnosetool des Herstellers testen. Aber auf jeden Fall den Steckplatz von der HDD merken.
Ziehe mal alle HDDs ein Stück raus uns starte das NAS dann. Wenn das NAS hochgefahren ist, dann alle HDD wieder komplett einschieben. Wie verhält sich das NAS dann?
Und das Wichtigste: Hast du ein Backup?
-
- #3
QNAP TS-653A
Firmware 4.3.4.0435
6x WD60EFRXHab die Platten eben rausgezogen, dann gestartet und wieder eingesteckt. Er hat dann erkannt das auf den Festplatten noch NAS Daten sind und ich habe diese wiederherstellen lassen. Leider hat das NAS nun die Standard Konfiguration. Das Sytemprotokoll ist noch vorhanden. Ich habe es dir mal angehängt.
PS: Backup ist vorhanden.
- Add new comment
I have a QNAP TS-453A NAS with 4 6TB disks configured as a RAID5 storage pool. Currently with firmware 4.4.2.1262.
Yesterday I discovered that one of the disks (disk 3) had failed, and that the storage pool was in a «Degraded» state.
I quickly got a new disk. The old disk was a WD Red 6TB WD60EFRX, the new one is a WD Red 6TB WD60AFEX. I hot-swapped the disks. According to the documentation, the new disk should be detected automatically, and the storage pool should automatically start rebuilding («Rebuilding» state). But nothing happened.
I checked the UI, Storage & Snapshots tool. The storage pool was still in degraded state, but all four disks were now green and healthy. However, disk 3 was listed as «not a member» of the storage pool. When I selected to Manage the pool, I could do nothing. The only action that was not disabled was «Rebuild RAID Group», but when I tried that there were no free disks to add to the RAID group.
So the problem appeared to be that disk 3 had been detected and was in use, but still it was listed as «not a member» of the storage pool. No actions were available in the UI to fix the situation. Pulling out the disk and inserting it again did not change anything. Googling for help showed that others have encountered similar situations, but no solutions helped me.
I decided to have look «under the hood» to see if I could figure out what was wrong.
ssh admin@mynas
[~] # cat /proc/mdstat
Personalities : [linear] [raid0] [raid1] [raid10] [raid6] [raid5] [raid4] [multipath]
md1 : active raid5 sda3[0] sdd3[3] sdb3[1]
      17551701504 blocks super 1.0 level 5, 512k chunk, algorithm 2 [4/3] [UU_U]

md256 : active raid1 sdc2[2](S) sdd2[3](S) sdb2[1] sda2[0]
      530112 blocks super 1.0 [2/2] [UU]
      bitmap: 0/1 pages [0KB], 65536KB chunk

md13 : active raid1 sdc4[24] sda4[0] sdd4[3] sdb4[1]
      458880 blocks super 1.0 [24/4] [UUUU____________________]
      bitmap: 1/1 pages [4KB], 65536KB chunk

md9 : active raid1 sdc1[24] sda1[0] sdd1[3] sdb1[1]
      530048 blocks super 1.0 [24/4] [UUUU____________________]
      bitmap: 1/1 pages [4KB], 65536KB chunk
OK, so /dev/md1 is my RAID5 storage pool. Only /dev/sda3, /dev/sdb3 and /dev/sdd3 are part of the group. /dev/sd3c is missing. Let’s check the group:
[~] # mdadm --misc --detail /dev/md1
/dev/md1:
        Version : 1.0
  Creation Time : Tue Aug 23 05:48:30 2016
     Raid Level : raid5
     Array Size : 17551701504 (16738.61 GiB 17972.94 GB)
  Used Dev Size : 5850567168 (5579.54 GiB 5990.98 GB)
   Raid Devices : 4
  Total Devices : 3
    Persistence : Superblock is persistent

    Update Time : Sat Apr  4 18:10:54 2020
          State : clean, degraded
 Active Devices : 3
Working Devices : 3
 Failed Devices : 0
  Spare Devices : 0

         Layout : left-symmetric
     Chunk Size : 512K

           Name : 1
           UUID : f82504b7:2c60d9bd:5676ec84:0a5ba214
         Events : 27378

    Number   Major   Minor   RaidDevice State
       0       8        3        0      active sync   /dev/sda3
       1       8       19        1      active sync   /dev/sdb3
       4       0        0        4      removed
       3       8       51        3      active sync   /dev/sdd3
OK, so 3 active devices, and /dev/sd3c is missing, as expected. Let’s check if the disk exists and is formatted like the other disks:
[~] # parted
GNU Parted 3.1
Using /dev/sdc
Welcome to GNU Parted! Type 'help' to view a list of commands.

(parted) select /dev/sda
select /dev/sda
Using /dev/sda
(parted) print
print
Model: WDC WD60EFRX-68L0BN1 (scsi)
Disk /dev/sda: 6001GB
Sector size (logical/physical): 512B/512B
Partition Table: gpt
Disk Flags:

Number  Start   End     Size    File system     Name     Flags
 1      20.5kB  543MB   543MB   ext3            primary
 2      543MB   1086MB  543MB   linux-swap(v1)  primary
 3      1086MB  5992GB  5991GB                  primary
 4      5992GB  5993GB  543MB   ext3            primary
 5      5993GB  6001GB  8554MB  linux-swap(v1)  primary

(parted) select /dev/sdc
select /dev/sdc
Using /dev/sdc
(parted) print
print
Model: WDC WD60EFAX-68SHWN0 (scsi)
Disk /dev/sdc: 6001GB
Sector size (logical/physical): 512B/512B
Partition Table: gpt
Disk Flags:

Number  Start   End     Size    File system  Name     Flags
 1      20.5kB  543MB   543MB   ext3         primary
 2      543MB   1086MB  543MB                primary
 3      1086MB  5992GB  5991GB               primary
 4      5992GB  5993GB  543MB   ext3         primary
 5      5993GB  6001GB  8554MB               primary

(parted) quit
quit
OK, so the new disk seems to be formatted correctly. Let’s just try to add the missing disk partition to the RAID group:
[~] # mdadm --manage /dev/md1 --add /dev/sdc3
mdadm: added /dev/sdc3
[~] # mdadm --misc --detail /dev/md1
/dev/md1:
        Version : 1.0
  Creation Time : Tue Aug 23 05:48:30 2016
     Raid Level : raid5
     Array Size : 17551701504 (16738.61 GiB 17972.94 GB)
  Used Dev Size : 5850567168 (5579.54 GiB 5990.98 GB)
   Raid Devices : 4
  Total Devices : 4
    Persistence : Superblock is persistent

    Update Time : Sat Apr  4 18:18:17 2020
          State : active, degraded, recovering
 Active Devices : 3
Working Devices : 4
 Failed Devices : 0
  Spare Devices : 1

         Layout : left-symmetric
     Chunk Size : 512K

 Rebuild Status : 0% complete

           Name : 1
           UUID : f82504b7:2c60d9bd:5676ec84:0a5ba214
         Events : 27846

    Number   Major   Minor   RaidDevice State
       0       8        3        0      active sync   /dev/sda3
       1       8       19        1      active sync   /dev/sdb3
       4       8       35        2      spare rebuilding   /dev/sdc3
       3       8       51        3      active sync   /dev/sdd3
Great! The RAID group is recovering! The NAS emitted two beeps and the status light started blinking red/green. In the UI, the storage pool state changed to «Rebuilding».
For some reason the NAS did not correctly add the /dev/sd3c disk partition to the storage pool. The disk had been correctly partitioned and the partitions formatted, and the other RAID arrays had apparently recovered, but not /dev/md1. Adding /dev/sd3c manually to /dev/md1 fixed the problem.

One more thing: it looks like /etc/config/mdadm.conf and /etc/config/raidtab are missing. /etc/mdadm.conf and /etc/raidtab existed as symbolic links to the non-existent files. I’m not sure that they are needed, but as a precaution I created them. mdadm.conf is created like this:
[~] # mdadm --detail -scan >> /etc/config/mdadm.conf
and this is the content of raidtab:
[~] # cat /etc/config/raidtab
raiddev /dev/md1
        raid-level      5
        nr-raid-disks   4
        nr-spare-disks  0
        chunk-size      4
        persistent-superblock   1
        device  /dev/sda3
        raid-disk       0
        device  /dev/sdb3
        raid-disk       1
        device  /dev/sdc3
        raid-disk       2
        device  /dev/sdd3
        raid-disk       3