Introduction
This document describes the errdisabled state, how to recover from it, and provides examples of errdisable recovery. This document uses the terms errdisable and error disable interchangeably. Customers often contact Cisco Technical Support when they notice that one or more of their switch ports have become error disabled, which means that the ports have a status of errdisabled. These customers want to know why the error disablement happened and how they can restore the ports to normal.
Note: The port status of err-disabled displays in the output of the show interfaces interface_number status command.
Prerequisites
Requirements
There are no specific requirements for this document.
Components Used
To create the examples in this document, you need two Cisco Catalyst 4500/6500 Series Switches (or the equivalent) in a lab environment with cleared configurations. The switches must run Cisco IOS® Software and each switch must have two Fast Ethernet ports that are capable of EtherChannel and PortFast.
The information in this document was created from the devices in a specific lab environment. All of the devices used in this document started with a cleared (default) configuration. If your network is live, ensure that you understand the potential impact of any command.
Background Information
Platforms That Use Errdisable
The errdisable feature is supported on these Catalyst switches:
-
Catalyst switches that run Cisco IOS Software:
-
2900XL / 3500XL
-
2940 / 2950 / 2960 / 2970
-
3550 / 3560 / 3560-E / 3750 / 3750-E
- 3650 / 3850
-
4500 / 4503 / 4506 / 4507 / 4510 / 4500-X
-
6500 / 6503 / 6504 / 6506 / 6509
- 9200 / 9300 / 9400 / 9500
-
The way in which errdisable is implemented varies between software platforms. This document specifically focuses on errdisable for switches that run Cisco IOS Software.
Errdisable
Function of Errdisable
If the configuration shows a port to be enabled, but software on the switch detects an error situation on the port, the software shuts down that port. In other words, the port is automatically disabled by the switch operating system software because of an error condition that is encountered on the port.
When a port is error disabled, it is effectively shut down and no traffic is sent or received on that port. The port LED is set to the color orange and, when you issue the show interfaces command, the port status shows err-disabled. Here is an example of what an error-disabled port looks like from the command-line interface (CLI) of the switch:
cat6knative#show interfaces gigabitethernet 4/1 status

Port    Name       Status       Vlan       Duplex  Speed Type
Gi4/1              err-disabled 100          full   1000 1000BaseSX
Or, if the interface has been disabled because of an error condition, you can see messages that are similar to these in both the console and the syslog:
%SPANTREE-SP-2-BLOCK_BPDUGUARD:
   Received BPDU on port GigabitEthernet4/1 with BPDU Guard enabled. Disabling port.
%PM-SP-4-ERR_DISABLE:
   bpduguard error detected on Gi4/1, putting Gi4/1 in err-disable state
This example message displays when a host port receives the bridge protocol data unit (BPDU). The actual message depends on the reason for the error condition.
The error disable function serves two purposes:
-
It lets the administrator know when and where there is a port problem.
-
It eliminates the possibility that this port can cause other ports on the module (or the entire module) to fail.
Such a failure can occur when a bad port monopolizes buffers or port error messages monopolize interprocess communications on the card, which can ultimately cause serious network issues. The error disable feature helps prevent these situations.
Causes of Errdisable
This feature was first implemented in order to handle special collision situations in which the switch detected excessive or late collisions on a port. Excessive collisions occur when a frame is dropped because the switch encounters 16 collisions in a row. Late collisions occur because every device on the wire did not recognize that the wire was in use. Possible causes of these types of errors include:
-
A cable that is out of specification (either too long, the wrong type, or defective)
-
A bad network interface card (NIC) card (with physical problems or driver problems)
-
A port duplex misconfiguration
A port duplex misconfiguration is a common cause of the errors because of failures to negotiate the speed and duplex properly between two directly connected devices (for example, a NIC that connects to a switch). Only half-duplex connections can ever have collisions in a LAN. Because of the carrier sense multiple access (CSMA) nature of Ethernet, collisions are normal for half duplex, as long as the collisions do not exceed a small percentage of traffic.
There are various reasons for the interface to go into errdisable. The reason can be:
-
Duplex mismatch
-
Port channel misconfiguration
-
BPDU guard violation
-
UniDirectional Link Detection (UDLD) condition
-
Late-collision detection
-
Link-flap detection
-
Security violation
-
Port Aggregation Protocol (PAgP) flap
-
Layer 2 Tunneling Protocol (L2TP) guard
-
DHCP snooping rate-limit
-
Incorrect GBIC / Small Form-Factor Pluggable (SFP) module or cable
-
Address Resolution Protocol (ARP) inspection
-
Inline power
Note: Error-disable detection is enabled for all of these reasons by default. In order to disable error-disable detection, use the no errdisable detect cause command. The show errdisable detect command displays the error-disable detection status.
Determine If Ports Are in the Errdisabled State
You can determine if your port has been error disabled if you issue the show interfaces command.
Here is an example of an active port:
cat6knative#show interfaces gigabitethernet 4/1 status

!--- Refer to show interfaces status for more information on the command.

Port    Name               Status       Vlan       Duplex  Speed Type
Gi4/1                      Connected    100          full   1000 1000BaseSX
Here is an example of the same port in the error disabled state:
cat6knative#show interfaces gigabitethernet 4/1 status

!--- Refer to show interfaces status for more information on the command.

Port    Name               Status       Vlan       Duplex  Speed Type
Gi4/1                      err-disabled 100          full   1000 1000BaseSX
Note: When a port is error disabled, the LED on the front panel that is associated with the port is set to the color orange.
Determine the Reason for the Errdisabled State (Console Messages, Syslog, and the show errdisable recovery Command)
When the switch puts a port in the error-disabled state, the switch sends a message to the console that describes why it disabled the port. The example in this section provides two sample messages that show the reason for port disablement:
-
One disablement is because of the PortFast BPDU guard feature.
-
The other disablement is because of an EtherChannel configuration problem.
Note: You can also see these messages in the syslog if you issue the show log command.
Here are the sample messages:
%SPANTREE-SP-2-BLOCK_BPDUGUARD:
   Received BPDU on port GigabitEthernet4/1 with BPDU Guard enabled. Disabling port.

%PM-SP-4-ERR_DISABLE:
   bpduguard error detected on Gi4/1, putting Gi4/1 in err-disable state

 %SPANTREE-2-CHNMISCFG: STP loop - channel 11/1-2 is disabled in vlan 1
If you have enabled errdisable recovery, you can determine the reason for the errdisable status if you issue the show errdisable recovery command. Here is an example:
cat6knative#show errdisable recovery
ErrDisable Reason    Timer Status
-----------------    --------------
udld                 Enabled
bpduguard            Enabled
security-violatio    Enabled
channel-misconfig    Enabled
pagp-flap            Enabled
dtp-flap             Enabled
link-flap            Enabled
l2ptguard            Enabled
psecure-violation    Enabled
gbic-invalid         Enabled
dhcp-rate-limit      Enabled
mac-limit            Enabled
unicast-flood        Enabled
arp-inspection       Enabled

Timer interval: 300 seconds

Interfaces that will be enabled at the next timeout:

Interface      Errdisable reason      Time left(sec)
---------    ---------------------    --------------
  Fa2/4                bpduguard          273
Recover a Port from Errdisabled State
This section provides examples of how you can encounter an error-disabled port and how to fix it, as well as a brief discussion of a few additional reasons that a port can become error disabled. In order to recover a port from the errdisable state, first identify and correct the root problem, and then reenable the port. If you reenable the port before you fix the root problem, the ports just become error disabled again.
Correct the Root Problem
After you discover why the ports were disabled, fix the root problem. The fix depends on what triggered the problem. There are numerous things that can trigger the shutdown. This section discusses some of the most noticeable and common causes:
-
EtherChannel misconfiguration
In order for EtherChannel to work, the ports that are involved must have consistent configurations. The ports must have the same VLAN, the same trunk mode, the same speed, the same duplex, and so on. Most of the configuration differences within a switch are caught and reported when you create the channel. If one switch is configured for EtherChannel and the other switch is not configured for EtherChannel, the spanning tree process can shut down the channeled ports on the side that is configured for EtherChannel. The on mode of EtherChannel does not send PAgP packets to negotiate with the other side before channeling; it just assumes that the other side is channeling. In addition, this example does not turn on EtherChannel for the other switch, but leaves these ports as individual, unchanneled ports. If you leave the other switch in this state for a minute or so, Spanning Tree Protocol (STP) on the switch where the EtherChannel is turned on thinks that there is a loop. This puts the channeling ports in the errdisabled state.
In this example, a loop was detected and the ports were disabled. The output of the show etherchannel summary command shows that the Number of channel-groups in use is 0. When you look at one of the ports that are involved, you can see that the status is err-disabled:
%SPANTREE-2-CHNL_MISCFG: Detected loop due to etherchannel misconfiguration of Gi4/1

cat6knative#show etherchannel summary

!--- Refer to show etherchannel for more information on the command.

Flags:  D - down        P - in port-channel
        I - stand-alone s - suspended
        H - Hot-standby (LACP only)
        R - Layer3      S - Layer2
        U - in use      f - failed to allocate aggregator

        u - unsuitable for bundling
Number of channel-groups in use: 0
Number of aggregators:           0

Group  Port-channel  Protocol    Ports
------+-------------+-----------+-----------------------------------------------
The EtherChannel was torn down because the ports were placed in errdisable on this switch.
cat6knative#show interfaces gigabitethernet 4/1 status

Port    Name               Status       Vlan       Duplex  Speed Type
Gi4/1                      err-disabled 100          full   1000 1000BaseSX
In order to determine what the problem was, look at the error message. The message indicates that the EtherChannel encountered a spanning tree loop. As this section explains, this problem can occur when one device (the switch, in this case) has EtherChannel turned on manually with use of the on mode (as opposed to desirable) and the other connected device (the other switch, in this case) does not have EtherChannel turned on at all. One way to fix the situation is to set the channel mode to desirable on both sides of the connection, and then reenable the ports. Then, each side forms a channel only if both sides agree to channel. If they do not agree to channel, both sides continue to function as normal ports.
cat6knative(config-terminal)#interface gigabitethernet 4/1
cat6knative(config-if)#channel-group 3 mode desirable non-silent
-
Duplex mismatch
Duplex mismatches are common because of failures to autonegotiate speed and duplex properly. Unlike a half duplex device, which must wait until there are no other devices that transmit on the same LAN segment, a full-duplex device transmits whenever the device has something to send, regardless of other devices. If this transmission occurs while the half-duplex device transmits, the half-duplex device considers this either a collision (during the slot time) or a late collision (after the slot time). Because the full-duplex side never expects collisions, this side never realizes that it must retransmit that dropped packet. A low percentage rate of collisions is normal with half duplex, but is not normal with full duplex. A switch port that receives many late collisions usually indicates a duplex mismatch problem. Be sure that the ports on both sides of the cable are set to the same speed and duplex. The show interfaces interface_number command tells you the speed and duplex for Catalyst switch ports. Later versions of Cisco Discovery Protocol (CDP) can warn you about a duplex mismatch before the port is put in the error-disabled state.
In addition, there are settings on a NIC, such as autopolarity features, that can cause the problem. If you are in doubt, turn these settings off. If you have multiple NICs from a vendor and the NICs all appear to have the same problem, check the manufacturer website for the release notes and be sure that you have the latest drivers.
Other causes of late collisions include:
-
A bad NIC (with physical problems, not just configuration problems)
-
A bad cable
-
A cable segment that is too long
-
-
BPDU port guard
A port that uses PortFast must only connect to an end station (such as a workstation or server) and not to devices that generate spanning tree BPDUs, such as switches, or bridges and routers that bridge. If the switch receives a spanning tree BPDU on a port that has spanning tree PortFast and spanning tree BPDU guard enabled, the switch puts the port in errdisabled mode in order to guard against potential loops. PortFast assumes that a port on a switch cannot generate a physical loop. Therefore, PortFast skips the initial spanning tree checks for that port, which avoids the timeout of end stations at bootup. The network administrator must carefully implement PortFast. On ports that have PortFast enabled, BPDU guard helps ensure that the LAN stays loop-free.
This example shows how to turn on this feature. This example was chosen because creation of an error-disable situation is easy in this case:
cat6knative(config-if)#spanning-tree bpduguard enable

!--- Refer to spanning-tree bpduguard for more information on the command.
In this example, a Catalyst 6509 switch is connected to another switch (a 6509). The 6500 sends BPDUs every 2 seconds (with use of the default spanning tree settings). When you enable PortFast on the 6509 switch port, the BPDU guard feature watches for BPDUs that come in on this port. When a BPDU comes into the port, which means that a device that is not an end device is detected on that port, the BPDU guard feature error disables the port in order to avoid the possibility of a spanning tree loop.
cat6knative(config-if)#spanning-tree portfast enable

!--- Refer to spanning-tree portfast (interface configuration mode)
!--- for more information on the command.


Warning: Spantree port fast start can only be enabled on ports connected
to a single host.  Connecting hubs, concentrators, switches, bridges, etc. to
a fast start port can cause temporary spanning tree loops.

%PM-SP-4-ERR_DISABLE: bpduguard error detected on Gi4/1, putting Gi4/1 in err-disable state.
In this message, the switch indicates that it received a BPDU on a PortFast-enabled port, and so the switch shuts down port Gi4/1.
cat6knative#show interfaces gigabitethernet 4/1 status

Port    Name               Status       Vlan       Duplex  Speed Type
Gi4/1                      err-disabled 100          full   1000 1000BaseSX
You need to turn off the PortFast feature because this port is a port with an improper connection. The connection is improper because PortFast is enabled, and the switch connects to another switch. Remember that PortFast is only for use on ports that connect to end stations.
cat6knative(config-if)#spanning-tree portfast disable
-
UDLD
The UDLD protocol allows devices that are connected through fiber-optic or copper Ethernet cables (for example, Category 5 cabling) to monitor the physical configuration of the cables and detect when a unidirectional link exists. When a unidirectional link is detected, UDLD shuts down the affected port and alerts the user. Unidirectional links can cause a variety of problems, which include spanning-tree topology loops.
Note: UDLD exchanges protocol packets between the neighboring devices. Both devices on the link must support UDLD and have UDLD enabled on the respective ports. If you have UDLD enabled on only one port of a link, it can also leave the end configured with UDLD to go to errdisable state.
Each switch port that is configured for UDLD sends UDLD protocol packets that contain the port device (or port ID) and the neighbor device (or port IDs) that are seen by UDLD on that port. The neighboring ports must see their own device or port ID (echo) in the packets that are received from the other side. If the port does not see its own device or port ID in the incoming UDLD packets for a specific duration of time, the link is considered unidirectional. Therefore, the respective port is disabled and a message that is similar to this is printed on the console:
PM-SP-4-ERR_DISABLE: udld error detected on Gi4/1, putting Gi4/1 in err-disable state.
For more information on UDLD operation, configuration, and commands, refer to the document Configuring UniDirectional Link Detection (UDLD).
-
Link-flap error
Link flap means that the interface continually goes up and down. The interface is put into the errdisabled state if it flaps more than five times in 10 seconds. The common cause of link flap is a Layer 1 issue such as a bad cable, duplex mismatch, or bad Gigabit Interface Converter (GBIC) card. Look at the console messages or the messages that were sent to the syslog server that state the reason for the port shutdown.
%PM-4-ERR_DISABLE: link-flap error detected on Gi4/1, putting Gi4/1 in err-disable state
Issue this command in order to view the flap values:
cat6knative#show errdisable flap-values !--- Refer to show errdisable flap-values for more information on the command. ErrDisable Reason Flaps Time (sec) ----------------- ------ ---------- pagp-flap 3 30 dtp-flap 3 30 link-flap 5 10 -
Loopback error
A loopback error occurs when the keepalive packet is looped back to the port that sent the keepalive. The switch sends keepalives out all the interfaces by default. A device can loop the packets back to the source interface, which usually occurs because there is a logical loop in the network that the spanning tree has not blocked. The source interface receives the keepalive packet that it sent out, and the switch disables the interface (errdisable). This message occurs because the keepalive packet is looped back to the port that sent the keepalive:
%PM-4-ERR_DISABLE: loopback error detected on Gi4/1, putting Gi4/1 in err-disable state
Keepalives are sent on all interfaces by default in Cisco IOS Software Release 12.1EA-based software. In Cisco IOS Software Release 12.2SE-based software and later, keepalives are not sent by default on fiber and uplink interfaces. For more information, refer to Cisco bug ID CSCea46385
 (registered customers only) .
The suggested workaround is to disable keepalives and upgrade to Cisco IOS Software Release 12.2SE or later.
-
Port security violation
You can use port security with dynamically learned and static MAC addresses in order to restrict the ingress traffic of a port. In order to restrict the traffic, you can limit the MAC addresses that are allowed to send traffic into the port. In order to configure the switch port to error disable if there is a security violation, issue this command:
cat6knative(config-if)#switchport port-security violation shutdown
A security violation occurs in either of these two situations:
-
When the maximum number of secure MAC addresses is reached on a secure port and the source MAC address of the ingress traffic differs from any of the identified secure MAC addresses
In this case, port security applies the configured violation mode.
-
If traffic with a secure MAC address that is configured or learned on one secure port attempts to access another secure port in the same VLAN
In this case, port security applies the shutdown violation mode.
-
-
L2pt Guard
When the Layer 2 PDUs enter the tunnel or access port on the inbound edge switch, the switch overwrites the customer PDU-destination MAC address with a well-known Cisco proprietary multicast address (01-00-0c-cd-cd-d0). If 802.1Q tunneling is enabled, packets are also double-tagged. The outer tag is the customer metro tag and the inner tag is the customer VLAN tag. The core switches ignore the inner tags and forward the packet to all trunk ports in the same metro VLAN. The edge switches on the outbound side restore the proper Layer 2 protocol and MAC address information and forward the packets to all tunnel or access ports in the same metro VLAN. Therefore, the Layer 2 PDUs are kept intact and delivered across the service-provider infrastructure to the other side of the customer network.
Switch(config)#interface gigabitethernet 0/7
l2protocol-tunnel {cdp | vtp | stp}
The interface goes to errdisabled state. If an encapsulated PDU (with the proprietary destination MAC address) is received from a tunnel port or access port with Layer 2 tunneling enabled, the tunnel port is shut down to prevent loops. The port also shuts down when a configured shutdown threshold for the protocol is reached. You can manually reenable the port (issue a shutdown, no shutdown command sequence) or if errdisable recovery is enabled, the operation is retried after a specified time interval.
To recover the interface from errdisable state, reenable the port with the command errdisable recovery cause l2ptguard. This command is used to configure the recovery mechanism from a Layer 2 maximum rate error so that the interface can be brought out of the disabled state and allowed to try again. You can also set the time interval. Errdisable recovery is disabled by default; when enabled, the default time interval is 300 seconds.
-
Incorrect SFP cable
Ports go into errdisable state with the %PHY-4-SFP_NOT_SUPPORTED error message when you connect Catalyst 3560 and Catalyst 3750 Switches and use an SFP Interconnect Cable.
The Cisco Catalyst 3560 SFP Interconnect Cable (CAB-SFP-50CM=) provides for a low-cost, point-to-point, Gigabit Ethernet connection between Catalyst 3560 Series Switches. The 50-centimeter (cm) cable is an alternative to the SFP transceivers to interconnect Catalyst 3560 Series Switches through their SFP ports over a short distance. All Cisco Catalyst 3560 Series Switches support the SFP Interconnect Cable.
When a Catalyst 3560 Switch is connected to a Catalyst 3750 or any other type of Catalyst switch model, you cannot use the CAB-SFP-50CM= cable. You can connect both switches with a copper cable with SFP (GLC-T) on both devices instead of a CAB-SFP-50CM= cable.
-
802.1X Security Violation
DOT1X-SP-5-SECURITY_VIOLATION: Security violation on interface GigabitEthernet4/8,
New MAC address 0080.ad00.c2e4 is seen on the interface in Single host mode
%PM-SP-4-ERR_DISABLE: security-violation error detected on Gi4/8, putting Gi4/8 in err-disable state
This message indicates that the port on the specified interface is configured in single-host mode. Any new host that is detected on the interface is treated as a security violation. The port has been error disabled.
Ensure that only one host is connected to the port. If you need to connect to an IP phone and a host behind it, configure Multidomain Authentication Mode on that switchport.
The Multidomain authentication (MDA) mode allows an IP phone and a single host behind the IP phone to authenticate independently, with 802.1X, MAC authentication bypass (MAB), or (for the host only) web-based authentication. In this application, Multidomain refers to two domains — data and voice — and only two MAC addresses are allowed per port. The switch can place the host in the data VLAN and the IP phone in the voice VLAN, though they appear to be on the same switch port. The data VLAN assignment can be obtained from the vendor-specific attributes (VSAs) received from the AAA server within authentication.
For more information, refer to the Multidomain Authentication Mode section of Configuring 802.1X Port-Based Authentication.
Reenable the Errdisabled Ports
After you fix the root problem, the ports are still disabled if you have not configured errdisable recovery on the switch. In this case, you must reenable the ports manually. Issue the shutdown command and then the no shutdown interface mode command on the associated interface in order to manually reenable the ports.
The errdisable recovery command allows you to choose the type of errors that automatically reenable the ports after a specified amount of time. The show errdisable recovery command shows the default error-disable recovery state for all the possible conditions.
cat6knative#show errdisable recovery
ErrDisable Reason    Timer Status
-----------------    --------------
udld                 Disabled
bpduguard            Disabled
security-violatio    Disabled
channel-misconfig    Disabled
pagp-flap            Disabled
dtp-flap             Disabled
link-flap            Disabled
l2ptguard            Disabled
psecure-violation    Disabled
gbic-invalid         Disabled
dhcp-rate-limit      Disabled
mac-limit            Disabled
unicast-flood        Disabled
arp-inspection       Disabled

Timer interval: 300 seconds

Interfaces that will be enabled at the next timeout:
Note: The default timeout interval is 300 seconds and, by default, the timeout feature is disabled.
In order to turn on errdisable recovery and choose the errdisable conditions, issue this command:
cat6knative#errdisable recovery cause ?
  all                 Enable timer to recover from all causes
  arp-inspection      Enable timer to recover from arp inspection error disable
                      state
  bpduguard           Enable timer to recover from BPDU Guard error disable
                      state
  channel-misconfig   Enable timer to recover from channel misconfig disable
                      state
  dhcp-rate-limit     Enable timer to recover from dhcp-rate-limit error
                      disable state
  dtp-flap            Enable timer to recover from dtp-flap error disable state
  gbic-invalid        Enable timer to recover from invalid GBIC error disable
                      state
  l2ptguard           Enable timer to recover from l2protocol-tunnel error
                      disable state
  link-flap           Enable timer to recover from link-flap error disable
                      state
  mac-limit           Enable timer to recover from mac limit disable state
  pagp-flap           Enable timer to recover from pagp-flap error disable
                      state
  psecure-violation   Enable timer to recover from psecure violation disable
                      state
  security-violation  Enable timer to recover from 802.1x violation disable
                      state
  udld                Enable timer to recover from udld error disable state
  unicast-flood       Enable timer to recover from unicast flood disable state
This example shows how to enable the BPDU guard errdisable recovery condition:
cat6knative(Config)#errdisable recovery cause bpduguard
A nice feature of this command is that, if you enable errdisable recovery, the command lists general reasons that the ports have been put into the error-disable state. In this example, notice that the BPDU guard feature was the reason for the shutdown of port 2/4:
cat6knative#show errdisable recovery
ErrDisable Reason    Timer Status
-----------------    --------------
udld                 Disabled
bpduguard            Enabled
security-violatio    Disabled
channel-misconfig    Disabled
pagp-flap            Disabled
dtp-flap             Disabled
link-flap            Disabled
l2ptguard            Disabled
psecure-violation    Disabled
gbic-invalid         Disabled
dhcp-rate-limit      Disabled
mac-limit            Disabled
unicast-flood        Disabled
arp-inspection       Disabled

Timer interval: 300 seconds

Interfaces that will be enabled at the next timeout:

Interface      Errdisable reason      Time left(sec)
---------    ---------------------    --------------
  Fa2/4                bpduguard          290
If any one of the errdisable recovery conditions is enabled, the ports with this condition are reenabled after 300 seconds. You can also change this default of 300 seconds if you issue this command:
cat6knative(Config)#errdisable recovery interval timer_interval_in_seconds
This example changes the errdisable recovery interval from 300 to 400 seconds:
cat6knative(Config)#errdisable recovery interval 400
Verify
-
show version—Displays the version of the software that is used on the switch.
-
show interfaces interface interface_number status—Shows the current status of the switch port.
-
show errdisable detect—Displays the current settings of the errdisable timeout feature and, if any of the ports are currently error disabled, the reason that they are error disabled.
Troubleshoot
-
show interfaces status err-disabled—Shows which local ports are involved in the errdisabled state.
-
show etherchannel summary—Shows the current status of the EtherChannel.
-
show errdisable recovery—Shows the time period after which the interfaces are enabled for errdisable conditions.
-
show errdisable detect—Shows the reason for the errdisable status.
For more information on how to troubleshoot switchport issues, refer to Troubleshooting Switch Port and Interface Problems.
Related Information
- Interface Is in errdisable Status Troubleshooting Hardware and Common Issues on Catalyst 6500/6000 Series Switches Running Cisco IOS System Software
- Spanning Tree PortFast BPDU Guard Enhancement
- Understanding EtherChannel Inconsistency Detection
- Troubleshooting Switch Port and Interface Problems
- LAN Product Support
- LAN Switching Technology Support
- Technical Support — Cisco Systems
Configuring Port-Based Traffic Control
This chapter describes how to configure the port-based traffic control features on the Catalyst 2960 and 2960-S switches. Unless otherwise noted, the term switch refers to a standalone switch and a switch stack.

Note![]() For complete syntax and usage information for the commands used in this chapter, see the command reference for this release.
For complete syntax and usage information for the commands used in this chapter, see the command reference for this release.
This chapter consists of these sections:
- Configuring Storm Control
- Configuring Protected Ports
- Configuring Port Blocking
- Configuring Port Security
- Displaying Port-Based Traffic Control Settings
Configuring Storm Control
These sections contain this conceptual and configuration information:
- Understanding Storm Control
- Default Storm Control Configuration
- Configuring Storm Control and Threshold Levels
- Configuring Small-Frame Arrival Rate
Understanding Storm Control
Storm control prevents traffic on a LAN from being disrupted by a broadcast, multicast, or unicast storm on one of the physical interfaces. A LAN storm occurs when packets flood the LAN, creating excessive traffic and degrading network performance. Errors in the protocol-stack implementation, mistakes in network configurations, or users issuing a denial-of-service attack can cause a storm.
Storm control (or traffic suppression) monitors packets passing from an interface to the switching bus and determines if the packet is unicast, multicast, or broadcast. The switch counts the number of packets of a specified type received within the 1-second time interval and compares the measurement with a predefined suppression-level threshold.
Storm control uses one of these methods to measure traffic activity:
- Bandwidth as a percentage of the total available bandwidth of the port that can be used by the broadcast, multicast, or unicast traffic
- Traffic rate in packets per second at which broadcast, multicast, or unicast packets are received.
- Traffic rate in bits per second at which broadcast, multicast, or unicast packets are received.
- Traffic rate in packets per second and for small frames. This feature is enabled globally. The threshold for small frames is configured for each interface.
With each method, the port blocks traffic when the rising threshold is reached. The port remains blocked until the traffic rate drops below the falling threshold (if one is specified) and then resumes normal forwarding. If the falling suppression level is not specified, the switch blocks all traffic until the traffic rate drops below the rising suppression level. In general, the higher the level, the less effective the protection against broadcast storms.
Note![]() When the storm control threshold for multicast traffic is reached, all multicast traffic except control traffic, such as bridge protocol data unit (BDPU) and Cisco Discovery Protocol (CDP) frames, are blocked.
When the storm control threshold for multicast traffic is reached, all multicast traffic except control traffic, such as bridge protocol data unit (BDPU) and Cisco Discovery Protocol (CDP) frames, are blocked.
The graph in Figure 1-1 shows broadcast traffic patterns on an interface over a given period of time. The example can also be applied to multicast and unicast traffic. In this example, the broadcast traffic being forwarded exceeded the configured threshold between time intervals T1 and T2 and between T4 and T5. When the amount of specified traffic exceeds the threshold, all traffic of that kind is dropped for the next time period. Therefore, broadcast traffic is blocked during the intervals following T2 and T5. At the next time interval (for example, T3), if broadcast traffic does not exceed the threshold, it is again forwarded.
Figure 1-1 Broadcast Storm Control Example
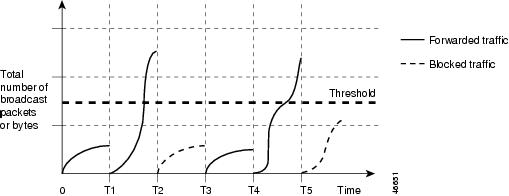
The combination of the storm-control suppression level and the 1-second time interval controls the way the storm control algorithm works. A higher threshold allows more packets to pass through. A threshold value of 100 percent means that no limit is placed on the traffic. A value of 0.0 means that all broadcast, multicast, or unicast traffic on that port is blocked.
Note![]() Because packets do not arrive at uniform intervals, the 1-second time interval during which traffic activity is measured can affect the behavior of storm control.
Because packets do not arrive at uniform intervals, the 1-second time interval during which traffic activity is measured can affect the behavior of storm control.
You use the storm-control interface configuration commands to set the threshold value for each traffic type.
Default Storm Control Configuration
By default, unicast, broadcast, and multicast storm control are disabled on the switch interfaces; that is, the suppression level is 100 percent.
Configuring Storm Control and Threshold Levels
You configure storm control on a port and enter the threshold level that you want to be used for a particular type of traffic.
However, because of hardware limitations and the way in which packets of different sizes are counted, threshold percentages are approximations. Depending on the sizes of the packets making up the incoming traffic, the actual enforced threshold might differ from the configured level by several percentage points.
Note![]() Storm control is supported on physical interfaces. You can also configure storm control on an EtherChannel. When storm control is configured on an EtherChannel, the storm control settings propagate to the EtherChannel physical interfaces.
Storm control is supported on physical interfaces. You can also configure storm control on an EtherChannel. When storm control is configured on an EtherChannel, the storm control settings propagate to the EtherChannel physical interfaces.
Beginning in privileged EXEC mode, follow these steps to storm control and threshold levels:
|
|
|
|
|---|---|---|
|
Step 1 |
configure terminal |
Enter global configuration mode. |
|
Step 2 |
interface interface-id |
Specify the interface to be configured, and enter interface configuration mode. |
|
Step 3 |
storm-control { broadcast | multicast | unicast } level { level [ level-low ] | bps bps [ bps-low ] | pps pps [ pps-low ]} |
Configure broadcast, multicast, or unicast storm control. By default, storm control is disabled. The keywords have these meanings:
If you set the threshold to the maximum value (100 percent), no limit is placed on the traffic. If you set the threshold to 0.0, all broadcast, multicast, and unicast traffic on that port is blocked.
For BPS and PPS settings, you can use metric suffixes such as k, m, and g for large number thresholds. |
|
Step 4 |
storm-control action { shutdown | trap } |
Specify the action to be taken when a storm is detected. The default is to filter out the traffic and not to send traps.
|
|
Step 5 |
end |
Return to privileged EXEC mode. |
|
Step 6 |
show storm-control [ interface-id ] [ broadcast | multicast | unicast ] |
Verify the storm control suppression levels set on the interface for the specified traffic type. If you do not enter a traffic type, broadcast storm control settings are displayed. |
|
Step 7 |
copy running-config startup-config |
(Optional) Save your entries in the configuration file. |
To disable storm control, use the no storm-control { broadcast | multicast | unicast } level interface configuration command.
This example shows how to enable unicast storm control on a port with an 87-percent rising suppression level and a 65-percent falling suppression level:
This example shows how to enable broadcast address storm control on a port to a level of 20 percent. When the broadcast traffic exceeds the configured level of 20 percent of the total available bandwidth of the port within the traffic-storm-control interval, the switch drops all broadcast traffic until the end of the traffic-storm-control interval:
Configuring Small-Frame Arrival Rate
Incoming VLAN-tagged packets smaller than 67 bytes are considered small frames. They are forwarded by the switch, but they do not cause the switch storm-control counters to increment. In Cisco IOS Release 12.2(44)SE and later, you can configure a port to be error disabled if small frames arrive at a specified rate (threshold).
You globally enable the small-frame arrival feature on the switch and then configure the small-frame threshold for packets on each interface. Packets smaller than the minimum size and arriving at a specified rate (the threshold) are dropped since the port is error disabled.
If the errdisable recovery cause small-frame global configuration command is entered, the port is re-enabled after a specified time. (You specify the recovery time by using errdisable recovery global configuration command.)
Note![]() Small Frame Arrival-Rate is supported by 2960 only.
Small Frame Arrival-Rate is supported by 2960 only.
Beginning in privileged EXEC mode, follow these steps to configure the threshold level for each interface:
|
|
|
|
|---|---|---|
|
Step 1 |
configure terminal |
Enter global configuration mode. |
|
Step 2 |
errdisable detect cause small-frame |
Enable the small-frame rate-arrival feature on the switch. |
|
Step 3 |
errdisable recovery interval interval |
(Optional) Specify the time to recover from the specified error-disabled state. |
|
Step 4 |
errdisable recovery cause small-frame |
(Optional) Configure the recovery time for error-disabled ports to be automatically re-enabled after they are error disabled by the arrival of small frames |
|
Step 5 |
interface interface-id |
Enter interface configuration mode, and specify the interface to be configured. |
|
Step 6 |
small violation-rate pps |
Configure the threshold rate for the interface to drop incoming packets and error disable the port. The range is 1 to 10,000 packets per second (pps) |
|
Step 7 |
end |
Return to privileged EXEC mode. |
|
Step 8 |
show interfaces interface-id |
Verify the configuration. |
|
Step 9 |
copy running-config startup-config |
(Optional) Save your entries in the configuration file. |
This example shows how to enable the small-frame arrival-rate feature, configure the port recovery time, and configure the threshold for error disabling a port:
Configuring Protected Ports
Some applications require that no traffic be forwarded at Layer 2 between ports on the same switch so that one neighbor does not see the traffic generated by another neighbor. In such an environment, the use of protected ports ensures that there is no exchange of unicast, broadcast, or multicast traffic between these ports on the switch.
Protected ports have these features:
- A protected port does not forward any traffic (unicast, multicast, or broadcast) to any other port that is also a protected port. Data traffic cannot be forwarded between protected ports at Layer 2; only control traffic, such as PIM packets, is forwarded because these packets are processed by the CPU and forwarded in software. All data traffic passing between protected ports must be forwarded through a Layer 3 device.
- Forwarding behavior between a protected port and a nonprotected port proceeds as usual.
Because a switch stack represents a single logical switch, Layer 2 traffic is not forwarded between any protected ports in the switch stack, whether they are on the same or different switches in the stack.
Note![]() Stacking is supported only on Catalyst 2960-S switches running the LAN base image.
Stacking is supported only on Catalyst 2960-S switches running the LAN base image.
These sections contain this configuration information:
- Default Protected Port Configuration
- Protected Port Configuration Guidelines
- Configuring a Protected Port
Default Protected Port Configuration
The default is to have no protected ports defined.
Protected Port Configuration Guidelines
You can configure protected ports on a physical interface (for example, Gigabit Ethernet port 1) or an EtherChannel group (for example, port-channel 5). When you enable protected ports for a port channel, it is enabled for all ports in the port-channel group.
Configuring a Protected Port
Beginning in privileged EXEC mode, follow these steps to define a port as a protected port:
|
|
|
|
|---|---|---|
|
Step 1 |
configure terminal |
Enter global configuration mode. |
|
Step 2 |
interface interface-id |
Specify the interface to be configured, and enter interface configuration mode. |
|
Step 3 |
switchport protected |
Configure the interface to be a protected port. |
|
Step 4 |
end |
Return to privileged EXEC mode. |
|
Step 5 |
show interfaces interface-id switchport |
Verify your entries. |
|
Step 6 |
copy running-config startup-config |
(Optional) Save your entries in the configuration file. |
To disable protected port, use the no switchport protected interface configuration command.
This example shows how to configure a port as a protected port:
Configuring Port Blocking
By default, the switch floods packets with unknown destination MAC addresses out of all ports. If unknown unicast and multicast traffic is forwarded to a protected port, there could be security issues. To prevent unknown unicast or multicast traffic from being forwarded from one port to another, you can block a port (protected or nonprotected) from flooding unknown unicast or multicast packets to other ports.
Note![]() With multicast traffic, the port blocking feature blocks only pure Layer 2 packets. Multicast packets that contain IPv4 or IPv6 information in the header are not blocked.
With multicast traffic, the port blocking feature blocks only pure Layer 2 packets. Multicast packets that contain IPv4 or IPv6 information in the header are not blocked.
These sections contain this configuration information:
- Default Port Blocking Configuration
- Blocking Flooded Traffic on an Interface
Default Port Blocking Configuration
The default is to not block flooding of unknown multicast and unicast traffic out of a port, but to flood these packets to all ports.
Blocking Flooded Traffic on an Interface
Note![]() The interface can be a physical interface or an EtherChannel group. When you block multicast or unicast traffic for a port channel, it is blocked on all ports in the port-channel group.
The interface can be a physical interface or an EtherChannel group. When you block multicast or unicast traffic for a port channel, it is blocked on all ports in the port-channel group.
Beginning in privileged EXEC mode, follow these steps to disable the flooding of unicast packets and Layer 2 multicast packets out of an interface:
|
|
|
|
|---|---|---|
|
Step 1 |
configure terminal |
Enter global configuration mode. |
|
Step 2 |
interface interface-id |
Specify the interface to be configured, and enter interface configuration mode. |
|
Step 3 |
switchport block multicast |
Block unknown multicast forwarding out of the port. Note Only pure Layer 2 multicast traffic is blocked. Multicast packets that contain IPv4 or IPv6 information in the header are not blocked. |
|
Step 4 |
switchport block unicast |
Block unknown unicast forwarding out of the port. |
|
Step 5 |
end |
Return to privileged EXEC mode. |
|
Step 6 |
show interfaces interface-id switchport |
Verify your entries. |
|
Step 7 |
copy running-config startup-config |
(Optional) Save your entries in the configuration file. |
To return the interface to the default condition where no traffic is blocked and normal forwarding occurs on the port, use the no switchport block { multicast | unicast } interface configuration commands.
This example shows how to block unicast and Layer 2 multicast flooding on a port:
Configuring Port Security
You can use the port security feature to restrict input to an interface by limiting and identifying MAC addresses of the stations allowed to access the port. When you assign secure MAC addresses to a secure port, the port does not forward packets with source addresses outside the group of defined addresses. If you limit the number of secure MAC addresses to one and assign a single secure MAC address, the workstation attached to that port is assured the full bandwidth of the port.
If a port is configured as a secure port and the maximum number of secure MAC addresses is reached, when the MAC address of a station attempting to access the port is different from any of the identified secure MAC addresses, a security violation occurs. Also, if a station with a secure MAC address configured or learned on one secure port attempts to access another secure port, a violation is flagged.
These sections contain this conceptual and configuration information:
- Understanding Port Security
- Default Port Security Configuration
- Port Security Configuration Guidelines
- Enabling and Configuring Port Security
- Enabling and Configuring Port Security Aging
- Port Security and Switch Stacks
Understanding Port Security
These sections contain this conceptual information:
- Secure MAC Addresses
- Security Violations
Secure MAC Addresses
You configure the maximum number of secure addresses allowed on a port by using the switchport port-security maximum value interface configuration command.
Note![]() If you try to set the maximum value to a number less than the number of secure addresses already configured on an interface, the command is rejected.
If you try to set the maximum value to a number less than the number of secure addresses already configured on an interface, the command is rejected.
The switch supports these types of secure MAC addresses:
- Static secure MAC addresses—These are manually configured by using the switchport port-security mac-address mac-address interface configuration command, stored in the address table, and added to the switch running configuration.
- Dynamic secure MAC addresses—These are dynamically configured, stored only in the address table, and removed when the switch restarts.
- Sticky secure MAC addresses—These can be dynamically learned or manually configured, stored in the address table, and added to the running configuration. If these addresses are saved in the configuration file, when the switch restarts, the interface does not need to dynamically reconfigure them.
You can configure an interface to convert the dynamic MAC addresses to sticky secure MAC addresses and to add them to the running configuration by enabling sticky learning. To enable sticky learning, enter the switchport port-security mac-address sticky interface configuration command. When you enter this command, the interface converts all the dynamic secure MAC addresses, including those that were dynamically learned before sticky learning was enabled, to sticky secure MAC addresses. All sticky secure MAC addresses are added to the running configuration.
The sticky secure MAC addresses do not automatically become part of the configuration file, which is the startup configuration used each time the switch restarts. If you save the sticky secure MAC addresses in the configuration file, when the switch restarts, the interface does not need to relearn these addresses. If you do not save the sticky secure addresses, they are lost.
If sticky learning is disabled, the sticky secure MAC addresses are converted to dynamic secure addresses and are removed from the running configuration.
The maximum number of secure MAC addresses that you can configure on a switch is set by the maximum number of available MAC addresses allowed in the system. This number is the total of available MAC addresses, including those used for other Layer 2 functions and any other secure MAC addresses configured on interfaces.
Security Violations
It is a security violation when one of these situations occurs:
- The maximum number of secure MAC addresses have been added to the address table, and a station whose MAC address is not in the address table attempts to access the interface.
- An address learned or configured on one secure interface is seen on another secure interface in the same VLAN.
You can configure the interface for one of four violation modes, based on the action to be taken if a violation occurs:
- protect—When the number of secure MAC addresses reaches the maximum limit allowed on the port, packets with unknown source addresses are dropped until you remove a sufficient number of secure MAC addresses to drop below the maximum value or increase the number of maximum allowable addresses. You are not notified that a security violation has occurred.
Note![]() We do not recommend configuring the protect violation mode on a trunk port. The protect mode disables learning when any VLAN reaches its maximum limit, even if the port has not reached its maximum limit.
We do not recommend configuring the protect violation mode on a trunk port. The protect mode disables learning when any VLAN reaches its maximum limit, even if the port has not reached its maximum limit.
- restrict—When the number of secure MAC addresses reaches the maximum limit allowed on the port, packets with unknown source addresses are dropped until you remove a sufficient number of secure MAC addresses to drop below the maximum value or increase the number of maximum allowable addresses. In this mode, you are notified that a security violation has occurred. An SNMP trap is sent, a syslog message is logged, and the violation counter increments.
- shutdown—A port security violation causes the interface to become error-disabled and to shut down immediately, and the port LED turns off. When a secure port is in the error-disabled state, you can bring it out of this state by entering the errdisable recovery cause psecure-violation global configuration command, or you can manually re-enable it by entering the shutdown and no shut down interface configuration commands. This is the default mode.
- shutdown vlan—Use to set the security violation mode per-VLAN. In this mode, the VLAN is error disabled instead of the entire port when a violation occurs
Table 1-1 shows the violation mode and the actions taken when you configure an interface for port security.
|
|
1 |
|
|
2 |
|
|
|---|---|---|---|---|---|---|
|
protect |
No |
No |
No |
No |
No |
No |
|
restrict |
No |
Yes |
Yes |
No |
Yes |
No |
|
shutdown |
No |
No |
No |
No |
Yes |
Yes |
|
shutdown vlan |
No |
No |
Yes |
No |
Yes |
No3 |
1.Packets with unknown source addresses are dropped until you remove a sufficient number of secure MAC addresses.
2.The switch returns an error message if you manually configure an address that would cause a security violation.
3.Shuts down only the VLAN on which the violation occurred.
Default Port Security Configuration
Table 1-2 shows the default port security configuration for an interface.
|
|
|
|---|---|
|
Port security |
Disabled on a port. |
|
Sticky address learning |
Disabled. |
|
Maximum number of secure MAC addresses per port |
1 |
|
Violation mode |
Shutdown. The port shuts down when the maximum number of secure MAC addresses is exceeded. |
|
Port security aging |
Disabled. Aging time is 0. Static aging is disabled. Type is absolute. |
Port Security Configuration Guidelines
Follow these guidelines when configuring port security:
- Port security can only be configured on static access ports or trunk ports. A secure port cannot be a dynamic access port.
- A secure port cannot be a destination port for Switched Port Analyzer (SPAN).
- A secure port cannot belong to a Fast EtherChannel or a Gigabit EtherChannel port group.
Note![]() Voice VLAN is only supported on access ports and not on trunk ports, even though the configuration is allowed.
Voice VLAN is only supported on access ports and not on trunk ports, even though the configuration is allowed.
- When you enable port security on an interface that is also configured with a voice VLAN, set the maximum allowed secure addresses on the port to two. When the port is connected to a Cisco IP phone, the IP phone requires one MAC address. The Cisco IP phone address is learned on the voice VLAN, but is not learned on the access VLAN. If you connect a single PC to the Cisco IP phone, no additional MAC addresses are required. If you connect more than one PC to the Cisco IP phone, you must configure enough secure addresses to allow one for each PC and one for the phone.
- When a trunk port configured with port security and assigned to an access VLAN for data traffic and to a voice VLAN for voice traffic, entering the switchport voice and switchport priority extend interface configuration commands has no effect.
When a connected device uses the same MAC address to request an IP address for the access VLAN and then an IP address for the voice VLAN, only the access VLAN is assigned an IP address.
- When you enter a maximum secure address value for an interface, and the new value is greater than the previous value, the new value overwrites the previously configured value. If the new value is less than the previous value and the number of configured secure addresses on the interface exceeds the new value, the command is rejected.
- The switch does not support port security aging of sticky secure MAC addresses.
Table 1-3 summarizes port security compatibility with other port-based features.
|
|
|
|---|---|
|
DTP4 port5 |
No |
|
Trunk port |
Yes |
|
Dynamic-access port6 |
No |
|
SPAN source port |
Yes |
|
SPAN destination port |
No |
|
EtherChannel |
No |
|
Protected port |
Yes |
|
IEEE 802.1x port |
Yes |
|
Voice VLAN port7 |
Yes |
|
Flex Links |
Yes |
4.DTP = Dynamic Trunking Protocol
5.A port configured with the switchport mode dynamic interface configuration command.
6.A VLAN Query Protocol (VQP) port configured with the switchport access vlan dynamic interface configuration command.
7.You must set the maximum allowed secure addresses on the port to two plus the maximum number of secure addresses allowed on the access VLAN.
Enabling and Configuring Port Security
Beginning in privileged EXEC mode, follow these steps to restrict input to an interface by limiting and identifying MAC addresses of the stations allowed to access the port:
|
|
|
|
|---|---|---|
|
Step 1 |
configure terminal |
Enter global configuration mode. |
|
Step 2 |
interface interface-id |
Specify the interface to be configured, and enter interface configuration mode. |
|
Step 3 |
switchport mode { access | trunk } |
Set the interface switchport mode as access or trunk; an interface in the default mode (dynamic auto) cannot be configured as a secure port. |
|
Step 4 |
switchport voice vlan vlan-id |
Enable voice VLAN on a port. vlan-id —Specify the VLAN to be used for voice traffic. |
|
Step 5 |
switchport port-security |
Enable port security on the interface. |
|
Step 6 |
switchport port-security [maximum value [vlan {vlan-list | {access | voice}}]] |
(Optional) Set the maximum number of secure MAC addresses for the interface. The maximum number of secure MAC addresses that you can configure on a switch is set by the maximum number of available MAC addresses allowed in the system. This number is the total of available MAC addresses, including those used for other Layer 2 functions and any other secure MAC addresses configured on interfaces. (Optional) vlan —set a per-VLAN maximum value Enter one of these options after you enter the vlan keyword:
Note The voice keyword is available only if a voice VLAN is configured on a port and if that port is not the access VLAN. If an interface is configured for voice VLAN, configure a maximum of two secure MAC addresses. |
|
Step 7 |
switchport port-security [violation { protect | restrict | shutdown | shutdown vlan }] |
(Optional) Set the violation mode, the action to be taken when a security violation is detected, as one of these:
Note We do not recommend configuring the protect mode on a trunk port. The protect mode disables learning when any VLAN reaches its maximum limit, even if the port has not reached its maximum limit.
Note When a secure port is in the error-disabled state, you can bring it out of this state by entering the errdisable recovery cause psecure-violation global configuration command. You can manually re-enable it by entering the shutdown and no shutdown interface configuration commands or by using the clear errdisable interface vlan privileged EXEC command. |
|
Step 8 |
switchport port-security [mac-address mac-address [vlan { vlan-id | {access | voice}}] |
(Optional) Enter a secure MAC address for the interface. You can use this command to enter the maximum number of secure MAC addresses. If you configure fewer secure MAC addresses than the maximum, the remaining MAC addresses are dynamically learned. Note If you enable sticky learning after you enter this command, the secure addresses that were dynamically learned are converted to sticky secure MAC addresses and are added to the running configuration. (Optional) vlan —set a per-VLAN maximum value. Enter one of these options after you enter the vlan keyword:
Note The voice keyword is available only if a voice VLAN is configured on a port and if that port is not the access VLAN. If an interface is configured for voice VLAN, configure a maximum of two secure MAC addresses. |
|
Step 9 |
switchport port-security mac-address sticky |
(Optional) Enable sticky learning on the interface. |
|
Step 10 |
switchport port-security mac-address sticky [mac-address | vlan {vlan-id | {access | voice}}] |
(Optional) Enter a sticky secure MAC address, repeating the command as many times as necessary. If you configure fewer secure MAC addresses than the maximum, the remaining MAC addresses are dynamically learned, are converted to sticky secure MAC addresses, and are added to the running configuration. Note If you do not enable sticky learning before this command is entered, an error message appears, and you cannot enter a sticky secure MAC address. (Optional) vlan —set a per-VLAN maximum value. Enter one of these options after you enter the vlan keyword:
Note The voice keyword is available only if a voice VLAN is configured on a port and if that port is not the access VLAN. |
|
Step 11 |
end |
Return to privileged EXEC mode. |
|
Step 12 |
show port-security |
Verify your entries. |
|
Step 13 |
copy running-config startup-config |
(Optional) Save your entries in the configuration file. |
To return the interface to the default condition as not a secure port, use the no switchport port-security interface configuration command. If you enter this command when sticky learning is enabled, the sticky secure addresses remain part of the running configuration but are removed from the address table. All addresses are now dynamically learned.
To return the interface to the default number of secure MAC addresses, use the no switchport port-security maximum value interface configuration command. To return the violation mode to the default condition (shutdown mode), use the no switchport port-security violation { protocol | restrict } interface configuration command.
To disable sticky learning on an interface, use the no switchport port-security mac-address sticky interface configuration command. The interface converts the sticky secure MAC addresses to dynamic secure addresses. However, if you have previously saved the configuration with the sticky MAC addresses, you should save the configuration again after entering the no switchport port-security mac-address sticky command, or the sticky addresses will be restored if the switch reboots.
Use the clear port-security { all | configured | dynamic | sticky } privileged EXEC command to delete from the MAC address table all secure addresses or all secure addresses of a specific type (configured, dynamic, or sticky) on the switch or on an interface.
To delete a specific secure MAC address from the address table, use the no switchport port-security mac-address mac-address interface configuration command. To delete all dynamic secure addresses on an interface from the address table, enter the no switchport port-security interface configuration command followed by the switchport port-security command (to re-enable port security on the interface). If you use the no switchport port-security mac-address sticky interface configuration command to convert sticky secure MAC addresses to dynamic secure MAC addresses before entering the no switchport port-security command, all secure addresses on the interface except those that were manually configured are deleted.
You must specifically delete configured secure MAC addresses from the address table by using the no switchport port-security mac-address mac-address interface configuration command.
This example shows how to enable port security on a port and to set the maximum number of secure addresses to 50. The violation mode is the default, no static secure MAC addresses are configured, and sticky learning is enabled.
This example shows how to configure a static secure MAC address on VLAN 3 on a port:
This example shows how to enable sticky port security on a port, to manually configure MAC addresses for data VLAN and voice VLAN, and to set the total maximum number of secure addresses to 20 (10 for data VLAN and 10 for voice VLAN).
Enabling and Configuring Port Security Aging
You can use port security aging to set the aging time for all secure addresses on a port. Two types of aging are supported per port:
- Absolute—The secure addresses on the port are deleted after the specified aging time.
- Inactivity—The secure addresses on the port are deleted only if the secure addresses are inactive for the specified aging time.
Use this feature to remove and add devices on a secure port without manually deleting the existing secure MAC addresses and to still limit the number of secure addresses on a port. You can enable or disable the aging of secure addresses on a per-port basis.
Beginning in privileged EXEC mode, follow these steps to configure port security aging:
|
|
|
|
|---|---|---|
|
Step 1 |
configure terminal |
Enter global configuration mode. |
|
Step 2 |
interface interface-id |
Specify the interface to be configured, and enter interface configuration mode. |
|
Step 3 |
switchport port-security aging { static | time time | type { absolute | inactivity} } |
Enable or disable static aging for the secure port, or set the aging time or type. Note The switch does not support port security aging of sticky secure addresses. Enter static to enable aging for statically configured secure addresses on this port. For time, specify the aging time for this port. The valid range is from 0 to 1440 minutes. For type, select one of these keywords:
|
|
Step 4 |
end |
Return to privileged EXEC mode. |
|
Step 5 |
show port-security [ interface interface-id ] [ address ] |
Verify your entries. |
|
Step 6 |
copy running-config startup-config |
(Optional) Save your entries in the configuration file. |
To disable port security aging for all secure addresses on a port, use the no switchport port-security aging time interface configuration command. To disable aging for only statically configured secure addresses, use the no switchport port-security aging static interface configuration command.
This example shows how to set the aging time as 2 hours for the secure addresses on a port:
This example shows how to set the aging time as 2 minutes for the inactivity aging type with aging enabled for the configured secure addresses on the interface:
You can verify the previous commands by entering the show port-security interface interface-id privileged EXEC command.
Port Security and Switch Stacks
When a switch joins a stack, the new switch receives the configured secure addresses. The new stack member downloads all dynamic secure addresses from the other stack members.
When a switch (either the stack master or a stack member) leaves the stack, the remaining stack members are notified, and the secure MAC addresses configured or learned by that switch are deleted from the secure MAC address table. For more information about switch stacks, see Chapter1, “Managing Switch Stacks”
Displaying Port-Based Traffic Control Settings
The show interfaces interface-id switchport privileged EXEC command displays (among other characteristics) the interface traffic suppression and control configuration. The show storm-control and show port-security privileged EXEC commands display those storm control and port security settings.
To display traffic control information, use one or more of the privileged EXEC commands in Table 1-4 .
|
|
|
|---|---|
|
show interfaces [interface-id] switchport |
Displays the administrative and operational status of all switching (nonrouting) ports or the specified port, including port blocking and port protection settings. |
|
show storm-control [ interface-id ] [ broadcast | multicast | unicast ] |
Displays storm control suppression levels set on all interfaces or the specified interface for the specified traffic type or for broadcast traffic if no traffic type is entered. |
|
show port-security [ interface interface-id ] |
Displays port security settings for the switch or for the specified interface, including the maximum allowed number of secure MAC addresses for each interface, the number of secure MAC addresses on the interface, the number of security violations that have occurred, and the violation mode. |
|
show port-security [ interface interface-id ] address |
Displays all secure MAC addresses configured on all switch interfaces or on a specified interface with aging information for each address. |
|
show port-security interface interface-id vlan |
Displays the number of secure MAC addresses configured per VLAN on the specified interface. |
 Errdisable is a feature that automatically disables a port on a Cisco Catalyst switch. When a port is error disabled, it is effectively shut down and no traffic is sent or received on that port.
The error disabled feature is supported on most Catalyst switches running the Cisco IOS software. Including all the following models:
- Catalyst 2940 / 2950 / 2960 / 2960S
- Catalyst 3550 / 3560 / 3560-E / 3750 / 3750-E
- Catalyst 4000 / 4500 / 4507R
- Catalyst 6000 / 6500
The Errdisable error disable feature was designed to inform the administrator when there is a port problem or error. The reasons a catalyst switch can go into Errdisable mode and shutdown a port are many and include:
-
Duplex Mismatch
-
Loopback Error
- Link Flapping (up/down)
- Port Security Violation
- Unicast Flodding
- UDLD Failure
- Broadcast Storms
- BPDU Guard
When a port is in error-disabled state, it is effectively shut down and no traffic is sent or received on that port. The port LED is set to the orange color and, when you issue the show interfaces command, the port status shows as Errdisabled.
Following is an example of what an error-disabled port looks like:
2960G# show interface gigabit0/7
GigabitEthernet0/7 is down, line protocol is down (err-disabled)
  Hardware is Gigabit Ethernet, address is 001b.54aa.c107 (bia 001b.54aa.c107)
  MTU 1500 bytes, BW 100000 Kbit, DLY 100 usec,
     reliability 234/255, txload 1/255, rxload 1/255
  Encapsulation ARPA, loopback not set
  Keepalive set (10 sec)
  Auto-duplex, Auto-speed, media type is 10/100/1000BaseTX
input flow-control is off, output flow-control is unsupported
ARP type: ARPA, ARP Timeout 04:00:00
Last input 18w5d, output 18w5d, output hang never
Last clearing of «show interface» counters never
Input queue: 0/75/0/0 (size/max/drops/flushes); Total output drops: 0
Queueing strategy: fifo
Output queue: 0/40 (size/max)
5 minute input rate 0 bits/sec, 0 packets/sec
5 minute output rate 0 bits/sec, 0 packets/sec
1011 packets input, 862666 bytes, 0 no buffer
Received 157 broadcasts (0 multicast)
0 runts, 0 giants, 0 throttles
3021 input errors, 2 CRC, 0 frame, 0 overrun, 0 ignored
0 watchdog, 144 multicast, 0 pause input
0 input packets with dribble condition detected
402154 packets output, 86290866 bytes, 0 underruns
0 output errors, 0 collisions, 1 interface resets
0 babbles, 0 late collision, 0 deferred
0 lost carrier, 0 no carrier, 0 PAUSE output
0 output buffer failures, 0 output buffers swapped out
To recover a port that is in an Errdisable state, manual intervention is required, and the administrator must access the switch and configure the specific port with ‘shutdown‘ followed by the ‘no shutdown‘ command. This command sequence will enable the port again, however, if the problem persists expect to find the port in Errdisable state again soon.
Understanding and Configuring Errdisable AutoRecovery
As outlined above, there are a number of reasons a port can enter the Errdisable state. One common reason is the Port Security error, also used in our example below.
Of all the errors, Port Security is more a feature rather than an error. Port Security allows the restriction of MAC Addresses on an interface configured as a layer 2 port. This effectively prevents others connecting unwanted hubs or switches on the network. Port Security allows us to specify a single MAC Address to be connected to a specific port, thus restricting access to a specific computer.
In the case of a violation, Port Security will automatically disable the port. This is the behaviour of the default port security policy when enabling Port Security. Following is a configuration example of port security:
2960G(config)# interface GigabitEthernet0/48
2960G(config-if)# switchport access vlan 2
2960G(config-if)# switchport mode access
2960G(config-if)# switchport port-security
2960G(config-if)# spanning-tree portfast
Once a host is connected to the port, we can get more information on its port-security status and actions that will be taken when a violation occurs:
2960G# show port-security interface GigabitEthernet 0/48
Port Security                : Enabled
Port Status                  : Secure-up
Violation Mode                            : Shutdown
Aging Time                   : 0 mins
Aging Type                   : Absolute
SecureStatic Address Aging   : Disabled
Maximum MAC Addresses        : 1
Total MAC Addresses          : 1
Configured MAC Addresses     : 0
Sticky MAC Addresses         : 0
Last Source Address:Vlan     : 001b.54aa.c107
Security Violation Count     : 0
Note that the Violation Mode is set to Shutdown. This means that when a violation is detected, the switch will place gigabitethernet 0/48 in the err-disable shutdown state as shown below:
%PORT_SECURITY-2-PSECURE_VIOLATION: Security violation occurred, caused by MAC address 0031.f6ac.03f5 on port GigabitEthernet0/48
While it’s almost always necessary to know when a port security violation occurs there are some circumstances where autorecovery is a desirable feature, especially durng accidental violations.
The following commands enable the autorecovery feature 30 seconds after a port security violation:
2960G(config)# errdisable recovery cause psecure-violation
2960G(config)# errdisable recovery interval 30
Determine the Reason for the Errdisabled State
To view the Errdisabled reasons, and see for which reason the autorecovery feature has been enabled, use the show Errdisable recovery command:
2960G# show errdisable recovery
ErrDisable Reason Timer Status
—————— —————
udld Disabled
bpduguard Disabled
security-violatio Disabled
channel-misconfig Disabled
vmps Disabled
pagp-flap Disabled
dtp-flap Disabled
link-flap Disabled
secure-violation Enabled
sfp-config-mismat Disabled
gbic-invalid Disabled
dhcp-rate-limit Disabled
unicast-flood Disabled
storm-control Disabled
loopback Disabled
Timer interval: 30 seconds
Interfaces that will be enabled at the next timeout.
We have now confirmed that autorecovery is enabled for port-security violations. If it is required to enable the Errdisable autorecovery feature for all supported reasons, use the following command:
2960G(config)# errdisable recovery cause all
To test our configuration we forced a port security violation, causing the switch to place the offending port in the shutdown state. Notice we’ve enabled autorecovery for all Errdisable reasons and the time left to enable the interfaces placed in shutdown state by the port security violation:
2960G# show errdisable recovery
ErrDisable Reason Timer Status
—————— —————
udld Enabled
bpduguard Enabled
security-violatio Enabled
channel-misconfig Enabled
vmps Enabled
pagp-flap Enabled
dtp-flap Enabled
link-flap Enabled
psecure-violation Enabled
sfp-config-mismat Enabled
gbic-invalid Enabled
dhcp-rate-limit Enabled
unicast-flood Enabled
storm-control Enabled
loopback Enabled
Timer interval: 30 seconds
Interfaces that will be enabled at the next timeout:
Interface Errdisable reason Time left(sec)
——— —————— —————
Gi0/48 security-violation 17
Seventeen seconds later, the switch automatically recovered from the port security violation and re-enabled the interface:
%PM-4-ERR_RECOVER: Attempting to recover from secure-violation err-disable state on gigabitethernet0/48
18w4d: %LINK-3-UPDOWN: Interface GigabitEthernet0/48, changed state to up
18w4d: %LINEPROTO-5-UPDOWN: Line protocol on Interface GigabitEthernet0/48, changed state to up
Disabling The Errdisable Feature
There are cases where it might be necessary to disable the Errdisable mechanism for specific supported features in order to overcome constant interface shutdowns and auto recoveries. While the Catalyst IOS does not allow disabling all features we can still fine-tune the mechanism and selectively disable a few.
To view the Errdisable reasons monitored by the switch, use the show Errdisable detect command:
2960G# show errdisable detect
ErrDisable Reason Detection Mode
----------------- --------- ----
bpduguard Enabled port
channel-misconfig Enabled port
community-limit Enabled port
dhcp-rate-limit Enabled port
dtp-flap Enabled port
gbic-invalid Enabled portinline-power Enabled port
invalid-policy Enabled port
link-flap Enabled port
loopback Enabled port
lsgroup Enabled port
mac-limit Enabled port
pagp-flap Enabled portport-mode-failure Enabled port
secure-violation Enabled port/vlan
security-violation Enabled portsfp-config-mismatch Enabled port
small-frame Enabled port
storm-control Enabled port
udld Enabled port
vmps Enabled port
As shown, the command lists all supported Errdisable reasons. For our example, let’s assume we want to disable the inline-power Errdisable feature.
To achieve this, we simply use the following command:
2960G(config)# errdisable recovery cause all
And verify that Errdisable has been disabled for the feature:
2960G# show errdisable detectErrDisable Reason Detection Mode
----------------- --------- ----
bpduguard Enabled port
channel-misconfig Enabled port
community-limit Enabled port
dhcp-rate-limit Enabled port
dtp-flap Enabled port
gbic-invalid Enabled portinline-power Disabled port
invalid-policy Enabled port
link-flap Enabled port
loopback Enabled port
lsgroup Enabled port
mac-limit Enabled port
pagp-flap Enabled portport-mode-failure Enabled port
psecure-violation Enabled port/vlan
security-violation Enabled portsfp-config-mismatch Enabled port
small-frame Enabled port
storm-control Enabled port
udld Enabled port
vmps Enabled port
Overall, the Errdisable feature is an extremely useful tool if configured and monitored correctly. Take the necessary time to play around with the supported options of your Cisco Catalyst switch and fine-tune it to suit your network needs.
Back to Cisco Switches Section
Содержание
- Восстановление порта из состояния errdisabled
- Платформы, на которых используется отключение из-за ошибки
- Назначение состояния «Errdisabled»
- Причины возникновения состояния «Errdisabled»
- Проверка нахождения портов в состоянии «Errdisabled»
- Определение причины состояния «Errdisabled» (сообщения консоли, системный журнал и команда «show errdisable recovery»)
- Восстановление порта из состояния отключения из-за ошибки
- Исправление основной причины
- Повторное включение портов, отключенных из-за ошибки
- Проверка
- Устранение неполадок
Восстановление порта из состояния errdisabled
В этой статье мы рассмотрим определение состояния отключения из-за ошибки, опишем восстановление из этого состояния и предоставим примеры такого восстановления. В данной статье взаимозаменяемо используются термины «errdisabled» и «отключенный из-за ошибки».
Примечание: Состояние порта err-disabled отображается в выходных данных команды show interfaces interface_number status.
Для воспроизведения примеров, приведенных в данном документе, необходимы два коммутатора серии Cisco Catalyst 4500/6500 (или эквивалентных) в лабораторной среде с настройками, сброшенными до заводских. На коммутаторах должно быть установлено ПО Cisco IOS®, и у каждого коммутатора должно быть по два порта Fast Ethernet, поддерживающих функции EtherChannel и PortFast.
Данные сведения были получены в результате тестирования приборов в специфической лабораторной среде. В качестве начальной конфигурации для всех описанных в документе устройств использовались стандартные (заводские) настройки. В условиях реально действующей сети при использовании каждой команды необходимо четко понимать, какие последствия может иметь применение той или иной команды.
Платформы, на которых используется отключение из-за ошибки
Функция отключения из-за ошибки поддерживается на следующих коммутаторах Catalyst:
- коммутаторы Catalyst со следующим программным обеспечением Cisco IOS:
- 2900XL / 3500XL
- 2940 / 2950 / 2960 / 2970
- 3550 / 3560 / 3560-E / 3750 / 3750-E
- 4000 / 4500
- 6000 / 6500
- коммутаторы Catalyst со следующим программным обеспечением Catalyst (CatOS):
- 2948G
- 4500 / 4000
- 5500 / 5000
- 6500 / 6000
Способ реализации функции отключения из-за ошибки зависит от программной платформы. В этом документе особое внимание уделяется функции отключения из-за ошибки на коммутаторах с программным обеспечением Cisco IOS.
Состояние «Errdisabled»
Назначение состояния «Errdisabled»
Если в конфигурации отображается порт, который должен быть включен, но программное обеспечение на коммутаторе обнаружило порт в состояние ошибки, то программное обеспечение отключит этот порт. Другими словами, порт автоматически отключается операционной системой коммутатора, так как порт обнаружен в состоянии ошибки.
Когда порт отключается из-за ошибки, он фактически выключается, а прием и отправка трафика через него не выполняются. Цвет индикатора порта становится оранжевым, а при выполнении команды show interfaces отображается состояние порта err-disabled . Ниже приводится пример вывода данных о порте в состоянии error-disabled из интерфейса командной строки коммутатора:
cat6knative#show interfaces gigabitethernet 4/1 status
| Port | Name | Status | Vlanv | Duplex | Speed | Type |
| Gi4/1 | err-disabled | 100 | full | 1000 | 1000BaseSX |
Или, если данный интерфейс отключен из-за состояния ошибки, и в консоли, и в системном журнале можно увидеть сообщения, подобные следующим:
%SPANTREE-SP-2-BLOCK_BPDUGUARD:
Received BPDU on port GigabitEthernet4/1 with BPDU Guard enabled. Disabling port.
%PM-SP-4-ERR_DISABLE:
bpduguard error detected on Gi4/1, putting Gi4/1 in err-disable state
Сообщение данного примера отображается, когда порт хоста принимает блок BPDU. Фактический вид сообщения зависит от причины состояния ошибки.
Функция отключения из-за ошибки решает две задачи.
- Она позволяет администраторам знать, когда и где возникла проблема с портом.
- Она исключает возможность того, что данный порт может вызвать сбой других портов модуля (или всего модуля).
Такой сбой может произойти, когда «неисправный» порт монополизирует буферы или сообщения об ошибках порта монополизируют связи между процессами на плате, что может в итоге вызвать серьезные сетевые проблемы. Функция отключения из-за ошибки помогает предотвратить такие ситуации.
Причины возникновения состояния «Errdisabled»
Эта функция была первоначально реализована для обработки особых конфликтных ситуаций, когда коммутатор обнаруживал в порту избыточные или поздние конфликты. Избыточные конфликты возникают, когда кадр отбрасывается из-за обнаружения 16 конфликтов подряд. Поздние конфликты возникают, когда каждое из подключенных к линии устройств определило, что линия занята. Ниже перечислены некоторые возможные причины ошибок данных типов:
- кабель, не соответствующий спецификациям (слишком длинный, неправильного типа или поврежденный);
- неисправная сетевая интерфейсная плата (с физическими неполадками или проблемами драйверов);
- неправильная конфигурация дуплексного режима порта.
Неправильная конфигурация дуплексного режима порта является распространенной причиной ошибок из-за невозможности правильного согласования скорости и дуплексного режима между двумя напрямую соединенными устройствами (например, сетевой адаптер, подключенный к коммутатору). Только у полудуплексных соединений могут возникать конфликты в ЛВС. Так как для Ethernet характерен множественный доступ с контролем несущей (CSMA), конфликты являются обычным явлением для полудуплексных соединений, пока они составляют малую часть трафика.
Интерфейс может перейти в состояние «errdisabled» по различным причинам. Среди таких причин могут быть следующие:
- Несоответствие дуплексных режимов
- неправильная конфигурация каналов портов
- нарушение защиты BPDU
- состояние обнаружения однонаправленной связи (UDLD)
- обнаружение поздних конфликтов
- обнаружение переброски канала
- нарушение безопасности
- переброска по протоколу агрегации портов (PAgP)
- защита протокола туннелирования уровня 2 (L2TP)
- ограничение скорости DHCP-отслеживания
- неисправный модуль GBIC, подключаемый модуль малого форм-фактора (SFP) или кабель
- проверка протокола ARP
- встроенное питание
Примечание: По умолчанию для всех таких причин включено обнаружение отключения из-за ошибки. Чтобы отключить обнаружение отключения из-за ошибки, выполните команду no errdisable detect cause. Команда show errdisable detect отображает состояние обнаружения отключения из-за ошибки.
Проверка нахождения портов в состоянии «Errdisabled»
Чтобы определить, был ли порт отключен из-за ошибки, выполняется команда show interfaces.
Пример данных об активном порте:
cat6knative#show interfaces gigabitethernet 4/1 status
| Port | Name | Status | Vlan | Duplex | Speed | Type |
| Gi4/1 | Connected | 100 | full | 1000 | 1000BaseSX |
Ниже приводится пример данных о том же порте в состоянии отключения из-за ошибки:
cat6knative#show interfaces gigabitethernet 4/1 status
Примечание: Если порт отключен из-за ошибки, индикатор на передней панели, соответствующей данному порту, будет выключен.
Определение причины состояния «Errdisabled» (сообщения консоли, системный журнал и команда «show errdisable recovery»)
Когда коммутатор переводит порт в состояние отключения из-за ошибки, он отправляет консоли сообщение с описанием причины отключения порта. В данном разделе приведены два примера сообщений с причинами отключения портов.
- В первом случае отключение вызвано функцией защиты PortFast BPDU.
- Во втором случае отключение вызвано ошибкой в конфигурации EtherChannel.
Примечание: Эти сообщения можно также увидеть в системном журнале, если выполнить команду show log .
Вот примеры сообщений:
%SPANTREE-SP-2-BLOCK_BPDUGUARD:
Received BPDU on port GigabitEthernet4/1 with BPDU Guard enabled. Disabling port.
%PM-SP-4-ERR_DISABLE:
bpduguard error detected on Gi4/1, putting Gi4/1 in err-disable state
%SPANTREE-2-CHNMISCFG: STP loop — channel 11/1-2 is disabled in vlan 1
Если выполнена команда errdisable recovery, можно определить причину состояния «errdisabled» с помощью команды show errdisable recovery.
Ниже представлен пример:
cat6knative#show errdisable recovery
| ErrDisable Reason | Timer Status |
| udld | Enabled |
| bpduguard | Enabled |
| security-violatio | Enabled |
| channel-misconfig | Enabled |
| pagp-flap | Enabled |
| dtp-flap | Enabled |
| link-flap | Enabled |
| 2ptguardl | Enabled |
| psecure-violation | Enabled |
| gbic-invalid | Enabled |
| mac-limit | Enabled |
| unicast-flood | Enabled |
| arp-inspection | Enabled |
Timer interval: 300 seconds
Interfaces that will be enabled at the next timeout:
| Interface | Errdisable reason | Time left(sec) |
| Fa2/4 | bpduguard | 273 |
Восстановление порта из состояния отключения из-за ошибки
В этом разделе предоставляются примеры способов обнаружения портов, отключенных из-за ошибки, и их восстановления, а также краткое обсуждение некоторых дополнительных причин отключения портов из-за ошибки. Чтобы восстановить порт из состояния «errdisabled», сначала необходимо установить и устранить основную причину проблемы, а затем включить порт. Если включить порт, не устранив причину проблемы, он снова будет отключен из-за ошибки.
Исправление основной причины
После обнаружения причин отключения портов устраните основную причину проблемы. Устранение зависит от проблемы, вызвавшей состояние. Завершение работы может быть инициировано по самым разным причинам. В данном разделе обсуждаются некоторые из наиболее заметных и распространенных случаев.
- Неверная конфигурация EtherChannel
Порты, задействованные в работе EtherChannel, должны обладать согласованными конфигурациями. У портов должны быть одинаковые сети VLAN, режим магистрали, скорость, дуплексный режим и т.д. Большинство отличий конфигураций в рамках одного коммутатора выявляются и заносятся в отчет при создании канала. Если на одной стороне коммутатор настроен для EtherChannel, а на другой — нет, процесс STP может отключить объединенные в канал порты на стороне, настроенной для поддержки режима EtherChannel. В режиме EtherChannel перед объединением портов в канал PAgP-пакеты не отправляются другой стороне для согласования; предполагается, что на другой стороне режим объединения в канал также поддерживается. Кроме того, в данном примере режим EtherChannel не включается на другом коммутаторе, однако соответствующие порты оставляются отдельными, не задействованными в каналах портами. Если оставить другой коммутатор в этом состоянии примерно на минуту, протокол STP коммутатора с включенным режимом EtherChannel считает, что образовалась петля. В результате объединенные в канал порты переводятся в состояние отключения из-за ошибки.
В данном примере обнаружена петля и отключены порты. В выходных данных команды show etherchannel summary указывается, что Number of channel-groups in use (Число используемых групп каналов) равно 0. Если обратить внимание на один из вовлеченных портов, можно заметить, что он находится в состоянии err-disabled:
%SPANTREE-2-CHNL_MISCFG: Detected loop due to etherchannel misconfiguration
of Gi4/1
cat6knative#show etherchannel summary
Flags: D — down P — in port-channel
I — stand-alone s — suspended
H — Hot-standby (LACP only)
R — Layer3 S — Layer2
U — in use f — failed to allocate aggregator u — unsuitable for bundling
Number of channel-groups in use: 0
Number of aggregators: 0
Режим EtherChannel отключен, так как на данном коммутаторе порты были переведены в состояние «errdisable».
cat6knative#show interfaces gigabitethernet 4/1 status
| Port | Name | Status | Vlan | Duplex | Speed | Type |
| Gi4/1 | err-disabled | 100 | full | 1000 | 1000BaseSX |
Чтобы определить характер проблемы, см. соответствующее сообщение об ошибке. В сообщении указывается, что функция EtherChannel обнаружила петлю в дереве STP. В этом разделе описывается возникновение данной проблемы, когда на одном устройстве (в этом случае коммутатор) канал EtherChannel вручную переведен в режим «Включено» (в противоположность режиму согласования), а на другом подключенном устройстве (в этом случае другой коммутатор) канал EtherChannel вообще не включен. Один из способов разрешения этой ситуации заключается в переводе режима канала в состояние «desirable» на обеих сторонах соединения с последующим повторным включением портов. В результате обе стороны формируют канал только после взаимного согласования. Если создание канала не согласовано, обе стороны продолжают функционировать как обычные порты.
cat6knative(config-terminal)#interface gigabitethernet 4/1
cat6knative(config-if)#channel-group 3 mode desirable non-silent
Несоответствие дуплексных режимов
Несоответствие дуплексных режимов встречается довольно часто из-за неудачного автоматического согласования скорости и дуплексного режима. В отличие от полудуплексного устройства, которому приходится дожидаться освобождения своего сегмента ЛВС другими передающими устройствами, дуплексное устройство при необходимости выполняет передачу независимо от других устройств. Если эта передача выполняется одновременно с передачей полудуплексного устройства, данное устройство будет рассматривать это как конфликт (в течение данного временного интервала) или как поздний конфликт (по истечении данного временного интервала). Так как дуплексное устройство никогда не ожидает конфликтов, на этой стороне никогда не допускается необходимость повторной передачи отброшенных пакетов. Низкий процент конфликтов характерен для полудуплексного режима, но не для дуплексного. Регистрация на порте коммутатора слишком большого количества конфликтов обычно указывает на несоответствие дуплексных режимов. Убедитесь, что на обеих сторонах кабеля порты настроены на одинаковые скорость и дуплексный режим. Команда show interfaces interface_number предоставляет данные о скорости и дуплексном режиме портов коммутатора Catalyst. Более поздние версии протокола обнаружения Cisco (CDP) могут предупреждать о несоответствии дуплексных режимов перед переводом порта в состояние отключения из-за ошибки.
Кроме того, в сетевом адаптере есть настройки, такие как автополярность, которые могут вызвать данную проблему. В случае сомнений отключите такие настройки. Если есть несколько сетевых адаптеров одного производителя и на всех таких сетевых адаптерах проявляется та же проблема, посетите веб-узел производителя, чтобы прочитать заметки о выпуске и получить драйверы последних версий.
Ниже перечислены другие возможные причины поздних конфликтов:
- неисправный сетевой адаптер (с физическими неполадками, а не просто с ошибками конфигурации);
- неисправный кабель
- слишком длинный сегмент кабеля
В режиме PortFast порт должен подключаться только к конечной станции (рабочей станции или серверу), а не к устройствам, генерирующим BPDU-блоки дерева STP, таким как коммутаторы, мосты или маршрутизаторы, формирующие мостовые соединения. При приеме BPDU-блока дерева STP через порт с включенной STP-функцией PortFast и защитой от пакетов BPDU дерева STP коммутатор переводит порт в состояние «err-disable», чтобы защитить сеть от возможного возникновения петель. Функция PortFast предполагает, что порт коммутатора не может сформировать физическую петлю. Поэтому PortFast пропускает первоначальные проверки протокола STP для данного порта, чтобы избежать тайм-аута конечных станций при загрузке. Сетевые администраторы должны тщательно реализовывать функцию PortFast. На портах с включенной функцией PortFast защита BPDU препятствует образованию петель в ЛВС.
В следующем примере показано, как включить эту функцию. Этот пример выбран из-за простоты создания ситуации отключения из-за ошибки в данном случае:
cat6knative(config-if)#spanning-tree bpduguard enable
В этом примере коммутатор Catalyst 6509 подключен к другому коммутатору (серии 6509). Коммутатор Catalyst 6500 отправляет блоки BPDU каждые 2 секунды (при использовании настроек STP по умолчанию). При включении режима PortFast для порта коммутатора 6509 функция защиты BPDU отслеживает поступающие в этот порт блоки BPDU. Поступление блока BPDU в порт означает, что устройство не является конечным. В этом случае функция защиты BPDU отключает данный порт во избежание возможного образования петли в дереве STP.
cat6knative(config-if)#spanning-tree portfast enable
Warning: Spantree port fast start should only be enabled on ports connected
to a single host. Connecting hubs, concentrators, switches, bridges, etc. to
a fast start port can cause temporary spanning tree loops.
%PM-SP-4-ERR_DISABLE: bpduguard error detected on Gi4/1, putting Gi4/1 in
err-disable state.
В этом сообщении коммутатор сообщает о поступлении блока BPDU в порт с поддержкой PortFast, из-за чего коммутатор отключает порт Gi4/1.
cat6knative#show interfaces gigabitethernet 4/1 status
| Port | Name | Status | Vlan | Duplex | Speed | Type |
| Gi4/1 | err-disabled | 100 | full | 1000 | 1000BaseSX |
Функцию PortFast необходимо отключить, так как данный порт является портом с непригодным соединением. Соединение является непригодным, так как включена функция PortFast, а коммутатор подключается к другому коммутатору. Необходимо помнить, что функция PortFast используется только на портах, подключенных к конечным станциям.
cat6knative(config-if)#spanning-tree portfast disable
Протокол обнаружения однонаправленной связи (UDLD) позволяет устройствам, подключенным с помощью оптоволоконных или медных кабелей Ethernet (например кабелей категории 5), отслеживать физическую конфигурацию кабелей и обнаруживать появление однонаправленных соединений. При обнаружении однонаправленного соединения протокол UDLD отключает соответствующий порт и создает сообщение предупреждения для пользователя. Однонаправленные соединения могут вызвать множество проблем, включая петли в топологии STP.
Примечание: Работа UDLD основана на обмене пакетами протокола между соседними устройствами. Устройства на обеих сторонах соединения должны поддерживать протокол UDLD. Этот же протокол должен поддерживаться на соответствующих портах. Если UDLD включен только на одном порте, на этом конце соединения может быть настроен переход UDLD в состояние «err-disable».
Каждый порт коммутатора, настроенный на UDLD, отправляет пакеты протокола UDLD, в которых указывается устройство порта (или идентификатор порта) и соседнее устройство (или идентификаторы портов), которые видны UDLD на данном порте. В полученных с другой стороны пакетах соседние порты должны видеть свои собственные устройство или идентификатор порта (эхо). Если порт не видит собственного устройства или идентификатора порта во входящих UDLD-пакетах в течение заданного времени, такое соединение считается однонаправленным. В результате соответствующий порт отключается, а в консоли печатается сообщение примерно такого содержания:
PM-SP-4-ERR_DISABLE: udld error detected on Gi4/1, putting Gi4/1 in err-disable state.
Ошибка неустойчивости соединения (link-flap)
Неустойчивость соединения означает постоянное подключение и отключение интерфейса. Если число таких ошибок за 10 секунд больше пяти, интерфейс переводится в состояние «err-disable». Распространенной причиной неустойчивости соединения являются проблемы первого уровня (L1), такие как неисправность кабеля, несоответствие дуплексных режимов или неисправная плата GBIC. Просмотрите сообщения консоли или сообщения, отправленные на сервер системного журнала, в которых сообщается причина отключения портов.
%PM-4-ERR_DISABLE: link-flap error detected on Gi4/1, putting Gi4/ 1 in err-disable state
Чтобы просмотреть данные об ошибках неустойчивости соединения, выполните следующую команду:
cat6knative#show errdisable flap-values
| ErrDisable Reason | Flaps | Time (sec) |
| pagp-flap | 3 | 30 |
| dtp-flap | 3 | 30 |
| link-flap | 5 | 10 |
Ошибка обратной петли (loopback)
Ошибка обратной петли возникает, когда пакет запроса keepalive возвращается обратно к отправившему его порту. По умолчанию коммутатор отправляет запросы keepalive всем интерфейсам. Устройство может отправлять пакеты обратно исходному интерфейсу по петле, которая обычно возникает из-за наличия в сети логической петли, не заблокированной протоколом STP. Исходный интерфейс принимает отправленный им пакет сообщения keepalive, а коммутатор отключает данный интерфейс (errdisable). Когда пакет keepalive возвращается обратно к отправившему его порту, появляется следующее сообщение:
%PM-4-ERR_DISABLE: loopback error detected on Gi4/1, putting Gi4/1 in err-disable state
По умолчанию в ПО на базе Cisco IOS версии 12.1EA сообщения keepalive отправляются всеми интерфейсами. В программном обеспечении на базе Cisco IOS 12.2SE или более поздней версии сообщения keepalive по умолчанию не отправляются оптоволоконными и восходящими интерфейсами. Предлагаемый обходной путь заключается в отключении запросов keepalive и обновлении до ПО Cisco IOS 12.2SE или более поздней версии.
Нарушение защиты порта
Защиту порта можно использовать вместе со статическими и динамически получаемыми MAC-адресами, чтобы ограничить входящий трафик порта. Чтобы ограничить трафик, можно ограничить MAC-адреса, которым разрешено отправлять трафик данному порту. Чтобы настроить порт коммутатора на отключение из-за ошибки при нарушении безопасности, выполните следующую команду:
cat6knative(config-if)#switchport port-security violation shutdown
Нарушение безопасности происходит в следующих двух ситуациях:
- Когда на защищенном порте число защищенных MAC-адресов достигло максимума, а исходный MAC-адрес входящего трафика не совпадает ни с одним из идентифицированных защищенных MAC-адресов.
В этом случае защитой порта применяется настроенный режим нарушения. - Если трафик с защищенным MAC-адресом, настроенный или полученный на одном защищенном порте, пытается получить доступ к другому защищенному порту в той же сети VLAN.
В этом случае защита порта применяет режим нарушения завершения работы.
Когда блоки PDU уровня 2 входят в туннель или порт доступа на входящем пограничном коммутаторе, коммутатор заменяет пользовательский MAC-адрес PDU-назначения хорошо известным проприетарным адресом многоадресной рассылки Cisco: 01-00-0c-cd-cd-d0. Если включено туннелирование 802.1Q, пакеты также помечаются двумя тегами. Внешний тег является пользовательским тегом муниципальной сети, а внутренний тег — пользовательским тегом сети VLAN. Основные коммутаторы игнорируют внутренние теги и пересылают пакет всем магистральным портам в одной муниципальной сети VLAN. Пограничные коммутаторы на исходящей стороне восстанавливают данные о необходимом протоколе уровня 2 и MAC-адресе и пересылают пакеты всем туннельным портам или портам доступа внутри одной муниципальной сети VLAN. Поэтому блоки PDU уровня 2 сохраняются неизмененными и через инфраструктуру сервис-провайдера доставляются на другую сторону сети заказчика.
Switch(config)#interface gigabitethernet 0/7
l2protocol-tunnel
Интерфейс переходит в состояние отключения из-за ошибки. Если инкапсулированный блок PDU (с собственным MAC-адресом назначения) получен из туннельного порта или порта доступа с включенным туннелированием уровня 2, туннельный порт отключается, чтобы предотвратить появление петель. Этот порт также отключается, когда достигается пороговое значение завершения работы для данного протокола. Порт можно снова включить вручную (выполнив последовательность команд shutdown, no shutdown), или если включено восстановление из состояния «errdisabled», данная операция повторяется через указанный интервал времени.
Интерфейс можно восстановить из состояния «errdisabled» включив порт с помощью команды errdisable recovery cause l2ptguard. Эта команда используется для настройки механизма восстановления после ошибки «максимальной скорости» уровня 2, чтобы интерфейс можно было вывести из отключенного состояния и попытаться снова использовать. Можно также задать временной интервал. Восстановление из состояния «errdisabled» по умолчанию отключено; при включении временной интервал по умолчанию равен 300 секундам.
Порты переходят в состояние «errdisabled» с сообщением об ошибке %PHY-4-SFP_NOT_SUPPORTED при подключении коммутаторов Catalyst 3560 и Catalyst 3750 с помощью соединительного SFP-кабеля.
Соединительный SFP-кабель для коммутаторов Cisco Catalyst 3560 (CAB-SFP-50CM=) является бюджетным решением для соединений Gigabit Ethernet типа «точка-точка» между коммутаторами серии Catalyst 3560. 50-сантиметровый кабель является альтернативой использованию трансивера SFP при соединении коммутаторов серии Catalyst 3560 через SFP-порты на небольших расстояниях. Все коммутаторы серии Cisco Catalyst 3560 поддерживают соединительные SFP-кабели.
При подключении коммутатора Catalyst 3560 к коммутатору Catalyst 3750 или любой другой модели коммутатора Catalyst нельзя использовать кабель CAB-SFP-50CM=. Два коммутатора можно соединить с помощью медного кабеля с SFP (GLC-T) на обоих устройствах вместо кабеля CAB-SFP-50CM=.
Повторное включение портов, отключенных из-за ошибки
После устранения причины проблемы порты остаются отключенными, если на коммутаторе не настроено восстановление из состояния «errdisabled». В этом случае необходимо включить порты вручную. Выполните команду shutdown, а затем — команду интерфейсного режима no shutdown на соответствующем интерфейсе, чтобы вручную включить порты.
Команда errdisable recovery позволяет выбрать тип ошибок, после которых порты снова автоматически включаются через указанный промежуток времени. Команда show errdisable recovery показывает состояние по умолчанию после восстановления из состояния отключения из-за ошибки для всех возможных условий.
cat6knative#show errdisable recovery
| ErrDisable Reason | Timer Status |
| udld | Disabled |
| bpduguard | Disabled |
| security-violatio | Disabled |
| channel-misconfig | Disabled |
| pagp-flap | Disabled |
| dtp-flap | Disabled |
| link-flap | Disabled |
| 2ptguardl | Disabled |
| psecure-violation | Disabled |
| gbic-invalid | Disabled |
| mac-limit | Disabled |
| unicast-flood | Disabled |
| arp-inspection | Disabled |
Timer interval: 300 seconds
Interfaces that will be enabled at the next timeout:
Примечание: Стандартный интервал тайм-аута равен 300 секундам, и по умолчанию он отключен.
Чтобы включить errdisable recovery и выбрать состояния отключения из-за ошибки, выполните следующую команду:
cat6knative#errdisable recovery cause?
| all | Enable timer to recover from all causes |
| arp-inspection | Enable timer to recover from arp inspection error disable |
| state | |
| bpduguard | Enable timer to recover from BPDU Guard error disable |
| state | |
| channel-misconfig | Enable timer to recover from channel misconfig disable |
| state | |
| dhcp-rate-limit | Enable timer to recover from dhcp-rate-limit error disable |
| state | |
| dtp-flap | Enable timer to recover from dtp-flap error disable |
| state | |
| gbic-invalid | Enable timer to recover from invalid GBIC error disable |
| state | |
| l2ptguard | Enable timer to recover from l2protocol-tunnel error disable |
| state | |
| link-flap | Enable timer to recover from link-flap error disable |
| state | |
| mac-limit | Enable timer to recover from mac limit disable |
| state | |
| pagp-flap | Enable timer to recover from pagp-flap error disable |
| state | |
| psecure-violation | Enable timer to recover from psecure violation disable |
| state | |
| udld | Enable timer to recover from udld error disable |
| state | |
| unicast-flood | Enable timer to recover from unicast flood disable |
| state |
В этом примере показано, как разрешить условие восстановления из состояния «errdisabled» при включенной защите BPDU:
cat6knative(Config)#errdisable recovery cause bpduguard
Полезное свойство этой команды состоит в том, что при включении восстановления из состояния «errdisabled», команда выдает список общих причин перевода портов в состояние отключения из-за ошибки. В следующем примере обратите внимание на то, что функция защиты BPDU была причиной отключения порта 2/4:
cat6knative#show errdisable recovery
| ErrDisable Reason | Timer Status |
| udld | Disabled |
| bpduguard | Enabled |
| security-violatio | Disabled |
| channel-misconfig | Disabled |
| pagp-flap | Disabled |
| dtp-flap | Disabled |
| link-flap | Disabled |
| 2ptguardl | Disabled |
| psecure-violation | Disabled |
| gbic-invalid | Disabled |
| mac-limit | Disabled |
| unicast-flood | Disabled |
| arp-inspection | Disabled |
Timer interval: 300 seconds
Interfaces that will be enabled at the next timeout:
Если разрешено любое из условий восстановления из состояния «errdisabled», порты с таким условием снова включаются через 300 секунд. Это значение по умолчанию (300 секунд) можно изменить, выполнив следующую команду:
cat6knative(Config)#errdisable recovery interval timer_interval_in_seconds
В следующем примере длительность интервала восстановления из состояния «errdisabled» изменяется с 300 на 400 секунд:
cat6knative(Config)#errdisable recovery interval 400
Проверка
- show version— отображение версии программного обеспечения, используемого на данном коммутаторе.
- show interfaces interface interface_number status— отображение текущего состояния порта коммутатора.
- show errdisable detect— отображение текущих настроек функции тайм-аута состояния «err-disable» и, если в данный момент есть порты, отключенные из-за ошибки, причины их отключения.
Устранение неполадок
- show interfaces status err-disabled— отображение локальных портов в состоянии отключения из-за ошибки.
- show etherchannel summary— отображение текущего состояния EtherChannel.
- show errdisable recovery— отображение периода времени, по истечении которого интерфейсы восстанавливаются из состояния «errdisabled».
- show errdisable detect— отображение причины состояния «err-disable».
Есть вопросы?
Обращайтесь в «Аквилон-А», чтобы узнать подробности и получить именно то, что вам требуется.
Источник
Errdisable is a feature that automatically disables a port on a Cisco Catalyst switch and is supported on most Catalyst switches running the Cisco IOS software. Including all the following models:
- Catalyst 2940 / 2950 / 2960 / 2960S
- Catalyst 3550 / 3560 / 3560-E / 3750 / 3750-E
- Catalyst 4000 / 4500 / 4507R
- Catalyst 6000 / 6500
The Errdisable error disable feature was designed to inform the administrator when there is a port problem or error. The reasons a catalyst switch can go into Errdisable mode and shutdown a port are many and include:
-
Duplex Mismatch
-
Loopback Error
- Link Flapping (up/down)
- Port Security Violation
- Unicast Flodding
- UDLD Failure
- Broadcast Storms
- BPDU Guard
When a port is in error-disabled state, it is effectively shut down and no traffic is sent or received on that port. The port LED is set to the orange color and, when you issue the show interfaces command, the port status shows as Errdisabled.
Following is an example of what an error-disabled port looks like:
2960G# show interface gigabit0/7
GigabitEthernet0/7 is down, line protocol is down (err-disabled)
Hardware is Gigabit Ethernet, address is 001b.54aa.c107 (bia 001b.54aa.c107)
MTU 1500 bytes, BW 100000 Kbit, DLY 100 usec,
reliability 234/255, txload 1/255, rxload 1/255
Encapsulation ARPA, loopback not set
Keepalive set (10 sec)
Auto-duplex, Auto-speed, media type is 10/100/1000BaseTX
To recover a port that is in an Errdisable state, manual intervention is required, and the administrator must access the switch and configure the specific port with ‘shutdown‘ followed by the ‘no shutdown‘ command. This command sequence will enable the port again, however, if the problem persists expect to find the port in Errdisable state again soon.
Understanding and Configuring Errdisable AutoRecovery
As outlined above, there are a number of reasons a port can enter the Errdisable state. One common reason is the Port Security error, also used in our example below.
Of all the errors, Port Security is more a feature rather than an error. Port Security allows the restriction of MAC Addresses on an interface configured as a layer 2 port. This effectively prevents others connecting unwanted hubs or switches on the network. Port Security allows us to specify a single MAC Address to be connected to a specific port, thus restricting access to a specific computer.
In the case of a violation, Port Security will automatically disable the port. This is the behaviour of the default port security policy when enabling Port Security. Following is a configuration example of port security:
2960G(config)# interface GigabitEthernet0/48
2960G(config-if)# switchport access vlan 2
2960G(config-if)# switchport mode access
2960G(config-if)# switchport port-security
2960G(config-if)# spanning-tree portfast
Once a host is connected to the port, we can get more information on its port-security status and actions that will be taken when a violation occurs:
2960G# show port-security interface GigabitEthernet 0/48Note that the Violation Mode is set to Shutdown. This means that when a violation is detected, the switch will place gigabitethernet 0/48 in the err-disable shutdown state as shown below:
Port Security : Enabled
Port Status : Secure-up
Violation Mode : Shutdown
Aging Time : 0 mins
Aging Type : Absolute
SecureStatic Address Aging : Disabled
Maximum MAC Addresses : 1
Total MAC Addresses : 1
Configured MAC Addresses : 0
Sticky MAC Addresses : 0
Last Source Address:Vlan : 001b.54aa.c107
Security Violation Count : 0%PORT_SECURITY-2-PSECURE_VIOLATION: Security violation occurred, caused by MAC address 0031.f6ac.03f5 on port GigabitEthernet0/48
While it’s almost always necessary to know when a port security violation occurs there are some circumstances where autorecovery is a desirable feature, especially durng accidental violations.
The following commands enable the autorecovery feature 30 seconds after a port security violation:
2960G(config)# errdisable recovery cause psecure-violation2960G(config)# errdisable recovery interval 30
Determine the Reason for the Errdisabled State
To view the Errdisabled reasons, and see for which reason the autorecovery feature has been enabled, use the show Errdisable recovery command:2960G# show errdisable recovery
ErrDisable Reason    Timer Status
-----------------    --------------
udld                 Disabled
bpduguard            Disabled
security-violatio    Disabled
channel-misconfig    Disabled
vmps                 Disabled
pagp-flap            Disabled
dtp-flap             Disabled
link-flap            Disabled
psecure-violation          Enabled
sfp-config-mismat    Disabled
gbic-invalid         Disabled
dhcp-rate-limit      Disabled
unicast-flood        Disabled
storm-control        Disabled
loopback             Disabled
Timer interval: 30 seconds
Interfaces that will be enabled at the next timeout:
We have now confirmed that autorecovery is enabled for port-security violations. If it is required to enable the Errdisable autorecovery feature for all supported reasons, use the following command:2960G(config)# errdisable recovery cause all
To test our configuration we forced a port security violation, causing the switch to place the offending port in the shutdown state. Notice we’ve enabled autorecovery for all Errdisable reasons and the time left to enable the interfaces placed in shutdown state by the port security violation:
2960G# show errdisable recovery
ErrDisable Reason    Timer Status
-----------------    --------------
udld                 Enabled
bpduguard            Enabled
security-violatio    Enabled
channel-misconfig    Enabled
vmps                 Enabled
pagp-flap            Enabled
dtp-flap             Enabled
link-flap            Enabled
psecure-violation    Enabled
sfp-config-mismat    Enabled
gbic-invalid         Enabled
dhcp-rate-limit      Enabled
unicast-flood        Enabled
storm-control        Enabled
loopback             Enabled
Timer interval: 30 seconds
Interfaces that will be enabled at the next timeout:
Interface    Errdisable reason    Time left(sec)
---------    -----------------    --------------
Gi0/48        security-violatio         17
Seventeen seconds later, the switch automatically recovered from the port security violation and re-enabled the interface:
%PM-4-ERR_RECOVER: Attempting to recover from psecure-violation err-disable state on gigabitethernet0/48
18w4d: %LINK-3-UPDOWN: Interface GigabitEthernet0/48, changed state to up
18w4d: %LINEPROTO-5-UPDOWN: Line protocol on Interface GigabitEthernet0/48, changed state to up
Disabling The Errdisable Feature
There are cases where it might be necessary to disable the Errdisable mechanism for specific supported features in order to overcome constant interface shutdowns and auto recoveries. While the Catalyst IOS does not allow disabling all features we can still fine-tune the mechanism and selectively disable a few.
To view the Errdisable reasons monitored by the switch, use the show Errdisable detect command:
2960G# show errdisable detect
ErrDisable Reason Detection Mode
----------------- --------- ----
bpduguard Enabled port
channel-misconfig Enabled port
community-limit Enabled port
dhcp-rate-limit Enabled port
dtp-flap Enabled port
gbic-invalid Enabled portinline-power Enabled port
invalid-policy Enabled port
link-flap Enabled port
loopback Enabled port
lsgroup Enabled port
mac-limit Enabled port
pagp-flap Enabled portport-mode-failure Enabled port
psecure-violation Enabled port/vlan
security-violation Enabled portsfp-config-mismatch Enabled port
small-frame Enabled port
storm-control Enabled port
udld Enabled port
vmps Enabled port
As shown, the command lists all supported Errdisable reasons. For our example, let’s assume we want to disable the inline-power Errdisable feature.
To achieve this, we simply use the following command:
2960G(config)# no errdisable detect cause inline-power
And verify that Errdisable has been disabled for the feature:
2960G# show errdisable detectErrDisable Reason Detection Mode
----------------- --------- ----
bpduguard Enabled port
channel-misconfig Enabled port
community-limit Enabled port
dhcp-rate-limit Enabled port
dtp-flap Enabled port
gbic-invalid Enabled port
invalid-policy Enabled port
link-flap Enabled port
loopback Enabled port
lsgroup Enabled port
mac-limit Enabled port
pagp-flap Enabled portport-mode-failure Enabled port
psecure-violation Enabled port/vlan
security-violation Enabled portsfp-config-mismatch Enabled port
small-frame Enabled port
storm-control Enabled port
udld Enabled port
vmps Enabled port
Overall, the Errdisable feature is an extremely useful tool if configured and monitored correctly. Take the necessary time to play around with the supported options of your Cisco Catalyst switch and fine-tune it to suit your network needs.
Повторное включение портов, отключенных из-за ошибки
После устранения причины проблемы порты остаются отключенными, если на коммутаторе не настроено восстановление из состояния «errdisabled». В этом случае необходимо включить порты вручную. Выполните команду shutdown , а затем — команду интерфейсного режима no shutdown на соответствующем интерфейсе, чтобы вручную включить порты, если не поможет — команду reload для перезагрузки (иногда помогает)
Содержание
Введение
Предварительные условия
Требования
Используемые компоненты
Условные обозначения
Общие сведения
Платформы, на которых используется отключение из-за ошибки
Состояние «Errdisabled»
Назначение состояния «Errdisabled»
Причины возникновения состояния «Errdisabled»
Проверка нахождения портов в состоянии «Errdisabled»
Определение причины состояния «Errdisabled» (сообщения консоли, системный журнал и команда «show errdisable recovery»)
Восстановление порта из состояния отключения из-за ошибкиСвязанные обсуждения сообщества поддержки Cisco
Дополнительные сведения
Введение
В данном документе дается определение состояния отключения из-за ошибки, описывается восстановление из этого состояния и предоставляются примеры такого восстановления. В данном документе взаимозаменяемо используются термины «errdisabled» и «отключенный из-за ошибки». Зачастую клиенты обращаются в службу технической поддержки Cisco, когда замечают, что один или несколько портов коммутатора отключены из-за ошибки, т.е. данные порты находятся в состоянии «errdisabled». Такие клиенты хотят знать, почему произошло отключение из-за ошибки и как восстановить нормальное состояние портов.
Примечание: Состояние порта err-disabled отображается в выходных данных команды show interfaces interface_number status .
Предварительные условия
Требования
Для данного документа нет особых требований.
Используемые компоненты
Для воспроизведения примеров, приведенных в данном документе, необходимы два коммутатора серии Cisco Catalyst 4500/6500 (или эквивалентных) в лабораторной среде с настройками, сброшенными до заводских. На коммутаторах должно быть установлено ПО Cisco IOS®, и у каждого коммутатора должно быть по два порта Fast Ethernet, поддерживающих функции EtherChannel и PortFast.
Данные сведения были получены в результате тестирования приборов в специфической лабораторной среде. В качестве начальной конфигурации для всех описанных в документе устройств использовались стандартные (заводские) настройки. В условиях реально действующей сети при использовании каждой команды необходимо четко понимать, какие последствия может иметь применение той или иной команды.
Условные обозначения
Более подробные сведения о применяемых в документе обозначениях см. в документе Cisco Technical Tips Conventions (Условные обозначения, используемые в технической документации Cisco).
Общие сведения
Платформы, на которых используется отключение из-за ошибки
Функция отключения из-за ошибки поддерживается на следующих коммутаторах Catalyst:
-
коммутаторы Catalyst со следующим программным обеспечением Cisco IOS:
-
2900XL / 3500XL
-
2940 / 2950 / 2960 / 2970
-
3550 / 3560 / 3560-E / 3750 / 3750-E
-
4000 / 4500
-
6000 / 6500
-
-
коммутаторы Catalyst со следующим программным обеспечением Catalyst (CatOS):
-
2948G
-
4500 / 4000
-
5500 / 5000
-
6500 / 6000
-
Способ реализации функции отключения из-за ошибки зависит от программной платформы. В этом документе особое внимание уделяется функции отключения из-за ошибки на коммутаторах с программным обеспечением Cisco IOS.
Состояние «Errdisabled»
Назначение состояния «Errdisabled»
Если в конфигурации отображается порт, который должен быть включен, но программное обеспечение на коммутаторе обнаружило порт в состояние ошибки, то программное обеспечение отключит этот порт. Другими словами, порт автоматически отключается операционной системой коммутатора, так как порт обнаружен в состоянии ошибки.
Когда порт отключается из-за ошибки, он фактически выключается, а прием и отправка трафика через него не выполняются. Цвет индикатора порта становится оранжевым, а при выполнении команды show interfaces
отображается состояние порта err-disabled. Ниже приводится пример вывода данных о порте в состоянии error-disabled из интерфейса командной строки коммутатора:
cat6knative#show interfaces gigabitethernet 4/1 status

Port    Name       Status       Vlan       Duplex  Speed Type
Gi4/1              err-disabled 100          full   1000 1000BaseSX
Или, если данный интерфейс отключен из-за состояния ошибки, и в консоли, и в системном журнале можно увидеть сообщения, подобные следующим:
%SPANTREE-SP-2-BLOCK_BPDUGUARD:
   Received BPDU on port GigabitEthernet4/1 with BPDU Guard enabled. Disabling port.
%PM-SP-4-ERR_DISABLE:
   bpduguard error detected on Gi4/1, putting Gi4/1 in err-disable state
Сообщение данного примера отображается, когда порт хоста принимает блок BPDU. Фактический вид сообщения зависит от причины состояния ошибки.
Функция отключения из-за ошибки решает две задачи.
-
Она позволяет администраторам знать, когда и где возникла проблема с портом.
-
Она исключает возможность того, что данный порт может вызвать сбой других портов модуля (или всего модуля).
Такой сбой может произойти, когда «неисправный» порт монополизирует буферы или сообщения об ошибках порта монополизируют связи между процессами на плате, что может в итоге вызвать серьезные сетевые проблемы. Функция отключения из-за ошибки помогает предотвратить такие ситуации.
Причины возникновения состояния «Errdisabled»
Эта функция была первоначально реализована для обработки особых конфликтных ситуаций, когда коммутатор обнаруживал в порту избыточные или поздние конфликты. Избыточные конфликты возникают, когда кадр отбрасывается из-за обнаружения 16 конфликтов подряд. Поздние конфликты возникают, когда каждое из подключенных к линии устройств определило, что линия занята. Ниже перечислены некоторые возможные причины ошибок данных типов:
-
кабель, не соответствующий спецификациям (слишком длинный, неправильного типа или поврежденный);
-
неисправная сетевая интерфейсная плата (с физическими неполадками или проблемами драйверов);
-
неправильная конфигурация дуплексного режима порта.
Неправильная конфигурация дуплексного режима порта является распространенной причиной ошибок из-за невозможности правильного согласования скорости и дуплексного режима между двумя напрямую соединенными устройствами (например, сетевой адаптер, подключенный к коммутатору). Только у полудуплексных соединений могут возникать конфликты в ЛВС. Так как для Ethernet характерен множественный доступ с контролем несущей (CSMA), конфликты являются обычным явлением для полудуплексных соединений, пока они составляют малую часть трафика.
Интерфейс может перейти в состояние «errdisabled» по различным причинам. Среди таких причин могут быть следующие:
-
Несоответствие дуплексных режимов
-
неправильная конфигурация каналов портов
-
нарушение защиты BPDU
-
состояние обнаружения однонаправленной связи (UDLD)
-
обнаружение поздних конфликтов
-
обнаружение переброски канала
-
нарушение безопасности
-
переброска по протоколу агрегации портов (PAgP)
-
защита протокола туннелирования уровня 2 (L2TP)
-
ограничение скорости DHCP-отслеживания
-
неисправный модуль GBIC, подключаемый модуль малого форм-фактора (SFP) или кабель
-
проверка протокола ARP
-
встроенное питание
Примечание: По умолчанию для всех таких причин включено обнаружение отключения из-за ошибки. Чтобы отключить обнаружение отключения из-за ошибки, выполните команду no errdisable detect cause . Команда show errdisable detect отображает состояние обнаружения отключения из-за ошибки.
Проверка нахождения портов в состоянии «Errdisabled»
Чтобы определить, был ли порт отключен из-за ошибки, выполняется команда show interfaces .
Пример данных об активном порте:
cat6knative#show interfaces gigabitethernet 4/1 status
!--- Refer to show interfaces status for more information on the command.

Port    Name               Status       Vlan       Duplex  Speed Type
Gi4/1                      Connected    100          full   1000 1000BaseSX
Ниже приводится пример данных о том же порте в состоянии отключения из-за ошибки:
cat6knative#show interfaces gigabitethernet 4/1 status
!--- Refer to show interfaces status for more information on the command.

Port    Name               Status       Vlan       Duplex  Speed Type
Gi4/1                      err-disabled 100          full   1000 1000BaseSX
Примечание: Если порт отключен из-за ошибки, индикатор на передней панели, соответствующей данному порту, будет выключен.
Определение причины состояния «Errdisabled» (сообщения консоли, системный журнал и команда «show errdisable recovery»)
Когда коммутатор переводит порт в состояние отключения из-за ошибки, он отправляет консоли сообщение с описанием причины отключения порта. В данном разделе приведены два примера сообщений с причинами отключения портов.
-
В первом случае отключение вызвано функцией защиты PortFast BPDU.
-
Во втором случае отключение вызвано ошибкой в конфигурации EtherChannel.
Примечание: Эти сообщения можно также увидеть в системном журнале, если выполнить команду show log .
Вот примеры сообщений:
%SPANTREE-SP-2-BLOCK_BPDUGUARD:
   Received BPDU on port GigabitEthernet4/1 with BPDU Guard enabled. Disabling port.

%PM-SP-4-ERR_DISABLE:
   bpduguard error detected on Gi4/1, putting Gi4/1 in err-disable state

 %SPANTREE-2-CHNMISCFG: STP loop - channel 11/1-2 is disabled in vlan 1
Если выполнена команда errdisable recovery, можно определить причину состояния «errdisabled» с помощью команды
show errdisable recovery
. Ниже представлен пример:
cat6knative#show errdisable recovery
ErrDisable Reason    Timer Status
-----------------    --------------
udld                 Enabled
bpduguard            Enabled
security-violatio    Enabled
channel-misconfig    Enabled
pagp-flap            Enabled
dtp-flap             Enabled
link-flap            Enabled
l2ptguard            Enabled
psecure-violation    Enabled
gbic-invalid         Enabled
dhcp-rate-limit      Enabled
mac-limit            Enabled
unicast-flood        Enabled
arp-inspection       Enabled

Timer interval: 300 seconds

Interfaces that will be enabled at the next timeout:

Interface      Errdisable reason      Time left(sec)
---------    ---------------------    --------------
  Fa2/4                bpduguard          273
Восстановление порта из состояния отключения из-за ошибки
В этом разделе предоставляются примеры способов обнаружения портов, отключенных из-за ошибки, и их восстановления, а также краткое обсуждение некоторых дополнительных причин отключения портов из-за ошибки. Чтобы восстановить порт из состояния «errdisabled», сначала необходимо установить и устранить основную причину проблемы, а затем включить порт. Если включить порт, не устранив причину проблемы, он снова будет отключен из-за ошибки.
Исправление основной причины
После обнаружения причин отключения портов устраните основную причину проблемы. Устранение зависит от проблемы, вызвавшей состояние. Завершение работы может быть инициировано по самым разным причинам. В данном разделе обсуждаются некоторые из наиболее заметных и распространенных случаев.
-
Неверная конфигурация EtherChannel
Порты, задействованные в работе EtherChannel, должны обладать согласованными конфигурациями. У портов должны быть одинаковые сети VLAN, режим магистрали, скорость, дуплексный режим и т.д. Большинство отличий конфигураций в рамках одного коммутатора выявляются и заносятся в отчет при создании канала. Если на одной стороне коммутатор настроен для EtherChannel, а на другой — нет, процесс STP может отключить объединенные в канал порты на стороне, настроенной для поддержки режима EtherChannel. В режиме EtherChannel перед объединением портов в канал PAgP-пакеты не отправляются другой стороне для согласования; предполагается, что на другой стороне режим объединения в канал также поддерживается. Кроме того, в данном примере режим EtherChannel не включается на другом коммутаторе, однако соответствующие порты оставляются отдельными, не задействованными в каналах портами. Если оставить другой коммутатор в этом состоянии примерно на минуту, протокол STP коммутатора с включенным режимом EtherChannel считает, что образовалась петля. В результате объединенные в канал порты переводятся в состояние отключения из-за ошибки.
В данном примере обнаружена петля и отключены порты. В выходных данных команды show etherchannel summary указывается, что Number of channel-groups in use (Число используемых групп каналов) равно 0. Если обратить внимание на один из вовлеченных портов, можно заметить, что он находится в состоянии err-disabled:
%SPANTREE-2-CHNL_MISCFG: Detected loop due to etherchannel misconfiguration
of Gi4/1


cat6knative#show etherchannel summary
!--- Refer to show etherchannel for more information on the command.

Flags:  D - down        P - in port-channel
        I - stand-alone s - suspended
        H - Hot-standby (LACP only)
        R - Layer3      S - Layer2
        U - in use      f - failed to allocate aggregator

        u - unsuitable for bundling
Number of channel-groups in use: 0
Number of aggregators:           0

Group  Port-channel  Protocol    Ports
------+-------------+-----------+-----------------------------------------------
Режим EtherChannel отключен, так как на данном коммутаторе порты были переведены в состояние «errdisable».
cat6knative#show interfaces gigabitethernet 4/1 status

Port    Name               Status       Vlan       Duplex  Speed Type
Gi4/1                      err-disabled 100          full   1000 1000BaseSX
Чтобы определить характер проблемы, см. соответствующее сообщение об ошибке. В сообщении указывается, что функция EtherChannel обнаружила петлю в дереве STP. В этом разделе описывается возникновение данной проблемы, когда на одном устройстве (в этом случае коммутатор) канал EtherChannel вручную переведен в режим «Включено» (в противоположность режиму согласования), а на другом подключенном устройстве (в этом случае другой коммутатор) канал EtherChannel вообще не включен. Один из способов разрешения этой ситуации заключается в переводе режима канала в состояние «desirable» на обеих сторонах соединения с последующим повторным включением портов. В результате обе стороны формируют канал только после взаимного согласования. Если создание канала не согласовано, обе стороны продолжают функционировать как обычные порты.
cat6knative(config-terminal)#interface gigabitethernet 4/1
cat6knative(config-if)#channel-group 3 mode desirable non-silent
-
Несоответствие дуплексных режимов
Несоответствие дуплексных режимов встречается довольно часто из-за неудачного автоматического согласования скорости и дуплексного режима. В отличие от полудуплексного устройства, которому приходится дожидаться освобождения своего сегмента ЛВС другими передающими устройствами, дуплексное устройство при необходимости выполняет передачу независимо от других устройств. Если эта передача выполняется одновременно с передачей полудуплексного устройства, данное устройство будет рассматривать это как конфликт (в течение данного временного интервала) или как поздний конфликт (по истечении данного временного интервала). Так как дуплексное устройство никогда не ожидает конфликтов, на этой стороне никогда не допускается необходимость повторной передачи отброшенных пакетов. Низкий процент конфликтов характерен для полудуплексного режима, но не для дуплексного. Регистрация на порте коммутатора слишком большого количества конфликтов обычно указывает на несоответствие дуплексных режимов. Убедитесь, что на обеих сторонах кабеля порты настроены на одинаковые скорость и дуплексный режим. Команда show interfaces interface_number
предоставляет данные о скорости и дуплексном режиме портов коммутатора Catalyst. Более поздние версии протокола обнаружения Cisco (CDP) могут предупреждать о несоответствии дуплексных режимов перед переводом порта в состояние отключения из-за ошибки.Кроме того, в сетевом адаптере есть настройки, такие как автополярность, которые могут вызвать данную проблему. В случае сомнений отключите такие настройки. Если есть несколько сетевых адаптеров одного производителя и на всех таких сетевых адаптерах проявляется та же проблема, посетите веб-узел производителя, чтобы прочитать заметки о выпуске и получить драйверы последних версий.
Ниже перечислены другие возможные причины поздних конфликтов:
-
неисправный сетевой адаптер (с физическими неполадками, а не просто с ошибками конфигурации);
-
неисправный кабель
-
слишком длинный сегмент кабеля
-
-
защита портов BPDU
В режиме PortFast порт должен подключаться только к конечной станции (рабочей станции или серверу), а не к устройствам, генерирующим BPDU-блоки дерева STP, таким как коммутаторы, мосты или маршрутизаторы, формирующие мостовые соединения. При приеме BPDU-блока дерева STP через порт с включенной STP-функцией PortFast и защитой от пакетов BPDU дерева STP коммутатор переводит порт в состояние «err-disable», чтобы защитить сеть от возможного возникновения петель. Функция PortFast предполагает, что порт коммутатора не может сформировать физическую петлю. Поэтому PortFast пропускает первоначальные проверки протокола STP для данного порта, чтобы избежать тайм-аута конечных станций при загрузке. Сетевые администраторы должны тщательно реализовывать функцию PortFast. На портах с включенной функцией PortFast защита BPDU препятствует образованию петель в ЛВС.
В следующем примере показано, как включить эту функцию. Этот пример выбран из-за простоты создания ситуации отключения из-за ошибки в данном случае:
cat6knative(config-if)#spanning-tree bpduguard enable
!--- Refer to spanning-tree bpduguard for more information on the command.
В этом примере коммутатор Catalyst 6509 подключен к другому коммутатору (серии 6509). Коммутатор Catalyst 6500 отправляет блоки BPDU каждые 2 секунды (при использовании настроек STP по умолчанию). При включении режима PortFast для порта коммутатора 6509 функция защиты BPDU отслеживает поступающие в этот порт блоки BPDU. Поступление блока BPDU в порт означает, что устройство не является конечным. В этом случае функция защиты BPDU отключает данный порт во избежание возможного образования петли в дереве STP.
cat6knative(config-if)#spanning-tree portfast enable
!--- Refer to spanning-tree portfast (interface configuration mode)
!--- for more information on the command.


Warning: Spantree port fast start should only be enabled on ports connected
to a single host.  Connecting hubs, concentrators, switches, bridges, etc. to
a fast start port can cause temporary spanning tree loops.

%PM-SP-4-ERR_DISABLE: bpduguard error detected on Gi4/1, putting Gi4/1 in
err-disable state.
В этом сообщении коммутатор сообщает о поступлении блока BPDU в порт с поддержкой PortFast, из-за чего коммутатор отключает порт Gi4/1.
cat6knative#show interfaces gigabitethernet 4/1 status

Port    Name               Status       Vlan       Duplex  Speed Type
Gi4/1                      err-disabled 100          full   1000 1000BaseSX
Функцию PortFast необходимо отключить, так как данный порт является портом с непригодным соединением. Соединение является непригодным, так как включена функция PortFast, а коммутатор подключается к другому коммутатору. Необходимо помнить, что функция PortFast используется только на портах, подключенных к конечным станциям.
cat6knative(config-if)#spanning-tree portfast disable
-
UDLD
Протокол обнаружения однонаправленной связи (UDLD) позволяет устройствам, подключенным с помощью оптоволоконных или медных кабелей Ethernet (например кабелей категории 5), отслеживать физическую конфигурацию кабелей и обнаруживать появление однонаправленных соединений. При обнаружении однонаправленного соединения протокол UDLD отключает соответствующий порт и создает сообщение предупреждения для пользователя. Однонаправленные соединения могут вызвать множество проблем, включая петли в топологии STP.
Примечание: Работа UDLD основана на обмене пакетами протокола между соседними устройствами. Устройства на обеих сторонах соединения должны поддерживать протокол UDLD. Этот же протокол должен поддерживаться на соответствующих портах. Если UDLD включен только на одном порте, на этом конце соединения может быть настроен переход UDLD в состояние «err-disable».
Каждый порт коммутатора, настроенный на UDLD, отправляет пакеты протокола UDLD, в которых указывается устройство порта (или идентификатор порта) и соседнее устройство (или идентификаторы портов), которые видны UDLD на данном порте. В полученных с другой стороны пакетах соседние порты должны видеть свои собственные устройство или идентификатор порта (эхо). Если порт не видит собственного устройства или идентификатора порта во входящих UDLD-пакетах в течение заданного времени, такое соединение считается однонаправленным. В результате соответствующий порт отключается, а в консоли печатается сообщение примерно такого содержания:
PM-SP-4-ERR_DISABLE: udld error detected on Gi4/1, putting Gi4/1 in
err-disable state.
Дополнительные сведения о работе, конфигурации и командах протокола обнаружения однонаправленной связи (UDLD) см. в документе Настройка обнаружения однонаправленной связи (UDLD).
-
Ошибка неустойчивости соединения (link-flap)
Неустойчивость соединения означает постоянное подключение и отключение интерфейса. Если число таких ошибок за 10 секунд больше пяти, интерфейс переводится в состояние «err-disable». Распространенной причиной неустойчивости соединения являются проблемы первого уровня (L1), такие как неисправность кабеля, несоответствие дуплексных режимов или неисправная плата GBIC. Просмотрите сообщения консоли или сообщения, отправленные на сервер системного журнала, в которых сообщается причина отключения портов.
%PM-4-ERR_DISABLE: link-flap error detected on Gi4/1, putting Gi4/
1 in err-disable state
Чтобы просмотреть данные об ошибках неустойчивости соединения, выполните следующую команду:
cat6knative#show errdisable flap-values !--- Refer to show errdisable flap-values for more information on the command. ErrDisable Reason Flaps Time (sec) ----------------- ------ ---------- pagp-flap 3 30 dtp-flap 3 30 link-flap 5 10 -
Ошибка обратной петли (loopback)
Ошибка обратной петли возникает, когда пакет запроса keepalive возвращается обратно к отправившему его порту. По умолчанию коммутатор отправляет запросы keepalive всем интерфейсам. Устройство может отправлять пакеты обратно исходному интерфейсу по петле, которая обычно возникает из-за наличия в сети логической петли, не заблокированной протоколом STP. Исходный интерфейс принимает отправленный им пакет сообщения keepalive, а коммутатор отключает данный интерфейс (errdisable). Когда пакет keepalive возвращается обратно к отправившему его порту, появляется следующее сообщение:
%PM-4-ERR_DISABLE: loopback error detected on Gi4/1, putting Gi4/1 in
err-disable state
По умолчанию в ПО на базе Cisco IOS версии 12.1EA сообщения keepalive отправляются всеми интерфейсами. В программном обеспечении на базе Cisco IOS 12.2SE или более поздней версии сообщения keepalive по умолчанию не отправляются оптоволоконными и восходящими интерфейсами. Дополнительные сведения см. в описании ошибки с идентификатором CSCea46385
(registered customers only)
.Предлагаемый обходной путь заключается в отключении запросов keepalive и обновлении до ПО Cisco IOS 12.2SE или более поздней версии.
-
Нарушение защиты порта
Защиту порта можно использовать вместе со статическими и динамически получаемыми MAC-адресами, чтобы ограничить входящий трафик порта. Чтобы ограничить трафик, можно ограничить MAC-адреса, которым разрешено отправлять трафик данному порту. Чтобы настроить порт коммутатора на отключение из-за ошибки при нарушении безопасности, выполните следующую команду:
cat6knative(config-if)#switchport port-security violation shutdown
Нарушение безопасности происходит в следующих двух ситуациях:
-
Когда на защищенном порте число защищенных MAC-адресов достигло максимума, а исходный MAC-адрес входящего трафика не совпадает ни с одним из идентифицированных защищенных MAC-адресов.
В этом случае защитой порта применяется настроенный режим нарушения.
-
Если трафик с защищенным MAC-адресом, настроенный или полученный на одном защищенном порте, пытается получить доступ к другому защищенному порту в той же сети VLAN.
В этом случае защита порта применяет режим нарушения завершения работы.
Дополнительные сведения о защите порта см. в документе Настройка защиты порта.
-
-
Защита L2pt
Когда блоки PDU уровня 2 входят в туннель или порт доступа на входящем пограничном коммутаторе, коммутатор заменяет пользовательский MAC-адрес PDU-назначения хорошо известным проприетарным адресом многоадресной рассылки Cisco: 01-00-0c-cd-cd-d0. Если включено туннелирование 802.1Q, пакеты также помечаются двумя тегами. Внешний тег является пользовательским тегом муниципальной сети, а внутренний тег — пользовательским тегом сети VLAN. Основные коммутаторы игнорируют внутренние теги и пересылают пакет всем магистральным портам в одной муниципальной сети VLAN. Пограничные коммутаторы на исходящей стороне восстанавливают данные о необходимом протоколе уровня 2 и MAC-адресе и пересылают пакеты всем туннельным портам или портам доступа внутри одной муниципальной сети VLAN. Поэтому блоки PDU уровня 2 сохраняются неизмененными и через инфраструктуру сервис-провайдера доставляются на другую сторону сети заказчика.
Switch(config)#interface gigabitethernet 0/7
l2protocol-tunnel {cdp | vtp | stp}
Интерфейс переходит в состояние отключения из-за ошибки. Если инкапсулированный блок PDU (с собственным MAC-адресом назначения) получен из туннельного порта или порта доступа с включенным туннелированием уровня 2, туннельный порт отключается, чтобы предотвратить появление петель. Этот порт также отключается, когда достигается пороговое значение завершения работы для данного протокола. Порт можно снова включить вручную (выполнив последовательность команд shutdown, no shutdown
), или если включено восстановление из состояния «errdisabled», данная операция повторяется через указанный интервал времени.Интерфейс можно восстановить из состояния «errdisabled» включив порт с помощью команды errdisable recovery cause l2ptguard. Эта команда используется для настройки механизма восстановления после ошибки «максимальной скорости» уровня 2, чтобы интерфейс можно было вывести из отключенного состояния и попытаться снова использовать. Можно также задать временной интервал. Восстановление из состояния «errdisabled» по умолчанию отключено; при включении временной интервал по умолчанию равен 300 секундам.
-
Неисправный SFP-кабель
Порты переходят в состояние «errdisabled» с сообщением об ошибке %PHY-4-SFP_NOT_SUPPORTED при подключении коммутаторов Catalyst 3560 и Catalyst 3750 с помощью соединительного SFP-кабеля.
Соединительный SFP-кабель для коммутаторов Cisco Catalyst 3560 (CAB-SFP-50CM=) является бюджетным решением для соединений Gigabit Ethernet типа «точка-точка» между коммутаторами серии Catalyst 3560. 50-сантиметровый кабель является альтернативой использованию трансивера SFP при соединении коммутаторов серии Catalyst 3560 через SFP-порты на небольших расстояниях. Все коммутаторы серии Cisco Catalyst 3560 поддерживают соединительные SFP-кабели.
При подключении коммутатора Catalyst 3560 к коммутатору Catalyst 3750 или любой другой модели коммутатора Catalyst нельзя использовать кабель CAB-SFP-50CM=. Два коммутатора можно соединить с помощью медного кабеля с SFP (GLC-T) на обоих устройствах вместо кабеля CAB-SFP-50CM=.
Повторное включение портов, отключенных из-за ошибки
После устранения причины проблемы порты остаются отключенными, если на коммутаторе не настроено восстановление из состояния «errdisabled». В этом случае необходимо включить порты вручную. Выполните команду shutdown
, а затем — команду интерфейсного режима no shutdown на соответствующем интерфейсе, чтобы вручную включить порты.
Команда errdisable recovery позволяет выбрать тип ошибок, после которых порты снова автоматически включаются через указанный промежуток времени. Команда show errdisable recovery показывает состояние по умолчанию после восстановления из состояния отключения из-за ошибки для всех возможных условий.
cat6knative#show errdisable recovery
ErrDisable Reason    Timer Status
-----------------    --------------
udld                 Disabled
bpduguard            Disabled
security-violatio    Disabled
channel-misconfig    Disabled
pagp-flap            Disabled
dtp-flap             Disabled
link-flap            Disabled
l2ptguard            Disabled
psecure-violation    Disabled
gbic-invalid         Disabled
dhcp-rate-limit      Disabled
mac-limit            Disabled
unicast-flood        Disabled
arp-inspection       Disabled

Timer interval: 300 seconds

Interfaces that will be enabled at the next timeout:
Примечание: Стандартный интервал тайм-аута равен 300 секундам, и по умолчанию он отключен.
Чтобы включить errdisable recovery и выбрать состояния отключения из-за ошибки, выполните следующую команду:
cat6knative#errdisable recovery cause ?
  all                 Enable timer to recover from all causes
  arp-inspection      Enable timer to recover from arp inspection error disable
                      state
  bpduguard           Enable timer to recover from BPDU Guard error disable
                      state
  channel-misconfig   Enable timer to recover from channel misconfig disable
                      state
  dhcp-rate-limit     Enable timer to recover from dhcp-rate-limit error
                      disable state
  dtp-flap            Enable timer to recover from dtp-flap error disable state
  gbic-invalid        Enable timer to recover from invalid GBIC error disable
                      state
  l2ptguard           Enable timer to recover from l2protocol-tunnel error
                      disable state
  link-flap           Enable timer to recover from link-flap error disable
                      state
  mac-limit           Enable timer to recover from mac limit disable state
  pagp-flap           Enable timer to recover from pagp-flap error disable
                      state
  psecure-violation   Enable timer to recover from psecure violation disable
                      state
  security-violation  Enable timer to recover from 802.1x violation disable
                      state
  udld                Enable timer to recover from udld error disable state
  unicast-flood       Enable timer to recover from unicast flood disable state
В этом примере показано, как разрешить условие восстановления из состояния «errdisabled» при включенной защите BPDU:
cat6knative(Config)#errdisable recovery cause bpduguard
Полезное свойство этой команды состоит в том, что при включении восстановления из состояния «errdisabled», команда выдает список общих причин перевода портов в состояние отключения из-за ошибки. В следующем примере обратите внимание на то, что функция защиты BPDU была причиной отключения порта 2/4:
cat6knative#show errdisable recovery
ErrDisable Reason    Timer Status
-----------------    --------------
udld                 Disabled
bpduguard            Enabled
security-violatio    Disabled
channel-misconfig    Disabled
pagp-flap            Disabled
dtp-flap             Disabled
link-flap            Disabled
l2ptguard            Disabled
psecure-violation    Disabled
gbic-invalid         Disabled
dhcp-rate-limit      Disabled
mac-limit            Disabled
unicast-flood        Disabled
arp-inspection       Disabled

Timer interval: 300 seconds

Interfaces that will be enabled at the next timeout:

Interface      Errdisable reason      Time left(sec)
---------    ---------------------    --------------
  Fa2/4                bpduguard          290
Если разрешено любое из условий восстановления из состояния «errdisabled», порты с таким условием снова включаются через 300 секунд. Это значение по умолчанию (300 секунд) можно изменить, выполнив следующую команду:
cat6knative(Config)#errdisable recovery interval timer_interval_in_seconds
В следующем примере длительность интервала восстановления из состояния «errdisabled» изменяется с 300 на 400 секунд:
cat6knative(Config)#errdisable recovery interval 400
Проверка
-
show version— отображение версии программного обеспечения, используемого на данном коммутаторе.
-
show interfaces interface interface_number status— отображение текущего состояния порта коммутатора.
-
show errdisable detect— отображение текущих настроек функции тайм-аута состояния «err-disable» и, если в данный момент есть порты, отключенные из-за ошибки, причины их отключения.
Устранение неполадок
-
show interfaces status err-disabled— отображение локальных портов в состоянии отключения из-за ошибки.
-
show etherchannel summary— отображение текущего состояния EtherChannel.
-
show errdisable recovery— отображение периода времени, по истечении которого интерфейсы восстанавливаются из состояния «errdisabled».
-
show errdisable detect— отображение причины состояния «err-disable».
Дополнительные сведения об устранении неполадок с портами коммутаторов см. в документе Устранение интерфейсных проблем и неполадок портов коммутатора.
http://www.cisco.com/cisco/web/support/RU/10/105/105416_errdisable_recovery.html
Содержание
Введение
Предварительные условия
Требования
Используемые компоненты
Функция errDisable
Платформы, использующие функцию errDisable
Назначение errDisable
Причины errDisable
Восстановление из errDisable
Расширения errDisableВведение
Зачастую клиенты обращаются в службу технической поддержки Cisco, когда замечают, что один или несколько портов коммутатора отключены из-за ошибки, т.е. данные порты находятся в состоянии «errdisabled». Они не знают, почему это произошло и как можно восстановить нормальную работу портов. В этом документе описано, что такое состояние errDisable, как восстановить работу после такого отказа, и приводятся два примера восстановления. Внутри этого документа термины errDisable и error-disable обозначают одно и то же. (errDisable – статус порта, отображаемый командой show port, error-disable или error-disabled – это эквиваленты errDisable)
Предварительные условия
Требования
Для данного документа нет особых требований.
Используемые компоненты
Сведения, содержащиеся в данном документе, касаются следующих версий программного и аппаратного обеспечения. Это необходимо для создания примеров из этого документа:
Два коммутатора семейства Catalyst 4000/5000/6000 (или подобные им) без настройки конфигурации для работы в лабораторных условиях. Основной компьютер — Catalyst 5500, работающий с CatOS 5.4(2). Данное устройство должно быть подключено к коммутатору Catalyst 6509 под управлением 5.3(5a)CSX (также можно использовать любое устройство под управлением CatOS с поддержкой функций Ethernet-канала и PortFast).
Два перекрестных кабеля Ethernet с разъемом RJ-45.
CatOS 5.4(x) как минимум на одном коммутаторе.
Два порта FastEthernet в каждом коммутаторе поддерживают EtherChannel и portfast.
Терминальное подключение к одному или обоим коммутаторам.
Сведения, рассматриваемые в этом документе, получены в условиях изолированной лабораторной среды. Перед использованием любой из команд необходимо изучить ее потенциальное воздействие на сеть. На коммутаторе была введена команда clear config all для установки конфигурации по умолчанию. Если требуется воспроизвести ошибки для изучения их последствий, следует выполнять эту работу только в изолированной среде, чтобы не повлиять на реально используемую сеть. Приведенные ниже примеры даны лишь в качестве обучающих материалов. Выходные данные некоторых команд были сокращены, если они не интересны для обсуждения.
Данные, содержащиеся в документе, получены в специально созданных лабораторных условиях. Все устройства, описанные в данном документе, обладают ненастроенной (заданной по умолчанию) конфигурацией. При работе в действующей сети необходимо изучить все возможные последствия каждой команды.
errDisable
Платформы, использующие функцию errDisable
Функция errDisable поддерживается коммутаторами Catalyst под управлением CatOS (Catalyst 2948G, 4500/4000, 5500/5000 & 6500/6000), а также коммутаторами Catalyst под управлением Cisco IOS (Catalyst 2900XL/3500XL, 2950, 2970, 3550, 4500 & 65000). Способ реализации функции errDisable зависит от программного обеспечения. В данной статье акцент делается на функции отключения в результате ошибок у коммутаторов с программным обеспечением CatOS.
Назначение errDisable
Функция errDisable впервые была реализована в операционной системе CatOS версии 3.2(2). Если в настройках коммутатора показано, что порт должен быть во включенном состоянии, но легальное ПО коммутатора выявило на порте ситуацию, связанную с появлением ошибки, то в таком случае ПО коммутатора отключит данный порт. Т.е. порт был автоматически отключен программным обеспечением коммутатора, так как на порту было обнаружено состояние ошибки.
Когда порт отключается по причине ошибки, то отправка и прием трафика на нем не выполняются. Светодиод порта горит оранжевым цветом, при вводе команды show port статус порта меняется на errdisable. Далее приведен пример данных о порте в состоянии error-disabled, полученных через командную строку:
Cat5500> (enable) show port 11/1
Port  Name               Status     Vlan       Level  Duplex Speed Type
----- ------------------ ---------- ---------- ------ ------ ----- ------------
11/1  		          errdisable   1 normal   auto  auto 10/100BaseTX
Функция отключения ошибок предназначена для двух целей. Во-первых, проинформируйте администратора о том, где и когда возникла проблема порта. Во-вторых, она устраняет возможность вызова данным портом сбоев в других портах модуля (или сбоя всего модуля) из-за монополизации буферов неисправным портом, сообщения об ошибках порта активно занимают межпроцессные взаимодействия в плате, даже если это приводит к серьезным проблемам сети. Функция отключения в результате ошибки дает возможность предотвратить вышеуказанные ситуации.
Причины errDisable
Сначала данная функция предназначалась для решения проблемных ситуаций, когда коммутатор выявлял в порту поздние либо избыточные коллизии. Избыточные коллизии происходят, после того, как кадр отбрасывается из-за 16 коллизий подряд. Поздние конфликты появляются, когда все устройства, подключенные к линии определили, что она занята. Ошибки этих типов могут быть вызваны параметрами кабеля, отличающимися от указанных в спецификации (слишком длинный, неверного типа, неисправный), или плохой картой сетевого интерфейса (NIC) (с физическими проблемами или с проблемами в драйвере), или неверной конфигурацией дуплексного соединения портов. Эта последняя причина широко распространена из-за сбоев в согласовании скорости и параметров дуплексной передачи между двумя непосредственно связанными устройствами (такими как сетевая интерфейсная карта, подключенная к коммутатору). Только у соединений, работающих в полудуплексном режиме могут происходить коллизии в LAN. Т.к. для технологии Ethernet характерен CSMA (множественный доступ с контролем несущей), для полудуплексных соединений коллизии являются рядовым явлением до тех пор пока на них приходится малая часть трафика.
Т. к. возможности CatOS расширились, появилось множество других причин возможных отключений портов Например, на Catalyst 6500 под управлением CatOS функция Errdisable поддерживается для следующих ошибок соединения:
Проверка ARP
Подавление широковещания
Защита портов BPDU
Неверная конфигурация канала
Перекрестный сбой
Несоответствие дуплексных режимов
Неверная конфигурация туннеля протокола уровня 2
Неверная конфигурация туннеля протокола уровня 2
UDLD
Функция error-disable позволяет коммутатору отключать порт в подобных ситуациях. Следует помнить, что отключение порта из-за ошибки не является причиной аварийного сигнала тревоги до тех пор, пока не будут определены и устранены основные причины ошибок. Отключенный в результате ошибки порт – симптом более серьезной проблемы, которую необходимо решить.
Восстановление из errDisable
Для выхода из состояния errDisable необходимо выполнить два действия:
Определите и устраните причину, по которой порты перешли в состояние «error-disabled» (кабель, NIC, EtherChannel и так далее).
Если вы не идентифицируете и не устраните основную проблему, вызвавшую отключение портов, то порты будут снова заблокированы при повторном ее возникновении. Некоторые ошибки могут происходить довольно часто (например, ошибка, обнаруживаемая защитой порта BPDU, может происходить каждые две секунды). При попытке повторного включения портов без исправления причины проблемы они снова будут выключены из-за ошибки.
Включите порт повторно.
Порты не будут включены снова даже при устранении источника проблемы. После устранения источника проблемы порты продолжают оставаться в отключенном состоянии (и светодиоды порта горят оранжевым цветом). Необходимо их включить повторно, прежде чем они станут активными. Раньше единственным способом отмены запрета порта был ручной ввод команды set port enable для соответствующих портов. Со временем появились дополнительные расширения, добавленные в функцию error-disable, сделавшие ее автоматической и более гибкой.
Примечание. Отключенные из-за ошибки порты — не единственная причина того, что индикатор порта горит оранжевым цветом. Это только одна из причин. Поэтому целесообразно проверять статус порта с помощью команды show port. Если ваша организация пользуется ИТ аутсорсингом сетевого оборудования, то лучше передать данную задачу профессиональным инженерам.
Расширения к errDisable
Set Option Errport – CatOS 4.2(2)
Некоторые пользователи хотят иметь возможность определять, следует ли отключить порт из-за особых конфликтных ситуаций, выявленных CatOS. Существовало несколько ситуаций, когда это требовалось — например, если соединение было магистральным, в котором отключение портов фактически хуже, чем обнаружение в них ошибок, то предпочтительнее оставить такие порты в рабочем состоянии до обнаружения причины проблемы, чем отключить их. Таким образом, в версии 4.2(2) к CatOS была добавлена новая команда set option errport, позволяющая администратору определить, какую процедуру выполнил маршрутизатор после обнаружения порта, имеющего данные конкретные конфликты. Исходным состоянием и состоянием по умолчанию является set option errport disable, в котором коммутатор переведет порт в состояние error-disabled при обнаружении специальных ошибок коллизий типа error-disable. Иначе, в случае использования команды set option errport enable, коммутатор оставит порты включенными даже в случае возникновения ошибок коллизий, которые обычно приводят к отключению этих портов.
Эта команда влияет на коммутатор глобально; она не может быть выполнена отдельным портом. Она не указана в справочнике по командам, но содержится в заметках о выпуске для 4.2(2). Обратите внимание, что данная команда представляет собой интуитивно-понятный счетчик, который должен активировать функцию errport для отключения функции err-disable (включенную по умолчанию). Имейте ввиду, чтобы избежать отключения порта в результате ошибки, просто задайте команду set option errport enable.
Использование команды set option errport рекомендуется только при условии полного осознания того, что это может повлиять на другие порты на модуле, если состояние, в котором произошла ошибка, будет продолжаться. Это только временная мера, а не «устранение» проблемы. Она только предотвращает отключение портов при обнаружении в них ошибки, до выяснения истинной причины проблемы. Используйте с осторожностью.
Задание errdisable-timeout — CatOS 5.4(1)
В версии CatOS 5.4(1) введена новая команда set errdisable-timeout. Эта команда является более усовершенствованной версией команды set option errport, рассмотренной ранее. Эта команда автоматически включает отключенный из-за ошибки (error-disabled) порт после того, как истечет настраиваемое количество времени (от 30 с до 24 ч, указанное в секундах). Она позволяет избежать необходимости включать такой порт вручную.
Эта команда влияет на все порты, включенные на коммутаторе текущей конфигурацией, но переведенные в состояние отключения в результате ошибки программным обеспечением CatOS. Использование команды show errdisable-timeout позволяет посмотреть текущий статус функции errdisable-timeout. Можно определить пять отдельных областей, в которых возможно включение данной функции: защита BPDU, неправильная настройка канала, несовпадение дуплексных режимов (со специальными ошибками коллизий, описанными выше), UDLD и другие. Таким образом может быть обеспечена постоянная защита от состояний error-disable в областях, где это необходимо. Это позволит выбирать области, в которых предпочтительнее оставлять порты работающими до устранения неполадок.
В программном обеспечении версии 5.2.1 и 5.2.2 для Catalyst 6000 есть дефект, который приводит к отключению сети, когда порт изменяет состояние на error-disabled. Если порт переходит в режим errDisable, коммутатор провоцирует случайную пересылку известного MAC-адреса на ошибочно отключенный порт. Это вызовет сбои в соответствующей сети VLAN. Это дефект ПО имеет идентификатор ошибки Cisco CSCdm48887. Проблема разрешена в ПО версий 5.2.3 и более поздних.
Краткосрочное обходное решение для предотвращения этой проблемы:
Введите команду set option errport, чтобы отключить функцию error-disabled.
Включите снова все отключенные из-за ошибки порты, используя команду set port speed mod_num/port_num.
Пример: set port enable 3/1
Очистите таблицу MAC-адресов с помощью команды clear cam dynamic для восстановления динамически полученных MAC-адресов.
Часть 2 Часть 3
=====Verify port status:
show int status
show interfaces Gi1/0/1 status
Cisco-2960X#sh int status

Port      Name               Status       Vlan       Duplex  Speed Type
Gi1/0/1   HP_C7K             err-disabled 20           auto   auto 10/100/1000BaseTX
Gi1/0/2   HP_C7K             connected    20         a-full a-1000 10/100/1000BaseTX
Gi1/0/3   HP_C7K             notconnect   20           auto   auto 10/100/1000BaseTX
Gi1/0/4   HP_C7K             notconnect   20           auto   auto 10/100/1000BaseTX
Gi1/0/5   HP_C7K             connected    20         a-full a-1000 10/100/1000BaseTX
Gi1/0/6   HP_C7K             connected    20         a-full a-1000 10/100/1000BaseTX
Gi1/0/7   HP_C7K             notconnect   20           auto   auto 10/100/1000BaseTX
Gi1/0/8   HP_C7K             connected    20         a-full a-1000 10/100/1000BaseTX
Gi1/0/9   HP_C7K             notconnect   20           auto   auto 10/100/1000BaseTX
Gi1/0/10  HP_C7K             notconnect   20           auto   auto 10/100/1000BaseTX
Cisco-2960X#show interfaces Gi1/0/1 status

Port      Name               Status       Vlan       Duplex  Speed Type
Gi1/0/1  HP_C7K              err-disabled 20         auto   auto 10/100/1000BaseTX
=====Check to see if errdisable recovery is turned on
Cisco-2960X#show errdisable recovery

ErrDisable Reason            Timer Status
-----------------            --------------
arp-inspection               Disabled
bpduguard                    Disabled
channel-misconfig (STP)      Disabled
dhcp-rate-limit              Disabled
tp-flap                      Disabled
gbic-invalid                 Disabled
inline-power                 Disabled
link-flap                    Disabled
mac-limit                    Disabled
loopback                     Disabled
pagp-flap                    Disabled
port-mode-failure            Disabled
pppoe-ia-rate-limit          Disabled
psecure-violation            Disabled
security-violation           Disabled
sfp-config-mismatch          Disabled
small-frame                  Disabled
storm-control                Disabled
udld                         Disabled
vmps                         Disabled
psp                          Disabled
dual-active-recovery         Disabled
evc-lite input mapping fa    Disabled
Recovery command: clear      Disabled

Timer interval: 300 seconds

Interfaces that will be enabled at the next timeout:
=====To enable auto recovery:
I’m not recommending this because you should figure out WHY the port is going into an error disabled state and fix it. But if you just want the port to auto-recover from that state, you can set it.
For this example I’m using loopback.
errdisable recovery cause loopback
errdisable recovery interval 30                   [interval is in seconds]
So basically what the above is doing, when the port goes into a error-disabled state caused by loopback, recover from that state in 30 seconds. It’s just like you going in there and doing a shut/no shut on the port.
Verify it’s enabled:
Cisco-2960X#show errdisable recovery

ErrDisable Reason            Timer Status
-----------------            --------------
arp-inspection               Disabled
bpduguard                    Disabled
channel-misconfig (STP)      Disabled
dhcp-rate-limit              Disabled
dtp-flap                     Disabled
gbic-invalid                 Disabled
inline-power                 Disabled
link-flap                    Disabled
mac-limit                    Disabled
loopback                     Enabled
pagp-flap                    Disabled
port-mode-failure            Disabled
pppoe-ia-rate-limit          Disabled
psecure-violation            Disabled
security-violation           Disabled
sfp-config-mismatch          Disabled
small-frame                  Disabled
storm-control                Disabled
udld                         Disabled
vmps                         Disabled
psp                          Disabled
dual-active-recovery         Disabled
evc-lite input mapping fa    Disabled
Recovery command: clear      Disabled

Timer interval: 30 seconds

Interfaces that will be enabled at the next timeout:
=====Reasons why this happens:
There are various reasons for the interface to go into errdisable. The reason can be:
-Duplex mismatch
-Port channel misconfiguration
-BPDU guard violation
-UniDirectional Link Detection (UDLD) condition
-Late-collision detection
-Link-flap detection
-Security violation
-Port Aggregation Protocol (PAgP) flap
-Layer 2 Tunneling Protocol (L2TP) guard
-DHCP snooping rate-limit
-Incorrect GBIC / Small Form-Factor Pluggable (SFP) module or cable
-Address Resolution Protocol (ARP) inspection
-Inline power
=====To see why it happened:
1. show logging command
Cisco-2960X#sh logging

May 2 14:01:17.223 Tampa: %ETHCNTR-3-LOOP_BACK_DETECTED: Loop-back detected on GigabitEthernet0/20.
May 2 14:01:17.223 Tampa: %PM-4-ERR_DISABLE: loopback error detected on Gi0/2, putting Gi0/20 in err-disable state
May 2 14:01:18.229 Tampa: %LINEPROTO-5-UPDOWN: Line protocol on Interface GigabitEthernet0/20, changed state to down
2. If you have enabled errdisable recovery, you can determine the reason for the errdisable status if you issue the show errdisable recovery command. Here is an example:
Cisco-2960X#show errdisable recovery

ErrDisable Reason    Timer Status
-----------------    --------------
udld                 Enabled
bpduguard            Enabled
security-violatio    Enabled
channel-misconfig    Enabled
pagp-flap            Enabled
dtp-flap             Enabled
link-flap            Enabled
l2ptguard            Enabled
psecure-violation    Enabled
gbic-invalid         Enabled
dhcp-rate-limit      Enabled
mac-limit            Enabled
unicast-flood        Enabled
arp-inspection       Enabled

Timer interval: 300 seconds

Interfaces that will be enabled at the next timeout:

Interface      Errdisable reason      Time left(sec)
---------    ---------------------    --------------
Gi1/0/20     bpduguard                273
Errdisable is a feature that automatically disables a port on a Cisco Catalyst switch and is supported on most Catalyst switches running the Cisco IOS software.
The Errdisable error disable feature was designed to inform the administrator when there is a port problem or error. The reasons a catalyst switch can go into Errdisable mode and shutdown a port are many and include:
-
Duplex Mismatch
-
Loopback Error
- Link Flapping (up/down)
- Port Security Violation
- Broadcast Storms
- etc
When a port is in error-disabled state, it is effectively shut down and no traffic is sent or received on that port. The port LED is set to the orange color and, when you issue the show interfaces command, the port status shows as Errdisabled.
To enable err-disabled ports on Cisco 3750 switch series. Follow the below . . .
First make telnet connection with the switch
telnet 10.0.0.1
(change the ip as required,)
Enter Password to continue.
To view Disabled Ports:
show interfaces status err-disabled
e.g:
NOC_SWITCH>show int status err-disabled
Port Name Status Reason Err-disabled Vlans
Gi2/0/10 err-disabled link-flapNOC_SWITCH>
To Enable Port:
enable
config t
int G2/0/10
no switchport port-security (< You probably dont need this line, its just to disable pot security feature, I used it to perform various tests)
shut
no shut
exit
Change the interface name to match your. In above example I had two 3750-e models in stack mode. so its showing G2, you may get G1 if you have single switch.
TIP1 :
Link flap means that the specific port continuously goes up and down. The port is put into the errdisabled state if it flaps more than four-five times in few seconds. The common cause of link flap is a Layer 1 issue such as a bad cable, duplex mismatch.
TIP2:
Firewalls that are equipped with a Hardware Switch (like a Fortigate 80E), the ports member of the hardware switch will be sending BPDUs as if its a switch. This can be unexpected as typical routers/firewalls are typically DTE. But just in case you come across issue with a switchport on a switch that is keep on going into errdisabled state. Check the port if the bdpuguard is enabled and just disable it.
sh run
…
interface GigabitEthernet1/0/1
switchport mode access
switchport nonegotiate
spanning-tree bpduguard enable
(config-if)#spanning-tree bpduguard disable
For more detailed and brief descriptions, please visit
https://www.cisco.com/c/en/us/support/docs/lan-switching/spanning-tree-protocol/69980-errdisable-recovery.html
http://www.firewall.cx/cisco-technical-knowledgebase/cisco-switches/883-cisco-switches-errdisable-autorecovery.html