Время прочтения
13 мин
Просмотры 35K
Часто вижу, что помимо обработки исключений, люди мучаются кое с чем еще, а именно с логированием.
Большинство людей не знают, что писать в логи, поэтому решают логировать все, что угодно, думая, что все подряд – это в любом случае лучше, чем ничего, и, в конечном итоге, просто создают шум. А шум – это информация, которая никак не помогает вашей команде понять, в чем дело и как решить проблему.
Более того, я не думаю, что эти люди могут уверенно пользоваться уровнями логирования, поэтому используют по умолчанию logger.info везде (если не пишут print).
Наконец, люди, похоже, не знают, как сконфигурировать логирование в Python, понятия не имеют, что такое обработчики, фильтры, методы форматирования (форматтеры) и т.д.
Цель этой статьи – разъяснить, что такое логирование и как вы должны его реализовывать. Я постараюсь привести содержательные примеры и обеспечить вас гибкими эмпирическими приемами, которые следует использовать при логировании в любом приложении, которое вы когда-либо будете создавать.
Введение
Примеры облегчают визуальное восприятие, поэтому мы будем рассматривать следующую систему:
-
Пользователи могут подключать несколько интеграций к ресурсам (например, GitHub, Slack, AWS и т.д.)
-
Ресурсы уникальны в зависимости от интеграции (например, репозитории списков с GitHub, диалоги из Slack, экземпляры списков EC2 из AWS и т.д.)
-
Каждая интеграция уникальна, имеет свой набор сложностей, конечных точек, шагов и т.д.
-
Каждая интеграция может привести к различным ошибкам, которые могут возникнуть в любое время (например, неверная аутентификация, ресурс не существует и т.д.)
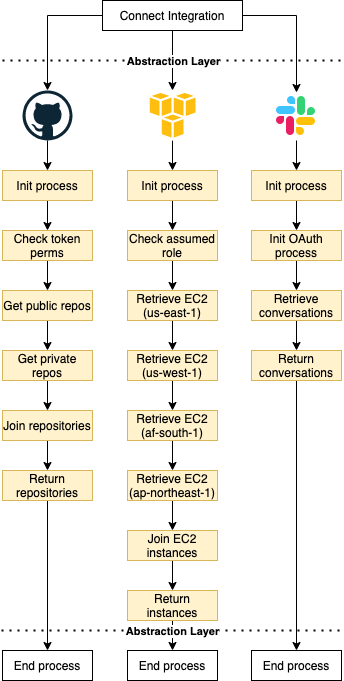
Я не буду сосредотачиваться на проблемах поддержки таких интеграций, просто пронаблюдаем за тем, как это работает.
Природа логирования: хорошее логирование имеет значение
Для начала давайте проанализируем характеристики логов.
Логи должны быть:
-
Наглядными;
-
Контекстными;
-
Реактивными.
«Наглядными» мы их называем потому, что они предоставляют вам какую-то информацию, «контекстными», потому что они дают вам общее представление о том, как обстоят дела на данный момент времени. И наконец, «реактивными» они являются потому, что они позволяют вам предпринимать действия только после того, как что-то произошло (даже если ваши логи отправляются/получаются в режиме реального времени, на самом деле вы не можете изменить то, что произошло только что).
Если вы не будете учитывать природу логов, то будете производить только шум, что снизит вашу производительность.
Дальше я приведу несколько примеров, основанных на системе, которую мы определили выше:
Если вы зададите описание, к примеру «operation connect failed», но не добавите контекст, трудно будет понять, какая из интеграций не отработала, кто пострадал, на каком этапе подключения произошел сбой, поэтому и среагировать вы не можете. В конечном итоге вы будете копаться в тонне логов без малейшего представления о том, где может быть проблема.
О, а еще не стоит недооценивать способность разработчика испортить описание. Сделать это легко, просто отправив поверхностные сообщения без какого-либо контекста, например «An error happened» или «An unexpected exception was raised». Если я прочту такое, то даже не пойму, на что повлияла ошибка, потому что не буду знать, ЧТО конкретно произошло. Так что да, можно сломать даже основной смысл логов.
Логи – это конфиденциальная информация из вашего программного обеспечения, нужная чтобы вы оставались в курсе происходящего и могли реагировать на ситуации. Любые логи, которые не дают вам такой информации – это шум.
Когда нужно логировать?
Чтобы логи оставались реактивными, вам нужно логировать «события». Сделайте их такими же понятными и удобными для чтения, как эта статья. Возможно, вы не прочитали каждую строку, которую я написал выше, но вы все равно можете продолжить дальше, пропустить ненужные разделы и сосредоточиться на том, что привлекло ваше внимание. Логи должны быть такими же.
Есть эмпирическое правило построение логов:

-
В начале соответствующих операций или потоков (например, при подключении к сторонним сервисам и т.д.);
-
При любом достигнутом прогрессе (например, успешная аутентификация, получен валидный код ответа и т.д.);
-
При завершении операции (успешном или неудачном).
Логи должны рассказывать вам историю, у каждой истории есть начало, середина и конец.
Будьте осторожны с релевантностью, добавлять логи проще, чем удалять их, ведь все, что нерелевантно – шум.
Что логировать?
Чтобы логи были наглядными и контекстными, нужно предоставлять правильный набор информации, и я не могу сказать, какая информация будет являться таковой, не зная вашего случая. Давайте вместо этого воспользуемся нашим примером.
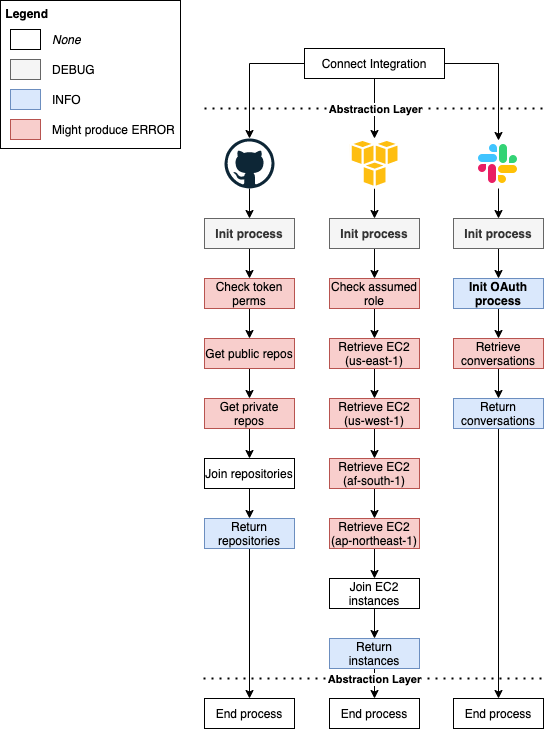
Рассмотрим интеграцию с AWS в качестве примера. Было бы круто иметь следующие сообщения:
Хороший пример логов
|
Сообщение |
Понимание картины |
Контекст |
|
|
Началась операция с AWS |
Атрибуты лога должны позволить мне выяснить, кто его вызвал |
|
|
Был достигнут существенный прогресс |
— |
|
|
Операция с AWS завершилась |
Атрибуты лога должны позволить мне найти сущности, на которые операция произвела положительный эффект |
Пример логов об ошибках
Допустим, что извлечь экземпляры из региона af-south-1 не удалось из-за какой-то внезапной ошибки в этом регионе.
|
Сообщение |
Понимание картины |
Контекст |
|
|
Началась операция с AWS |
Атрибуты лога должны позволить мне выяснить, кто его вызвал |
|
|
Операция AWS не завершена, произошел сбой в регионе af-south-1, пострадал пользователь X |
Я должен иметь возможность увидеть трассировку стека ошибки, чтобы понять, почему извлечение не удалось |
В обоих случаях, я могу отследить, когда произошло какое-то событие (в логах есть отметки о времени), что именно произошло и кто от этого пострадал.
Я решил не указывать пользователя при начале и успешном завершении операции, потому что это не имеет значения (ведь это шум), поскольку:
-
Если я знаю, что что-то запустилось, но не знаю результата выполнения, то что я могу сделать?
-
Если все хорошо, то зачем беспокоиться?
Добавление таких данных делает логи шумными, потому что на них невозможно реагировать, делать-то с этим ничего не надо! Но я все еще должен быть в состоянии собрать детальную информацию из атрибутов (кто, когда, почему и т.д.). Если вы хотите что-то измерить, вам следует воспользоваться метриками, а не логами.
С другой стороны, логи об ошибках кажутся более подробными, и так и должно быть! Чтение таких логов дает достаточно уверенности, чтобы немедленно перейти к действиям:
-
Попросите разработчика проверить статус AWS в регионе
af-south-1, и по возможности сделайте sanity check. -
Свяжитесь с пользователем Х и сообщите ему, что вам известно о проблеме в этом регионе.
Ключевой момент следующий: вы можете отреагировать сразу и для этого вам не требуется более глубокого изучения ситуации. Вы знаете все, что вам нужно, и можете немедленно принять меры для уменьшения ущерба. Разработчикам, возможно, потребуется углубиться в трассировку стека, чтобы собрать больше контекста (в случае с ошибкой), но общая картина уже становится ясна.
Любое сообщение об ошибке, в котором отсутствует эта минимальная информация, становится шумом, поскольку у вас появляется беспокойство, но вы все еще не можете действовать. Сначала нужно углубиться в ситуацию, чтобы понять, насколько проблема серьезна.
Если вы все еще не поняли, как писать полезные сообщения, я поделюсь с вами очень простым лайфхаком:
Всегда спрашивайте себя: Что я хочу уяснить для себя, после получения такого лога?
Предоставление контекста с помощью Python
В Python атрибуты логов можно добавить с помощью дополнительного поля, например:
# Do that
logger.info("Connecting to AWS", extra={"user": "X"})
...
logger.info("Connection to AWS has been successful", extra={"user": "X"})
Контекст не отменяет необходимости в содержательных сообщениях! Поэтому я бы так не делал:
# Don't do that
logger.info("Connecting to third-party", extra={"user": "X", "third-party": "AWS"})
Сообщения должны быть четкими и не оставлять места вопросам о том, что же вообще происходит. Контекст должен обогащать ваш опыт, предоставив информацию о более глубоких деталях, и давать вам понимание, по какой причине что-то произошло.
Нечто большее, чем logger.info и logger.error
Не так-то просто понять, что происходит, когда тысячи клиентов выдают логи «Connecting to Slack». Поскольку вы выдаете логи, а вашим приложением пользуются несколько клиентов, нужно иметь возможность фильтровать информацию по релевантности.
В логах бывает много уровней (т.е. уровней релевантности). В Python у вас есть DEBUG, INFO, WARNING, ERROR, CRITICAL. Я рекомендую использовать их все.
Чтобы упростить ситуацию, вот вам новое эмпирическое правило (будьте гибкими):
|
Уровень |
Когда используется |
|
|
Для какой-то действительно повторяющейся информации. Возможно, было бы полезно выдавать весь контекст информации, но порой этого не нужно. |
|
|
Когда происходит что-то важное, достойное того, чтобы о нем было известно большую часть времени. |
|
|
Случилось что-то странное (но не прервало поток/операцию). Если проблема возникнет на более поздних этапах, такой лог может дать вам подсказку. |
|
|
Произошла ошибка, ее следует устранить как можно быстрее. |
|
|
Произошла очень серьезная ошибка, она требует немедленного вмешательства. Если не уверены в критичности ошибки, применяйте |
Для описанной системы/потоков, я бы использовал уровни логов, как определено:
Что делать с logger.critical и logger.warning?
Для примера хочу осветить случаи, когда я бы рассмотрел возможность использования WARNING и CRITICAL.
-
WARNING– недостаточно веская причина для остановки потока, однако это предупреждение на будущее, если возникнет какая-то проблема. -
CRITICAL– самый тревожный предупреждающий лог, который вы когда-либо получите. По сути, он должен быть той самой причиной встать в три часа ночи и пойти что-то чинить.
Для этих случаев мы рассмотрим:
-
Для AWS: если какой-то регион AWS недоступен, мы можем предположить, что у пользователя там нет никаких ресурсов, поэтому можно двигаться дальше.
-
Для Slack: если OAuth завершится неудачно из-за невалидного id клиента, значит остальные пользователи столкнутся с той же проблемой, интеграция не отработает, пока мы вручную не сгенерируем новый id. Это дело кажется достаточно критичным.

Непопулярное мнение: использование DEBUG-уровня на продакшене
Да, я считаю, что логи DEBUG нужно использовать на продакшене.
Другой вариант – включить дебаг после того, как странная ошибка потребует более детального разбирательства.
Простите, но для меня такой вариант недопустим.
В реальном мире клиентам нужна быстрая реакция, командам нужно выполнять свою работу и постоянно поддерживать системы в рабочем состоянии. У меня нет времени и пропускной способности для нового деплоя или включения флага и ожидания повторения проблемы. Я должен реагировать на неожиданные проблемы в считанные секунды, а не минуты.
Правильно настройте логгер
Еще я замечаю, что люди испытывают трудности при настройке логгера (или вообще его не настраивают). Конечно, документация в Python не очень дружелюбная, но это не оправдание, чтобы вообще ее не трогать.
Есть несколько способов настроить логгер. Вы можете использовать logging.config.dictConfig, logging.config.fileConfig или вообще сделать все вручную, вызывая такие команды как setLevel, AddHandler, addFilter.
По моему опыту:
-
Использование ручных команд непросто поддерживать и понимать;
-
fileConfig– негибкая история, у вас не бывает динамических значений (без дополнительных фокусов); -
dictConfig– простая история в запуске и настройке.
Поэтому в качестве примера мы будем придерживаться dictConfig. Еще можно запустить basicConfig, но не думаю, что он вам понадобится, если вы все настроили правильно.
Я поделюсь несколькими советами и определениями, которые вам надо знать, а затем мы создадим окончательную конфигурацию на реальных примерах из проектов, над которыми я работаю.
Вот кусочек того, о чем мы будем говорить дальше:
Что такое логгеры?
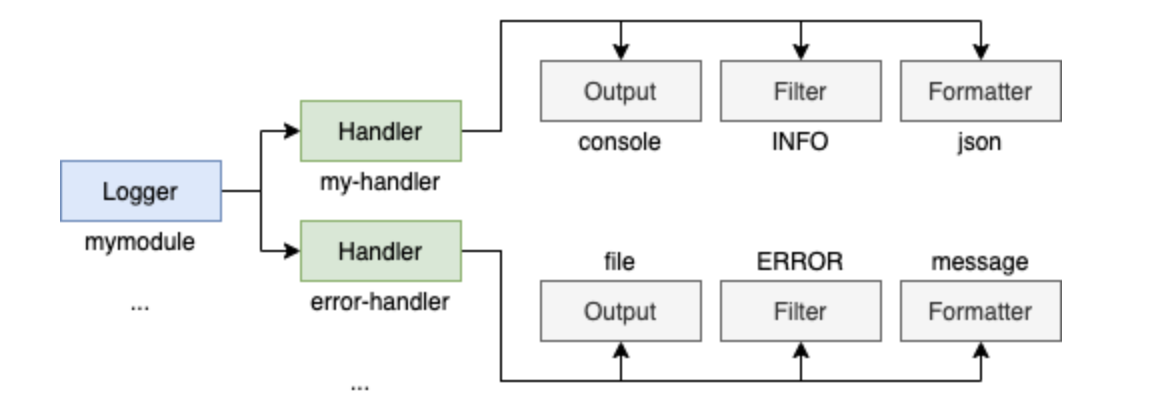
Логгеры – это объекты, которые вы создаете с помощью logging.getLogger, они позволяют выдавать сообщения. Каждый отдельный логгер может быть привязан к конфигурации со своим собственным набором форматтеров, фильтров, обработчиков и т.д.
Самое интересное, что логгеры образуют иерархию и все наследуются от root-логгера. Дальнейшее наследование определяется «.» (точками), например mymodule.this.that будет наследником mymodule.this.
Посмотрите:
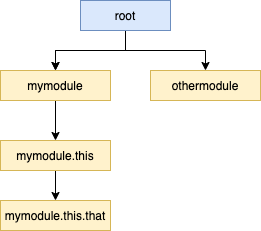
Из-за этого в документации Python есть рекомендация по использованию logger.getLogger(name), поскольку name, вернет лишь пространство имен текущего пакета.
В любом случае, придерживайтесь:
import logging

logger = logging.getLogger(__name__)

def myfunc():
    ...
    logger.info("Something relevant happened")
    ...
Внимание: Вы можете обратиться к корневому логгеру по имени root, пустой строке “” или вообще ни по чему. Да, это сбивает с толку, поэтому используйте root для многословности и ясности.
Форматируйте логи
Форматтеры вызываются для вывода конечного сообщения и отвечают за него преобразование в конечную строку.
Когда я работал в Zak (бывшем Mimic), и даже сегодня в Lumos мы форматировали логи как JSON. Он является хорошим стандартом для систем, работающих на продакшене, поскольку содержит множество атрибутов. Проще визуализировать JSON, чем обычную длинную строку, и для этого вам не нужно создавать свой собственный форматтер (ознакомьтесь с python-json-logger).
Для локальной разработки я рекомендую использовать форматирование по умолчанию для простоты.
Ваше решение будет зависеть от вида проекта. Для Tryceratops я решил использовать обычный форматтер, поскольку он проще и работает локально, там нет нужды в JSON.
Фильтруйте логи
Фильтры можно использовать либо для фильтрации логов (внезапно), либо для добавления дополнительного контекста в запись лога. Рассматривайте фильтры, как хуки, вызываемые до обработки итогового лога.
Их можно определить следующим образом:
class ContextFilter(logging.Filter):
    USERS = ['jim', 'fred', 'sheila']
    IPS = ['123.231.231.123', '127.0.0.1', '192.168.0.1']

    def filter(self, record):  # Add random values to the log record
        record.ip = choice(ContextFilter.IPS)
        record.user = choice(ContextFilter.USERS)
        return True
Адаптировано из https://docs.python.org/3/howto/logging-cookbook.html#using-filters-to-impart-contextual-information
Или их можно добавить прямо в логгер или обработчик для упрощения фильтрации по уровням (скоро будут примеры).
Обрабатывайте логи и то, как все связано
Обработчики представляют из себя комбинации форматтеров, выходных данных (потоков) и фильтров.
С ними вы можете создавать следующие комбинации:
-
Выводить все логи из
info(фильтр), а потом выводитьJSONв консоль. -
Выводить все логи, начиная с
error(фильтр) в файл, содержащий только сообщение и трассировку стека (форматтер).
Наконец логгеры указывают обработчикам.
Пример logging.dictConfig
Теперь, когда вы понимаете, что делают все эти объекты, давайте писать собственные! Как всегда, я постараюсь показать вам примеры из реальной жизни. Я буду использовать конфигурацию Tryceratops. Вы можете открыть ссылку и посмотреть самостоятельно окончательную конфигурацию.
Шаблон конфигурации логирования
Начнем с такого каркаса, создадим константу LOGGING_CONFIG:
import logging.config

LOGGING_CONFIG = {
    "version": 1,
    "disable_existing_loggers": False,
    "formatters": { },
    "handlers": { },
    "loggers": { },
    "root": { },
}

logging.config.dictConfig(LOGGING_CONFIG)
Несколько заметок:
-
Versionвсегда будет 1. Это плейсхолдер для возможных следующих релизов. На данный момент версия всего одна. -
Я рекомендую оставить значение
disable_existing_loggersв False, чтобы ваша система не поглощала другие неожиданные проблемы, которые могут возникнуть. Если вы хотите изменить другие логгеры, я бы порекомендовал их явно переписать (хоть это и скучно). -
Внешний ключ
root, как вы могли догадаться, определяет логгер верхнего уровня, от которого может наследоваться текущий.
Корневой логгер можно определить тремя разными способами, что сбивает с толку:
LOGGING_CONFIG = {
    "version": 1,
    ...
    "loggers": {
        "root": ... # Defines root logger
        "": ... # Defines root logger
    },
    "root": { }, # Define root logger
}
Выбирайте любой! Мне нравится оставлять его снаружи, поскольку так он выглядит очевиднее и подробнее говорит о том, чего я хочу, ведь корневой логгер влияет на все другие определенные логгеры.
Конфигурация логирования: форматтеры
Я дополню пример из Tryceratops примером с JSON из Lumos.
Обратите внимание, что любая конструкция %([name])[type], как %(message) или %(created), говорит форматтеру, что и как отображать.
LOGGING_CONFIG = {
    ...,
    "formatters": {
        "default": {  # The formatter name, it can be anything that I wish
            "format": "%(asctime)s:%(name)s:%(process)d:%(lineno)d " "%(levelname)s %(message)s",  #  What to add in the message
            "datefmt": "%Y-%m-%d %H:%M:%S",  # How to display dates
        },
        "simple": {  # The formatter name
            "format": "%(message)s",  # As simple as possible!
        },
        "json": {  # The formatter name
            "()": "pythonjsonlogger.jsonlogger.JsonFormatter",  # The class to instantiate!
            # Json is more complex, but easier to read, display all attributes!
            "format": """
                    asctime: %(asctime)s
                    created: %(created)f
                    filename: %(filename)s
                    funcName: %(funcName)s
                    levelname: %(levelname)s
                    levelno: %(levelno)s
                    lineno: %(lineno)d
                    message: %(message)s
                    module: %(module)s
                    msec: %(msecs)d
                    name: %(name)s
                    pathname: %(pathname)s
                    process: %(process)d
                    processName: %(processName)s
                    relativeCreated: %(relativeCreated)d
                    thread: %(thread)d
                    threadName: %(threadName)s
                    exc_info: %(exc_info)s
                """,
            "datefmt": "%Y-%m-%d %H:%M:%S",  # How to display dates
        },
    },
    ...
}
Обратите внимание, что имена, которые мы задаем (default, simple и JSON), — произвольные, но актуальные. Вскоре мы к ним обратимся.
Конфигурация логирования: обработчики
ERROR_LOG_FILENAME = ".tryceratops-errors.log"

LOGGING_CONFIG = {
    ...,
    "formatters": {
        "default": { ... },
        "simple": { ... },
        "json": { ... },
    },
    "handlers": {
        "logfile": {  # The handler name
            "formatter": "default",  # Refer to the formatter defined above
            "level": "ERROR",  # FILTER: Only ERROR and CRITICAL logs
            "class": "logging.handlers.RotatingFileHandler",  # OUTPUT: Which class to use
            "filename": ERROR_LOG_FILENAME,  # Param for class above. Defines filename to use, load it from constant
            "backupCount": 2,  # Param for class above. Defines how many log files to keep as it grows
        },
        "verbose_output": {  # The handler name
            "formatter": "simple",  # Refer to the formatter defined above
            "level": "DEBUG",  # FILTER: All logs
            "class": "logging.StreamHandler",  # OUTPUT: Which class to use
            "stream": "ext://sys.stdout",  # Param for class above. It means stream to console
        },
        "json": {  # The handler name
            "formatter": "json",  # Refer to the formatter defined above
            "class": "logging.StreamHandler",  # OUTPUT: Same as above, stream to console
            "stream": "ext://sys.stdout",
        },
    },
    ...
}
Обратите внимание, что если вы используете logging.fileConfig, иметь хорошую константу, такую как ERROR_LOG_FILENAME, невозможно. Эту же информацию можно прочитать из переменных среды, если хотите.
Также обратите внимание, что классы/параметры, которые я использую для обработчиков, создавал не я. Они из библиотеки logging, и там есть не только они!
Конфигурация логирования: логгеры и root
LOGGING_CONFIG = {
    ...,
    "formatters": {
        "default": { ... },
        "simple": { ... },
        "json": { ... },
    },
    "handlers": {
        "logfile": { ... },
        "verbose_output": { ... },
        "json": { ... },
    },
    "loggers": {
        "tryceratops": {  # The name of the logger, this SHOULD match your module!
            "level": "INFO",  # FILTER: only INFO logs onwards from "tryceratops" logger
            "handlers": [
                "verbose_output",  # Refer the handler defined above
            ],
        },
    },
    "root": {  # All loggers (including tryceratops)
        "level": "INFO",  # FILTER: only INFO logs onwards
        "handlers": [
            "logfile",  # Refer the handler defined above
            "json"  # Refer the handler defined above
        ]
    }
Давайте разберемся, что происходит:
-
В
rootмы определяем все логи, кромеDEBUG, которые будут обрабатыватьсяlogfileи обработчикамиJSON. -
Обработчик
logfileотфильтровывает только логиERRORиCRITICAL, и выводит их в файл с форматтером по умолчанию. -
JSONпринимает все входящие логи (без фильтра) и выводит их в консоль сJSON-форматтером. -
Tryceratopsпереопределяет некоторые конфигурации, унаследованные отroot, такие какlevel(несмотря на то, что это то же самое), иhandlersдля использования толькоverbose_output. -
verbose_outputпринимает все входящие логи (фильтр поDEBUG) и выводит их в консоль, используя форматтерsimple.
Имя логгера tryceratops – это очень важная часть, и оно должно соответствовать логгерам, которые я создам позже. Для нашего примера, когда я пишу: logger.getLogger(name) внутри модуля, я получаю такие имена как tryceratops.main, tryceratops.runners или tryceratops.files.discovery, и все они соответствуют созданному нами правилу.
Я определил новый набор обработчиков для tryceratops, но все другие логгеры (в том числе из сторонних библиотек) будут использовать те, которые находятся в корне.
Кроме того, обратите внимание, что я могу переписать правила по умолчанию. Через настройки или позже динамически. Например, каждый раз, когда triceratops получает подобный флаг от CLI, он обновляет конфигурацию logging чтобы включить дебаг.
Логирование – это важно, но наличие хорошо структурированных исключений и блоков try/except также важно, поэтому вы можете также прочитать, как профессионально обрабатывать и структурировать исключения в Python.
Материал подготовлен в рамках курса «Python Developer. Basic».
Всех желающих приглашаем на demo-занятие «Основы ООП». Цели занятия: научиться работать с классами и познакомиться с наследованием.
Краткое содержание:
— мутабельность экземпляров класса
— передача аргументов в инициализатор
— наследование
— переопределение методов
— обращение к методам суперкласса
>> РЕГИСТРАЦИЯ
В стандартной библиотеке Python есть замечательный пакет для логирования — logging. В сети бытует мнение, что он сложный и настраивать его сплошная боль. В этой статье я попробую убедить вас в обратном. Мы разберём что из себя представляет этот пакет, изучим основные компоненты и закрепим материал практическим примером.
Зачем нужны логи?
Логи это рентген снимок выполнения вашей программы. Чем детальнее лог, тем проще разобраться в нестандартных ситуациях, которые могут приключиться с вашим скриптом. Наиболее популярным примером логов служат access логи веб-сервера, например, Apache httpd или nginx. Пример куска access лога моего блога:
92.63.107.227 - - [04/Nov/2020:06:30:48 +0000] "GET /ru/hosted-open-vpn-server/ HTTP/1.1" 301 169 "-" "python-requests/2.11.1" "-"
92.63.107.227 - - [04/Nov/2020:06:30:49 +0000] "GET /ru/data-engineering-course/ HTTP/1.1" 301 169 "-" "python-requests/2.11.1" "-"
213.180.203.50 - - [04/Nov/2020:06:36:07 +0000] "GET / HTTP/1.1" 301 169 "-" "Mozilla/5.0 (compatible; YandexMetrika/2.0; +http://yandex.com/bots yabs01)" "-"
114.119.160.75 - - [04/Nov/2020:06:36:41 +0000] "GET /robots.txt HTTP/1.1" 301 169 "-" "(compatible;PetalBot;+https://aspiegel.com/petalbot)" "10.179.80.67"
90.180.35.207 - - [04/Nov/2020:06:47:11 +0000] "GET / HTTP/1.0" 301 169 "-" "-" "-"
46.246.122.77 - - [04/Nov/2020:06:53:22 +0000] "GET / HTTP/1.1" 301 169 "<http://khashtamov.com>" "Mozilla/5.0 (Macintosh; Intel Mac OS X 10_12_4) AppleWebKit/537.36 (KHTML, like Gecko) Chrome/66.0.3359.181 Safari/537.36" "-"
66.249.76.16 - - [04/Nov/2020:06:53:30 +0000] "GET / HTTP/1.1" 301 169 "-" "Mozilla/5.0 (compatible; Googlebot/2.1; +http://www.google.com/bot.html)" "-"
66.102.9.118 - - [04/Nov/2020:07:11:19 +0000] "GET / HTTP/1.1" 301 169 "-" "Mozilla/5.0 (X11; Linux x86_64) AppleWebKit/537.36 (KHTML, like Gecko) Chrome/49.0.2623.75 Safari/537.36 Google Favicon" "46.159.204.234"
71.6.167.142 - - [04/Nov/2020:07:11:55 +0000] "GET / HTTP/1.1" 301 169 "-" "Mozilla/5.0 (Windows NT 6.1) AppleWebKit/537.36 (KHTML, like Gecko) Chrome/41.0.2228.0 Safari/537.36" "-"
Помимо access логов веб-сервер также пишет error лог, там хранится информация обо всех ошибках при обработке HTTP запросов. Также и в ваших скриптах, логи могут делиться на информационные — вывод текущего состояния выполнения, отладочной информации, и на логи с ошибками — вывод исключений, ошибок с дополнительной информацией для отладки, содержащей контекст).
logging и Python
Точкой входа в работу с логированием в Python является библиотека logging. На первый взгляд может показаться, что библиотека сложная и запутанная, но потратив некоторое время на её изучение, можно убедиться в обратном. Для меня logging это классический пример дизайна ООП, где композиция преобладает над наследованием, поэтому в исходном коде библиотеки можно встретить множество функциональных классов. Цель этого туториала разобрать по косточкам каждый класс и воссоединить их в единый механизм логирования в Python. Начнём-с.
Logger
Чтобы начать работу с logging необходимо в импортировать библиотеку logging и вызвать функцию getLogger, передав ей имя будущего логера. Функция вернёт инстанс объекта Logger. Логер это рычаг за который мы дёргаем каждый раз, когда нам нужно записать информацию в лог.
import logging

logger = logging.getLogger('logger')
Заметьте, что функция getLogger принимает на вход параметр — имя логера. Можно назначать любое имя или __name__. Вызов getLogger с одинаковым названием вернёт один и тот же инстанс логера.
Я рекомендую использовать в качестве аргумента __name__, в этом случае не нужно беспокоиться, что разные модули могут ссылаться на один и тот же логер.
Класс Logger предоставляет наружу несколько методов для записи сообщений разного уровня. Уровни необходимы для понимания контекста сообщения/лога, который мы пишем. В logging существует несколько уровней:
- DEBUG — уровень отладочной информации, зачастую помогает при разработке приложения на машине программиста.
- INFO — уровень вспомогательной информации о ходе работы приложения/скрипта.
- WARNING — уровень предупреждения. Например, мы можем предупреждать о том, что та или иная функция будет удалена в будущих версиях вашего приложения.
- ERROR — с таким уровнем разработчики пишут логи с ошибками, например, о том, что внешний сервис недоступен.
- CRITICAL — уровень сообщений после которых работа приложения продолжаться не может.
По умолчанию в logging задан уровень WARNING, это означает, что сообщения уровня DEBUG и INFOбудут игнорироваться при записи в лог. Разработчик может самостоятельно задать необходимый ему уровень логирования через метод setLevel у инстанса Logger:
logger.setLevel(logging.DEBUG)
Методы для записи сообщений с разными уровнями именуются по тому же принципу:
logger.debug('debug info')
logger.info('info')
logger.warning('warning')
logger.error('debug info')
logger.critical('debug info')
Также есть ещё один метод — exception. Его желательно вызывать в блоке except при обработке исключения. В это случае он сможет уловить контекст исключения и записать его в лог:
try:
    1/0
except :
    logger.exception('exception')
Handler
Задача класса Handler и его потомков обрабатывать запись сообщений/логов. Т.е. Handler отвечает за то куда будут записаны сообщения. В базовом наборе logging предоставляет ряд готовых классов-обработчиков:
- SteamHandler — запись в поток, например, stdout или stderr.
- FileHandler — запись в файл, класс имеет множество производных классов с различной функциональностью (ротация файлов логов по размеру, времени и т.д.)
- SocketHandler — запись сообщений в сокет по TCP
- DatagramHandler — запись сообщений в сокет по UDP
- SysLogHandler — запись в syslog
- HTTPHandler — запись по HTTP
Это далеко не полный список. Чтобы посмотреть все, перейдите по ссылке выше. Для указания Handler, необходимо у инстанса Logger вызвать метод addHandler и передать туда инстанс класса Handler. У одного Logger инстанса может быть множество обработчиков.
Пример записи лога в stdout:
import sys
import logging
from logging import StreamHandler

logger = logging.getLogger(__name__)
logger.setLevel(logging.DEBUG)
handler = StreamHandler(stream=sys.stdout)
logger.addHandler(handler)

logger.debug('debug information')
Если запустить этот скрипт, то можно увидеть сообщение:
debug information
Мы видим сообщение уровня DEBUG потому что задачи этот уровень в настройках. Если поменять его на INFO, то сообщение пропадёт:
logger.setLevel(logging.INFO)
Наверняка вы обратили внимание, что лог содержит всего лишь переданную строку. Как сделать так, чтобы в логе была информация об уровне лога, времени записи?
Formatter
Formatter это ёщё один класс в семействе logging, отвечающий за отображение лога. Если класс Handler ответственный за то куда будет происходить запись, то класс Formatter отвечает на вопрос как будет записано сообщение. По умолчанию в лог пишется голая строка, которую мы передаём через методы debug, info и т.д. Давайте обогатим наш лог дополнительной метаинформация, например, о времени записи и уровне сообщения. Formatter передаётся инстансу Handler через метод .setFormatter
import sys
import logging
from logging import StreamHandler, Formatter

logger = logging.getLogger(__name__)
logger.setLevel(logging.DEBUG)

handler = StreamHandler(stream=sys.stdout)
handler.setFormatter(Formatter(fmt='[%(asctime)s: %(levelname)s] %(message)s'))
logger.addHandler(handler)

logger.debug('debug information')
Запуск скрипта выведет на экран следующее сообщение:
[2020-11-22 13:00:08,751: DEBUG] debug information
Обратите внимание на строку, которую я передал при инициализации инстанса Formatter:
[%(asctime)s: %(levelname)s] %(message)s
Это шаблон, который будет заполнен при записи сообщения в лог. Набор таких готовых шаблонов можно посмотреть в разделе LogRecord attributes.
Filter
Задача класса фильтровать сообщения по заданной разработчиком логике. Предположим, что я хочу записывать в лог сообщения, содержащие слово python. Чтобы задать фильтр необходимо вызвать метод addFilter у инстанса Logger. Передать можно либо инстанс класса, реализующий метод filter либо callable объект (например, функцию). На вход прилетит инстанс класса LogRecord, это и есть 1 сообщение лога:
import sys
import logging
from logging import StreamHandler, Formatter, LogRecord

def filter_python(record: LogRecord) -> bool:
    return record.getMessage().find('python') != -1

logger = logging.getLogger(__name__)
logger.setLevel(logging.DEBUG)

handler = StreamHandler(stream=sys.stdout)
handler.setFormatter(Formatter(fmt='[%(asctime)s: %(levelname)s] %(message)s'))
logger.addHandler(handler)
logger.addFilter(filter_python)

logger.debug('python debug information')
Наглядно и понятно, разве logging может быть сложным? 😎
LoggerAdapter
Адаптер нужен для передачи дополнительной контекстной информации при каждой записи лога через Logger. Например, вы написали веб-приложение и вам необходимо в логи дополнительно передавать username пользователя:
class CustomLoggerAdapter(LoggerAdapter):
    def process(self, msg, kwargs):
        return f'{msg} from {self.extra["username"]}', kwargs

logger2 = logging.getLogger('adapter')
logger2.setLevel(logging.DEBUG)

handler = StreamHandler(stream=sys.stdout)
handler.setFormatter(Formatter(fmt='[%(asctime)s: %(levelname)s] %(message)s'))

adapter = CustomLoggerAdapter(logger2, {'username': 'adilkhash'})

logger2.addHandler(handler)
adapter.error('failed to save')
extra и не только
Строки в логах это хорошо, а что если я хочу помимо строки дополнительно передавать ответ от веб-сервера? Для этого можно использовать аргумент extra при вызове методов debug, info и т.д. Давайте напишем пример вывода
logger.debug('debug info', extra={"response": response.text})Теперь вывод значения ключа response можно указать через Formatter (при условии, что response передаётся всегда):
Formatter(fmt='[%(asctime)s: %(levelname)s] %(message)s, response: %(response)s')
Аргумент extra удобен при написании своих кастомных обработчиков логов (например, отсылка логов в телеграм). Далее я покажу пример кастомного Handler класса для отправки логов в Telegram через бота.
Конфигурация logging
Официальная документация рекомендует конфигурировать logging через python-словарь. Для этого необходимо вызвать функцию logging.config.dictConfig и передать ей специальный словарь. Схема словаря описана здесь. Я лишь вкратце пробегусь по основным ключам:
- version — ключ указывает версию конфига, рекомендуется наличие этого ключа со значением 1, нужно для обратной совместимости в случае, если в будущем появятся новые версии конфигов.
- disable_existing_loggers — запрещает или разрешает настройки для существующих логеров (на момент запуска), по умолчанию равен True
- formatters — настройки форматов логов
- handlers — настройки для обработчиков логов
- loggers — настройки существующих логеров
Ранее все настройки я задавал кодом через вызов методов. Это может быть удобно, если у вас 1 модуль, но когда таких модулей становится множество, то в каждом из них задавать общие настройки кажется излишним занятием. Давайте попробуем все настройки задать в одном месте:
import logging.config

LOGGING_CONFIG = {
    'version': 1,
    'disable_existing_loggers': False,

    'formatters': {
        'default_formatter': {
            'format': '[%(levelname)s:%(asctime)s] %(message)s'
        },
    },

    'handlers': {
        'stream_handler': {
            'class': 'logging.StreamHandler',
            'formatter': 'default_formatter',
        },
    },

    'loggers': {
        'my_logger': {
            'handlers': ['stream_handler'],
            'level': 'DEBUG',
            'propagate': True
        }
    }
}

logging.config.dictConfig(LOGGING_CONFIG)
logger = logging.getLogger('my_logger')
logger.debug('debug log')
Неправда ли удобно? В реальных приложениях настройки выносят в отдельный модуль, который обязательно импортируется на старте, например, модуль в settings.py как в Django. Именно в нём задаются глобальные настройки для всех логеров приложения.
Наследование в logging
Ещё одним удобным механизмом в logging является «наследование» настроек корневого логера его потомками. Наследование задаётся через символ . в названии логера. То есть логер с названием my_package.logger1 унаследует все настройки, заданные для my_package. Давайте обновим пример выше, добавив в LOGGING_CONFIG настройку для my_package
LOGGING_CONFIG['loggers'].update({
    'my_package': {
        'handlers': ['stream_handler'],
        'level': 'DEBUG',
        'propagate': False
    }
})
Если у вас есть настройка для конкретного логера и вы не хотите, чтобы он был дополнительно обработан родительскими Handler классами, то ключу propagate нужно присвоить значение False. В этом случае передача управления «вверх» до родителя будет запрещена.
Отправляем логи в Telegram
А теперь давайте напишем свой кастомный Handler для отправки логов через бота в телеграм. Если вы никогда не работали с телеграм-ботами, то почитайте мою статью про создание телеграм-ботов. Я предполагаю, что вы уже создали бота, получили его токен и знаете свой user-id/chat-id, чтобы бот смог посылать сообщения лично вам. Для работы с телеграмом я использую библиотеку pyTelegramBotAPI.
Чтобы создать свой обработчик, необходимо наследоваться от класса Handler и перезаписать метод emit:
import telebot
from logging import Handler, LogRecord

class TelegramBotHandler(Handler):
    def __init__(self, token: str, chat_id: str):
        super().__init__()
        self.token = token
        self.chat_id = chat_id

    def emit(self, record: LogRecord):
        bot = telebot.TeleBot(self.token)
        bot.send_message(
            self.chat_id,
            self.format(record)
        )
При инициализации инстанса класса TelegramBotHandler ему необходимо будет передать токен бота и chat_id. Замечу, что эти настройки можно задать через конфигурирование:
'handlers': {
        'telegram_handler': {
            'class': 'handlers.TelegramBotHandler',
            'chat_id': '<CHAT_ID>',
            'token': '<BOT_TOKEN>',
            'formatter': 'default_formatter',
        }
    },
Чтобы обработчик начал свою работу, достаточно в настройках вашего логера прописать новый обработчик:
LOGGING_CONFIG['loggers'].update({
    'my_package': {
        'handlers': ['stream_handler', 'telegram_handler'],
        'level': 'DEBUG',
        'propagate': False
    }
})
Всё готово! 😎
Заключение
В этой статье я постарался вкратце рассказать и показать основные сущности библиотеки logging, а также продемонстрировать гибкий механизм логирования в python. Надеюсь мне это удалось, и статья оказалась для вас полезной.
💌 Присоединяйтесь к рассылке
Понравился контент? Пожалуйста, подпишись на рассылку.
Logging is used to track events that happen when an application runs. Logging calls are added to application code to record or log the events and errors that occur during program execution. In Python, the logging module is used to log such events and errors.
An event can be described by a message and can optionally contain data specific to the event. Events also have a level or severity assigned by the developer.
Logging is very useful for debugging and for tracking any required information.
How to Use Logging in Python
The Logging Module
The Python standard library contains a logging module that provides a flexible framework for writing log messages from Python code. This module is widely used and is the starting point for most Python developers to use logging.
The logging module provides ways for applications to configure different log handlers and to route log messages to these handlers. This enables a highly flexible configuration that helps to handle many different use cases.
To write a log message, a caller requests a named logger. This logger can be used to write formatted messages using a log level (DEBUG, INFO, ERROR etc). Here’s an example:
import logging
log = logging.getLogger("mylogger")
log.info("Hello World")
Logging Levels
The standard logging levels in Python (in increasing order of severity) and their applicability are:
- DEBUG — Detailed information, typically of interest when diagnosing problems.
- INFO — Confirmation of things working as expected.
- WARNING — Indication of something unexpected or a problem in the near future e.g. ‘disk space low’.
- ERROR — A more serious problem due to which the program was unable to perform a function.
- CRITICAL — A serious error, indicating that the program itself may not be able to continue executing.
The default log level is WARNING, which means that only events of this level and above are logged by default.
Configuring Logging
In general, a configuration consists of adding a Formatter and a Handler to the root logger. The Python logging module provides a number of ways to configure logging:
- Creating loggers, handlers and formatters programmatically that call the configuration methods.
- Creating a logging configuration file and reading it.
- Creating a dictionary of config information and passing it to the
dictConfig()function.
The official Python documentation recommends configuring the error logger via Python dictionary. To do this logging.config.dictConfig needs to be called which accepts the dictionary as an argument. Its schema is:
version— Should be 1 for backwards compatibilitydisable_existing_loggers— Disables the configuration for existing loggers. This isTrueby default.formatters— Formatter settingshandlers— Handler settingsloggers— Logger settings
It is best practice to configure this by creating a new module e.g. settings.py or conf.py. Here’s an example:
import logging.config

MY_LOGGING_CONFIG = {
    'version': 1,
    'disable_existing_loggers': False,
    'formatters': {
        'default_formatter': {
            'format': '[%(levelname)s:%(asctime)s] %(message)s'
        },
    },
    'handlers': {
        'stream_handler': {
            'class': 'logging.StreamHandler',
            'formatter': 'default_formatter',
        },
    },
    'loggers': {
        'mylogger': {
            'handlers': ['stream_handler'],
            'level': 'INFO',
            'propagate': True
        }
    }
}

logging.config.dictConfig(MY_LOGGING_CONFIG)
logger = logging.getLogger('mylogger')
logger.info('info log')
How to Use Logging for Debugging
Besides the logging levels described earlier, exceptions can also be logged with associated traceback information. With logger.exception, traceback information can be included along with the message in case of any errors. This can be highly useful for debugging issues. Here’s an example:
import logging

logger = logging.getLogger(“mylogger”)
logger.setLevel(logging.INFO)

def add(a, b):
    try:
        result = a + b
    except TypeError:
        logger.exception("TypeError occurred")
    else:
        return result

c = add(10, 'Bob')
Running the above code produces the following output:
TypeError occurred
Traceback (most recent call last):
  File "test.py", line 8, in add
    result = a + b
TypeError: unsupported operand type(s) for +: 'int' and 'str'
The output includes the message as well as the traceback info, which can be used to debug the issue.
Python Logging Examples
Basic Logging
Here’s a very simple example of logging using the root logger with basic config:
import logging
logging.basicConfig(level=logging.INFO)
logging.info('Hello World')
Here, the basic Python error logging configuration was set up using logging.basicConfig(). The log level was set to logging.INFO, which means that messages with a level of INFO and above will be logged. Running the above code produces the following output:
INFO:root:Hello WorldThe message is printed to the console, which is the default output destination. The printed message includes the level and the description of the event provided in the logging call.
Logging to a File
A very common use case is logging events to a file. Here’s an example:
import logging
logging.basicConfig(level=logging.INFO, filename='sample.log', encoding='utf-8')
logging.info('Hello World')
Running the above code should create a log file sample.log in the current working directory (if it doesn’t exist already). All subsequent log messages will go straight to this file. The file should contain the following log message after the above code is executed:
INFO:root:Hello WorldLog Message Formatting
The log message format can be specified using the format argument of logging.basicConfig(). Here’s an example:
import logging
logging.basicConfig(level=logging.INFO, format='%(asctime)s:%(levelname)s:%(message)s')
logging.info('Hello World')
Running the above code changes the log message format to show the time, level and message and produces the following output:
2021-12-09 16:28:25,008:INFO:Hello WorldPython Error Logging Using Handler and Formatter
Handlers and formatters are used to set up the output location and the message format for loggers. The FileHandler() class can be used to setup the output file for logs:
import logging

logger = logging.getLogger(__name__)
logger.setLevel(logging.INFO)

file_handler = logging.FileHandler('sample.log')
formatter = logging.Formatter('%(asctime)s:%(levelname)s:%(message)s')
file_handler.setFormatter(formatter)

logger.addHandler(file_handler)

logger.info('Hello World')
Running the above code will create the log file sample.log if it doesn’t exist already and write the following log message to the file:
2021-12-10 15:49:46,494:INFO:Hello WorldFrequently Asked Questions
What is logging in Python?
Logging in Python allows the tracking of events during program execution. Logs are added to application code to indicate the occurrence of certain events. An event is described by a message and optional variable data specific to the event. In Python, the built-in logging module can be used to log events.
Log messages can have 5 levels — DEBUG, INGO, WARNING, ERROR and CRITICAL. They can also include traceback information for exceptions. Logs can be especially useful in case of errors to help identify their cause.
What is logging getLogger Python?
To start logging using the Python logging module, the factory function logging.getLogger(name) is typically executed. The getLogger() function accepts a single argument — the logger’s name. It returns a reference to a logger instance with the specified name if provided, or root if not. Multiple calls to getLogger() with the same name will return a reference to the same logger object.
Any logger name can be provided, but the convention is to use the __name__ variable as the argument, which holds the name of the current module. The names are separated by periods(.) and are hierarchical structures. Loggers further down the list are children of loggers higher up the list. For example, given a logger foo, loggers further down such as foo.bar are descendants of foo.
Track, Analyze and Manage Errors With Rollbar
 Managing errors and exceptions in your code is challenging. It can make deploying production code an unnerving experience. Being able to track, analyze, and manage errors in real-time can help you to proceed with more confidence. Rollbar automates error monitoring and triaging, making fixing Java errors easier than ever. Sign Up Today!
The requests library is the most popular python library for sending HTTP requests. As a normal part of RESTful application development you’ll often want to see exactly what you’re sending to the server including request headers and payload. In fact, this is especially true when you’ll be communicating with an API endpoints that:
- May be out of your control and sensitive to specific header values, and
- Are only available over HTTPS which makes side-channel observation unavailable
Further, you’ll often want to log these details in your normal application log file to be able to sift through after and find the specific request you are working with.
Unfortunately the method to turn on such debugging is a bit awkward since the requests library relies on the http.client.HTTPConnection class which do not use python’s standard logging library.
This article covers the steps necessary to turn on HTTPConnection debug logging and redirect the output to your application’s log file.
Step 1: Set up environment
$ python3 -m venv venv
$ . venv/bin/activate
(venv) $ pip3 install Flask requests
Step 2: Setting up the dummy test server
In order to test our app, we’ll use flask to spin up a small HTTP server to accept both GET and POST requests and simply respond with 200 OK.
# test_server.py
from flask import Flask

app = Flask(__name__)


@app.route('/test', methods=['GET', 'POST'])
def test():
    return 'OK', 200
Start up the test server:
$ env FLASK_APP=test_server flask run
 * Serving Flask app "test_server"
 * Environment: production
   WARNING: This is a development server. Do not use it in a production deployment.
   Use a production WSGI server instead.
 * Debug mode: off
 * Running on http://127.0.0.1:5000/ (Press CTRL+C to quit)
Step 3: Initial App
Here is our minimal app that we’ll add onto later:
import requests
import logging

# Set up logging to a file
logging.basicConfig(filename="app.log", level=logging.DEBUG)
logger = logging.getLogger(__name__)

url = "http://localhost:5000/test"

logger.info("Sending HTTP GET")
resp = requests.get(url)

logger.info("Sending HTTP POST")
resp = requests.post(url, data='My Test Data')
Step 4: Enabling Low-Level HTTPConnection Debugging
As mentioned above, the requests library relies on the low-level http.client.HTTPConnection class, so the first step is to enable that class’s debugging functionality.
Adding the following turns on global debugging in the HTTPConnection class:
http.client.HTTPConnection.debuglevel = 1
These debug messages will be printed to the console, in order to save them to the log we will need to redirect them.
Step 5: Redirecting Console Debug Messages To A File
The next step is to monkey patch the http.client’s print() function with our own that redirects the messages to a pre-defined logger instance.
def print_to_log(*args):
    logger.debug(" ".join(args))
http.client.print = print_to_log
Putting It All Together
import http
import logging
import requests

# Set up logging to a file
logging.basicConfig(filename="app.log", level=logging.DEBUG)
logger = logging.getLogger(__name__)

# Turn on global debugging for the HTTPConnection class, doing so will
# cause debug messages to be printed to STDOUT
http.client.HTTPConnection.debuglevel = 1

# Monkey patch the print() function and redirect it to a
# logger.debug() call
def print_to_log(*args):
    logger.debug(" ".join(args))
http.client.print = print_to_log


# Test HTTP GET and POST
url = "http://localhost:5000/test"

logger.info("Sending HTTP GET")
resp = requests.get(url)

logger.info("Sending HTTP POST")
resp = requests.post(url, data='My Test Data')
Demo Output (app.log)
INFO:__main__:Sending HTTP GET
DEBUG:urllib3.connectionpool:Starting new HTTP connection (1): localhost:5000
DEBUG:__main__:send: b'GET /test HTTP/1.1rnHost: localhost:5000rnUser-Agent: python-requests/2.25.1rnAccept-Encoding: gzip, deflaternAccept: */*rnConnection: keep-alivernrn'
DEBUG:__main__:reply: 'HTTP/1.0 200 OKrn'
DEBUG:__main__:header: Content-Type: text/html; charset=utf-8
DEBUG:__main__:header: Content-Length: 2
DEBUG:__main__:header: Server: Werkzeug/1.0.1 Python/3.7.3
DEBUG:__main__:header: Date: Sun, 21 Feb 2021 19:35:24 GMT
DEBUG:urllib3.connectionpool:http://localhost:5000 "GET /test HTTP/1.1" 200 2
INFO:__main__:Sending HTTP POST
DEBUG:urllib3.connectionpool:Starting new HTTP connection (1): localhost:5000
DEBUG:__main__:send: b'POST /test HTTP/1.1rnHost: localhost:5000rnUser-Agent: python-requests/2.25.1rnAccept-Encoding: gzip, deflaternAccept: */*rnConnection: keep-alivernContent-Length: 12rnrn'
DEBUG:__main__:send: b'My Test Data'
DEBUG:__main__:reply: 'HTTP/1.0 200 OKrn'
DEBUG:__main__:header: Content-Type: text/html; charset=utf-8
DEBUG:__main__:header: Content-Length: 2
DEBUG:__main__:header: Server: Werkzeug/1.0.1 Python/3.7.3
DEBUG:__main__:header: Date: Sun, 21 Feb 2021 19:35:24 GMT
DEBUG:urllib3.connectionpool:http://localhost:5000 "POST /test HTTP/1.1" 200 2
Python’s built-in logging module is designed to give you critical visibility into your applications with minimal setup. Whether you’re just getting started or already using Python’s logging module, this guide will show you how to configure this module to log all the data you need, route it to your desired destinations, and centralize your logs to get deeper insights into your Python applications. In this post, we will show you how to:
- Customize the priority level and destination of your logs
- Configure a custom setup that involves multiple loggers and destinations
- Incorporate exception handling and tracebacks in your logs
- Format your logs in JSON and centralize them for more effective troubleshooting
Python’s logging module basics
The logging module is included in Python’s standard library, which means that you can start using it without installing anything. The logging module’s basicConfig() method is the quickest way to configure the desired behavior of your logger. However, the Python documentation recommends creating a logger for each module in your application—and it can be difficult to configure a logger-per-module setup using basicConfig() alone. Therefore, most applications (including web frameworks like Django) automatically use file-based or dictionary-based logging configuration instead. If you’d like to get started with one of those methods, we recommend skipping directly to that section.
Three of the main parameters of basicConfig() are:
- level: the minimum priority level of messages to log. In order of increasing severity, the available log levels are: DEBUG, INFO, WARNING, ERROR, and CRITICAL. By default, the level is set to WARNING, meaning that Python’s logging module will filter out any DEBUG or INFO messages.
- handler: determines where to route your logs. Unless you specify otherwise, the logging library will use a
StreamHandlerto direct log messages tosys.stderr(usually the console). - format: by default, the logging library will log messages in the following format:
<LEVEL>:<LOGGER_NAME>:<MESSAGE>. In the following section, we’ll show you how to customize this to include timestamps and other information that is useful for troubleshooting.
Since the logging module only captures WARNING and higher-level logs by default, you may be lacking visibility into lower-priority logs that can be useful for conducting a root cause analysis. The logging module also streams logs to the console instead of appending them to a file. Rather than using a StreamHandler or a SocketHandler to stream logs directly to the console or to an external service over the network, you should use a FileHandler to log to one or more files on disk.
One main advantage of logging to a file is that your application does not need to account for the possibility of encountering network-related errors while streaming logs to an external destination. If it runs into any issues with streaming logs over the network, you won’t lose access to those logs, since they’ll be stored locally on each server. Logging to a file also allows you to create a more customized logging setup, where you can route different types of logs to separate files, and tail and centralize those files with a log monitoring service.
In the next section, we’ll show you how easy it is to customize basicConfig() to log lower-priority messages and direct them to a file on disk.
An example of basicConfig()
The following example uses basicConfig() to configure an application to log DEBUG and higher-level messages to a file on disk (myapp.log). It also indicates that logs should follow a format that includes the timestamp and log severity level:
import logging

def word_count(myfile):
    logging.basicConfig(level=logging.DEBUG, filename='myapp.log', format='%(asctime)s %(levelname)s:%(message)s')
    try:
        # count the number of words in a file and log the result
        with open(myfile, 'r') as f:
            file_data = f.read()
            words = file_data.split(" ")
            num_words = len(words)
            logging.debug("this file has %d words", num_words)
            return num_words
    except OSError as e:
        logging.error("error reading the file")
[...]
If you run the code on an accessible file (e.g., myfile.txt) followed by an inaccessible file (e.g., nonexistentfile.txt), it will append the following logs to the myapp.log file:
2019-03-27 10:49:00,979 DEBUG:this file has 44 words
2019-03-27 10:49:00,979 ERROR:error reading the file
Thanks to the new basicConfig() configuration, DEBUG-level logs are no longer being filtered out, and logs follow a custom format that includes the following attributes:
%(asctime)s: displays the date and time of the log, in local time%(levelname)s: the logging level of the message%(message)s: the message
See the documentation for information about the attributes you can include in the format of each log record. In the example above, an error message was logged, but it did not include any exception traceback information, making it difficult to determine the source of the issue. In a later section of this post, we’ll show you how to log the full traceback when an exception occurs.
Digging deeper into Python’s logging library
We’ve covered the basics of basicConfig(), but as mentioned earlier, most applications will benefit from implementing a logger-per-module setup. As your application scales, you’ll need a more robust, scalable way to configure each module-specific logger—and to make sure you’re capturing the logger name as part of each log. In this section, we’ll explore how to:
- configure multiple loggers and automatically capture the logger name
- use
fileConfig()to implement custom formatting and routing options - capture tracebacks and uncaught exceptions
Configure multiple loggers and capture the logger name
To follow the best practice of creating a new logger for each module in your application, use the logging library’s built-in getLogger() method to dynamically set the logger name to match the name of your module:
logger = logging.getLogger(__name__)
This getLogger() method sets the logger name to __name__, which corresponds to the fully qualified name of the module from which this method is called. This allows you to see exactly which module in your application generated each log message, so you can interpret your logs more clearly.
For example, if your application includes a lowermodule.py module that gets called from another module, uppermodule.py, the getLogger() method will set the logger name to match the associated module. Once you modify your log format to include the logger name (%(name)s), you’ll see this information in every log message. You can define the logger within each module like this:
# lowermodule.py
import logging

logging.basicConfig(level=logging.DEBUG, format='%(asctime)s %(name)s %(levelname)s:%(message)s')
logger = logging.getLogger(__name__)

def word_count(myfile):
    try:
        with open(myfile, 'r') as f:
            file_data = f.read()
            words = file_data.split(" ")
            final_word_count = len(words)
            logger.info("this file has %d words", final_word_count)
            return final_word_count
    except OSError as e:
        logger.error("error reading the file")
[...]

# uppermodule.py

import logging
import lowermodule

logging.basicConfig(level=logging.DEBUG, format='%(asctime)s %(name)s %(levelname)s:%(message)s')
logger = logging.getLogger(__name__)

def record_word_count(myfile):
    logger.info("starting the function")
    try:
        word_count = lowermodule.word_count(myfile)
        with open('wordcountarchive.csv', 'a') as file:
            row = str(myfile) + ',' + str(word_count)
            file.write(row + 'n')
    except:
        logger.warning("could not write file %s to destination", myfile)
    finally:
        logger.debug("the function is done for the file %s", myfile)
If we run uppermodule.py on an accessible file (myfile.txt) followed by an inaccessible file (nonexistentfile.txt), the logging module will generate the following output:
2019-03-27 21:16:41,200 __main__ INFO:starting the function
2019-03-27 21:16:41,200 lowermodule INFO:this file has 44 words
2019-03-27 21:16:41,201 __main__ DEBUG:the function is done for the file myfile.txt
2019-03-27 21:16:41,201 __main__ INFO:starting the function
2019-03-27 21:16:41,202 lowermodule ERROR:[Errno 2] No such file or directory: 'nonexistentfile.txt'
2019-03-27 21:16:41,202 __main__ DEBUG:the function is done for the file nonexistentfile.txt
The logger name is included right after the timestamp, so you can see exactly which module generated each message. If you do not define the logger with getLogger(), each logger name will show up as root, making it difficult to discern which messages were logged by the uppermodule as opposed to the lowermodule. Messages that were logged from uppermodule.py list the __main__ module as the logger name, because uppermodule.py was executed as the top-level script.
Although we are now automatically capturing the logger name as part of the log format, both of these loggers are configured with the same basicConfig() line. In the next section, we’ll show you how to streamline your logging configuration by using fileConfig() to apply logging configuration across multiple loggers.
Use fileConfig() to output logs to multiple destinations
Although basicConfig() makes it quick and easy to get started with logging, using file-based (fileConfig()) or dictionary-based (dictConfig()) configuration allows you to implement more custom formatting and routing options for each logger in your application, and route logs to multiple destinations. This is also the model that popular frameworks like Django and Flask use for configuring application logging. In this section, we’ll take a closer look at setting up file-based logging configuration. A logging configuration file needs to contain three sections:
- [loggers]: the names of the loggers you’ll configure.
- [handlers]: the handler(s) these
loggersshould use (e.g.,consoleHandler,fileHandler). - [formatters]: the format(s) you want each logger to follow when generating a log.
Each section should include a comma-separated list of one or more keys: keys=handler1,handler2,[...]. The keys determine the names of the other sections you’ll need to configure, formatted as [<SECTION_NAME>_<KEY_NAME>], where the section name is logger, handler, or formatter. A sample logging configuration file (logging.ini) is shown below.
[loggers]
keys=root

[handlers]
keys=fileHandler

[formatters]
keys=simpleFormatter

[logger_root]
level=DEBUG
handlers=fileHandler

[handler_fileHandler]
class=FileHandler
level=DEBUG
formatter=simpleFormatter
args=("/path/to/log/file.log",)

[formatter_simpleFormatter]
format=%(asctime)s %(name)s - %(levelname)s:%(message)s
Python’s logging documentation recommends that you should only attach each handler to one logger and rely on propagation to apply handlers to the appropriate child loggers. This means that if you have a default logging configuration that you want all of your loggers to pick up, you should add it to a parent logger (such as the root logger), rather than applying it to each lower-level logger. See the documentation for more details about propagation. In this example, we configured a root logger and let it propagate to both of the modules in our application (lowermodule and uppermodule). Both loggers will output DEBUG and higher-priority logs, in the specified format (formatter_simpleFormatter), and append them to a log file (file.log). This removes the need to include logging.basicConfig(level=logging.DEBUG, format='%(asctime)s %(name)s %(levelname)s:%(message)s') in both modules.
Instead, once you’ve created this logging configuration file, you can add logging.config.fileConfig() to your code like so:
import logging.config

logging.config.fileConfig('/path/to/logging.ini', disable_existing_loggers=False)
logger = logging.getLogger(__name__)
Make sure to import logging.config so that you’ll have access to the fileConfig() function. In this example, disable_existing_loggers is set to False, indicating that the logging module should not disable pre-existing non-root loggers. This setting defaults to True, which will disable any non-root loggers that existed prior to fileConfig() unless you configure them afterward.
Your application should now start logging based on the configuration you set up in your logging.ini file. You also have the option to configure logging in the form of a Python dictionary (via dictConfig()), rather than in a file. See the documentation for more details about using fileConfig() and dictConfig().
Python exception handling and tracebacks
Logging the traceback in your exception logs can be very helpful for troubleshooting issues. As we saw earlier, logging.error() does not include any traceback information by default—it will simply log the exception as an error, without providing any additional context. To make sure that logging.error() captures the traceback, set the sys.exc_info parameter to True. To illustrate, let’s try logging an exception with and without exc_info:
# lowermodule.py

logging.config.fileConfig('/path/to/logging.ini', disable_existing_loggers=False)
logger = logging.getLogger(__name__)

def word_count(myfile):
    try:
    # count the number of words in a file, myfile, and log the result
    [...]
    except OSError as e:
        logger.error(e)
        logger.error(e, exc_info=True)
[...]
If you run the code with an inaccessible file (e.g., nonexistentfile.txt) as the input, it will generate the following output:
2019-03-27 21:01:58,191 lowermodule - ERROR:[Errno 2] No such file or directory: 'nonexistentfile.txt'
2019-03-27 21:01:58,191 lowermodule - ERROR:[Errno 2] No such file or directory: 'nonexistentfile.txt'
Traceback (most recent call last):
  File "/home/emily/logstest/lowermodule.py", line 14, in word_count
    with open(myfile, 'r') as f:
FileNotFoundError: [Errno 2] No such file or directory: 'nonexistentfile.txt'
The first line, logged by logger.error(), doesn’t provide much context beyond the error message (“No such file or directory”). The second line shows how adding exc_info=True to logger.error() allows you to capture the exception type (FileNotFoundError) and the traceback, which includes information about the function and line number where this exception was raised.
Alternatively, you can also use logger.exception() to log the exception from an exception handler (such as in an except clause). This automatically captures the same traceback information shown above and sets ERROR as the priority level of the log, without requiring you to explicitly set exc_info to True. Regardless of which method you use to capture the traceback, having the full exception information available in your logs is critical for monitoring and troubleshooting the performance of your applications.
Capturing unhandled exceptions
You’ll never be able to anticipate and handle every possible exception, but you can make sure that you log uncaught exceptions so you can investigate them later on. An unhandled exception occurs outside of a try...except block, or when you don’t include the correct exception type in your except statement. For instance, if your application encounters a TypeError exception, and your except clause only handles a NameError, it will get passed to any remaining try clauses until it encounters the correct exception type.
If it does not, it becomes an unhandled exception, in which case, the interpreter will invoke sys.excepthook(), with three arguments: the exception class, the exception instance, and the traceback. This information usually appears in sys.stderr but if you’ve configured your logger to output to a file, the traceback information won’t get logged there.
You can use Python’s standard traceback library to format the traceback and include it in the log message. Let’s revise our word_count() function so that it tries writing the word count to the file. Since we’ve provided the wrong number of arguments in the write() function, it will raise an exception:
# lowermodule.py
import logging.config
import traceback

logging.config.fileConfig('logging.ini', disable_existing_loggers=False)
logger = logging.getLogger(__name__)

def word_count(myfile):
    try:
        # count the number of words in a file, myfile, and log the result
        with open(myfile, 'r+') as f:
            file_data = f.read()
            words = file_data.split(" ")
            final_word_count = len(words)
            logger.info("this file has %d words", final_word_count)
            f.write("this file has %d words", final_word_count)
            return final_word_count
    except OSError as e:
        logger.error(e, exc_info=True)
    except:
        logger.error("uncaught exception: %s", traceback.format_exc())
        return False

if __name__ == '__main__':
    word_count('myfile.txt')
Running this code will encounter a TypeError exception that doesn’t get handled in the try-except logic. However, since we added the traceback code, it will get logged, thanks to the traceback code included in the second except clause:
# exception doesn't get handled but still gets logged, thanks to our traceback code
2019-03-28 15:22:31,121 lowermodule - ERROR:uncaught exception: Traceback (most recent call last):
  File "/home/emily/logstest/lowermodule.py", line 23, in word_count
    f.write("this file has %d words", final_word_count)
TypeError: write() takes exactly one argument (2 given)
Logging the full traceback within each handled and unhandled exception provides critical visibility into errors as they occur in real time, so that you can investigate when and why they occurred. Although multi-line exceptions are easy to read, if you are aggregating your logs with an external logging service, you’ll want to convert your logs into JSON to ensure that your multi-line logs get parsed correctly. Next, we’ll show you how to use a library like python-json-logger to log in JSON format.
Unify all your Python logs
So far, we’ve shown you how to configure Python’s built-in logging library, customize the format and severity level of your logs, and capture useful information like the logger name and exception tracebacks. We’ve also used file-based configuration to implement more dynamic log formatting and routing options. Now we can turn our attention to interpreting and analyzing all the data we’re collecting. In this section, we’ll show you how to format logs in JSON, add custom attributes, and centralize and analyze that data with a log management solution to get deeper visibility into application performance, errors, and more.
Streamline your Python log collection and analysis with Datadog.
Log in JSON format
As your systems generate more logs over time, it can quickly become challenging to locate the logs that can help you troubleshoot specific issues—especially when those logs are distributed across multiple servers, services, and files. If you centralize your logs with a log management solution, you’ll always know where to look whenever you need to search and analyze your logs, rather than manually logging into each application server.
Logging in JSON is a best practice when centralizing your logs with a log management service, because machines can easily parse and analyze this standard, structured format. JSON format is also easily customizable to include any attributes you decide to add to each log format, so you won’t need to update your log processing pipelines every time you add or remove an attribute from your log format.
The Python community has developed various libraries that can help you convert your logs into JSON format. For this example, we’ll be using python-json-logger to convert log records into JSON.
First, install it in your environment:
pip install python-json-logger
Now update the logging configuration file (e.g., logging.ini) to customize an existing formatter or add a new formatter that will format logs in JSON ([formatter_json] in the example below). The JSON formatter needs to use the pythonjsonlogger.jsonlogger.JsonFormatter class. In the formatter’s format key, you can specify the attributes you’d like to include in each log record’s JSON object:
[loggers]
keys=root,lowermodule

[handlers]
keys=consoleHandler,fileHandler

[formatters]
keys=simpleFormatter,json

[logger_root]
level=DEBUG
handlers=consoleHandler

[logger_lowermodule]
level=DEBUG
handlers=fileHandler
qualname=lowermodule

[handler_consoleHandler]
class=StreamHandler
level=DEBUG
formatter=simpleFormatter
args=(sys.stdout,)

[handler_fileHandler]
class=FileHandler
level=DEBUG
formatter=json
args=("/home/emily/myapp.log",)

[formatter_json]
class=pythonjsonlogger.jsonlogger.JsonFormatter
format=%(asctime)s %(name)s %(levelname)s %(message)s

[formatter_simpleFormatter]
format=%(asctime)s %(name)s - %(levelname)s:%(message)s
Logs that get sent to the console (with the consoleHandler) will still follow the simpleFormatter format for readability, but logs produced by the lowermodule logger will get written to the myapp.log file in JSON format.
Once you’ve included the pythonjsonlogger.jsonlogger.JsonFormatter class in your logging configuration file, the fileConfig() function should be able to create the JsonFormatter as long as you run the code from an environment where it can import pythonjsonlogger.
If you’re not using file-based configuration, you will need to import the python-json-logger library in your application code, and define a handler and formatter, as described in the documentation:
from pythonjsonlogger import jsonlogger

logger = logging.getLogger()

logHandler = logging.StreamHandler()
formatter = jsonlogger.JsonFormatter()
logHandler.setFormatter(formatter)
logger.addHandler(logHandler)
To see why JSON format is preferable, particularly when it comes to more complex or detailed log records, let’s return to the example of the multi-line exception traceback we logged earlier. It looked something like this:
2019-03-27 21:01:58,191 lowermodule - ERROR:[Errno 2] No such file or directory: 'nonexistentfile.txt'
Traceback (most recent call last):
  File "/home/emily/logstest/lowermodule.py", line 14, in word_count
    with open(myfile, 'r') as f:
FileNotFoundError: [Errno 2] No such file or directory: 'nonexistentfile.txt'
Although this exception traceback log is easy to read in a file or in the console, if it gets processed by a log management platform, each line may show up as a separate log (unless you configure multiline aggregation rules), which can make it difficult to reconstruct exactly what happened.
Now that we’re logging this exception traceback in JSON, the application will generate a single log that looks like this:
{"asctime": "2019-03-28 17:44:40,202", "name": "lowermodule", "levelname": "ERROR", "message": "[Errno 2] No such file or directory: 'nonexistentfile.txt'", "exc_info": "Traceback (most recent call last):n File "/home/emily/logstest/lowermodule.py", line 19, in word_countn with open(myfile, 'r') as f:nFileNotFoundError: [Errno 2] No such file or directory: 'nonexistentfile.txt'"}
A logging service can easily interpret this JSON log and display the full traceback information (including the exc_info attribute) in an easy-to-read format:
Add custom attributes to your JSON logs
Another benefit of logging in JSON is that you can add attributes that an external log management service can parse and analyze automatically. Earlier we configured the format to include standard attributes like %(asctime)s, %(name)s, %(levelname)s, and %(message)s. You can also log custom attributes by using the python-json-logs “extra” field. Below, we created a new attribute that tracks the duration of this operation:
# lowermodule.py
import logging.config
import traceback
import time

def word_count(myfile):
    logger = logging.getLogger(__name__)
    logging.fileConfig('logging.ini', disable_existing_loggers=False)
    try:
        starttime = time.time()
        with open(myfile, 'r') as f:
            file_data = f.read()
            words = file_data.split(" ")
            final_word_count = len(words)
            endtime = time.time()
            duration = endtime - starttime
            logger.info("this file has %d words", final_word_count, extra={"run_duration":duration})
            return final_word_count
    except OSError as e:
        [...]
This custom attribute, run_duration, measures the duration of the operation in seconds:
{"asctime": "2019-03-28 18:13:05,061", "name": "lowermodule", "levelname": "INFO", "message": "this file has 44 words", "run_duration": 6.389617919921875e-05}
In a log management solution, this JSON log’s attributes would get parsed into something that looks like the following:
If you’re using a log monitoring platform, you can graph and alert on the run_duration of your application over time. You can also export this graph to a dashboard if you want to visualize it side-by-side with application performance or infrastructure metrics.
Whether you’re using python-json-logger or another library to format your Python logs in JSON, it’s easy to customize your logs to include information that you can analyze with an external log management platform.
Correlate logs with other sources of monitoring data
Once you’re centralizing your Python logs with a monitoring service, you can start exploring them alongside distributed request traces and infrastructure metrics to get deeper visibility into your applications. A service like Datadog can connect logs with metrics and application performance monitoring data to help you see the full picture.
For example, if you update your log format to include the dd.trace_id and dd.span_id attributes, Datadog will automatically correlate logs and traces from each individual request. This means that as you’re viewing a trace, you can simply click on the “Logs” tab of the trace view to see any logs generated during that specific request, as shown below.
You can also navigate in the other direction—from a log to the trace of the request that generated the log—if you need to investigate a specific issue. See our documentation for more details about automatically correlating Python logs and traces for faster troubleshooting.
Centralize and analyze your Python logs
In this post we’ve walked through some best practices for configuring Python’s standard logging library to generate context-rich logs, capture exception tracebacks, and route logs to the appropriate destinations. We’ve also seen how you can centralize, parse, and analyze your JSON-formatted logs with a log management platform whenever you need to troubleshoot or debug issues. If you’d like to monitor your Python application logs with Datadog, sign up for a free trial.
In the vast computing world, there are different programming languages that include facilities for logging. From our previous posts, you can learn best practices about Node logging, Java logging, and Ruby logging. As part of the ongoing logging series, this post describes what you need to discover about Python logging best practices.
Considering that “log” has the double meaning of a (single) log-record and a log-file, this post assumes that “log” refers to a log-file.
Advantages of Python logging
So, why learn about logging in Python? One of Python’s striking features is its capacity to handle high traffic sites, with an emphasis on code readability. Other advantages of logging in Python is its own dedicated library for this purpose, the various outputs where the log records can be directed, such as console, file, rotating file, Syslog, remote server, email, etc., and the large number of extensions and plugins it supports. In this post, you’ll find out examples of different outputs.
Python logging description
The Python standard library provides a logging module as a solution to log events from applications and libraries. Once the Python JSON logger is configured, it becomes part of the Python interpreter process that is running the code. In other words, it is global. You can also configure Python logging subsystem using an external configuration file. The specifications for the logging configuration format are found in the Python standard library.
The logging library is based on a modular approach and includes categories of components: loggers, handlers, filters, and formatters. Basically:
- Loggers expose the interface that application code directly uses.
- Handlers send the log records (created by loggers) to the appropriate destination.
- Filters provide a finer grained facility for determining which log records to output.
- Formatters specify the layout of log records in the final output.
These multiple logger objects are organized into a tree that represents various parts of your system and different third-party libraries that you have installed. When you send a message into one of the loggers, the message gets output on all of that logger’s handlers, using a formatter that’s attached to each handler. The message then propagates up the logger tree until it hits the root logger, or a logger up in the tree that is configured with propagate=False.
Python logging platforms
This is an example of a basic logger in Python:
import logging

logging.basicConfig(level=logging.DEBUG,
format='%(asctime)s %(levelname)s %(message)s',
      filename='/tmp/myapp.log',
      filemode='w')

logging.debug("Debug message")

logging.info("Informative message")

logging.error("Error message")
Line 1: import the logging module.
Line 2: create a basicConf function and pass some arguments to create the log file. In this case, we indicate the severity level, date format, filename and file mode to have the function overwrite the log file.
Line 3 to 5: messages for each logging level.
The default format for log records is SEVERITY: LOGGER: MESSAGE. Hence, if you run the code above as is, you’ll get this output:
2021-07-02 13:00:08,743 DEBUG Debug message

2021-07-02 13:00:08,743 INFO Informative message

2021-07-02 13:00:08,743 ERROR Error message
Regarding the output, you can set the destination of the log messages. As a first step, you can print messages to the screen using this sample code:
import logging
logging.basicConfig(level=logging.DEBUG, format='%(asctime)s - %(levelname)s - %(message)s')
logging.debug('This is a log message.')
If your goals are aimed at the Cloud, you can take advantage of Python’s set of logging handlers to redirect content. Currently in beta release, you can write logs to Stackdriver Logging from Python applications by using Google’s Python logging handler included with the Stackdriver Logging client library, or by using the client library to access the API directly. When developing your logger, take into account that the root logger doesn’t use your log handler. Since the Python Client for Stackdriver Logging library also does logging, you may get a recursive loop if the root logger uses your Python log handler.
Python logging best practices
The possibilities with Python logging are endless and you can customize them to your needs. The following are some tips for web application logging best practices, so you can take the most from Python logging:
Setting level names: This supports you in maintaining your own dictionary of log messages and reduces the possibility of typo errors.
LogWithLevelName = logging.getLogger('myLoggerSample')
level = logging.getLevelName('INFO')
LogWithLevelName.setLevel(level)
logging.getLevelName(logging_level) returns the textual representation of the severity called logging_level. The predefined values include, from highest to lowest severity:
- CRITICAL
- ERROR
- WARNING
- INFO
- DEBUG
Logging from multiple modules: if you have various modules, and you have to perform the initialization in every module before logging messages, you can use cascaded logger naming:
logging.getLogger(“coralogix”)

logging.getLogger(“coralogix.database”)

logging.getLogger(“coralogix.client”)
Making coralogix.client and coralogix.database descendants of the logger coralogix, and propagating their messages to it, it thereby enables easy multi-module logging. This is one of the positive side-effects of name in case the library structure of the modules reflects the software architecture.
Logging with Django and uWSGI: To deploy web applications you can use StreamHandler as logger which sends all logs to For Django you have:
  'handlers': {

    'stderr': {

        'level': 'INFO',

        'class': 'logging.StreamHandler',

        'formatter': 'your_formatter',

      },

    },
Next, uWSGI forwards all of the app output, including prints and possible tracebacks, to syslog with the app name attached:
$ uwsgi --log-syslog=yourapp …
Logging with Nginx: In case you need having additional features not supported by uWSGI — for example, improved handling of static resources (via any combination of Expires or E-Tag headers, gzip compression, pre-compressed gzip, etc.), access logs and their format can be customized in conf. You can use the combined format, such the example for a Linux system:
access_log /var/log/nginx/access.log;
This line is similar to explicitly specifying the combined format as this:
# note that the log_format directly below is a single line
log_format mycombined '$remote_addr - $remote_user [$time_local]
"$request" $status $body_bytes_sent "$http_referer"
"$http_user_agent"'server_port';
access_log /var/log/nginx/access.log mycombinedplus;
Log analysis and filtering: after writing proper logs, you might want to analyze them and obtain useful insights. First, open files using blocks, so you won’t have to worry about closing them. Moreover, avoid reading everything into memory at once. Instead, read a line at a time and use it to update the cumulative statistics. The use of the combined log format can be practical if you are thinking on using log analysis tools because they have pre-built filters for consuming these logs.
If you need to parse your log output for analysis you might want to use the code below:
    with open(logfile, "rb") as f:

        for line in csv.reader(f, delimiter=' '):

            self._update(**self._parse(line))
Python’s CSV module contains code the read CSV files and other files with a similar format. In this way, you can combine Python’s logging library to register the logs and the CSV library to parse them.
And of course, the Coralogix way for python logging, using the Coralogix Python appender allows sending all Python written logs directly to Coralogix for search, live tail, alerting, and of course, machine learning powered insights such as new error detection and flow anomaly detection.
Python Logging Deep Dive
The rest of this guide is focused on how to log in Python using the built-in support for logging. It introduces various concepts that are relevant to understanding Python logging, discusses the corresponding logging APIs in Python and how to use them, and presents best practices and performance considerations for using these APIs.
We will introduce various concepts relevant to understanding logging in Python, discuss the corresponding logging APIs in Python and how to use them, and present best practices and performance considerations for using these APIs.
This Python tutorial assumes the reader has a good grasp of programming in Python; specifically, concepts and constructs pertaining to general programming and object-oriented programming. The information and Python logging examples in this article are based on Python version 3.8.
Python has offered built-in support for logging since version 2.3. This support includes library APIs for common concepts and tasks that are specific to logging and language-agnostic. This article introduces these concepts and tasks as realized and supported in Python’s logging library.
Basic Python Logging Concepts
When we use a logging library, we perform/trigger the following common tasks while using the associated concepts (highlighted in bold).
- A client issues a log request by executing a logging statement. Often, such logging statements invoke a function/method in the logging (library) API by providing the log data and the logging level as arguments. The logging level specifies the importance of the log request. Log data is often a log message, which is a string, along with some extra data to be logged. Often, the logging API is exposed via logger objects.
- To enable the processing of a request as it threads through the logging library, the logging library creates a log record that represents the log request and captures the corresponding log data.
- Based on how the logging library is configured (via a logging configuration), the logging library filters the log requests/records. This filtering involves comparing the requested logging level to the threshold logging level and passing the log records through user-provided filters.
- Handlers process the filtered log records to either store the log data (e.g., write the log data into a file) or perform other actions involving the log data (e.g., send an email with the log data). In some logging libraries, before processing log records, a handler may again filter the log records based on the handler’s logging level and user-provided handler-specific filters. Also, when needed, handlers often rely on user-provided formatters to format log records into strings, i.e., log entries.
Independent of the logging library, the above tasks are performed in an order similar to that shown in Figure 1.
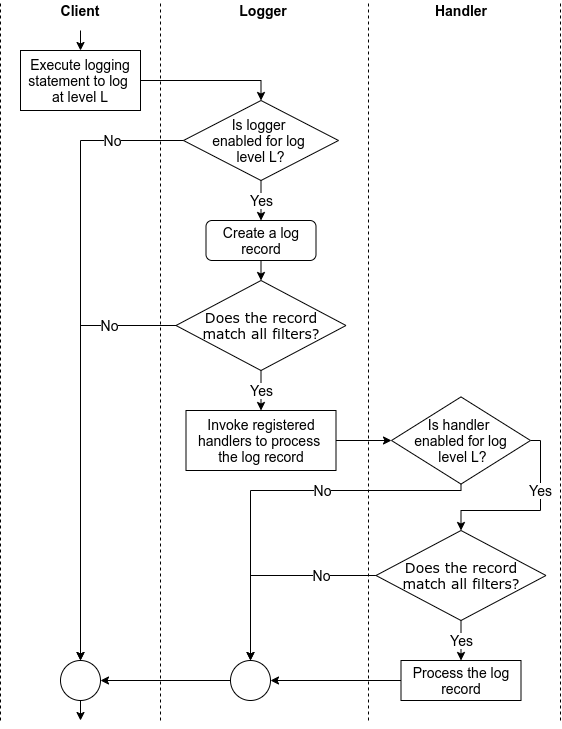
Figure 1: The flow of tasks when logging via a logging library
Python Logging Module
Python’s standard library offers support for logging via logging, logging.config, and logging.handlers modules.
loggingmodule provides the primary client-facing API.logging.configmodule provides the API to configure logging in a client.logging.handlersmodule provides different handlers that cover common ways of processing and storing log records.
We collectively refer to these modules as Python’s logging library.
These Python log modules realize the concepts introduced in the previous section as classes, a set of module-level functions, or a set of constants. Figure 2 shows these classes and the associations between them.
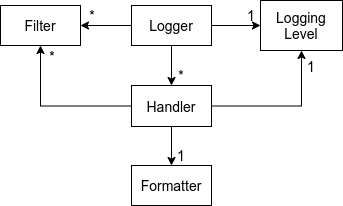
Figure 2: Python classes and constants representing various logging concepts
Python Logging Levels
Out of the box, the Python logging library supports five logging levels: critical, error, warning, info, and debug. These levels are denoted by constants with the same name in the logging module, i.e., logging.CRITICAL, logging.ERROR, logging.WARNING, logging.INFO, and logging.DEBUG. The values of these constants are 50, 40, 30, 20, and 10, respectively.
At runtime, the numeric value of a logging level determines the meaning of a logging level. Consequently, clients can introduce new logging levels by using numeric values that are greater than 0 and not equal to pre-defined logging levels as logging levels.
Logging levels can have names. When names are available, logging levels appear by their names in log entries. Every pre-defined logging level has the same name as the name of the corresponding constant; hence, they appear by their names in log entries, e.g., logging.WARNING and 30 levels appear as ‘WARNING’. In contrast, custom logging levels are unnamed by default. So, an unnamed custom logging level with numeric value n appears as ‘Level n’ in log entries, and this results in inconsistent and human-unfriendly log entries. To address this, clients can name a custom logging level using the module-level function logging.addLevelName(level, levelName). For example, by using logging.addLevelName(33, 'CUSTOM1'), level 33 will be recorded as ‘CUSTOM1’.
The Python logging library adopts the community-wide applicability rules for logging levels, i.e., when should logging level X be used?
- Debug: Use
logging.DEBUGto log detailed information, typically of interest only when diagnosing problems, e.g., when the app starts. - Info: Use
logging.INFOto confirm the software is working as expected, e.g., when the app initializes successfully. - Warning: Use
logging.WARNINGto report behaviors that are unexpected or are indicative of future problems but do not affect the current functioning of the software, e.g., when the app detects low memory, and this could affect the future performance of the app. - Error: Use
logging.ERRORto report the software has failed to perform some function, e.g., when the app fails to save the data due to insufficient permission. - Critical: Use
logging.CRITICALto report serious errors that may prevent the continued execution of the software, e.g., when the app fails to allocate memory.
Python Loggers
The logging.Logger objects offer the primary interface to the logging library. These objects provide the logging methods to issue log requests along with the methods to query and modify their state. From here on out, we will refer to Logger objects as loggers.
Creation
The factory function logging.getLogger(name) is typically used to create loggers. By using the factory function, clients can rely on the library to manage loggers and to access loggers via their names instead of storing and passing references to loggers.
The name argument in the factory function is typically a dot-separated hierarchical name, e.g., a.b.c. This naming convention enables the library to maintain a hierarchy of loggers. Specifically, when the factory function creates a logger, the library ensures a logger exists for each level of the hierarchy specified by the name, and every logger in the hierarchy is linked to its parent and child loggers.
Threshold Logging Level
Each logger has a threshold logging level that determines if a log request should be processed. A logger processes a log request if the numeric value of the requested logging level is greater than or equal to the numeric value of the logger’s threshold logging level. Clients can retrieve and change the threshold logging level of a logger via Logger.getEffectiveLevel() and Logger.setLevel(level) methods, respectively.
When the factory function is used to create a logger, the function sets a logger’s threshold logging level to the threshold logging level of its parent logger as determined by its name.
Python Logging Methods
Every logger offers the following logging methods to issue log requests.
Logger.critical(msg, *args, **kwargs)Logger.error(msg, *args, **kwargs)Logger.debug(msg, *args, **kwargs)Logger.info(msg, *args, **kwargs)Logger.warn(msg, *args, **kwargs)
Each of these methods is a shorthand to issue log requests with corresponding pre-defined logging levels as the requested logging level.
In addition to the above methods, loggers also offer the following two methods:
Logger.log(level, msg, *args, **kwargs)issues log requests with explicitly specified logging levels. This method is useful when using custom logging levels.Logger.exception(msg, *args, **kwargs)issues log requests with the logging levelERRORand that capture the current exception as part of the log entries. Consequently, clients should invoke this method only from an exception handler.
msg and args arguments in the above methods are combined to create log messages captured by log entries. All of the above methods support the keyword argument exc_info to add exception information to log entries and stack_info and stacklevel to add call stack information to log entries. Also, they support the keyword argument extra, which is a dictionary, to pass values relevant to filters, handlers, and formatters.
When executed, the above methods perform/trigger all of the tasks shown in Figure 1 and the following two tasks:
- After deciding to process a log request based on its logging level and the threshold logging level, the logger creates a
LogRecordobject to represent the log request in the downstream processing of the request.LogRecordobjects capture themsgandargsarguments of logging methods and the exception and call stack information along with source code information. They also capture the keys and values in the extra argument of the logging method as fields. - After every handler of a logger has processed a log request, the handlers of its ancestor loggers process the request (in the order they are encountered walking up the logger hierarchy). The
Logger.propagatefield controls this aspect, which isTrueby default.
Beyond logging levels, filters provide a finer means to filter log requests based on the information in a log record, e.g., ignore log requests issued in a specific class. Clients can add and remove filters to/from loggers using Logger.addFilter(filter) and Logger.removeFilter(filter) methods, respectively.
Python Logging Filters
Any function or callable that accepts a log record argument and returns zero to reject the record and a non-zero value to admit the record can serve as a filter. Any object that offers a method with the signature filter(record: LogRecord) -> int can also serve as a filter.
A subclass of logging.Filter(name: str) that optionally overrides the logging.Filter.filter(record) method can also serve as a filter. Without overriding the filter method, such a filter will admit records emitted by loggers that have the same name as the filter and are children of the filter (based on the name of the loggers and the filter). If the name of the filter is empty, then the filter admits all records. If the method is overridden, then it should return zero value to reject the record and a non-zero value to admit the record.
Python Logging Handler
The logging.Handler objects perform the final processing of log records, i.e., logging log requests. This final processing often translates into storing the log record, e.g., writing it into system logs or files. It can also translate it to communicate the log record data to specific entities (e.g., send an email) or passing the log record to other entities for further processing (e.g., provide the log record to a log collection process or a log collection service).
Like loggers, handlers have a threshold logging level, which can be set via theHandler.setLevel(level) method. They also support filters via Handler.addFilter(filter) and Handler.removeFilter(filter) methods.
The handlers use their threshold logging level and filters to filter log records for processing. This additional filtering allows context-specific control over logging, e.g., a notifying handler should only process log requests that are critical or from a flaky module.
While processing the log records, handlers format log records into log entries using their formatters. Clients can set the formatter for a handler via Handler.setFormatter(formatter) method. If a handler does not have a formatter, then it uses the default formatter provided by the library.
The logging.handler module provides a rich collection of 15 useful handlers that cover many common use cases (including the ones mentioned above). So, instantiating and configuring these handlers suffices in many situations.
In situations that warrant custom handlers, developers can extend the Handler class or one of the pre-defined Handler classes by implementing the Handler.emit(record) method to log the provided log record.
Python Logging Formatter
The handlers use logging.Formatter objects to format a log record into a string-based log entry.
Note: Formatters do not control the creation of log messages.
A formatter works by combining the fields/data in a log record with the user-specified format string.
Unlike handlers, the logging library only provides a basic formatter that logs the requested logging level, the logger’s name, and the log message. So, beyond simple use cases, clients need to create new formatters by creating logging.Formatter objects with the necessary format strings.
Formatters support three styles of format strings:
printf, e.g., ‘%(levelname)s:%(name)s:%(message)s’
str.format(), e.g., ‘{levelname}:{name}:{message}’
str.template, e.g., ‘$levelname:$name:$message’
The format string of a formatter can refer to any field of LogRecord objects, including the fields based on the keys of the extra argument of the logging method.
Before formatting a log record, the formatter uses the LogRecord.getMessage() method to construct the log message by combining the msg and args arguments of the logging method (stored in the log record) using the string formatting operator (%). The formatter then combines the resulting log message with the data in the log record using the specified format string to create the log entry.
Python Logging Module
To maintain a hierarchy of loggers, when a client uses the logging library, the library creates a root logger that serves as the root of the hierarchy of loggers. The default threshold logging level of the root logger is logging.WARNING.
The module offers all of the logging methods offered by the Logger class as module-level functions with identical names and signature, e.g., logging.debug(msg, *args, **kwargs). Clients can use these functions to issue log requests without creating loggers, and the root logger services these requests. If the root logger has no handlers when servicing log requests issued via these methods, then the logging library adds a logging.StreamHandler instance based on the sys.stderr stream as a handler to the root logger.
When loggers without handlers receive log requests, the logging library directs such log requests to the last resort handler, which is a logging.StreamHandler instance based on sys.stderr stream. This handler is accessible via the logging.lastResort attribute.
Python Logging Examples
Here are a few code snippets illustrating how to use the Python logging library.
Snippet 1: Creating a logger with a handler and a formatter
# main.py
import lo
gging, sys

def _init_logger():
    logger = logging.getLogger('app')  #1
    logger.setLevel(logging.INFO)  #2
    handler = logging.StreamHandler(sys.stderr)  #3
    handler.setLevel(logging.INFO)  #4
    formatter = logging.Formatter(
           '%(created)f:%(levelname)s:%(name)s:%(module)s:%(message)s') #5
    handler.setFormatter(formatter)  #6
    logger.addHandler(handler)  #7

_init_logger()
_logger = logging.getLogger('app')
This snippet does the following.
- Create a logger named ‘app’.
- Set the threshold logging level of the logger to INFO.
- Create a stream-based handler that writes the log entries into the standard error stream.
- Set the threshold logging level of the handler to INFO.
- Create a formatter to capture
- the time of the log request as the number of seconds since epoch,
- the logging level of the request,
- the logger’s name,
- the name of the module issuing the log request, and
- the log message.
- Set the created formatter as the formatter of the handler.
- Add the created handler to this logger.
By changing the handler created in step 3, we can redirect the log entries to different locations or processors.
Snippet 2: Issuing log requests
# main.py
_logger.info('App started in %s', os.getcwd())
This snippet logs informational messages stating the app has started.
When the app is started in the folder /home/kali with the logger created using snippet 1, this snippet will generate the log entry 1586147623.484407:INFO:app:main:App started in /home/kali/ in standard error stream.
Snippet 3: Issuing log requests
# app/io.py
import logging

def _init_logger():
    logger = logging.getLogger('app.io')
    logger.setLevel(logging.INFO)

_init_logger()
_logger = logging.getLogger('app.io')

def write_data(file_name, data):
    try:
        # write data
        _logger.info('Successfully wrote %d bytes into %s', len(data), file_name)
    except FileNotFoundError:
        _logger.exception('Failed to write data into %s', file_name)
This snippet logs an informational message every time data is written successfully via write_data. If a write fails, then the snippet logs an error message that includes the stack trace in which the exception occurred.
With the logger created using snippet 1, if the execution of app.write_data('/tmp/tmp_data.txt', image_data) succeeds, then this snippet will generate a log entry similar to 1586149091.005398:INFO:app.io:io:Successfully wrote 134 bytes into /tmp/tmp_data.txt. If the execution of app.write_data('/tmp/tmp_data.txt', image_data) fails, then this snippet will generate the following log entry:
1586149219.893821:ERROR:app:io:Failed to write data into /tmp1/tmp_data.txt
Traceback (most recent call last):
  File "/home/kali/program/app/io.py", line 12, in write_data
    print(open(file_name), data)
FileNotFoundError: [Errno 2] No such file or directory: '/tmp1/tmp_data.txt'
Instead of using positional arguments in the format string in the logging method, we could achieve the same output by using the arguments via their names as follows:
_logger.info('Successfully wrote %(data_size)s bytes into %(file_name)s',
    {'data_size': len(data), 'file_name': file_name})
Snippet 4: Filtering log requests
# main.py
import logging, os, sys
import app.io

def _init_logger():
    logger = logging.getLogger('app')
    logger.setLevel(logging.INFO)
    formatter = logging.Formatter(
        '%(created)f:%(levelname)s:%(name)s:%(module)s:%(message)s')
    handler = logging.StreamHandler(sys.stderr)
    handler.setLevel(logging.INFO)
    handler.setFormatter(formatter)
    handler.addFilter(lambda record: record.version > 5 or #1
            record.levelno >= logging.ERROR)               #1
    logger.addHandler(handler)

_init_logger()
_logger = logging.LoggerAdapter(logging.getLogger('app'), {'version': 6})  #2
This snippet modifies Snippet 1 as follows.
- Lines marked #1 add a filter to the handler. This filter admits log records only if their logging level is greater than or equal to
logging.ERRORor they are from a component whose version is higher than 4. - Line marked #2 wraps the logger in a
logging.LoggerAdapterobject to inject version information into log records.
The logging.LoggerAdapter class provides a mechanism to inject contextual information into log records. We discuss other mechanisms to inject contextual information in the Good Practices and Gotchas section.
# app/io.py
import logging

def _init_logger():
    logger = logging.getLogger('app.io')
    logger.setLevel(logging.INFO)

_init_logger()
_logger = logging.LoggerAdapter(logging.getLogger('app.io'), {'version': 3})  # 1

def write_data(file_name, data):
    try:
        # write data
        _logger.info('Successfully wrote %d bytes into %s', len(data),
            file_name)
    except FileNotFoundError:
        _logger.exception('Failed to write data into %s', file_name)
This snippet modifies Snippet 3 by wrapping the logger in a LoggerAdapter object to inject version information.
All of the above changes affect the logging behavior of the app described in Snippet 2 and Snippet 3 as follows.
- The request to log the informational message about the start of the app is processed as the version info supplied by the module satisfies the filter.
- The request to log the informational message about the successful write is ignored as the version info supplied by the module fails to satisfy the filter.
- The request to log the error message about the failure to write data is processed as the logging level of the message satisfies the filter.
What do you suppose would have happened if the filter was added to the logger instead of the handler? See Gotchas for the answer.
Python Logging Configuration
The logging classes introduced in the previous section provide methods to configure their instances and, consequently, customize the use of the logging library. Snippet 1 demonstrates how to use configuration methods. These methods are best used in simple single-file programs.
When involved programs (e.g., apps, libraries) use the logging library, a better option is to externalize the configuration of the logging library. Such externalization allows users to customize certain facets of logging in a program (e.g., specify the location of log files, use custom loggers/handlers/formatters/filters) and, hence, ease the deployment and use of the program. We refer to this approach to configuration as data-based approach.
Configuring the Library
Clients can configure the logging library by invoking logging.config.dictConfig(config: Dict) function. The config argument is a dictionary and the following optional keys can be used to specify a configuration.
filters key maps to a dictionary of strings and dictionaries. The strings serve as filter ids used to refer to filters in the configuration (e.g., adding a filter to a logger) while the mapped dictionaries serve as filter configurations. The string value of the name key in filter configurations is used to construct logging.Filter instances.
"filters": {
  "io_filter": {
    "name": "app.io"
  }
}
This configuration snippet results in the creation of a filter that admits all records created by the logger named ‘app.io’ or its descendants.
formatters key maps to a dictionary of strings and dictionaries. The strings serve as formatter ids used to refer to formatters in the configuration (e.g., adding a formatter to a handler) while the mapped dictionaries serve as formatter configurations. The string values of the datefmt and format keys in formatter configurations are used as the date and log entry formatting strings, respectively, to construct logging.Formatter instances. The boolean value of the (optional) validate key controls the validation of the format strings during the construction of a formatter.
"formatters": {
  "simple": {
    "format": "%(asctime)s - %(message)s",
    "datefmt": "%y%j-%H%M%S"

  },
  "detailed": {
    "format": "%(asctime)s - %(pathname):%(lineno) - %(message)s"
  }
}
This configuration snippet results in the creation of two formatters. A simple formatter with the specified log entry and date formatting strings and detailed formatter with specified log entry formatting string and default date formatting string.
handlers key maps to a dictionary of strings and dictionaries. The strings serve as handler ids used to refer to handlers in the configuration (e.g., adding a handler to a logger) while the mapped dictionaries serve as handler configurations. The string value of the class key in a handler configuration names the class to instantiate to construct a handler. The string value of the (optional) level key specifies the logging level of the instantiated handler. The string value of the (optional) formatter key specifies the id of the formatter of the handler. Likewise, the list of values of the (optional) filters key specifies the ids of the filters of the handler. The remaining keys are passed as keyword arguments to the handler’s constructor.
"handlers": {
  "stderr": {
    "class": "logging.StreamHandler",
    "level": "INFO",
    "filters": ["io_filter"],
    "formatter": "simple",
    "stream": "ext://sys.stderr"
  },
  "alert": {
    "class": "logging.handlers.SMTPHandler",
    "level": "ERROR",
    "formatter": "detailed",
    "mailhost": "smtp.skynet.com",
    "fromaddr": "[email protected]",
    "toaddrs": [ "[email protected]", "[email protected]" ],
    "subject": "System Alert"
  }
}
This configuration snippet results in the creation of two handlers:
- A
stderrhandler that formats log requests with INFO and higher logging level log via thesimpleformatter and emits the resulting log entry into the standard error stream. Thestreamkey is passed as keyword arguments tologging.StreamHandlerconstructor.
The value of thestreamkey illustrates how to access objects external to the configuration. Theext://prefixed string refers to the object that is accessible when the string without the ext:// prefix (i.e., sys.stderr) is processed via the normal importing mechanism. Refer to Access to external objects for more details. Refer to Access to internal objects for details about a similar mechanism based oncfg://prefix to refer to objects internal to a configuration. - An alert handler that formats ERROR and CRITICAL log requests via the
detailedformatter and emails the resulting log entry to the given email addresses. The keysmailhost,formaddr,toaddrs, and subject are passed as keyword arguments tologging.handlers.SMTPHandler’s constructor.
loggers key maps to a dictionary of strings that serve as logger names and dictionaries that serve as logger configurations. The string value of the (optional) level key specifies the logging level of the logger. The boolean value of the (optional) propagate key specifies the propagation setting of the logger. The list of values of the (optional) filters key specifies the ids of the filters of the logger. Likewise, the list of values of the (optional) handlers key specifies the ids of the handlers of the logger.
"loggers": {
  "app": {
    "handlers": ["stderr", "alert"],
    "level": "WARNING"
  },
  "app.io": {
    "level": "INFO"
  }
}
This configuration snippet results in the creation of two loggers. The first logger is named app, its threshold logging level is set to WARNING, and it is configured to forward log requests to stderr and alert handlers. The second logger is named app.io, and its threshold logging level is set to INFO. Since a log request is propagated to the handlers associated with every ascendant logger, every log request with INFO or a higher logging level made via the app.io logger will be propagated to and handled by both stderr and alert handlers.
root key maps to a dictionary of configuration for the root logger. The format of the mapped dictionary is the same as the mapped dictionary for a logger.
incremental key maps to either True or False (default). If True, then only logging levels and propagate options of loggers, handlers, and root loggers are processed, and all other bits of the configuration is ignored. This key is useful to alter existing logging configuration. Refer to Incremental Configuration for more details.
disable_existing_loggers key maps to either True (default) or False. If False, then all existing non-root loggers are disabled as a result of processing this configuration.
Also, the config argument should map the version key to 1.
Here’s the complete configuration composed of the above snippets.
{
  "version": 1,
  "filters": {
    "io_filter": {
      "name": "app.io"
    }
  },
  "formatters": {
    "simple": {
      "format": "%(asctime)s - %(message)s",
      "datefmt": "%y%j-%H%M%S"

    },
    "detailed": {
      "format": "%(asctime)s - %(pathname):%(lineno) - %(message)s"
    }
  },
  "handlers": {
    "stderr": {
      "class": "logging.StreamHandler",
      "level": "INFO",
      "filters": ["io_filter"],
      "formatter": "simple",
      "stream": "ext://sys.stderr"
    },
    "alert": {
      "class": "logging.handlers.SMTPHandler",
      "level": "ERROR",
      "formatter": "detailed",
      "mailhost": "smtp.skynet.com",
      "fromaddr": "[email protected]",
      "toaddrs": [ "[email protected]", "[email protected]" ],
      "subject": "System Alert"
    }
  },
  "loggers": {
    "app": {
      "handlers": ["stderr", "alert"],
      "level": "WARNING"
    },
    "app.io": {
      "level": "INFO"
    }
  }
}
Customizing via Factory Functions
The configuration schema for filters supports a pattern to specify a factory function to create a filter. In this pattern, a filter configuration maps the () key to the fully qualified name of a filter creating factory function along with a set of keys and values to be passed as keyword arguments to the factory function. In addition, attributes and values can be added to custom filters by mapping the . key to a dictionary of attribute names and values.
For example, the below configuration will cause the invocation of app.logging.customFilterFactory(startTime='6PM', endTime='6AM') to create a custom filter and the addition of local attribute with the value True to this filter.
  "filters": {
    "time_filter": {
      "()": "app.logging.create_custom_factory",
      "startTime": "6PM",
      "endTime": "6PM",
      ".": {
        "local": true
      }
    }
  }
Configuration schemas for formatters, handlers, and loggers also support the above pattern. In the case of handlers/loggers, if this pattern and the class key occur in the configuration dictionary, then this pattern is used to create handlers/loggers. Refer to User-defined Objects for more details.
Configuring using Configparse-Format Files
The logging library also supports loading configuration from a configparser-format file via the <a href="https://docs.python.org/3/library/logging.config.html#logging.config.fileConfig" target="_blank" rel="noopener noreferrer">logging.config.fileConfig() function. Since this is an older API that does not provide all of the functionalities offered by the dictionary-based configuration scheme, the use of the dictConfig() function is recommended; hence, we’re not discussing the fileConfig() function and the configparser file format in this tutorial.
Configuring Over The Wire
While the above APIs can be used to update the logging configuration when the client is running (e.g., web services), programming such update mechanisms from scratch can be cumbersome. The logging.config.listen() function alleviates this issue. This function starts a socket server that accepts new configurations over the wire and loads them via dictConfig() or fileConfig() functions. Refer to logging.config.listen() for more details.
Loading and Storing Configuration
Since the configuration provided to dictConfig() is nothing but a collection of nested dictionaries, a logging configuration can be easily represented in JSON and YAML format. Consequently, programs can use the json module in Python’s standard library or external YAML processing libraries to read and write logging configurations from files.
For example, the following snippet suffices to load the logging configuration stored in JSON format.
import json, logging.config

with open('logging-config.json', 'rt') as f:
  config = json.load(f)
  logging.config.dictConfig(config)
Limitations
In the supported configuration scheme, we cannot configure filters to filter beyond simple name-based filtering. For example, we cannot create a filter that admits only log requests created between 6 PM and 6 AM. We need to program such filters in Python and add them to loggers and handlers via factory functions or the addFilter() method.
Python Logging Good Practices and Gotchas
In this section, we will list a few good practices and gotchas related to the logging library. This list stems from our experience, and we intend it to complement the extensive information available in the Logging HOWTO and Logging Cookbook sections of Python’s documentation.
Since there are no silver bullets, all good practices and gotchas have exceptions that are almost always contextual. So, before using the following good practices and gotchas, consider their applicability in the context of your application and ascertain whether they are appropriate in your application’s context.
Best Practices
Create Loggers Using getlogger Function
The logging.getLogger() factory function helps the library manage the mapping from logger names to logger instances and maintain a hierarchy of loggers. In turn, this mapping and hierarchy offer the following benefits:
- Clients can use the
factoryfunction to access the same logger in different parts of the program by merely retrieving the logger by its name. - Only a finite number of loggers are created at runtime (under normal circumstances).
- Log requests can be propagated up the logger hierarchy.
- When unspecified, the threshold logging
levelof a logger can be inferred from its ascendants. - The configuration of the logging library can be updated at runtime by merely relying on the logger names.
Use Logging Level Function
Use the logging.<logging level>() function or the Logger.<logging level>() methods to log at pre-defined logging levels
Besides making the code a bit shorter, the use of these functions/methods helps partition the logging statements in a program into two sets:
- Those that issue log requests with pre-defined logging levels
- Those that issue log requests with custom logging levels.
Use Pre-defined Logging Levels
As described in the Logging Level section in the Concepts and API chapter, the pre-defined logging levels offered by the library capture almost all logging scenarios that occur in programs. Further, since most developers are familiar with pre-defined logging levels (as most logging libraries across different programming languages offer very similar levels), the use of pre-defined levels can help lower deployment, configuration, and maintenance burden. So, unless required, use pre-defined logging levels.
Create module-level loggers
While creating loggers, we can create a logger for each class or create a logger for each module. While the first option enables fine-grained configuration, it leads to more loggers in a program, i.e., one per class. In contrast, the second option can help reduce the number of loggers in a program. So, unless such fine-grained configuration is necessary, create module-level loggers.
Name module-level loggers with the name of the corresponding modules.
Since the logger names are string values that are not part of the namespace of a Python program, they will not clash with module names. Hence, use the name of a module as the name of the corresponding module-level logger. With this naming, logger naming piggybacks on the dot notation based module naming and, consequently, simplifies referring to loggers.
Use logging.LoggerAdatper to inject local contextual information
As demonstrated in Snippet 4, we can use logging.LoggerAdapter to inject contextual information into log records. LoggerAdapter can also be used to modify the log message and the log data provided as part of a log request.
Since the logging library does not manage these adapters, they cannot be accessed via common names. For this reason, use them to inject contextual information that is local to a module or a class.
Use filters or logging.setLogRecordFactory() to inject global contextual information
There are two options to seamlessly inject global contextual information (that is common across an app) into log records.
The first option is to use the filter support to modify the log record arguments provided to filters. For example, the following filter injects version information into incoming log records.
def version_injecting_filter(logRecord):
    logRecord.version = '3'
    return True
There are two downsides to this option. First, if filters depend on the data in log records, then filters that inject data into log records should be executed before filters that use the injected data. Hence, the order of filters added to loggers and handlers becomes crucial. Second, the option “abuses” the support to filter log records to extend log records.
The second option is to initialize the logging library with a log record creating factory function via logging.setLogRecordFactory(). Since the injected contextual information is global, it can be injected into log records when they are created in the factory function and be sure the data will be available to every filter, formatter, logger, and handler in the program.
The downside of this option is that we have to ensure factory functions contributed by different components in a program play nicely with each other. While log record factory functions could be chained, such chaining increases the complexity of programs.
Use the data-based approach to configure the logging library
If your program involves multiple modules and possibly third-party components, then use the data-based approach described in the Configuration chapter to configure the logging library.
Attach common handlers to the loggers higher up the logger hierarchy
If a handler is common to two loggers of which one is the descendant of the other, then attach the handler to the ascendant logger and rely on the logging library to propagate the log requests from the descendant logger to the handlers of the ascendant logger. If the propagate attribute of loggers has not been modified, this pattern helps avoid duplicate messages.
Use logging.disable() function to inhibit the processing of log requests below a certain logging level across all loggers
A logger processes a log request if the logging level of the log request is at least as high as the logger’s effective logging level. A logger’s effective logging level is the higher of two logging levels: the logger’s threshold logging level and the library-wide logging level. We can set the library-wide logging level via the logging.disable(level) function. By default, the library-wide logging level is 0, i.e., log requests of every logging level will be processed.
Using this function, we can throttle the logging output of an app by increasing the logging level across the entire app.
What about caching references to loggers?
Before moving on to gotchas, let’s consider the goodness of the common practice of caching references to loggers and accessing loggers via cached references, e.g., this is how the _logger attribute was used in the previous code snippets.
This coding pattern avoids repeated invocations of the logging.getLogger() function to retrieve the same module-level logger; hence, it helps eliminate redundant retrievals. However, such eliminations can lead to lost log requests if retrievals are not redundant. For example, suppose the logging library configuration in a long-running web service is updated with this disabling_existing_loggers option. Since such an update would disable cached loggers, none of the logging statements that use cached loggers would log any requests. While we can remedy this situation by updating cached references to loggers, a simpler solution would be to use the logging.getLogger() function instead of caching references.
In short, caching references to loggers is not always a good practice. So, consider the context of the program while deciding to cache references to loggers.
Troubleshooting
Filters Fail
When the logging library invokes the filters associated with handlers and loggers, the library assumes the filters will always execute to completion, i.e., not fail on errors. So, there is no error handling logic in the library to deal with failing filters. Consequently, when a filter fails (to execute to completion), the corresponding log request will not be logged.
Ensure filters will execute to completion. More so, when using custom filters and using additional data in filtering.
Formatters Fail
The logging library makes a similar assumption about formatters, i.e., formatters will always execute to completion. Consequently, when a formatter fails to execute to completion, the corresponding log request will not be logged.
Ensure formatters will execute to completion.
Required keys are missing is the extra argument
If the filters/formatters refer to keys of the extra argument provided as part of logging methods, then the filters/formatters can fail when the extra argument does not provide a referred key.
Ensure every key of the extra argument used in a filter or a formatter are available in every triggering logging statement.
Keys in the extra argument clash with required attributes
The logging library adds the keys of the extra argument (to various logging methods) as attributes to log records. However, if asctime and message occur as keys in the extra argument, then the creation of log records will fail, and the corresponding log request will not be logged.
Similar failure occurs if args, exc_info, lineno, msg, name, or pathname occur as keys in the extra argument; these are attributes of the LogRecord class.
Ensure asctime, message, and certain attributes of LogRecord do not appear as keys in the extra argument of logging methods.
Libraries using custom logging levels are combined
When a program and its dependent libraries use the logging library, their logging requirements are combined by the underlying logging library that services these requirements. In this case, if the components of a program use custom logging levels that are mutually inconsistent, then the logging outcome can be unpredictable.
Don’t use custom logging levels, specifically, in libraries.
Filters of ancestor loggers do not fire
By default, log requests are propagated up the logger hierarchy to be processed by the handlers of ancestor loggers. While the filters of the handlers process such log requests, the filters of the corresponding loggers do not process such log requests.
To apply a filter to all log requests submitted to a logger, add the filter to the logger.
Ids of handlers/filters/formatters clash
If multiple handlers share the same handler id in a configuration, then the handler id refers to the handler that is created last when the configuration is processed. The same happens amongst filters and formatters that share ids.
When a client terminates, the logging library will execute the cleanup logic of the handler associated with each handler id. So, if multiple handlers have the same id in a configuration, then the cleanup logic of all but the handler created last will not be executed and, hence, result in resource leaks.
Use unique ids for objects of a kind in a configuration.
Python Logging Performance
While logging statements help capture information at locations in a program, they contribute to the cost of the program in terms of execution time (e.g., logging statements in loops) and storage (e.g., logging lots of data). Although cost-free yet useful logging is impossible, we can reduce the cost of logging by making choices that are informed by performance considerations.
Configuration-Based Considerations
After adding logging statements to a program, we can use the support to configure logging (described earlier) to control the execution of logging statements and the associated execution time. In particular, consider the following configuration capabilities when making decisions about logging-related performance.
- Change logging levels of loggers: This change helps suppress log messages below a certain log level. This helps reduce the execution cost associated with unnecessary creation of log records.
- Change handlers: This change helps replace slower handlers with faster handlers (e.g., during testing, use a transient handler instead of a persistent handler) and even remove context-irrelevant handlers. This reduces the execution cost associated with unnecessary handling of log records.
- Change format: This change helps exclude unnecessary parts of a log record from the log (e.g., exclude IP addresses when executing in a single node setting). This reduces the execution cost associated with unnecessary handling of parts of log records.
The above changes the range over coarser to finer aspects of logging support in Python.
Code-Based Considerations
While the support to configure logging is powerful, it cannot help control the performance impact of implementation choices baked into the source code. Here are a few such logging-related implementation choices and the reasons why you should consider them when making decisions about logging-related performance.
Do not execute inactive logging statements
Upon adding the logging module to Python’s standard library, there were concerns about the execution cost associated with inactive logging statements — logging statements that issue log requests with logging level lower than the threshold logging level of the target logger. For example, how much extra time will a logging statement that invokes logger.debug(...) add to a program’s execution time when the threshold logging level of logger is logging.WARN? This concern led to client-side coding patterns (as shown below) that used the threshold logging level of the target logger to control the execution of the logging statement.
# client code
...
if logger.isEnabledFor(logging.DEBUG):
    logger.debug(msg)
...
Today, this concern is not valid because the logging methods in the logging.Logger class perform similar checks and process the log requests only if the checks pass. For example, as shown below, the above check is performed in the logging.Logger.debug method.
# client code
...
logger.debug(msg)
...

# logging library code

class Logger:
    ...
    def debug(self, msg, *args, **kwargs):
        if self.isEnabledFor(DEBUG):
            self._log(DEBUG, msg, args, **kwargs)
Consequently, inactive logging statements effectively turn into no-op statements and do not contribute to the execution cost of the program.
Even so, one should consider the following two aspects when adding logging statements.
- Each invocation of a logging method incurs a small overhead associated with the invocation of the logging method and the check to determine if the logging request should proceed, e.g., a million invocations of
logger.debug(...)when threshold logging level of logger waslogging.WARNtook half a second on a typical laptop. So, while the cost of an inactive logging statement is trivial, the total execution cost of numerous inactive logging statements can quickly add up to be non-trivial. - While disabling a logging statement inhibits the processing of log requests, it does not inhibit the calculation/creation of arguments to the logging statement. So, if such calculations/creations are expensive, then they can contribute non-trivially to the execution cost of the program even when the corresponding logging statement is inactive.
Do not construct log messages eagerly
Clients can construct log messages in two ways: eagerly and lazily.
- The client constructs the log message and passes it on to the
loggingmethod, e.g.,logger.debug(f'Entering method Foo: {x=}, {y=}').
This approach offers formatting flexibility viaf-stringsand theformat()method, but it involves the eager construction of log messages, i.e., before the logging statements are deemed as active. - The client provides a
printf-style message format string (as amsgargument) and the values (as aargsargument) to construct the log message to the logging method, e.g.,logger.debug('Entering method %s: x=%d, y=%f', 'Foo', x, y). After the logging statement is deemed as active, the logger constructs the log message using the string formatting operator%.
This approach relies on an older and quirky string formatting feature of Python but it involves the lazy construction of log messages.
While both approaches result in the same outcome, they exhibit different performance characteristics due to the eagerness and laziness of message construction.
For example, on a typical laptop, a million inactive invocations of logger.debug('Test message {0}'.format(t)) takes 2197ms while a million inactive invocations of logger.debug('Test message %s', t) takes 1111ms when t is a list of four integers. In the case of a million active invocations, the first approach takes 11061ms and the second approach took 10149ms. A savings of 9–50% of the time taken for logging!
So, the second (lazy) approach is more performant than the first (eager) approach in cases of both inactive and active logging statements. Further, the gains would be larger when the message construction is non-trivial, e.g., use of many arguments, conversion of complex arguments to strings.
Do not gather unnecessary under-the-hood information
By default, when a log record is created, the following data is captured in the log record:
- Identifier of the current process
- Identifier and name of the current thread
- Name of the current process in the multiprocessing framework
- Filename, line number, function name, and call stack info of the logging statement
Unless these bits of data are logged, gathering them unnecessarily increases the execution cost. So, if these bits of data will not be logged, then configure the logging framework to not gather them by setting the following flags.
logging.logProcesses = Falselogging.logThreads = Falselogging.logMultiProcessing = Falselogging._srcFile = None
Do not block the main thread of execution
There are situations where we may want to log data in the main thread of execution without spending almost any time logging the data. Such situations are common in web services, e.g., a request processing thread needs to log incoming web requests without significantly increasing its response time. We can tackle these situations by separating concerns across threads: a client/main thread creates a log record while a logging thread logs the record. Since the task of logging is often slower as it involves slower resources (e.g., secondary storage) or other services (e.g., logging services such as Coralogix, pub-sub systems such as Kafka), this separation of concerns helps minimize the effort of logging on the execution time of the main/client thread.
The Python logging library helps handle such situations via the QueueHandler and QueueListener classes as follows.
- A pair of
QueueHandlerandQueueListenerinstances are initialized with a queue. - When the
QueueHandlerinstance receives a log record from the client, it merely places the log request in its queue while executing in the client’s thread. Given the simplicity of the task performed by theQueueHandler, the client thread hardly pauses. - When a log record is available in the
QueueListenerqueue, the listener retrieves the log record and executes the handlers registered with the listener to handle the log record. In terms of execution, the listener and the registered handlers execute in a dedicated thread that is different from the client thread.
Note: While QueueListener comes with a default threading strategy, developers are not required to use this strategy to use QueueHandler. Instead, developers can use alternative threading strategies that meet their needs.
That about wraps it up for this Python logging guide. If you’re looking for a log management solution to centralize your Python logs, check out our easy-to-configure Python integration.
В Python есть отличная встроенная библиотека — logging. Часто ее противопоставляют print-ам, однако на мой взгляд это гораздо более весомый инструмент. Разобравшись с некотрыми приемами в работе, хочу поделиться с сообществом наиболее, на мой взгляд, интересными вещами. Данная заметка основана на официальной документации, и по сути является частичным вольным переводом.
Когда использовать logging
Для самого простого использования, модуль предоставляет функции debug(), info(), warning(), error() и critical(). Название функций соответствует названию уровней или серьезности логируемых событий. Рекомендации по использованию стандартных уровней сведены в таблицу (в порядке возрастания серьезности).
| Уровень сообщений | Когда использовать |
|---|---|
| CRITICAL | Критическая ошибка, выполнение программы невозможно |
| ERROR | Из-за серьезной ошибки программа не смогла выполнить какую-либо функцию |
| WARNING | Индикация того что произошло что-то неожиданное или указывающее на проблемы в ближайшем будущем, программа все еще работает так как ожидается |
| INFO | Подтверждения, когда программа работает так ожидается |
| DEBUG | Вывод детальной информации при поиске проблем в программе |
Уровень логирования по умолчанию — WARNING, это означает что сообщения этого уровня или выше будут обработаны, ниже — отброшены.
Simple example. (или В Бой!)
Самый простой пример использования модуля выглядит так:
import logging

logging.warning("Warning message")
logging.info("Info message")
если запустить скрипт с этим кодом, то в консоли будет выведено:
WARNING:root:Warning message
что мы видим: WARNING это индикация уровня события, root — имя логгера, Warning message сообщение. Пока не обращайте внимание на имя логгера, это будет объяснено позже. Строка logging.info("Info message") была проигнорирована т.к. уровень INFO ниже уровня WARNING (который был установлен по умолчанию).
Немного теории.
Модуль logging имеет модульный подход и предлагает несколько категорий компонентов: логгеры (loggers), обработчики (handlers), фильтры (filters) и объекты форматирования (formatters).
- logger содержит интерфейс для логирования. Это основной объект, именно он создает записи в лог.
- handler обработчик, который направляет созданные логгером записи в пункт назначения. Например вывод в консоль, запись в файл, отправка письма и т.д.
- filter позволяет получить больший контроль над фильтрацией записей чем стандартные уровни логирования.
Базовый класс реализует только одно поведение: выстраивание иерархии логгеров при помощи имени логгера и точки. Например инициализирован логгер с именем
A.B, тогда записи логгеров с именамиA.B.C,A.B.C.D,A.B.Dбудут обработаны, а логгеров с именамиA.BBилиB.B.Cотброшены.
- formatter является шаблоном для форматирования записи. Возможные атрибуты для заполнения шаблона здесь
Способы конфигурации модуля.
basicConfig
Это базовый, простой способ. Рассмотрим его, на примере чтобы погрузится удивительнйый мир логирования (смайлик):
import logging

logging.basicConfig(
    format='%(asctime)s - %(name)s - %(levelname)s - %(message)s',
    filename='example.log',
    filemode='w',
    level=logging.DEBUG,
    )
logging.debug('This message should go to the log file')
logging.info('So should this')
logging.warning('And this, too')
Рассмотрим параметры переданные в baseConfig: format — преобразует вывод логера по переданному шаблону, filename — сообщает логгеру что необходимо логи заносить в файл с переданным названием example.log, filemod: w — перезаписывать файл при каждом запуске файла, a — дописывать в конец файла и наконец level устанавливает уровень логирования DEBUG. В результате выполнения будет создан файл filemod.log в котором окажутся записи:
2018-05-13 23:41:47,769 - root - DEBUG - This message should go to the log file
2018-05-13 23:41:47,769 - root - INFO - So should this
2018-05-13 23:41:47,769 - root - WARNING - And this, too
дата и время возможно будут другими. Этот способ конфигурирования на сколько прост, настолько же не понятен и не гибок, предлагаю перейти к следующему способу.
getLogger
Этот способ открывает весь набор инструментов библиотеки. Для использования необходимо создать логгер, создать и добавить обработчики, фильтры и шаблон форматирования. Да, у одного логгера может быть несколько обработчиков. И снова пример:
import logging

# создание логгера с именем "main" (может быть любым)
logger = logging.getLogger('main')
# установка уровня логирования
logger.setLevel(logging.DEBUG)

# создание обработчика с логированием в консоль
cons_handler = logging.StreamHandler()
# установка уровня логирования конкретно этого обработчика
cons_handler.setLevel(logging.DEBUG)

# создание обработчика с логированием в файл "2_example.log"
file_handler = logging.FileHandler("3_example.log", mode="a")
file_handler.setLevel(logging.WARNING)

# создание шаблона отображения
formatter = logging.Formatter('%(asctime)s - %(name)s - %(levelname)s - %(message)s')

# связвание обработчиков с шаблоном форматирования
cons_handler.setFormatter(formatter)
file_handler.setFormatter(formatter)

# добавление обработчиков логгеру
logger.addHandler(cons_handler)
logger.addHandler(file_handler)

# использование логгера
logger.debug('debug message')
logger.info('info message')
logger.warn('warn message')
logger.error('error message')
logger.critical('critical message')
По коду должно быть все понятно из комментариев, в результате выполнения получим в консоль:
2018-05-15 22:40:07,974 - main - DEBUG - debug message
2018-05-15 22:40:07,974 - main - INFO - info message
2018-05-15 22:40:07,974 - main - WARNING - warn message
2018-05-15 22:40:07,975 - main - ERROR - error message
2018-05-15 22:40:07,975 - main - CRITICAL - critical message
и файл с именем 3_example.log с содержимым:
2018-05-15 22:40:07,974 - main - WARNING - warn message
2018-05-15 22:40:07,975 - main - ERROR - error message
2018-05-15 22:40:07,975 - main - CRITICAL - critical message
Хочу пояснить следующие моменты:
- Первым делом получаем логгер — экземпляр класса Logger с именем
main. Причем действует правило: одно имя — один экземпляр. Это означает что при первом вызове метода логгер создается, а при последующих передается уже созданный экземпляр логгера. На практике это означает что достаточно вызвать и настроить логгер в одном месте (модуле), выполнить этот код (импортировать модуль), во всех последующих местах вызывать настроеный логгер и… просто логировать. - Далее получаем обработчики. Полный список с описанием здесь их много и они разные: вывод в консоль, запись в файл (возможно с ротацией логов), отправка через сокет, http, UDP, отправка письмом, чтение/запись в очередь и т.д. Далее в приимерах будут те что пользовался я сам.
- Нужно четко понимать что у логгера может быть множество обработчиков, каждый обработчик может иметь свой шаблон сообщения, уровень логирования и фильтрацию. Поэтому в консоль попали все сообщения логгера, а в файл с уровнем
WARNINGи выше. - И наконец получаем шаблоны сообщений. Параметры для шаблонов здесь, основные параметры далее в примерах примерах.
Оптимизация. Процесс подстановки аргументов в шаблон ленивый, и произойдет только если запись действительно будет обрабатываться, поэтому в функцию логирования нужно передавать шаблон строки с аргументами, например
logger.debug("received params %s", a). Если же передавать заранее сформированную строку, то ресурсы системы будут потрачены независимо от того будет запись занесена в лог или нет.
Оптимизация. Вычисление аргуменов для логирования может быть долгим. Для того чтобы не терять время можно воспользоваться методом
isEnabledForлоггера, который принимает уровень логирования, проверяет будет ли производится запись и возвращает ответ вTrueилиFalse. Например:
if logger.isEnabledFor(logging.DEBUG):
    logger.debug('Message with %s', expensive_func())
dictConfig
Мой любимый способ. Сразу к примеру:
import logging
import logging.config

DEBUG = True

LOGGING_CONF = {
    "disable_existing_loggers": True,
    "version": 1,
    "formatters": {
        "verbose": {
            "format": "%(levelname)-8s %(asctime)s [%(filename)s:%(lineno)d] %(message)s",
            "datefmt": "%Y-%m-%d %H:%M:%S",
        },
        "brief": {
            "format": "%(levelname)-8s %(asctime)s %(name)-16s %(message)s",
        }
    },
    "handlers": {
        "console": {
            "level": "DEBUG",
            "class": "logging.StreamHandler",
            "formatter": "verbose",
        },
        "other_cons": {
            "level": "DEBUG",
            "class": "logging.StreamHandler",
            "formatter": "brief",
        },
    },
    "loggers": {
        "main": {
            "level": "INFO",
            "handlers": ["console"],
        },
        "slave": {
            "level": "DEBUG" if DEBUG else "INFO",
            "handlers": ["other_cons"],
        },
    },
}

logging.config.dictConfig(LOGGING_CONF)

logger = logging.getLogger("main")
logger.info("loggers %s configured", ", ".join(LOGGING_CONF["loggers"]))
Итак почему мне нравится этот способ: есть полный контроль над логгерами как в предыдущем способе, но вся настройка происходит в одном месте и выглядит более наглядно. К тому же объект конфигурации это просто словарь который позволяет использовать всю мощь языка Python, и упростить контроль в процессе разработки (а по моему это очень много).
В примере, переменная DEBUG как раз для такого контроля, эта переменная может импортироваться из настроек проекта и определять поведение целевых логгеров. Это может помочь выводить проект в production — не придется ходить по модулям и править все DEBUG = True на False.
В словаре-конфигурации, первая строка отключает объявленные ранее логгеры (может применяться например для отключения логгеров сторонних библиотек), вторая указывается только для обратной совместимости (в будущем этот параметр появится) и может быть только 1. Дальше думаю все понятно: создаются шаблоны, обработчики и объявляются логгеры, к обработчикам добавляются шаблоны, к логгерам обработчики.
Дальше с помощью метода dictConfig обрабатывается словарь-конфигурация, затем берется свежесозданный логгер main и выводится список имен описанных логгеров. Вывод может быть таким:
INFO 2018-05-20 22:43:12 [4_dictConfig.py:45] loggers main, slave configured
fileConfig
Загружает конфигурацию из файла, файл должен быть в формате библиотеки configparser. Мехнизм описания конфигурации в файле очень похож на словарь dictConfig -а. Сама конфигурация чуть более многословна, так же предоставляет полный контроль над логгерами.
По умолчанию disable_existing_loggers = True
Вместо непосредственно файла может принимать экземпляр класса RawConfigParser, что позволяет хранить конфигурацию проекта в одном файле.
import logging
import logging.config

logging.config.fileConfig("5_logging.conf")

logger = logging.getLogger("simpleExample")

logger.debug("debug message")
logger.info("info message")
logger.warn("warn message")
logger.error("error message")
logger.critical("critical message")
[loggers]
keys=root,simpleExample

[handlers]
keys=consoleHandler

[formatters]
keys=simpleFormatter

[logger_root]
level=DEBUG
handlers=consoleHandler

[logger_simpleExample]
level=DEBUG
handlers=consoleHandler
qualname=simpleExample
propagate=0

[handler_consoleHandler]
class=StreamHandler
level=DEBUG
formatter=simpleFormatter
args=(sys.stdout,)

[formatter_simpleFormatter]
format=%(asctime)s - %(name)s - %(levelname)s - %(message)s
datefmt=
и вывод будет:
2018-05-20 23:31:29,215 - simpleExample - DEBUG - debug message
2018-05-20 23:31:29,216 - simpleExample - INFO - info message
2018-05-20 23:31:29,216 - simpleExample - WARNING - warn message
2018-05-20 23:31:29,216 - simpleExample - ERROR - error message
2018-05-20 23:31:29,217 - simpleExample - CRITICAL - critical message
Код думаю понятен, переходим к седующему способу конфигурации.
listen
Поднимает сокет, который слушает и загружает конфигурацию. Наверное применяется в больших, распределенных проектах. Я это не использовал поэтому без примеров.
Некоторые варианты использования
Наследование
Как я уже упоминал, в логгерах, через имена, реализовано наследование. Рассмотрим пример:
import sys
import logging

# этот ужас из-за первой цифры в названии файла
log_dict_conf = __import__("4_dictConfig")
slave = __import__("6_inh_slave")

logger = logging.getLogger("slave." + __name__)
logger.debug("logger with name: %s created", logger.name)


def simple_func(a, b, c):
    s = slave.sum(a, b)
    m = slave.mult(s, c)
    logger.debug("received params %s, %s, %s; return %s", a, b, c, m)
    return m


if __name__ == "__main__":
    args = sys.argv[1:4]
    if len(args) == 3:
        logger.debug("received params from sys.argv")
        args = list(map(int, args))
    else:
        args = [4, 5, 6]
        logger.debug("load default params")
    logger.info("received params %s, %s, %s", *args)
    logger.info(simple_func(*args))
import logging
logger = logging.getLogger("slave." + __name__)
logger.debug("logger with name: %s created", logger.name)


def sum(a, b):
    s = a + b
    logger.debug("received params %s, %s; sum %s", a, b, s)
    return s


def mult(a, b):
    m = a * b
    logger.debug("received params %s, %s; multiply %s", a, b, m)
    return m
выполнив python 6_inh_main.py 1 2 3 в консоли получим:
INFO     2018-05-24 00:54:14 [4_dictConfig.py:45] loggers main, slave configured
DEBUG    2018-05-24 00:54:14,411 slave.6_inh_slave logger with name: slave.6_inh_slave created
DEBUG    2018-05-24 00:54:14,412 slave.__main__   logger with name: slave.__main__ created
DEBUG    2018-05-24 00:54:14,412 slave.__main__   received params from sys.argv
INFO     2018-05-24 00:54:14,412 slave.__main__   received params 1, 2, 3
DEBUG    2018-05-24 00:54:14,412 slave.6_inh_slave received params 1, 2; sum 3
DEBUG    2018-05-24 00:54:14,412 slave.6_inh_slave received params 3, 3; multiply 9
DEBUG    2018-05-24 00:54:14,412 slave.__main__   received params 1, 2, 3; return 9
INFO     2018-05-24 00:54:14,412 slave.__main__   9
Пройдем по порядку. Для начала имортируем модуль 4_dictConfig в котором инициализируем логгеры, это он в первой строке сообщает какие логгеры были настроены. Мне нравится подход, при котром логгеры инициализируюися в одном модуле, и затем получаются getLogger -ом по необходимости.
Затем имортируется модуль 6_inh_slave, и в нем, при вызове getLogger -а к имени инициализированного логгера slave через точку добавлен __name__ (вернет имя модуля если модуль импортируется), что определяет логгер-потомок slave -а с именем slave.6_inh_slave. Логгер-потомок наследует поведение логгера-родителя, однако теперь понятно из логгера какого модуля была сделана запись. Можно в наследовании подставлять имя пакета, название функционального блока или класса, здесь как душе угодно.