Здравствуйте, помогите пожалуйста разобраться в ошибке…
Имеется FreeBSD 9.3
Из портов собрал следующее:
apache24-2.4.23
mysql56-client-5.6.30
mysql56-server-5.6.30
php55-5.5.37
mod_php55-5.5.37
postfixadmin
Конфигурация выглядит следующим образом:
В apache24 добавил следующее:
Код: Выделить всё
LoadModule php5_module        libexec/apache24/libphp5.so

<IfModule mod_php5.c>
    DirectoryIndex index.php index.php3 index.html

    AddType application/x-httpd-php .php
    AddType application/x-httpd-php-source .phps
</IfModule>
Так же создал файл /usr/local/etc/apache24/Includes/postfixadmin.con с содержанием:
Код: Выделить всё
alias /postfixadmin "/usr/local/www/postfixadmin"

<Directory "/usr/local/www/postfixadmin">
    AllowOverride none
    DirectoryIndex index.php
    Require all granted
</Directory>
В postfixadmin указал следующие параметры:
Код: Выделить всё
$CONF['configured'] = true;
$CONF['postfix_admin_url'] = 'http://192.168.10.4/postfixadmin'
$CONF['database_type'] = ‘mysql';
$CONF['database_host'] = 'localhost';
$CONF['database_user'] = ‘mail';
$CONF['database_password'] = ‘mail';
$CONF['database_name'] = ‘mail';
$CONF['emailcheck_resolve_domain']='NO';
Создал базу, пользователя с паролем в mysql…
После всего этого захожу на веб интерфейс и вижу ошибки, но не могу сообразить в чем дело…Вроде бы пишет что параметр configured в значении false… Потом вроде бы ругается что не может к базе подключиться и т.д.
Код: Выделить всё
Postfix Admin Setup Checker

Running software:
Error: Depends on: PHP v5
n"; $error += 1; } elseif (version_compare(phpversion(), '5.2.3') < 0) { # smarty uses htmlentities() with 4 parameters, the 4th parameter was introduced in PHP 5.2.3 # older PHP versions will cause warnings $phpversion = 5; print "•Recommended PHP version: >= 5.2.3, you have " . phpversion () . "
n"; } else { $phpversion = 5; print "•PHP version " . phpversion () . "
n"; } # TODO: check for PHP >= 5.2.3 - smarty uses htmlentities with 4 parameters. The forth parameter was added in PHP 5.2.3, older versions will give a warning } else { print "•Unable to check for PHP version. (missing function: phpversion())
n"; } // // Check for Apache version // if ($f_apache_get_version == 1) { print "•" . apache_get_version() . "
n"; } else { # not running on Apache. # However postfixadmin _is_ running, so obviously we are on a supported webserver ;-)) # No need to confuse the user with a warning. } print ""; print "
Checking for dependencies:n"; print "
n"; // // Check for Magic Quotes // if ($f_get_magic_quotes_gpc == 1) { if (get_magic_quotes_gpc () == 0) { print "•Magic Quotes: Disabled - OK
n"; } else { print "•Warning: Magic Quotes: ON (internal workaround used)
n"; } } else { print "•Unable to check for Magic Quotes. (missing function: get_magic_quotes_gpc())
n"; } // // Check for config.inc.php // $config_loaded = 0; if ($file_config == 1) { print "•Depends on: presence config.inc.php - OK
n"; require_once($incpath.'/config.inc.php'); $config_loaded = 1; if(isset($CONF['configured'])) { if($CONF['configured'] === TRUE) { print "•Checking $CONF['configured'] - OKn"; } else { print "
•Warning: $CONF['configured'] is 'false'.
n"; print "You must edit your config.inc.php and change this to true (this indicates you've created the database and user)n"; } } } else { print "
•Error: Depends on: presence config.inc.php - NOT FOUND

n"; print "Create the file, and edit as appropriate (e.g. select database type etc)
"; print "For example:
n"; print "cp config.inc.php.sample config.inc.php
n"; $error =+ 1; } // // Check if templates directory is writable // if (!is_writeable($incpath.'/templates_c')) { print "•Error: Smarty template compile directory templates_c is not writable.
n"; print "Please make it writable.
n"; print "If you are using SELinux or AppArmor, you might need to adjust their setup to allow write access.
n"; $error =+ 1; } else { print "
•Smarty template compile directory is writable - OK
n"; } // // Check if there is support for at least 1 database // if (($f_mysql_connect == 0) and ($f_mysqli_connect == 0) and ($f_pg_connect == 0)) { print "
•Error: There is no database support in your PHP setup
n"; print "To install MySQL 3.23 or 4.0 support on FreeBSD:
n"; print "% cd /usr/ports/databases/php$phpversion-mysql/n";
    print "% make clean installn";
    print " - or with portupgrade -n";
    print "% portinstall php$phpversion-mysql
n"; if ($phpversion >= 5) { print "To install MySQL 4.1 support on FreeBSD:
n"; print "% cd /usr/ports/databases/php5-mysqli/n";
        print "% make clean installn";
        print " - or with portupgrade -n";
        print "% portinstall php5-mysqli
n"; } print "To install PostgreSQL support on FreeBSD:
n"; print "% cd /usr/ports/databases/php$phpversion-pgsql/n";
    print "% make clean installn";
    print " - or with portupgrade -n";
    print "% portinstall php$phpversion-pgsql

n"; $error =+ 1; } // // MySQL 3.23, 4.0 functions // if ($f_mysql_connect == 1) { print "•Depends on: MySQL 3.23, 4.0 - OK
n"; } // // MySQL 4.1 functions // if ($phpversion >= 5) { if ($f_mysqli_connect == 1) { print "•Depends on: MySQL 4.1 - OKn"; if ( !($config_loaded && $CONF['database_type'] == 'mysqli') ) { print "
(change the database_type to 'mysqli' in config.inc.php if you want to use MySQL)n"; } print "
"; } } // // PostgreSQL functions // if ($f_pg_connect == 1) { print "•Depends on: PostgreSQL - OK n"; if ( !($config_loaded && $CONF['database_type'] == 'pgsql') ) { print "
(change the database_type to 'pgsql' in config.inc.php if you want to use PostgreSQL)n"; } print "
"; } // // Database connection // if ($config_loaded) { list ($link, $error_text) = db_connect(TRUE); if ($error_text == "") { print "•Testing database connection - OK - {$CONF['database_type']}://{$CONF['database_user']}:xxxxx@{$CONF['database_host']}/{$CONF['database_name']}
"; } else { print "•Error: Can't connect to database
n"; print "Please edit the $CONF['database_*'] parameters in config.inc.php.n"; print "$error_text
n"; $error ++; } } // // Session functions // if ($f_session_start == 1) { print "•Depends on: session - OK
n"; } else { print "•Error: Depends on: session - NOT FOUND
n"; print "To install session support on FreeBSD:
n"; print "% cd /usr/ports/www/php$phpversion-session/n";
    print "% make clean installn";
    print " - or with portupgrade -n";
    print "% portinstall php$phpversion-session

n"; $error =+ 1; } // // PCRE functions // if ($f_preg_match == 1) { print "•Depends on: pcre - OK
n"; } else { print "•Error: Depends on: pcre - NOT FOUND
n"; print "To install pcre support on FreeBSD:
n"; print "% cd /usr/ports/devel/php$phpversion-pcre/n";
    print "% make clean installn";
    print " - or with portupgrade -n";
    print "% portinstall php$phpversion-pcre

n"; $error =+ 1; } // // Multibyte functions // if ( $f_mb_encode_mimeheader == 1 ) { print "•Depends on: multibyte string - OK
n"; } else { print "•Error: Depends on: multibyte string - NOT FOUND
n"; print "To install multibyte string support, install php$phpversion-mbstring
n"; $error =+ 1; } // // Imap functions // if ( $f_imap_open == 1) { print "•Depends on: IMAP functions - OK
n"; } else { print "•Warning: Depends on: IMAP functions - NOT FOUND
n"; print "To install IMAP support, install php$phpversion-imap
n"; print "Without IMAP support, you won't be able to create subfolders when creating mailboxes.
n"; # $error =+ 1; } print ""; if ($error != 0) { print "
Please fix the errors listed above.
"; } else { print "
Everything seems fine... attempting to create/update database structure
n"; require_once($incpath.'/upgrade.php'); $tUsername = ''; $setupMessage = ''; $lostpw_error = 0; $setuppw = ""; if (isset($CONF['setup_password'])) $setuppw = $CONF['setup_password']; if (safepost("form") == "setuppw") { # "setup password" form submitted if (safepost('setup_password') != safepost('setup_password2')) { $setupMessage = "The two passwords differ!"; $lostpw_error = 1; } else { list ($lostpw_error, $lostpw_result) = check_setup_password(safepost('setup_password'), 1); $setupMessage = $lostpw_result; $setuppw = "changed"; } } elseif (safepost("form") == "createadmin") { # "create admin" form submitted list ($pw_check_error, $pw_check_result) = check_setup_password(safepost('setup_password')); if ($pw_check_result != 'pass_OK') { $error += 1; $setupMessage = $pw_check_result; } if($error == 0 && $pw_check_result == 'pass_OK') { // XXX need to ensure domains table includes an 'ALL' entry. $table_domain = table_by_key('domain'); $r = db_query("SELECT * FROM $table_domain WHERE domain = 'ALL'"); if($r['rows'] == 0) { db_insert('domain', array('domain' => 'ALL', 'description' => '', 'transport' => '') ); // all other fields should default through the schema. } $values = array( 'username' => safepost('username'), 'password' => safepost('password'), 'password2' => safepost('password2'), 'superadmin' => 1, 'domains' => array(), 'active' => 1, ); list ($error, $setupMessage, $errormsg) = create_admin($values); if ($error != 0) { $tUsername = htmlentities($values['username']); } else { $setupMessage .= "
You are done with your basic setup. "; $setupMessage .= "

You can now login to PostfixAdmin using the account you just created."; } } } if ( ($setuppw == "" || $setuppw == "changeme" || safeget("lostpw") == 1 || $lostpw_error != 0) /* && $_SERVER['REQUEST_METHOD'] != "POST" */ ) { # show "create setup password" form ?>


Change setup password

Setup password
Setup password (again)


Create superadmin account

Setup password  Lost password?


Since version 2.3 there is no requirement to delete setup.php!
n"; print "Check the config.inc.php file for any other settings that you might need to change!
n"; } ?>  0 (or 1), 'message => text ) */ function check_setup_password($password, $lostpw_mode = 0) { global $CONF; $error = 1; # be pessimistic $setuppw = ""; if (isset($CONF['setup_password'])) $setuppw = $CONF['setup_password']; list($confsalt, $confpass, $trash) = explode(':', $setuppw . '::'); $pass = encrypt_setup_password($password, $confsalt); $validpass = validate_password($password); if ($password == "" ) { # no password specified? $result = "Setup password must be specified
If you didn't set up a setup password yet, enter the password you want to use."; } elseif (count($validpass) > 0) { $result = $validpass[0]; # TODO: honor all error messages, not only the first one } elseif ($pass == $setuppw && $lostpw_mode == 0) { # correct passsword (and not asking for a new password) $result = "pass_OK"; $error = 0; } else { $pass = encrypt_setup_password($password, generate_setup_password_salt()); $result = ""; if ($lostpw_mode == 1) { $error = 0; # non-matching password is expected when the user asks for a new password } else { $result = '
Setup password not specified correctly
'; } $result .= '
If you want to use the password you entered as setup password, edit config.inc.php or config.local.php and set
'; $result .= "$CONF['setup_password'] = '$pass';
"; } return array ($error, $result); } function create_admin($values) { DEFINE('POSTFIXADMIN_SETUP', 1); # avoids instant redirect to login.php after creating the admin $handler = new AdminHandler(1, 'setup.php'); $formconf = $handler->webformConfig(); if (!$handler->init($values['username'])) { return array(1, "", $handler->errormsg); } if (!$handler->set($values)) { return array(1, "", $handler->errormsg); } if (!$handler->store()) { return array(1, "", $handler->errormsg); } return array( 0, $handler->infomsg['success'], array(), ); } /* vim: set expandtab softtabstop=4 tabstop=4 shiftwidth=4: */ ?>
First time for me to try setting up any server stuff with arch, so forgive if I come across as clueless
The story is I followed this page from the arch wiki: https://wiki.archlinux.org/index.php/SO … #SMTP-AUTH to setup postfix, dovecot and postfixadmin (without smtp-auth as I have to use my isp’s server for outgoing mail) and have a few issues but I think the first place I need to start is postfixadmin. Haven’t been able to get it to run the setup.php file which as far a I can see will create the mysql tables mapped in postfix’s main.cf file
When I try running http://mydomain/postfixadmin/setup.php I get this error:
Please edit config.inc.php - change $CONF['configured'] to true after setting your database settingsIn my /srv/http/postfixadmin/config_inc.php file I have already set this like so:
$CONF['configured'] = true;I’m thinking maybe I did something wrong in the config_inc.php file, I’m able to use phpmyadmin so I don’t think it’s an issue with my apache/php installation, here’s my full /srv/http/postfixadmin/config_inc.php file in case anyone can spot anything:
<?php
/*
* You have to set $CONF['configured'] = true; before the application will run!
*/
$CONF['configured'] = true;
// In order to setup Postfixadmin, you MUST specify a hashed password here.
// To create the hash, visit setup.php in a browser and type a password into the field,
// on submission it will be echoed out to you as a hashed value.
$CONF['setup_password'] = '';
// Postfix Admin Path
$CONF['postfix_admin_url'] = '[url]http://mydomain.com/postfixadmin[/url]';
// shouldn't need changing.
$CONF['postfix_admin_path'] = dirname(__FILE__);
$CONF['default_language'] = 'en';
// Database Config
// mysql = MySQL 3.23 and 4.0, 4.1 or 5
// mysqli = MySQL 4.1+
// pgsql = PostgreSQL
$CONF['database_type'] = 'mysqli';
$CONF['database_host'] = 'localhost';
$CONF['database_user'] = 'my_db_user';
$CONF['database_password'] = 'my_db_password';
$CONF['database_name'] = 'postfix';
// If you need to specify a different port for a MYSQL database connection, use e.g.
// $CONF['database_host'] = '172.30.33.66:3308';
// Here, if you need, you can customize table names.
$CONF['database_prefix'] = '';
$CONF['database_tables'] = array (
'admin' => 'admin',
'alias' => 'alias',
'alias_domain' => 'alias_domain',
'config' => 'config',
'domain' => 'domain',
'domain_admins' => 'domain_admins',
'fetchmail' => 'fetchmail',
'log' => 'log',
'mailbox' => 'mailbox',
'vacation' => 'vacation',
'vacation_notification' => 'vacation_notification',
'quota' => 'quota',
'quota2' => 'quota2',
);
// Site Admin
// Define the Site Admins email address below.
// This will be used to send emails from to create mailboxes.
$CONF['admin_email'] = 'postmaster@mydomain.com';
// Mail Server
// Hostname (FQDN) of your mail server.
// This is used to send email to Postfix in order to create mailboxes.
$CONF['smtp_server'] = 'localhost';
$CONF['smtp_server'] = 'mydomain.com';
$CONF['smtp_port'] = '25';
// Encrypt
// In what way do you want the passwords to be crypted?
// md5crypt = internal postfix admin md5
// md5 = md5 sum of the password
// system = whatever you have set as your PHP system default
// cleartext = clear text passwords (ouch!)
// mysql_encrypt = useful for PAM integration
// authlib = support for courier-authlib style passwords
// dovecot:CRYPT-METHOD = use dovecotpw -s 'CRYPT-METHOD'. Example: dovecot:CRAM-MD5
$CONF['encrypt'] = 'md5crypt';
// In what flavor should courier-authlib style passwords be enrypted?
// md5 = {md5} + base64 encoded md5 hash
// md5raw = {md5raw} + plain encoded md5 hash
// SHA = {SHA} + base64-encoded sha1 hash
// crypt = {crypt} + Standard UNIX DES-enrypted with 2-character salt
$CONF['authlib_default_flavor'] = 'md5raw';
// If you use the dovecot encryption method: where is the dovecotpw binary located?
$CONF['dovecotpw'] = "/usr/sbin/dovecotpw";
// Minimum length required for passwords. Postfixadmin will not
// allow users to set passwords which are shorter than this value.
$CONF['min_password_length'] = 5;
// Generate Password
// Generate a random password for a mailbox or admin and display it.
// If you want to automagically generate paswords set this to 'YES'.
$CONF['generate_password'] = 'NO';
// Show Password
// Always show password after adding a mailbox or admin.
// If you want to always see what password was set set this to 'YES'.
$CONF['show_password'] = 'NO';
// Page Size
// Set the number of entries that you would like to see
// in one page.
$CONF['page_size'] = '10';
// Default Aliases
// The default aliases that need to be created for all domains.
$CONF['default_aliases'] = array (
'abuse' => 'abuse@mydomain.com',
'hostmaster' => 'hostmaster@mydomain.com',
'postmaster' => 'postmaster@mydomain.com',
'webmaster' => 'webmaster@mydomain.com'
);
// Mailboxes
// If you want to store the mailboxes per domain set this to 'YES'.
// Examples:
// YES: /usr/local/virtual/domain.tld/username@domain.tld
// NO: /usr/local/virtual/username@domain.tld
$CONF['domain_path'] = 'NO';
// If you don't want to have the domain in your mailbox set this to 'NO'.
// Examples:
// YES: /usr/local/virtual/domain.tld/username@domain.tld
// NO: /usr/local/virtual/domain.tld/username
// Note: If $CONF['domain_path'] is set to NO, this setting will be forced to YES.
$CONF['domain_in_mailbox'] = 'YES';
// If you want to define your own function to generate a maildir path set this to the name of the function.
// Notes:
// - this configuration directive will override both domain_path and domain_in_mailbox
// - the maildir_name_hook() function example is present below, commented out
// - if the function does not exist the program will default to the above domain_path and domain_in_mailbox settings
$CONF['maildir_name_hook'] = 'NO';
/*
maildir_name_hook example function
Called by create-mailbox.php if $CONF['maildir_name_hook'] == '<name_of_the_function>'
- allows for customized maildir paths determined by a custom function
- the example below will prepend a single-character directory to the
beginning of the maildir, splitting domains more or less evenly over
36 directories for improved filesystem performance with large numbers
of domains.
Returns: maildir path
ie. I/example.com/user/
*/
/*
function maildir_name_hook($domain, $user) {
$chars = "0123456789ABCDEFGHIJKLMNOPQRSTUVWXYZ";
$dir_index = hexdec(substr(md5($domain), 28)) % strlen($chars);
$dir = substr($chars, $dir_index, 1);
return sprintf("%s/%s/%s/", $dir, $domain, $user);
}
*/
// Default Domain Values
// Specify your default values below. Quota in MB.
$CONF['aliases'] = '10';
$CONF['mailboxes'] = '10';
$CONF['maxquota'] = '10';
// Quota
// When you want to enforce quota for your mailbox users set this to 'YES'.
$CONF['quota'] = 'NO';
// You can either use '1024000' or '1048576'
$CONF['quota_multiplier'] = '1024000';
// Transport
// If you want to define additional transport options for a domain set this to 'YES'.
// Read the transport file of the Postfix documentation.
$CONF['transport'] = 'NO';
// Transport options
// If you want to define additional transport options put them in array below.
$CONF['transport_options'] = array (
'virtual', // for virtual accounts
'local', // for system accounts
'relay' // for backup mx
);
// Transport default
// You should define default transport. It must be in array above.
$CONF['transport_default'] = 'virtual';
// Virtual Vacation
// If you want to use virtual vacation for you mailbox users set this to 'YES'.
// NOTE: Make sure that you install the vacation module. (See VIRTUAL-VACATION/)
$CONF['vacation'] = 'NO';
// This is the autoreply domain that you will need to set in your Postfix
// transport maps to handle virtual vacations. It does not need to be a
// real domain (i.e. you don't need to setup DNS for it).
$CONF['vacation_domain'] = 'autoreply.change-this-to-your.domain.tld';
// Vacation Control
// If you want users to take control of vacation set this to 'YES'.
$CONF['vacation_control'] ='YES';
// Vacation Control for admins
// Set to 'YES' if your domain admins should be able to edit user vacation.
$CONF['vacation_control_admin'] = 'YES';
// Alias Control
// Postfix Admin inserts an alias in the alias table for every mailbox it creates.
// The reason for this is that when you want catch-all and normal mailboxes
// to work you need to have the mailbox replicated in the alias table.
// If you want to take control of these aliases as well set this to 'YES'.
// Alias control for superadmins
$CONF['alias_control'] = 'NO';
// Alias Control for domain admins
$CONF['alias_control_admin'] = 'NO';
// Special Alias Control
// Set to 'NO' if your domain admins shouldn't be able to edit the default aliases
// as defined in $CONF['default_aliases']
$CONF['special_alias_control'] = 'NO';
// Alias Goto Field Limit
// Set the max number of entries that you would like to see
// in one 'goto' field in overview, the rest will be hidden and "[and X more...]" will be added.
// '0' means no limits.
$CONF['alias_goto_limit'] = '0';
// Alias Domains
// Alias domains allow to "mirror" aliases and mailboxes to another domain. This makes
// configuration easier if you need the same set of aliases on multiple domains, but
// also requires postfix to do more database queries.
// Note: If you update from 2.2.x or earlier, you will have to update your postfix configuration.
// Set to 'NO' to disable alias domains.
$CONF['alias_domain'] = 'YES';
// Backup
// If you don't want backup tab set this to 'NO';
$CONF['backup'] = 'YES';
// Send Mail
// If you don't want sendmail tab set this to 'NO';
$CONF['sendmail'] = 'YES';
// Logging
// If you don't want logging set this to 'NO';
$CONF['logging'] = 'YES';
// Fetchmail
// If you don't want fetchmail tab set this to 'NO';
$CONF['fetchmail'] = 'YES';
// fetchmail_extra_options allows users to specify any fetchmail options and any MDA
// (it will even accept 'rm -rf /' as MDA!)
// This should be set to NO, except if you *really* trust *all* your users.
$CONF['fetchmail_extra_options'] = 'NO';
// Header
$CONF['show_header_text'] = 'NO';
$CONF['header_text'] = ':: Postfix Admin ::';
// link to display under 'Main' menu when logged in as a user.
$CONF['user_footer_link'] = "[url]http://change-this-to-your.domain.tld/main[/url]";
// link to display under 'Main' menu when logged in as a user.
$CONF['user_footer_link'] = "[url]http://change-this-to-your.domain.tld/main[/url]";
// Footer
// Below information will be on all pages.
// If you don't want the footer information to appear set this to 'NO'.
$CONF['show_footer_text'] = 'YES';
$CONF['footer_text'] = 'Return to change-this-to-your.domain.tld';
$CONF['footer_link'] = '[url]http://change-this-to-your.domain.tld[/url]';
// Welcome Message
// This message is send to every newly created mailbox.
// Change the text between EOM.
$CONF['welcome_text'] = <<<EOM
Hi,
Welcome to your new account.
EOM;
// When creating mailboxes or aliases, check that the domain-part of the
// address is legal by performing a name server look-up.
$CONF['emailcheck_resolve_domain']='YES';
// Optional:
// color names available on most browsers
//set to YES to enable this feature
$CONF['show_status']='YES';
//display a guide to what these colors mean
$CONF['show_status_key']='YES';
// 'show_status_text' will be displayed with the background colors
// associated with each status, you can customize it here
$CONF['show_status_text']=' ';
// show_undeliverable is useful if most accounts are delivered to this
// postfix system. If many aliases and mailboxes are forwarded
// elsewhere, you will probably want to disable this.
$CONF['show_undeliverable']='NO';
$CONF['show_undeliverable_color']='tomato';
// mails to these domains will never be flagged as undeliverable
$CONF['show_undeliverable_exceptions']=array("unixmail.domain.ext","exchangeserver.domain.ext","gmail.com");
$CONF['show_popimap']='NO';
$CONF['show_popimap_color']='darkgrey';
// you can assign special colors to some domains. To do this,
// - add the domain to show_custom_domains
// - add the corresponding color to show_custom_colors
$CONF['show_custom_domains']=array("subdomain.domain.ext","domain2.ext");
$CONF['show_custom_colors']=array("lightgreen","lightblue");
// If you use a recipient_delimiter in your postfix config, you can also honor it when aliases are checked.
// Example: $CONF['recipient_delimiter'] = "+";
// Set to "" to disable this check.
$CONF['recipient_delimiter'] = "";
// Optional:
// Script to run after creation of mailboxes.
// Note that this may fail if PHP is run in "safe mode", or if
// operating system features (such as SELinux) or limitations
// prevent the web-server from executing external scripts.
// Parameters: (1) username (2) domain (3) maildir (4) quota
// $CONF['mailbox_postcreation_script']='sudo -u courier /usr/local/bin/postfixadmin-mailbox-postcreation.sh';
// Optional:
// Script to run after alteration of mailboxes.
// Note that this may fail if PHP is run in "safe mode", or if
// operating system features (such as SELinux) or limitations
// prevent the web-server from executing external scripts.
// Parameters: (1) username (2) domain (3) maildir (4) quota
// $CONF['mailbox_postedit_script']='sudo -u courier /usr/local/bin/postfixadmin-mailbox-postedit.sh';
// Optional:
// Script to run after deletion of mailboxes.
// Note that this may fail if PHP is run in "safe mode", or if
// operating system features (such as SELinux) or limitations
// prevent the web-server from executing external scripts.
// Parameters: (1) username (2) domain
// $CONF['mailbox_postdeletion_script']='sudo -u courier /usr/local/bin/postfixadmin-mailbox-postdeletion.sh';
// Optional:
// Script to run after creation of domains.
// Note that this may fail if PHP is run in "safe mode", or if
// operating system features (such as SELinux) or limitations
// prevent the web-server from executing external scripts.
// Parameters: (1) domain
//$CONF['domain_postcreation_script']='sudo -u courier /usr/local/bin/postfixadmin-domain-postcreation.sh';
// Optional:
// Script to run after deletion of domains.
// Note that this may fail if PHP is run in "safe mode", or if
// operating system features (such as SELinux) or limitations
// prevent the web-server from executing external scripts.
// Parameters: (1) domain
// $CONF['domain_postdeletion_script']='sudo -u courier /usr/local/bin/postfixadmin-domain-postdeletion.sh';
// Optional:
// Sub-folders which should automatically be created for new users.
// The sub-folders will also be subscribed to automatically.
// Will only work with IMAP server which implement sub-folders.
// Will not work with POP3.
// If you define create_mailbox_subdirs, then the
// create_mailbox_subdirs_host must also be defined.
//
// $CONF['create_mailbox_subdirs']=array('Spam');
// $CONF['create_mailbox_subdirs_host']='localhost';
//
// Specify '' for Dovecot and 'INBOX.' for Courier.
$CONF['create_mailbox_subdirs_prefix']='INBOX.';
// Optional:
// Show used quotas from Dovecot dictionary backend in virtual
// mailbox listing.
// See: DOCUMENTATION/DOVECOT.txt
// [url]http://wiki.dovecot.org/Quota/Dict[/url]
//
$CONF['used_quotas'] = 'NO';
// if you use dovecot >= 1.2, set this to yes.
// Note about dovecot config: table "quota" is for 1.0 & 1.1, table "quota2" is for dovecot 1.2 and newer
$CONF['new_quota_table'] = 'NO';
//
// Normally, the TCP port number does not have to be specified.
// $CONF['create_mailbox_subdirs_hostport']=143;
//
// If you have trouble connecting to the IMAP-server, then specify
// a value for $CONF['create_mailbox_subdirs_hostoptions']. These
// are some examples to experiment with:
// $CONF['create_mailbox_subdirs_hostoptions']=array('notls');
// $CONF['create_mailbox_subdirs_hostoptions']=array('novalidate-cert','norsh');
// See also the "Optional flags for names" table at
// [url]http://www.php.net/manual/en/function.imap-open.php[/url]
// Theme Config
// Specify your own logo and CSS file
$CONF['theme_logo'] = 'images/logo-default.png';
$CONF['theme_css'] = 'css/default.css';
// XMLRPC Interface.
// This should be only of use if you wish to use e.g the
// Postfixadmin-Squirrelmail package
// change to boolean true to enable xmlrpc
$CONF['xmlrpc_enabled'] = false;
// If you want to keep most settings at default values and/or want to ensure
// that future updates work without problems, you can use a separate config
// file (config.local.php) instead of editing this file and override some
// settings there.
if (file_exists(dirname(__FILE__) . '/config.local.php')) {
include(dirname(__FILE__) . '/config.local.php');
}
//
// END OF CONFIG FILE
//
/* vim: set expandtab softtabstop=4 tabstop=4 shiftwidth=4: */Any suggestions on what I can try to get postfixadmin’s setup.php to run will be much appreciated
Last edited by Ecky (2012-09-14 23:23:24)
Mainboard: Gigabyte 880GMA-UD2H — Processor: Amd Phenom X6 1090T — Memory: 8GB (2x4Gb) Corsair Vengeance 1600Mhz DDR3 — Graphics: XFX Ati Radeon HD 6870
In previous articles, we discussed how to set up your own mail server on Ubuntu from scratch. In part 1 and part 2 of this tutorial series, we learned how to set up Postfix SMTP server and Dovecot IMAP server, but so far we can only have email addresses for users with local Unix accounts. This tutorial is going to show you how to create virtual mailboxes on Ubuntu mail server with PostfixAdmin, which is an open-source web-based interface to configure and manage a Postfix-based email server for many domains and users.
With virtual mailboxes, we don’t need to create a local Unix account for each email address. If you are going to set up a mail server for a company or organization, it’s always better to have an easy way to create virtual mailboxes in a web-based interface, which also allows users to change their passwords. That’s where PostfixAdmin comes in.
PostfixAdmin Features
- manage mailboxes, virtual domains, and aliases
- vacation/out-of-office messages (Personally I think it’s better done in Roundcube webmail)
- alias domains (forwarding one domain to another with recipient validation)
- users can manage their own mailbox (change alias, password and vacation message)
- quota support for single mailboxes and total quota of a domain
- fetchmail integration: You can fetch emails from your original email address to your new email address.
- command-line client postfixadmin-cli for those who don’t want to click around in a web interface 😉
Note
- This tutorial works on Ubuntu 22.04, Ubuntu 20.04, and Ubuntu 18.04.
- This tutorial uses MariaDB/MySQL database server. If you prefer to use PostgreSQL database server, please follow this PostfixAdmin/PostgreSQL tutorial.
- Once you finish part 3, you can no longer use local Unix accounts as email addresses. You must create email addresses from the PostfixAdmin web interface.
Prerequisites
It’s required that you have followed part 1 and part 2 of this tutorial series before continuing to read this article. If you followed mail server tutorials on other websites, I recommend purging your configurations (sudo apt purge postfix dovecot-core) and start over with my tutorial series, so you are not going to be confused by different setup processes.
Once the above requirements are met, let’s install and configure PostfixAdmin.
Step 1: Install MariaDB/MySQL Database Server
PostfixAdmin is written in PHP and requires a database (MySQL/MariaDB, PostgreSQL or SQLite). This article will use MariaDB database, which is a drop-in replacement for MySQL. It is developed by former members of MySQL team who are concerned that Oracle might turn MySQL into a closed-source product. Enter the following command to install MariaDB on Ubuntu.
sudo apt install mariadb-server mariadb-client
Hint: If you prefer to use MySQL, you can install it with: sudo apt install mysql-server-8.0.
After it’s installed, MariaDB server should be automatically started. Use systemctl to check its status.
systemctl status mariadb
Output:
● mariadb.service - MariaDB 10.3.22 database server
     Loaded: loaded (/lib/systemd/system/mariadb.service; enabled; vendor preset: enabled)
     Active: active (running) since Fri 2020-04-10 14:19:16 UTC; 18s ago
       Docs: man:mysqld(8)
             https://mariadb.com/kb/en/library/systemd/
   Main PID: 9161 (mysqld)
     Status: "Taking your SQL requests now..."
      Tasks: 31 (limit: 9451)
     Memory: 64.7M
     CGroup: /system.slice/mariadb.service
             └─9161 /usr/sbin/mysqld
If it’s not running, start it with this command:
sudo systemctl start mariadb
To enable MariaDB to automatically start at boot time, run
sudo systemctl enable mariadb
Now run the post-installation security script.
sudo mysql_secure_installation
When it asks you to enter MariaDB root password, press Enter key as the root password isn’t set yet. Then enter y to set the root password for MariaDB server.
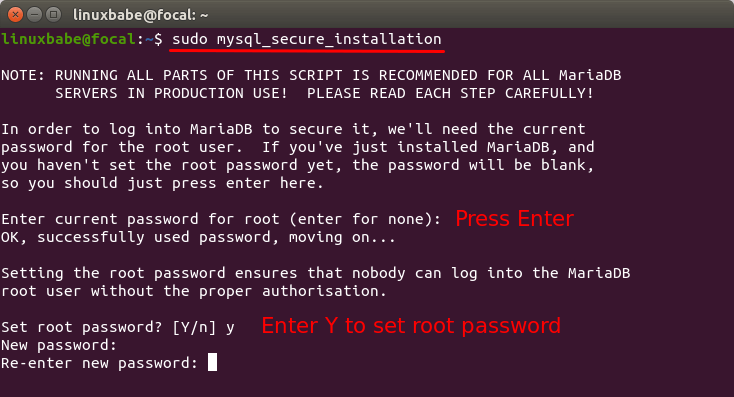
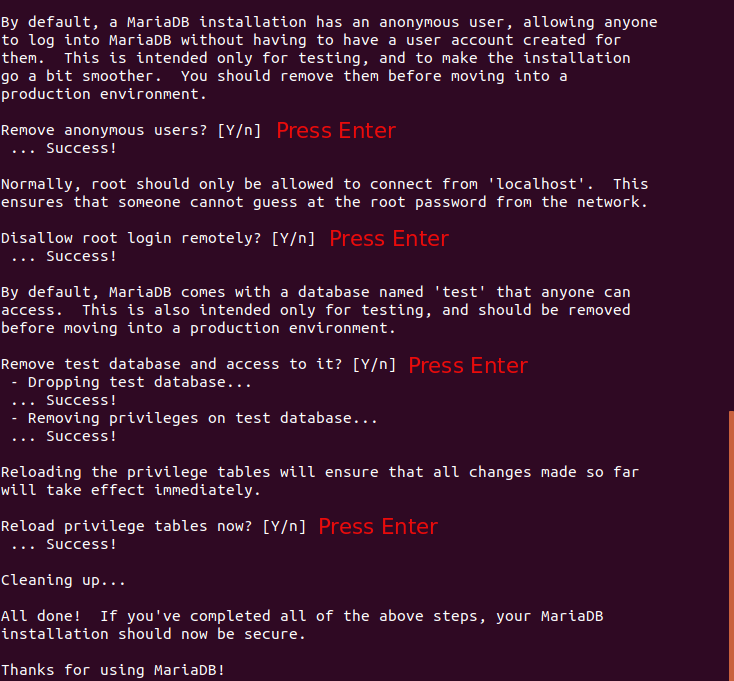
Next, you can press Enter to answer all remaining questions, which will remove anonymous user, disable remote root login and remove test database. This step is a basic requirement for MariaDB database security. (Notice that Y is capitalized, which means it is the default answer. )
Step 2: Download PostfixAdmin on Ubuntu Server
PostfixAdmin is included in the default Ubuntu repository. However, I don’t recommend it for the following reasons:
- It can create problems when you upgrade the Ubuntu system to a new version, resulting in upgrade failure.
- If you use Nginx, the
postfixadminpackage might automatically install Apache on your system. - If you use MySQL, this package might remove MySQL from your system.
- The default
postfixadminpackage has a login loop issue from time to time. You will also sometimes encounter theInvalid token! (CSRF check failed)error.
So I will show you how to install the latest version of PostfixAdmin. Go to PostfixAdmin Gitbub page to download the latest version. You can use the wget tool to download it from command line. The download link is always available in the format below. If a new version comes out, simply replace 3.3.11 with the new version number.
sudo apt install wget

wget https://github.com/postfixadmin/postfixadmin/archive/postfixadmin-3.3.11.tar.gz
Once downloaded, extract the archive to the /var/www/ directory and rename it to postfixadmin.
sudo mkdir -p /var/www/

sudo tar xvf postfixadmin-3.3.11.tar.gz -C /var/www/

sudo mv /var/www/postfixadmin-postfixadmin-3.3.11 /var/www/postfixadmin
Step 3: Setting Up Permissions
PostfixAdmin requires a templates_c directory, and the web server needs read and write access to this directory, so run the following commands.
sudo mkdir -p /var/www/postfixadmin/templates_c

sudo apt install acl

sudo setfacl -R -m u:www-data:rwx /var/www/postfixadmin/templates_c/
Starting with Dovecot 2.3.11, the web server user needs permission to read Let’s Encrypt TLS certificate in order to do password hashing. Run the following two commands to grant permissions.
sudo setfacl -R -m u:www-data:rx /etc/letsencrypt/live/ /etc/letsencrypt/archive/
Step 4: Create a Database and User for PostfixAdmin
Log into MySQL/MariaDB shell as root with the following command.
sudo mysql -u root
Once you are logged in, create a database for PostfixAdmin using the following command. I named it postfixadmin, but you can use whatever name you like. (Don’t leave out the semicolon.)
create database postfixadmin;
Then enter the command below to create a database user for PostfixAdmin. Replace postfixadmin_password with your preferred password. Note that the password should not contain the # character, or you might not be able to log in later.
create user 'postfixadmin'@'localhost' identified by 'postfixadmin_password';
Grants all privileges of postfixadmin database to the user.
grant all privileges on postfixadmin.* to 'postfixadmin'@'localhost';
Flush the privileges table for the changes to take effect and then get out of MariaDB shell.
flush privileges;

exit;
Step 5: Configure PostfixAdmin
The default PostfixAdmin configuration file is config.inc.php. We need to create a config.local.php file and add custom configurations.
sudo nano /var/www/postfixadmin/config.local.php
Add the following lines in the file, so PostfixAdmin can connect to MySQL/MariaDB database. Replace postfixadmin_password with the real PostfixAdmin password created in step 4.
<?php
$CONF['configured'] = true;
$CONF['database_type'] = 'mysqli';
$CONF['database_host'] = 'localhost';
$CONF['database_port'] = '3306';
$CONF['database_user'] = 'postfixadmin';
$CONF['database_password'] = 'postfixadmin_password';
$CONF['database_name'] = 'postfixadmin';
$CONF['encrypt'] = 'dovecot:ARGON2I';
$CONF['dovecotpw'] = "/usr/bin/doveadm pw -r 5";
if(@file_exists('/usr/bin/doveadm')) { // @ to silence openbase_dir stuff; see https://github.com/postfixadmin/postfixadmin/issues/171
    $CONF['dovecotpw'] = "/usr/bin/doveadm pw -r 5"; # debian
}
Save and close the file. Note that we will use the ARGON2I password scheme. By default, PostfixAdmin and Dovecot use MD5-CRYPT, which is a weak password scheme. You can list available password schemes in Dovecot with the following command.
sudo doveadm pw -l
Sample output:
SHA1 SSHA512 BLF-CRYPT PLAIN HMAC-MD5 OTP SHA512 SHA RPA DES-CRYPT CRYPT SSHA MD5-CRYPT SKEY PLAIN-MD4 PLAIN-MD5 SCRAM-SHA-1 LANMAN SHA512-CRYPT CLEAR CLEARTEXT ARGON2I ARGON2ID SSHA256 NTLM MD5 PBKDF2 SHA256 CRAM-MD5 PLAIN-TRUNC SHA256-CRYPT SMD5 DIGEST-MD5 LDAP-MD5
Installing Dovecot 2.3 on Ubuntu 18.04
If you are using Ubuntu 22.04/20.4, you already have Dovecot 2.3. If you use Ubuntu 18.04, you need to install Dovecot 2.3 from the official upstream repository, so you will be able to use ARGON2I password scheme.
Create a repository file for Dovecot.
sudo nano /etc/apt/sources.list.d/dovecot.list
Add the following line in the file.
deb [arch=amd64] https://repo.dovecot.org/ce-2.3-latest/ubuntu/bionic bionic main
Save and close the file. Because this repository is using https, so we need to install the apt-transport-https package.
sudo apt install apt-transport-https
Then we need to import the Dovecot PGP key with the following two commands, so that packages downloaded from this repository can be verified.
curl https://repo.dovecot.org/DOVECOT-REPO-GPG | gpg --import
gpg --export ED409DA1 | sudo tee /etc/apt/trusted.gpg.d/dovecot.gpg
Now update repository and upgrade existing Dovecot packages.
sudo apt update
sudo apt upgrade
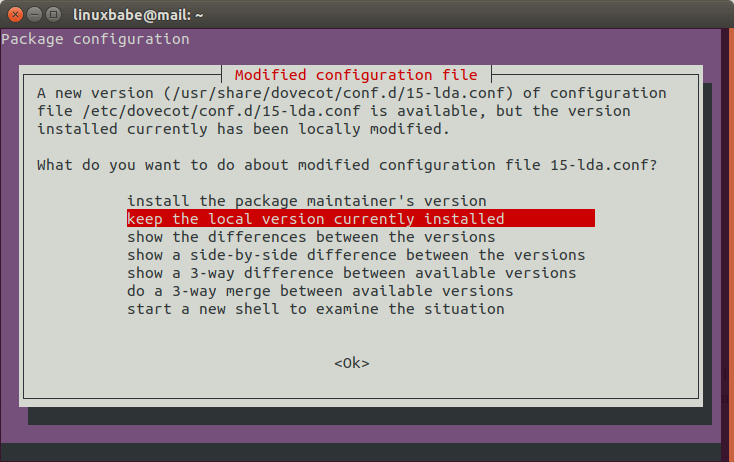
If you see a question like below in the upgrade process, it’s always a good idea to keep the local version and examine what needs to change later.
Once the upgrade is finished, check Dovecot version again.
dovecot --version
Output:
2.3.9.2 (cf2918cac)
Step 6: Create Apache Virtual Host or Nginx Config File for PostfixAdmin
Apache
If you use Apache web server, create a virtual host for PostfixAdmin.
sudo nano /etc/apache2/sites-available/postfixadmin.conf
Put the following text into the file. Replace postfixadmin.example.com with your real domain name and don’t forget to set DNS A record for it.
<VirtualHost *:80>
  ServerName postfixadmin.example.com
  DocumentRoot /var/www/postfixadmin/public

  ErrorLog ${APACHE_LOG_DIR}/postfixadmin_error.log
  CustomLog ${APACHE_LOG_DIR}/postfixadmin_access.log combined

  <Directory />
    Options FollowSymLinks
    AllowOverride All
  </Directory>

  <Directory /var/www/postfixadmin/>
    Options FollowSymLinks MultiViews
    AllowOverride All
    Order allow,deny
    allow from all
  </Directory>

</VirtualHost>
Save and close the file. Then enable this virtual host with:
sudo a2ensite postfixadmin.conf
Reload Apache for the changes to take effect.
sudo systemctl reload apache2
Now you should be able to see the PostfixAdmin web-based install wizard at http://postfixadmin.example.com/setup.php.
Nginx
If you use Nginx web server, create a virtual host for PostfixAdmin.
sudo nano /etc/nginx/conf.d/postfixadmin.conf
Put the following text into the file. Replace postfixadmin.example.com with your real domain name and don’t forget to set DNS A record for it.
server {
   listen 80;
   listen [::]:80;
   server_name postfixadmin.example.com;

   root /var/www/postfixadmin/public/;
   index index.php index.html;

   access_log /var/log/nginx/postfixadmin_access.log;
   error_log /var/log/nginx/postfixadmin_error.log;

   location / {
       try_files $uri $uri/ /index.php;
   }

   location ~ ^/(.+.php)$ {
        try_files $uri =404;
        fastcgi_pass unix:/run/php/php8.1-fpm.sock;
        fastcgi_index index.php;
        fastcgi_param SCRIPT_FILENAME $document_root$fastcgi_script_name;
        include /etc/nginx/fastcgi_params;
   }
}
- The above configuration uses php8.1-fpm, which is the default for Ubuntu 22.04.
- If you use Ubuntu 20.04, replace
php8.1-fpmwithphp7.4-fpm. - If you use Ubuntu 18.04, replace
php8.1-fpmwithphp7.2-fpm.
Save and close the file. Then test Nginx configuration.
sudo nginx -t
If the test is successful, reload Nginx for the changes to take effect.
sudo systemctl reload nginx
Now you should be able to see the PostfixAdmin web-based install wizard at http://postfixadmin.example.com/setup.php.
Step 7: Install Required and Recommended PHP Modules
Run the following command to install PHP modules required or recommended by PostfixAdmin.
Ubuntu 22.04
sudo apt install php8.1-fpm php8.1-imap php8.1-mbstring php8.1-mysql php8.1-curl php8.1-zip php8.1-xml php8.1-bz2 php8.1-intl php8.1-gmp php8.1-redis
Ubuntu 20.04
sudo apt install php7.4-fpm php7.4-imap php7.4-mbstring php7.4-mysql php7.4-json php7.4-curl php7.4-zip php7.4-xml php7.4-bz2 php7.4-intl php7.4-gmp php7.4-redis
Ubuntu 18.04
sudo apt install php7.2-fpm php7.2-imap php7.2-mbstring php7.2-mysql php7.2-json php7.2-curl php7.2-zip php7.2-xml php7.2-bz2 php7.2-intl php7.2-gmp php7.2-redis
If you use Apache, you also need to install the libapache2-mod-php package.
sudo apt install libapache2-mod-php
Then restart Apache.
sudo systemctl restart apache2
Step 8: Enabling HTTPS
To encrypt the HTTP traffic, we can enable HTTPS by installing a free TLS certificate issued from Let’s Encrypt. Run the following command to install Let’s Encrypt client (certbot) on Ubuntu server.
sudo apt install certbot
If you use Apache, install the Certbot Apache plugin.
sudo apt install python3-certbot-apache
And run this command to obtain and install TLS certificate.
sudo certbot --apache --agree-tos --redirect --hsts --staple-ocsp --email [email protected] -d postfixadmin.example.com
If you use Nginx, then you also need to install the Certbot Nginx plugin.
sudo apt install python3-certbot-nginx
Next, run the following command to obtain and install TLS certificate.
sudo certbot --nginx --agree-tos --redirect --hsts --staple-ocsp --email [email protected] -d postfixadmin.example.com
Where
--nginx: Use the nginx plugin.--apache: Use the Apache plugin.--agree-tos: Agree to terms of service.--redirect: Force HTTPS by 301 redirect.--hsts: Add the Strict-Transport-Security header to every HTTP response. Forcing browser to always use TLS for the domain. Defends against SSL/TLS Stripping.--staple-ocsp: Enables OCSP Stapling. A valid OCSP response is stapled to the certificate that the server offers during TLS.
The certificate should now be obtained and automatically installed, which is indicated by the message below.
Step 9: Enable Statistics in Dovecot
PostfixAdmin needs to read Dovecot statistics. Edit the Dovecot configuration file.
sudo nano /etc/dovecot/conf.d/10-master.conf
Add the following lines to the end of this file.
service stats {
    unix_listener stats-reader {
    user = www-data
    group = www-data
    mode = 0660
}

unix_listener stats-writer {
    user = www-data
    group = www-data
    mode = 0660
  }
}
Save and close the file. Then add the web server to the dovecot group.
sudo gpasswd -a www-data dovecot
Restart Dovecot.
sudo systemctl restart dovecot
Grant permissions to the www-data user.
sudo setfacl -R -m u:www-data:rwx /var/run/dovecot/stats-reader /var/run/dovecot/stats-writer
Step 10: Finish the Installation in Web Browser
Go to postfixadmin.example.com/setup.php to run the web-based setup wizard. First, you need to create a setup password for PostfixAdmin.
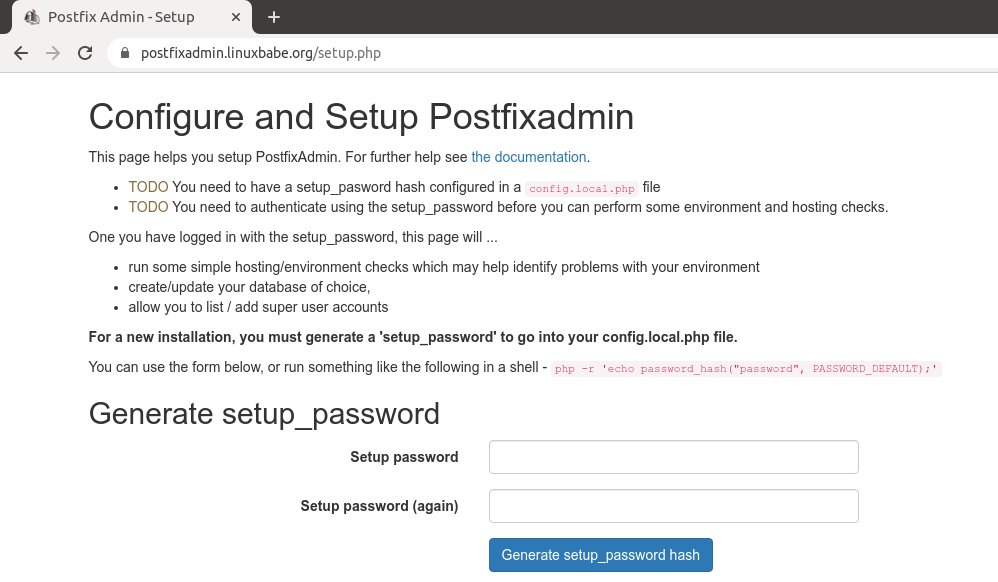
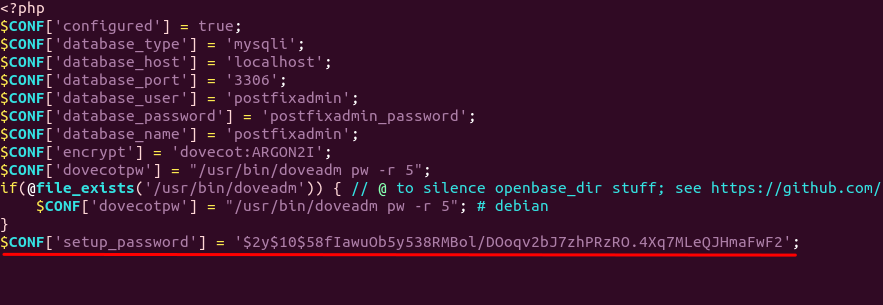
After creating the password hash, PostfixAdmin will display a line like below.
$CONF['setup_password'] = '$2y$10$58fIawuOb5y538RMBol/DOoqv2bJ7zhPRzRO.4Xq7MLeQJHmaFwF2';
You need to open the config.local.php file.
sudo nano /var/www/postfixadmin/config.local.php
Add the line displayed on PostfixAdmin setup page to the end of the file like below.
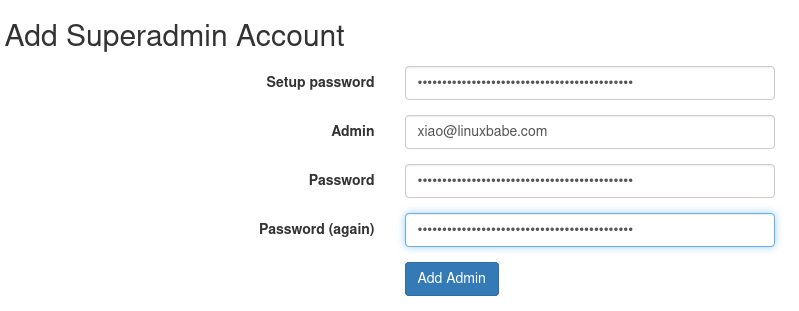
After saving the file, you need to refresh the PostfixAdmin setup page and enter the setup password again, then create the admin account. Please don’t use a Gmail, Yahoo Mail, or Microsoft email address for the admin account, or you might not be able to log in later. Use an email address on your own domain. You can create the email address later in PostfixAdmin.
If you encounter the following error when trying to create a superadmin account,
Password Hashing - attempted to use configured encrypt backend (dovecot:ARGON2I) triggered an error: /usr/bin/doveadm pw -r 5 failed, see error log for details
or
can’t encrypt password with dovecotpw, see error log for details
It’s because the www-data user doesn’t have permission to read Let’s Encrypt TLS certificate. To fix it, run the following command to grant permissions.
sudo setfacl -R -m u:www-data:rx /etc/letsencrypt/live/ /etc/letsencrypt/archive/
Sometimes, you might also need to run the following command to fix this error.
sudo setfacl -R -m u:www-data:rwx /var/run/dovecot/stats-reader /var/run/dovecot/stats-writer
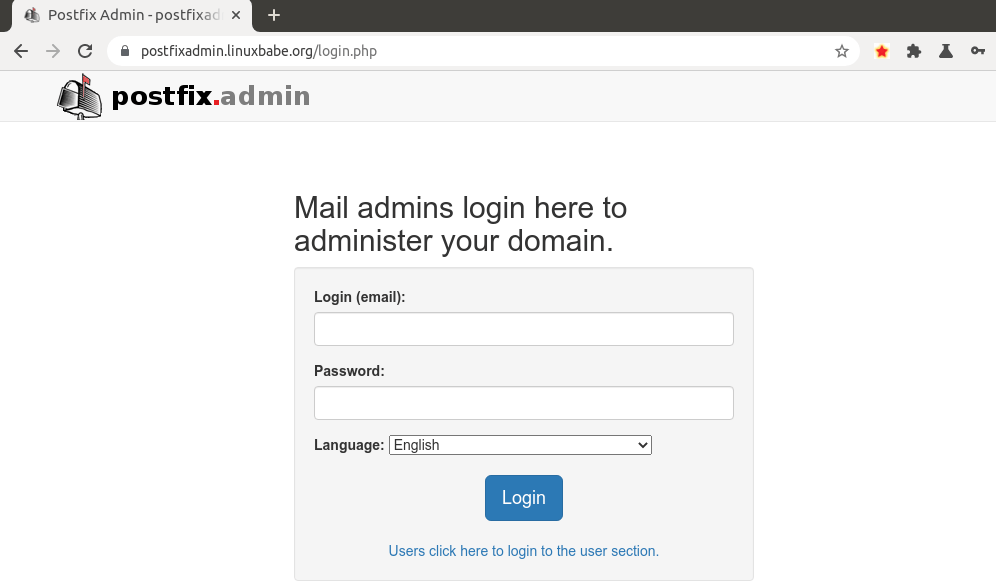
Once the superadmin account is created, you can log into PostfixAdmin at postfixadmin.example.com/login.php.
Step 11: Checking Tables in the Database
The PostfixAdmin setup process populates the postfixadmin database with some default tables. It’s helpful for us to know the names and structure of the tables. Log in to MySQL/MariaDB console.
sudo mysql -u root
Select the postfixadmin database.
USE postfixadmin;
List all tables in this database.
SHOW TABLES;
Output:
+------------------------+
| Tables_in_postfixadmin |
+------------------------+
| admin                  |
| alias                  |
| alias_domain           |
| config                 |
| domain                 |
| domain_admins          |
| fetchmail              |
| log                    |
| mailbox                |
| quota                  |
| quota2                 |
| vacation               |
| vacation_notification  |
+------------------------+
13 rows in set (0.001 sec)
The 3 most important tables are:
domain: contains information on the domains that are using your mail server to send and receive email.mailbox: contains information on every email address, including hashed password and the location of mail files.alias: contains the alias of each email address.
If you are interested, you can check what columns each table contains. For example, the following command will show us the columns in the domain table.
DESCRIBE domain;
Output:
+-------------+--------------+------+-----+---------------------+-------+
| Field       | Type         | Null | Key | Default             | Extra |
+-------------+--------------+------+-----+---------------------+-------+
| domain      | varchar(255) | NO   | PRI | NULL                |       |
| description | varchar(255) | NO   |     | NULL                |       |
| aliases     | int(10)      | NO   |     | 0                   |       |
| mailboxes   | int(10)      | NO   |     | 0                   |       |
| maxquota    | bigint(20)   | NO   |     | 0                   |       |
| quota       | bigint(20)   | NO   |     | 0                   |       |
| transport   | varchar(255) | NO   |     | NULL                |       |
| backupmx    | tinyint(1)   | NO   |     | 0                   |       |
| created     | datetime     | NO   |     | 2000-01-01 00:00:00 |       |
| modified    | datetime     | NO   |     | 2000-01-01 00:00:00 |       |
| active      | tinyint(1)   | NO   |     | 1                   |       |
+-------------+--------------+------+-----+---------------------+-------+
Log out of MySQL/MariaDB console.
EXIT;
Step 12: Configure Postfix to Use MySQL/MariaDB Database
By default, Postfix delivers emails only to users with a local Unix account. To make it deliver emails to virtual users whose information is stored in the database, we need to configure Postfix to use virtual mailbox domains.
First, we need to add MySQL map support for Postfix by installing the postfix-mysql package.
sudo apt install postfix-mysql
Then edit the Postfix main configuration file.
sudo nano /etc/postfix/main.cf
Add the following lines at the end of this file.
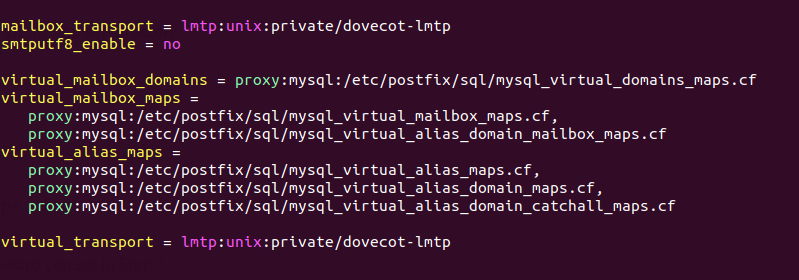
virtual_mailbox_domains = proxy:mysql:/etc/postfix/sql/mysql_virtual_domains_maps.cf
virtual_mailbox_maps =
   proxy:mysql:/etc/postfix/sql/mysql_virtual_mailbox_maps.cf,
   proxy:mysql:/etc/postfix/sql/mysql_virtual_alias_domain_mailbox_maps.cf
virtual_alias_maps =
   proxy:mysql:/etc/postfix/sql/mysql_virtual_alias_maps.cf,
   proxy:mysql:/etc/postfix/sql/mysql_virtual_alias_domain_maps.cf,
   proxy:mysql:/etc/postfix/sql/mysql_virtual_alias_domain_catchall_maps.cf
Where:
virtual_mailbox_domainspoints to a file that will tell Postfix how to look up domain information from the database.virtual_mailbox_mapspoints to files that will tell Postfix how to look up email addresses from the database.virtual_alias_mapspoints to files that will tell Postfix how to look up aliases from the database.
We want to use dovecot to deliver incoming emails to the virtual users’ message store, so also add the following line at the end of this file.
virtual_transport = lmtp:unix:private/dovecot-lmtp
Save and close the file. Next, we need to create the .cf files one by one. Create the sql directory.
sudo mkdir /etc/postfix/sql/
Create the mysql_virtual_domains_maps.cf file.
sudo nano /etc/postfix/sql/mysql_virtual_domains_maps.cf
Add the following content. Replace password with the postfixadmin password you set in Step 2.
user = postfixadmin
password = password
hosts = localhost
dbname = postfixadmin
query = SELECT domain FROM domain WHERE domain='%s' AND active = '1'
#query = SELECT domain FROM domain WHERE domain='%s'
#optional query to use when relaying for backup MX
#query = SELECT domain FROM domain WHERE domain='%s' AND backupmx = '0' AND active = '1'
#expansion_limit = 100
Create the mysql_virtual_mailbox_maps.cf file.
sudo nano /etc/postfix/sql/mysql_virtual_mailbox_maps.cf
Add the following content.
user = postfixadmin
password = password
hosts = localhost
dbname = postfixadmin
query = SELECT maildir FROM mailbox WHERE username='%s' AND active = '1'
#expansion_limit = 100
Create the mysql_virtual_alias_domain_mailbox_maps.cf file.
sudo nano /etc/postfix/sql/mysql_virtual_alias_domain_mailbox_maps.cf
Add the following content.
user = postfixadmin
password = password
hosts = localhost
dbname = postfixadmin
query = SELECT maildir FROM mailbox,alias_domain WHERE alias_domain.alias_domain = '%d' and mailbox.username = CONCAT('%u', '@', alias_domain.target_domain) AND mailbox.active = 1 AND alias_domain.active='1'
Create the mysql_virtual_alias_maps.cf file.
sudo nano /etc/postfix/sql/mysql_virtual_alias_maps.cf
Add the following content.
user = postfixadmin
password = password
hosts = localhost
dbname = postfixadmin
query = SELECT goto FROM alias WHERE address='%s' AND active = '1'
#expansion_limit = 100
Create the mysql_virtual_alias_domain_maps.cf file.
sudo nano /etc/postfix/sql/mysql_virtual_alias_domain_maps.cf
Add the following content.
user = postfixadmin
password = password
hosts = localhost
dbname = postfixadmin
query = SELECT goto FROM alias,alias_domain WHERE alias_domain.alias_domain = '%d' and alias.address = CONCAT('%u', '@', alias_domain.target_domain) AND alias.active = 1 AND alias_domain.active='1'
Create the mysql_virtual_alias_domain_catchall_maps file.
sudo nano /etc/postfix/sql/mysql_virtual_alias_domain_catchall_maps.cf
Add the following content.
# handles catch-all settings of target-domain
user = postfixadmin
password = password
hosts = localhost
dbname = postfixadmin
query = SELECT goto FROM alias,alias_domain WHERE alias_domain.alias_domain = '%d' and alias.address = CONCAT('@', alias_domain.target_domain) AND alias.active = 1 AND alias_domain.active='1'
Since the database passwords are stored in plain text so they should be readable only by user postfix and root, which is done by executing the following two commands.
sudo chmod 0640 /etc/postfix/sql/*
sudo setfacl -R -m u:postfix:rx /etc/postfix/sql/
Next, we need to change the value of the mydestination parameter in Postfix. Display the current value:
postconf mydestination
Sample output:
mydestination = $myhostname, linuxbabe.com, localhost.$mydomain, localhost
The mydestination parameter contains a list of domain names that will receive emails delivered to local Unix accounts. In part 1, we added the apex domain name (like linuxbabe.com) to mydestination. Since we are going to use virtual mailbox, we need to remove the apex domain name from the list by issuing the following command.
sudo postconf -e "mydestination = $myhostname, localhost.$mydomain, localhost"
Now let’s open the Postfix main configuration file again.
sudo nano /etc/postfix/main.cf
Add the following lines at the end of this file.
virtual_mailbox_base = /var/vmail
virtual_minimum_uid = 2000
virtual_uid_maps = static:2000
virtual_gid_maps = static:2000
The first line defines the base location of mail files. The remaining 3 lines define which user ID and group ID Postfix will use when delivering incoming emails to the mailbox. We use the user ID 2000 and group ID 2000.
Save and close the file. Restart Postfix for the changes to take effect.
sudo systemctl restart postfix
Next, we need to create a user named vmail with ID 2000 and a group with ID 2000.
sudo adduser vmail --system --group --uid 2000 --disabled-login --no-create-home
Create the mail base location.
sudo mkdir /var/vmail/
Make vmail as the owner.
sudo chown vmail:vmail /var/vmail/ -R
Step 13: Configure Dovecot to Use MySQL/MariaDB Database
We also need to configure the Dovecot IMAP server to query user information from the database. First, run the following command to add MySQL support for Dovecot.
sudo apt install dovecot-mysql
Then edit the 10-mail.conf file.
sudo nano /etc/dovecot/conf.d/10-mail.conf
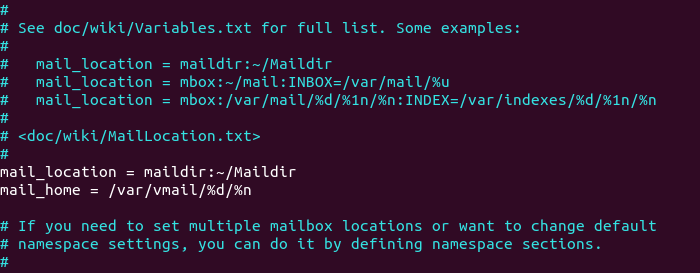
In part 2, we used the following mail_location. Email messages are stored under the Maildir directory under each user’s home directory.
mail_location = maildir:~/Maildir
Since we are using virtual mailbox domain now, we need to enable mail_home for the virtual users by adding the following line in the file, because virtual users don’t have home directories by default.
mail_home = /var/vmail/%d/%n/
Save and close the file. Then edit the 10-auth.conf file.
sudo nano /etc/dovecot/conf.d/10-auth.conf
In part 2, we used the following value for auth_username_format.
auth_username_format = %n
The %n would drop the domain if it was given. Because in part 2 we were using local Unix account for the username of every email address, we must use %n to drop the domain, so users were able to login with the full email address.
Now we are using virtual mailbox domains, which means the username of every email address includes the domain part, so we need to change the auth_username_format as follows. %u won’t drop away the domain. This allows users to login with the full email address.
auth_username_format = %u
Then find the following line.
#auth_default_realm =
Change it to
auth_default_realm = example.com
This is to ensure users who didn’t enter the @example.com part in the username field can still log in. Dovecot will append the @example.com part if it’s not given by users.
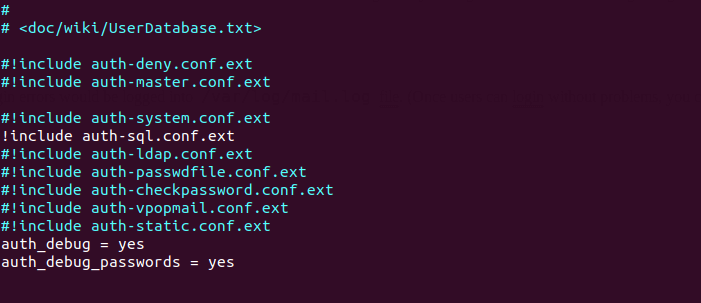
Next, uncomment the following line at the end of this file, so Dovecot can query user information from MySQL/MariaDB database.
!include auth-sql.conf.ext
Now you probably don’t want local Unix users to send emails without registering email addresses in PostfixAdmin, then comment out the following line by adding the # character at the beginning, so Dovecot won’t query the local /etc/passwd or /etc/shadow file.
#!include auth-system.conf.ext
It can be helpful to add the following two lines in this file to debug login issues. The login errors would be logged into /var/log/mail.log file. (Once users can login without problems, you can comment out the following two lines.)
auth_debug = yes
auth_debug_passwords = yes
Save and close the file.
Edit the dovecot-sql.conf.ext file.
sudo nano /etc/dovecot/dovecot-sql.conf.ext
Here is the content that you should have in this file. By default, all lines in this file are commented out, so you can simply copy and paste them at the bottom. Replace password with the postfixadmin password you set in Step 2.
driver = mysql

connect = host=localhost dbname=postfixadmin user=postfixadmin password=password

default_pass_scheme = ARGON2I

password_query = SELECT username AS user,password FROM mailbox WHERE username = '%u' AND active='1'

user_query = SELECT maildir, 2000 AS uid, 2000 AS gid FROM mailbox WHERE username = '%u' AND active='1'

iterate_query = SELECT username AS user FROM mailbox
Restart Dovecot.
sudo systemctl restart dovecot
When a user tries to log in, Dovecot would use the Argon2 algorithm to generate a password hash from the password entered by the user, then compare it with the password hash stored in the database.
Step 14: Add Domain and Mailboxes in PostfixAdmin
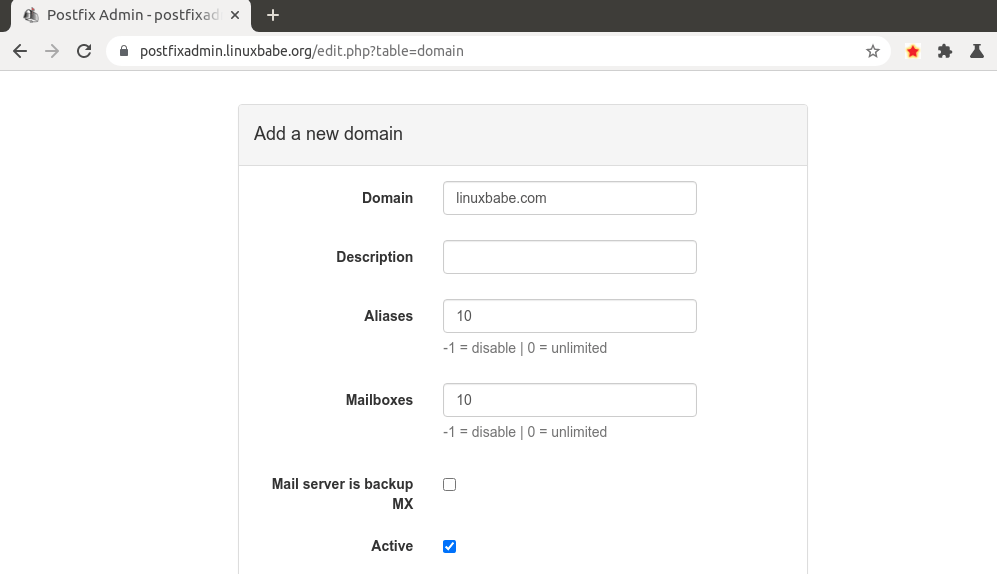
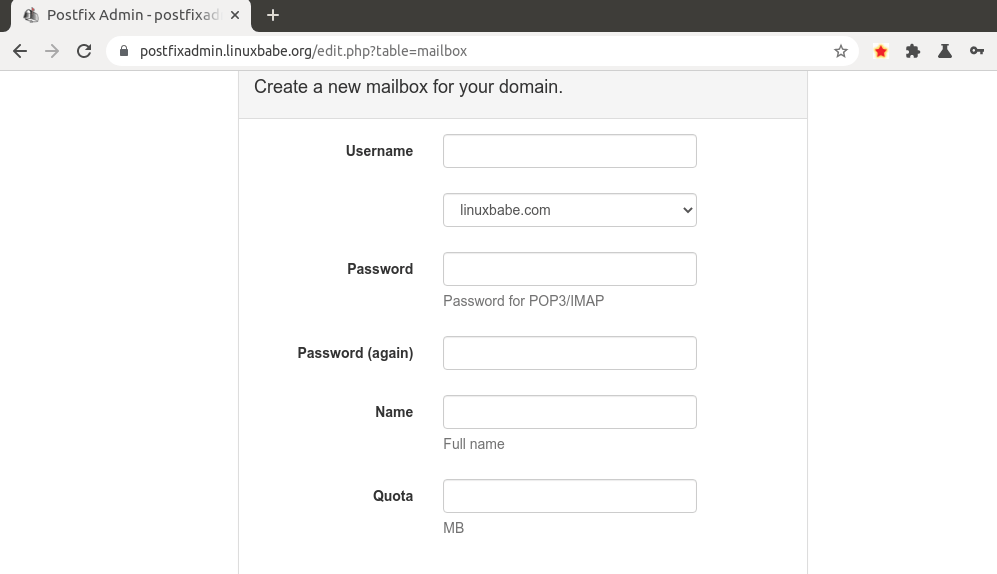
Log in to PostfixAdmin web interface as the admin. Click the Domain List tab and select New Domain to add a domain. You can choose how many aliases and mailboxes are allowed for this domain.
Then click Virtual List tab and select Add Mailbox to add a new email address for your domain.
Next, you can open your desktop email client such as Mozilla Thunderbird and add a mail account.
- In the incoming server section, select IMAP protocol, enter
mail.your-domain.comas the server name, choose port 143 and STARTTLS. Choosenormal passwordas the authentication method. - In the outgoing section, select SMTP protocol, enter
mail.your-domain.comas the server name, choose port 587 and STARTTLS. Choosenormal passwordas the authentication method.
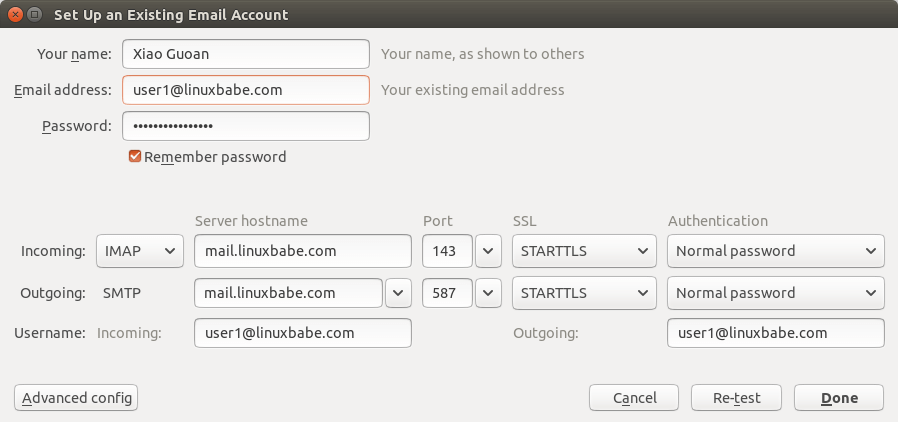
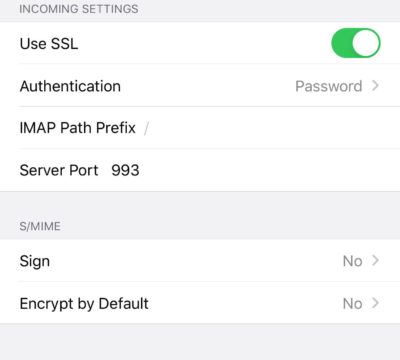
Hint 1: You can also use port 993 with SSL/TLS encryption for IMAP, and use port 465 with SSL/TLS encryption for SMTP. You should not use port 25 as the SMTP port in mail clients to submit outgoing emails.
Hint 2: If you use Microsoft 365 Outlook email client, then you shouldn’t enable Secure Password Authentication (SPA), which is a proprietary Microsoft protocol. Your password is already encrypted by TLS.
You should now be able to connect to your own email server and also send and receive emails with your desktop email client! Note that you cannot use local Unix accounts to login now. You must log in with the virtual user created from PostfixAdmin web interface.
Troubleshooting Tips
As a rule of thumb, you should always check the mail log (/var/log/mail.log) on your mail server when an error happens. The following is a list of specific errors and troubleshooting tips.
Can’t login from Mail Clients
If you can’t log into your mail server from a desktop mail client, scan your mail server to find if the ports are open. Note that you should run the following command from another Linux computer or server. If you run it on your mail server, then the ports will always appear to be open.
sudo nmap mail.your-domain.com
And check if Dovecot is running.
systemctl status dovecot
You can also check the mail log (/var/log/mail.log), which may give you some clues. If Dovecot fails to start, the error might not be logged to the /var/log/mail.log file, you can run the following command to see what’s wrong.
sudo journalctl -eu dovecot
If you see the following error in the mail log, it’s likely that you didn’t set a correct password in the .cf files under /etc/postfix/sql/ directory.
postfix/trivial-rewrite[28494]: warning: virtual_alias_domains: proxy:mysql:/etc/postfix/sql/mysql_virtual_alias_maps.cf: table lookup problem
postfix/trivial-rewrite[28494]: warning: virtual_alias_domains lookup failure
If you see the following error in the mail log, it’s because you forgot to add mail_location = maildir:~/Maildir in the /etc/dovecot/conf.d/10-mail.conf file.
open(/var/mail/[email protected]) failed: Permission denied (euid=2000(vmail) egid=2000(vmail) missing +w perm: /var/mail, we're not in group 8(mail), dir owned by 0:8 mode=0775
Cloudflare DNS
As I said in part 1, if you use Cloudflare DNS service, you should not enable the CDN (proxy) feature when creating DNS A record and AAAA record for the hostname of your mail server. Cloudflare doesn’t support SMTP or IMAP proxy.
Relay Access Denied
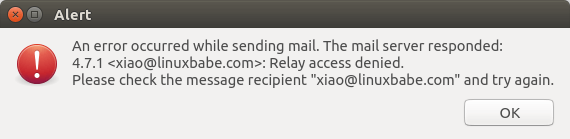
If you see the “relay access denied” error when trying to send emails from a mail client, it’s most likely that you use port 25 as the SMTP port in your mail client. As I said a while ago, you should use port 587 or 465 as the SMTP port in mail clients (Mozilla Thunberbird, Microsoft Outlook, etc) to submit outgoing emails. Port 25 should be used for SMTP server to SMTP server communications.
iOS Mail App
If you use the iOS Mail app to log into your mail server and encounter the following error.
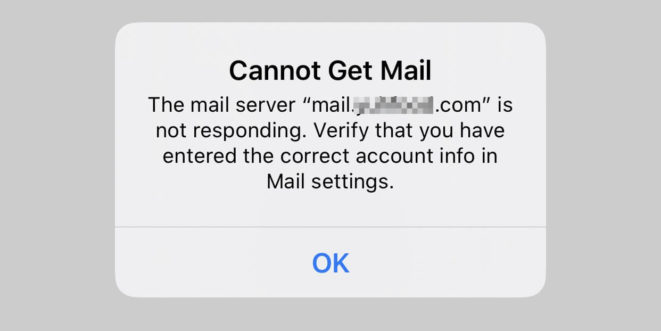
You can try to fix it by enforcing SSL encryption, for both SMTP and IMAP.
Fun fact: It seems the iOS Mail app has difficulty in supporting STARTTLS on IMAP port 143, but it supports STARTTLS on the submission port 587.
Temporary Lookup Failure
If your mail server was working fine for some time, but suddenly you find the following error in the mail log,
Aug 25 20:25:24 mx postfix/trivial-rewrite[3313]: warning: virtual_alias_domains: proxy:mysql:/etc/postfix/sql/mysql_virtual_alias_maps.cf: table lookup problem
Aug 25 20:25:24 mx postfix/trivial-rewrite[3313]: warning: virtual_alias_domains lookup failure
Aug 25 20:25:24 mx postfix/submission/smtpd[3464]: NOQUEUE: reject: 451 4.3.0 <[email protected]>: Temporary lookup failure;  proto=ESMTP
Aug 25 20:25:24 mx postfix/submission/smtpd[3464]: Temporary lookup failure
It’s likely that your MariaDB/MySQL database stopped somehow. You can use the following command to check when your database server stopped.
sudo journalctl -eu mariadb
or
sudo journalctl -eu mysql
A common cause for this situation is that your server is out-of-memory. Check if your server has enough memory.
htop
or
free -m
This error can also be caused by too many connections to the MariaDB/MySQL databases, so it can’t handle more queries. To fix this, you can increase the number of connections MariaDB/MySQL can handle.
sudo nano /etc/mysql/mariadb.conf.d/50-server.cnf
Find the following line in the Fine Tuning section.
#max_connections = 100
Uncomment it and change the value to 500.
max_connections = 500
If your server has lots of RAM, you can change it to a bigger number like 1000.
max_connections = 1000
Save and close the file. Then restart MariaDB/MySQL.
sudo systemctl restart mysql
Automatically Clean the Junk Folder and Trash Folder
To delete emails in Junk folder for all users, you can run
sudo doveadm expunge -A mailbox Junk all
To delete emails in Trash folder, run
sudo doveadm expunge -A mailbox Trash all
I think it’s better to clean emails that have been in the Junk or Trash folder for more than 2 weeks, instead of cleaning all emails.
sudo doveadm expunge -A mailbox Junk savedbefore 2w
Then add a cron job to automate the job.
sudo crontab -e
Add the following line to clean Junk and Trash folder every day.
@daily doveadm expunge -A mailbox Junk savedbefore 2w;doveadm expunge -A mailbox Trash savedbefore 2w
You also need to allow the www-data user to read certificate files by adding the following line.
@daily setfacl -R -m u:www-data:rx /etc/letsencrypt/live/ /etc/letsencrypt/archive/
To receive report when a Cron job produces an error, you can add the following line above all Cron jobs.
MAILTO="[email protected]"
Save and close the file. And you’re done.
Change User Password in PostfixAdmin
Users can log into PostfixAdmin at https://postfixadmin.example.com/users/login.php, then change their passwords.
Restricting Access to Sendmail
By default, any local user can use the sendmail binary to submit outgoing emails. Now that your mail server is using virtual mailboxes, you might want to restrict access to the sendmail binary to trusted local users only, so a malicious user can’t use it to send a large volume of emails to damage your mail server’s reputation. Edit the Postfix main configuration file.
sudo nano /etc/postfix/main.cf
Add the following line to the end of this file, so only the root, www-data and vmail user can submit emails via sendmail. You can also add other usernames.
authorized_submit_users = root,www-data,vmail
Save and close the file. Then restart Postfix.
sudo systemctl restart postfix
How to Deal with Data Breach with Alias
If you use the same email address to register accounts on every website, and the data is leaked to third parties due to various reasons, then lots of spammers will buy the leaked email database and send spam.
To prevent your email address from being the target of spammers, you can use PostfixAdmin to create an alias address for each website. If the data is leaked to third parties, you can delete the alias and create a new one, so you won’t be spammed by those third parties.
How to Upgrade PostfixAdmin
Sometimes there might be bugs in the current PostfixAdmin that can be fixed by upgrading to a new version. It’s very simple to upgrade PostfixAdmin. When a new version of PostfixAdmin comes out, then you need to
- Make a copy of the
/var/www/postfixadmin/config.local.phpfile to your home directory. - Remove the PostfixAdmin web directory (
sudo rm /var/www/postfixadmin/ -r) - Go through step 2, step 3, step 5, and step 10 again in this tutorial. When doing step 5, simply copy the
config.local.phpfile from your home directory. In step 10, the PostfixAdmin database schema will be automatically updated when you visit thesetup.phpweb page.
I once had a login loop problem in my PostfixAdmin installation and it’s fixed by upgrading PostfixAdmin to the latest version.
Next Step
I hope this tutorial helped you install and use PostfixAdmin on Ubuntu to create virtual mailboxes. In part 4, I will show you how to set up SPF and DKIM with Postfix to improve email deliverability and in a future tutorial, I’m going to show you how to host multiple domains with PostfixAdmin.
If you want to access emails from a web browser, then I recommend Roundcube, which is a very popular and featured-rich open-source webmail client. As always, if you found this post useful, subscribe to our free newsletter to get more tips and tricks. Take care 🙂
214
Итак, в процессе обновления postfixadmin с версии 3.1 на 3.3.11 (OS Gentoo) в браузере получил ошибку
Database — MySQL (pdo_mysql) extension not found
…
Database connection string : mysql:host=localhost;dbname=mail;charset=UTF8 Problem connecting to database,
check database configuration ($CONF[‘database_*’] entries in config.local.php) could not find driver
…
Ключевая фраза «pdo_mysql extension not found«. Решение простое. Нужно собрать php с поддержкой PDO с последующей перезагрузкой php-fpm
Обновляем страницу в браузере и видим, что postfixadmin «видит» поддержку pdo_mysql, однако с базой соединится не может. Возникает ошибка
Database — MySQL support available
…
Database connection string : mysql:host=localhost;dbname=mail;charset=UTF8
Problem connecting to database, check database configuration ($CONF[‘database_*’] entries in config.local.php)
SQLSTATE[HY000] [2002] No such file or directory
…
Для ее устранения в файле конфигурации config.local.php ищем строку
$CONF['database_host'] = 'localhost';
и меняем на строку
$CONF['database_host'] = '127.0.0.1';
Снова обновляем страницу в браузере и получаем еще одну ошибку
Everything seems fine… attempting to create/update database structure
Exception message: Postfixadmin DB update failed. Please check your PHP error_log — check logs!
Something went wrong while trying to apply database updates, a message should be logged — check PHP’s error_log ()
[error] FastCGI sent in stderr: «PHP message: Invalid query: SQLSTATE[42000]: Syntax error or access violation: 1142 CREATE command denied to user ‘postfix’@’localhost’ for table ‘config’
Это говорит о том, что у пользователя postfix базы mysql нет права CREATE для обновления схемы БД postfixadmin’а. Решение этой проблемы — дело техники
P.S.
Для таких продуктов как postfixadmin, phpmyadmin и некоторых других параметры конфигурации указаны в файле config.inc.php. Это дифолтный конфиг и он будет перезаписан в процессе следующего автоматического обновления (если таковое используется). Чтобы избежать потери «своих» настроек, рекомендуется хранить их в файле config.local.php, который нужно создать в той же папке, рядом с config.inc.php
0
0
голоса
Оцените статью