ALTER TABLE — change the definition of a table
Synopsis
ALTER TABLE [ IF EXISTS ] [ ONLY ]name[ * ]action[, ... ] ALTER TABLE [ IF EXISTS ] [ ONLY ]name[ * ] RENAME [ COLUMN ]column_nameTOnew_column_nameALTER TABLE [ IF EXISTS ] [ ONLY ]name[ * ] RENAME CONSTRAINTconstraint_nameTOnew_constraint_nameALTER TABLE [ IF EXISTS ]nameRENAME TOnew_nameALTER TABLE [ IF EXISTS ]nameSET SCHEMAnew_schemaALTER TABLE ALL IN TABLESPACEname[ OWNED BYrole_name[, ... ] ] SET TABLESPACEnew_tablespace[ NOWAIT ] ALTER TABLE [ IF EXISTS ]nameATTACH PARTITIONpartition_name{ FOR VALUESpartition_bound_spec| DEFAULT } ALTER TABLE [ IF EXISTS ]nameDETACH PARTITIONpartition_name[ CONCURRENTLY | FINALIZE ] whereactionis one of: ADD [ COLUMN ] [ IF NOT EXISTS ]column_namedata_type[ COLLATEcollation] [column_constraint[ ... ] ] DROP [ COLUMN ] [ IF EXISTS ]column_name[ RESTRICT | CASCADE ] ALTER [ COLUMN ]column_name[ SET DATA ] TYPEdata_type[ COLLATEcollation] [ USINGexpression] ALTER [ COLUMN ]column_nameSET DEFAULTexpressionALTER [ COLUMN ]column_nameDROP DEFAULT ALTER [ COLUMN ]column_name{ SET | DROP } NOT NULL ALTER [ COLUMN ]column_nameDROP EXPRESSION [ IF EXISTS ] ALTER [ COLUMN ]column_nameADD GENERATED { ALWAYS | BY DEFAULT } AS IDENTITY [ (sequence_options) ] ALTER [ COLUMN ]column_name{ SET GENERATED { ALWAYS | BY DEFAULT } | SETsequence_option| RESTART [ [ WITH ]restart] } [...] ALTER [ COLUMN ]column_nameDROP IDENTITY [ IF EXISTS ] ALTER [ COLUMN ]column_nameSET STATISTICSintegerALTER [ COLUMN ]column_nameSET (attribute_option=value[, ... ] ) ALTER [ COLUMN ]column_nameRESET (attribute_option[, ... ] ) ALTER [ COLUMN ]column_nameSET STORAGE { PLAIN | EXTERNAL | EXTENDED | MAIN } ALTER [ COLUMN ]column_nameSET COMPRESSIONcompression_methodADDtable_constraint[ NOT VALID ] ADDtable_constraint_using_indexALTER CONSTRAINTconstraint_name[ DEFERRABLE | NOT DEFERRABLE ] [ INITIALLY DEFERRED | INITIALLY IMMEDIATE ] VALIDATE CONSTRAINTconstraint_nameDROP CONSTRAINT [ IF EXISTS ]constraint_name[ RESTRICT | CASCADE ] DISABLE TRIGGER [trigger_name| ALL | USER ] ENABLE TRIGGER [trigger_name| ALL | USER ] ENABLE REPLICA TRIGGERtrigger_nameENABLE ALWAYS TRIGGERtrigger_nameDISABLE RULErewrite_rule_nameENABLE RULErewrite_rule_nameENABLE REPLICA RULErewrite_rule_nameENABLE ALWAYS RULErewrite_rule_nameDISABLE ROW LEVEL SECURITY ENABLE ROW LEVEL SECURITY FORCE ROW LEVEL SECURITY NO FORCE ROW LEVEL SECURITY CLUSTER ONindex_nameSET WITHOUT CLUSTER SET WITHOUT OIDS SET ACCESS METHODnew_access_methodSET TABLESPACEnew_tablespaceSET { LOGGED | UNLOGGED } SET (storage_parameter[=value] [, ... ] ) RESET (storage_parameter[, ... ] ) INHERITparent_tableNO INHERITparent_tableOFtype_nameNOT OF OWNER TO {new_owner| CURRENT_ROLE | CURRENT_USER | SESSION_USER } REPLICA IDENTITY { DEFAULT | USING INDEXindex_name| FULL | NOTHING } andpartition_bound_specis: IN (partition_bound_expr[, ...] ) | FROM ( {partition_bound_expr| MINVALUE | MAXVALUE } [, ...] ) TO ( {partition_bound_expr| MINVALUE | MAXVALUE } [, ...] ) | WITH ( MODULUSnumeric_literal, REMAINDERnumeric_literal) andcolumn_constraintis: [ CONSTRAINTconstraint_name] { NOT NULL | NULL | CHECK (expression) [ NO INHERIT ] | DEFAULTdefault_expr| GENERATED ALWAYS AS (generation_expr) STORED | GENERATED { ALWAYS | BY DEFAULT } AS IDENTITY [ (sequence_options) ] | UNIQUE [ NULLS [ NOT ] DISTINCT ]index_parameters| PRIMARY KEYindex_parameters| REFERENCESreftable[ (refcolumn) ] [ MATCH FULL | MATCH PARTIAL | MATCH SIMPLE ] [ ON DELETEreferential_action] [ ON UPDATEreferential_action] } [ DEFERRABLE | NOT DEFERRABLE ] [ INITIALLY DEFERRED | INITIALLY IMMEDIATE ] andtable_constraintis: [ CONSTRAINTconstraint_name] { CHECK (expression) [ NO INHERIT ] | UNIQUE [ NULLS [ NOT ] DISTINCT ] (column_name[, ... ] )index_parameters| PRIMARY KEY (column_name[, ... ] )index_parameters| EXCLUDE [ USINGindex_method] (exclude_elementWITHoperator[, ... ] )index_parameters[ WHERE (predicate) ] | FOREIGN KEY (column_name[, ... ] ) REFERENCESreftable[ (refcolumn[, ... ] ) ] [ MATCH FULL | MATCH PARTIAL | MATCH SIMPLE ] [ ON DELETEreferential_action] [ ON UPDATEreferential_action] } [ DEFERRABLE | NOT DEFERRABLE ] [ INITIALLY DEFERRED | INITIALLY IMMEDIATE ] andtable_constraint_using_indexis: [ CONSTRAINTconstraint_name] { UNIQUE | PRIMARY KEY } USING INDEXindex_name[ DEFERRABLE | NOT DEFERRABLE ] [ INITIALLY DEFERRED | INITIALLY IMMEDIATE ]index_parametersinUNIQUE,PRIMARY KEY, andEXCLUDEconstraints are: [ INCLUDE (column_name[, ... ] ) ] [ WITH (storage_parameter[=value] [, ... ] ) ] [ USING INDEX TABLESPACEtablespace_name]exclude_elementin anEXCLUDEconstraint is: {column_name| (expression) } [opclass] [ ASC | DESC ] [ NULLS { FIRST | LAST } ]referential_actionin aFOREIGN KEY/REFERENCESconstraint is: { NO ACTION | RESTRICT | CASCADE | SET NULL [ (column_name[, ... ] ) ] | SET DEFAULT [ (column_name[, ... ] ) ] }
Description
ALTER TABLE changes the definition of an existing table. There are several subforms described below. Note that the lock level required may differ for each subform. An ACCESS EXCLUSIVE lock is acquired unless explicitly noted. When multiple subcommands are given, the lock acquired will be the strictest one required by any subcommand.
ADD COLUMN [ IF NOT EXISTS ]-
This form adds a new column to the table, using the same syntax as
CREATE TABLE. IfIF NOT EXISTSis specified and a column already exists with this name, no error is thrown. DROP COLUMN [ IF EXISTS ]-
This form drops a column from a table. Indexes and table constraints involving the column will be automatically dropped as well. Multivariate statistics referencing the dropped column will also be removed if the removal of the column would cause the statistics to contain data for only a single column. You will need to say
CASCADEif anything outside the table depends on the column, for example, foreign key references or views. IfIF EXISTSis specified and the column does not exist, no error is thrown. In this case a notice is issued instead. SET DATA TYPE-
This form changes the type of a column of a table. Indexes and simple table constraints involving the column will be automatically converted to use the new column type by reparsing the originally supplied expression. The optional
COLLATEclause specifies a collation for the new column; if omitted, the collation is the default for the new column type. The optionalUSINGclause specifies how to compute the new column value from the old; if omitted, the default conversion is the same as an assignment cast from old data type to new. AUSINGclause must be provided if there is no implicit or assignment cast from old to new type.When this form is used, the column’s statistics are removed, so running
ANALYZEon the table afterwards is recommended. SET/DROP DEFAULT-
These forms set or remove the default value for a column (where removal is equivalent to setting the default value to NULL). The new default value will only apply in subsequent
INSERTorUPDATEcommands; it does not cause rows already in the table to change. SET/DROP NOT NULL-
These forms change whether a column is marked to allow null values or to reject null values.
SET NOT NULLmay only be applied to a column provided none of the records in the table contain aNULLvalue for the column. Ordinarily this is checked during theALTER TABLEby scanning the entire table; however, if a validCHECKconstraint is found which proves noNULLcan exist, then the table scan is skipped.If this table is a partition, one cannot perform
DROP NOT NULLon a column if it is markedNOT NULLin the parent table. To drop theNOT NULLconstraint from all the partitions, performDROP NOT NULLon the parent table. Even if there is noNOT NULLconstraint on the parent, such a constraint can still be added to individual partitions, if desired; that is, the children can disallow nulls even if the parent allows them, but not the other way around. DROP EXPRESSION [ IF EXISTS ]-
This form turns a stored generated column into a normal base column. Existing data in the columns is retained, but future changes will no longer apply the generation expression.
If
DROP EXPRESSION IF EXISTSis specified and the column is not a stored generated column, no error is thrown. In this case a notice is issued instead. ADD GENERATED { ALWAYS | BY DEFAULT } AS IDENTITYSET GENERATED { ALWAYS | BY DEFAULT }DROP IDENTITY [ IF EXISTS ]-
These forms change whether a column is an identity column or change the generation attribute of an existing identity column. See
CREATE TABLEfor details. LikeSET DEFAULT, these forms only affect the behavior of subsequentINSERTandUPDATEcommands; they do not cause rows already in the table to change.If
DROP IDENTITY IF EXISTSis specified and the column is not an identity column, no error is thrown. In this case a notice is issued instead. SETsequence_optionRESTART-
These forms alter the sequence that underlies an existing identity column.
sequence_optionis an option supported byALTER SEQUENCEsuch asINCREMENT BY. SET STATISTICS-
This form sets the per-column statistics-gathering target for subsequent
ANALYZEoperations. The target can be set in the range 0 to 10000; alternatively, set it to -1 to revert to using the system default statistics target (default_statistics_target). For more information on the use of statistics by the PostgreSQL query planner, refer to Section 14.2.SET STATISTICSacquires aSHARE UPDATE EXCLUSIVElock. SET (attribute_option=value[, ... ] )RESET (attribute_option[, ... ] )-
This form sets or resets per-attribute options. Currently, the only defined per-attribute options are
n_distinctandn_distinct_inherited, which override the number-of-distinct-values estimates made by subsequentANALYZEoperations.n_distinctaffects the statistics for the table itself, whilen_distinct_inheritedaffects the statistics gathered for the table plus its inheritance children. When set to a positive value,ANALYZEwill assume that the column contains exactly the specified number of distinct nonnull values. When set to a negative value, which must be greater than or equal to -1,ANALYZEwill assume that the number of distinct nonnull values in the column is linear in the size of the table; the exact count is to be computed by multiplying the estimated table size by the absolute value of the given number. For example, a value of -1 implies that all values in the column are distinct, while a value of -0.5 implies that each value appears twice on the average. This can be useful when the size of the table changes over time, since the multiplication by the number of rows in the table is not performed until query planning time. Specify a value of 0 to revert to estimating the number of distinct values normally. For more information on the use of statistics by the PostgreSQL query planner, refer to Section 14.2.Changing per-attribute options acquires a
SHARE UPDATE EXCLUSIVElock. SET STORAGE-
This form sets the storage mode for a column. This controls whether this column is held inline or in a secondary TOAST table, and whether the data should be compressed or not.
PLAINmust be used for fixed-length values such asintegerand is inline, uncompressed.MAINis for inline, compressible data.EXTERNALis for external, uncompressed data, andEXTENDEDis for external, compressed data.EXTENDEDis the default for most data types that support non-PLAINstorage. Use ofEXTERNALwill make substring operations on very largetextandbyteavalues run faster, at the penalty of increased storage space. Note thatSET STORAGEdoesn’t itself change anything in the table, it just sets the strategy to be pursued during future table updates. See Section 73.2 for more information. SET COMPRESSIONcompression_method-
This form sets the compression method for a column, determining how values inserted in future will be compressed (if the storage mode permits compression at all). This does not cause the table to be rewritten, so existing data may still be compressed with other compression methods. If the table is restored with pg_restore, then all values are rewritten with the configured compression method. However, when data is inserted from another relation (for example, by
INSERT ... SELECT), values from the source table are not necessarily detoasted, so any previously compressed data may retain its existing compression method, rather than being recompressed with the compression method of the target column. The supported compression methods arepglzandlz4. (lz4is available only if--with-lz4was used when building PostgreSQL.) In addition,compression_methodcan bedefault, which selects the default behavior of consulting the default_toast_compression setting at the time of data insertion to determine the method to use. ADDtable_constraint[ NOT VALID ]-
This form adds a new constraint to a table using the same constraint syntax as
CREATE TABLE, plus the optionNOT VALID, which is currently only allowed for foreign key and CHECK constraints.Normally, this form will cause a scan of the table to verify that all existing rows in the table satisfy the new constraint. But if the
NOT VALIDoption is used, this potentially-lengthy scan is skipped. The constraint will still be enforced against subsequent inserts or updates (that is, they’ll fail unless there is a matching row in the referenced table, in the case of foreign keys, or they’ll fail unless the new row matches the specified check condition). But the database will not assume that the constraint holds for all rows in the table, until it is validated by using theVALIDATE CONSTRAINToption. See Notes below for more information about using theNOT VALIDoption.Although most forms of
ADDrequire antable_constraintACCESS EXCLUSIVElock,ADD FOREIGN KEYrequires only aSHARE ROW EXCLUSIVElock. Note thatADD FOREIGN KEYalso acquires aSHARE ROW EXCLUSIVElock on the referenced table, in addition to the lock on the table on which the constraint is declared.Additional restrictions apply when unique or primary key constraints are added to partitioned tables; see
CREATE TABLE. Also, foreign key constraints on partitioned tables may not be declaredNOT VALIDat present. ADDtable_constraint_using_index-
This form adds a new
PRIMARY KEYorUNIQUEconstraint to a table based on an existing unique index. All the columns of the index will be included in the constraint.The index cannot have expression columns nor be a partial index. Also, it must be a b-tree index with default sort ordering. These restrictions ensure that the index is equivalent to one that would be built by a regular
ADD PRIMARY KEYorADD UNIQUEcommand.If
PRIMARY KEYis specified, and the index’s columns are not already markedNOT NULL, then this command will attempt to doALTER COLUMN SET NOT NULLagainst each such column. That requires a full table scan to verify the column(s) contain no nulls. In all other cases, this is a fast operation.If a constraint name is provided then the index will be renamed to match the constraint name. Otherwise the constraint will be named the same as the index.
After this command is executed, the index is “owned” by the constraint, in the same way as if the index had been built by a regular
ADD PRIMARY KEYorADD UNIQUEcommand. In particular, dropping the constraint will make the index disappear too.This form is not currently supported on partitioned tables.
Note
Adding a constraint using an existing index can be helpful in situations where a new constraint needs to be added without blocking table updates for a long time. To do that, create the index using
CREATE INDEX CONCURRENTLY, and then install it as an official constraint using this syntax. See the example below. ALTER CONSTRAINT-
This form alters the attributes of a constraint that was previously created. Currently only foreign key constraints may be altered.
VALIDATE CONSTRAINT-
This form validates a foreign key or check constraint that was previously created as
NOT VALID, by scanning the table to ensure there are no rows for which the constraint is not satisfied. Nothing happens if the constraint is already marked valid. (See Notes below for an explanation of the usefulness of this command.)This command acquires a
SHARE UPDATE EXCLUSIVElock. DROP CONSTRAINT [ IF EXISTS ]-
This form drops the specified constraint on a table, along with any index underlying the constraint. If
IF EXISTSis specified and the constraint does not exist, no error is thrown. In this case a notice is issued instead. DISABLE/ENABLE [ REPLICA | ALWAYS ] TRIGGER-
These forms configure the firing of trigger(s) belonging to the table. A disabled trigger is still known to the system, but is not executed when its triggering event occurs. For a deferred trigger, the enable status is checked when the event occurs, not when the trigger function is actually executed. One can disable or enable a single trigger specified by name, or all triggers on the table, or only user triggers (this option excludes internally generated constraint triggers such as those that are used to implement foreign key constraints or deferrable uniqueness and exclusion constraints). Disabling or enabling internally generated constraint triggers requires superuser privileges; it should be done with caution since of course the integrity of the constraint cannot be guaranteed if the triggers are not executed.
The trigger firing mechanism is also affected by the configuration variable session_replication_role. Simply enabled triggers (the default) will fire when the replication role is “origin” (the default) or “local”. Triggers configured as
ENABLE REPLICAwill only fire if the session is in “replica” mode, and triggers configured asENABLE ALWAYSwill fire regardless of the current replication role.The effect of this mechanism is that in the default configuration, triggers do not fire on replicas. This is useful because if a trigger is used on the origin to propagate data between tables, then the replication system will also replicate the propagated data, and the trigger should not fire a second time on the replica, because that would lead to duplication. However, if a trigger is used for another purpose such as creating external alerts, then it might be appropriate to set it to
ENABLE ALWAYSso that it is also fired on replicas.This command acquires a
SHARE ROW EXCLUSIVElock. DISABLE/ENABLE [ REPLICA | ALWAYS ] RULE-
These forms configure the firing of rewrite rules belonging to the table. A disabled rule is still known to the system, but is not applied during query rewriting. The semantics are as for disabled/enabled triggers. This configuration is ignored for
ON SELECTrules, which are always applied in order to keep views working even if the current session is in a non-default replication role.The rule firing mechanism is also affected by the configuration variable session_replication_role, analogous to triggers as described above.
DISABLE/ENABLE ROW LEVEL SECURITY-
These forms control the application of row security policies belonging to the table. If enabled and no policies exist for the table, then a default-deny policy is applied. Note that policies can exist for a table even if row-level security is disabled. In this case, the policies will not be applied and the policies will be ignored. See also
CREATE POLICY. NO FORCE/FORCE ROW LEVEL SECURITY-
These forms control the application of row security policies belonging to the table when the user is the table owner. If enabled, row-level security policies will be applied when the user is the table owner. If disabled (the default) then row-level security will not be applied when the user is the table owner. See also
CREATE POLICY. CLUSTER ON-
This form selects the default index for future
CLUSTERoperations. It does not actually re-cluster the table.Changing cluster options acquires a
SHARE UPDATE EXCLUSIVElock. SET WITHOUT CLUSTER-
This form removes the most recently used
CLUSTERindex specification from the table. This affects future cluster operations that don’t specify an index.Changing cluster options acquires a
SHARE UPDATE EXCLUSIVElock. SET WITHOUT OIDS-
Backward-compatible syntax for removing the
oidsystem column. Asoidsystem columns cannot be added anymore, this never has an effect. SET ACCESS METHOD-
This form changes the access method of the table by rewriting it. See Chapter 63 for more information.
SET TABLESPACE-
This form changes the table’s tablespace to the specified tablespace and moves the data file(s) associated with the table to the new tablespace. Indexes on the table, if any, are not moved; but they can be moved separately with additional
SET TABLESPACEcommands. When applied to a partitioned table, nothing is moved, but any partitions created afterwards withCREATE TABLE PARTITION OFwill use that tablespace, unless overridden by aTABLESPACEclause.All tables in the current database in a tablespace can be moved by using the
ALL IN TABLESPACEform, which will lock all tables to be moved first and then move each one. This form also supportsOWNED BY, which will only move tables owned by the roles specified. If theNOWAIToption is specified then the command will fail if it is unable to acquire all of the locks required immediately. Note that system catalogs are not moved by this command; useALTER DATABASEor explicitALTER TABLEinvocations instead if desired. Theinformation_schemarelations are not considered part of the system catalogs and will be moved. See alsoCREATE TABLESPACE. SET { LOGGED | UNLOGGED }-
This form changes the table from unlogged to logged or vice-versa (see
UNLOGGED). It cannot be applied to a temporary table.This also changes the persistence of any sequences linked to the table (for identity or serial columns). However, it is also possible to change the persistence of such sequences separately.
SET (storage_parameter[=value] [, ... ] )-
This form changes one or more storage parameters for the table. See Storage Parameters in the
CREATE TABLEdocumentation for details on the available parameters. Note that the table contents will not be modified immediately by this command; depending on the parameter you might need to rewrite the table to get the desired effects. That can be done withVACUUM FULL,CLUSTERor one of the forms ofALTER TABLEthat forces a table rewrite. For planner related parameters, changes will take effect from the next time the table is locked so currently executing queries will not be affected.SHARE UPDATE EXCLUSIVElock will be taken for fillfactor, toast and autovacuum storage parameters, as well as the planner parameterparallel_workers. RESET (storage_parameter[, ... ] )-
This form resets one or more storage parameters to their defaults. As with
SET, a table rewrite might be needed to update the table entirely. INHERITparent_table-
This form adds the target table as a new child of the specified parent table. Subsequently, queries against the parent will include records of the target table. To be added as a child, the target table must already contain all the same columns as the parent (it could have additional columns, too). The columns must have matching data types, and if they have
NOT NULLconstraints in the parent then they must also haveNOT NULLconstraints in the child.There must also be matching child-table constraints for all
CHECKconstraints of the parent, except those marked non-inheritable (that is, created withALTER TABLE ... ADD CONSTRAINT ... NO INHERIT) in the parent, which are ignored; all child-table constraints matched must not be marked non-inheritable. CurrentlyUNIQUE,PRIMARY KEY, andFOREIGN KEYconstraints are not considered, but this might change in the future. NO INHERITparent_table-
This form removes the target table from the list of children of the specified parent table. Queries against the parent table will no longer include records drawn from the target table.
OFtype_name-
This form links the table to a composite type as though
CREATE TABLE OFhad formed it. The table’s list of column names and types must precisely match that of the composite type. The table must not inherit from any other table. These restrictions ensure thatCREATE TABLE OFwould permit an equivalent table definition. NOT OF-
This form dissociates a typed table from its type.
OWNER TO-
This form changes the owner of the table, sequence, view, materialized view, or foreign table to the specified user.
REPLICA IDENTITY-
This form changes the information which is written to the write-ahead log to identify rows which are updated or deleted. In most cases, the old value of each column is only logged if it differs from the new value; however, if the old value is stored externally, it is always logged regardless of whether it changed. This option has no effect except when logical replication is in use.
DEFAULT-
Records the old values of the columns of the primary key, if any. This is the default for non-system tables.
USING INDEXindex_name-
Records the old values of the columns covered by the named index, that must be unique, not partial, not deferrable, and include only columns marked
NOT NULL. If this index is dropped, the behavior is the same asNOTHING. FULL-
Records the old values of all columns in the row.
NOTHING-
Records no information about the old row. This is the default for system tables.
RENAME-
The
RENAMEforms change the name of a table (or an index, sequence, view, materialized view, or foreign table), the name of an individual column in a table, or the name of a constraint of the table. When renaming a constraint that has an underlying index, the index is renamed as well. There is no effect on the stored data. SET SCHEMA-
This form moves the table into another schema. Associated indexes, constraints, and sequences owned by table columns are moved as well.
ATTACH PARTITIONpartition_name{ FOR VALUESpartition_bound_spec| DEFAULT }-
This form attaches an existing table (which might itself be partitioned) as a partition of the target table. The table can be attached as a partition for specific values using
FOR VALUESor as a default partition by usingDEFAULT. For each index in the target table, a corresponding one will be created in the attached table; or, if an equivalent index already exists, it will be attached to the target table’s index, as ifALTER INDEX ATTACH PARTITIONhad been executed. Note that if the existing table is a foreign table, it is currently not allowed to attach the table as a partition of the target table if there areUNIQUEindexes on the target table. (See also CREATE FOREIGN TABLE.) For each user-defined row-level trigger that exists in the target table, a corresponding one is created in the attached table.A partition using
FOR VALUESuses same syntax forpartition_bound_specasCREATE TABLE. The partition bound specification must correspond to the partitioning strategy and partition key of the target table. The table to be attached must have all the same columns as the target table and no more; moreover, the column types must also match. Also, it must have all theNOT NULLandCHECKconstraints of the target table. CurrentlyFOREIGN KEYconstraints are not considered.UNIQUEandPRIMARY KEYconstraints from the parent table will be created in the partition, if they don’t already exist. If any of theCHECKconstraints of the table being attached are markedNO INHERIT, the command will fail; such constraints must be recreated without theNO INHERITclause.If the new partition is a regular table, a full table scan is performed to check that existing rows in the table do not violate the partition constraint. It is possible to avoid this scan by adding a valid
CHECKconstraint to the table that allows only rows satisfying the desired partition constraint before running this command. TheCHECKconstraint will be used to determine that the table need not be scanned to validate the partition constraint. This does not work, however, if any of the partition keys is an expression and the partition does not acceptNULLvalues. If attaching a list partition that will not acceptNULLvalues, also add aNOT NULLconstraint to the partition key column, unless it’s an expression.If the new partition is a foreign table, nothing is done to verify that all the rows in the foreign table obey the partition constraint. (See the discussion in CREATE FOREIGN TABLE about constraints on the foreign table.)
When a table has a default partition, defining a new partition changes the partition constraint for the default partition. The default partition can’t contain any rows that would need to be moved to the new partition, and will be scanned to verify that none are present. This scan, like the scan of the new partition, can be avoided if an appropriate
CHECKconstraint is present. Also like the scan of the new partition, it is always skipped when the default partition is a foreign table.Attaching a partition acquires a
SHARE UPDATE EXCLUSIVElock on the parent table, in addition to theACCESS EXCLUSIVElocks on the table being attached and on the default partition (if any).Further locks must also be held on all sub-partitions if the table being attached is itself a partitioned table. Likewise if the default partition is itself a partitioned table. The locking of the sub-partitions can be avoided by adding a
CHECKconstraint as described in Section 5.11.2.2. DETACH PARTITIONpartition_name[ CONCURRENTLY | FINALIZE ]-
This form detaches the specified partition of the target table. The detached partition continues to exist as a standalone table, but no longer has any ties to the table from which it was detached. Any indexes that were attached to the target table’s indexes are detached. Any triggers that were created as clones of those in the target table are removed.
SHARElock is obtained on any tables that reference this partitioned table in foreign key constraints.If
CONCURRENTLYis specified, it runs using a reduced lock level to avoid blocking other sessions that might be accessing the partitioned table. In this mode, two transactions are used internally. During the first transaction, aSHARE UPDATE EXCLUSIVElock is taken on both parent table and partition, and the partition is marked as undergoing detach; at that point, the transaction is committed and all other transactions using the partitioned table are waited for. Once all those transactions have completed, the second transaction acquiresSHARE UPDATE EXCLUSIVEon the partitioned table andACCESS EXCLUSIVEon the partition, and the detach process completes. ACHECKconstraint that duplicates the partition constraint is added to the partition.CONCURRENTLYcannot be run in a transaction block and is not allowed if the partitioned table contains a default partition.If
FINALIZEis specified, a previousDETACH CONCURRENTLYinvocation that was canceled or interrupted is completed. At most one partition in a partitioned table can be pending detach at a time.
All the forms of ALTER TABLE that act on a single table, except RENAME, SET SCHEMA, ATTACH PARTITION, and DETACH PARTITION can be combined into a list of multiple alterations to be applied together. For example, it is possible to add several columns and/or alter the type of several columns in a single command. This is particularly useful with large tables, since only one pass over the table need be made.
You must own the table to use ALTER TABLE. To change the schema or tablespace of a table, you must also have CREATE privilege on the new schema or tablespace. To add the table as a new child of a parent table, you must own the parent table as well. Also, to attach a table as a new partition of the table, you must own the table being attached. To alter the owner, you must also be a direct or indirect member of the new owning role, and that role must have CREATE privilege on the table’s schema. (These restrictions enforce that altering the owner doesn’t do anything you couldn’t do by dropping and recreating the table. However, a superuser can alter ownership of any table anyway.) To add a column or alter a column type or use the OF clause, you must also have USAGE privilege on the data type.
Parameters
IF EXISTS-
Do not throw an error if the table does not exist. A notice is issued in this case.
name-
The name (optionally schema-qualified) of an existing table to alter. If
ONLYis specified before the table name, only that table is altered. IfONLYis not specified, the table and all its descendant tables (if any) are altered. Optionally,*can be specified after the table name to explicitly indicate that descendant tables are included. column_name-
Name of a new or existing column.
new_column_name-
New name for an existing column.
new_name-
New name for the table.
data_type-
Data type of the new column, or new data type for an existing column.
table_constraint-
New table constraint for the table.
constraint_name-
Name of a new or existing constraint.
CASCADE-
Automatically drop objects that depend on the dropped column or constraint (for example, views referencing the column), and in turn all objects that depend on those objects (see Section 5.14).
RESTRICT-
Refuse to drop the column or constraint if there are any dependent objects. This is the default behavior.
trigger_name-
Name of a single trigger to disable or enable.
ALL-
Disable or enable all triggers belonging to the table. (This requires superuser privilege if any of the triggers are internally generated constraint triggers such as those that are used to implement foreign key constraints or deferrable uniqueness and exclusion constraints.)
USER-
Disable or enable all triggers belonging to the table except for internally generated constraint triggers such as those that are used to implement foreign key constraints or deferrable uniqueness and exclusion constraints.
index_name-
The name of an existing index.
storage_parameter-
The name of a table storage parameter.
value-
The new value for a table storage parameter. This might be a number or a word depending on the parameter.
parent_table-
A parent table to associate or de-associate with this table.
new_owner-
The user name of the new owner of the table.
new_access_method-
The name of the access method to which the table will be converted.
new_tablespace-
The name of the tablespace to which the table will be moved.
new_schema-
The name of the schema to which the table will be moved.
partition_name-
The name of the table to attach as a new partition or to detach from this table.
partition_bound_spec-
The partition bound specification for a new partition. Refer to CREATE TABLE for more details on the syntax of the same.
Notes
The key word COLUMN is noise and can be omitted.
When a column is added with ADD COLUMN and a non-volatile DEFAULT is specified, the default is evaluated at the time of the statement and the result stored in the table’s metadata. That value will be used for the column for all existing rows. If no DEFAULT is specified, NULL is used. In neither case is a rewrite of the table required.
Adding a column with a volatile DEFAULT or changing the type of an existing column will require the entire table and its indexes to be rewritten. As an exception, when changing the type of an existing column, if the USING clause does not change the column contents and the old type is either binary coercible to the new type or an unconstrained domain over the new type, a table rewrite is not needed. However, indexes must always be rebuilt unless the system can verify that the new index would be logically equivalent to the existing one. For example, if the collation for a column has been changed, an index rebuild is always required because the new sort order might be different. However, in the absence of a collation change, a column can be changed from text to varchar (or vice versa) without rebuilding the indexes because these data types sort identically. Table and/or index rebuilds may take a significant amount of time for a large table; and will temporarily require as much as double the disk space.
Adding a CHECK or NOT NULL constraint requires scanning the table to verify that existing rows meet the constraint, but does not require a table rewrite.
Similarly, when attaching a new partition it may be scanned to verify that existing rows meet the partition constraint.
The main reason for providing the option to specify multiple changes in a single ALTER TABLE is that multiple table scans or rewrites can thereby be combined into a single pass over the table.
Scanning a large table to verify a new foreign key or check constraint can take a long time, and other updates to the table are locked out until the ALTER TABLE ADD CONSTRAINT command is committed. The main purpose of the NOT VALID constraint option is to reduce the impact of adding a constraint on concurrent updates. With NOT VALID, the ADD CONSTRAINT command does not scan the table and can be committed immediately. After that, a VALIDATE CONSTRAINT command can be issued to verify that existing rows satisfy the constraint. The validation step does not need to lock out concurrent updates, since it knows that other transactions will be enforcing the constraint for rows that they insert or update; only pre-existing rows need to be checked. Hence, validation acquires only a SHARE UPDATE EXCLUSIVE lock on the table being altered. (If the constraint is a foreign key then a ROW SHARE lock is also required on the table referenced by the constraint.) In addition to improving concurrency, it can be useful to use NOT VALID and VALIDATE CONSTRAINT in cases where the table is known to contain pre-existing violations. Once the constraint is in place, no new violations can be inserted, and the existing problems can be corrected at leisure until VALIDATE CONSTRAINT finally succeeds.
The DROP COLUMN form does not physically remove the column, but simply makes it invisible to SQL operations. Subsequent insert and update operations in the table will store a null value for the column. Thus, dropping a column is quick but it will not immediately reduce the on-disk size of your table, as the space occupied by the dropped column is not reclaimed. The space will be reclaimed over time as existing rows are updated.
To force immediate reclamation of space occupied by a dropped column, you can execute one of the forms of ALTER TABLE that performs a rewrite of the whole table. This results in reconstructing each row with the dropped column replaced by a null value.
The rewriting forms of ALTER TABLE are not MVCC-safe. After a table rewrite, the table will appear empty to concurrent transactions, if they are using a snapshot taken before the rewrite occurred. See Section 13.6 for more details.
The USING option of SET DATA TYPE can actually specify any expression involving the old values of the row; that is, it can refer to other columns as well as the one being converted. This allows very general conversions to be done with the SET DATA TYPE syntax. Because of this flexibility, the USING expression is not applied to the column’s default value (if any); the result might not be a constant expression as required for a default. This means that when there is no implicit or assignment cast from old to new type, SET DATA TYPE might fail to convert the default even though a USING clause is supplied. In such cases, drop the default with DROP DEFAULT, perform the ALTER TYPE, and then use SET DEFAULT to add a suitable new default. Similar considerations apply to indexes and constraints involving the column.
If a table has any descendant tables, it is not permitted to add, rename, or change the type of a column in the parent table without doing the same to the descendants. This ensures that the descendants always have columns matching the parent. Similarly, a CHECK constraint cannot be renamed in the parent without also renaming it in all descendants, so that CHECK constraints also match between the parent and its descendants. (That restriction does not apply to index-based constraints, however.) Also, because selecting from the parent also selects from its descendants, a constraint on the parent cannot be marked valid unless it is also marked valid for those descendants. In all of these cases, ALTER TABLE ONLY will be rejected.
A recursive DROP COLUMN operation will remove a descendant table’s column only if the descendant does not inherit that column from any other parents and never had an independent definition of the column. A nonrecursive DROP COLUMN (i.e., ALTER TABLE ONLY ... DROP COLUMN) never removes any descendant columns, but instead marks them as independently defined rather than inherited. A nonrecursive DROP COLUMN command will fail for a partitioned table, because all partitions of a table must have the same columns as the partitioning root.
The actions for identity columns (ADD GENERATED, SET etc., DROP IDENTITY), as well as the actions TRIGGER, CLUSTER, OWNER, and TABLESPACE never recurse to descendant tables; that is, they always act as though ONLY were specified. Adding a constraint recurses only for CHECK constraints that are not marked NO INHERIT.
Changing any part of a system catalog table is not permitted.
Refer to CREATE TABLE for a further description of valid parameters. Chapter 5 has further information on inheritance.
Examples
To add a column of type varchar to a table:
ALTER TABLE distributors ADD COLUMN address varchar(30);
That will cause all existing rows in the table to be filled with null values for the new column.
To add a column with a non-null default:
ALTER TABLE measurements
  ADD COLUMN mtime timestamp with time zone DEFAULT now();
Existing rows will be filled with the current time as the value of the new column, and then new rows will receive the time of their insertion.
To add a column and fill it with a value different from the default to be used later:
ALTER TABLE transactions
  ADD COLUMN status varchar(30) DEFAULT 'old',
  ALTER COLUMN status SET default 'current';
Existing rows will be filled with old, but then the default for subsequent commands will be current. The effects are the same as if the two sub-commands had been issued in separate ALTER TABLE commands.
To drop a column from a table:
ALTER TABLE distributors DROP COLUMN address RESTRICT;
To change the types of two existing columns in one operation:
ALTER TABLE distributors
    ALTER COLUMN address TYPE varchar(80),
    ALTER COLUMN name TYPE varchar(100);
To change an integer column containing Unix timestamps to timestamp with time zone via a USING clause:
ALTER TABLE foo
    ALTER COLUMN foo_timestamp SET DATA TYPE timestamp with time zone
    USING
        timestamp with time zone 'epoch' + foo_timestamp * interval '1 second';
The same, when the column has a default expression that won’t automatically cast to the new data type:
ALTER TABLE foo
    ALTER COLUMN foo_timestamp DROP DEFAULT,
    ALTER COLUMN foo_timestamp TYPE timestamp with time zone
    USING
        timestamp with time zone 'epoch' + foo_timestamp * interval '1 second',
    ALTER COLUMN foo_timestamp SET DEFAULT now();
To rename an existing column:
ALTER TABLE distributors RENAME COLUMN address TO city;
To rename an existing table:
ALTER TABLE distributors RENAME TO suppliers;
To rename an existing constraint:
ALTER TABLE distributors RENAME CONSTRAINT zipchk TO zip_check;
To add a not-null constraint to a column:
ALTER TABLE distributors ALTER COLUMN street SET NOT NULL;
To remove a not-null constraint from a column:
ALTER TABLE distributors ALTER COLUMN street DROP NOT NULL;
To add a check constraint to a table and all its children:
ALTER TABLE distributors ADD CONSTRAINT zipchk CHECK (char_length(zipcode) = 5);
To add a check constraint only to a table and not to its children:
ALTER TABLE distributors ADD CONSTRAINT zipchk CHECK (char_length(zipcode) = 5) NO INHERIT;
(The check constraint will not be inherited by future children, either.)
To remove a check constraint from a table and all its children:
ALTER TABLE distributors DROP CONSTRAINT zipchk;
To remove a check constraint from one table only:
ALTER TABLE ONLY distributors DROP CONSTRAINT zipchk;
(The check constraint remains in place for any child tables.)
To add a foreign key constraint to a table:
ALTER TABLE distributors ADD CONSTRAINT distfk FOREIGN KEY (address) REFERENCES addresses (address);
To add a foreign key constraint to a table with the least impact on other work:
ALTER TABLE distributors ADD CONSTRAINT distfk FOREIGN KEY (address) REFERENCES addresses (address) NOT VALID;
ALTER TABLE distributors VALIDATE CONSTRAINT distfk;
To add a (multicolumn) unique constraint to a table:
ALTER TABLE distributors ADD CONSTRAINT dist_id_zipcode_key UNIQUE (dist_id, zipcode);
To add an automatically named primary key constraint to a table, noting that a table can only ever have one primary key:
ALTER TABLE distributors ADD PRIMARY KEY (dist_id);
To move a table to a different tablespace:
ALTER TABLE distributors SET TABLESPACE fasttablespace;
To move a table to a different schema:
ALTER TABLE myschema.distributors SET SCHEMA yourschema;
To recreate a primary key constraint, without blocking updates while the index is rebuilt:
CREATE UNIQUE INDEX CONCURRENTLY dist_id_temp_idx ON distributors (dist_id);
ALTER TABLE distributors DROP CONSTRAINT distributors_pkey,
    ADD CONSTRAINT distributors_pkey PRIMARY KEY USING INDEX dist_id_temp_idx;
To attach a partition to a range-partitioned table:
ALTER TABLE measurement
    ATTACH PARTITION measurement_y2016m07 FOR VALUES FROM ('2016-07-01') TO ('2016-08-01');
To attach a partition to a list-partitioned table:
ALTER TABLE cities
    ATTACH PARTITION cities_ab FOR VALUES IN ('a', 'b');
To attach a partition to a hash-partitioned table:
ALTER TABLE orders
    ATTACH PARTITION orders_p4 FOR VALUES WITH (MODULUS 4, REMAINDER 3);
To attach a default partition to a partitioned table:
ALTER TABLE cities
    ATTACH PARTITION cities_partdef DEFAULT;
To detach a partition from a partitioned table:
ALTER TABLE measurement
    DETACH PARTITION measurement_y2015m12;
Compatibility
The forms ADD (without USING INDEX), DROP [COLUMN], DROP IDENTITY, RESTART, SET DEFAULT, SET DATA TYPE (without USING), SET GENERATED, and SET conform with the SQL standard. The other forms are PostgreSQL extensions of the SQL standard. Also, the ability to specify more than one manipulation in a single sequence_optionALTER TABLE command is an extension.
ALTER TABLE DROP COLUMN can be used to drop the only column of a table, leaving a zero-column table. This is an extension of SQL, which disallows zero-column tables.
When you create a table and you realize that you made a mistake, or the requirements of the application change, you can drop the table and create it again. But this is not a convenient option if the table is already filled with data, or if the table is referenced by other database objects (for instance a foreign key constraint). Therefore PostgreSQL provides a family of commands to make modifications to existing tables. Note that this is conceptually distinct from altering the data contained in the table: here we are interested in altering the definition, or structure, of the table.
You can:
-
Add columns
-
Remove columns
-
Add constraints
-
Remove constraints
-
Change default values
-
Change column data types
-
Rename columns
-
Rename tables
All these actions are performed using the ALTER TABLE command, whose reference page contains details beyond those given here.
5.6.1. Adding a Column
To add a column, use a command like:
ALTER TABLE products ADD COLUMN description text;
The new column is initially filled with whatever default value is given (null if you don’t specify a DEFAULT clause).
Tip
From PostgreSQL 11, adding a column with a constant default value no longer means that each row of the table needs to be updated when the ALTER TABLE statement is executed. Instead, the default value will be returned the next time the row is accessed, and applied when the table is rewritten, making the ALTER TABLE very fast even on large tables.
However, if the default value is volatile (e.g., clock_timestamp()) each row will need to be updated with the value calculated at the time ALTER TABLE is executed. To avoid a potentially lengthy update operation, particularly if you intend to fill the column with mostly nondefault values anyway, it may be preferable to add the column with no default, insert the correct values using UPDATE, and then add any desired default as described below.
You can also define constraints on the column at the same time, using the usual syntax:
ALTER TABLE products ADD COLUMN description text CHECK (description <> '');
In fact all the options that can be applied to a column description in CREATE TABLE can be used here. Keep in mind however that the default value must satisfy the given constraints, or the ADD will fail. Alternatively, you can add constraints later (see below) after you’ve filled in the new column correctly.
5.6.2. Removing a Column
To remove a column, use a command like:
ALTER TABLE products DROP COLUMN description;
Whatever data was in the column disappears. Table constraints involving the column are dropped, too. However, if the column is referenced by a foreign key constraint of another table, PostgreSQL will not silently drop that constraint. You can authorize dropping everything that depends on the column by adding CASCADE:
ALTER TABLE products DROP COLUMN description CASCADE;
See Section 5.14 for a description of the general mechanism behind this.
5.6.3. Adding a Constraint
To add a constraint, the table constraint syntax is used. For example:
ALTER TABLE products ADD CHECK (name <> '');
ALTER TABLE products ADD CONSTRAINT some_name UNIQUE (product_no);
ALTER TABLE products ADD FOREIGN KEY (product_group_id) REFERENCES product_groups;
To add a not-null constraint, which cannot be written as a table constraint, use this syntax:
ALTER TABLE products ALTER COLUMN product_no SET NOT NULL;
The constraint will be checked immediately, so the table data must satisfy the constraint before it can be added.
5.6.4. Removing a Constraint
To remove a constraint you need to know its name. If you gave it a name then that’s easy. Otherwise the system assigned a generated name, which you need to find out. The psql command d can be helpful here; other interfaces might also provide a way to inspect table details. Then the command is:tablename
ALTER TABLE products DROP CONSTRAINT some_name;
(If you are dealing with a generated constraint name like $2, don’t forget that you’ll need to double-quote it to make it a valid identifier.)
As with dropping a column, you need to add CASCADE if you want to drop a constraint that something else depends on. An example is that a foreign key constraint depends on a unique or primary key constraint on the referenced column(s).
This works the same for all constraint types except not-null constraints. To drop a not null constraint use:
ALTER TABLE products ALTER COLUMN product_no DROP NOT NULL;
(Recall that not-null constraints do not have names.)
5.6.5. Changing a Column’s Default Value
To set a new default for a column, use a command like:
ALTER TABLE products ALTER COLUMN price SET DEFAULT 7.77;
Note that this doesn’t affect any existing rows in the table, it just changes the default for future INSERT commands.
To remove any default value, use:
ALTER TABLE products ALTER COLUMN price DROP DEFAULT;
This is effectively the same as setting the default to null. As a consequence, it is not an error to drop a default where one hadn’t been defined, because the default is implicitly the null value.
5.6.6. Changing a Column’s Data Type
To convert a column to a different data type, use a command like:
ALTER TABLE products ALTER COLUMN price TYPE numeric(10,2);
This will succeed only if each existing entry in the column can be converted to the new type by an implicit cast. If a more complex conversion is needed, you can add a USING clause that specifies how to compute the new values from the old.
PostgreSQL will attempt to convert the column’s default value (if any) to the new type, as well as any constraints that involve the column. But these conversions might fail, or might produce surprising results. It’s often best to drop any constraints on the column before altering its type, and then add back suitably modified constraints afterwards.
5.6.7. Renaming a Column
To rename a column:
ALTER TABLE products RENAME COLUMN product_no TO product_number;
5.6.8. Renaming a Table
To rename a table:
ALTER TABLE products RENAME TO items;
В этом учебном пособии вы узнаете, как использовать PostgreSQL оператор ALTER TABLE для добавления столбца, изменения столбца, удаления столбца, переименования столбца или переименования таблицы (с использованием синтаксиса и примеров).
Описание
PostgreSQL оператор ALTER TABLE используется для добавления, изменения или очищения / удаления столбцов в таблице. Оператор PostgreSQL ALTER TABLE также используется для переименования таблицы.
Добавить столбец в таблицу
Синтаксис
Синтаксис для добавления столбца в таблицу в PostgreSQL (используя ALTER TABLE):
ALTER TABLE table_name
ADD new_column_name column_definition;
- table_name
- Имя таблицы для изменения.
- new_column_name
- Имя нового столбца, добавляемого в таблицу.
- column_definition
- Тип данных столбца.
Пример
Рассмотрим пример, который показывает, как добавить столбец в таблицу PostgreSQL с помощью оператора ALTER TABLE.
Например:
|
ALTER TABLE order_details ADD order_date date; |
Этот PostgreSQL пример ALTER TABLE добавит столбец с именем order_date в таблицу order_details. Он будет создан как столбец NULL.
Добавить несколько столбцов в таблицу
Синтаксис
Синтаксис для добавления нескольких столбцов в таблицу в PostgreSQL (используя ALTER TABLE):
ALTER TABLE table_name
ADD new_column_name column_definition,
ADD new_column_name column_definition,
…
;
- table_name
- Имя таблицы для изменения.
- new_column_name
- Имя нового столбца, добавляемого в таблицу.
- column_definition
- Тип данных столбца.
Пример
Рассмотрим пример, который показывает, как добавить несколько столбцов в таблицу PostgreSQL, используя оператор ALTER TABLE.
Например:
|
ALTER TABLE order_details ADD order_date date, ADD quantity integer; |
Этот пример добавит два столбца в таблицу order_details — order_date и quantity.
Поле order_date будет создано как столбец с типом данных date, а столбец quantity будет создан как столбец с типом данных integer.
Изменить столбец в таблице
Синтаксис
Синтаксис для изменения столбца в таблице в PostgreSQL (используя ALTER TABLE):
ALTER TABLE table_name
ALTER COLUMN column_name TYPE column_definition;
- table_name
- Имя таблицы для изменения.
- column_name
- Имя столбца, который нужно изменить в таблице.
- column_definition
- Измененный тип данных столбца.
Пример
Рассмотрим пример, который показывает, как изменить столбец в таблице PostgreSQL с помощью оператора ALTER TABLE.
Например:
|
ALTER TABLE order_details ALTER COLUMN notes TYPE varchar(500); |
Этот ALTER TABLE пример изменит столбец с именем notes на тип данных varchar (500) в таблице order_details.
Изменить несколько столбцов в таблице
Синтаксис
Синтаксис для изменения нескольких столбцов в таблице в PostgreSQL (используя ALTER TABLE):
ALTER TABLE table_name
ALTER COLUMN column_name TYPE column_definition,
ALTER COLUMN column_name TYPE column_definition,
…
;
- table_name
- Имя таблицы для изменения.
- column_name
- Имя столбца, который нужно изменить в таблице.
- column_definition
- Измененный тип данных столбца.
Пример
Рассмотрим пример, который показывает, как изменить несколько столбцов в таблице PostgreSQL с помощью оператора ALTER TABLE.
Например:
|
ALTER TABLE order_details ALTER COLUMN notes TYPE varchar(500), ALTER COLUMN quantity TYPE numeric; |
В этом примере ALTER TABLE будут изменены два столбца таблицы order_details — notes и quantity.
Поле notes будет изменен на тип данных varchar(500), а столбец quantity будет изменен на тип данных numeric.
Удалить столбец в таблице
Синтаксис
Синтаксис для удаления столбца в таблице в PostgreSQL (используя оператор ALTER TABLE):
ALTER TABLE table_name
DROP COLUMN column_name;
- table_name
- Имя таблицы для изменения.
- column_name
- Имя столбца, который нужно удалить из таблицы.
Пример
Рассмотрим пример, который показывает, как удалить столбец в таблице PostgreSQL с помощью оператора ALTER TABLE.
Например:
|
ALTER TABLE order_details DROP COLUMN notes; |
Этот пример ALTER TABLE удалит столбец с именем notes из таблицы с именем order_details.
Переименовать столбец в таблице
Синтаксис
Синтаксис для переименования столбца в таблице в PostgreSQL (используя оператор ALTER TABLE):
ALTER TABLE table_name
RENAME COLUMN old_name TO new_name;
- table_name
- Имя таблицы для изменения.
- old_name
- Столбец для переименования.
- new_name
- Новое имя для столбца.
Пример
Рассмотрим пример, который показывает, как переименовать столбец в таблице PostgreSQL, используя оператор ALTER TABLE.
Например:
|
ALTER TABLE order_details RENAME COLUMN notes TO order_notes; |
Этот PostgreSQL пример ALTER TABLE переименует столбец с именем notes в order_notes в таблице order_details.
Переименовать таблицу
Синтаксис
Синтаксис переименования таблицы в PostgreSQL (используя оператор ALTER TABLE):
ALTER TABLE table_name
RENAME TO new_table_name;
- table_name
- Таблица для переименования.
- new_table_name
- Новое имя таблицы.
Пример
Рассмотрим пример, который показывает, как переименовать таблицу в PostgreSQL, используя оператор ALTER TABLE.
Например:
|
ALTER TABLE order_details RENAME TO order_information; |
Этот пример ALTER TABLE будет переименовывать таблицу order_details в order_information.
Узнайте как использовать оператор ALTER TABLE в распространенных БД:
- ALTER TABLE Oracle PL/SQL
- ALTER TABLE SQL Server
- ALTER TABLE MySQL
- ALTER TABLE MariaDB
- ALTER TABLE SQLite
Изменение таблиц
Последнее обновление: 19.03.2018
Нередко возникает изменить уже имеющуюся таблицу, в частности, добавить или удалить столбцы, изменить тип столбцов и т.д..
То есть потребуется изменить определение таблицы. Для этого применяется выражение ALTER TABLE,
которое имеет следующий формальный синтаксис:
ALTER TABLE название_таблицы
{ ADD название_столбца тип_данных_столбца [ограничения_столбца] |
  DROP COLUMN название_столбца |
  ALTER COLUMN название_столбца параметры_столбца |
  ADD [CONSTRAINT] определение_ограничения |
  DROP [CONSTRAINT] имя_ограничения}
Рассмотрим некоторые возможности по изменению таблицы.
Добавление нового столбца
Добавим в таблицу Customers новый столбец Phone:
ALTER TABLE Customers
ADD Phone CHARACTER VARYING(20) NULL;
Здесь столбец Phone имеет тип CHARACTER VARYING(20), и для него определен атрибут NULL, то есть
столбец допускает отсутствие значения. Но что если нам надо добавить столбец, который не должен принимать значения NULL? Если в таблице есть
данные, то следующая команда не будет выполнена:
ALTER TABLE Customers
ADD Address CHARACTER VARYING(30) NOT NULL;
Поэтому в данном случае решение состоит в установке значения по умолчанию через атрибут DEFAULT:
ALTER TABLE Customers
ADD Address CHARACTER VARYING(30) NOT NULL DEFAULT 'Неизвестно';
Удаление столбца
Удалим столбец Address из таблицы Customers:
ALTER TABLE Customers
DROP COLUMN Address;
Изменение типа столбца
Для изменения типа применяется ключевое слово TYPE. Изменим в таблице Customers тип данных у столбца FirstName на VARCHAR(50) (он же VARYING CHARACTER(50)):
ALTER TABLE Customers
ALTER COLUMN FirstName TYPE VARCHAR(50);
Изменение ограничений столбца
Для добавления ограничения применяется оператор SET, после которого указывается ограничение.
Например, установим для столбца FirstName ограничение NOT NULL:
ALTER TABLE Customers
ALTER COLUMN FirstName
SET NOT NULL;
Для удаления ограничения применяется оператор DROP, после которого указывается ограничение.
Например, удалим выше установленное ограничение:
ALTER TABLE Customers
ALTER COLUMN FirstName
DROP NOT NULL;
Изменение ограничений таблицы
Добавление ограничения CHECK:
ALTER TABLE Customers
ADD CHECK (Age > 0);
Добавление первичного ключа PRIMARY KEY:
ALTER TABLE Customers
ADD PRIMARY KEY (Id);
В данном случае предполагается, что в таблице уже есть столбец Id, который не имеет ограничения PRIMARY KEY. А с помощью вышеуказанного скрипта устанавливается ограничение PRIMARY KEY.
Добавление ограничение UNIQUE — определим для столбца Email уникальные значения:
ALTER TABLE Customers
ADD UNIQUE (Email);
При добавлении ограничения каждому из них дается определенное имя. Например, выше добавленное ограничение для CHECK будет называться
customers_age_check. Имена ограничений можно посмотреть в таблице через pgAdmin.
Также мы можем явным образом назначить ограничению при добавлении имя с помощью оператора CONSTRAINT.
ALTER TABLE Customers
ADD CONSTRAINT phone_unique UNIQUE (Phone);
В данном случае ограничение будет называться «phone_unique».
Чтобы удалить ограничение, надо знать его имя, которое указывается после выражения DROP CONSTRAINT. Например, удалим выше добавленное ограничение:
ALTER TABLE Customers
DROP CONSTRAINT phone_unique;
Переименование столбца и таблицы
Переименуем столбец Address в City:
ALTER TABLE Customers
RENAME COLUMN Address TO City;
Переименуем таблицу Customers в Users:
ALTER TABLE Customers
RENAME TO Users;
Обратите внимание, что мы вставили значения только для двух столбцов, id и name. Однако для столбца book_author было использовано значение по умолчанию:
Проверочное ограничение помогает в проверке записей, которые вставляются в таблицу. Мы можем сделать это, комбинируя команду ALTER TABLE с оператором ADD CHECK. Синтаксис:
ALTER TABLE table-name ADD CHECK expression;
Имя таблицы – это имя таблицы, которую нужно изменить.
Выражение – это ограничение, накладываемое на столбец таблицы.
Давайте изменим столбец book_author таблицы Book так, чтобы он принимал только значения Николас и Самуил:
ALTER TABLE Book ADD CHECK (book_author IN ('Nicholas', 'Samuel'));
Теперь давайте попробуем вставить значение, отличное от Николаса или Сэмюэля, в столбец book_author таблицы Book:
INSERT INTO Book
VALUES(7, 'Best PostgreSQL Book', 'Gregory Bush');
Оператор вернет следующую ошибку:
Операция вставки не удалась, потому что мы нарушили проверочное ограничение.
Шаг 3) Введите запрос в редакторе запросов:
ALTER TABLE Book
  ADD author VARCHAR(50);
Шаг 4) Нажмите кнопку «Выполнить».

Шаг 5) Чтобы проверить, был ли добавлен столбец, выполните следующие действия:
- Нажмите Базы данных на левой навигационной панели.
- Разверните Демо.
- Разверните Схемы.
- Развернуть Public.
- Развернуть Таблицы.
- Развернуть книгу.
- Разверните столбцы.
Столбец должен быть добавлен, как показано ниже:

Переименование столбца таблицы
Чтобы сделать то же самое через pgAdmin, сделайте это:
Шаг 1) Войдите в свою учетную запись pgAdmin.
Шаг 2)
- На панели навигации слева нажмите Базы данных.
- Нажмите Демо.

Шаг 3) Введите запрос в редакторе запросов:
ALTER TABLE Book
  RENAME COLUMN author TO book_author;
Шаг 4) Нажмите кнопку «Выполнить».

Шаг 5) Чтобы проверить, было ли изменение успешным, сделайте следующее:
- Нажмите Базы данных на левой навигационной панели.
- Разверните Демо.
- Разверните Схемы.
- Развернуть Public.
- Развернуть Таблицы.
- Развернуть книгу.
- Разверните столбцы.

Теперь столбцы должны быть следующими:

Столбец был успешно изменен.
Установка значения по умолчанию для столбца
Чтобы сделать то же самое через pgAdmin, сделайте это:
Шаг 1) Войдите в свою учетную запись pgAdmin.
Шаг 2)
- На панели навигации слева нажмите Базы данных.
- Нажмите Демо.

Шаг 3) Введите запрос в редакторе запросов:
ALTER TABLE Book ALTER COLUMN book_author SET DEFAULT 'Nicholas Samuel';
Шаг 4) Нажмите кнопку «Выполнить».

Шаг 5) Чтобы проверить, выполните следующую команду в редакторе запросов:
INSERT INTO Book (id, name)
 VALUES (6, 'PostgreSQL for Beginners')
Шаг 6) Теперь мы можем запросить таблицу, чтобы проверить, было ли введено значение по умолчанию в столбце book_author:

Добавление ограничения проверки
Чтобы сделать то же самое через pgAdmin, сделайте это:
Шаг 1) Войдите в свою учетную запись pgAdmin.
Шаг 2)
- На панели навигации слева нажмите Базы данных.
- Нажмите Демо.

Шаг 3) Введите запрос в редакторе запросов:
ALTER TABLE Book ADD CHECK (book_author IN ('Nicholas', 'Samuel'))
Шаг 4) Нажмите кнопку «Выполнить».

Шаг 5) Чтобы проверить это, сделайте следующее:
- Введите следующий запрос в редакторе запросов:
INSERT INTO Book
VALUES(7, 'Best PostgreSQL Book', 'Gregory Bush');
- Нажмите кнопку Выполнить.

Он вернет следующее:


Переименование таблицы
Чтобы сделать то же самое через pgAdmin, сделайте это:
Шаг 1) Войдите в свою учетную запись pgAdmin.
Шаг 2)
- На панели навигации слева нажмите Базы данных.
- Нажмите Демо.

Шаг 3) Введите запрос в редакторе запросов:
ALTER TABLE Book
  RENAME TO Books;
Шаг 4) Нажмите кнопку «Выполнить».

Шаг 5) Чтобы проверить, была ли таблица переименована, сделайте следующее:
- Нажмите Базы данных на левой навигационной панели.
- Разверните Демо.
- Разверните Схемы.
- Развернуть Public.
- Развернуть Таблицы.

Таблица была успешно переименована.
Резюме:
- Инструкция ALTER TABLE используется для изменения структуры таблицы.
- Команда ALTER TABLE принимает различные формы в зависимости от задачи, которую вам нужно выполнить.
- Структура может быть столбцами таблицы или самой таблицей.
- Мы можем использовать это утверждение, чтобы изменить имя таблицы.
- Команда ALTER TABLE может использоваться для установки значения столбца по умолчанию.
- Оператор может использоваться для проверки значений, введенных в столбец таблицы.
Загрузите базу данных, использованную в этом руководстве
The ALTER TABLE command is used to alter the structure of a PostgreSQL table. It is the command used to change the table columns or the name of the table.
In this tutorial, you will learn:
- Syntax
- Description
- Modifying a column
- Adding a New column
- Renaming a Table Column
- Setting a Default Value for a Column
- Adding a Check Constraint
- Renaming a Table
- Using pgAdmin
Syntax
Here is the syntax for the PostgreSQL ALTER TABLE command:
ALTER TABLE table-name action;
The table-name parameter is the name of the table that you need to change.
The action parameter is the action that you need to perform, such as changing the name of a column, changing the data type of a column, etc.
Description
The ALTER TABLE command changes the definition of an existing table. It takes the following subforms:
- ADD COLUMN: this uses similar syntax as CREATE TABLE command to add a new column to a table.
- DROP COLUMN: for dropping a table column. The constraints and indexes imposed on the columns will also be dropped.
- SET/DROP DEFAULT: Use for removing the default value for a column. However, the change will only apply to the subsequent INSERT statements.
- SET/DROP NOT NULL: Changes whether a column will allow nulls or not.
- SET STATISTICS: For setting the statistics-gathering target for each column for ANALYZE operations.
- SET STORAGE: For setting the mode of storage for a column. This will determine where the column is held, whether inline, or in a supplementary table.
- SET WITHOUT OIDS: Use for removing the old column of the table.
- RENAME: for changing the table name or a column name.
- ADD table_constraint: Use for adding a new constraint to a table It uses the same syntax as CREATE TABLE command.
- DROP CONSTRAINT: Use for dropping a table constraint.
- OWNER: for changing the owner of a table, sequence, index or a view to a certain user.
- CLUSTER: for marking a table to be used for carrying out future cluster operations.
Modifying a column
A column may be modified in a number of ways. Such modifications can be done using the ALTER TABLE command. Let us discuss these:
Adding a New column
To add a new column to a PostgreSQL table, the ALTER TABLE command is used with the following syntax:
ALTER TABLE table-name
  ADD new-column-name column-definition;
The table-name is the name of the table to be modified.
The new-column-name is the name of the new column to be added.
The column-definition is the data type of the new column.
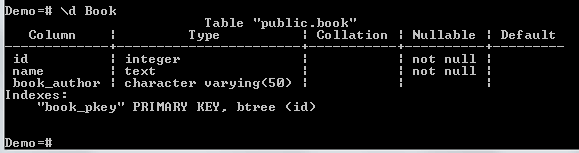
See the Book table shown below:
The table has two columns, id, and name. We need to add a new column to the table and give it the name author. Just run the following command:
ALTER TABLE Book
  ADD author VARCHAR(50);
After running the above command, the Book table is now as follows:

The new column was added successfully.
Renaming a Table Column
We can use the ALTER TABLE command to change the name of a column. In this case, the command is used with the following syntax:
ALTER TABLE table-name
  RENAME COLUMN old-name TO new-name;
The table-name is the name of the table whose column is to be renamed.
The old-name is the old/current name of the column.
The new-name is the new name of the column. Consider the table Book shown below:
Book:
We need the name of the column author to book_author. Here is the command:
ALTER TABLE Book
  RENAME COLUMN author TO book_author;
After running the command, we can view the structure of the table:
The column name was changed successfully.
Setting a Default Value for a Column
We can set a default value for a column such that even when you don’t specify a value for that column during INSERT operations, the default value will be used. In this case, the ALTER TABLE command can be used with the following syntax:
ALTER TABLE table-name ALTER COLUMN column-name [SET DEFAULT value];
The table-name is the name of the table whose column is to be modified.
The column-name is the name for whose default value is to be set.
The value is the default value for the column.
Consider the Book table given below:
We need to set a default value for the book_author column. We can run the following command:
ALTER TABLE Book ALTER COLUMN book_author SET DEFAULT 'Nicholas Samuel';
Now, let us insert a row into the table:
INSERT INTO Book (id, name)
 VALUES (6, 'PostgreSQL for Beginners');
Note that we inserted values for only two columns, id and name. However, the default value has been used for book_author column:
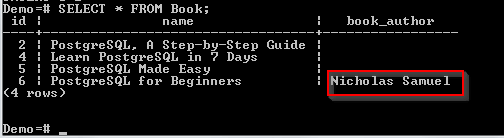
Adding a Check Constraint
A check constraint helps in validating the records that are being inserted into a table. We can do this by combining the ALTER TABLE command with the ADD CHECK statement. Syntax:
ALTER TABLE table-name ADD CHECK expression;
The table-name is the name of the table to be altered.
The expression is the constraint to be imposed on the table column.
Let us modify the book_author column of the Book table so that it only accepts the values, Nicholas and Samuel:
ALTER TABLE Book ADD CHECK (book_author IN ('Nicholas', 'Samuel'));
Now, let us try to insert a value other than Nicholas or Samuel into the book_author column of the Book table:
INSERT INTO Book
VALUES(7, 'Best PostgreSQL Book', 'Gregory Bush');
The statement will return the following error:

The insert operation failed because we violated the check constraint.
Renaming a Table
Here is the syntax for the ALTER TABLE command for renaming a table:
ALTER TABLE table-name
  RENAME TO new-table-name;
The table-name is the current name of the table.
The new-table-name is the new name to be assigned to the table.
For example, let us change the name of the Book table to Books:
ALTER TABLE Book
  RENAME TO Books;
Using pgAdmin
Now let’s see how these actions can be performed using pgAdmin.
Adding a New column
To accomplish the same through pgAdmin, do this:
Step 1) Login to your pgAdmin account.
Step 2)
- From the navigation bar on the left- Click Databases.
- Click Demo.

Step 3) Type the query in the query editor:
ALTER TABLE Book
  ADD author VARCHAR(50);
Step 4) Click the Execute button.

Step 5) To check whether the column was added, do the following:
- Click Databases from the left navigation.
- Expand Demo.
- Expand Schemas.
- Expand Public.
- Expand Tables.
- Expand book.
- Expand Columns.

The column should have been added, as shown below:
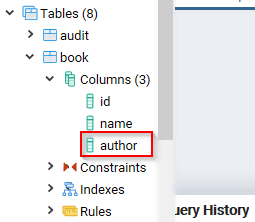
Renaming a Table Column
To accomplish the same through pgAdmin, do this:
Step 1) Login to your pgAdmin account.
Step 2)
- From the navigation bar on the left- Click Databases.
- Click Demo.

Step 3) Type the query in the query editor:
ALTER TABLE Book
  RENAME COLUMN author TO book_author;
Step 4) Click the Execute button.

Step 5) To check whether the change was successful, do the following:
- Click Databases from the left navigation.
- Expand Demo.
- Expand Schemas.
- Expand Public.
- Expand Tables.
- Expand book.
- Expand Columns.

The columns should now be as follows:
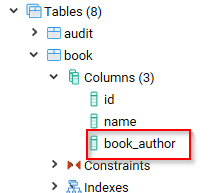
The column was changed successfully.
Setting a Default Value for a Column
To accomplish the same through pgAdmin, do this:
Step 1) Login to your pgAdmin account.
Step 2)
- From the navigation bar on the left- Click Databases.
- Click Demo.

Step 3) Type the query in the query editor:
ALTER TABLE Book ALTER COLUMN book_author SET DEFAULT 'Nicholas Samuel';
Step 4) Click the Execute button.

Step 5) To test, run the following command on the query editor:
INSERT INTO Book (id, name)
 VALUES (6, 'PostgreSQL for Beginners')
Step 6) Now, we can query the table to check whether the default value was inserted in the book_author column:
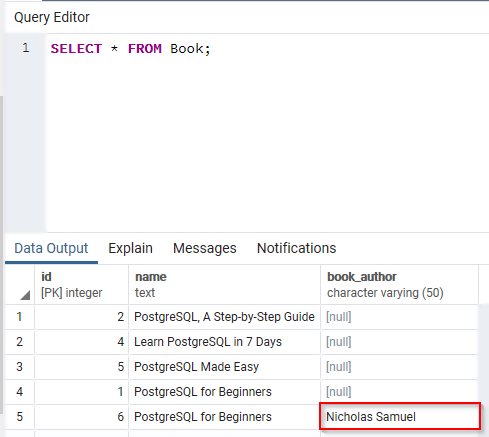
Adding a Check Constraint
To accomplish the same through pgAdmin, do this:
Step 1) Login to your pgAdmin account.
Step 2)
- From the navigation bar on the left- Click Databases.
- Click Demo.
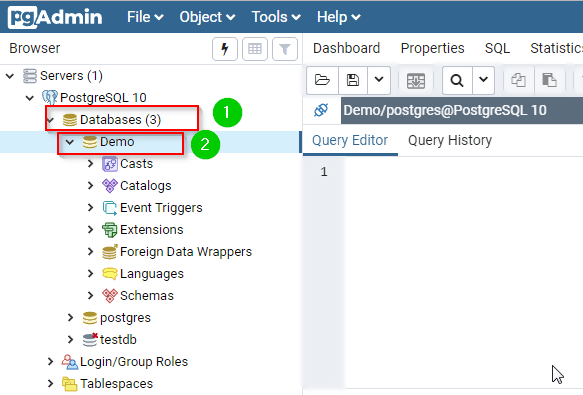
Step 3) Type the query in the query editor:
ALTER TABLE Book ADD CHECK (book_author IN ('Nicholas', 'Samuel'))
Step 4) Click the Execute button.

Step 5) To test this, do the following:
- Type the following query on the query editor:
INSERT INTO Book
VALUES(7, 'Best PostgreSQL Book', 'Gregory Bush');
- Click the Execute button.

It will return the following:


Renaming a Table
To accomplish the same through pgAdmin, do this:
Step 1) Login to your pgAdmin account.
Step 2)
- From the navigation bar on the left- Click Databases.
- Click Demo.

Step 3) Type the query in the query editor:
ALTER TABLE Book
  RENAME TO Books;
Step 4) Click the Execute button.

Step 5) To check whether the table was renamed, do the following:
- Click Databases from the left navigation.
- Expand Demo.
- Expand Schemas.
- Expand Public.
- Expand Tables.
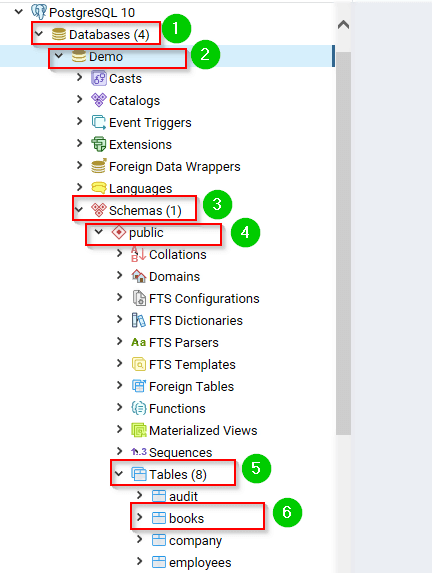
The table was renamed successfully.
Summary:
- The ALTER TABLE statement is used to modify the structure of the table.
- The ALTER TABLE command takes various forms depending on the task that you need to perform.
- The structure can be the table columns or the table itself.
- We can use this statement to change the name of a table.
- The ALTER TABLE command can be used to set the default value of a column.
- The statement can be used to validate the values that are entered into a table column.
Download the Database used in this Tutorial
Изменение таблиц
5.5. Изменение таблиц
Когда вы создали таблицу и видите, что допустили ошибку
или что требования приложения изменились, вы можете удалить
эту таблицу и создать её заново. Но это неудобно, если таблица
уже содержит данные или если на таблицу ссылаются другие объекты
базы данных (например, внешний ключ). Поэтому
PostgreSQL предоставляет набор команд
для внесения изменений в существующие таблицы. Заметим, что эти
действия концептуально отличаются от изменений самих данных,
содержащихся в таблице: здесь мы говорим о изменении структуры
таблицы.
Вы можете:
-
Добавить колонки
-
Удалить колонки
-
Добавить ограничения
-
Удалить ограничения
-
Изменить значения по умолчанию
-
Изменить типы данных колонок
-
Переименовать колонки
-
Переименовать таблицы
Все эти действия выполняются с помощью команды
ALTER TABLE,
на странице описания которой, можно найти подробности перечисленных
здесь действий.
5.5.1. Добавление колонки
Чтобы добавить колонку, используйте команду вида:
ALTER TABLE products ADD COLUMN description text;
Новая колонка изначально заполняется указанным значением по умолчанию
(значением null, если вы не задали другое значение в предложении
DEFAULT).
Также в этот момент, вы можете задать ограничения на колонку,
используя синтаксис вида:
ALTER TABLE products ADD COLUMN description text CHECK (description <> '');
Фактически, все опции, которые используются при выполнении команды
CREATE TABLE, могут быть применены и здесь. Однако,
держите в уме, что значение по умолчанию должно удовлетворять
заданным ограничениям, иначе выполнение ADD закончится
ошибкой. В качестве альтернативы, вы можете добавить ограничения
позже (см. ниже), после того как вы корректно закончили добавление
новой колонки.
Tip: Добавление колонки с указанием значения по умолчанию, обновляет каждую
строку в таблице (чтобы сохранить новое значение колонки). Однако,
если значение по умолчанию не задано, PostgreSQL
позволяет избежать физического обновления. Таким образом, если вы
задумали заполнить колонку значениями, которые в большинстве своём не
совпадают с теми, которые заданы по умолчанию, лучше всего добавить
колонку без указания значения по умолчанию, затем вставить нужные значения,
используя UPDATE и затем добавить любое значение по
умолчанию как описывается ниже.
5.5.2. Удаление колонки
Чтобы удалить колонку, используйте команду вида:
ALTER TABLE products DROP COLUMN description;
Данные в этой колонке будут потеряны. Ограничения, касающиеся этой
колонки также будут удалены. Однако, если на колонку ссылается
ограничение внешнего ключа другой таблицы, то PostgreSQL
не будет молча удалять это ограничение. Вы можете явно указать удаление
зависящего от колонки ограничения, добавив CASCADE:
ALTER TABLE products DROP COLUMN description CASCADE;
См. описание этого механизма в Section 5.12.
5.5.3. Добавление ограничения
Чтобы добавить какое-либо ограничение, используется табличный
синтаксис определения этого ограничения. Например:
ALTER TABLE products ADD CHECK (name <> '');
ALTER TABLE products ADD CONSTRAINT some_name UNIQUE (product_no);
ALTER TABLE products ADD FOREIGN KEY (product_group_id) REFERENCES product_groups;
Чтобы добавить ограничение не-null, которое нельзя записать как
ограничение на таблицу, используйте синтаксис:
ALTER TABLE products ALTER COLUMN product_no SET NOT NULL;
Указанное ограничение будет задействовано немедленно, так что данные
в таблице перед добавлением ограничения должны ему удовлентворять.
5.5.4. Удаление ограничения
Чтобы удалить ограничение, вам необходимо знать его имя. Если вы
сами давали ему имя, то все просто. В противном случае, СУБД
назначило автоматически сгенерированное имя, которое нужно найти.
В этом может помочь команда d tablename
в psql; другие интерфейсы также могут
предоставлять способ инспектирования подробностей таблиц.
Затем выполняется команда:
ALTER TABLE products DROP CONSTRAINT some_name;
(Если вы выполняете команду с указанием такого имени ограничения как
$2, не забудьте, что вам понадобится заключить имя в
двойные кавычки, чтобы имя было воспринято как правильный идентификатор.)
Как и в случае с удалением колонки, вам понадобится добавить
CASCADE, если вы хотите удалить ограничение, от которого
зависит что либо другое. Например, если некое ограничение внешнего ключа
зависит от ограничения уникальности или первичного ключа для
ссылочной колонки(ок).
Те же правила работают для всех видов ограничений, исключая
ограничения не-null. Чтобы удалить ограничение не-null, используйте
ALTER TABLE products ALTER COLUMN product_no DROP NOT NULL;
(Обратите внимание, что ограничения не-null не имеют имени.)
5.5.5. Изменение значения по умолчанию для колонки
Чтобы установить новое значение по умолчанию для колонки,
используйте команду вида:
ALTER TABLE products ALTER COLUMN price SET DEFAULT 7.77;
Заметим, что выполнение данной команды не влияет на уже существующие
строки в таблице, команда изменят значение по умолчанию только для
будущих команд INSERT.
Чтобы удалить любое значение по умолчанию, используйте
ALTER TABLE products ALTER COLUMN price DROP DEFAULT;
Команда выполняет тоже самое, что и установка значения по
умолчанию в null. Поскольку при удалении значения
по умолчанию, оно неявно устанавливается в null, в случае
удаления существующего значения по умолчанию, сообщений
об ошибках, не будет.
5.5.6. Изменение типа данных колонки
Чтобы преобразовать колонку к другому типу данных, используйте
команду вида:
ALTER TABLE products ALTER COLUMN price TYPE numeric(10,2);
Команда выполнится успешно только если каждая существующая запись
в колонке может быть преобразована к новому типу через неявное
приведение типа. Если необходимо более сложное преобразование,
вам нужно добавить предложение USING, которое
определяет как из старого значения будет получено новое.
PostgreSQL будет пытаться преобразовать к новому
типу значение по умолчанию, заданное для колонки, а также все
ограничения, связанные с этой колонкой. Но эти преобразования
могут завершиться ошибкой или могут привести к неожиданным
результатам. Часто, лучше удалить все ограничения на колонку
перед тем как изменить её тип, а затем добавить соответственно
изменённые ограничения обратно.
5.5.7. Переименование колонки
Чтобы переименовать колонку, используйте команду вида:
ALTER TABLE products RENAME COLUMN product_no TO product_number;
Back to top