20.3.1. Connection Settings
listen_addresses(string)-
Specifies the TCP/IP address(es) on which the server is to listen for connections from client applications. The value takes the form of a comma-separated list of host names and/or numeric IP addresses. The special entry
*corresponds to all available IP interfaces. The entry0.0.0.0allows listening for all IPv4 addresses and::allows listening for all IPv6 addresses. If the list is empty, the server does not listen on any IP interface at all, in which case only Unix-domain sockets can be used to connect to it. The default value is localhost, which allows only local TCP/IP “loopback” connections to be made. While client authentication (Chapter 21) allows fine-grained control over who can access the server,listen_addressescontrols which interfaces accept connection attempts, which can help prevent repeated malicious connection requests on insecure network interfaces. This parameter can only be set at server start. port(integer)-
The TCP port the server listens on; 5432 by default. Note that the same port number is used for all IP addresses the server listens on. This parameter can only be set at server start.
max_connections(integer)-
Determines the maximum number of concurrent connections to the database server. The default is typically 100 connections, but might be less if your kernel settings will not support it (as determined during initdb). This parameter can only be set at server start.
When running a standby server, you must set this parameter to the same or higher value than on the primary server. Otherwise, queries will not be allowed in the standby server.
superuser_reserved_connections(integer)-
Determines the number of connection “slots” that are reserved for connections by PostgreSQL superusers. At most max_connections connections can ever be active simultaneously. Whenever the number of active concurrent connections is at least
max_connectionsminussuperuser_reserved_connections, new connections will be accepted only for superusers, and no new replication connections will be accepted.The default value is three connections. The value must be less than
max_connections. This parameter can only be set at server start. unix_socket_directories(string)-
Specifies the directory of the Unix-domain socket(s) on which the server is to listen for connections from client applications. Multiple sockets can be created by listing multiple directories separated by commas. Whitespace between entries is ignored; surround a directory name with double quotes if you need to include whitespace or commas in the name. An empty value specifies not listening on any Unix-domain sockets, in which case only TCP/IP sockets can be used to connect to the server.
A value that starts with
@specifies that a Unix-domain socket in the abstract namespace should be created (currently supported on Linux only). In that case, this value does not specify a “directory” but a prefix from which the actual socket name is computed in the same manner as for the file-system namespace. While the abstract socket name prefix can be chosen freely, since it is not a file-system location, the convention is to nonetheless use file-system-like values such as@/tmp.The default value is normally
/tmp, but that can be changed at build time. On Windows, the default is empty, which means no Unix-domain socket is created by default. This parameter can only be set at server start.In addition to the socket file itself, which is named
.s.PGSQL.wherennnnnnnnis the server’s port number, an ordinary file named.s.PGSQL.will be created in each of thennnn.lockunix_socket_directoriesdirectories. Neither file should ever be removed manually. For sockets in the abstract namespace, no lock file is created. unix_socket_group(string)-
Sets the owning group of the Unix-domain socket(s). (The owning user of the sockets is always the user that starts the server.) In combination with the parameter
unix_socket_permissionsthis can be used as an additional access control mechanism for Unix-domain connections. By default this is the empty string, which uses the default group of the server user. This parameter can only be set at server start.This parameter is not supported on Windows. Any setting will be ignored. Also, sockets in the abstract namespace have no file owner, so this setting is also ignored in that case.
unix_socket_permissions(integer)-
Sets the access permissions of the Unix-domain socket(s). Unix-domain sockets use the usual Unix file system permission set. The parameter value is expected to be a numeric mode specified in the format accepted by the
chmodandumasksystem calls. (To use the customary octal format the number must start with a0(zero).)The default permissions are
0777, meaning anyone can connect. Reasonable alternatives are0770(only user and group, see alsounix_socket_group) and0700(only user). (Note that for a Unix-domain socket, only write permission matters, so there is no point in setting or revoking read or execute permissions.)This access control mechanism is independent of the one described in Chapter 21.
This parameter can only be set at server start.
This parameter is irrelevant on systems, notably Solaris as of Solaris 10, that ignore socket permissions entirely. There, one can achieve a similar effect by pointing
unix_socket_directoriesto a directory having search permission limited to the desired audience.Sockets in the abstract namespace have no file permissions, so this setting is also ignored in that case.
bonjour(boolean)-
Enables advertising the server’s existence via Bonjour. The default is off. This parameter can only be set at server start.
bonjour_name(string)-
Specifies the Bonjour service name. The computer name is used if this parameter is set to the empty string
''(which is the default). This parameter is ignored if the server was not compiled with Bonjour support. This parameter can only be set at server start. tcp_keepalives_idle(integer)-
Specifies the amount of time with no network activity after which the operating system should send a TCP keepalive message to the client. If this value is specified without units, it is taken as seconds. A value of 0 (the default) selects the operating system’s default. This parameter is supported only on systems that support
TCP_KEEPIDLEor an equivalent socket option, and on Windows; on other systems, it must be zero. In sessions connected via a Unix-domain socket, this parameter is ignored and always reads as zero.Note
On Windows, setting a value of 0 will set this parameter to 2 hours, since Windows does not provide a way to read the system default value.
tcp_keepalives_interval(integer)-
Specifies the amount of time after which a TCP keepalive message that has not been acknowledged by the client should be retransmitted. If this value is specified without units, it is taken as seconds. A value of 0 (the default) selects the operating system’s default. This parameter is supported only on systems that support
TCP_KEEPINTVLor an equivalent socket option, and on Windows; on other systems, it must be zero. In sessions connected via a Unix-domain socket, this parameter is ignored and always reads as zero.Note
On Windows, setting a value of 0 will set this parameter to 1 second, since Windows does not provide a way to read the system default value.
tcp_keepalives_count(integer)-
Specifies the number of TCP keepalive messages that can be lost before the server’s connection to the client is considered dead. A value of 0 (the default) selects the operating system’s default. This parameter is supported only on systems that support
TCP_KEEPCNTor an equivalent socket option; on other systems, it must be zero. In sessions connected via a Unix-domain socket, this parameter is ignored and always reads as zero.Note
This parameter is not supported on Windows, and must be zero.
tcp_user_timeout(integer)-
Specifies the amount of time that transmitted data may remain unacknowledged before the TCP connection is forcibly closed. If this value is specified without units, it is taken as milliseconds. A value of 0 (the default) selects the operating system’s default. This parameter is supported only on systems that support
TCP_USER_TIMEOUT; on other systems, it must be zero. In sessions connected via a Unix-domain socket, this parameter is ignored and always reads as zero.Note
This parameter is not supported on Windows, and must be zero.
client_connection_check_interval(integer)-
Sets the time interval between optional checks that the client is still connected, while running queries. The check is performed by polling the socket, and allows long running queries to be aborted sooner if the kernel reports that the connection is closed.
This option relies on kernel events exposed by Linux, macOS, illumos and the BSD family of operating systems, and is not currently available on other systems.
If the value is specified without units, it is taken as milliseconds. The default value is
0, which disables connection checks. Without connection checks, the server will detect the loss of the connection only at the next interaction with the socket, when it waits for, receives or sends data.For the kernel itself to detect lost TCP connections reliably and within a known timeframe in all scenarios including network failure, it may also be necessary to adjust the TCP keepalive settings of the operating system, or the tcp_keepalives_idle, tcp_keepalives_interval and tcp_keepalives_count settings of PostgreSQL.
- 28-Sep-2018

The default TCP port for PostgreSQL is usually 5432, however this can easily be changed in the postgresql.conf configuration file, which is the main configuration file for the database server.
In addition to a TCP listening port, PostgreSQL will also a local socket if the server is running in a Linux/ Unix environment. A local socket is the prefered method of connecting to a database as it removes much of the overhead of creating a TCP connection and transferring data. This comes with the limitation that it can only be used if the application accessing the database is on the same machine. In larger or highly available systems this may not be possible.
A TCP connection is the only option of connecting to your PostgreSQL database server from a remote machine. It incurs a small penalty over a local socket and therefore slightly higher latencies and is limited by the network bandwidth available. PostgreSQL Server can be configured to use a local socket, TCP connections or both.
be editing the postgresql.conf file for the following sections however the location of the file is different depending on OS and PostgreSQL version. In Linux you can use the following command to find the file:
locate postgresql.conf
/etc/postgresql/9.5/main/postgresql.conf
As you can see, the server version is included in the file path so you’ll need to check that before trying to open it.
On Windows it’s usually C:Program FilesPostgreSQL9.5data but again, you’ll have to take the version into account.
I’m using Linux for this example, but adjust the following steps to suit your environment. Open the file in your favourite editor.
vi /etc/postgresql/9.5/main/postgresql.confConfiguring local socket use (Linux/ Unix only)
The unix_socket_directory option indicates the filesystem path to the location of the directory you’d like to hold your socket. Specify a filesystem directory path, usually /var/run/postgresql/ and the socket will be created when the server next starts. Remove or comment (#) the line to disable socket access.
unix_socket_directory= /var/run/postgresql/
Restart the server for the changes to take effect.
service postgresql restart
Setting or changing the TCP port
The port option sets the PostgreSQL server port number that will be used when listening for TCP/ IP connections. The default port number is 5432 but you can change it as required. Use the port option with the
listen_addresses option to control the interface where the port will be listening. Use ‘*’ to listen on all interfaces on the host, specify a single host name or IP address to listen on a single interface, or separate several hostname or IP addresses by space (such as ‘10.10.0.1 10.11.0.1’). Omit both of these options to disable TCP/ IP connections.
port = 2345
listen_addresses='*'
Restart the server for the changes to take effect.
service postgresqlrestart
This article explains how to change the port number in postgres. We will change the port from 5444 to 5432 .
1. Check the existing port details
postgres=# select * from pg_settings where name='port'; -[ RECORD 1 ]---+----------------------------------------------------- name | port setting | 5444 unit | category | Connections and Authentication / Connection Settings short_desc | Sets the TCP port the server listens on. extra_desc | context | postmaster vartype | integer source | configuration file min_val | 1 max_val | 65535 enumvals | boot_val | 5444 reset_val | 5444 sourcefile | /pgdata/data/postgresql.conf sourceline | 63 pending_restart | f postgres=# conninfo You are connected to database "postgres" as user "enterprisedb" via socket in "/tmp" at port "5444".postgres=# show config_file; config_file --------------------------------- /pgdata/data/postgresql.conf (1 row) [enterprisedb@master ~]$ cat /pgdata/data/postgresql.conf | grep 'port' port = 5444 # (change requires restart)
2. Update the port in postgresql.conf file:
-- change the port from 5444 to 5432

[enterprisedb@master ~]$  cat /pgdata/data/postgresql.conf | grep 'port'
port = 5432
3. restart postgres services:
pg_ctl stop -D /pgdata/data
pg_ctl start -D /pgdata/data
Alternatively you can restart the service, if configured.
root# systemctl stop edb-as-11
root# systemctl start edb-as-11
4. Check whether port has been updated
[enterprisedb@master ~]$psql -d postgres -p 5432

postgres=# x
Expanded display is on.

postgres=# select * from pg_settings where name='port';
-[ RECORD 1 ]---+-----------------------------------------------------
name            | port
setting         | 5432
unit            |
category        | Connections and Authentication / Connection Settings
short_desc      | Sets the TCP port the server listens on.
extra_desc      |
context         | postmaster
vartype         | integer
source          | configuration file
min_val         | 1
max_val         | 65535
enumvals        |
boot_val        | 5444
reset_val       | 5432
sourcefile      | /pgdata/data/postgresql.conf
sourceline      | 63
pending_restart | f
We can see , the port has been updated to 5432.
Now If any streaming replication is enabled, then we need to update the primary server port in recovery.conf file of standby server.
5. Check for any streaming replication ( run On primary server)
postgres=# select * from pg_stat_replication;
-[ RECORD 1 ]----+---------------------------------
pid              | 2800
usesysid         | 10
usename          | enterprisedb
application_name | walreceiver
client_addr      | 10.20.30.77
client_hostname  |
client_port      | 45884
backend_start    | 01-JUN-21 09:38:07.003029 +03:00
backend_xmin     |
state            | streaming
sent_lsn         | 0/F001AB8
write_lsn        | 0/F001AB8
flush_lsn        | 0/F001AB8
replay_lsn       | 0/F001AB8
write_lag        |
flush_lag        |
replay_lag       |
sync_priority    | 0
sync_state       | async
It shows replication is enabled to server 10.20.30.77(standby server). So we need to update the recovery.conf file in that standby server.
6.Update the recovery.conf file in standby server.
-- recovery.conf file resides inside data directory.
[enterprisedb@standby]$ cat /pgdata/data/recovery.conf
standby_mode = 'on'
primary_conninfo = 'user=enterprisedb password=edbpostgres#123 host=10.20.30.76 port=5432 sslmode=prefer sslcompression=0 krbsrvname=postgres target_session_attrs=any'
primary_slot_name = 'slot1'
7. Updating the postgresql.conf file:
Just like primary, if you want to change the listening port from 5444 to 5432 in standby( just like primary) also, then update the postgresql.conf file in standby server also. Otherwise you can continue with the same port.
[enterprisedb@master ~]$  cat /pgdata/data/postgresql.conf | grep 'port'
port = 5432                             # (change requires restart)
7.Restart the pg services in standby server.
pg_ctl stop -D /pgdata/data
pg_ctl start -D /pgdata/data
Alternatively you can restart the service, if configured.
root# systemctl stop edb-as-11
root# systemctl start edb-as-11
8.Check replication status on standby:
postgres=# select * from pg_stat_wal_receiver;
-[ RECORD 1 ]---------+------------------------------------------------------------------------------------------------------------------------------------------------------------------------------------------------------
pid                   | 8124
status                | streaming
receive_start_lsn     | 0/D000000
receive_start_tli     | 1
received_lsn          | 0/F001AB8
received_tli          | 1
last_msg_send_time    | 01-JUN-21 16:59:57.746814 +03:00
last_msg_receipt_time | 01-JUN-21 16:59:57.747272 +03:00
latest_end_lsn        | 0/F001AB8
latest_end_time       | 01-JUN-21 09:54:24.322036 +03:00
slot_name             | slot1
sender_host           | 10.20.30.76
sender_port           | 5432
conninfo              | user=enterprisedb password=******** dbname=replication host=10.20.30.76 port=5432 fallback_application_name=walreceiver sslmode=prefer sslcompression=0 krbsrvname=postgres target_session_attrs=any
PostgreSQL — это бесплатная объектно-реляционная СУБД с мощным функционалом, который позволяет конкурировать с платными базами данных, такими как Microsoft SQL, Oracle. PostgreSQL поддерживает пользовательские данные, функции, операции, домены и индексы. В данной статье мы рассмотрим установку и краткий обзор по управлению базой данных PostgreSQL. Мы установим СУБД PostgreSQL в Windows 10, создадим новую базу, добавим в неё таблицы и настроим доступа для пользователей. Также мы рассмотрим основы управления PostgreSQL с помощью SQL shell и визуальной системы управления PgAdmin. Надеюсь эта статья станет хорошей отправной точкой для обучения работы с PostgreSQL и использованию ее в разработке и тестовых проектах.
Содержание:
- Установка PostgreSQL 11 в Windows 10
- Доступ к PostgreSQL по сети, правила файерволла
- Утилиты управления PostgreSQL через командную строку
- PgAdmin: Визуальный редактор для PostgresSQL
- Query Tool: использование SQL запросов в PostgreSQL
Установка PostgreSQL 11 в Windows 10
Для установки PostgreSQL перейдите на сайт https://www.postgresql.org и скачайте последнюю версию дистрибутива для Windows, на сегодняшний день это версия PostgreSQL 11 (в 11 версии PostgreSQL поддерживаются только 64-х битные редакции Windows). После загрузки запустите инсталлятор.

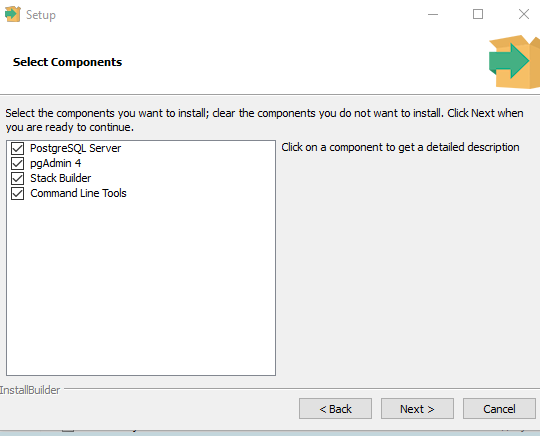
В процессе установки установите галочки на пунктах:
- PostgreSQL Server – сам сервер СУБД
- PgAdmin 4 – визуальный редактор SQL
- Stack Builder – дополнительные инструменты для разработки (возможно вам они понадобятся в будущем)
- Command Line Tools – инструменты командной строки
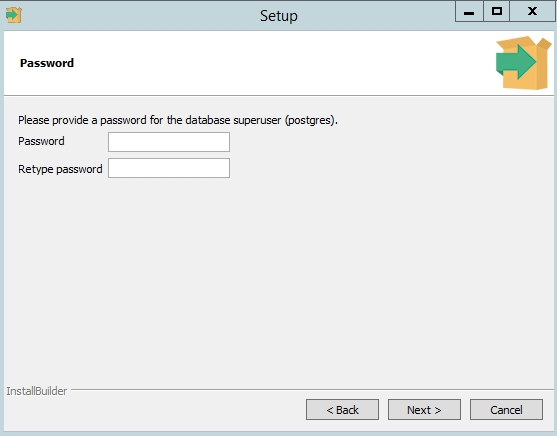
Установите пароль для пользователя postgres (он создается по умолчанию и имеет права суперпользователя).
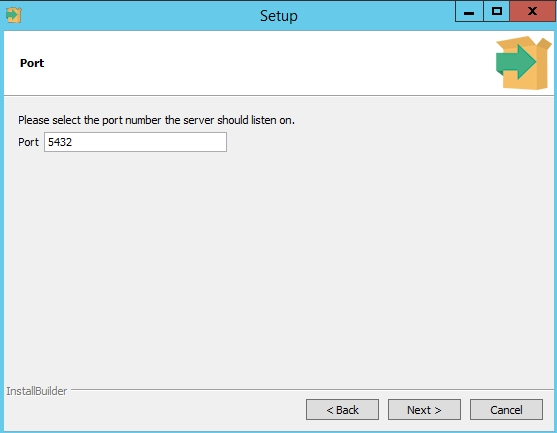
По умолчание СУБД слушает на порту 5432, который нужно будет добавить в исключения в правилах фаерволла.
Нажимаете Далее, Далее, на этом установка PostgreSQL завершена.
Доступ к PostgreSQL по сети, правила файерволла
Чтобы разрешить сетевой доступ к вашему экземпляру PostgreSQL с других компьютеров, вам нужно создать правила в файерволе. Вы можете создать правило через командную строку или PowerShell.
Запустите командную строку от имени администратора. Введите команду:
netsh advfirewall firewall add rule name="Postgre Port" dir=in action=allow protocol=TCP localport=5432
- Где rule name – имя правила
- Localport – разрешенный порт
Либо вы можете создать правило, разрешающее TCP/IP доступ к экземпляру PostgreSQL на порту 5432 с помощью PowerShell:
New-NetFirewallRule -Name 'POSTGRESQL-In-TCP' -DisplayName 'PostgreSQL (TCP-In)' -Direction Inbound -Enabled True -Protocol TCP -LocalPort 5432
После применения команды в брандмауэре Windows появится новое разрешающее правило для порта Postgres.
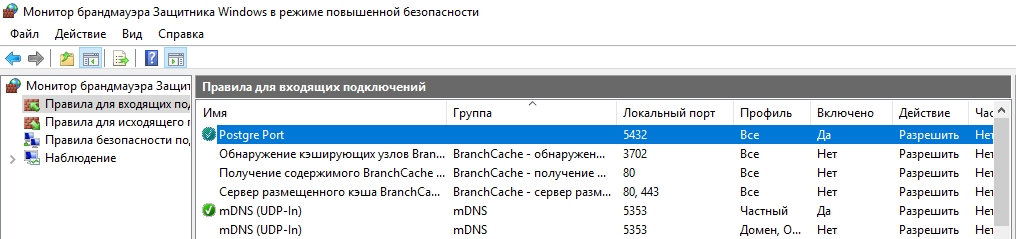
Совет. Для изменения порта в установленной PostgreSQL отредактируйте файл postgresql.conf по пути C:Program FilesPostgreSQL11data.
Измените значение в пункте
port = 5432
. Перезапустите службу сервера postgresql-x64-11 после изменений. Можно перезапустить службу с помощью PowerShell:
Restart-Service -Name postgresql-x64-11

Более подробно о настройке параметров в конфигурационном файле postgresql.conf с помощью тюнеров смотрите в статье.
Утилиты управления PostgreSQL через командную строку
Рассмотрим управление и основные операции, которые можно выполнять с PostgreSQL через командную строку с помощью нескольких утилит. Основные инструменты управления PostgreSQL находятся в папке bin, потому все команды будем выполнять из данного каталога.
- Запустите командную строку.
Совет. Перед запуском СУБД, смените кодировку для нормального отображения в русской Windows 10. В командной строке выполните:
chcp 1251 - Перейдите в каталог bin выполнив команду:
CD C:Program FilesPostgreSQL11bin

Основные команды PostgreSQL:

PgAdmin: Визуальный редактор для PostgresSQL
Редактор PgAdmin служит для упрощения управления базой данных PostgresSQL в понятном визуальном режиме.
По умолчанию все созданные базы хранятся в каталоге base по пути C:Program FilesPostgreSQL11database.
Для каждой БД существует подкаталог внутри PGDATA/base, названный по OID базы данных в pg_database. Этот подкаталог по умолчанию является местом хранения файлов базы данных; в частности, там хранятся её системные каталоги. Каждая таблица и индекс хранятся в отдельном файле.
Для резервного копирования и восстановления лучше использовать инструмент Backup в панели инструментов Tools. Для автоматизации бэкапа PostgreSQL из командной строки используйте утилиту pg_dump.exe.
Query Tool: использование SQL запросов в PostgreSQL
Для написания SQL запросов в удобном графическом редакторе используется встроенный в pgAdmin инструмент Query Tool. Например, вы хотите создать новую таблицу в базе данных через инструмент Query Tool.
- Выберите базу данных, в панели Tools откройте Query Tool
- Создадим таблицу сотрудников:
CREATE TABLE employee
(
Id SERIAL PRIMARY KEY,
FirstName CHARACTER VARYING(30),
LastName CHARACTER VARYING(30),
Email CHARACTER VARYING(30),
Age INTEGER
);
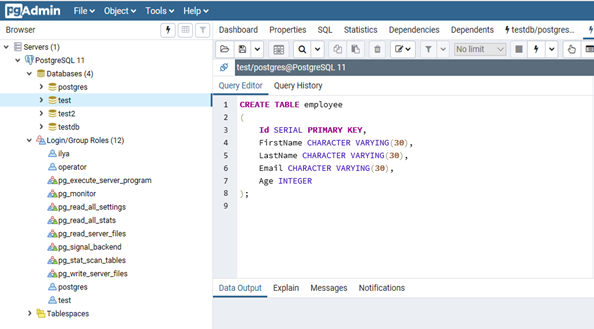
Id — номер сотрудника, которому присвоен ключ SERIAL. Данная строка будет хранить числовое значение 1, 2, 3 и т.д., которое для каждой новой строки будет автоматически увеличиваться на единицу. В следующих строках записаны имя, фамилия сотрудника и его электронный адрес, которые имеют тип CHARACTER VARYING(30), то есть представляют строку длиной не более 30 символов. В строке — Age записан возраст, имеет тип INTEGER, т.к. хранит числа.
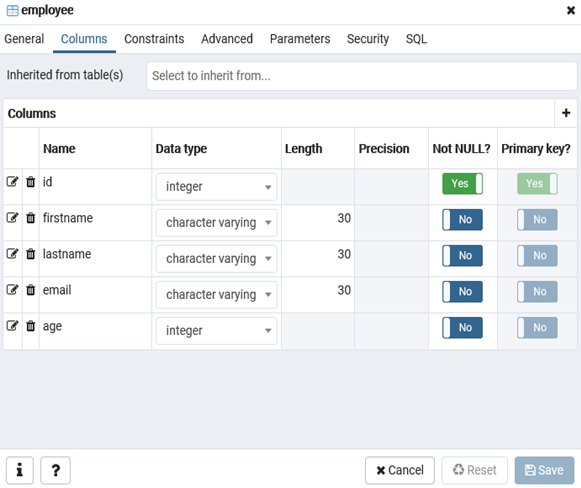
После того, как написали код SQL запроса в Query Tool, нажмите клавишу F5 и в базе будет создана новая таблица employee.
Для заполнения полей в свойствах таблицы выберите таблицу employee в разделе Schemas -> Tables. Откройте меню Object инструмент View/Edit Data.
Здесь вы можете заполнить данные в таблице.
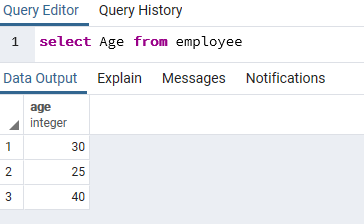
После заполнения данных выполним инструментом Query простой запрос на выборку:
select Age from employee;