| title | description | author | ms.date | ms.author |
|---|---|---|---|---|
|
Error handling |
An article on how to catch and handle errors in Power Query using the syntax try and otherwise. |
ptyx507x |
12/9/2022 |
miescobar |
Error handling
Similar to how Excel and the DAX language have an IFERROR function, Power Query has its own syntax to test and catch errors.
As mentioned in the article on dealing with errors in Power Query, errors can appear either at the step or cell level. This article will focus on how you can catch and manage errors based on your own specific logic.
[!Note]
To demonstrate this concept, this article will use an Excel Workbook as its data source. The concepts showcased here apply to all values in Power Query and not only the ones coming from an Excel Workbook.
The sample data source for this demonstration is an Excel Workbook with the following table.

This table from an Excel Workbook has Excel errors such as #NULL!, #REF!, and #DIV/0! in the Standard Rate column. When you import this table into the Power Query editor, the following image shows how it will look.

Notice how the errors from the Excel workbook are shown with the [Error] value in each of the cells.
In this article, you’ll learn how to replace an error with another value. In addition, you’ll also learn how to catch an error and use it for your own specific logic.
In this case, the goal is to create a new Final Rate column that will use the values from the Standard Rate column. If there are any errors, then it will use the value from the correspondent Special Rate column.
Provide an alternative value when finding errors
In this case, the goal is to create a new Final Rate column in the sample data source that will use the values from the Standard Rate column. If there are any errors, then it will use the value from the corresponding Special Rate column.
To create a new custom column, go to the Add column menu and select Custom column. In the Custom column window, enter the formula try [Standard Rate] otherwise [Special Rate]. Name this new column Final Rate.

The formula above will try to evaluate the Standard Rate column and will output its value if no errors are found. If errors are found in the Standard Rate column, then the output will be the value defined after the otherwise statement, which in this case is the Special Rate column.
After adding the correct data types to all columns in the table, the following image shows how the final table looks.

[!NOTE]
As an alternative approach, you can also enter the formulatry [Standard Rate] catch ()=> [Special Rate], which is equivalent to the previous formula, but using the catch keyword with a function that requires no parameters.The
catchkeyword was introduced to Power Query in May of 2022.
Provide your own conditional error logic
Using the same sample data source as the previous section, the new goal is to create a new column for the Final Rate. If the value from the Standard Rate exists, then that value will be used. Otherwise the value from the Special Rate column will be used, except for the rows with any #REF! error.
[!Note]
The sole purpose of excluding the#REF!error is for demonstration purposes. With the concepts showcased in this article, you can target any fields of your choice from the error record.
When you select any of the whitespace next to the error value, you get the details pane at the bottom of the screen. The details pane contains both the error reason, DataFormat.Error, and the error message, Invalid cell value '#REF!':

You can only select one cell at a time, so you can effectively only see the error components of one error value at a time. This is where you’ll create a new custom column and use the try expression.
Use try with custom logic
To create a new custom column, go to the Add column menu and select Custom column. In the Custom column window, enter the formula try [Standard Rate]. Name this new column All Errors.

The try expression converts values and errors into a record value that indicates whether the try expression handled an error or not, as well as the proper value or the error record.

You can expand this newly created column with record values and look at the available fields to be expanded by selecting the icon next to the column header.

This operation will expose three new fields:
- All Errors.HasError—displays whether the value from the Standard Rate column had an error or not.
- All Errors.Value—if the value from the Standard Rate column had no error, this column will display the value from the Standard Rate column. For values with errors this field won’t be available, and during the expand operation this column will have
nullvalues. - All Errors.Error—if the value from the Standard Rate column had an error, this column will display the error record for the value from the Standard Rate column. For values with no errors, this field won’t be available, and during the expand operation this column will have
nullvalues.

For further investigation, you can expand the All Errors.Error column to get the three components of the error record:
- Error reason
- Error message
- Error detail
After doing the expand operation, the All Errors.Error.Message field displays the specific error message that tells you exactly what Excel error each cell has. The error message is derived from the Error Message field of the error record.

Now with each error message in a new column, you can create a new conditional column with the name Final Rate and the following clauses:
- If the value in the All Errors.Errors.Message column equals
null, then the output will be the value from the Standard Rate column. - Else, if the value in the All Errors.Errors.Message column doesn’t equal
Invalid cell value '#REF!'., then the output will be the value from the Special Rate column. - Else, null.

After keeping only the Account, Standard Rate, Special Rate, and Final Rate columns, and adding the correct data type for each column, the following image demonstrates what the final table looks like.

Use try and catch with custom logic
Alternatively, you can also create a new custom column using the try and catch keywords.
try [Standard Rate] catch (r)=> if r[Message] <> "Invalid cell value '#REF!'." then [Special Rate] else null

More resources
- Understanding and working with errors in Power Query
- Add a Custom column in Power Query
- Add a Conditional column in Power Query
IMPORTANT: You can read the official documentation that Microsoft has on this topic from the following link (url).
If you haven’t read the first two posts (Part 1 | Part 2) in this series yet, I welcome you to do so before reading this one.
I also recommend that you check out this post on Query Error Auditing so you get a better understanding of what types of errors you can find in Power BI / Power Query.
This is a post on how to use error handling, similar to an IFERROR in DAX and Excel, but for Power Query (using its M language).
How does Error handling works in Excel & DAX?
In Excel and in DAX we have the IFERROR function which works like this:
=IFERROR( value, value_if_error)
Taken directly from the official DAX documentation:
Evaluates an expression and returns a specified value if the expression returns an error; otherwise returns the value of the expression itself.
It’s a pretty simple and straightforward function in DAX and Excel, where you can enter your formula in the “value” parameter and then, if you get an error from it, you can define what should be the output value in the “value_if_error” parameter.
The whole idea is that you can “catch” an error and use a different value when it finds an error.
How does Error handling works in Power BI / Power Query?
In Power Query the code is a bit different. Let’s see it in action and then talk more about it.
Imagine that we have an Excel workbook with a table like this
 :
:
What we would like to create is a new column that should multiply the values from the [Price] and [Amount] columns to create a new Subtotal column.
One caveat, as you can probably see, is that this spreadsheet has some cells with errors on the [Price] column. In the event that we find an error on the Price column, we need to use the value from the [List Price] instead of the [Price] value.
The first thing that we need to do is import that table from Excel. If you’d like to follow along, you can download the workbook by clicking the button below:
Importing data from the Excel Workbook
I’ll be using Power BI Desktop for this, but you can use Excel as well.
The first thing that we need to do is select the Excel connector and connect to our file:

and once you get the “Navigator” window, you can select the table that reads “Sample”:

Notice how there’s a bunch of errors in that [Price] column just in the preview. Let’s hit the “Edit” button so we can go to the Power Query Editor Window.
Using error handling in Power BI /Power Query
Now that we have our data in the Power Query Editor window:
 what we want to do is create a Custom Column, so we simply go to the “Add Column” menu and hit on “Custom Column”.
In there, we try do create a simple column that will multiply the [Price] column by the [Amount] column:

and as you can see, our [Subtotal] column has some errors.
We know that in Excel and DAX you can use IFERROR, but what can you use in Power Query ?
For Power Query, we need to hit modify that Custom Column code (just click the gear icon next to the Added Custom step) and add the following pieces to it:

try [Price]*[Amount] otherwise [Amount]*[List Price]
We need to use the keywords “try” and “otherwise”. It’s pretty easy to read, but it just says to try and evaluate the expression ([Price] * [Amount]) and if that gives an error, use the expression defined after the otherwise statement.
The result of that will look like this:

pretty simple! almost as simple as the IFERROR function in DAX and Excel where intellisense does explain you a bit how to use that function, but in Power Query you need to understand how this works in order to use it. Is nowhere in the User Interface of Power Query, so you need to write this code manually.
Understanding Errors
The workbook sample that I’m using is fairly simple. I’ve had experiences where some users / customers absolutely need to know when a specific error is found from an Excel Workbook.
What happens with Power Query is that it just flags any errors found as “Error” but, what if you needed to know WHY it shows as an error?
Let’s go back to our initial load of the file. Remember that in most cases Power Query will automatically try to add a “Changed Type” step, so what if we remove that step?

Well, I removed the step and I’m still seeing the errors and that’s because the error wasn’t triggered by a data type conversion, but rather it’s a source error, meaning that the error comes directly from the Excel Workbook.
In Workbook with vast amounts of rows, it’s hard to tell if there are any errors at all and doing a “Replace Errors” will not tell us why those errors occurred. We NEED to know what is the error from the source because we want to handle each type of error differently.
Error Message and Error Reason
To figure out what’s the reason why there’s an error, we need to use the “try” statement again.

Note how I only use “try” and not the “otherwise” statement. This will give me a new column with record values. We can expand those records like this:

the most important field from those records it’s the “Error” field which can be either a null or a record value:

and after expanding that column and deleting some others that we don’t need, I end up with this:

I’ve highlighted the most important field after this whole process which is the “Message” which tells me exactly the reason why this is an error.
I can later use this to my advantage and target specific errors differently or get a report of ALL the errors found on a series of files that my department / group uses. This is extremely helpful if you’re trying to validate everything and make sure that we don’t have any errors at the source.
Don’t forget that these same principles work for both Step and cell Value level errors.
В М можно вызвать и обработать ошибки во время выполнения. Если из других языков программирования вы знакомы с идеей исключения, обработка ошибок Power Query отличается по крайней мере одним существенным моментом.[1]
Предыдущая заметка Следующая заметка
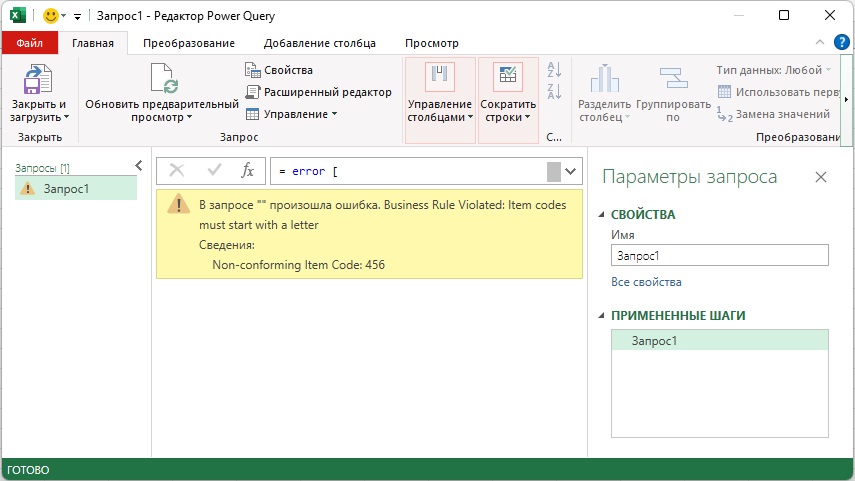
Рис. 1. Три поля записи error; чтобы увеличить изображение кликните на нем правой кнопкой мыши и выберите Открыть картинку в новой вкладке
Скачать заметку в формате Word или pdf, примеры в формате Excel
Сообщение об ошибке
В Power Query каждое выражение должно что-то возвращать. Как правило, это значение. Но выражение также может вызвать ошибку – особый способ указать, что не получилось вернуть значение. Один из способов вызвать ошибку – создать запись с ключевым словом error. Такая запись имеет три поля: причина, сообщение и подробности. Поля с любыми другими именами будут проигнорированы.
Листинг 1[2]
|
= error [ Reason = «Business Rule Violated», Message = «Item codes must start with a letter», Detail = «Non-conforming Item Code: 456» ] |
Все три поля являются необязательными. Если поле Reason отсутствует, причина ошибки будет иметь значение по умолчанию – Expression.Error. Запись ошибки можно также создать с помощью функции Error.Record. В отличие от описанного выше подхода, в Error.Record атрибут Reason является обязательным.
Листинг 2
|
= error Error.Record( «Business Rule Violated», «Item codes must start with a letter», «Non-conforming Item Code: 456» ) |
Оба приведенных выше примера приводят к эквивалентной ошибке, изображенной на рис. 1 Глядя на рисунок, видно, как три поля/параметра соотносятся с отображаемым сообщением.
Вместо записи error также может принимать строку. Результирующее сообщение об ошибке будет иметь значение предоставленной строки, а его причина – значение Expression.Error.
Листинг 3
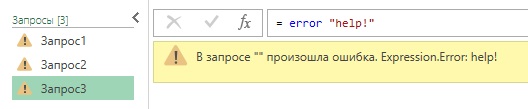
Рис. 2. Строка в error
Ярлык с многоточием
Существует также оператор быстрого доступа для создания ошибок, который пригодится во время разработки. Допустим, вы хотите протестировать запрос, часть кода которого еще не написана. Поскольку каждое выражение должно возвращать значение, или вызывать ошибку, вы не можете протестировать свой запрос, не поместив что-то в качестве заполнителя в нереализованные участки кода. Используйте оператор многоточия (…). При вызове … выдает ошибку Expression.Error: Значение не задано. Вот фрагмент кода, в котором не реализована ветвь else:
Листинг 4
|
let a = 6, Result = if a = 5 then true else ... in Result |
Когда условие (а = 5) принимает значение false, вызывается «…», что приводит к ошибке. Обратите внимание, ключевое слово error не используется. Оператор многоточия как определяет, так и вызывает ошибку.
Особое поведение
Что именно происходит, когда возникает ошибка? Какое поведение возвращает ошибку, а не значение? Рассмотрим выражение:
В обычных условиях сначала выполняется функция GetValue(). Затем полученное значение передается в someFunction(), которая возвращает финальный результат. Предположим, GetValue() выдает ошибку. Дальнейшее выполнение выражения прекращается. someFunction() не вызывается. Ошибка GetValue() становится итогом выражения. Такое поведение также известно, как повышение. Ошибка передается тому шагу, с которого была вызвана someFunction().
Дальнейшее зависит от того, предусмотрено ли в коде появление ошибки. Если да, запрос продолжит выполнение. Если нет, возникнет ошибка верхнего уровня. Запрос завершит работу и вернет значение ошибки.
Сдерживание ошибок
Если ошибка возникает в выражении, которое что-то определяет (поле записи, ячейку таблицы, переменную в выражении let, …), ошибка содержится в этом чём-то. Последствия ошибки ограничены этим чем-то и логикой, которая пытается получить доступ к значению этого чего-то. Ниже последствия ошибки GetValue содержатся в той части запроса, на которую она повлияла. Ошибка не остановила выполнение запроса. Запрос завершился успешно и вернул запись. Два поля – FieldB и FieldC – вернули ошибку, потому что они являются чем-то, затронутым ошибкой.
Листинг 5
|
let GetValue = () => error «Something bad happened!», DoSomething = (input) => input + 1, Result = [ FieldA = 25, FieldB = DoSomething(GetValue), FieldC = FieldA + FieldB ] in Result |
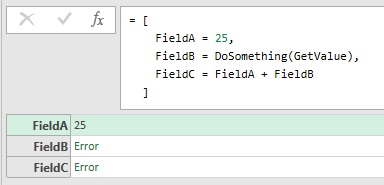
Рис. 3. Результат запроса
Сдерживание ошибок влечет за собой еще одну особенность. Ошибка сохраняется в чём-то, что ее содержит. Пока выполняется запрос, любая попытка получить доступ к значению этого чего-то приводит к повторному возникновению сохраненной ошибки. Когда происходит попытка доступа, логика, которая первоначально вызвала ошибку, не подвергается повторной оценке. Эта логика при повторном обращении могла бы вернуть допустимое значение. Но логика пропускается, и ранее сохраненная ошибка просто вызывается повторно.
Ниже функция GetDataFromWebService() вычисляется один раз, даже если к самим данным обращаются дважды. Если первое обращение вернуло ошибку, второе обращение тоже вернет ошибку, сохраненную ранее.
|
let Data = GetDataFromWebService() // повышенная ошибка in { List.Sum(Data[Amount]), List.Max(Data[TransactionDate]) } |
Ошибки верхнего уровня
Если ошибку не удалось сдержать, она передается из выражения в верхний уровень, как результат всего запроса. Далее в среду хоста и выполнение запроса останавливается. В следующем выражении ничто не содержит ошибку, поэтому её нельзя сдержать, и запрос завершается ошибкой:
Листинг 6
|
let GetValue= () => error «Something bad happened!», SomeFunction = (input) => input + 1 in SomeFunction(GetValue()) |
Сдерживание против исключения
Поведение Power Query по сдерживанию ошибок отличает его от большинства языков программирования, основанных на исключениях. В мире исключений ошибка автоматически распространяется вплоть до среды хоста, что приводит к завершению работы программы (если только в коде не будет предусмотрена обработка ошибок). В M ошибка локализуется, пока есть что-то, что ее содержит. Это позволяет успешно завершить запрос, даже если не удалось вычислить отдельные элементы.
Сдерживание ошибок – отличное поведение, учитывая цель использования M: обработка данных. Предположим, что выражение, определяющее значение столбца таблицы, содержит ошибку для одной ячейки из всей таблицы. В мире, основанном на исключениях, эта ошибка может привести к завершению всей обработки. В мире M ошибка просто влияет на эту единственную ячейку и любой код, который обращается к этой ячейке. Обработка продолжается, и будет получен результат.
На самом деле, из-за лени M, если к ячейке с ошибкой не будет обращений, то ошибка и не возникнет.
Листинг 7
|
let Data = #table({«Col1»}, {{«SomeValue»}, { error «bad» }}) in Table.RowCount(Data) // возвращает 2 |
Хотя одна ячейка и содержит ошибку, запрошенные данные (количество строк), не требуют вычисления значения ошибочной ячейки, поэтому выражение вернет значение 2.
Хотя сдерживание ошибок – отличное поведение по умолчанию, что, если оно не соответствует вашим потребностям? В частности, что делать с таблицами, если важно различать строки с ошибками и строки без ошибок? Возможно, вы не обращаетесь к содержимому строки напрямую, поэтому не делаете ничего, что могло бы вызвать распространение ошибок, но все же хотите знать, в каких строках есть ошибка, а в каких нет. Функции Table.SelectRowsWithErrors и Table.RemoveRowsWithErrors, то, что вам нужно.
Листинг 8
|
let Data = #table({«Col1»}, {{«SomeValue»}, { error «bad» }}) in [ RowsWithErrors = Table.RowCount(Table.SelectRowsWithErrors(Data)), RowsWithoutErrors = Table.RowCount(Table.RemoveRowsWithErrors(Data)) ] |
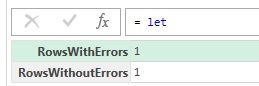
Рис. 4. Список, содержащий количество строк с ошибками и без
Обработка ошибок
Понимая, какие операции способны вызывать ошибку, вы можете использовать ключевое слово try, чтобы проверить, не возвращает ли выражение ошибку. try используется в двух вариантах…
|
try ExpressionToTry otherwise FallbackExpression |
… первый, try with otherwise, пытается выполнить ExpressionToTry. Если это выражение возвращает значение, всё Ok, переходим к следующему шагу запроса. Когда выражение выдает ошибку, вычисляется выражение otherwise и возвращается его значение.
|
try Number.FromText(input) otherwise 0 |
Если Number.FromText возвращает значение, оно и будет результатом выражения. Когда Number.FromText выдает ошибку, try обращается к части otherwise, и возвращает 0. Другими словами, если входные данные могут быть преобразованы в число, возвращается это число; в противном случае возвращается значение по умолчанию – 0.
Имейте в виду, что ошибки будут обработаны только в выражении, расположенном непосредственно справа от try. Если ошибку возвращает выражение otherwise, эта ошибка не будет обработана предшествующим try. Но… поскольку otherwise само по себе является выражением, try можно поместить внутрь него, чтобы обработать ошибку, вызванную otherwise.
|
try GetFromPrimary() otherwise try GetFromSecondary() otherwise «Возникли проблемы с обоими серверами. Возьми отгул на остаток дня :)» |
Проблема с конструкцией try with otherwise в том, что она неразборчива: любая ошибка возвращает альтернативное значение. Иногда последующие действия зависят от типа ошибки. Для этих ситуаций подойдет второй вариант – простое выражение try.
Эта форма всегда возвращает запись. Если выражение завершилось успешно, эта запись имеет вид:
|
[ HasError = false, Value = (значение выражения ExpressionToTry) ] |
Если выражение вызвало ошибку, возвращаемая запись выглядит следующим образом:
|
[ HasError = true, Error = (запись, описывающая возникшую ошибку) ] |
Например:
Листинг 9
|
let DoSomething = () => 45, Result = try DoSomething() in Result // [HasError = false, Value = 45] |
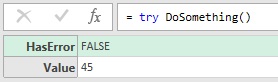
Рис. 5. Запись, возвращаемая try, если нет ошибки
Листинг 10
|
let DoSomething = () => error «bad», Result = try DoSomething() in Result // [HasError = true, Error = [Reason = «Expression.Error», Message = «bad», Details = null] |
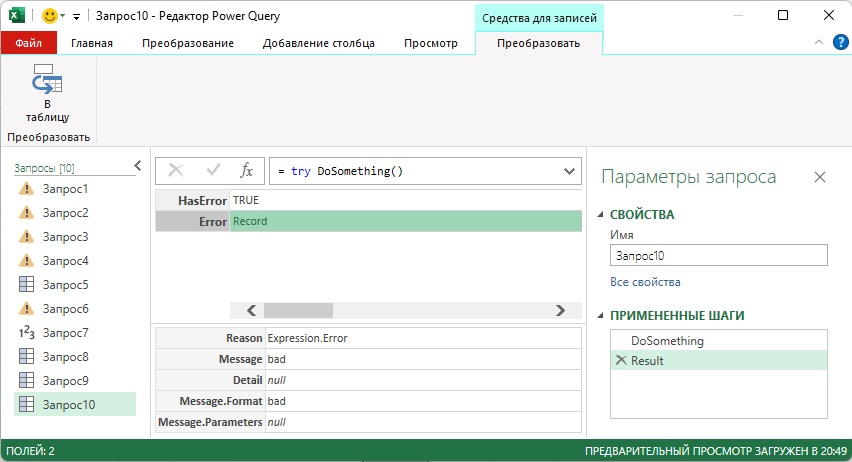
Рис. 6. Запись, возвращаемая try, если есть ошибка
Запись, помещенная в поле Error, содержит ровно три поля: Reason, Message и Details.[3] Это верно, даже если в записи, первоначально использовавшейся для определения ошибки, отсутствовало одно или несколько из этих полей (помните, они необязательны при определении ошибки), или если она включала дополнительные поля.
Запись, возвращаемая try, может быть использована для реализации логики условного исправления. Следующий код обращается к вторичному источнику данных, если первичный выдает ошибку из-за недоступности сервера.
|
let Primary = try GetDataFromPrimary(), Source = if Primary[HasError] = false then Primary[Value] /* если Primary возвращает значение, используй его */ else if Primary[Error][Reason] = «External Source Error» and Primary[Error][Message] = «Server is unreachable» then GetDataFromSecondary() /* если ошибка Primary вызвана тем, что его источник недоступен, запроси данные с сервера Secondary */ else error Primary[Error] /* если Primary вернул иную ошибку, верни её в качестве результата запроса */ in Source |
Используя try with otherwise, мы бы запросили Secondary, если Primary выдаст любую ошибку, а не только когда основной сервер недоступен:
|
try GetDataFromPrimary() otherwise GetDataFromSecondary() |
Масштаб (область действия)
Обработка ошибок должна происходить на уровне, на котором они возникают. Нельзя обработать ошибки, содержащиеся на другом уровне.
|
let Data = #table({«Amount»}, {{10}, {error «help!»}, {error «save me!»}}) in try Data otherwise 0 |
try – бесполезный оператор в этом запросе. Возможно, разработчик надеялся с помощью try заменить ошибки нулями. Но в этом случае Data возвращает допустимую таблицу. Правда, в ней самой есть ячейки с ошибками, но эти ошибки содержатся на уровне ячеек. Поскольку они не влияют на выражение данных на уровне таблицы, try не дает эффекта.
try будет полезен в следующем случае, но его эффект может быть не таким, как предполагал разработчик.
Листинг 11
|
let Data = #table({«Amount»}, {{10}, {error «help!»}, {error «save me!»}}) in try List.Sum(Data[Amount]) otherwise 0 |
List.Sum суммирует значения в столбце [Amount] таблицы Data. Если выражение, определяющее значение элемента, вызывает ошибку, она повышается. List.Sum прекращает суммирование и возвращает ошибку. try обрабатывает эту ошибку, возвращая 0 вместо суммы элементов списка. Скорее всего, цель у разработчика была иная. Он хотел заменить элементы с ошибками на 0, и суммировать числовые значения. Необходимо применить try так, чтобы обработка ошибок велась на уровне ячеек таблицы. Кажется, что можно сделать так:
|
Table.TransformColumns(Data, (input) => try input otherwise 0) |
Однако, эта логика не улавливает ошибки, вызванные выражениями значений ячеек. Дело в том, что аргументы вычисляются до того, как их значения будут переданы в функцию. Если оценка приводит к ошибке, функция не вызывается. Вместо этого ошибка передается шагу, который вызвал функцию. В нашем случае, если выражение значения столбца выдает ошибку, функция преобразования (input) => … не вызывается, поэтому try не может обработать ошибку. Вместо этого ошибка передается обратно в Table.TransformColumns.
Проблема заключается в том, что выражение значения ячейки должно быть вычислено внутри try. Чтобы добиться этого, надо вернуться на уровень строки, и использовать функцию, которая получает строку. Затем внутри функции использовать ссылку на значение столбца строки и вот его подставить в try. Лишь тогда try сможет обработать ошибку. Чтобы реализовать это, нужно создать новый столбец, значения которого формировать путем проверки try. Затем можно удалить исходный столбец, а новому столбцу дать старое имя.
Листинг 12
|
let Data = #table({«Amount»}, {{10}, {error «help!»}, {error «save me!»}}), ErrorsReplacedWithZero = Table.AddColumn( Data, «NewAmount», (row) => try row[Amount] otherwise 0 ), RemoveOldAmount = Table.RemoveColumns(ErrorsReplacedWithZero, {«Amount»}), RenameNewAmount = Table.RenameColumns(RemoveOldAmount, {«NewAmount», «Amount»}) in List.Sum(RenameNewAmount[Amount]) // возвращает 10 |
Это довольно сложно. Но пример хорошо иллюстрирует общий подход к использованию try на уровне ячеек. Если же, как в нашем пример, вы просто хотите заменить любую ошибку значением по умолчанию, используйте Table.ReplaceErrorValues.
Листинг 13
|
let Data = #table({«Amount»}, {{10}, {error «help!»}, {error «save me!»}}), ErrorsReplacedWithZero = Table.ReplaceErrorValues( Data, {{«Amount», 0}} ) // заменяет ошибки в столбце Amount нулями in List.Sum(ErrorsReplacedWithZero[Amount]) // возвращает 10 |
Применить try к элементам списка сложнее. Для списков нет функции List.ReplaceErrorValues. Самым простым решением может быть преобразование списка в таблицу, обработка ошибки, а затем обратное преобразование таблицы в список.
Листинг 14
|
let Data = {10, error «help!», error «save me!»}, #»Преобразовано в таблицу» = Table.FromValue(Data), #»Замененные ошибки» = Table.ReplaceErrorValues(#»Преобразовано в таблицу», {{«Value», 0}}), Value = #»Замененные ошибки»[Value], #»Вычисленная сумма» = List.Sum(Value) in #»Вычисленная сумма» |
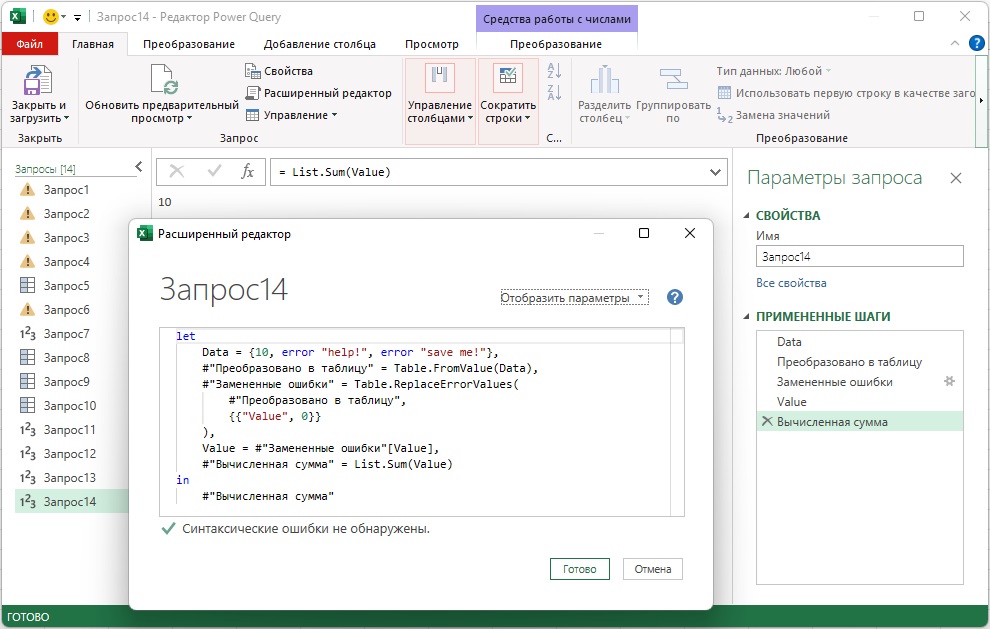
Рис. 7. Сумма элементов списка, содержащего ошибки
Нарушения правил
Вы можете использовать ошибки, как сигнал о несоответствиях. Допустим, вы обрабатываете CSV-файл, где значения в столбце ItemCode должны начинаться с буквы A. В начале запроса вы проверяете это, заменяя несоответствующие значения ошибками. Последующие этапы обработки, которые обращаются к столбцу, будут предупреждены, если они попытаются работать со значениями, нарушающими правила.
|
let Data = GetData(), // for testing use: #table({«ItemCode»}, {{«1»}, {«A2»}}) Validated = Table.TransformColumns( Data, { «ItemCode», each if Text.StartsWith(_, «A») then _ else error Error.Record( «Invalid Data», «ItemCode does not start with expected letter», _ ) } ) in Validated |
Такую проверку полезно применить в базовом запросе, на который будут ссылаться несколько других запросов. Это позволит вам выполнить проверку один раз (вспомните принцип Не повторяйся, Don’t repeat yourself), гарантируя, что пользователи, пытающиеся использовать ошибочные данные, будут предупреждены о наличии аномалий.
Другой вариант – добавить столбец со значениями true и false, в зависимости от того, соблюдается ли правило:
|
let Data = GetData(), // for testing use: #table({«ItemCode»}, {{«1»}, {«A2»}}) Validated = Table.AddColumn( Data, «ValidItemCode», each Text.StartsWith(_[ItemCode], «A»), type logical ) in Validated |
В этом примере логика заботится о том, является ли ItemCode допустимым. Если разработчик забудет выполнить проверку, неверные данные могут рассматриваться как действительные. В отличие от этого, подход замены несоответствующих данных ошибками гарантирует, что попытка получить доступ к недопустимому значению, закончится ошибкой. Пользователь будет вынужден поправить данные в источнике. Какой вариант выбрать, зависит от вашего контекста.
В следующей заметке
Я планирую рассказать о том, что остается за кулисами: организации разделов кода и о том, как M предоставляет возможность аннотировать значения дополнительной информацией (метаданными). Однако перед этим обсудим, как работает система типов в Power Query.
[1] Заметка написана на основе статьи Ben Gribaudo. Power Query M Primer (Part 15): Error Handling. Если вы впервые сталкиваетесь с Power Query, рекомендую начать с Марк Мур. Power Query.
[2] Номер листинга соответствует номеру запроса в приложенном Excel файле.
[3] Судя по рис. 6 современная реализация M создает пять полей.
Earlier this month I published a new and very practical Power BI app on Microsoft AppSource. The app audits Excel workbooks and detects changes and errors. To implement the app I needed to resolve key obstacles that are very common when you import Excel workbooks using Power Query. How do you import the data from Excel if you have formula errors in unpredictable cells?
In today’s tutorial, you will learn how to avoid these errors when you import the data from Excel to Power Query. As a bonus, you will also learn to detect the erroneous cells and find out the type of errors and their coordinates, so if needed, you can report back to the owners of the workbooks and ask them to fix these errors.
The Challenge
Let’s examine a very simple table in Excel as shown in the screenshot below (You can download it here). You can see that we have errors in the Price and Amount columns. Formula errors in Excel are very common. Sometimes, these errors are kept by design, sometimes, they are there by mistake.

When you import data from Excel using Power Query, you may find in the preview pane the errors. But oftentimes, when you deal with a very large dataset, you may completely miss them.

Import the Excel (here), convert the type of the Price column to Fixed decimal number (or let the auto-detection of column types work its black-magic), and apply any filter on Price. For example, in the screenshot below, I applied a greater than 100 filter.


I am sure you have seen these errors before. In the next sections, we will discuss possible solutions.
Removing Rows with Errors
One of the common approaches to resolve the errors is to filter out rows with errors. To do it, you can right-click on the headers of the columns with the errors (In our case, Price and Amount), and select Remove Errors in the shortcut menu.

This step will remove rows that have errors in the selected columns. This approach may be too harsh. Oftentimes, you may know the root cause for the errors and apply some logic that to workaround the errors instead of ignoring the entire rows.
Still, let’s assume that you have no options, and need to remove the errors. We can make your challenge more interesting, and say that you need to remove rows if you find errors in ANY column. How would you approach it?
Looking at the M formula after you removed the errors for columns Price and Amount, you can see that the column names were explicitly called out in the formula, using a list.
= Table.RemoveRowsWithErrors(#"Changed Type", {"Price", "Amount"})To remove rows with errors for any columns, you can replace the static list with the function Table.ColumnNames. Here is the modified formula:
= Table.RemoveRowsWithErrors(#"Changed Type", Table.ColumnNames(#"Changed Type"))Note that in the formula above, in my example, I had #”Changed Type” as the last step in Applied Steps, so I used it as the parameter for Table.ColumnNames. When you apply this technique on your own data, you will have a different step name and will need to copy it as the relevant parameter.
Replacing Errors with other Values
A more common approach to handle errors in Power Query and avoid the refresh errors, is to replace the errors with values. For example, you will oftentimes want to replace the errors with nulls.
Replacing the errors for a single column is very discoverable. You right-click on the column’s header and select Replace Errors in the

But in our example, we have two columns with errors. See, what happens when you select both Price and Amount. Right-clicking on one of their headers, will not have an option for Replace Errors. But when something is missing in one UI element, it doesn’t mean that this functionality is not supported. Let’s look for it in the ribbon.


You can see in the formula bar the following line:
= Table.ReplaceErrorValues(#"Changed Type", {{"Price", null}, {"Amount", null}})We now have a different format in M to replace the errors. You can see a list of pairs. Each pair includes the column name and the null value.
What would you do to replace errors with nulls when you don’t know in which columns you have the errors? Here is the solution using Table.ColumnNames and List.Transform.
= Table.ReplaceErrorValues(#"Changed Type", List.Transform(Table.ColumnNames(#"Changed Type"), each {_,null}))The formula above gets the list of column names and transform them into the required pairs of column name and null. If you are not sure how it works, don’t worry. You can apply it to any table you have in the future, by clicking the fx button in the formula bar, and then copy the formula above. Don’t forget to replace the two occurrences of #”Changed Type” with the last step name of your table. If you have spaces or special characters in the last step, use the #”…” wrapper.
Detecting Errors
So far we have learned to remove formula errors or replace the errors with values. Now, let’s move to a more advanced scenario. Imagine that after you resolved the errors, you still want to dynamically detect these errors and report them to the Excel workbook’s owner.
In this section, you will learn how to do it.
Note: if this use-case has a very high value for you, you can install my Excel Compare app from AppSource here, and use it to report the errors in Excel.
If you are an advanced Power Query user and wish to detect Excel formula errors in Power Query across many workbooks, you can create the following custom function in Power Query:
(tbl) =>
let
    #"Unpivoted Columns" = Table.UnpivotOtherColumns(tbl, {"ID"}, "Column", "Value"),
    #"Kept Errors" = Table.SelectRowsWithErrors(#"Unpivoted Columns", {"Value"}),
    #"Added Custom" = Table.AddColumn(#"Kept Errors", "Custom", each try [Value]),
    #"Removed Columns" = Table.RemoveColumns(#"Added Custom",{"Value"}),
    #"Expanded Custom" = Table.ExpandRecordColumn(#"Removed Columns", "Custom", {"Error"}, {"Error"}),
    #"Expanded Error" = Table.ExpandRecordColumn(#"Expanded Custom", "Error", {"Reason", "Message", "Detail"}, {"Reason", "Message", "Detail"})
in
    #"Expanded Error"
Name the custom function FnDetectErrorsInWorksheet.
Before you use the function, make sure you have a column ID in the table. If you don’t have one, you can create it using the Add Index button in Add Column tab. To apply the function on your table, you can invoke the FnDetectErrorsInWorksheet on your table. For example, if the table with the errors is represented in the Table query, this formula will do the trick.
= FnDetectErrorsInWorksheet(Table)

How to detect errors step by step
If you want to learn how to detect the errors without the custom function above, let’s show you the steps in the UI. You will find it very easy.
On the Queries pane, select the query with the errors. Right-click on it and select Reference in the shortcut menu. Name the new query Detect Errors.
Right-click on the header of ID column, and select Unpivot Other Columns. Now, all the data in the Excel table is rebuilt as the value and its coordinates. ID represents the row. The Attribute column represents the column name, and the Value column represents the value in the original Excel table. You can see that the Value column contains the errors.

Right-click on the header of the Value column.
In Home tab, select Keep Rows, and then select Keep Errors.

You are now left with the errors only. You already know at this stage where errors are located.
But can you tell what kind of errors were detected? To do it, we will add a custom column. In Add Column tab, click Custom Column.

In the Custom Column dialog box, enter the formula:
try [Value]This formula returns a record with the details of the error. You can learn more about the try statement here and check out the latest official error handling article here.
It’s time to move on. Click OK and close the Custom Column dialog box.

Click the expand control in the Custom column header.

Select HasError and Error fields and click OK.

Click the expand control in the Error column header. Select the fields Reason, Message, and Detail, and then click OK.

You can now see that we extracted the specific Excel formula errors in the Message column. From here, you only need to load the Detect Errors query and build a nice report to notify your colleagues when they have errors in Excel.

Did you find this tutorial helpful? Do you want to learn more?
Schedule a very special Power BI or Power Query training for your team. Learn more here.
