Error Handling is a very important concept in every programming language including PowerShell which gives us several possibilities to manage errors in code.
In this article, I will try to cover as many as possible error handling concepts with examples from my practice and one of the important concepts is writing errors in external Error Log text file.
Why Should We Bother Handling Errors In PowerShell
It is no fun to run any code or application full of errors and bugs as the matter a fact it is quite annoying so in order for users to have a pleasant experience handling the errors is one of the essentials in programming.
PowerShell is no exception to that way of thinking and programming ethics although it can take some additional coding and effort but trust me it is always worth it.
I would be more than happy to share my experience with error handling and even more satisfied if I can hear your tips from the field so we can all enrich our knowledge on this very important subject.
Here is a general approach to error handling and logging errors into the external text file. I have an example in the next subheading that further explain each step so everything is much more understandable.
- Identify which Commands need Error Handling in your Function, CmdLet or Script.
- Set the ErrorAction parameter to value Stop for the command that needs Error Handling. This will stop executing the command when an error occurs and it will show the error message. Basically, we are making non-terminating errors into terminating in order to be able to handle the error in the catch block.
- Command that has ErrorAction parameter set to value Stop is wrapped in Try { } block. So when Error occurs handling of the code will jump from the Try block to Catch block.
- In Catch { } block that immediately follows after Try {} block, the error is handled by writing to the error log file on the disk.
- We use our own Write-ErrorLog CmdLet inside Catch{ } block to write the error in a text file on the disk. (See the explanation and code here)
- We have an additional switch error parameter to decide whether we want to write an error in the log file or not. This is totally optional.
- Use the Finally { } block if needed.
- Test the whole setup by intentionally breaking the code while in the development phase.
- Since some of the CmdLets calls are Scheduled we have routine to check external Error Log text file at least once a week and investigate errors that are caught. This step is part of improving the overall quality of the written code.
Example Of PowerShell Error Handling
To show you Error Handling and implement previously defined steps I will use my own Get-CPUInfo CmdLet which is in the Common module of the Efficiency Booster PowerShell Project. Efficiency Booster PowerShell Project is a library of CmdLets that help us IT experts in day to day IT tasks.
In order to follow me along, I highly encourage you to download the zip file with the source code used in this example.
Here is the location of Get-CPUInfo script:
…[My] DocumentsWindowsPowerShellModules3common

Let’s use steps defined in the previous subheading to this example.
Step 1. I have identified the command that needs Error Handling in Get-CPUInfo CmdLet and that is a call to Get-CimInstance CmdLet.
Get-CimInstance @params Step 2. So I have set up the ErrorAction parameter to the value ‘Stop‘ for Get-CimInstance CmdLet in order to force non-terminating errors into terminating and then to be able to handle such errors.
INFO: I use parameter splatting when running CmdLet. If you want to know more about parameter splating please read this article.
            $params = @{ 'ComputerName'=$computer;
                         'Class'='Win32_Processor';
                         'ErrorAction'='Stop'}
            $CPUInfos = Get-CimInstance @params |
                            Select-Object   @{label="ServerName"; Expression={$_.SystemName}},
                                            @{label="CPU"; Expression={$_.Name}},
                                            @{label="CPUid"; Expression={$_.DeviceID}},
                                            NumberOfCores,
                                            AddressWidth
Step 3. Wrap up the call to Get-CimInstance CmdLet into the Try Block in order to be able to handle the error in a catch block that follows.
         try {
            Write-Verbose "Start processing: $computer - $env - $logicalname"
            Write-Verbose "Start Win32_Processor processing..."
            $CPUInfos = $null
            $params = @{ 'ComputerName'=$computer;
                         'Class'='Win32_Processor';
                         'ErrorAction'='Stop'}
            $CPUInfos = Get-CimInstance @params |
                            Select-Object   @{label="ServerName"; Expression={$_.SystemName}},
                                            @{label="CPU"; Expression={$_.Name}},
                                            @{label="CPUid"; Expression={$_.DeviceID}},
                                            NumberOfCores,
                                            AddressWidth
            Write-Verbose "Finish Win32_Processor processing..."
            foreach ($CPUInfo in $CPUInfos) {
                Write-Verbose "Start processing CPU: $CPUInfo"
                $properties = @{ 'Environment'=$env;
                                 'Logical name'=$logicalname;
                                 'Server name'=$CPUInfo.ServerName;
            	                 'CPU'=$CPUInfo.CPU;
            	                 'CPU ID'=$CPUInfo.CPUid;
            	                 'Number of CPU cores'=$CPUInfo.NumberOfCores;
                                 '64 or 32 bits'=$CPUInfo.AddressWidth;
                                 'IP'=$ip;
                                 'Collected'=(Get-Date -UFormat %Y.%m.%d' '%H:%M:%S)}
                $obj = New-Object -TypeName PSObject -Property $properties
                $obj.PSObject.TypeNames.Insert(0,'Report.CPUInfo')
                Write-Output $obj
                Write-Verbose "Finish processing CPU: $CPUInfo"
            }
 Write-Verbose "Finish processing: $computer - $env - $logicalname"
        }
Step 4. When the error occurs in the try block it is handled in the Catch Block.
It is important to notice following in the catch block of code:
- Get-CPUInfo CmdLet switch parameter $errorlog has been used to decide whether to log the errors in an external text file or not. This is completely optional.
- Certain Error properties are collected using an automatic variable $_ ($PSItem is another name for the same variable). If you want to know more about which properties we collect please read here.
- Collected data about the error that will be handled has been passed to another CmdLet Write-ErrorLog that will write the data in an external text log file. Please read here about Write-ErrorLog CmdLet.
catch {
            Write-Warning "Computer failed: $computer - $env - $logicalname CPU failed: $CPUInfos"
            Write-Warning "Error message: $_"
            if ( $errorlog ) {
                $errormsg = $_.ToString()
                $exception = $_.Exception
                $stacktrace = $_.ScriptStackTrace
                $failingline = $_.InvocationInfo.Line
                $positionmsg = $_.InvocationInfo.PositionMessage
                $pscommandpath = $_.InvocationInfo.PSCommandPath
                $failinglinenumber = $_.InvocationInfo.ScriptLineNumber
                $scriptname = $_.InvocationInfo.ScriptName
                Write-Verbose "Start writing to Error log."
                Write-ErrorLog -hostname $computer -env $env -logicalname $logicalname -errormsg $errormsg -exception $exception -scriptname $scriptname -failinglinenumber $failinglinenumber -failingline $failingline -pscommandpath $pscommandpath -positionmsg $pscommandpath -stacktrace $stacktrace
                Write-Verbose "Finish writing to Error log."
            }
        }
Step 5. I have already mentioned that Write-ErrorLog CmdLet has been used to write the error data into an external text log file. Read more about this CmdLet here.
Step 6. I did not need Finally { } block for this example.
Step 7. In the development phase, I was intentionally breaking Get-CPUInfo CmdLet to test my error handling code.
Step 8. If Get-CPUInfo CmdLet is part of the scheduled code I would look regularly Error log file and work on correcting all the bugs in the code produced by Get-CPUInfo CmdLet.
Chain Of Events When PowerShell Error Occurs
Let’s talk a little bit about what is happening when an error occurs in PowerShell and which events are triggered one after another.
- Call to CmdLet is failing and error has just occurred.
- Since we have ErrorAction parameter set to value Stop our non-terminating error has forced into terminating error so the execution of code stops.
- The error that is failing in the CmdLet is written in the $Error automatic variable by the PowerShell.
- We have forced the error to be terminating in order to be able to handle with try catch finally block of error handling.
- Since our CmdLet call is wrapped in Try block and error is terminating PowerShell can trigger error handling looking for a Catch block.
- We can have several Catch blocks for one try block. If we have a Catch block that handles the actual error number that block is executed.
- Otherwise, PowerShell will look Catch block that handles all error numbers.
- Optionally in the Catch block, we can have code that will write the error in the external text Error log file.
- We can use the automatic variable $Error or $_ object to read Error data and write them in the external file.
- If there is no Catch block PowerShell will look for Catch block in parent call if we have nested calls.
- If there are no further Catch block or no Catch block at all that will handle error then PowerShell looks for Finally block to execute which is used to clean up resources as needed.
- After executing Finally block error message will be sent to the error stream for further processing.
In further sections of this article, you can read in more detail about the many terms mentioned (ErrorAction, $Error, Try Catch Finally, Terminating, Non-Terminating, etc ) in this bulleted list in order to better understand them.
How To Write PowerShell Errors Into The External Log File
Here I will explain the code of Write-ErrorLog CmdLet that writes error data that occurs in CmdLets and handle the error data into an external text file.
Error data are written in the file named Error_Log.txt in folder PSlogs.


Write-ErrorLog CmdLet is part of the Efficiency Booster PowerShell Project and if you want to download the source code of this CmdLet please click here.
Here is the location of Write-ErrorLog script which is part of the Utils module:
…[My] DocumentsWindowsPowerShellModules2utils

Write-ErrorLog CmdLet Code
Here is the code of the whole Write-ErrorLog CmdLet.
<#
.SYNOPSIS
Writes errors that occur in powershell scripts into error log file.
.DESCRIPTION
Writes errors that occur in powershell scripts into error log file.
Error log file and error log folder will be created if doesn't exist.
Error log file name is Error_Log.txt and it has been saved into ..DocumentsPSlogs

.PARAMETER hostname
Name of the computer that is failing.

.PARAMETER env
Environment where computer is located. For example: Production, Acceptance, Test, Course etc.

.PARAMETER logicalname
Type of the server that is failing. For example: Application, Web, Integration, FTP, Scan, etc.

.PARAMETER errormsg
Error message.

.PARAMETER exception
Error number.

.PARAMETER scriptname
Name of the powershell script that is failing.

.PARAMETER failinglinenumber
Line number in the script that is failing.

.PARAMETER failingline
Content of failing line.

.PARAMETER pscommandpath
Path to the powershell command.

.PARAMETER positionmsg
Error message position.

.PARAMETER stacktrace
Stack trace of the error.

.EXAMPLE
Write-ErrorLog -hostname "Server1" -env "PROD" -logicalname "APP1" -errormsg "Error Message" -exception "HResult 0789343" -scriptname "Test.ps1" -failinglinenumber "25" -failingline "Get-Service" -pscommandpath "Command pathc." -positionmsg "Position message" -stacktrace "Stack trace"

.EXAMPLE
Help Write-ErrorLog -Full

.LINK
Out-File
#>
Function Write-ErrorLog {
[CmdletBinding()]
param (

    [Parameter(Mandatory=$false,
                HelpMessage="Error from computer.")]
    [string]$hostname,

    [Parameter(Mandatory=$false,
                HelpMessage="Environment that failed. (Test, Production, Course, Acceptance...)")]
    [string]$env,

    [Parameter(Mandatory=$false,
                HelpMessage="Type of server that failed. (Application, Web, Integration...)")]
    [string]$logicalname,

    [Parameter(Mandatory=$false,
                HelpMessage="Error message.")]
    [string]$errormsg,

    [Parameter( Mandatory=$false,
                HelpMessage="Exception.")]
    [string]$exception,

    [Parameter(Mandatory=$false,
                HelpMessage="Name of the script that is failing.")]
    [string]$scriptname,

    [Parameter(Mandatory=$false,
                HelpMessage="Script fails at line number.")]
    [string]$failinglinenumber,

    [Parameter(Mandatory=$false,
                HelpMessage="Failing line looks like.")]
    [string]$failingline,

    [Parameter(Mandatory=$false,
                HelpMessage="Powershell command path.")]
    [string]$pscommandpath,

    [Parameter(Mandatory=$false,
                HelpMessage="Position message.")]
    [string]$positionmsg,

    [Parameter(Mandatory=$false,
                HelpMessage="Stack trace.")]
    [string]$stacktrace
)
BEGIN {

        $errorlogfile = "$homeDocumentsPSlogsError_Log.txt"
        $errorlogfolder = "$homeDocumentsPSlogs"

        if  ( !( Test-Path -Path $errorlogfolder -PathType "Container" ) ) {

            Write-Verbose "Create error log folder in: $errorlogfolder"
            New-Item -Path $errorlogfolder -ItemType "Container" -ErrorAction Stop

            if ( !( Test-Path -Path $errorlogfile -PathType "Leaf" ) ) {
                Write-Verbose "Create error log file in folder $errorlogfolder with name Error_Log.txt"
                New-Item -Path $errorlogfile -ItemType "File" -ErrorAction Stop
            }
        }
}
PROCESS {

            Write-Verbose "Start writing to Error log file. $errorlogfile"
            $timestamp = Get-Date
            #IMPORTANT: Read just first value from collection not the whole collection.
            "   " | Out-File $errorlogfile -Append
            "************************************************************************************************************" | Out-File $errorlogfile -Append
            "Error happend at time: $timestamp on a computer: $hostname - $env - $logicalname" | Out-File $errorlogfile -Append
            "Error message: $errormsg" | Out-File $errorlogfile -Append
            "Error exception: $exception" | Out-File $errorlogfile -Append
            "Failing script: $scriptname" | Out-File $errorlogfile -Append
            "Failing at line number: $failinglinenumber" | Out-File $errorlogfile -Append
            "Failing at line: $failingline" | Out-File $errorlogfile -Append
            "Powershell command path: $pscommandpath" | Out-File $errorlogfile -Append
            "Position message: $positionmsg" | Out-File $errorlogfile -Append
            "Stack trace: $stacktrace" | Out-File $errorlogfile -Append
            "------------------------------------------------------------------------------------------------------------" | Out-File $errorlogfile -Append

            Write-Verbose "Finish writing to Error log file. $errorlogfile"
}
END {

}
}
#region Execution examples
#Write-ErrorLog -hostname "Server1" -env "PROD" -logicalname "APP1" -errormsg "Error Message" -exception "HResult 0789343" -scriptname "Test.ps1" -failinglinenumber "25" -failingline "Get-Service" -pscommandpath "Command pathc." -positionmsg "Position message" -stacktrace "Stack trace" -Verbose
#endregion
Write-ErrorLog CmdLet Explained
Let’s make our hand’s a little bit “dirty” and dive into PowerShell code.
In the BEGIN block we:
- Check if folder PSlogs exist in the (My) Documents folder of the current user.
- If the PSlogs folder doesn’t exist then create the folder.
- Check if file Error_Log.txt exists in the folder PSlogs.
- If Error_Log.txt doesn’t exist then create the file.
- Now we can move on to PROCESS block code.
BEGIN {

        $errorlogfile = "$homeDocumentsPSlogsError_Log.txt"
        $errorlogfolder = "$homeDocumentsPSlogs"

        if  ( !( Test-Path -Path $errorlogfolder -PathType "Container" ) ) {

            Write-Verbose "Create error log folder in: $errorlogfolder"
            New-Item -Path $errorlogfolder -ItemType "Container" -ErrorAction Stop

            if ( !( Test-Path -Path $errorlogfile -PathType "Leaf" ) ) {
                Write-Verbose "Create error log file in folder $errorlogfolder with name Error_Log.txt"
                New-Item -Path $errorlogfile -ItemType "File" -ErrorAction Stop
            }
        }
}
In the PROCESS block:
- We format the line of text that we want to write into the log file.
- Then we pipe formatted text to Out-File CmdLet with the Append parameter to write that line of text in the file.
- We repeat the process of formatting the line of text and appending of that line to the Error log file.
PROCESS {

            Write-Verbose "Start writing to Error log file. $errorlogfile"
            $timestamp = Get-Date
            #IMPORTANT: Read just first value from collection not the whole collection.
            "   " | Out-File $errorlogfile -Append
            "************************************************************************************************************" | Out-File $errorlogfile -Append
            "Error happend at time: $timestamp on a computer: $hostname - $env - $logicalname" | Out-File $errorlogfile -Append
            "Error message: $errormsg" | Out-File $errorlogfile -Append
            "Error exception: $exception" | Out-File $errorlogfile -Append
            "Failing script: $scriptname" | Out-File $errorlogfile -Append
            "Failing at line number: $failinglinenumber" | Out-File $errorlogfile -Append
            "Failing at line: $failingline" | Out-File $errorlogfile -Append
            "Powershell command path: $pscommandpath" | Out-File $errorlogfile -Append
            "Position message: $positionmsg" | Out-File $errorlogfile -Append
            "Stack trace: $stacktrace" | Out-File $errorlogfile -Append
            "------------------------------------------------------------------------------------------------------------" | Out-File $errorlogfile -Append

            Write-Verbose "Finish writing to Error log file. $errorlogfile"
}
$PSItem or $_
$PSItem contains the current object in the pipeline object and we use it to read Error properties in this case.
Just a quick explanation of each Error property from the $_ ($PSItem) automatic variable that we collect and write in Logfile:
- $_.ToString() – This is Error Message.
- $_.Exception – This is Error Exception.
- $_.InvocationInfo.ScriptName – This the PowerShell script name where Error occurred.
- $_.InvocationInfo.ScriptLineNumber – This is line number within the PowerShell script where Error occurred.
- $_.InvocationInfo.Line – This is the line of code within PowerShell script where Error occurred.
- $_.InvocationInfo.PSCommandPath – This is the path to the PowerShell script file on the disk.
- $_.InvocationInfo.PositionMessage – This is a formatted message indicating where the CmdLet appeared in the line.
- $_.ScriptStackTrace – This is the Trace of the Stack.
As you can see on the screenshot below we collect really useful information about the Error that we handle in the Logfile. The pieces of information are presented in very neatly fashion so we can immediately see:
- which error occurred,
- what were the message and exception,
- where the error occurred (script name, script location, line number and line of the code in the script)
- even the call stack is shown if needed.
Here are the final result and an example of one formatted error logged in Error_Log.txt file.
************************************************************************************************************
Error happend at time: 09/11/2019 18:20:41 on a computer: APP01 -  -
Error message: The WinRM client cannot process the request. If the authentication scheme is different from Kerberos, or if the client computer is not joined to a domain, then HTTPS transport must be used or the destination machine must be added to the TrustedHosts configuration setting. Use winrm.cmd to configure TrustedHosts. Note that computers in the TrustedHosts list might not be authenticated. You can get more information about that by running the following command: winrm help config.
Error exception: Microsoft.Management.Infrastructure.CimException: The WinRM client cannot process the request. If the authentication scheme is different from Kerberos, or if the client computer is not joined to a domain, then HTTPS transport must be used or the destination machine must be added to the TrustedHosts configuration setting. Use winrm.cmd to configure TrustedHosts. Note that computers in the TrustedHosts list might not be authenticated. You can get more information about that by running the following command: winrm help config.
   at Microsoft.Management.Infrastructure.Internal.Operations.CimAsyncObserverProxyBase`1.ProcessNativeCallback(OperationCallbackProcessingContext callbackProcessingContext, T currentItem, Boolean moreResults, MiResult operationResult, String errorMessage, InstanceHandle errorDetailsHandle)
Failing script: C:UsersdekibDocumentsWindowsPowerShellModules3commonGetCPUInfo.ps1
Failing at line number: 214
Failing at line:             $CPUInfos = Get-CimInstance @params |

Powershell command path: C:UsersdekibDocumentsWindowsPowerShellModules3commonGetCPUInfo.ps1
Position message: C:UsersdekibDocumentsWindowsPowerShellModules3commonGetCPUInfo.ps1
Stack trace: at Get-CPUInfo, C:UsersdekibDocumentsWindowsPowerShellModules3commonGetCPUInfo.ps1: line 214
at , : line 1
------------------------------------------------------------------------------------------------------------
TIP: If your scripts are scheduled in Task Manager the best practice is to have a routine of regularly checking the Error Log file and investigate the errors that occurred since the last check. I am doing this once a week.
Errors In PowerShell
There are two types of Errors in PowerShell:
- Terminating
- Non-Terminating
Terminating Errors
Here are the important features of Terminating errors:
- terminates execution of command or script
- triggers Catch block and can be error handled by the Catch block.
Examples are syntax errors, non-existent CmdLets, or other fatal errors
Non-Terminating Errors
Here are important features of Non-Terminating Error:
- A non-fatal error.
- Allows execution to continue despite the failure that just occurred.
- It doesn’t trigger the Catch block and cannot be Error Handled in the Catch block by default.
Examples are permission problems, file not found, etc.
How To Force Non-Terminating Errors Into Terminating
Use the ErrorAction parameter with value Stop to force non-terminating error into terminating as in the following example. The reason why we want to make non-termination error into terminating one is to be able to catch the error when occurs.
$AuthorizedUser = Get-Content .DocumentsWindowsPowerShellProfile.ps1 -ErrorAction Stop Basically, the workflow is as follows.
- When an error occurs,
- a non-terminating error has changed into terminating one since we have Stop value on ErrrorAction parameter,
- then since terminating error has occurred try block will send the error handling to catch block where error can be processed and
- optionally written to the external log,
- optionally error handling can continue in the final block.
NOTE: ErrorAction parameter overrides temporarily ErrorActionPreference variable while the call to CmdLet has been processed.
How To Treat All Errors As Terminating
We use the ErrorActionPreference variable to treat all errors as terminating by setting to the value Stop in the:
- script
- or session
Write the following line of code at the begging of the script to treat all errors as terminating.
$ErrorActionPreference = StopType in Windows PowerShell Console the same command to setup terminating errors for the session.
ErrorAction Common Parameter
ErrorAction parameter belongs to the set of common parameters that we can use with any CmdLet. If we set CmdLetBinding on Advanced Functions than PowerShell automatically makes common parameters available for that command.
This is a parameter that I always use with CmdLets that need error handling since the ErrorAction Parameter determines how the CmdLet responds to a non-terminating error. It has several values that we will talk about in a minute but the value that I like to use is Stop and it is used to make non-terminating errors into terminating errors as written in previous sections.
The ErrorAction parameter overrides the value of the $ErrorActionPreference variable when applied to the specific command.
Here are valid values:
- Continue (Default)
- This is the default setting. Display error then continues execution.
- Stop
- Display error, and stop the execution.
- Inquire
- Displays error message and the user is asked to continue with execution.
- SilentlyContinue
- No error message is displayed and execution is continued. However, the error message is added to the $Error automatic variable.
- Ignore
- The same as SilentlyContinue, No error message is displayed and execution is continued. However, Ignore does not add an error message to the $Error automatic variable.
- Suspend
- This one is for workflows. A workflow job is suspended to investigate what happened, then the workflow can be resumed.
$ErrorActionPreference Preference Variable Explained
$ErrorActionPreference preference variable determines how Windows PowerShell responds to a non-terminating error (an error that does not stop the cmdlet processing) in a script, cmdlet or at the command line
If we want to override the value of the ErrorActionPreference preference variable for the specific command we use the ErrorAction common parameter as explained here.
The valid values for $ErrorActionPreference preference variable are:
- Continue (Default)
- This is the default setting. Display error then continues execution.
- Stop
- Display error message, and stop the execution.
- Inquire
- Displays error message and the user is asked to continue with execution.
- SilentlyContinue
- No error message is displayed and execution is continued. However, the error message is added to the $Error automatic variable.
- Suspend
- This one is for workflows. A workflow job is suspended to investigate what happened, then the workflow can be resumed.
Error Handling With Try/Catch/Finally Blocks
Try, Catch, and Finally, blocks are used to handle terminating errors in the scripts, functions, and CmdLets. A non-terminating error does not trigger Try block and Windows PowerShell will not look for Catch block to handle the error. So we need to force a non-terminating error to become terminating error using ErrorAction parameter with value Stop whenever we call some CmdLet or Advanced function.
Try block is used as part of the code that PowerShell will monitor for errors. The workflow in the Try block is as follows:
- Try block is the section of code that will be monitored for errors by Windows PowerShell.
- When the error occurs within Try block the error is saved to $Error automatic variable first.
- Windows PowerShell searches for a Catch block to handle the error if the error is terminating. If the Catch block has not been found in current scope Windows PowerShell will search for catch block in parent scopes for nested calls.
- Then the Finally block is run if exists.
- If there is no Catch block than the error is not handled and the error is written to the error stream.
One Try block can have several Catch Blocks that will handle different error types.
Catch block usually handles the error.
The Finally block is optional and can be only one. Usually, it is used to clean up and free the resources.
The syntax for Try, Catch, and Finally block:
try { }
catch [],[]
   { }
catch { }
finally { }
Getting Error Information With $Error Automatic Variable
$Error automatic variable is an array of error objects (both terminating and the non-terminating) that occurred in the current PowerShell session. The most recent error that occurred is written with index 0 in the array as $Error[0]. If we have just opened the Windows PowerShell session the $Error variable is an empty array and ready to be used.
Check the number of Errors in $Error variable with the following code:
$Error.CountTo prevent the error from being written in $Error automatic variable set ErrorAction parameter to value Ignore.
$Error variable is a rich object that has many useful properties worth reading and helpful for further understanding of the error that just occurred.
Let’s see some useful properties and in section Write-ErrorLog CmdLet Explained I have explained to you some useful examples of properties that are interesting to be written in an external log file.
$error[0] | Get-Member
$Error.CategoryInfo | Get-Member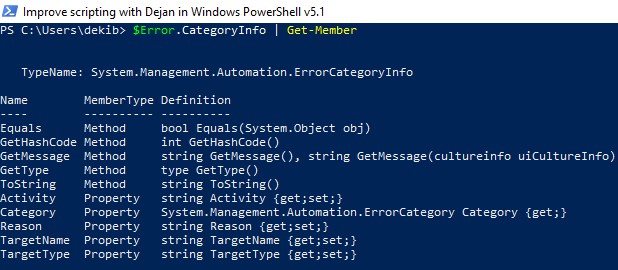
$Error[0].Exception
$Error.InvocationInfo | Get-Member
Write-Error CmdLet
Write-Error CmdLet writes an object to the error stream.
Please read this article from Microsoft PowerShell documentation regarding this CmdLet.
Handling Errors from non-PowerShell processes
We can run applications from PowerShell script like for example, PsExec.exe or robocopy.exe and they are external processes for PowerShell. Since it is an external process, errors from it will not be caught by our try/catch blocks in PowerShell script. So how we will know whether our external process was successful or not.
Well, we can use the $LastExitCode PowerShell automatic variable.
PowerShell will write the exit code to the $LastExitCode automatic variable when the external process exits. Check the external tool’s documentation for exit code values but usually, 0 means success and 1 or greater values mean a failure.
Useful PowerShell Error Handling Articles
Here are some useful articles and resources:
- Windows PowerShell Error Reporting
- About Try Catch Finally
- About CommonParameters
- About Automatic Variables
- About Preference Variables
- Write-Error
- About Throw
- About Break
- About Continue
Содержание
- Используем лог-файлы для скриптов PowerShell
- How To Log PowerShell Errors And Much More
- Share this post:
- Why Should We Bother Handling Errors In PowerShell
- How To Handle And Log PowerShell Errors
- Example Of PowerShell Error Handling
- Chain Of Events When PowerShell Error Occurs
- How To Write PowerShell Errors Into The External Log File
- Write-ErrorLog CmdLet Code
- Write-ErrorLog CmdLet Explained
- $PSItem or $_
- How To Treat All Errors As Terminating
- ErrorAction Common Parameter
- $ErrorActionPreference Preference Variable Explained
- Error Handling With Try/Catch/Finally Blocks
- Getting Error Information With $Error Automatic Variable
- Write-Error CmdLet
- Handling Errors from non-PowerShell processes
- Useful PowerShell Error Handling Articles
- Share this post:
- Recent Posts
- About Dejan Mladenović
- LEGAL INFORMATION
- About Dejan Mladenović
Используем лог-файлы для скриптов PowerShell
Вы можете использовать простые текстовые лог файлы для контроля запуска и отслеживания всех действий, которые выполняются при запуске PowerShell скриптов. Это удобно при отладке ошибок, для аудита выполненных скриптом действий. В этой статье мы рассмотрим несколько способов ведения текстовых лог-файлов для ваших PowerShell скриптов.
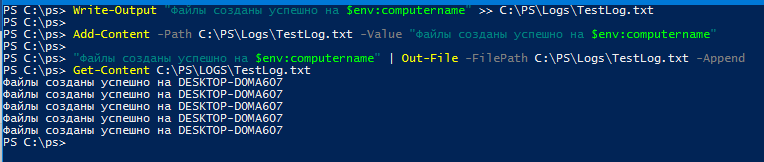
В самом простом случае, если вам нужно записать вывод информационного сообщения или результатов определенной PowerShell команды в текстовый лог файл, вы можете использовать один из следующих форматов перенаправления вывода в txt файл:
Write-Output «Файлы созданы успешно на $env:computername» >> C:PSLogsTestLog.txt
Add-Content -Path C:PSLogsTestLog.txt -Value «Файлы созданы успешно на $env:computername»
«Файлы созданы успешно на $env:computername» | Out-File -FilePath C:PSLogsTestLog.txt –Append
Во всех случаях команды добавляют в указанный текстовый файл новую строку c указанным вами текстом.
Главный недостаток такого метода – по такому лог файлу нельзя определить, когда была внесена та или иная запись в лог (произошло событие). Вы можете добавить в лог текущую метку даты, времени (timestamp). Это поможет легко идентифицировать время запуска скрипта и конкретного события в нем.
Для удобства можно создать в PowerShell скрипте отдельную функцию, которая будет сохранять переданные ей данные в лог файл и добавлять время записи информации.
Можно сделать функцию:
$Logfile = «C:PSLogsproc_$env:computername.log»
function WriteLog
<
Param ([string]$LogString)
Теперь, чтобы записать что-то в лог файл, вам нужно вызвать функцию WriteLog.
WriteLog «Скрипт запущен”
WriteLog «Выполняю вычисления….»
Start-Sleep 20
WriteLog «Скрипт выполнен успешно»
Теперь в лог файле содержится время, когда была произведена запись.

В PowerShell также есть встроенная возможность сохранять в текстовый лог файл все команды и результаты, которые выводятся в консоль PS.
Чтобы начать запись текущей PowerShell сессии, используется командлет Start-Transcript.
После запуска этой команды появляется сообщение, в котором указано, в какой файл сохраняются результаты всех команд. По умолчанию лог файл пишется в профиль текущего пользователя:
Start-Transcript -Append C:PSLogsPSScriptLog.txt
Параметр –Append указывает, что нужно дописывать новые сессию в конец лог файла (не перезатирать его).
Выполните несколько PowerShell команд, которые выводят результаты в консоль. Например, выведем список тяжелых запущенных процессов, запущенных служб и состояние репликации в AD:
Get-Process| where-object <$_.WorkingSet -GT 300000*1024>|select processname,@> |sort «Used RAM(MB)» –Descending
Get-Service | Where-Object <$_.status -eq ‘running’>
Get-ADReplicationFailure -Target DC01
![]()
Завершите запись сессии для текущей сессии:
Теперь откройте текстовый файл с логом.
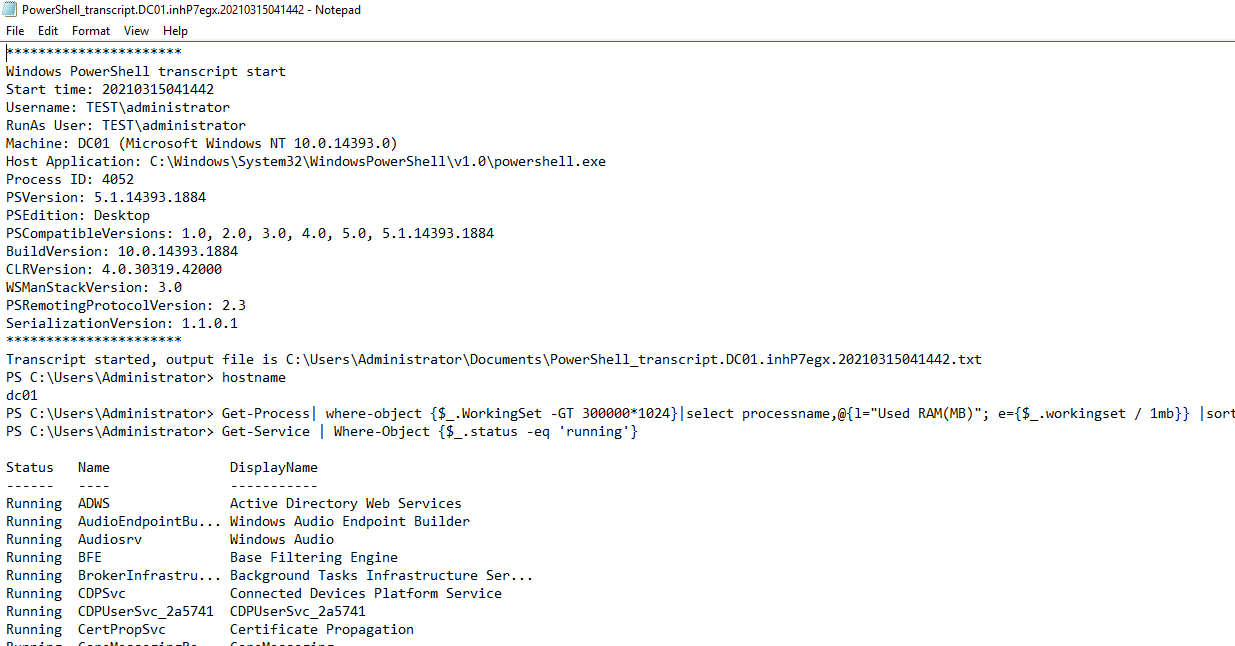
Как вы видите, в текстовом логе отображаются вся история PowerShell команд, которые запускались в скрипте и весь вывод, который выводился в консоль.
Вы можете использовать Start-Transcript/Stop-Transcript в своих PowerShell скриптах чтобы нативно логировать все действия и результаты.
Источник
How To Log PowerShell Errors And Much More
Error Handling is a very important concept in every programming language including PowerShell which gives us several possibilities to manage errors in code.
In this article, I will try to cover as many as possible error handling concepts with examples from my practice and one of the important concepts is writing errors in external Error Log text file.
Table of Contents
Why Should We Bother Handling Errors In PowerShell
It is no fun to run any code or application full of errors and bugs as the matter a fact it is quite annoying so in order for users to have a pleasant experience handling the errors is one of the essentials in programming.
PowerShell is no exception to that way of thinking and programming ethics although it can take some additional coding and effort but trust me it is always worth it.
I would be more than happy to share my experience with error handling and even more satisfied if I can hear your tips from the field so we can all enrich our knowledge on this very important subject.
How To Handle And Log PowerShell Errors
Here is a general approach to error handling and logging errors into the external text file. I have an example in the next subheading that further explain each step so everything is much more understandable.
- Identify which Commands need Error Handling in your Function, CmdLet or Script.
- Set the ErrorAction parameter to value Stop for the command that needs Error Handling. This will stop executing the command when an error occurs and it will show the error message. Basically, we are making non-terminating errors into terminating in order to be able to handle the error in the catch block.
- Command that has ErrorAction parameter set to value Stop is wrapped in Try block. So when Error occurs handling of the code will jump from the Try block to Catch block.
- In Catch < >block that immediately follows after Try <> block, the error is handled by writing to the error log file on the disk.
- We use our own Write-ErrorLogCmdLet inside Catch < >block to write the error in a text file on the disk. (See the explanation and code here)
- We have an additional switch error parameter to decide whether we want to write an error in the log file or not. This is totally optional.
- Use the Finally block if needed.
- Test the whole setup by intentionally breaking the code while in the development phase.
- Since some of the CmdLets calls are Scheduled we have routine to check external Error Log text file at least once a week and investigate errors that are caught. This step is part of improving the overall quality of the written code.
Example Of PowerShell Error Handling
To show you Error Handling and implement previously defined steps I will use my own Get-CPUInfo CmdLet which is in the Common module of the Efficiency Booster PowerShell Project. Efficiency Booster PowerShell Project is a library of CmdLets that help us IT experts in day to day IT tasks.
In order to follow me along, I highly encourage you to download the zip file with the source code used in this example.
Here is the location of Get-CPUInfo script:
…[My] DocumentsWindowsPowerShellModules3common
Let’s use steps defined in the previous subheading to this example.
Step 1. I have identified the command that needs Error Handling in Get-CPUInfo CmdLet and that is a call to Get-CimInstance CmdLet.
Step 2. So I have set up the ErrorAction parameter to the value ‘Stop‘ for Get-CimInstance CmdLet in order to force non-terminating errors into terminating and then to be able to handle such errors.
INFO: I use parameter splatting when running CmdLet. If you want to know more about parameter splating please read this article.
Step 3. Wrap up the call to Get-CimInstance CmdLet into the Try Block in order to be able to handle the error in a catch block that follows.
Step 4. When the error occurs in the try block it is handled in the Catch Block.
It is important to notice following in the catch block of code:
- Get-CPUInfo CmdLet switch parameter $errorlog has been used to decide whether to log the errors in an external text file or not. This is completely optional.
- Certain Error properties are collected using an automatic variable $_ ($PSItem is another name for the same variable). If you want to know more about which properties we collect please read here.
- Collected data about the error that will be handled has been passed to another CmdLet Write-ErrorLog that will write the data in an external text log file. Please read here about Write-ErrorLog CmdLet.
Step 5. I have already mentioned that Write-ErrorLog CmdLet has been used to write the error data into an external text log file. Read more about this CmdLet here.
Step 6. I did not need Finally block for this example.
Step 7. In the development phase, I was intentionally breaking Get-CPUInfo CmdLet to test my error handling code.
Step 8. If Get-CPUInfo CmdLet is part of the scheduled code I would look regularly Error log file and work on correcting all the bugs in the code produced by Get-CPUInfo CmdLet.
Chain Of Events When PowerShell Error Occurs
Let’s talk a little bit about what is happening when an error occurs in PowerShell and which events are triggered one after another.
- Call to CmdLet is failing and error has just occurred.
- Since we have ErrorAction parameter set to value Stop our non-terminating error has forced into terminating error so the execution of code stops.
- The error that is failing in the CmdLet is written in the $Errorautomatic variable by the PowerShell.
- We have forced the error to be terminating in order to be able to handle with try catch finally block of error handling.
- Since our CmdLet call is wrapped in Try block and error is terminating PowerShell can trigger error handling looking for a Catch block.
- We can have several Catch blocks for one try block. If we have a Catch block that handles the actual error number that block is executed.
- Otherwise, PowerShell will look Catch block that handles all error numbers.
- Optionally in the Catch block, we can have code that will write the error in the external text Error log file.
- We can use the automatic variable $Error or $_ object to read Error data and write them in the external file.
- If there is no Catch block PowerShell will look for Catch block in parent call if we have nested calls.
- If there are no further Catch block or no Catch block at all that will handle error then PowerShell looks for Finally block to execute which is used to clean up resources as needed.
- After executing Finally block error message will be sent to the error stream for further processing.
In further sections of this article, you can read in more detail about the many terms mentioned (ErrorAction, $Error, Try Catch Finally, Terminating, Non-Terminating, etc ) in this bulleted list in order to better understand them.
How To Write PowerShell Errors Into The External Log File
Here I will explain the code of Write-ErrorLog CmdLet that writes error data that occurs in CmdLets and handle the error data into an external text file.
Error data are written in the file named Error_Log.txt in folder PSlogs.
Write-ErrorLog CmdLet is part of the Efficiency Booster PowerShell Project and if you want to download the source code of this CmdLet please click here.
Here is the location of Write-ErrorLog script which is part of the Utils module:
…[My] DocumentsWindowsPowerShellModules2utils
Write-ErrorLog CmdLet Code
Here is the code of the whole Write-ErrorLog CmdLet.
Write-ErrorLog CmdLet Explained
Let’s make our hand’s a little bit “dirty” and dive into PowerShell code.
In the BEGIN block we:
- Check if folder PSlogs exist in the (My) Documents folder of the current user.
- If the PSlogs folder doesn’t exist then create the folder.
- Check if file Error_Log.txt exists in the folder PSlogs.
- If Error_Log.txt doesn’t exist then create the file.
- Now we can move on to PROCESS block code.
In the PROCESS block:
- We format the line of text that we want to write into the log file.
- Then we pipe formatted text to Out-File CmdLet with the Append parameter to write that line of text in the file.
- We repeat the process of formatting the line of text and appending of that line to the Error log file.
$PSItem or $_
$PSItem contains the current object in the pipeline object and we use it to read Error properties in this case.
Just a quick explanation of each Error property from the $_ ($PSItem) automatic variable that we collect and write in Logfile:
- $_.ToString() – This is Error Message.
- $_.Exception – This is Error Exception.
- $_.InvocationInfo.ScriptName – This the PowerShell script name where Error occurred.
- $_.InvocationInfo.ScriptLineNumber – This is line number within the PowerShell script where Error occurred.
- $_.InvocationInfo.Line – This is the line of code within PowerShell script where Error occurred.
- $_.InvocationInfo.PSCommandPath – This is the path to the PowerShell script file on the disk.
- $_.InvocationInfo.PositionMessage – This is a formatted message indicating where the CmdLet appeared in the line.
- $_.ScriptStackTrace – This is the Trace of the Stack.
As you can see on the screenshot below we collect really useful information about the Error that we handle in the Logfile. The pieces of information are presented in very neatly fashion so we can immediately see:
- which error occurred,
- what were the message and exception,
- where the error occurred (script name, script location, line number and line of the code in the script)
- even the call stack is shown if needed.
Here are the final result and an example of one formatted error logged in Error_Log.txt file.
Basically, the workflow is as follows.
- When an error occurs,
- a non-terminating error has changed into terminating one since we have Stop value on ErrrorAction parameter,
- then since terminating error has occurred try block will send the error handling to catch block where error can be processed and
- optionally written to the external log,
- optionally error handling can continue in the final block.
NOTE: ErrorAction parameter overrides temporarily ErrorActionPreference variable while the call to CmdLet has been processed.
How To Treat All Errors As Terminating
We use the ErrorActionPreference variable to treat all errors as terminating by setting to the value Stop in the:
- script
- or session
Write the following line of code at the begging of the script to treat all errors as terminating.
Type in Windows PowerShell Console the same command to setup terminating errors for the session.
ErrorAction Common Parameter
ErrorAction parameter belongs to the set of common parameters that we can use with any CmdLet. If we set CmdLetBinding on Advanced Functions than PowerShell automatically makes common parameters available for that command.
This is a parameter that I always use with CmdLets that need error handling since the ErrorAction Parameter determines how the CmdLet responds to a non-terminating error. It has several values that we will talk about in a minute but the value that I like to use is Stop and it is used to make non-terminating errors into terminating errors as written in previous sections.
The ErrorAction parameter overrides the value of the $ErrorActionPreference variable when applied to the specific command.
Here are valid values:
- Continue (Default)
- This is the default setting. Display error then continues execution.
- Stop
- Display error, and stop the execution.
- Inquire
- Displays error message and the user is asked to continue with execution.
- SilentlyContinue
- No error message is displayed and execution is continued. However, the error message is added to the $Error automatic variable.
- Ignore
- The same as SilentlyContinue, No error message is displayed and execution is continued. However, Ignore does not add an error message to the $Error automatic variable.
- Suspend
- This one is for workflows. A workflow job is suspended to investigate what happened, then the workflow can be resumed.
$ErrorActionPreference Preference Variable Explained
$ErrorActionPreference preference variable determines how Windows PowerShell responds to a non-terminating error (an error that does not stop the cmdlet processing) in a script, cmdlet or at the command line
If we want to override the value of the ErrorActionPreference preference variable for the specific command we use the ErrorAction common parameter as explained here.
The valid values for $ErrorActionPreference preference variable are:
- Continue (Default)
- This is the default setting. Display error then continues execution.
- Stop
- Display error message, and stop the execution.
- Inquire
- Displays error message and the user is asked to continue with execution.
- SilentlyContinue
- No error message is displayed and execution is continued. However, the error message is added to the $Error automatic variable.
- Suspend
- This one is for workflows. A workflow job is suspended to investigate what happened, then the workflow can be resumed.
Error Handling With Try/Catch/Finally Blocks
Try, Catch, and Finally, blocks are used to handle terminating errors in the scripts, functions, and CmdLets. A non-terminating error does not trigger Try block and Windows PowerShell will not look for Catch block to handle the error. So we need to force a non-terminating error to become terminating error using ErrorAction parameter with value Stop whenever we call some CmdLet or Advanced function.
Try block is used as part of the code that PowerShell will monitor for errors. The workflow in the Try block is as follows:
- Try block is the section of code that will be monitored for errors by Windows PowerShell.
- When the error occurs within Try block the error is saved to $Error automatic variable first.
- Windows PowerShell searches for a Catch block to handle the error if the error is terminating. If the Catch block has not been found in current scope Windows PowerShell will search for catch block in parent scopes for nested calls.
- Then the Finally block is run if exists.
- If there is no Catch block than the error is not handled and the error is written to the error stream.
One Try block can have several Catch Blocks that will handle different error types.
Catch block usually handles the error.
The Finally block is optional and can be only one. Usually, it is used to clean up and free the resources.
The syntax for Try, Catch, and Finally block:
Getting Error Information With $Error Automatic Variable
$Error automatic variable is an array of error objects (both terminating and the non-terminating) that occurred in the current PowerShell session. The most recent error that occurred is written with index 0 in the array as $Error[0]. If we have just opened the Windows PowerShell session the $Error variable is an empty array and ready to be used.
Check the number of Errors in $Error variable with the following code:
To prevent the error from being written in $Error automatic variable set ErrorAction parameter to value Ignore.
$Error variable is a rich object that has many useful properties worth reading and helpful for further understanding of the error that just occurred.
Let’s see some useful properties and in section Write-ErrorLog CmdLet Explained I have explained to you some useful examples of properties that are interesting to be written in an external log file.
Write-Error CmdLet
Write-Error CmdLet writes an object to the error stream.
Please read this article from Microsoft PowerShell documentation regarding this CmdLet.
Handling Errors from non-PowerShell processes
We can run applications from PowerShell script like for example, PsExec.exe or robocopy.exe and they are external processes for PowerShell. Since it is an external process, errors from it will not be caught by our try/catch blocks in PowerShell script. So how we will know whether our external process was successful or not.
Well, we can use the $LastExitCode PowerShell automatic variable.
PowerShell will write the exit code to the $LastExitCode automatic variable when the external process exits. Check the external tool’s documentation for exit code values but usually, 0 means success and 1 or greater values mean a failure.
Useful PowerShell Error Handling Articles
About Dejan Mladenović
Hey Everyone! I hope that this article you read today has taken you from a place of frustration to a place of joy coding! Please let me know of anything you need for Windows PowerShell in the comments below that can help you achieve your goals!
I have 18+ years of experience in IT and you can check my Microsoft credentials. Transcript ID: 750479 and Access Code: DejanMladenovic
Credentials
About Me.
Hey Everyone! I hope that this article you read today has taken you from a place of frustration to a place of joy coding! Please let me know of anything you need for Windows PowerShell in the comments below that can help you achieve your goals! I have 18+ years of experience in IT and you can check my Microsoft credentials. Transcript ID: 750479 and Access Code: DejanMladenovic
Credentials About Me.
Recent Posts
This article is a step up from our previous article about writing PowerShell Functions. We will show you that converting your existing PowerShell Functions into Advanced PowerShell Functions is.
Writing PowerShell Function is not difficult but for some reason, some people are uncomfortable writing them. Do not worry this article will show you easy steps with examples so you can write your.
About Dejan Mladenović
Hello I’m Dejan Mladenović
Over the years I have used PowerShell for many of my every day IT tasks to be more efficient so I would like to share my Windows PowerShell scripting experience with you.
If you find a post helpful and feel like rewarding my effort with the price of a cup of coffee, please donate here!
LEGAL INFORMATION
This site is a participant in the Amazon Services LLC Associates Program, an affiliate advertising program designed to provide a means for sites to earn advertising fees by advertising and linking to Amazon.com.
We are compensated for referring traffic and business to Amazon and other companies linked to on this site.
About Dejan Mladenović
Hello, if you find PowerShell’s post helpful and feel like rewarding my effort with the price of a cup of coffee, please donate here!
Источник

In this PowerShell tutorial, we will discuss how to create a log file in PowerShell. We use log files to track information while running a PowerShell script.
If you are a little familiar with PowerShell, then you might realize we use PowerShell for simple to complex and to complete a long time-consuming task. Your PowerShell script might be also running automatically through a scheduler.
So it is very much necessary that, we should tack information while the script is running and that when we use log files. We can track information, error, warning, etc on a log file in PowerShell.
But you should not log sensitive information or personal data like password, credit card numbers, email address, social security numbers etc.
So let us see different ways to create a log file in PowerShell.
We will discuss here different approaches here to write information to a log file as well as how to create PowerShell log file.
I always use PowerShell ISE to write, test, and debug PowerShell scripts. You can use the Visual Studio Code also.
Open PowerShell ISE in administrator mode (Right-click and Run as administrator) and go through the examples step by step.
Example-1: PowerShell create simple log file
This is one of the simplest way to write a message to a log file in PowerShell.
$logfilepath="D:Log.txt"
$logmessage="This is a test message for the PowerShell create log file"
$logmessage >> $logfilepath
The above PowerShell script will write the message in the Log.txt file that is presented in D drive.
If the file is presented before then it will keep appending the message like by like. And if the Log.txt file is not presented in the D drive, then it will create the log file first and then write the message.
Example-2: Create simple log file in PowerShell
The below example will check if the log file is presented already, then it will delete the file and create a new file and write the message into it.
$logfilepath="D:Log.txt"
$logmessage="This is a test message for the PowerShell create log file"
if(Test-Path $logfilepath)
{
    Remove-Item $logfilepath
}
$logmessage >> $logfilepath
We can use the Test-Path PowerShell command to check if a file exists or not in the file path.
Example-3:
We can also use the date and time when the message is logged using PowerShell Get-Date.
$logfilepath="D:Log.txt"
$logmessage="This is a test message for the PowerShell create log file"
if(Test-Path $logfilepath)
{
    Remove-Item $logfilepath
}
$logmessage +" - "+ (Get-Date).ToString() >> $logfilepath
The above PowerShell script will log the message with the current date and time.

Example-4:
If you want to track multiple log messages, then you can create a PowerShell function like below:
$logfilepath="D:Log.txt"

function WriteToLogFile ($message)
{
$message +" - "+ (Get-Date).ToString() >> $logfilepath
}

if(Test-Path $logfilepath)
{
    Remove-Item $logfilepath
}

WriteToLogFile "This is a test message for the PowerShell create log file"
WriteToLogFile "This is another message"
WriteToLogFile "This is another another message"
The above PowerShell script will check if the log file exists in the path, if yes then it will delete the file. And then it will call 3 times the function to write the messages to the PowerShell log file.
Example-5:
Below is a PowerShell script where we have used the Add-content PowerShell cmdlets to write the message to a .log file.
$logfilepath = "D:Logs.log"

function WriteToLogFile ($message)
{
   Add-content $logfilepath -value $message
}
if(Test-Path $logfilepath)
{
    Remove-Item $logfilepath
}

WriteToLogFile "This is a test message for the PowerShell create log file"
WriteToLogFile "This is another message"
WriteToLogFile "This is another another message"
Rather using a .txt file, most of times we write the extension as .log file.
Example-6:
We can also use Start-Transcript PowerShell cmdlets to write to a log file. This not only writes the log message but also tracks other information like username, machine, host application, PSVersion, CLRVersion, etc.
$logfilepath="D:Log.log"

Start-Transcript -Path $logfilepath

Write-Host "This is a message"

Stop-Transcript
The file looks like below:

PowerShell Log Levels
In the Write- PowerShell cmdlets, PowerShell provides various types of log levels like:
- Write-Verbose
- Write-Debug
- Write-Information
- Write-Warning
- Write-Error
PowerShell create log file with date
Now, let us see how to create log file with date in PowerShell. Basically, it will create the file with the file name as of today’s date.
The script will check if any file exists with name as today’s date, if the file exists, then it will delete will first delete the file, else it will create the file and write the log message into it.
$todaysdate=Get-Date -Format "MM-dd-yyyy"

$logfilepath = "D:"+$todaysdate+".log"

function WriteToLogFile ($message)
{
   Add-content $logfilepath -value $message
}
if(Test-Path $logfilepath)
{
    Remove-Item $logfilepath
}

WriteToLogFile "PowerShell log file message"
WriteToLogFile "This is another message"
WriteToLogFile "This is another another message"
This is how we can create log file with date in PowerShell.
This is how we can create a daily log file in PowerShell that will be created on today’s date.
PowerShell create log file with datetime
Now, we can see how to create a log file with datetime using PowerShell.
We need to format the Get-Date PowerShell cmdlet to get the current date and time like below:
$todaysdate=Get-Date -Format "MM-dd-yyyy-hh-mm"

$logfilepath = "D:"+$todaysdate+".log"

function WriteToLogFile ($message)
{
   Add-content $logfilepath -value $message
}
if(Test-Path $logfilepath)
{
    Remove-Item $logfilepath
}

WriteToLogFile "PowerShell log file message"
In the above example the PowerShell log file will be created on the name as today’s date and time.
PowerShell create log file if not exists
Now, let us see how to create a log file if not exists in PowerShell.
We can use the Test-Path PowerShell cmdlet to check if the file exists in the path or not.
And we can use New-Item PowerShell cmdlets to create a file in the folder path.
$todaysdate=Get-Date -Format "MM-dd-yyyy"
$folderpath="D:"
$filename = $todaysdate+".log"

if (!(Test-Path $logfilepath))
{
New-Item -itemType File -Path $folderpath -Name $filename
}
You can see the output like below:

This is how we can create a log file if not exists in PowerShell.
PowerShell create log file with headers
Now, let us see how to create a log file with headers in PowerShell. Here we will create a .csv file and also will add headers to the CSV file.
$filename = "Log-"+ (Get-Date -Format "MM-dd-yyyy")
$outfile = "D:"+$filename+".csv"

$newcsv = {} | Select "DateAndTime","Message" | Export-Csv $outfile

$csvfile = Import-Csv $outfile
$csvfile.DateAndTime = Get-Date -Format "MM-dd-yyyy-hh-mm"
$csvfile.Message = "This is a test message"

$csvfile | Export-CSV $outfile
The above PowerShell script will create a .csv file and then it will add two headers (DateAndTime and Message). We will add a test log message also.
PowerShell create error log file
Now, we will see how to create an error log file in PowerShell. Basically, we will use the try-catch statement and in the catch statement, we will log the error message in a log file in PowerShell.
$filename = "Log-"+ (Get-Date -Format "MM-dd-yyyy")
$logfile = "D:"+$filename+".log"

try
{
1/0
}
catch
{
$_.Exception.Message | Out-File $logfile
}
In the above PowerShell script, whenever an error will appear in the try statement, then the message will be logged in the catch statement in the PowerShell error log file.
PowerShell create csv log file
In the same way, we are creating .txt or .log file, we can also create .csv file in PowerShell to log information.
Now, let us see how to create a .csv log file in PowerShell.
To create a .csv file, we just need to change the file extension to .csv.
$todaysdate=Get-Date -Format "MM-dd-yyyy"

$logfilepath = "D:"+$todaysdate+".csv"

function WriteToLogFile ($message)
{
   Add-content $logfilepath -value $message
}
if(Test-Path $logfilepath)
{
    Remove-Item $logfilepath
}

WriteToLogFile "PowerShell log file message"
This is how we can create csv log file in PowerShell.
Use PowerShell Framework (PSFramework) to Log Information
You can also use PSFramework or PowerShell Framework to log information.
To use PSFramework, the first thing you need to install it by running the following command.
Install-Module PSFrameworkBy using the PSFramework, we can write to the log file by using the Write-PSFMessage script. Check out moe on PSFramwwork site.
PowerShell create simple log file
Now, let us see how to create a simple log file in PowerShell. The PowerShell script will create a very simple log file and will log a text message. The file will be created on today’s date.
$filename = "Log- "+ (Get-Date -Format "MM-dd-yyyy")
$logfilepath = "C:"+$filename+".log"
New-Item -Path $logfilepath  -ItemType file
Add-Content -Path $logfilepath -Value "This is a text file message"
You may like the following PowerShell tutorials:
- How to loop through a PowerShell array
- How to create and use PowerShell ArrayList
- How to create an array in PowerShell from CSV file
- What is PowerShell Array
- How to use PowerShell reference variable
- What is a PowerShell variable
- SharePoint 2013 backup and restore using PowerShell
- The term ‘Get-MsolUser’ is not recognized as the name of a cmdlet
In this tutorial, we learned how to create a log file in PowerShell and the below things:
- PowerShell create log file
- PowerShell Log Levels
- PowerShell create log file with date
- PowerShell create log file with datetime
- PowerShell create log file if not exists
- PowerShell create log file with headers
- PowerShell create error log file
- PowerShell create csv log file
- Use PowerShell Framework (PSFramework) to Log Information
- PowerShell create simple log file
- powershell write to log file
- powershell log to file
- create log file powershell
- powershell logging to file

I am Bijay a Microsoft MVP (8 times – My MVP Profile) in SharePoint and have more than 15 years of expertise in SharePoint Online Office 365, SharePoint subscription edition, and SharePoint 2019/2016/2013. Currently working in my own venture TSInfo Technologies a SharePoint development, consulting, and training company. I also run the popular SharePoint website EnjoySharePoint.com
In our “Getting Started with Logging” series, we’ve already covered logging for many languages and frameworks: C#, Java, Python, Ruby, Ruby on Rails, Node.js, Symfony, Kotlin, Flask, Angular, and Laravel. Today, we’ll add another one to this series: PowerShell.
It might be an odd one to add to the list; PowerShell is a scripting language, while the others can be seen as full application programming languages or frameworks. Yet PowerShell is so sufficiently powerful that it can create systems complex and important enough to warrant logging.
PowerShell is often used to perform critical maintenance tasks on computers or servers. It’s important for admins to know how if these scripts ran well or not.
We’ll look into how you can log with PowerShell in a very basic way by writing your own logging function. Then we’ll cover why logging from PowerShell is useful. We’ll also talk about what you should log and what you should not log. Finally, we’ll look at two different options that will make your logging lives easier.
![]()
A Simple PowerShell Script
Let’s start with this extremely simple PowerShell script:
param (
    [Parameter(Mandatory=$true)][int]$number
)

$digits = $number.ToString().ToCharArray()
$sum = 0

While ($digits.Length -ne 1) {
    $sum = 0
    $digits | ForEach { $sum += [int]$_.ToString() }
    $digits = $sum.ToString().ToCharArray()
}

Write-Output $digits
This basic script takes an integer as input. It then makes the sum of the digits of that number. If the result is longer than a single digit, it performs the operation again, until this results in a single digit.
Here are some examples to clarify things:
- 45 -> 4 + 5 = 9
- 397 -> 3 + 9 + 7 = 19 -> 1 + 9 = 10 -> 1 + 0 = 1
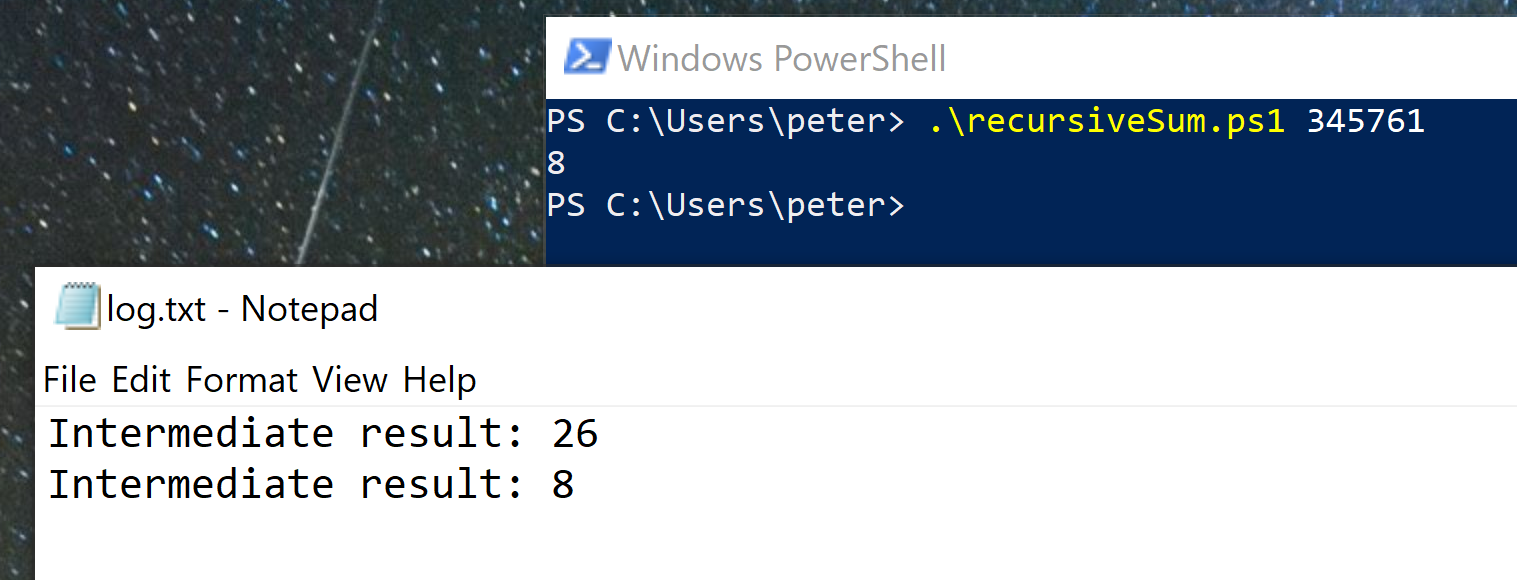
- 3 -> 3
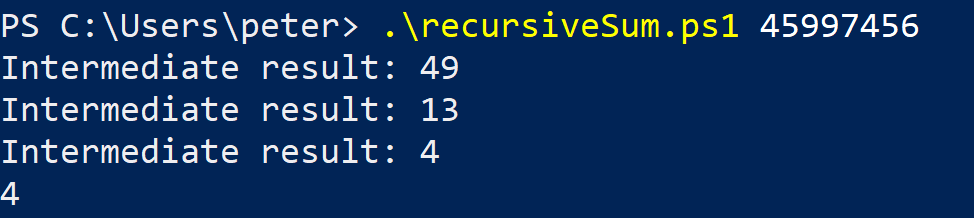
Put this script in a text file and save it as recursiveSum.ps1. Then, you can run it at the PowerShell command line by running recursiveSum.ps1 45, for example. The output will be 9:

This is a script that is simple enough to function as an example but has enough steps that we could be interested in some logging. Of course, real-life PowerShell scripts will be much more complex, warranting the need for logging even more.
The Easiest Way to Log in PowerShell
Let’s write the result of each step to the console. We’re already writing something to the console by using the Write-Output statement, so we can easily use that again. Change the While loop to include such a statement:
While ($digits.Length -ne 1) {
    $sum = 0
    $digits | ForEach { $sum += [int]$_.ToString() }
    $digits = $sum.ToString().ToCharArray()
    Write-Output "Intermediate result: $($sum)"
}
When you run it now, you should be able to see an output like this:
That’s great! We have some logging going on. However, these log statements will always be visible. In a more complex program, it might make sense to show nothing unless the user wants to see the logging. It’s probably also useful to give the user some control over the amount of detail they see. This is where log levels come in.
Log Levels in PowerShell
PowerShell has some Write-* statements that map to traditional log levels like:
- Write-Verbose
- Write-Debug
- Write-Information
- Write-Warning
- Write-Error
Verbose
Let’s look at Write-Verbose first. We can change our messages about the intermediate steps to use Write-Verbose. When we run our script now, we won’t see our intermediate steps:

But if we add the -Verbose flag, our logs appear once again:

Debug, Information, and Warning
The Debug, Information, and Warning log levels work a little different than we’re used to from traditional logging frameworks in other languages. Let’s add some extra statements first:
Write-Debug "This is a debug statement"
Write-Information "This is an info statement"
Write-Warning "This is a warning statement"
The Write-Debug will only be visible when you add the -Debug flag. It will also stop your script from running and ask for confirmation to continue. This is useful to run through your scripts step by step.

But you do have some control over whether or not to show warnings and information messages. The Write-Warning and Write-Information commands can be controlled by using the -WarningAction and -InformationAction flags. If we omit these flags, only the warning messages are shown:

If we want to show the information messages, we can do so by adding -InformationAction Continue flag:

And if we want to hide the warnings, we can use the -WarningAction SilentlyContinue option:

Error
Finally, let’s look at how Write-Error works. We can add such a statement to our script:
Write-Error "Something went wrong"
When this statement is executed, PowerShell will stop the execution of our script and write the error to the console, along with some details that might be useful:

What Is Application Logging?
Let’s now take a step away from our PowerShell script and look at what application logging is exactly. The first post in our series defined it well:
Application logging involves recording information about your application’s runtime behavior to a more persistent medium.
We’re already doing the first part: in other words, capturing information about our application’s runtime behavior. We’re showing the intermediate results of our process. But we’re not doing the second part. We’re not recording this information to a persistent medium. When we close our PowerShell session, we’ve lost this information. Let’s do that first.
Logging to a File
We’ll add this Log function to our script file:
Function Log {
    param(
        [Parameter(Mandatory=$true)][String]$msg
    )

    Add-Content log.txt $msg
}
It simply takes in a String and then adds it to a log.txt file.
Then we can change our log statement so that it no longer uses Write-Verbose but this Log function instead:
Log "Intermediate result: $($sum)"
Now we can run our script and it will create a file containing our intermediate steps:
But if we run our script multiple times, it will just be a long list of statements. We have no way of knowing when the lines were logged. In a more complex scenario, containing multiple scripts, we also have no way of know where the log line originated—i.e., from which ps1 file. There’s more information that we could be logging.
Again, let’s take a step back and look at what we are trying to achieve with logging.
Why Do We Log?
PowerShell is often used to automate and script certain tasks that would otherwise be tedious and error-prone. Automation really starts to provide value when it is applied to more complex tasks. But these complex scripts might also have more chance of breaking: services may not respond, machine configurations may have changed, etc.
Without logging, it’s hard to know if scripts ran fine or if something went wrong. If something went wrong, logging will help us find out where and why it did. Application logging can also help you gather insights into which pieces of your scripts are being used most or where performance gains can still be made.

What to Log and What Not to: A Quick Detour Into Best Practices
Covering best practices at length would be out of the scope for this post. For starters, this post is but a basic introduction to logging. Also, we already have other posts dedicated to general logging best practices, such as the following ones:
- Logging Best Practices: The 13 You Should Know About
- Application Logging Practices You Should Adopt
However, we will cover two important aspects of logging best practices: namely, what you should and shouldn’t log. Even though when it comes to logging, the more the better, generally speaking, there are certain types of data you certainly must not log.
What Shouldn’t You Log?
When you write your logging statements, make sure you leave out sensitive or personal data. Examples include:
- passwords and access tokens
- credit card numbers or bank account numbers
- social security numbers
- email addresses
- street addresses
- encryption keys
- social security numbers
The OWASP cheat sheet on logging has a section about data to exclude that is interesting to read. Although it is aimed at full-fledged applications, it could be useful for PowerShell scripts too. I can imagine scenario’s where PowerShell scripts handle email addresses or certain API keys.
Logging such personally identifiable information (or PII) is dangerous. Not only do you need explicit consent from the user in most countries, due to GDPR and other similar regulations, but if the data is ever leaked, you or your company could be held accountable. If it’s not really necessary, it’s better to leave this data out.
What Should You Log?
Our article on getting started with Ruby logging makes a great point:
You should think of a log entry as an event—something that’s of interest to your app that happened at some time.
This means that at a minimum, we need a timestamp and a description of the event. The description could also include relevant data. This is not always easy to determine upfront. Think about what you would need to troubleshoot a script that failed to run successfully. And if you later encounter a situation where you would have required more information to fix an issue, add it to the logging for next time.
Less obvious, but very useful, is to include a log level:
- At the lowest level, Debug statements can be useful to track the executed flow of your PowerShell script.
- A level up are Informational messages about the functional side of your script: what was executed, why, and with what data?
- Then there’s also the level of Warnings: things that aren’t normal and potentially damaging but that don’t prevent the script from continuing.
- Finally, Error-level messages are there to log errors that have made the script crash.
You can choose to log all these levels or only a specific level and up (for example, warnings and errors). Then, when you need more information, you can configure your script to also log more details on the next execution.
Our own simple logging function didn’t include log levels. Neither did it add a timestamp. We could add this functionality of course, but luckily others have already created decent logging scripts.
Enter the Logging Script
There is a simple yet useful script on Technet called Write-Log. If we download it, we can change our script to look like this:
param (
    [Parameter(Mandatory=$true)][int]$number
)

. C:UserspeterFunction-Write-Log.ps1

$logPath = "C:Userspeterlog.txt"
$digits = $number.ToString().ToCharArray()
$sum = 0

While ($digits.Length -ne 1) {
    $sum = 0
    $digits | ForEach { $sum += [int]$_.ToString() }
    $digits = $sum.ToString().ToCharArray()
    Write-Log -Message "Intermediate result: $($sum)" -Level Info -Path $logPath
}

Write-Output $digits
We’ve included the Function-Write-Log.ps1 file, removed our Log function, and replaced the call with a call to Write-Log. We can pass in a message, a level, and a path. The level can be Info, Warn, or Error. Notice that this script doesn’t have a Debug level, which is unfortunate. You could, however, easily modify it to include it, since the script is released under the MIT license allowing modification.
When we use this script, our log will look like this:
2021-07-22 09:18:29 INFO: Intermediate result: 51
2021-07-22 09:18:29 INFO: Intermediate result: 6
We now have clear log lines that include a timestamp, the log level, and our message. That’s much better than what we had previously. This may be sufficient for your needs, but let’s take it one step further and look at another option: the PSFramework.
Enter the Logging Framework
The PSFramework is a PowerShell framework that includes several useful utilities.
PSFramework Core Concepts
Before diving into a hands-on demonstration of PSFramework, let’s take a step back and talk about some of the main concepts of the framework.
Message
A message is what is generated by your code and you want to log. Generally speaking, the message represents some relevant event you consider valuable to record.
Providers
Logging providers are one of the most important concepts in PSFramework. If you have experience with logging in other languages and logging tools, you might be familiar with the same concept under different names:
- Appenders
- Writers
- Targets
These are just to name a few. They’re all the same: they represent possible destinations for your log messages.
In practical terms, you can think of PSFramework logging providers as plugins that know how to handle messages. A basic provider would be one that allows you to log to the filesystem. On the other hand, you could use a provider that allows you to log to Azure Log Analytics, for instance.
Providers Instances
In order to use a given provider, you’ll need a provider instance, which is a prepared “copy” of said provider—not that different from an instance of a class, in object-oriented programming.
Depending on your provider, you can have more than one instance alive simultaneously.
Installing PSFramework
To get started with the PSFramework, you will first need to install it by running Install-Module PSFramework in PowerShell. (You might have to run your PowerShell console as administrator). Then, you can write to the log files by calling the Write-PSFMessage script. In our case, it would look like this:
Write-PSFMessage -Level Output -Message "Intermediate result: $($sum)"
Notice how we’re not using an Info level. Instead, we’re using Output. This is because PSFramework uses log levels that match more nicely with that different output streams that PowerShell has by default: Verbose, Host, Output, Warning, Error, etc.
The log file will also look slightly different than what we’re used to:
"XPS-13-2021","22/07/2021 09:31:07","Output","Intermediate result: 28","Information, Debug","recursiveSum.ps1","<Unknown>","C:UserspeterrecursiveSum.ps1","29","","","c00b36b8-76bc-4251-9549-0f541742236f"
"XPS-13-2021","22/07/2021 09:31:07","Output","Intermediate result: 10","Information, Debug","recursiveSum.ps1","<Unknown>","C:UserspeterrecursiveSum.ps1","29","","","c00b36b8-76bc-4251-9549-0f541742236f"
"XPS-13-2021","22/07/2021 09:31:08","Output","Intermediate result: 1","Information, Debug","recursiveSum.ps1","<Unknown>","C:UserspeterrecursiveSum.ps1","29","","","c00b36b8-76bc-4251-9549-0f541742236f"
The column headers are missing, but that can easily be remedied by setting the logging provider first:
$logFile = Join-Path -path "C:Userspeter" -ChildPath "log-$(Get-date -f 'yyyyMMddHHmmss').txt";
Set-PSFLoggingProvider -Name logfile -FilePath $logFile -Enabled $true;
This log file will include a timestamp in the filename, and will now include a header row. This is because PSFramework’s default log provider will not add a header row, but the logfile provider will. The log file will now look like this:
"ComputerName","File","FunctionName","Level","Line","Message","ModuleName","Runspace","Tags","TargetObject","Timestamp","Type","Username"
"XPS-13-2021","C:UserspeterrecursiveSum.ps1","recursiveSum.ps1","Output","32","Intermediate result: 28","<Unknown>","c00b36b8-76bc-4251-9549-0f541742236f","",,"22/07/2021 09:43:05","Information, Debug","XPS-13-2021peter"
"XPS-13-2021","C:UserspeterrecursiveSum.ps1","recursiveSum.ps1","Output","32","Intermediate result: 10","<Unknown>","c00b36b8-76bc-4251-9549-0f541742236f","",,"22/07/2021 09:43:05","Information, Debug","XPS-13-2021peter"
"XPS-13-2021","C:UserspeterrecursiveSum.ps1","recursiveSum.ps1","Output","32","Intermediate result: 1","<Unknown>","c00b36b8-76bc-4251-9549-0f541742236f","",,"22/07/2021 09:43:05","Information, Debug","XPS-13-2021peter"
This now includes a lot of useful information like the filename of our script, the line where the logging occurred and the username of the user that is running the script. Another great advantage of the logging by PSFramework is that it logs asynchronously. The logging will not slow down your scripts. Finally, it will also automatically clean up your logs. By default, it will remove log files after seven days or when they exceed 100 megabytes.

A Comparison
The Function-Write-Log script matches more with what many application programmers are used to. It includes the standard log levels (except for Debug) and writes a log file like many logging frameworks do: a timestamp, the log level, and the message.
However, it misses some extra functionality that might be crucial to you: log clean up; asynchronous logging; and extra technical information like the script, line number, and executing user.
The PSFramework logging does provide these features, though it requires you to install the entire framework. This shouldn’t be a real issue, but it’s something to keep in mind. The PSFramework also uses different logging levels than we’re used to. However, they match closely to the PowerShell output streams. This may feel more natural to seasoned PowerShell users.
Summary and Next Steps
We’ve taken a look at a simple way to log in PowerShell. We also improved upon our own solution by using a better script (Function-Write-Log.ps1) and by using the logging included in PSFramework.
One thing that struck me was that logging in PowerShell is still fairly basic. It’s not that the options we looked at are bad or lacking. But I didn’t find a single logging script or module that includes multiple log levels, asynchronous logging, log clean up, and, most importantly, multiple log destinations.
What if we want to send errors to an email address? Or what if we want to log to a database? As far as I can see, PSFramework offers the most options here, but email or database aren’t included. It might be possible to write your own and register it in PSFramework, though.
This might be because the world of PowerShell is different that the world of application development. PowerShell scripts may be much more custom-made, meant for a specific scenario, and composed of multiple separate scripts.
Yet logging remains important, especially with scripts that run regularly and have a certain level of complexity. PowerShell is a powerful language to automate a multitude of tasks. When something goes wrong with such a task, you want to know what went wrong, what preceded it, and how to fix it. Logs give you this information.

Log Smarter and Stop Putting Out Fires!
Do you know what’s the biggest tragedy of logging is? It’s the fact that most organizations treat it as a mere troubleshooting mechanism.
Sure, logging is invaluable for understanding and fixing issues, there’s no denying that. Using the data from your log files to make your debugging and post-morten sessions easier is certainly way better than the alternative, which would be going blind.
But what if I told you that logging can be used not only to fix issues but even to prevent them altogether? What if I told you that’s possible to quit putting out fires and start stopping them from beginning?
That’s exactly the value proposition of log management. Log management is the process of collecting your logs, then extracting useful data from them. If that sounds underwhelming, here’s a list of only a few of the use cases for log management:
- You can set up real time alerts and notifications. A great log management tool can analyze data from your logs, identify concerning trends, and then proactively notify the key people.
- You get dashboards to visualize your environments in real time.
- You get super fast search among log entries from your entire organization.
To sum it up, not using log management is pure waste. You have a treasure in the form of all the data inside your logs, and you doing a whole lot of nothing with it.
To leverage log management, you’ll need a tool, and Scalyr is a great one for this. Have look at the Scalyr API for the different options of sending log events to Scalyr. This can easily be called from PowerShell and will improve your ability of monitoring and troubleshooting your PowerShell scripts.
Вы можете использовать простые текстовые лог файлы для контроля запуска и отслеживания всех действий, которые выполняются при запуске PowerShell скриптов. Это удобно при отладке ошибок, для аудита выполненных скриптом действий. В этой статье мы рассмотрим несколько способов ведения текстовых лог-файлов для ваших PowerShell скриптов.
В самом простом случае, если вам нужно записать вывод информационного сообщения или результатов определенной PowerShell команды в текстовый лог файл, вы можете использовать один из следующих форматов перенаправления вывода в txt файл:
Write-Output "Файлы созданы успешно на $env:computername" >> C:PSLogsTestLog.txt
Add-Content -Path C:PSLogsTestLog.txt -Value "Файлы созданы успешно на $env:computername"
"Файлы созданы успешно на $env:computername" | Out-File -FilePath C:PSLogsTestLog.txt –Append
Во всех случаях команды добавляют в указанный текстовый файл новую строку c указанным вами текстом.
Если вам нужно каждый раз перезатирать содержимое ло-файла, используйте Set-Content.
Главный недостаток такого метода – по такому лог файлу нельзя определить, когда была внесена та или иная запись в лог (произошло событие). Вы можете добавить в лог текущую метку даты, времени (timestamp). Это поможет легко идентифицировать время запуска скрипта и конкретного события в нем.
Для удобства можно создать в PowerShell скрипте отдельную функцию, которая будет сохранять переданные ей данные в лог файл и добавлять время записи информации.
Можно сделать функцию:
$Logfile = "C:PSLogsproc_$env:computername.log"
function WriteLog
{
Param ([string]$LogString)
$Stamp = (Get-Date).toString("yyyy/MM/dd HH:mm:ss")
$LogMessage = "$Stamp $LogString"
Add-content $LogFile -value $LogMessage
}
Теперь, чтобы записать что-то в лог файл, вам нужно вызвать функцию WriteLog.
WriteLog "Скрипт запущен”
WriteLog "Выполняю вычисления…."
Start-Sleep 20
WriteLog "Скрипт выполнен успешно"
Теперь в лог файле содержится время, когда была произведена запись.
Можете заменить в своем скрипте вызовы Write-host на LogWrite.
В PowerShell также есть встроенная возможность сохранять в текстовый лог файл все команды и результаты, которые выводятся в консоль PS.
Чтобы начать запись текущей PowerShell сессии, используется командлет Start-Transcript.
После запуска этой команды появляется сообщение, в котором указано, в какой файл сохраняются результаты всех команд. По умолчанию лог файл пишется в профиль текущего пользователя:
Transcript started, output file is C:UsersAdministratorDocumentsPowerShell_transcript.DC01.inhP7egx.20210315041442.txt
Можно указать путь к текстовому файлу так:
Start-Transcript -Append C:PSLogsPSScriptLog.txt
Параметр –Append указывает, что нужно дописывать новые сессию в конец лог файла (не перезатирать его).
Выполните несколько PowerShell команд, которые выводят результаты в консоль. Например, выведем список тяжелых запущенных процессов, запущенных служб и состояние репликации в AD:
Get-Process| where-object {$_.WorkingSet -GT 300000*1024}|select processname,@{l="Used RAM(MB)"; e={$_.workingset / 1mb}} |sort "Used RAM(MB)" –Descending
Get-Service | Where-Object {$_.status -eq 'running'}
Get-ADReplicationFailure -Target DC01
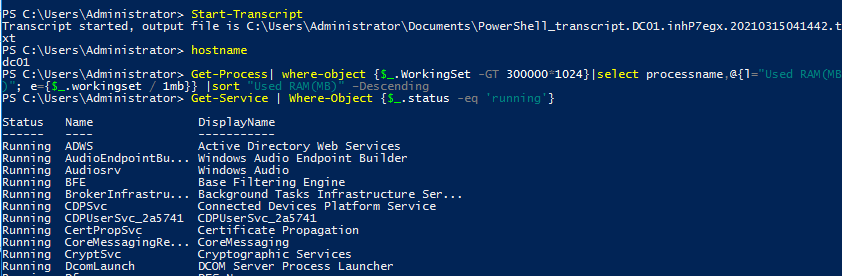
Завершите запись сессии для текущей сессии:
Stop-Transcript
Теперь откройте текстовый файл с логом.
Как вы видите, в текстовом логе отображаются вся история PowerShell команд, которые запускались в скрипте и весь вывод, который выводился в консоль.
В лог файл попадают в том числе все ошибки и предупреждения, что бывает крайне удобно при диагностике и отладке сложных PowerShell скриптов.
Вы можете использовать Start-Transcript/Stop-Transcript в своих PowerShell скриптах чтобы нативно логировать все действия и результаты.
С помощью групповой политики Turn on PowerShell Transcription в Computer Configuration –> Administrative Templates –> Windows Components –> Windows PowerShell можно включить автоматическое логирование всех запускаемых PowerShell команд и выводимых результатов на компьютере. После обновления настроек GPO на компьютере, для каждого запущенного процесса powershell.exe будет создаваться отдельный тектовый лог файл, куда будут записываться все PS команды и результаты результаты.
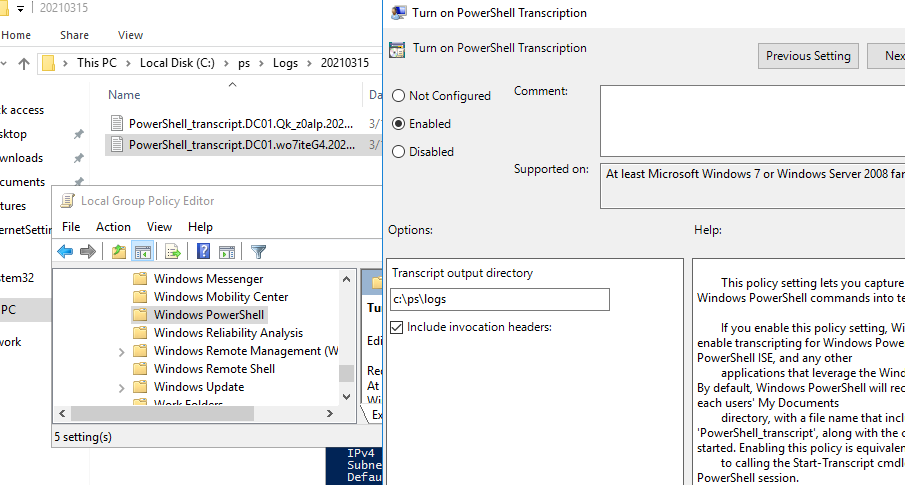
Important Update
As of September 2015, I have released version 2 of my PowerShell Logging solution, and is now known as PSLogging.
There has been a number of significant improvements with the most notable being that the PowerShell Logging function library has now been converted into a fully fledged PowerShell module. All of the details about the new version, the improvements and how to use and integrate the new version into your new and existing scripts can be found here – PSLogging PowerShell module.
Note: This version of the logging solution is no longer supported or maintained, so please upgrade to the new version today!
Today I thought I would share some thing that I have developed over the last year or so as I have been working more and more with PowerShell…. some standard functions that can simply be dot sourced and called at any time so that all my scripts have some awesome logs to go along with the awesome script.
Why have logging?
Well personally I feel that this is a very important part of a script or tool that is developed, particularly if it is going to be used regularly and provides some sort of valuable functionality.
Having a log that people can follow, and see what is happening while the script is executing or if the script runs into errors is very useful. Not only that, but I feel people will respect your developed scripts tools as they see it as a mature product, not some dodgey backyard operation that was just copied from the web and had the crap hacked through it.
The other reason is that it makes troubleshooting a hell of a lot easier… particularly 6 – 12 months down the track when lets say you are running the script in a different environment than what it was originally developed for. Having a log and being able to write out the result of each step of your script allows you to easily pin-point where the problem lies, especially if you pipe out error messages to the log (both custom or system errors).
Another great reason is having compassion on the guy the might be having to update or troubleshoot your script tool in the future. Its sort of like having well commented code (which I know everyone does… lol), it makes it easier for someone to be able to track your script and know what is happening and why its happening.
Finally, the reason why I personally like logging is because the way I layout all of my scripts is a seperate function per major task that the script completes. At the end of my scripts I then have an execution section where I call all of my functions in order and pass the required variables.
Using logging with this approach to development is great because it allows you to break your log into sections… each function has its own mini log section if you like, so it makes tracking the script really really easy and plus it looks awesome.
Logging Function Library: The contents
Becuase of the reasons above, I decided to create a logging function library which is essentially just a .ps1 file with a bunch of standard log functions. In each of my scripts I just dot source the .ps1 file and then call the each of the functions as required. The functions included in logging library are:
- Log-Start: Creates the .log file and initialises the log with date and time, etc
- Log-Write: Writes a informational line to the log
- Log-Error: Writes an error line to the log (formatted differently)
- Log-Finish: Completes the log and writes stop date and time
- Log-Email: Emails the content of the log
Logging Function Library: Log Formatting
All of my scripts use this logging library and therefore all the logs look kinda the same. This is actually a good thing because it allows your user base to get used to a particular log format and so its just another incentive for them to use and enjoy your script that you worked so hard on.
Here is a screenshot of one of my logs that has been written using this logging function library
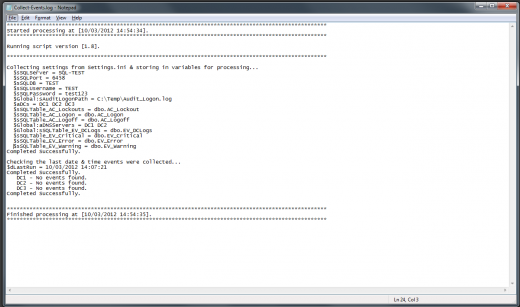
Logging Function Library: The Code
Ok guys, enough rambling… here it is in all of its raw beauty:
Logging Function Library: Installation Instructions
Here are the instructions to start using this logging function library in your scripts:
- Copy the code above and save it in a new
.ps1file calledLogging_Functions.ps1. Alternatively you can download the file from here: PowerShell Logging Function Library - Copy the file and store it in a central location that everyone has access to (Note: This is very important otherwise your script will fail for people who don’t have access to the function library)
- In your script dot source the
Logging_Functions.ps1file. You should do this at the top of your PowerShell script and it should look something like this:. "C:ScriptsFunctionsLogging_Functions.ps1" - Call the relevant functions as required (see the examples found in the meta information of each of the functions on how to do this)
PowerShell Script Template
If you are unsure on how to do step 4 above, or you would like to fill-out a standard template that have everything you need to create a new PowerShell script, then check out this post: PowerShell Script Template
If you have any problems using my PowerShell Logging Function Library then please let me know in the comments below or send me an email and I will try my hardest to get you all fixed up. Also, if you have any cool ideas or have some thoughts on how to improve the library then I am always intersted in hearing what others are doing and how I can improve myself.
Thanks guys and happy scripting 🙂
Luca
- Remove From My Forums
-
Question
-
Hi,
I am trying to create a error logger file, which will contain the list of errors when the powershell was run.
I tried the below code, but it is not working:
Add-PSSnapin Microsoft.SharePoint.PowerShell -ErrorAction SilentlyContinue
clear
foreach ($user in $SPWeb.AllUsers){
$SPWeb = Get-SPWeb "Site collection"
#other powershell commands

 Set-SPUser -Identity $user -SyncFromAD -Web site collection -EA 0 -EV Err
    Write-Host "Updated for User: $user"

        if ( $Err )
        {
         ConfigureLogger
         LogError $Err[0].Exception
         Write-Host "Not updated for user : $user" -ForegroundColor DarkCyan $_.Exception
        }

}

$SPWeb.Dispose()


function LogError($message)
{
     $date= Get-Date
     $outContent = "[$date]`tError`t`t $message`n"
     Add-Content "Log$Script:logFile" $outContent
}

function ConfigureLogger()
{

     if((Test-Path Log) -eq $false)
     {
           $LogFolderCreationObj=New-Item -Name Log -type directory
     }

     $Script:logFile="UpdateErrorScripts.log"

     Add-Content "Log$logFile" "Date`t`t`tCategory`t`tDetails"
}
The line is hitting «ConfigureError» function, but giving error as :
ConfigureLogger : The term 'ConfigureLogger' is not recognized as the name of a cmdlet, function, script file, or operable program. Check the spelling of the name, or if a path
was included, verify that the path is correct and try again.
At D:TestTestError.ps1:33 char:10
+          ConfigureLogger
+          ~~~~~~~~~~~~~~~
    + CategoryInfo          : ObjectNotFound: (ConfigureLogger:String) [], CommandNotFoundException
    + FullyQualifiedErrorId : CommandNotFoundException

LogError : The term 'LogError' is not recognized as the name of a cmdlet, function, script file, or operable program. Check the spelling of the name, or if a path was included,
verify that the path is correct and try again.
At D:TestTestError.ps1:34 char:10
+          LogError $Err[0].Exception
+          ~~~~~~~~
    + CategoryInfo          : ObjectNotFound: (LogError:String) [], CommandNotFoundException
    + FullyQualifiedErrorId : CommandNotFoundException
How to fix this?
Thanks
Answers
-
Hi Venkatzeus,
The errors appear because your functions appear below your code. Powershell does not import all the functions in a script before running executable code, so you need to move your function definitions to the top of the script, or put your code into another
function that is executed at the bottom of the sript.Good Luck!
Shane
-
Marked as answer by
Monday, December 5, 2016 4:58 AM
-
Marked as answer by
If you think ahead and implement proper logging throughout your PowerShell scripts, you will have a much easier time troubleshooting anything that goes wrong.
There are many different ways to think about logging. Within PowerShell, this could mean logging to the host, a file, the Windows event log, a database, syslog on Linux or even a combination of these choices.
It helps to have options and flexibility, but the setup process to log to all the different places can be difficult.
One of the preferred ways is to create a custom PowerShell logging function that directs the output where you want it in your scripts and functions.
Building the framework
First, decide on the logging options to include. A good starting point is to log to the host, a file and a database.
Next, we build the skeleton of the PowerShell logging function:
Function Write-Log {
[CmdletBinding()]Param (
$Message
)Process {
Write-Host $Message
}
}
At its simplest, we define a single parameter and output it back to the host. Using CmdletBinding will let us take advantage of advanced cmdlet functionality that is explained further along in this tutorial.
Prepping the parameters
Next, add some additional parameters. One of the common functionalities within PowerShell logging is the level of logging such as information, verbose, error or debug.
Add a few parameters into the Param block and some decorative statements to make the PowerShell logging function more comprehensive.
Param (
[Parameter(
Mandatory=$true,
ValueFromPipeline=$true,
Position=0)]
[ValidateNotNullorEmpty()]
[String]$Message,[Parameter(Position=1)]
[ValidateSet("Information","Warning","Error","Debug","Verbose")]
[String]$Level = 'Information',[String]$Path = [IO.Path]::GetTempPath(),
[String]$Server,
[String]$Database,
[String]$Table,
[Switch]$NoHost,
[Switch]$SQL,
[Switch]$File
)
The functionality of the new parameters in the script do the following:
- Message: This is a string sent to the different destinations in the script. This is mandatory, pipeline-enabled and usable without defining a parameter.
- Level: The level corresponds to one of the following: information, verbose, error, debug. The default is information. The script makes this usable without defining a parameter.
- Path: Since the function allows logging to a file, use the default temporary path. The script uses [IO.Path]::GetTempPath() to work cross-platform, defaulting to the temp path in Linux and Windows.
- Server: To support logging to a database — in this case, SQL Server — the script provides the server, which relies on Windows authentication.
- Database: Along with the server, the script supplies a database to store the data.
- Table: This section defines the table where we will send the logs.
- NoHost: This portion does logging without outputting to the host.
- SQL: The switch defines whether or not to send logs to SQL Server. This requires setting the Server, Database and Table
- File: The switch defines whether to send logging output to the file.
Defining the logic
The next portion of our PowerShell logging function centers on the output:
$DateFormat = "%m/%d/%Y %H:%M:%S"If (-Not $NoHost) {
Switch ($Level) {
"information" {
Write-Host ("[{0}] {1}" -F (Get-Date -UFormat $DateFormat), $Message)
Break
}
"warning" {
Write-Warning ("[{0}] {1}" -F (Get-Date -UFormat $DateFormat), $Message)
Break
}
"error" {
Write-Error ("[{0}] {1}" -F (Get-Date -UFormat $DateFormat), $Message)
Break
}
"debug" {
Write-Debug ("[{0}] {1}" -F (Get-Date -UFormat $DateFormat), $Message) -Debug:$true
Break
}
"verbose" {
Write-Verbose ("[{0}] {1}" -F (Get-Date -UFormat $DateFormat), $Message) -Verbose:$true
Break
}
}
}If ($File) {
Add-Content -Path (Join-Path $Path 'log.txt') -Value ("[{0}] ({1}) {2}" -F (Get-Date -UFormat $DateFormat), $Level, $Message)
}If ($SQL) {
If (-Not $Server -Or -Not $Database -Or -Not $Table) {
Write-Error "Missing Parameters"
Return
}$connection = New-Object System.Data.SqlClient.SqlConnection
$connection.ConnectionString = "Data Source=$Server;Initial Catalog=$Database;Integrated Security=SSPI;"If (-Not ($connection.State -like "Open")) {
$connection.Open()
}$sqlCommand = New-Object System.Data.SqlClient.SqlCommand
$sqlCommand.Connection = $connection$sqlCommand.CommandText = "INSERT INTO [$Database].dbo.$table ( DateTime, Level, Message ) VALUES ( @DateTime, @Level, @Message )"
$sqlCommand.Parameters.Add("@DateTime", [System.Data.SqlDbType]::VarChar, 255) | Out-Null
$sqlCommand.Parameters.Add("@Level", [System.Data.SqlDbType]::VarChar, 255) | Out-Null
$sqlCommand.Parameters.Add("@Message", [System.Data.SqlDbType]::NText) | Out-Null$sqlCommand.Parameters['@DateTime'].Value = ( Get-Date -UFormat $DateFormat )
$sqlCommand.Parameters['@Level'].Value = $Level
$sqlCommand.Parameters['@Message'].Value = ($message | Out-String)Try {
$sqlCommand.ExecuteNonQuery() | Out-Null
} Catch {
Write-Error "Unable to Insert Log Record: $($_.Exception.Message)"
}If ($connection.State -like "Open") {
$connection.Close()
}
}
There are three different sections to the code, which is structured to allow for multiple logging variations, such as output to three different sources at the same time.
- Host: You can generate output based on the level required, such as verbose, warning or error. If we have defined the nohost switch, then we will skip this; otherwise, the default of our function is to output to the host. The script forces the Write-Debug and Write-Verbose functions with -Debug:$true and -Verbose:$true to send output to the host.
- File: Outputting to a file is the simplest of the functions here. The script adds content to a file for each new log line.
- SQL: The most complicated function is the SQL functionality. Most of this is boilerplate code that will set up the connection and prepare the insert command. The script uses SQL parameterization to make the insert code safer.
The following is an example of a Logs table that contains the fields defined in the insert query to set up the database to insert the data:
CREATE TABLE [dbo].[Logs](
   [DateTime] [varchar](255) NOT NULL,
   [Level] [varchar](255) NOT NULL,
   [Message] [ntext] NOT NULL,
 );
For the sake of convenience, here’s the full code:
Function Write-Log {
[CmdletBinding()]Param (
[Parameter(
Mandatory=$true,
ValueFromPipeline=$true,
Position=0)]
[ValidateNotNullorEmpty()]
[String]$Message,[Parameter(Position=1)]
[ValidateSet("Information","Warning","Error","Debug","Verbose")]
[String]$Level = 'Information',[String]$Path = [IO.Path]::GetTempPath(),
[String]$Server,
[String]$Database,
[String]$Table,[Switch]$NoHost,
[Switch]$SQL,
[Switch]$File
)Process {
$DateFormat = "%m/%d/%Y %H:%M:%S"If (-Not $NoHost) {
Switch ($Level) {
"information" {
Write-Host ("[{0}] {1}" -F (Get-Date -UFormat $DateFormat), $Message)
Break
}
"warning" {
Write-Warning ("[{0}] {1}" -F (Get-Date -UFormat $DateFormat), $Message)
Break
}
"error" {
Write-Error ("[{0}] {1}" -F (Get-Date -UFormat $DateFormat), $Message)
Break
}
"debug" {
Write-Debug ("[{0}] {1}" -F (Get-Date -UFormat $DateFormat), $Message) -Debug:$true
Break
}
"verbose" {
Write-Verbose ("[{0}] {1}" -F (Get-Date -UFormat $DateFormat), $Message) -Verbose:$true
Break
}
}
}If ($File) {
Add-Content -Path (Join-Path $Path 'log.txt') -Value ("[{0}] ({1}) {2}" -F (Get-Date -UFormat $DateFormat), $Level, $Message)
}If ($SQL) {
If (-Not $Server -Or -Not $Database -Or -Not $Table) {
Write-Error "Missing Parameters"
Return
}$connection = New-Object System.Data.SqlClient.SqlConnection
$connection.ConnectionString = "Data Source=$Server;Initial Catalog=$Database;Integrated Security=SSPI;"If (-Not ($connection.State -like "Open")) {
$connection.Open()
}$sqlCommand = New-Object System.Data.SqlClient.SqlCommand
$sqlCommand.Connection = $connection$sqlCommand.CommandText = "INSERT INTO [$Database].dbo.$table ( DateTime, Level, Message ) VALUES ( @DateTime, @Level, @Message )"
$sqlCommand.Parameters.Add("@DateTime", [System.Data.SqlDbType]::VarChar, 255) | Out-Null
$sqlCommand.Parameters.Add("@Level", [System.Data.SqlDbType]::VarChar, 255) | Out-Null
$sqlCommand.Parameters.Add("@Message", [System.Data.SqlDbType]::NText) | Out-Null$sqlCommand.Parameters['@DateTime'].Value = ( Get-Date -UFormat $DateFormat )
$sqlCommand.Parameters['@Level'].Value = $Level
$sqlCommand.Parameters['@Message'].Value = ($message | Out-String)Try {
$sqlCommand.ExecuteNonQuery() | Out-Null
} Catch {
Write-Error "Unable to Insert Log Record: $($_.Exception.Message)"
}If ($connection.State -like "Open") {
$connection.Close()
}
}
}
}
Using the logging function
Now that we have our function, what’s the best way to use it? Is there something else we should be logging? What makes the most sense for troubleshooting in the future?
The following examples show a few ways to use the new logging function:
Write-Log -Message "First Message"
 Write-Log "Second Message" -Level "Warning"
 Write-Log "Third Message" -NoHost -File
 Write-Log "Fourth Message" -SQL -Server "SQLServer" -Database "Logging" -Table "Logs"
 Write-Log "Fifth Message" -Level "Error" -File
What if we log to SQL but don’t want to define the same parameters repeatedly? PowerShell gives the option to use default parameters that the functions will use unless there is an override on a per-function call basis:
$PSDefaultParameterValues = @{
     'Write-Log:SQL'      = $true
     'Write-Log:Server'   = 'SQLServer'
     'Write-Log:Database' = 'Logging'
     'Write-Log:Table'      = 'Logs'
 }
By defining some default parameters, the script can use the following:
# Full Function with all Parameters
 Write-Log "Logging Message" -SQL -Server "SQLServer" -Database "Logging" -Table "Logs"
 # Same Function Call with Default Parameters
 Write-Log "Logging Message"
This makes it much easier to control the logging behavior and provides more flexibility.
The end result is you get a PowerShell logging function that builds output, similar to Figure 1.
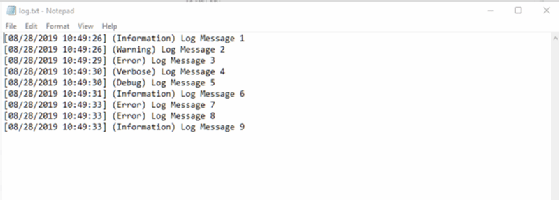
Additional logging functionality to consider
While the PowerShell logging function in this article is useful, there is much more advanced functionality you can add, such as output to syslog in Linux and even internal logging for the function itself to diagnose when the script does not perform as expected.
Next Steps
5 PowerShell tools to help simplify admin tasks and support
7 PowerShell courses to help hone skills for all levels of expertise
What’s new with PowerShell error handling?
Dig Deeper on Windows Server OS and management
-

11 lessons learned from writing my first Java program
By: Darcy DeClute
-
Follow this tutorial to get started with Azure Bicep
By: Christopher Blackden
-
Understanding code smells and how refactoring can help
By: Joydip Kanjilal
-
Use NetBackup version command to gather critical data
By: Stuart Burns