Обновлено 19.08.2021
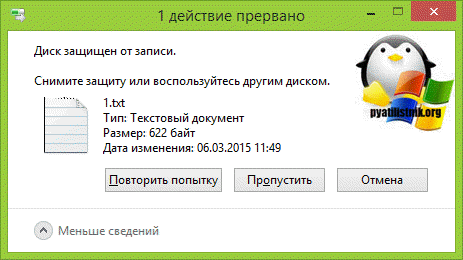
Добрый день уважаемые читатели и подписчики блога pyatilistnik.org. Расскажу небольшую историю как люди ломают usb флешки и как их потом восстанавливать. Мой коллега, дал одному из сотрудников флешку, для переноса данных с одного компьютера на другой. Пользователь произвел перенос и отдал нам носитель. Далее мой коллега, вставил себе эту флешку и попытался на нее, что-либо записать и был очень удивлен, что она вообще не виделась, лишь сразу появилось окно, что ее нужно отформатировать, пробуем и получаем ошибку «Диск защищен от записи«. Давайте я покажу как решить данную проблему и вернуть носитель в рабочее состояние.
Как выглядят ошибки
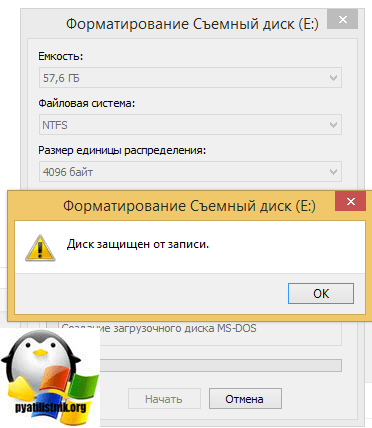
Давайте покажу как выглядит ошибка. На первом окне форматирования съемного диска, вы увидите «Диск защищен от записи».
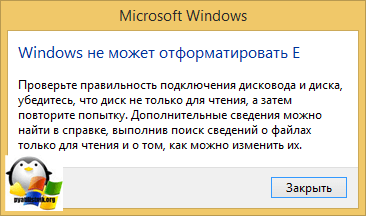
Нажав ок, вы увидите еще интересное предупреждение:
Windows не может отформатировать. Проверьте правильность подключения дисковода и диска, убедитесь, что диск не только для чтения, а затем повторите попытку. Дополнительные сведения можно найти в справке, выполнив поиск сведений о файлах только для чтения и о том, как можно изменить
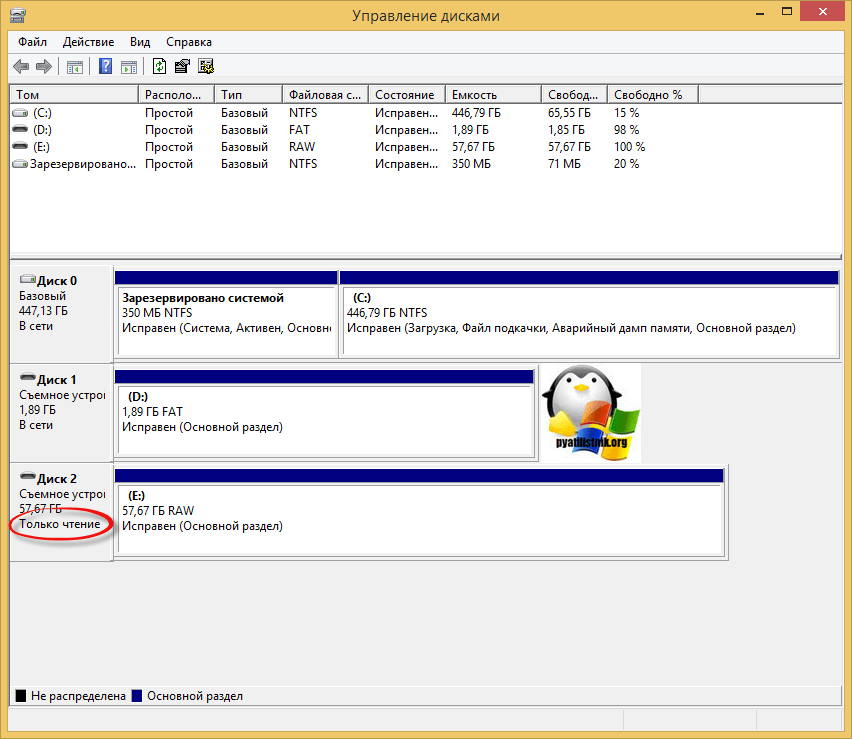
Если открыть оснастку «Управление дисками», то вы обнаружите, что носитель имеет статус «Только для чтения»
Еще бывает ситуация, что флешка видится и открывается, но вот записать туда ничего не дает, даже если учесть, что на вкладке «Безопасность» права на запись присутствуют. Тут вы уже видите сообщение «Снимите защиту или воспользуйтесь другим диском.»
Все эти симптомы мы с вами легко излечим.
Почему пишет диск защищен от записи
Давайте рассмотрим самые частые причины, приводящие к поломке USB носителя, как на физическом, так и на логическом уровне:
- Не правильное извлечение носителя из компьютера, на уровне операционной системы Windows. Уверен, что и вы этим грешите, в большинстве случаев пользователю, проще просто вытащить флешку, чем делать правильное ее извлечение,через специальное окно или программу. Как следствие вы увеличиваете вероятность краха файловой системы на ней, NTFS такого не любит.
- Большое количество ошибок на флешке
- Физический износ
- Проблема с драйверами
Убираем диск защищен от записи при форматировании
Когда с причинами все понятно, то давайте приступать к практике. Сразу покажу рабочий метод убирающий блокировку носителя «Только для чтения». В этом вам поможет утилита Formatter SiliconPower.
Скачать Formatter SiliconPower можно либо с официального сайта либо у меня.

Утилита полностью portable и не требует установки. Запускаем Formatter SiliconPower.
Перед запуском я вам советую оставить включенной только не рабочую флешку
У вас появится окно, в котором вам предложат произвести форматирование, соглашаемся и нажимаем «Format»
Вас предупредят, что все данные будут удалены, продолжаем операцию.
Начинается процесс восстановления, ни в коем случае не извлекайте флешку, пока не увидите окно, что все прошло успешно.
Вот так вот выглядит окно, что все выполнено и теперь usb носитель не защищен от записи, и работает в привычном вам режиме.

Убираем защиту от записи с USB в редакторе реестра Windows
Данный метод поможет в 99 процентах случаев, когда у вас флешка видится, но не дает ничего на себя записать. Тут вся проблема в одном ключе реестра, который нужно поправить или создать заново. И так, нажимаем одновременно кнопки Win и R, и в открывшемся окне «Выполнить» пишем regedit.
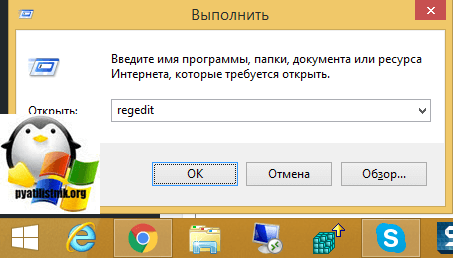
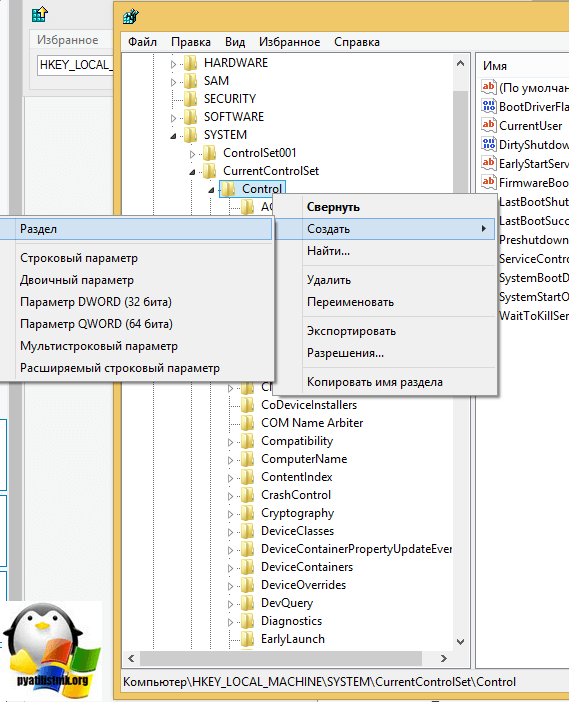
Переходите в раздел:
HKEY_LOCAL_MACHINESYSTEMCurrentControlSetControlStorageDevicePolicies
Если такого раздела не будет, то вам придется его создать через правый клик и задать ему имя StorageDevicePolicies
Кто лентяй, тот может уже скачать готовый ключ реестра с нужным значением, скачать WriteProtect. При запуске согласитесь с добавлением ключа
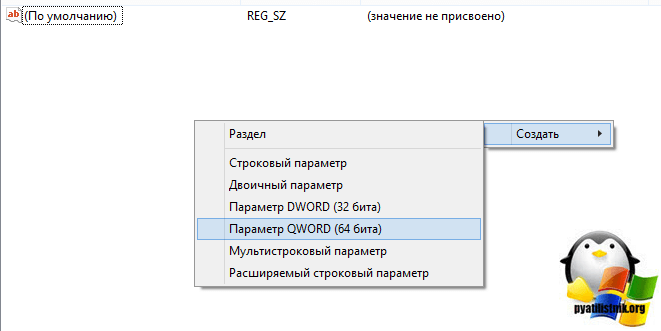
В разделе StorageDevicePolicies вам необходимо создать ключ реестра «Параметр QWORD (64 бита)» с именем WriteProtect и дать ему значение 0.
Если ключ WriteProtect уже был у вас в реестре и имел значение 1, то это он запрещал форматирование флешки и писал, что диск защищен от записи, меняем на ноль.
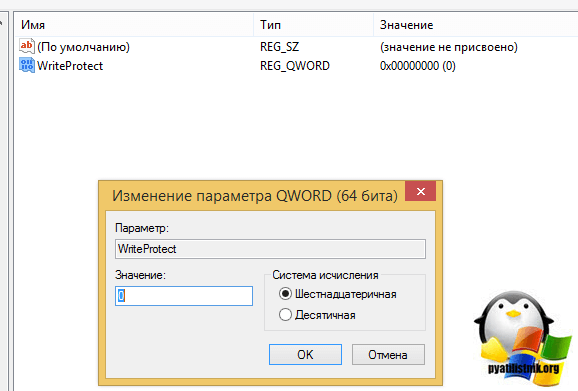
После внесения изменений в реестр, вам необходимо перезагрузить компьютер, иначе настройки не вступят в силу.
Как убрать защиту от записи в командной строке (cmd)
Если у вас по прежнему ваш съемный носитель выдает сообщение «Что usb диск защищен от записи» не спешите расстраиваться, у нас с вами есть в запасе утилита Diskpart. Запустить ее можно через командную строку Windows от имени администратора.
- Запустите командную строку от имени администратора.
- В командной строке введите Diskpart и нажмите Enter. Затем введите команду list disk и в списке дисков найдите свою флешку, вам потребуется ее номер. Введите по порядку следующие команды, нажимая Enter после каждой.
- select disk N (где N номер флешки из предыдущего шага)
- attributes disk clear readonly
- exit
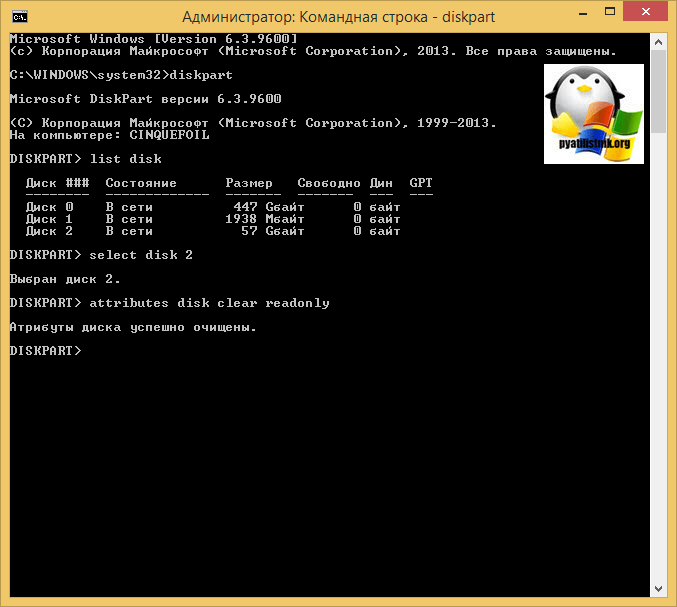
Как видите, утилита diskpart отработала, теперь можно проверять результат ее выполнения.
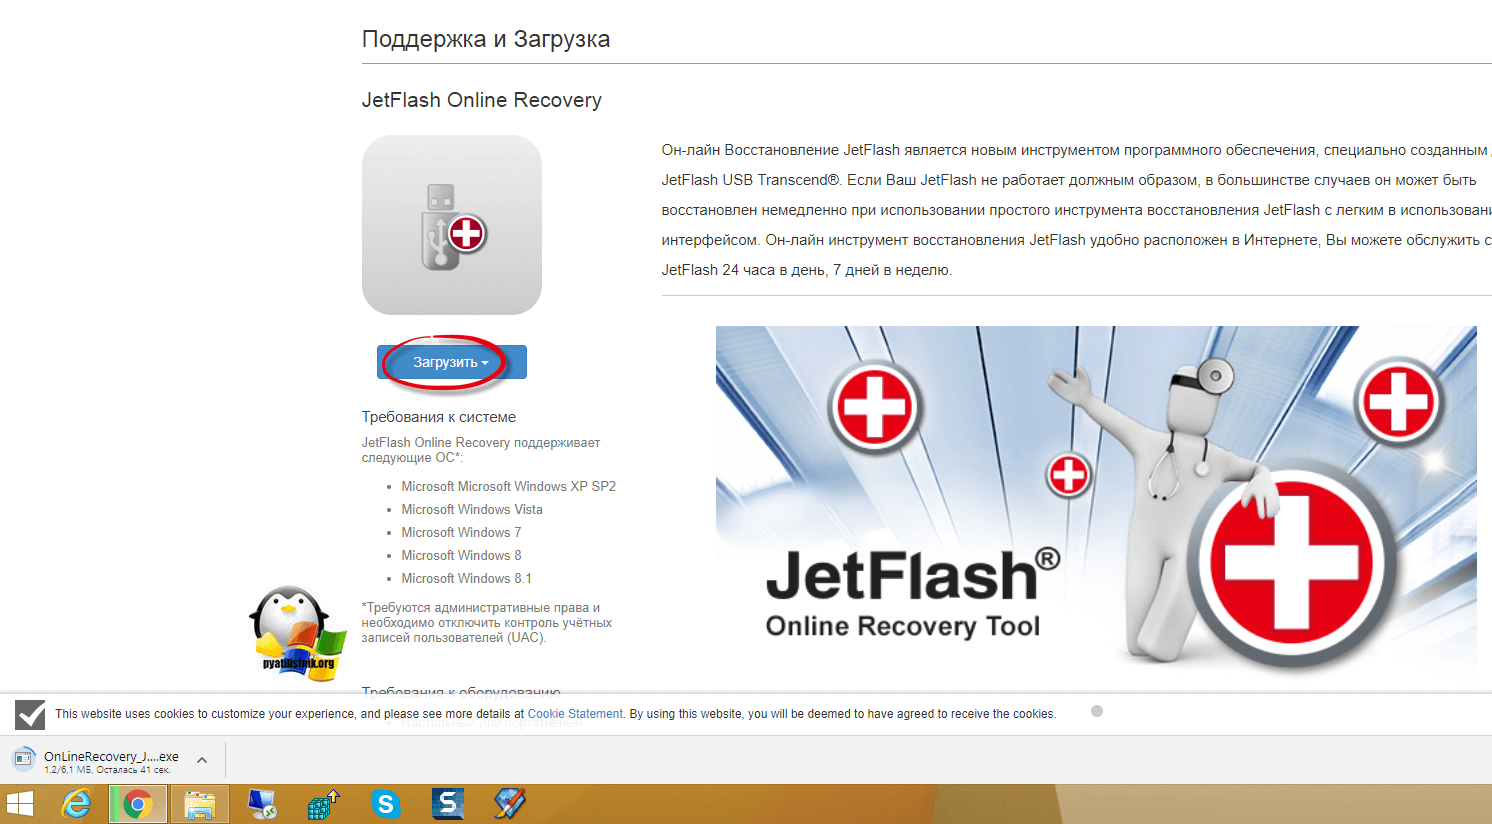
Не форматируется Trancend флешка
Есть еще специфические методы для USB носителей, определенных производителей, так например, для Trancend, есть специальная утилита JetFlash Online Recovery.
Скачать JetFlash Online Recovery https://ru.transcend-info.com/Support/Software-3/
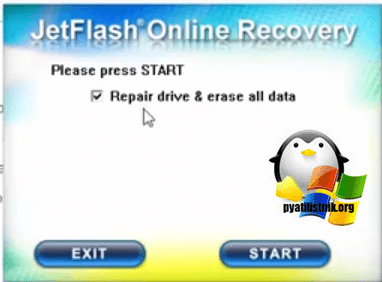
Сама утилита очень простая, запускаете ее и нажимаете Start.
Начнется процесс восстановления usb носителя.
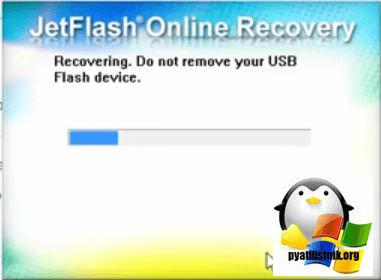
Как видите все успешно выполнилось и флешка спокойно открылась.

Резюме
Как видите ошибка с невозможностью прочитать или отформатировать флешку решается очень просто, для этого есть как встроенные утилиты, так и утилиты от производителей, выбираете подходящий для вас способ и ремонтируйте, если есть вопросы, то пишите их в комментариях, я постараюсь на них ответить, всем спасибо.
Полезный совет от пользователя Сергей (Fin)
Сейчас препарировал трупика и обнаружил окисление контактов USB. У радиолюбителей есть спрей такой Contact CLEANER называется, вот им и воспользовался. Контакты блестят, флешка читается, записывается и форматируется. Надеюсь и дальше будет радовать меня своей работоспособностью (хотя это уже под большим вопросом, общий возраст ее около 8 лет).
Вам Иван, спасибо за статью и всех благ!
Надеюсь поможет остальным вашим читателям.
PS: кто постирал флешку или уронил в воду — разберите, просушите, затем почистите зубной щеткой со спиртом саму плату с обоих сторон. Должна ожить — сам делал так несколько раз =) Удачи!
Как форматировать флешку, защищенную от записи
 Ранее я писал пару статей о том, как отформатировать флешку в FAT32 или NTFS, но не учел одного варианта. Иногда, при попытке форматирования, Windows пишет, что диск защищён от записи. Что делать в этом случае? С этим вопросом и разберемся в данной статье. См. также: Как исправить ошибку Windows не удается завершить форматирование.
Прежде всего, отмечу, что на некоторых флешках, а также на картах памяти есть переключатель, одно положение которого устанавливает защиту от записи, а другое — снимает ее. Эта инструкция предназначена для тех случаев, когда флешка отказывается форматироваться несмотря на то, что никаких переключателей нет. И последний момент: если все нижеописанное не поможет, то вполне возможно, что ваш USB накопитель попросту поврежден и единственное решение — покупка нового. Стоит, правда, попробовать и еще два варианта: Программы для ремонта флешек (Silicon Power, Kingston, Sandisk и других), Низкоуровневое форматирование флешки.
2 обновления:
- В отдельной статье есть другие способы исправить проблему, а также видео инструкция: Флешка пишет диск защищен от записи.
- Если у вас не форматируются все флешки на одном конкретном компьютере, дело может быть в том, что установлены ограничения на запись. Об их отмене, в другом контексте, но подойдет и в этом случае, в отдельной инструкции — Расположение недоступно, отказано в доступе к флешке (эта же инструкция подойдет, если при попытке создать файл на USB накопителе вы видите сообщение о том, что нет доступа к целевой папке.
Удаление защиты от записи с помощью Diskpart
Для начала, запустите командную строку от имени администратора:
- В Windows 7 найдите ее в меню пуск, кликните по ней правой кнопкой мыши и выберите пункт «Запуск от имени администратора».
- В Windows 8.1 нажмите на клавиатуре клавиши Win (с эмблемой) + X и в меню выберите пункт «Командная строка (администратор)».
- В Windows 10 начните набирать «Командная строка» в поиске на панели задач, а когда нужный результат будет найден, нажмите по нему правой кнопкой мыши и выберите запуск от имени администратора.
В командной строке введите следующие команды по порядку (все данные будут удалены):
- diskpart
- list disk
- select disk N (где N — число, соответствующее номеру вашей флешки, будет показано после выполнения предыдущей команды)
- attributes disk clear readonly
- clean
- create partition primary
- format fs=fat32 (или format fs=ntfs, если требуется форматировать в NTFS)
- assign letter=Z (где Z — буква, которую нужно присвоить флешке)
- exit
После этого, закройте командную строку: флешка будет отформатирована в нужной файловой системе и впредь будет форматироваться без проблем.
Если же это не помогло, то пробуем следующий вариант.
Убираем защиту флешки от записи в редакторе локальной групповой политики Windows
Возможен вариант, что флешка защищена от записи несколько иным образом и по этой причине не форматируется. Стоит попробовать воспользоваться редактором локальной групповой политики. Для того, чтобы запустить его, в любой версии операционной системы нажмите клавиши Win+R и введите gpedit.msc после чего нажмите Ок или Enter.

В редакторе локальной групповой политики откройте ветку «Конфигурация компьютера» — «Административные шаблоны» — «Система» — «Доступ к съемным запоминающим устройствам».
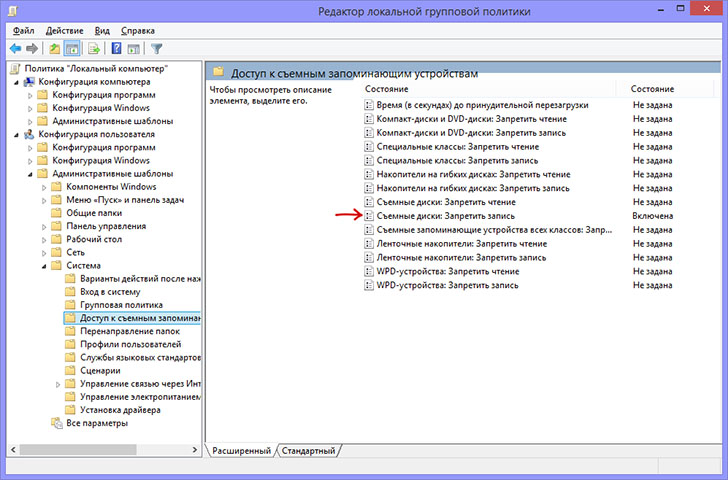
После этого, обратите внимание на пункт «Съемные диски: запретить запись». Если для этого свойства установлено «Включено», то кликните дважды по нему и установите «Отключено», после чего нажмите кнопку «Ок». Затем посмотрите на значение этого же параметра, но уже в разделе «Конфигурация пользователя» — «Административные шаблоны» — и так далее, как в предыдущем варианте. Сделайте необходимые изменения.
После этого можно снова отформатировать флешку, скорее всего, Windows не напишет, что диск защищен от записи. Напомню, возможен вариант, что ваш USB накопитель неисправен.
Как снять защиту от записи с флешки — инструкция! Ошибка «диск защищен от записи» или «флешка защищена от записи» как правило случается в самый неподходящий момент. Если вы начали читать эту статью, стало быть, оказались одним из тех «везунчиков», которые в один прекрасный момент решили что-то скинуть на свою флешку, а в итоге получили сообщение системы, что записывать данные на диск нельзя и теперь эту самую защиту необходимо снять. У человека, который столкнулся с подобным впервые резонно появляется полное недоумение. Попробуем выяснить причины, по которым не удаётся записать файлы на флешку и разобраться в методах устранения этой проблемы.
Содержание:

Причины ошибки «Диск защищен от записи. Снимите защиту или воспользуйтесь другим диском».
 Вполне логично, что такая проблема возникает, если операционная система опрашивает диск, но права записи не получает. При этом нет возможности именно записывать файлы, хотя одновременно с этим считываться данные могут совершенно без проблем. Причины такого поведения бывают разные, но явно делятся на две группы:
- Программный сбой.
- Аппаратный сбой.
Важно понимать, что оба типа неполадок могут случиться как на флешке, так и на вашем компьютере.
Типы защиты от записи
По аналогии с причинами ошибки «носитель защищен от записи» можно разделить и методы защиты от записи. Классическим примером аппаратной защиты может выступать наличие специального переключателя (на корпусе флешки), включающим и отключающим возможность записи на флешку.
Программная защита представляет собой разного рода программные комплексы, предназначенные для недопущения несанкционированного использования накопителя.
Механическое снятие защиты от записи с флешки
Решая вопрос как снять защиту, если «Диск защищен от записи», первым делом проверьте нет ли на корпусе специального небольшого переключателя. Он всегда присутствует на карточках формата SD, несколько реже встречается на обычных USB-накопителях. Нередки случайные переключения, когда флешка носится в кармане.
Также обязательно проверьте работоспособность флешки в других USB-портах, а ещё лучше, на другом компьютере. Если вы владелец настольного компьютера с системным блоком, предпочтительно проверять флешку, подключаясь к портам на задней стенке системного блока. Проблема может крыться плохом контакте, некачественных проводах, сбоях контроллера USB.
Программное снятие защиты от записи
Убедившись в отсутствии механической проблемы защиты, приступаем к проверке программного обеспечения.
Стандартно флешка форматируется с использованием файловой системы FAT32. Малое количество пользователей знают об ограничении в этой файловой системе на максимальный размер файла в 4Gb. Получается двоякая ситуация, формально разрешение на запись есть, но сообщение о невозможности выполнения таковой появляется. Имея необходимость переносить файлы большого размера, отформатируйте накопитель, используя NTFS – систему, где таких ограничений нет. Для этого откройте «Мой компьютер», нажмите правой кнопкой мышки на вашем съёмном диске и выберите «Форматировать». В появившемся окне, в строке «Файловая система» выберите NTFS, нажмите «Начать».
Важно! Перед извлечением флешки из разъёма всегда лучше пользоваться «безопасным извлечением». В силу некоторых особенностей, касательно флешек отформатированных в NTFS, это должно быть обязательным правилом.
Блокирование может быть установлено в реестре Windows. Сочетание клавиш Windows+R, вызовет окно «Выполнить», введите regeditи кликните OK.
В окне редактора нужно перейти в секцию HKEY_LOCAL_MACHINE SYSTEM CurrentControlSet Control StorageDevicePolicies, где справа увидите параметр WriteProtect. Двойным кликом по параметру вызовите диалог изменения параметра, установитезначение 0. Раздел StorageDevicePolicies может отсутствовать и придётся его создать. Для создания правой кнопкой мышки кликнитепредыдущий раздел Control, выбирайте «Создать > раздел», название должно быть StorageDevicePolicies. В пустой области правой части окна только что созданного раздела вновь нажмите правой кнопкой мышки, выделите в меню «Создать > Параметр DWORD», битность выберите 64 или 32, в зависимости от разрядности вашей системы. Назовите параметр WriteProtect и присвойте значение 0, как описано выше. Обязательно перезагрузитесь и проверяйте результат.
Удостоверьтесь в том, что запись на съёмные устройства не запрещена групповой политикой. Аналогично с запуском редактора реестра выполните gpedit.msc, что вызовет «Редактор локальной групповой политики». Пройдите по веткам «Конфигурация компьютера — Административные шаблоны — Система — Доступ к съёмным запоминающим устройствам». Справа проверьте параметр «Съёмные диски: Запретить запись». Он должен быть отключен или не задан. Если параметр включен, дважды кликните по нему, выберите «Отключить» и примените выбор. Перед проверкой не забудьте перезагрузиться.
Проверьте систему хорошим антивирусом со свежими базами. Есть некоторое количество вредоносных программ, блокирующих возможность нормальной работы с подключенными переносными устройствами хранения информации.
Снимаем защиту от записи в total commander
Значительное количество пользователей Windows отдают предпочтение файловому менеджеру Total Commander, предлагающему обширные функции и удобство работы. Важно понимать, что Total Commander по своей сути просто удобная надстройка над Windows, соответственно к нему применимо всё описанное в статье. Однако есть нюансы. Попробуйте скопировать ваши файлы в проводнике Wındows, если с копированием в проводнике проблем нет, в Total Commander откройте «Конфигурация > Настройка: Операции с файлами» и выберите «Автоматический выбор способа копирования». Авторы некоторых сборок этого менеджера выставляют настройки, вызывающие подобные сбои.
Убираем защиту от записи в коммандной строке (cmd)
Как снять защиту с флешки, защищённой от записи, воспользовавшись командной строкой. Способ чуть более сложный. Найдите в меню «Пуск» приложение «Командная строка» и запустите её с правами администратора. Далее последовательно вводите указанные ниже команды, подтверждая ввод каждой нажатием Enter.
Внимание! Всё содержимое флешки будет удалено безвозвратно!
- Diskpart – запускает утилиту управления дисками;
- list disk – отобразит все диски, подключённые к системе, необходимо определить, какой из них является вашей флешкой, для чего можете ориентироваться по размеру диска;
- select disk X – нацеливает программу на диск, вместо X укажите номер нужного диска;
- detail disk – покажет подробную информацию о выбранном диске, чтобы убедиться в правильности выбора;
- attributes disk clear readonly – обнуляет атрибут «только чтение»;
- clean – все тома и разделы на диске будут удалены;
- create partition primary – заново создаёт основной раздел;
- formatfs=fat32 – форматирует раздел, используя файловую систему FAT32 (можно выбрать файловую систему NTFS командойfs=ntfs);
- exit – завершает работу программы.
Смотри наши инструкции по настройке девасов в ютуб!
Программы для снятия защит от записи
Производители флешек заботятся о решении разного рода проблем, возникающих с их продукцией, выпуская фирменные утилиты для восстановления проблемных устройств. Не забудьте, что запускать любую из подобных утилит необходимо с правами администратора. Эти полезные программки можно свободно скачать на соответствующих сайтах фирм-изготовителей. У Transcend она называется JetFlash Recovery, у Silicon Power – USB Flash Drive Recovery, у Adata – USB Flash Drive Online Recovery, у Kingston – Kingston Format Utility. Их использование довольно простое и не вызывает сложностей даже у новичков.
Ниже перечисленные программы рассчитаны на продвинутого пользователя и перед началом использования следует ознакомиться с документацией. Независимые разработчики выпускают собственные универсальные программы, не привязанные к какому-либо вендору, но обладающие схожим функционалом.
Популярные представители: HP USB Disk Storage Format Tool, D-Soft Flash Doctor, AlcorMP.
Последняя работает только с накопителями на одноимённом контроллере, но у всех задача одна – помочь восстановить проблемное устройство. Столкнувшись с поиском решения того, как снять защиту с флешки, в качестве последней меры, следует попытаться перепрошить её. Полную информацию о типе контроллера, используемой памяти и даже дате производства расскажет Flash Drive Information Extractor. После извлечения нужных данных остаётся найти нужную микропрограмму и прошивальщик, что для Google или Yandex, как правило, не представляет сложности.
Итог
Мы надеемся, что описанные способы помогли вам восстановить работоспособность флешки и ситуация, когда флешка пишет «диск защищен от записи» больше не повторится. Если вы всё же не добились результата, придётся озаботиться выбором новой флешки поскольку она действительно не подлежит ремонту.
![]()
Download Article
![]()
Download Article
If your pen drive is write-protected, you may not have the ability to modify files or format the drive. There are a few things you can do to remove write protection from a USB drive. However, it’s also possible the drive may be failing or locked with security software making it impossible to write to. This wikiHow teaches you how to remove write protection from your USB pen drive on a Windows or macOS computer.
-

1
Toggle the switch on the USB drive. If your USB drive has a physical write-protection switch on its exterior, it might be in the wrong (locked) position. Try toggling the switch before you continue with this method.
- In some instances, a pen drive can be locked using security software that prevents permission changes on a flash drive. If this is the case, you may not be able to remove write protection from the USB drive. You will need to use the program that was used to apply the write-protection to remove it.[1]
- In some instances, a pen drive can be locked using security software that prevents permission changes on a flash drive. If this is the case, you may not be able to remove write protection from the USB drive. You will need to use the program that was used to apply the write-protection to remove it.[1]
-
2
Insert the pen drive into an open USB slot. You can use any available USB slot on your PC.
Advertisement
-
3
Right-click the Start
menu. It’s usually at the bottom-left corner of the screen. This displays a menu.
-
4
Click Run. It’s at the bottom of the menu that appears when you right-click the Windows Start menu. This opens Run in a new window.
-
5
Type diskpart into Run and press ↵ Enter. This opens Diskpart in the Command Prompt.
-
6
Type list disk and press ↵ Enter. A list of all drives, including your pen drive, will appear. Each drive is labeled «Disk (number)», and each number is unique to that drive.
- You should be able to identify your USB drive by how much space it has listed under «Size». For example, if your USB drive is a 32 GB drive, it should say «32 GB» or close to that below «Size» in the Command Prompt.
-
7
Type select disk # and press ↵ Enter. Replace # with the number of your pen drive (i.e. «select disk 3»). This selects the USB drive in Diskpart.
-
8
Type attributes disk clear readonly and press ↵ Enter. This should remove write-protected status from the drive.
-
9
Type clean and press ↵ Enter. This should remove the data from the drive. Once it’s removed, you’ll be able to set it up for use.
-
10
Type create partition primary and press ↵ Enter. This creates a partition on the USB drive.
-
11
Type format fs=ntfs, format fs=fat32 or format fs=exFAT and press ↵ Enter. .This selects the file system you want the USB drive to use.[2]
- Type «format fs=ntfs» if you want the drive to be readable only by a Windows computer.
- Type «format fs=fat32». If the drive is less than 32GB, and you want it to be compatible with the largest number of devices.
- Type «format fs=exFAT» if the drive is greater than 32GB, and you want it to be compatible with the largest number of devices.
-
12
Type exit and press ↵ Enter. This returns you to the standard command prompt. The drive should now be available for data storage and other uses.[3]


Advertisement
-
1
Download CleanGenius. CleanGenius is a free program you can download for Windows. It has lots of tools to help optimize your system, but it also has a feature that can remove write-protection on a USB drive. Click the following link to download CleanGenius:
- https://down.easeus.com/product/win_cleangenius_trial
-
2
Install CleanGenius. Clicking the link downloads an executable file. By default, you can find the downloaded file in your Downloads folder or in your web browser. Click the «win_cleangenius_trial.exe» file to open it. Follow the instructions to complete the installation.
-
3
Insert the USB drive. Insert the USB drive with write protection into a free USB port on your computer.
- If the USB drive has a write-protection switch on it, ensure the switch is disabled.
-
4
Open CleanGenius. It has a blue icon with a «C» that has a star in the middle of it. Click the icon in the Windows Start menu to open CleanGenius.
-
5
Click Optimization. It’s the third option in the menu bar to the left. It has an icon that resembles three slider bars.
-
6
Click Write Protection. It’s the third option in the top row. It has an icon that resembles a shield with a green checkmark in the box.
-
7
Ensure the correct USB drive is selected. Use the drop-down menu below «Choose drive» to select the correct USB drive and drive letter.
-
8
Click Disable. It’s the blue button in the upper-right corner. This disables write-protection on your USB drive.
- If the write-protection was applied using a different program, you may need to use that program to disable write-protection. It may not be possible to disable is using another program.


Advertisement
-
1
Toggle the switch on the USB drive. If your USB drive has a physical write-protection switch on its exterior, it might be in the wrong (locked) position. Try toggling the switch before you continue with this method.
-
2
Open the Windows Registry Editor on your PC. Warning: Making incorrect changes to the system registry can cause damages to your operating system. This is only recommended for advanced users. Do not make any changes unless you know what you are doing. Use the following steps to open the Registry Editor:
- Press ⊞ Win+S to open the search bar.
- Type regedit into the search field.
- Click Registry Editor in the search results.
- Click Yes to run the app.
-
3
Go to the Control folder. Use the following steps to navigate to the Control folder in the system registry. You should see several more folders inside the Control folder.
- Click the HKEY_LOCAL_MACHINE folder.
- Click the SYSTEM folder.
- Click the CurrentControlSet folder.
- Click the Control folder.
-
4
Click the StorageDevicePolicies folder (if it exists). If you see this folder in the left panel (under the «Control» folder), double-click it to display its contents in the right panel. If you don’t see this folder, perform the following steps to create it:[4]
- Right-click a blank area of the right panel to open the context menu.
- Select New and then Key on the menu.
- Type StorageDevicePolicies and then click the blank area to save the new key.
- Click StorageDevicePolicies in the left panel to open it.
- Right-click a blank area in the right panel and select New > DWORD.
- Type WriteProtect and then click anywhere to save the DWORD.
-
5
Double-click WriteProtect in the right column. A dialog window will appear.
-
6
Enter «0» as the «Value Data» amount and click OK. Enter the numerical zero without the quotes.
-
7
Close Registry Editor and restart your PC. Changes you make in the Registry Editor usually require a restart to take effect.


Advertisement
-
1
Download AOMEI Partition Manager. AOMEI Partition Manager Standard Edition is a freeware program for Windows that you can use to format a USB drive. In some cases, it may be able to format a write-protected USB drive. Use the following steps to download and install AOMEI Partition Manager:
- Go to https://www.diskpart.com/download-home.html in a web browser.
- Click the green button that says Download Freeware.
- Click the PAssist_Std.exe file in your Downloads folder or web browser.
- Follow the instruction to install the program.
-
2
Insert the USB drive. Insert the USB drive with write-protection into a free USB slot on your computer.
- If the USB drive has a write-protection switch on it, make sure it is disabled.
-
3
Open AOMEI Partition Manager. It has an icon that resembles a blue, red, and green pie chart with a green checkmark in the middle.
-
4
Right-click your USB drive. It should be the bar listed at the bottom of the list of drives on your computer. It contains the drive name and the amount of storage space the drive holds. Right-click it to display a drop-down menu.
- Be careful not to click one of the other drives on your computer. Check the drive name and the amount of space to make sure you are selecting the right drive.
- Ensure you have backed up any data on the drive you want to keep.
-
5
Click Format Partition. This displays a dialogue box you can use to format your USB drive.
-
6
Enter the drive name. Enter the new name for the drive next to «Partition Label.» This is the name that will be given to the drive after it is formatted.
-
7
Select the file system. Use the drop-down menu next to «File system» to select how you want to format the drive. You should select one of the following options:
- NTFS is a file system that is only compatible with Windows. NTFS drives are not compatible with other devices.
- FAT32 is a universal file system that works with most devices. Select this if your drive is less than 32 GB.
- exFAT is a newer version of «FAT32» that works with a wide variety of devices, but may not work on some older devices. Select this option if your USB drive is greater than 32 GB.
-
8
Click Ok. It’s the blue button in the dialogue box. This saves your changes.
-
9
Click Apply. It’s the icon with the checkmark in the upper-left corner. This displays a preview dialogue box that lists the changes that will be made to your USB drive.
-
10
Click Proceed and then click Yes. It’s the blue button in the lower-left corner of the dialogue box. Then click Yes in the confirmation box. This formats your USB drive with the settings you selected.
- In some cases, AOMEI will format the drive without removing write-protection. If still get an error message that the USB drive is write-protected when you try to use it, you will need to use one of the other methods to remove write-protection. If the write-protection was applied using specific software, you may need to use that program to remove the write-protection.


Advertisement
-
1
Insert the USB drive. Insert the USB drive with write-protection into a free USB slot on your computer.
- If the USB drive has a write-protection switch on it, make sure it is disabled.
-
2
Right-click the Windows Start menu
. It’s the icon with the Windows Start menu in the lower-left corner. Right-clicking it displays an alternate system menu that is different from the usual Start menu.
-
3
Click Disk Managament. This opens the Disk Management wizard. It should display a list of all your connected drives.
-
4
Right-click your USB drive. It should be listed below «Volume:» in the list at the top. Check the drive letter and the amount of storage size the drive has to make sure you select the right drive.
-
5
Click Format and click Yes. It’s in the menu that appears when you right-click a drive. Then click Yes in the pop-up window to acknowledge that this will erase all data on the drive.
- Ensure you have backed up any data on the drive you want to keep.
-
6
Enter a new name for the drive. This is the name that the drive will be given after it is formatted. Enter it in the space next to «Volume Label:»
-
7
Select the file system. Use the drop-down menu next to «File System» to select the file system you want the drive to use. You can select «exFAT», «FAT32», or «NTFS».
- NTFS is a file system that is only compatible with Windows. NTFS drives are not compatible with other devices.
- FAT32 is a universal file system that works with most devices. Select this if your drive is less than 32 GB.
- exFAT is a newer version of «FAT32» that works with a wide variety of devices, but may not work on some older devices. Select this option if your USB drive is greater than 32 GB.
-
8
Click Ok twice. Clicking «OK» in the dialogue box displays a warning that this will erase all data on the drive. Clicking «OK» again will proceed to format the drive.


Advertisement
-
1
Toggle the switch on the USB drive. If your USB drive has a physical write-protection switch on its exterior, it might be in the wrong (locked) position. Try toggling the switch before you continue with this method.
-
2
Insert the write-protected pen drive into a USB slot on your Mac.
-
3
Open Finder
. It’s the first icon on the Dock, which is usually at the bottom of the screen.
-
4
Click the Applications folder. It should be in the left panel. Some icons will appear in the right panel.
-
5
Double-click the Utilities folder. It’s in the right panel.
-
6
Double-click Disk Utility. It’s the hard drive icon with a stethoscope in the right panel. This opens a tool you can use to format drives.
-
7
Select your pen drive in the left panel. Some info about the drive will appear in the right panel.
-
8
Click the Erase tab in the right panel. It’s near the top of the panel.[5]
-
9
Enter a name for the drive (optional). You can keep the default name if you wish.
-
10
Select a file system type from the «Format» menu. If you want your pen drive to be compatible with both PCs and Mac, select MS-DOS (FAT) (pen drives under 32GB) or ExFAT (drives over 32GB). Otherwise, choose your desired Mac filesystem type.
-
11
Click the Erase button. It’s at the bottom-right corner of the active window. Your Mac will reformat the write-protected pen drive and change the sharing and permissions status to “read and write».[6]
- If this process does not make your drive usable, the issue is likely mechanical and you should replace the pen drive.


Advertisement
Ask a Question
200 characters left
Include your email address to get a message when this question is answered.
Submit
Advertisement
-
If you’re trying to access or use a write-protected pen drive using a Mac, consider trying the pen drive in a Windows computer prior to formatting the drive. In some cases, your pen drive could show up as “read-only” on a Mac due to issues with file-type compatibility between Apple and Windows.
Thanks for submitting a tip for review!
Advertisement
-
If your pen drive is corrupt or physically damaged, the steps in this article may not be effective at formatting a write-protected pen drive. If you are still unable to format your pen drive after following these steps, consider purchasing a new pen drive.
Advertisement
About This Article
Article SummaryX
1. Toggle the write-protection switch on the USB drive to off and insert it into a Windows computer.
2. Right-click on the Windows Start button.
3. Click Run.
4. Type «diskpart» in Run and press Enter.
5. Type «list disk» and press Enter to see a list of drives.
6. Type «select disk #» and press Enter.
7. Type «attributes disk clear readonly» and press Enter.
8. Type «clean» and press Enter.
9. Type «create partition primary» and press Enter.
10. Type «format fs=fat32» (if less than 32 GB) or «format fs=ntfs» (if greater than 32 GB) and press Enter.
11. Type «exit» and press Enter.
Did this summary help you?
Thanks to all authors for creating a page that has been read 382,103 times.
Is this article up to date?
![]()
Download Article
![]()
Download Article
If your pen drive is write-protected, you may not have the ability to modify files or format the drive. There are a few things you can do to remove write protection from a USB drive. However, it’s also possible the drive may be failing or locked with security software making it impossible to write to. This wikiHow teaches you how to remove write protection from your USB pen drive on a Windows or macOS computer.
-
1
Toggle the switch on the USB drive. If your USB drive has a physical write-protection switch on its exterior, it might be in the wrong (locked) position. Try toggling the switch before you continue with this method.
- In some instances, a pen drive can be locked using security software that prevents permission changes on a flash drive. If this is the case, you may not be able to remove write protection from the USB drive. You will need to use the program that was used to apply the write-protection to remove it.[1]
- In some instances, a pen drive can be locked using security software that prevents permission changes on a flash drive. If this is the case, you may not be able to remove write protection from the USB drive. You will need to use the program that was used to apply the write-protection to remove it.[1]
-
2
Insert the pen drive into an open USB slot. You can use any available USB slot on your PC.
Advertisement
-
3
Right-click the Start
menu. It’s usually at the bottom-left corner of the screen. This displays a menu.
-
4
Click Run. It’s at the bottom of the menu that appears when you right-click the Windows Start menu. This opens Run in a new window.
-
5
Type diskpart into Run and press ↵ Enter. This opens Diskpart in the Command Prompt.
-
6
Type list disk and press ↵ Enter. A list of all drives, including your pen drive, will appear. Each drive is labeled «Disk (number)», and each number is unique to that drive.
- You should be able to identify your USB drive by how much space it has listed under «Size». For example, if your USB drive is a 32 GB drive, it should say «32 GB» or close to that below «Size» in the Command Prompt.
-
7
Type select disk # and press ↵ Enter. Replace # with the number of your pen drive (i.e. «select disk 3»). This selects the USB drive in Diskpart.
-
8
Type attributes disk clear readonly and press ↵ Enter. This should remove write-protected status from the drive.
-
9
Type clean and press ↵ Enter. This should remove the data from the drive. Once it’s removed, you’ll be able to set it up for use.
-
10
Type create partition primary and press ↵ Enter. This creates a partition on the USB drive.
-
11
Type format fs=ntfs, format fs=fat32 or format fs=exFAT and press ↵ Enter. .This selects the file system you want the USB drive to use.[2]
- Type «format fs=ntfs» if you want the drive to be readable only by a Windows computer.
- Type «format fs=fat32». If the drive is less than 32GB, and you want it to be compatible with the largest number of devices.
- Type «format fs=exFAT» if the drive is greater than 32GB, and you want it to be compatible with the largest number of devices.
-
12
Type exit and press ↵ Enter. This returns you to the standard command prompt. The drive should now be available for data storage and other uses.[3]
Advertisement
-
1
Download CleanGenius. CleanGenius is a free program you can download for Windows. It has lots of tools to help optimize your system, but it also has a feature that can remove write-protection on a USB drive. Click the following link to download CleanGenius:
- https://down.easeus.com/product/win_cleangenius_trial
-
2
Install CleanGenius. Clicking the link downloads an executable file. By default, you can find the downloaded file in your Downloads folder or in your web browser. Click the «win_cleangenius_trial.exe» file to open it. Follow the instructions to complete the installation.
-
3
Insert the USB drive. Insert the USB drive with write protection into a free USB port on your computer.
- If the USB drive has a write-protection switch on it, ensure the switch is disabled.
-
4
Open CleanGenius. It has a blue icon with a «C» that has a star in the middle of it. Click the icon in the Windows Start menu to open CleanGenius.
-
5
Click Optimization. It’s the third option in the menu bar to the left. It has an icon that resembles three slider bars.
-
6
Click Write Protection. It’s the third option in the top row. It has an icon that resembles a shield with a green checkmark in the box.
-
7
Ensure the correct USB drive is selected. Use the drop-down menu below «Choose drive» to select the correct USB drive and drive letter.
-
8
Click Disable. It’s the blue button in the upper-right corner. This disables write-protection on your USB drive.
- If the write-protection was applied using a different program, you may need to use that program to disable write-protection. It may not be possible to disable is using another program.
Advertisement
-
1
Toggle the switch on the USB drive. If your USB drive has a physical write-protection switch on its exterior, it might be in the wrong (locked) position. Try toggling the switch before you continue with this method.
-
2
Open the Windows Registry Editor on your PC. Warning: Making incorrect changes to the system registry can cause damages to your operating system. This is only recommended for advanced users. Do not make any changes unless you know what you are doing. Use the following steps to open the Registry Editor:
- Press ⊞ Win+S to open the search bar.
- Type regedit into the search field.
- Click Registry Editor in the search results.
- Click Yes to run the app.
-
3
Go to the Control folder. Use the following steps to navigate to the Control folder in the system registry. You should see several more folders inside the Control folder.
- Click the HKEY_LOCAL_MACHINE folder.
- Click the SYSTEM folder.
- Click the CurrentControlSet folder.
- Click the Control folder.
-
4
Click the StorageDevicePolicies folder (if it exists). If you see this folder in the left panel (under the «Control» folder), double-click it to display its contents in the right panel. If you don’t see this folder, perform the following steps to create it:[4]
- Right-click a blank area of the right panel to open the context menu.
- Select New and then Key on the menu.
- Type StorageDevicePolicies and then click the blank area to save the new key.
- Click StorageDevicePolicies in the left panel to open it.
- Right-click a blank area in the right panel and select New > DWORD.
- Type WriteProtect and then click anywhere to save the DWORD.
-
5
Double-click WriteProtect in the right column. A dialog window will appear.
-
6
Enter «0» as the «Value Data» amount and click OK. Enter the numerical zero without the quotes.
-
7
Close Registry Editor and restart your PC. Changes you make in the Registry Editor usually require a restart to take effect.
Advertisement
-
1
Download AOMEI Partition Manager. AOMEI Partition Manager Standard Edition is a freeware program for Windows that you can use to format a USB drive. In some cases, it may be able to format a write-protected USB drive. Use the following steps to download and install AOMEI Partition Manager:
- Go to https://www.diskpart.com/download-home.html in a web browser.
- Click the green button that says Download Freeware.
- Click the PAssist_Std.exe file in your Downloads folder or web browser.
- Follow the instruction to install the program.
-
2
Insert the USB drive. Insert the USB drive with write-protection into a free USB slot on your computer.
- If the USB drive has a write-protection switch on it, make sure it is disabled.
-
3
Open AOMEI Partition Manager. It has an icon that resembles a blue, red, and green pie chart with a green checkmark in the middle.
-
4
Right-click your USB drive. It should be the bar listed at the bottom of the list of drives on your computer. It contains the drive name and the amount of storage space the drive holds. Right-click it to display a drop-down menu.
- Be careful not to click one of the other drives on your computer. Check the drive name and the amount of space to make sure you are selecting the right drive.
- Ensure you have backed up any data on the drive you want to keep.
-
5
Click Format Partition. This displays a dialogue box you can use to format your USB drive.
-
6
Enter the drive name. Enter the new name for the drive next to «Partition Label.» This is the name that will be given to the drive after it is formatted.
-
7
Select the file system. Use the drop-down menu next to «File system» to select how you want to format the drive. You should select one of the following options:
- NTFS is a file system that is only compatible with Windows. NTFS drives are not compatible with other devices.
- FAT32 is a universal file system that works with most devices. Select this if your drive is less than 32 GB.
- exFAT is a newer version of «FAT32» that works with a wide variety of devices, but may not work on some older devices. Select this option if your USB drive is greater than 32 GB.
-
8
Click Ok. It’s the blue button in the dialogue box. This saves your changes.
-
9
Click Apply. It’s the icon with the checkmark in the upper-left corner. This displays a preview dialogue box that lists the changes that will be made to your USB drive.
-
10
Click Proceed and then click Yes. It’s the blue button in the lower-left corner of the dialogue box. Then click Yes in the confirmation box. This formats your USB drive with the settings you selected.
- In some cases, AOMEI will format the drive without removing write-protection. If still get an error message that the USB drive is write-protected when you try to use it, you will need to use one of the other methods to remove write-protection. If the write-protection was applied using specific software, you may need to use that program to remove the write-protection.
Advertisement
-
1
Insert the USB drive. Insert the USB drive with write-protection into a free USB slot on your computer.
- If the USB drive has a write-protection switch on it, make sure it is disabled.
-
2
Right-click the Windows Start menu
. It’s the icon with the Windows Start menu in the lower-left corner. Right-clicking it displays an alternate system menu that is different from the usual Start menu.
-
3
Click Disk Managament. This opens the Disk Management wizard. It should display a list of all your connected drives.
-
4
Right-click your USB drive. It should be listed below «Volume:» in the list at the top. Check the drive letter and the amount of storage size the drive has to make sure you select the right drive.
-
5
Click Format and click Yes. It’s in the menu that appears when you right-click a drive. Then click Yes in the pop-up window to acknowledge that this will erase all data on the drive.
- Ensure you have backed up any data on the drive you want to keep.
-
6
Enter a new name for the drive. This is the name that the drive will be given after it is formatted. Enter it in the space next to «Volume Label:»
-
7
Select the file system. Use the drop-down menu next to «File System» to select the file system you want the drive to use. You can select «exFAT», «FAT32», or «NTFS».
- NTFS is a file system that is only compatible with Windows. NTFS drives are not compatible with other devices.
- FAT32 is a universal file system that works with most devices. Select this if your drive is less than 32 GB.
- exFAT is a newer version of «FAT32» that works with a wide variety of devices, but may not work on some older devices. Select this option if your USB drive is greater than 32 GB.
-
8
Click Ok twice. Clicking «OK» in the dialogue box displays a warning that this will erase all data on the drive. Clicking «OK» again will proceed to format the drive.
Advertisement
-
1
Toggle the switch on the USB drive. If your USB drive has a physical write-protection switch on its exterior, it might be in the wrong (locked) position. Try toggling the switch before you continue with this method.
-
2
Insert the write-protected pen drive into a USB slot on your Mac.
-
3
Open Finder
. It’s the first icon on the Dock, which is usually at the bottom of the screen.
-
4
Click the Applications folder. It should be in the left panel. Some icons will appear in the right panel.
-
5
Double-click the Utilities folder. It’s in the right panel.
-
6
Double-click Disk Utility. It’s the hard drive icon with a stethoscope in the right panel. This opens a tool you can use to format drives.
-
7
Select your pen drive in the left panel. Some info about the drive will appear in the right panel.
-
8
Click the Erase tab in the right panel. It’s near the top of the panel.[5]
-
9
Enter a name for the drive (optional). You can keep the default name if you wish.
-
10
Select a file system type from the «Format» menu. If you want your pen drive to be compatible with both PCs and Mac, select MS-DOS (FAT) (pen drives under 32GB) or ExFAT (drives over 32GB). Otherwise, choose your desired Mac filesystem type.
-
11
Click the Erase button. It’s at the bottom-right corner of the active window. Your Mac will reformat the write-protected pen drive and change the sharing and permissions status to “read and write».[6]
- If this process does not make your drive usable, the issue is likely mechanical and you should replace the pen drive.
Advertisement
Ask a Question
200 characters left
Include your email address to get a message when this question is answered.
Submit
Advertisement
-
If you’re trying to access or use a write-protected pen drive using a Mac, consider trying the pen drive in a Windows computer prior to formatting the drive. In some cases, your pen drive could show up as “read-only” on a Mac due to issues with file-type compatibility between Apple and Windows.
Thanks for submitting a tip for review!
Advertisement
-
If your pen drive is corrupt or physically damaged, the steps in this article may not be effective at formatting a write-protected pen drive. If you are still unable to format your pen drive after following these steps, consider purchasing a new pen drive.
Advertisement
About This Article
Article SummaryX
1. Toggle the write-protection switch on the USB drive to off and insert it into a Windows computer.
2. Right-click on the Windows Start button.
3. Click Run.
4. Type «diskpart» in Run and press Enter.
5. Type «list disk» and press Enter to see a list of drives.
6. Type «select disk #» and press Enter.
7. Type «attributes disk clear readonly» and press Enter.
8. Type «clean» and press Enter.
9. Type «create partition primary» and press Enter.
10. Type «format fs=fat32» (if less than 32 GB) or «format fs=ntfs» (if greater than 32 GB) and press Enter.
11. Type «exit» and press Enter.
Did this summary help you?
Thanks to all authors for creating a page that has been read 382,103 times.
Is this article up to date?
Вопрос, как отформатировать флешку, защищенную от записи, может стать актуальным для любого пользователя ПК. Для его решения существуют системные средства, внешние специализированные программы и рискованные приемы, используемые в последнюю очередь.
Почему появляется ошибка «Диск защищен от записи»?
Сообщение «Диск защищен от записи» выводится на экран в силу настроек Windows или из-за неисправности портативного запоминающего устройства.
Как отформатировать флешку, защищенную от записи?
Чтобы что-нибудь записать, флешку форматируют. Для этого снимают защиту от записи.
Используем средства системы
Для снятия защиты от записи перед форматированием возможно использовать средства, уже имеющиеся на компьютере. Нужно вызвать командную строку, появляющуюся на экране:
- с помощью клавиатуры;
- посредством меню «Пуск».
В любой версии Windows, консоль можно вызвать при помощи стандартной подпрограммы «Выполнить» или комбинации клавиш Win+R. После чего вводят в окне CMD.
В Windows 8.1 в меню Пуск находят пункт «Командная строка» или жмут Win+X.
В Windows 10 во внутреннем поисковике набирают «Командная строка».
Далее последовательно вводят команды, каждый раз завершая набор нажатием клавиши Enter:
- Diskpart.
- List disk.

- Находится N – номер флешки, в списке дисков, вызванном командой list disk. Для определения обращают внимание на объем известной памяти.
- Select disk N. Где N – номер накопителя.
- Attributes disk clear readonly.
- Clean.
- Create partition primary.
- Format fs=ntfs (или format fs=fat32 для FAT).
- Assign letter=Y (или другая буква для обозначения флешки).
- Exit.

Внешнее запоминающее устройство отформатировано и может быть в дальнейшем снова подвергнуто этой операции. Командную строку закрывают.
В случае, если проблема осталась, или хочется попробовать что-то другое, рекомендуется изучить эту статью.
HUDS Format Tool
Существуют программы, воссоздающие и форматирующие USB-накопители, не встроенные в OC Windows. HUDS Format Tool – одна из них. Инструкция по форматированию флешки защищенной от записи:
- Подсоединить флешку к компьютеру.
- Скачать и запустить утилиту.
- В списке найти тип установленной флешки.
- Выбрать вид файловой системы.
- Отметить функцию «Быстрое форматирование».
- Нажать кнопку начать.


HP USB Disk Storage Format Tool
Также флешку форматирует простейшая бесплатная программа для форматирования накопителей защищенных от записи — HP USB Disk Storage Format Tool. Исполняя последовательно ниже описанные шаги, запоминающее устройство форматируют за несколько минут.
- Скачать программу.
- Вставить в USB-разъем флешку.
- Выбрать в ставшей активной верхней строке соответствующую модель.
- Из списка файловых систем выбрать подходящую для компьютера.
- Нажать кнопку «Старт».
Современным компьютерам обычно соответствует файловая система NTFS. Если машина старая и не требуется запись файлов размером свыше 4 ГБ, можно отформатировать для FAT, FAT32, ExFAT. Разумнее всего посмотреть, как отформатированы диски компьютера. Сделать это можно при помощи поисковой строки в меню «Пуск», вводя поочередно наиболее вероятные форматы. В случае установленной Windows 10 варианты с FAT и FAT32 отпадают, с ними она не работает.
Быстрое форматирование (Quick Format) убирает заголовки уже записанных файлов, тем самым лишая их возможности быть считанными при запросе. Но файлы остаются целыми. Кластеры, в которых они находятся, помечаются используемыми. За счет этого такое форматирование в сотни раз быстрее полного, а старые файлы могут быть восстановлены до тех пор, пока на их место не запишется новая информация. Если на накопителе нет конфиденциальной информации, предпочтительнее назначать быстрое форматирование.
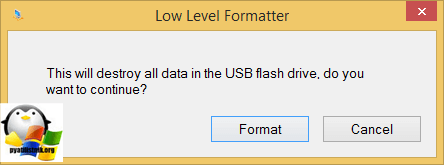
Silicon Power Low Level Formatter
Если снять защиту от записи и отформатировать накопитель не удалось ни при помощи системных средств, ни с применением специализированных программ от производителя флешки, обращаются к утилитам низкоуровневого форматирования. Каждый производитель устройств хранения информации, обычно выпускает подобную утилиту для своих продуктов. Бывают программы, способные заставить работать несколько разных флешек. Именно такой и является Silicon Power Low Level Formatter, разработанная для накопителей одноименного производителя с контроллером PS2251-03.
С ее помощью удавалось реанимировать устройства от SmartBuy, Kingston, Apacer, HyperX. Но риск велик даже для флешек Silicon Power. Дело в том, что такой тип форматирования может физически повредить накопитель.
При запуске Formatter Silicon Power может сообщить: «Device Not Found». Это будет означать, что в списке обнаруженных компьютером устройств нет хранилищ данных с поддерживаемым утилитой контроллером. Следовательно, ее запуск невозможен.
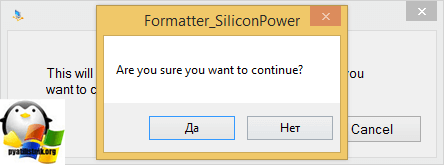
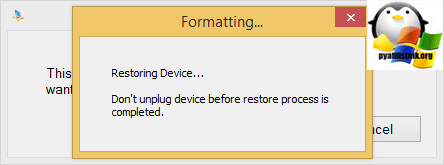
Если флешка может быть отформатирована, появляется предупреждение об уничтожении всей записанной на нее информации. Запрашивается разрешение на продолжение работы. Нажатием кнопки «Format» запускается процесс исправления неполадок.
После завершения форматирования следует флешку извлечь и вставить снова.