Драйвер видеокарты обычно устанавливается в фоновом режиме, однако встречаются ситуации, когда инсталляция не выполняется или завершается ошибкой, из-за чего графический адаптер начинает сбоить. Мы собрали наиболее распространённые причины неполадки и нашли для каждой несколько простых решений.
Сбой при установке
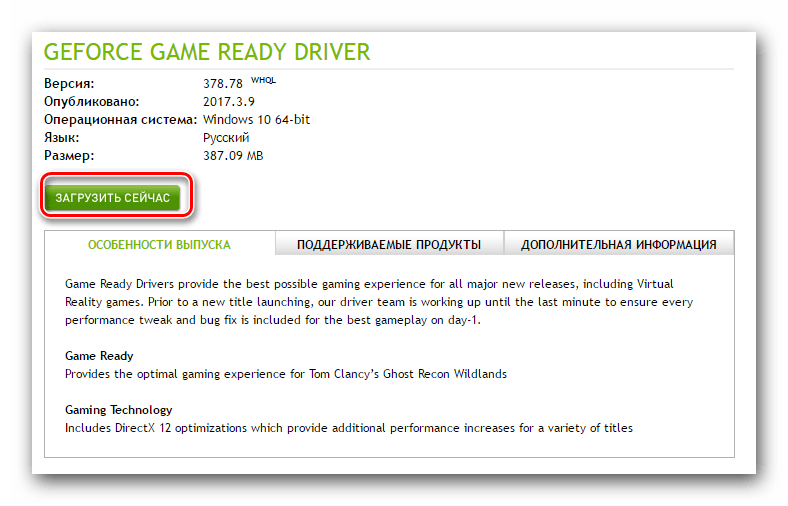
Самая распространённая ошибка при инсталляции драйвера видеокарты — сообщение с текстом «Сбой программы установки NVIDIA». Устранить её можно разными способами. Первый — использование драйверов, скачанных с официального сайта NVIDIA.
- Открываем сайт NVIDIA.
- Переходим на страницу «Драйверы».
- Заполняем форму поиска: тип продукта, серия, семейство, операционная система. Тип драйвера и тип загрузки можно оставить по умолчанию.
- Скачиваем подходящее ПО и устанавливаем его как обычную программу.

Форма на сайте NVIDIA помогает найти правильный драйвер для видеокарты

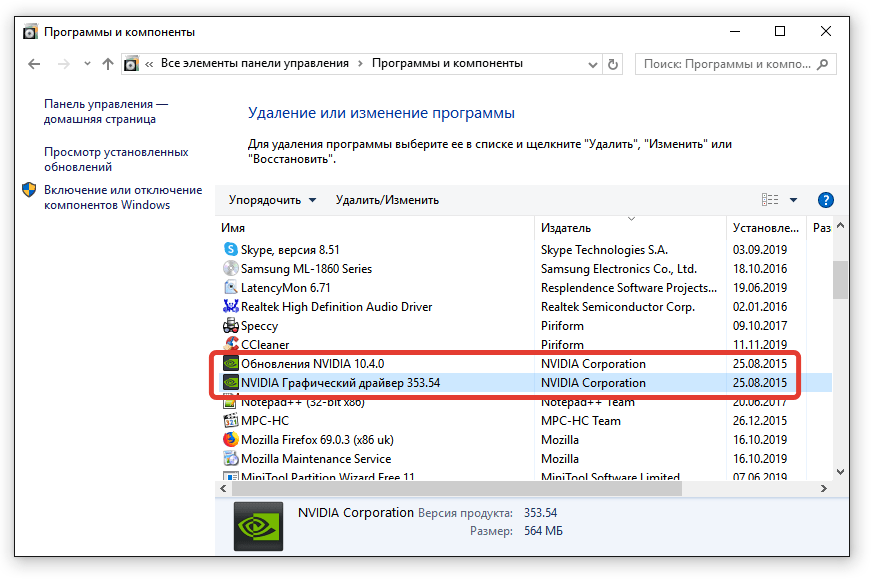
Мешать установке могут также предыдущие версии драйвера. В таком случае необходимо их удалить, прежде чем выполнять инсталляцию нового ПО.
- Открываем «Панель управления».
- Переходим в раздел «Программы и компоненты».
- Сортируем список по издателю и находим все продукты от NVIDIA.
- Удаляем их по очереди и перезагружаем компьютер.

Обычно установлены сами драйверы и утилита для обновления
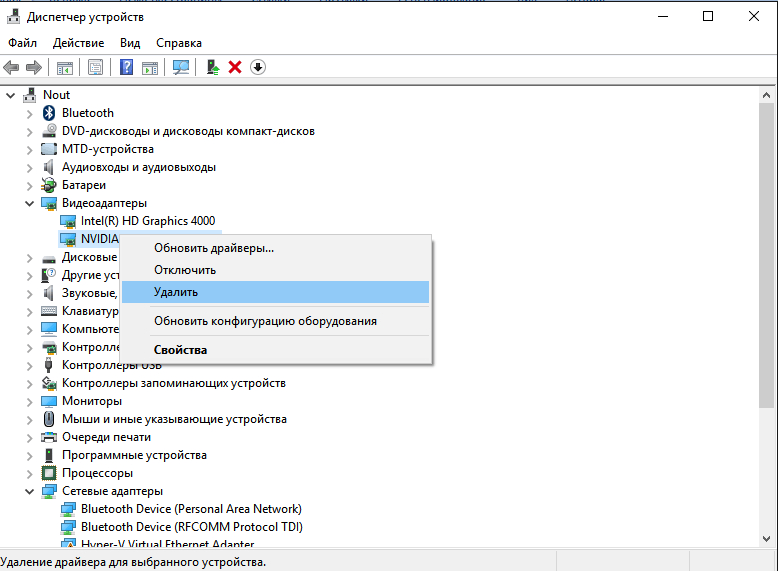
После перезагрузки приступаем к установке предварительно скачанного драйвера графического адаптера. Если снова появляется ошибка, то идём ещё дальше и полностью удаляем видеокарту из списка оборудования.
- Открываем «Диспетчер устройств». Найти его можно через встроенный поиск Windows.
- Раскрываем раздел «Видеоадаптеры».
- Кликаем правой кнопкой по графическому адаптеру NVIDIA и выбираем опцию «Удалить».

Удалим оборудование, чтобы систем забыла о его старой конфигурации
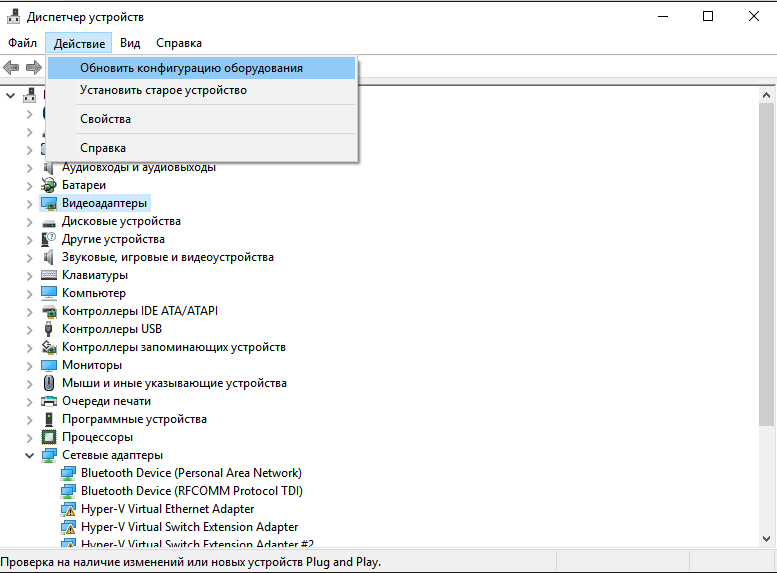
- Не закрывая «Диспетчер устройств», переходим в меню «Действие» и нажимаем «Обновить конфигурацию».

Попросим систему заново обнаружить подключенное устройство
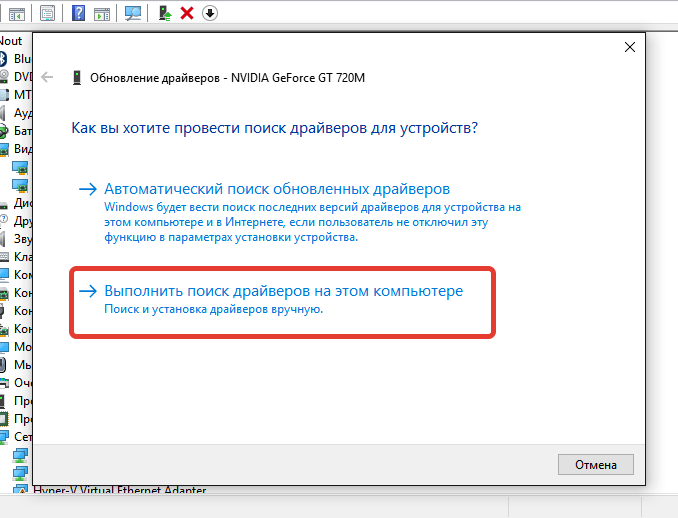
- В разделе «Видеоадаптер» снова появится графический адаптер NVIDIA. Кликаем по нему правой кнопкой и выбираем опцию «Обновить драйверы».
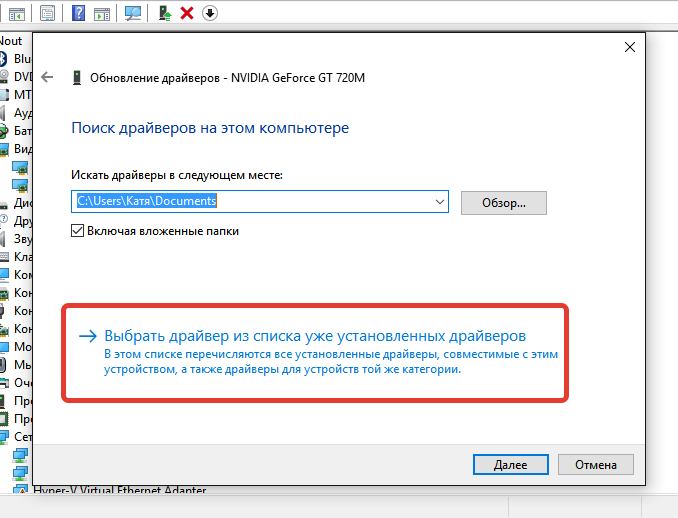
- В окне мастера обновления выбираем режим «Выполнить поиск драйверов на этом компьютере».

Установим драйвер в ручном режиме
- В следующем окне нажимаем «Выбрать драйвер из списка уже установленных».
Будем искать установщик на компьютере
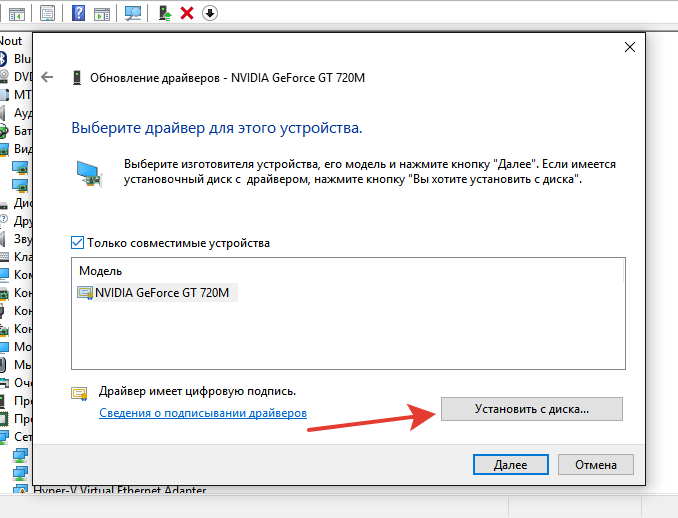
- Нажимаем «Установить с диска».
Дисков с драйверами давно нет, но название кнопки осталось прежним
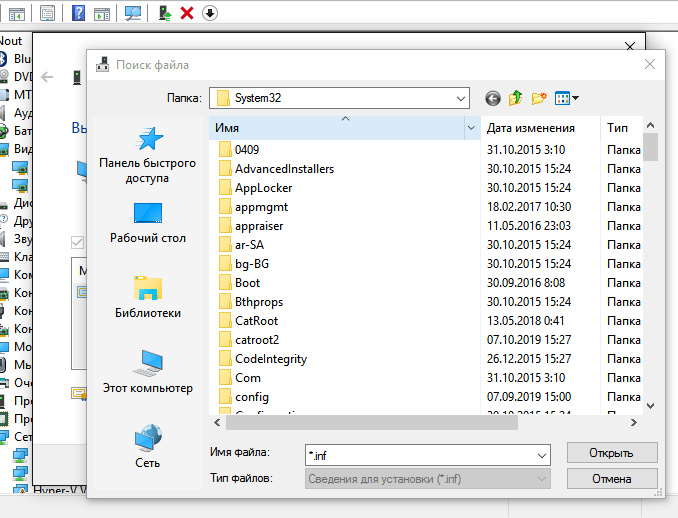
- Указываем путь к файлу драйвера, который предварительно был скачан с сайта NVIDIA.
Покажем мастеру установки, откуда брать файлы драйвера
- Выполняем инсталляцию.
При таком подходе никаких ошибок при установке драйвера NVIDIA быть не должно. Фактически мы устанавливаем его с нуля. Впрочем, могут быть и другие причины сбоя.
![]() Загрузка …
Загрузка …
Неверная разрядность ОС
При инсталляции драйвера может также появиться сообщение о том, что продолжить установку невозможно. Часто это связано с тем, что при выборе программного обеспечения видеокарты была выбрана неправильная разрядность системы. Из-за этого возникает конфликт, который можно разрешить только одним способом — скачать корректный драйвер.
Первым делом уточняем разрядность Windows. Находим значок «Компьютер». Кликаем по нему правой кнопкой и переходим в «Свойства». В окне со сведениями о системе находим строчку с типом. В ней указана разрядность.
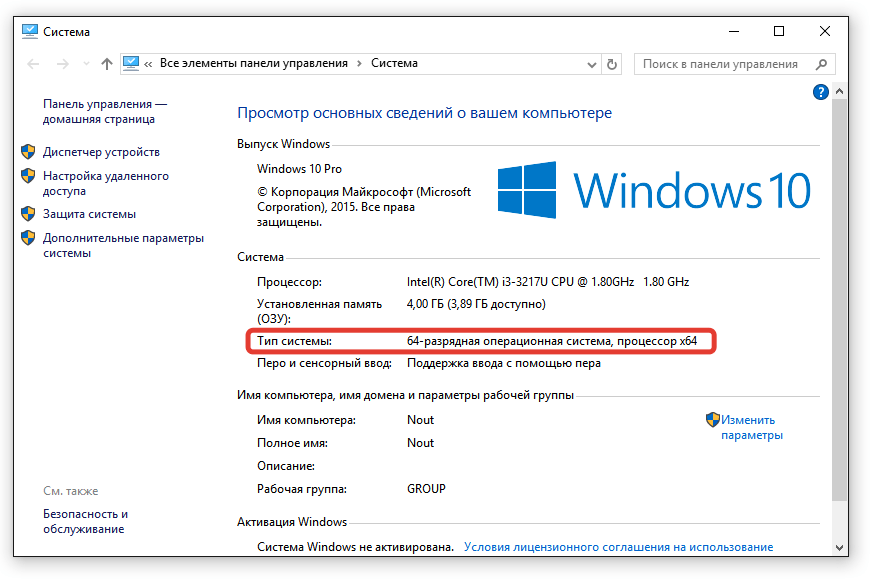
У меня стоит 64-разрядная версия Windows
После проверки типа системы возвращаемся на страницу загрузки драйверов видеокарт NVIDIA. Указываем в форме для поиска тип, серию, семейство продуктов, а также операционную систему с подходящей разрядностью — в нашем случае это Windows 10 64-bit
Выбираем ту систему, в которую будем устанавливать драйвер
Принимаем лицензионное соглашение, скачиваем файл для установки, запускаем его и выполняем стандартную инсталляцию драйвера. На этот раз ошибок быть не должно.
![]() Загрузка …
Загрузка …
Неподходящая видеокарта
Ещё одна возможная причина того, что драйвер не устанавливается, — несовместимость с видеокартой. В таком случае в сообщении об ошибке может быть ещё и соответствующее пояснение.
Установщик говорит, что на компьютере нет совместимого с драйвером устройства
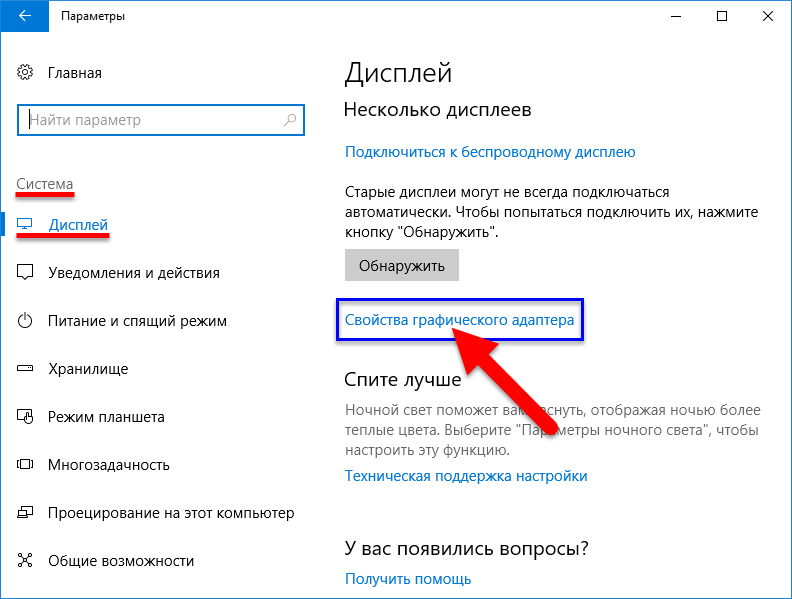
Для устранения этой проблемы необходимо скачать с сайта NVIDIA подходящие драйверы. Но прежде давайте ещё раз посмотрим, какая у нас точно модель видеокарты — значение имеет каждая буква и цифра в названии. Есть огромное количество способов сделать это, но мы воспользуемся информацией из «Параметров».
- Открываем меню «Пуск» и переходим в «Параметры» или используем сочетание Win+I для быстрого запуска системного приложения.
- Выбираем раздел «Система».
- Переходим на вкладку «Дисплей» и нажимаем на ссылку «Свойства графического адаптера».

Вся информация о видеокарте доступна в её свойствах
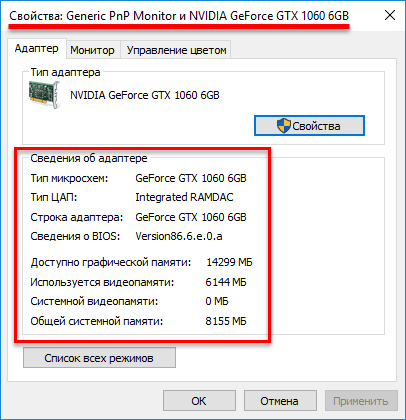
- В сведениях об адаптере смотрим блок «Тип». Это и есть модель видеокарты.

На этом компьютере установлена видеокарта GeForce TXG 1060
Для верности используем ещё один способ проверки. Нажимаем на клавиатуре сочетание Win+R, выполняем команду dxdiag и переходим на вкладку «Экран». В поле «Устройство» в строке название указана модель видеокарты.
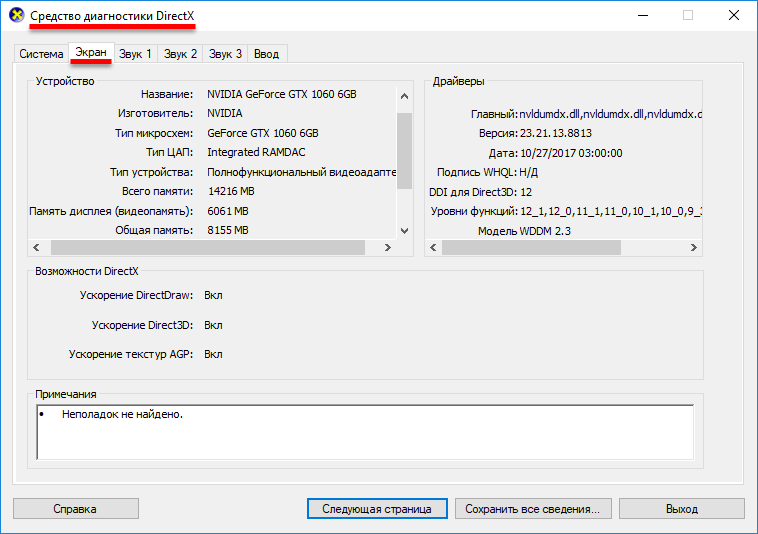
Подтверждаем, что у нас GeForce TXG 1060
![]() Загрузка …
Загрузка …
Узнав точное наименование графического адаптера, возвращаемся на сайт NVIDIA и выбираем подходящее оборудование в каталоге, не забывая и про разрядность системы. В ответ мы получим полностью совместимый драйвер, при установке которого не должно возникнуть никаких проблем.
Post Views: 11 693
After trying out our solutions, you’ll be able to install Nvidia drivers
by Kazim Ali Alvi
Kazim has always been fond of technology, be it scrolling through the settings on his iPhone, Android device, or Windows. And at times, unscrewing the device to take… read more
Updated on September 2, 2022
Reviewed by
Vlad Turiceanu

Passionate about technology, Windows, and everything that has a power button, he spent most of his time developing new skills and learning more about the tech world. Coming… read more
- After upgrading to Windows 11 several users have reported being unable to install the Nvidia driver.
- This error could be due to installing an outdated version, conflicting processes, or the antivirus blocking it, amongst others.
- Also, find out how you can install just the Nvidia driver without the GeForce Experience application.
XINSTALL BY CLICKING THE DOWNLOAD FILE
- Download Restoro PC Repair Tool that comes with Patented Technologies (patent available here).
- Click Start Scan to find Windows 11 issues that could be causing PC problems.
- Click Repair All to fix issues affecting your computer’s security and performance
- Restoro has been downloaded by 0 readers this month.
We all know how critical the graphics drivers are, and the significance of keeping them up-to-date. However, a lot of users have reported that the Nvidia drivers are not installing in Windows 11.
This poses a major hurdle since a lot of errors can be encountered on running an outdated version of the graphics driver. Hence, it becomes imperative that you resolve the issue and get your hands on the latest version.
To update Nvidia drivers, you can either use the GeForce Experience application or install just the driver itself. We will walk you through it as well in the later sections.
Before we head to the fixes, it’s imperative that you understand the underlying causes for effective troubleshooting.
Why won’t my NVIDIA drivers install?
This could be due to a bunch of reasons. In case you are trying to install the Nvidia drivers right after upgrading to Windows 11, there is a chance of encountering the error. This is because the OS too might be trying to locate and install the same driver.
If your PC already has a newer version installed, you may encounter the Nvidia drivers not installing issue in Windows 11. A background program, most likely an antivirus, may also conflict with the installation and lead to the error.
How do I force NVIDIA drivers to install?
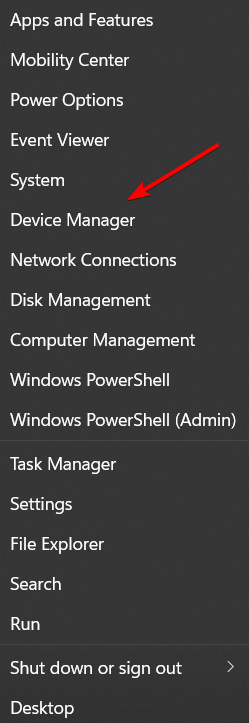
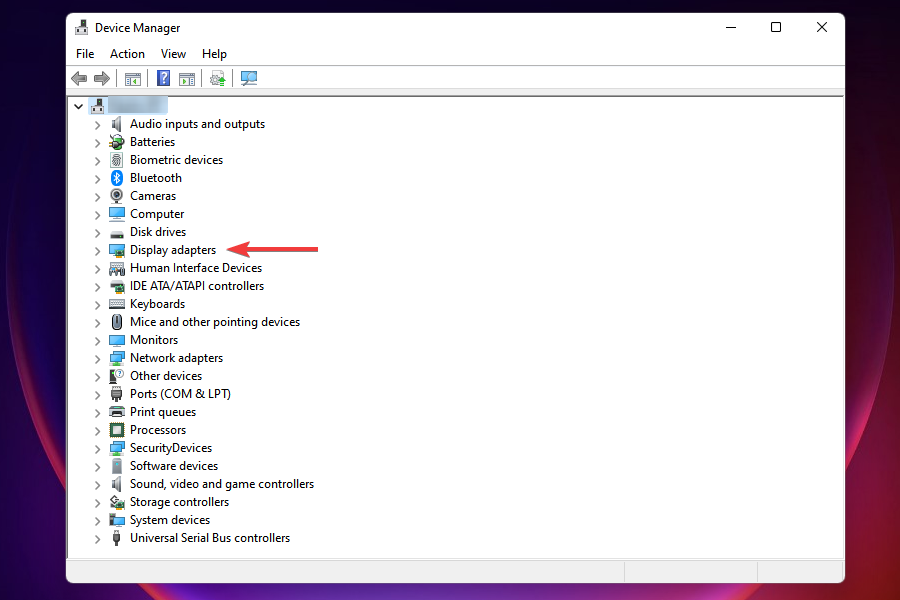
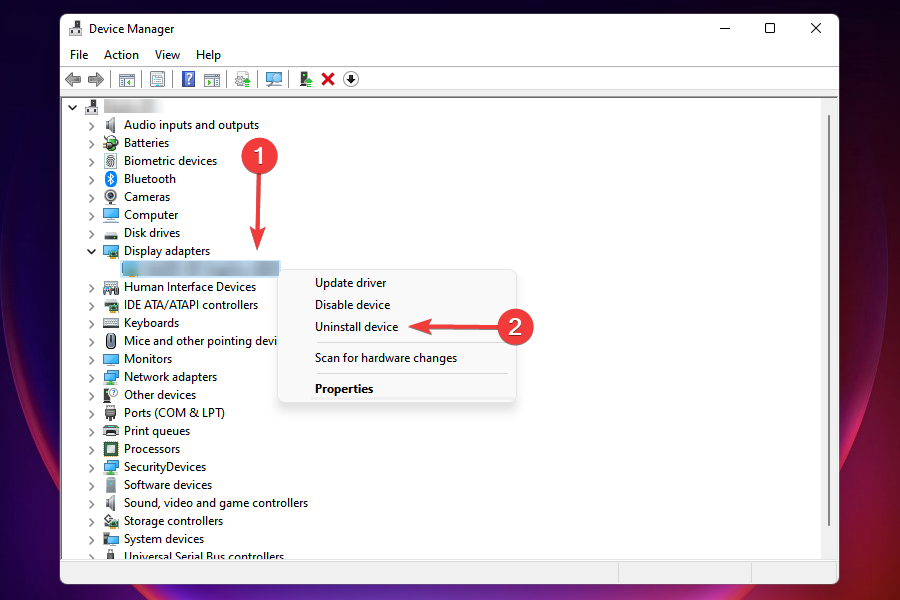
- Right-click the Start icon from your Taskbar then choose Device Manager.

- Here, look for your Nvidia driver, under the Display adapters section. Right-click it and choose Uninstall device.

- Reboot your PC in order to automatically install the driver.

Without further ado, let’s see what you can do if the Nvidia driver is not installing on Windows 11. Follow along!
What can I do if the Nvidia driver is not installing on Windows 11?
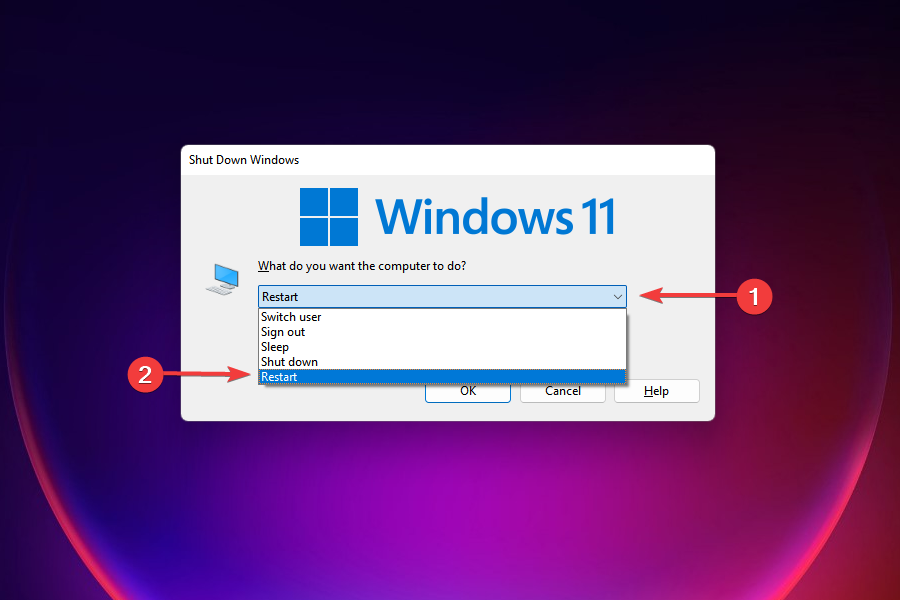
1. Restart the Windows 11 PC
- Navigate to the desktop and press Alt + F4 to launch the Shut Down Windows box.
- Click on the dropdown menu and select Restart from the list of options.

- Next, click on OK.
- After the computer restarts, check if you are able to install the Nvidia drivers.
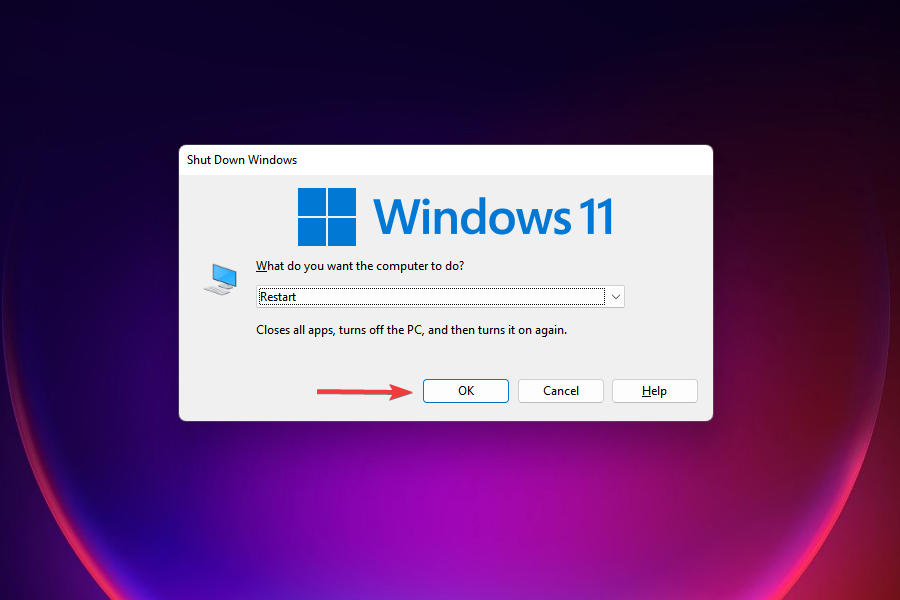
Many a time, it’s a bug or a process that’s preventing you from installing the Nvidia drivers in Windows 11. Restarting the computer eliminates any such bug, fixing the Nvidia drivers not working issue.
2. Uninstall the current driver and then try reinstalling
- Press Windows + R to launch the Run command.
- Type devmgmt.msc in the text field and either click on OK or press Enter to launch the Device Manager.
- Double-click on the Display adapters entry to view the various devices under it.
- Right-click on the Nvidia adapter, and select Uninstall device from the context menu.
- Next, tick the checkbox for Attempt to remove the driver for this device and click on Uninstall at the bottom.
- After uninstalling the driver, restart the Windows 11 PC and check if you are able to install the Nvidia driver.
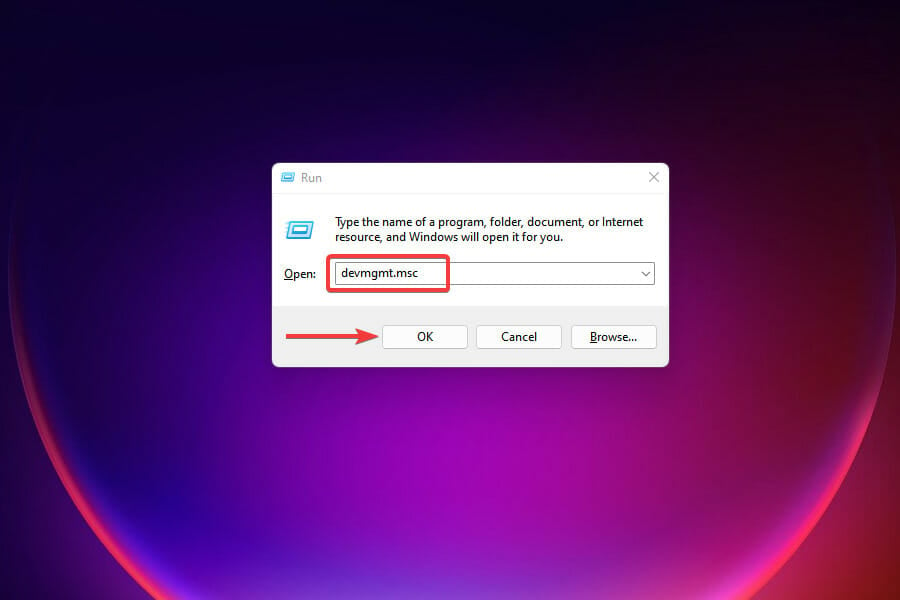
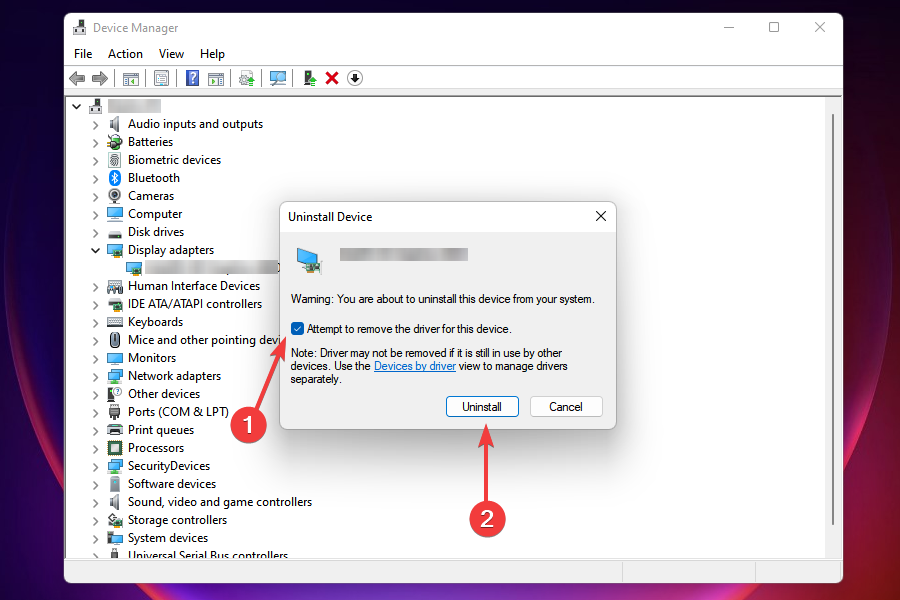
Several users found that the current driver was preventing the installation. In many cases, such as that of corruption, uninstalling the driver is the best way forward.
Even if you get the Nvidia driver not compatible with this version of Windows message, this solution will remove it and install a compatible version.
You should now be able to install the Nvidia driver in Windows 11. When it comes to automatic scans of outdated drivers, do not hesitate to take advantage of a dedicated tool.
Some of the most common Windows errors and bugs are a result of old or incompatible drivers. The lack of an up-to-date system can lead to lag, system errors or even BSoDs.
To avoid these types of problems, you can use an automatic tool that will find, download, and install the right driver version on your Windows PC in just a couple of clicks, and we strongly recommend DriverFix. Here’s how to do it:
- Download and install DriverFix.
- Launch the application.
- Wait for DriverFix to detect all your faulty drivers.
- The software will now show you all the drivers that have issues, and you just need to select the ones you’d liked fixed.
- Wait for DriverFix to download and install the newest drivers.
- Restart your PC for the changes to take effect.

DriverFix
Drivers will no longer create any problems if you download and use this powerful software today.
Disclaimer: this program needs to be upgraded from the free version in order to perform some specific actions.
3. Stop all the Nvidia services
- Press Windows + R to launch the Run command.
- Type services.msc in the text field and either click on OK or press Enter to launch the Services app.
- Locate all the services that start with Nvidia, right-click on them, and select Stop from the context menu.
- After all such services are stopped, try reinstalling the Nvidia driver.
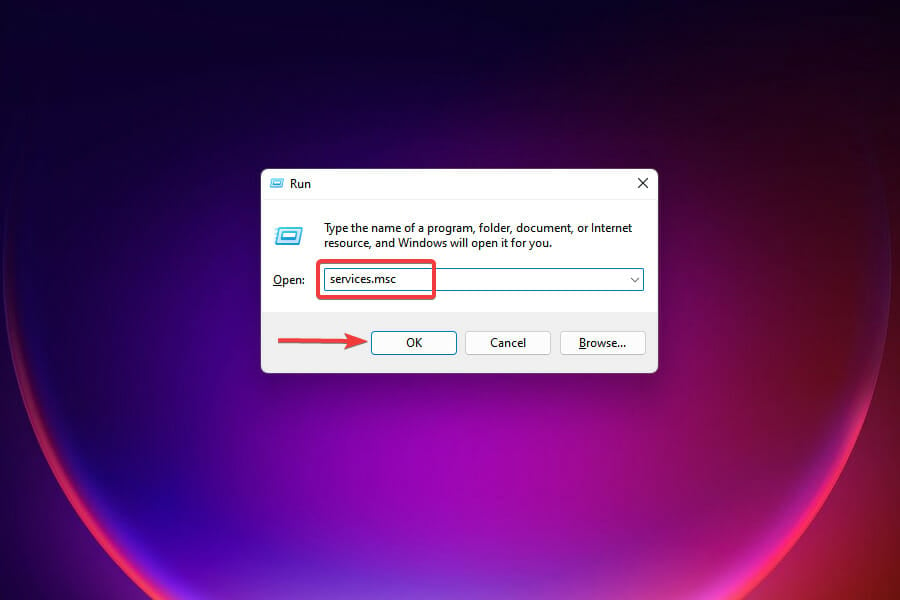
If any of the related services are running, you may face trouble installing the Nvidia driver in Windows 11. Once these are stopped, you shouldn’t encounter the issue anymore. In case the error persists, head to the next fix.
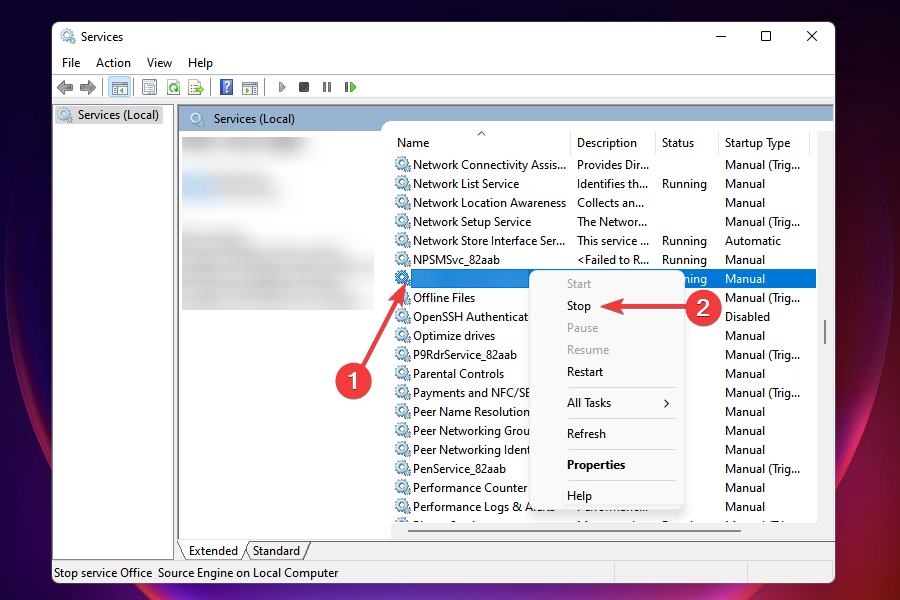
4. End Nvidia tasks, delete files, and registry entries
- Press Ctrl + Shift + Esc to launch the Task Manager.
- Locate any app or process that has Nvidia in its name, select it, and click on End Task at the bottom.
- Do the same for all such processes.
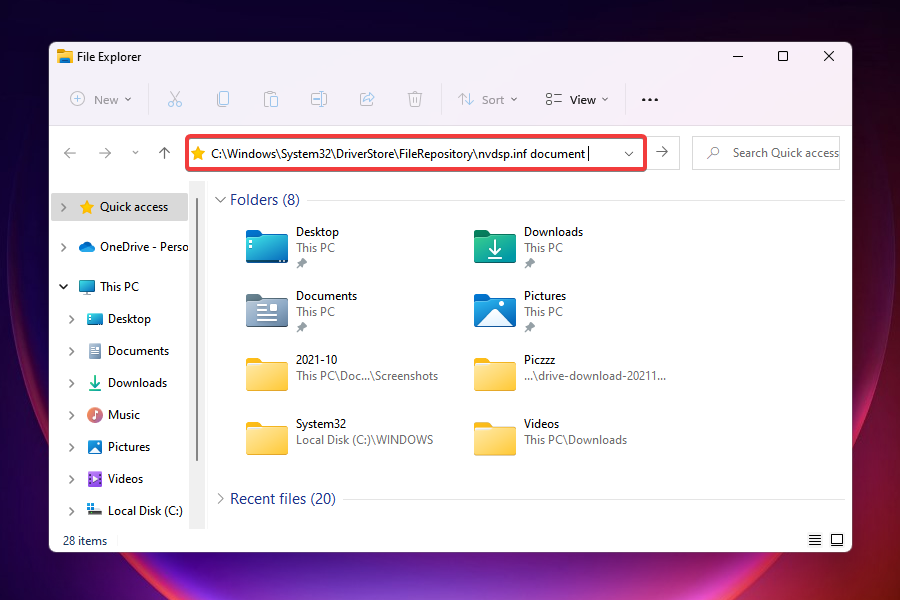
- Next, press Windows + E to launch the File Explorer.
- Either navigate to the following paths or paste them in address bar at the top, and delete the files at the end:
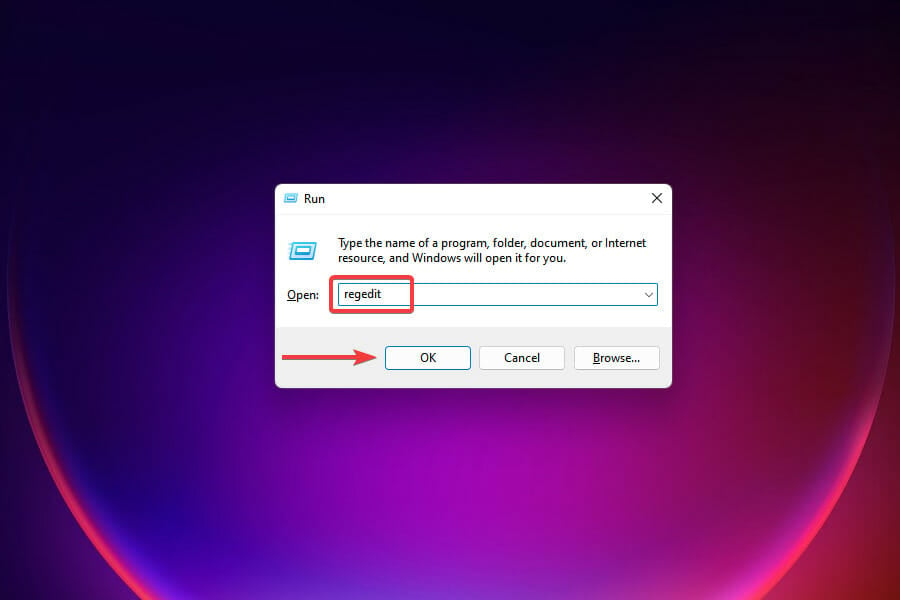
C:WindowsSystem32DriverStoreFileRepositorynvdsp.inf documentC:WindowsSystem32DriverStoreFileRepositorynv_lh documentC:WindowsSystem32DriverStoreFileRepositorynvoclock documentC:Program FilesNVIDIA CorporationC:Program Files (x86)NVIDIA Corporation - Next, press Windows + R to launch the Run command.
- Enter regedit in the text field and either click on OK or hit Enter to launch the Registry Editor.
- Click Yes on the UAC (User Account Control) prompt that appears.
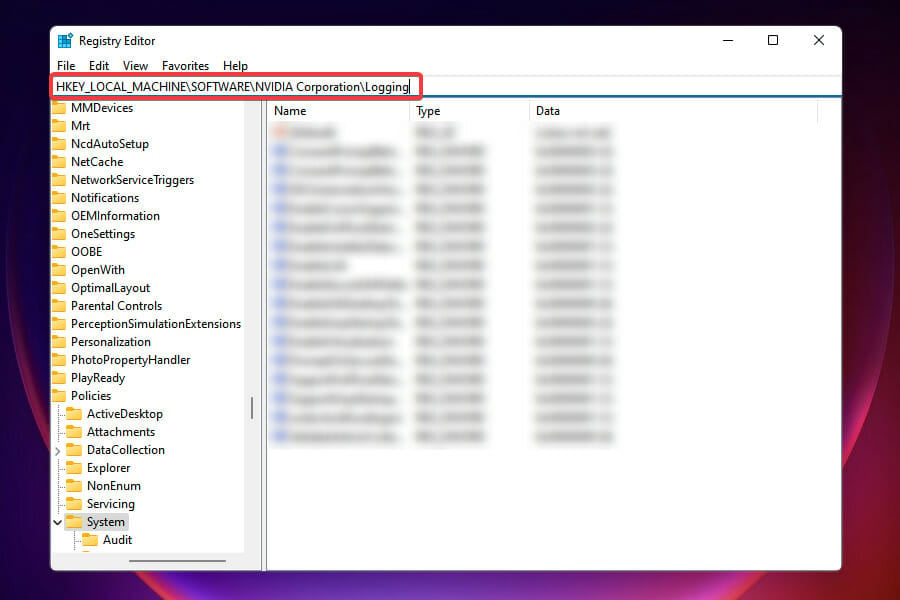
- Individually navigate the following paths or paste them in the address bar at the top and hit Enter:
ComputerHKEY_LOCAL_MACHINESOFTWARENVIDIA CorporationLoggingComputerHKEY_LOCAL_MACHINESOFTWAREWow6432NodeNVIDIA CorporationLogging - If the registry keys are found, delete them.
- Once done, try to reinstall the Nvidia driver.
Certain processes, files, or registry keys may be preventing the driver from installing. Hence, it’s best that you remove all these, and try to install the Nvidia driver afresh in Windows 11.
5. Disable antivirus and firewall

NOTE
We have listed the steps to disable Windows Security below to help you get acquainted with the process. In case you are using another third-party antivirus, the process should be similar. Also, you can check the FAQ section of the official manufacturer’s website for more help.
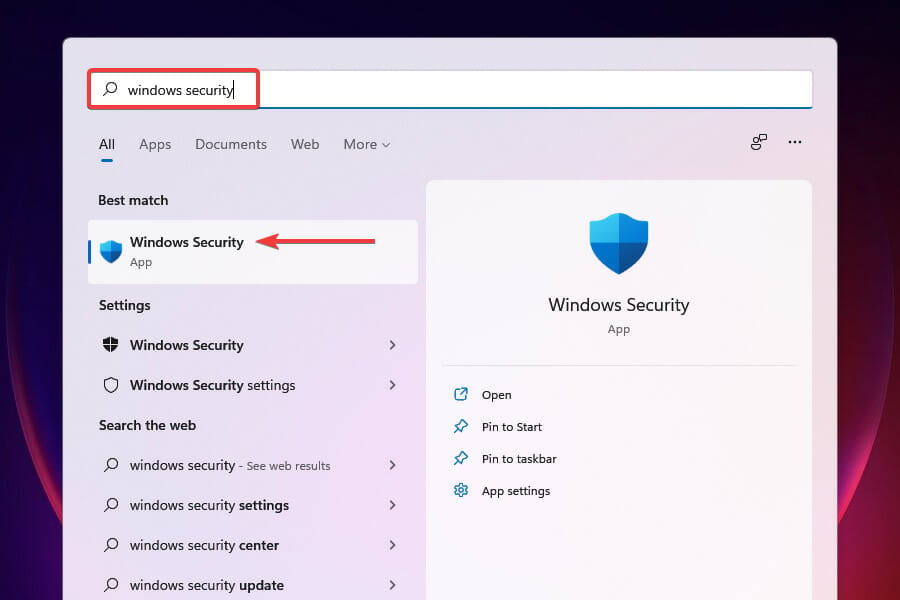
- Press Windows to launch the Search menu and enter Windows Security in the text field at the top, then click on the relevant search result that appears.
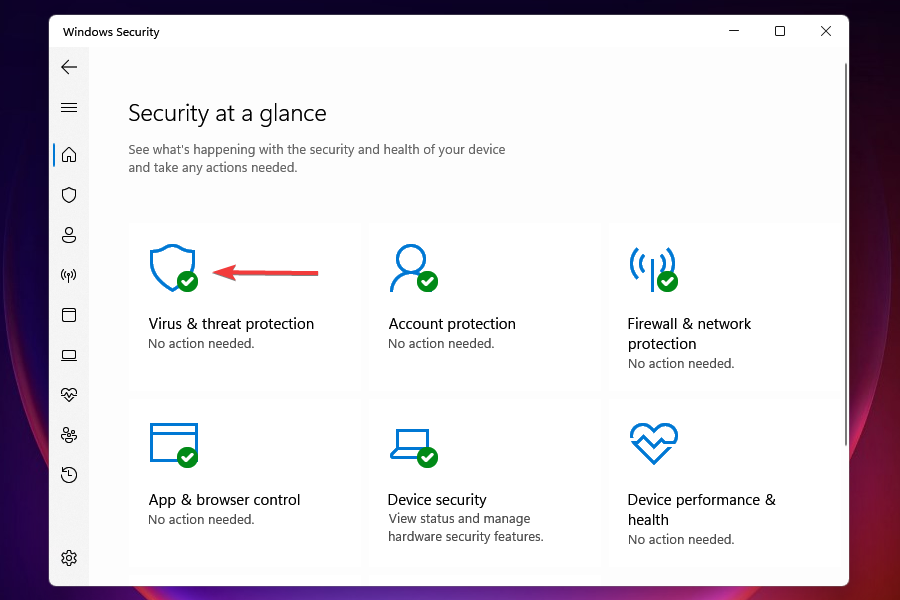
- Click on Virus & threat protection from the options that appear.
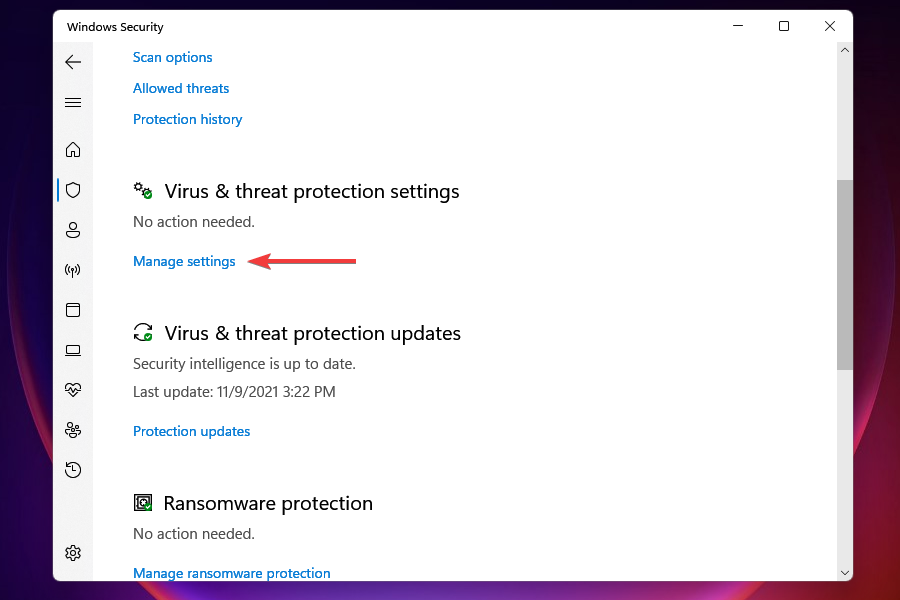
- Next, click on Manage settings under Virus & threat protection settings.
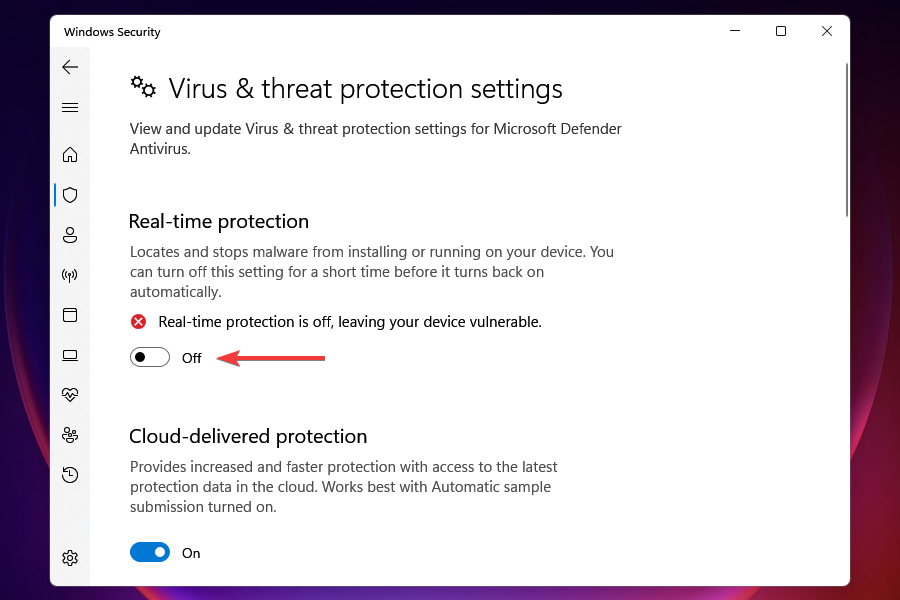
- Turn off the toggle under Real-time protection.
- Click Yes on the UAC (User Account Control) prompt that appears.
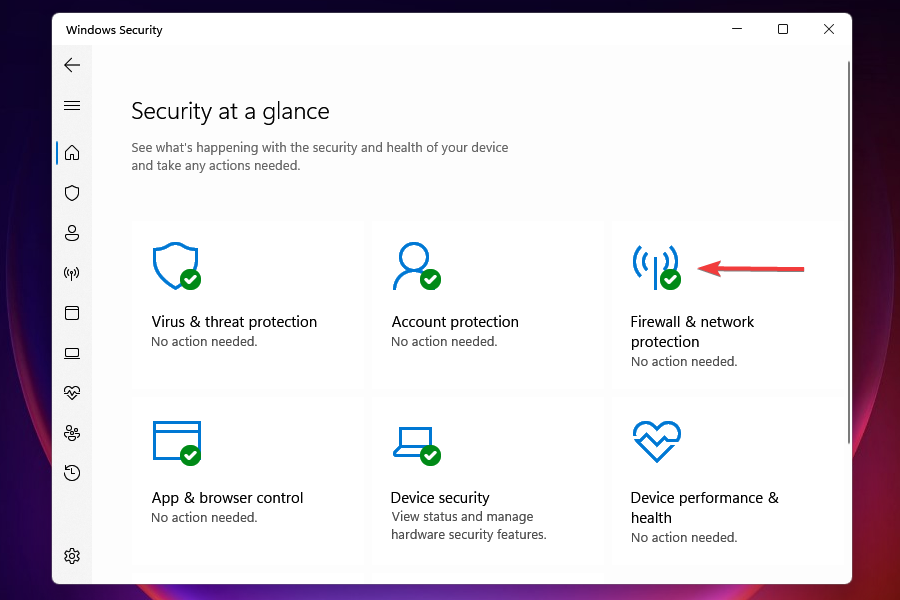
- Go back to the main screen, and click on Firewall & network protection.
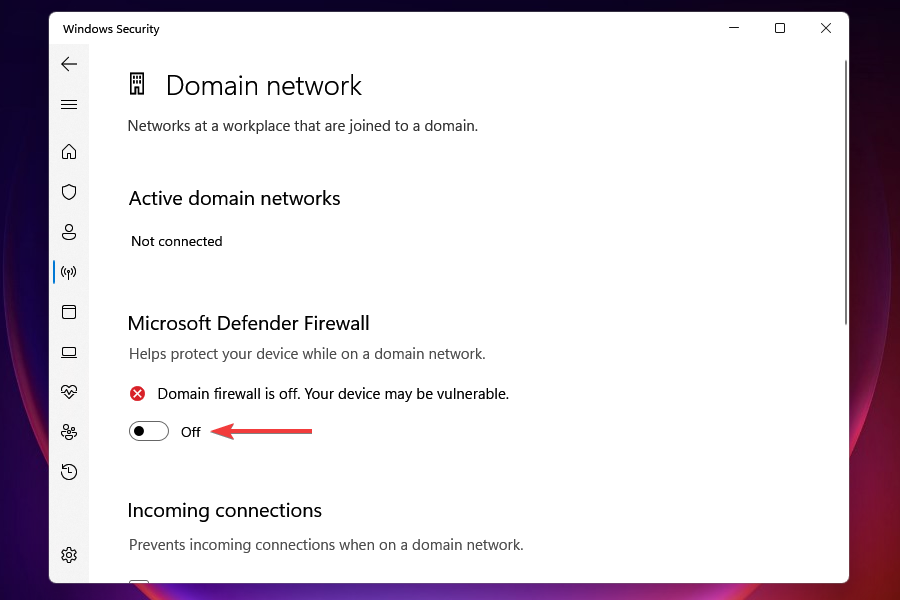
- Select Domain network from the list of options that appear.
- Turn off the toggle under Microsoft Defender Firewall.
- Click Yes on the UAC (User Account Control) prompt that appears.
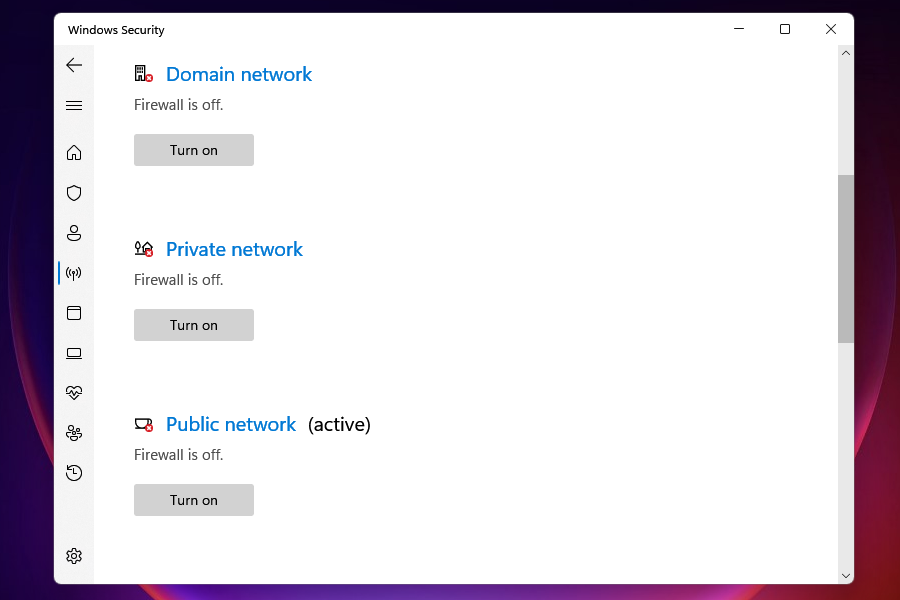
- Similarly, disable the other two, i.e., Private network and Public network.

Some PC issues are hard to tackle, especially when it comes to corrupted repositories or missing Windows files. If you are having troubles fixing an error, your system may be partially broken.
We recommend installing Restoro, a tool that will scan your machine and identify what the fault is.
Click here to download and start repairing.
In many instances, it was the antivirus that lead to an error while installing the Nvidia driver in Windows 11. Also, the firewall settings are known to cause trouble while installing certain software. Hence, it’s best that you disable both and check if the driver can now be installed.
Do remember to revert the changes after installing the driver, as keeping them disabled exposes your computer to threats and cyber attacks.
6. Rename Nvidia folder
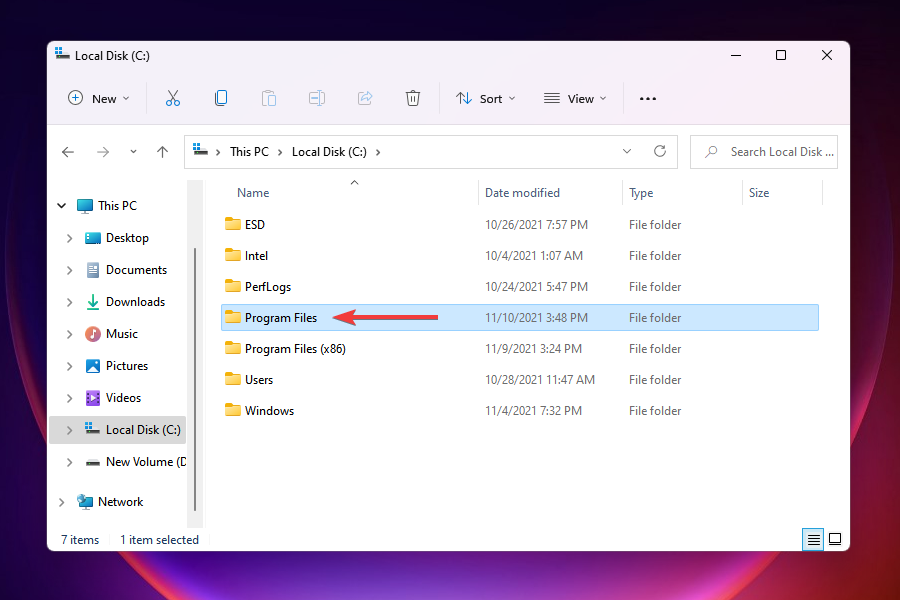
- Press Windows + E to launch the File Explorer and navigate to the system drive, which should most likely be the C: drive.
- Select Program Files from the folders listed here.
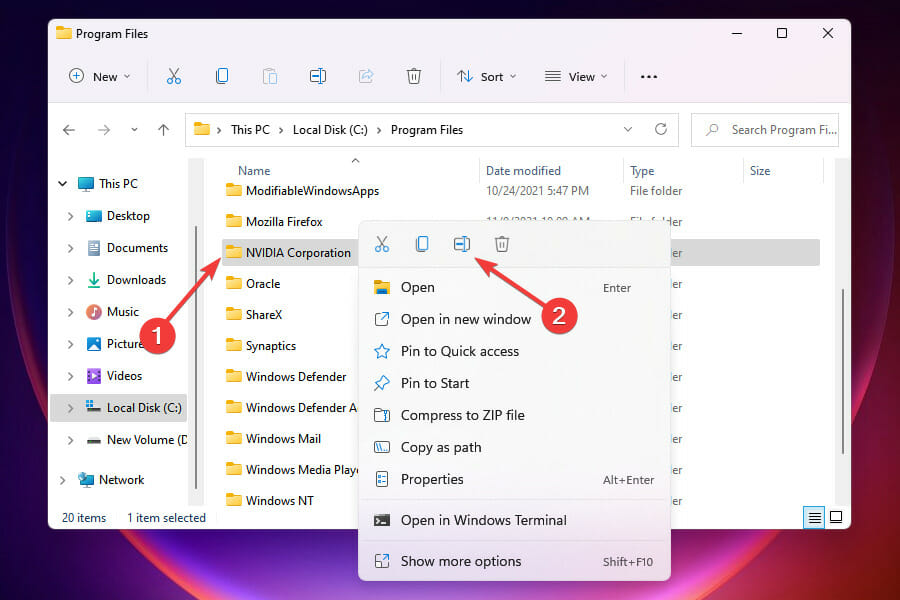
- Locate the NVIDIA Corporation folder, right-click it, and select the Rename option.
- Rename the folder as NVIDIA Corporation1 and hit Enter to save the changes.
- Check if you are now able to install the Nvidia driver via the setup in Windows 11.
Though it may sound a bit unconventional, this method has fixed the Nvidia driver installation error for a lot of users. If none of the other methods listed here work, this one is worth a shot since you are only left with the option to reset Windows 11, as discussed in the next section.
7. Reset Windows 11
This should ideally be the last fix since the saved data and programs will be lost during the process. You can, however, create a backup of the files to avoid data loss.
The process to reset Windows 11 to its factory settings is quite similar to the one in the previous OS. You should be done with the whole process in a few hours without the need for a bootable USB drive.
- Can’t download/install Nvidia drivers on Windows 10/11
- How to update drivers in Windows 10 [Full Guide]
- How to undo a system restore in Windows 11
- Reset this PC feature not working on Windows 11? Fix it now
Can I install the Nvidia drivers without the GeForce Experience app?
While some users prefer the GeForce application owing to the added functionality and ease, many still go with just the Nvidia driver in Windows 11 since for them the GeForce Game Ready driver installation failed. Here’s how you can do that.
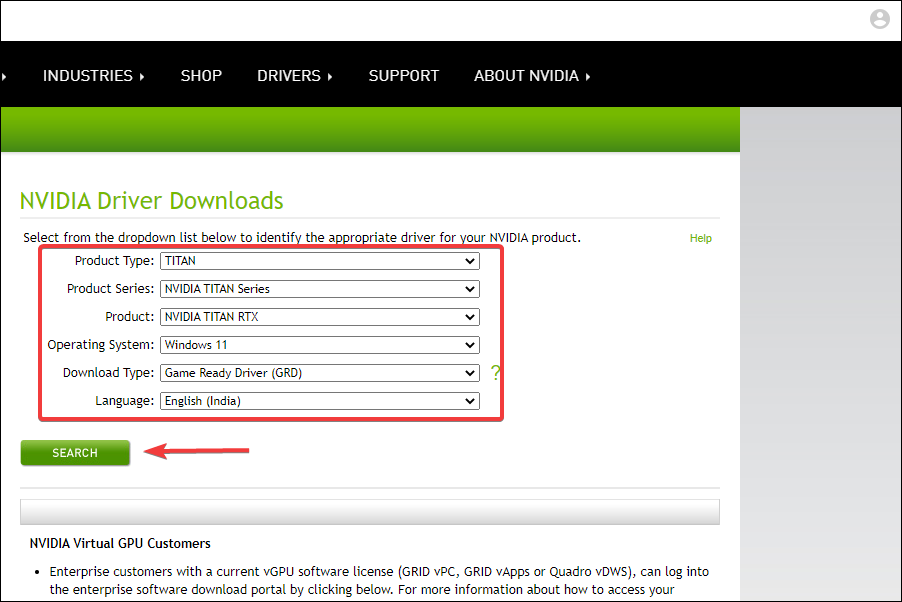
- Go to the NVIDIA Driver Download page, select the appropriate options from each of the dropdown menus, and click on the Search at the bottom.

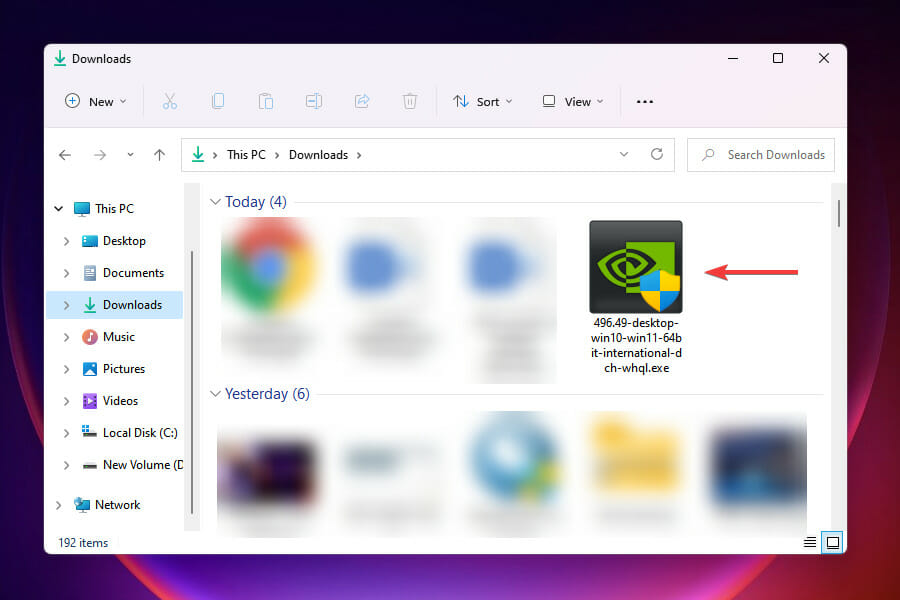
- Click on the Download button when the most suitable is displayed.
- After the file is downloaded, navigate to the folder where it’s stored and double-click on it to launch the installer.
- Click Yes on the UAC prompt that appears.
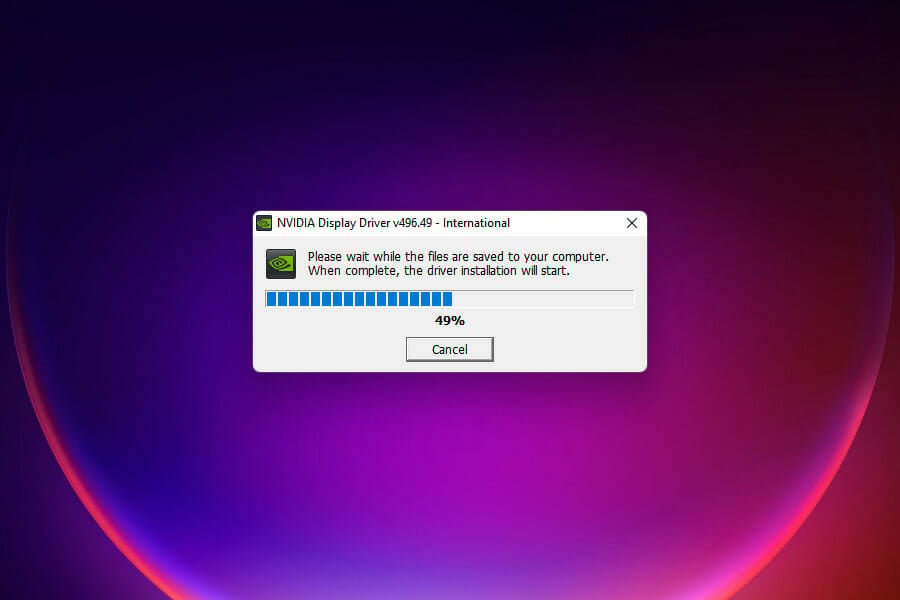
- Choose the extraction path and click on OK to continue.
- It will take a few moments to save the required files to your computer.
- The installer will launch next and check whether the system requirements are met.
- Next, select the NVIDIA Graphics Driver option instead of instead of NVIDIA Graphics Driver and GeForce Experience to install just the driver, and click on AGREE AND CONTINUE at the bottom.

- Follow the on-screen instructions to complete the installation process.
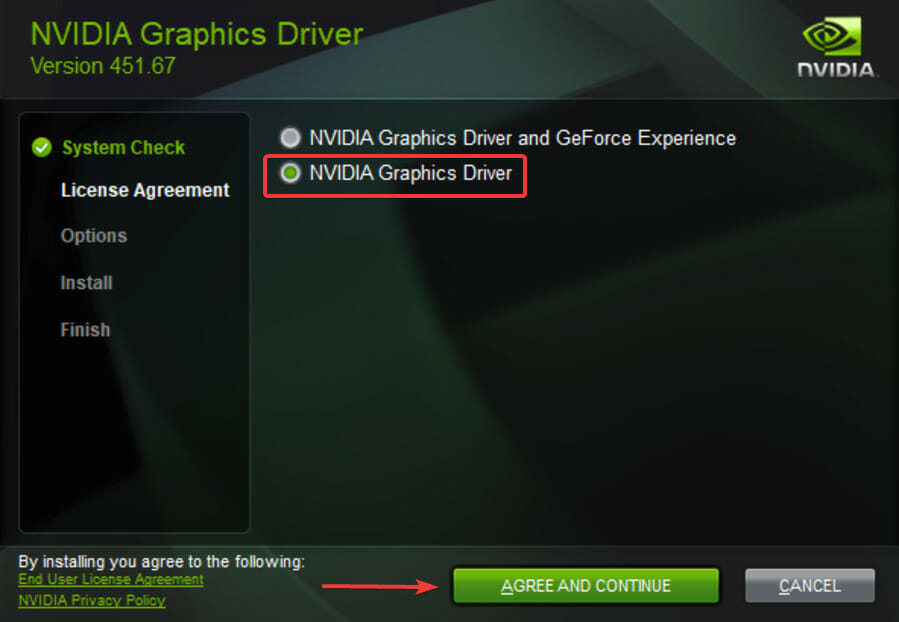
Once the installation is complete, you will only have the Nvidia graphics driver on the system and not the application, thus saving some space.
What will happen if I uninstall NVIDIA drivers?
Uninstalling your Nvidia drivers won’t have any negative consequences for you. They will be erased from your computer and then replaced with fresh ones.
You have the option of either restarting your computer or going to the company’s website to look for the most recent version of the software that is available for download.
Uninstalling your drivers is a frequent solution to use in situations in which they have a glitch or cease working properly.
There are all the ways you can fix issues while installing Nvidia drivers in Windows 11, along with a quick method to get just the driver. Many users faced the Nvidia driver installation issues in Windows 10 as well, and the fixes are pretty much the same.
Also, see how you can resolve problems preventing the Nvidia control panel from opening.
Let us know which fix worked for you in the comments section below, and whether you choose to install the Nvidia driver with the GeForce Experience application or without it.
Still having issues? Fix them with this tool:
SPONSORED
If the advices above haven’t solved your issue, your PC may experience deeper Windows problems. We recommend downloading this PC Repair tool (rated Great on TrustPilot.com) to easily address them. After installation, simply click the Start Scan button and then press on Repair All.
![]()
Newsletter
After trying out our solutions, you’ll be able to install Nvidia drivers
by Kazim Ali Alvi
Kazim has always been fond of technology, be it scrolling through the settings on his iPhone, Android device, or Windows. And at times, unscrewing the device to take… read more
Updated on September 2, 2022
Reviewed by
Vlad Turiceanu
Passionate about technology, Windows, and everything that has a power button, he spent most of his time developing new skills and learning more about the tech world. Coming… read more
- After upgrading to Windows 11 several users have reported being unable to install the Nvidia driver.
- This error could be due to installing an outdated version, conflicting processes, or the antivirus blocking it, amongst others.
- Also, find out how you can install just the Nvidia driver without the GeForce Experience application.
XINSTALL BY CLICKING THE DOWNLOAD FILE
- Download Restoro PC Repair Tool that comes with Patented Technologies (patent available here).
- Click Start Scan to find Windows 11 issues that could be causing PC problems.
- Click Repair All to fix issues affecting your computer’s security and performance
- Restoro has been downloaded by 0 readers this month.
We all know how critical the graphics drivers are, and the significance of keeping them up-to-date. However, a lot of users have reported that the Nvidia drivers are not installing in Windows 11.
This poses a major hurdle since a lot of errors can be encountered on running an outdated version of the graphics driver. Hence, it becomes imperative that you resolve the issue and get your hands on the latest version.
To update Nvidia drivers, you can either use the GeForce Experience application or install just the driver itself. We will walk you through it as well in the later sections.
Before we head to the fixes, it’s imperative that you understand the underlying causes for effective troubleshooting.
Why won’t my NVIDIA drivers install?
This could be due to a bunch of reasons. In case you are trying to install the Nvidia drivers right after upgrading to Windows 11, there is a chance of encountering the error. This is because the OS too might be trying to locate and install the same driver.
If your PC already has a newer version installed, you may encounter the Nvidia drivers not installing issue in Windows 11. A background program, most likely an antivirus, may also conflict with the installation and lead to the error.
How do I force NVIDIA drivers to install?
- Right-click the Start icon from your Taskbar then choose Device Manager.
- Here, look for your Nvidia driver, under the Display adapters section. Right-click it and choose Uninstall device.
- Reboot your PC in order to automatically install the driver.
Without further ado, let’s see what you can do if the Nvidia driver is not installing on Windows 11. Follow along!
What can I do if the Nvidia driver is not installing on Windows 11?
1. Restart the Windows 11 PC
- Navigate to the desktop and press Alt + F4 to launch the Shut Down Windows box.
- Click on the dropdown menu and select Restart from the list of options.
- Next, click on OK.
- After the computer restarts, check if you are able to install the Nvidia drivers.
Many a time, it’s a bug or a process that’s preventing you from installing the Nvidia drivers in Windows 11. Restarting the computer eliminates any such bug, fixing the Nvidia drivers not working issue.
2. Uninstall the current driver and then try reinstalling
- Press Windows + R to launch the Run command.
- Type devmgmt.msc in the text field and either click on OK or press Enter to launch the Device Manager.
- Double-click on the Display adapters entry to view the various devices under it.
- Right-click on the Nvidia adapter, and select Uninstall device from the context menu.
- Next, tick the checkbox for Attempt to remove the driver for this device and click on Uninstall at the bottom.
- After uninstalling the driver, restart the Windows 11 PC and check if you are able to install the Nvidia driver.
Several users found that the current driver was preventing the installation. In many cases, such as that of corruption, uninstalling the driver is the best way forward.
Even if you get the Nvidia driver not compatible with this version of Windows message, this solution will remove it and install a compatible version.
You should now be able to install the Nvidia driver in Windows 11. When it comes to automatic scans of outdated drivers, do not hesitate to take advantage of a dedicated tool.
Some of the most common Windows errors and bugs are a result of old or incompatible drivers. The lack of an up-to-date system can lead to lag, system errors or even BSoDs.
To avoid these types of problems, you can use an automatic tool that will find, download, and install the right driver version on your Windows PC in just a couple of clicks, and we strongly recommend DriverFix. Here’s how to do it:
- Download and install DriverFix.
- Launch the application.
- Wait for DriverFix to detect all your faulty drivers.
- The software will now show you all the drivers that have issues, and you just need to select the ones you’d liked fixed.
- Wait for DriverFix to download and install the newest drivers.
- Restart your PC for the changes to take effect.
DriverFix
Drivers will no longer create any problems if you download and use this powerful software today.
Disclaimer: this program needs to be upgraded from the free version in order to perform some specific actions.
3. Stop all the Nvidia services
- Press Windows + R to launch the Run command.
- Type services.msc in the text field and either click on OK or press Enter to launch the Services app.
- Locate all the services that start with Nvidia, right-click on them, and select Stop from the context menu.
- After all such services are stopped, try reinstalling the Nvidia driver.
If any of the related services are running, you may face trouble installing the Nvidia driver in Windows 11. Once these are stopped, you shouldn’t encounter the issue anymore. In case the error persists, head to the next fix.
4. End Nvidia tasks, delete files, and registry entries
- Press Ctrl + Shift + Esc to launch the Task Manager.
- Locate any app or process that has Nvidia in its name, select it, and click on End Task at the bottom.
- Do the same for all such processes.
- Next, press Windows + E to launch the File Explorer.
- Either navigate to the following paths or paste them in address bar at the top, and delete the files at the end:
C:WindowsSystem32DriverStoreFileRepositorynvdsp.inf documentC:WindowsSystem32DriverStoreFileRepositorynv_lh documentC:WindowsSystem32DriverStoreFileRepositorynvoclock documentC:Program FilesNVIDIA CorporationC:Program Files (x86)NVIDIA Corporation - Next, press Windows + R to launch the Run command.
- Enter regedit in the text field and either click on OK or hit Enter to launch the Registry Editor.
- Click Yes on the UAC (User Account Control) prompt that appears.
- Individually navigate the following paths or paste them in the address bar at the top and hit Enter:
ComputerHKEY_LOCAL_MACHINESOFTWARENVIDIA CorporationLoggingComputerHKEY_LOCAL_MACHINESOFTWAREWow6432NodeNVIDIA CorporationLogging - If the registry keys are found, delete them.
- Once done, try to reinstall the Nvidia driver.
Certain processes, files, or registry keys may be preventing the driver from installing. Hence, it’s best that you remove all these, and try to install the Nvidia driver afresh in Windows 11.
5. Disable antivirus and firewall
NOTE
We have listed the steps to disable Windows Security below to help you get acquainted with the process. In case you are using another third-party antivirus, the process should be similar. Also, you can check the FAQ section of the official manufacturer’s website for more help.
- Press Windows to launch the Search menu and enter Windows Security in the text field at the top, then click on the relevant search result that appears.
- Click on Virus & threat protection from the options that appear.
- Next, click on Manage settings under Virus & threat protection settings.
- Turn off the toggle under Real-time protection.
- Click Yes on the UAC (User Account Control) prompt that appears.
- Go back to the main screen, and click on Firewall & network protection.
- Select Domain network from the list of options that appear.
- Turn off the toggle under Microsoft Defender Firewall.
- Click Yes on the UAC (User Account Control) prompt that appears.
- Similarly, disable the other two, i.e., Private network and Public network.
Some PC issues are hard to tackle, especially when it comes to corrupted repositories or missing Windows files. If you are having troubles fixing an error, your system may be partially broken.
We recommend installing Restoro, a tool that will scan your machine and identify what the fault is.
Click here to download and start repairing.
In many instances, it was the antivirus that lead to an error while installing the Nvidia driver in Windows 11. Also, the firewall settings are known to cause trouble while installing certain software. Hence, it’s best that you disable both and check if the driver can now be installed.
Do remember to revert the changes after installing the driver, as keeping them disabled exposes your computer to threats and cyber attacks.
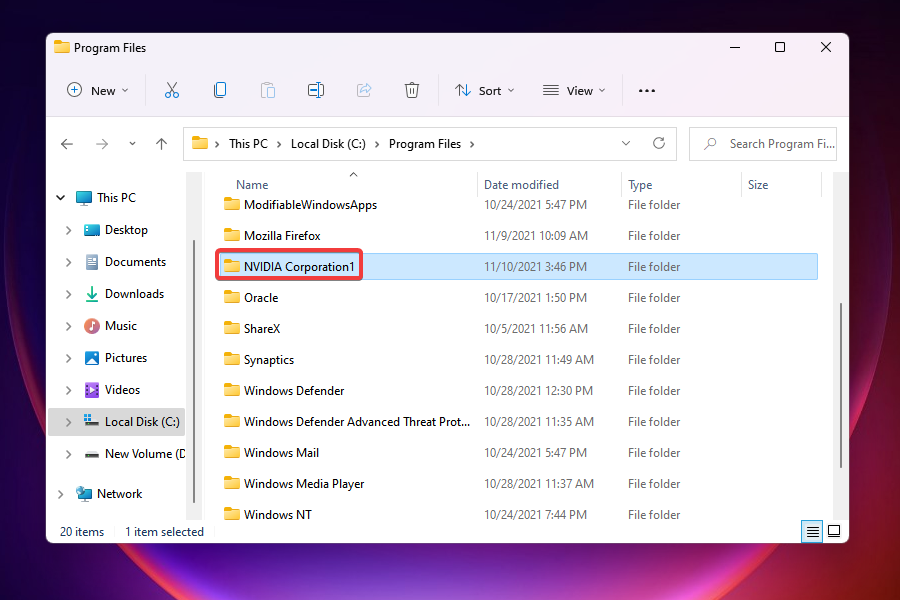
6. Rename Nvidia folder
- Press Windows + E to launch the File Explorer and navigate to the system drive, which should most likely be the C: drive.
- Select Program Files from the folders listed here.
- Locate the NVIDIA Corporation folder, right-click it, and select the Rename option.
- Rename the folder as NVIDIA Corporation1 and hit Enter to save the changes.
- Check if you are now able to install the Nvidia driver via the setup in Windows 11.
Though it may sound a bit unconventional, this method has fixed the Nvidia driver installation error for a lot of users. If none of the other methods listed here work, this one is worth a shot since you are only left with the option to reset Windows 11, as discussed in the next section.
7. Reset Windows 11
This should ideally be the last fix since the saved data and programs will be lost during the process. You can, however, create a backup of the files to avoid data loss.
The process to reset Windows 11 to its factory settings is quite similar to the one in the previous OS. You should be done with the whole process in a few hours without the need for a bootable USB drive.
- Can’t download/install Nvidia drivers on Windows 10/11
- How to update drivers in Windows 10 [Full Guide]
- How to undo a system restore in Windows 11
- Reset this PC feature not working on Windows 11? Fix it now
Can I install the Nvidia drivers without the GeForce Experience app?
While some users prefer the GeForce application owing to the added functionality and ease, many still go with just the Nvidia driver in Windows 11 since for them the GeForce Game Ready driver installation failed. Here’s how you can do that.
- Go to the NVIDIA Driver Download page, select the appropriate options from each of the dropdown menus, and click on the Search at the bottom.
- Click on the Download button when the most suitable is displayed.
- After the file is downloaded, navigate to the folder where it’s stored and double-click on it to launch the installer.
- Click Yes on the UAC prompt that appears.
- Choose the extraction path and click on OK to continue.
- It will take a few moments to save the required files to your computer.
- The installer will launch next and check whether the system requirements are met.
- Next, select the NVIDIA Graphics Driver option instead of instead of NVIDIA Graphics Driver and GeForce Experience to install just the driver, and click on AGREE AND CONTINUE at the bottom.
- Follow the on-screen instructions to complete the installation process.
Once the installation is complete, you will only have the Nvidia graphics driver on the system and not the application, thus saving some space.
What will happen if I uninstall NVIDIA drivers?
Uninstalling your Nvidia drivers won’t have any negative consequences for you. They will be erased from your computer and then replaced with fresh ones.
You have the option of either restarting your computer or going to the company’s website to look for the most recent version of the software that is available for download.
Uninstalling your drivers is a frequent solution to use in situations in which they have a glitch or cease working properly.
There are all the ways you can fix issues while installing Nvidia drivers in Windows 11, along with a quick method to get just the driver. Many users faced the Nvidia driver installation issues in Windows 10 as well, and the fixes are pretty much the same.
Also, see how you can resolve problems preventing the Nvidia control panel from opening.
Let us know which fix worked for you in the comments section below, and whether you choose to install the Nvidia driver with the GeForce Experience application or without it.
Still having issues? Fix them with this tool:
SPONSORED
If the advices above haven’t solved your issue, your PC may experience deeper Windows problems. We recommend downloading this PC Repair tool (rated Great on TrustPilot.com) to easily address them. After installation, simply click the Start Scan button and then press on Repair All.
![]()
Newsletter
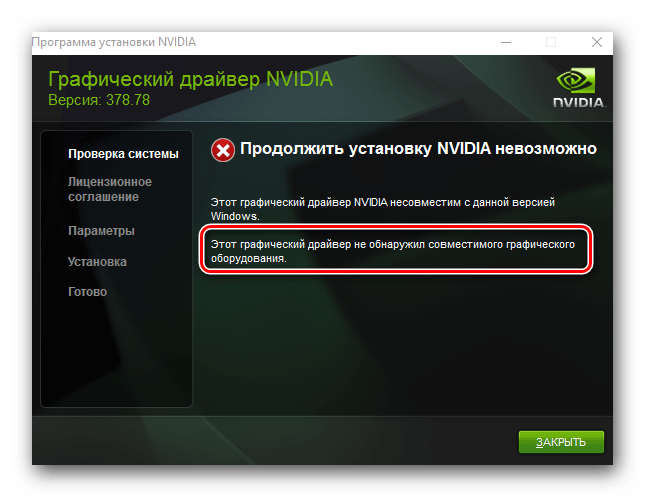
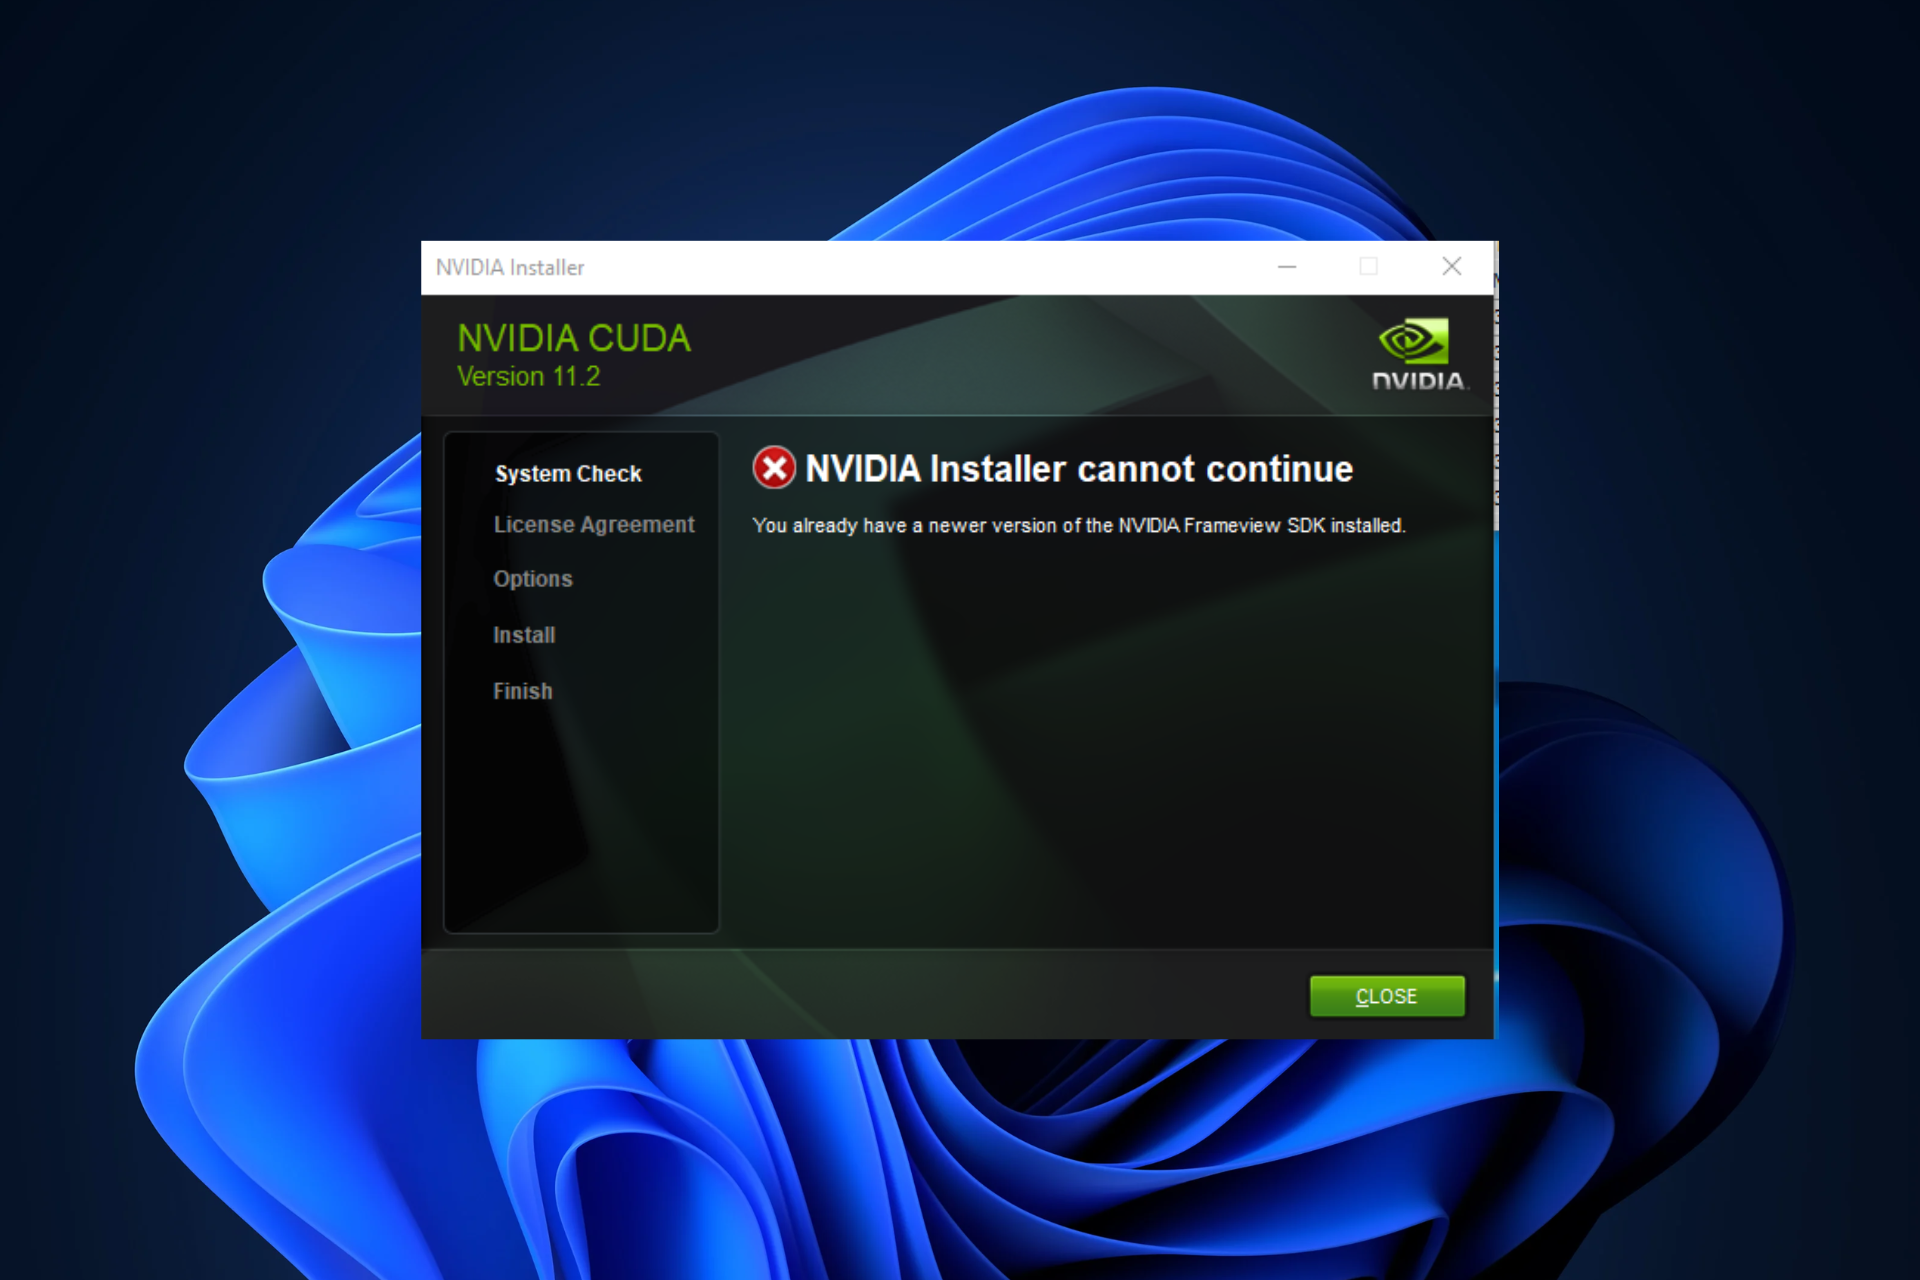
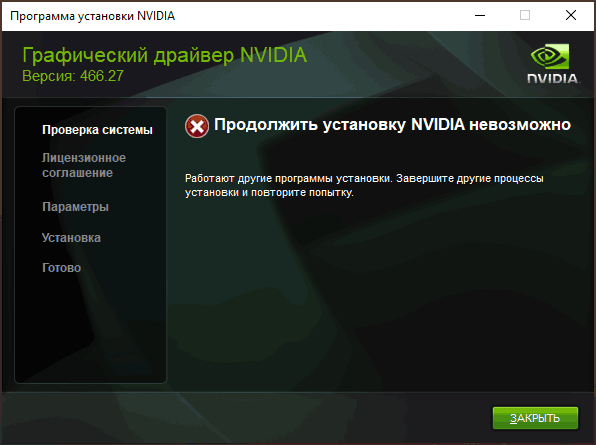
 При установке драйвера видеокарты NVIDIA GeForce в Windows 11 и Windows 10, 8.1 или Windows 7 вы можете получить сообщение об ошибке: Продолжить установку NVIDIA невозможно, с поясняющим текстом, который может отличаться в зависимости от сценария появления проблемы.
В этой инструкции подробно о том, почему может не устанавливаться драйвер NVIDIA на компьютере или ноутбуке и как исправить проблему в различных ситуациях.
Содержание
Решение проблемы продолжения установки NVIDIA
При возникновении ошибки Продолжить установку NVIDIA невозможно, обычно отображается пояснение, которое может иметь следующее содержание, в зависимости от ошибки:
- Этот графический драйвер NVIDIA несовместим с данной версией Windows
- Этот графический драйвер не обнаружил совместимого графического оборудования
- Работают другие программы установки. Завершите другие процессы и повторите попытку
- Дополнительно вы можете увидеть сообщения на тему «This DCH driver package is not compatible with this version of Windows» или «This Standard NVIDIA graphics driver is not compatible with this version of Windows»
В некоторых случаях эта информация помогает разобраться с сутью проблемы, но не всегда.
Далее рассмотрим нюансы установки драйверов NVIDIA, поговорим о некоторых особенностях разных версий драйверов и разберёмся, как можно исправить ошибку при их установке.
Стандартные и DCH драйверы NVIDIA
Примечание: если драйвер был установлен, но сменился на Базовый видеоадаптер Майкрософт после апгрейда RAM, обновления БИОС или подобных действий, имеющих отношение к оборудованию, прежде чем продолжать, обратите внимание на 2-й пункт в разделе «Дополнительные решения».

Драйверы современных видеокарт NVIDIA GeForce поставляются в двух вариантах — DCH драйверы, которые не установятся на старые версии Windows 10 и предыдущие версии системы, и стандартные драйверы, которые в некоторых случаях не устанавливаются на системы с уже установленными драйверами DCH — часто от производителя ноутбука или автоматически установленные Windows 10.
В этом случае, кроме сообщения о том, что продолжить установку NVIDIA невозможно вы получите упомянутые выше сообщения: «This DCH driver package is not compatible with this version of Windows» или «This Standard NVIDIA graphics driver is not compatible with this version of Windows».
Определить текущий установленный драйвер (при условии, что он установлен) можно следующим способом:
- Открыть панель управления NVIDIA, например, нажав правой кнопкой мыши по рабочему столу и выбрав соответствующий пункт контекстного меню.
- В меню панели управления NVIDIA открыть пункт «Справка» — «Информация о системе».
- Просмотреть информацию в поле «Тип драйвера».


Простое решение для такого случая, которое обычно (но не всегда) работает — скачать драйвер того же типа, который уже установлен. Сделать это можно следующим способом:
- Зайдите на страницу расширенного поиска драйверов NVIDIA https://www.nvidia.com/Download/Find.aspx (она может работать не очень быстро, но знайте: ничего не зависло и должно загрузиться через какое-то время).
- Укажите, для какой видеокарты вам нужен драйвер и для какой операционной системы.
- В поле Windows Driver Type укажите тип драйвера и нажмите кнопку Search (поиск).

- Загрузите нужный вам драйвер нужного типа и попробуйте его установить.

Установка драйверов видеокарты после полного удаления
В простых случаях приведённый выше метод срабатывает, но не всегда. В такой ситуации помимо загрузки желаемых и подходящих драйверов (помним, что не следует скачивать драйверы DCH для старых версий Windows), следует попробовать удалить уже установленные драйверы NVIDIA и лишь после этого попробовать выполнить установку. Удалить можно двумя способами:
- Средствами Windows 11, 10, 8.1 или Windows 7
- С помощью стороннего ПО — Display Driver Uninstaller (DDU)
Первый способ часто срабатывает исправно, поэтому, если вы не хотите обращаться к стороннему софту, можно начать с него (внимание: изображение может пропасть — в этом случае и почти гарантированно будет установлено низкое разрешение):
- Заранее скачайте нужную версию драйвера видеокарты NVIDIA.
- Отключите Интернет на вашем компьютере или ноутбуке для того, чтобы Windows сама не установила драйверы после удаления.
- Откройте диспетчер устройств, для этого можно нажать клавиши Win+R на клавиатуре, ввести devmgmt.msc и нажать Enter, а в Windows 11 или 10 — нажать правой кнопкой мыши по кнопке «Пуск» и выбрать нужный пункт контекстного меню.
- В разделе «Видеоадаптеры» нажмите правой кнопкой мыши по видеокарте NVIDIA, выберите пункт «Удалить устройство», а в следующем окне отметьте пункт «Удалить программы драйверов для этого устройства» и нажмите кнопку «Удалить».

- После этого желательно перезагрузить компьютер и, если у вас автоматически подключается Интернет, не дать ему этого сделать.
- Запустите установку скачанного на 1-м шаге драйвера.

Если предложенный подход не сработал, следующий вариант — использовать Display Driver Uninstaller, лучше — в безопасном режиме, но обычно срабатывает и без этого:
- Скачайте установщик нужного драйвера NVIDIA, чтобы он был на компьютере.
- Скачайте DDU с официальной страницы https://www.guru3d.com/files-details/display-driver-uninstaller-download.html и распакуйте архив.
- Отключитесь от Интернета.
- Запустите DDU и установите параметры как на скриншоте ниже — удаляем драйвер видеокарты, NVIDIA, остальные настройки, как правило, менять не требуется.

- Нажмите «Удалить и перезагрузить».
- После перезагрузки, не подключаясь к Интернету, запустите установку ранее скачанного драйвера NVIDIA.

Если предложенные выше решения не помогли, можно попробовать следующие варианты для различных сценариев появления проблемы «Продолжить установку NVIDIA невозможно», иногда — с указанием на несовместимость с текущей версией Windows, иногда — с другими сообщениями:
- Если это ноутбук или фирменный компьютер, а наличие последней версии драйвера не критично, проверьте, установится ли драйвер видеокарты, доступный на сайте производителя именно для вашей модели ноутбука или ПК (на официальном сайте он может называться VGA Driver).
- Если драйвер «слетел» после обновления оборудования или БИОС, отображается как стандартный видеоадаптер (Базовый видеоадаптер Майкрософт) и драйвер не устанавливается что бы вы не делали, попробуйте такой вариант: откройте диспетчер устройств, нажмите правой кнопкой мыши по видеоадаптеру и выберите «Обновить драйвер». Затем нажмите «Найти драйверы на этом компьютере» — «Выбрать драйвер из списка доступных драйверов на компьютере». Снимите отметку «Только совместимые устройства» и посмотрите, есть ли в списке NVIDIA и драйвер вашей видеокарты. Если есть — попробуйте его установить несмотря на предупреждения.

- Если драйвера в списке нет, попробуйте следующий метод: распакуйте .exe установщик драйвера NVIDIA с помощью архиватора: это точно умеет 7-Zip и, не исключено, что WinRAR. После распаковки, как и в предыдущем случае дойдите до этапа «Выбрать драйвер из списка доступных драйверов на компьютере», нажмите «Установить с диска» и укажите путь к файлу nv_dispi.inf (находится в папке Display.Driver с распакованными драйверами), подтвердите установку драйвера.

- Перед установкой драйвера NVIDIA установите остальные драйверы, в частности: интегрированной графики и, вручную, оригинальные драйверы чипсета и, при наличии — управления электропитанием от производителя устройства. Например, сталкивался с ситуацией, когда драйвер NVIDIA не устанавливался до тех пор, пока не были решены проблемы с устройствами Intel Serial IO в диспетчере устройств.
- Сообщение «Работают другие программы установки» обычно говорит о том, что вы действительно запустили установщик несколько раз, возможно, не дождавшись реакции после первого запуска». Решение — закрыть все процессы NVIDIA Install Application в диспетчере задач, запустить установку заново.

- Случается, что пользователь скачал с сайта NVIDIA драйвер, который действительно разработан не для его видеокарты или операционной системы. Если не уверены — перепроверьте и, при необходимости, загрузите драйвер снова, используя приведённую выше ссылку расширенного поиска драйверов на официальном сайте.


Если один из предложенных вариантов помог исправить проблему и успешно установить драйверы, буду благодарен комментарию с описанием как самой ситуации так и того, какой именно подход оказался работоспособным: возможно, это поможет кому-то ещё.
GeForce Experience — это унифицированный пакет драйверов и программного обеспечения от NVIDIA, который позволяет вам устанавливать последние обновления драйверов, как только выходит новая игра.
Однако вы можете столкнуться с трудностями, что приведет к появлению сообщений об ошибках, таких как установка драйвера GeForce Game Ready, которая не может быть продолжена.
Почему драйвер GeForce Game Ready не работает во время установки?
Установка драйверов GeForce Game Ready не может быть продолжена. Ошибка может возникнуть на вашем ПК по нескольким причинам:
- Устаревший драйвер видеокарты. В процессе установки драйверов GeForce Game Ready могут возникнуть проблемы, если драйвер видеокарты на вашем компьютере устарел.
- Устаревшая операционная система. Версия вашей ОС может быть несовместима с драйвером, который вы хотите установить, поэтому он не сможет установиться. Попробуйте обновить систему.
- Взаимодействие с другими приложениями. Такие приложения, как антивирус, могут повлиять на процесс установки, препятствуя его запуску на вашем устройстве.
- Проблемы с приложением GeForce Experience / установочными файлами. Один или несколько установочных файлов GeForce Experience могут быть повреждены или установка приложения не завершена.
Что делать, если драйверы GeForce не могут продолжить установку?
Прежде чем перейти к более сложным решениям, есть несколько предварительных шагов, которые могут быстро решить проблему:
- Перезапустите приложение и вашу систему. Как бы просто это ни казалось, это может исправить все, как по волшебству.
- Установите все последние обновления Windows. Обновление может содержать важные исправления или обновления драйверов, которых вам не хватает.
- Убедитесь, что на вашем диске есть как минимум 3 ГБ свободного места для установки GeForce Experience.
- Переустановите приложения Nvidia GeForce Experience и Nvidia Graphics Driver с помощью приложения Windows Settings.
Если эти предварительные исправления не помогли решить проблему с драйвером GeForce Game Ready, воспользуйтесь приведенными ниже решениями.
1. Обновите графический драйвер Nvidia.
- Нажмите клавиши Windows + R, чтобы вызвать консоль «Выполнить», введите devmgmt.msc в поле поиска и нажмите «ОК».
- В результатах поиска нажмите Видеоадаптеры и выберите драйвер Nvidia в раскрывающемся меню.

- Нажмите «Обновить программное обеспечение драйвера» и выберите «Автоматический поиск драйверов».


Перезагрузите компьютер после завершения процесса обновления и проверьте, можете ли вы установить драйвер GeForce Game Ready.
2. Отключите брандмауэр Защитника Windows.
- Нажмите «Пуск» и введите «Безопасность Windows» в поле поиска.
- Выберите Безопасность Windows в результатах поиска.
- Щелкните Защита от вирусов и угроз на вкладке Безопасность Windows.

- Затем выберите «Управление настройками» в разделе «Параметры защиты от вирусов и угроз».

- Выключите защиту в режиме реального времени и перезагрузите компьютер.


Если у вас установлен сторонний антивирус, откройте его настройки и временно отключите его оттуда.
3. Завершите все фоновые процессы NVIDIA.
- Нажмите на меню «Пуск», затем введите taskmgr в поле поиска.
- Выберите «Диспетчер задач» в результатах поиска.
- Перейдите на вкладку «Процессы» и найдите процессы NVIDIA, затем щелкните правой кнопкой мыши каждый и выберите параметр «Завершить задачу», чтобы завершить все процессы.

- Перезагрузите компьютер.

4. Установите драйвер GeForce вручную
- Перейдите на страницу загрузки драйверов Nvidia и найдите правильный драйвер Game Ready для вашей системы.

- Найдя драйвер, нажмите кнопку «Загрузить».

- Вам будет предложено опционально получить последнюю версию приложения GeForce Experience. Нажмите кнопку «Загрузить».

- После завершения загрузки нажмите Windows клавишу + E, чтобы запустить проводник, перейдите в папку «Загрузки», щелкните файл правой кнопкой мыши и выберите «Запуск от имени администратора».
- Пройдите установку и перезагрузите компьютер после этого.


5. Перезапустите службы NVIDIA.
- Нажмите клавишиWindows +, чтобы открыть диалоговое окно «Выполнить».R
- Введите services.msc и нажмите ENTER .

- Прокрутите и найдите службы, работающие в NVIDIA.

- Щелкните правой кнопкой мыши на каждом из них, чтобы выбрать параметр «Перезагрузить».


Мы рекомендуем вам перезагрузить компьютер и проверить, можете ли вы установить драйвер GeForce Game Ready.
Что произойдет, если я удалю GeForce Experience?
Удаление GeForce Experience на вашем компьютере не повлияет на его производительность. Однако вы не сможете получить доступ и использовать функции, которые поставляются с пакетом.
Рассмотрим, например, проверку последних версий драйверов для вашей видеокарты.
Это лучшие исправления для проблемы с установкой готового к игре драйвера GeForce. Если вы выполните все описанные шаги, проблема должна быть решена.
Если у вас есть какие-либо вопросы или потенциальные решения, которые могут сработать, сообщите нам об этом в разделе комментариев ниже.