Эти уроки подразумевают, что у вас уже установлен python и вы знаете как открыть IDLE. Рекомендую использовать python 3.7+.
Если он не установлен, посмотрите руководства здесь: https://pythonru.com/tag/skachat-i-ustanovit-python
Вывод «Hello World!» — это, наверное, один из самых распространенных ритуалов для всех языков программирования, поэтому при изучения основ функции print можно и взять его за основу.
Print — это как первая буква в алфавите программирования. В Python она отвечает за вывод данных пользователю.
print() используется для показа информации пользователю или программисту. Она не меняет значения, переменные или функции, а просто показывает данные.
Функция очень полезна для программиста, ведь помогает проверять значения, устанавливать напоминания или показывать сообщения на разных этапах процесса работы программы.
Правила использования
- Print работает с круглыми скобками. Вот корректный синтаксис:
print(). - Если нужно вывести текст, то его необходимо заключить в скобки:
print("Hello World"). - Символ
#используется для добавления комментариев в текст. Эти комментарии не выполняются и не выводятся. Они выступают всего лишь заметками для тех, кто работает с кодом.
Частые ошибки
- Нельзя выводить текст без скобок. Хотя такой подход и работает с Python 2, в Python 3 возникнет ошибка.
- Внутри функции print не нужно использовать кавычки при выводе значений переменных. Они нужны только для строк.
Переменная — сущность, которая хранит записанное значение. Например, в контакты телефона мы сохраняем номер под именем, что бы не запоминать его и не вводить каждый раз. В python мы сохраняем такие значения в переменные: pavel = "8 800 123 45 67"
>>> print("Hello, World!")

Hello, World!
Важные моменты:
- Текст для вывода должен быть заключен в скобки. Это правило синтаксиса, которому нужно следовать.
- Если выводится переменная, то кавычки не нужны, достаточно ввести название самой переменной. Как в следующем примере:
>>> my_message = "Этот текст выводим"

>>> print(my_message)

Этот текст выводим
Советы:
- Используйте запятую. Можно вывести несколько значений, разделив их запятыми.
print("Привет" , "меня зовут" , "Иван") - Параметр
sep. Помимо того, что можно увидеть, есть еще и параметрsep, который разделяет каждое значение указанным разделителем.print("Model S" , "Model 3" , sep="--") - Параметр
end. По умолчанию функция добавляет символ новой строки после каждого выполнения. Этого можно избежать с помощью параметраend. Ему также можно присвоить любое значение.print("Model S" , "Model 3" , end="|")print("100" , "200" , end="|")print("USA" , "France" , end="|")
>>> print("Привет" , "меня зовут" , "Иван")

Привет меня зовут Иван
>>># Это комментарий. Обычно здесь пишут пояснения своего кода. Эта строка не выполняется.

>>> print("Привет" , "меня зовут" , "Иван")

Привет меня зовут Иван
Можно увидеть, что в коде есть строка комментария, которая начинается с символа #. Она полностью игнорируется программой — ее можно воспринимать как заметку относительно содержания кода.
Задачи к уроку
Попробуйте решить задачи к этому уроку для закрепления знаний.
1. Отредактируйте код, что бы он выводил текст Добро пожаловать!.
# данный код
print("Hello world")
# требуемый вывод:
# Добро пожаловать!
2. Допишите код, что бы получить вывод: Функция print().
# данный код
my_text=""
print(my_text)
# требуемый вывод:
# Функция print()
3. Даны переменные name, surname и salary. Выведите требуемый текст.
# данный код
name = "Иван"
surname = "Петров"
salary = "90 000"
# требуемый вывод:
# Иван Петров зарабатывает 90 000 рублей
Файл со всем заданиями: https://gitlab.com/PythonRu/python-dlya-nachinayushih/-/blob/master/lesson_1.py.
Тест по функции print()
Пройдите тест к этому уроку для проверки знаний. В тесте 5 вопросов, количество попыток неограниченно.
Что выведет этот код: print «Hello»
Что выведет этот код:
name = "Alex"
print("name")
Какой код выведет строку «Пользователь-Qwerty-не-зарегистирован»
print(«пользователь-Qwerty-не-зарегистирован»)
print(«Пользователь-«, «Qwerty-«, «не-«, «зарегистирован»)
print(«Пользователь», «Qwerty», «не», «зарегистирован», end=»-«)
print(«Пользователь», «Qwerty», «не», «зарегистирован», sep=»-«)
print(«Пользователь», -, «Qwerty», -, «не», -, «зарегистирован»)
Что выведет этот код:
# print("Hello World", end="!")
print() — это…
функция python для вывода текста
команда python для записи текста
метод python для вывода текста
Если нашли ошибку, опечатку или знаете как улучшить этот урок, пишите на почту. Ее можно найти внизу сайта.
Обучение с трудоустройством
Python известен своим простым синтаксисом. Однако, когда вы изучаете Python в первый раз или когда вы попали на Python с большим опытом работы на другом языке программирования, вы можете столкнуться с некоторыми вещами, которые Python не позволяет. Если вы когда-либо получали + SyntaxError + при попытке запустить код Python, то это руководство может вам помочь. В этом руководстве вы увидите общие примеры неправильного синтаксиса в Python и узнаете, как решить эту проблему.
Неверный синтаксис в Python
Когда вы запускаете ваш код Python, интерпретатор сначала анализирует его, чтобы преобразовать в байтовый код Python, который он затем выполнит. Интерпретатор найдет любой недопустимый синтаксис в Python на этом первом этапе выполнения программы, также известном как этап синтаксического анализа . Если интерпретатор не может успешно проанализировать ваш код Python, это означает, что вы использовали неверный синтаксис где-то в вашем коде. Переводчик попытается показать вам, где произошла эта ошибка.
Когда вы изучаете Python в первый раз, может быть неприятно получить + SyntaxError +. Python попытается помочь вам определить, где в вашем коде указан неверный синтаксис, но предоставляемый им traceback может немного сбить с толку. Иногда код, на который он указывает, вполне подходит.
*Примечание:* Если ваш код *синтаксически* правильный, то вы можете получить другие исключения, которые не являются `+ SyntaxError +`. Чтобы узнать больше о других исключениях Python и о том, как их обрабатывать, ознакомьтесь с https://realpython.com/python-exceptions/[Python Exceptions: Введение].
Вы не можете обрабатывать неправильный синтаксис в Python, как и другие исключения. Даже если вы попытаетесь обернуть блок + try + и + кроме + вокруг кода с неверным синтаксисом, вы все равно увидите, что интерпретатор вызовет + SyntaxError +.
+ SyntaxError + Исключение и трассировка
Когда интерпретатор обнаруживает неверный синтаксис в коде Python, он вызовет исключение + SyntaxError + и предоставит трассировку с некоторой полезной информацией, которая поможет вам отладить ошибку. Вот некоторый код, который содержит недопустимый синтаксис в Python:
 1 # theofficefacts.py
 2 ages = {
 3     'pam': 24,
 4     'jim': 24
 5     'michael': 43
 6 }
 7 print(f'Michael is {ages["michael"]} years old.')
Вы можете увидеть недопустимый синтаксис в литерале словаря в строке 4. Во второй записи + 'jim' + пропущена запятая. Если вы попытаетесь запустить этот код как есть, вы получите следующую трассировку:
$ python theofficefacts.py
File "theofficefacts.py", line 5
    'michael': 43
            ^
SyntaxError: invalid syntax
Обратите внимание, что сообщение трассировки обнаруживает ошибку в строке 5, а не в строке 4. Интерпретатор Python пытается указать, где находится неправильный синтаксис. Тем не менее, он может только указать, где он впервые заметил проблему. Когда вы получите трассировку + SyntaxError + и код, на который указывает трассировка, выглядит нормально, тогда вы захотите начать движение назад по коду, пока не сможете определить, что не так.
В приведенном выше примере нет проблемы с запятой, в зависимости от того, что следует после нее. Например, нет проблемы с отсутствующей запятой после + 'michael' + в строке 5. Но как только переводчик сталкивается с чем-то, что не имеет смысла, он может лишь указать вам на первое, что он обнаружил, что он не может понять.
*Примечание:* В этом руководстве предполагается, что вы знакомы с основами *tracebacks* в Python. Чтобы узнать больше о трассировке Python и о том, как их читать, ознакомьтесь с https://realpython.com/python-traceback/[Understanding Python Traceback].
Существует несколько элементов трассировки + SyntaxError +, которые могут помочь вам определить, где в вашем коде содержится неверный синтаксис:
-
Имя файла , где встречается неверный синтаксис
-
Номер строки и воспроизводимая строка кода, где возникла проблема
-
Знак (
+ ^ +) в строке ниже воспроизводимого кода, который показывает точку в коде, которая имеет проблему -
Сообщение об ошибке , которое следует за типом исключения
+ SyntaxError +, которое может предоставить информацию, которая поможет вам определить проблему
В приведенном выше примере имя файла было + theofficefacts.py +, номер строки был 5, а каретка указывала на закрывающую кавычку из словарного ключа + michael +. Трассировка + SyntaxError + может не указывать на реальную проблему, но она будет указывать на первое место, где интерпретатор не может понять синтаксис.
Есть два других исключения, которые вы можете увидеть в Python. Они эквивалентны + SyntaxError +, но имеют разные имена:
-
+ +IndentationError -
+ +TabError
Оба эти исключения наследуются от класса + SyntaxError +, но это особые случаи, когда речь идет об отступе. + IndentationError + возникает, когда уровни отступа вашего кода не совпадают. + TabError + возникает, когда ваш код использует и табуляцию, и пробелы в одном файле. Вы познакомитесь с этими исключениями более подробно в следующем разделе.
Общие проблемы с синтаксисом
Когда вы впервые сталкиваетесь с + SyntaxError +, полезно знать, почему возникла проблема и что вы можете сделать, чтобы исправить неверный синтаксис в вашем коде Python. В следующих разделах вы увидите некоторые из наиболее распространенных причин, по которым может быть вызвано «+ SyntaxError +», и способы их устранения.
Неправильное использование оператора присваивания (+ = +)
В Python есть несколько случаев, когда вы не можете назначать объекты. Некоторые примеры присваивают литералам и вызовам функций. В приведенном ниже блоке кода вы можете увидеть несколько примеров, которые пытаются это сделать, и получающиеся в результате трассировки + SyntaxError +:
>>>
>>> len('hello') = 5
  File "<stdin>", line 1
SyntaxError: can't assign to function call

>>> 'foo' = 1
  File "<stdin>", line 1
SyntaxError: can't assign to literal

>>> 1 = 'foo'
  File "<stdin>", line 1
SyntaxError: can't assign to literal
Первый пример пытается присвоить значение + 5 + вызову + len () +. Сообщение + SyntaxError + очень полезно в этом случае. Он говорит вам, что вы не можете присвоить значение вызову функции.
Второй и третий примеры пытаются присвоить литералам строку и целое число. То же правило верно и для других литеральных значений. И снова сообщения трассировки указывают, что проблема возникает, когда вы пытаетесь присвоить значение литералу.
*Примечание:* В приведенных выше примерах отсутствует повторяющаяся строка кода и каретка (`+ ^ +`), указывающая на проблему в трассировке. Исключение и обратная трассировка, которые вы видите, будут другими, когда вы находитесь в REPL и пытаетесь выполнить этот код из файла. Если бы этот код был в файле, то вы бы получили повторяющуюся строку кода и указали на проблему, как вы видели в других случаях в этом руководстве.
Вероятно, ваше намерение не состоит в том, чтобы присвоить значение литералу или вызову функции. Например, это может произойти, если вы случайно пропустите дополнительный знак равенства (+ = +), что превратит назначение в сравнение. Сравнение, как вы можете видеть ниже, будет правильным:
>>>
>>> len('hello') == 5
True
В большинстве случаев, когда Python сообщает вам, что вы делаете присвоение чему-то, что не может быть назначено, вы сначала можете проверить, чтобы убедиться, что оператор не должен быть логическим выражением. Вы также можете столкнуться с этой проблемой, когда пытаетесь присвоить значение ключевому слову Python, о котором вы расскажете в следующем разделе.
Неправильное написание, отсутствие или неправильное использование ключевых слов Python
Ключевые слова Python — это набор защищенных слов , которые имеют особое значение в Python. Это слова, которые вы не можете использовать в качестве идентификаторов, переменных или имен функций в своем коде. Они являются частью языка и могут использоваться только в контексте, который допускает Python.
Существует три распространенных способа ошибочного использования ключевых слов:
-
Неправильное написание ключевое слово
-
Отсутствует ключевое слово
-
Неправильное использование ключевого слова
Если вы неправильно написали ключевое слово в своем коде Python, вы получите + SyntaxError +. Например, вот что происходит, если вы пишете ключевое слово + for + неправильно:
>>>
>>> fro i in range(10):
  File "<stdin>", line 1
    fro i in range(10):
        ^
SyntaxError: invalid syntax
Сообщение читается как + SyntaxError: неверный синтаксис +, но это не очень полезно. Трассировка указывает на первое место, где Python может обнаружить, что что-то не так. Чтобы исправить эту ошибку, убедитесь, что все ваши ключевые слова Python написаны правильно.
Другая распространенная проблема с ключевыми словами — это когда вы вообще их пропускаете:
>>>
>>> for i range(10):
  File "<stdin>", line 1
    for i range(10):
              ^
SyntaxError: invalid syntax
Еще раз, сообщение об исключении не очень полезно, но трассировка действительно пытается указать вам правильное направление. Если вы отойдете от каретки, то увидите, что ключевое слово + in + отсутствует в синтаксисе цикла + for +.
Вы также можете неправильно использовать защищенное ключевое слово Python. Помните, что ключевые слова разрешено использовать только в определенных ситуациях. Если вы используете их неправильно, у вас будет неправильный синтаксис в коде Python. Типичным примером этого является использование https://realpython.com/python-for-loop/#the-break-and-continue-statements [+ continue + или + break +] вне цикла. Это может легко произойти во время разработки, когда вы реализуете вещи и когда-то перемещаете логику за пределы цикла:
>>>
>>> names = ['pam', 'jim', 'michael']
>>> if 'jim' in names:
...     print('jim found')
...     break
...
  File "<stdin>", line 3
SyntaxError: 'break' outside loop

>>> if 'jim' in names:
...     print('jim found')
...     continue
...
  File "<stdin>", line 3
SyntaxError: 'continue' not properly in loop
Здесь Python отлично говорит, что именно не так. Сообщения " 'break' вне цикла " и " 'continue' не в цикле должным образом " помогут вам точно определить, что делать. Если бы этот код был в файле, то Python также имел бы курсор, указывающий прямо на неправильно использованное ключевое слово.
Другой пример — если вы пытаетесь назначить ключевое слово Python переменной или использовать ключевое слово для определения функции:
>>>
>>> pass = True
  File "<stdin>", line 1
    pass = True
         ^
SyntaxError: invalid syntax

>>> def pass():
  File "<stdin>", line 1
    def pass():
           ^
SyntaxError: invalid syntax
Когда вы пытаетесь присвоить значение + pass +, или когда вы пытаетесь определить новую функцию с именем + pass +, вы получите ` + SyntaxError + и снова увидеть сообщение + «неверный синтаксис» + `.
Может быть немного сложнее решить этот тип недопустимого синтаксиса в коде Python, потому что код выглядит хорошо снаружи. Если ваш код выглядит хорошо, но вы все еще получаете + SyntaxError +, то вы можете рассмотреть возможность проверки имени переменной или имени функции, которое вы хотите использовать, по списку ключевых слов для версии Python, которую вы используете.
Список защищенных ключевых слов менялся с каждой новой версией Python. Например, в Python 3.6 вы можете использовать + await + в качестве имени переменной или имени функции, но в Python 3.7 это слово было добавлено в список ключевых слов. Теперь, если вы попытаетесь использовать + await + в качестве имени переменной или функции, это вызовет + SyntaxError +, если ваш код для Python 3.7 или более поздней версии.
Другим примером этого является + print +, который отличается в Python 2 от Python 3:
| Version | print Type |
Takes A Value |
|---|---|---|
|
Python 2 |
keyword |
no |
|
Python 3 |
built-in function |
yes |
+ print + — это ключевое слово в Python 2, поэтому вы не можете присвоить ему значение. Однако в Python 3 это встроенная функция, которой можно присваивать значения.
Вы можете запустить следующий код, чтобы увидеть список ключевых слов в любой версии Python, которую вы используете:
import keyword
print(keyword.kwlist)
+ keyword + также предоставляет полезную + keyword.iskeyword () +. Если вам просто нужен быстрый способ проверить переменную + pass +, то вы можете использовать следующую однострочную строку:
>>>
>>> import keyword; keyword.iskeyword('pass')
True
Этот код быстро сообщит вам, является ли идентификатор, который вы пытаетесь использовать, ключевым словом или нет.
Отсутствующие скобки, скобки и цитаты
Часто причиной неправильного синтаксиса в коде Python являются пропущенные или несовпадающие закрывающие скобки, скобки или кавычки. Их может быть трудно обнаружить в очень длинных строках вложенных скобок или длинных многострочных блоках. Вы можете найти несоответствующие или пропущенные кавычки с помощью обратных трассировок Python:
>>>
>>> message = 'don't'
  File "<stdin>", line 1
    message = 'don't'
                   ^
SyntaxError: invalid syntax
Здесь трассировка указывает на неверный код, где после закрывающей одинарной кавычки стоит + t '+. Чтобы это исправить, вы можете сделать одно из двух изменений:
-
Escape одиночная кавычка с обратной косой чертой (
+ 'don ' t '+) -
Окружить всю строку в двойных кавычках (
" не ")
Другая распространенная ошибка — забыть закрыть строку. Как для строк с двойными, так и с одинарными кавычками ситуация и обратная трассировка одинаковы:
>>>
>>> message = "This is an unclosed string
  File "<stdin>", line 1
    message = "This is an unclosed string
                                        ^
SyntaxError: EOL while scanning string literal
На этот раз каретка в трассировке указывает прямо на код проблемы. Сообщение + SyntaxError +, " EOL при сканировании строкового литерала ", немного более конкретно и полезно при определении проблемы. Это означает, что интерпретатор Python дошел до конца строки (EOL) до закрытия открытой строки. Чтобы это исправить, закройте строку с кавычкой, которая совпадает с той, которую вы использовали для ее запуска. В этом случае это будет двойная кавычка (`+» + `).
Кавычки, отсутствующие в инструкциях внутри f-string, также могут привести к неверному синтаксису в Python:
 1 # theofficefacts.py
 2 ages = {
 3     'pam': 24,
 4     'jim': 24,
 5     'michael': 43
 6 }
 7 print(f'Michael is {ages["michael]} years old.')
Здесь, ссылка на словарь + ages + внутри напечатанной f-строки пропускает закрывающую двойную кавычку из ссылки на ключ. Итоговая трассировка выглядит следующим образом:
$ python theofficefacts.py
  File "theofficefacts.py", line 7
    print(f'Michael is {ages["michael]} years old.')
         ^
SyntaxError: f-string: unterminated string
Python идентифицирует проблему и сообщает, что она существует внутри f-строки. Сообщение " неопределенная строка " также указывает на проблему. Каретка в этом случае указывает только на начало струны.
Это может быть не так полезно, как когда каретка указывает на проблемную область струны, но она сужает область поиска. Где-то внутри этой f-строки есть неопределенная строка. Вы просто должны узнать где. Чтобы решить эту проблему, убедитесь, что присутствуют все внутренние кавычки и скобки f-строки.
Ситуация в основном отсутствует в скобках и скобках. Например, если вы исключите закрывающую квадратную скобку из списка, Python обнаружит это и укажет на это. Однако есть несколько вариантов этого. Первый — оставить закрывающую скобку вне списка:
# missing.py
def foo():
    return [1, 2, 3

print(foo())
Когда вы запустите этот код, вам скажут, что есть проблема с вызовом + print () +:
$ python missing.py
  File "missing.py", line 5
    print(foo())
        ^
SyntaxError: invalid syntax
Здесь происходит то, что Python думает, что список содержит три элемента: + 1 +, + 2 + и +3 print (foo ()) +. Python использует whitespace для логической группировки вещей, и потому что нет запятой или скобки, отделяющей + 3 + от `+ print (foo ()) + `, Python объединяет их вместе как третий элемент списка.
Еще один вариант — добавить запятую после последнего элемента в списке, оставляя при этом закрывающую квадратную скобку:
# missing.py
def foo():
    return [1, 2, 3,

print(foo())
Теперь вы получаете другую трассировку:
$ python missing.py
  File "missing.py", line 6

                ^
SyntaxError: unexpected EOF while parsing
В предыдущем примере + 3 + и + print (foo ()) + были объединены в один элемент, но здесь вы видите запятую, разделяющую два. Теперь вызов + print (foo ()) + добавляется в качестве четвертого элемента списка, и Python достигает конца файла без закрывающей скобки. В трассировке говорится, что Python дошел до конца файла (EOF), но ожидал чего-то другого.
В этом примере Python ожидал закрывающую скобку (+] +), но повторяющаяся строка и каретка не очень помогают. Отсутствующие круглые скобки и скобки сложно определить Python. Иногда единственное, что вы можете сделать, это начать с каретки и двигаться назад, пока вы не сможете определить, чего не хватает или что нет.
Ошибочный синтаксис словаря
Вы видели ссылку: # syntaxerror-exception-and-traceback [ранее], чтобы вы могли получить + SyntaxError +, если не указывать запятую в словарном элементе. Другая форма недопустимого синтаксиса в словарях Python — это использование знака равенства (+ = +) для разделения ключей и значений вместо двоеточия:
>>>
>>> ages = {'pam'=24}
  File "<stdin>", line 1
    ages = {'pam'=24}
                 ^
SyntaxError: invalid syntax
Еще раз, это сообщение об ошибке не очень полезно. Повторная линия и каретка, однако, очень полезны! Они указывают прямо на характер проблемы.
Этот тип проблемы распространен, если вы путаете синтаксис Python с синтаксисом других языков программирования. Вы также увидите это, если перепутаете определение словаря с вызовом + dict () +. Чтобы это исправить, вы можете заменить знак равенства двоеточием. Вы также можете переключиться на использование + dict () +:
>>>
>>> ages = dict(pam=24)
>>> ages
{'pam': 24}
Вы можете использовать + dict () + для определения словаря, если этот синтаксис более полезен.
Использование неправильного отступа
Существует два подкласса + SyntaxError +, которые конкретно занимаются проблемами отступов:
-
+ +IndentationError -
+ +TabError
В то время как другие языки программирования используют фигурные скобки для обозначения блоков кода, Python использует whitespace. Это означает, что Python ожидает, что пробелы в вашем коде будут вести себя предсказуемо. Он вызовет + IndentationError + , если в блоке кода есть строка с неправильным количеством пробелов:
 1 # indentation.py
 2 def foo():
 3     for i in range(10):
 4         print(i)
 5   print('done')
 6
 7 foo()
Это может быть сложно увидеть, но в строке 5 есть только два пробела с отступом. Он должен соответствовать выражению цикла + for +, которое на 4 пробела больше. К счастью, Python может легко определить это и быстро расскажет вам, в чем проблема.
Здесь также есть некоторая двусмысленность. Является ли строка + print ('done') + after циклом + for + или inside блоком цикла + for +? Когда вы запустите приведенный выше код, вы увидите следующую ошибку:
$ python indentation.py
  File "indentation.py", line 5
    print('done')
                ^
IndentationError: unindent does not match any outer indentation level
Хотя трассировка выглядит во многом как трассировка + SyntaxError +, на самом деле это + IndentationError +. Сообщение об ошибке также очень полезно. Он говорит вам, что уровень отступа строки не соответствует ни одному другому уровню отступа. Другими словами, + print ('done') + это отступ с двумя пробелами, но Python не может найти любую другую строку кода, соответствующую этому уровню отступа. Вы можете быстро это исправить, убедившись, что код соответствует ожидаемому уровню отступа.
Другой тип + SyntaxError + — это + TabError + , который вы будете видеть всякий раз, когда есть строка, содержащая либо табуляцию, либо пробелы для отступа, в то время как остальная часть файла содержит другую. Это может скрыться, пока Python не покажет это вам!
Если размер вкладки равен ширине пробелов на каждом уровне отступа, то может показаться, что все строки находятся на одном уровне. Однако, если одна строка имеет отступ с использованием пробелов, а другая — с помощью табуляции, Python укажет на это как на проблему:
 1 # indentation.py
 2 def foo():
 3     for i in range(10):
 4         print(i)
 5     print('done')
 6
 7 foo()
Здесь строка 5 имеет отступ вместо 4 пробелов. Этот блок кода может выглядеть идеально для вас, или он может выглядеть совершенно неправильно, в зависимости от настроек вашей системы.
Python, однако, сразу заметит проблему. Но прежде чем запускать код, чтобы увидеть, что Python скажет вам, что это неправильно, вам может быть полезно посмотреть пример того, как код выглядит при различных настройках ширины вкладки:
$ tabs 4 # Sets the shell tab width to 4 spaces
$ cat -n indentation.py
     1   # indentation.py
     2   def foo():
     3       for i in range(10)
     4           print(i)
     5       print('done')
     6
     7   foo()

$ tabs 8 # Sets the shell tab width to 8 spaces (standard)
$ cat -n indentation.py
     1   # indentation.py
     2   def foo():
     3       for i in range(10)
     4           print(i)
     5           print('done')
     6
     7   foo()

$ tabs 3 # Sets the shell tab width to 3 spaces
$ cat -n indentation.py
     1   # indentation.py
     2   def foo():
     3       for i in range(10)
     4           print(i)
     5      print('done')
     6
     7   foo()
Обратите внимание на разницу в отображении между тремя примерами выше. Большая часть кода использует 4 пробела для каждого уровня отступа, но строка 5 использует одну вкладку во всех трех примерах. Ширина вкладки изменяется в зависимости от настройки tab width :
-
Если ширина вкладки равна 4 , то оператор
+ print +будет выглядеть так, как будто он находится вне цикла+ for +. Консоль выведет+ 'done' +в конце цикла. -
Если ширина табуляции равна 8 , что является стандартным для многих систем, то оператор
+ print +будет выглядеть так, как будто он находится внутри цикла+ for +. Консоль будет печатать+ 'done' +после каждого числа. -
Если ширина табуляции равна 3 , то оператор
+ print +выглядит неуместно. В этом случае строка 5 не соответствует ни одному уровню отступа.
Когда вы запустите код, вы получите следующую ошибку и трассировку:
$ python indentation.py
  File "indentation.py", line 5
    print('done')
                ^
TabError: inconsistent use of tabs and spaces in indentation
Обратите внимание на + TabError + вместо обычного + SyntaxError +. Python указывает на проблемную строку и дает вам полезное сообщение об ошибке. Это ясно говорит о том, что в одном и том же файле для отступа используется смесь вкладок и пробелов.
Решение этой проблемы состоит в том, чтобы все строки в одном и том же файле кода Python использовали либо табуляции, либо пробелы, но не обе. Для приведенных выше блоков кода исправление будет состоять в том, чтобы удалить вкладку и заменить ее на 4 пробела, которые будут печатать + 'done' + после завершения цикла + for +.
Определение и вызов функций
Вы можете столкнуться с неверным синтаксисом в Python, когда вы определяете или вызываете функции. Например, вы увидите + SyntaxError +, если будете использовать точку с запятой вместо двоеточия в конце определения функции:
>>>
>>> def fun();
  File "<stdin>", line 1
    def fun();
             ^
SyntaxError: invalid syntax
Трассировка здесь очень полезна, с помощью каретки, указывающей прямо на символ проблемы. Вы можете очистить этот неверный синтаксис в Python, отключив точку с запятой для двоеточия.
Кроме того, ключевые аргументы как в определениях функций, так и в вызовах функций должны быть в правильном порядке. Аргументы ключевых слов always идут после позиционных аргументов. Отказ от использования этого порядка приведет к + SyntaxError +:
>>>
>>> def fun(a, b):
...     print(a, b)
...
>>> fun(a=1, 2)
  File "<stdin>", line 1
SyntaxError: positional argument follows keyword argument
Здесь, еще раз, сообщение об ошибке очень полезно, чтобы рассказать вам точно, что не так со строкой.
Изменение версий Python
Иногда код, который прекрасно работает в одной версии Python, ломается в более новой версии. Это связано с официальными изменениями в синтаксисе языка. Наиболее известным примером этого является оператор + print +, который перешел от ключевого слова в Python 2 к встроенной функции в Python 3:
>>>
>>> # Valid Python 2 syntax that fails in Python 3
>>> print 'hello'
  File "<stdin>", line 1
    print 'hello'
                ^
SyntaxError: Missing parentheses in call to 'print'. Did you mean print('hello')?
Это один из примеров, где появляется сообщение об ошибке, сопровождающее + SyntaxError +! Он не только сообщает вам, что в вызове + print + отсутствует скобка, но также предоставляет правильный код, который поможет вам исправить оператор.
Другая проблема, с которой вы можете столкнуться, — это когда вы читаете или изучаете синтаксис, который является допустимым синтаксисом в более новой версии Python, но недопустим в той версии, в которую вы пишете. Примером этого является синтаксис f-string, которого нет в версиях Python до 3.6:
>>>
>>> # Any version of python before 3.6 including 2.7
>>> w ='world'
>>> print(f'hello, {w}')
  File "<stdin>", line 1
    print(f'hello, {w}')
                      ^
SyntaxError: invalid syntax
В версиях Python до 3.6 интерпретатор ничего не знает о синтаксисе f-строки и просто предоставляет общее сообщение «» неверный синтаксис «`. Проблема, в данном случае, в том, что код looks прекрасно работает, но он был запущен с более старой версией Python. В случае сомнений перепроверьте, какая версия Python у вас установлена!
Синтаксис Python продолжает развиваться, и в Python 3.8 появилось несколько интересных новых функций:
-
Walrus оператор (выражения присваивания)
-
F-string синтаксис для отладки
*https://docs.python.org/3.8/whatsnew/3.8.html#positional-only-parameters[Positional-only arguments]
Если вы хотите опробовать некоторые из этих новых функций, то вам нужно убедиться, что вы работаете в среде Python 3.8. В противном случае вы получите + SyntaxError +.
Python 3.8 также предоставляет новый* + SyntaxWarning + *. Вы увидите это предупреждение в ситуациях, когда синтаксис допустим, но все еще выглядит подозрительно. Примером этого может быть отсутствие запятой между двумя кортежами в списке. Это будет действительный синтаксис в версиях Python до 3.8, но код вызовет + TypeError +, потому что кортеж не может быть вызван:
>>>
>>> [(1,2)(2,3)]
Traceback (most recent call last):
  File "<stdin>", line 1, in <module>
TypeError: 'tuple' object is not callable
Этот + TypeError + означает, что вы не можете вызывать кортеж, подобный функции, что, как думает интерпретатор Python, вы делаете.
В Python 3.8 этот код все еще вызывает + TypeError +, но теперь вы также увидите + SyntaxWarning +, который указывает, как вы можете решить проблему:
>>>
>>> [(1,2)(2,3)]
<stdin>:1: SyntaxWarning: 'tuple' object is not callable; perhaps you missed a comma?
Traceback (most recent call last):
  File "<stdin>", line 1, in <module>
TypeError: 'tuple' object is not callable
Полезное сообщение, сопровождающее новый + SyntaxWarning +, даже дает подсказку (" возможно, вы пропустили запятую? "), Чтобы указать вам правильное направление!
Заключение
В этом руководстве вы увидели, какую информацию предоставляет обратная связь + SyntaxError +. Вы также видели много распространенных примеров неправильного синтаксиса в Python и каковы решения этих проблем. Это не только ускорит ваш рабочий процесс, но и сделает вас более полезным рецензентом кода!
Когда вы пишете код, попробуйте использовать IDE, который понимает синтаксис Python и предоставляет обратную связь. Если вы поместите многие из недопустимых примеров кода Python из этого руководства в хорошую IDE, то они должны выделить проблемные строки, прежде чем вы даже сможете выполнить свой код.
Получение + SyntaxError + во время изучения Python может быть неприятным, но теперь вы знаете, как понимать сообщения трассировки и с какими формами недопустимого синтаксиса в Python вы можете столкнуться. В следующий раз, когда вы получите + SyntaxError +, у вас будет больше возможностей быстро решить проблему!
Print() – наверное, самая первая команда, с которой сталкивается новичок при изучении Python с нуля. Почти все начинают с вывода на экран простого приветствия и переходят к дальнейшему изучению синтаксиса, функций и методов языка, не задумываясь о дополнительных возможностях print(). Однако в Python 3 эта команда предоставляет доступ к базовой функции вывода данных с присущими ей параметрами и возможностями. Знание этих особенностей позволит оптимизировать вывод данных для каждого конкретного случая.
Содержание
- Преимущества функции print () в Python 3
- Особенности синтаксиса print() в Python 3
- Параметр sep
- Параметр end
- Параметр file
- Параметр flush
- Вывод значений переменных с помощью print()
- Заключение
Преимущества функции print() в Python 3
В третьей версии Python print() входит в базовый набор функций. При выполнении проверки type(print) выводится информация: class ‘builtin_function_or_method‘. Слово builtin указывает на то, что проверяемая функция встроенная.
В Python 3 выводимые объекты (objects) помещают в скобках после слова print. На примере вывода традиционного приветствия это будет выглядеть так:
Для Python 3: print(‘Hello, World!’).
В Python 2 оператор применяется без скобок: print ‘Hello, World!’
Результат в обеих версиях будет одинаковый: Hello, World!
Если во второй версии Python значения после print поместить в скобки, тогда выведен будет кортеж – тип данных, представляющий собой неизменяемый список:
print(1, ‘first’, 2, ‘second’)
(1, ‘ first’, 2, ‘ second ‘)
При попытке убрать скобки после print в третьей версии Python, программа выдаст синтаксическую ошибку.
File "<ipython-input-6-a1fcabcd869c>", line 1
    print "Hello, World!"
                        ^
SyntaxError: Missing parentheses in call to 'print'. Did you mean print("Hello, World!")?
Особенности синтаксиса print() в Python 3
Синтаксис функции print() включает собственно объект или объекты (objects), которые также могут называться значениями (values) или элементами (items), и несколько параметров. То, как именно будут выводиться объекты, определяется четырьмя именованными аргументами: разделителем элементов (sep), строкой, выводимой после всех объектов (end), файлом, куда выводятся данные (file), и параметром, отвечающим за буферизацию вывода (flush).
print(value, ..., sep='', end='n', file=sys.stdout, flush=False)
Вызов функции возможен без указания значений параметров и даже без каких-либо объектов: print(). В этом случае задействованы параметры по умолчанию, и при отсутствии элементов выведется неотображаемый символ пустой строки – фактически, значение параметра end – ‘n‘. Такой вызов, к примеру, можно использовать для вертикального отступа между выводами.
В поток данных записываются все аргументы (объекты), не относящиеся к ключевым словам, преобразованные в строки, разделенные sep и завершаемые end. Аргументы параметров sep и end также имеют строковый тип, они могут не указываться при использовании дефолтных значений.
Параметр sep
Значения всех параметров print описываются в виде аргументов ключевых слов sep, end, file, flush. Если параметр sep не указывается, то применяется его дефолтное значение: sep=’ ‘, и выводимые объекты разделяются пробелами. Пример:
print(1, 2, 3)
1 2 3
В качестве аргумента sep можно указать другое значение, например:
- разделитель отсутствует sep=»;
- вывод с новой строки sep=‘n’;
- или любую строку:
print(1, 2, 3, sep=’слово-разделитель’)
1слово-разделитель2слово-разделитель3
Параметр end
По умолчанию end=’n’, и вывод объектов завершается переходом на новую строку. Замена дефолтного значения другим аргументом, например, end=», приведет к изменению формата выводимых данных:
print(‘one_’, end=»)
print(‘two_’, end=»)
print(‘three’)
one_two_three
Параметр file
Функционал print() поддерживает перенаправление вывода с помощью параметра file, который по умолчанию ссылается на sys.stdout – стандартный вывод. Значение может быть изменено на sys.stdin или sys.stderr. Файловый объект stdin применяется для входных данных, а stderr для отправки подсказок интерпретатора и сообщений об ошибках. С помощью параметра file можно задать вывод в файл. Это могут быть файлы формата .csv или .txt. Возможный вариант записи строки в файл:
fileitem = open(‘printfile.txt’,’a’)
def test(objects):
for element in objects:
print(element, file=fileitem)
fileitem.close()
test([10,9,8,7,6,5,4,3,2,1])
На выходе элементы списка будут записаны в printfile.txt по одному в строке.
Параметр flush
Этот параметр имеет отношение к буферизации потока данных и, поскольку он является логическим, может принимать два значения – True и False. По умолчанию параметр отключен: flush=False. Это означает, что сохранение данных из внутреннего буфера в файл будет происходить только после закрытия файла или после непосредственного вызова flush(). Для сохранения после каждого вызова print() параметру требуется присвоить значение True:
file_flush = open(r’file_flush.txt’, ‘a’)
print(«Запись строки в файл«, file=file_flush, flush=True)
print(«Запись второй строки в файл«, file=file_flush, flush=True)
file_flush.close()
Еще один пример использования параметра flush с помощью модуля time:
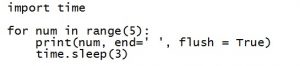
В этом случае аргумент True параметра flush позволит выводить числа по одному в три секунды, в то время как по умолчанию все числа были бы выведены на экран по истечении 15 секунд. Чтобы наглядно увидеть действие параметра flush, лучше запустить скрипт в консоли. Дело в том, что при использовании некоторых веб-оболочек, в частности, Jupyter Notebook, программа реализуется иначе (без учета параметра flush).
Вывод значений переменных с помощью print()
При выводе строки, содержащей присвоенное переменной значение, достаточно указать через запятую нужный идентификатор (имя переменной). Тип переменной указывать не следует, поскольку print преобразует данные любого типа в строки. Приведем пример:
a = 0
b = ‘Python from scratch’
print(a,’– число, а‘,b,’– строка.’)
0 – число, а Python from scratch – строка.
Еще один инструмент для передачи значений переменных на вывод – метод format. Print при этом выступает в качестве шаблона, в котором вместо имен переменных в фигурных скобках указываются индексы позиционных аргументов:
a = 0
b = ‘Python from scratch’
print(‘{0} является числом, а {1} – строкой.’.format(a,b))
0 является числом, а Python from scratch – строкой.
Вместо format может быть использован символ %, который работает по тому же принципу заполнителей (в предыдущем примере роль заполнителей выполняли фигурные скобки). В этом случае номера индексов заменяются типом данных, получаемым функцией:
- заполнитель %d применяют для числовых данных;
- заполнитель %s – для строк.
a = 0
b = ‘Python from scratch’
print(‘%d является числом, а %s – строкой.’%(a,b))
0 является числом, а Python from scratch – строкой.
Если вместо заполнителя для целых чисел %d указать %s, функция print преобразует число в строку, и код сработает правильно. Но при замене %s на %d будет выведено сообщение об ошибке, поскольку обратная конвертация не осуществляется.
![]()
Заключение
С помощью функции print могут быть реализованы различные варианты вывода данных. Помимо описанных в этой статье способов, существуют и другие возможности применения этого инструмента, которые станут доступны по мере углубления в мир программирования Python.
Оцените качество статьи. Нам важно ваше мнение:
Watch Now This tutorial has a related video course created by the Real Python team. Watch it together with the written tutorial to deepen your understanding: The Python print() Function: Go Beyond the Basics
If you’re like most Python users, including me, then you probably started your Python journey by learning about print(). It helped you write your very own hello world one-liner. You can use it to display formatted messages onto the screen and perhaps find some bugs. But if you think that’s all there is to know about Python’s print() function, then you’re missing out on a lot!
Keep reading to take full advantage of this seemingly boring and unappreciated little function. This tutorial will get you up to speed with using Python print() effectively. However, prepare for a deep dive as you go through the sections. You may be surprised how much print() has to offer!
By the end of this tutorial, you’ll know how to:
- Avoid common mistakes with Python’s
print() - Deal with newlines, character encodings, and buffering
- Write text to files
- Mock
print()in unit tests - Build advanced user interfaces in the terminal
If you’re a complete beginner, then you’ll benefit most from reading the first part of this tutorial, which illustrates the essentials of printing in Python. Otherwise, feel free to skip that part and jump around as you see fit.
Printing in a Nutshell
Let’s jump in by looking at a few real-life examples of printing in Python. By the end of this section, you’ll know every possible way of calling print(). Or, in programmer lingo, you’d say you’ll be familiar with the function signature.
Calling print()
The simplest example of using Python print() requires just a few keystrokes:
You don’t pass any arguments, but you still need to put empty parentheses at the end, which tell Python to actually execute the function rather than just refer to it by name.
This will produce an invisible newline character, which in turn will cause a blank line to appear on your screen. You can call print() multiple times like this to add vertical space. It’s just as if you were hitting Enter on your keyboard in a word processor.
A newline character is a special control character used to indicate the end of a line (EOL). It usually doesn’t have a visible representation on the screen, but some text editors can display such non-printable characters with little graphics.
The word “character” is somewhat of a misnomer in this case, because a newline is often more than one character long. For example, the Windows operating system, as well as the HTTP protocol, represent newlines with a pair of characters. Sometimes you need to take those differences into account to design truly portable programs.
To find out what constitutes a newline in your operating system, use Python’s built-in os module.
This will immediately tell you that Windows and DOS represent the newline as a sequence of r followed by n:
>>>
>>> import os
>>> os.linesep
'rn'
On Unix, Linux, and recent versions of macOS, it’s a single n character:
>>>
>>> import os
>>> os.linesep
'n'
The classic Mac OS X, however, sticks to its own “think different” philosophy by choosing yet another representation:
>>>
>>> import os
>>> os.linesep
'r'
Notice how these characters appear in string literals. They use special syntax with a preceding backslash () to denote the start of an escape character sequence. Such sequences allow for representing control characters, which would be otherwise invisible on screen.
Most programming languages come with a predefined set of escape sequences for special characters such as these:
\: backslashb: backspacet: tabr: carriage return (CR)n: newline, also known as line feed (LF)
The last two are reminiscent of mechanical typewriters, which required two separate commands to insert a newline. The first command would move the carriage back to the beginning of the current line, while the second one would advance the roll to the next line.
By comparing the corresponding ASCII character codes, you’ll see that putting a backslash in front of a character changes its meaning completely. However, not all characters allow for this–only the special ones.
To compare ASCII character codes, you may want to use the built-in ord() function:
>>>
>>> ord('r')
114
>>> ord('r')
13
Keep in mind that, in order to form a correct escape sequence, there must be no space between the backslash character and a letter!
As you just saw, calling print() without arguments results in a blank line, which is a line comprised solely of the newline character. Don’t confuse this with an empty line, which doesn’t contain any characters at all, not even the newline!
You can use Python’s string literals to visualize these two:
'n'  # Blank line
''    # Empty line
The first one is one character long, whereas the second one has no content.
In a more common scenario, you’d want to communicate some message to the end user. There are a few ways to achieve this.
First, you may pass a string literal directly to print():
>>>
>>> print('Please wait while the program is loading...')
This will print the message verbatim onto the screen.
String literals in Python can be enclosed either in single quotes (') or double quotes ("). According to the official PEP 8 style guide, you should just pick one and keep using it consistently. There’s no difference, unless you need to nest one in another.
For example, you can’t use double quotes for the literal and also include double quotes inside of it, because that’s ambiguous for the Python interpreter:
"My favorite book is "Python Tricks"" # Wrong!
What you want to do is enclose the text, which contains double quotes, within single quotes:
'My favorite book is "Python Tricks"'
The same trick would work the other way around:
"My favorite book is 'Python Tricks'"
Alternatively, you could use escape character sequences mentioned earlier, to make Python treat those internal double quotes literally as part of the string literal:
"My favorite book is "Python Tricks""
Escaping is fine and dandy, but it can sometimes get in the way. Specifically, when you need your string to contain relatively many backslash characters in literal form.
One classic example is a file path on Windows:
'C:Usersjdoe'    # Wrong!
'C:\Users\jdoe'
Notice how each backslash character needs to be escaped with yet another backslash.
This is even more prominent with regular expressions, which quickly get convoluted due to the heavy use of special characters:
'^\w:\\(?:(?:(?:[^\\]+)?|(?:[^\\]+)\\[^\\]+)*)$'
Fortunately, you can turn off character escaping entirely with the help of raw-string literals. Simply prepend an r or R before the opening quote, and now you end up with this:
r'C:Usersjdoe'
r'^w:\(?:(?:(?:[^\]+)?|(?:[^\]+)\[^\]+)*)$'
That’s much better, isn’t it?
There are a few more prefixes that give special meaning to string literals in Python, but you won’t get into them here.
Lastly, you can define multi-line string literals by enclosing them between ''' or """, which are often used as docstrings.
Here’s an example:
"""
This is an example
of a multi-line string
in Python.
"""
To prevent an initial newline, simply put the text right after the opening """:
"""This is an example
of a multi-line string
in Python.
"""
You can also use a backslash to get rid of the newline:
"""
This is an example
of a multi-line string
in Python.
"""
To remove indentation from a multi-line string, you might take advantage of the built-in textwrap module:
>>>
>>> import textwrap
>>> paragraph = '''
...     This is an example
...     of a multi-line string
...     in Python.
...     '''
...
>>> print(paragraph)

    This is an example
    of a multi-line string
    in Python.

>>> print(textwrap.dedent(paragraph).strip())
This is an example
of a multi-line string
in Python.
This will take care of unindenting paragraphs for you. There are also a few other useful functions in textwrap for text alignment you’d find in a word processor.
Secondly, you could extract that message into its own variable with a meaningful name to enhance readability and promote code reuse:
>>>
>>> message = 'Please wait while the program is loading...'
>>> print(message)
Lastly, you could pass an expression, like string concatenation, to be evaluated before printing the result:
>>>
>>> import os
>>> print('Hello, ' + os.getlogin() + '! How are you?')
Hello, jdoe! How are you?
In fact, there are a dozen ways to format messages in Python. I highly encourage you to take a look at f-strings, introduced in Python 3.6, because they offer the most concise syntax of them all:
>>>
>>> import os
>>> print(f'Hello, {os.getlogin()}! How are you?')
Moreover, f-strings will prevent you from making a common mistake, which is forgetting to type cast concatenated operands. Python is a strongly typed language, which means it won’t allow you to do this:
>>>
>>> 'My age is ' + 42
Traceback (most recent call last):
  File "<input>", line 1, in <module>
    'My age is ' + 42
TypeError: can only concatenate str (not "int") to str
That’s wrong because adding numbers to strings doesn’t make sense. You need to explicitly convert the number to string first, in order to join them together:
>>>
>>> 'My age is ' + str(42)
'My age is 42'
Unless you handle such errors yourself, the Python interpreter will let you know about a problem by showing a traceback.
As with any function, it doesn’t matter whether you pass a literal, a variable, or an expression. Unlike many other functions, however, print() will accept anything regardless of its type.
So far, you only looked at the string, but how about other data types? Let’s try literals of different built-in types and see what comes out:
>>>
>>> print(42)                            # <class 'int'>
42
>>> print(3.14)                          # <class 'float'>
3.14
>>> print(1 + 2j)                        # <class 'complex'>
(1+2j)
>>> print(True)                          # <class 'bool'>
True
>>> print([1, 2, 3])                     # <class 'list'>
[1, 2, 3]
>>> print((1, 2, 3))                     # <class 'tuple'>
(1, 2, 3)
>>> print({'red', 'green', 'blue'})      # <class 'set'>
{'red', 'green', 'blue'}
>>> print({'name': 'Alice', 'age': 42})  # <class 'dict'>
{'name': 'Alice', 'age': 42}
>>> print('hello')                       # <class 'str'>
hello
Watch out for the None constant, though. Despite being used to indicate an absence of a value, it will show up as 'None' rather than an empty string:
How does print() know how to work with all these different types? Well, the short answer is that it doesn’t. It implicitly calls str() behind the scenes to type cast any object into a string. Afterward, it treats strings in a uniform way.
Later in this tutorial, you’ll learn how to use this mechanism for printing custom data types such as your classes.
Okay, you’re now able to call print() with a single argument or without any arguments. You know how to print fixed or formatted messages onto the screen. The next subsection will expand on message formatting a little bit.
To achieve the same result in the previous language generation, you’d normally want to drop the parentheses enclosing the text:
# Python 2
print
print 'Please wait...'
print 'Hello, %s! How are you?' % os.getlogin()
print 'Hello, %s. Your age is %d.' % (name, age)
That’s because print wasn’t a function back then, as you’ll see in the next section. Note, however, that in some cases parentheses in Python are redundant. It wouldn’t harm to include them as they’d just get ignored. Does that mean you should be using the print statement as if it were a function? Absolutely not!
For example, parentheses enclosing a single expression or a literal are optional. Both instructions produce the same result in Python 2:
>>>
>>> # Python 2
>>> print 'Please wait...'
Please wait...
>>> print('Please wait...')
Please wait...
Round brackets are actually part of the expression rather than the print statement. If your expression happens to contain only one item, then it’s as if you didn’t include the brackets at all.
On the other hand, putting parentheses around multiple items forms a tuple:
>>>
>>> # Python 2
>>> print 'My name is', 'John'
My name is John
>>> print('My name is', 'John')
('My name is', 'John')
This is a known source of confusion. In fact, you’d also get a tuple by appending a trailing comma to the only item surrounded by parentheses:
>>>
>>> # Python 2
>>> print('Please wait...')
Please wait...
>>> print('Please wait...',)  # Notice the comma
('Please wait...',)
The bottom line is that you shouldn’t call print with brackets in Python 2. Although, to be completely accurate, you can work around this with the help of a __future__ import, which you’ll read more about in the relevant section.
Separating Multiple Arguments
You saw print() called without any arguments to produce a blank line and then called with a single argument to display either a fixed or a formatted message.
However, it turns out that this function can accept any number of positional arguments, including zero, one, or more arguments. That’s very handy in a common case of message formatting, where you’d want to join a few elements together.
Arguments can be passed to a function in one of several ways. One way is by explicitly naming the arguments when you’re calling the function, like this:
>>>
>>> def div(a, b):
...     return a / b
...
>>> div(a=3, b=4)
0.75
Since arguments can be uniquely identified by name, their order doesn’t matter. Swapping them out will still give the same result:
>>>
>>> div(b=4, a=3)
0.75
Conversely, arguments passed without names are identified by their position. That’s why positional arguments need to follow strictly the order imposed by the function signature:
>>>
>>> div(3, 4)
0.75
>>> div(4, 3)
1.3333333333333333
print() allows an arbitrary number of positional arguments thanks to the *args parameter.
Let’s have a look at this example:
>>>
>>> import os
>>> print('My name is', os.getlogin(), 'and I am', 42)
My name is jdoe and I am 42
print() concatenated all four arguments passed to it, and it inserted a single space between them so that you didn’t end up with a squashed message like 'My name isjdoeand I am42'.
Notice that it also took care of proper type casting by implicitly calling str() on each argument before joining them together. If you recall from the previous subsection, a naïve concatenation may easily result in an error due to incompatible types:
>>>
>>> print('My age is: ' + 42)
Traceback (most recent call last):
  File "<input>", line 1, in <module>
    print('My age is: ' + 42)
TypeError: can only concatenate str (not "int") to str
Apart from accepting a variable number of positional arguments, print() defines four named or keyword arguments, which are optional since they all have default values. You can view their brief documentation by calling help(print) from the interactive interpreter.
Let’s focus on sep just for now. It stands for separator and is assigned a single space (' ') by default. It determines the value to join elements with.
It has to be either a string or None, but the latter has the same effect as the default space:
>>>
>>> print('hello', 'world', sep=None)
hello world
>>> print('hello', 'world', sep=' ')
hello world
>>> print('hello', 'world')
hello world
If you wanted to suppress the separator completely, you’d have to pass an empty string ('') instead:
>>>
>>> print('hello', 'world', sep='')
helloworld
You may want print() to join its arguments as separate lines. In that case, simply pass the escaped newline character described earlier:
>>>
>>> print('hello', 'world', sep='n')
hello
world
A more useful example of the sep parameter would be printing something like file paths:
>>>
>>> print('home', 'user', 'documents', sep='/')
home/user/documents
Remember that the separator comes between the elements, not around them, so you need to account for that in one way or another:
>>>
>>> print('/home', 'user', 'documents', sep='/')
/home/user/documents
>>> print('', 'home', 'user', 'documents', sep='/')
/home/user/documents
Specifically, you can insert a slash character (/) into the first positional argument, or use an empty string as the first argument to enforce the leading slash.
One more interesting example could be exporting data to a comma-separated values (CSV) format:
>>>
>>> print(1, 'Python Tricks', 'Dan Bader', sep=',')
1,Python Tricks,Dan Bader
This wouldn’t handle edge cases such as escaping commas correctly, but for simple use cases, it should do. The line above would show up in your terminal window. In order to save it to a file, you’d have to redirect the output. Later in this section, you’ll see how to use print() to write text to files straight from Python.
Finally, the sep parameter isn’t constrained to a single character only. You can join elements with strings of any length:
>>>
>>> print('node', 'child', 'child', sep=' -> ')
node -> child -> child
In the upcoming subsections, you’ll explore the remaining keyword arguments of the print() function.
To print multiple elements in Python 2, you must drop the parentheses around them, just like before:
>>>
>>> # Python 2
>>> import os
>>> print 'My name is', os.getlogin(), 'and I am', 42
My name is jdoe and I am 42
If you kept them, on the other hand, you’d be passing a single tuple element to the print statement:
>>>
>>> # Python 2
>>> import os
>>> print('My name is', os.getlogin(), 'and I am', 42)
('My name is', 'jdoe', 'and I am', 42)
Moreover, there’s no way of altering the default separator of joined elements in Python 2, so one workaround is to use string interpolation like so:
>>>
>>> # Python 2
>>> import os
>>> print 'My name is %s and I am %d' % (os.getlogin(), 42)
My name is jdoe and I am 42
That was the default way of formatting strings until the .format() method got backported from Python 3.
Preventing Line Breaks
Sometimes you don’t want to end your message with a trailing newline so that subsequent calls to print() will continue on the same line. Classic examples include updating the progress of a long-running operation or prompting the user for input. In the latter case, you want the user to type in the answer on the same line:
Are you sure you want to do this? [y/n] y
Many programming languages expose functions similar to print() through their standard libraries, but they let you decide whether to add a newline or not. For example, in Java and C#, you have two distinct functions, while other languages require you to explicitly append n at the end of a string literal.
Here are a few examples of syntax in such languages:
| Language | Example |
|---|---|
| Perl | print "hello worldn" |
| C | printf("hello worldn"); |
| C++ | std::cout << "hello world" << std::endl; |
In contrast, Python’s print() function always adds n without asking, because that’s what you want in most cases. To disable it, you can take advantage of yet another keyword argument, end, which dictates what to end the line with.
In terms of semantics, the end parameter is almost identical to the sep one that you saw earlier:
- It must be a string or
None. - It can be arbitrarily long.
- It has a default value of
'n'. - If equal to
None, it’ll have the same effect as the default value. - If equal to an empty string (
''), it’ll suppress the newline.
Now you understand what’s happening under the hood when you’re calling print() without arguments. Since you don’t provide any positional arguments to the function, there’s nothing to be joined, and so the default separator isn’t used at all. However, the default value of end still applies, and a blank line shows up.
To disable the newline, you must specify an empty string through the end keyword argument:
print('Checking file integrity...', end='')
# (...)
print('ok')
Even though these are two separate print() calls, which can execute a long time apart, you’ll eventually see only one line. First, it’ll look like this:
Checking file integrity...
However, after the second call to print(), the same line will appear on the screen as:
Checking file integrity...ok
As with sep, you can use end to join individual pieces into a big blob of text with a custom separator. Instead of joining multiple arguments, however, it’ll append text from each function call to the same line:
print('The first sentence', end='. ')
print('The second sentence', end='. ')
print('The last sentence.')
These three instructions will output a single line of text:
The first sentence. The second sentence. The last sentence.
You can mix the two keyword arguments:
print('Mercury', 'Venus', 'Earth', sep=', ', end=', ')
print('Mars', 'Jupiter', 'Saturn', sep=', ', end=', ')
print('Uranus', 'Neptune', 'Pluto', sep=', ')
Not only do you get a single line of text, but all items are separated with a comma:
Mercury, Venus, Earth, Mars, Jupiter, Saturn, Uranus, Neptune, Pluto
There’s nothing to stop you from using the newline character with some extra padding around it:
print('Printing in a Nutshell', end='n * ')
print('Calling Print', end='n * ')
print('Separating Multiple Arguments', end='n * ')
print('Preventing Line Breaks')
It would print out the following piece of text:
Printing in a Nutshell
 * Calling Print
 * Separating Multiple Arguments
 * Preventing Line Breaks
As you can see, the end keyword argument will accept arbitrary strings.
You’re getting more acquainted with printing in Python, but there’s still a lot of useful information ahead. In the upcoming subsection, you’ll learn how to intercept and redirect the print() function’s output.
Preventing a line break in Python 2 requires that you append a trailing comma to the expression:
However, that’s not ideal because it also adds an unwanted space, which would translate to end=' ' instead of end='' in Python 3. You can test this with the following code snippet:
print 'BEFORE'
print 'hello',
print 'AFTER'
Notice there’s a space between the words hello and AFTER:
In order to get the expected result, you’d need to use one of the tricks explained later, which is either importing the print() function from __future__ or falling back to the sys module:
import sys
print 'BEFORE'
sys.stdout.write('hello')
print 'AFTER'
This will print the correct output without extra space:
While using the sys module gives you control over what gets printed to the standard output, the code becomes a little bit more cluttered.
Printing to a File
Believe it or not, print() doesn’t know how to turn messages into text on your screen, and frankly it doesn’t need to. That’s a job for lower-level layers of code, which understand bytes and know how to push them around.
print() is an abstraction over these layers, providing a convenient interface that merely delegates the actual printing to a stream or file-like object. A stream can be any file on your disk, a network socket, or perhaps an in-memory buffer.
In addition to this, there are three standard streams provided by the operating system:
stdin: standard inputstdout: standard outputstderr: standard error
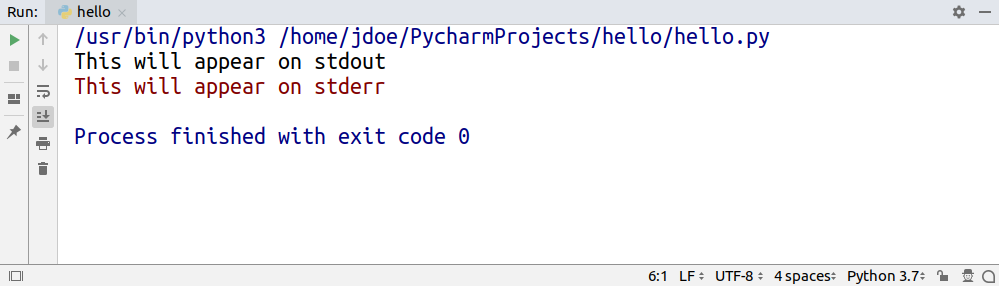
Standard output is what you see in the terminal when you run various command-line programs including your own Python scripts:
$ cat hello.py
print('This will appear on stdout')
$ python hello.py
This will appear on stdout
Unless otherwise instructed, print() will default to writing to standard output. However, you can tell your operating system to temporarily swap out stdout for a file stream, so that any output ends up in that file rather than the screen:
$ python hello.py > file.txt
$ cat file.txt
This will appear on stdout
That’s called stream redirection.
The standard error is similar to stdout in that it also shows up on the screen. Nonetheless, it’s a separate stream, whose purpose is to log error messages for diagnostics. By redirecting one or both of them, you can keep things clean.
Some programs use different coloring to distinguish between messages printed to stdout and stderr:
While both stdout and stderr are write-only, stdin is read-only. You can think of standard input as your keyboard, but just like with the other two, you can swap out stdin for a file to read data from.
In Python, you can access all standard streams through the built-in sys module:
>>>
>>> import sys
>>> sys.stdin
<_io.TextIOWrapper name='<stdin>' mode='r' encoding='UTF-8'>
>>> sys.stdin.fileno()
0
>>> sys.stdout
<_io.TextIOWrapper name='<stdout>' mode='w' encoding='UTF-8'>
>>> sys.stdout.fileno()
1
>>> sys.stderr
<_io.TextIOWrapper name='<stderr>' mode='w' encoding='UTF-8'>
>>> sys.stderr.fileno()
2
As you can see, these predefined values resemble file-like objects with mode and encoding attributes as well as .read() and .write() methods among many others.
By default, print() is bound to sys.stdout through its file argument, but you can change that. Use that keyword argument to indicate a file that was open in write or append mode, so that messages go straight to it:
with open('file.txt', mode='w') as file_object:
    print('hello world', file=file_object)
This will make your code immune to stream redirection at the operating system level, which might or might not be desired.
For more information on working with files in Python, you can check out Reading and Writing Files in Python (Guide).
Note that print() has no control over character encoding. It’s the stream’s responsibility to encode received Unicode strings into bytes correctly. In most cases, you won’t set the encoding yourself, because the default UTF-8 is what you want. If you really need to, perhaps for legacy systems, you can use the encoding argument of open():
with open('file.txt', mode='w', encoding='iso-8859-1') as file_object:
    print('über naïve café', file=file_object)
Instead of a real file existing somewhere in your file system, you can provide a fake one, which would reside in your computer’s memory. You’ll use this technique later for mocking print() in unit tests:
>>>
>>> import io
>>> fake_file = io.StringIO()
>>> print('hello world', file=fake_file)
>>> fake_file.getvalue()
'hello worldn'
If you got to this point, then you’re left with only one keyword argument in print(), which you’ll see in the next subsection. It’s probably the least used of them all. Nevertheless, there are times when it’s absolutely necessary.
There’s a special syntax in Python 2 for replacing the default sys.stdout with a custom file in the print statement:
with open('file.txt', mode='w') as file_object:
    print >> file_object, 'hello world'
Because strings and bytes are represented with the same str type in Python 2, the print statement can handle binary data just fine:
with open('file.dat', mode='wb') as file_object:
    print >> file_object, 'x41x0a'
Although, there’s a problem with character encoding. The open() function in Python 2 lacks the encoding parameter, which would often result in the dreadful UnicodeEncodeError:
>>>
>>> with open('file.txt', mode='w') as file_object:
...     unicode_text = u'xfcber naxefve cafxe9'
...     print >> file_object, unicode_text
...
Traceback (most recent call last):
  File "<stdin>", line 3, in <module>
UnicodeEncodeError: 'ascii' codec can't encode character u'xfc'...
Notice how non-Latin characters must be escaped in both Unicode and string literals to avoid a syntax error. Take a look at this example:
unicode_literal = u'xfcber naxefve cafxe9'
string_literal = 'xc3xbcber naxc3xafve cafxc3xa9'
Alternatively, you could specify source code encoding according to PEP 263 at the top of the file, but that wasn’t the best practice due to portability issues:
#!/usr/bin/env python2
# -*- coding: utf-8 -*-

unescaped_unicode_literal = u'über naïve café'
unescaped_string_literal = 'über naïve café'
Your best bet is to encode the Unicode string just before printing it. You can do this manually:
with open('file.txt', mode='w') as file_object:
    unicode_text = u'xfcber naxefve cafxe9'
    encoded_text = unicode_text.encode('utf-8')
    print >> file_object, encoded_text
However, a more convenient option is to use the built-in codecs module:
import codecs

with codecs.open('file.txt', 'w', encoding='utf-8') as file_object:
    unicode_text = u'xfcber naxefve cafxe9'
    print >> file_object, unicode_text
It’ll take care of making appropriate conversions when you need to read or write files.
Buffering print() Calls
In the previous subsection, you learned that print() delegates printing to a file-like object such as sys.stdout. Some streams, however, buffer certain I/O operations to enhance performance, which can get in the way. Let’s take a look at an example.
Imagine you were writing a countdown timer, which should append the remaining time to the same line every second:
Your first attempt may look something like this:
import time

num_seconds = 3
for countdown in reversed(range(num_seconds + 1)):
    if countdown > 0:
        print(countdown, end='...')
        time.sleep(1)
    else:
        print('Go!')
As long as the countdown variable is greater than zero, the code keeps appending text without a trailing newline and then goes to sleep for one second. Finally, when the countdown is finished, it prints Go! and terminates the line.
Unexpectedly, instead of counting down every second, the program idles wastefully for three seconds, and then suddenly prints the entire line at once:
That’s because the operating system buffers subsequent writes to the standard output in this case. You need to know that there are three kinds of streams with respect to buffering:
- Unbuffered
- Line-buffered
- Block-buffered
Unbuffered is self-explanatory, that is, no buffering is taking place, and all writes have immediate effect. A line-buffered stream waits before firing any I/O calls until a line break appears somewhere in the buffer, whereas a block-buffered one simply allows the buffer to fill up to a certain size regardless of its content. Standard output is both line-buffered and block-buffered, depending on which event comes first.
Buffering helps to reduce the number of expensive I/O calls. Think about sending messages over a high-latency network, for example. When you connect to a remote server to execute commands over the SSH protocol, each of your keystrokes may actually produce an individual data packet, which is orders of magnitude bigger than its payload. What an overhead! It would make sense to wait until at least a few characters are typed and then send them together. That’s where buffering steps in.
On the other hand, buffering can sometimes have undesired effects as you just saw with the countdown example. To fix it, you can simply tell print() to forcefully flush the stream without waiting for a newline character in the buffer using its flush flag:
print(countdown, end='...', flush=True)
That’s all. Your countdown should work as expected now, but don’t take my word for it. Go ahead and test it to see the difference.
Congratulations! At this point, you’ve seen examples of calling print() that cover all of its parameters. You know their purpose and when to use them. Understanding the signature is only the beginning, however. In the upcoming sections, you’ll see why.
There isn’t an easy way to flush the stream in Python 2, because the print statement doesn’t allow for it by itself. You need to get a handle of its lower-level layer, which is the standard output, and call it directly:
import time
import sys

num_seconds = 3
for countdown in reversed(range(num_seconds + 1)):
    if countdown > 0:
        sys.stdout.write('%s...' % countdown)
        sys.stdout.flush()
        time.sleep(1)
    else:
        print 'Go!'
Alternatively, you could disable buffering of the standard streams either by providing the -u flag to the Python interpreter or by setting up the PYTHONUNBUFFERED environment variable:
$ python2 -u countdown.py
$ PYTHONUNBUFFERED=1 python2 countdown.py
Note that print() was backported to Python 2 and made available through the __future__ module. Unfortunately, it doesn’t come with the flush parameter:
>>>
>>> from __future__ import print_function
>>> help(print)
Help on built-in function print in module __builtin__:

print(...)
    print(value, ..., sep=' ', end='n', file=sys.stdout)
What you’re seeing here is a docstring of the print() function. You can display docstrings of various objects in Python using the built-in help() function.
Printing Custom Data Types
Up until now, you only dealt with built-in data types such as strings and numbers, but you’ll often want to print your own abstract data types. Let’s have a look at different ways of defining them.
For simple objects without any logic, whose purpose is to carry data, you’ll typically take advantage of namedtuple, which is available in the standard library. Named tuples have a neat textual representation out of the box:
>>>
>>> from collections import namedtuple
>>> Person = namedtuple('Person', 'name age')
>>> jdoe = Person('John Doe', 42)
>>> print(jdoe)
Person(name='John Doe', age=42)
That’s great as long as holding data is enough, but in order to add behaviors to the Person type, you’ll eventually need to define a class. Take a look at this example:
class Person:
    def __init__(self, name, age):
        self.name, self.age = name, age
If you now create an instance of the Person class and try to print it, you’ll get this bizarre output, which is quite different from the equivalent namedtuple:
>>>
>>> jdoe = Person('John Doe', 42)
>>> print(jdoe)
<__main__.Person object at 0x7fcac3fed1d0>
It’s the default representation of objects, which comprises their address in memory, the corresponding class name and a module in which they were defined. You’ll fix that in a bit, but just for the record, as a quick workaround you could combine namedtuple and a custom class through inheritance:
from collections import namedtuple

class Person(namedtuple('Person', 'name age')):
    pass
Your Person class has just become a specialized kind of namedtuple with two attributes, which you can customize.
That’s better than a plain namedtuple, because not only do you get printing right for free, but you can also add custom methods and properties to the class. However, it solves one problem while introducing another. Remember that tuples, including named tuples, are immutable in Python, so they can’t change their values once created.
It’s true that designing immutable data types is desirable, but in many cases, you’ll want them to allow for change, so you’re back with regular classes again.
From earlier subsections, you already know that print() implicitly calls the built-in str() function to convert its positional arguments into strings. Indeed, calling str() manually against an instance of the regular Person class yields the same result as printing it:
>>>
>>> jdoe = Person('John Doe', 42)
>>> str(jdoe)
'<__main__.Person object at 0x7fcac3fed1d0>'
str(), in turn, looks for one of two magic methods within the class body, which you typically implement. If it doesn’t find one, then it falls back to the ugly default representation. Those magic methods are, in order of search:
def __str__(self)def __repr__(self)
The first one is recommended to return a short, human-readable text, which includes information from the most relevant attributes. After all, you don’t want to expose sensitive data, such as user passwords, when printing objects.
However, the other one should provide complete information about an object, to allow for restoring its state from a string. Ideally, it should return valid Python code, so that you can pass it directly to eval():
>>>
>>> repr(jdoe)
"Person(name='John Doe', age=42)"
>>> type(eval(repr(jdoe)))
<class '__main__.Person'>
Notice the use of another built-in function, repr(), which always tries to call .__repr__() in an object, but falls back to the default representation if it doesn’t find that method.
Python gives you a lot of freedom when it comes to defining your own data types if none of the built-in ones meet your needs. Some of them, such as named tuples and data classes, offer string representations that look good without requiring any work on your part. Still, for the most flexibility, you’ll have to define a class and override its magic methods described above.
The semantics of .__str__() and .__repr__() didn’t change since Python 2, but you must remember that strings were nothing more than glorified byte arrays back then. To convert your objects into proper Unicode, which was a separate data type, you’d have to provide yet another magic method: .__unicode__().
Here’s an example of the same User class in Python 2:
class User(object):
    def __init__(self, login, password):
        self.login = login
        self.password = password

    def __unicode__(self):
        return self.login

    def __str__(self):
        return unicode(self).encode('utf-8')

    def __repr__(self):
        user = u"User('%s', '%s')" % (self.login, self.password)
        return user.encode('unicode_escape')
As you can see, this implementation delegates some work to avoid duplication by calling the built-in unicode() function on itself.
Both .__str__() and .__repr__() methods must return strings, so they encode Unicode characters into specific byte representations called character sets. UTF-8 is the most widespread and safest encoding, while unicode_escape is a special constant to express funky characters, such as é, as escape sequences in plain ASCII, such as xe9.
The print statement is looking for the magic .__str__() method in the class, so the chosen charset must correspond to the one used by the terminal. For example, default encoding in DOS and Windows is CP 852 rather than UTF-8, so running this can result in a UnicodeEncodeError or even garbled output:
>>>
>>> user = User(u'u043du0438u043au0438u0442u0430', u's3cret')
>>> print user
đŻđŞđ║đŞĐéđ░
However, if you ran the same code on a system with UTF-8 encoding, then you’d get the proper spelling of a popular Russian name:
>>>
>>> user = User(u'u043du0438u043au0438u0442u0430', u's3cret')
>>> print user
никита
It’s recommended to convert strings to Unicode as early as possible, for example, when you’re reading data from a file, and use it consistently everywhere in your code. At the same time, you should encode Unicode back to the chosen character set right before presenting it to the user.
It seems as if you have more control over string representation of objects in Python 2 because there’s no magic .__unicode__() method in Python 3 anymore. You may be asking yourself if it’s possible to convert an object to its byte string representation rather than a Unicode string in Python 3. It’s possible, with a special .__bytes__() method that does just that:
>>>
>>> class User(object):
...     def __init__(self, login, password):
...         self.login = login
...         self.password = password
...
...     def __bytes__(self):  # Python 3
...         return self.login.encode('utf-8')
...
>>> user = User(u'u043du0438u043au0438u0442u0430', u's3cret')
>>> bytes(user)
b'xd0xbdxd0xb8xd0xbaxd0xb8xd1x82xd0xb0'
Using the built-in bytes() function on an instance delegates the call to its __bytes__() method defined in the corresponding class.
Understanding Python print()
You know how to use print() quite well at this point, but knowing what it is will allow you to use it even more effectively and consciously. After reading this section, you’ll understand how printing in Python has improved over the years.
Print Is a Function in Python 3
You’ve seen that print() is a function in Python 3. More specifically, it’s a built-in function, which means that you don’t need to import it from anywhere:
>>>
>>> print
<built-in function print>
It’s always available in the global namespace so that you can call it directly, but you can also access it through a module from the standard library:
>>>
>>> import builtins
>>> builtins.print
<built-in function print>
This way, you can avoid name collisions with custom functions. Let’s say you wanted to redefine print() so that it doesn’t append a trailing newline. At the same time, you wanted to rename the original function to something like println():
>>>
>>> import builtins
>>> println = builtins.print
>>> def print(*args, **kwargs):
...     builtins.print(*args, **kwargs, end='')
...
>>> println('hello')
hello
>>> print('hellon')
hello
Now you have two separate printing functions just like in the Java programming language. You’ll define custom print() functions in the mocking section later as well. Also, note that you wouldn’t be able to overwrite print() in the first place if it wasn’t a function.
On the other hand, print() isn’t a function in the mathematical sense, because it doesn’t return any meaningful value other than the implicit None:
>>>
>>> value = print('hello world')
hello world
>>> print(value)
None
Such functions are, in fact, procedures or subroutines that you call to achieve some kind of side-effect, which ultimately is a change of a global state. In the case of print(), that side-effect is showing a message on the standard output or writing to a file.
Because print() is a function, it has a well-defined signature with known attributes. You can quickly find its documentation using the editor of your choice, without having to remember some weird syntax for performing a certain task.
Besides, functions are easier to extend. Adding a new feature to a function is as easy as adding another keyword argument, whereas changing the language to support that new feature is much more cumbersome. Think of stream redirection or buffer flushing, for example.
Another benefit of print() being a function is composability. Functions are so-called first-class objects or first-class citizens in Python, which is a fancy way of saying they’re values just like strings or numbers. This way, you can assign a function to a variable, pass it to another function, or even return one from another. print() isn’t different in this regard. For instance, you can take advantage of it for dependency injection:
def download(url, log=print):
    log(f'Downloading {url}')
    # ...

def custom_print(*args):
    pass  # Do not print anything

download('/js/app.js', log=custom_print)
Here, the log parameter lets you inject a callback function, which defaults to print() but can be any callable. In this example, printing is completely disabled by substituting print() with a dummy function that does nothing.
Composition allows you to combine a few functions into a new one of the same kind. Let’s see this in action by specifying a custom error() function that prints to the standard error stream and prefixes all messages with a given log level:
>>>
>>> from functools import partial
>>> import sys
>>> redirect = lambda function, stream: partial(function, file=stream)
>>> prefix = lambda function, prefix: partial(function, prefix)
>>> error = prefix(redirect(print, sys.stderr), '[ERROR]')
>>> error('Something went wrong')
[ERROR] Something went wrong
This custom function uses partial functions to achieve the desired effect. It’s an advanced concept borrowed from the functional programming paradigm, so you don’t need to go too deep into that topic for now. However, if you’re interested in this topic, I recommend taking a look at the functools module.
Unlike statements, functions are values. That means you can mix them with expressions, in particular, lambda expressions. Instead of defining a full-blown function to replace print() with, you can make an anonymous lambda expression that calls it:
>>>
>>> download('/js/app.js', lambda msg: print('[INFO]', msg))
[INFO] Downloading /js/app.js
However, because a lambda expression is defined in place, there’s no way of referring to it elsewhere in the code.
Another kind of expression is a ternary conditional expression:
>>>
>>> user = 'jdoe'
>>> print('Hi!') if user is None else print(f'Hi, {user}.')
Hi, jdoe.
Python has both conditional statements and conditional expressions. The latter is evaluated to a single value that can be assigned to a variable or passed to a function. In the example above, you’re interested in the side-effect rather than the value, which evaluates to None, so you simply ignore it.
As you can see, functions allow for an elegant and extensible solution, which is consistent with the rest of the language. In the next subsection, you’ll discover how not having print() as a function caused a lot of headaches.
print Was a Statement in Python 2
A statement is an instruction that may evoke a side-effect when executed but never evaluates to a value. In other words, you wouldn’t be able to print a statement or assign it to a variable like this:
result = print 'hello world'
That’s a syntax error in Python 2.
Here are a few more examples of statements in Python:
- assignment:
= - conditional:
if - loop:
while - assertion:
assert
Statements are usually comprised of reserved keywords such as if, for, or print that have fixed meaning in the language. You can’t use them to name your variables or other symbols. That’s why redefining or mocking the print statement isn’t possible in Python 2. You’re stuck with what you get.
Furthermore, you can’t print from anonymous functions, because statements aren’t accepted in lambda expressions:
>>>
>>> lambda: print 'hello world'
  File "<stdin>", line 1
    lambda: print 'hello world'
                ^
SyntaxError: invalid syntax
The syntax of the print statement is ambiguous. Sometimes you can add parentheses around the message, and they’re completely optional:
>>>
>>> print 'Please wait...'
Please wait...
>>> print('Please wait...')
Please wait...
At other times they change how the message is printed:
>>>
>>> print 'My name is', 'John'
My name is John
>>> print('My name is', 'John')
('My name is', 'John')
String concatenation can raise a TypeError due to incompatible types, which you have to handle manually, for example:
>>>
>>> values = ['jdoe', 'is', 42, 'years old']
>>> print ' '.join(map(str, values))
jdoe is 42 years old
Compare this with similar code in Python 3, which leverages sequence unpacking:
>>>
>>> values = ['jdoe', 'is', 42, 'years old']
>>> print(*values)  # Python 3
jdoe is 42 years old
There aren’t any keyword arguments for common tasks such as flushing the buffer or stream redirection. You need to remember the quirky syntax instead. Even the built-in help() function isn’t that helpful with regards to the print statement:
>>>
>>> help(print)
  File "<stdin>", line 1
    help(print)
             ^
SyntaxError: invalid syntax
Trailing newline removal doesn’t work quite right, because it adds an unwanted space. You can’t compose multiple print statements together, and, on top of that, you have to be extra diligent about character encoding.
The list of problems goes on and on. If you’re curious, you can jump back to the previous section and look for more detailed explanations of the syntax in Python 2.
However, you can mitigate some of those problems with a much simpler approach. It turns out the print() function was backported to ease the migration to Python 3. You can import it from a special __future__ module, which exposes a selection of language features released in later Python versions.
To enable the print() function in Python 2, you need to add this import statement at the beginning of your source code:
from __future__ import print_function
From now on the print statement is no longer available, but you have the print() function at your disposal. Note that it isn’t the same function like the one in Python 3, because it’s missing the flush keyword argument, but the rest of the arguments are the same.
Other than that, it doesn’t spare you from managing character encodings properly.
Here’s an example of calling the print() function in Python 2:
>>>
>>> from __future__ import print_function
>>> import sys
>>> print('I am a function in Python', sys.version_info.major)
I am a function in Python 2
You now have an idea of how printing in Python evolved and, most importantly, understand why these backward-incompatible changes were necessary. Knowing this will surely help you become a better Python programmer.
Printing With Style
If you thought that printing was only about lighting pixels up on the screen, then technically you’d be right. However, there are ways to make it look cool. In this section, you’ll find out how to format complex data structures, add colors and other decorations, build interfaces, use animation, and even play sounds with text!
Pretty-Printing Nested Data Structures
Computer languages allow you to represent data as well as executable code in a structured way. Unlike Python, however, most languages give you a lot of freedom in using whitespace and formatting. This can be useful, for example in compression, but it sometimes leads to less readable code.
Pretty-printing is about making a piece of data or code look more appealing to the human eye so that it can be understood more easily. This is done by indenting certain lines, inserting newlines, reordering elements, and so forth.
Python comes with the pprint module in its standard library, which will help you in pretty-printing large data structures that don’t fit on a single line. Because it prints in a more human-friendly way, many popular REPL tools, including JupyterLab and IPython, use it by default in place of the regular print() function.
If you don’t care about not having access to the original print() function, then you can replace it with pprint() in your code using import renaming:
>>>
>>> from pprint import pprint as print
>>> print
<function pprint at 0x7f7a775a3510>
Personally, I like to have both functions at my fingertips, so I’d rather use something like pp as a short alias:
from pprint import pprint as pp
At first glance, there’s hardly any difference between the two functions, and in some cases there’s virtually none:
>>>
>>> print(42)
42
>>> pp(42)
42
>>> print('hello')
hello
>>> pp('hello')
'hello'  # Did you spot the difference?
That’s because pprint() calls repr() instead of the usual str() for type casting, so that you may evaluate its output as Python code if you want to. The differences become apparent as you start feeding it more complex data structures:
>>>
>>> data = {'powers': [x**10 for x in range(10)]}
>>> pp(data)
{'powers': [0,
            1,
            1024,
            59049,
            1048576,
            9765625,
            60466176,
            282475249,
            1073741824,
            3486784401]}
The function applies reasonable formatting to improve readability, but you can customize it even further with a couple of parameters. For example, you may limit a deeply nested hierarchy by showing an ellipsis below a given level:
>>>
>>> cities = {'USA': {'Texas': {'Dallas': ['Irving']}}}
>>> pp(cities, depth=3)
{'USA': {'Texas': {'Dallas': [...]}}}
The ordinary print() also uses ellipses but for displaying recursive data structures, which form a cycle, to avoid stack overflow error:
>>>
>>> items = [1, 2, 3]
>>> items.append(items)
>>> print(items)
[1, 2, 3, [...]]
However, pprint() is more explicit about it by including the unique identity of a self-referencing object:
>>>
>>> pp(items)
[1, 2, 3, <Recursion on list with id=140635757287688>]
>>> id(items)
140635757287688
The last element in the list is the same object as the entire list.
pprint() automatically sorts dictionary keys for you before printing, which allows for consistent comparison. When you’re comparing strings, you often don’t care about a particular order of serialized attributes. Anyways, it’s always best to compare actual dictionaries before serialization.
Dictionaries often represent JSON data, which is widely used on the Internet. To correctly serialize a dictionary into a valid JSON-formatted string, you can take advantage of the json module. It too has pretty-printing capabilities:
>>>
>>> import json
>>> data = {'username': 'jdoe', 'password': 's3cret'}
>>> ugly = json.dumps(data)
>>> pretty = json.dumps(data, indent=4, sort_keys=True)
>>> print(ugly)
{"username": "jdoe", "password": "s3cret"}
>>> print(pretty)
{
    "password": "s3cret",
    "username": "jdoe"
}
Notice, however, that you need to handle printing yourself, because it’s not something you’d typically want to do. Similarly, the pprint module has an additional pformat() function that returns a string, in case you had to do something other than printing it.
Surprisingly, the signature of pprint() is nothing like the print() function’s one. You can’t even pass more than one positional argument, which shows how much it focuses on printing data structures.
Adding Colors With ANSI Escape Sequences
As personal computers got more sophisticated, they had better graphics and could display more colors. However, different vendors had their own idea about the API design for controlling it. That changed a few decades ago when people at the American National Standards Institute decided to unify it by defining ANSI escape codes.
Most of today’s terminal emulators support this standard to some degree. Until recently, the Windows operating system was a notable exception. Therefore, if you want the best portability, use the colorama library in Python. It translates ANSI codes to their appropriate counterparts in Windows while keeping them intact in other operating systems.
To check if your terminal understands a subset of the ANSI escape sequences, for example, related to colors, you can try using the following command:
My default terminal on Linux says it can display 256 distinct colors, while xterm gives me only 8. The command would return a negative number if colors were unsupported.
ANSI escape sequences are like a markup language for the terminal. In HTML you work with tags, such as <b> or <i>, to change how elements look in the document. These tags are mixed with your content, but they’re not visible themselves. Similarly, escape codes won’t show up in the terminal as long as it recognizes them. Otherwise, they’ll appear in the literal form as if you were viewing the source of a website.
As its name implies, a sequence must begin with the non-printable Esc character, whose ASCII value is 27, sometimes denoted as 0x1b in hexadecimal or 033 in octal. You may use Python number literals to quickly verify it’s indeed the same number:
>>>
>>> 27 == 0x1b == 0o33
True
Additionally, you can obtain it with the e escape sequence in the shell:
The most common ANSI escape sequences take the following form:
| Element | Description | Example |
|---|---|---|
| Esc | non-printable escape character | 33 |
[ |
opening square bracket | [ |
| numeric code | one or more numbers separated with ; |
0 |
| character code | uppercase or lowercase letter | m |
The numeric code can be one or more numbers separated with a semicolon, while the character code is just one letter. Their specific meaning is defined by the ANSI standard. For example, to reset all formatting, you would type one of the following commands, which use the code zero and the letter m:
$ echo -e "e[0m"
$ echo -e "x1b[0m"
$ echo -e "33[0m"
At the other end of the spectrum, you have compound code values. To set foreground and background with RGB channels, given that your terminal supports 24-bit depth, you could provide multiple numbers:
$ echo -e "e[38;2;0;0;0me[48;2;255;255;255mBlack on whitee[0m"
It’s not just text color that you can set with the ANSI escape codes. You can, for example, clear and scroll the terminal window, change its background, move the cursor around, make the text blink or decorate it with an underline.
In Python, you’d probably write a helper function to allow for wrapping arbitrary codes into a sequence:
>>>
>>> def esc(code):
...     return f'33[{code}m'
...
>>> print(esc('31;1;4') + 'really' + esc(0) + ' important')
This would make the word really appear in red, bold, and underlined font:
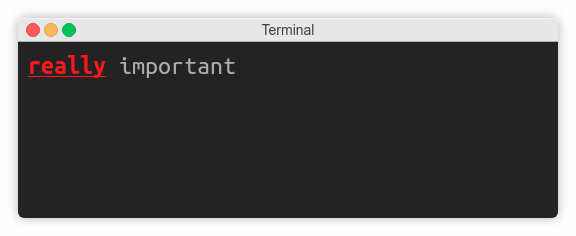
However, there are higher-level abstractions over ANSI escape codes, such as the mentioned colorama library, as well as tools for building user interfaces in the console.
Building Console User Interfaces
While playing with ANSI escape codes is undeniably a ton of fun, in the real world you’d rather have more abstract building blocks to put together a user interface. There are a few libraries that provide such a high level of control over the terminal, but curses seems to be the most popular choice.
Primarily, it allows you to think in terms of independent graphical widgets instead of a blob of text. Besides, you get a lot of freedom in expressing your inner artist, because it’s really like painting a blank canvas. The library hides the complexities of having to deal with different terminals. Other than that, it has great support for keyboard events, which might be useful for writing video games.
How about making a retro snake game? Let’s create a Python snake simulator:
First, you need to import the curses module. Since it modifies the state of a running terminal, it’s important to handle errors and gracefully restore the previous state. You can do this manually, but the library comes with a convenient wrapper for your main function:
import curses

def main(screen):
    pass

if __name__ == '__main__':
    curses.wrapper(main)
Note, the function must accept a reference to the screen object, also known as stdscr, that you’ll use later for additional setup.
If you run this program now, you won’t see any effects, because it terminates immediately. However, you can add a small delay to have a sneak peek:
import time, curses

def main(screen):
    time.sleep(1)

if __name__ == '__main__':
    curses.wrapper(main)
This time the screen went completely blank for a second, but the cursor was still blinking. To hide it, just call one of the configuration functions defined in the module:
import time, curses

def main(screen):
    curses.curs_set(0)  # Hide the cursor
    time.sleep(1)

if __name__ == '__main__':
    curses.wrapper(main)
Let’s define the snake as a list of points in screen coordinates:
snake = [(0, i) for i in reversed(range(20))]
The head of the snake is always the first element in the list, whereas the tail is the last one. The initial shape of the snake is horizontal, starting from the top-left corner of the screen and facing to the right. While its y-coordinate stays at zero, its x-coordinate decreases from head to tail.
To draw the snake, you’ll start with the head and then follow with the remaining segments. Each segment carries (y, x) coordinates, so you can unpack them:
# Draw the snake
screen.addstr(*snake[0], '@')
for segment in snake[1:]:
    screen.addstr(*segment, '*')
Again, if you run this code now, it won’t display anything, because you must explicitly refresh the screen afterward:
import time, curses

def main(screen):
    curses.curs_set(0)  # Hide the cursor

    snake = [(0, i) for i in reversed(range(20))]

    # Draw the snake
    screen.addstr(*snake[0], '@')
    for segment in snake[1:]:
        screen.addstr(*segment, '*')

    screen.refresh()
    time.sleep(1)

if __name__ == '__main__':
    curses.wrapper(main)
You want to move the snake in one of four directions, which can be defined as vectors. Eventually, the direction will change in response to an arrow keystroke, so you may hook it up to the library’s key codes:
directions = {
    curses.KEY_UP: (-1, 0),
    curses.KEY_DOWN: (1, 0),
    curses.KEY_LEFT: (0, -1),
    curses.KEY_RIGHT: (0, 1),
}

direction = directions[curses.KEY_RIGHT]
How does a snake move? It turns out that only its head really moves to a new location, while all other segments shift towards it. In each step, almost all segments remain the same, except for the head and the tail. Assuming the snake isn’t growing, you can remove the tail and insert a new head at the beginning of the list:
# Move the snake
snake.pop()
snake.insert(0, tuple(map(sum, zip(snake[0], direction))))
To get the new coordinates of the head, you need to add the direction vector to it. However, adding tuples in Python results in a bigger tuple instead of the algebraic sum of the corresponding vector components. One way to fix this is by using the built-in zip(), sum(), and map() functions.
The direction will change on a keystroke, so you need to call .getch() to obtain the pressed key code. However, if the pressed key doesn’t correspond to the arrow keys defined earlier as dictionary keys, the direction won’t change:
# Change direction on arrow keystroke
direction = directions.get(screen.getch(), direction)
By default, however, .getch() is a blocking call that would prevent the snake from moving unless there was a keystroke. Therefore, you need to make the call non-blocking by adding yet another configuration:
def main(screen):
    curses.curs_set(0)    # Hide the cursor
    screen.nodelay(True)  # Don't block I/O calls
You’re almost done, but there’s just one last thing left. If you now loop this code, the snake will appear to be growing instead of moving. That’s because you have to erase the screen explicitly before each iteration.
Finally, this is all you need to play the snake game in Python:
import time, curses

def main(screen):
    curses.curs_set(0)    # Hide the cursor
    screen.nodelay(True)  # Don't block I/O calls

    directions = {
        curses.KEY_UP: (-1, 0),
        curses.KEY_DOWN: (1, 0),
        curses.KEY_LEFT: (0, -1),
        curses.KEY_RIGHT: (0, 1),
    }

    direction = directions[curses.KEY_RIGHT]
    snake = [(0, i) for i in reversed(range(20))]

    while True:
        screen.erase()

        # Draw the snake
        screen.addstr(*snake[0], '@')
        for segment in snake[1:]:
            screen.addstr(*segment, '*')

        # Move the snake
        snake.pop()
        snake.insert(0, tuple(map(sum, zip(snake[0], direction))))

        # Change direction on arrow keystroke
        direction = directions.get(screen.getch(), direction)

        screen.refresh()
        time.sleep(0.1)

if __name__ == '__main__':
    curses.wrapper(main)
This is merely scratching the surface of the possibilities that the curses module opens up. You may use it for game development like this or more business-oriented applications.
Living It Up With Cool Animations
Not only can animations make the user interface more appealing to the eye, but they also improve the overall user experience. When you provide early feedback to the user, for example, they’ll know if your program’s still working or if it’s time to kill it.
To animate text in the terminal, you have to be able to freely move the cursor around. You can do this with one of the tools mentioned previously, that is ANSI escape codes or the curses library. However, I’d like to show you an even simpler way.
If the animation can be constrained to a single line of text, then you might be interested in two special escape character sequences:
- Carriage return:
r - Backspace:
b
The first one moves the cursor to the beginning of the line, whereas the second one moves it only one character to the left. They both work in a non-destructive way without overwriting text that’s already been written.
Let’s take a look at a few examples.
You’ll often want to display some kind of a spinning wheel to indicate a work in progress without knowing exactly how much time’s left to finish:

Many command line tools use this trick while downloading data over the network. You can make a really simple stop motion animation from a sequence of characters that will cycle in a round-robin fashion:
from itertools import cycle
from time import sleep

for frame in cycle(r'-|/-|/'):
    print('r', frame, sep='', end='', flush=True)
    sleep(0.2)
The loop gets the next character to print, then moves the cursor to the beginning of the line, and overwrites whatever there was before without adding a newline. You don’t want extra space between positional arguments, so separator argument must be blank. Also, notice the use of Python’s raw strings due to backslash characters present in the literal.
When you know the remaining time or task completion percentage, then you’re able to show an animated progress bar:
First, you need to calculate how many hashtags to display and how many blank spaces to insert. Next, you erase the line and build the bar from scratch:
from time import sleep

def progress(percent=0, width=30):
    left = width * percent // 100
    right = width - left
    print('r[', '#' * left, ' ' * right, ']',
          f' {percent:.0f}%',
          sep='', end='', flush=True)

for i in range(101):
    progress(i)
    sleep(0.1)
As before, each request for update repaints the entire line.
Making Sounds With print()
If you’re old enough to remember computers with a PC speaker, then you must also remember their distinctive beep sound, often used to indicate hardware problems. They could barely make any more noises than that, yet video games seemed so much better with it.
Today you can still take advantage of this small loudspeaker, but chances are your laptop didn’t come with one. In such a case, you can enable terminal bell emulation in your shell, so that a system warning sound is played instead.
Go ahead and type this command to see if your terminal can play a sound:
This would normally print text, but the -e flag enables the interpretation of backslash escapes. As you can see, there’s a dedicated escape sequence a, which stands for “alert”, that outputs a special bell character. Some terminals make a sound whenever they see it.
Similarly, you can print this character in Python. Perhaps in a loop to form some kind of melody. While it’s only a single note, you can still vary the length of pauses between consecutive instances. That seems like a perfect toy for Morse code playback!
The rules are the following:
- Letters are encoded with a sequence of dot (·) and dash (–) symbols.
- A dot is one unit of time.
- A dash is three units of time.
- Individual symbols in a letter are spaced one unit of time apart.
- Symbols of two adjacent letters are spaced three units of time apart.
- Symbols of two adjacent words are spaced seven units of time apart.
According to those rules, you could be “printing” an SOS signal indefinitely in the following way:
while True:
    dot()
    symbol_space()
    dot()
    symbol_space()
    dot()
    letter_space()
    dash()
    symbol_space()
    dash()
    symbol_space()
    dash()
    letter_space()
    dot()
    symbol_space()
    dot()
    symbol_space()
    dot()
    word_space()
In Python, you can implement it in merely ten lines of code:
from time import sleep

speed = 0.1

def signal(duration, symbol):
    sleep(duration)
    print(symbol, end='', flush=True)

dot = lambda: signal(speed, '·a')
dash = lambda: signal(3*speed, '−a')
symbol_space = lambda: signal(speed, '')
letter_space = lambda: signal(3*speed, '')
word_space = lambda: signal(7*speed, ' ')
Maybe you could even take it one step further and make a command line tool for translating text into Morse code? Either way, I hope you’re having fun with this!
Mocking Python print() in Unit Tests
Nowadays, it’s expected that you ship code that meets high quality standards. If you aspire to become a professional, you must learn how to test your code.
Software testing is especially important in dynamically typed languages, such as Python, which don’t have a compiler to warn you about obvious mistakes. Defects can make their way to the production environment and remain dormant for a long time, until that one day when a branch of code finally gets executed.
Sure, you have linters, type checkers, and other tools for static code analysis to assist you. But they won’t tell you whether your program does what it’s supposed to do on the business level.
So, should you be testing print()? No. After all, it’s a built-in function that must have already gone through a comprehensive suite of tests. What you want to test, though, is whether your code is calling print() at the right time with the expected parameters. That’s known as a behavior.
You can test behaviors by mocking real objects or functions. In this case, you want to mock print() to record and verify its invocations.
Mocking in Python can be done twofold. First, you can take the traditional path of statically-typed languages by employing dependency injection. This may sometimes require you to change the code under test, which isn’t always possible if the code is defined in an external library:
def download(url, log=print):
    log(f'Downloading {url}')
    # ...
This is the same example I used in an earlier section to talk about function composition. It basically allows for substituting print() with a custom function of the same interface. To check if it prints the right message, you have to intercept it by injecting a mocked function:
>>>
>>> def mock_print(message):
...     mock_print.last_message = message
...
>>> download('resource', mock_print)
>>> assert 'Downloading resource' == mock_print.last_message
Calling this mock makes it save the last message in an attribute, which you can inspect later, for example in an assert statement.
In a slightly alternative solution, instead of replacing the entire print() function with a custom wrapper, you could redirect the standard output to an in-memory file-like stream of characters:
>>>
>>> def download(url, stream=None):
...     print(f'Downloading {url}', file=stream)
...     # ...
...
>>> import io
>>> memory_buffer = io.StringIO()
>>> download('app.js', memory_buffer)
>>> download('style.css', memory_buffer)
>>> memory_buffer.getvalue()
'Downloading app.jsnDownloading style.cssn'
This time the function explicitly calls print(), but it exposes its file parameter to the outside world.
However, a more Pythonic way of mocking objects takes advantage of the built-in mock module, which uses a technique called monkey patching. This derogatory name stems from it being a “dirty hack” that you can easily shoot yourself in the foot with. It’s less elegant than dependency injection but definitely quick and convenient.
What monkey patching does is alter implementation dynamically at runtime. Such a change is visible globally, so it may have unwanted consequences. In practice, however, patching only affects the code for the duration of test execution.
To mock print() in a test case, you’ll typically use the @patch decorator and specify a target for patching by referring to it with a fully qualified name, that is including the module name:
from unittest.mock import patch

@patch('builtins.print')
def test_print(mock_print):
    print('not a real print')
    mock_print.assert_called_with('not a real print')
This will automatically create the mock for you and inject it to the test function. However, you need to declare that your test function accepts a mock now. The underlying mock object has lots of useful methods and attributes for verifying behavior.
Did you notice anything peculiar about that code snippet?
Despite injecting a mock to the function, you’re not calling it directly, although you could. That injected mock is only used to make assertions afterward and maybe to prepare the context before running the test.
In real life, mocking helps to isolate the code under test by removing dependencies such as a database connection. You rarely call mocks in a test, because that doesn’t make much sense. Rather, it’s other pieces of code that call your mock indirectly without knowing it.
Here’s what that means:
from unittest.mock import patch

def greet(name):
    print(f'Hello, {name}!')

@patch('builtins.print')
def test_greet(mock_print):
    greet('John')
    mock_print.assert_called_with('Hello, John!')
The code under test is a function that prints a greeting. Even though it’s a fairly simple function, you can’t test it easily because it doesn’t return a value. It has a side-effect.
To eliminate that side-effect, you need to mock the dependency out. Patching lets you avoid making changes to the original function, which can remain agnostic about print(). It thinks it’s calling print(), but in reality, it’s calling a mock you’re in total control of.
There are many reasons for testing software. One of them is looking for bugs. When you write tests, you often want to get rid of the print() function, for example, by mocking it away. Paradoxically, however, that same function can help you find bugs during a related process of debugging you’ll read about in the next section.
You can’t monkey patch the print statement in Python 2, nor can you inject it as a dependency. However, you have a few other options:
- Use stream redirection.
- Patch the standard output defined in the
sysmodule. - Import
print()from the__future__module.
Let’s examine them one by one.
Stream redirection is almost identical to the example you saw earlier:
>>>
>>> def download(url, stream=None):
...     print >> stream, 'Downloading %s' % url
...     # ...
...
>>> from StringIO import StringIO
>>> memory_buffer = StringIO()
>>> download('app.js', memory_buffer)
>>> download('style.css', memory_buffer)
>>> memory_buffer.getvalue()
'Downloading app.jsnDownloading style.cssn'
There are only two differences. First, the syntax for stream redirection uses chevron (>>) instead of the file argument. The other difference is where StringIO is defined. You can import it from a similarly named StringIO module, or cStringIO for a faster implementation.
Patching the standard output from the sys module is exactly what it sounds like, but you need to be aware of a few gotchas:
from mock import patch, call

def greet(name):
    print 'Hello, %s!' % name

@patch('sys.stdout')
def test_greet(mock_stdout):
    greet('John')
    mock_stdout.write.assert_has_calls([
       call('Hello, John!'),
       call('n')
    ])
First of all, remember to install the mock module as it wasn’t available in the standard library in Python 2.
Secondly, the print statement calls the underlying .write() method on the mocked object instead of calling the object itself. That’s why you’ll run assertions against mock_stdout.write.
Finally, a single print statement doesn’t always correspond to a single call to sys.stdout.write(). In fact, you’ll see the newline character written separately.
The last option you have is importing print() from future and patching it:
from __future__ import print_function
from mock import patch

def greet(name):
    print('Hello, %s!' % name)

@patch('__builtin__.print')
def test_greet(mock_print):
    greet('John')
    mock_print.assert_called_with('Hello, John!')
Again, it’s nearly identical to Python 3, but the print() function is defined in the __builtin__ module rather than builtins.
print() Debugging
In this section, you’ll take a look at the available tools for debugging in Python, starting from a humble print() function, through the logging module, to a fully fledged debugger. After reading it, you’ll be able to make an educated decision about which of them is the most suitable in a given situation.
Tracing
Also known as print debugging or caveman debugging, it’s the most basic form of debugging. While a little bit old-fashioned, it’s still powerful and has its uses.
The idea is to follow the path of program execution until it stops abruptly, or gives incorrect results, to identify the exact instruction with a problem. You do that by inserting print statements with words that stand out in carefully chosen places.
Take a look at this example, which manifests a rounding error:
>>>
>>> def average(numbers):
...     print('debug1:', numbers)
...     if len(numbers) > 0:
...         print('debug2:', sum(numbers))
...         return sum(numbers) / len(numbers)
...
>>> 0.1 == average(3*[0.1])
debug1: [0.1, 0.1, 0.1]
debug2: 0.30000000000000004
False
As you can see, the function doesn’t return the expected value of 0.1, but now you know it’s because the sum is a little off. Tracing the state of variables at different steps of the algorithm can give you a hint where the issue is.
In this case, the problem lies in how floating point numbers are represented in computer memory. Remember that numbers are stored in binary form. Decimal value of 0.1 turns out to have an infinite binary representation, which gets rounded.
For more information on rounding numbers in Python, you can check out How to Round Numbers in Python.
This method is simple and intuitive and will work in pretty much every programming language out there. Not to mention, it’s a great exercise in the learning process.
On the other hand, once you master more advanced techniques, it’s hard to go back, because they allow you to find bugs much quicker. Tracing is a laborious manual process, which can let even more errors slip through. The build and deploy cycle takes time. Afterward, you need to remember to meticulously remove all the print() calls you made without accidentally touching the genuine ones.
Besides, it requires you to make changes in the code, which isn’t always possible. Maybe you’re debugging an application running in a remote web server or want to diagnose a problem in a post-mortem fashion. Sometimes you simply don’t have access to the standard output.
That’s precisely where logging shines.
Logging
Let’s pretend for a minute that you’re running an e-commerce website. One day, an angry customer makes a phone call complaining about a failed transaction and saying he lost his money. He claims to have tried purchasing a few items, but in the end, there was some cryptic error that prevented him from finishing that order. Yet, when he checked his bank account, the money was gone.
You apologize sincerely and make a refund, but also don’t want this to happen again in the future. How do you debug that? If only you had some trace of what happened, ideally in the form of a chronological list of events with their context.
Whenever you find yourself doing print debugging, consider turning it into permanent log messages. This may help in situations like this, when you need to analyze a problem after it happened, in an environment that you don’t have access to.
There are sophisticated tools for log aggregation and searching, but at the most basic level, you can think of logs as text files. Each line conveys detailed information about an event in your system. Usually, it won’t contain personally identifying information, though, in some cases, it may be mandated by law.
Here’s a breakdown of a typical log record:
[2019-06-14 15:18:34,517][DEBUG][root][MainThread] Customer(id=123) logged out
As you can see, it has a structured form. Apart from a descriptive message, there are a few customizable fields, which provide the context of an event. Here, you have the exact date and time, the log level, the logger name, and the thread name.
Log levels allow you to filter messages quickly to reduce noise. If you’re looking for an error, you don’t want to see all the warnings or debug messages, for example. It’s trivial to disable or enable messages at certain log levels through the configuration, without even touching the code.
With logging, you can keep your debug messages separate from the standard output. All the log messages go to the standard error stream by default, which can conveniently show up in different colors. However, you can redirect log messages to separate files, even for individual modules!
Quite commonly, misconfigured logging can lead to running out of space on the server’s disk. To prevent that, you may set up log rotation, which will keep the log files for a specified duration, such as one week, or once they hit a certain size. Nevertheless, it’s always a good practice to archive older logs. Some regulations enforce that customer data be kept for as long as five years!
Compared to other programming languages, logging in Python is simpler, because the logging module is bundled with the standard library. You just import and configure it in as little as two lines of code:
import logging
logging.basicConfig(level=logging.DEBUG)
You can call functions defined at the module level, which are hooked to the root logger, but more the common practice is to obtain a dedicated logger for each of your source files:
logging.debug('hello')  # Module-level function

logger = logging.getLogger(__name__)
logger.debug('hello')   # Logger's method
The advantage of using custom loggers is more fine-grain control. They’re usually named after the module they were defined in through the __name__ variable.
One last reason to switch from the print() function to logging is thread safety. In the upcoming section, you’ll see that the former doesn’t play well with multiple threads of execution.
Debugging
The truth is that neither tracing nor logging can be considered real debugging. To do actual debugging, you need a debugger tool, which allows you to do the following:
- Step through the code interactively.
- Set breakpoints, including conditional breakpoints.
- Introspect variables in memory.
- Evaluate custom expressions at runtime.
A crude debugger that runs in the terminal, unsurprisingly named pdb for “The Python Debugger,” is distributed as part of the standard library. This makes it always available, so it may be your only choice for performing remote debugging. Perhaps that’s a good reason to get familiar with it.
However, it doesn’t come with a graphical interface, so using pdb may be a bit tricky. If you can’t edit the code, you have to run it as a module and pass your script’s location:
$ python -m pdb my_script.py
Otherwise, you can set up a breakpoint directly in the code, which will pause the execution of your script and drop you into the debugger. The old way of doing this required two steps:
>>>
>>> import pdb
>>> pdb.set_trace()
--Return--
> <stdin>(1)<module>()->None
(Pdb)
This shows up an interactive prompt, which might look intimidating at first. However, you can still type native Python at this point to examine or modify the state of local variables. Apart from that, there’s really only a handful of debugger-specific commands that you want to use for stepping through the code.
Since Python 3.7, you can also call the built-in breakpoint() function, which does the same thing, but in a more compact way and with some additional bells and whistles:
def average(numbers):
    if len(numbers) > 0:
        breakpoint()  # Python 3.7+
        return sum(numbers) / len(numbers)
You’re probably going to use a visual debugger integrated with a code editor for the most part. PyCharm has an excellent debugger, which boasts high performance, but you’ll find plenty of alternative IDEs with debuggers, both paid and free of charge.
Debugging isn’t the proverbial silver bullet. Sometimes logging or tracing will be a better solution. For example, defects that are hard to reproduce, such as race conditions, often result from temporal coupling. When you stop at a breakpoint, that little pause in program execution may mask the problem. It’s kind of like the Heisenberg principle: you can’t measure and observe a bug at the same time.
These methods aren’t mutually exclusive. They complement each other.
Thread-Safe Printing
I briefly touched upon the thread safety issue before, recommending logging over the print() function. If you’re still reading this, then you must be comfortable with the concept of threads.
Thread safety means that a piece of code can be safely shared between multiple threads of execution. The simplest strategy for ensuring thread-safety is by sharing immutable objects only. If threads can’t modify an object’s state, then there’s no risk of breaking its consistency.
Another method takes advantage of local memory, which makes each thread receive its own copy of the same object. That way, other threads can’t see the changes made to it in the current thread.
But that doesn’t solve the problem, does it? You often want your threads to cooperate by being able to mutate a shared resource. The most common way of synchronizing concurrent access to such a resource is by locking it. This gives exclusive write access to one or sometimes a few threads at a time.
However, locking is expensive and reduces concurrent throughput, so other means for controlling access have been invented, such as atomic variables or the compare-and-swap algorithm.
Printing isn’t thread-safe in Python. The print() function holds a reference to the standard output, which is a shared global variable. In theory, because there’s no locking, a context switch could happen during a call to sys.stdout.write(), intertwining bits of text from multiple print() calls.
In practice, however, that doesn’t happen. No matter how hard you try, writing to the standard output seems to be atomic. The only problem that you may sometimes observe is with messed up line breaks:
[Thread-3 A][Thread-2 A][Thread-1 A]

[Thread-3 B][Thread-1 B]


[Thread-1 C][Thread-3 C]

[Thread-2 B]
[Thread-2 C]
To simulate this, you can increase the likelihood of a context switch by making the underlying .write() method go to sleep for a random amount of time. How? By mocking it, which you already know about from an earlier section:
import sys

from time import sleep
from random import random
from threading import current_thread, Thread
from unittest.mock import patch

write = sys.stdout.write

def slow_write(text):
    sleep(random())
    write(text)

def task():
    thread_name = current_thread().name
    for letter in 'ABC':
        print(f'[{thread_name} {letter}]')

with patch('sys.stdout') as mock_stdout:
    mock_stdout.write = slow_write
    for _ in range(3):
        Thread(target=task).start()
First, you need to store the original .write() method in a variable, which you’ll delegate to later. Then you provide your fake implementation, which will take up to one second to execute. Each thread will make a few print() calls with its name and a letter: A, B, and C.
If you read the mocking section before, then you may already have an idea of why printing misbehaves like that. Nonetheless, to make it crystal clear, you can capture values fed into your slow_write() function. You’ll notice that you get a slightly different sequence each time:
[
    '[Thread-3 A]',
    '[Thread-2 A]',
    '[Thread-1 A]',
    'n',
    'n',
    '[Thread-3 B]',
    (...)
]
Even though sys.stdout.write() itself is an atomic operation, a single call to the print() function can yield more than one write. For example, line breaks are written separately from the rest of the text, and context switching takes place between those writes.
You can make the newline character become an integral part of the message by handling it manually:
print(f'[{thread_name} {letter}]n', end='')
This will fix the output:
[Thread-2 A]
[Thread-1 A]
[Thread-3 A]
[Thread-1 B]
[Thread-3 B]
[Thread-2 B]
[Thread-1 C]
[Thread-2 C]
[Thread-3 C]
Notice, however, that the print() function still keeps making a separate call for the empty suffix, which translates to useless sys.stdout.write('') instruction:
[
    '[Thread-2 A]n',
    '[Thread-1 A]n',
    '[Thread-3 A]n',
    '',
    '',
    '',
    '[Thread-1 B]n',
    (...)
]
A truly thread-safe version of the print() function could look like this:
import threading

lock = threading.Lock()

def thread_safe_print(*args, **kwargs):
    with lock:
        print(*args, **kwargs)
You can put that function in a module and import it elsewhere:
from thread_safe_print import thread_safe_print

def task():
    thread_name = current_thread().name
    for letter in 'ABC':
        thread_safe_print(f'[{thread_name} {letter}]')
Now, despite making two writes per each print() request, only one thread is allowed to interact with the stream, while the rest must wait:
[
    # Lock acquired by Thread-3
    '[Thread-3 A]',
    'n',
    # Lock released by Thread-3
    # Lock acquired by Thread-1
    '[Thread-1 B]',
    'n',
    # Lock released by Thread-1
    (...)
]
I added comments to indicate how the lock is limiting access to the shared resource.
Conversely, the logging module is thread-safe by design, which is reflected by its ability to display thread names in the formatted message:
>>>
>>> import logging
>>> logging.basicConfig(format='%(threadName)s %(message)s')
>>> logging.error('hello')
MainThread hello
It’s another reason why you might not want to use the print() function all the time.
Python Print Counterparts
By now, you know a lot of what there is to know about print()! The subject, however, wouldn’t be complete without talking about its counterparts a little bit. While print() is about the output, there are functions and libraries for the input.
Built-In
Python comes with a built-in function for accepting input from the user, predictably called input(). It accepts data from the standard input stream, which is usually the keyboard:
>>>
>>> name = input('Enter your name: ')
Enter your name: jdoe
>>> print(name)
jdoe
The function always returns a string, so you might need to parse it accordingly:
try:
    age = int(input('How old are you? '))
except ValueError:
    pass
The prompt parameter is completely optional, so nothing will show if you skip it, but the function will still work:
>>>
>>> x = input()
hello world
>>> print(x)
hello world
Nevertheless, throwing in a descriptive call to action makes the user experience so much better.
Asking the user for a password with input() is a bad idea because it’ll show up in plaintext as they’re typing it. In this case, you should be using the getpass() function instead, which masks typed characters. This function is defined in a module under the same name, which is also available in the standard library:
>>>
>>> from getpass import getpass
>>> password = getpass()
Password:
>>> print(password)
s3cret
The getpass module has another function for getting the user’s name from an environment variable:
>>>
>>> from getpass import getuser
>>> getuser()
'jdoe'
Python’s built-in functions for handling the standard input are quite limited. At the same time, there are plenty of third-party packages, which offer much more sophisticated tools.
Third-Party
There are external Python packages out there that allow for building complex graphical interfaces specifically to collect data from the user. Some of their features include:
- Advanced formatting and styling
- Automated parsing, validation, and sanitization of user data
- A declarative style of defining layouts
- Interactive autocompletion
- Mouse support
- Predefined widgets such as checklists or menus
- Searchable history of typed commands
- Syntax highlighting
Demonstrating such tools is outside of the scope of this article, but you may want to try them out. I personally got to know about some of those through the Python Bytes Podcast. Here they are:
bulletcooked-inputprompt_toolkitquestionnaire
Nonetheless, it’s worth mentioning a command line tool called rlwrap that adds powerful line editing capabilities to your Python scripts for free. You don’t have to do anything for it to work!
Let’s assume you wrote a command-line interface that understands three instructions, including one for adding numbers:
print('Type "help", "exit", "add a [b [c ...]]"')
while True:
    command, *arguments = input('~ ').split(' ')
    if len(command) > 0:
        if command.lower() == 'exit':
            break
        elif command.lower() == 'help':
            print('This is help.')
        elif command.lower() == 'add':
            print(sum(map(int, arguments)))
        else:
            print('Unknown command')
At first glance, it seems like a typical prompt when you run it:
$ python calculator.py
Type "help", "exit", "add a [b [c ...]]"
~ add 1 2 3 4
10
~ aad 2 3
Unknown command
~ exit
$
But as soon as you make a mistake and want to fix it, you’ll see that none of the function keys work as expected. Hitting the Left arrow, for example, results in this instead of moving the cursor back:
$ python calculator.py
Type "help", "exit", "add a [b [c ...]]"
~ aad^[[D
Now, you can wrap the same script with the rlwrap command. Not only will you get the arrow keys working, but you’ll also be able to search through the persistent history of your custom commands, use autocompletion, and edit the line with shortcuts:
$ rlwrap python calculator.py
Type "help", "exit", "add a [b [c ...]]"
(reverse-i-search)`a': add 1 2 3 4
Isn’t that great?
Conclusion
You’re now armed with a body of knowledge about the print() function in Python, as well as many surrounding topics. You have a deep understanding of what it is and how it works, involving all of its key elements. Numerous examples gave you insight into its evolution from Python 2.
Apart from that, you learned how to:
- Avoid common mistakes with
print()in Python - Deal with newlines, character encodings and buffering
- Write text to files
- Mock the
print()function in unit tests - Build advanced user interfaces in the terminal
Now that you know all this, you can make interactive programs that communicate with users or produce data in popular file formats. You’re able to quickly diagnose problems in your code and protect yourself from them. Last but not least, you know how to implement the classic snake game.
If you’re still thirsty for more information, have questions, or simply would like to share your thoughts, then feel free to reach out in the comments section below.
Watch Now This tutorial has a related video course created by the Real Python team. Watch it together with the written tutorial to deepen your understanding: The Python print() Function: Go Beyond the Basics
2 answers to this question.
You must be trying this command in Python3. Instead of adding space, add paranthesis. As print is considered as a function now.
print("Hello World!")
![]()
answered
Mar 31, 2018
by
GandalfDwhite
• 1,320 points
selected
Oct 12, 2018
by Omkar
Related Questions In Python
- All categories
-

ChatGPT
(4) -
Apache Kafka
(84) -
Apache Spark
(596) -
Azure
(131) -
Big Data Hadoop
(1,907) -
Blockchain
(1,673) -
C#
(141) -
C++
(271) -
Career Counselling
(1,060) -
Cloud Computing
(3,446) -
Cyber Security & Ethical Hacking
(147) -
Data Analytics
(1,266) -
Database
(855) -
Data Science
(75) -
DevOps & Agile
(3,575) -
Digital Marketing
(111) -
Events & Trending Topics
(28) -
IoT (Internet of Things)
(387) -
Java
(1,247) -
Kotlin
(8) -
Linux Administration
(389) -
Machine Learning
(337) -
MicroStrategy
(6) -
PMP
(423) -
Power BI
(516) -
Python
(3,188) -
RPA
(650) -
SalesForce
(92) -
Selenium
(1,569) -
Software Testing
(56) -
Tableau
(608) -
Talend
(73) -
TypeSript
(124) -
Web Development
(3,002) -
Ask us Anything!
(66) -
Others
(1,938) -
Mobile Development
(263)


Subscribe to our Newsletter, and get personalized recommendations.
Already have an account? Sign in.
Overview
Teaching: 30 min
Exercises: 0 minQuestions
How does Python report errors?
How can I handle errors in Python programs?
Objectives
To be able to read a traceback, and determine where the error took place and what type it is.
To be able to describe the types of situations in which syntax errors, indentation errors, name errors, index errors, and missing file errors occur.
Every programmer encounters errors,
both those who are just beginning,
and those who have been programming for years.
Encountering errors and exceptions can be very frustrating at times,
and can make coding feel like a hopeless endeavour.
However,
understanding what the different types of errors are
and when you are likely to encounter them can help a lot.
Once you know why you get certain types of errors,
they become much easier to fix.
Errors in Python have a very specific form,
called a traceback.
Let’s examine one:
# This code has an intentional error. You can type it directly or
# use it for reference to understand the error message below.
def favorite_ice_cream():
    ice_creams = [
        'chocolate',
        'vanilla',
        'strawberry'
    ]
    print(ice_creams[3])

favorite_ice_cream()
---------------------------------------------------------------------------
IndexError                                Traceback (most recent call last)
<ipython-input-1-70bd89baa4df> in <module>()
      9     print(ice_creams[3])
      10
----> 11 favorite_ice_cream()

<ipython-input-1-70bd89baa4df> in favorite_ice_cream()
      7         'strawberry'
      8     ]
----> 9     print(ice_creams[3])
      10
      11 favorite_ice_cream()

IndexError: list index out of range
This particular traceback has two levels.
You can determine the number of levels by looking for the number of arrows on the left hand side.
In this case:
-
The first shows code from the cell above,
with an arrow pointing to Line 11 (which isfavorite_ice_cream()). -
The second shows some code in the function
favorite_ice_cream,
with an arrow pointing to Line 9 (which isprint(ice_creams[3])).
The last level is the actual place where the error occurred.
The other level(s) show what function the program executed to get to the next level down.
So, in this case, the program first performed a
function call to the function favorite_ice_cream.
Inside this function,
the program encountered an error on Line 6, when it tried to run the code print(ice_creams[3]).
Long Tracebacks
Sometimes, you might see a traceback that is very long
– sometimes they might even be 20 levels deep!
This can make it seem like something horrible happened,
but the length of the error message does not reflect severity, rather,
it indicates that your program called many functions before it encountered the error.
Most of the time, the actual place where the error occurred is at the bottom-most level,
so you can skip down the traceback to the bottom.
So what error did the program actually encounter?
In the last line of the traceback,
Python helpfully tells us the category or type of error (in this case, it is an IndexError)
and a more detailed error message (in this case, it says “list index out of range”).
If you encounter an error and don’t know what it means,
it is still important to read the traceback closely.
That way,
if you fix the error,
but encounter a new one,
you can tell that the error changed.
Additionally,
sometimes knowing where the error occurred is enough to fix it,
even if you don’t entirely understand the message.
If you do encounter an error you don’t recognize,
try looking at the
official documentation on errors.
However,
note that you may not always be able to find the error there,
as it is possible to create custom errors.
In that case,
hopefully the custom error message is informative enough to help you figure out what went wrong.
Syntax Errors
When you forget a colon at the end of a line,
accidentally add one space too many when indenting under an if statement,
or forget a parenthesis,
you will encounter a syntax error.
This means that Python couldn’t figure out how to read your program.
This is similar to forgetting punctuation in English:
for example,
this text is difficult to read there is no punctuation there is also no capitalization
why is this hard because you have to figure out where each sentence ends
you also have to figure out where each sentence begins
to some extent it might be ambiguous if there should be a sentence break or not
People can typically figure out what is meant by text with no punctuation,
but people are much smarter than computers.
If Python doesn’t know how to read the program,
it will give up and inform you with an error.
For example:
def some_function()
    msg = 'hello, world!'
    print(msg)
     return msg
  File "<ipython-input-3-6bb841ea1423>", line 1
    def some_function()
                       ^
SyntaxError: invalid syntax
Here, Python tells us that there is a SyntaxError on line 1,
and even puts a little arrow in the place where there is an issue.
In this case the problem is that the function definition is missing a colon at the end.
Actually, the function above has two issues with syntax.
If we fix the problem with the colon,
we see that there is also an IndentationError,
which means that the lines in the function definition do not all have the same indentation:
def some_function():
    msg = 'hello, world!'
    print(msg)
     return msg
  File "<ipython-input-4-ae290e7659cb>", line 4
    return msg
    ^
IndentationError: unexpected indent
Both SyntaxError and IndentationError indicate a problem with the syntax of your program,
but an IndentationError is more specific:
it always means that there is a problem with how your code is indented.
Tabs and Spaces
Some indentation errors are harder to spot than others.
In particular, mixing spaces and tabs can be difficult to spot
because they are both whitespace.
In the example below, the first two lines in the body of the function
some_functionare indented with tabs, while the third line — with spaces.
If you’re working in a Jupyter notebook, be sure to copy and paste this example
rather than trying to type it in manually because Jupyter automatically replaces
tabs with spaces.def some_function(): msg = 'hello, world!' print(msg) return msgVisually it is impossible to spot the error.
Fortunately, Python does not allow you to mix tabs and spaces.File "<ipython-input-5-653b36fbcd41>", line 4 return msg ^ TabError: inconsistent use of tabs and spaces in indentation
Variable Name Errors
Another very common type of error is called a NameError,
and occurs when you try to use a variable that does not exist.
For example:
---------------------------------------------------------------------------
NameError                                 Traceback (most recent call last)
<ipython-input-7-9d7b17ad5387> in <module>()
----> 1 print(a)

NameError: name 'a' is not defined
Variable name errors come with some of the most informative error messages,
which are usually of the form “name ‘the_variable_name’ is not defined”.
Why does this error message occur?
That’s a harder question to answer,
because it depends on what your code is supposed to do.
However,
there are a few very common reasons why you might have an undefined variable.
The first is that you meant to use a
string, but forgot to put quotes around it:
---------------------------------------------------------------------------
NameError                                 Traceback (most recent call last)
<ipython-input-8-9553ee03b645> in <module>()
----> 1 print(hello)

NameError: name 'hello' is not defined
The second reason is that you might be trying to use a variable that does not yet exist.
In the following example,
count should have been defined (e.g., with count = 0) before the for loop:
for number in range(10):
    count = count + number
print('The count is:', count)
---------------------------------------------------------------------------
NameError                                 Traceback (most recent call last)
<ipython-input-9-dd6a12d7ca5c> in <module>()
      1 for number in range(10):
----> 2     count = count + number
      3 print('The count is:', count)

NameError: name 'count' is not defined
Finally, the third possibility is that you made a typo when you were writing your code.
Let’s say we fixed the error above by adding the line Count = 0 before the for loop.
Frustratingly, this actually does not fix the error.
Remember that variables are case-sensitive,
so the variable count is different from Count. We still get the same error,
because we still have not defined count:
Count = 0
for number in range(10):
    count = count + number
print('The count is:', count)
---------------------------------------------------------------------------
NameError                                 Traceback (most recent call last)
<ipython-input-10-d77d40059aea> in <module>()
      1 Count = 0
      2 for number in range(10):
----> 3     count = count + number
      4 print('The count is:', count)

NameError: name 'count' is not defined
Index Errors
Next up are errors having to do with containers (like lists and strings) and the items within them.
If you try to access an item in a list or a string that does not exist,
then you will get an error.
This makes sense:
if you asked someone what day they would like to get coffee,
and they answered “caturday”,
you might be a bit annoyed.
Python gets similarly annoyed if you try to ask it for an item that doesn’t exist:
letters = ['a', 'b', 'c']
print('Letter #1 is', letters[0])
print('Letter #2 is', letters[1])
print('Letter #3 is', letters[2])
print('Letter #4 is', letters[3])
Letter #1 is a
Letter #2 is b
Letter #3 is c
---------------------------------------------------------------------------
IndexError                                Traceback (most recent call last)
<ipython-input-11-d817f55b7d6c> in <module>()
      3 print('Letter #2 is', letters[1])
      4 print('Letter #3 is', letters[2])
----> 5 print('Letter #4 is', letters[3])

IndexError: list index out of range
Here,
Python is telling us that there is an IndexError in our code,
meaning we tried to access a list index that did not exist.
File Errors
The last type of error we’ll cover today
are those associated with reading and writing files: FileNotFoundError.
If you try to read a file that does not exist,
you will receive a FileNotFoundError telling you so.
If you attempt to write to a file that was opened read-only, Python 3
returns an UnsupportedOperationError.
More generally, problems with input and output manifest as
IOErrors or OSErrors, depending on the version of Python you use.
file_handle = open('myfile.txt', 'r')
---------------------------------------------------------------------------
FileNotFoundError                         Traceback (most recent call last)
<ipython-input-14-f6e1ac4aee96> in <module>()
----> 1 file_handle = open('myfile.txt', 'r')

FileNotFoundError: [Errno 2] No such file or directory: 'myfile.txt'
One reason for receiving this error is that you specified an incorrect path to the file.
For example,
if I am currently in a folder called myproject,
and I have a file in myproject/writing/myfile.txt,
but I try to open myfile.txt,
this will fail.
The correct path would be writing/myfile.txt.
It is also possible that the file name or its path contains a typo.
A related issue can occur if you use the “read” flag instead of the “write” flag.
Python will not give you an error if you try to open a file for writing
when the file does not exist.
However,
if you meant to open a file for reading,
but accidentally opened it for writing,
and then try to read from it,
you will get an UnsupportedOperation error
telling you that the file was not opened for reading:
file_handle = open('myfile.txt', 'w')
file_handle.read()
---------------------------------------------------------------------------
UnsupportedOperation                      Traceback (most recent call last)
<ipython-input-15-b846479bc61f> in <module>()
      1 file_handle = open('myfile.txt', 'w')
----> 2 file_handle.read()

UnsupportedOperation: not readable
These are the most common errors with files,
though many others exist.
If you get an error that you’ve never seen before,
searching the Internet for that error type
often reveals common reasons why you might get that error.
Reading Error Messages
Read the Python code and the resulting traceback below, and answer the following questions:
- How many levels does the traceback have?
- What is the function name where the error occurred?
- On which line number in this function did the error occur?
- What is the type of error?
- What is the error message?
# This code has an intentional error. Do not type it directly; # use it for reference to understand the error message below. def print_message(day): messages = { 'monday': 'Hello, world!', 'tuesday': 'Today is Tuesday!', 'wednesday': 'It is the middle of the week.', 'thursday': 'Today is Donnerstag in German!', 'friday': 'Last day of the week!', 'saturday': 'Hooray for the weekend!', 'sunday': 'Aw, the weekend is almost over.' } print(messages[day]) def print_friday_message(): print_message('Friday') print_friday_message()--------------------------------------------------------------------------- KeyError Traceback (most recent call last) <ipython-input-1-4be1945adbe2> in <module>() 14 print_message('Friday') 15 ---> 16 print_friday_message() <ipython-input-1-4be1945adbe2> in print_friday_message() 12 13 def print_friday_message(): ---> 14 print_message('Friday') 15 16 print_friday_message() <ipython-input-1-4be1945adbe2> in print_message(day) 9 'sunday': 'Aw, the weekend is almost over.' 10 } ---> 11 print(messages[day]) 12 13 def print_friday_message(): KeyError: 'Friday'Solution
- 3 levels
print_message- 11
KeyError- There isn’t really a message; you’re supposed
to infer thatFridayis not a key inmessages.
Identifying Syntax Errors
- Read the code below, and (without running it) try to identify what the errors are.
- Run the code, and read the error message. Is it a
SyntaxErroror anIndentationError?- Fix the error.
- Repeat steps 2 and 3, until you have fixed all the errors.
def another_function print('Syntax errors are annoying.') print('But at least Python tells us about them!') print('So they are usually not too hard to fix.')Solution
SyntaxErrorfor missing():at end of first line,
IndentationErrorfor mismatch between second and third lines.
A fixed version is:def another_function(): print('Syntax errors are annoying.') print('But at least Python tells us about them!') print('So they are usually not too hard to fix.')
Identifying Variable Name Errors
- Read the code below, and (without running it) try to identify what the errors are.
- Run the code, and read the error message.
What type ofNameErrordo you think this is?
In other words, is it a string with no quotes,
a misspelled variable,
or a variable that should have been defined but was not?- Fix the error.
- Repeat steps 2 and 3, until you have fixed all the errors.
for number in range(10): # use a if the number is a multiple of 3, otherwise use b if (Number % 3) == 0: message = message + a else: message = message + 'b' print(message)Solution
3
NameErrors fornumberbeing misspelled, formessagenot defined,
and foranot being in quotes.Fixed version:
message = '' for number in range(10): # use a if the number is a multiple of 3, otherwise use b if (number % 3) == 0: message = message + 'a' else: message = message + 'b' print(message)
Identifying Index Errors
- Read the code below, and (without running it) try to identify what the errors are.
- Run the code, and read the error message. What type of error is it?
- Fix the error.
seasons = ['Spring', 'Summer', 'Fall', 'Winter'] print('My favorite season is ', seasons[4])Solution
IndexError; the last entry isseasons[3], soseasons[4]doesn’t make sense.
A fixed version is:seasons = ['Spring', 'Summer', 'Fall', 'Winter'] print('My favorite season is ', seasons[-1])
Key Points
Tracebacks can look intimidating, but they give us a lot of useful information about what went wrong in our program, including where the error occurred and what type of error it was.
An error having to do with the ‘grammar’ or syntax of the program is called a
SyntaxError. If the issue has to do with how the code is indented, then it will be called anIndentationError.A
NameErrorwill occur when trying to use a variable that does not exist. Possible causes are that a variable definition is missing, a variable reference differs from its definition in spelling or capitalization, or the code contains a string that is missing quotes around it.Containers like lists and strings will generate errors if you try to access items in them that do not exist. This type of error is called an
IndexError.Trying to read a file that does not exist will give you an
FileNotFoundError. Trying to read a file that is open for writing, or writing to a file that is open for reading, will give you anIOError.