Если вы видите сообщение об ошибке, например «Произошла ошибка. Перезагрузите страницу.» или «Не удается загрузить файл» и не можете редактировать файлы Документов, Презентаций или Таблиц, попробуйте устранить неполадки самостоятельно. Если вам нужно срочно получить доступ к файлу и продолжить работу с ним, узнайте о возможных решениях.
Наиболее часто встречаются следующие сообщения об ошибках:
- «Произошла ошибка. Попробуйте перезагрузить страницу или повторите попытку через несколько минут.»
- «Произошла ошибка сервера. Нажмите «Обновить» в браузере.»
Основные неполадки
Подождите 5 минут и обновите страницу
В некоторых случаях ошибка, о которой говорится в сообщении, может исчезнуть. Подождите 5 минут и обновите страницу.
Проверьте подключение к интернету
Если ошибка возникла из-за плохого подключения к интернету, попробуйте переместиться туда, где связь более стабильна. Можно использовать проводное соединение.
Обновите устаревшее устройство или программное обеспечение
Если у вас старый компьютер или браузер, вероятно, они не соответствуют системным требованиям Google Документов, Презентаций или Таблиц. В этом случае попробуйте открыть файл на другом устройстве. Если файл откроется, то проблема связана с вашим устройством. Попробуйте обновить браузер до последней версии.
Открытые вкладки и окна сохранятся в браузере и автоматически откроются при его повторном запуске. Окна в режиме инкогнито не будут открыты повторно.
Воспользуйтесь другим браузером
Если сообщения об ошибке регулярно появляются при работе в одном браузере, попробуйте использовать другой браузер.
Воспользуйтесь другим аккаунтом
Файл не обнаружен
Дальнейшие шаги по устранению неполадок
Очистите кеш и удалите файлы cookie
Браузеры сохраняют некоторые страницы, чтобы загружать их быстрее. При этом браузер может сохранить страницу с ошибкой и продолжит показывать сообщение об ошибке. Чтобы устранить эту проблему, очистите кеш и удалите файлы cookie.
Совет. Очистка кеша и удаление файлов cookie могут помочь, если вы используете и другие браузеры, например Safari, Firefox и Microsoft Edge.
Отключите расширения
Включите офлайн-доступ (только для браузера Chrome)
Очистите данные размещаемых приложений (только для браузера Chrome)
Данные размещаемых приложений – это данные приложений, добавленных в браузер Chrome из интернет-магазина Chrome. Чтобы устранить ошибку, попробуйте очистить данные размещаемых приложений.
- Откройте Google Chrome на компьютере.
- В верхней части экрана выберите Chrome
 Очистить историю.
 - Нажмите Дополнительные.
- Установите флажок Данные размещаемых приложений.
- Нажмите Удалить данные.
Импортируйте данные из новой таблицы (только для Google Таблиц)
Если ошибка происходит при работе с Google Таблицами и не устраняется после копирования файла на Диск, попробуйте применить функцию IMPORTRANGE. Она поможет сохранить ваши данные, перенеся их в новую таблицу. Для использования функции IMPORTRANGE необходимо знать URL исходного файла и название вкладки.
Внимание! После активации функции IMPORTRANGE формулы не будут импортироваться из исходной таблицы в новую.
Как продолжить работу с файлом
Создайте копию вашего файла на Диске
Если ошибка препятствует работе с файлами Презентаций, Таблиц или Документов, то вы можете создать копию нужного файла на Google Диске и продолжить работу в новом файле. Скопированный файл также можно редактировать.
- Откройте Google Диск на компьютере.
- Нажмите на нужный файл правой кнопкой мыши.
- Выберите Создать копию.
Совет. Если вы копируете файл туда, где расположен исходный файл, может потребоваться время, чтобы новый файл появился на Диске. В этом случае подождите несколько секунд.
Скачайте и снова загрузите файл
Если ошибка препятствует работе с файлом, вы попробуйте скачать этот файл на устройство, а затем снова загрузить его на Google Диск. В результате у вас получится новый файл с прежним контентом.
Как скачать файл
- Откройте Google Диск на компьютере.
- Нажмите на нужный файл правой кнопкой мыши.
- Выберите Скачать.
Как загрузить файл
- Откройте Google Диск на компьютере.
- Нажмите Создать.
- Выберите Загрузить файлы.
- Загрузите файл.
Внимание! В результате скачивания может быть утеряна некоторая информация о файле, например история изменений.
Скачайте файл с Диска и работайте с ним локально
Вы можете скачать файлы с Диска на компьютер и сохранять изменения на Google Диске. Вы можете продолжить работу со скачанным файлом, открыв его на своем устройстве, если установлено необходимое программное обеспечение. Когда сообщение об ошибке перестанет появляться, вы сможете загрузить файл обратно на Google Диск или просто скопировать изменения и вставить их в исходный файл.
Внимание! Когда вы скачаете файл на устройство и начнете работу, некоторая информация о файле, например история изменений, может быть утеряна.
Помогите нам улучшить работу сервиса и получите помощь на форуме
Если сообщение об ошибке продолжает появляться, обратитесь за помощью или сообщите нам о проблеме.
- Если у вас остались вопросы, посетите справочный форум редакторов Google Документов.
- Чтобы сообщить о проблеме, откройте файл Документов, Таблиц или Презентаций и в верхней части страницы нажмите СправкаПомочь улучшить.
Эта информация оказалась полезной?
Как можно улучшить эту статью?
The 504 Gateway Timeout error is one of the most common HTTP 5xx errors faced by website owners and site visitors. For many WordPress blogs and ecommerce platforms, knowing how to fix server errors like this is crucial to keep their hard-earned visitors from bouncing to competitor sites.
As the 504 Gateway Timeout error doesn’t tell you why it occurred, it’s hard to pinpoint what’s causing the server timeout. This article will help you understand it in detail, learn how to diagnose its cause, and then fix it.
After trying all the various solutions mentioned in the post, your site should be up and running in no time.
Sounds interesting? Let’s dive in!
The 504 Gateway Timeout error is one of the most common HTTP 5xx errors faced by website owners and site visitors. 🤔 Learn how to fix it with this guide quickly. ⬇️Click to Tweet
Prefer to watch the video version?
What Is the 504 Gateway Timeout Error?
Every time you visit a website in your browser, the browser sends a request to the web server where the site is hosted. The server processes the request and responds with the requested resources.
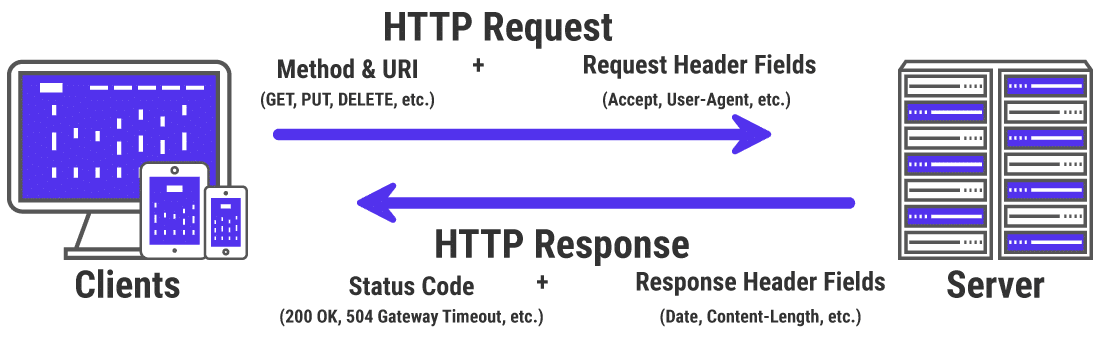
The server response includes one of many HTTP status codes to indicate the response’s status to the browser. But not all these HTTP status codes are errors. For instance, a 200 OK status code means that the server processed the request successfully and “Everything is OK.”
The 5xx class of HTTP status codes indicates that something’s wrong with the server, the server is aware of it, and it cannot carry out the client request. As a result, they’re also referred to as Server Error 5xx status codes.
Officially, five status codes are specified under the 5xx class (500, 501, 502, 503, 504). You may come upon many unofficial codes too (506, 507, 509, 520, etc.).
The Internet Engineering Task Force (IETF) defines the 504 Gateway Timeout error as:
The 504 (Gateway Timeout) status code indicates that the server, while acting as a gateway or proxy, did not receive a timely response from an upstream server it needed to access in order to complete the request.
To simplify it further, this error occurs when two servers are involved in processing a request. The first server (typically the main server) times out, waiting for a response from the second server (upstream server).
The 504 Gateway Timeout error manifests itself in various forms. Here are some ways it usually shows up:

The 504 Gateway Timeout error is similar to the 502 Bad Gateway error, which indicates that the first server received an invalid response from the second server (upstream server).
Variations of the 504 Gateway Timeout Error
The browser displays any 504 Gateway Timeout error inside it, just like any other error. As there are various operating systems, web servers, browsers, and user agents, it can show up in multiple ways.
Below are a few common 504 error message variations that you may run into:
- 504 Gateway Timeout
- 504 Gateway Timeout NGINX
- NGINX 504 Gateway Timeout
- Gateway Timeout Error
- Error 504
- HTTP Error 504
- HTTP Error 504 — Gateway Timeout
- HTTP 504
- 504 Error
- Gateway Timeout (504)
- This page isn’t working — Domain took too long to respond
- 504 Gateway Time-out — The server didn’t respond in time
- The page request was canceled because it took too long to complete
- Site visitors: There was an issue serving your request, please try again in a few minutes.
- Site Owners: There was a gateway timeout. You should visit your error log for more information.
- A blank white screen
All the above error responses, though worded differently, point to the same 504 Gateway Timeout server error.
Web servers and websites can customize how they show the 504 Gateway Timeout error to users. Some of them can be cool! It’s an excellent tactic to quell their visitors’ disappointment.
SEO Impact of the 504 Gateway Timeout Error
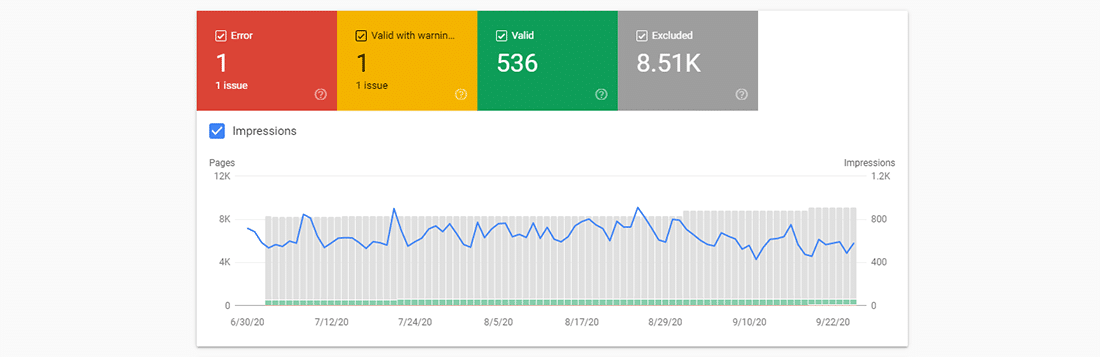
All 5xx errors prevent a webpage from loading, making them detrimental to user experience. Hence, search engines like Google take these errors seriously. If the error persists for a long duration, it may even lead to deindexing the webpage from the search engine results.
For example, when Google spiders stumble upon a 503 Service Unavailable error, they’ll understand that it’s a temporary issue as it’s mostly used to enable site maintenance mode. Thus, they’ll try to crawl the page again later.
A 504 Gateway Timeout error isn’t necessarily temporary as it can be due to multiple reasons. If your site is down for just a few minutes, and if the spiders are trying to crawl it multiple times every minute, they’ll try to serve the page from their cache. They wouldn’t even notice it.
But if your site is down for 6+ hours or more, then Google will consider the 504 error as a serious site-wide issue that you need to fix as soon as possible. This can impact your SEO negatively.
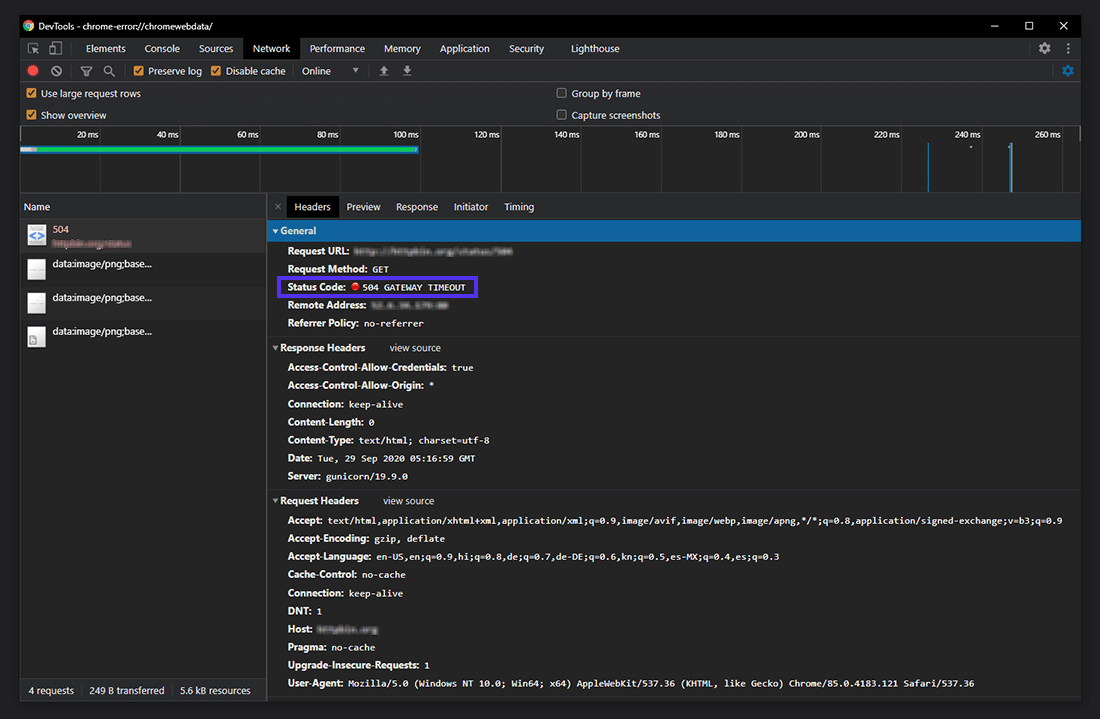
Google Search Console is one of the best SEO tools to monitor your website’s HTTP 5xx errors.
Causes of the 504 Gateway Timeout Error
As the 504 error is due to a timeout between servers, the problem probably isn’t with the client’s device or internet connection. That also includes your device and connection.
A 504 Gateway Timeout error indicates that the web server is waiting too long to respond from another server and “timing out.” There can be many reasons for this timeout: the other server is not functioning properly, overloaded, or down.
The other server need not always be external (e.g. CDN, API gateway). It can also be a server-like entity within the main web server (e.g. reverse proxy server, database server).
How to Fix the 504 Gateway Timeout Error
Without knowing exact details about the site, such as its server configuration, hosting plan, third-party plugins, and the traffic it attracts, you may find it frustrating and overwhelming to fix a 504 Gateway Timeout error.
Since many variables are involved, I recommend you to start by fixing client-side issues, which are pretty rare, and then move towards fixing server-side problems. They’re usually the culprits with 504 errors.
- Try Reloading the Webpage
- Reboot Your Network Devices
- Check Your Proxy Settings
- Check for DNS Issues
- Disable Your Site’s CDN Temporarily
- Check Server Issues With Your Host
- Check for Spam, Bots, or DDoS Attacks
- Repair Your Corrupted WordPress Database
- Check Your Site’s Plugins and Themes
- Check Error Logs
- Configure Apache or Nginx Settings Properly
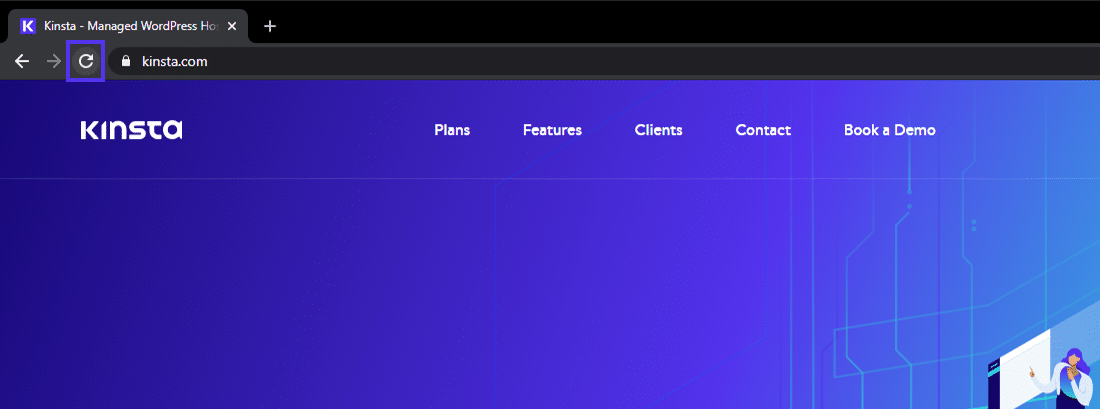
1. Try Reloading the Webpage
One of the first things you can try when encountering a 504 Gateway Timeout error is to wait a few minutes and try reloading the page.
You can press the F5 keyboard shortcut to refresh/reload the webpage in most browsers. To remove the page’s browser cache before reloading, you can press the CTRL+F5 shortcut combo instead.
While you’re at it, you can also try loading the site in a different browser to rule that out as an issue. As most 504 errors are due to temporarily overloaded servers, using this solution should make your site come right back.
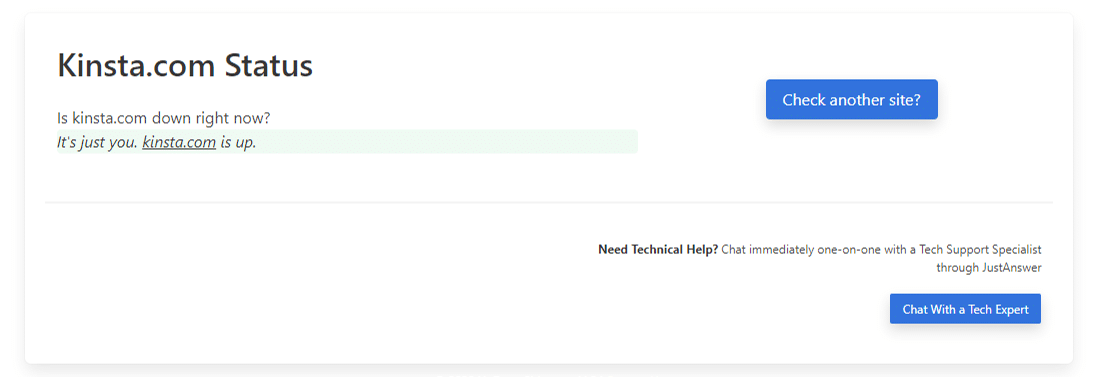
If waiting and reloading the site doesn’t fix the 504 error issue, you can check whether a site is down for everyone or just you. Two useful online tools to test a site for downtime are Down for Everyone or Just Me and Is It Down Right Now?
2. Reboot Your Network Devices
Sometimes, problems with your network devices like modem or router could lead to a 504 Gateway Timeout error. Rebooting these devices could help you with fixing the problem.
While you can switch off all these networking devices in any order, the order you switch them back on is important. Typically, turn these devices on from the “outside-in,” following the connection order from the internet service provider to your main client device.
3. Check Your Proxy Settings
A proxy server sits between your device and the internet. It’s mostly used to enhance online privacy by hiding private information (e.g. device location) from websites and webservers (e.g. using a VPN).
While it’s rare for proxy servers to cause a 504 error, incorrect proxy server settings can sometimes be the reason. You can disable the proxy server and try reloading the webpage to see whether it’ll fix the error.
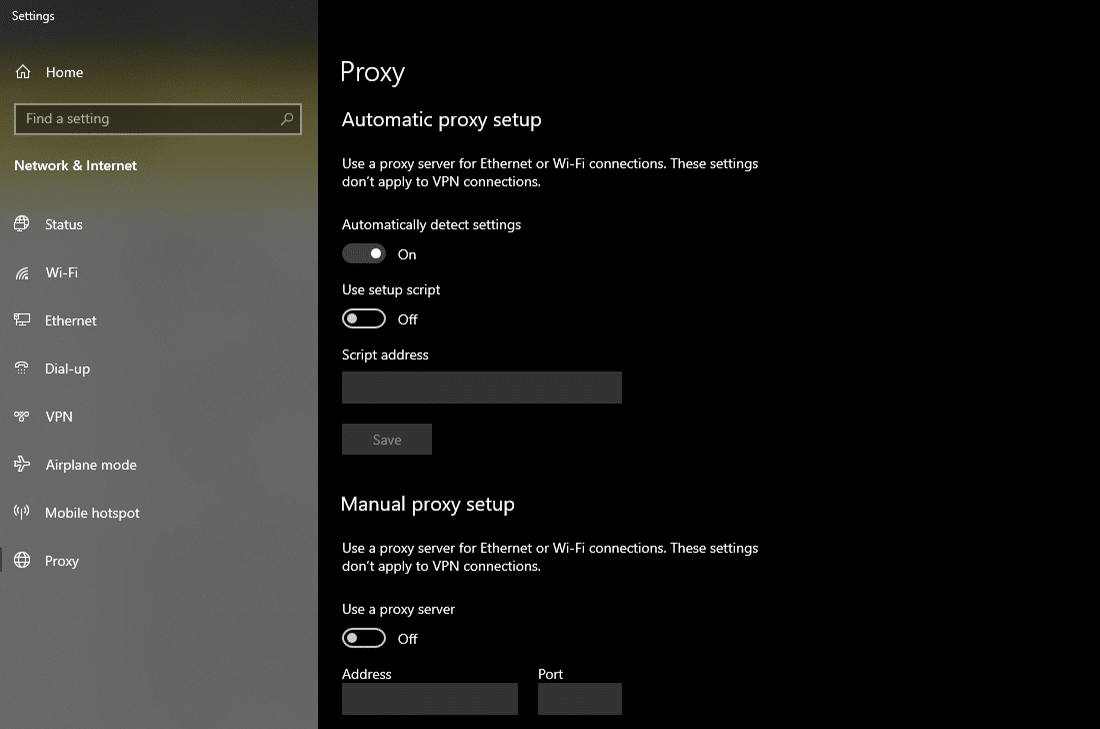
Most clients don’t use a proxy service, so you can skip this step if you’re confident that you don’t use any proxy server. However, you might have set it without you even knowing about it. I’d suggest you check your device’s and browser’s proxy settings to rule this cause out.
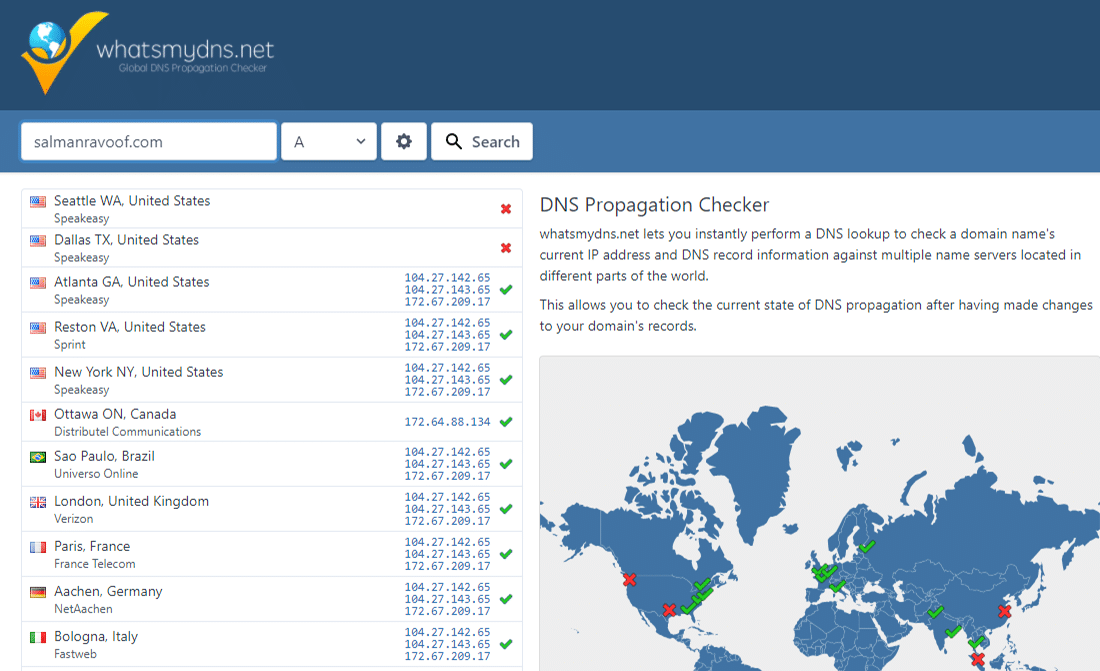
4. Check for DNS Issues
A 504 Gateway Timeout error can also be caused by DNS issues on the server-side or the client-side (or both).
The most probable reason for a server-side DNS issue is the FQDN (fully qualified domain name) not resolving the correct IP address or the DNS server not responding. Usually, this occurs when you’ve just migrated your site to a new server or host. Hence, it’s important to wait for the domain’s DNS records to propagate fully, which can take up to 24 hours.
You can use free tools like whatsmydns.net DNS Checker or DNSMap to see if your DNS has propagated around the globe.
For fixing client-side DNS issues, you could try flushing your local DNS cache. It’s like clearing your browser cache, except here, you’re flushing the DNS cache from the operating system.
If you’re using Windows, you can flush the DNS cache by opening the Command Prompt and entering the following directive:
ipconfig /flushdns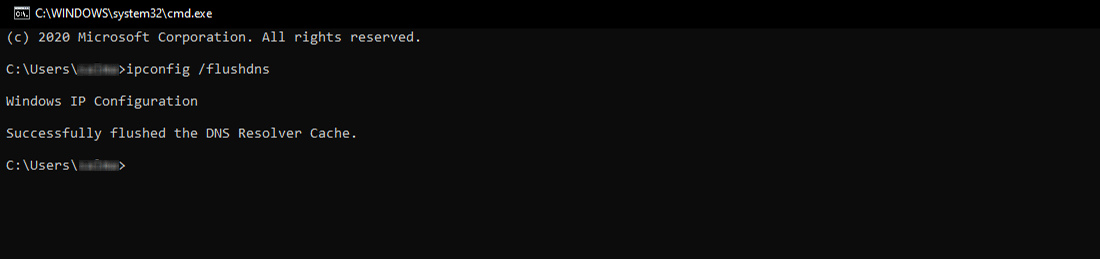
You should see a “Successfully flushed the DNS resolver Cache.” message if it worked.
For the latest macOS versions, you can open the Terminal and run the following command:
sudo killall -HUP mDNSResponderYou won’t see any notification in macOS when the process finishes, but you can change that by appending the command with your custom message.
sudo killall -HUP mDNSResponder; DNS Cache was cleared successfullyIf you’re using older macOS versions, the command you need to enter varies based on which version of macOS you’re running. For more details, you can refer to the macOS section in Kinsta’s in-depth flush DNS tutorial.
If you’re using the Linux operating system, then the process is quite similar to macOS as even Linux uses the Terminal as its command-line interface. Since there are many Linux distributions, the exact command you need to run may vary from one distro to another. You can check out Kinsta’s guide for more information.
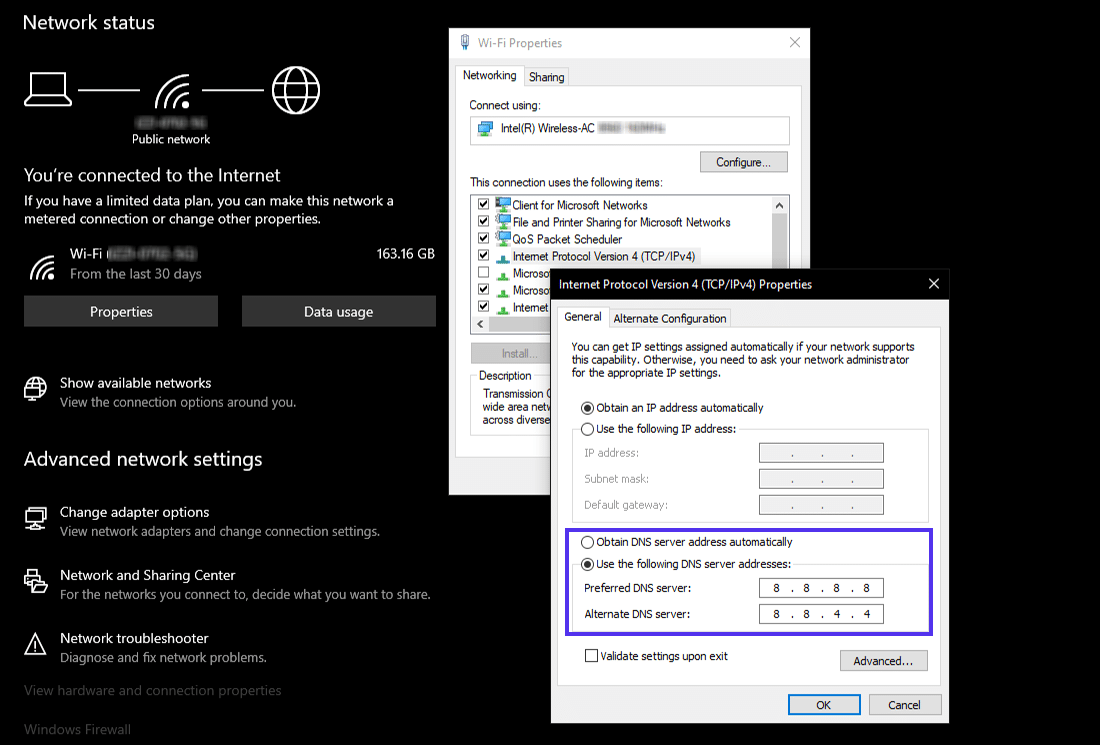
Finally, you can change your client-side DNS servers temporarily. By default, your ISP assigns the DNS servers automatically to you. But you can change these to public DNS IPs temporarily.
Some reliable DNS servers you can try out are Google Public DNS, Cloudflare 1.1.1.1, Quad9 DNS, and Cisco OpenDNS.
5. Disable Your Site’s CDN Temporarily
Sometimes, the issue could also be with your content delivery network (CDN). If a site’s origin server isn’t reachable, most CDNs will try to serve the full webpage from their cache.
But most CDNs don’t enable this feature by default as it’s complex to cache dynamic assets on most sites (e.g. the WordPress admin dashboard).
A straightforward way to troubleshoot this is to disable your CDN temporarily. For example, if you’re using the free CDN Enabler WordPress plugin to link your site assets to the CDN URLs, then you can deactivate the plugin and test reloading your site.
The same goes for using any other plugin you may use to connect to your CDN (e.g. WP Rocket, Breeze, W3 Total Cache).
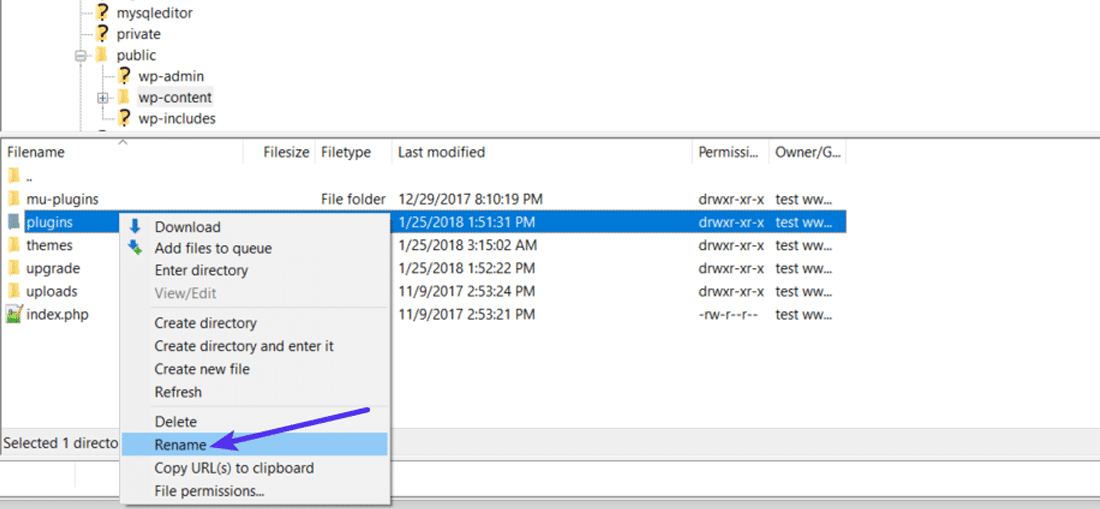
If you can’t access your site’s admin dashboard, you can disable the plugin via SFTP by renaming the plugin’s folder name.
CDNs like Cloudflare or Sucuri, which provide full proxy services, have extra firewalls between their edge servers and your origin server. Hence, you may encounter HTTP 5xx errors more frequently while using them. Most of them cache 5xx errors returned by your origin server, so it’s easy to troubleshoot them.
Cloudflare’s free plan is prone to throw up a 5xx error. Unfortunately, since it’s a full proxy service, there’s no quick way to disable it. But before you blame Cloudflare for it, know that Cloudflare shows two variations of the 504 Gateway Timeout error.
504 Gateway Timeout at Cloudflare (Variation 1)
Cloudflare will show you a custom 504 Gateway Timeout error screen when your site’s origin server responds with a standard HTTP 504 response.
Here, the issue lies with your web server and not Cloudflare. You can try fixing it with the other solutions mentioned below or contact your hosting provider’s support for technical help.
504 Gateway Timeout at Cloudflare (Variation 2)
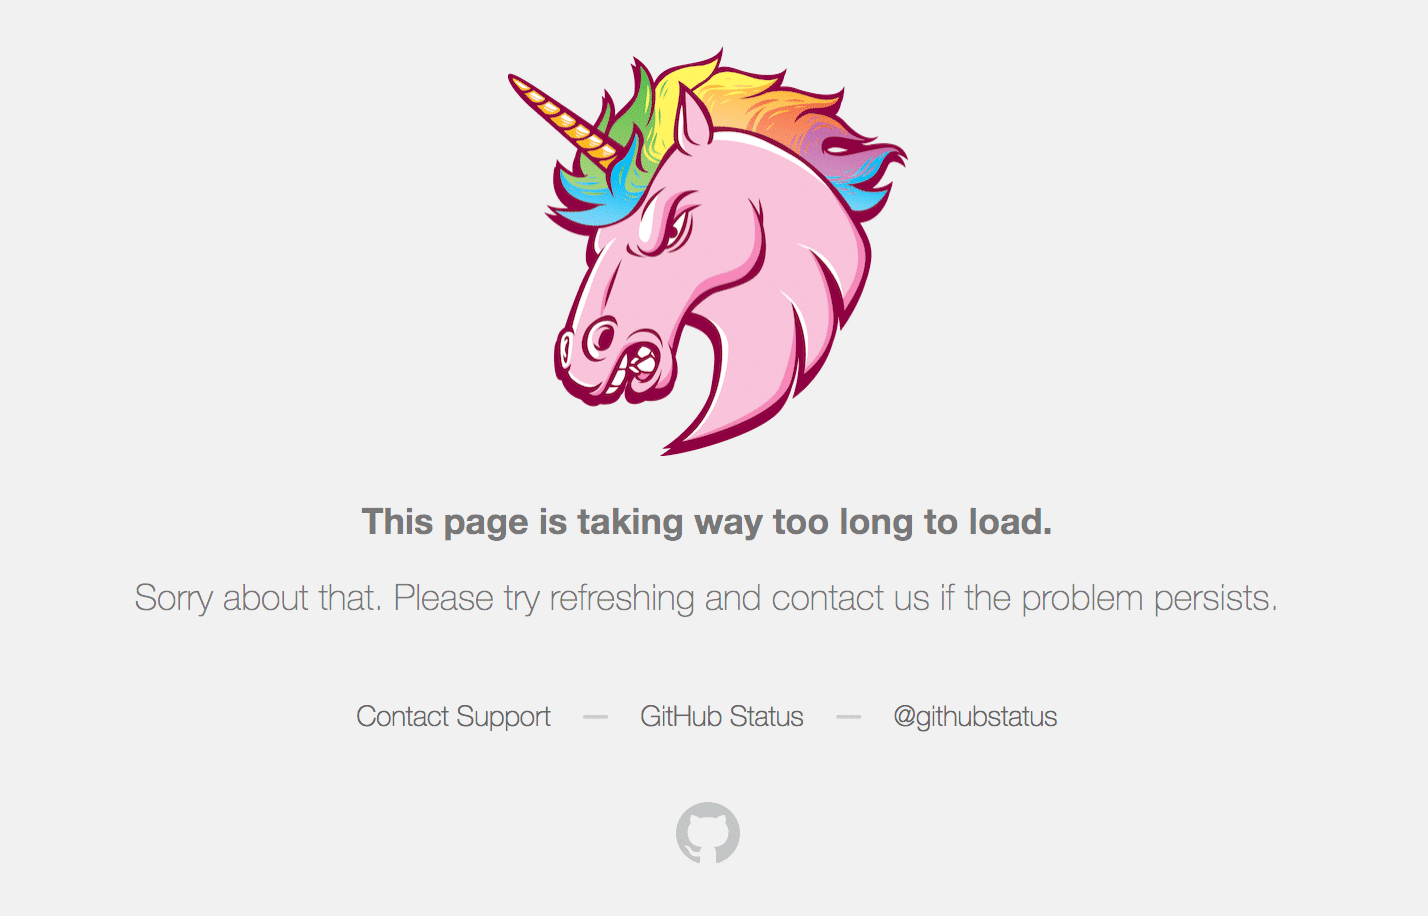
If Cloudflare causes the 504 Gateway Timeout error, the error screen will mention “cloudflare,” which is currently the standard server name for all Cloudflare assets. Usually, the error screen will appear as below:
Since Cloudflare itself is unresponsive, you’ll not see any Cloudflare-branded error screen here.
Most likely, Cloudflare is already aware of the issue and is working on a fix already. You can confirm this by checking the Cloudflare System Status webpage. Alternatively, you can get in touch with Cloudflare support for a quicker resolution.
504 Gateway Timeout at Cloudflare Due to Large Uploads
The size of your uploads to your site can also be a reason for the server timeouts. Cloudflare limits upload file size (per HTTP POST request) to just 100 MB on both Free and Pro plans.
The issue can be on your host’s end or with Cloudflare. You can find out the exact cause by bypassing Cloudflare with your DNS hosts file and trying your upload again.
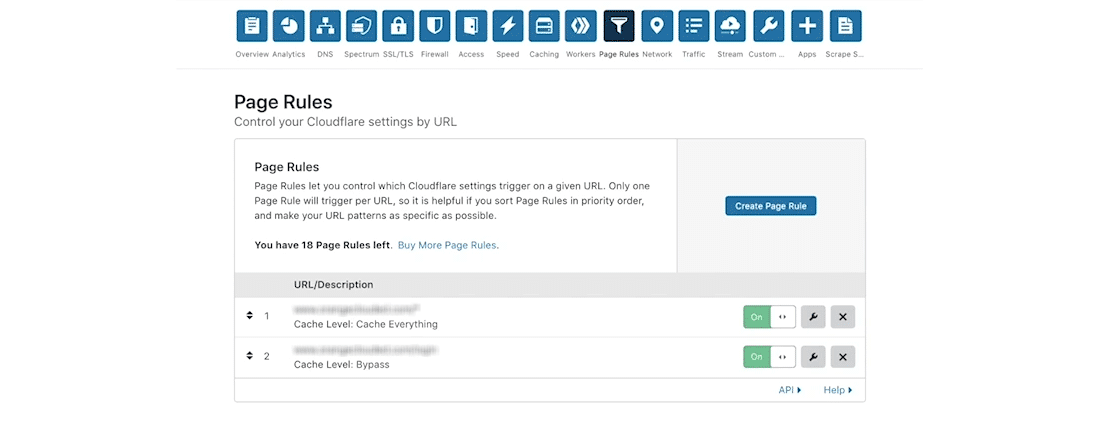
If you’re using Cloudflare with WordPress, I recommend using their free plugin and excluding critical URLs from caching (such as the WordPress admin dashboard). You can refer to Kinsta’s detailed post on how to configure Cloudflare settings for WordPress.
Suggested reading: How to Set up Cloudflare APO for WordPress.
6. Check Server Issues With Your Host
Server issues are one of the most common reasons for facing a 504 Gateway Timeout error. Since most WordPress sites are hosted on Nginx or Apache webservers, Nginx or Apache is waiting for a response from something and timing out.
Many clients come to Kinsta for exactly this problem they’re facing at other hosts. The conversation goes something like this:
We’re getting around 100k visitors per month with more than 200k views. Currently, we’re hosting with ____ and we experience 504 errors constantly due to server overload. I don’t like how ____ handled the problem, and we were also advised that we will have to move to their dedicated plans soon, which I believe is not necessary.
High-traffic and ecommerce sites are more prone to getting 504 errors because of server overload as they generate many uncacheable requests. However, this issue can crop with any site, including simple blogs. Many hosts will ask you to upgrade to a high-tier plan to fix the issue, which in most cases is unnecessary.
Kinsta uses LXD managed hosts and orchestrated LXC software containers for each site. Thus, every site is housed in its own isolated container with access to all the software required to run it (Linux, Nginx, PHP, MySQL). The resources are 100% private and aren’t shared with any other site, even your sites.
Most hosts providing shared hosting plans don’t have this capability. Hence, a high-traffic site hosted on the same server as yours may cause your site to throw up a 504 error too.
Apart from isolating each site in its container, Kinsta has also designed its infrastructure to handle thousands of concurrent connections easily. Kinsta even hosts the MySQL databases at localhost, not a remote server. This means no latency between machines, resulting in faster queries and fewer chances of timeouts occurring.
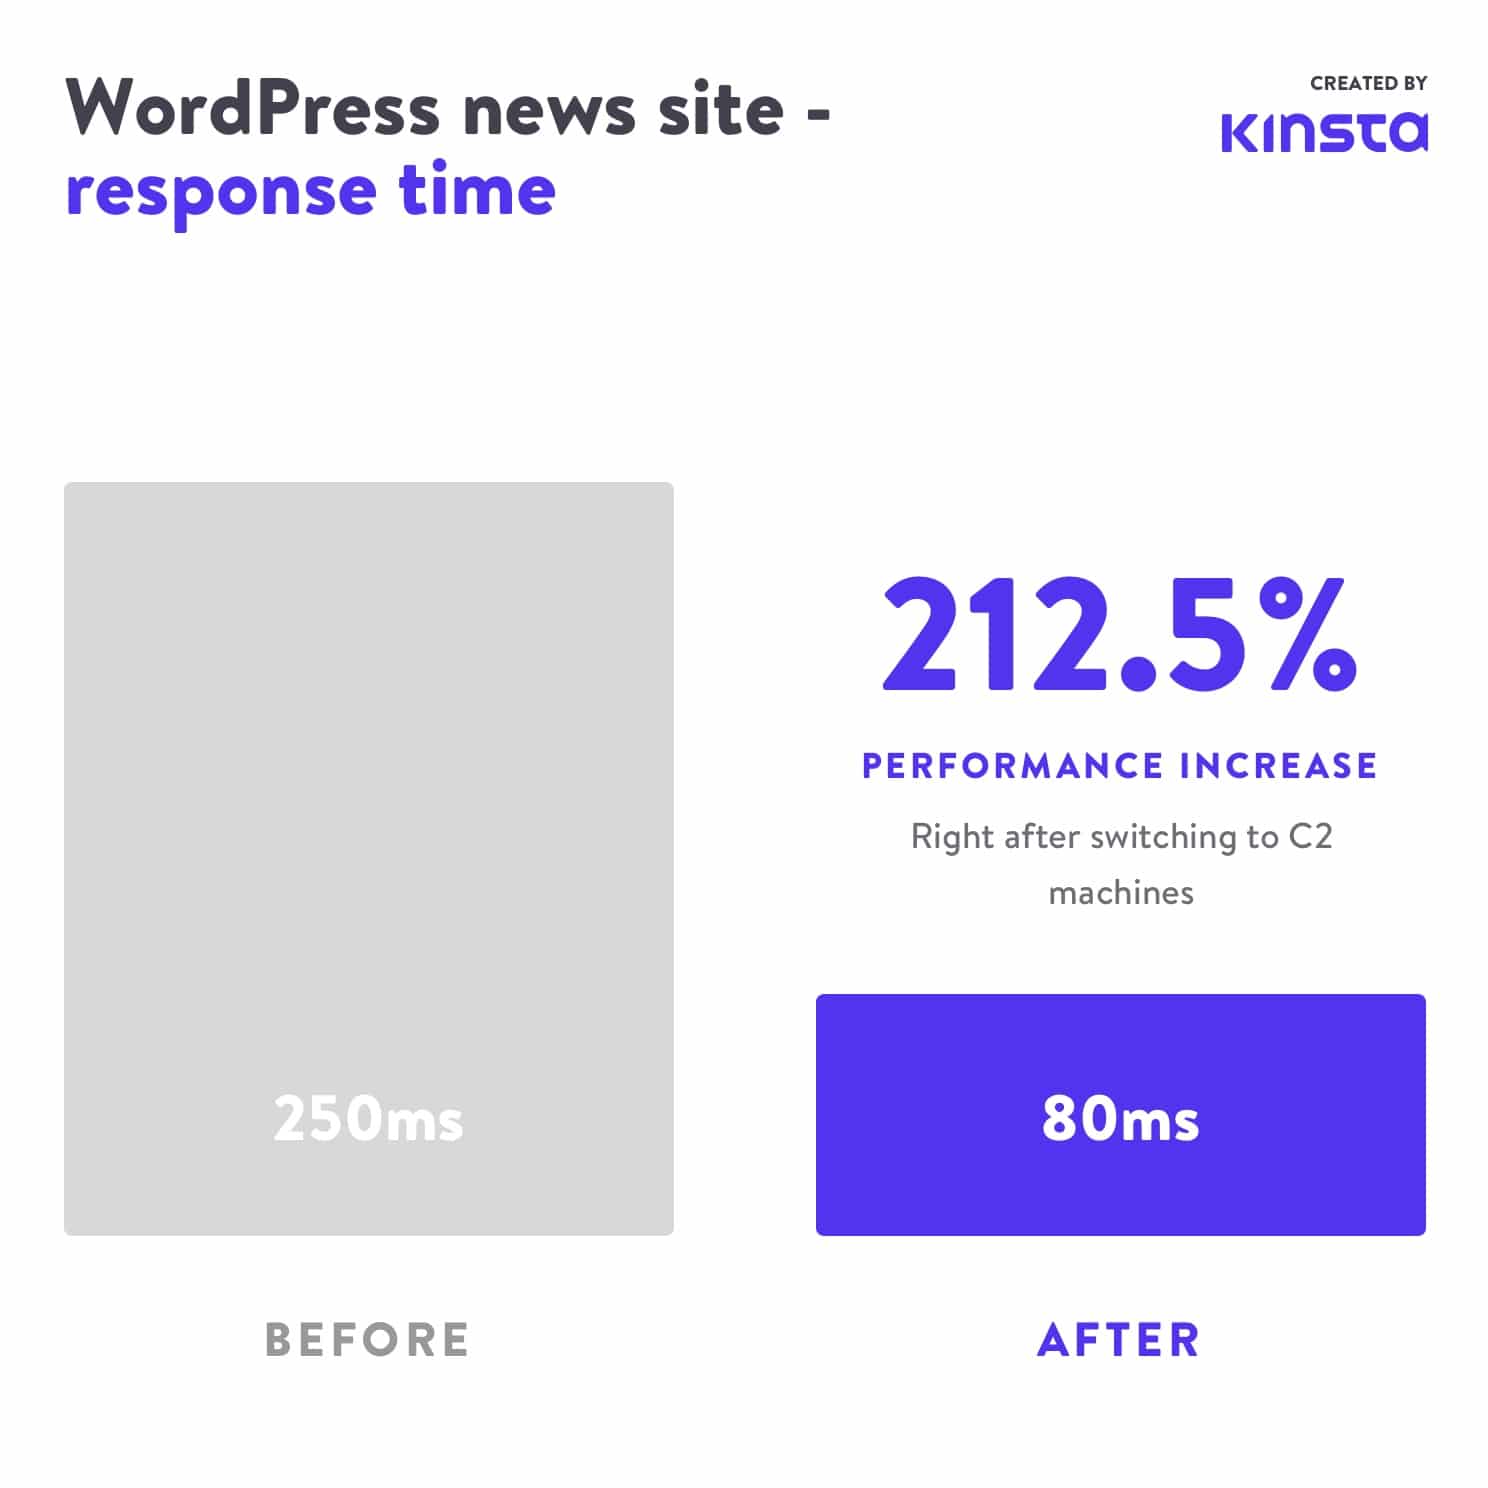
Many clients who migrate to Kinsta see huge decreases in overall load times.
An overloaded server isn’t the only cause for a server timeout. There can be many other reasons for the 504 error:
Slow Server Infrastructure
The server you use to host your site may not have enough resources to handle the load. It’s like playing a modern, graphics-intensive videogame on a decade-old PC.
The server just hangs up trying to serve the website. The only solution to this problem is to upgrade to a server with better infrastructure. For this reason, even Kinsta’s most basic hosting plan will handle a static site with medium traffic.
Needs More PHP Workers
PHP workers are used to execute your site’s code. An ecommerce site that gets 50,000 visitors per month needs a lot more resources than a simple blog with the same amount of traffic. If all the server’s PHP workers are busy, they’ll build up a queue.
When the queue gets too big, the server disregards old requests, which may cause the server to throw up a 504 gateway error. You can ask your host about increasing your number of PHP workers. This’ll allow your site to execute multiple requests simultaneously.
Firewall Issues
Your server’s firewall could have some errors or an improper configuration. Perhaps, a few of its rules prevent the server from establishing a connection properly. To know if your firewall is the culprit, you can check your server’s error logs.
Network Connectivity Problems
Connectivity issues between the proxy server and the web server could cause delays in responding to HTTP requests. If you use a load balancer, there could also be network connectivity issues with it.
HTTP Timeouts
HTTP timeouts can occur when a connection between the web server and the client is kept open for too long. With WordPress sites, this usually happens when running WordPress imports. One way to resolve this issue is to switch to a faster internet connection.
You can also use a tool with support for WP-CLI to run the scripts directly on the server, bypassing the HTTP connection entirely. For instance, you can use the wp import WP-CLI command to run the WordPress Importer plugin directly through the command-line interface.
Important: 504 Gateway Timeout errors look similar to 503 Service Unavailable errors or 502 Bad Gateway errors. But they’re all different. If you’re experiencing a 504 error at Kinsta, open a support ticket to get your issue fixed immediately.
For monitoring your site’s downtime on your own, you can use a tool like updown.io. It’ll check your website’s status (or any URL) periodically by sending an HTTP request to it. You can set the check frequency from 15 seconds to 1 hour. If your website isn’t responding correctly, it’ll notify you with an email or an SMS.

You’ll get a generous quantity of free credits with every account of updown.io, but if you’re looking for cheaper alternatives, you can check out WebGazer or UptimeRobot. Both these tools will help you monitor your site’s uptime every 5 minutes for free. That’s decent enough for most website owners.
Monitoring your website will give you an idea of how often it’s down. This is especially helpful if you’re using a shared hosting provider. Most application, database, and managed WordPress hosts (like Kinsta) take care of this automatically for you. Hence it’s always recommended to go with them.
For a detailed explanation, check out Kinsta’s post on the importance of managed WordPress hosting.
7. Check for Spam, Bots, or DDoS Attacks
Malicious attackers can bring your web server to a crawl by sending too many and/or resource-intensive requests. If your site is getting spammed by bots or undergoing a DDoS attack, it can overwhelm your server and result in 504 Gateway Timeout errors for many genuine users.
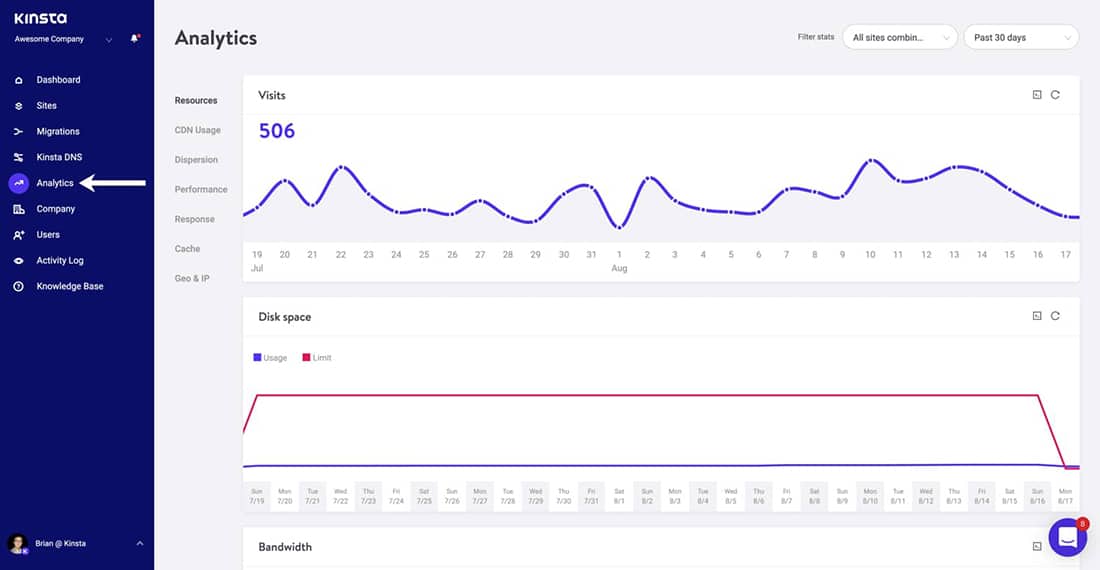
You can look at your server traffic and analytics to see if you can spot any irregular patterns in the site traffic. If you’re using Kinsta to host your site, you can view this data easily by going to your MyKinsta Analytics dashboard.
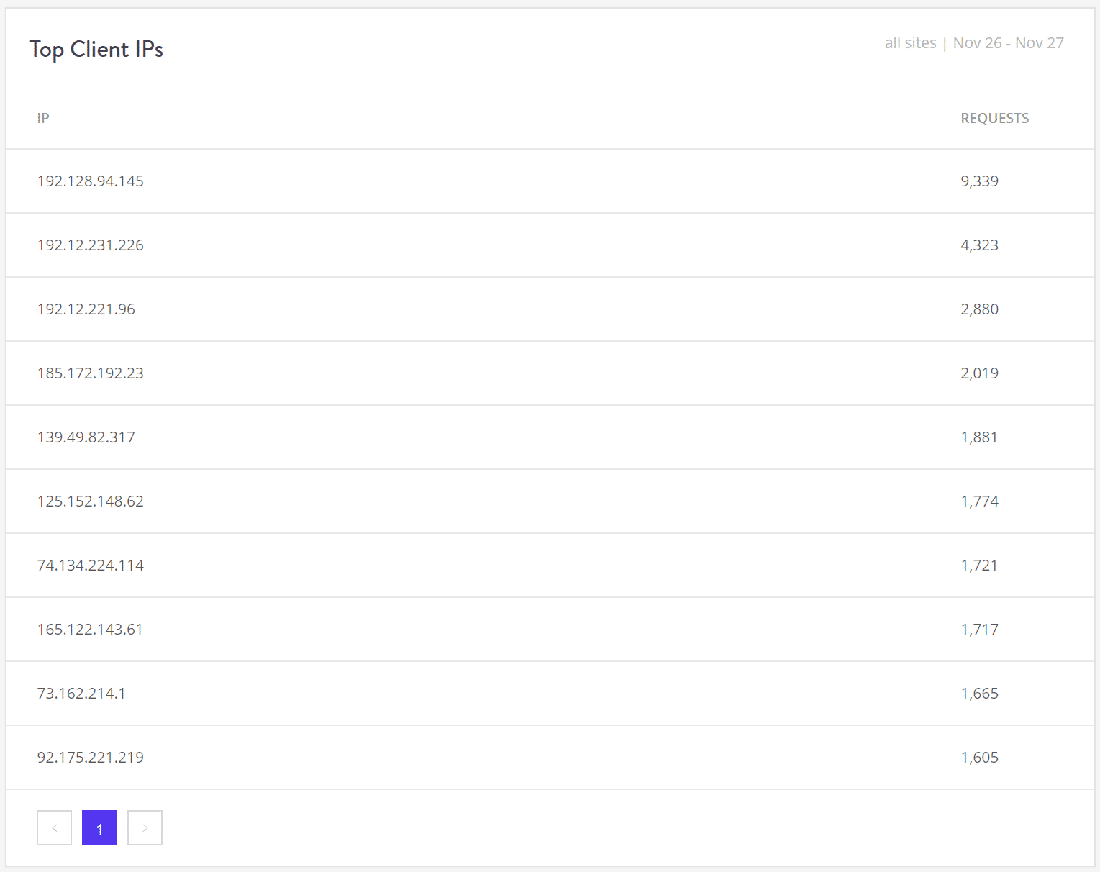
Start your investigation by looking at the top client IPs. It’ll give you an idea of who generates the maximum number of requests, and from where. If your server suddenly uses up enormous bandwidth or attracts a lot of traffic, then this report will come in super handy.
Next, you can check out the Cache Analysis report. Here, you can see how many requests are bypassing or missing the cache, or being served from the cache. For performance and stability reasons, you want to cache as many requests as possible, but it’s not always possible to achieve that.
For example, WooCommerce sites generate many uncacheable requests for features such as the shopping cart and the checkout process.

Finally, you can use a security plugin to beef up your website’s security by spotting and blocking worrisome traffic/IPs. You can ask your host to block certain IPs too.
Depending upon the length and scale of the attack, this could be a never-ending process of blacklisting IPs as many attackers change their IPs and proxy addresses after getting blocked.
Note: Kinsta doesn’t allow its clients to install security plugins as they can have a huge effect on the site’s performance, especially its scanning capabilities. As Kinsta uses load balancers with Google Cloud Platform, blocking IPs wouldn’t always work as intended.
You can use dedicated security solutions such as Cloudflare or Sucuri to protect your sites from DDoS attacks and spambots. For more, you can check out Kinsta’s articles on how to install Cloudflare on your site and how Sucuri helped stop a DDoS attack in its tracks.
8. Repair Your Corrupted WordPress Database
Sometimes, a 504 Gateway Timeout error can be because of a corrupt database, especially in WordPress sites. Typically, this is due to corrupted database tables or files. Sometimes, it can also be caused by a serious security issue like your site or database being hacked.
Repairing a corrupted WordPress database depends on the problem. Plugins like WP-DBManager make it easy to diagnose database issues and repair them. I recommend you to read Kinsta’s detailed walkthrough on repairing WordPress database issues to get started.
9. Check Your Site’s Plugins and Themes
In most cases, third-party plugins and themes don’t cause 504 errors. But there’s a slight chance that they might cause server timeouts, usually by queuing up many uncached requests generated by the plugin/theme. As this ties up a lot of your server’s PHP workers, it can cause 504 errors.
A great example of this issue is WooCommerce, a plugin installed to add ecommerce functionality to WordPress sites.
The simplest way you can troubleshoot this problem is by deactivating all your plugins. Remember, you won’t lose any data if you just deactivate a plugin.
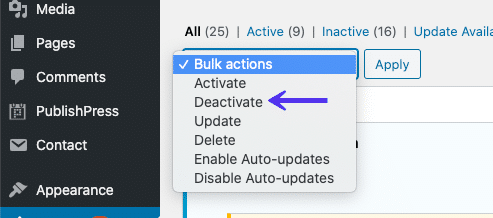
If you can access your admin dashboard, you can go to the Plugins screen, select Deactivate from the bulk actions menu, checkmark all the plugins, and then hit the Apply button. This will disable all of your plugins.
If you can’t access your admin area, you can disable plugins via SFTP using the method described before. Just rename the main plugin folder name to disable all the plugins in bulk.
Once you’ve deactivated all the plugins, check whether your site loads properly. If it works, you must activate each plugin, testing the site after enabling every plugin.
Finally, make sure that your plugins, themes, and WordPress core are up to date. Also, ensure that your server is running the recommended version of PHP.
If you feel this to be too overwhelming, you can always reach out to your host for help. Kinsta uses Kinsta APM and other troubleshooting techniques to help clients narrow down what plugin, query, or script might cause the error.
In the worst-case scenarios, like an inefficient query or bad code in a plugin/theme, you can bring in a WordPress developer to fix the issue.
10. Check Error Logs
Viewing error logs can be very helpful when troubleshooting and debugging 504 errors on your site. This can help you narrow down an issue on your site quickly, especially if it’s resulting from a demanding plugin on your site.
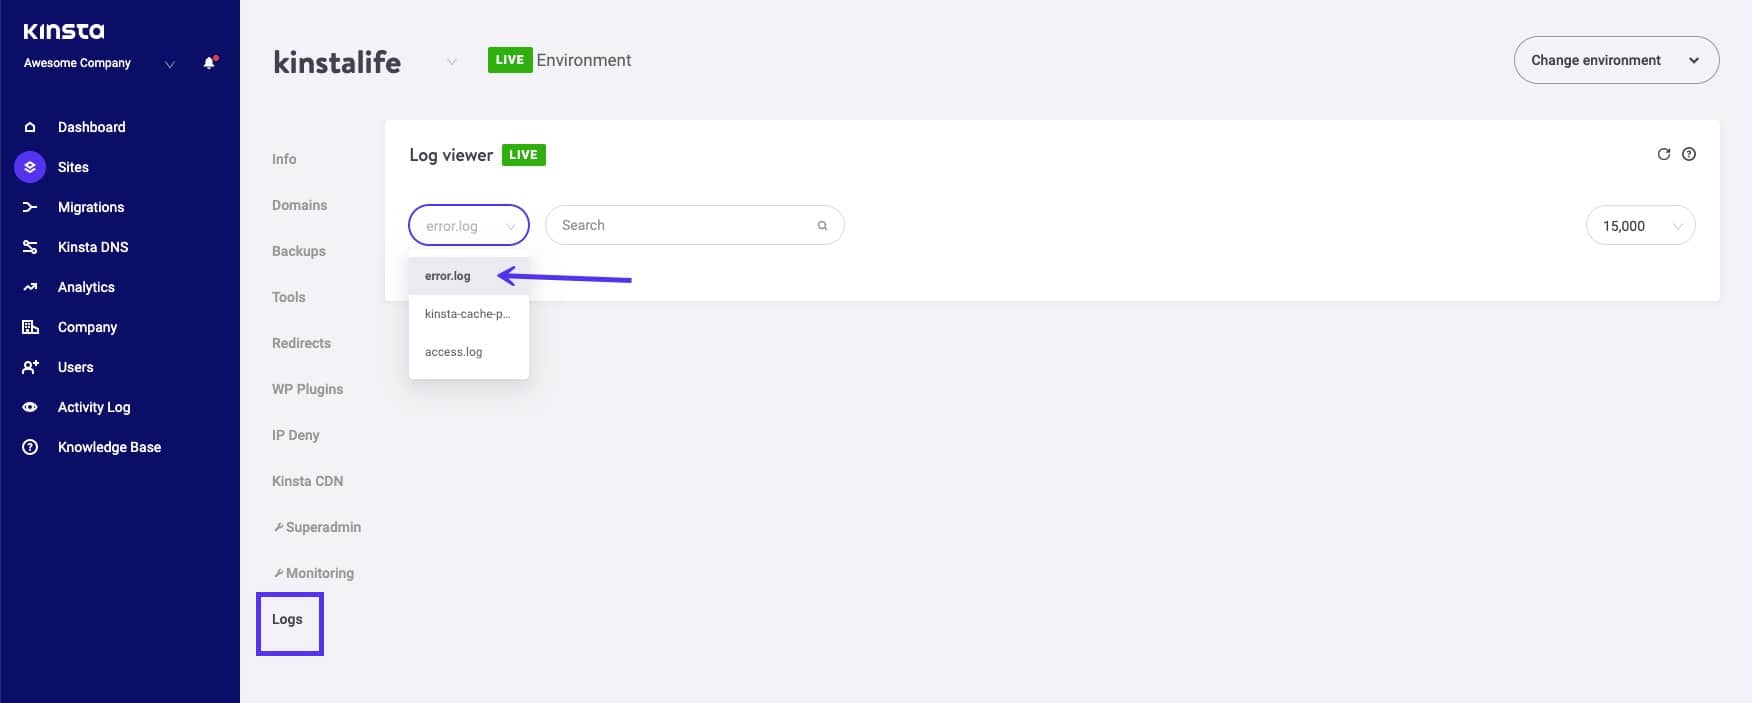
If you’re a Kinsta customer, you can easily see errors in the log viewer in your MyKinsta dashboard.
If your host doesn’t have a logging tool, then you can enable WordPress debug mode by adding the following code to your wp-config.php file:
define( 'WP_DEBUG', true );
define( 'WP_DEBUG_LOG', true );
define( 'WP_DEBUG_DISPLAY', false );
The WP_DEBUG constant enables or disables the WordPress debug mode. It has two optional companion constants that can extend its features. The WP_DEBUG_LOG constant directs all errors to be saved to a debug.log file within the /wp-content/ directory. If you don’t see this file, you can always create one.
The WP_DEBUG_DISPLAY constant controls whether debug logs show up on the HTML page. Setting this to false will hide all errors, but you can review the errors later, as you’ve also defined WP_DEBUG_LOG as true.
Important: If you have WP_DEBUG enabled in the Kinsta environment, it’ll route all errors to the debug.log file and not the error.log in the MyKinsta dashboard.
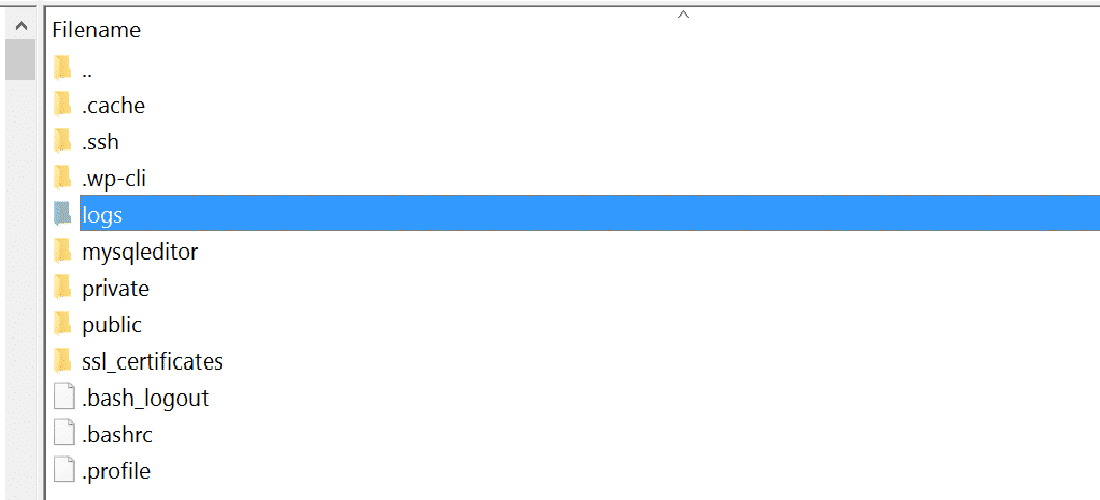
You can also download the raw WordPress error log files via SFTP. Typically, you can find error logs in your server’s root directory in a folder named “logs.”
Kinsta users can also enable WordPress debug mode from their MyKinsta dashboard. To do that, navigate to Sites > Tools > WordPress Debugging and click the Enable button. This will allow you to see PHP errors and notices without enabling debug mode via SSH or SFTP.
Lastly, you can check the server log files. Depending on which server you’re using to host your WordPress site, they’re commonly found in these locations:
- Apache:
/var/log/apache2/error.log/ - Nginx:
/var/log/nginx/error.log/
You can refer to logging related documentation of Apache or Nginx for more information.
11. Configure Apache or Nginx Settings Properly
You can edit your server config files to increase resource limits for specific directives. This can help you resolve the 504 Gateway Timeout error.
For Apache Webservers
First, add the following code to your httpd.conf:
TimeOut 600This setting defines how long the server will wait for certain requests before marking it as a network timeout issue. Its default value is 60 seconds (Apache 2.4 version).
You can only add this directive in your httpd.conf file, not in your .htaccess file. Since most shared hosting providers don’t allow you to modify the httpd.conf file, you can try increasing the value of the LimitRequestBody directive in your .htaccess file instead.
Then add the following line to your php.ini file:
max_execution_time 300The default value of PHP’s max_execution_time directive is 30 seconds. Increasing it will allow your site’s PHP scripts to run longer.
For Nginx Webservers
If you’re running your WordPress sites on Nginx + FastCGI Process Manager (PHP-FPM) or using Nginx as a reverse proxy for Apache, you can tweak the server settings to help prevent 504 Gateway Timeout errors.
504 Gateway Timeout Error on Nginx + FastCGI (PHP-FPM)
First, you must edit your PHP-FPM pool config file. You can find it at the /etc/php7.4/fpm/pool.d/www.conf location in your Nginx server (the exact path may vary based on the PHP version). Alternately, you can run the following command in your terminal to edit the PHP-FPM pool config file:
sudo nano /etc/php/7.2/fpm/pool.d/www.confNext, set the following directive:
request_terminate_timeout = 300After this, you must edit your php.ini file. You can locate it at /etc/php.ini. Open the file and add/change the value for the max_execution_time directive to 300 seconds.
max_execution_time = 300Finally, add the following code to your nginx.conf file’s location block:
location ~ .php$ {
...
fastcgi_read_timeout 300;
}
Reload Nginx and PHP-FPM for the changes to take effect.
sudo service nginx reload
sudo service php7.4-fpm reload
The exact code to reload PHP-FPM will vary based on the PHP version installed on your server. Test your site to see whether it has fixed the issue.
504 Gateway Timeout Error on Nginx Proxy
If you’re using Nginx as a reverse proxy server for Apache, then you can make it more lenient towards server timeouts by adding the following directives to your nginx.conf file:
proxy_connect_timeout 600;
proxy_send_timeout 600;
proxy_read_timeout 600;
send_timeout 600;
Don’t forget to reload Nginx after making your changes.
sudo service nginx reload
Other HTTP Errors Like 504 Gateway Timeout
As mentioned earlier in the article, many other HTTP 5xx errors are just like the 504 Gateway Timeout error. It’s because they all happen on the server-side. These errors include:
- 500 Internal Server Error
- 501 Not Implemented Error
- 502 Bad Gateway Error
- 503 Service Unavailable Error
Other HTTP errors caused due to client-side issues, like the 404 Not Found error, are also like the 504 error. You can refer to Kinsta’s detailed guide and list of HTTP status codes for more information.
When you don’t know what caused a 504 Gateway Timeout error, how do you fix it in time to keep hard-earned visitors from bouncing to competitor sites? 🤷♂️ All the details are in this post. ⬆️Click to Tweet
Summary
Your site can be affected by the 504 Gateway Timeout error because of multiple reasons. In this article, you learned how to troubleshoot them all. Typically, these errors are caused due to server-side issues, in which case you can reach out to your host and get it resolved quickly.
However, you must also understand that this error can be due to third-party plugins, themes, services, inefficient database queries, or a combination of two or more of these. If you’re maxing out your server’s resources (e.g. PHP workers), it’s recommended to optimize your site for performance.
If you still find that your website is timing out, then it might very well be that you need to upgrade your hosting plan or the number of PHP workers. I recommend you to consider this option only after you’ve exhausted all the other solutions described in this article.
From simple static sites to complex ecommerce and membership sites, Kinsta’s scalable hosting plans are designed to accommodate all types of websites. To learn more about our scalable cloud hosting, check out this article!
Did we miss anything? If you’re still finding it difficult to fix the 504 Gateway Timeout error on your site, leave a comment below.
Get all your applications, databases and WordPress sites online and under one roof. Our feature-packed, high-performance cloud platform includes:
- Easy setup and management in the MyKinsta dashboard
- 24/7 expert support
- The best Google Cloud Platform hardware and network, powered by Kubernetes for maximum scalability
- An enterprise-level Cloudflare integration for speed and security
- Global audience reach with up to 35 data centers and 275 PoPs worldwide
Test it yourself with $20 off your first month of Application Hosting or Database Hosting. Explore our plans or talk to sales to find your best fit.
The 504 Gateway Timeout error is one of the most common HTTP 5xx errors faced by website owners and site visitors. For many WordPress blogs and ecommerce platforms, knowing how to fix server errors like this is crucial to keep their hard-earned visitors from bouncing to competitor sites.
As the 504 Gateway Timeout error doesn’t tell you why it occurred, it’s hard to pinpoint what’s causing the server timeout. This article will help you understand it in detail, learn how to diagnose its cause, and then fix it.
After trying all the various solutions mentioned in the post, your site should be up and running in no time.
Sounds interesting? Let’s dive in!
The 504 Gateway Timeout error is one of the most common HTTP 5xx errors faced by website owners and site visitors. 🤔 Learn how to fix it with this guide quickly. ⬇️Click to Tweet
Prefer to watch the video version?
What Is the 504 Gateway Timeout Error?
Every time you visit a website in your browser, the browser sends a request to the web server where the site is hosted. The server processes the request and responds with the requested resources.
The server response includes one of many HTTP status codes to indicate the response’s status to the browser. But not all these HTTP status codes are errors. For instance, a 200 OK status code means that the server processed the request successfully and “Everything is OK.”
The 5xx class of HTTP status codes indicates that something’s wrong with the server, the server is aware of it, and it cannot carry out the client request. As a result, they’re also referred to as Server Error 5xx status codes.
Officially, five status codes are specified under the 5xx class (500, 501, 502, 503, 504). You may come upon many unofficial codes too (506, 507, 509, 520, etc.).
The Internet Engineering Task Force (IETF) defines the 504 Gateway Timeout error as:
The 504 (Gateway Timeout) status code indicates that the server, while acting as a gateway or proxy, did not receive a timely response from an upstream server it needed to access in order to complete the request.
To simplify it further, this error occurs when two servers are involved in processing a request. The first server (typically the main server) times out, waiting for a response from the second server (upstream server).
The 504 Gateway Timeout error manifests itself in various forms. Here are some ways it usually shows up:
The 504 Gateway Timeout error is similar to the 502 Bad Gateway error, which indicates that the first server received an invalid response from the second server (upstream server).
Variations of the 504 Gateway Timeout Error
The browser displays any 504 Gateway Timeout error inside it, just like any other error. As there are various operating systems, web servers, browsers, and user agents, it can show up in multiple ways.
Below are a few common 504 error message variations that you may run into:
- 504 Gateway Timeout
- 504 Gateway Timeout NGINX
- NGINX 504 Gateway Timeout
- Gateway Timeout Error
- Error 504
- HTTP Error 504
- HTTP Error 504 — Gateway Timeout
- HTTP 504
- 504 Error
- Gateway Timeout (504)
- This page isn’t working — Domain took too long to respond
- 504 Gateway Time-out — The server didn’t respond in time
- The page request was canceled because it took too long to complete
- Site visitors: There was an issue serving your request, please try again in a few minutes.
- Site Owners: There was a gateway timeout. You should visit your error log for more information.
- A blank white screen
All the above error responses, though worded differently, point to the same 504 Gateway Timeout server error.
Web servers and websites can customize how they show the 504 Gateway Timeout error to users. Some of them can be cool! It’s an excellent tactic to quell their visitors’ disappointment.
SEO Impact of the 504 Gateway Timeout Error
All 5xx errors prevent a webpage from loading, making them detrimental to user experience. Hence, search engines like Google take these errors seriously. If the error persists for a long duration, it may even lead to deindexing the webpage from the search engine results.
For example, when Google spiders stumble upon a 503 Service Unavailable error, they’ll understand that it’s a temporary issue as it’s mostly used to enable site maintenance mode. Thus, they’ll try to crawl the page again later.
A 504 Gateway Timeout error isn’t necessarily temporary as it can be due to multiple reasons. If your site is down for just a few minutes, and if the spiders are trying to crawl it multiple times every minute, they’ll try to serve the page from their cache. They wouldn’t even notice it.
But if your site is down for 6+ hours or more, then Google will consider the 504 error as a serious site-wide issue that you need to fix as soon as possible. This can impact your SEO negatively.
Google Search Console is one of the best SEO tools to monitor your website’s HTTP 5xx errors.
Causes of the 504 Gateway Timeout Error
As the 504 error is due to a timeout between servers, the problem probably isn’t with the client’s device or internet connection. That also includes your device and connection.
A 504 Gateway Timeout error indicates that the web server is waiting too long to respond from another server and “timing out.” There can be many reasons for this timeout: the other server is not functioning properly, overloaded, or down.
The other server need not always be external (e.g. CDN, API gateway). It can also be a server-like entity within the main web server (e.g. reverse proxy server, database server).
How to Fix the 504 Gateway Timeout Error
Without knowing exact details about the site, such as its server configuration, hosting plan, third-party plugins, and the traffic it attracts, you may find it frustrating and overwhelming to fix a 504 Gateway Timeout error.
Since many variables are involved, I recommend you to start by fixing client-side issues, which are pretty rare, and then move towards fixing server-side problems. They’re usually the culprits with 504 errors.
- Try Reloading the Webpage
- Reboot Your Network Devices
- Check Your Proxy Settings
- Check for DNS Issues
- Disable Your Site’s CDN Temporarily
- Check Server Issues With Your Host
- Check for Spam, Bots, or DDoS Attacks
- Repair Your Corrupted WordPress Database
- Check Your Site’s Plugins and Themes
- Check Error Logs
- Configure Apache or Nginx Settings Properly
1. Try Reloading the Webpage
One of the first things you can try when encountering a 504 Gateway Timeout error is to wait a few minutes and try reloading the page.
You can press the F5 keyboard shortcut to refresh/reload the webpage in most browsers. To remove the page’s browser cache before reloading, you can press the CTRL+F5 shortcut combo instead.
While you’re at it, you can also try loading the site in a different browser to rule that out as an issue. As most 504 errors are due to temporarily overloaded servers, using this solution should make your site come right back.
If waiting and reloading the site doesn’t fix the 504 error issue, you can check whether a site is down for everyone or just you. Two useful online tools to test a site for downtime are Down for Everyone or Just Me and Is It Down Right Now?
2. Reboot Your Network Devices
Sometimes, problems with your network devices like modem or router could lead to a 504 Gateway Timeout error. Rebooting these devices could help you with fixing the problem.
While you can switch off all these networking devices in any order, the order you switch them back on is important. Typically, turn these devices on from the “outside-in,” following the connection order from the internet service provider to your main client device.
3. Check Your Proxy Settings
A proxy server sits between your device and the internet. It’s mostly used to enhance online privacy by hiding private information (e.g. device location) from websites and webservers (e.g. using a VPN).
While it’s rare for proxy servers to cause a 504 error, incorrect proxy server settings can sometimes be the reason. You can disable the proxy server and try reloading the webpage to see whether it’ll fix the error.
Most clients don’t use a proxy service, so you can skip this step if you’re confident that you don’t use any proxy server. However, you might have set it without you even knowing about it. I’d suggest you check your device’s and browser’s proxy settings to rule this cause out.
4. Check for DNS Issues
A 504 Gateway Timeout error can also be caused by DNS issues on the server-side or the client-side (or both).
The most probable reason for a server-side DNS issue is the FQDN (fully qualified domain name) not resolving the correct IP address or the DNS server not responding. Usually, this occurs when you’ve just migrated your site to a new server or host. Hence, it’s important to wait for the domain’s DNS records to propagate fully, which can take up to 24 hours.
You can use free tools like whatsmydns.net DNS Checker or DNSMap to see if your DNS has propagated around the globe.
For fixing client-side DNS issues, you could try flushing your local DNS cache. It’s like clearing your browser cache, except here, you’re flushing the DNS cache from the operating system.
If you’re using Windows, you can flush the DNS cache by opening the Command Prompt and entering the following directive:
ipconfig /flushdns
You should see a “Successfully flushed the DNS resolver Cache.” message if it worked.
For the latest macOS versions, you can open the Terminal and run the following command:
sudo killall -HUP mDNSResponderYou won’t see any notification in macOS when the process finishes, but you can change that by appending the command with your custom message.
sudo killall -HUP mDNSResponder; DNS Cache was cleared successfullyIf you’re using older macOS versions, the command you need to enter varies based on which version of macOS you’re running. For more details, you can refer to the macOS section in Kinsta’s in-depth flush DNS tutorial.
If you’re using the Linux operating system, then the process is quite similar to macOS as even Linux uses the Terminal as its command-line interface. Since there are many Linux distributions, the exact command you need to run may vary from one distro to another. You can check out Kinsta’s guide for more information.
Finally, you can change your client-side DNS servers temporarily. By default, your ISP assigns the DNS servers automatically to you. But you can change these to public DNS IPs temporarily.
Some reliable DNS servers you can try out are Google Public DNS, Cloudflare 1.1.1.1, Quad9 DNS, and Cisco OpenDNS.
5. Disable Your Site’s CDN Temporarily
Sometimes, the issue could also be with your content delivery network (CDN). If a site’s origin server isn’t reachable, most CDNs will try to serve the full webpage from their cache.
But most CDNs don’t enable this feature by default as it’s complex to cache dynamic assets on most sites (e.g. the WordPress admin dashboard).
A straightforward way to troubleshoot this is to disable your CDN temporarily. For example, if you’re using the free CDN Enabler WordPress plugin to link your site assets to the CDN URLs, then you can deactivate the plugin and test reloading your site.
The same goes for using any other plugin you may use to connect to your CDN (e.g. WP Rocket, Breeze, W3 Total Cache).
If you can’t access your site’s admin dashboard, you can disable the plugin via SFTP by renaming the plugin’s folder name.
CDNs like Cloudflare or Sucuri, which provide full proxy services, have extra firewalls between their edge servers and your origin server. Hence, you may encounter HTTP 5xx errors more frequently while using them. Most of them cache 5xx errors returned by your origin server, so it’s easy to troubleshoot them.
Cloudflare’s free plan is prone to throw up a 5xx error. Unfortunately, since it’s a full proxy service, there’s no quick way to disable it. But before you blame Cloudflare for it, know that Cloudflare shows two variations of the 504 Gateway Timeout error.
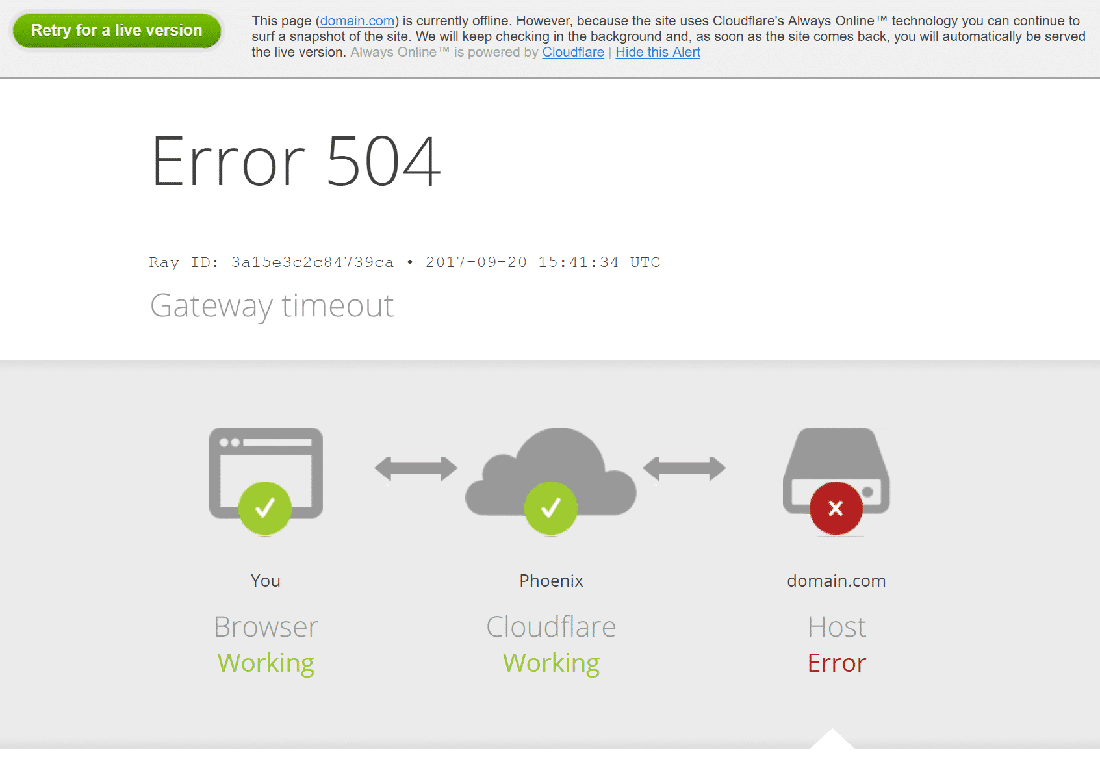
504 Gateway Timeout at Cloudflare (Variation 1)
Cloudflare will show you a custom 504 Gateway Timeout error screen when your site’s origin server responds with a standard HTTP 504 response.
Here, the issue lies with your web server and not Cloudflare. You can try fixing it with the other solutions mentioned below or contact your hosting provider’s support for technical help.
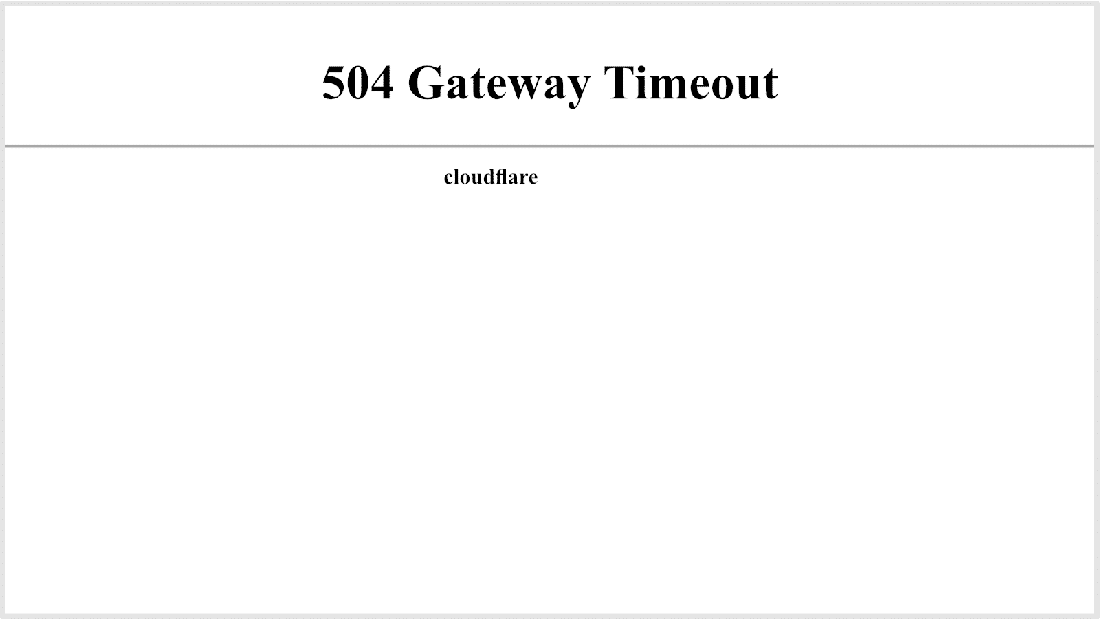
504 Gateway Timeout at Cloudflare (Variation 2)
If Cloudflare causes the 504 Gateway Timeout error, the error screen will mention “cloudflare,” which is currently the standard server name for all Cloudflare assets. Usually, the error screen will appear as below:
Since Cloudflare itself is unresponsive, you’ll not see any Cloudflare-branded error screen here.
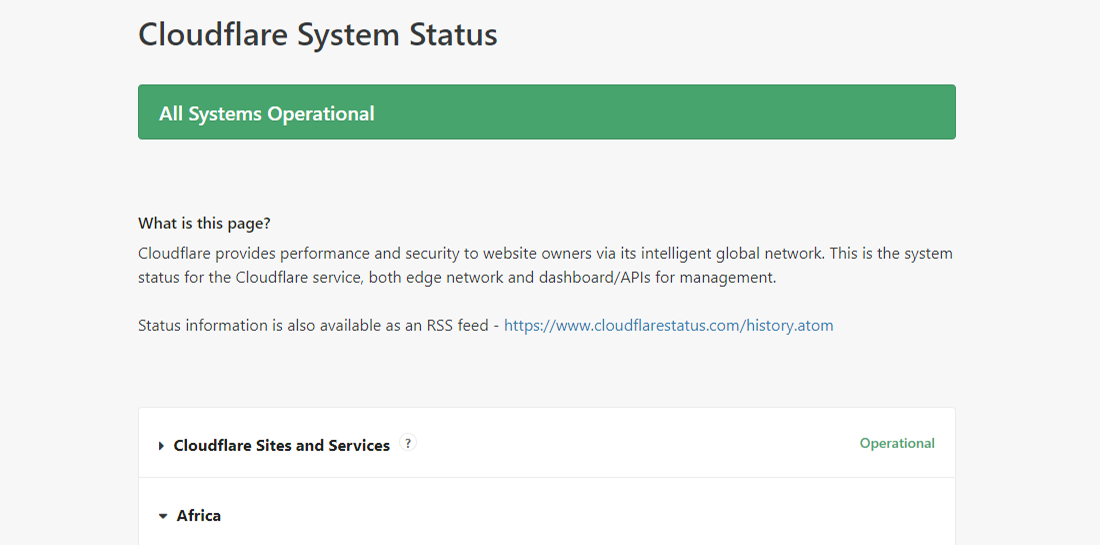
Most likely, Cloudflare is already aware of the issue and is working on a fix already. You can confirm this by checking the Cloudflare System Status webpage. Alternatively, you can get in touch with Cloudflare support for a quicker resolution.
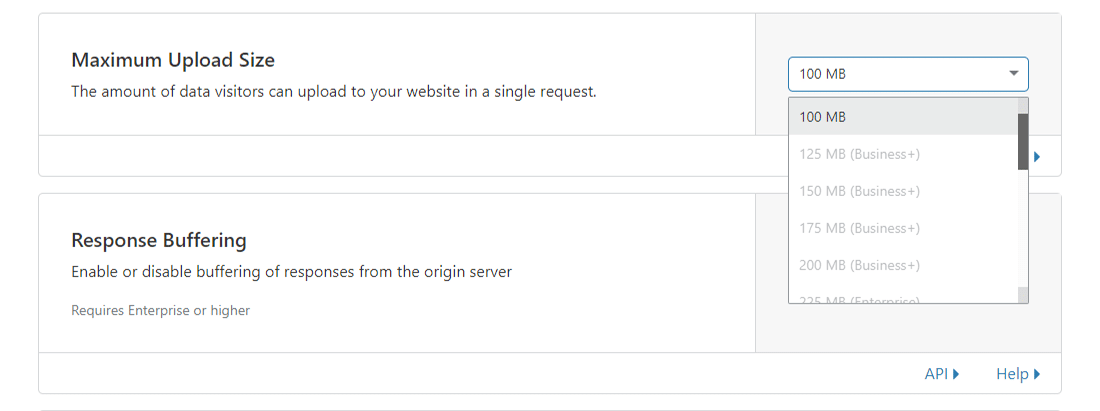
504 Gateway Timeout at Cloudflare Due to Large Uploads
The size of your uploads to your site can also be a reason for the server timeouts. Cloudflare limits upload file size (per HTTP POST request) to just 100 MB on both Free and Pro plans.
The issue can be on your host’s end or with Cloudflare. You can find out the exact cause by bypassing Cloudflare with your DNS hosts file and trying your upload again.
If you’re using Cloudflare with WordPress, I recommend using their free plugin and excluding critical URLs from caching (such as the WordPress admin dashboard). You can refer to Kinsta’s detailed post on how to configure Cloudflare settings for WordPress.
Suggested reading: How to Set up Cloudflare APO for WordPress.
6. Check Server Issues With Your Host
Server issues are one of the most common reasons for facing a 504 Gateway Timeout error. Since most WordPress sites are hosted on Nginx or Apache webservers, Nginx or Apache is waiting for a response from something and timing out.
Many clients come to Kinsta for exactly this problem they’re facing at other hosts. The conversation goes something like this:
We’re getting around 100k visitors per month with more than 200k views. Currently, we’re hosting with ____ and we experience 504 errors constantly due to server overload. I don’t like how ____ handled the problem, and we were also advised that we will have to move to their dedicated plans soon, which I believe is not necessary.
High-traffic and ecommerce sites are more prone to getting 504 errors because of server overload as they generate many uncacheable requests. However, this issue can crop with any site, including simple blogs. Many hosts will ask you to upgrade to a high-tier plan to fix the issue, which in most cases is unnecessary.
Kinsta uses LXD managed hosts and orchestrated LXC software containers for each site. Thus, every site is housed in its own isolated container with access to all the software required to run it (Linux, Nginx, PHP, MySQL). The resources are 100% private and aren’t shared with any other site, even your sites.
Most hosts providing shared hosting plans don’t have this capability. Hence, a high-traffic site hosted on the same server as yours may cause your site to throw up a 504 error too.
Apart from isolating each site in its container, Kinsta has also designed its infrastructure to handle thousands of concurrent connections easily. Kinsta even hosts the MySQL databases at localhost, not a remote server. This means no latency between machines, resulting in faster queries and fewer chances of timeouts occurring.
Many clients who migrate to Kinsta see huge decreases in overall load times.
An overloaded server isn’t the only cause for a server timeout. There can be many other reasons for the 504 error:
Slow Server Infrastructure
The server you use to host your site may not have enough resources to handle the load. It’s like playing a modern, graphics-intensive videogame on a decade-old PC.
The server just hangs up trying to serve the website. The only solution to this problem is to upgrade to a server with better infrastructure. For this reason, even Kinsta’s most basic hosting plan will handle a static site with medium traffic.
Needs More PHP Workers
PHP workers are used to execute your site’s code. An ecommerce site that gets 50,000 visitors per month needs a lot more resources than a simple blog with the same amount of traffic. If all the server’s PHP workers are busy, they’ll build up a queue.
When the queue gets too big, the server disregards old requests, which may cause the server to throw up a 504 gateway error. You can ask your host about increasing your number of PHP workers. This’ll allow your site to execute multiple requests simultaneously.
Firewall Issues
Your server’s firewall could have some errors or an improper configuration. Perhaps, a few of its rules prevent the server from establishing a connection properly. To know if your firewall is the culprit, you can check your server’s error logs.
Network Connectivity Problems
Connectivity issues between the proxy server and the web server could cause delays in responding to HTTP requests. If you use a load balancer, there could also be network connectivity issues with it.
HTTP Timeouts
HTTP timeouts can occur when a connection between the web server and the client is kept open for too long. With WordPress sites, this usually happens when running WordPress imports. One way to resolve this issue is to switch to a faster internet connection.
You can also use a tool with support for WP-CLI to run the scripts directly on the server, bypassing the HTTP connection entirely. For instance, you can use the wp import WP-CLI command to run the WordPress Importer plugin directly through the command-line interface.
Important: 504 Gateway Timeout errors look similar to 503 Service Unavailable errors or 502 Bad Gateway errors. But they’re all different. If you’re experiencing a 504 error at Kinsta, open a support ticket to get your issue fixed immediately.
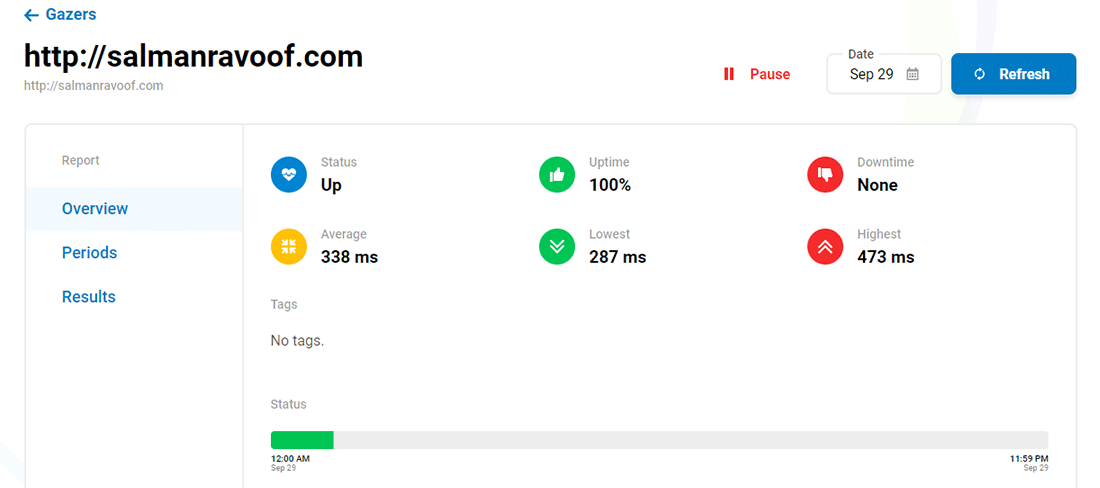
For monitoring your site’s downtime on your own, you can use a tool like updown.io. It’ll check your website’s status (or any URL) periodically by sending an HTTP request to it. You can set the check frequency from 15 seconds to 1 hour. If your website isn’t responding correctly, it’ll notify you with an email or an SMS.
You’ll get a generous quantity of free credits with every account of updown.io, but if you’re looking for cheaper alternatives, you can check out WebGazer or UptimeRobot. Both these tools will help you monitor your site’s uptime every 5 minutes for free. That’s decent enough for most website owners.
Monitoring your website will give you an idea of how often it’s down. This is especially helpful if you’re using a shared hosting provider. Most application, database, and managed WordPress hosts (like Kinsta) take care of this automatically for you. Hence it’s always recommended to go with them.
For a detailed explanation, check out Kinsta’s post on the importance of managed WordPress hosting.
7. Check for Spam, Bots, or DDoS Attacks
Malicious attackers can bring your web server to a crawl by sending too many and/or resource-intensive requests. If your site is getting spammed by bots or undergoing a DDoS attack, it can overwhelm your server and result in 504 Gateway Timeout errors for many genuine users.
You can look at your server traffic and analytics to see if you can spot any irregular patterns in the site traffic. If you’re using Kinsta to host your site, you can view this data easily by going to your MyKinsta Analytics dashboard.
Start your investigation by looking at the top client IPs. It’ll give you an idea of who generates the maximum number of requests, and from where. If your server suddenly uses up enormous bandwidth or attracts a lot of traffic, then this report will come in super handy.
Next, you can check out the Cache Analysis report. Here, you can see how many requests are bypassing or missing the cache, or being served from the cache. For performance and stability reasons, you want to cache as many requests as possible, but it’s not always possible to achieve that.
For example, WooCommerce sites generate many uncacheable requests for features such as the shopping cart and the checkout process.
Finally, you can use a security plugin to beef up your website’s security by spotting and blocking worrisome traffic/IPs. You can ask your host to block certain IPs too.
Depending upon the length and scale of the attack, this could be a never-ending process of blacklisting IPs as many attackers change their IPs and proxy addresses after getting blocked.
Note: Kinsta doesn’t allow its clients to install security plugins as they can have a huge effect on the site’s performance, especially its scanning capabilities. As Kinsta uses load balancers with Google Cloud Platform, blocking IPs wouldn’t always work as intended.
You can use dedicated security solutions such as Cloudflare or Sucuri to protect your sites from DDoS attacks and spambots. For more, you can check out Kinsta’s articles on how to install Cloudflare on your site and how Sucuri helped stop a DDoS attack in its tracks.
8. Repair Your Corrupted WordPress Database
Sometimes, a 504 Gateway Timeout error can be because of a corrupt database, especially in WordPress sites. Typically, this is due to corrupted database tables or files. Sometimes, it can also be caused by a serious security issue like your site or database being hacked.
Repairing a corrupted WordPress database depends on the problem. Plugins like WP-DBManager make it easy to diagnose database issues and repair them. I recommend you to read Kinsta’s detailed walkthrough on repairing WordPress database issues to get started.
9. Check Your Site’s Plugins and Themes
In most cases, third-party plugins and themes don’t cause 504 errors. But there’s a slight chance that they might cause server timeouts, usually by queuing up many uncached requests generated by the plugin/theme. As this ties up a lot of your server’s PHP workers, it can cause 504 errors.
A great example of this issue is WooCommerce, a plugin installed to add ecommerce functionality to WordPress sites.
The simplest way you can troubleshoot this problem is by deactivating all your plugins. Remember, you won’t lose any data if you just deactivate a plugin.
If you can access your admin dashboard, you can go to the Plugins screen, select Deactivate from the bulk actions menu, checkmark all the plugins, and then hit the Apply button. This will disable all of your plugins.
If you can’t access your admin area, you can disable plugins via SFTP using the method described before. Just rename the main plugin folder name to disable all the plugins in bulk.
Once you’ve deactivated all the plugins, check whether your site loads properly. If it works, you must activate each plugin, testing the site after enabling every plugin.
Finally, make sure that your plugins, themes, and WordPress core are up to date. Also, ensure that your server is running the recommended version of PHP.
If you feel this to be too overwhelming, you can always reach out to your host for help. Kinsta uses Kinsta APM and other troubleshooting techniques to help clients narrow down what plugin, query, or script might cause the error.
In the worst-case scenarios, like an inefficient query or bad code in a plugin/theme, you can bring in a WordPress developer to fix the issue.
10. Check Error Logs
Viewing error logs can be very helpful when troubleshooting and debugging 504 errors on your site. This can help you narrow down an issue on your site quickly, especially if it’s resulting from a demanding plugin on your site.
If you’re a Kinsta customer, you can easily see errors in the log viewer in your MyKinsta dashboard.
If your host doesn’t have a logging tool, then you can enable WordPress debug mode by adding the following code to your wp-config.php file:
define( 'WP_DEBUG', true );
define( 'WP_DEBUG_LOG', true );
define( 'WP_DEBUG_DISPLAY', false );
The WP_DEBUG constant enables or disables the WordPress debug mode. It has two optional companion constants that can extend its features. The WP_DEBUG_LOG constant directs all errors to be saved to a debug.log file within the /wp-content/ directory. If you don’t see this file, you can always create one.
The WP_DEBUG_DISPLAY constant controls whether debug logs show up on the HTML page. Setting this to false will hide all errors, but you can review the errors later, as you’ve also defined WP_DEBUG_LOG as true.
Important: If you have WP_DEBUG enabled in the Kinsta environment, it’ll route all errors to the debug.log file and not the error.log in the MyKinsta dashboard.
You can also download the raw WordPress error log files via SFTP. Typically, you can find error logs in your server’s root directory in a folder named “logs.”
Kinsta users can also enable WordPress debug mode from their MyKinsta dashboard. To do that, navigate to Sites > Tools > WordPress Debugging and click the Enable button. This will allow you to see PHP errors and notices without enabling debug mode via SSH or SFTP.
Lastly, you can check the server log files. Depending on which server you’re using to host your WordPress site, they’re commonly found in these locations:
- Apache:
/var/log/apache2/error.log/ - Nginx:
/var/log/nginx/error.log/
You can refer to logging related documentation of Apache or Nginx for more information.
11. Configure Apache or Nginx Settings Properly
You can edit your server config files to increase resource limits for specific directives. This can help you resolve the 504 Gateway Timeout error.
For Apache Webservers
First, add the following code to your httpd.conf:
TimeOut 600This setting defines how long the server will wait for certain requests before marking it as a network timeout issue. Its default value is 60 seconds (Apache 2.4 version).
You can only add this directive in your httpd.conf file, not in your .htaccess file. Since most shared hosting providers don’t allow you to modify the httpd.conf file, you can try increasing the value of the LimitRequestBody directive in your .htaccess file instead.
Then add the following line to your php.ini file:
max_execution_time 300The default value of PHP’s max_execution_time directive is 30 seconds. Increasing it will allow your site’s PHP scripts to run longer.
For Nginx Webservers
If you’re running your WordPress sites on Nginx + FastCGI Process Manager (PHP-FPM) or using Nginx as a reverse proxy for Apache, you can tweak the server settings to help prevent 504 Gateway Timeout errors.
504 Gateway Timeout Error on Nginx + FastCGI (PHP-FPM)
First, you must edit your PHP-FPM pool config file. You can find it at the /etc/php7.4/fpm/pool.d/www.conf location in your Nginx server (the exact path may vary based on the PHP version). Alternately, you can run the following command in your terminal to edit the PHP-FPM pool config file:
sudo nano /etc/php/7.2/fpm/pool.d/www.confNext, set the following directive:
request_terminate_timeout = 300After this, you must edit your php.ini file. You can locate it at /etc/php.ini. Open the file and add/change the value for the max_execution_time directive to 300 seconds.
max_execution_time = 300Finally, add the following code to your nginx.conf file’s location block:
location ~ .php$ {
...
fastcgi_read_timeout 300;
}
Reload Nginx and PHP-FPM for the changes to take effect.
sudo service nginx reload
sudo service php7.4-fpm reload
The exact code to reload PHP-FPM will vary based on the PHP version installed on your server. Test your site to see whether it has fixed the issue.
504 Gateway Timeout Error on Nginx Proxy
If you’re using Nginx as a reverse proxy server for Apache, then you can make it more lenient towards server timeouts by adding the following directives to your nginx.conf file:
proxy_connect_timeout 600;
proxy_send_timeout 600;
proxy_read_timeout 600;
send_timeout 600;
Don’t forget to reload Nginx after making your changes.
sudo service nginx reload
Other HTTP Errors Like 504 Gateway Timeout
As mentioned earlier in the article, many other HTTP 5xx errors are just like the 504 Gateway Timeout error. It’s because they all happen on the server-side. These errors include:
- 500 Internal Server Error
- 501 Not Implemented Error
- 502 Bad Gateway Error
- 503 Service Unavailable Error
Other HTTP errors caused due to client-side issues, like the 404 Not Found error, are also like the 504 error. You can refer to Kinsta’s detailed guide and list of HTTP status codes for more information.
When you don’t know what caused a 504 Gateway Timeout error, how do you fix it in time to keep hard-earned visitors from bouncing to competitor sites? 🤷♂️ All the details are in this post. ⬆️Click to Tweet
Summary
Your site can be affected by the 504 Gateway Timeout error because of multiple reasons. In this article, you learned how to troubleshoot them all. Typically, these errors are caused due to server-side issues, in which case you can reach out to your host and get it resolved quickly.
However, you must also understand that this error can be due to third-party plugins, themes, services, inefficient database queries, or a combination of two or more of these. If you’re maxing out your server’s resources (e.g. PHP workers), it’s recommended to optimize your site for performance.
If you still find that your website is timing out, then it might very well be that you need to upgrade your hosting plan or the number of PHP workers. I recommend you to consider this option only after you’ve exhausted all the other solutions described in this article.
From simple static sites to complex ecommerce and membership sites, Kinsta’s scalable hosting plans are designed to accommodate all types of websites. To learn more about our scalable cloud hosting, check out this article!
Did we miss anything? If you’re still finding it difficult to fix the 504 Gateway Timeout error on your site, leave a comment below.
Get all your applications, databases and WordPress sites online and under one roof. Our feature-packed, high-performance cloud platform includes:
- Easy setup and management in the MyKinsta dashboard
- 24/7 expert support
- The best Google Cloud Platform hardware and network, powered by Kubernetes for maximum scalability
- An enterprise-level Cloudflare integration for speed and security
- Global audience reach with up to 35 data centers and 275 PoPs worldwide
Test it yourself with $20 off your first month of Application Hosting or Database Hosting. Explore our plans or talk to sales to find your best fit.
Содержание
- 1 Причины ошибки при воспроизведении аудиозаписей.
- 2 «При загрузке аудиозаписи произошла ошибка» — решение.
- 2.1 Переходим к проверке браузеров и Флеш Плеера.
- 3 Еще способы решения проблемы.
- 4 Предыстория появления ошибки
- 5 Суть и причины дисфункции
- 6 При загрузке аудиозаписи произошла ошибка в ВК – как исправить
- 7 Заключение
- 8 Почему появляется ошибка «Опаньки…»: основные причины
- 9 Как исправить ошибку в Гугл Хром
- 9.1 Проверка интернет-соединения
- 9.2 Проверка загрузки сайта
- 9.3 Перезагрузка страницы
- 9.4 Перезапуск браузера
- 9.5 Перезагрузка компьютера
- 9.6 Устраняем неполадки, отключив расширения
- 9.7 Отключение конфликтующих приложений
- 9.8 Проверка компьютера на вирусы
- 9.9 Отключение Firewall
- 9.10 Отключение Flash —плеера
- 9.11 Обновление Google Chrome
- 9.12 Переустановка браузера
- 9.13 Смена аккаунта Google
- 9.14 Обращение в службу поддержки
- 9.15 Видео: что делать, если страницы в Google Chrome нельзя открыть
- 10 Что сделать, чтобы ошибка не возникла вновь
Всем привет. Сегодня обсудим проблему всемирно известной социальной сети «В контакте», а именно поговорим об ошибке с воспроизведением аудио. Сообщение об ошибке выглядит так: «При загрузке аудиозаписи произошла ошибка. Попробуйте обновить страницу». При чем, на некоторых песнях окошко выскакивает, а на некоторых нет. Вот скриншот с данной бедой: 
По ходу статьи рассмотрим возможные причины, а далее расскажем как исправить ситуацию.
Причины ошибки при воспроизведении аудиозаписей.
Пользователи описывают самые распространенные проблемы:
- Неправильный протокол сетевого подключения;
- Устаревшая версия Adobe Flash Player;
- Отключенный Flash Player в браузере;
- Неработоспособная, устаревшая версия самого браузера;
- Редко, но тоже случается — конфликт с IP адресом;
- Проблемы с плагином «VK Saver» и другими расширениями для сохранения аудио и видео файлов;
- Если у вас включен FriGate — смело отключайте, часто причина именно в нем;
Что бы избежать путаницы, выполняйте все рекомендации по порядку.
«При загрузке аудиозаписи произошла ошибка» — решение.
Насколько нам известно плагин VK Saver долгое время не обновляется, друге расширения для сохранения видео и аудио в контакте так же могут вызывать конфликт, контакт обновляется, а разработчики не успевают обновлять расширения. По этому первым рекомендуем отключить их.
Вторым шагом станет проверка протокола сетевого подключения, для этого:
- Зайдите в Панель управления;
- Нажмите на значок Центр управления сетями и общим доступом;
- Откройте изменение параметров адаптера;
- Щелкаем правой кнопкой мыши на «Свойства»;
- С пункта «Протокол Интернета версии 6 ( TCP/IPv6 )» снимаем галочку;

Отключите протокол TCPIPv6
Переходим к проверке браузеров и Флеш Плеера.
- Бывают нестабильные версии проигрывателя вызывающие данную ошибку. Идем на скачать Флеш Плеер. Качаем и устанавливаем финальную сборку.
- Для Яндекс.Браузер, Google Chrome и Mozilla, смотрим актуальность версии браузера.
- Открываем Меню (три полоски в правом верхнем углу) → Дополнительно → О браузере Yandex (Для Google Chrome и Мозиллы действия аналогичные).
- Скачиваем и устанавливаем с официального сайта любимый браузер.
- Вот что советуют сами разработчики контакта: в Хроме осталась вбейте в адресную строку chrome://plugins, нажмите Enter.
- В открывшемся окошке в разделе Adobe Flash Player щелкните галочку «Запускать всегда».

- Перезагружаем машину и проверяем.

Еще способы решения проблемы.
Вышеприведенные методы помогают всегда, но есть люди пользующийся старыми версиями Windows, браузерами и не обновленным программным обеспечением. Не забывайте периодически обновлять компоненты системы и софт.
Для тех, кто хочет «Потанцевать с бубном» — вот еще варианты, которые предложили пользователи:
В настройках безопасности поставь ‘Использовать безопасное соединение».
Если проблема была в конфликте с IP адресом установите VPN плагин для Хрома, например TouchVPN — он совершенно бесплатный и не содержит рекламы. Загрузить тут: TouchVpn. Для других браузеров есть похожие дополнения.
Надеюсь вы разобрались бедой При загрузке аудиозаписи произошла ошибка попробуйте обновить страницу, по традиции видео из Ютуба по данной теме:
При нажатии на кнопку воспроизведения какой-либо аудиозаписи в социальной сети «Вконтакте» пользователь может столкнуться с сообщением «При загрузке аудиозаписи произошла ошибка. Попробуйте обновить страницу». Обычно это связано с очередными обновлениями функционала «VK», проводимыми администрацией сайта, но бывают и случаи, когда в указанной дисфункции виноваты настройки сети пользователя, некорректно работающий браузер, а также различные VK-плагины (к примеру, «VKMusic» или «VKSaver»). В этой статье я расскажу, почему возникает данная проблема, каковы её причины, и как исправить «При загрузке аудиозаписи произошла ошибка» на вашем ПК.
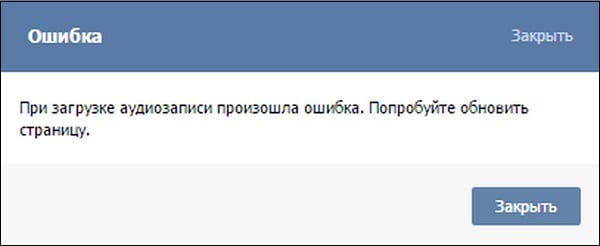
Текст сообщения «При загрузке аудиозаписи произошла ошибка»
Предыстория появления ошибки
28 апреля 2017 года администрация «Вконтакте» провозгласила переход социальной сети на новый аудио функционал. Был кардинально переработан музыкальный раздел, улучшена система рекомендаций по поиску музыки, появились новые обложки альбомов.
Отдельной стороной новации стало введение платного музыкального контента в VK. Поскольку проблема пиратства в VK стоит довольно остро, то владелец «Вконтакте» – компании Mail.ru Group, предпринимает шаги, направленные на исправление сложившейся конъюнктуры, и улучшение ситуации с соблюдением авторских прав.

Реклама нового музыкального раздела в VK
Суть и причины дисфункции
Как это обычно бывает, переход на новый аудиофункционал VK не прошёл гладко. У ряда пользователей перестали воспроизводиться большинство аудиозаписей, при попытке воспроизвести какую-либо композицию активная строка просто перескакивает на композицию ниже, и, в конце концов, на экране появляется сообщение «При загрузке аудиозаписи произошла ошибка. Попробуйте обновить страницу».
Разумеется, обновление страницы не меняет ровным счётом ничего, вынуждая пользователя искать варианты решений в сети. Но, в данном случае, всё довольно просто, причиной дисфункции является не до конца «отшлифованное» обновление аудиораздела ВК, и пользователю остаётся просто ждать, пока разработчики соизволят исправить ситуацию.
Также в довольно редких случаях причиной дисфункции «При загрузке аудиозаписи произошла ошибка» может быть следующее:
- Случайный сбой вашего ПК;
- Некорректно работающий браузер;
- Нестабильная работа плагинов к VK (VKSaver, VKMusic, VK Plugin и так далее);
- Неверный протокол сетевого подключения;
- Проблемы с работой Adobe Flash Player.

Исправляем ошибку воспроизведения аудио VK
При загрузке аудиозаписи произошла ошибка в ВК – как исправить
Как я уже писал выше, в большинстве случаев это проблема самих разработчиков, которые не до конца проработали новый функционал аудиораздела ВК. Наилучшим решением здесь будет просто подождать пару дней, или написать письмо в техническую поддержку VK c описанием вашей проблемы.
Также можно попробовать выполнить следующие шаги, способные помочь избавиться от сообщения «При загрузке аудиозаписи произошла ошибка» на вашем компьютере:
- Если вы встретились с данной ошибкой впервые, тогда попробуйте просто перегрузить ваш компьютер;
- Попробуйте использовать другой браузер для прослушивания аудиокомпозиций ВК;
- Отключите (удалите) браузерные плагины для работы с «Вконтакте». Перейдите в настройки вашего браузера, затем в дополнения (расширения), найдите там плагины к VK и отключите (удалите) их;
- Отключите протокол интернета версии 6 на вашем ПК. Перейдите в «Панель управления» — «Сеть и Интернет» — «Центр управления сетями и общим доступом». Кликните на «Изменение параметров адаптера», найдите в списке подключений ваше интернет-подключение, наведите курсор на него, и кликните правой клавишей мыши. В появившемся меню выберите «Свойства». В открывшемся окошке свойств снимите галочку рядом с «Протокол интернета версии 6», нажмите на «Ок», и перезагрузите ваш компьютер.

Отключаем шестую версию протокола

Установите галочку на опции «Запускать всегда»
Заключение
В большинстве случаев причиной появления сообщения «При загрузке аудиозаписи произошла ошибка» является некорректная работа самого ресурса VK. В данной ситуации рекомендуется подождать пару дней, пока разработчики выявят и исправят найденные проблемы, восстановив, тем самым, нормальную работу музыкального раздела. Кроме того рекомендую воспользоваться советами, перечисленными мной выше, они могут оказаться действенными и эффективными в вашем конкретном случае.
Ваш IT помощник
Google Chrome — один из самых удобных и практичных браузеров на данный момент, но даже в нем могу случаться непредвиденные ошибки. Одна из них: «Опаньки… При загрузке этой страницы возникли неполадки в Google Chrome». После того как она появляется на экране, страница перестает открываться, и простая перезагрузка вкладки не всегда может помочь. Если данная ошибка появляется уже не раз, а с определенной частотой, то нужно ее решать самостоятельно. Что делать в таких случаях, расскажем ниже.
Почему появляется ошибка «Опаньки…»: основные причины
Ошибка может появиться из-за следующих проблем:
- Сайт временно недоступен или перестал существовать вовсе. Проверьте, правильно указана ссылка.
- Версия браузера неактуальна или устарела.
- Файлы, отвечающие за работу браузера, повреждены вирусом или вашими действиями.
- Интернет-соединение нестабильно.
- На компьютере находятся программы, которые конфликтуют с браузером.
- Компьютер подцепил вирус, не дающий загружаться страницам.
- Неправильная работа дополнения Firewall вашего антивируса.
- Конфликт браузера с установленными дополнениями.
Посмотреть, как часто у вас случается ошибка «Опаньки…» можно, перейдя по ссылке chrome://crashes. Введите ее в поисковой строке и нажмите Enter.
Как исправить ошибку в Гугл Хром
Если вы не знаете, из-за чего именно страницы в вашем браузере не отображаются, то попробуйте все способы поочередно, пока не найдете тот, который решит вашу проблему.
Проверка интернет-соединения
Попробуйте открыть другую ссылку, использовать другой браузер или скачать какой-либо файл, чтобы убедиться в том, что интернет работает стабильно. Если проверка показала, что интернет не работает так, как надо, то добейтесь того, чтобы эта проблема была решена. Возможно, поможет переподключение к сети, или перезагрузка роутера, если вы пользуетесь Wi-Fi.
Проверка загрузки сайта
Перед тем как пытаться починить браузер, попробуйте открыть ссылке через любой другой веб-браузер, например, Internet Explorer, который установлен на компьютере по умолчанию. Если в нем сайт откроется, то проблема в Google Chrome, если же нет — проблема с самим сайтом, и устранять ее должны не вы, а его администраторы.
Перезагрузка страницы
Иногда, обычная перезагрузка страницы решает проблему, так как происходит повторное подключение, которое на этот раз может пройти успешно.
Перезапуск браузера
Следующий шаг — перезагрузить браузер. Проверка всех файлов и сертификатов запустится заново, возможно, именно это избавит вас от ошибки.
Перезагрузка компьютера
Перезагрузка компьютера вызовет перезапуск всех процессов, работающих в фоновом режиме, а все лишние программы будут автоматически отключены.
Устраняем неполадки, отключив расширения
Если ошибка появилась после установки или обновления одного из расширений для браузера, то необходимо его отключить:
-
Разверните меню браузера.
Отключение конфликтующих приложений
Чтобы узнать, с какими приложениями конфликтует Google Chrome, выполните следующие действия:
Введите в поисковую строку команду chrome://conflicts и выполните ее.
Проверка компьютера на вирусы
Возможно, проблемы возникают из-за вируса, который мешает работе браузера, а это значит, что его надо удалить с компьютера:
-
Откройте ваш антивирус.
Отключение Firewall
Firewall — дополнение, которое запрещает доступ в интернет сомнительным программам. Если на вашем компьютере установлено антивирус, то, скорее всего, в нем существует это расширение.
-
Открываем антивирус, установленный на вашем компьютере.
Отключение Flash —плеера
Возможно, проблема в Flesh-плеере, встроенном в сам браузер. Так как на всех компьютерах установлен Flash-плеер по умолчанию, то плеер браузера можно отключить.
-
В поисковой строке браузера вводим команду about:plugins и выполняем ее.
Обновление Google Chrome
Если версия браузера устарела, то он может некорректно работать, в этом случае его нужно обновить:
-
Разворачиваем меню браузера.
Переустановка браузера
Если обновление не помогло, или вирус повредил файлы браузера, об этом было сказано раньше, то необходимо полностью удалить браузер с компьютера и скачать его заново.
-
Откройте панель управления при помощи поиска Windows.
Смена аккаунта Google
Если вы ранее авторизовались в Google Chrome при помощи своего аккаунта Google, то можно выйти из него и войти под другой учетной записью. Сделать это можно, перейдя по следующей ссылке — https://accounts.google.com/Login?hl=ru. Нажмите кнопку «Войти в другой аккаунт», а после введите все необходимые для авторизации данные.
Обращение в службу поддержки
Если ни один из вышеперечисленных способов не помог, то остается одно — обратиться в официальную службу поддержки Google, чтобы получить помощь квалифицированного специалиста. На этом сайте вы можете найти всю подробную информацию о поддержки Google — https://www.google.com/intl/ru/contact/. Подробно опишите операторам, какая именно ошибка произошла в вашем браузере, и какие способы не помогли ее устранить.
Видео: что делать, если страницы в Google Chrome нельзя открыть
Что сделать, чтобы ошибка не возникла вновь
Если вам удалось избавиться от ошибки в этот раз, то придерживаетесь в будущем следующих правил, чтобы не пришлось решать проблему снова:
- Установите и обновите на свой компьютер качественный антивирус, никогда не отключайте его.
- Следите за актуальностью версии Google Chrome, проверяйте наличие обновлений хотя бы раз в две недели.
- Не устанавливайте лишние дополнения, так как это приведет только к лишней нагрузке на браузер и, соответственно, к его поломке. Это правило относится и к сторонним приложениям.
- Не пытайтесь без наличия хорошей инструкции и понимания дела настраивать браузер и лазить в его файлах.
Итак, если во время использования браузера появилась ошибка «Опаньки… При загрузке этой страницы возникли неполадки в Google Chrome», то первым делом надо разобраться из-за чего она возникла. Если такой возможности нет, то используйте все вышеперечисленные варианты по очереди, пока не найдёте нужный. Если ни один из них не помог, то это значит, что ваша проблема уникальна и требуется более глубокий разбор причин, в котором вам помогут агенты службы поддержки Google.
Как исправить ошибку 500 Internal Server – как восстановить соединение
Внутренняя ошибка сервера 500 – это очень общий код состояния HTTP, который означает, что что-то пошло не так на сервере веб-сайта, но сервер не может сказать более конкретно, в чем именно заключается проблема.

Как выглядит ошибка с кодом 500
Сообщение 500 Internal Server Error может отображаться любым количеством способов, поскольку каждому веб-сайту разрешено настраивать собственную форму.
Вот несколько распространенных способов появления ошибки HTTP 500:
- внутренняя ошибка сервера 500
- HTTP 500 – внутренняя ошибка сервера
- Временная ошибка (500)
- Внутренняя ошибка сервера
- Внутренняя ошибка HTTP 500
- Ошибка 500
- Ошибка HTTP 500
- 500. Это ошибка!
Поскольку веб-сайт, который вы посещаете, генерирует внутреннюю ошибку сервера, её можно увидеть в любом браузере в любой операционной системе, даже на вашем смартфоне.
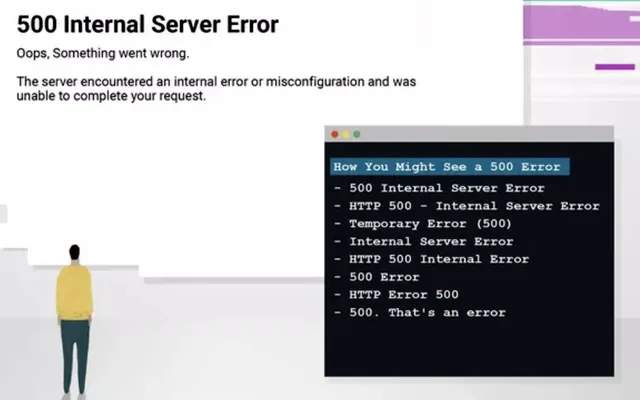
В большинстве случаев в окне интернет-браузера отображается ошибка 500 Internal Server Error.
Причины ошибок HTTP 500
Как мы уже упоминали выше, сообщения о внутренних ошибках сервера не указывают какой-то конкретной проблемы.
В большинстве случаев «ошибка» означает проблему с кодом страницы или сайта, но, безусловно, существует вероятность того, что проблема на вашей стороне, что мы рассмотрим ниже.
Более конкретная информация о причине конкретной ошибки HTTP 500 часто предоставляется, когда она возникает на сервере с использованием программного обеспечения Microsoft IIS. Ищите числа после 500, как в HTTP Error 500.19 – Internal Server Error, это означает, что данные конфигурации недействительны.
Как исправить внутреннюю ошибку сервера
Как мы упоминали выше, 500 Internal Server Error – это ошибка на стороне сервера, означающая, что проблема, вероятно, не в вашем компьютере или интернет-соединении, а на сервере веб-сайта.
Хотя это маловероятно, возможно, что-то не так с вашей стороны, и в этом случае мы рассмотрим некоторые вещи, которые вы можете попробовать:
Перезагрузите веб-страницу. Вы можете сделать это, нажав кнопку обновления/перезагрузки, нажав F5 или Ctrl + R или повторив попытку URL-адреса из адресной строки.
Даже если ошибка 500 Internal Server Error является проблемой на веб-сервере, проблема может быть временной. Повторная попытка загрузки страницы часто бывает успешной.
Если во время оформления заказа у интернет-продавца появляется сообщение «500 Internal Server Error», учтите, что повторные попытки оформления заказа могут привести к созданию нескольких заказов – и даже нескольких платежей! У большинства торговцев есть автоматическая защита от подобных действий, но об этом нужно помнить.
Очистите кеш вашего браузера. Если есть проблема с кэшированной версией просматриваемой страницы, это может вызвать проблемы HTTP 500. Внутренние ошибки сервера редко вызваны проблемами с кэшированием, но я видел, как ошибка исчезла после очистки кэша. Это такая простая и безвредная вещь, которую можно попробовать в самом начале.
Удалите куки вашего браузера. Некоторые проблемы с 500 Internal Server Error можно исправить, удалив файлы cookie, связанные с сайтом, на котором вы получаете ошибку. После удаления файлов cookie перезапустите браузер и повторите попытку.
Устраните неисправность как ошибку тайм-аута 504 шлюза. Это не очень часто, но некоторые серверы выдают внутреннюю ошибку сервера с кодом 500, когда на самом деле 504 Gateway Timeout является более подходящим сообщением, основанным на причине проблемы.
Связь с сайтом напрямую является ещё одним вариантом. Есть большая вероятность, что администраторы сайта уже знают об ошибке 500, но если вы подозреваете, что они этого не знают, то оповещение может помочь вам и им (и всем остальным).
Если кажется, что сайт полностью недоступен, и вы не можете найти способ сообщить об ошибке сервера на веб-сайте, стоит поискать официальных представителей в социальных сетях.
Вернитесь позже. К сожалению, на данный момент Внутренняя ошибка сервера с кодом 500, без сомнения, является проблемой вне вашего контроля, которая в конечном итоге будет исправлена кем-то другим.
Исправление ошибки 500 на вашем собственном сайте
Внутренняя ошибка сервера 500 на вашем собственном сайте требует совершенно другого поведения. Как мы упоминали выше, большинство из 500 ошибок являются ошибками на стороне сервера, а это, вероятно, ваша проблема, которую нужно исправить, если это ваш сайт.
Существует множество причин, по которым ваш сайт может показывать пользователям ошибку 500, но наиболее распространенные:
- Ошибка разрешений. В большинстве случаев ошибка 500 Internal Server Error связана с неправильным разрешением для одного или нескольких файлов или папок. В большинстве этих случаев, неправильное разрешение имеют скрипты PHP и CGI. Обычно они должны быть установлены на 0755 (-rwxr-xr-x).
- Тайм-аут PHP. Если ваш сценарий подключается к внешним ресурсам, время ожидания этих ресурсов может приводить к ошибке HTTP 500. Правила тайм-аута или лучшая обработка ошибок в вашем скрипте должны помочь, если это является причиной ошибки 500.
- Ошибка кодирования в .htaccess. Хотя это не так часто, убедитесь, что файл .htaccess вашего сайта правильно структурирован.
Если вы используете WordPress, Joomla или другую систему управления контентом или CMS, обязательно поищите в их центрах поддержки более конкретную помощь по устранению неисправности 500 Internal Server Error.
Больше способов увидеть внутреннюю ошибку сервера
В Internet Explorer сообщение «Веб-сайт не может отобразить страницу» часто указывает на внутреннюю ошибку сервера HTTP 500. Ошибка 405 Method Not Allowed – это ещё один вариант, но должны найти соответствующее подтверждение в строке заголовка IE.
Когда службы Google, такие как Gmail, испытывают внутреннюю ошибку сервера 500, они часто сообщают о временной ошибке (500) или просто 500.
Когда Центр обновления Windows сообщает о внутренней ошибке сервера, она отображается как сообщение WU_E_PT_HTTP_STATUS_SERVER_ERROR или как код ошибки 0x8024401F.
Если веб-сайт, который сообщает об ошибке 500, работает под управлением Microsoft IIS, вы можете получить более конкретное сообщение об ошибке:
| Ошибка 500 Internal Server Error | |
|---|---|
| Код | Объяснение |
| 500,0 | Произошла ошибка модуля или ISAPI. |
| 500,11 | Приложение закрывается на веб-сервере. |
| 500,12 | Приложение занято перезагрузкой на веб-сервере. |
| 500,13 | Веб-сервер слишком занят. |
| 500,15 | Прямые запросы на Global.asax не допускаются. |
| 500,19 | Данные конфигурации неверны. |
| 500,21 | Модуль не распознан. |
| 500,22 | Конфигурация ASP.NET httpModules не применяется в режиме управляемого конвейера. |
| 500,23 | Конфигурация ASP.NET httpHandlers не применяется в режиме управляемого конвейера. |
| 500,24 | Конфигурация олицетворения ASP.NET не применяется в режиме управляемого конвейера. |
| 500,50 | Произошла ошибка перезаписи во время обработки уведомления RQ_BEGIN_REQUEST. Произошла ошибка выполнения конфигурации или входящего правила. |
| 500,51 | Произошла ошибка перезаписи во время обработки уведомления GL_PRE_BEGIN_REQUEST. Произошла глобальная конфигурация или ошибка выполнения глобального правила. |
| 500,52 | Произошла ошибка перезаписи во время обработки уведомления RQ_SEND_RESPONSE. Выполнение исходящего правила. |
| 500,53 | Произошла ошибка перезаписи во время обработки уведомления RQ_RELEASE_REQUEST_STATE. Произошла ошибка выполнения правила для исходящих сообщений. Правило настроено для выполнения до обновления выходного пользовательского кэша. |
| 500,100 | Внутренняя ошибка ASP. |
Ошибки, похожие на HTTP 500
Многие сообщения об ошибках браузера аналогичны сообщению 500 Internal Server Error, поскольку все они являются ошибками на стороне сервера, например 502 Bad Gateway, 503 Service Unavailable и 504 Gateway Timeout.
Также существует множество кодов состояния HTTP на стороне клиента, например, популярная ошибка 404 Not Found.
Как исправить ошибку Google Chrome Aw Snap «Что-то пошло не так»
Google Chrome, несомненно, является самым популярным браузером, который используется сегодня. Многие люди предпочитают использовать этот браузер из-за его скорости. Несколько тестов показывают, что он быстрее загружает веб-страницы по сравнению с конкурентами. Несмотря на то, что это надежное приложение, в некоторых случаях могут возникать определенные проблемы, которые мы будем решать сегодня. В этой последней версии нашей серии по устранению неполадок мы рассмотрим проблему с Google Chrome! Что-то пошло не так, ошибка.
Что делать, когда вы получаете Aw Snap, что-то пошло не так ошибка
Перед выполнением рекомендуемых действий по устранению этой конкретной проблемы я предлагаю вам сначала попробовать перезагрузить компьютер. Это обновит операционную систему, а также удалит поврежденные временные данные и довольно эффективно решит большинство проблем, связанных с программным обеспечением.
Есть несколько факторов, которые могут вызвать эту конкретную проблему, от проблемы с подключением к Интернету до глюк в браузере. Ниже перечислены действия по устранению неполадок, которые необходимо выполнить, чтобы решить эту проблему.
Попробуйте перезагрузить страницу
Первое, что вы в этом случае нужно будет попытаться перезагрузить веб-страницу, которую вы пытаетесь открыть. Если проблема вызвана временной потерей интернет-соединения, этот шаг обычно решает проблему. Вам также необходимо убедиться, что ваш компьютер подключен к Интернету, попытавшись выйти в Интернет с помощью других приложений.
Закройте другие вкладки
Все мы знаем, что Chrome использует больше оперативной памяти по сравнению с другими браузерами, поэтому это одна из распространенных причин этой проблемы. это когда на вашем компьютере недостаточно оперативной памяти для использования браузером. Попробуйте закрыть другие вкладки, которые вы не используете, а затем проверьте, что что-то пошло не так, ошибка по-прежнему возникает.
Отключите прогнозирование сетевых действий
Одной из особенностей этого браузера является то, что он использует службу прогнозирования для улучшения общего пользовательского опыта. Это отличная функция, однако, если у вас медленное интернет-соединение, это может вызвать определенные проблемы.
- Нажмите кнопку «Меню» в правом верхнем углу и выберите «Настройки».
- Прокрутите страницу вниз и нажмите «Показать дополнительные настройки».
- Перейдите в раздел «Конфиденциальность» и снимите флажок «Использовать службу прогнозирования для более быстрой загрузки страниц».
- Перезапустите Chrome.
Убедитесь, что в Google Chrome aw snap что-то пошло не так, ошибка по-прежнему возникает.
Отключить расширения
Вы можете настроить работу своего браузера, добавив к нему определенные расширения. Хотя это может быть отличной функцией, иногда она может вызывать проблемы, поэтому вам нужно будет отключить ее в этом сценарии..
- Нажмите кнопку «Меню» в правом верхнем углу и выберите «Дополнительные инструменты»> «Расширения».
- Список установленных расширений теперь появится в новой вкладке.
- Снимите флажок «Включено». Повторите этот шаг для всех установленных расширений.
- Перезапустите браузер.
Проверьте, не возникает ли ошибка Aw Snap Something Went Wired.
Отключите антивирус
Возможно, что антивирусное программное обеспечение, которое вы установили, вызывает эту проблему. Чтобы проверить, является ли это виновником, попробуйте отключить его.
Если вы используете Windows Security
- Выберите Пуск — Настройки> Обновить и Безопасность — Безопасность Windows — Защита от вирусов и угроз> Управление настройками
- Установите для параметра Защита в реальном времени значение Выкл.
Если вы используете Avast
- Найдите значок Avast на панели задач вашего компьютера и щелкните его правой кнопкой мыши.
- Щелкните элемент управления Avast Shields.
- Найдите параметры для отключения программы — варианты включают ее отключение на 10 минут, час, пока компьютер не будет перезагружен, или навсегда (пока вы сами не включите его снова). Выберите наиболее подходящий вариант и используйте его для отключения программы.
Если вы используете AVG
- Найдите AVG на панели задач вашего компьютера и щелкните его правой кнопкой мыши.
- Нажмите «Временно отключить защиту AVG».
- Выберите, как долго вы хотите отключать AVG и нужно ли вы хотите, чтобы AVG также отключила свой брандмауэр.
- Нажмите OK, чтобы отключить антивирусную программу.
Если вы используете McAfee
- Найдите значок McAfee Antivirus на панели задач вашего компьютера и щелкните его правой кнопкой мыши.
- Нажмите «Выход».
- Вы должно появиться диалоговое окно с предупреждением о том, что защита McAfee будет отключена. Нажмите «Да» в этом диалоговом окне, чтобы отключить антивирусную программу.
Проверьте, не возникает ли ошибка Google Chrome Aw Snap Something Went Went Wired.
Выключите брандмауэр
В некоторых случаях брандмауэр является виновником, не позволяя Chrome подключаться к Интернету. Попробуйте проверить, не в этом ли проблема, отключив брандмауэр.
- Нажмите Windows Key + I, чтобы открыть Настройки.
- Поиск для «Брандмауэр Защитника Windows», а затем выберите «Брандмауэр Защитника Windows».
- С левой стороны нажмите «Включение или выключение брандмауэра Защитника Windows».
- Установите флажки «Отключить брандмауэр Защитника Windows» под обоими настройками.
Проверьте, сохраняется ли проблема. Если этого не произошло, включите брандмауэр и добавьте Chrome в его список исключений.
- Введите Firewall в строке поиска и щелкните появившееся приложение Firewall.
- В открывшемся окне брандмауэра Windows щелкните Разрешить приложение через брандмауэр Windows..
- В открывшемся окне «Разрешенные приложения» нажмите кнопку «Изменить настройки», а затем установите флажок для приложений на вашем компьютере, которым вы хотите разрешить взаимодействие через Интернет без остановки брандмауэра.
- Установите флажок «Частный» и «Общедоступный», чтобы сузить круг вопросов, хотите ли вы только защищенные сети, чтобы разрешить этот обмен данными, или также общедоступные и небезопасные сети.
- Нажмите ОК, а затем нажмите кнопку Закрыть, чтобы закрыть окно брандмауэра Windows.
Очистить данные просмотра
Chrome обычно сохраняет данные о ваших просмотрах, чтобы при следующем посещении определенного веб-сайта они загружались быстрее. Если эти данные будут повреждены, это может вызвать определенные проблемы, поэтому вы должны попытаться удалить их.
- На вашем компьютере откройте Chrome.
- В правом верхнем углу нажмите «Еще».
- Нажмите «Дополнительные инструменты», а затем «Очистить данные просмотра».
- Выберите временной диапазон, например «Последний час» или «Все время».
- Выберите типы информации, которую вы хотите удалить.
- Нажмите «Очистить данные».
Перезапустите Chrome, затем проверьте, если проблема все еще возникает.
Переустановите Chrome
Если описанные выше действия не помогли решить проблему, вам следует удалить, а затем переустановить Chrome
- На компьютере закройте все окна и вкладки Chrome.
- Щелкните меню «Пуск», а затем «Настройки».
- Щелкните «Приложения».
- В разделе «Приложения и функции» найдите и щелкните Google Chrome.
- Нажмите «Удалить».
- Подтвердите, нажав «Удалить».
- Чтобы удалить информацию вашего профиля, например закладки и историю, установите флажок «Также удалите просмотр данных ».
- Нажмите» Удалить «.
- Перейдите по адресу https://www.google.com/chrome/
- Нажмите «Загрузить Chrome».
- При появлении запроса нажмите «Выполнить» или «Сохранить».
- Если вы выберите «Сохранить», дважды щелкните загружаемый файл, чтобы начать установку.
Проверьте, не возникает ли ошибка Google Chrome Aw Snap Something Went Wired.
Возникли проблемы с вашим компьютером? Не стесняйтесь обращаться к нам, используя эту форму. Мы постараемся помочь.
упс что то пошло не так Мы знаем о проблеме и уже работаем. Попробуйте обновить страницу или зайти попозже.
У меня не отбражаются фотки, имя не могу отвравить сообщ. пишет упс что то пошло не так Мы знаем о проблеме и уже работаем.
Попробуйте обновить страницу или зайти попозже. это профилактика? жду ответа
У Вас тут уже вроде всё в порядке на странице в Мире:
http://my.mail.ru/mail/bukrieieva.2005/
А такие сбои, как у Вас на скрине, тут иногда случаются.
Паниковать не стоит. Дам несколько советов на будущее.
Попробуйте обновить окно страницы, нажав Ctrl+F5 (может даже несколько раз) .
YouTube сегодня является одним из крупнейших веб-сайтов для обмена видео. Однако, когда вы смотрите видео или выполняете другие действия на YouTube, вам не избежать ошибок. Например, ошибка невозможности просмотра видео на YouTube, ошибки видео YouTube теряются, а ошибки YouTube недоступны.
Ниже приведены некоторые из наиболее распространенных ошибок на Youtube и способы их устранения.

- 1. Ошибка «Произошла ошибка, повторите попытку позже»
- 2. Ошибка при просмотре видео на YouTube.
- 3. Ошибка при отображении видео с YouTube.
- 4. Ошибка потери голоса при просмотре видео на Youtube.
- 5. Видео скоро остановится.
- 6. Ошибка JavaScript или ошибка Flash Player.
- 7. Ошибка «Не удалось загрузить Shockwave Flash» в браузере Chrome.
- 8. Ошибки видео заблокированы в вашей стране.
- 9. Ошибка воспроизведения видео.
- 10. Ошибка Youtube не работает
- Проверьте, не свернут ли YouTube
- Как исправить YouTube в Chrome
- Как исправить YouTube на Android и iOS
1. Ошибка «Произошла ошибка, повторите попытку позже»
Это одна из самых распространенных ошибок на Youtube. Чтобы исправить эту ошибку, вы можете выполнить следующие действия:
1. Удалите файлы cookie, кеш, историю и временные интернет-файлы в своем браузере.
2. Приостановите воспроизведение видео, затем измените разрешение видео (720p, 480p, 360p и т. Д.).
3. Убедитесь, что все плагины обновлены до последней версии. Если нет, установите последнюю версию.
4. Отключите аппаратное ускорение видеокарты. Наконец, сохраните изменения и перезапустите Firefox.
5. Отключите youtube.com в HTTPS по всем правилам, затем посмотрите видео Youtube в этом профиле Firefox, если это не SSL.
2. Ошибка при просмотре видео на YouTube.
Эта ошибка возникает часто, вероятно, из-за скорости подключения к Интернету, владельца видео изменяет видео или видео было удалено,.
Чтобы исправить эту ошибку, вы можете выполнить следующие действия:
1. Перезагрузите страницу видео Youtube.
2. Подождите около 30 минут, чтобы перезагрузить видео.
3. Закройте браузер и откройте его снова.
4. Убедитесь, что вы обновили Flash Player и браузер до последней версии.
5. Откройте JavaScript. Ссылка: Включение и отключение JavaScript в браузере Chrome
6. Смотрите видео с Youtube в другом браузере или на другом компьютере.
7. Удалите файлы cookie, кеш, историю и временные Интернет-файлы в своем браузере, нажав Ctrl + Shift + Del, появится сообщение «Очистить данные» нажмите / Удалить данные. Дополнительная информация: Очистить кеш и файлы cookie в браузерах Coc Coc, Chrome, Firefox
8. Приостановите воспроизведение видео, затем измените разрешение видео (720p, 480p, 360p и т. Д.).
3. Ошибка при отображении видео с YouTube.
Если вы слышите только звук, но не видите видеоизображение, вы можете исправить это несколькими способами:
1. Отключите аппаратное ускорение в Adobe Flash Player. Щелкните правой кнопкой мыши видео с ошибкой => нажмите Настройки => Оставьте Включить аппаратное ускорение => Затем выберите Закрыть и перейдите к обновлению страницы YouTube.
2. Обновите драйвер графики (видеокарты).
4. Ошибка потери голоса при просмотре видео на Youtube.
Чтобы исправить потерю языка в видеороликах Youtube:
1. Проверьте громкость на компьютере, проверьте динамик и видео на Youtube.
2. Перезагрузите браузер.
3. Обновите версию Flash Player до последней версии.
4. Проверьте, не блокируют ли антивирусное программное обеспечение и брандмауэр (брандмауэр) содержимое третьего приложения.
5. Убедитесь, что на вкладке YouTube отключен звук. Если щелкнуть вкладку YouTube правой кнопкой мыши, выберите сайт «Включить звук».
Кроме того, в некоторых случаях ошибки YouTube вызваны тем, что видео защищено авторским правом, поэтому YouTube отключил видео, вам следует выбрать другое видео для просмотра.
5. Видео скоро остановится.
Как и в случае с вышеуказанными ошибками, с помощью этой ошибки вы можете изменить разрешение видео или очистить кеш браузера и файлы cookie. Также, если скорость медленного интернет-соединения также является причиной этой ошибки.
6. Ошибка JavaScript или ошибка Flash Player.
При возникновении ошибки JavaScript или Flash Player на экране отображается сообщение об ошибке: «Здравствуйте, у вас отключен JaveScript или установлена старая версия Macromedia’s Flash Player. Загрузите последнюю версию Flash-плеера» .
Чтобы исправить это, просто активируйте JavaScript в своем браузере или установите последнюю версию Flash Player.
7. Ошибка «Не удалось загрузить Shockwave Flash» в браузере Chrome.
В процессе просмотра видеороликов Youtube в браузере Chrome многие пользователи часто сталкиваются с ошибками: Не удается загрузить Shockwave Flash. Чтобы исправить эту ошибку:
Сначала введите chrome: // plugins / в адресную строку новой вкладки, затем найдите плагин Shockwave Flash => нажмите «Подробности» => отключите версию только в C: Users. и сохраните сеансы Другая версия C: Windows. активирован.
Затем повторно откройте видео Youtbe на новой вкладке или в новом окне.
8. Ошибки видео заблокированы в вашей стране.
- Ознакомьтесь с некоторыми способами исправить заблокированные видео в вашей стране здесь.
9. Ошибка воспроизведения видео.
Эта ошибка связана с такими ситуациями, как медленная загрузка видео, отсутствие воспроизведения видео, ошибки без видео. Эту ошибку можно разделить на 2 случая: некоторые видео недоступны для воспроизведения или в видео нет контента для воспроизведения.
Чтобы исправить эту ошибку:
1. Измените настройки межсетевого экрана (межсетевого экрана).
В некоторых случаях YouTube блокируется брандмауэром, что не позволяет воспроизвести видео. Поэтому вам нужно изменить настройки брандмауэра для доступа и просмотра видео на Youtube.
2. Временно отключите программу или блокировщик всплывающих окон.
10. Ошибка Youtube не работает
YouTube не работает? Может быть, у всех пользователей YouTube есть эта ошибка, или только у вас.
Если приложение не загружается, следующие шаги по устранению неполадок для Chrome, Android и iOS помогут YouTube снова работать.
Проверьте, не свернут ли YouTube
YouTube редко выходит из строя полностью, но это уже случалось раньше. Первое, что нужно проверить, — не связана ли проблема с самим YouTube, вместо того, чтобы пытаться найти субъективные причины.
В этом пользователям помогают два веб-сайта: downdetector.com и outage.report. Они собирают отчеты пользователей повсюду, сообщают вам, о каких проблемах сообщается и из какой точки мира.
Когда у YouTube слишком долгое «мертвое» время, информационные агентства также публикуют информацию об этом. Самый быстрый способ проверить это — зайти в Новости Google и найти такие фразы, как «YouTube свернут» или «YouTube не работает», либо перейти на сайт TipsMake.com.
Если вы точно знаете, что YouTube по-прежнему работает с другими пользователями, возможно, причина в вас. Давайте посмотрим на эти шаги по устранению неполадок!
Как исправить YouTube в Chrome
Если вы используете YouTube в настольной версии Chrome, выполните следующие действия, чтобы попытаться устранить неактивный YouTube.
1. Обновите Chrome.
Пользователи всегда должны использовать последнюю версию Chrome. Он обновится автоматически, но лучше еще раз активно проверить это.
Вставьте chrome: // settings / help в поле ввода URL-адреса и нажмите Enter. Пользователи увидят сообщение «Google Chrome обновлен». Если нет, нажмите «Обновить Google Chrome», а затем нажмите «Перезапустить».
2. Удалите файлы cookie и кеш.
Попробуйте очистить файлы cookie и кеш в Chrome, чтобы «очистить» браузер. Вставьте chrome: // settings / clearBrowserData в то место, где нужно ввести URL-адрес, и нажмите Enter.
В раскрывающемся списке Диапазон времени выберите Все время. Проверьте файлы cookie и другие данные сайта, а также кешированные изображения и файлы. Затем щелкните Очистить данные.
3. Отключить расширения.
Расширения могут вызвать проблемы совместимости с YouTube. Чтобы увидеть установленные расширения, вставьте chrome: // extensions / в URL-адрес и нажмите Enter.
Отключите каждое расширение по очереди, щелкнув ползунок, чтобы он стал серым. После отключения каждого расширения попробуйте еще раз зайти на YouTube и посмотреть, решена ли проблема. Если проблема решена, оставьте расширение отключенным и попробуйте связаться с разработчиком, чтобы узнать, могут ли они решить проблему.
4. Обновите видеодрайверы.
Если видеодрайвер «устарел», это может вызвать проблемы при воспроизведении видео. Попробуйте обновить драйвер, чтобы увидеть, решит ли он проблему. Для этого нажмите клавиши Windows + X и щелкните Диспетчер устройств.
Дважды щелкните адаптеры дисплея. Затем щелкните адаптер правой кнопкой мыши и выберите «Обновить драйвер». Щелкните Автоматический поиск обновленного программного обеспечения драйвера и следуйте инструкциям мастера.
5. Проверьте подключение к Интернету.
Даже если вы можете получить доступ к другим сайтам, это не значит, что с подключением к Интернету нет проблем. Возможно, он недостаточно стабилен для потоковой передачи YouTube. Используйте собственное средство устранения неполадок Windows 10 для обнаружения и устранения проблем.
Нажмите Windows + I, чтобы открыть Настройки. Выберите Обновление и безопасность> Устранение неполадок> Подключения к Интернету> Запустить средство устранения неполадок.
Если это не сработает, см. Статью на сайте TipsMake.com о 7 лучших инструментах устранения неполадок в сети, «спасающих» вашу домашнюю сеть, чтобы попробовать другие способы.
Как исправить YouTube на Android и iOS
Если вы используете YouTube на устройстве Android или iOS, например iPhone или iPad, попробуйте выполнить следующие действия по устранению неполадок.
1. Обновите операционную систему.
Ваша операционная система может быть устаревшей, и поэтому YouTube не может работать с ней должным образом.
На Android откройте «Настройки» и найдите «Обновление программного обеспечения» (или «Обновление системы»). Может быть в разделе «О телефоне». Если доступна новая версия, скачайте и установите ее.
В iOS перейдите в «Настройки»> «Основные»> «Обновление программного обеспечения», затем загрузите и установите обновление, если оно доступно.
2. Обновите приложение YouTube.
В приложении YouTube всегда должна быть установлена последняя версия, чтобы пользователи могли пользоваться новейшими функциями и исправлениями.
На Android откройте Play Store, смахните слева, чтобы открыть боковую панель, затем нажмите «Мои приложения и игры». Вы попадете на вкладку «Обновления». Любое приложение, которое требует обновления, будет в разделе «Ожидающие обновления». Если в этом разделе отображается YouTube, нажмите «Обновить».
3. Удалите данные YouTube и кеш.
Если вы какое-то время использовали приложение YouTube, возможно, накопился большой объем кеша и данных, что вызвало проблемы.
На Android выберите «Настройки»> «Приложения»> «YouTube»> «Хранилище». Нажмите Очистить кеш и посмотрите, решит ли это проблему. Если нет, вернитесь в этот раздел и нажмите «Очистить данные».
На iOS лучший способ сделать это — удалить приложение, а затем переустановить YouTube. Нажмите и удерживайте приложение на главном экране и нажмите Удалить. Затем перейдите в Play Store и снова загрузите YouTube.
4. Синхронизируйте дату и время.
У приложения YouTube могут возникнуть проблемы, если дата и время на устройстве пользователя не совпадают с сервером YouTube. Лучший способ решить эту проблему — разрешить сети автоматически обрабатывать обновления даты и времени.
На Android перейдите в «Настройки»> «Общее управление»> «Дата и время» и установите для параметра «Автоматическая дата и время» значение «Вкл.».
В iOS перейдите в «Настройки»> «Основные»> «Дата и время» и установите для параметра «Автоматически» значение «Вкл.».
5. Проверьте подключение к Интернету.
YouTube может не работать, если подключение к Интернету нестабильно. На Android перейдите в «Настройки»> «Подключения». В iOS перейдите в Настройки.
Сначала включите и выключите режим полета (Flight mode). Часто это может обновить настройки сети и решить проблему. Затем попробуйте подключиться через Wi-Fi или телефонную сеть (любую сеть, которую вы используете по умолчанию). Если это не помогло, попробуйте выключить Bluetooth.
Если по-прежнему не работает, полностью сбросьте сетевое соединение. На Android выберите «Настройки»> «Общее управление»> «Сброс»> «Сбросить настройки сети». В iOS перейдите в «Настройки»> «Общие настройки»> «Сброс»> «Сбросить настройки сети».
После выполнения всех этих действий по устранению неполадок YouTube, скорее всего, вернется в нормальное состояние. Если нет, оставьте комментарии в разделе комментариев под этой статьей, чтобы сайт TipsMake.com вам помог!
Когда YouTube снова заработает, вы даже сможете сделать его еще круче с помощью расширений. Обратитесь к 5 утилитам, которые максимально используют YouTube для получения более подробной информации.
Удачи!
Узнать больше:
- Видео Youtube не воспроизводится, черный экран на Android, iOS, компьютере и Mac, вот как исправить ошибки
- Все ошибки на Youtube и как их исправить
- Исправить ошибки Flash при просмотре видео на YouTube