Гайд по моду [ProjectE]
(Equvialent Exchange 2)
(2 часть)
В этой части вы узнаете как пользоваться инструментами из ТёмнойКрасной материи, пьедесталом из тёмной материи и талисманамиамулетамикамнями.
Инструменты из Тёмной материи
( Никогда НЕ ломаются! )
Кирка из Тёмной материи.
Данная кирка имеет 4 режима работы: Стандартный (Обычная кирка)|| 3 блока в высоту || 3 блока в ширину || 3 блока в длинну. (Для переключения нажмите клавишу [Сменить Режим] ), также при нажатии [ПКМ] по руде, выкапывает всю руду данного типа, которая находится вплотную друг к другу.
Крафт:
Скрытый текст

Топор из тёмной материи.
Обычный топор, который имеет режим — Срубить все деревья площадью (11х11 || 21х21 ), для применения нажмите — [ПКМ]. Чтобы выбрать режим используйте кнопку [Разбег], для выключения [shift] + [Разбег].
Крафт:
Скрытый текст

Лопата из тёмной материи.
Обычная лопата, которая имеет режим — Копать травупесокгрязь областью 3х3х1, но если копать гравий, то добудет весь, в независимости от его колличества. Для применения используйте — [ПКМ]. Чтобы включить данный режим нажмите кнопку [Разбег], для выключения [shift] + [Разбег].
Крафт:
Скрытый текст

Меч из тёмной материи.
Обычный меч, который имеет режим — нанести урон враждебным мобам в области 1×1|| 3х3 || 6×6 блоков. Для увеличения радиуса нажми кнопку [Разбег], для уменьшения радиуса [shift]+[Разбег]. Чтобы применить данный режим нажмите кнопку [Доп.Функция].
Крафт:
Скрытый текст

Мотыга из тёмной материи.
Работает также как и обычная мотыга, но может за одно использование может вскопать большую область ( 1х1 || 3х3 || 5х5 ). Увеличение уменьшения радиуса так как и на других инструментах.
Крафт:

Ножницы из тёмной материи.
Позволяют подстричь всех овец в области ( 1х1 || 9х9 || 17х17 ), шерсть попадает сразу к вам в инвентарь.
Крафт:

Молот из тёмной материи.
Позволяет копать ( блоки которые может сломать кирка. Земля/гравия/песок и прочее — не копает) областью 1х1х1 || 3х3х2 || 5х5х3. Менять радиус действия, так же как и на других инструментах. Все добытые ресурсы складывает в сферу ( шарик черного цвета), чтобы забрать ресурсы из сферы, просто подойдите к ней. Для использования данной функции, нажмите [ПКМ] по блоку вокруг которого будет выкопано всё в определенной области.
Крафт:
Тёмный порошок:
Скрытый текст


Инструменты из Красной материи:
( Никогда НЕ ломаются! )
Кирка из красной материи.
Также как и кирка из тёмной материи может копать 4 режимами, но делает это быстрее.
Крафт:

Топор из красной материи.
Как и топор из тёмной материи срубает деревья в области, но область больше — (11х11 || 21х21 || 31×31 ), для применения нажмите — [ПКМ]. Чтобы выбрать режим используйте кнопку [Разбег], для выключения [shift] + [Разбег].
Крафт:

Лопата из красной материи.
Так же как и лопата из тёмной материи может копать область, но как и у всех предметов из красной материи, область эта будет больше. ( 1х1х1 || 3х3х1 || 5х5х1 || 7х7х1 ).
Крафт:

Меч из красной материи.
Так же как и меч из тёмной материи имеет дополнительную функцию но с увеличенным радиусом, а также появляется выбор ( убивать враждебных убивать всех ), менять режим так же как и у других инструментов. Ну и область действия дополнительной функции ( 1×1 || 3х3 || 6×6 || 9×9 ).
Крафт:

Мотыга из красной материи.
Может вскопать землю такими областями как ( 1х1 || 3×3 || 5×5 || 7×7 ). Увеличениеуменьшение радиуса так же как и всех инструментов.
Крафт:

Ножницы из красной материи.
Так же как и ножницы из тёмной материи подстригают всех овец, но имеют большую область работы ( 1х1 || 9х9 || 17х17 || 33х33 ).
Крафт:

Молот из красной материи.
Работает так же как и молот из тёмной материи, только имеет увелечинную площадь работы ( 1х1х1 || 3х3х3 || 5х5х3 || 7х7х4 ).
Крафт:

Красный катар.
Данный инструмент выполняет функцию сразу 4 инструментов из красной материи ( Меч || Топор || Ножницы || Мотыга ). Имеет разные режимы ( для убийств мобов ) убивать враждебных/ убивать всех. Также как и у всех инструментов из материи имеет возможность переключения радиуса действия. Менять режим и радиус действия, так как и на всех инструментах. Также стоит отметить , что дополнительная функция позволяет убить любого моба с одного использования (P.s Даже боссов из Galacticraft )
Крафт:

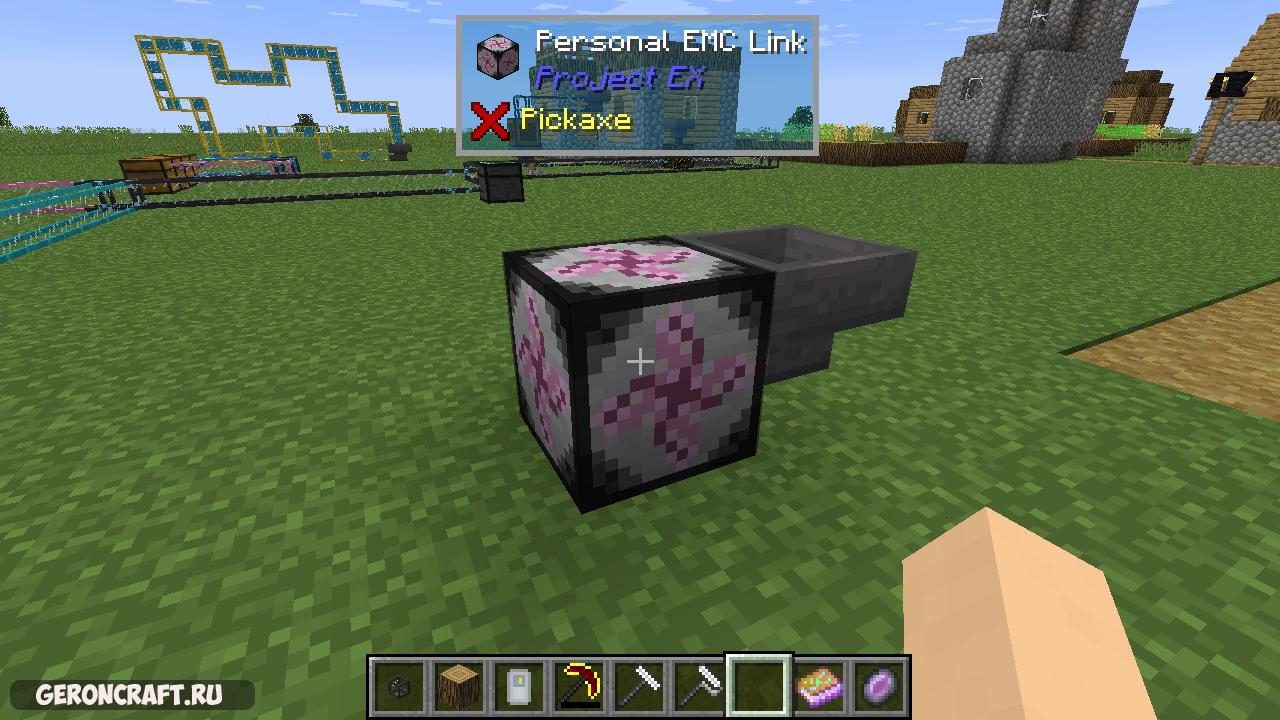
Самоцвет вечной плоти.
Позволяет мгновенно использовать накопленный ЕМС, для преобразования в ценный ресурс. К примеру из 256 булыжника, можно получить 1 слиток железа. Один булыжник имеет 1 ЕМС, один слиток железа имеет 256 ЕМС. Работа очень проста, вы выбираете предмет который хотите превращать в ЕМС — клавиша [Доп.Функция] > [White list], и поместите туда блоки которые вы хотите преобразовывать в ЕМС ( эти блоки будут автоматически попадать в самоцвет из вашего инвентаря и хранится в нем, до преобразования в ресурс). Чтобы выбрать ресурс в который вы хотите преобразовывать ЕМС нажмите на кнопку [Смена Режима].
Список всех возможных ресурсов:Позволяет мгновенно использовать накопленный ЕМС, для преобразования в ценный ресурс. К примеру из 256 булыжника, можно получить 1 слиток железа. Один булыжник имеет 1 ЕМС, один слиток железа имеет 256 ЕМС. Работа очень проста, вы выбираете предмет который хотите превращать в ЕМС — клавиша [Доп.Функция] > выбираете [White list] , и размещаете блоки которые вы хотите преобразовывать в ЕМС ( эти блоки будут автоматически попадать в самоцвет из вашего инвентаря и хранится в нем, до преобразования в ресурс). Чтобы выбрать ресурс в который вы хотите преобразовывать ЕМС нажмите на кнопку [Смена Режима].
Список всех возможных ресурсов:

Крафт:

Ртутное око.
Позволяет размножать любые блоки (Которые имеют ЕМС), используя энергию(ЕМС) накопленную в маленькой звезде. Есть 2 режима работы: стандартный — создаёт блоки на свободном месте, и режим трансмутации — заменяет блоки на тот который вы выбрали, поглащая их ЕМС для зарядки звезды. Для смены режима нажмите кнопку [Смена режима]. Также Ртутного око имеет разные радиусы работы ( 1х1х1 || 3х3х1 || 5х5х1 || 7х9х1 || 9x12x1 ) — если ставить блоки вертикально, ( 1x1x1 || 3x3x1 || 5x5x1 || 7x7x1 || 9x9x1 ) — если ставить блоки горизонтально. Чтобы увеличить радиус используйте кнопку [Разбег], чтобы уменьшить [shift] + [Разбег].
Для того чтобы открыть интерфейс Ртутного Ока, нажмите кнопку [Доп.Функции].
Крафт:
Скрытый текст

Интерфейс:
Скрытый текст

1 — слот для маленькой звезды
2 — слот для блока который вы хотите размножить.
Катализатор разрушения.
Разрушает любые блоки ( за исключением бедрока ) в определенной области ( 3х3х1 || 3х3х4 || 3x3x8 || 3x3x16 ). Для работы требуется энергия ЕМС. Поместите заряженную маленькую звезду в инвентарь, и катализатор будет работать до тех пор, пока звезда полностью не разрядится. Чтобы использовать просто нажмите [ПКМ] по блоку катализатором.
Предмет можно купить у торговца на /warp bank

Пьедестал из Тёмной материи.
На данный пьедестал можно устанавливать амулеты/камни/кольца, которые в последствии будут давать определенные эффекты, если находиться рядом с пьедесталом. Также может быть использован как обычный пьедестал — показывает предмет который размещаем на нём.
Чтобы открыть интерфейс пьедестала, следует навести на него курсор и нажать [shift] + [ПКМ].
Крафт:

Интерфейс:

1 — Слот для предмета || камня || амулета || кольца || талисмана.
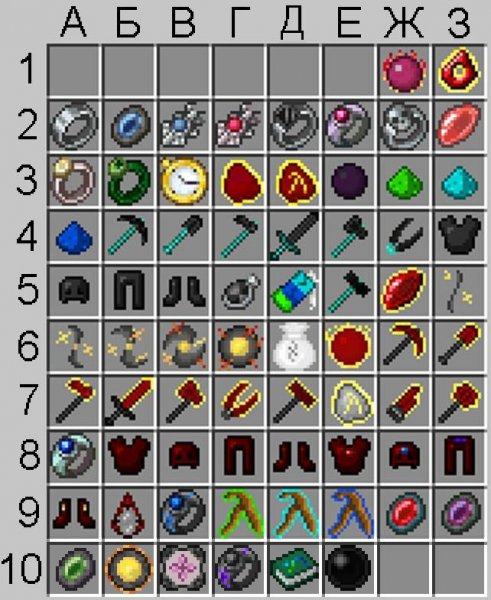
2 — камни || амулеты || талисманы которые можно сделать/купить.
КамниТалисманыАмулеты:
Камень тела.

Крафт:

Камень души.

Крафт:

Камень жизни.

Крафт:

Камень разума.

Данный камень может хранить в себе опыт, который вы потом сможете взять себе. Принцип работы прост, камень всасывает сферы опыта когда находится на пьедестале, затем вы берете камень себе в инвентарь и нажимаете [shift]+[ПКМ], до тех пор пока пока в камне не останется опыта. После чего снова можно установить камень на пьедестал.
Талисман восстановления.

Так же если носить талисман с собой, то он будет восстановить предметы которые находятся в инвентаре.
Талисман можно купить у торговца на /warp bank

Вулканический амулет.
Может создавать блок лавы в любом месте, а также может заполнять резервуары лавой, для использования [ПКМ] по пустому месту/ резервуару.
Для работы требует 32 ЕМС за одну операцию, значит нужно чтобы в инвентаре находилась заряженная маленькая звезда.
Амулет можно купить у торговца на /warp bank

|
|
This article is a work-in-progress. It may be finished in the near future, check its history to see previous edits. |
This is a community-written guide. It was written to help players to get accustomed to ProjectE.
Introduction
ProjectE is a remake of Equivalent Exchange 2 and is a magic mod that allows players to convert almost any item into energy, and convert that energy into almost any other item. At its core is the concept of Energy-Matter Covalence, or EMC. Almost every vanilla item, and many modded items, have an EMC value (which will show up on a tooltip). If an item has an EMC value, it can be converted into EMC and stored in a Transmutation Table or created from EMC energy stored in the Table.
EMC values for base items such as Coal and Stick have been set by the mod author. EMC values for compound items, such as a Torch are calculated from their ingredient. Items from many popular mods have also been included but support is far from universal. The mod config files allow for adjustments to EMC values.
Tooltip displaying EMC value of a vanilla item.
About this Guide
This guide is not an exhaustive description of items, nor a tutorial on using each item. It is a helping hand to get you started with ProjectE. Throughout this guide you’ll find links to named items. Be sure to explore these links for full details, descriptions and illustrations.
The foundation
- Start by making a Philosopher’s Stone. This handy-dandy item functions as a portable crafting station, portable furnace and transmutator of materials.

- Next, make a Transmutation Table and place it somewhere convenient. You get your Philosopher’s Stone back. The Transmutation Table can be picked up and relocated at any time. It will not forget its contents—transmutation lists are bound to players and can be accessed through any Table placed by any player.
- Put something with an EMC value in the «flames» slot. The item will be destroyed, converted to EMC and memorised by the table (signified by «learned» popping up in the middle of the interface.) Now try putting some other things in. You’ll see the table learn them and see your EMC storage increase. Items without an EMC value will not be destroyed.

- Click on the item’s icon to create one from stored EMC. Shift-click to get a whole stack (or as much as it can create with the stored EMC.)
- Do this with anything else you come across. With time, you’ll build up a store of EMC and a growing list of items that you can create using EMC.
- Make yourself an Alchemical Chest and use it to make an Alchemical Bag (or two or three!) These large-capacity magical bags will help greatly in your adventuring.

Generating EMC
Now you know how useful EMC can be, you’ll be wanting more of it! There are two ways of generating EMC, converting items and collecting it passively from light.
Converting items
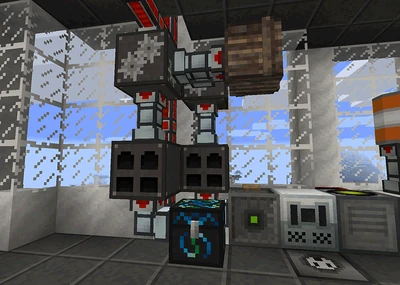
The Energy Condenser looks like a chest but converts any items put or piped into it into EMC . It will then create an item specified at the top from the stored EMC. Rather than simply trashing the mountains of dirt from your quarry, you might want to pipe them into an Energy Condenser. Note: Depending on your mod pack, ores may not have an EMC value. In this illustration, we see an ore-doubler / furnace chain feeding into an Energy Condenser where it is converted into an item with a high EMC value.
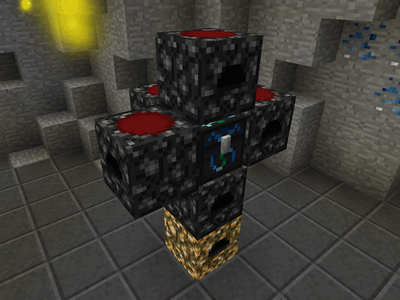
Passive EMC generation
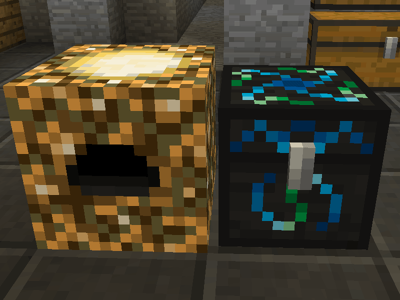
The Energy Collector absorbs light energy from its environment and converts it into EMC. There are three tiers of Energy Collector, each producing a higher amount of EMC per second.
Anti-Matter Relays are used to connect Energy Collectors to an Energy Condenser.
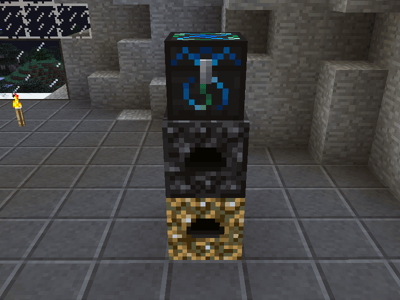
- Start with just a single Energy Collector MK1, placed adjacent to an Energy Condenser.
- Open the condenser and put a piece of Alchemical Coal in the top-left slot.
- Wait. You’ll see the EMC bar slowly climb. When it reaches 100%, a new piece of Alchemical Coal will be placed in the Condenser’s inventory. Congratulations! You’re now generating EMC without lifting a finger!
- Periodically clear out the Alchemical Coal and put it into your Transmutation Table.
- As you accumulate more EMC, make more Energy Collectors so you can gather EMC more quickly.
With time, your stored EMC will allow you to upgrade your machines to higher tiers, expand your setup and start producing fuels or materials with a higher EMC value. For example, start with making Alchemical Coal. Once you have a couple of MK2 or MK3 collectors, make Mobius Fuel or Aeternalis Fuel instead.
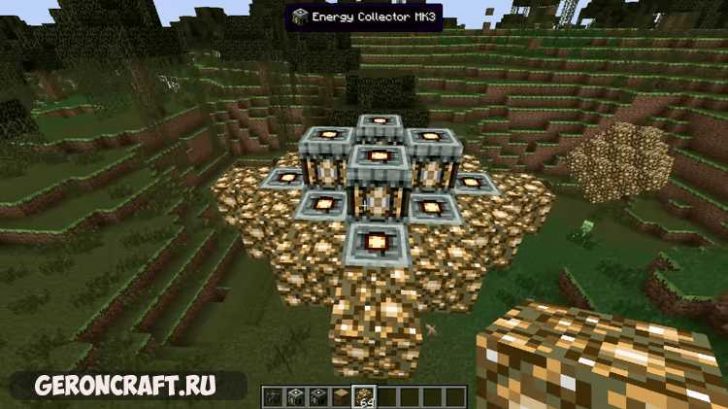
Once you have three or more Energy Collectors, you can think about building a «Power Flower».
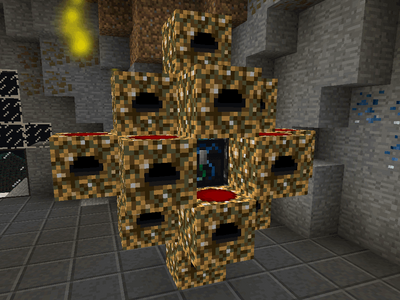
Power flowers
A Power Flower is the most compact way of arranging Collectors, Relays and Condensers. It is not the only way to set things up, and you don’t need to do it all at once. You can make just one «petal» of the flower with 3 or 4 Energy Collectors, one Anti-Matter Relay and one Energy Condenser, then add additional relays and petals as you have the EMC to expand. If you follow this pattern, you’ll get the best efficiency of cost and space.
Using the following pattern, 17 Energy Collectors can be linked via 5 Anti-Matter Relays to a single Energy Condenser. Any combination of machine tiers can be used but be sure to upgrade your Anti-Matter Relays to ensure you have enough capacity to handle the EMC energy flow. For example, 5 x Energy Collector MK1 or Energy Collector MK2 produce less than an Anti-Matter Relay MK1’s capacity of 64 EMC/s. However two Energy Collector MK3s produce a total of 80 EMC/s which means a MK1 relay is inadequate. Don’t worry about making too many of the one thing, you can just convert it back into EMC!
- Start by placing an Energy Collector. Then place an Anti-Matter Relay on top of the collector, and an Energy Condenser on top of the relay.

- Next, place a relay on the top, left, right and rear face of the Condenser. Leave the front face clear so you can get to the Condenser.
- Now place your remaining Energy Collectors so they are in contact with the Relays.
- Finally, open the Energy Condenser and specify what it should create with all this EMC.

Afterword
ProjectE offers a wide variety of utility items, baubles, tools and armor. Be sure to explore the navbar below to explore this mod further.
| v · d · eProjectE | ||||||||||||||||||||||||||||||||||
|---|---|---|---|---|---|---|---|---|---|---|---|---|---|---|---|---|---|---|---|---|---|---|---|---|---|---|---|---|---|---|---|---|---|---|
|
||||||||||||||||||||||||||||||||||
|
|
|
This article is a work-in-progress. It may be finished in the near future, check its history to see previous edits. |
This is a community-written guide. It was written to help players to get accustomed to ProjectE.
Introduction
ProjectE is a remake of Equivalent Exchange 2 and is a magic mod that allows players to convert almost any item into energy, and convert that energy into almost any other item. At its core is the concept of Energy-Matter Covalence, or EMC. Almost every vanilla item, and many modded items, have an EMC value (which will show up on a tooltip). If an item has an EMC value, it can be converted into EMC and stored in a Transmutation Table or created from EMC energy stored in the Table.
EMC values for base items such as Coal and Stick have been set by the mod author. EMC values for compound items, such as a Torch are calculated from their ingredient. Items from many popular mods have also been included but support is far from universal. The mod config files allow for adjustments to EMC values.
Tooltip displaying EMC value of a vanilla item.
About this Guide
This guide is not an exhaustive description of items, nor a tutorial on using each item. It is a helping hand to get you started with ProjectE. Throughout this guide you’ll find links to named items. Be sure to explore these links for full details, descriptions and illustrations.
The foundation
- Start by making a Philosopher’s Stone. This handy-dandy item functions as a portable crafting station, portable furnace and transmutator of materials.
- Next, make a Transmutation Table and place it somewhere convenient. You get your Philosopher’s Stone back. The Transmutation Table can be picked up and relocated at any time. It will not forget its contents—transmutation lists are bound to players and can be accessed through any Table placed by any player.
- Put something with an EMC value in the «flames» slot. The item will be destroyed, converted to EMC and memorised by the table (signified by «learned» popping up in the middle of the interface.) Now try putting some other things in. You’ll see the table learn them and see your EMC storage increase. Items without an EMC value will not be destroyed.
- Click on the item’s icon to create one from stored EMC. Shift-click to get a whole stack (or as much as it can create with the stored EMC.)
- Do this with anything else you come across. With time, you’ll build up a store of EMC and a growing list of items that you can create using EMC.
- Make yourself an Alchemical Chest and use it to make an Alchemical Bag (or two or three!) These large-capacity magical bags will help greatly in your adventuring.
Generating EMC
Now you know how useful EMC can be, you’ll be wanting more of it! There are two ways of generating EMC, converting items and collecting it passively from light.
Converting items
The Energy Condenser looks like a chest but converts any items put or piped into it into EMC . It will then create an item specified at the top from the stored EMC. Rather than simply trashing the mountains of dirt from your quarry, you might want to pipe them into an Energy Condenser. Note: Depending on your mod pack, ores may not have an EMC value. In this illustration, we see an ore-doubler / furnace chain feeding into an Energy Condenser where it is converted into an item with a high EMC value.
Passive EMC generation
The Energy Collector absorbs light energy from its environment and converts it into EMC. There are three tiers of Energy Collector, each producing a higher amount of EMC per second.
Anti-Matter Relays are used to connect Energy Collectors to an Energy Condenser.
- Start with just a single Energy Collector MK1, placed adjacent to an Energy Condenser.
- Open the condenser and put a piece of Alchemical Coal in the top-left slot.
- Wait. You’ll see the EMC bar slowly climb. When it reaches 100%, a new piece of Alchemical Coal will be placed in the Condenser’s inventory. Congratulations! You’re now generating EMC without lifting a finger!
- Periodically clear out the Alchemical Coal and put it into your Transmutation Table.
- As you accumulate more EMC, make more Energy Collectors so you can gather EMC more quickly.
With time, your stored EMC will allow you to upgrade your machines to higher tiers, expand your setup and start producing fuels or materials with a higher EMC value. For example, start with making Alchemical Coal. Once you have a couple of MK2 or MK3 collectors, make Mobius Fuel or Aeternalis Fuel instead.
Once you have three or more Energy Collectors, you can think about building a «Power Flower».
Power flowers
A Power Flower is the most compact way of arranging Collectors, Relays and Condensers. It is not the only way to set things up, and you don’t need to do it all at once. You can make just one «petal» of the flower with 3 or 4 Energy Collectors, one Anti-Matter Relay and one Energy Condenser, then add additional relays and petals as you have the EMC to expand. If you follow this pattern, you’ll get the best efficiency of cost and space.
Using the following pattern, 17 Energy Collectors can be linked via 5 Anti-Matter Relays to a single Energy Condenser. Any combination of machine tiers can be used but be sure to upgrade your Anti-Matter Relays to ensure you have enough capacity to handle the EMC energy flow. For example, 5 x Energy Collector MK1 or Energy Collector MK2 produce less than an Anti-Matter Relay MK1’s capacity of 64 EMC/s. However two Energy Collector MK3s produce a total of 80 EMC/s which means a MK1 relay is inadequate. Don’t worry about making too many of the one thing, you can just convert it back into EMC!
- Start by placing an Energy Collector. Then place an Anti-Matter Relay on top of the collector, and an Energy Condenser on top of the relay.
- Next, place a relay on the top, left, right and rear face of the Condenser. Leave the front face clear so you can get to the Condenser.
- Now place your remaining Energy Collectors so they are in contact with the Relays.
- Finally, open the Energy Condenser and specify what it should create with all this EMC.
Afterword
ProjectE offers a wide variety of utility items, baubles, tools and armor. Be sure to explore the navbar below to explore this mod further.
| v · d · eProjectE | ||||||||||||||||||||||||||||||||||
|---|---|---|---|---|---|---|---|---|---|---|---|---|---|---|---|---|---|---|---|---|---|---|---|---|---|---|---|---|---|---|---|---|---|---|
|
||||||||||||||||||||||||||||||||||
|

ProjectE является ремейком Equivalent Exchange 2 и представляет собой магический мод, который позволяет игрокам превращать практически любой предмет в энергию, и преобразовывать эту энергию практически в любой другой предмет. В его основе лежит концепция ковалентности энергии и вещества, или ЭМС. Почти каждый элемент из ванильного Майнкрафта и многие модифицированные элементы имеют значение EMC (которое будет отображаться во всплывающей подсказке). Если элемент имеет значение EMC, его можно преобразовать в EMC и сохранить в таблице преобразования или создать из энергии EMC, хранящейся в таблице.
Описание мода
Значения ЭМС для базовых предметов, таких как уголь и палка, были установлены автором мода. Значения ЭМС для составных изделий, таких как горелка, рассчитываются исходя из их ингредиентов. Также были включены элементы из многих популярных модов, но поддержка далека от универсальной. Конфигурационные файлы мода позволяют изменять значения EMC.

Об этом руководстве
В этом руководстве мы не сможем описать полностью все предметы или то, как ими пользоваться! Это скорее вступительный гайд для новичков, который поможет вам начать работу с ProjectE.
Основы
Начните с изготовления философского камня. Этот удобный предмет функционирует как портативная крафтовая станция, переносная печь и преобразователь материалов.
Затем составьте таблицу трансмутации и разместите ее в удобном месте. Игрок может забрать свой философский камень обратно. Таблица трансмутации может быть сломана и перемещена в любое время. Камень не забудет свое содержимое — списки трансмутаций привязаны к игрокам и могут быть доступны через любой стол, размещенный любым игроком.
Поместите что-нибудь со значением EMC в слот «Пламя». Элемент будет уничтожен, преобразован в EMC и сохранен в памяти с помощью таблицы (обозначается словом «Изучено», появляющимся в середине интерфейса).
Теперь попробуйте вставить еще что-нибудь. Элементы, не имеющие значения EMC, не будут уничтожены. Нажмите на значок элемента, чтобы создать его из сохраненных данных. Щелкните Shift, чтобы получить весь стак (или столько, сколько он может создать с помощью сохраненного EMC). Проделайте это со всем, с чем еще столкнетесь.
Со временем вы создадите хранилище EMC и увеличите список товаров, которые вы можете создавать с помощью EMC. Сделайте себе алхимический сундук и используйте его, чтобы сделать алхимический мешок (или два, а, может, и три!). Эти волшебные сумки большой емкости очень помогут вам в ваших приключениях.
Генерирующая ЭМС
Теперь вы знаете, насколько полезной может быть EMC, и вам захочется ее еще больше! Существует два способа генерирования электромагнитного излучения: преобразование элементов и пассивный сбор его из света.
Преобразование элементов
Энергетический конденсатор выглядит как сундук, но преобразует любые предметы, помещенные в него или переданные по трубопроводу, в электромагнитную совместимость. Затем он создаст элемент, указанный вверху, из сохраненного EMC. Вместо того чтобы просто выбрасывать горы грязи из шахты, вы можете поместить их в энергетический конденсатор.

Пассивная генерация электромагнитной совместимости
Коллектор энергии поглощает световую энергию из окружающей среды и преобразует ее в электромагнитную совместимость. Существует три уровня коллектора энергии, каждый из которых производит большее количество электромагнитных помех в секунду.
Реле антивещества используются для подключения коллекторов энергии к энергетическому конденсатору. Начните с одного коллектора энергии MK1, расположенного рядом с конденсатором энергии. Откройте конденсатор и положите кусочек алхимического угля в верхнюю левую щель. Подождите. Вы увидите, как медленно поднимается планка EMC. Когда она достигнет 100%, новый кусок алхимического угля будет помещен в инвентарь конденсатора. Теперь вы генерируете EMC, не пошевелив и пальцем! Периодически очищайте алхимический уголь и кладите его в свою таблицу трансмутации. По мере накопления ЭМС создавайте больше коллекторов энергии, чтобы быстрее собирать ЭМС.

Со временем сохраненная ЭМС позволит вам модернизировать свои машины до более высоких уровней, расширить настройки и начать производить топливо или материалы с более высоким значением ЭМС. Например, начните с изготовления алхимического угля. Как только у вас будет три или более коллектора энергии, вы можете подумать о создании «Цветка силы».
Цветы силы
Силовой цветок — это наиболее компактный способ размещения коллекторов, реле и конденсаторов. Это не единственный способ все настроить, и вам не нужно делать все это сразу. Вы можете сделать только один «лепесток» цветка с 3 или 4 коллекторами энергии, одним реле антивещества и одним конденсатором энергии, затем добавить дополнительные реле и лепестки по мере расширения. Если вы будете следовать этому гайду, то получите максимальную эффективность затрат и пространства.
Сервера Майнкрафт с модами на проекте MinecraftOM
Видео обзор
Установка для большинства лаунчеров
1. Скачайте мод нужной версии ниже
2. Загрузите и установите Minecraft Forge (в большинстве лаунчеров можно установить через лаунчер)
3. Загруженный мод не распаковывая, скопируйте в .minecraft/mods
4. Готово! Выберите в лаунчере Forge и запустите игру
1. Скачайте мод нужной версии ниже
2. Загрузите и установите Minecraft Forge (можно установить через лаунчер, но версии выше 1.12.2 недоступны)
3. Загруженный мод не распаковывая, скопируйте в .flauncher/clients/vanilla/minecraft/mods
4. Готово! Выберите в лаунчере Forge и запустите игру
Copy link Quote reply
Hi, i’m running a server for the ATLauncher pack Natural Magic, and there are a few modded items/blocks i’d like to add to the custom EMC list however my own coding skills are terrible, and i have no idea what information this code requires in order to sucseed. I was hoping someone wouldn’t mind either pointing me to a guide, or putting some examples here for me to copy or work from? I’d really appreciate it. Its mainly Thaumcraft and Ars Magica i’m looking to add items for, but it would obviously be useful for multiple mods to know how to have them have EMC values. Thanks in advance for any assistance offered.
Copy link Quote reply
First go into config ProjectE.cfg file and set both variables to true. So it looks like this:
B:»Show Ore-Dictionary names in tool-tips»=true
B:»Show unlocalized names in tool-tips»=true
Then get the OD name or UN name
then use command in game
/projecte_addEMC OD ingotCyanite 1020
with 1020 being the EMC you want the item to have.
Copy link Quote reply
Do these commands require a restart of a server to take effect? And thank you, i shall give it a try shortly.
Copy link Quote reply
The ingame commands do not require a restart but the config changes do.
Copy link Quote reply
I’ve set both values to true in the config and restarted my server, where will the OD and UN Names be displayed?
Copy link Quote reply
Search for the item in nei and mouse over it and the names will show in the item tooltip.
Copy link Quote reply
If i search for Thaumcraft shards in NEI and hover over i see «Air Shard 4115» followed by «Thaumcraft» as the mod, i’m guessing neither of those are the values i’m looking for as i’m fairly sure they showed up before.
Copy link Quote reply
no, air shard is OD shardAir
so you would type
/projecte_addEMC OD shardAir 256
if you want it to be worth 256 emc.
not sure why your not showing the un and od names if you set the configs right.
You can probably figure out the other shards (shardWater shardFire ETC..) but you
will need the configs to work to figure out others.
Did you remember to save the config file after you changed the values? Did you save it to the same place you opened it from? If so not sure why its not working.
Copy link Quote reply
Yeah i’ve double checked on the server, but i’ll restart the server and PC again and try once more, could it be related to WAILA?
Copy link Quote reply
no I have waila installed also. You should be able to mouse an item in nei or in your inventory and it will say
Air Shard 4362
UN: Thaumcraft:ItemShard
OD: shardAir
Thaumcraft
Did you enter that command and did it work?
Did you change the configs in both the server and your local configs?
Copy link Quote reply
Not my local ones no, That might have made more sense. I’ll try that quickly.
Copy link Quote reply
Managed to get them to display and added the code for the Chocobo feather from Chococraft using the items UN. Got the green text to say it had been added, but when i tried to test then with my tablet it still wasn’t a compatible item, i’ve restarted the server to see if that works.
Copy link Quote reply
Not sure what you mean by not compatible.
After you entered the command if you mouse over it again does it now show an EMC value?
Copy link Quote reply
Just tried with the air shard from thaumcraft which worked using the OD value, but using the UN value for the chocobo feather didn’t despite the green text message showing that both worked.
(By not compatible i mean it didn’t work, sorry poor way to describe the situation :D)
Copy link Quote reply
/projecte_addEMC UN chocoFeather 0 256
Not sure what choco feather UN name is actually called since i dont have it installed. Just replace that with the real UN for it and change 256 to whatever EMC you want it to cost again.
Copy link Quote reply
If you want an easy way to set EMC, download the latest Dev build (link in the main page).
Then, hold the item you want to add EMC to in your hand, and type the command /projecte_setEMC and the value you want.
Copy link Quote reply
WOW, you are the man dude. That is awsome.
Copy link Quote reply
how do you set ore dictionary entries in the dev version?
Автору эти координаты пригодятся для дальнейших разъяснений.
Если вы знаете английский, то после просмотра видео переходите к установке.
Эта сборка только и исключительно для версии Minecraft 1.2.5.
1) Вам необходимо скачать следующие файлы:
а) MinecraftForge 3.3.8.152 Эта программа необходимая для работы мода.
б) И сам мод
2) Зайти в папку с игрой:
C:Documents and SettingsAdminApplication Data.minecraft.
3) Заходим в папку «bin».
В ней находится файл minecraft.jar.
Правый щелчёк->Открыть с помощью->WinRAR archiver.
Находим папку META-INF и удаляем её. (ничего не закрываем).
4) Открываем MinecraftForge-3.3.8.152-Client.zip.
Перетаскиваем всё его содержимое в открытый вами minecraft.jar.
Закрываем minecraft.jar.
5) Запускаем Minecraft.
Ждём пока игра загрузится.
Выходим из игры.
6) В папке с игрой .minecraft должна появиться папка «mods».
Перетаскиваем в неё EE2ClientV1.4.6.6.jar.
7) Запускаем игру.
Создаём карту Creative Mode.
Если в инвентаре появились новые вещи — вы всё правильно сделали.
 Заходим в википедию мода смотрим рецепты.
9) Играем новую Survival с новыми возможностями.
Project EX [1.12.2]
Project EX — это дополнение к Project E, которое добавляет обновленные версии элементов PE.
ProjectE Recipe Difficulty Increase [1.12.2]
Увеличение сложности рецепта ProjectE. Этот скрипт был создан с помощью CraftTweaker для использования в моем приложении:…
Equivalent Storage [1.12.2]
Эквивалентное хранение производится для усовершенствованного хранилища 1.6 или более нового и Project E 1.3.1 или новее….

Equivalent Integrations [1.12.2]
Существуют отдельные версии для ProjectE 1.3.0 (последняя стабильная версия) и 1.3.1B (последняя бета-версия). Пожалуйста, убедитесь, что…

Thaumic Equivalence [1.12.2] [1.8.9] [1.7.10]
Добавление к ProjectE и Thaumcraft! Все, что он делает, это добавляет EMC в предметы Thaumcraft. Не…

Progressive Alchemy [1.12.2]
Прогрессивная алхимия. Это мод, что добавляет несколько уровней Конденсаторов, каждый из которых ограничивает значение EMC. Количество…
Equivalent Energistics [1.12.2] [1.10.2] [1.7.10]
Equivalent Energistics — это мод, который добавляет компоненты, позволяющие вам добавить автокранирование с помощью Equivalent Exchange…
Expanded Equivalence [1.12.2]
Expanded Equivalence — Это аддон ProjectE. Этот аддон добавляет интеграцию для ProjectE и множество других модов….
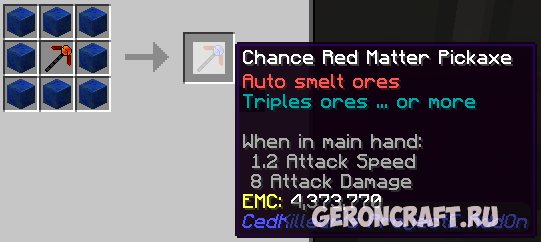
Ced Killeurs ProjectE AddOn [1.12.2]
CedKilleurs ProjectE AddOn — Мод добавляет две новых кирка, которые расширяют кирки ProjectE: Экстремальная темная маска…
ProjectE Aether Addon [1.7.10]
Добавляет новый контент, который соединяет ProjectE и Aether 2.