Overview of VHDX/VHD Corruption
VHD and VHDX files are recognized as two major virtual disk image file formats used to create a virtual environment of a Windows system. Similar to a physical hard disk drive, a VHD/VHDX file is vulnerable to corruption. As a consequence, the entire virtual machine file data becomes inaccessible. Therefore, knowing how to repair VHDX and recover data from corrupted VHDX files begins the main topic of this page.
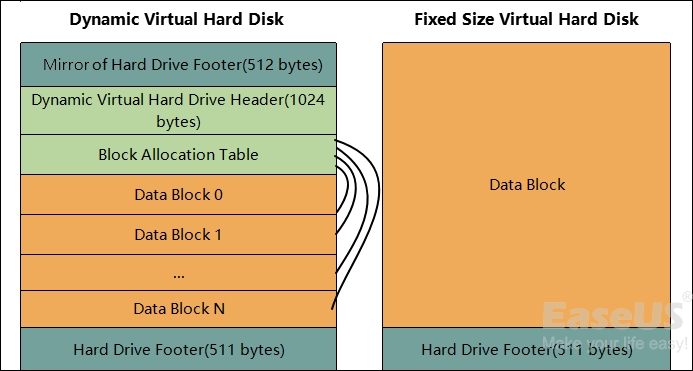
The issue of VHD corruption with data loss can be a nightmare for many users, so it’s important to know how to get corrupted VHD files back in Windows 10 or other Windows systems. Many of you are told to run VHD data recovery tools inside the virtual machine when data is in danger. But are those data files recoverable after the VHDX gets corrupted? We need to observe a little how the virtual hard disk is structured. Read from the Virtual Hard Disk specification (available here), and you can see that virtual hard disks have the following structure:
Can you recover data from corrupted VHD or VHDX files?
- If Virtual PC / Virtual Server / Hyper-V report that the virtual hard disk is corrupt – then one of the headers/footer sections has been corrupted – there is nothing you can do.
- If the virtual machine starts correctly – but then reports errors accessing the disk – run EaseUS Data Recovery Wizard inside the virtual machine.
How do you opt for VHDX repair solutions for different scenarios?
- If the HVD or VHDX image files are damaged or corrupted, being unable to be loaded, please get in touch with a local or online VHD repair center or the support team of your VHD manufacturer and ask them for help.
- If the VHD or VHDX image files are safe, try to reboot your virtual machine and check if you can visit your VHD or VHDX disks. If not, move on to follow Part 1 to restore important files on your virtual disk and run methods in Part 2 to repair the corrupted or unreadable virtual disk.
Part 1. Recover Corrupted VHD Files with VHD Data Recovery Tool
It is necessary for users to choose a professional data recovery tool to bring back their corrupted VHD files. Here we recommend EaseUS Data Recovery Wizard. It works effectively to help you restore all files from VHD or VHDX disk partition with simple clicks. Check the brilliant features of this data recovery software first.
- Recover corrupted and lost files and data in 3 steps.
- Recover files from emptied Recycle Bin, HDD/SSD, external hard drive, SD card, and more.
- Support users to preview recoverable files before actual recovery.
- 100% secure and works well on both Windows and Mac computers.
Download and install this VHD repair tool on your VM and apply the steps to restore your lost VHD files:
Step 1. Run EaseUS Data Recovery Wizard. Choose the drive where you lost files and start scanning. This software allows you to recover lost data from all devices, including HDD, SSD, USB drive, SD card, pen drive, camera, etc.

Step 2. Browse the full scan results. You can choose the file type you need by clicking on the file type filter. EaseUS data recovery software supports 1000+ file types like photos, videos, documents, emails, audio files, and many more.

Step 3. Select the files you want to preview. Click «Recover» and set a storage location to save the recovered data.

Part 2. Repair the Corrupted or Unreadable VHD/VHDX
After getting all data out of the unreadable virtual disk, you can now follow the VHDX repair part to repair and fix the corrupted VHD or VHDX:
Method 1. Run CHKDSK command to repair bad sectors on VHD
If bad sectors exist on your virtual disk, you may not be able to access all saved data or important files on the drive. CHKDSK command will effectively solve this issue and repair all bad sectors on VHD for you:
Caution: As the CHKDSK command will cause a permanent data loss error, ensure you recover all data from the VHD or VHDX drive with a reliable EaseUS Data Recovery Wizard first.
- Click Search and, type: cmd, hit «Enter» to bring up Command Prompt.
- Right-click Command Prompt and select «Run as administrator.»
- Type: chkdsk D: /f /r /x and hit «Enter».
By doing so, the CHKDSK command will automatically find and repair all existing errors, bad sectors, and even corrupted system files on your VHD disk.
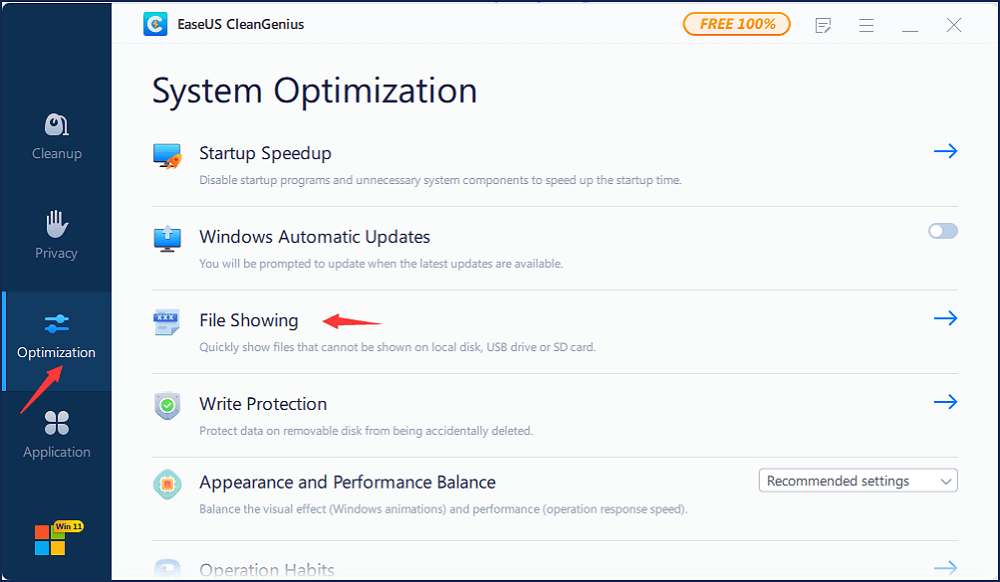
Use CHKDSK Alternative to Fix Problematic Device
Download EaseUS CleanGenius and install it on your computer. Let’s start checking and refixing file system error on your device now.
Step 1. Click «File Showing» to enter the next step.
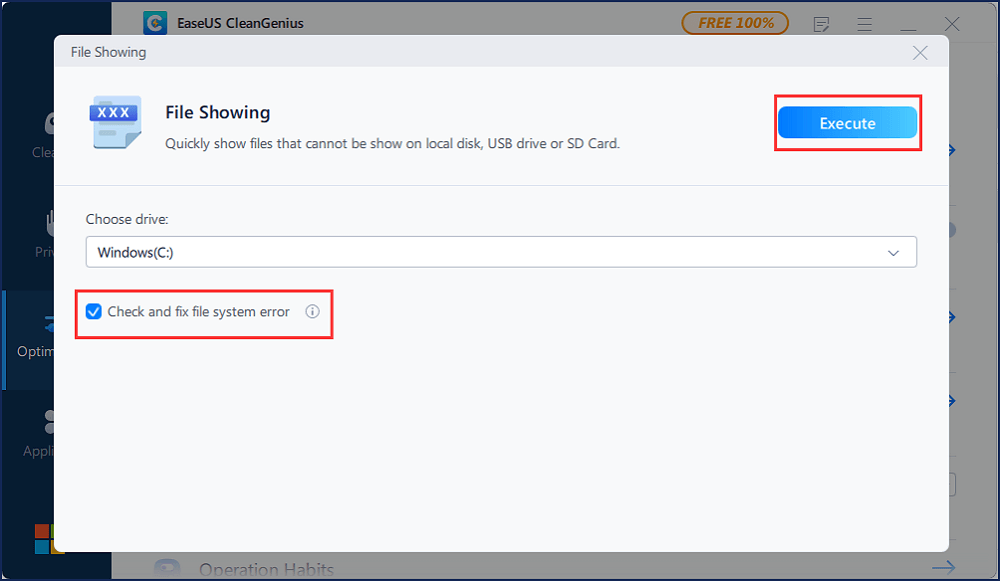
Step 2. Choose the target device and tick the box of «Check and fix file system error». Click «Execute» to start fixing the problematic device.
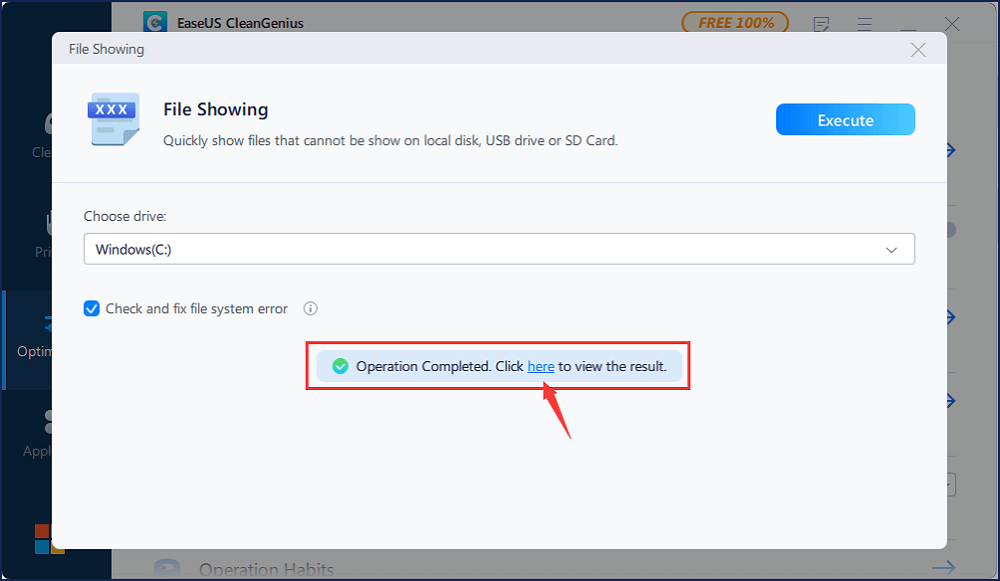
Step 3. When the fixing process completes, click «here» to open and use your device.
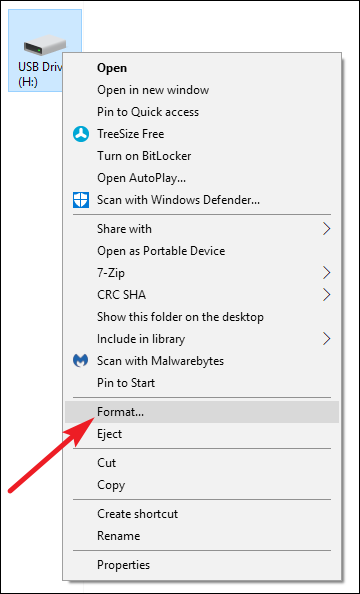
Method 2. Format VHD to NTFS file system
If the VHD disk is still not working, you can directly format the disk into the NTFS file system to make it work again:
- Open This PC on your virtual machine, find and right-click on the VHD disk, and select Format.
- Select NTFS as the file system of VHD that you want to format it to.
- Then click «OK» to confirm that you need to format the VHD to NTFS.
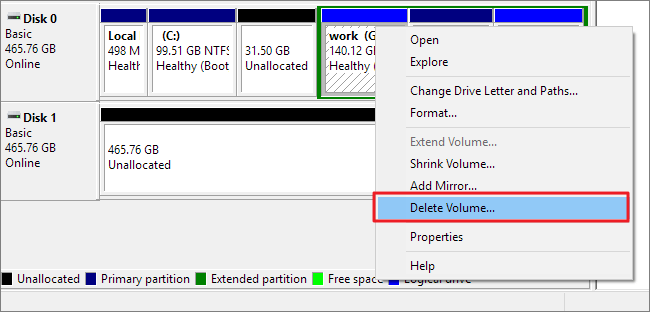
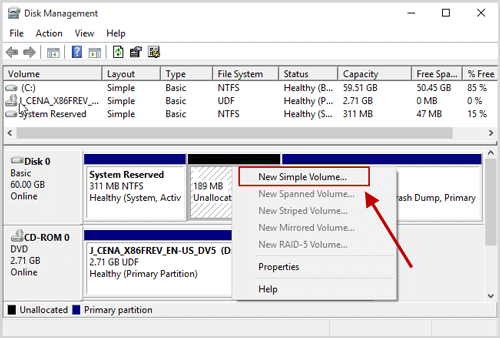
Method 3. Delete and create a new VHD partition
The last way you can try is to delete and create a new partition on your VHD disk.
- Right-click on This PC > Manage.
- Click Disk Management, find and right-click on the VHD disk partition, then select Delete Volume;
- Click Yes to confirm the deletion;
- Then right-click on the unallocated space on the VHD and select New Simple Volume;
- Assign the volume with a new drive letter, file system, and size, then follow the onscreen instructions to complete the process.
After this, you’ll get a brand new VHD partition, which you can use to save data again.
Still cannot solve the problem? If the provided methods don’t work, you may need a manual fix. Try to email the EaseUS Support team at [email protected] You’re not guaranteed a 100% working VHD/VHDX repair from there, but it seems the last resort when all the online workarounds cannot help.
VHDX Repair FAQs
1. How to recover the deleted VHD file?
Run EaseUS VHD recovery Software on your PC. Choose the partition drive where your VHD file was created, and click the Scan button. After a while, depending on how large the VHD file is, the software will automatically display the scanning results for you. Locate the VHD file you’re looking for and click the Recover button. You’re then able to recover the deleted VHD file successfully.
2. Is it possible to recover shift-deleted VHD data?
Using the Shift and Del/Delete keys to delete a file or bulk delete some files are said to be a permanent deletion. In this case, only the third-party data recovery software can scan and recover permanently deleted files from the VHD files.
Overview of VHDX/VHD Corruption
VHD and VHDX files are recognized as two major virtual disk image file formats used to create a virtual environment of a Windows system. Similar to a physical hard disk drive, a VHD/VHDX file is vulnerable to corruption. As a consequence, the entire virtual machine file data becomes inaccessible. Therefore, knowing how to repair VHDX and recover data from corrupted VHDX files begins the main topic of this page.
The issue of VHD corruption with data loss can be a nightmare for many users, so it’s important to know how to get corrupted VHD files back in Windows 10 or other Windows systems. Many of you are told to run VHD data recovery tools inside the virtual machine when data is in danger. But are those data files recoverable after the VHDX gets corrupted? We need to observe a little how the virtual hard disk is structured. Read from the Virtual Hard Disk specification (available here), and you can see that virtual hard disks have the following structure:
Can you recover data from corrupted VHD or VHDX files?
- If Virtual PC / Virtual Server / Hyper-V report that the virtual hard disk is corrupt – then one of the headers/footer sections has been corrupted – there is nothing you can do.
- If the virtual machine starts correctly – but then reports errors accessing the disk – run EaseUS Data Recovery Wizard inside the virtual machine.
How do you opt for VHDX repair solutions for different scenarios?
- If the HVD or VHDX image files are damaged or corrupted, being unable to be loaded, please get in touch with a local or online VHD repair center or the support team of your VHD manufacturer and ask them for help.
- If the VHD or VHDX image files are safe, try to reboot your virtual machine and check if you can visit your VHD or VHDX disks. If not, move on to follow Part 1 to restore important files on your virtual disk and run methods in Part 2 to repair the corrupted or unreadable virtual disk.
Part 1. Recover Corrupted VHD Files with VHD Data Recovery Tool
It is necessary for users to choose a professional data recovery tool to bring back their corrupted VHD files. Here we recommend EaseUS Data Recovery Wizard. It works effectively to help you restore all files from VHD or VHDX disk partition with simple clicks. Check the brilliant features of this data recovery software first.
- Recover corrupted and lost files and data in 3 steps.
- Recover files from emptied Recycle Bin, HDD/SSD, external hard drive, SD card, and more.
- Support users to preview recoverable files before actual recovery.
- 100% secure and works well on both Windows and Mac computers.
Download and install this VHD repair tool on your VM and apply the steps to restore your lost VHD files:
Step 1. Run EaseUS Data Recovery Wizard. Choose the drive where you lost files and start scanning. This software allows you to recover lost data from all devices, including HDD, SSD, USB drive, SD card, pen drive, camera, etc.
Step 2. Browse the full scan results. You can choose the file type you need by clicking on the file type filter. EaseUS data recovery software supports 1000+ file types like photos, videos, documents, emails, audio files, and many more.
Step 3. Select the files you want to preview. Click «Recover» and set a storage location to save the recovered data.
Part 2. Repair the Corrupted or Unreadable VHD/VHDX
After getting all data out of the unreadable virtual disk, you can now follow the VHDX repair part to repair and fix the corrupted VHD or VHDX:
Method 1. Run CHKDSK command to repair bad sectors on VHD
If bad sectors exist on your virtual disk, you may not be able to access all saved data or important files on the drive. CHKDSK command will effectively solve this issue and repair all bad sectors on VHD for you:
Caution: As the CHKDSK command will cause a permanent data loss error, ensure you recover all data from the VHD or VHDX drive with a reliable EaseUS Data Recovery Wizard first.
- Click Search and, type: cmd, hit «Enter» to bring up Command Prompt.
- Right-click Command Prompt and select «Run as administrator.»
- Type: chkdsk D: /f /r /x and hit «Enter».
By doing so, the CHKDSK command will automatically find and repair all existing errors, bad sectors, and even corrupted system files on your VHD disk.
Use CHKDSK Alternative to Fix Problematic Device
Download EaseUS CleanGenius and install it on your computer. Let’s start checking and refixing file system error on your device now.
Step 1. Click «File Showing» to enter the next step.
Step 2. Choose the target device and tick the box of «Check and fix file system error». Click «Execute» to start fixing the problematic device.
Step 3. When the fixing process completes, click «here» to open and use your device.
Method 2. Format VHD to NTFS file system
If the VHD disk is still not working, you can directly format the disk into the NTFS file system to make it work again:
- Open This PC on your virtual machine, find and right-click on the VHD disk, and select Format.
- Select NTFS as the file system of VHD that you want to format it to.
- Then click «OK» to confirm that you need to format the VHD to NTFS.
Method 3. Delete and create a new VHD partition
The last way you can try is to delete and create a new partition on your VHD disk.
- Right-click on This PC > Manage.
- Click Disk Management, find and right-click on the VHD disk partition, then select Delete Volume;
- Click Yes to confirm the deletion;
- Then right-click on the unallocated space on the VHD and select New Simple Volume;
- Assign the volume with a new drive letter, file system, and size, then follow the onscreen instructions to complete the process.
After this, you’ll get a brand new VHD partition, which you can use to save data again.
Still cannot solve the problem? If the provided methods don’t work, you may need a manual fix. Try to email the EaseUS Support team at [email protected] You’re not guaranteed a 100% working VHD/VHDX repair from there, but it seems the last resort when all the online workarounds cannot help.
VHDX Repair FAQs
1. How to recover the deleted VHD file?
Run EaseUS VHD recovery Software on your PC. Choose the partition drive where your VHD file was created, and click the Scan button. After a while, depending on how large the VHD file is, the software will automatically display the scanning results for you. Locate the VHD file you’re looking for and click the Recover button. You’re then able to recover the deleted VHD file successfully.
2. Is it possible to recover shift-deleted VHD data?
Using the Shift and Del/Delete keys to delete a file or bulk delete some files are said to be a permanent deletion. In this case, only the third-party data recovery software can scan and recover permanently deleted files from the VHD files.
It is probably a safe bet that the VHD and VHDX files in a Hyper-V environment are incredibly important. If the file isn’t where you expect it to be or if there is a problem with it, Hyper-V won’t be very happy. Typically when a virtual machine is running if there is a problem with a disk file you’ll know right away. But perhaps you have a library of virtual machines that aren’t always online. It would be better to know ahead of time if there is a problem by testing your VHD and VHDX files.
Here are some techniques using the PowerShell cmdlets in the Hyper-V 3.0 module.
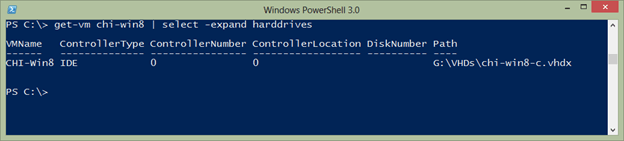
Getting VHD Paths
Finding the associated file paths with virtual machine is pretty simple. The virtual machine has a hard drives property which is a collection of hard drive objects.
PS C:> get-vm chi-win8 | select -expand harddrives
Or, you can use the Get-VMHardDiskDrive cmdlet.
PS C:> Get-VMHardDiskDrive chi-win8
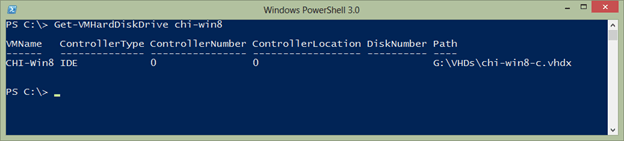
This works even better when used in a pipelined expression.
PS C:> get-vm chi* | Get-VMHardDiskDrive
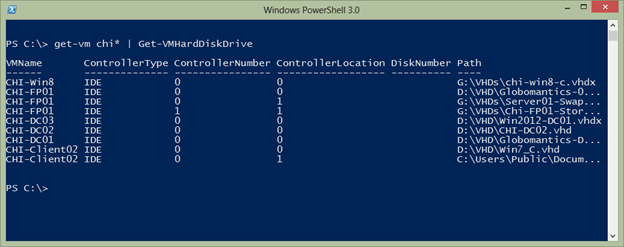
I could have gotten all virtual machines. You can see the path, but that is only the configuration. There is no way of knowing if the file even exists unless you start the virtual machine or test.
Testing Path
One test we can do is to use the Test-Path cmdlet. This is an easy way to verify a file or folder exists.
PS C:> test-path c:windows
True
To use with the Hyper-V cmdlets takes a little more because we need to get the Path property.
PS C:> Get-VMHardDiskDrive chi-fp01 | foreach { Test-path $_.path}
True
True
True
Or here’s a neat trick we can do in PowerShell 3.0.
PS C:> Test-Path (Get-VMHardDiskDrive chi-fp01).Path
True
True
True
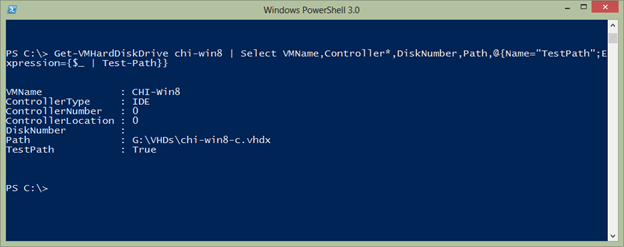
The downside here is that if a file couldn’t be found PowerShell would return False, but I wouldn’t know which file failed. One solution is to simply add the test as a custom property.
PS C:> Get-VMHardDiskDrive chi-win8 | Select VMName,Controller*,DiskNumber,Path,@{Name="TestPath";Expression={$_ | Test-Path}}
This should work as well on multiple virtual machines and those with multiple drives.
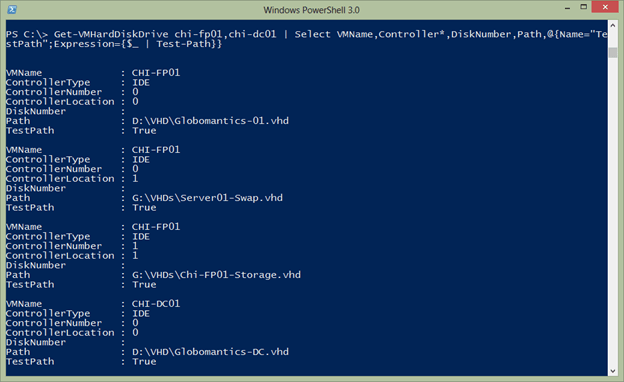
PS C:> Get-VMHardDiskDrive chi-fp01,chi-dc01 | Select VMName,Controller*,DiskNumber,Path,@{Name="TestPath";Expression={$_ | Test-Path}}
Let’s check all of my virtual machines and see if there are any problems:
PS C:> Get-VMHardDiskDrive * | Select VMName,Controller*,DiskNumber,Path, @{Name="TestPath";Expression={$_ | Test-Path}} | where {-Not $_.TestPath}

Because of PowerShell’s object-based nature, this is a one-line command and now I can see where I have a problem.
But verifying the path is only half the battle. The file might exist but it might be corrupted or in the case of a differencing disk there may be an issue with the chain of disks. We can accomplish this with Test-VHD from the Hyper-V PowerShell module. It is as simple to use as this.
PS C:> Get-VMHardDiskDrive chi-win8 | test-vhd
True
PS C:> Get-VMHardDiskDrive chi-fp01 | test-vhd
True
True
True
If there is a failure PowerShell will tell you and display the error.

Like Test-Path it is hard to tell what file goes with the result unless there is a problem. So we can expand our earlier pipelined expression.
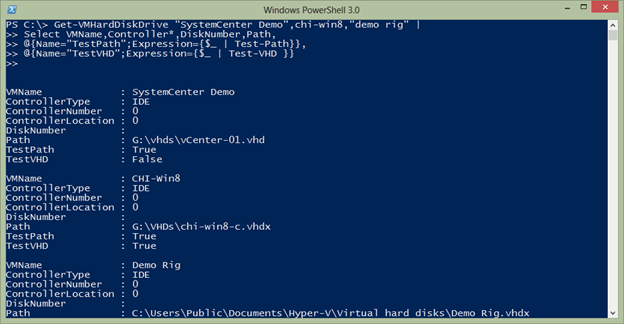
PS C:> Get-VMHardDiskDrive "SystemCenter Demo",chi-win8,"demo rig" | Select VMName,Controller*,DiskNumber,Path, @{Name="TestPath";Expression={$_ | Test-Path}},@{Name="TestVHD";Expression={$_ | Test-VHD }}
Or I can filter for test failures as I did before. If this is something I wanted to use often, I’d turn it into a PowerShell function.
#requires -version 3.0

Function Test-VHDIntegrity {

<#
.Synopsis
Test VHD files for integrity
.Description
Test the drive files for a Hyper-V virtual machine and verify the specified
file exists and that there are no problems with it.
.Example
PS C:> Get-VM | Test-VHDIntegrity | Out-Gridview
.Example
PS C:> Get-VM | Test-VHDIntegrity | where {(-NOT $_.TestPath) -OR (-NOT $_.TestVHD)}
.Link
Test-Path
Test-VHD
#>

[CmdletBinding()]

Param (
 [Parameter(Position=0,Mandatory,
 ValueFromPipelineByPropertyName,
 ValueFromPipeline)]
 [alias("vmname","name")]
 [ValidateNotNullorEmpty()]
 [object[]]$VM
)
Process {
#write-verbose ($vm | out-string)
    foreach ($item in $VM) {
      Write-Verbose "Analyzing disks for $item"
      <#
      I intentionally omitted parameter names for
      Get-VMHardDiskDrive so that it can detect if it
      is processing a string or a virtual machine
      #>
      Get-VMHardDiskDrive $item |
      Select VMName,Controller*,DiskNumber,Path,
      @{Name="TestPath";Expression={$_ | Test-Path}},
      @{Name="TestVHD";Expression={$_ | Test-VHD }}
    } #foreach
}

} #end function
With this function loaded into my PowerShell session I can now run commands like this to identify problems:
PS C:> get-vm | Test-VHDIntegrity | where {(! $_.TestPath) -or (! $_.TestVHD)}
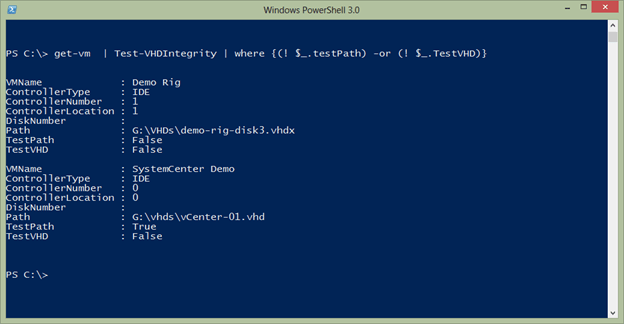
I retrieved all the virtual machines, and tested the drives with my function for each one, then I filtered out all the results except those where one of the tests failed. Now I can see which virtual machines I need to look at in more detail. As with all the PowerShell samples I post here, please review and test thoroughly in a non-production environment.
Summary
The health and integrity of your VHD and VHDX files are paramount in Hyper-V. With a little PowerShell it is easy to discover problems before they become major headaches. Of course, this is another scenario where having decent backups is critical so that if a file is found missing you can easily restore it.
Is it possible to fix a corrupted Hyper-V VHDX file? The answer is ‘Yes’.
But how you can do so? Let’s read this article till the end to know a few effective solutions to repair VHD files…
Hyper-V VHDX format is almost similar to a hard disk, it used to store the cherished information. Like physical hard drives, a VHD (virtual hard drive) is also prone to corruption and this makes trouble for users to access the data present on it.
Read further to know more…
- Part 1: What Causes the VHD/VHDX File Corruption Issue?
- Part 2: What To Do If VHD Get Corrupted Or Damaged?
- Part 3: How To Fix A Corrupted Hyper-V VHDX File?
- Part 4: Bottom Line
Well, there could be numerous reasons for Hyper V VHDX files corruption. Therefore, before moving ahead to know how to fix a corrupted Hyper-V VHDX file, have a look at the major factors behind the .vhd corruption.
Part 1: What Causes the VHD/VHDX File Corruption Issue?
There are many reasons due to which your VHD file becomes corrupted & unreadable. So, here are some of the major root causes that can lead to the .vhd corruption problem:
1. Failure Of The Storage Media
Because of the failure or corruption of storage media, your files become inaccessible and get damaged.
2. Virus Infection
The virus is one of the major reasons behind the VHD file corruption. When a system is attacked, it ruins the files on a system including VHD files.
3. Paused State Of Virtual Machines
If you don’t notice the early signs of the Virtual Machines (VM) failure or paused state of the Virtual Machines, it might lead to VHD file corruption.
4. Unexpected System Shutdown
Accidental/sudden closure of the PC can cause severe damage to the hardware and software of your computer. Moreover, if a Virtual Machine is active at that moment, then it can lead to the corruption or damage of VHD file.
5. Due To The Human Errors
Intentional/unintentional deletion of stored files, force shutdown of a system, registry modification errors, and inadequate disk management are some of the human errors that can damage VHDX files.
Part 2: What To Do If VHD Get Corrupted Or Damaged?
When you notice that your VHD gets corrupted, you need to first restore the data present on it.
However, you can recover deleted VHD/VHDX files by using the powerful VHD File Recovery Software. It is enough solution that provides better recovery of your valuable stuff.
The best thing about this program is that- it can help you in recovering deleted, formatted, or inaccessible media files from digital devices without any destruction.
And, it is a read-only program, 100% clean, safe & easy to use, and compatible with both the Windows & Mac OS.

* Free version of the program only scans and previews recoverable objects.
You just have to download & install this program and start performing the step-by-step guide. This software will surely help you to retrieve deleted virtual hard drives.
If your .vhdx or .vhd file gets corrupted and you’re not able to access it then you need trustworthy fixes to repair corrupt Hyper-V VHD files and make them healthy.
In this section, I’ll explain the six best ways to fix a corrupted Hyper-V VHDX file. Click out the below solutions right now:
Method #1: Repair Corrupt Hyper-V VHD Files by Creating The New Virtual Machine
Create a new VM and add a corrupted .vhd files to it. Then, compact an added virtual file and follow the below-given instructions:
Step 1: At first, create a fresh Virtual Server & add a new hard disk.
Step 2: Find & click on the Setting and load a .vhd file.
Step 3: Click on a virtual disk >> choose a Compact option >> click Next.
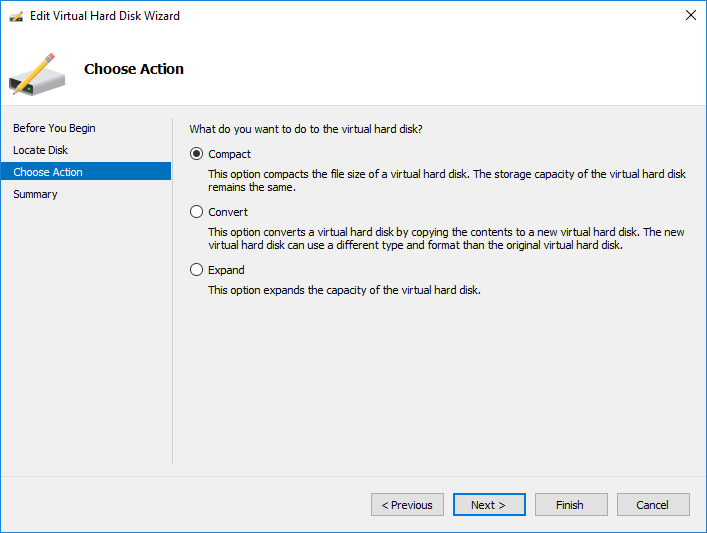
Step 4: Also, check to convert it to a fixed-size virtual hard disk option is selected or not. If not, then select it and move to the next step.
Step 5: Now you can save the resultant VHDX file with the same or new name.
Step 6: Once the VHD file is compacted copy the resultant file and mount it to the original server.
Please Note: – If your .vhd file is of 100 GB and you stored only 30 GB of data in it. Then the resultant VHD will be 30 GB in size.
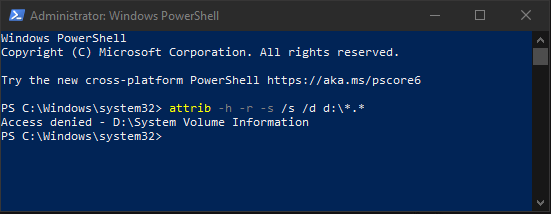
Method #2: Fix Corrupted VHD File With PowerShell
To repair corrupted VHD files, just open the Windows PowerShell as an Admin & try the below steps:
- Type Mount-VHD–path d:foldervdisk.vhdx –ReadOnly >> press the Enter.
- Next, you need to type the Optimize-VHD –path d:foldervdisk.vhdx– Mode Full >> hit Enter.
- Now, type the Dismount-VHD –path d:foldervdisk.vhdx& press the Enter (where d:foldervdisk.vhdx is a complete path of the corrupted VHD file.
Method #3: Run CHKDSK To Repair Bad Sectors On The VHD
Sometimes, it may happen that bad sectors present on your virtual disk can lead to .vhdx corruption due to which you are unable to access the data saved on a drive.
Thus, the CHKDSK command will easily solve this problem & repair all the bad sectors that exist on the VHD:
Step 1: Click on Search >> type the cmd >> hit the Enter option to open the Command Prompt.
Step 2: Type the diskpart >> press the “Enter” to open the DiskPart.
Step 3: After that, type the chkdsk D: /f /r /x >> press the “Enter“.
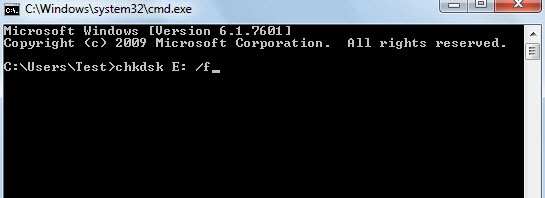
After doing so, a CHKDSK will automatically find & repair the bad sectors, existing errors, and even corrupted/damaged system files on your VHD disk.
Method #4: Delete & Create New VHDX Partition
Another method you could try to fix a corrupted Hyper-V VHDX file is to delete & create new partition on the VHDX hard disk.
- First, make a right-click on the option This PC and then tap on Manage.
- At this time, make a tap on Disk Management then find & right-click on a VHD disk partition >> select the Delete Volume.
- After that, click on Yes option to confirm a deletion.
- Right-click on an unallocated space on a VHD >> select the New Simple Volume.
- Then, assign a volume with the new drive letter to finish the process.
Once you completed the above steps, you will get a new VHDX partition & you can use it to save data again.
Method #5: Fix Hyper V VHDX Files With Inbuilt Utility
Microsoft offers an inbuilt utility with the help of which you can easily solve damaged VHDX files. Let’s follow the beneath easy steps to troubleshoot VHD file corruption issue:
Step 1: Firstly, you need to mount a VHDX file with a parent partition
Step 2: In the second step, use the CHKDSK to resolve the issue.
Step 3: Next, check the integrity of a VHDX using the Hyper-V VM (virtual machine).
Step 4: Then, you need to Add a VHDX file to IDE controller >> choose the option Inspect.
Step 5: After this, simply merge any of the VHD files. They need to verify if it can be opened by Windows 7, server 2008.
Step 6: Now, download a free VHD tool, it includes the “repair” option that is created to undo an expanding mode on a base VHDX when different VHDs are available.
Method #6: Format The VHDX To NTFS File System
Last but not the least, if the above five fixes don’t work for you to repair VHD files then you can format a disk into the NTFS file system to make it accessible:
- Just open My Computer or This PC on your VM (virtual machine)
- Find & make right-click on the virtual hard disk >> select the Format.
- Choose the NTFS as a file system of the VHD which you need to format.
- Now, click on the “OK” in order to confirm it and format VHD to NTFS.
FAQ:
How Do I Repair A VHDX File?
You can repair corrupt VHDX files by using any of the solutions mentioned above in this blog.
Is It Possible to Recover Shift Deleted VHD File?
Yes, of course, it is possible to recover normal deleted or shift deleted VHD files with the help of the VHD File Recovery software mentioned here.
Part 4: Bottom Line
While accessing a VHD file, you may face the corruption problem. This issue can take place because of server downtime, network connectivity on the virtual machine.
However, in the above section of this blog, I have covered each and every possible solution on how to fix a corrupted Hyper-V VHDX file easily.
Ultimate Suggestion: Try the VHD Recovery tool to recover VHD/VHDX files before repairing the damaged VHD files.

Taposhi is an expert technical writer with 5+ years of experience. Her in-depth knowledge about data recovery and fascination to explore new DIY tools & technologies have helped many. She has a great interest in photography and loves to share photography tips and tricks with others.