From Proxmox VE
Jump to navigation
Jump to search
Proxmox VE is using the Linux network stack. This provides a lot of flexibility on
how to set up the network on the Proxmox VE nodes. The configuration can be done
either via the GUI, or by manually editing the file /etc/network/interfaces,
which contains the whole network configuration. The interfaces(5) manual
page contains the complete format description. All Proxmox VE tools try hard to keep
direct user modifications, but using the GUI is still preferable, because it
protects you from errors.
A vmbr interface is needed to connect guests to the underlying physical
network. They are a Linux bridge which can be thought of as a virtual switch
to which the guests and physical interfaces are connected to. This section
provides some examples on how the network can be set up to accomodate different
use cases like redundancy with a bond,
vlans or
routed and
NAT setups.
The Software Defined Network is an option for more complex
virtual networks in Proxmox VE clusters.
|
|
It’s discouraged to use the traditional Debian tools ifup and ifdown if unsure, as they have some pitfalls like interupting all guest traffic on ifdown vmbrX but not reconnecting those guest again when doing ifup on the same bridge later. |
Apply Network Changes
Proxmox VE does not write changes directly to /etc/network/interfaces. Instead, we
write into a temporary file called /etc/network/interfaces.new, this way you
can do many related changes at once. This also allows to ensure your changes
are correct before applying, as a wrong network configuration may render a node
inaccessible.
Live-Reload Network with ifupdown2
With the recommended ifupdown2 package (default for new installations since
Proxmox VE 7.0), it is possible to apply network configuration changes without a
reboot. If you change the network configuration via the GUI, you can click the
Apply Configuration button. This will move changes from the staging
interfaces.new file to /etc/network/interfaces and apply them live.
If you made manual changes directly to the /etc/network/interfaces file, you
can apply them by running ifreload -a
|
|
If you installed Proxmox VE on top of Debian, or upgraded to Proxmox VE 7.0 from an older Proxmox VE installation, make sure ifupdown2 is installed: apt install ifupdown2 |
Reboot Node to Apply
Another way to apply a new network configuration is to reboot the node.
In that case the systemd service pvenetcommit will activate the staging
interfaces.new file before the networking service will apply that
configuration.
Naming Conventions
We currently use the following naming conventions for device names:
-
Ethernet devices: en*, systemd network interface names. This naming scheme is
used for new Proxmox VE installations since version 5.0. -
Ethernet devices: eth[N], where 0 ≤ N (eth0, eth1, …) This naming
scheme is used for Proxmox VE hosts which were installed before the 5.0
release. When upgrading to 5.0, the names are kept as-is. -
Bridge names: vmbr[N], where 0 ≤ N ≤ 4094 (vmbr0 — vmbr4094)
-
Bonds: bond[N], where 0 ≤ N (bond0, bond1, …)
-
VLANs: Simply add the VLAN number to the device name,
separated by a period (eno1.50, bond1.30)
This makes it easier to debug networks problems, because the device
name implies the device type.
Systemd Network Interface Names
Systemd uses the two character prefix en for Ethernet network
devices. The next characters depends on the device driver and the fact
which schema matches first.
-
o<index>[n<phys_port_name>|d<dev_port>] — devices on board
-
s<slot>[f<function>][n<phys_port_name>|d<dev_port>] — device by hotplug id
-
[P<domain>]p<bus>s<slot>[f<function>][n<phys_port_name>|d<dev_port>] — devices by bus id
-
x<MAC> — device by MAC address
The most common patterns are:
-
eno1 — is the first on board NIC
-
enp3s0f1 — is the NIC on pcibus 3 slot 0 and use the NIC function 1.
Choosing a network configuration
Depending on your current network organization and your resources you can
choose either a bridged, routed, or masquerading networking setup.
Proxmox VE server in a private LAN, using an external gateway to reach the internet
The Bridged model makes the most sense in this case, and this is also
the default mode on new Proxmox VE installations.
Each of your Guest system will have a virtual interface attached to the
Proxmox VE bridge. This is similar in effect to having the Guest network card
directly connected to a new switch on your LAN, the Proxmox VE host playing the role
of the switch.
Proxmox VE server at hosting provider, with public IP ranges for Guests
For this setup, you can use either a Bridged or Routed model, depending on
what your provider allows.
Proxmox VE server at hosting provider, with a single public IP address
In that case the only way to get outgoing network accesses for your guest
systems is to use Masquerading. For incoming network access to your guests,
you will need to configure Port Forwarding.
For further flexibility, you can configure
VLANs (IEEE 802.1q) and network bonding, also known as «link
aggregation». That way it is possible to build complex and flexible
virtual networks.
Default Configuration using a Bridge

Bridges are like physical network switches implemented in software.
All virtual guests can share a single bridge, or you can create multiple
bridges to separate network domains. Each host can have up to 4094 bridges.
The installation program creates a single bridge named vmbr0, which
is connected to the first Ethernet card. The corresponding
configuration in /etc/network/interfaces might look like this:
auto lo
iface lo inet loopback

iface eno1 inet manual

auto vmbr0
iface vmbr0 inet static
        address 192.168.10.2/24
        gateway 192.168.10.1
        bridge-ports eno1
        bridge-stp off
        bridge-fd 0
Virtual machines behave as if they were directly connected to the
physical network. The network, in turn, sees each virtual machine as
having its own MAC, even though there is only one network cable
connecting all of these VMs to the network.
Routed Configuration
Most hosting providers do not support the above setup. For security
reasons, they disable networking as soon as they detect multiple MAC
addresses on a single interface.
|
|
Some providers allow you to register additional MACs through their management interface. This avoids the problem, but can be clumsy to configure because you need to register a MAC for each of your VMs. |
You can avoid the problem by “routing” all traffic via a single
interface. This makes sure that all network packets use the same MAC
address.

A common scenario is that you have a public IP (assume 198.51.100.5
for this example), and an additional IP block for your VMs
(203.0.113.16/28). We recommend the following setup for such
situations:
auto lo
iface lo inet loopback

auto eno0
iface eno0 inet static
        address  198.51.100.5/29
        gateway  198.51.100.1
        post-up echo 1 > /proc/sys/net/ipv4/ip_forward
        post-up echo 1 > /proc/sys/net/ipv4/conf/eno0/proxy_arp


auto vmbr0
iface vmbr0 inet static
        address  203.0.113.17/28
        bridge-ports none
        bridge-stp off
        bridge-fd 0
Masquerading (NAT) with iptables
Masquerading allows guests having only a private IP address to access the
network by using the host IP address for outgoing traffic. Each outgoing
packet is rewritten by iptables to appear as originating from the host,
and responses are rewritten accordingly to be routed to the original sender.
auto lo
iface lo inet loopback

auto eno1
#real IP address
iface eno1 inet static
        address  198.51.100.5/24
        gateway  198.51.100.1

auto vmbr0
#private sub network
iface vmbr0 inet static
        address  10.10.10.1/24
        bridge-ports none
        bridge-stp off
        bridge-fd 0

        post-up   echo 1 > /proc/sys/net/ipv4/ip_forward
        post-up   iptables -t nat -A POSTROUTING -s '10.10.10.0/24' -o eno1 -j MASQUERADE
        post-down iptables -t nat -D POSTROUTING -s '10.10.10.0/24' -o eno1 -j MASQUERADE
|
|
In some masquerade setups with firewall enabled, conntrack zones might be needed for outgoing connections. Otherwise the firewall could block outgoing connections since they will prefer the POSTROUTING of the VM bridge (and not MASQUERADE). |
Adding these lines in the /etc/network/interfaces can fix this problem:
post-up   iptables -t raw -I PREROUTING -i fwbr+ -j CT --zone 1
post-down iptables -t raw -D PREROUTING -i fwbr+ -j CT --zone 1
For more information about this, refer to the following links:
Linux Bond
Bonding (also called NIC teaming or Link Aggregation) is a technique
for binding multiple NIC’s to a single network device. It is possible
to achieve different goals, like make the network fault-tolerant,
increase the performance or both together.
High-speed hardware like Fibre Channel and the associated switching
hardware can be quite expensive. By doing link aggregation, two NICs
can appear as one logical interface, resulting in double speed. This
is a native Linux kernel feature that is supported by most
switches. If your nodes have multiple Ethernet ports, you can
distribute your points of failure by running network cables to
different switches and the bonded connection will failover to one
cable or the other in case of network trouble.
Aggregated links can improve live-migration delays and improve the
speed of replication of data between Proxmox VE Cluster nodes.
There are 7 modes for bonding:
-
Round-robin (balance-rr): Transmit network packets in sequential
order from the first available network interface (NIC) slave through
the last. This mode provides load balancing and fault tolerance. -
Active-backup (active-backup): Only one NIC slave in the bond is
active. A different slave becomes active if, and only if, the active
slave fails. The single logical bonded interface’s MAC address is
externally visible on only one NIC (port) to avoid distortion in the
network switch. This mode provides fault tolerance. -
XOR (balance-xor): Transmit network packets based on [(source MAC
address XOR’d with destination MAC address) modulo NIC slave
count]. This selects the same NIC slave for each destination MAC
address. This mode provides load balancing and fault tolerance. -
Broadcast (broadcast): Transmit network packets on all slave
network interfaces. This mode provides fault tolerance. -
IEEE 802.3ad Dynamic link aggregation (802.3ad)(LACP): Creates
aggregation groups that share the same speed and duplex
settings. Utilizes all slave network interfaces in the active
aggregator group according to the 802.3ad specification. -
Adaptive transmit load balancing (balance-tlb): Linux bonding
driver mode that does not require any special network-switch
support. The outgoing network packet traffic is distributed according
to the current load (computed relative to the speed) on each network
interface slave. Incoming traffic is received by one currently
designated slave network interface. If this receiving slave fails,
another slave takes over the MAC address of the failed receiving
slave. -
Adaptive load balancing (balance-alb): Includes balance-tlb plus receive
load balancing (rlb) for IPV4 traffic, and does not require any
special network switch support. The receive load balancing is achieved
by ARP negotiation. The bonding driver intercepts the ARP Replies sent
by the local system on their way out and overwrites the source
hardware address with the unique hardware address of one of the NIC
slaves in the single logical bonded interface such that different
network-peers use different MAC addresses for their network packet
traffic.
If your switch support the LACP (IEEE 802.3ad) protocol then we recommend using
the corresponding bonding mode (802.3ad). Otherwise you should generally use the
active-backup mode.
If you intend to run your cluster network on the bonding interfaces, then you
have to use active-passive mode on the bonding interfaces, other modes are
unsupported.
The following bond configuration can be used as distributed/shared
storage network. The benefit would be that you get more speed and the
network will be fault-tolerant.
Example: Use bond with fixed IP address
auto lo
iface lo inet loopback

iface eno1 inet manual

iface eno2 inet manual

iface eno3 inet manual

auto bond0
iface bond0 inet static
      bond-slaves eno1 eno2
      address  192.168.1.2/24
      bond-miimon 100
      bond-mode 802.3ad
      bond-xmit-hash-policy layer2+3

auto vmbr0
iface vmbr0 inet static
        address  10.10.10.2/24
        gateway  10.10.10.1
        bridge-ports eno3
        bridge-stp off
        bridge-fd 0

Another possibility it to use the bond directly as bridge port.
This can be used to make the guest network fault-tolerant.
Example: Use a bond as bridge port
auto lo
iface lo inet loopback

iface eno1 inet manual

iface eno2 inet manual

auto bond0
iface bond0 inet manual
      bond-slaves eno1 eno2
      bond-miimon 100
      bond-mode 802.3ad
      bond-xmit-hash-policy layer2+3

auto vmbr0
iface vmbr0 inet static
        address  10.10.10.2/24
        gateway  10.10.10.1
        bridge-ports bond0
        bridge-stp off
        bridge-fd 0
VLAN 802.1Q
A virtual LAN (VLAN) is a broadcast domain that is partitioned and
isolated in the network at layer two. So it is possible to have
multiple networks (4096) in a physical network, each independent of
the other ones.
Each VLAN network is identified by a number often called tag.
Network packages are then tagged to identify which virtual network
they belong to.
VLAN for Guest Networks
Proxmox VE supports this setup out of the box. You can specify the VLAN tag
when you create a VM. The VLAN tag is part of the guest network
configuration. The networking layer supports different modes to
implement VLANs, depending on the bridge configuration:
-
VLAN awareness on the Linux bridge:
In this case, each guest’s virtual network card is assigned to a VLAN tag,
which is transparently supported by the Linux bridge.
Trunk mode is also possible, but that makes configuration
in the guest necessary. -
«traditional» VLAN on the Linux bridge:
In contrast to the VLAN awareness method, this method is not transparent
and creates a VLAN device with associated bridge for each VLAN.
That is, creating a guest on VLAN 5 for example, would create two
interfaces eno1.5 and vmbr0v5, which would remain until a reboot occurs. -
Open vSwitch VLAN:
This mode uses the OVS VLAN feature. -
Guest configured VLAN:
VLANs are assigned inside the guest. In this case, the setup is
completely done inside the guest and can not be influenced from the
outside. The benefit is that you can use more than one VLAN on a
single virtual NIC.
VLAN on the Host
To allow host communication with an isolated network. It is possible
to apply VLAN tags to any network device (NIC, Bond, Bridge). In
general, you should configure the VLAN on the interface with the least
abstraction layers between itself and the physical NIC.
For example, in a default configuration where you want to place
the host management address on a separate VLAN.
Example: Use VLAN 5 for the Proxmox VE management IP with traditional Linux bridge
auto lo
iface lo inet loopback

iface eno1 inet manual

iface eno1.5 inet manual

auto vmbr0v5
iface vmbr0v5 inet static
        address  10.10.10.2/24
        gateway  10.10.10.1
        bridge-ports eno1.5
        bridge-stp off
        bridge-fd 0

auto vmbr0
iface vmbr0 inet manual
        bridge-ports eno1
        bridge-stp off
        bridge-fd 0
Example: Use VLAN 5 for the Proxmox VE management IP with VLAN aware Linux bridge
auto lo
iface lo inet loopback

iface eno1 inet manual


auto vmbr0.5
iface vmbr0.5 inet static
        address  10.10.10.2/24
        gateway  10.10.10.1

auto vmbr0
iface vmbr0 inet manual
        bridge-ports eno1
        bridge-stp off
        bridge-fd 0
        bridge-vlan-aware yes
        bridge-vids 2-4094
The next example is the same setup but a bond is used to
make this network fail-safe.
Example: Use VLAN 5 with bond0 for the Proxmox VE management IP with traditional Linux bridge
auto lo
iface lo inet loopback

iface eno1 inet manual

iface eno2 inet manual

auto bond0
iface bond0 inet manual
      bond-slaves eno1 eno2
      bond-miimon 100
      bond-mode 802.3ad
      bond-xmit-hash-policy layer2+3

iface bond0.5 inet manual

auto vmbr0v5
iface vmbr0v5 inet static
        address  10.10.10.2/24
        gateway  10.10.10.1
        bridge-ports bond0.5
        bridge-stp off
        bridge-fd 0

auto vmbr0
iface vmbr0 inet manual
        bridge-ports bond0
        bridge-stp off
        bridge-fd 0
Disabling IPv6 on the Node
Proxmox VE works correctly in all environments, irrespective of whether IPv6 is
deployed or not. We recommend leaving all settings at the provided defaults.
Should you still need to disable support for IPv6 on your node, do so by
creating an appropriate sysctl.conf (5) snippet file and setting the proper
sysctls,
for example adding /etc/sysctl.d/disable-ipv6.conf with content:
net.ipv6.conf.all.disable_ipv6 = 1
net.ipv6.conf.default.disable_ipv6 = 1
This method is preferred to disabling the loading of the IPv6 module on the
kernel commandline.
Disabling MAC Learning on a Bridge
By default, MAC learning is enabled on a bridge to ensure a smooth experience
with virtual guests and their networks.
But in some environments this can be undesired. Since Proxmox VE 7.3 you can disable
MAC learning on the bridge by setting the ‘bridge-disable-mac-learning 1`
configuration on a bridge in `/etc/network/interfaces’, for example:
# ...

auto vmbr0
iface vmbr0 inet static
        address  10.10.10.2/24
        gateway  10.10.10.1
        bridge-ports ens18
        bridge-stp off
        bridge-fd 0
        bridge-disable-mac-learning 1
Once enabled, Proxmox VE will manually add the configured MAC address from VMs and
Containers to the bridges forwarding database to ensure that guest can still
use the network — but only when they are using their actual MAC address.
Многие используют Proxmox VE как масштабированное решение для виртуализации и хранения данных со встроенным резервным копированием. Обычная проблема, с которой сталкиваются пользователи, особенно при большом количестве мобильных настроек, заключается в том, что веб-интерфейс Proxmox VE доступен на статическом IP-адресе, который обычно настраивается во время установки. В этом практическом руководстве мы рассмотрим простые способы внесения изменений и обсудим некоторые способы.
Это полезно при переносе физического сервера Proxmox VE в новую сеть.
Чтобы добавить некоторую сложность, мы предполагаем, что собираемся перейти в большее адресное пространство и, следовательно, изменим IP-адрес на другой адрес в этом пространстве. Мы сохраним тот же шлюз, но изменим маску сети. Кроме того, здесь мы сосредоточимся на основном IP-адресе веб-интерфейса управления, а не на адресах виртуальных машин и других уникальных настройках.
Текущий Proxmox VE (CPVE)
Вот текущая конфигурация:
CPVE IP: 192.168.1.3
CPVE Netmask: 255.255.255.0
CPVE Gateway: 192.168.1.1
Вкратце, по умолчанию Proxmox VE использует статический адрес во время установки. Это тот же адрес, который используется для доступа к интерфейсу веб-управления через порт 8006.
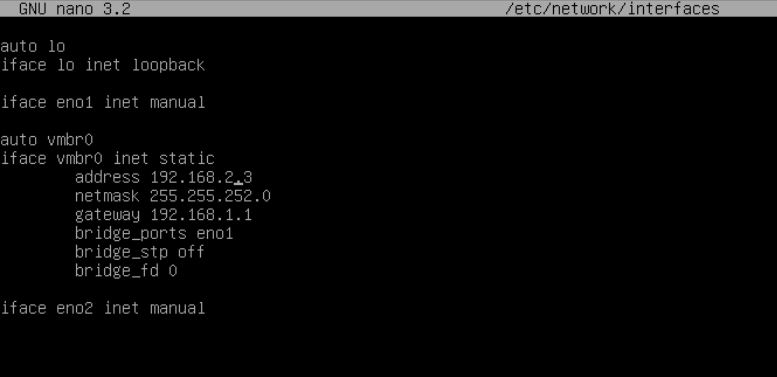
Будущее состояние Proxmox VE (FPVE)
Вот конфигурация будущего состояния:
FPVE IP: 192.168.2.3
FPVE Netmask: 255.255.252.0
FPVE Gateway: 192.168.1.1
Как видите, мы меняем IP-адрес на что-то за пределами исходной подсети. В результате нам надо поменять IP и подсеть.
Необязательно (но полезно) перед тем, как начать
Это не обязательно, но это хорошая практика. Мы показываем, как изменить важные системные файлы. Обычно рекомендуется сделать резервную копию существующего файла с помощью команды cp (copy).
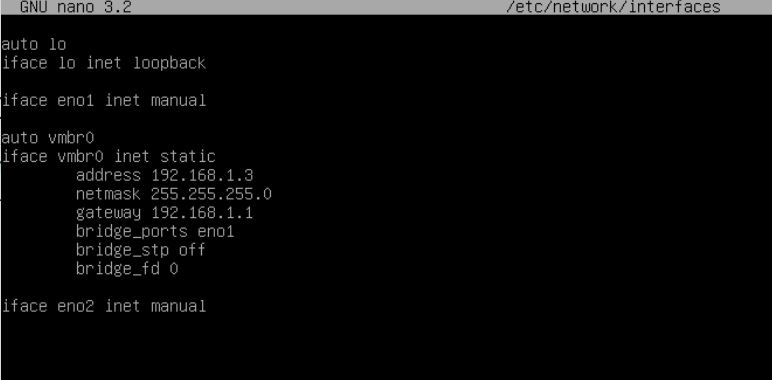
Изменение основного IP-адреса Proxmox VE
Во-первых, мы собираемся изменить /etc/network/interfaces.
Примечание: мы используем командную строку, потому что когда вы внесете не все изменения, веб интерфейс может стать не доступным, и вам все равно прийдется заходить на сервер через физическую или удаленную консоль и использовать терминал, чтобы завершить вносить изменения.
nano /etc/network/interfaces

Здесь у нас очень простая установка. eno1 — это наша управляющая сетевая карта, и мы видим мост vmbr0 с его статическим IP-адресом. Этот статический IP-адрес мы изменим на 192.168.2.3, а маску сети на 255.255.252.0, так как это большая сеть.

Вкратце, это небольшая тестовая система, которая была у нас в лаборатории, но она не настроена, как в обычной практике. Как правило, нам нравится настраивать сетевую карту, предназначенную для функций управления, и размещать ее в собственной сети. Вторая сеть используется для трафика виртуальных машин, который обычно представляет собой bridge/OVS, для которого мы не помещаем IP-адрес. Обычно у нас есть треть для трафика выделенного хранилища, особенно при использовании Ceph.
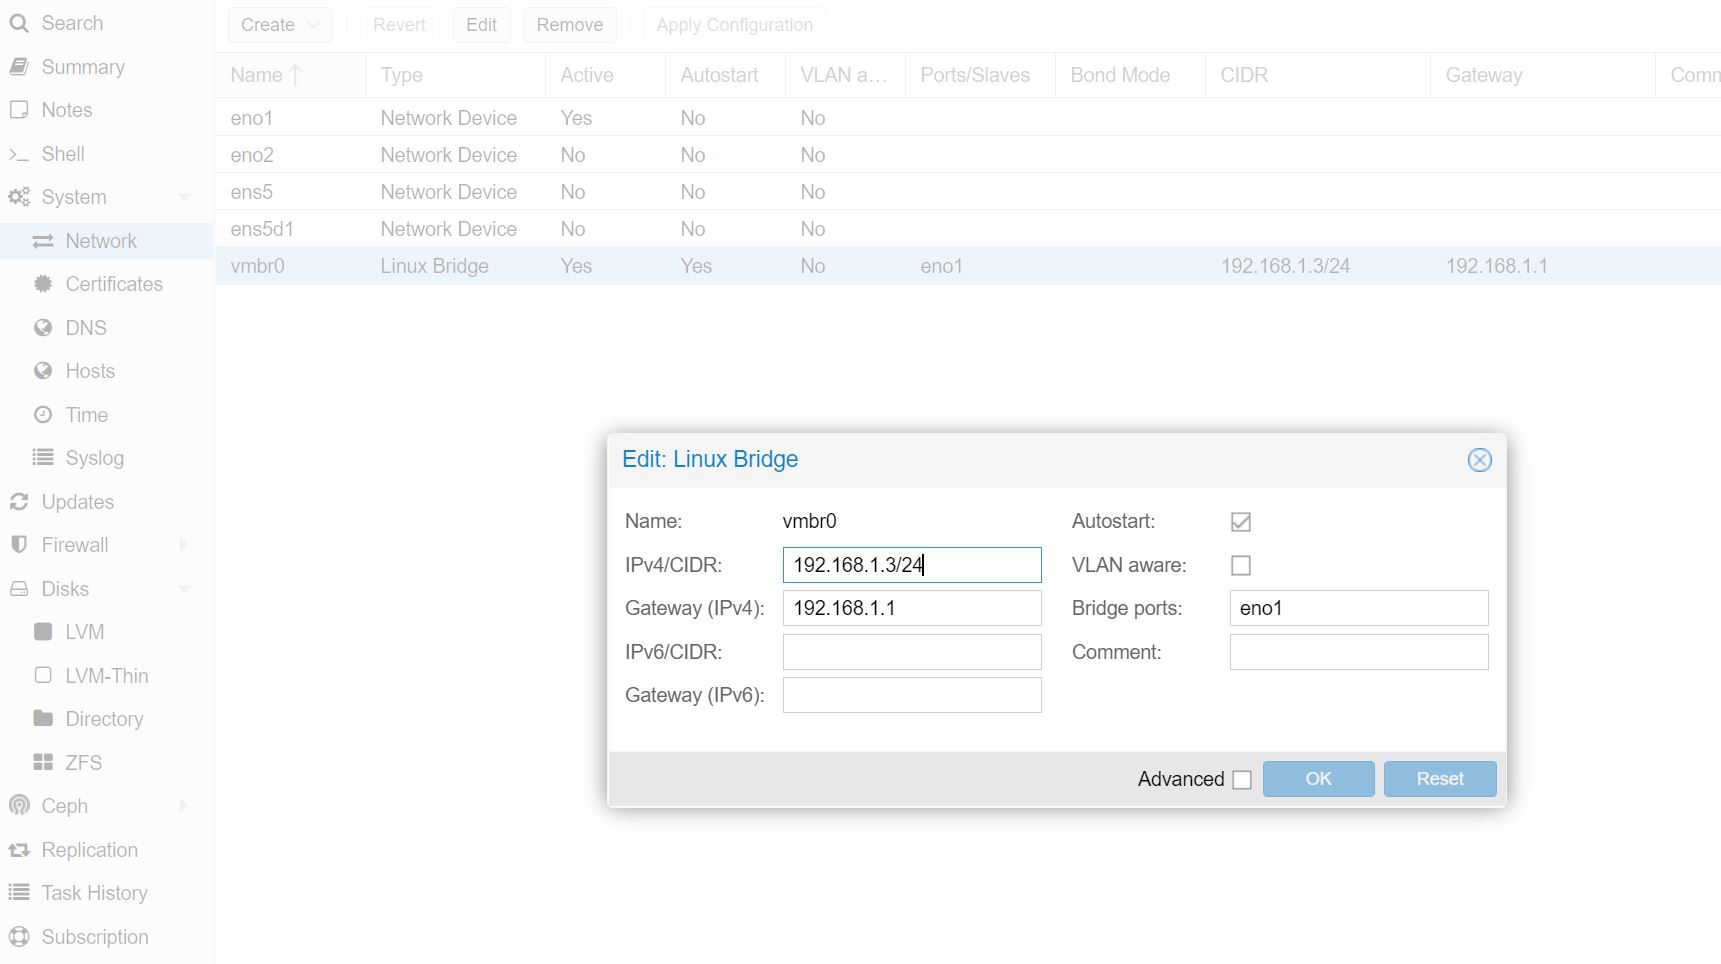
В веб-интерфейсе это связано с вкладкой PVE Host->System->Network, где мы можем увидеть Linux Bridge vmbr0 с портом eno1. Эту часть довольно легко настроить, если у вас есть доступ к веб-интерфейсу через графический интерфейс. Для информации: CIDR/24 соответствует маске сети 255.255.255.0.

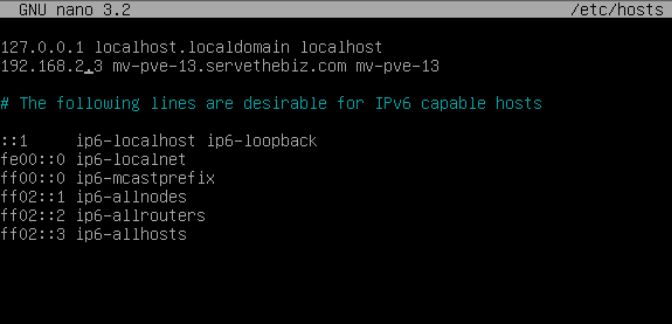
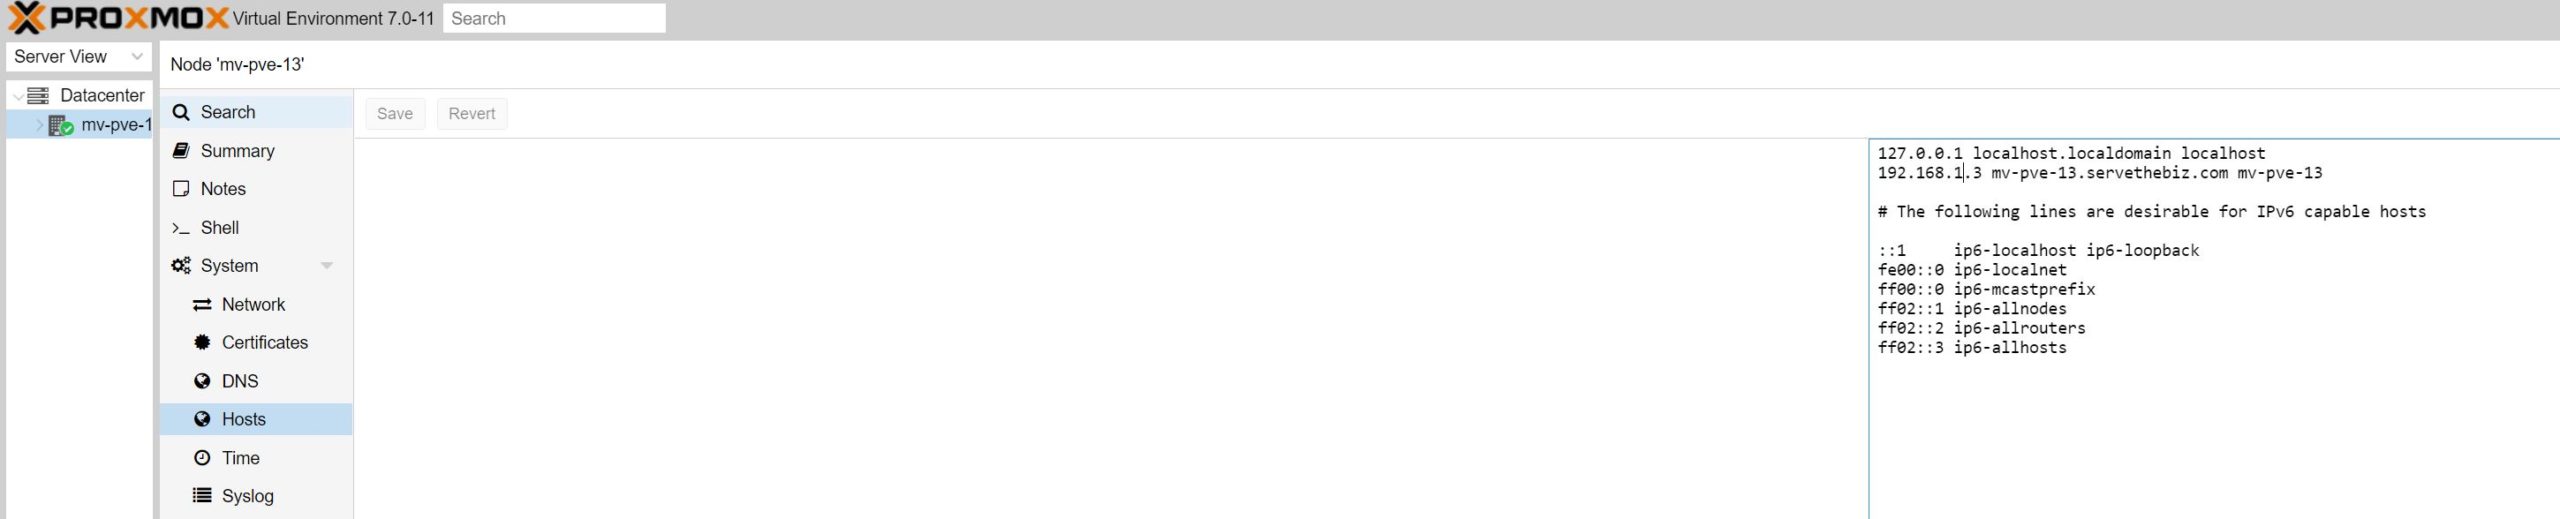
Некоторые руководства, скажут, что это все, что нужно сделать. Но есть еще один важный шаг, особенно если вы не хотите ошибок. Необходимо изменить файл хоста, в котором жестко задан IP-адрес. Это файл /etc/hosts. Для редактирования мы используем:
nano /etc/hosts
Вот состояние CPVE:
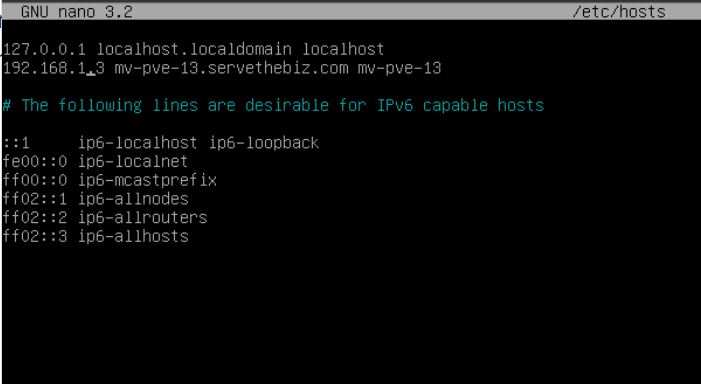
Вот измененное состояние FPVE:

Можно заметить, что здесь нет сетевой маски, только IP-адрес, поэтому в нашем примере мы видим изменение 1 на 2. Этот экран выглядит немного странно. Вы перейдете на вкладку PVE Host->System->Hosts, и то, что находится в файле выше, будет отображаться на экране.

Здесь вы щелкните область с IP-адресом, отредактируйте его, затем нажмите «Сохранить». Эта кнопка «Сохранить / Вернуть» загорится после того, как будет сделано редактирование.
Заключительные слова
В целом это довольно простой процесс. Proxmox VE очень мощный, и в его основе лежит Debian Linux. В результате многие функции, подобные этой, аналогичны другим дистрибутивам Linux на основе Debian. Тем не менее влияние наличия статического IP-адреса (что в целом является хорошей функцией) означает, что если хост Proxmox меняет сети, то веб-интерфейс, который многие используют для управления, будет недоступен.
Это тоже основной метод. Если кто-то делает что-то вроде изменения сети, в которой находится кластер Ceph, тогда IP-адрес узла кластера Ceph должен отличаться от этого IP-адреса, и его также необходимо изменить. В большинстве случаев для Ceph можно использовать другую сеть, но это хорошая причина для отделения основной сети управления от других функций хоста Proxmox.
1922911cookie-checkКак изменить основной IP-адрес Proxmox VE
Автор публикации

Ubuntu*Pack / ualinux.com
Комментарии: 1033Публикации: 956Регистрация: 10-06-2016

Many STH users utilize Proxmox VE as one can have a scale-up or scale-out virtualization and storage solution with integrated backup. A common challenge users face, especially with more mobile setups, is that the Proxmox VE web GUI is available on a static IP address generally set up during installation. In this how-to guide, we are going to cover the easy ways to make the change and discuss some ways to make things easier for yourself.
We are going to set an easy scenario. This is useful if one transfers the Proxmox VE server to a new network. Perhaps one is moving the physical Proxmox server to a new location, thus a new network. Another option is that the network will change as can happen with new IT shops or new service providers. We are going to use “Current Proxmox VE” or “CPVE” as the pre-move and “Future-state Proxmox VE” or “FPVE” as the network that the Proxmox VE server will be moved to.
To add some complexity so you can see more than IP address, we are going to assume that we are going to move to a larger address space and therefore will be changing the IP address to a different address in that space. We will keep the same gateway, but we will change the network mask or netmask. Also, we are going to focus on the main web interface/ management IP address here, not the addresses of VMs and other unique setups.
Current Proxmox VE
Here is the current configuration:
CPVE IP: 192.168.1.3
CPVE Netmask: 255.255.255.0
CPVE Gateway: 192.168.1.1
As a quick note here, by default, Proxmox VE uses a static address during installation. This is the same address as one uses to access the web management interface on port 8006.
Future-state Proxmox VE
Here is the future-state configuration:
FPVE IP: 192.168.2.3
FPVE Netmask: 255.255.252.0
FPVE Gateway: 192.168.1.1
As you can see, we are changing the IP address to something outside of the initial subnet. As a result, we changing IP and subnet.
Optional (but Useful) Before You Start
This is not a must-do, but it is something that is a good practice. We are showing how to change important system files. It is usually a good practice to copy the existing file into a backup location on the machine using the cp (copy) command.
Changing the Primary Proxmox VE IP Address
First, we are going to change /etc/network/interfaces and we will be using nano here since that is an easy text editor for quick changes like this. Note: we are using the command line here because if you change a Proxmox VE host without changing the networking, you are most likely going to need to login via a physical or remote console and use the CLI to change this. We will also show the easier to use web screens as well. Here is what we see when we type:
nano /etc/network/interfaces
Here we have a very simple setup. eno1 is our management NIC and we see the bridge vmbr0 with its static IP. This static IP we will change to 192.168.2.3 and the netmask to 255.255.252.0 since it is a bigger network.
As a quick aside, this is a small test system we had in the lab, but it is not setup as one would with a leading practice. Generally, we like to set up a NIC dedicated to management functions and put that on its own network. The second network is used for VM traffic which is usually its own bridge/ OVS that we do not put an IP address on. We usually will have a third for dedicated storage traffic, especially when using Ceph.
On the web interface, one can see this ties to the PVE Host -> System -> Network tab where we can see the vmbr0 Linux Bridge with the eno1 port. This part is fairly easy to set up if you have access to the web interface via the GUI here. The CIDR /24 corresponds to the 255.255.255.0 network mask if you want to learn more about that.
There are some guides that will say that this is all one needs to do. There is another important step, especially if you do not want errors. That is to change the host file which has the original IP address hard coded. This is the /etc/hosts file. To edit, we use:
nano /etc/hosts
Here is the CPVE state:

Here is the changed FPVE state:
One will notice that there is not a netmask here, only the IP address so we see the 1 change to 2 in our example. This screen looks a little odd. One will navigate to the PVE Host -> System -> Hosts tab and what is in the file above will display on the screen.
Here you will click into the area with the IP address, edit it, then click Save. That Save/ Revert button will light up after an edit has been made.
Final Words
Overall, this is a fairly simple process. Proxmox VE is very powerful and is Debian Linux underneath. As a result, a lot of the functionality, like this, is similar to other Debian-based Linux distributions. Still, the impact of having a static IP (which is overall a good feature) means that if a Proxmox host changes networks then the Web GUI many use for management will not be available. Hopefully, this guide becomes like our Directly Download an ISO to Proxmox VE for VM Creation or Initial Installation Checklist pieces (PVE 7 coming) where one can reference it in the future as needed.
This is also the basic method. If one does something such as changes a network that a Ceph cluster is on, then the Ceph cluster node IP should be something different than this IP address and will also need to change. Most times one would use another network for Ceph but that is a good reason to separate the main management network from the other functions of the Proxmox host.
Over time and business growth, majority online businesses tend to require more server resources. Ensuring high uptime is also very critical. To accomplish this, Proxmox cluster with fail-over setup helps.
But setting up clusters, configuring fail-over, performing IP updates, etc. may require changing the IP address of the existing Proxmox server that was set initially.
There may also be times you need to switch your IP blocks to another set, which usually happens during data center changes or network updates.
See how our server management team helps you!
In all these scenarios, the Proxmox server IP address will have to be changed to another IP. Today we’ll discuss how to change main IP address in Proxmox.
Steps to change IP address of Proxmox server
You can change the Proxmox node IP address in three simple steps as given here:
1. Lookup the current IP address in Proxmox console
To change IP address in Proxmox, go to the management console of Proxmox VE. You can access the console at https://IPaddress:8006/
You’ll see the server IP in the summary section.

Proxmox server IP address
To change the IP, go to the ‘proxmox node’ and choose option ‘Network’ and edit the ‘vmbr0’ section.

Edit ‘vmbr0’ to change IP address of Proxmox
2. Change the IP address of Proxmox node
Enter the new IP address in the ‘Edit’ window and click ‘OK’. Here we’re changing the IP address from 172.17.4.45 to 172.17.5.45.
The new IP address would be now shown in the ‘Network’ section:

New IP address shown in Proxmox
3. Change the IP address of Proxmox in hosts file
However, the above IP change will not yet reflect in the main Summary section. For that, we edit the ‘/etc/hosts’ file in the server and change the IP address.

Change Proxmox IP in /etc/hosts
Once the /etc/hosts is updated, Logout and Login to the Proxmox VE management console to see the new IP listed. If it doesn’t show, reboot the machine and check.

New Proxmox IP address in Summary
Today we saw the steps to easily change a Proxmox node IP address. To change the IP address, you need to first ensure that the new IP is available and bound to the server.
[ Managing your Proxmox server infrastructure doesn’t have to be hard, or costly. Get world class server virtualization management services at affordable pricing. ]
The gateway and the network interface for the new IP address should be mentioned correctly after checking the details in the server. Otherwise you’d get errors while adding the IP.
The hostname and DNS changes should also be made in cases where they are applicable. If you’d like to know how to do it for your servers, we’d be happy to talk to you.
var google_conversion_label = «owonCMyG5nEQ0aD71QM»;
Beginner here.
I setup PVE and I recall it asked me for a static IP address and hostname/domain name. I did set it up successfully but now I need to change it because I am changing the IP ranges in my LAN (let’s say I’m changing from 192.168.1.1/24 to 198.168.2.0/24 and thus I’m changing the IP from 198.1.1.100 to 198.1.2.100. The problem is that the IP address, the hostname and the domain are all hardcoded in Proxmox. And worse, I am not sure in how many places (although I really hope it’s only /etc/network/interface and /etc/hosts)
I read these two threads: https://www.reddit.com/r/homelab/comments/9hjcim/proxmox_dhcp_on_bridge_interface/ https://www.reddit.com/r/Proxmox/comments/9k1ns2/proxmox_change_ip_in_cmd_line/
Neither one actually solves the problem.
Here’s my /etc/network/interface:
root@pve:~# cat /etc/network/interfaces
auto lo
iface lo inet loopback

iface enp6s0 inet manual

auto vmbr0
iface vmbr0 inet static
    address 192.168.1.100
    netmask 255.255.255.0
    gateway 192.168.1.1
    bridge_ports enp6s0
    bridge_stp off
    bridge_fd 0

 iface eno2 inet manual
With the admin UI what I see for my pve datacenter in System | Network is the same basically and the UI doesn’t allow for DHCP.
Then the content of /etc/hosts (also available and editable via the GUI) is:
127.0.0.1 localhost.localdomain localhost
192.168.1.1000 pve.mylan pve
(plus some lines for IPv6) Clearly Proxmox wants you to have a static IP address and hostname and wants them hardcoded on the machine.
There’s a comment in the first thread above that says: «Some of proxmox services rely on the hostname in /etc/hosts to resolve to the correct IP address, you might screw something up if you get an other dhcp address than the one in your /etc/hosts file».
Fair enough, I suppose. What services are those though, and what do they rely on exactly?
Would it work if I just changed those /etc/hosts and /etc/network/interface to what I need them to be?
I have a couple of VMs that took some effort to build so I’d rather not reinstall ProxMox. Maybe there’s a way to dump & restore the setup somehow but right now I’m more interested if there’s a proper way to simply change the IP address, host and domain (since all 3 need to be changed in my case).
I’m also wondering why does ProxMox require such a rigid way of setting up the IP address. Why not let the DHCP take care of it, whether it’s static or dynamic. Does it have to do with what a hypervisor needs to provide to underlying VMs somehow? I about that, they aren’t supposed to be aware of the hypervisor, right?
 Настройка сетевой конфигурации системы виртуализации — одна из самых главных задач, она же вызывает наибольшие затруднения у начинающих. Поэтому начиная цикл статей о Proxmox мы сразу решили подробно разобрать этот вопрос. Тем более, что официальная документация довольно скупо освещает эту тему и может сложиться впечатление, что Proxmox ограничен в сетевых возможностях по сравнению с другими гипервизорами. Однако это не так, скорее даже наоборот, потому что перед нами открытое ПО и мы можем конфигурировать его именно так, как считаем нужным, даже если этих возможностей не было из коробки.
Научиться настраивать MikroTik с нуля или систематизировать уже имеющиеся знания можно на углубленном курсе по администрированию MikroTik. Автор курса, сертифицированный тренер MikroTik Дмитрий Скоромнов, лично проверяет лабораторные работы и контролирует прогресс каждого своего студента. В три раза больше информации, чем в вендорской программе MTCNA, более 20 часов практики и доступ навсегда.
Если обратиться к официальной документации, то там будет рассказано о двух основных сетевых конфигурациях: с использованием моста и маршрутизации. Приведенные примеры покрывают основные сценарии использования и не углубляются в подробности, но различные комбинации настроек для этих вариантов позволяют реализовывать самые разнообразные сетевые конфигурации. В данном материале мы рассмотрим базовые возможности Proxmox, не касаясь объединения сетевых адаптеров или использования Open vSwitch, потому как это отдельные темы, лежащие за рамками базовой настройки.
Все сетевые параметры настраиваются на уровне ноды, для этого перейдите на нужный сервер и раскройте Система — Сеть. Ниже показан пример нашего тестового сервера, где реализованы все те сетевые конфигурации, о которых мы будем говорить ниже.
 Внешняя сеть
 Внешняя сеть
Сетевая конфигурация, создаваемая по умолчанию, когда и виртуальные машины, и гипервизор получают прозрачный доступ к вешней сети, подключенной через физический сетевой адаптер. Она же самая часто используемая, так как позволяет организовать простой доступ к виртуальным машинам, как к самым обычным узлам локальной сети.
 В основе всех виртуальных сетей в Proxmoх лежит сетевой мост (Linux Bridge) — vmbr, допускается создание до 4095 таких устройств. Сетевой мост может включать в себя как физические, так и виртуальные адаптеры, выполняя для них роль неуправляемого коммутатора. Физическая сетевая карта, подключенная к мосту, не имеет настроек и используется как физический Ehternet-интерфейс для данного виртуального коммутатора. Все сетевые настройки производятся внутри виртуальных машин, которые через мост и физический адаптер прозрачно попадают во внешнюю сеть.
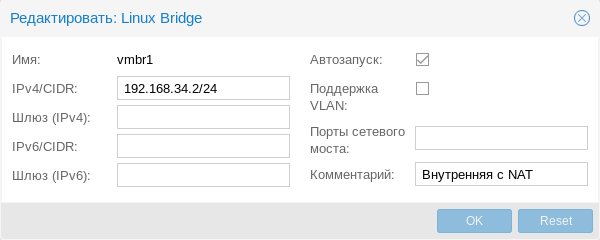
Присвоение интерфейсу моста IP-адреса фактически подключает к виртуальному коммутатору сам хост, т.е. гипервизор, который также прозрачно попадет во внешнюю сеть. Если в Hyper-V для подключения гипервизора к сети на хосте создавался еще один виртуальный сетевой адаптер, то в Proxmox для этого следует назначить IP-адрес интерфейсу моста. Ниже показан пример такой настройки:
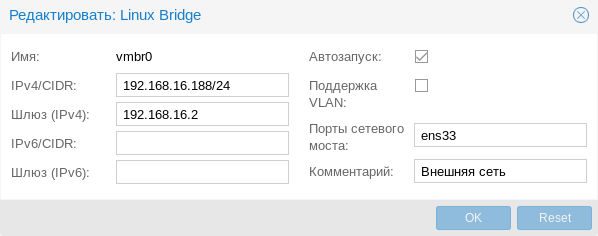 В настройках указывается адрес и шлюз, опция автозапуска и привязанный к мосту физический адаптер. Также мы советуем в поле комментарий оставлять осмысленное описание сетевого устройства, чтобы всегда было понятно, что это и зачем.
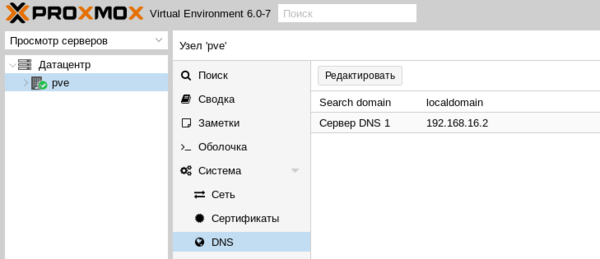
Фактически это сетевые настройки самого гипервизора. Обратите внимание, что сервера DNS указываются отдельно, в Система — DNS:
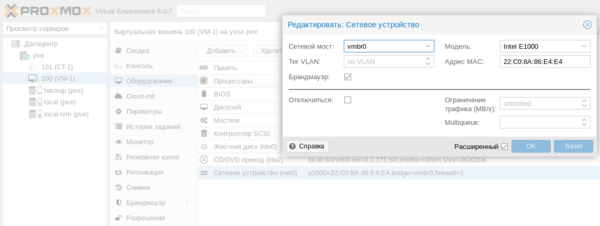
 Для того, чтобы подключить к такой сети виртуальную машину в настройках ее сетевого адаптера следует выбрать нужный мост (виртуальный коммутатор):
 Сетевые настройки виртуальной машины либо задаются вручную, либо могут быть получены от DHCP-сервера внешней сети.
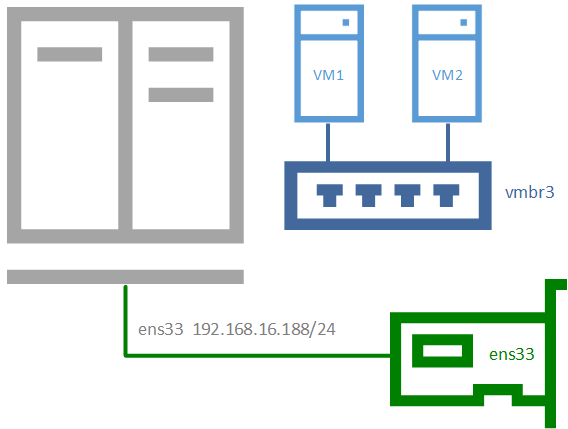
Внешняя изолированная сеть
Данная конфигурация требует минимум двух сетевых адаптеров и предусматривает изоляцию гипервизора от внешней сети и виртуальных машин. Это может быть полезно при виртуализации пограничных устройства, например, шлюза. Либо когда виртуальные машины арендуются третьими лицами, либо находятся вне доверенной сети и доступ к гипервизору оттуда должен быть закрыт.
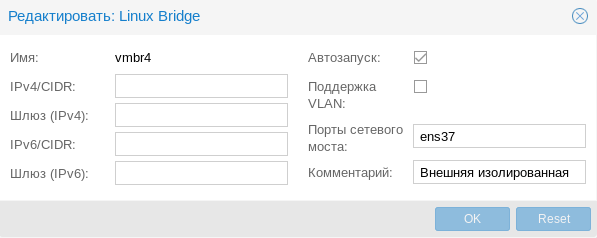
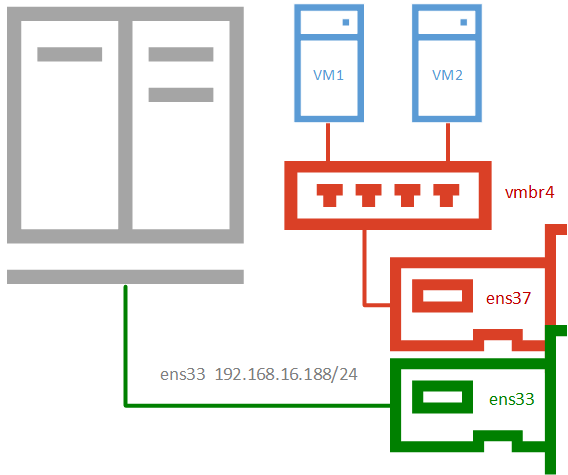 Для создания изолированной внешней сети нам потребуется создать новый сетевой мост без сетевых настроек и привязать к нему физический адаптер (тоже без настроек), таким образом будет обеспечен доступ виртуальных машин во внешнюю сеть с изоляцией этой сети от гипервизора.
 Для доступа к самому гипервизору может быть использован либо другой сетевой адаптер (как показано на нашей схеме), так и созданная по умолчанию внешняя сеть с сетевым мостом. Оба варианта имеют право на жизнь, а во втором случае вы сможете также подключать виртуальные машины к разным виртуальным сетям. Поэтому не следует рассматривать приведенную нами схему как догму, это только один из возможных вариантов и выбран нами в целях упрощения схемы.
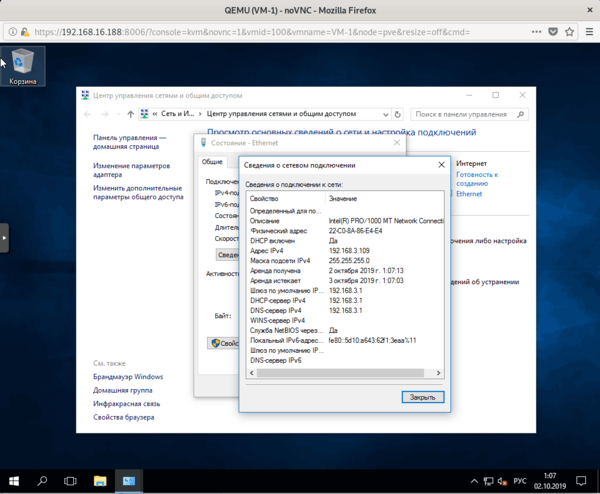
Для примера мы подключили к такой сети виртуальную машину, которая тут же получила по DHCP адрес из внешней сети, никак не связанной с гипервизором.
 Внутренняя сеть с NAT
 Внутренняя сеть с NAT
Применяется в тех случаях, когда нужно изолировать виртуальные машины в собственной сети, но в тоже время обеспечить им доступ в интернет, а также доступ из внешней сети к некоторым из них (или отдельным сетевым службам). Широко используется в лабораторных сценариях, а также при работе с контейнерами.
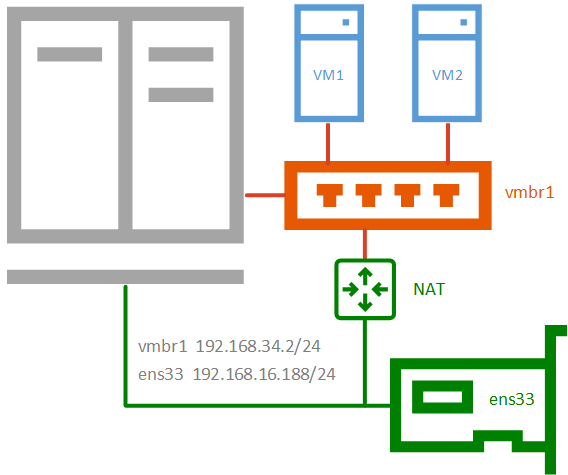 Обратите внимание, данная конфигурация не может быть изолирована от хоста, так как именно хост предоставляет ей службу трансляции сетевых адресов (NAT) и выступает шлюзом для виртуальных машин. Для настройки такой сети создайте новый сетевой мост без привязки к физическому адаптеру и назначьте ему IP-адрес из произвольной сети, отличной от внешней.
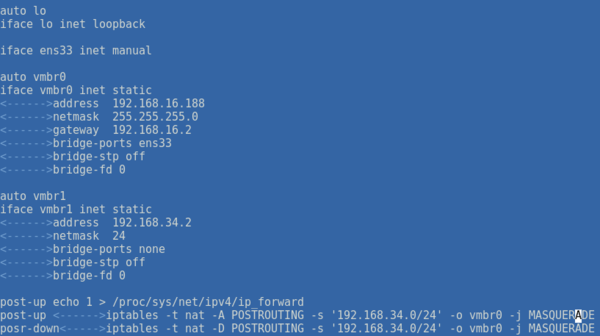
 Все изменения сетевой конфигурации требуют перезагрузки узла гипервизора, поэтому, чтобы не перезагружать узел дважды перейдем в консоль сервера и перейдем в директорию /etc/network, в котором будут присутствовать файлы interfaces — с текущей сетевой конфигурацией и interfaces.new — с новой, которая вступит в силу после перезагрузки.
 Откроем именно interfaces.new и внесем в конец следующие строки:
post-up echo 1 > /proc/sys/net/ipv4/ip_forward
post-up   iptables -t nat -A POSTROUTING -s '192.168.34.0/24' -o ens33 -j MASQUERADE
post-down iptables -t nat -D POSTROUTING -s '192.168.34.0/24' -o ens33 -j MASQUERADE
В качестве сети, в нашем случае 192.168.34.0/24, укажите выбранную вами сеть, а вместо интерфейса ens33 укажите тот сетевой интерфейс, который смотрит во внешнюю сеть с доступом в интернет. Если вы используете сетевую конфигурацию по умолчанию, то это будет не физический адаптер, а первый созданный мост vmbr0, как на скриншоте ниже:
 Перезагрузим узел и назначим виртуальной машине или контейнеру созданную сеть (vmbr1), также выдадим ей адрес из этой сети, а шлюзом укажем адрес моста.

Не забудьте указать доступный адрес DNS-сервера и убедитесь, что виртуальная машина имеет выход в интернет через NAT.
Внутренняя сеть
Позволяет изолировать виртуальные машины от внешней сети и не предоставляет им доступ в интернет, используется в основном в лабораторных целях, когда в качестве шлюза будет выступать одна из виртуальных машин и обычно сочетается на хосте с одной из сетей, имеющих выход в интернет.

Чтобы получить такую сеть, просто создайте еще один мост без привязки к адаптеру и назначьте ему IP-адрес из любой отличной от используемых сети.
 Частная сеть
 Частная сеть
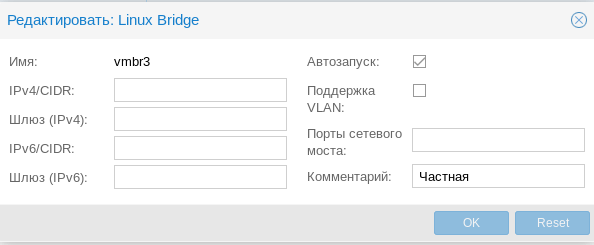
Разновидность внутренней сети, которая подразумевает изоляцию не только от внешней сети, но и от хоста. Что позволяет получить полностью независимую сеть между виртуальными машинами, может быть полезна в лабораторных условиях, когда нужно смоделировать сеть, адресация которой пересекается с используемыми вами сетями.
 Для такой сети просто создайте еще один сетевой мост без каких-либо настроек:
 Подобные сети также обычно используются не самостоятельно, а в сочетании с иными типами сетей на хосте.
Организуем службы DNS и DHCP для внутренних сетей
Как вы уже могли заметить все адреса для виртуальных машин во внутренних сетях мы назначали вручную. Но можно это делать автоматически, сняв с себя еще одну заботу, это удобно, особенно в лабораторных и тестовых средах, где виртуальных машин много и назначать им адреса вручную может быть достаточно затруднительно.
В нашем примере мы организуем службы DNS и DHCP для внутренней сети с NAT и просто внутренней сети. Для первой мы должны будет выдавать адрес, шлюз и сервера DNS, для второй просто адрес. Данная конфигурация не является реальной, а создана нами исключительно в учебных целях.
В качестве серверов DNS и DHCP мы будем использовать уже известный нашим читателям пакет dnsmasq, который является простым и легким кеширующим DNS и DHCP-сервером. Установим его:
apt install dnsmasqЗатем перейдем в конфигурационный файл /etc/dnsmasq.conf и найдем и приведем к следующему виду параметры:
interface= vmbrl, vmbr2
listen-address= 127.0.0.1, 192.168.34.2, 192.168.35.2
Здесь мы явно указали интерфейсы и адреса, на которых будет работать наш сервер. С одной стороны, присутствует некоторая избыточность, но лучше так, чем потом, при изменении сетевых настроек в вашей сети неожиданно появится неавторизованный DHCP-сервер.
Затем укажем выдаваемые клиентам диапазоны адресов:
dhcp-range=interface:vmbr1,192.168.34.101,192.168.34.199,255.255.255.0,12h
dhcp-range=interface:vmbr2,192.168.35.101,192.168.35.199,255.255.255.0,12h
Обратите внимание на формат записи, перед каждой настройкой мы указываем сетевой интерфейс к которой она применяется.
Аналогичным образом зададим нужные DHCP-опции, в нашем случае это Option 3 и 6 (шлюз и DNS-сервер).
dhcp-option=interface:vmbr1,3,192.168.34.2
dhcp-option=interface:vmbr1,6,192.168.34.2
dhcp-option=interface:vmbr2,3
dhcp-option=interface:vmbr2,6
Если настройки для моста vmbr1 не вызывают вопросов, то настройки для второй сети следует пояснить. Так как нам нужно передавать ей только IP-адрес и маску, без шлюза и серверов имен, то соответствующие опции следует передать пустыми, иначе будут переданы опции по умолчанию, где в качестве этих узлов будет передан адрес сервера.
Сохраняем конфигурационный файл и перезапускаем службу
service dnsmasq restartПосле чего в виртуальных машинах, подключенных к внутренним сетям, мы можем установить настройки для получения адреса через DHCP и убедиться, что все работает как надо.
Научиться настраивать MikroTik с нуля или систематизировать уже имеющиеся знания можно на углубленном курсе по администрированию MikroTik. Автор курса, сертифицированный тренер MikroTik Дмитрий Скоромнов, лично проверяет лабораторные работы и контролирует прогресс каждого своего студента. В три раза больше информации, чем в вендорской программе MTCNA, более 20 часов практики и доступ навсегда.

Ginger Sugar Cookies
Ginger-laced, heart-shaped sugar cookies offer a sweetly spicy crunch.
Provided by Martha Stewart
Buttery Almond Cookies
Made with high-fat, cultured butter, these melt-in-your-mouth almond cookies are like the most tender shortbread you’ve ever eaten. A simple confectioners’…
Provided by Melissa Clark
Ginger-Brown Sugar Cookies
Remember old-fashioned chewy ginger cookies? These get an extra spicy hit from crystallized ginger.
Provided by Betty Crocker Kitchens
Gingerbread loaf cake
Make our multifunctional ginger and honey loaf cake. Enjoy with yogurt and stewed fruit for a festive brunch, or try as a teatime treat slathered with…
Provided by Barney Desmazery
Ye Ole Gingerbread
A deliciously moist never-fail loaf. I bake this loaf before bed and leave it in the cooling oven overnight. NO hard crusts!
Provided by Mandy
![]()
Lemon Vinaigrette
The simplest of vinaigrettes, this recipe requires simply four ingredients, two of which are salt and pepper. It’s a perfect dressing to throw on a simple…
Provided by Pierre Franey
Glazed Tofu With Chile and Star Anise
This sauce — a dark, star anise-spiced caramel intermingled with rice wine, soy sauce, ginger and scallions — builds sweet, acidic and umami notes as it…
Provided by Yewande Komolafe
Soy and Ginger Glazed Tofu
I love tofu…I like how it picks up the flavor of whatever sauce it’s coated with. I especially liked this recipe where the tofu is browned a bit before…
Provided by Hey Jude

Gluten-Free Crunchy Breaded Chicken
This chicken is absolutely delicious. The kids cleaned their plates which is very rare and my husband raved about it. Of course check each spice and the…
Provided by Dannygirl
Goan Chicken Xacuti
Yummy Goa chicken specialty…relished by all alike! Garnish with cilantro leaves and serve hot with boiled rice or bread.
Provided by dVOKDAqueen
![]()
Banoffee pie pancakes
This Pancake Day try a new take on banoffee pie. Sticky dulce de leche and sweet bananas make an irresistible topping for fluffy pancakes
Provided by Esther Clark
Mrs. G’s Fair Scones
This base of this recipe is called Puyallup Fair Scones (Recipe #183806)…I of course had to mess with a good thing and here’s the recipe I came up with….
Provided by Mrs Goodall
Roasting tin chicken tikka masala
Make a quick, hearty weeknight supper with this all-in-one chicken curry bake. Serve with naans and finely chopped red onion
Provided by Esther Clark
Bananas Foster Crisp
Top banana crisp with whipped cream for a tempting baked dessert.
Provided by Betty Crocker Kitchens
Baked Macaroni and Pimento Cheese
From the KC Star (local newspaper) n adapted from Southern Living…it looks so DARN and HEALTHY that I wish I could eat some right now! 
Provided by Vanessa
Previous
Next
HOW TO CHANGE THE IP ADDRESS OF PROXMOX VE

WebNov 3, 2022 The interesting thing with Proxmox is that when you configure it, they force you to specify an individual IP address as opposed to using DHCP. This is beneficial as you’ll know ahead of time what IP …
From wundertech.net
Nov 3, 2022 The interesting thing with Proxmox is that when you configure it, they force you to specify an individual IP address as opposed to using DHCP. This is beneficial as you’ll know ahead of time what IP …»>
See details
PROXMOX CHANGE IP ADDRESS IN 3 SIMPLE STEPS — BOBCARES
2023-01-26
From bobcares.com
Estimated Reading Time 3 mins
- Lookup the current IP address in Proxmox console. You’ll see the server IP in the summary section. To change the IP, go to the ‘proxmox node’ and choose option ‘Network’ and edit the ‘vmbr0’ section.
- Change the IP address of Proxmox node. Enter the new IP address in the ‘Edit’ window and click ‘OK’. Here we’re changing the IP address from 172.17.4.45 to 172.17.5.45.
- Change the IP address of Proxmox in hosts file. However, the above IP change will not yet reflect in the main Summary section. For that, we edit the ‘/etc/hosts’ file in the server and change the IP address.
HELP WITH CHANGING IP ADDRESS / REINSTALLING. — PROXMOX …
WebJan 19, 2022 1) /etc/network/interfaces — updated the ‘address’ and ‘gateway’ fields with my new IP Address 2) /etc/hosts — updated the hostname from the old IP address to the new …
From forum.proxmox.com
Estimated Reading Time 3 mins
Jan 19, 2022 1) /etc/network/interfaces — updated the ‘address’ and ‘gateway’ fields with my new IP Address 2) /etc/hosts — updated the hostname from the old IP address to the new …»>
See details
CHANGE HOST IP THROUGH TERMINAL | PROXMOX SUPPORT FORUM
WebAug 28, 2017 Change Host IP through terminal | Proxmox Support Forum Change Host IP through terminal Nathan Davis Aug 27, 2017 Forums Proxmox Virtual Environment …
From forum.proxmox.com
Estimated Reading Time 40 secs
Aug 28, 2017 Change Host IP through terminal | Proxmox Support Forum Change Host IP through terminal Nathan Davis Aug 27, 2017 Forums Proxmox Virtual Environment …»>
See details
PROXMOX AND OVH FAILOVER IP SETUP | TRUENAS COMMUNITY
WebMay 25, 2022 OVH’s setup with failover IPs is pretty simple when explained in plain old English: Set the failover IP as your VM’s static IP (105.29.51.54/32 in my example) Route …
From truenas.com
May 25, 2022 OVH’s setup with failover IPs is pretty simple when explained in plain old English: Set the failover IP as your VM’s static IP (105.29.51.54/32 in my example) Route …»>
See details
HOW TO CONFIGURE STATIC IP IN PROXMOX VM
WebJul 25, 2019 The Proxmox team works very hard to make sure you are running the best software and getting stable updates and security enhancements, as well as quick …
From forum.proxmox.com
Jul 25, 2019 The Proxmox team works very hard to make sure you are running the best software and getting stable updates and security enhancements, as well as quick …»>
See details
HOW TO MODIFY/CHANGE CONSOLE/SSH LOGIN BANNER FOR PROXMOX …
WebJul 12, 2021 1 To modify the /usr/bin/pvebanner file we can use the following command to back it up first then edit it # Backup the file before editing cp /usr/bin/pvebanner …
From dannyda.com
HOW TO: CHANGE IP ADDRESS FOR PROXMOX VE (PVE)
WebJun 4, 2020 1 Login to Proxmox VE web gui 2 Navigate to Datacenter -> node name/cluster name -> System -> Network 3 Find the one with the IP address which we …
From dannyda.com
Jun 4, 2020 1 Login to Proxmox VE web gui 2 Navigate to Datacenter -> node name/cluster name -> System -> Network 3 Find the one with the IP address which we …»>
See details
CHANGING PROXMOX IP FROM CLI — YOUTUBE
WebChanging Proxmox IP from CLI — YouTube 0:00 / 1:26 Changing Proxmox IP from CLI Viatto 56.8K subscribers Subscribe 196 Save 17K views 1 year ago #proxmox #Viatto …
From youtube.com
Changing Proxmox IP from CLI — YouTube 0:00 / 1:26 Changing Proxmox IP from CLI Viatto 56.8K subscribers Subscribe 196 Save 17K views 1 year ago #proxmox #Viatto …»>
See details
HOW TO CHANGE THE IP ADDRESS OF PROXMOX — YOUTUBE
WebVE is Changing network and showing you how to change the ip address of your Proxmox serverLinks in our description may be affiliate links which help our chan…
From youtube.com
VE is Changing network and showing you how to change the ip address of your Proxmox serverLinks in our description may be affiliate links which help our chan…»>
See details
CHANGE CLUSTER NODES IP ADDRESSES | PROXMOX SUPPORT …
WebJun 23, 2020 First, install Proxmox VE on all nodes. Make sure that each node is installed with the final hostname and IP configuration. Changing the hostname and IP is not …
From forum.proxmox.com
Jun 23, 2020 First, install Proxmox VE on all nodes. Make sure that each node is installed with the final hostname and IP configuration. Changing the hostname and IP is not …»>
See details
COMMAND LINE FROM THE CONSOLE FOR PROXMOX 3 — PROXMOX SUPPORT …
WebSep 7, 2013 Changing the IP and gateway — command line from the console for proxmox 3. Thread starter alexdimarco; Start date Sep 7, 2013; Forums. Proxmox Virtual …
From forum.proxmox.com
Sep 7, 2013 Changing the IP and gateway — command line from the console for proxmox 3. Thread starter alexdimarco; Start date Sep 7, 2013; Forums. Proxmox Virtual …»>
See details
HOW TO: CHANGE IP ADDRESS FOR PROXMOX VE (PVE)
WebJun 4, 2020 1 Login to Proxmox VE web gui. 2 Navigate to Datacenter -> node name/cluster name -> System -> Network. 3 Find the one with the IP address which we …
From dannyda.com
Jun 4, 2020 1 Login to Proxmox VE web gui. 2 Navigate to Datacenter -> node name/cluster name -> System -> Network. 3 Find the one with the IP address which we …»>
See details
CHANGING PROXMOX MANAGEMENT IP | PROXMOX SUPPORT …
WebFeb 24, 2021 Use VLAN 99 ( 10.0.0.1/24 subnet) for the Proxmox VE management IP with VLAN aware Linux bridge. So change the proxmox management ip to something …
From forum.proxmox.com
Feb 24, 2021 Use VLAN 99 ( 10.0.0.1/24 subnet) for the Proxmox VE management IP with VLAN aware Linux bridge. So change the proxmox management ip to something …»>
See details
CHANGE PROXMOX IP VIA TERMINAL : R/PROXMOX — REDDIT
WebChange Proxmox IP via terminal I am trying to migrate my proxmox server to a new subnet VLAN to separate it from my home network. I going from subnet 192.168.1.1/24 …
From reddit.com
HOW TO KNOW THE IP ADDRESS OF A VM | PROXMOX SUPPORT …
WebDec 22, 2021 And there you enter «ip a» and it should show you the ip configuration. You can also install at the terminal the qemu-guest-agent inside the vm, this is necessary to …
From forum.proxmox.com
Dec 22, 2021 And there you enter «ip a» and it should show you the ip configuration. You can also install at the terminal the qemu-guest-agent inside the vm, this is necessary to …»>
See details
302 PROXMOX — CHANGING THE IP ADDRESS OF THE SERVER (NOT IN A …
Web302 Proxmox — Changing the IP Address of the server (not in a cluster) 9,026 views Sep 6, 2020 You have to change the IP in up to three files, dependence on your setup. …more …
From youtube.com
302 Proxmox — Changing the IP Address of the server (not in a cluster) 9,026 views Sep 6, 2020 You have to change the IP in up to three files, dependence on your setup. …more …»>
See details
CHANGE PVE’S STATIC IP ADDRESS, HOSTNAME AND DOMAIN : R/PROXMOX …
WebProxmox doesn’t tie you to one IP address, you can configure it to have multiple IPs with different interfaces and vlans. However, the main hostname is set in the /etc/hostname …
From reddit.com
Proxmox doesn’t tie you to one IP address, you can configure it to have multiple IPs with different interfaces and vlans. However, the main hostname is set in the /etc/hostname …»>
See details
PROXMOX CHANGE IP ADDRESS STEP BY STEP — COMPUTER HOW TO
WebProxmox Change IP Address. As you can see our current IP is 10.110.11.0, and I need change it to 10.110.11.10. Select select line were you see old IP and press “Edit” button. …
From arstech.net
Proxmox Change IP Address. As you can see our current IP is 10.110.11.0, and I need change it to 10.110.11.10. Select select line were you see old IP and press “Edit” button. …»>
See details
Ginger Sugar Cookies
Ginger-laced, heart-shaped sugar cookies offer a sweetly spicy crunch.
Provided by Martha Stewart
Buttery Almond Cookies
Made with high-fat, cultured butter, these melt-in-your-mouth almond cookies are like the most tender shortbread you’ve ever eaten. A simple confectioners’…
Provided by Melissa Clark
Ginger-Brown Sugar Cookies
Remember old-fashioned chewy ginger cookies? These get an extra spicy hit from crystallized ginger.
Provided by Betty Crocker Kitchens
Gingerbread loaf cake
Make our multifunctional ginger and honey loaf cake. Enjoy with yogurt and stewed fruit for a festive brunch, or try as a teatime treat slathered with…
Provided by Barney Desmazery
Ye Ole Gingerbread
A deliciously moist never-fail loaf. I bake this loaf before bed and leave it in the cooling oven overnight. NO hard crusts!
Provided by Mandy
![]()
Lemon Vinaigrette
The simplest of vinaigrettes, this recipe requires simply four ingredients, two of which are salt and pepper. It’s a perfect dressing to throw on a simple…
Provided by Pierre Franey
Glazed Tofu With Chile and Star Anise
This sauce — a dark, star anise-spiced caramel intermingled with rice wine, soy sauce, ginger and scallions — builds sweet, acidic and umami notes as it…
Provided by Yewande Komolafe
Soy and Ginger Glazed Tofu
I love tofu…I like how it picks up the flavor of whatever sauce it’s coated with. I especially liked this recipe where the tofu is browned a bit before…
Provided by Hey Jude
Gluten-Free Crunchy Breaded Chicken
This chicken is absolutely delicious. The kids cleaned their plates which is very rare and my husband raved about it. Of course check each spice and the…
Provided by Dannygirl
Goan Chicken Xacuti
Yummy Goa chicken specialty…relished by all alike! Garnish with cilantro leaves and serve hot with boiled rice or bread.
Provided by dVOKDAqueen
![]()
Banoffee pie pancakes
This Pancake Day try a new take on banoffee pie. Sticky dulce de leche and sweet bananas make an irresistible topping for fluffy pancakes
Provided by Esther Clark
Mrs. G’s Fair Scones
This base of this recipe is called Puyallup Fair Scones (Recipe #183806)…I of course had to mess with a good thing and here’s the recipe I came up with….
Provided by Mrs Goodall
Roasting tin chicken tikka masala
Make a quick, hearty weeknight supper with this all-in-one chicken curry bake. Serve with naans and finely chopped red onion
Provided by Esther Clark
Bananas Foster Crisp
Top banana crisp with whipped cream for a tempting baked dessert.
Provided by Betty Crocker Kitchens
Baked Macaroni and Pimento Cheese
From the KC Star (local newspaper) n adapted from Southern Living…it looks so DARN and HEALTHY that I wish I could eat some right now!
Provided by Vanessa
Previous
Next
HOW TO CHANGE THE IP ADDRESS OF PROXMOX VE
WebNov 3, 2022 The interesting thing with Proxmox is that when you configure it, they force you to specify an individual IP address as opposed to using DHCP. This is beneficial as you’ll know ahead of time what IP …
From wundertech.net
Nov 3, 2022 The interesting thing with Proxmox is that when you configure it, they force you to specify an individual IP address as opposed to using DHCP. This is beneficial as you’ll know ahead of time what IP …»>
See details
PROXMOX CHANGE IP ADDRESS IN 3 SIMPLE STEPS — BOBCARES
2023-01-26
From bobcares.com
Estimated Reading Time 3 mins
- Lookup the current IP address in Proxmox console. You’ll see the server IP in the summary section. To change the IP, go to the ‘proxmox node’ and choose option ‘Network’ and edit the ‘vmbr0’ section.
- Change the IP address of Proxmox node. Enter the new IP address in the ‘Edit’ window and click ‘OK’. Here we’re changing the IP address from 172.17.4.45 to 172.17.5.45.
- Change the IP address of Proxmox in hosts file. However, the above IP change will not yet reflect in the main Summary section. For that, we edit the ‘/etc/hosts’ file in the server and change the IP address.
HELP WITH CHANGING IP ADDRESS / REINSTALLING. — PROXMOX …
WebJan 19, 2022 1) /etc/network/interfaces — updated the ‘address’ and ‘gateway’ fields with my new IP Address 2) /etc/hosts — updated the hostname from the old IP address to the new …
From forum.proxmox.com
Estimated Reading Time 3 mins
Jan 19, 2022 1) /etc/network/interfaces — updated the ‘address’ and ‘gateway’ fields with my new IP Address 2) /etc/hosts — updated the hostname from the old IP address to the new …»>
See details
CHANGE HOST IP THROUGH TERMINAL | PROXMOX SUPPORT FORUM
WebAug 28, 2017 Change Host IP through terminal | Proxmox Support Forum Change Host IP through terminal Nathan Davis Aug 27, 2017 Forums Proxmox Virtual Environment …
From forum.proxmox.com
Estimated Reading Time 40 secs
Aug 28, 2017 Change Host IP through terminal | Proxmox Support Forum Change Host IP through terminal Nathan Davis Aug 27, 2017 Forums Proxmox Virtual Environment …»>
See details
PROXMOX AND OVH FAILOVER IP SETUP | TRUENAS COMMUNITY
WebMay 25, 2022 OVH’s setup with failover IPs is pretty simple when explained in plain old English: Set the failover IP as your VM’s static IP (105.29.51.54/32 in my example) Route …
From truenas.com
May 25, 2022 OVH’s setup with failover IPs is pretty simple when explained in plain old English: Set the failover IP as your VM’s static IP (105.29.51.54/32 in my example) Route …»>
See details
HOW TO CONFIGURE STATIC IP IN PROXMOX VM
WebJul 25, 2019 The Proxmox team works very hard to make sure you are running the best software and getting stable updates and security enhancements, as well as quick …
From forum.proxmox.com
Jul 25, 2019 The Proxmox team works very hard to make sure you are running the best software and getting stable updates and security enhancements, as well as quick …»>
See details
HOW TO MODIFY/CHANGE CONSOLE/SSH LOGIN BANNER FOR PROXMOX …
WebJul 12, 2021 1 To modify the /usr/bin/pvebanner file we can use the following command to back it up first then edit it # Backup the file before editing cp /usr/bin/pvebanner …
From dannyda.com
HOW TO: CHANGE IP ADDRESS FOR PROXMOX VE (PVE)
WebJun 4, 2020 1 Login to Proxmox VE web gui 2 Navigate to Datacenter -> node name/cluster name -> System -> Network 3 Find the one with the IP address which we …
From dannyda.com
Jun 4, 2020 1 Login to Proxmox VE web gui 2 Navigate to Datacenter -> node name/cluster name -> System -> Network 3 Find the one with the IP address which we …»>
See details
CHANGING PROXMOX IP FROM CLI — YOUTUBE
WebChanging Proxmox IP from CLI — YouTube 0:00 / 1:26 Changing Proxmox IP from CLI Viatto 56.8K subscribers Subscribe 196 Save 17K views 1 year ago #proxmox #Viatto …
From youtube.com
Changing Proxmox IP from CLI — YouTube 0:00 / 1:26 Changing Proxmox IP from CLI Viatto 56.8K subscribers Subscribe 196 Save 17K views 1 year ago #proxmox #Viatto …»>
See details
HOW TO CHANGE THE IP ADDRESS OF PROXMOX — YOUTUBE
WebVE is Changing network and showing you how to change the ip address of your Proxmox serverLinks in our description may be affiliate links which help our chan…
From youtube.com
VE is Changing network and showing you how to change the ip address of your Proxmox serverLinks in our description may be affiliate links which help our chan…»>
See details
CHANGE CLUSTER NODES IP ADDRESSES | PROXMOX SUPPORT …
WebJun 23, 2020 First, install Proxmox VE on all nodes. Make sure that each node is installed with the final hostname and IP configuration. Changing the hostname and IP is not …
From forum.proxmox.com
Jun 23, 2020 First, install Proxmox VE on all nodes. Make sure that each node is installed with the final hostname and IP configuration. Changing the hostname and IP is not …»>
See details
COMMAND LINE FROM THE CONSOLE FOR PROXMOX 3 — PROXMOX SUPPORT …
WebSep 7, 2013 Changing the IP and gateway — command line from the console for proxmox 3. Thread starter alexdimarco; Start date Sep 7, 2013; Forums. Proxmox Virtual …
From forum.proxmox.com
Sep 7, 2013 Changing the IP and gateway — command line from the console for proxmox 3. Thread starter alexdimarco; Start date Sep 7, 2013; Forums. Proxmox Virtual …»>
See details
HOW TO: CHANGE IP ADDRESS FOR PROXMOX VE (PVE)
WebJun 4, 2020 1 Login to Proxmox VE web gui. 2 Navigate to Datacenter -> node name/cluster name -> System -> Network. 3 Find the one with the IP address which we …
From dannyda.com
Jun 4, 2020 1 Login to Proxmox VE web gui. 2 Navigate to Datacenter -> node name/cluster name -> System -> Network. 3 Find the one with the IP address which we …»>
See details
CHANGING PROXMOX MANAGEMENT IP | PROXMOX SUPPORT …
WebFeb 24, 2021 Use VLAN 99 ( 10.0.0.1/24 subnet) for the Proxmox VE management IP with VLAN aware Linux bridge. So change the proxmox management ip to something …
From forum.proxmox.com
Feb 24, 2021 Use VLAN 99 ( 10.0.0.1/24 subnet) for the Proxmox VE management IP with VLAN aware Linux bridge. So change the proxmox management ip to something …»>
See details
CHANGE PROXMOX IP VIA TERMINAL : R/PROXMOX — REDDIT
WebChange Proxmox IP via terminal I am trying to migrate my proxmox server to a new subnet VLAN to separate it from my home network. I going from subnet 192.168.1.1/24 …
From reddit.com
HOW TO KNOW THE IP ADDRESS OF A VM | PROXMOX SUPPORT …
WebDec 22, 2021 And there you enter «ip a» and it should show you the ip configuration. You can also install at the terminal the qemu-guest-agent inside the vm, this is necessary to …
From forum.proxmox.com
Dec 22, 2021 And there you enter «ip a» and it should show you the ip configuration. You can also install at the terminal the qemu-guest-agent inside the vm, this is necessary to …»>
See details
302 PROXMOX — CHANGING THE IP ADDRESS OF THE SERVER (NOT IN A …
Web302 Proxmox — Changing the IP Address of the server (not in a cluster) 9,026 views Sep 6, 2020 You have to change the IP in up to three files, dependence on your setup. …more …
From youtube.com
302 Proxmox — Changing the IP Address of the server (not in a cluster) 9,026 views Sep 6, 2020 You have to change the IP in up to three files, dependence on your setup. …more …»>
See details
CHANGE PVE’S STATIC IP ADDRESS, HOSTNAME AND DOMAIN : R/PROXMOX …
WebProxmox doesn’t tie you to one IP address, you can configure it to have multiple IPs with different interfaces and vlans. However, the main hostname is set in the /etc/hostname …
From reddit.com
Proxmox doesn’t tie you to one IP address, you can configure it to have multiple IPs with different interfaces and vlans. However, the main hostname is set in the /etc/hostname …»>
See details
PROXMOX CHANGE IP ADDRESS STEP BY STEP — COMPUTER HOW TO
WebProxmox Change IP Address. As you can see our current IP is 10.110.11.0, and I need change it to 10.110.11.10. Select select line were you see old IP and press “Edit” button. …
From arstech.net
Proxmox Change IP Address. As you can see our current IP is 10.110.11.0, and I need change it to 10.110.11.10. Select select line were you see old IP and press “Edit” button. …»>
See details