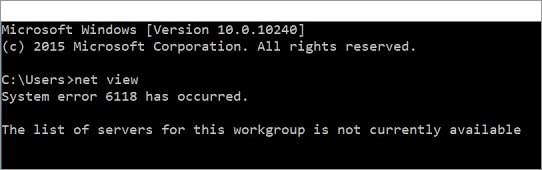
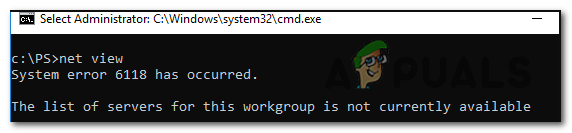
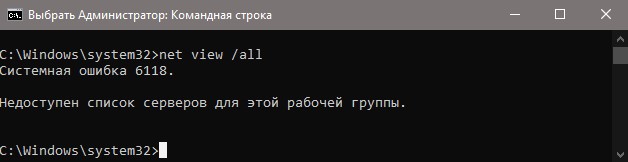
С системной ошибкой 6118 можно столкнуться в консоли командной строки при запуске команды net view /all, которая выводит список всех сетевых устройств. При этом в сетевом окружении Проводника не отображается ни одно устройство, хотя они пингуются в командной строке.
Содержание
- 1 Чем вызвана ошибка?
- 2 Удаление антивируса
- 3 Проверка состояния служб
- 4 Запуск «Браузера компьютеров»
Чем вызвана ошибка?
Команды «net view» не обрабатываются из-за ошибки 6118 по следующим причинам:
- Обработка блокируется сторонним антивирусом или межсетевым экраном (файрволом), которые создают помехи между протоколом прикладного уровня SMB и сетевыми устройствами.
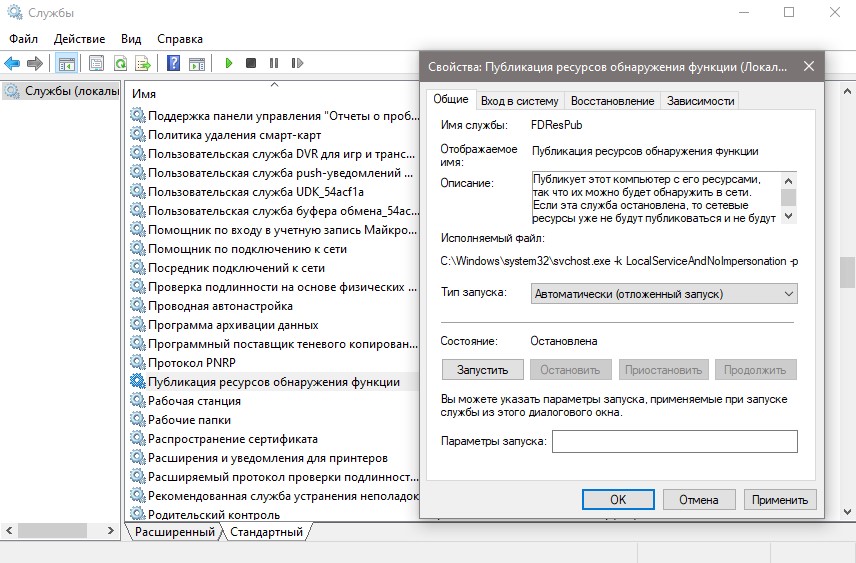
- Отключен Хост поставщика функции обнаружения. Для устранения проблемы также нужно запустить связанную с ней службу Публикации ресурсов обнаружения функции.
- Отключена служба браузеров компьютеров. Для ее запуска нужно включить поддержку SMBv1.
Удаление антивируса
Во многих случаях с системной ошибкой 6118 можно столкнуться в результате блокировки антивирусом связи между протоколом SMB с другими сетевыми устройствами. Поэтому в первую очередь отключите защиту антивируса в реальном времени и запустите команду «net view».
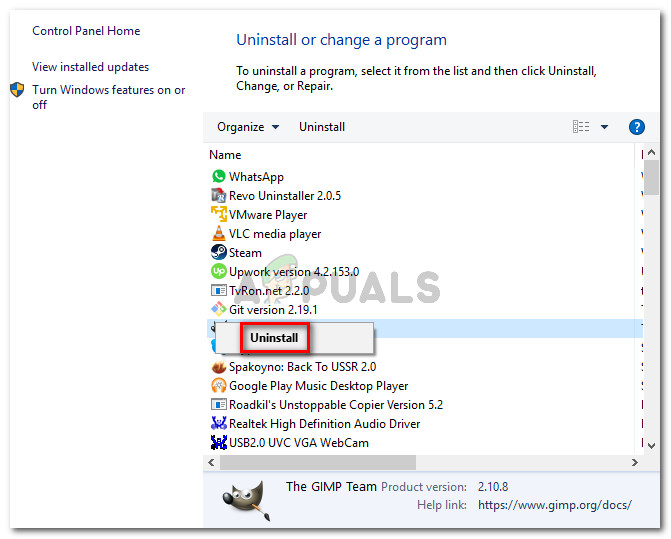
Если используете антивирус со встроенным файрволом, отключение межсетевого экрана или защиты в реальном времени не принесет никакой пользы, поскольку все правила защиты остаются на месте. Поэтому полностью удалите его на время поиска причины ошибки.
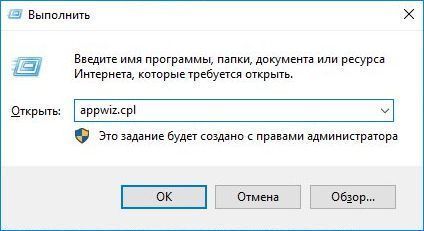
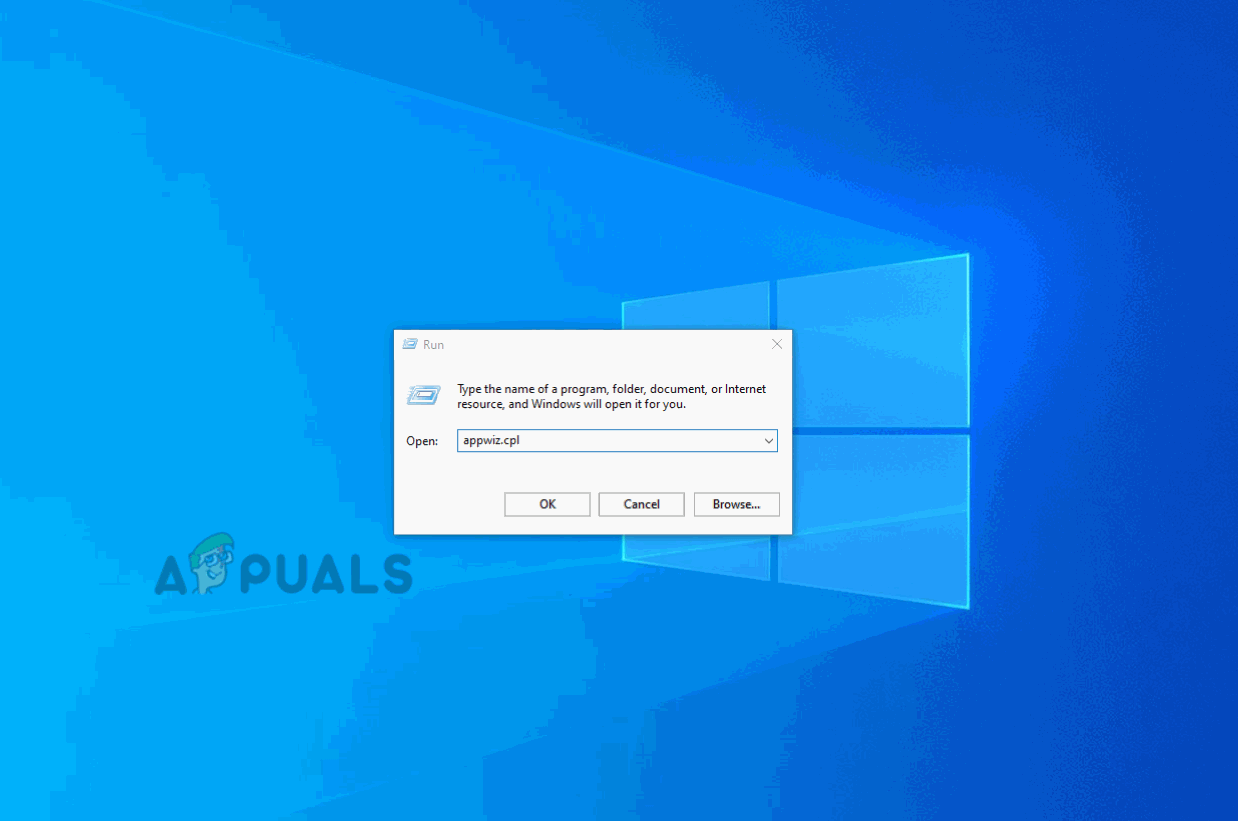
Перейдите на вкладку Удаления и изменения программ командой appwiz.cpl, запущенной из окна «Выполнить» (Win + R).
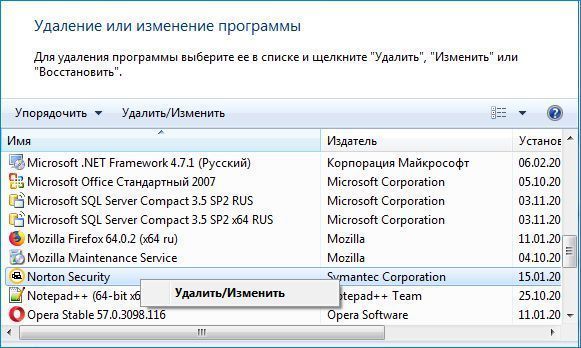
В списке найдите антивирусную программу, щелкните по нему правой кнопкой мыши и выберите «Удалить». Подтвердите все запросы, которые могут появиться в процессе удаления.
После перезагрузки компьютера запустите команды, выполнение которых было прервано системной ошибкой 6118. Если проблема остается, установите обратно антивирус и перейдите к следующему шагу.
Проверка состояния служб
Если подключенные сетевые устройства по-прежнему недоступны, возможно, остановлена служба хоста поставщика функции обнаружения. Если она была остановлена, то после ее включения в Проводнике отобразится запрос о включении обнаружения сети. В результате подтверждения должны отобразится общие ресурсы. Для проверки ее состояния, следуйте инструкции.
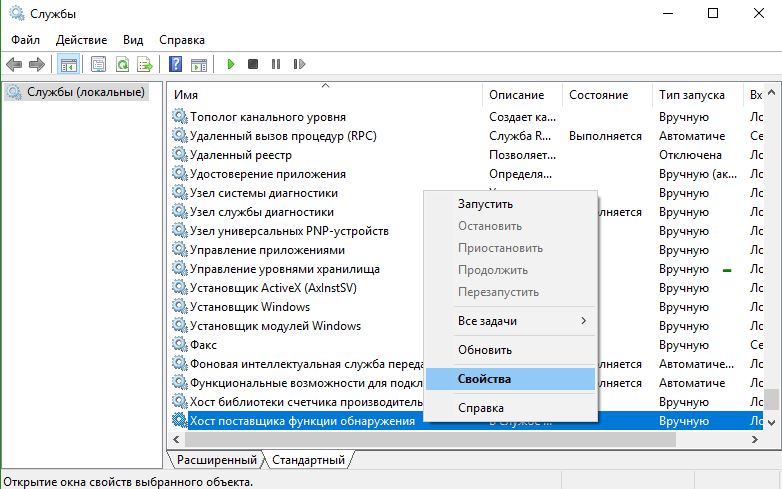
Нажмите комбинацию Ctrl + Shift + Esc для входа в «Диспетчер задач». На вкладке Службы нажмите кнопку с таким же наименованием.

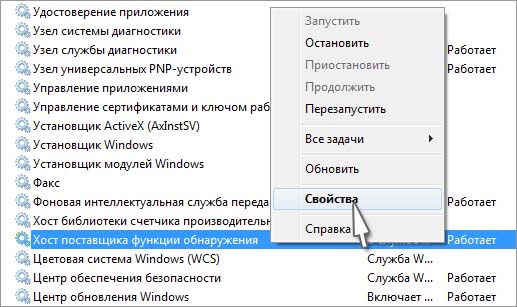
В списке найдите Хост поставщика функции обнаружения, щелкните на него правой кнопкой мыши и выберите Свойства.
На вкладке Общие установите тип запуска «Автоматически (отложенный запуск)» и кликните на «Применить» для сохранения изменений.

Повторите эти действия для службы «Публикация ресурсов обнаружения функции».
После этого откройте Проводник и кликните на вкладку «Сеть». При отображении сообщения об ошибке отклоните его нажатием на «ОК».
На желтой полосе щелкните на «Включить обнаружение сети общий доступ к файлам», чтобы отобразились устройства, подключенные к локальной сети. Теперь в командной строке проверьте, прерывается ли выполнение net view системной ошибкой 6118.
Запуск «Браузера компьютеров»
Выполнение «net view» также может завершиться ошибкой 6118, если не запущена служба «Браузер компьютеров». Проблема в том, что она была исключена в последних версиях Windows 10 по соображениям безопасности.
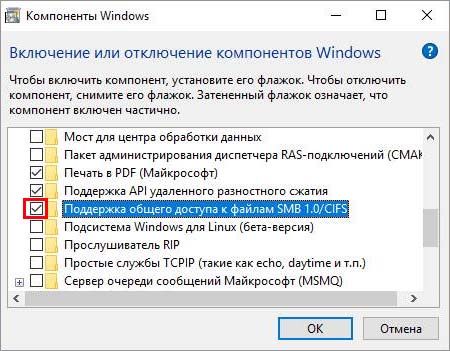
Если решите использовать это решение, нужно сначала включить поддержку SMBv1. Тогда после перезагрузки системы «Браузер компьютеров» станет доступным в списке системных служб.
Нажмите Win + R, впишите appwiz.cpl и кликните на «ОК» для входа в раздел «Программы и компоненты». В левом боковом меню выберите пункт «Включение или отключение компонентов Windows.

В списке отметьте флажком опцию поддержки общего доступа к файлам SMB 1.0/CIFS. После применения изменений появится запрос на перезагрузку. Подтвердите нажатием на кнопку «Перезагрузить сейчас».
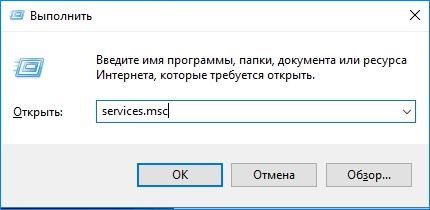
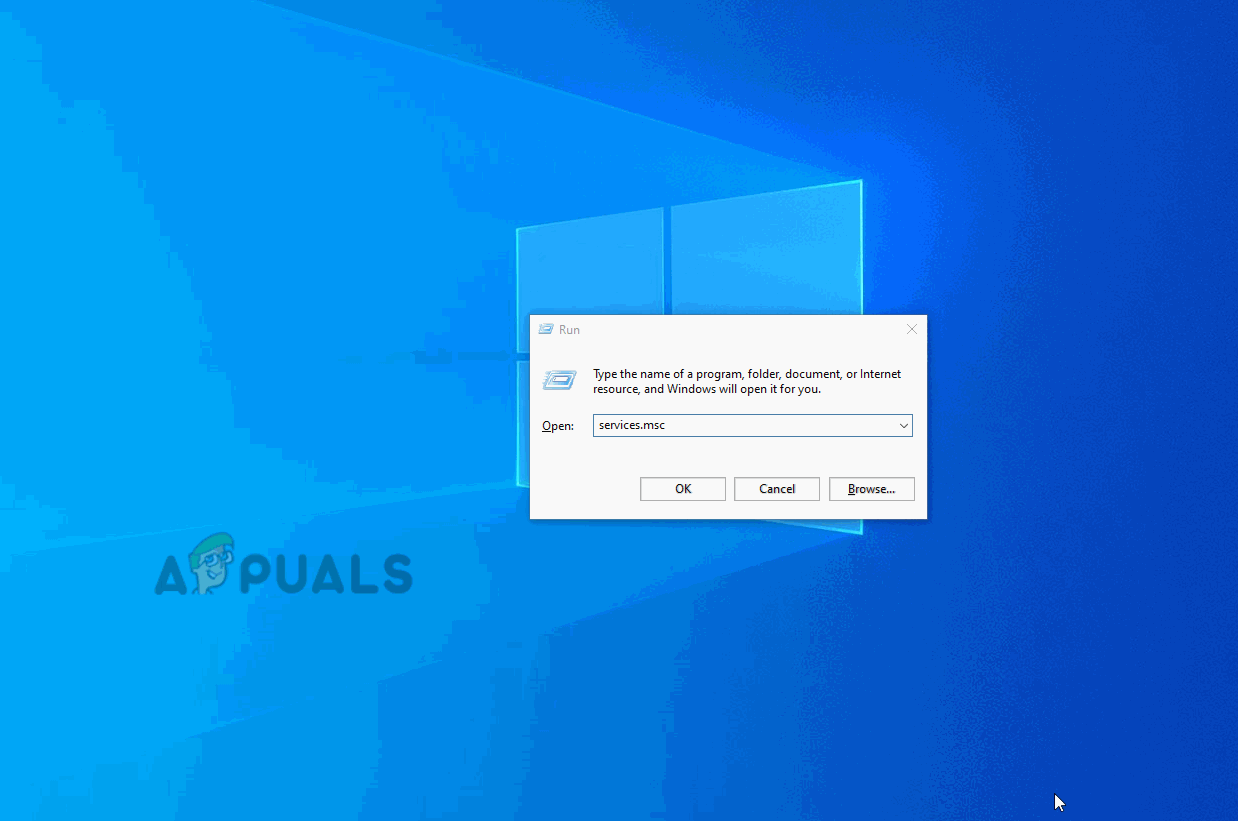
После перезагрузки перейдите в системные службы командой services.msc из окна «Выполнить».
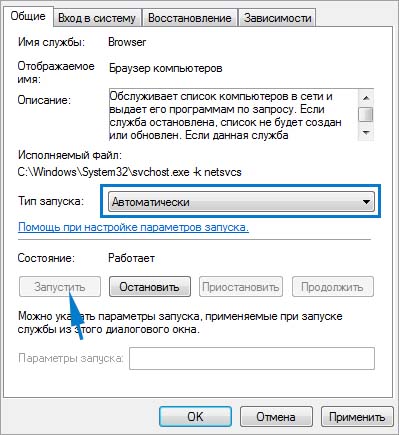
Найдите запись «Браузер компьютеров», дважды щелкните на нее для входа в свойства. На вкладке Общие переключите тип запуска на «Автоматически», нажмите на кнопку «Запустить» и примените изменения.
Теперь откройте консоль и попробуйте выполнить команду, которая была прервана сообщением «net view 6118».
7 Replies
-
Try making it interactive with -i.
Powershell
psexec \* -i gupdate /target:computer /force
Was this post helpful?
thumb_up
thumb_down
-

JitenSh
This person is a verified professional.
Verify your account
to enable IT peers to see that you are a professional.mace
Active Directory & GPO Expert
-
check
127
Best Answers -
thumb_up
278
Helpful Votes
Right click on OU and select group policy update
Was this post helpful?
thumb_up
thumb_down
-
check
-
Right click on OU and select group policy update
That is a great solution. I assumed you are referring to AD Users & Computers and didn’t find the option at first. But of course there it is in GP Mgmt. Probably the best solution for me.
But, while that may solve the immediate problem, it doesn’t address the PSExec error.
Was this post helpful?
thumb_up
thumb_down
-
CyberSecHakr wrote:
Try making it interactive with -i.
Powershell
psexec \* -i gupdate /target:computer /force
That changed the error to:
«A system error has occurred: 6118»
Was this post helpful?
thumb_up
thumb_down
-
CyberSecHakr wrote:
Invoke-gpupdate would be the preferred method of psexec isn’t required.
It doesn’t look like invoke-gpupdate supports wildcards.
Was this post helpful?
thumb_up
thumb_down
-
Still get the same 1231 error on my 2019 server. I see «A system error has occurred: 2184» on my 2008R2 & 2012R2 servers.
Was this post helpful?
thumb_up
thumb_down


Ошибка CMD Net View 6118 обычно возникает, когда пользователь пытается использовать команду «net view / all» для просмотра полного списка сетевых устройств через терминал. В большинстве случаев затронутые пользователи сообщают, что никакие устройства не отображаются в сети в проводнике, хотя они могут пропинговать их напрямую через CMD.
Net View Error 6118 Сообщение об ошибке
Что вызывает «Net View Error 6118» и как ее исправить?
- Вмешательство стороннего AV / брандмауэра. Как выясняется, эта конкретная проблема может возникать из-за чрезмерно защищенного решения безопасности, которое мешает между блоком сообщений сервера и другими сетевыми устройствами. Чтобы устранить проблему в этом случае, вам нужно будет удалить текущий брандмауэр стороннего производителя или, по крайней мере, отключить защиту в режиме реального времени.
- Служба обнаружения функций отключена — если ни одно из подключенных к сети устройств не отображается на экране служб, возможно, это связано с тем, что служба хоста поставщика обнаружения функций отключена. Чтобы устранить проблему в этом случае, все, что вам нужно сделать, это открыть экран «Службы» и включить службу + ту, которая связана с ней (публикация ресурса обнаружения функций).
- Служба «Обозреватель компьютеров» отключена — если CMD не обрабатывает команды «net view», возможно, это связано с тем, что служба «Обозреватель компьютеров» отключена. Это было частью SMBv1, которое устарело в последних версиях Windows 10. Чтобы использовать его, вам нужно включить SMBv1 через меню «Функции Windows», а затем включить службу «Обозреватель компьютеров» через меню «Службы».
1. Отключите сторонний брандмауэр / AV (если применимо)
Как выясняется, одной из наиболее распространенных причин, которые могут привести к появлению ошибки «Net View Error 6118», является защита от чрезмерной защиты брандмауэром, которая блокирует SMB (блок сообщений сервера) от связи с другими сетевыми устройствами.
Примечание. Если вы не используете внешний брандмауэр / пакет безопасности, который может вызвать эту проблему, перейдите непосредственно к следующему способу ниже.
Довольно много затронутых пользователей сообщают, что в их случае проблема в конечном итоге была вызвана набором средств защиты с чрезмерной защитой, который в конечном итоге прерывал соединение между SMB и другими устройствами, подключенными к той же сети, из-за ложного срабатывания.
Если этот сценарий применим, вы должны начать свое руководство по поиску и устранению неисправностей, выяснив, действительно ли используемое вами средство защиты от вирусов на самом деле не вызывает проблему «Net View Error 6118».
Если вы используете сторонний AV, идеальный способ начать — отключить постоянную защиту, перезагрузить компьютер и посмотреть, исчезнет ли проблема навсегда.
Отключение постоянной защиты на Avast Antivirus
Однако, если вы используете внешний брандмауэр, отключение защиты Shields / Real-Time не принесет вам пользы, так как те же правила безопасности будут оставаться в силе. Если последний сценарий применим, единственный способ подтвердить свое подозрение — это временно удалить сторонний пакет и проверить, перестает ли возникать ошибка Net View Error 6118.
Вот краткое руководство по удалению стороннего брандмауэра для устранения возможных помех:
- Нажмите клавишу Windows + R, чтобы открыть диалоговое окно «Выполнить». Затем введите «appwiz.cpl» и нажмите Enter, чтобы открыть окно «Программы и компоненты».
Введите appwiz.cpl и нажмите Enter, чтобы открыть список установленных программ.
- Как только вы окажетесь на экране «Программы и компоненты», прокрутите список установленных приложений и попробуйте найти используемый вами сторонний пакет безопасности / брандмауэр. Когда вы увидите его, щелкните по нему правой кнопкой мыши и выберите «Удалить» в следующем контекстном меню.
Удаление пакета безопасности
- Теперь, когда вы находитесь в окне удаления, следуйте инструкциям на экране, чтобы завершить удаление вашего стороннего пакета / брандмауэра.
- Перезагрузите компьютер и посмотрите, исчезла ли проблема сейчас, когда вы удалили своего потенциального преступника.
Если та же проблема все еще возникает, переустановите стороннюю версию, которую вы ранее удалили, и перейдите к следующему потенциальному исправлению ниже для другой стратегии исправления.
2. Включение хоста провайдера обнаружения функций
Другой потенциальной причиной, которая может сделать другие устройства, подключенные к сети, недоступными, является отключенная служба Host Discovery Provided Provid. Некоторые пользователи, которым мы пытаемся решить ту же проблему, сообщили, что наконец-то смогли исправить проблему после того, как они открыли меню «Службы» и включили эту службу.
После этого и повторного открытия проводника файлов соответствующим пользователям было предложено включить обнаружение сети, что снова сделало доступными подключенные к сети устройства.
Примечание. Хотя этот метод не исправит ошибку «Net View Error 6118», он предоставит вам более безопасный протокол для доступа к подключенным к сети устройствам непосредственно из проводника.
Вот краткое руководство по включению хоста провайдера обнаружения функций, чтобы другие подключенные сетевые устройства появлялись в проводнике:
- Нажмите клавишу Windows + R, чтобы открыть диалоговое окно «Выполнить». Затем введите «services.msc» внутри текстового поля и нажмите Enter, чтобы открыть экран «Службы». Когда вы получите приглашение UAC (Контроль учетных записей), нажмите Да, чтобы предоставить административные привилегии.
- Как только вы окажетесь на экране «Службы», прокрутите вниз список локальных служб и найдите службу «Хост провайдера обнаружения функций». Когда вы увидите его, щелкните его правой кнопкой мыши и выберите «Свойства» в контекстном меню.
- В меню «Свойства» хоста провайдера обнаружения функций выберите вкладку «Общие», затем измените тип запуска на «Автоматический» (отложенный перезапуск) и нажмите «Применить», чтобы сохранить изменения.
- Затем найдите публикацию ресурса обнаружения функций и повторите те же изменения, которые вы сделали на шаге 3 для службы хоста поставщика обнаружения функций.
- После внесения изменений закройте экран «Службы», откройте проводник и нажмите «Сеть» в левом меню.
- Сначала вы получите сообщение об ошибке, поэтому отклоните его, нажав Ok.
- Затем нажмите на желтую полосу в верхней части окна, а затем нажмите «Включить обнаружение сети и общий доступ к файлам», чтобы сделать видимыми другие подключенные сетевые устройства.
Делаем сетевые устройства видимыми в проводнике
Если вы хотите использовать другое исправление, которое фактически устранит симптомы ошибки «Net View Error 6118» и сделает сетевые устройства видимыми внутри терминала, перейдите к следующему способу ниже.
3. Включение службы «Обозреватель компьютеров»
Как выясняется, причиной номер один, которая, как известно, является причиной ошибки «Net View Error 6118», является отключенная служба, которая называется Computer Browser. Но проблема в том, что эта служба устарела в последних версиях Windows 10 по соображениям безопасности.
Однако, если вы хотите использовать это исправление, вам нужно начать с включения SMBv1 с помощью функции Windows — эта технология с тех пор устарела. После того как вы это сделаете и перезагрузите компьютер, служба «Обозреватель компьютеров» должна стать доступной на экране «Службы».
Вот краткое руководство по включению SMBv1 с помощью функции Windows и последующему запуску службы обозревателя компьютеров, чтобы исправить ошибку «Net View Error 6118»:
- Нажмите клавишу Windows + R, чтобы открыть диалоговое окно «Выполнить». Затем введите «appwiz.cpl» внутри текстового поля и нажмите Enter, чтобы открыть меню «Программы и компоненты».
- Когда вы окажетесь на экране «Программы и компоненты», используйте вертикальное меню с правой стороны, чтобы включить или отключить функции Windows.
- Находясь на экране «Функции Windows», прокрутите вниз список собственных функций Windows и найдите поддержку общего доступа к файлам SMB 1.0 / CIFS. После того, как вам удастся найти его, просто установите флажок, связанный с ним, и нажмите ОК.
- Затем дождитесь завершения операции и внесения изменений. При появлении запроса на перезагрузку сделайте это, нажав «Перезагрузить сейчас».
- После завершения следующей последовательности запуска нажмите клавиши Windows + R, чтобы открыть другое диалоговое окно «Выполнить». Затем введите «services.msc» и нажмите Enter, чтобы открыть экран «Службы». В ответ на запрос UAC (Контроль учетных записей пользователей) нажмите Да, чтобы предоставить административные привилегии.
- Как только вам удастся попасть на экран «Службы», прокрутите вниз список локальных служб и найдите службу «Обозреватель компьютеров».
- Когда вы увидите его, щелкните его правой кнопкой мыши и выберите «Свойства» в появившемся контекстном меню.
- На экране «Свойства» службы «Обозреватель компьютеров» выберите вкладку «Общие» и измените тип запуска с «Отключено» на «Автоматически». Затем нажмите «Пуск», чтобы запустить его сразу и завершить, нажав «Применить», чтобы сохранить изменения.
- Теперь, когда служба «Обозреватель компьютеров» включена, откройте окно терминала и выполните ту же команду, которая ранее вызывала ошибку CMD «Net View Error 6118», чтобы проверить, была ли проблема решена.
Включение служб браузера компьютера
In this article, you will learn how to use PsExec, a great command line utility from Microsoft’s Sysinternals PsTools suite, which allows system admins to run programs on one or more remote computers while redirecting the program’s output to the local computer.
Contents
- Why use PsExec
- Prerequisites for PsExec
- Security considerations
- Downloading and installing PsExec
- Use PsExec on a single remote computer
- PsExec syntax
- Getting help
- PsExec command error
- Exit and error codes
- Impersonation and alternate credentials
- Use PsExec on multiple remote computers
- Using comma-separated computer names
- Using a file to specify multiple computer names
- Using a wildcard to run the process on all computers
- Run a process as the LocalSystem account
- Interactive mode
- Copy a program to a remote computer
- Respecting UAC and Windows security
- Author
- Recent Posts

Surender Kumar has more than twelve years of experience in server and network administration. His fields of interest are Windows Servers, Active Directory, PowerShell, web servers, networking, Linux, virtualization, and penetration testing. He loves writing for his blog.
Latest posts by Surender Kumar (see all)
- Extending LVM space in Ubuntu — Thu, Feb 2 2023
- Backup in Proxmox VE — Thu, Jan 26 2023
- Snapshots in Proxmox VE — Wed, Jan 25 2023
Why use PsExec
Although PsExec’s ability to run processes on remote computers might not be a big deal for new admins (since PowerShell remoting is already available), it is still popular among long-time admins. So instead of considering PsExec to be an old, outdated tool, it is very powerful if you use it along with PowerShell. In my next post, I will tell you how you can use PsExec to complement PowerShell and achieve great results that are hard to achieve with PowerShell alone.
Prerequisites for PsExec
Your system and the remote systems in your network must meet the following prerequisites before you can start using PsExec:
File and printer sharing must be enabled on both local and remote computers (TCP port 445 must be open on remote computers). It could be a potential security risk, so make sure you enable this port for the Private profile in the Windows firewall.
Set-NetFirewallRule -DisplayGroup “File And Printer Sharing” -Enabled True -Profile Private

Enable File and Printer Sharing firewall rule using PowerShell
You could also use the Invoke-Command cmdlet in PowerShell to set this firewall rule in multiple remote computers at once.
The default admin$ share must be enabled.

View default admin shares using PowerShell
Security considerations
If a remote computer is in the domain, the members of the domain admins group will be able to use PsExec without a problem.
An earlier version of PsExec wasn’t that safe since it was used to transmit passwords and commands in clear text over the network. However, starting with version 2.1, it encrypts the alternate credentials and commands in transit. Please make sure you are using the latest version of PSExec (2.34 is the latest version at the time of writing).
PsExec is kind of like a double-edged sword. In the right hands, it can be a great tool, but in the wrong hands, it can be a disaster. Due to its abilities, it is often used by hackers in combination with other tools, such as the Metasploit framework and Mimikatz, to carry out malicious attacks. This is the reason that major antivirus products have started flagging PsExec as malware. In a nutshell, PsExec is a safe sysadmin tool in itself, but in the end, it totally depends on how the person is using it.
Since PsExec uses the file and printer sharing service, which is vulnerable to various viruses and ransomware, please make sure you properly secure and restrict this service and its associated ports to the local network only; never expose it to a public network.
Downloading and installing PsExec
As mentioned above, PsExec is part of the PsTools suite. To use PsExec utility, we need to download the PsTools suite from the Sysinternals website.
There is no installer in the PsTools zip file. All you need to do is extract the files from the zip archive and start using them. The installation of PsTools depends on how and where you want to extract the files. Some people prefer directly extracting them inside the %systemroot%System32 directory so that the executables can run directly without having to specify the full path.
I like extracting these files into a separate directory inside %systemdrive%Program Files alongside other programs and then setting up the Path environment variable. You could choose either way; it’s just a matter of your own preference. Let’s extract the zip archive using the following PowerShell command:
Expand-Archive -Path "$env:USERPROFILEdownloadsPsTools.zip" -DestinationPath "C:Program FilesPsTools" -Force
The PsTools are now in the right place. You just need to modify the Path environment variable and specify the full path of your destination directory. Again, there are two path environment variables—System and User. It depends on how you want to use the PsExec tool. If you want PsExec (and other tools) to be available for all users in the current system, you can add it to the System Path variable. If you want PsExec to be available only to your current user profile, you could add it to the User Path variable. To do this, you can use one of the following commands:
For the User variable:
$path = [System.Environment]::GetEnvironmentVariable("Path","User")
[System.Environment]::SetEnvironmentVariable("Path", $path + ";C:Program FilesPsTools", "User")

Add PsTools to the User Path environment variable
For the System variable
$path = [System.Environment]::GetEnvironmentVariable("Path","Machine")
[System.Environment]::SetEnvironmentVariable("Path", $path + ";C:Program FilesPsTools", "Machine")

Add PsTools to the System Path environment variable
No matter which environment variable you set, be sure to specify the full path of the directory to which you extracted the PsTools executables. Also note that the semicolon (;) before the directory path is intentionally added to separate the new value from the old values.
Similarly, you can also view the System Path environment variable using the following command:
[System.Environment]::GetEnvironmentVariable("Path","Machine") -Split ";"
At this point, PsExec (and other utilities in PsTools) are ready for use in your system.
Use PsExec on a single remote computer
To start using PsExec, just close the existing PowerShell console and launch a new one. If you want to use it in a command prompt, you can launch a command prompt. Whichever you choose, just make sure you launch an elevated session since PsExec requires administrator privileges to run programs on remote computers. Non-admins will also be able to use PsExec locally, but there is not much you can do without admin privilege.
PsExec syntax
The syntax of PsExec is fairly simple, as shown below:
psexec [\computer[,computer2[,...] | @file]][-u user [-p password][-n s][-r servicename][-h][-l][-s|-e][-x][-i [session]][-c executable [-f|-v]][-w directory][-d][-<priority>][-a n,n,...] cmd [arguments]
If the syntax sounds complicated to you, trust me, it will become clear as we use it. When you run PsExec for the first time, you will see an end-user license agreement (EULA), as shown in the following screenshot:

Displaying the PsExec EULA
Click the Agree button to accept the EULA. To suppress this EULA, you could use the /accepteula switch as shown below:
psexec /accepteula
Getting help
Help documentation is the most important thing for getting started with any tool. If you run the psexec command without any switch, you will see detailed help, including its usage syntax and all the supported switches. The following screenshot shows what the help section looks like.

Displaying the PsExec help
I will not discuss every switch in detail, but will try to cover the most important ones. While researching and experimenting with PsExec, you can always refer to the built-in help.
PsExec command error
If you do not see this help page but instead see an error that says ‘psexec’ is not recognized as an internal or external command, operable program or batch file, it means you did something wrong while setting up the Path environment variable.

‘psexec’ is not recognized as an internal or external command operable program or batch file
To fix this error, make sure you set the Path environment variable correctly.
Exit and error codes
When you use PsExec to run a program (or a process), it might display an exit code for that program and returns an error code. The error code returned is not generated by PsExec; it is generated by the original program that you run using PsExec. So, if you get any error while running a program, you should consult the program’s documentation to determine what that error code means. An exit code of 0 typically indicates successful execution.
Impersonation and alternate credentials
User impersonation occurs when a program runs in the security context of a user other than the currently logged-in user. When you run a program (or process) with PsExec, the program is executed on the remote computer impersonating the user account that you’re using on your local computer to run PsExec. In other words, the process that you start on a remote computer runs by impersonating your user account on a local system. Impersonation has certain limitations in Windows. The main limitation is that the remote process cannot access any resources on the network. To get around this problem, PsExec allows you to provide alternate credentials using the -u and -p switches.
To run a process on a remote computer using alternate credentials, you could use PsExec, as shown below:
psexec \remote_computer -u domainadmin -p password -i process_name
where:
- The \remote_computer should be replaced with the name or IP address of the remote computer. You could specify multiple computers separated by a comma (,).
- The -u switch specifies the alternate user name. The -u should be followed by the user name, which can be either a local admin user on the remote computer or a domain admin.
- The -p switch is used to specify the password of the alternate user account you specified in the -u switch. Note that -p requires you to type the password in clear text, so even though PsExec will encrypt these credentials in transit, someone could still see the password as you type it in clear text. Therefore, it is a good idea to skip the -p switch and use the -u switch alone. PsExec will automatically prompt you to type the password when you press Enter, which is a safer way.
- The -i switch specifies the interactive mode. This switch was not needed until PsExec version 2.20. You should use this switch with version 2.30 and above; otherwise, you will get an error.
- The process_name should be replaced with the command or process you want to run on the remote computer.
Example
psexec \webserver -u domainadmin -i ipconfig
This command runs the ipconfig command on a remote computer named webserver using the alternate credentials of the domain admin.

Running a command on a remote computer using alternate credentials with PsExec
Running a command on a remote computer using alternate credentials with PsExec
The screenshot shows that PsExec prompted for the password on the fly, since I did not use the -p switch. Error code 0 indicates that the ipconfig command exited with success.
If you get an error that says «Logon failure: the user has not been granted the requested logon type at this computer,» as shown in the following screenshot, make sure to use the -i switch with the command. It is needed with PsExec version 2.30 and above.

Logon failure the user has not been granted the requested logon type at this computer
Use PsExec on multiple remote computers
One cool feature of PsExec is that you can specify multiple computers on which to run a program (or process) at the same time. There are several ways to specify multiple remote computers.
Using comma-separated computer names
PsExec allows you to specify a comma-separated list of computers in a domain or workgroup.
psexec \webserver01,webserver02,fileserver01,fileserver02 sc start wuauserv
The above command will run sc start wuauserv to start the Windows update service on multiple remote computers specified in a comma-separated string. Remember not to use a space between computer names and commas.
Using a file to specify multiple computer names
You can also use a text file containing multiple computer names (one per line) using the @file format to specify the file name.
psexec @domain_computers.txt sc query wuauserv

Running a command on multiple remote computers using files with PsExec
The above command runs the sc query wuauserv command to view the status of the Windows update service on all the computers mentioned in the specified file (@domain_computers.txt in our example). Make sure there is one computer name per line in the file; otherwise, you will get an error.
Note that I am using PowerShell to run PsExec, so I had to enclose the file name in single or double quotes (for example, «@domain_computers.txt»). This is necessary, since PowerShell, by default, interprets the @ symbol as an array subexpression operator. If you’re running PsExec at the normal command prompt (cmd.exe), there is no need to enclose the @filename in quotes.
Using a wildcard to run the process on all computers
PsExec also allows you to use the wildcard character (*) to specify all the computers in the current domain or workgroup.
psexec \* getmac
This will run the getmac command on all the remote computers that are in the same workgroup or domain.
Using \* causes PsExec to enumerate all the computers in the current domain or workgroup by running the net view /all command under the hood. Since the net view command depends on NetBIOS, if you run this command in your domain or workgroup environment, it will most likely fail with an error stating: «A system error has occurred: 6118».

PsExec: A system error has occurred 6118
This error essentially means that the firewall (either the Windows firewall or the antivirus firewall) is blocking the SMB connections, or the network discovery is turned off on the remote computer(s).
This is an outdated and inefficient way of enumerating network computers. Later in this guide, I will tell you how you can utilize PowerShell to build a file containing multiple (or all) domain computers so that you can easily run processes on those computers with the help of PsExec, and you won’t have to use \* to enumerate computers.
Run a process as the LocalSystem account
The LocalSystem account is a predefined account with extensive privileges on the local computer. It is created by the operating system during installation. The security token of the LocalSystem account includes the security identifiers «NT AUTHORITYSystem» and «BUILTINAdministrators». These accounts have unrestricted access to most of the system objects. The advantage of running a process or program under the LocalSystem account is that the process will have unrestricted access to all system resources.
One of the most powerful features of PsExec is its ability to launch a process (or program) with LocalSystem account privileges. This feature is most often exploited by hackers and other malicious users. You can imagine what malicious users can do on your system if they succeed in running a malicious process with the LocalSystem account privilege.
To launch a process as a LocalSystem account, you can use the -s switch with PsExec, as shown below:
psexec \webserver -s cmd /c dir "c:System Volume Information"
The -s switch causes PsExec to launch the cmd.exe process with the LocalSystem account on the webserver. Note that the /c switch used here belongs to cmd.exe itself, which is useful for running a command on the fly and then terminating it. It is particularly useful when you want to run a single command without having to launch an interactive console session of cmd.exe on a remote computer. Don’t confuse this with the -c switch of PsExec, which is useful for copying a program to a remote computer when it doesn’t exist in the default path. We will discuss the -c switch in greater detail in a separate section below.
This command displays the contents of the System Volume Information directory on the remote webserver, which is not accessible by regular user accounts.

Run a process on a remote computer under the LocalSystem account with PsExec
The following image shows how the -s switch makes a difference in the PsExec command:

Local System Account vs. Impersonate User
This image shows that when you run a process with the -s switch, it is launched with the «NT AUTHORITYSystem» privilege. When you run a process without specifying any alternate credentials, your currently logged-in user is impersonated.
Interactive mode
Another important feature of PsExec is its ability to launch a process in an interactive mode using the -i switch. It is most commonly used along with the -s switch to launch a GUI-based program (or process) on a local computer with the «NT AUTHORITYSystem» privilege.
For example, when you normally launch the Windows registry editing tool (regedit.exe) and try to open the HKEY_LOCAL_MACHINESYSTEM and HKEY_LOCAL_MACHINESAM subkeys, you will not see anything there because these subkeys are only accessible to the SYSTEM account.

Direct access to SAM and SECURITY registry subkeys
However, if you launch regedit.exe with PsExec using the -s and -i switches, as shown in the following command, you will be able to see everything in these subkeys.
psexec -s -i regedit

Interactively launch regedit under the System account with PsExec
Take a look at the following screenshot showing all the subkeys under SYSTEM and SAM. This became possible since PsExec launched the regedit.exe with «NT AUTHORITYSystem» privilege.

Accessing SAM and SECURITY registry subkeys using System Account
When you launch the process this way, PsExec waits for the program to finish running before the exit code is returned. If you do not want to wait, you can use the -d switch, as shown below:
psexec -s -i -d regedit
This command returns the exit code, and you will get the command console control back immediately.
You can also use this technique to launch any GUI-based program interactively on a remote computer, as shown in the following command:
psexec \webserver -s -i -d powershell
This command launches PowerShell in interactive mode on a remote webserver with the SYSTEM account privilege and returns the process ID.

Launch PowerShell in interactive mode on a remote computer using PsExec
PsExec even allows you to control the priority of the process that you’re running with the help of the -low, -belownormal, -abovenormal, -high, or -realtime keywords. The following command launches the PowerShell process on a remote webserver with a priority of high.
psexec \webserver -i -d -high powershell

Launch a process in interactive mode and high priority using PsExec
On Windows Vista, you can also use -background to run the process at low memory and I/O priority.
Copy a program to a remote computer
The most unique feature of PsExec is its ability to temporarily copy a program (or process) and then execute it on one or more remote computers. This is particularly useful when you have a program on your local computer, and you want to run it on the remote computer(s). All you need to do is use PsExec with the -c switch and specify the name of the program on the local computer. Have a look at the following command:
psexec @domain_computers.txt -s -d -c awesome_script.cmd
This command copies the awesome_script.cmd script and executes it on all the computers mentioned in the domain_computers.txt file using the SYSTEM account.

Copy a program to a remote computer using PsExec
The -c switch allows PsExec to temporarily copy the program from the local computer to the admin$ share (which is mapped to the Windows directory) on a remote computer, execute it, and then delete it as soon as the program finishes executing.
If you get an error that says, «The specified application is not on the path,» as shown in the following screenshot, make sure the program or script you’re trying to copy using the -c switch exists in your current working directory. In my case, the awesome_script.cmd must exist in the D:MyScripts directory.

PsExec error: The specified application is not on the path
If the program or script already exists in the remote computer, but you still want to copy it anyway, use the -f switch. You can also use the -v switch to copy only the program if its version on the local computer is newer than on the remote computer.
Respecting UAC and Windows security
Windows Vista and above have an access control feature known as User Account Control (UAC), which allows programs and processes to always run in the security context of a non-administrator account unless the administrator specifically authorizes that program to run with elevated access to the system. This feature prevents malware and other potentially dangerous programs from making changes to your computer.
PsExec provides the -h switch, which allows the process to run with the account’s elevated token if the target system supports it. With the help of this switch, admins can launch processes without having to worry about being blocked by UAC on a remote computer. Let’s understand this with an example:
I have a batch script on my workstation that stops the print spooler service, deletes all the files from the %SystemRoot%system32spoolprinters directory, and then starts the print spooler service again. This is just a simple batch script; there’s nothing fancy here. When I get a call from any user complaining about stuck print jobs, all I need to do is run this script remotely on their PC with the help of PsExec. The following screenshot shows that when I try to run the script without the -h switch, it fails with an error stating: «Access is denied:»
psexec \192.168.0.216 -i -u .admin -c .DeletePrintJobs.cmd

Running a script on a remote computer without an elevated security token
The script failed because UAC on the remote computer is restricting it from making changes to the computer, even though the alternate user specified is a member of the administrators group. This is the main purpose of UAC.
Now, let’s see what happens when we add the -h switch to command:
psexec \192.168.0.216 -i -h -u .admin -c .DeletePrintJobs.cmd
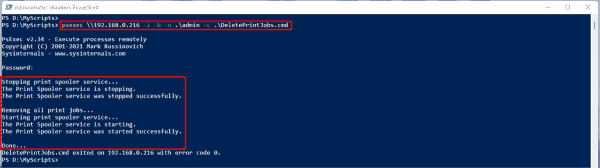
Running a script on a remote computer with an elevated security token
You can see that the script was executed successfully. The -h switch allowed the script to run with the user’s elevated security token on the remote computer.
In the same way, if you think your current user account has too much privilege but you want to run the process on a remote computer with limited privileges, you can do so with the help of the -l switch. This allows PsExec to run the process as a limited user by stripping off the administrators group and allowing the privileges assigned to the Users group only. The following command shows how to run cmd.exe with the least privilege on a remote webserver:
psexec \webserver -l cmd /c whoami /priv
This command launches cmd on the remote webserver with the least privilege. So, even though my currently logged-in user is a member of the domain admins AD group, it will still have restricted permissions on the remote computer within that process. Have a look at the following screenshot:

Running a process using limited privileges on the remote computer with PsExec
This screenshot shows that I had only a few privileges. When I tried creating a user, I got an Access Denied error since the cmd process was launched using the -l switch with PsExec. It is a great way to run business applications either on remote or local computers with the user’s default security context.
Subscribe to 4sysops newsletter!
In my next post, we will discuss the use of PsExec and PowerShell together.
![]()
The ‘Net View Error 6118′ CMD error typically appears when the user tries to use the ‘net view /all‘ command to view the full list of network devices from via the terminal. In most cases, affected users report that no devices are showing up under Network in File Explorer, although they can ping them directly via CMD.
What’s causing the ‘Net View Error 6118’ and How to Fix it?
- 3rd party AV / Firewall interference – As it turns out, this particular issue can appear due to an overprotective security solution that is interfering between the Server Message Block and the other network devices. To fix the issue in this case, you will need to uninstall your current 3rd party firewall or at least disable the real-time protection.
- Function Discovery service is Disabled – If none of your network-connected devices show up inside the services screen, it’s probably because of the Function Discovery Provider Host service is disabled. To fix the issue in this case, all you need to do is open the Services screen and enable the service + the one associated with it (Function Discovery Resource Publication).
- Computer Browser service is Disabled – If no ‘net view’ commands are being processed by CMD, it’s probably because the Computer Browser service is disabled. This was part of the SMBv1 the was deprecated on the latest versions of Windows 10. To use it, you will need to enable SMBv1 via the Windows Features menu and then enabled the Computer Browser service via the Services menu.
1. Disable 3rd party Firewall / AV (if applicable)
As it turns out, one of the most common causes that might end up spawning the ‘Net View Error 6118’ error is overprotective firewall protection that blocks the SMB (Server Message Block) from communicating with other network devices.
Note: If you’re not using an external firewall/security suite that might cause this issue, move down directly to the next method below.
Quite a lot of affected users have reported that in their case, the issue ended up being caused by an overprotective security suite that ended up interrupting the connection between the SMB and other devices connected to the same network due to a false positive.
If this scenario is applicable, you should start your troubleshooting guide by investigating if the 3rd party virus protection tool that you’re using is not actually causing the ‘Net View Error 6118′ issue.
If you’re using a 3rd party AV, the ideal way to start is to disable the real-time protection, restart your computer and see if the issue goes away for good.

However, if you’re using an external firewall, disabling the Shields / Real-Time protection will not do you any good since the same security rules will remain firmly in place. If the latter scenario is applicable, the only way you will be able to confirm your suspicion is by temporarily uninstalling the 3rd party suite and seeing if the ‘Net View Error 6118′ error stops occurring.
Here’s a quick guide on uninstalling your 3rd party firewall in order to eliminate the potential interference:
- Press Windows key + R to open up a Run dialog box. Next, type ‘appwiz.cpl’ and press Enter to open up the Programs and Features window.

Type appwiz.cpl and Press Enter to Open Installed Programs List - Once you’re inside the Programs and Features screen, scroll down through the list of installed applications and try to locate the 3rd party security suite/firewall that you’re using. When you see it, right-click on it and choose Uninstall from the next context menu.

Uninstalling the security suite - Now that you’re inside the uninstallation prompt, follow the on-screen prompts to complete the removal of your 3rd party suite/firewall.
- Restart your computer and see if the issue went away now that you uninstalled your potential culprit.

In case the same issue is still occurring, reinstall the 3rd party you previously uninstalled and move down to the next potential fix below for a different repair strategy.
2. Enabling the Function Discovery Provider Host
Another potential cause that might make the other network-connected devices inaccessible is a disabled Function Discovery Provided Host service. Some users that we’re struggling to resolve the same issue have reported that they were finally able to fix the issue after they accessed the Services menu and enabled this service.
After doing this and opening File Explorer again, affected users were prompted to enable Network Discovery, which made the network-connected devices accessible again.
Note: While this method will not fix the ‘Net View Error 6118′ error, it will provide you with a safer protocol for accessing network-connected devices directly from File Explorer.
Here’s a quick guide on enabling the Function Discovery Provider Host in order to force the other connected network devices to appear inside File Explorer:
- Press Windows key + R to open up a Run dialog box. Next, type ‘services.msc’ inside the text box and press Enter to open up the Services screen. When you are prompted by the UAC (User Account Control) prompt, click Yes to grant administrative privileges.
- Once you’re inside the Services screen, scroll down through the list of Local services and locate the Function Discovery Provider Host service. When you see it, right-click on it and click on Properties from the context menu.
- Inside the Properties menu of Function Discovery Provider Host, select the General tab, then change the Startup type to Automatic (Delayed Restart) and click on Apply to save the changes.
- Next, find the Function Discovery Resource Publication and repeat the same changes you did at step 3 for the Function Discovery Provider Host service.
- After the modifications were operated, close the Services screen and open file Explorer and clicking on Network from the left-hand side menu.
- You will get an error message initially, so dismiss it by clicking on Ok.
- Next, click on the yellow bar that appears at the top of the window and then click on Turn on Network Discovery and File Sharing to make the other connected network devices visible.
In case you want to go for a different fix that will actually treat the symptoms of the ‘Net View Error 6118’ error and make the network devices visible inside the terminal, move down to the next method below.
3. Enabling the Computer Browser service
As it turns out, the number one reason that is known to cause the ‘Net View Error 6118′ error is a disabled service called Computer Browser. But the problem is, this service was deprecated in the latest versions of Windows 10 for security reasons.
However, if you do want to leverage this fix, you will need to start by enabling SMBv1 via Windows Feature – this technology was since deprecated. After you do this and restarting your computer, the Computer Browser service should become available inside the Services screen.
Here’s a quick guide on enabling SMBv1 via Windows Feature and then starting the Computer Browser service to fix the ‘Net View Error 6118′ error:
- Press Windows key + R to open up a Run dialog box. Next, type ‘appwiz.cpl’ inside the text box and press Enter to open up the Programs and Features menu.
- Once you’re inside the Programs and Features screen, use the vertical menu on the right-hand side to click on Turn Windows Features On or Off.
- When you’re inside the Windows Features screen, scroll down through the list of native Windows features and locate SMB 1.0/CIFS File Sharing Support. After you manage to locate it, simply check the box associated with it and hit Ok.
- Next, wait for the operation to complete and the changes to be applied. When prompted to restart, do so by clicking on Restart Now.
- After the next startup sequence is complete, press Windows key + R to open up another Run dialog box. Next, type ‘services.msc’ and press Enter to open up the Services screen. When prompted by the UAC (User Account Control), click Yes to grant administrative privileges.
- Once you manage to get inside the Services screen, scroll down through the list of local services and locate the Computer Browser service.
- When you see it, right-click on it and choose Properties from the newly appeared context menu.
- Inside the Properties screen of the Computer Browser service, select the General tab and then change the Startup type from Disabled to Automatic. Then, click on Start to start it right away and finish it up by clicking Apply to save the changes.
- Now that the Computer Browser service is enabled, open a terminal window and run the same command that was previously causing the ‘Net View Error 6118′ CMD error to see if the issue has been resolved.

Kevin Arrows
Kevin is a dynamic and self-motivated information technology professional, with a Thorough knowledge of all facets pertaining to network infrastructure design, implementation and administration. Superior record of delivering simultaneous large-scale mission critical projects on time and under budget.
Я решил посмотреть полный список сетевых устройств через командную строку при помощи команды net view /all и мне выдало системную ошибку 6118 с комментарием, что недоступен список серверов для этой рабочей группы. Виновником данной ошибки может быть сторонний антивирус, брандмауэр или служба обнаружения отключена. После долгого времени решения данной проблемы я не смог точно выявить виновника, но последовательность способов, которые я проделывал, будут полезны.
1. Сторонний антивирус и брандмауэр
Сторонний антивирус и брандмауэр могут блокировать сетевое соединение как ложное. В этом случае нужно отключить сторонний антивирус на тех ПК, где сеть с доступом, и проверить, устранена ли системная ошибка 6118.
Если не помогло, то сторонние антивирусы поставляются со своим брандмауэром, и дело в том, что он может работать даже тогда, когда вы на время отключили антивирус. Попробуйте отключить брандмауэр на время, если не поможет, то нужно будет полностью удалить антивирус с ПК. Ниже руководство поможет вам:
- Как удалить Антивирусы полностью с компьютера
2. Функция обнаружения
Нажмите сочетание кнопок Win+R и введите services.msc, чтобы открыть службы. Найдите службу «Хоcт поставщика функции обнаружения«. и нажмите по немй правой кнопкой мыши, после чего выберите «Свойства«. В новом окне установите:
- Тип запуска: Автоматически (отложенный запуск).
- Нажмите на кнопку «Запустить».
Далее найдите службу «Публикация ресурсов обнаружения функции» и сделайте тоже самое:
- Тип запуска: Автоматически (отложенный запуск).
- Нажмите на кнопку «Запустить».
3. Параметры общего доступа
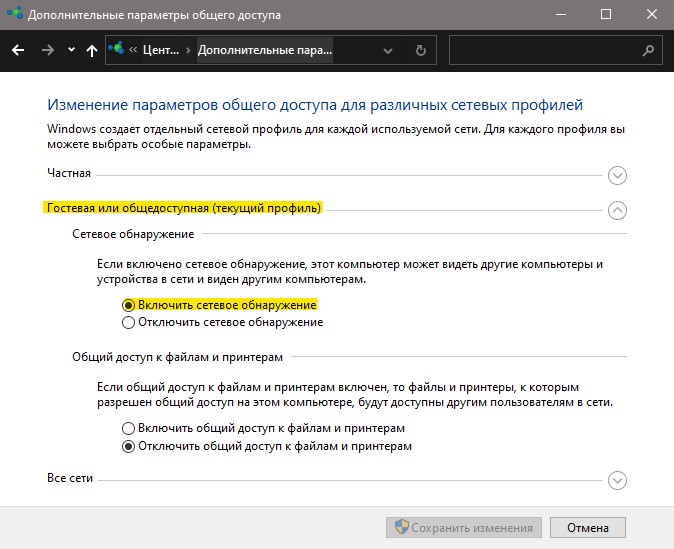
Нажмите Win+R и введите control.exe /name Microsoft.NetworkandSharingCenter, чтобы открыть центр сетями. В левом столбце нажмите на «Изменить дополнительные параметры общего доступа«.
- В гостевой и общедоступном профиле включите «Включить сетевое обнаружение».
- Далее разверните профиль «Все сети» и включите 128-битное шифрование и включите общий доступ с парольной защитой.
Смотрите еще:
- Не найден сетевой путь ошибка 0x80070035
- Windows 10 не видит другие компьютеры в сети
- Как включить сетевой протокол SMB 1 в Windows 10
- Сетевой адаптер не имеет допустимых параметров настройки IP
- Windows не удалось автоматически обнаружить параметры прокси этой сети
[ Telegram | Поддержать ]
Ошибка 6118 может возникнуть в выводе командной строки при вводе команды net view, которая при отсутствии проблем выводит список сетевых устройств, и компьютеры отображаются в сетевом окружении. Получается, что из-за этой ошибки Windows не видит другие компьютеры в сети.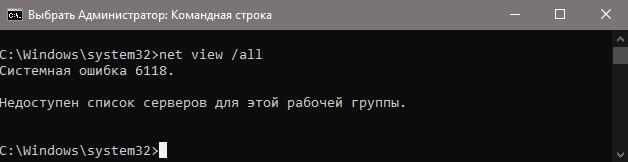 Для того, что бы решить проблему, необходимо выполнить действия, которые мы постарались подготовить для вас.
1 Способ. Отключение антивируса и брандмауэра Windows (Windows Defender Firewall).
Чаще всего причина системной ошибки 6118 в командной строке является чрезмерно активный брандмауэр, который блокирует служебные сообщения сервера (SMB) с другими устройствами. Большинство пользователей обнаружили, что проблема вызвана их сторонним антивирусным программным обеспечением.
В этом случае необходимо отключить антивирусную защиту и перезагрузить компьютер.
1.1. Как отключить «Бранмауэр Windows»?
1. В окне поиска Windows 10 вводим «брандмауэр Защитника Windows».
2. В открывшемся окне «Брандмауэр Защитника Windows» в левом меню выбираем «Включение и отключение брандмауэра Защитника Windows».
3. Далее в новом окне «Настройка параметров для каждого типа сети» отмечаем галочкой пункт «Отключить брандмауэр Защитника windows (не рекомендуется)» для каждого типа сети:
— Параметры для частной сети;
— Параметры для общественной сети.
1.2. Как отключить «Брандмауэр Microsoft Defender»?
1. Нажмите пуск и выберите «Параметры» (значок шестерёнки);
2. Перейдите в раздел «Обновление и безопасность«;
3. В левом меню нажмите «Безопасность Windows.«;
4. В основном окне находим «Брандмауэр и защита сети«;
5. В новом окне видим «Сеть домена», «Частная сеть», «Общедоступная сеть». Выбираем ту сеть, которая указана как (активный);
6. Передвигаем переключатель в положение «Откл.» для отключения «Брандмауэр Microsoft Defender».
После настройки перезапустите систему и снова повторите команду «net view«.
2 Способ. Включить службу «Хост поставщика функции обнаружения».
Если Windows 10 не видит соседние компьютеры в сети, то одной из причин может быть не рабочая служба «Хост поставщика функции обнаружения«.
В службе «Хост поставщика функции обнаружения» размещаются поставщики обнаружения сетевых ресурсов компонента обнаружения функций. Эти поставщики обнаружения функций обеспечивают службы обнаружения сетевых ресурсов для протоколов SSDP и WS-D. Остановка или отключение службы «Хост поставщика функции обнаружения» приведет к отключению обнаружения сетевых ресурсов для этих протоколов при использовании обнаружения функций. Если эта служба недоступна, сетевые службы, работа которых зависит от компонента обнаружения функций и данных протоколов обнаружения, не смогут находить сетевые устройства или ресурсы.
1.Нажмите комбинацию клавиш Win + R, чтобы открыть окно «Выполнить«.
В открывшемся окне введите команду «services.msc«(без кавычек) и нажмите ОК.
2. В запустившемся окне «Службы» найдите службу с именем «Хост поставщика функции обнаружения» и перейдите в Свойства нажав на ней правой кнопкой мыши.
3. Найдите параметр «Тип запуска» и выберите в раскрывающемся списке Автоматический (Отложенный запуск). Предварительно остановив службу и запустив после изменения типа запуска.
4. Перезапустите ПК. Вернитесь в командную строку и попробуйте выполнить команду “net view”, которая должна успешно подключить все сетевые устройства. Если нет, то попробуйте следующий 3-й способ.
Аналогично сделайте со службой «Публикация ресурсов обнаружения функции«.
Для сброса сети Windows необходимо поочередно выполнить следующие команды в командной строке.
ipconfig /release

ipconfig /flushdns

ipconfig /renew

netsh winsock reset

netsh interface ipv4 reset

netsh interface ipv6 reset

netsh winsock reset catalog

netsh int ipv4 reset reset.log

netsh int ipv6 reset reset.log

netsh advfirewall reset
Как только все команды будут выполнены, закройте окно командной строки и перезапустите ПК.
4 Способ. Включение службы «Браузера компьютеров»(Browser) в Windows.
Если вы сразу попробуете найти службу «Браузера компьютеров»(Browser), то скорее всего не увидите в общем списке. Причиной этому является отключенный SMBv1, который необходимо включить. Включить SMBv1 в Windows можно следующим образом:
1.Нажмите комбинацию клавиш Win + R введите команду «appwiz.cpl«(без кавычек).
2. В левом меню открывшемся окне «Программы и компоненты» переходим к пункту «Включение или отключение компонентов Windows«.
3. В появившемся окне «Компоненты windows» найдите «Поддержка общего доступа к файлам SMB 1.0/CIFS» и отметьте его галочкой, нажмите ОК.
4. Перезагрузите компьютер.
5. После запуска компьютера перейдите в службы, как это уже делали во 2 способе.
Найдите в списке имя «Браузера компьютеров»(Browser).
6. Правой кнопкой мыши выберите «Свойства» и измените тип запуска на «Автоматически«.
Запустите командную строку и проверьте выполнение команды «net view«.
5 Способ. Включить сетевое обнаружение в Windows.
1. В окне «Выполнить» (win+R) введите команду «control.exe /name Microsoft.NetworkandSharingCenter«. В открывшемся окне «Центр управления сетями и общим доступом» в меню слева выберите «Изменить дополнительные параметры общего доступа«.
2. Для профилей «Частная«, «Гостевая или общедоступная«, «Все сети» отметьте пункт «Включить сетевое обнаружение«.
3. Перезапустите ПК.
Надеюсь один из способов помог вам решить ошибку net view.
Укажите в комментариях какую именно ошибку и способ применили для решения проблемы.