Синтез речи
Познакомимся, как использовать Python для преобразования текста в речь с использованием кроссплатформенной библиотеки pyttsx3. Этот пакет работает в Windows, Mac и Linux. Он использует родные драйверы речи, когда они доступны, и работает в оффлайн режиме.
Использует разные системы синтеза речи в зависимости от текущей ОС:
- в Windows — SAPI5,
- в Mac OS X — nsss,
- в Linux и на других платформах — eSpeak.
Есть функции, которые здесь не рассматриваются, такие как система событий. Вы можете подключить движок к определенным событиям:
- можно посчитать, сколько слов сказано, и обрезать его,
- можно проверить каждое слово и отрезать его, если есть неуместные слова.
Всегда обращайтесь к официальной документации для получения наиболее точной, полной и актуальной информации https://pyttsx3.readthedocs.io/en/latest/open in new window
Установка пакетов в Windows
Используйте pip для установки пакета. В Windows, вам понадобится дополнительный пакет pypiwin32, который понадобится для доступа к собственному речевому API Windows.
pip install pyttsx3
pip install pypiwin32  # Только для Windows
1
2
Преобразование текста в речь
Для первой программой озвучивания текста используем код:
import pyttsx3

engine = pyttsx3.init()     # инициализация движка

# зададим свойства
engine.setProperty('rate', 150)     # скорость речи
engine.setProperty('volume', 0.9)   # громкость (0-1)

engine.say("I can speak!")      # запись фразы в очередь
engine.say("Я могу говорить!")  # запись фразы в очередь

# очистка очереди и воспроизведение текста
engine.runAndWait()

# выполнение кода останавливается, пока весь текст не сказан
1
2
3
4
5
6
7
8
9
10
11
12
13
14
15
В примере программы даны две фразы на английском и на русском языке. Существует голосовой набор по умолчанию, поэтому вам не нужно выбирать голос. В зависимости от версии windows будет озвучена соответствующая фраза. Например для английской версии windows услышим: «I can speak!»
Доступные синтезаторы по умолчанию
Доступные голоса будут зависеть от версии установленной систем. Вы можете получить список доступных голосов на вашем компьютере. Обратите внимание, что голоса, имеющиеся у вас на компьютере, могут отличаться от чьей-либо машины.
У каждого голоса есть несколько параметров, с которыми можно работать:
- id (идентификатор в операционной системе),
- name (имя),
- languages (поддерживаемые языки),
- gender (пол),
- age (возраст).
У активного движка есть стандартный параметр ‘voices’, где содержится список всех доступных этому движку голосов. Получить список доступных голосов можно так:
import pyttsx3

engine = pyttsx3.init()    # Инициализировать голосовой движок.
voices = engine.getProperty('voices')

for voice in voices:    # голоса и параметры каждого
    print('------')
    print(f'Имя: {voice.name}')
    print(f'ID: {voice.id}')
    print(f'Язык(и): {voice.languages}')
    print(f'Пол: {voice.gender}')
    print(f'Возраст: {voice.age}')
1
2
3
4
5
6
7
8
9
10
11
12
Результат будет примерно таким:
Имя: Microsoft Hazel Desktop - English (Great Britain)
ID: HKEY_LOCAL_MACHINESOFTWAREMicrosoftSpeechVoicesTokensTTS_MS_EN-GB_HAZEL_11.0
Язык(и): []
Пол: None
Возраст: None
------
Имя: Microsoft David Desktop - English (United States)
ID: HKEY_LOCAL_MACHINESOFTWAREMicrosoftSpeechVoicesTokensTTS_MS_EN-US_DAVID_11.0
Язык(и): []
Пол: None
Возраст: None
------
Имя: Microsoft Zira Desktop - English (United States)
ID: HKEY_LOCAL_MACHINESOFTWAREMicrosoftSpeechVoicesTokensTTS_MS_EN-US_ZIRA_11.0
Язык(и): []
Пол: None
Возраст: None
1
2
3
4
5
6
7
8
9
10
11
12
13
14
15
16
17
Как видите, в Windows для большинства установленных голосов MS SAPI заполнены только «Имя» и ID.
Установка дополнительных голосов в Windows
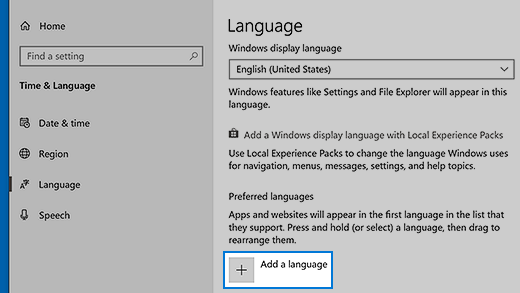
При желании можно установить дополнительные языковые пакеты согласно инструкции https://support.microsoft.com/en-us/help/14236/language-packs#lptabs=win10open in new window
Для этого выполните указанные ниже действия.
-
Нажмите кнопку Пуск , затем выберите Параметры > Время и язык > Язык.
-
В разделе Предпочитаемые языки выберите Добавить язык.
-
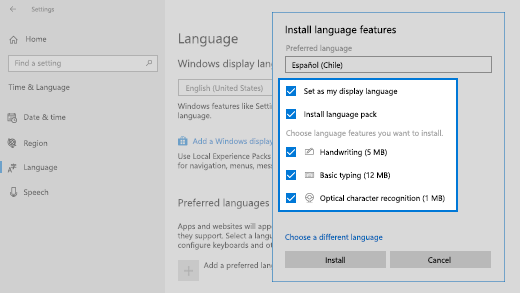
В разделе Выберите язык для установки выберите или введите название языка, который требуется загрузить и установить, а затем нажмите Далее.
-
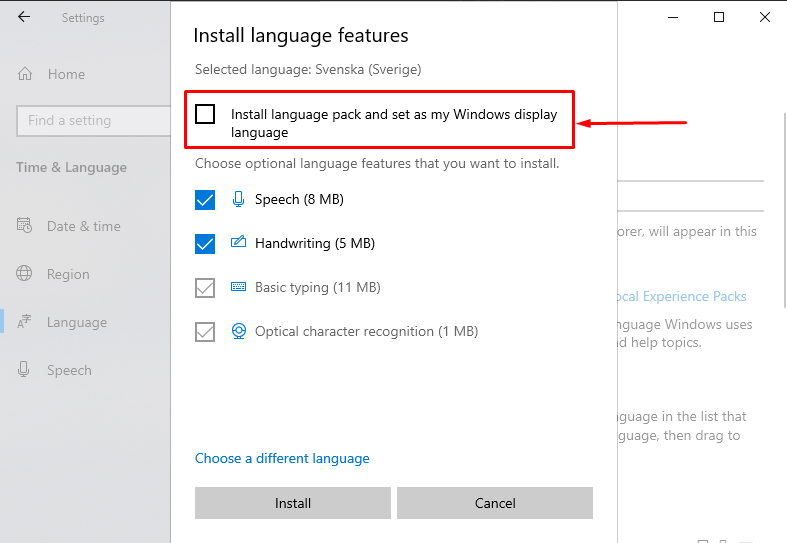
В разделе Установка языковых компонентов выберите компоненты, которые вы хотите использовать на языке.
-
ВНИМАНИЕ: отключите первый пакет: «Install language pack and set as my Windows display language» — «Установите языковой пакет и установите мой язык отображения Windows»
Иначе переустановиться язык отображения операционной системы.
-
Нажмите Установить.
После установки нового языкового пакета перезагрузка не требуется. Запустив код проверки установленных языков. Новый язык должен отобразиться в списке.
ПРИМЕЧАНИЕ
Не все языковые пакеты поддерживают синтез речи. Для этого опция Speech должны быть в описании установки.
Выбор голоса
Установить голос можно методом setProperty(). Например, используя голосовые идентификаторы, найденные ранее, вы можете настроить голос. В примере показано, как настроить один голос, чтобы сказать что-то, а затем использовать другой голос из другого языка, чтобы сказать что-то другое.
В Windows идентификатором служит адрес записи в системном реестре:
import pyttsx3
engine = pyttsx3.init()

en_voice_id = "HKEY_LOCAL_MACHINESOFTWAREMicrosoftSpeechVoicesTokensTTS_MS_EN-US_ZIRA_11.0"
ru_voice_id = "HKEY_LOCAL_MACHINESOFTWAREMicrosoftSpeechVoicesTokensTTS_MS_RU-RU_IRINA_11.0"

# Use female English voice
engine.setProperty('voice', en_voice_id)
engine.say('Hello with my new voice.')

# Use female Russian voice
engine.setProperty('voice', ru_voice_id)
engine.say('Привет. Я знаю несколько языков.')

engine.runAndWait()
1
2
3
4
5
6
7
8
9
10
11
12
13
14
15
Как озвучить системное время в Windows
Пример консольного приложения которое будет называть неточное время может быть реализованно следующим кодом:
from datetime import datetime, date, time
import pyttsx3
import time

ru_voice_id = "HKEY_LOCAL_MACHINESOFTWAREMicrosoftSpeechVoicesTokensTTS_MS_RU-RU_IRINA_11.0"

engine = pyttsx3.init()
engine.setProperty('voice', ru_voice_id)

def say_time(msg):
    engine.say(msg)
    engine.runAndWait()

time_checker = datetime.now()
say_time(f'Не точное Мурманское время: {time_checker.hour} часа {time_checker.minute} плюс минус 7 минут')
1
2
3
4
5
6
7
8
9
10
11
12
13
14
15
Привер риложения которое каждую минуту проговаривает текущее время по системным часам. Точнее, оно сообщает время при каждой смене минуты. Например, если вы запустите скрипт в 14:59:59, программа заговорит через секунду.
Программа будет отслеживать и называть время, пока вы не остановите ее сочетанием клавиш Ctrl+C в Windows.
from datetime import datetime, date, time
import pyttsx3
import time

ru_voice_id = "HKEY_LOCAL_MACHINESOFTWAREMicrosoftSpeechVoicesTokensTTS_MS_RU-RU_IRINA_11.0"

engine = pyttsx3.init()
engine.setProperty('voice', ru_voice_id)

def say_time(msg):
    engine.say(msg)
    engine.runAndWait()

while True:
    time_checker = datetime.now()
    if time_checker.second == 0:
        say_time(f'Мурманское время: {time_checker.hour} часа {time_checker.minute} минут')
        time.sleep(55)
1
2
3
4
5
6
7
8
9
10
11
12
13
14
15
16
17
18
Посмотрите на алгоритм: чтобы уловить смену минуты, следим за значением секунд и ждем, когда оно будет равно нулю. После этого объявляем время и, чтобы поберечь ресурсы производительности, отправляем программу спать на 55 секунд. После этого она снова начнет проверять текущее время и ждать нулевой секунды.
Для дальнейшего изучения библиотеки pyttsx3 вы можете заглянуть в англоязычную документацию, в том числе справку по классу и примеры.
Упражнения tkinter
- Напишите программу часы, которая показывает текущее время и имеет кнорку, при нажатии на которую можно ушлышать текуще время.
- Внесите измеения с программу что бы при произненсении времени программа корректно склоняла слова: «часы» и «минуты».
- Добавьте с помощью радиокнопки выбор языка озвучки часов.
Озвучиваем текст из файла
Не будем довольствоваться текстами в коде программы — пора научиться брать их извне. Тем более, это очень просто. В папке, где хранится только что рассмотренный нами скрипт, создайте файл test.txt с текстом на русском языке и в кодировке UTF-8. Теперь добавьте в конец кода такой блок:
text_file = open("test.txt", "r")
data = text_file.read()
engine.say(data, sync=True)
text_file.close()
1
2
3
4
Открываем файл на чтение, передаем содержимое в переменную data, затем воспроизводим голосом все, что в ней оказалось, и закрываем файл.
Упражнения tkinter
- Напишите программу текстовым полем и кнопкой которая будет озвучивать написанное.
- Добавьте меню выбора голоса с возможностью управлять такими параметрами, как высота голоса, громкость и скорость речи.
Модуль Google TTS — голоса из интернета
Google предлагает онлайн-озвучку текста с записью результата в mp3-файл. Это не для каждой задачи:
- постоянно нужен быстрый интернет;
- нельзя воспроизвести аудио средствами самого gtts;
- скорость обработки текста ниже, чем у офлайн-синтезаторов.
Что касается голосов, английский и французский звучат очень реалистично. Русский голос Гугла — девушка, которая немного картавит и вдобавок произносит «ц» как «ч». По этой причине ей лучше не доверять чтение аудиокниг, имен и топонимов.
Еще один нюанс. Когда будете экспериментировать с кодом, не называйте файл «gtts.py» — он не будет работать! Выберите любое другое имя, например use_gtts.py.
Для работы необходимо установить пакет:
Простейший код, который сохраняет текст на русском в аудиофайл:
from gtts import gTTS

tts = gTTS('И это тоже интересно!', lang='ru')
tts.save('sound_ru.mp3')
tts = gTTS("It's amazing!", lang='en')
tts.save('sound_en.mp3')
1
2
3
4
5
6
После запуска этого кода в директории, где лежит скрипт, появится запись. Для воспроизведения в питоне придется использовать pygame или pyglet.
Упражнения tkinter
- Напишите программу состояющую из текстового поля, кнопки выбора языка, кнопки «получить аудио». Программа должна преобразовывать текст набранный в текстовом поле в аудио файл, который будет сохраняться в папке с программой.
- Добавьте текстовое поле, куда можно ввести имя для получаемого файла. И сохранять полученный файл с заданным иметем. Реализуйте проверку полей и выводом диалогового окна с сообщением о соотвествующей ошибке.
- Добавьте в программу кнопку выбора каталога для сохранения файла.
Improve Article
Save Article
Improve Article
Save Article
There are several APIs available to convert text to speech in python. One such APIs is the Python Text to Speech API commonly known as the pyttsx3 API. pyttsx3 is a very easy to use tool which converts the text entered, into audio.
Installation
To install the pyttsx3 API, open terminal and write
pip install pyttsx3
This library is dependent on win32 for which we may get an error while executing the program. To avoid that simply install pypiwin32 in your environment.
pip install pypiwin32
Some of the important functions available in pyttsx3 are:
- pyttsx3.init([driverName : string, debug : bool]) – Gets a reference to an engine instance that will use the given driver. If the requested driver is already in use by another engine instance, that engine is returned. Otherwise, a new engine is created.
- getProperty(name : string) – Gets the current value of an engine property.
- setProperty(name, value) – Queues a command to set an engine property. The new property value affects all utterances queued after this command.
- say(text : unicode, name : string) – Queues a command to speak an utterance. The speech is output according to the properties set before this command in the queue.
- runAndWait() – Blocks while processing all currently queued commands. Invokes callbacks for engine notifications appropriately. Returns when all commands queued before this call are emptied from the queue.
Now we are all set to write a sample program that converts text to speech.
import pyttsx3
converter = pyttsx3.init()
converter.setProperty('rate', 150)
converter.setProperty('volume', 0.7)
converter.say("Hello GeeksforGeeks")
converter.say("I'm also a geek")
converter.runAndWait()
Output:
The output of the above program will be a voice saying, “Hello GeeksforGeeks” and “I’m also a geek”.
Changing Voice
Suppose, you want to change the voice generated from male to female. How do you go about it? Let us see.
As you will notice, when you run the above code to bring about the text to speech conversion, the voice that responds is a male voice. To change the voice you can get the list of available voices by getting voices properties from the engine and you can change the voice according to the voice available in your system.
To get the list of voices, write the following code.
voices = converter.getProperty('voices')
for voice in voices:
print("Voice:")
print("ID: %s" %voice.id)
print("Name: %s" %voice.name)
print("Age: %s" %voice.age)
print("Gender: %s" %voice.gender)
print("Languages Known: %s" %voice.languages)
Output:
To change the voice, set the voice using setProperty() method. Voice Id found above is used to set the voice.
Below is the implementation of changing voice.
voice_id = "HKEY_LOCAL_MACHINESOFTWAREMicrosoftSpeechVoicesTokensTTS_MS_EN-US_ZIRA_11.0"
converter.setProperty('voice', voice_id)
converter.runAndWait()
Now you’ll be able to switch between voices as and when you want. You can try out running a for loop to assign different statements to different voices. Run the code and enjoy the result.
Text-to-speech conversion is a technique used to generate a voice output based on a text.
This might be useful when you don’t want to read a document but want to listen to it instead. Also, some more advanced text-to-speech tools can be used to create a realistic voice for videos, ads, or podcasts.
This guide teaches you how to use Python to convert text to speech. After reading this guide, you have the knowledge to build a small text-to-speech converter.
🎙️By the way, if you are looking for a professional tool to create a realistic voice from text, read Best AI Voice Generators.
And if you are looking for a quick answer, first install gTTS module with:
pip install gTTS
And then create a Python script like this:
from gtts import gTTS
import os

mytext = "Hi, this is an example of converting text to audio. This is a bot speaking here, not a real human!"
audio = gTTS(text=mytext, lang="en", slow=False)

audio.save("example.mp3")
os.system("start example.mp3")
When you run this script, it generates a new mp3 file and plays it. The file is located in the same folder as your script.
Below you find a step-by-step guide on how this code works.
As you might imagine, there is a whole bunch of text-to-speech tools available for Python. The one we are going to use in this guide is called Google Text-to-Speech API (gTTS API for short).
The gTTS API is easy to use. You can simply feed a text document to it and get an mp3 file out with the spoken version of the text.
To use the gTTS API to convert text into voice in Python:
- Install gTTS on your system.
- Import gTTS to your program.
- Specify a piece of text to convert to audio.
- Pass the text into the gTTS engine and specify the language and speed.
- Save the file.
- Open the file and listen to it.
Let’s take a step-by-step overview of this process.
1. Install gTTS to Your System
Before you can use the text-to-speech converter in Python, you need to install the gTTS module on your system.
You can use pip to install it. Open up the command line tools and run the following command:
pip install gTTS
2. Import gTTS to Your Program
Once you have installed the gTTS module in your system, you can import it to your code project.
By the way, to use the program to play the mp3 file, you also need to import the built-in os module.
So add these two lines to the beginning of your Python file:
from gtts import gTTS
import os
3. Specify a Piece of Text to Be Converted
Now you have the necessary tools in the code file and you are ready to convert text to speech.
Next, specify a piece of text you want to convert to speech.
For example:
mytext = "Hi, this is an example of converting text to audio. This is a bot speaking here, not a real human!"
4. Pass the Text into gTTS Engine
Now, let’s input the text to the gTTS engine and specify the language as English:
audio = gTTS(text=mytext, lang="en", slow=False)
5. Save the File
Now that you have the audio object specified, let’s export it to an mp3 file:
audio.save("example.mp3")
This saves the audio file to the same folder where your program file lives. Now you can open up the file to listen to it.
6. Listen and Enjoy the File
If you want to use your Python program to play the file, you need to call the os.system() function.
Here is how to do it:
os.system("start example.mp3")
This is the last line of your program. If you now run the file, you hear the message being spoken by your machine. In addition, it generates an audio file as an output.
Full Code
For your convenience, here is the full code of the step-by-step guide:
from gtts import gTTS
import os

mytext = "Hi, this is an example of converting text to audio. This is a bot speaking here, not a real human!"
audio = gTTS(text=mytext, lang="en", slow=False)

audio.save("example.mp3")
os.system("start example.mp3")
Wrap Up
Today you learned how to use the gTTS module to convert text to speech in your Python program.
To recap, all you need to do is install gTTS module to your system and input it some text in your Python program.
Thanks for reading. Happy coding!
You May Also Like to Read
- Best AI Voice Generating Tools
About the Author
- I’m an entrepreneur and a blogger from Finland. My goal is to make coding and tech easier for you with comprehensive guides and reviews.
Recent Posts
·
7 min read
· Updated
jul 2022
· Machine Learning
· Application Programming Interfaces
Disclosure: This post may contain affiliate links, meaning when you click the links and make a purchase, we receive a commission.
Speech synthesis (or Text to Speech) is the computer-generated simulation of human speech. It converts human language text into human-like speech audio. In this tutorial, you will learn how you can convert text to speech in Python.
In this tutorial, we won’t be building neural networks and training the model in order to achieve results, as it is pretty complex and hard to do it. Instead, we gonna use some APIs and engines that offer it. There are a lot of APIs out there that offer this service, one of the commonly used services is Google Text to Speech, in this tutorial, we will play around with it along with another offline library called pyttsx3.
To make things clear, this tutorial is about converting text to speech and not the other way around, if you want to convert speech to text instead, check this tutorial.
Table of contents:
- Online Text to Speech
- Offline Text to Speech
To get started, let’s install the required modules:
pip3 install gTTS pyttsx3 playsoundOnline Text to Speech
As you may guess, gTTS stands for Google Text To Speech, it is a Python library to interface with Google Translate’s text to speech API. It requires an Internet connection and it’s pretty easy to use.
Open up a new Python file and import:
import gtts
from playsound import playsound
It’s pretty straightforward to use this library, you just need to pass text to the gTTS object that is an interface to Google Translate’s Text to Speech API:
# make request to google to get synthesis
tts = gtts.gTTS("Hello world")
Up to this point, we have sent the text and retrieved the actual audio speech from the API, let’s save this audio to a file:
# save the audio file
tts.save("hello.mp3")
Awesome, you’ll see a new file appear in the current directory, let’s play it using playsound module installed previously:
# play the audio file
playsound("hello.mp3")
And that’s it! You’ll hear a robot talking about what you just told him to say!
It isn’t available only in English, you can use other languages as well by passing the lang parameter:
# in spanish
tts = gtts.gTTS("Hola Mundo", lang="es")
tts.save("hola.mp3")
playsound("hola.mp3")
If you don’t want to save it to a file and just play it directly, then you should use tts.write_to_fp() which accepts io.BytesIO() object to write into, check this link for more information.
To get the list of available languages, use this:
# all available languages along with their IETF tag
print(gtts.lang.tts_langs())
Here are the supported languages:
{'af': 'Afrikaans', 'sq': 'Albanian', 'ar': 'Arabic', 'hy': 'Armenian', 'bn': 'Bengali', 'bs': 'Bosnian', 'ca': 'Catalan', 'hr': 'Croatian', 'cs': 'Czech', 'da': 'Danish', 'nl': 'Dutch', 'en': 'English', 'eo': 'Esperanto', 'et': 'Estonian', 'tl': 'Filipino', 'fi': 'Finnish', 'fr': 'French', 'de': 'German', 'el': 'Greek', 'gu': 'Gujarati', 'hi': 'Hindi', 'hu': 'Hungarian', 'is': 'Icelandic', 'id': 'Indonesian', 'it': 'Italian', 'ja': 'Japanese', 'jw': 'Javanese', 'kn': 'Kannada', 'km': 'Khmer', 'ko': 'Korean', 'la': 'Latin', 'lv': 'Latvian', 'mk': 'Macedonian', 'ml': 'Malayalam', 'mr':
'Marathi', 'my': 'Myanmar (Burmese)', 'ne': 'Nepali', 'no': 'Norwegian', 'pl': 'Polish', 'pt': 'Portuguese', 'ro': 'Romanian', 'ru': 'Russian', 'sr': 'Serbian', 'si': 'Sinhala', 'sk': 'Slovak', 'es': 'Spanish', 'su': 'Sundanese', 'sw': 'Swahili', 'sv': 'Swedish', 'ta': 'Tamil', 'te': 'Telugu', 'th': 'Thai', 'tr': 'Turkish', 'uk': 'Ukrainian', 'ur': 'Urdu', 'vi': 'Vietnamese', 'cy': 'Welsh', 'zh-cn': 'Chinese (Mandarin/China)', 'zh-tw': 'Chinese (Mandarin/Taiwan)', 'en-us': 'English (US)', 'en-ca': 'English (Canada)', 'en-uk': 'English (UK)', 'en-gb': 'English (UK)', 'en-au': 'English (Australia)', 'en-gh': 'English (Ghana)', 'en-in': 'English (India)', 'en-ie': 'English (Ireland)', 'en-nz': 'English (New Zealand)', 'en-ng': 'English (Nigeria)', 'en-ph': 'English (Philippines)', 'en-za': 'English (South Africa)', 'en-tz': 'English (Tanzania)', 'fr-ca': 'French (Canada)', 'fr-fr': 'French (France)', 'pt-br': 'Portuguese (Brazil)', 'pt-pt': 'Portuguese (Portugal)', 'es-es': 'Spanish (Spain)', 'es-us': 'Spanish (United States)'}
Offline Text to Speech
Now you know how to use Google’s API, but what if you want to use text-to-speech technologies offline?
Well, pyttsx3 library comes to the rescue, it is a text to speech conversion library in Python, it looks for TTS engines pre-installed in your platform and uses them, here are the text-to-speech synthesizers that this library uses:
- SAPI5 on Windows XP, Windows Vista, 8, 8.1 and 10
- NSSpeechSynthesizer on Mac OS X 10.5 and 10.6
- espeak on Ubuntu Desktop Edition 8.10, 9.04 and 9.10
Here are the main features of the pyttsx3 library:
- It works fully offline
- You can choose among different voices that are installed on your system
- Controlling the speed of speech
- Tweaking volume
- Saving the speech audio into a file
Note: If you’re on a Linux system and the voice output is not working with this library, then you should install espeak, FFmpeg and libespeak1:
$ sudo apt update && sudo apt install espeak ffmpeg libespeak1To get started with this library, open up a new Python file and import it:
import pyttsx3Now we need to initialize the TTS engine:
# initialize Text-to-speech engine
engine = pyttsx3.init()
Now to convert some text, we need to use say() and runAndWait() methods:
# convert this text to speech
text = "Python is a great programming language"
engine.say(text)
# play the speech
engine.runAndWait()
say() method adds an utterance to speak to the event queue, while runAndWait() method runs the actual event loop until all commands queued up. So you can call multiple times the say() method and run a single runAndWait() method in the end, in order to hear the synthesis, try it out!
This library provides us with some properties that we can tweak based on our needs. For instance, let’s get the details of speaking rate:
# get details of speaking rate
rate = engine.getProperty("rate")
print(rate)
Output:
200Alright, let’s change this to 300 (make the speaking rate much faster):
# setting new voice rate (faster)
engine.setProperty("rate", 300)
engine.say(text)
engine.runAndWait()
Or slower:
# slower
engine.setProperty("rate", 100)
engine.say(text)
engine.runAndWait()
Another useful property is voices, which allow us to get details of all voices available on your machine:
# get details of all voices available
voices = engine.getProperty("voices")
print(voices)
Here is the output in my case:
[<pyttsx3.voice.Voice object at 0x000002D617F00A20>, <pyttsx3.voice.Voice object at 0x000002D617D7F898>, <pyttsx3.voice.Voice object at 0x000002D6182F8D30>]As you can see, my machine has three voice speakers, let’s use the second, for example:
# set another voice
engine.setProperty("voice", voices[1].id)
engine.say(text)
engine.runAndWait()
You can also save the audio as a file using the save_to_file() method, instead of playing the sound using say() method:
# saving speech audio into a file
engine.save_to_file(text, "python.mp3")
engine.runAndWait()
A new MP3 file will appear in the current directory, check it out!
Conclusion
Great, that’s it for this tutorial, I hope that will help you build your application, or maybe your own virtual assistant in Python.
To conclude, if you want to use a more reliable synthesis, Google TTS API is your choice, if you just want to make it work a lot faster and without an Internet connection, you should use the pyttsx3 library.
Update: I have made a Skillshare course where I made an AI voice assistant with Python, we used most of the code on this tutorial to produce it.
Here are the documentation for both libraries:
- gTTS (Google Text-to-Speech)
- pyttsx3 — Text-to-speech x-platform
Finally, if you’re a beginner and want to learn Python, I suggest you take the Python For Everybody Coursera course, in which you’ll learn a lot about Python. You can also check our resources and courses page to see the Python resources I recommend!
Related: How to Play and Record Audio in Python.
Happy Coding ♥
View Full Code
View on Skillshare
Read Also
