Сталкивались ли вы с трудностями при отладке Python-кода? Если это так — то изучение того, как наладить логирование (журналирование, logging) в Python, способно помочь вам упростить задачи, решаемые при отладке.
Если вы — новичок, то вы, наверняка, привыкли пользоваться командой print(), выводя с её помощью определённые значения в ходе работы программы, проверяя, работает ли код так, как от него ожидается. Использование print() вполне может оправдать себя при отладке маленьких Python-программ. Но, когда вы перейдёте к более крупным и сложным проектам, вам понадобится постоянный журнал, содержащий больше информации о поведении вашего кода, помогающий вам планомерно отлаживать и отслеживать ошибки.
Из этого учебного руководства вы узнаете о том, как настроить логирование в Python, используя встроенный модуль logging. Вы изучите основы логирования, особенности вывода в журналы значений переменных и исключений, разберётесь с настройкой собственных логгеров, с форматировщиками вывода и со многим другим.
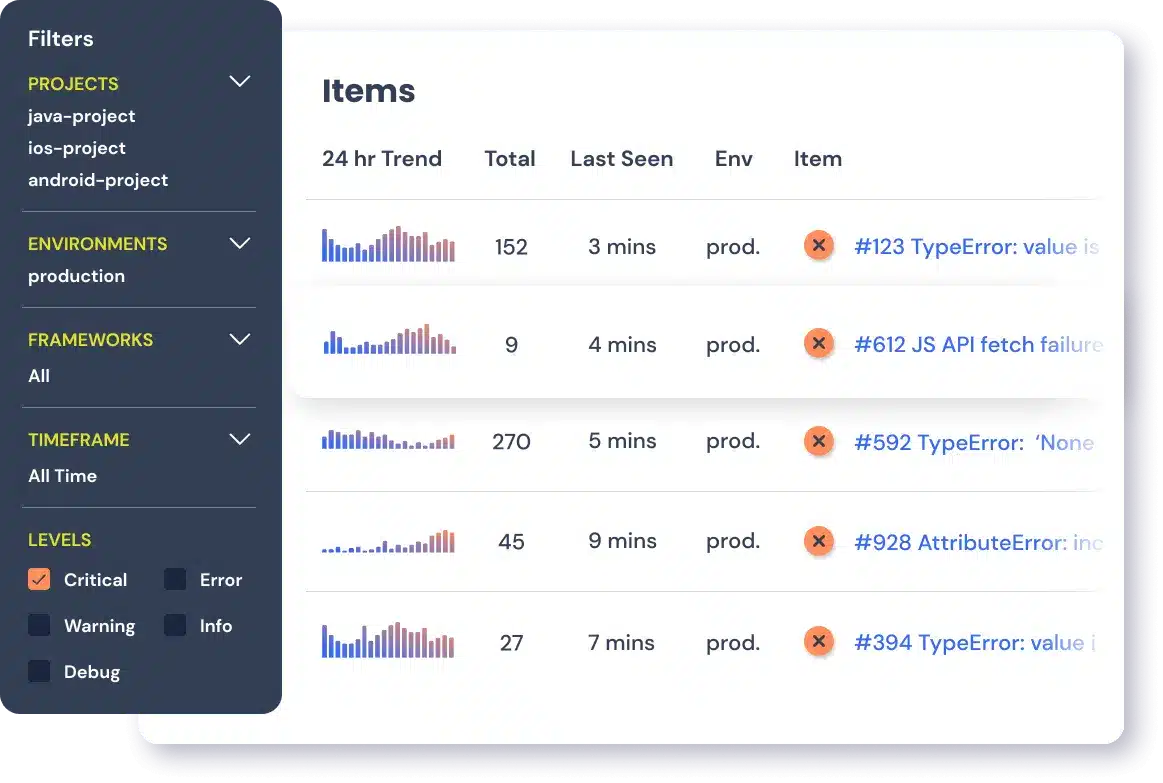
Вы, кроме того, узнаете о том, как Sentry Python SDK способен помочь вам в мониторинге приложений и в упрощении рабочих процессов, связанных с отладкой кода. Платформа Sentry обладает нативной интеграцией со встроенным Python-модулем logging, и, кроме того, предоставляет подробную информацию об ошибках приложения и о проблемах с производительностью, которые в нём возникают.
Начало работы с Python-модулем logging
В Python имеется встроенный модуль logging, применяемый для решения задач логирования. Им мы будем пользоваться в этом руководстве. Первый шаг к профессиональному логированию вы можете выполнить прямо сейчас, импортировав этот модуль в своё рабочее окружение.
import loggingВстроенный модуль логирования Python даёт нам простой в использовании функционал и предусматривает пять уровней логирования. Чем выше уровень — тем серьёзнее неприятность, о которой сообщает соответствующая запись. Самый низкий уровень логирования — это debug (10), а самый высокий — это critical (50).
Дадим краткие характеристики уровней логирования:
-
Debug (10): самый низкий уровень логирования, предназначенный для отладочных сообщений, для вывода диагностической информации о приложении. -
Info (20): этот уровень предназначен для вывода данных о фрагментах кода, работающих так, как ожидается. -
Warning (30): этот уровень логирования предусматривает вывод предупреждений, он применяется для записи сведений о событиях, на которые программист обычно обращает внимание. Такие события вполне могут привести к проблемам при работе приложения. Если явно не задать уровень логирования — по умолчанию используется именноwarning. -
Error (40): этот уровень логирования предусматривает вывод сведений об ошибках — о том, что часть приложения работает не так как ожидается, о том, что программа не смогла правильно выполниться. -
Critical (50): этот уровень используется для вывода сведений об очень серьёзных ошибках, наличие которых угрожает нормальному функционированию всего приложения. Если не исправить такую ошибку — это может привести к тому, что приложение прекратит работу.
В следующем фрагменте кода показано использование вышеперечисленных уровней логирования при выводе нескольких сообщений. Здесь используется синтаксическая конструкция logging.<level>(<message>).
logging.debug("A DEBUG Message")
logging.info("An INFO")
logging.warning("A WARNING")
logging.error("An ERROR")
logging.critical("A message of CRITICAL severity")
Ниже приведён результат выполнения этого кода. Как видите, сообщения, выведенные с уровнями логирования warning, error и critical, попадают в консоль. А сообщения с уровнями debug и info — не попадают.
WARNING:root:A WARNING
ERROR:root:An ERROR
CRITICAL:root:A message of CRITICAL severity
Это так из-за того, что в консоль выводятся лишь сообщения с уровнями от warning и выше. Но это можно изменить, настроив логгер и указав ему, что в консоль надо выводить сообщения, начиная с некоего, заданного вами, уровня логирования.
Подобный подход к логированию, когда данные выводятся в консоль, не особо лучше использования print(). На практике может понадобиться записывать логируемые сообщения в файл. Этот файл будет хранить данные и после того, как работа программы завершится. Такой файл можно использовать в качестве журнала отладки.
Обратите внимание на то, что в примере, который мы будем тут разбирать, весь код находится в файле main.py. Когда мы производим рефакторинг существующего кода или добавляем новые модули — мы сообщаем о том, в какой файл (имя которого построено по схеме <module-name>.py) попадает новый код. Это поможет вам воспроизвести у себя то, о чём тут идёт речь.
Логирование в файл
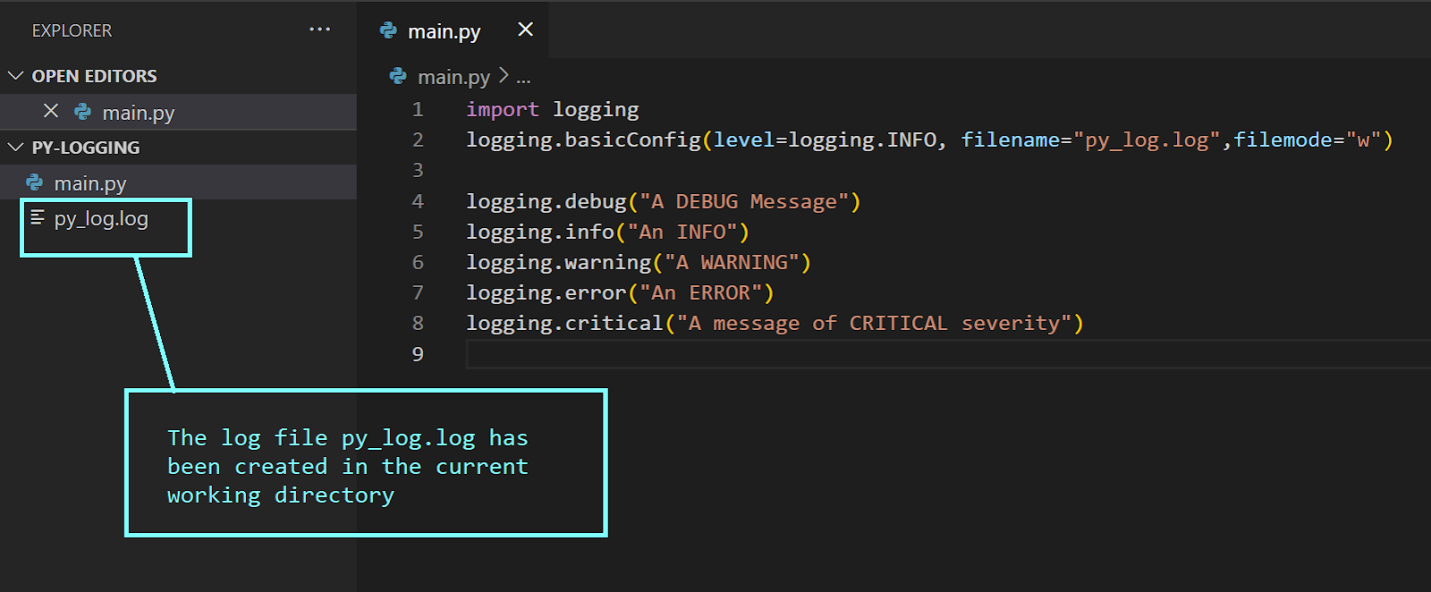
Для того чтобы настроить простую систему логирования в файл — можно воспользоваться конструктором basicConfig(). Вот как это выглядит:
logging.basicConfig(level=logging.INFO, filename="py_log.log",filemode="w")
logging.debug("A DEBUG Message")
logging.info("An INFO")
logging.warning("A WARNING")
logging.error("An ERROR")
logging.critical("A message of CRITICAL severity")
Поговорим о логгере root, рассмотрим параметры basicConfig():
-
level: это — уровень, на котором нужно начинать логирование. Если он установлен вinfo— это значит, что все сообщения с уровнемdebugигнорируются. -
filename: этот параметр указывает на объект обработчика файла. Тут можно указать имя файла, в который нужно осуществлять логирование. -
filemode: это — необязательный параметр, указывающий режим, в котором предполагается работать с файлом журнала, заданным параметромfilename. Установкаfilemodeв значениеw(write, запись) приводит к тому, что логи перезаписываются при каждом запуске модуля. По умолчанию параметрfilemodeустановлен в значениеa(append, присоединение), то есть — в файл будут попадать записи из всех сеансов работы программы.
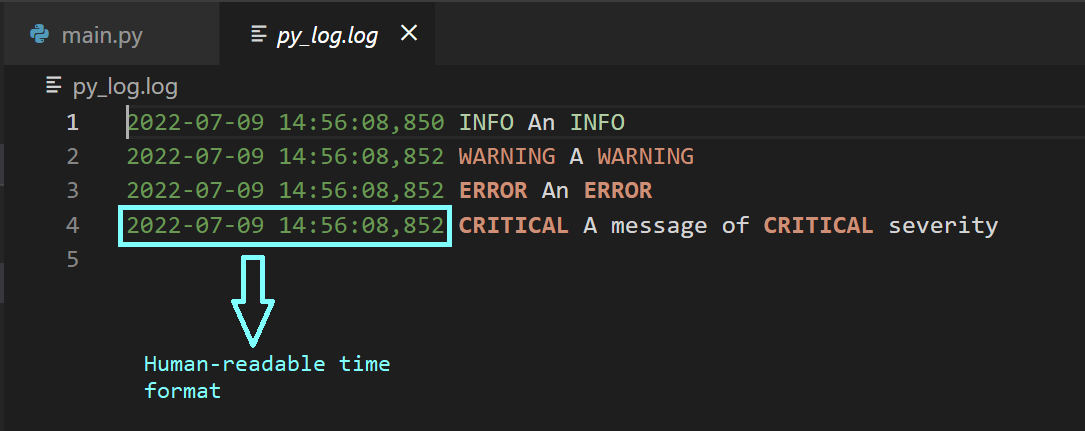
После выполнения модуля main можно будет увидеть, что в текущей рабочей директории был создан файл журнала, py_log.log.
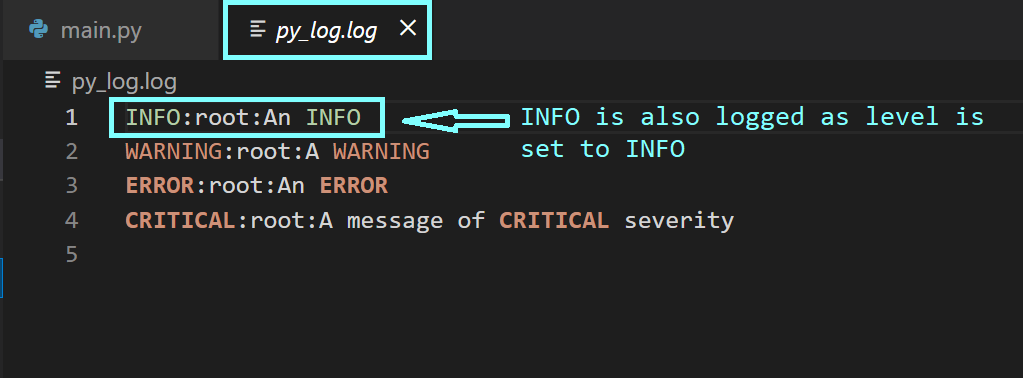
Так как мы установили уровень логирования в значение info — в файл попадут записи с уровнем info и с более высокими уровнями.
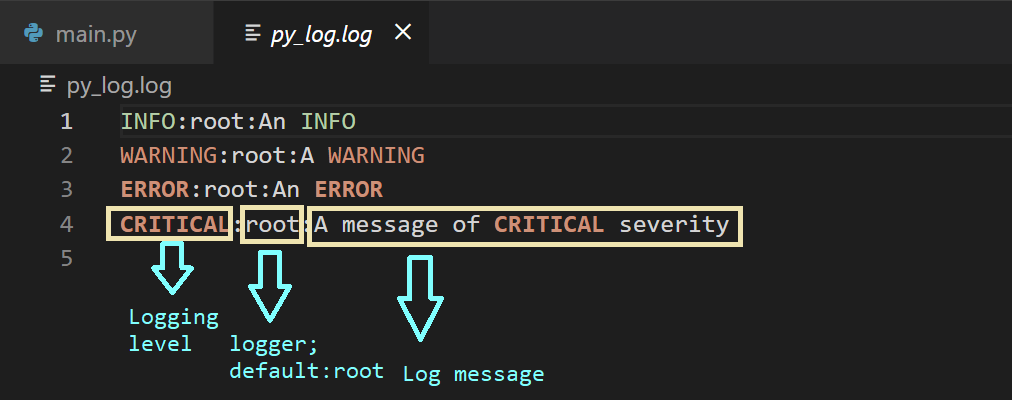
Записи в лог-файле имеют формат <logging-level>:<name-of-the-logger>:<message>. По умолчанию <name-of-the-logger>, имя логгера, установлено в root, так как мы пока не настраивали пользовательские логгеры.
Помимо базовой информации, выводимой в лог, может понадобится снабдить записи отметками времени, указывающими на момент вывода той или иной записи. Это упрощает анализ логов. Сделать это можно, воспользовавшись параметром конструктора format:
logging.basicConfig(level=logging.INFO, filename="py_log.log",filemode="w",
                    format="%(asctime)s %(levelname)s %(message)s")
logging.debug("A DEBUG Message")
logging.info("An INFO")
logging.warning("A WARNING")
logging.error("An ERROR")
logging.critical("A message of CRITICAL severity")Существуют и многие другие атрибуты записи лога, которыми можно воспользоваться для того чтобы настроить внешний вид сообщений в лог-файле. Настраивая поведение логгера root — так, как это показано выше, проследите за тем, чтобы конструктор logging.basicConfig()вызывался бы лишь один раз. Обычно это делается в начале программы, до использования команд логирования. Последующие вызовы конструктора ничего не изменят — если только не установить параметр force в значение True.
Логирование значений переменных и исключений
Модифицируем файл main.py. Скажем — тут будут две переменных — x и y, и нам нужно вычислить значение выражения x/y. Мы знаем о том, что при y=0 мы столкнёмся с ошибкой ZeroDivisionError. Обработать эту ошибку можно в виде исключения с использованием блока try/except.
Далее — нужно залогировать исключение вместе с данными трассировки стека. Чтобы это сделать — можно воспользоваться logging.error(message, exc_info=True). Запустите следующий код и посмотрите на то, как в файл попадают записи с уровнем логирования info, указывающие на то, что код работает так, как ожидается.
x = 3
y = 4

logging.info(f"The values of x and y are {x} and {y}.")
try:
    x/y
    logging.info(f"x/y successful with result: {x/y}.")
except ZeroDivisionError as err:
logging.error("ZeroDivisionError",exc_info=True)Теперь установите значение y в 0 и снова запустите модуль.
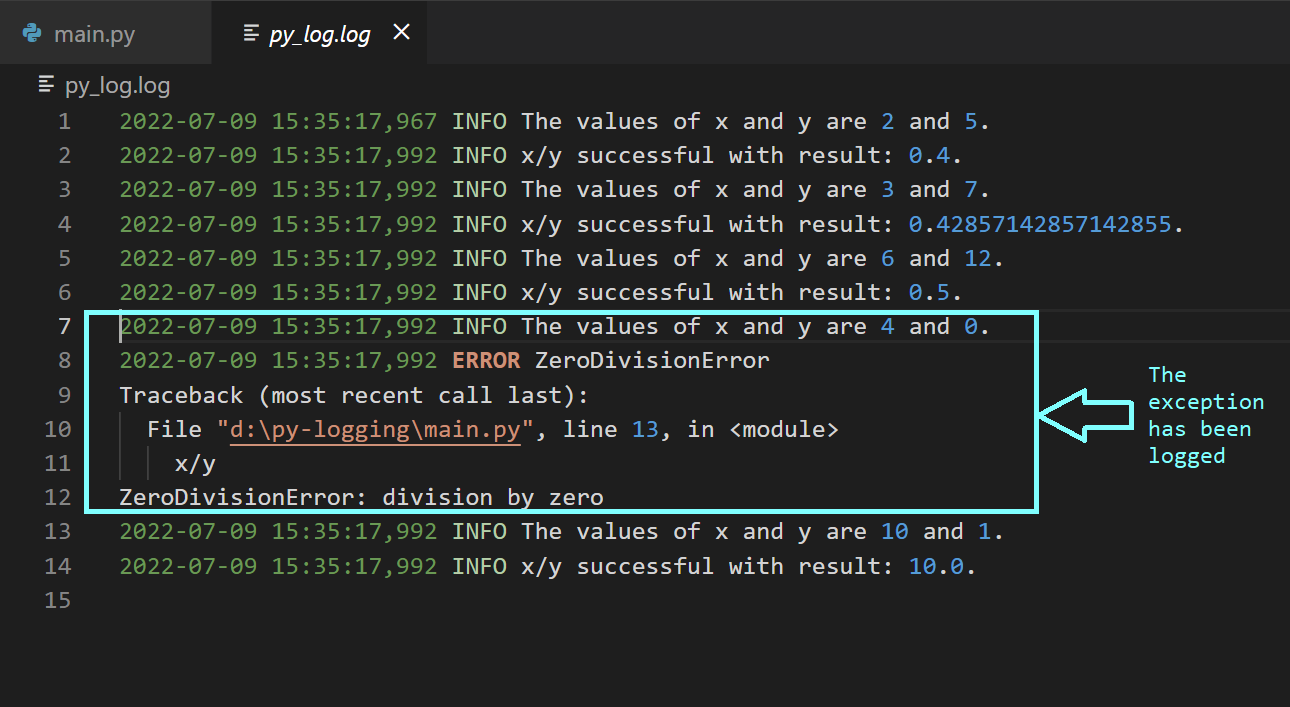
Исследуя лог-файл py_log.log, вы увидите, что сведения об исключении были записаны в него вместе со стек-трейсом.
x = 4
y = 0

logging.info(f"The values of x and y are {x} and {y}.")
try:
    x/y
    logging.info(f"x/y successful with result: {x/y}.")
except ZeroDivisionError as err:
logging.error("ZeroDivisionError",exc_info=True)Теперь модифицируем код так, чтобы в нём имелись бы списки значений x и y, для которых нужно вычислить коэффициенты x/y. Для логирования исключений ещё можно воспользоваться конструкцией logging.exception(<message>).
x_vals = [2,3,6,4,10]
y_vals = [5,7,12,0,1]

for x_val,y_val in zip(x_vals,y_vals):
    x,y = x_val,y_val
    logging.info(f"The values of x and y are {x} and {y}.")
    try:
        x/y
        logging.info(f"x/y successful with result: {x/y}.")
    except ZeroDivisionError as err:
        logging.exception("ZeroDivisionError")
Сразу после запуска этого кода можно будет увидеть, что в лог-файл попала информация и о событиях успешного вычисления коэффициента, и об ошибке, когда возникло исключение.
Настройка логирования с помощью пользовательских логгеров, обработчиков и форматировщиков
Отрефакторим код, который у нас уже есть. Объявим функцию test_division.
def test_division(x,y):
    try:
        x/y
        logger2.info(f"x/y successful with result: {x/y}.")
    except ZeroDivisionError as err:
        logger2.exception("ZeroDivisionError")
Объявление этой функции находится в модуле test_div. В модуле main будут лишь вызовы функций. Настроим пользовательские логгеры в модулях main и test_div, проиллюстрировав это примерами кода.
Настройка пользовательского логгера для модуля test_div
import logging

logger2 = logging.getLogger(__name__)
logger2.setLevel(logging.INFO)

# настройка обработчика и форматировщика для logger2
handler2 = logging.FileHandler(f"{__name__}.log", mode='w')
formatter2 = logging.Formatter("%(name)s %(asctime)s %(levelname)s %(message)s")

# добавление форматировщика к обработчику
handler2.setFormatter(formatter2)
# добавление обработчика к логгеру
logger2.addHandler(handler2)

logger2.info(f"Testing the custom logger for module {__name__}...")

def test_division(x,y):
    try:
        x/y
        logger2.info(f"x/y successful with result: {x/y}.")
    except ZeroDivisionError as err:
        logger2.exception("ZeroDivisionError")
Настройка пользовательского логгера для модуля main
import logging
from test_div import test_division

# получение пользовательского логгера и установка уровня логирования
py_logger = logging.getLogger(__name__)
py_logger.setLevel(logging.INFO)

# настройка обработчика и форматировщика в соответствии с нашими нуждами
py_handler = logging.FileHandler(f"{__name__}.log", mode='w')
py_formatter = logging.Formatter("%(name)s %(asctime)s %(levelname)s %(message)s")

# добавление форматировщика к обработчику
py_handler.setFormatter(py_formatter)
# добавление обработчика к логгеру
py_logger.addHandler(py_handler)

py_logger.info(f"Testing the custom logger for module {__name__}...")

x_vals = [2,3,6,4,10]
y_vals = [5,7,12,0,1]

for x_val,y_val in zip(x_vals,y_vals):
    x,y = x_val, y_val
    # вызов test_division
    test_division(x,y)
    py_logger.info(f"Call test_division with args {x} and {y}")
Разберёмся с тем, что происходит коде, где настраиваются пользовательские логгеры.
Сначала мы получаем логгер и задаём уровень логирования. Команда logging.getLogger(name) возвращает логгер с заданным именем в том случае, если он существует. В противном случае она создаёт логгер с заданным именем. На практике имя логгера устанавливают с использованием специальной переменной name, которая соответствует имени модуля. Мы назначаем объект логгера переменной. Затем мы, используя команду logging.setLevel(level), устанавливаем нужный нам уровень логирования.
Далее мы настраиваем обработчик. Так как мы хотим записывать сведения о событиях в файл, мы пользуемся FileHandler. Конструкция logging.FileHandler(filename) возвращает объект обработчика файла. Помимо имени лог-файла, можно, что необязательно, задать режим работы с этим файлом. В данном примере режим (mode) установлен в значение write. Есть и другие обработчики, например — StreamHandler, HTTPHandler, SMTPHandler.
Затем мы создаём объект форматировщика, используя конструкцию logging.Formatter(format). В этом примере мы помещаем имя логгера (строку) в начале форматной строки, а потом идёт то, чем мы уже пользовались ранее при оформлении сообщений.
Потом мы добавляем форматировщик к обработчику, пользуясь конструкцией вида <handler>.setFormatter(<formatter>). А в итоге добавляем обработчик к объекту логгера, пользуясь конструкцией <logger>.addHandler(<handler>).
Теперь можно запустить модуль main и исследовать сгенерированные лог-файлы.
Рекомендации по организации логирования в Python
До сих пор мы говорили о том, как логировать значения переменных и исключения, как настраивать пользовательские логгеры. Теперь же предлагаю вашему вниманию рекомендации по логированию.
-
Устанавливайте оптимальный уровень логирования. Логи полезны лишь тогда, когда их можно использовать для отслеживания важных ошибок, которые нужно исправлять. Подберите такой уровень логирования, который соответствует специфике конкретного приложения. Вывод в лог сообщений о слишком большом количестве событий может быть, с точки зрения отладки, не самой удачной стратегией. Дело в том, что при таком подходе возникнут сложности с фильтрацией логов при поиске ошибок, которым нужно немедленно уделить внимание.
-
Конфигурируйте логгеры на уровне модуля. Когда вы работаете над приложением, состоящим из множества модулей — вам стоит задуматься о том, чтобы настроить свой логгер для каждого модуля. Установка имени логгера в
nameпомогает идентифицировать модуль приложения, в котором имеются проблемы, нуждающиеся в решении. -
Включайте в состав сообщений логов отметку времени и обеспечьте единообразное форматирование сообщений. Всегда включайте в сообщения логов отметки времени, так как они полезны в деле поиска того момента, когда произошла ошибка. Единообразно форматируйте сообщения логов, придерживаясь одного и того же подхода в разных модулях.
-
Применяйте ротацию лог-файлов ради упрощения отладки. При работе над большим приложением, в состав которого входит несколько модулей, вы, вполне вероятно, столкнётесь с тем, что размер ваших лог-файлов окажется очень большим. Очень длинные логи сложно просматривать в поисках ошибок. Поэтому стоит подумать о ротации лог-файлов. Сделать это можно, воспользовавшись обработчиком
RotatingFileHandler, применив конструкцию, которая строится по следующей схеме:logging.handlers.RotatingFileHandler(filename, maxBytes, backupCount). Когда размер текущего лог-файла достигнет размераmaxBytes, следующие записи будут попадать в другие файлы, количество которых зависит от значения параметраbackupCount. Если установить этот параметр в значениеK— у вас будетKфайлов журнала.
Сильные и слабые стороны логирования
Теперь, когда мы разобрались с основами логирования в Python, поговорим о сильных и слабых сторонах этого механизма.
Мы уже видели, как логирование позволяет поддерживать файлы журналов для различных модулей, из которых состоит приложение. Мы, кроме того, можем конфигурировать подсистему логирования и подстраивать её под свои нужды. Но эта система не лишена недостатков. Даже когда уровень логирования устанавливают в значение warning, или в любое значение, которое выше warning, размеры лог-файлов способны быстро увеличиваться. Происходит это в том случае, когда в один и тот же журнал пишут данные, полученные после нескольких сеансов работы с приложением. В результате использование лог-файлов для отладки программ превращается в нетривиальную задачу.
Кроме того, исследование логов ошибок — это сложно, особенно в том случае, если сообщения об ошибках не содержат достаточных сведений о контекстах, в которых происходят ошибки. Когда выполняют команду logging.error(message), не устанавливая при этом exc_info в True, сложно обнаружить и исследовать первопричину ошибки в том случае, если сообщение об ошибке не слишком информативно.
В то время как логирование даёт диагностическую информацию, сообщает о том, что в приложении нужно исправить, инструменты для мониторинга приложений, вроде Sentry, могут предоставить более детальную информацию, которая способна помочь в диагностике приложения и в исправлении проблем с производительностью.
В следующем разделе мы поговорим о том, как интегрировать в Python-проект поддержку Sentry, что позволит упростить процесс отладки кода.
Интеграция Sentry в Python-проект
Установить Sentry Python SDK можно, воспользовавшись менеджером пакетов pip.
pip install sentry-sdkПосле установки SDK для настройки мониторинга приложения нужно воспользоваться таким кодом:
sentry_sdk.init(
     dsn="<your-dsn-key-here>",
     traces_sample_rate=0.85,
)
Как можно видеть — вам, для настройки мониторинга, понадобится ключ dsn. DSN расшифровывается как Data Source Name (имя источника данных). Найти этот ключ можно, перейдя в Your-Project > Settings > Client Keys (DSN).
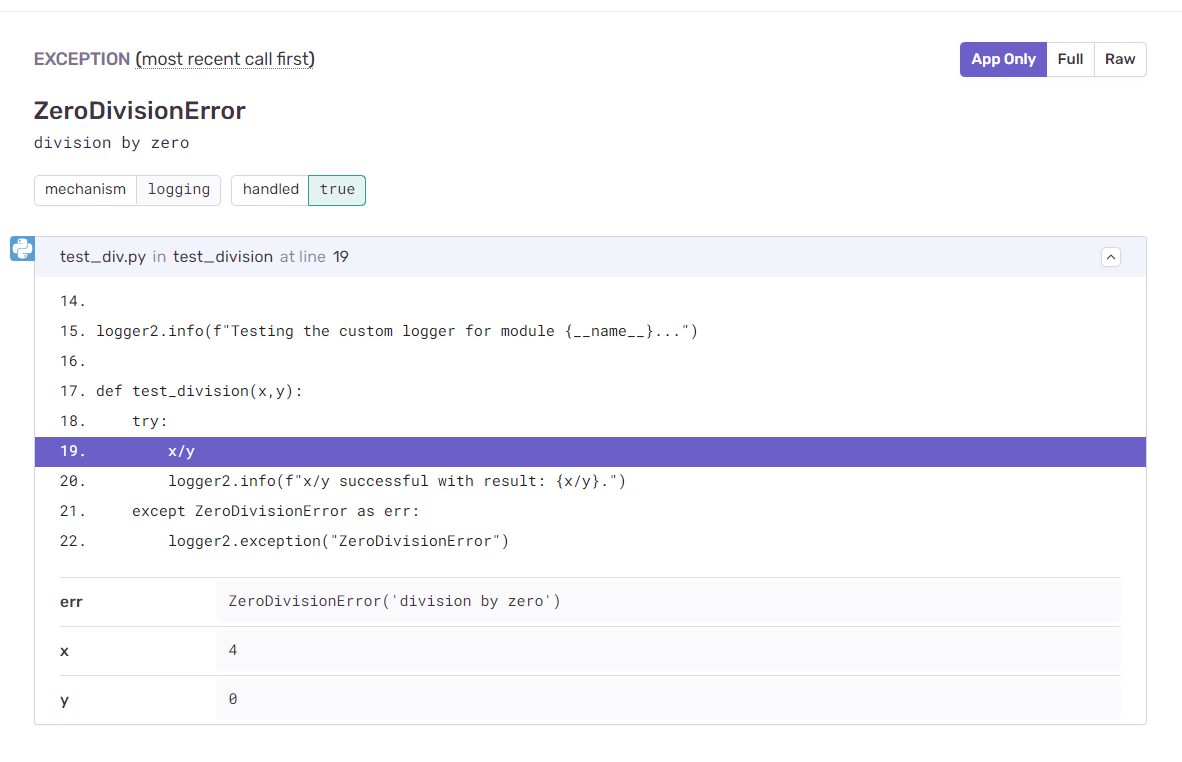
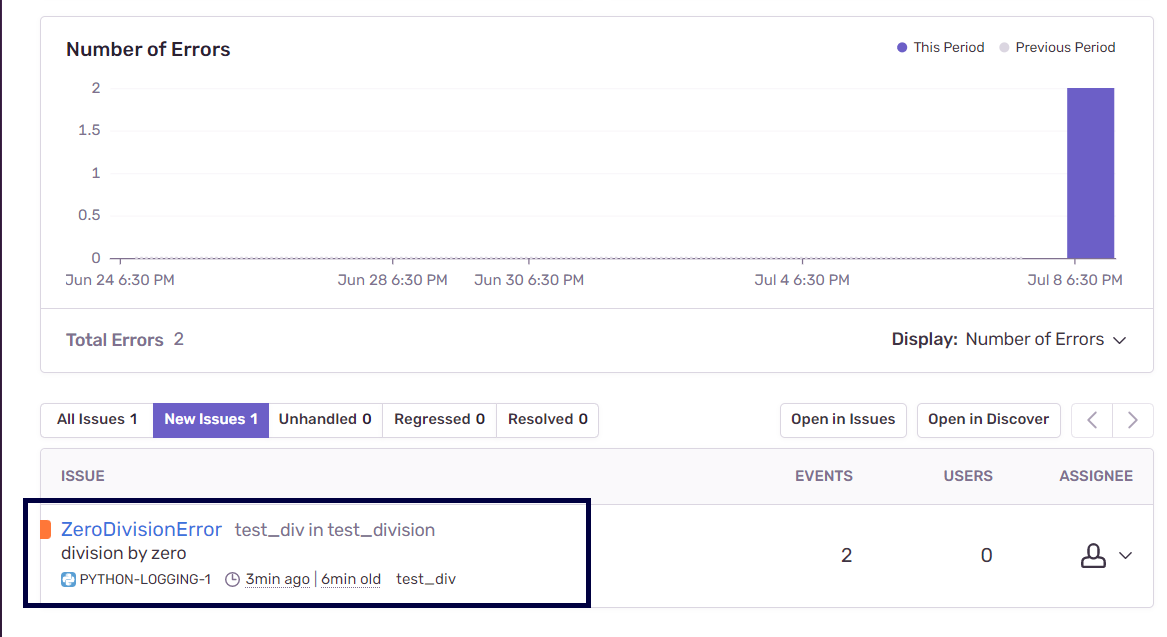
После того, как вы запустите Python-приложение, вы можете перейти на Sentry.io и открыть панель управления проекта. Там должны быть сведения о залогированных ошибках и о других проблемах приложения. В нашем примере можно видеть сообщение об исключении, соответствующем ошибке ZeroDivisionError.
Изучая подробности об ошибке, вы можете увидеть, что Sentry предоставляет подробную информацию о том, где именно произошла ошибка, а так же — об аргументах x и y, работа с которыми привела к появлению исключения.
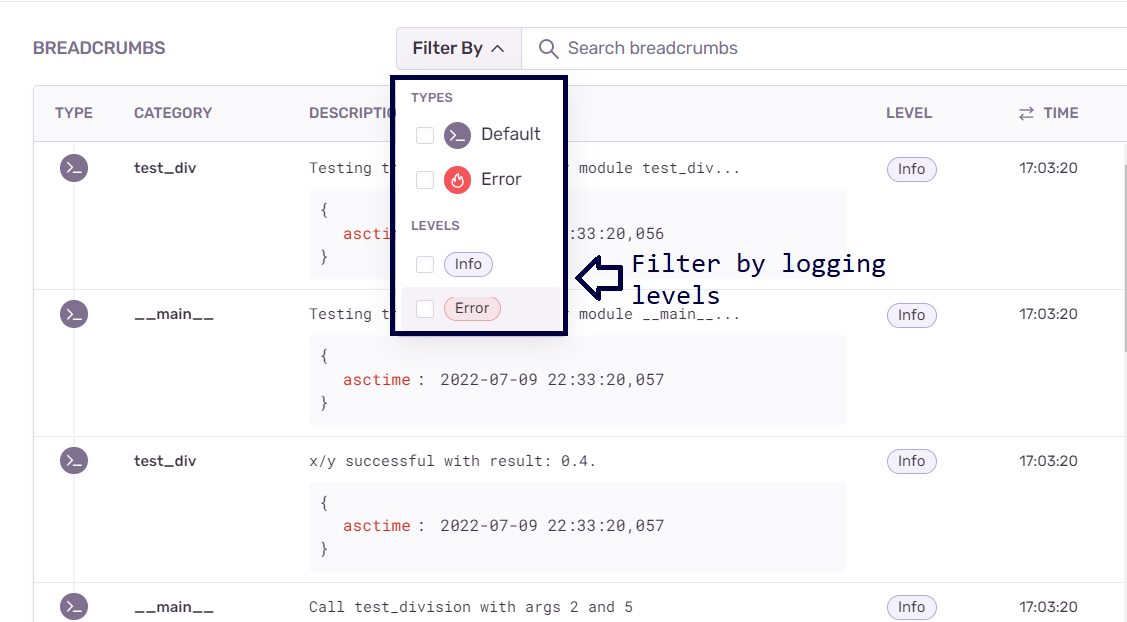
Продолжая изучение логов, можно увидеть, помимо записей уровня error, записи уровня info. Налаживая мониторинг приложения с использованием Sentry, нужно учитывать, что эта платформа интегрирована с модулем logging. Вспомните — в нашем экспериментальном проекте уровень логирования был установлен в значение info. В результате Sentry записывает все события, уровень которых соответствует info и более высоким уровням, делая это в стиле «навигационной цепочки», что упрощает отслеживание ошибок.
Sentry позволяет фильтровать записи по уровням логирования, таким, как info и error. Это удобнее, чем просмотр больших лог-файлов в поиске потенциальных ошибок и сопутствующих сведений. Это позволяет назначать решению проблем приоритеты, зависящие от серьёзности этих проблем, и, кроме того, позволяет, используя навигационные цепочки, находить источники неполадок.
В данном примере мы рассматриваем ZeroDivisionError как исключение. В более крупных проектах, даже если мы не реализуем подобный механизм обработки исключений, Sentry автоматически предоставит диагностическую информацию о наличии необработанных исключений. С помощью Sentry, кроме того, можно анализировать проблемы с производительностью кода.
Код, использованный в данном руководстве, можно найти в этом GitHub-репозитории.
Итоги
Освоив это руководство, вы узнали о том, как настраивать логирование с использованием стандартного Python-модуля logging. Вы освоили основы настройки логгера root и пользовательских логгеров, ознакомились с рекомендациями по логированию. Вы, кроме того, узнали о том, как платформа Sentry может помочь вам в деле мониторинга ваших приложений, обеспечивая вас сведениями о проблемах с производительностью и о других ошибках, и используя при этом все возможности модуля logging.
Когда вы будете работать над своим следующим Python-проектом — не забудьте реализовать в нём механизмы логирования. И можете испытать бесплатную пробную версию Sentry.
О, а приходите к нам работать? 🤗 💰
Мы в wunderfund.io занимаемся высокочастотной алготорговлей с 2014 года. Высокочастотная торговля — это непрерывное соревнование лучших программистов и математиков всего мира. Присоединившись к нам, вы станете частью этой увлекательной схватки.
Мы предлагаем интересные и сложные задачи по анализу данных и low latency разработке для увлеченных исследователей и программистов. Гибкий график и никакой бюрократии, решения быстро принимаются и воплощаются в жизнь.
Сейчас мы ищем плюсовиков, питонистов, дата-инженеров и мл-рисерчеров.
Присоединяйтесь к нашей команде.
In software development, different types of errors can occur. They could be syntax errors, logical errors, or runtime errors.
Syntax errors most probably occur during the initial development phase and are a result of incorrect syntax. Syntax errors can be caught easily when the program is compiled for execution.
Logical errors, on the other hand, are a result of improper logical implementation. An example would be a program accessing an unsorted list assuming it to be sorted. Logical errors are the most difficult ones to track.
Runtime errors are the most interesting errors which occur, if we don’t consider all the corner cases. An example would be trying to access a non-existent file.
- Handling Exceptions Using Try and Except
- Multiple Exceptions
- finally Clause
- User-Defined Exceptions
- Logging in Python
- Getting the Stack Trace
In this tutorial, we’ll learn how to handle errors in Python and how to log the errors for a better understanding of what went wrong in the application.
Handling Exceptions in Python
Let’s start with a simple program to add two numbers in Python. Our program takes in two parameters as input and prints the sum. Here is a Python program to add two numbers:
1 |
def addNumbers(a, b): |
2 |
print a + b |
3 |
|
4 |
addNumbers(5, 10) |
Try running the above Python program, and you should have the sum printed.
15
While writing the above program, we didn’t really consider the fact that anything can go wrong. What if one of the parameters passed is not a number?
We haven’t handled that case, hence our program would crash with the following error message:
1 |
Traceback (most recent call last): |
2 |
File "addNumber.py", line 4, in <module> |
3 |
addNumbers('', 10)
|
4 |
File "addNumber.py", line 2, in addNumbers |
5 |
print a + b |
6 |
TypeError: cannot concatenate 'str' and 'int' objects |
We can handle the above issue by checking if the parameters passed are integers. But that won’t solve the issue. What if the code breaks down due to some other reason and causes the program to crash? Working with a program which crashes on being encountered with an error is not a good sight. Even if an unknown error is encountered, the code should be robust enough to handle the crash gracefully and let the user know that something is wrong.
Handling Exceptions Using try and except
In Python, we use the try and except statements to handle exceptions. Whenever the code breaks down, an exception is thrown without crashing the program. Let’s modify the add number program to include the try and except statements.
1 |
def addNumbers(a, b): |
2 |
try: |
3 |
return a + b |
4 |
except Exception as e: |
5 |
return 'Error occurred : ' + str(e) |
6 |
|
7 |
print(addNumbers('', 10)) |
Python would process all code inside the try and except statement. When it encounters an error, the control is passed to the except block, skipping the code in between.
As seen in the above code, we have moved our code inside a try and except statement. Try running the program and it should throw an error message instead of crashing the program. The reason for the exception is also returned as an exception message.
The above method handles unexpected exceptions. Let’s have a look at how to handle an expected exception. Assume that we are trying to read a particular file using our Python program, but the file doesn’t exist. In this case, we’ll handle the exception and let the user know that the file doesn’t exist when it happens. Have a look at the file reading code:
1 |
try: |
2 |
try: |
3 |
with open('file.txt') as f: |
4 |
content = f.readlines() |
5 |
except IOError as e: |
6 |
print(str(e)) |
7 |
except Exception as e: |
8 |
print(str(e)) |
In the above code, we have handled the file reading inside an IOError exception handler. If the code breaks down because the file.txt is unavailable, the error would be handled inside the IOError handler. Similar to the IOError exceptions, there are a lot more standard exceptions like Arithmetic, OverflowError, and ImportError, to name a few.
Multiple Exceptions
We can handle multiple exceptions at a time by clubbing the standard exceptions as shown:
1 |
try: |
2 |
with open('file.txt') as f: |
3 |
content = f.readlines() |
4 |
print(content) |
5 |
except (IOError,NameError) as e: |
6 |
print(str(e)) |
The above code would raise both the IOError and NameError exceptions when the program is executed.
finally Clause
Assume that we are using certain resources in our Python program. During the execution of the program, it encountered an error and only got executed halfway. In this case, the resource would be unnecessarily held up. We can clean up such resources using the finally clause. Take a look at the below code:
1 |
try: |
2 |
filePointer = open('file.txt','r') |
3 |
try: |
4 |
content = filePointer.readline() |
5 |
finally: |
6 |
filePointer.close() |
7 |
except IOError as e: |
8 |
print(str(e)) |
If, during the execution of the above code, an exception is raised while reading the file, the filePointer would be closed in the finally block.
User-Defined Exceptions
So far, we have dealt with exceptions provided by Python, but what if you want to define your own custom exceptions? To create user-defined exceptions, you will need to create a class that inherits from the built-in Exception class. An advantage of creating user-defined exceptions is that they will make sense in our programs. For example, suppose you had a program that ensures that the discounted price of an item is not more than the sale price. Let’s create a custom exception for this type of error.
1 |
class PriceError(Exception): |
2 |
pass
|
Next, add the exception as follows:
1 |
def discount(price,discounted_price): |
2 |
if discounted_price > price: |
3 |
raise PriceError |
4 |
else: |
5 |
print("Discount applied") |
In the code above, the raise statement forces the PriceError exception to occur.
Now, if you call the function with values where the disounted_price is greater than the price, you will get an error, as shown below.
1 |
Traceback (most recent call last): |
2 |
File "/home/vat/Desktop/errors.py", line 75, in <module> |
3 |
discount(100,110) |
4 |
File "/home/vat/Desktop/errors.py", line 70, in discount |
5 |
raise PriceError |
6 |
__main__.PriceError |
The error above does not provide a descriptive message; let’s customize it to give a detailed message of what the error means.
1 |
class PriceError(Exception): |
2 |
def __init__(self, price,discounted_price): |
3 |
self.price = price |
4 |
self.disounted_price = discounted_price |
5 |
|
6 |
def __str__(self): |
7 |
return 'Discounted price greater than price' |
Now, let’s apply the error and call our function.
1 |
def discount(price,discounted_price): |
2 |
if discounted_price > price: |
3 |
raise PriceError(price,discounted_price) |
4 |
else: |
5 |
print("Discount applied") |
6 |
|
7 |
discount(100,110) |
Now, if you call the function, you will get the following error:
1 |
(base) vaati@vaati-Yoga-9-14ITL5:~/Desktop/EVANTO2022$ python3 errors.py |
2 |
Traceback (most recent call last): |
3 |
File "/home/vaati/Desktop/EVANTO2022/errors.py", line 84, in <module> |
4 |
discount(100,110) |
5 |
File "/home/vaati/Desktop/EVANTO2022/errors.py", line 79, in discount |
6 |
raise PriceError(price,discounted_price) |
7 |
__main__.PriceError: Discounted price greater than price |
Logging in Python
When something goes wrong in an application, it becomes easier to debug if we know the source of the error. When an exception is raised, we can log the required information to track down the issue. Python provides a simple and powerful logging library. Let’s have a look at how to use logging in Python.
1 |
try: |
2 |
logging.info('Trying to open the file') |
3 |
filePointer = open('file.txt','r') |
4 |
try: |
5 |
logging.info('Trying to read the file content') |
6 |
content = filePointer.readline() |
7 |
print(content) |
8 |
finally: |
9 |
filePointer.close() |
10 |
except IOError as e: |
11 |
logging.error('Error occurred ' + str(e)) |
As seen in the above code, first we need to import the logging Python library and then initialize the logger with the log file name and logging level. There are five logging levels: DEBUG, INFO, WARNING, ERROR, and CRITICAL. Here we have set the logging level to INFO, so any message that has the level INFO will be logged.
Getting the Stack Trace
In the above code we had a single program file, so it was easier to figure out where the error had occurred. But what do we do when multiple program files are involved? In such a case, getting the stack trace of the error helps in finding the source of the error. The stack trace of the exception can be logged as shown:
1 |
import logging |
2 |
|
3 |
# initialize the log settings
|
4 |
logging.basicConfig(filename = 'app.log', level = logging.INFO) |
5 |
|
6 |
try: |
7 |
filePointer = open('appFile','r') |
8 |
try: |
9 |
content = filePointer.readline() |
10 |
finally: |
11 |
filePointer.close() |
12 |
except IOError as e: |
13 |
logging.exception(str(e)) |
If you try to run the above program, on raising an exception the following error would be logged in the log file:
1 |
ERROR:root:[Errno 2] No such file or directory: 'appFile' |
2 |
Traceback (most recent call last): |
3 |
File "readFile.py", line 7, in <module> |
4 |
filePointer = open('appFile','r')
|
5 |
IOError: [Errno 2] No such file or directory: 'appFile' |
Wrapping It Up
In this tutorial, we saw how to get started with handling errors in Python and using the logging module to log errors. We saw the usage of try, except, and finally statements, which are quite useful when dealing with error handling in Python. For more detailed information, I would recommend reading the official documentation on logging. Also have a look at the documentation for handling exceptions in Python.
This post has been updated with contributions from Esther Vaati. Esther is a software developer and writer for Envato Tuts+.
Did you find this post useful?
I’m a software engineer by profession and love to write tutorials and educational stuff.
Watch Now This tutorial has a related video course created by the Real Python team. Watch it together with the written tutorial to deepen your understanding: Logging in Python
Logging is a very useful tool in a programmer’s toolbox. It can help you develop a better understanding of the flow of a program and discover scenarios that you might not even have thought of while developing.
Logs provide developers with an extra set of eyes that are constantly looking at the flow that an application is going through. They can store information, like which user or IP accessed the application. If an error occurs, then they can provide more insights than a stack trace by telling you what the state of the program was before it arrived at the line of code where the error occurred.
By logging useful data from the right places, you can not only debug errors easily but also use the data to analyze the performance of the application to plan for scaling or look at usage patterns to plan for marketing.
Python provides a logging system as a part of its standard library, so you can quickly add logging to your application. In this article, you will learn why using this module is the best way to add logging to your application as well as how to get started quickly, and you will get an introduction to some of the advanced features available.
The Logging Module
The logging module in Python is a ready-to-use and powerful module that is designed to meet the needs of beginners as well as enterprise teams. It is used by most of the third-party Python libraries, so you can integrate your log messages with the ones from those libraries to produce a homogeneous log for your application.
Adding logging to your Python program is as easy as this:
With the logging module imported, you can use something called a “logger” to log messages that you want to see. By default, there are 5 standard levels indicating the severity of events. Each has a corresponding method that can be used to log events at that level of severity. The defined levels, in order of increasing severity, are the following:
- DEBUG
- INFO
- WARNING
- ERROR
- CRITICAL
The logging module provides you with a default logger that allows you to get started without needing to do much configuration. The corresponding methods for each level can be called as shown in the following example:
import logging

logging.debug('This is a debug message')
logging.info('This is an info message')
logging.warning('This is a warning message')
logging.error('This is an error message')
logging.critical('This is a critical message')
The output of the above program would look like this:
WARNING:root:This is a warning message
ERROR:root:This is an error message
CRITICAL:root:This is a critical message
The output shows the severity level before each message along with root, which is the name the logging module gives to its default logger. (Loggers are discussed in detail in later sections.) This format, which shows the level, name, and message separated by a colon (:), is the default output format that can be configured to include things like timestamp, line number, and other details.
Notice that the debug() and info() messages didn’t get logged. This is because, by default, the logging module logs the messages with a severity level of WARNING or above. You can change that by configuring the logging module to log events of all levels if you want. You can also define your own severity levels by changing configurations, but it is generally not recommended as it can cause confusion with logs of some third-party libraries that you might be using.
Basic Configurations
You can use the basicConfig(**kwargs) method to configure the logging:
“You will notice that the logging module breaks PEP8 styleguide and uses
camelCasenaming conventions. This is because it was adopted from Log4j, a logging utility in Java. It is a known issue in the package but by the time it was decided to add it to the standard library, it had already been adopted by users and changing it to meet PEP8 requirements would cause backwards compatibility issues.” (Source)
Some of the commonly used parameters for basicConfig() are the following:
level: The root logger will be set to the specified severity level.filename: This specifies the file.filemode: Iffilenameis given, the file is opened in this mode. The default isa, which means append.format: This is the format of the log message.
By using the level parameter, you can set what level of log messages you want to record. This can be done by passing one of the constants available in the class, and this would enable all logging calls at or above that level to be logged. Here’s an example:
import logging

logging.basicConfig(level=logging.DEBUG)
logging.debug('This will get logged')
DEBUG:root:This will get logged
All events at or above DEBUG level will now get logged.
Similarly, for logging to a file rather than the console, filename and filemode can be used, and you can decide the format of the message using format. The following example shows the usage of all three:
import logging

logging.basicConfig(filename='app.log', filemode='w', format='%(name)s - %(levelname)s - %(message)s')
logging.warning('This will get logged to a file')
root - ERROR - This will get logged to a file
The message will look like this but will be written to a file named app.log instead of the console. The filemode is set to w, which means the log file is opened in “write mode” each time basicConfig() is called, and each run of the program will rewrite the file. The default configuration for filemode is a, which is append.
You can customize the root logger even further by using more parameters for basicConfig(), which can be found here.
It should be noted that calling basicConfig() to configure the root logger works only if the root logger has not been configured before. Basically, this function can only be called once.
debug(), info(), warning(), error(), and critical() also call basicConfig() without arguments automatically if it has not been called before. This means that after the first time one of the above functions is called, you can no longer configure the root logger because they would have called the basicConfig() function internally.
The default setting in basicConfig() is to set the logger to write to the console in the following format:
ERROR:root:This is an error message
Formatting the Output
While you can pass any variable that can be represented as a string from your program as a message to your logs, there are some basic elements that are already a part of the LogRecord and can be easily added to the output format. If you want to log the process ID along with the level and message, you can do something like this:
import logging

logging.basicConfig(format='%(process)d-%(levelname)s-%(message)s')
logging.warning('This is a Warning')
18472-WARNING-This is a Warning
format can take a string with LogRecord attributes in any arrangement you like. The entire list of available attributes can be found here.
Here’s another example where you can add the date and time info:
import logging

logging.basicConfig(format='%(asctime)s - %(message)s', level=logging.INFO)
logging.info('Admin logged in')
2018-07-11 20:12:06,288 - Admin logged in
%(asctime)s adds the time of creation of the LogRecord. The format can be changed using the datefmt attribute, which uses the same formatting language as the formatting functions in the datetime module, such as time.strftime():
import logging

logging.basicConfig(format='%(asctime)s - %(message)s', datefmt='%d-%b-%y %H:%M:%S')
logging.warning('Admin logged out')
12-Jul-18 20:53:19 - Admin logged out
You can find the guide here.
Logging Variable Data
In most cases, you would want to include dynamic information from your application in the logs. You have seen that the logging methods take a string as an argument, and it might seem natural to format a string with variable data in a separate line and pass it to the log method. But this can actually be done directly by using a format string for the message and appending the variable data as arguments. Here’s an example:
import logging

name = 'John'

logging.error('%s raised an error', name)
ERROR:root:John raised an error
The arguments passed to the method would be included as variable data in the message.
While you can use any formatting style, the f-strings introduced in Python 3.6 are an awesome way to format strings as they can help keep the formatting short and easy to read:
import logging

name = 'John'

logging.error(f'{name} raised an error')
ERROR:root:John raised an error
Capturing Stack Traces
The logging module also allows you to capture the full stack traces in an application. Exception information can be captured if the exc_info parameter is passed as True, and the logging functions are called like this:
import logging

a = 5
b = 0

try:
  c = a / b
except Exception as e:
  logging.error("Exception occurred", exc_info=True)
ERROR:root:Exception occurred
Traceback (most recent call last):
  File "exceptions.py", line 6, in <module>
    c = a / b
ZeroDivisionError: division by zero
[Finished in 0.2s]
If exc_info is not set to True, the output of the above program would not tell us anything about the exception, which, in a real-world scenario, might not be as simple as a ZeroDivisionError. Imagine trying to debug an error in a complicated codebase with a log that shows only this:
ERROR:root:Exception occurred
Here’s a quick tip: if you’re logging from an exception handler, use the logging.exception() method, which logs a message with level ERROR and adds exception information to the message. To put it more simply, calling logging.exception() is like calling logging.error(exc_info=True). But since this method always dumps exception information, it should only be called from an exception handler. Take a look at this example:
import logging

a = 5
b = 0
try:
  c = a / b
except Exception as e:
  logging.exception("Exception occurred")
ERROR:root:Exception occurred
Traceback (most recent call last):
  File "exceptions.py", line 6, in <module>
    c = a / b
ZeroDivisionError: division by zero
[Finished in 0.2s]
Using logging.exception() would show a log at the level of ERROR. If you don’t want that, you can call any of the other logging methods from debug() to critical() and pass the exc_info parameter as True.
Classes and Functions
So far, we have seen the default logger named root, which is used by the logging module whenever its functions are called directly like this: logging.debug(). You can (and should) define your own logger by creating an object of the Logger class, especially if your application has multiple modules. Let’s have a look at some of the classes and functions in the module.
The most commonly used classes defined in the logging module are the following:
-
Logger: This is the class whose objects will be used in the application code directly to call the functions. -
LogRecord: Loggers automatically createLogRecordobjects that have all the information related to the event being logged, like the name of the logger, the function, the line number, the message, and more. -
Handler: Handlers send theLogRecordto the required output destination, like the console or a file.Handleris a base for subclasses likeStreamHandler,FileHandler,SMTPHandler,HTTPHandler, and more. These subclasses send the logging outputs to corresponding destinations, likesys.stdoutor a disk file. -
Formatter: This is where you specify the format of the output by specifying a string format that lists out the attributes that the output should contain.
Out of these, we mostly deal with the objects of the Logger class, which are instantiated using the module-level function logging.getLogger(name). Multiple calls to getLogger() with the same name will return a reference to the same Logger object, which saves us from passing the logger objects to every part where it’s needed. Here’s an example:
import logging

logger = logging.getLogger('example_logger')
logger.warning('This is a warning')
This creates a custom logger named example_logger, but unlike the root logger, the name of a custom logger is not part of the default output format and has to be added to the configuration. Configuring it to a format to show the name of the logger would give an output like this:
WARNING:example_logger:This is a warning
Again, unlike the root logger, a custom logger can’t be configured using basicConfig(). You have to configure it using Handlers and Formatters:
“It is recommended that we use module-level loggers by passing
__name__as the name parameter togetLogger()to create a logger object as the name of the logger itself would tell us from where the events are being logged.__name__is a special built-in variable in Python which evaluates to the name of the current module.” (Source)
Using Handlers
Handlers come into the picture when you want to configure your own loggers and send the logs to multiple places when they are generated. Handlers send the log messages to configured destinations like the standard output stream or a file or over HTTP or to your email via SMTP.
A logger that you create can have more than one handler, which means you can set it up to be saved to a log file and also send it over email.
Like loggers, you can also set the severity level in handlers. This is useful if you want to set multiple handlers for the same logger but want different severity levels for each of them. For example, you may want logs with level WARNING and above to be logged to the console, but everything with level ERROR and above should also be saved to a file. Here’s a program that does that:
# logging_example.py

import logging

# Create a custom logger
logger = logging.getLogger(__name__)

# Create handlers
c_handler = logging.StreamHandler()
f_handler = logging.FileHandler('file.log')
c_handler.setLevel(logging.WARNING)
f_handler.setLevel(logging.ERROR)

# Create formatters and add it to handlers
c_format = logging.Formatter('%(name)s - %(levelname)s - %(message)s')
f_format = logging.Formatter('%(asctime)s - %(name)s - %(levelname)s - %(message)s')
c_handler.setFormatter(c_format)
f_handler.setFormatter(f_format)

# Add handlers to the logger
logger.addHandler(c_handler)
logger.addHandler(f_handler)

logger.warning('This is a warning')
logger.error('This is an error')
__main__ - WARNING - This is a warning
__main__ - ERROR - This is an error
Here, logger.warning() is creating a LogRecord that holds all the information of the event and passing it to all the Handlers that it has: c_handler and f_handler.
c_handler is a StreamHandler with level WARNING and takes the info from the LogRecord to generate an output in the format specified and prints it to the console. f_handler is a FileHandler with level ERROR, and it ignores this LogRecord as its level is WARNING.
When logger.error() is called, c_handler behaves exactly as before, and f_handler gets a LogRecord at the level of ERROR, so it proceeds to generate an output just like c_handler, but instead of printing it to console, it writes it to the specified file in this format:
2018-08-03 16:12:21,723 - __main__ - ERROR - This is an error
The name of the logger corresponding to the __name__ variable is logged as __main__, which is the name Python assigns to the module where execution starts. If this file is imported by some other module, then the __name__ variable would correspond to its name logging_example. Here’s how it would look:
# run.py

import logging_example
logging_example - WARNING - This is a warning
logging_example - ERROR - This is an error
Other Configuration Methods
You can configure logging as shown above using the module and class functions or by creating a config file or a dictionary and loading it using fileConfig() or dictConfig() respectively. These are useful in case you want to change your logging configuration in a running application.
Here’s an example file configuration:
[loggers]
keys=root,sampleLogger

[handlers]
keys=consoleHandler

[formatters]
keys=sampleFormatter

[logger_root]
level=DEBUG
handlers=consoleHandler

[logger_sampleLogger]
level=DEBUG
handlers=consoleHandler
qualname=sampleLogger
propagate=0

[handler_consoleHandler]
class=StreamHandler
level=DEBUG
formatter=sampleFormatter
args=(sys.stdout,)

[formatter_sampleFormatter]
format=%(asctime)s - %(name)s - %(levelname)s - %(message)s
In the above file, there are two loggers, one handler, and one formatter. After their names are defined, they are configured by adding the words logger, handler, and formatter before their names separated by an underscore.
To load this config file, you have to use fileConfig():
import logging
import logging.config

logging.config.fileConfig(fname='file.conf', disable_existing_loggers=False)

# Get the logger specified in the file
logger = logging.getLogger(__name__)

logger.debug('This is a debug message')
2018-07-13 13:57:45,467 - __main__ - DEBUG - This is a debug message
The path of the config file is passed as a parameter to the fileConfig() method, and the disable_existing_loggers parameter is used to keep or disable the loggers that are present when the function is called. It defaults to True if not mentioned.
Here’s the same configuration in a YAML format for the dictionary approach:
version: 1
formatters:
  simple:
    format: '%(asctime)s - %(name)s - %(levelname)s - %(message)s'
handlers:
  console:
    class: logging.StreamHandler
    level: DEBUG
    formatter: simple
    stream: ext://sys.stdout
loggers:
  sampleLogger:
    level: DEBUG
    handlers: [console]
    propagate: no
root:
  level: DEBUG
  handlers: [console]
Here’s an example that shows how to load config from a yaml file:
import logging
import logging.config
import yaml

with open('config.yaml', 'r') as f:
    config = yaml.safe_load(f.read())
    logging.config.dictConfig(config)

logger = logging.getLogger(__name__)

logger.debug('This is a debug message')
2018-07-13 14:05:03,766 - __main__ - DEBUG - This is a debug message
Keep Calm and Read the Logs
The logging module is considered to be very flexible. Its design is very practical and should fit your use case out of the box. You can add basic logging to a small project, or you can go as far as creating your own custom log levels, handler classes, and more if you are working on a big project.
If you haven’t been using logging in your applications, now is a good time to start. When done right, logging will surely remove a lot of friction from your development process and help you find opportunities to take your application to the next level.
Watch Now This tutorial has a related video course created by the Real Python team. Watch it together with the written tutorial to deepen your understanding: Logging in Python
Logging is used to track events that happen when an application runs. Logging calls are added to application code to record or log the events and errors that occur during program execution. In Python, the logging module is used to log such events and errors.
An event can be described by a message and can optionally contain data specific to the event. Events also have a level or severity assigned by the developer.
Logging is very useful for debugging and for tracking any required information.
How to Use Logging in Python
The Logging Module
The Python standard library contains a logging module that provides a flexible framework for writing log messages from Python code. This module is widely used and is the starting point for most Python developers to use logging.
The logging module provides ways for applications to configure different log handlers and to route log messages to these handlers. This enables a highly flexible configuration that helps to handle many different use cases.
To write a log message, a caller requests a named logger. This logger can be used to write formatted messages using a log level (DEBUG, INFO, ERROR etc). Here’s an example:
import logging
log = logging.getLogger("mylogger")
log.info("Hello World")
Logging Levels
The standard logging levels in Python (in increasing order of severity) and their applicability are:
- DEBUG — Detailed information, typically of interest when diagnosing problems.
- INFO — Confirmation of things working as expected.
- WARNING — Indication of something unexpected or a problem in the near future e.g. ‘disk space low’.
- ERROR — A more serious problem due to which the program was unable to perform a function.
- CRITICAL — A serious error, indicating that the program itself may not be able to continue executing.
The default log level is WARNING, which means that only events of this level and above are logged by default.
Configuring Logging
In general, a configuration consists of adding a Formatter and a Handler to the root logger. The Python logging module provides a number of ways to configure logging:
- Creating loggers, handlers and formatters programmatically that call the configuration methods.
- Creating a logging configuration file and reading it.
- Creating a dictionary of config information and passing it to the
dictConfig()function.
The official Python documentation recommends configuring the error logger via Python dictionary. To do this logging.config.dictConfig needs to be called which accepts the dictionary as an argument. Its schema is:
version— Should be 1 for backwards compatibilitydisable_existing_loggers— Disables the configuration for existing loggers. This isTrueby default.formatters— Formatter settingshandlers— Handler settingsloggers— Logger settings
It is best practice to configure this by creating a new module e.g. settings.py or conf.py. Here’s an example:
import logging.config

MY_LOGGING_CONFIG = {
    'version': 1,
    'disable_existing_loggers': False,
    'formatters': {
        'default_formatter': {
            'format': '[%(levelname)s:%(asctime)s] %(message)s'
        },
    },
    'handlers': {
        'stream_handler': {
            'class': 'logging.StreamHandler',
            'formatter': 'default_formatter',
        },
    },
    'loggers': {
        'mylogger': {
            'handlers': ['stream_handler'],
            'level': 'INFO',
            'propagate': True
        }
    }
}

logging.config.dictConfig(MY_LOGGING_CONFIG)
logger = logging.getLogger('mylogger')
logger.info('info log')
How to Use Logging for Debugging
Besides the logging levels described earlier, exceptions can also be logged with associated traceback information. With logger.exception, traceback information can be included along with the message in case of any errors. This can be highly useful for debugging issues. Here’s an example:
import logging

logger = logging.getLogger(“mylogger”)
logger.setLevel(logging.INFO)

def add(a, b):
    try:
        result = a + b
    except TypeError:
        logger.exception("TypeError occurred")
    else:
        return result

c = add(10, 'Bob')
Running the above code produces the following output:
TypeError occurred
Traceback (most recent call last):
  File "test.py", line 8, in add
    result = a + b
TypeError: unsupported operand type(s) for +: 'int' and 'str'
The output includes the message as well as the traceback info, which can be used to debug the issue.
Python Logging Examples
Basic Logging
Here’s a very simple example of logging using the root logger with basic config:
import logging
logging.basicConfig(level=logging.INFO)
logging.info('Hello World')
Here, the basic Python error logging configuration was set up using logging.basicConfig(). The log level was set to logging.INFO, which means that messages with a level of INFO and above will be logged. Running the above code produces the following output:
INFO:root:Hello WorldThe message is printed to the console, which is the default output destination. The printed message includes the level and the description of the event provided in the logging call.
Logging to a File
A very common use case is logging events to a file. Here’s an example:
import logging
logging.basicConfig(level=logging.INFO, filename='sample.log', encoding='utf-8')
logging.info('Hello World')
Running the above code should create a log file sample.log in the current working directory (if it doesn’t exist already). All subsequent log messages will go straight to this file. The file should contain the following log message after the above code is executed:
INFO:root:Hello WorldLog Message Formatting
The log message format can be specified using the format argument of logging.basicConfig(). Here’s an example:
import logging
logging.basicConfig(level=logging.INFO, format='%(asctime)s:%(levelname)s:%(message)s')
logging.info('Hello World')
Running the above code changes the log message format to show the time, level and message and produces the following output:
2021-12-09 16:28:25,008:INFO:Hello WorldPython Error Logging Using Handler and Formatter
Handlers and formatters are used to set up the output location and the message format for loggers. The FileHandler() class can be used to setup the output file for logs:
import logging

logger = logging.getLogger(__name__)
logger.setLevel(logging.INFO)

file_handler = logging.FileHandler('sample.log')
formatter = logging.Formatter('%(asctime)s:%(levelname)s:%(message)s')
file_handler.setFormatter(formatter)

logger.addHandler(file_handler)

logger.info('Hello World')
Running the above code will create the log file sample.log if it doesn’t exist already and write the following log message to the file:
2021-12-10 15:49:46,494:INFO:Hello WorldFrequently Asked Questions
What is logging in Python?
Logging in Python allows the tracking of events during program execution. Logs are added to application code to indicate the occurrence of certain events. An event is described by a message and optional variable data specific to the event. In Python, the built-in logging module can be used to log events.
Log messages can have 5 levels — DEBUG, INGO, WARNING, ERROR and CRITICAL. They can also include traceback information for exceptions. Logs can be especially useful in case of errors to help identify their cause.
What is logging getLogger Python?
To start logging using the Python logging module, the factory function logging.getLogger(name) is typically executed. The getLogger() function accepts a single argument — the logger’s name. It returns a reference to a logger instance with the specified name if provided, or root if not. Multiple calls to getLogger() with the same name will return a reference to the same logger object.
Any logger name can be provided, but the convention is to use the __name__ variable as the argument, which holds the name of the current module. The names are separated by periods(.) and are hierarchical structures. Loggers further down the list are children of loggers higher up the list. For example, given a logger foo, loggers further down such as foo.bar are descendants of foo.
Track, Analyze and Manage Errors With Rollbar
