Содержание
- Python — Command Line Arguments
- Beyond Basic Programming — Intermediate Python
- Practical Machine Learning using Python
- Practical Data Science using Python
- sys module — System-specific parameters
- Example
- Parsing Command-Line Arguments
- getopt.getopt method
- Example
- Exception getopt.GetoptError
- Example
- Python argparse Module
- Example
- Python Command Line Arguments
- The Command Line Interface
- The C Legacy
- Two Utilities From the Unix World
- sha1sum
- The sys.argv Array
- Displaying Arguments
- Reversing the First Argument
- Mutating sys.argv
- Escaping Whitespace Characters
- Handling Errors
- Calculating the sha1sum
- The Anatomy of Python Command Line Arguments
- Standards
- Options
- Arguments
- Subcommands
- Windows
- Visuals
- A Few Methods for Parsing Python Command Line Arguments
- Regular Expressions
- File Handling
- Standard Input
- Standard Output and Standard Error
- Custom Parsers
- A Few Methods for Validating Python Command Line Arguments
- Type Validation With Python Data Classes
- Custom Validation
- The Python Standard Library
- argparse
- getopt
- A Few External Python Packages
- Click
- Python Prompt Toolkit
- Conclusion
- Additional Resources
Python — Command Line Arguments

Beyond Basic Programming — Intermediate Python
36 Lectures 3 hours

Practical Machine Learning using Python
91 Lectures 23.5 hours

Practical Data Science using Python
22 Lectures 6 hours
Python Command Line Arguments provides a convenient way to accept some information at the command line while running the program. The arguments that are given after the name of the Python script are known as Command Line Arguments and they are used to pass some information to the program. For example —
Here Python script name is script.py and rest of the three arguments — arg1 arg2 arg3 are command line arguments for the program. There are following three Python modules which are helpful in parsing and managing the command line arguments:
sys module — System-specific parameters
The Python sys module provides access to any command-line arguments via the sys.argv. This serves two purposes −
sys.argv is the list of command-line arguments.
len(sys.argv) is the number of command-line arguments.
Here sys.argv[0] is the program ie. script name.
Example
Consider the following script test.py −
Now run above script as below. All the programs in this tutorial need to be run from the command line, so we are unable to provide online compile & run option for these programs. Kindly try to run these programs at your computer.
This produce following result −
As mentioned above, first argument is always script name and it is also being counted in number of arguments.
Parsing Command-Line Arguments
Python provided a getopt module that helps you parse command-line options and arguments. This module provides two functions and an exception to enable command line argument parsing.
getopt.getopt method
This method parses command line options and parameter list. Following is simple syntax for this method −
Here is the detail of the parameters −
args − This is the argument list to be parsed.
options − This is the string of option letters that the script wants to recognize, with options that require an argument should be followed by a colon (:).
long_options − This is optional parameter and if specified, must be a list of strings with the names of the long options, which should be supported. Long options, which require an argument should be followed by an equal sign (‘=’). To accept only long options, options should be an empty string.
This method getopt.getopt() returns value consisting of two elements: the first is a list of (option, value) pairs. The second is the list of program arguments left after the option list was stripped. Each option-and-value pair returned has the option as its first element, prefixed with a hyphen for short options (e.g., ‘-x’) or two hyphens for long options (e.g., ‘—long-option’).
Example
Following is a Python program which takes three arguments at command line:
- First command line argument is -h which will be used to display the usage help of the program.
- Second argument is either -i or —ifile which we are considering as input file.
- Third argument is either -o or —ofile which we are considering as output file.
Here is the following script to test.py −
Now, run above script as follows −
This will produce the following result:
We can also run the above program as follows:
This will produce the same result as in case of -i and -o:
We can use h option to check the usage of the program:
This will produce the following result:
Exception getopt.GetoptError
Consider we use some other option which has not been implemented in the program. This will raise an exception. For example, let’s try to run the same program with wrong option -p as follows:
This will raise an exception as below:
This exception is raised when an unrecognized option is found in the argument list or when an option requiring an argument is given none. The argument to the exception is a string indicating the cause of the error. The attributes msg and opt give the error message and related option.
Example
Following is a correct Python program which makes use of try. except block and capture getopt.GetoptError exception:
Now, run above script as follows −
This will run the program gracefully and will display the program usage as we have implemented in exception section:
Python argparse Module
Python argparse module makes it easy to write user-friendly command-line interfaces. The program defines what arguments it requires, and argparse will figure out how to parse those out of sys.argv. The argparse module also automatically generates help and usage messages. The module will also issue errors when users give the program invalid arguments.
Example
Following is an example which makes simple use of argparse to accept a name parameter:<>/p>
You can add as many arguments as you like using add_argument() method, infact you can also provide required data type of the argument as follows.
However, let’s try to run above program as follows:
This will display the following help:
Now if we provide our name to the program as follows:
Источник
Python Command Line Arguments
Table of Contents
Watch Now This tutorial has a related video course created by the Real Python team. Watch it together with the written tutorial to deepen your understanding: Command Line Interfaces in Python
Adding the capability of processing Python command line arguments provides a user-friendly interface to your text-based command line program. It’s similar to what a graphical user interface is for a visual application that’s manipulated by graphical elements or widgets.
Python exposes a mechanism to capture and extract your Python command line arguments. These values can be used to modify the behavior of a program. For example, if your program processes data read from a file, then you can pass the name of the file to your program, rather than hard-coding the value in your source code.
By the end of this tutorial, you’ll know:
- The origins of Python command line arguments
- The underlying support for Python command line arguments
- The standards guiding the design of a command line interface
- The basics to manually customize and handle Python command line arguments
- The libraries available in Python to ease the development of a complex command line interface
If you want a user-friendly way to supply Python command line arguments to your program without importing a dedicated library, or if you want to better understand the common basis for the existing libraries that are dedicated to building the Python command line interface, then keep on reading!
Free Bonus: 5 Thoughts On Python Mastery, a free course for Python developers that shows you the roadmap and the mindset you’ll need to take your Python skills to the next level.
The Command Line Interface
A command line interface (CLI) provides a way for a user to interact with a program running in a text-based shell interpreter. Some examples of shell interpreters are Bash on Linux or Command Prompt on Windows. A command line interface is enabled by the shell interpreter that exposes a command prompt. It can be characterized by the following elements:
- A command or program
- Zero or more command line arguments
- An output representing the result of the command
- Textual documentation referred to as usage or help
Not every command line interface may provide all these elements, but this list isn’t exhaustive, either. The complexity of the command line ranges from the ability to pass a single argument, to numerous arguments and options, much like a Domain Specific Language. For example, some programs may launch web documentation from the command line or start an interactive shell interpreter like Python.
The two following examples with the Python command illustrates the description of a command line interface:
In this first example, the Python interpreter takes option -c for command, which says to execute the Python command line arguments following the option -c as a Python program.
Another example shows how to invoke Python with -h to display the help:
Try this out in your terminal to see the complete help documentation.
The C Legacy
Python command line arguments directly inherit from the C programming language. As Guido Van Rossum wrote in An Introduction to Python for Unix/C Programmers in 1993, C had a strong influence on Python. Guido mentions the definitions of literals, identifiers, operators, and statements like break , continue , or return . The use of Python command line arguments is also strongly influenced by the C language.
To illustrate the similarities, consider the following C program:
Line 4 defines main() , which is the entry point of a C program. Take good note of the parameters:
- argc is an integer representing the number of arguments of the program.
- argv is an array of pointers to characters containing the name of the program in the first element of the array, followed by the arguments of the program, if any, in the remaining elements of the array.
You can compile the code above on Linux with gcc -o main main.c , then execute with ./main to obtain the following:
Unless explicitly expressed at the command line with the option -o , a.out is the default name of the executable generated by the gcc compiler. It stands for assembler output and is reminiscent of the executables that were generated on older UNIX systems. Observe that the name of the executable ./main is the sole argument.
Let’s spice up this example by passing a few Python command line arguments to the same program:
The output shows that the number of arguments is 5 , and the list of arguments includes the name of the program, main , followed by each word of the phrase «Python Command Line Arguments» , which you passed at the command line.
Note: argc stands for argument count, while argv stands for argument vector. To learn more, check out A Little C Primer/C Command Line Arguments.
The compilation of main.c assumes that you used a Linux or a Mac OS system. On Windows, you can also compile this C program with one of the following options:
- Windows Subsystem for Linux (WSL): It’s available in a few Linux distributions, like Ubuntu, OpenSUSE, and Debian, among others. You can install it from the Microsoft Store.
- Windows Build Tools: This includes the Windows command line build tools, the Microsoft C/C++ compiler cl.exe , and a compiler front end named clang.exe for C/C++.
- Microsoft Visual Studio: This is the main Microsoft integrated development environment (IDE). To learn more about IDEs that can be used for both Python and C on various operating systems, including Windows, check out Python IDEs and Code Editors (Guide).
- mingw-64 project: This supports the GCC compiler on Windows.
If you’ve installed Microsoft Visual Studio or the Windows Build Tools, then you can compile main.c as follows:
You’ll obtain an executable named main.exe that you can start with:
You could implement a Python program, main.py , that’s equivalent to the C program, main.c , you saw above:
You don’t see an argc variable like in the C code example. It doesn’t exist in Python because sys.argv is sufficient. You can parse the Python command line arguments in sys.argv without having to know the length of the list, and you can call the built-in len() if the number of arguments is needed by your program.
Also, note that enumerate() , when applied to an iterable, returns an enumerate object that can emit pairs associating the index of an element in sys.arg to its corresponding value. This allows looping through the content of sys.argv without having to maintain a counter for the index in the list.
Execute main.py as follows:
sys.argv contains the same information as in the C program:
- The name of the program main.py is the first item of the list.
- The arguments Python , Command , Line , and Arguments are the remaining elements in the list.
With this short introduction into a few arcane aspects of the C language, you’re now armed with some valuable knowledge to further grasp Python command line arguments.
Two Utilities From the Unix World
To use Python command line arguments in this tutorial, you’ll implement some partial features of two utilities from the Unix ecosystem:
You’ll gain some familiarity with these Unix tools in the following sections.
sha1sum
sha1sum calculates SHA-1 hashes, and it’s often used to verify the integrity of files. For a given input, a hash function always returns the same value. Any minor changes in the input will result in a different hash value. Before you use the utility with concrete parameters, you may try to display the help:
Displaying the help of a command line program is a common feature exposed in the command line interface.
To calculate the SHA-1 hash value of the content of a file, you proceed as follows:
The result shows the SHA-1 hash value as the first field and the name of the file as the second field. The command can take more than one file as arguments:
Thanks to the wildcards expansion feature of the Unix terminal, it’s also possible to provide Python command line arguments with wildcard characters. One such a character is the asterisk or star ( * ):
The shell converts main.* to main.c and main.py , which are the two files matching the pattern main.* in the current directory, and passes them to sha1sum . The program calculates the SHA1 hash of each of the files in the argument list. You’ll see that, on Windows, the behavior is different. Windows has no wildcard expansion, so the program may have to accommodate for that. Your implementation may need to expand wildcards internally.
Without any argument, sha1sum reads from the standard input. You can feed data to the program by typing characters on the keyboard. The input may incorporate any characters, including the carriage return Enter . To terminate the input, you must signal the end of file with Enter , followed by the sequence Ctrl + D :
You first enter the name of the program, sha1sum , followed by Enter , and then Real and Python , each also followed by Enter . To close the input stream, you type Ctrl + D . The result is the value of the SHA1 hash generated for the text RealnPythonn . The name of the file is — . This is a convention to indicate the standard input. The hash value is the same when you execute the following commands:
Up next, you’ll read a short description of seq .
seq generates a sequence of numbers. In its most basic form, like generating the sequence from 1 to 5, you can execute the following:
To get an overview of the possibilities exposed by seq , you can display the help at the command line:
For this tutorial, you’ll write a few simplified variants of sha1sum and seq . In each example, you’ll learn a different facet or combination of features about Python command line arguments.
On Mac OS and Linux, sha1sum and seq should come pre-installed, though the features and the help information may sometimes differ slightly between systems or distributions. If you’re using Windows 10, then the most convenient method is to run sha1sum and seq in a Linux environment installed on the WSL. If you don’t have access to a terminal exposing the standard Unix utilities, then you may have access to online terminals:
- Create a free account on PythonAnywhere and start a Bash Console.
- Create a temporary Bash terminal on repl.it.
These are two examples, and you may find others.
The sys.argv Array
Before exploring some accepted conventions and discovering how to handle Python command line arguments, you need to know that the underlying support for all Python command line arguments is provided by sys.argv . The examples in the following sections show you how to handle the Python command line arguments stored in sys.argv and to overcome typical issues that occur when you try to access them. You’ll learn:
- How to access the content of sys.argv
- How to mitigate the side effects of the global nature of sys.argv
- How to process whitespaces in Python command line arguments
- How to handle errors while accessing Python command line arguments
- How to ingest the original format of the Python command line arguments passed by bytes
Let’s get started!
Displaying Arguments
The sys module exposes an array named argv that includes the following:
- argv[0] contains the name of the current Python program.
- argv[1:] , the rest of the list, contains any and all Python command line arguments passed to the program.
The following example demonstrates the content of sys.argv :
Here’s how this code works:
- Line 2 imports the internal Python module sys .
- Line 4 extracts the name of the program by accessing the first element of the list sys.argv .
- Line 5 displays the Python command line arguments by fetching all the remaining elements of the list sys.argv .
Note: The f-string syntax used in argv.py leverages the new debugging specifier in Python 3.8. To read more about this new f-string feature and others, check out Cool New Features in Python 3.8.
If your Python version is less than 3.8, then simply remove the equals sign ( = ) in both f-strings to allow the program to execute successfully. The output will only display the value of the variables, not their names.
Execute the script argv.py above with a list of arbitrary arguments as follows:
The output confirms that the content of sys.argv[0] is the Python script argv.py , and that the remaining elements of the sys.argv list contains the arguments of the script, [‘un’, ‘deux’, ‘trois’, ‘quatre’] .
To summarize, sys.argv contains all the argv.py Python command line arguments. When the Python interpreter executes a Python program, it parses the command line and populates sys.argv with the arguments.
Reversing the First Argument
Now that you have enough background on sys.argv , you’re going to operate on arguments passed at the command line. The example reverse.py reverses the first argument passed at the command line:
In reverse.py the process to reverse the first argument is performed with the following steps:
- Line 5 fetches the first argument of the program stored at index 1 of sys.argv . Remember that the program name is stored at index 0 of sys.argv .
- Line 6 prints the reversed string. args[::-1] is a Pythonic way to use a slice operation to reverse a list.
You execute the script as follows:
As expected, reverse.py operates on «Real Python» and reverses the only argument to output «nohtyP laeR» . Note that surrounding the multi-word string «Real Python» with quotes ensures that the interpreter handles it as a unique argument, instead of two arguments. You’ll delve into argument separators in a later section.
Mutating sys.argv
sys.argv is globally available to your running Python program. All modules imported during the execution of the process have direct access to sys.argv . This global access might be convenient, but sys.argv isn’t immutable. You may want to implement a more reliable mechanism to expose program arguments to different modules in your Python program, especially in a complex program with multiple files.
Observe what happens if you tamper with sys.argv :
You invoke .pop() to remove and return the last item in sys.argv .
Execute the script above:
Notice that the fourth argument is no longer included in sys.argv .
In a short script, you can safely rely on the global access to sys.argv , but in a larger program, you may want to store arguments in a separate variable. The previous example could be modified as follows:
This time, although sys.argv lost its last element, args has been safely preserved. args isn’t global, and you can pass it around to parse the arguments per the logic of your program. The Python package manager, pip , uses this approach. Here’s a short excerpt of the pip source code:
In this snippet of code taken from the pip source code, main() saves into args the slice of sys.argv that contains only the arguments and not the file name. sys.argv remains untouched, and args isn’t impacted by any inadvertent changes to sys.argv .
Escaping Whitespace Characters
In the reverse.py example you saw earlier, the first and only argument is «Real Python» , and the result is «nohtyP laeR» . The argument includes a whitespace separator between «Real» and «Python» , and it needs to be escaped.
On Linux, whitespaces can be escaped by doing one of the following:
- Surrounding the arguments with single quotes ( ‘ )
- Surrounding the arguments with double quotes ( » )
- Prefixing each space with a backslash ( )
Without one of the escape solutions, reverse.py stores two arguments, «Real» in sys.argv[1] and «Python» in sys.argv[2] :
The output above shows that the script only reverses «Real» and that «Python» is ignored. To ensure both arguments are stored, you’d need to surround the overall string with double quotes ( » ).
You can also use a backslash ( ) to escape the whitespace:
With the backslash ( ), the command shell exposes a unique argument to Python, and then to reverse.py .
In Unix shells, the internal field separator (IFS) defines characters used as delimiters. The content of the shell variable, IFS , can be displayed by running the following command:
From the result above, ‘ tn’ , you identify three delimiters:
- Space ( ‘ ‘ )
- Tab ( t )
- Newline ( n )
Prefixing a space with a backslash ( ) bypasses the default behavior of the space as a delimiter in the string «Real Python» . This results in one block of text as intended, instead of two.
Note that, on Windows, the whitespace interpretation can be managed by using a combination of double quotes. It’s slightly counterintuitive because, in the Windows terminal, a double quote ( » ) is interpreted as a switch to disable and subsequently to enable special characters like space, tab, or pipe ( | ).
As a result, when you surround more than one string with double quotes, the Windows terminal interprets the first double quote as a command to ignore special characters and the second double quote as one to interpret special characters.
With this information in mind, it’s safe to assume that surrounding more than one string with double quotes will give you the expected behavior, which is to expose the group of strings as a single argument. To confirm this peculiar effect of the double quote on the Windows command line, observe the following two examples:
In the example above, you can intuitively deduce that «Real Python» is interpreted as a single argument. However, realize what occurs when you use a single double quote:
The command prompt passes the whole string «Real Python» as a single argument, in the same manner as if the argument was «Real Python» . In reality, the Windows command prompt sees the unique double quote as a switch to disable the behavior of the whitespaces as separators and passes anything following the double quote as a unique argument.
For more information on the effects of double quotes in the Windows terminal, check out A Better Way To Understand Quoting and Escaping of Windows Command Line Arguments.
Handling Errors
Python command line arguments are loose strings. Many things can go wrong, so it’s a good idea to provide the users of your program with some guidance in the event they pass incorrect arguments at the command line. For example, reverse.py expects one argument, and if you omit it, then you get an error:
The Python exception IndexError is raised, and the corresponding traceback shows that the error is caused by the expression arg = sys.argv[1] . The message of the exception is list index out of range . You didn’t pass an argument at the command line, so there’s nothing in the list sys.argv at index 1 .
This is a common pattern that can be addressed in a few different ways. For this initial example, you’ll keep it brief by including the expression arg = sys.argv[1] in a try block. Modify the code as follows:
The expression on line 4 is included in a try block. Line 8 raises the built-in exception SystemExit . If no argument is passed to reverse_exc.py , then the process exits with a status code of 1 after printing the usage. Note the integration of sys.argv[0] in the error message. It exposes the name of the program in the usage message. Now, when you execute the same program without any Python command line arguments, you can see the following output:
reverse.py didn’t have an argument passed at the command line. As a result, the program raises SystemExit with an error message. This causes the program to exit with a status of 1 , which displays when you print the special variable $? with echo .
Calculating the sha1sum
You’ll write another script to demonstrate that, on Unix-like systems, Python command line arguments are passed by bytes from the OS. This script takes a string as an argument and outputs the hexadecimal SHA-1 hash of the argument:
This is loosely inspired by sha1sum , but it intentionally processes a string instead of the contents of a file. In sha1sum.py , the steps to ingest the Python command line arguments and to output the result are the following:
- Line 6 stores the content of the first argument in data .
- Line 7 instantiates a SHA1 algorithm.
- Line 8 updates the SHA1 hash object with the content of the first program argument. Note that hash.update takes a byte array as an argument, so it’s necessary to convert data from a string to a bytes array.
- Line 9 prints a hexadecimal representation of the SHA1 hash computed on line 8.
When you run the script with an argument, you get this:
For the sake of keeping the example short, the script sha1sum.py doesn’t handle missing Python command line arguments. Error handling could be addressed in this script the same way you did it in reverse_exc.py .
Note: Checkout hashlib for more details about the hash functions available in the Python standard library.
From the sys.argv documentation, you learn that in order to get the original bytes of the Python command line arguments, you can use os.fsencode() . By directly obtaining the bytes from sys.argv[1] , you don’t need to perform the string-to-bytes conversion of data :
The main difference between sha1sum.py and sha1sum_bytes.py are highlighted in the following lines:
- Line 7 populates data with the original bytes passed to the Python command line arguments.
- Line 9 passes data as an argument to m.update() , which receives a bytes-like object.
Execute sha1sum_bytes.py to compare the output:
The hexadecimal value of the SHA1 hash is the same as in the previous sha1sum.py example.
The Anatomy of Python Command Line Arguments
Now that you’ve explored a few aspects of Python command line arguments, most notably sys.argv , you’re going to apply some of the standards that are regularly used by developers while implementing a command line interface.
Python command line arguments are a subset of the command line interface. They can be composed of different types of arguments:
- Options modify the behavior of a particular command or program.
- Arguments represent the source or destination to be processed.
- Subcommands allow a program to define more than one command with the respective set of options and arguments.
Before you go deeper into the different types of arguments, you’ll get an overview of the accepted standards that have been guiding the design of the command line interface and arguments. These have been refined since the advent of the computer terminal in the mid-1960s.
Standards
A few available standards provide some definitions and guidelines to promote consistency for implementing commands and their arguments. These are the main UNIX standards and references:
The standards above define guidelines and nomenclatures for anything related to programs and Python command line arguments. The following points are examples taken from those references:
- POSIX:
- A program or utility is followed by options, option-arguments, and operands.
- All options should be preceded with a hyphen or minus ( — ) delimiter character.
- Option-arguments should not be optional.
- GNU:
- All programs should support two standard options, which are —version and —help .
- Long-named options are equivalent to the single-letter Unix-style options. An example is —debug and -d .
- docopt:
- Short options can be stacked, meaning that -abc is equivalent to -a -b -c .
- Long options can have arguments specified after a space or the equals sign ( = ). The long option —input=ARG is equivalent to —input ARG .
These standards define notations that are helpful when you describe a command. A similar notation can be used to display the usage of a particular command when you invoke it with the option -h or —help .
The GNU standards are very similar to the POSIX standards but provide some modifications and extensions. Notably, they add the long option that’s a fully named option prefixed with two hyphens ( — ). For example, to display the help, the regular option is -h and the long option is —help .
Note: You don’t need to follow those standards rigorously. Instead, follow the conventions that have been used successfully for years since the advent of UNIX. If you write a set of utilities for you or your team, then ensure that you stay consistent across the different utilities.
In the following sections, you’ll learn more about each of the command line components, options, arguments, and sub-commands.
Options
An option, sometimes called a flag or a switch, is intended to modify the behavior of the program. For example, the command ls on Linux lists the content of a given directory. Without any arguments, it lists the files and directories in the current directory:
Let’s add a few options. You can combine -l and -s into -ls , which changes the information displayed in the terminal:
An option can take an argument, which is called an option-argument. See an example in action with od below:
od stands for octal dump. This utility displays data in different printable representations, like octal (which is the default), hexadecimal, decimal, and ASCII. In the example above, it takes the binary file main and displays the first 16 bytes of the file in hexadecimal format. The option -t expects a type as an option-argument, and -N expects the number of input bytes.
In the example above, -t is given type x1 , which stands for hexadecimal and one byte per integer. This is followed by z to display the printable characters at the end of the input line. -N takes 16 as an option-argument for limiting the number of input bytes to 16.
Arguments
The arguments are also called operands or parameters in the POSIX standards. The arguments represent the source or the destination of the data that the command acts on. For example, the command cp , which is used to copy one or more files to a file or a directory, takes at least one source and one target:
In line 4, cp takes two arguments:
- main : the source file
- main2 : the target file
It then copies the content of main to a new file named main2 . Both main and main2 are arguments, or operands, of the program cp .
Subcommands
The concept of subcommands isn’t documented in the POSIX or GNU standards, but it does appear in docopt. The standard Unix utilities are small tools adhering to the Unix philosophy. Unix programs are intended to be programs that do one thing and do it well. This means no subcommands are necessary.
By contrast, a new generation of programs, including git , go , docker , and gcloud , come with a slightly different paradigm that embraces subcommands. They’re not necessarily part of the Unix landscape as they span several operating systems, and they’re deployed with a full ecosystem that requires several commands.
Take git as an example. It handles several commands, each possibly with their own set of options, option-arguments, and arguments. The following examples apply to the git subcommand branch :
- git branch displays the branches of the local git repository.
- git branch custom_python creates a local branch custom_python in a local repository.
- git branch -d custom_python deletes the local branch custom_python .
- git branch —help displays the help for the git branch subcommand.
In the Python ecosystem, pip has the concept of subcommands, too. Some pip subcommands include list , install , freeze , or uninstall .
Windows
On Windows, the conventions regarding Python command line arguments are slightly different, in particular, those regarding command line options. To validate this difference, take tasklist , which is a native Windows executable that displays a list of the currently running processes. It’s similar to ps on Linux or macOS systems. Below is an example of how to execute tasklist in a command prompt on Windows:
Note that the separator for an option is a forward slash ( / ) instead of a hyphen ( — ) like the conventions for Unix systems. For readability, there’s a space between the program name, taskslist , and the option /FI , but it’s just as correct to type taskslist/FI .
The particular example above executes tasklist with a filter to only show the Notepad processes currently running. You can see that the system has two running instances of the Notepad process. Although it’s not equivalent, this is similar to executing the following command in a terminal on a Unix-like system:
The ps command above shows all the current running vi processes. The behavior is consistent with the Unix Philosophy, as the output of ps is transformed by two grep filters. The first grep command selects all the occurrences of vi , and the second grep filters out the occurrence of grep itself.
With the spread of Unix tools making their appearance in the Windows ecosystem, non-Windows-specific conventions are also accepted on Windows.
Visuals
At the start of a Python process, Python command line arguments are split into two categories:
Python options: These influence the execution of the Python interpreter. For example, adding option -O is a means to optimize the execution of a Python program by removing assert and __debug__ statements. There are other Python options available at the command line.
Python program and its arguments: Following the Python options (if there are any), you’ll find the Python program, which is a file name that usually has the extension .py , and its arguments. By convention, those can also be composed of options and arguments.
Take the following command that’s intended to execute the program main.py , which takes options and arguments. Note that, in this example, the Python interpreter also takes some options, which are -B and -v .
In the command line above, the options are Python command line arguments and are organized as follows:
- The option -B tells Python not to write .pyc files on the import of source modules. For more details about .pyc files, check out the section What Does a Compiler Do? in Your Guide to the CPython Source Code.
- The option -v stands for verbose and tells Python to trace all import statements.
- The arguments passed to main.py are fictitious and represent two long options ( —verbose and —debug ) and two arguments ( un and deux ).
This example of Python command line arguments can be illustrated graphically as follows:
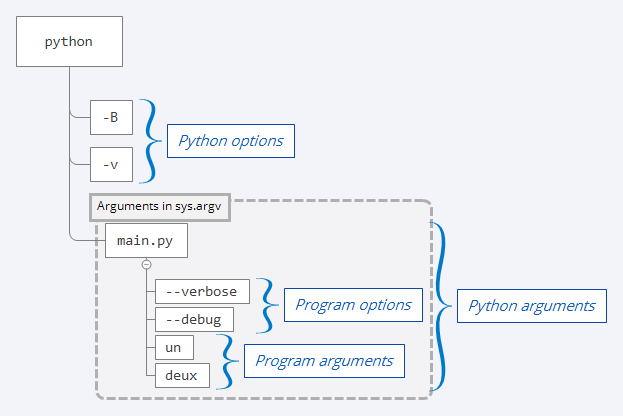
Within the Python program main.py , you only have access to the Python command line arguments inserted by Python in sys.argv . The Python options may influence the behavior of the program but are not accessible in main.py .
A Few Methods for Parsing Python Command Line Arguments
Now you’re going to explore a few approaches to apprehend options, option-arguments, and operands. This is done by parsing Python command line arguments. In this section, you’ll see some concrete aspects of Python command line arguments and techniques to handle them. First, you’ll see an example that introduces a straight approach relying on list comprehensions to collect and separate options from arguments. Then you will:
- Use regular expressions to extract elements of the command line
- Learn how to handle files passed at the command line
- Apprehend the standard input in a way that’s compatible with the Unix tools
- Differentiate the regular output of the program from the errors
- Implement a custom parser to read Python command line arguments
This will serve as a preparation for options involving modules in the standard libraries or from external libraries that you’ll learn about later in this tutorial.
For something uncomplicated, the following pattern, which doesn’t enforce ordering and doesn’t handle option-arguments, may be enough:
The intent of the program above is to modify the case of the Python command line arguments. Three options are available:
- -c to capitalize the arguments
- -u to convert the arguments to uppercase
- -l to convert the argument to lowercase
The code collects and separates the different argument types using list comprehensions:
- Line 5 collects all the options by filtering on any Python command line arguments starting with a hyphen ( — ).
- Line 6 assembles the program arguments by filtering out the options.
When you execute the Python program above with a set of options and arguments, you get the following output:
This approach might suffice in many situations, but it would fail in the following cases:
- If the order is important, and in particular, if options should appear before the arguments
- If support for option-arguments is needed
- If some arguments are prefixed with a hyphen ( — )
You can leverage other options before you resort to a library like argparse or click .
Regular Expressions
You can use a regular expression to enforce a certain order, specific options and option-arguments, or even the type of arguments. To illustrate the usage of a regular expression to parse Python command line arguments, you’ll implement a Python version of seq , which is a program that prints a sequence of numbers. Following the docopt conventions, a specification for seq.py could be this:
First, look at a regular expression that’s intended to capture the requirements above:
To experiment with the regular expression above, you may use the snippet recorded on Regular Expression 101. The regular expression captures and enforces a few aspects of the requirements given for seq . In particular, the command may take:
- A help option, in short ( -h ) or long format ( —help ), captured as a named group called HELP
- A separator option, -s or —separator , taking an optional argument, and captured as named group called SEP
- Up to three integer operands, respectively captured as OP1 , OP2 , and OP3
For clarity, the pattern args_pattern above uses the flag re.VERBOSE on line 11. This allows you to spread the regular expression over a few lines to enhance readability. The pattern validates the following:
- Argument order: Options and arguments are expected to be laid out in a given order. For example, options are expected before the arguments.
- Option values**: Only —help , -s , or —separator are expected as options.
- Argument mutual exclusivity: The option —help isn’t compatible with other options or arguments.
- Argument type: Operands are expected to be positive or negative integers.
For the regular expression to be able to handle these things, it needs to see all Python command line arguments in one string. You can collect them using str.join():
This makes arg_line a string that includes all arguments, except the program name, separated by a space.
Given the pattern args_pattern above, you can extract the Python command line arguments with the following function:
The pattern is already handling the order of the arguments, mutual exclusivity between options and arguments, and the type of the arguments. parse() is applying re.match() to the argument line to extract the proper values and store the data in a dictionary.
The dictionary includes the names of each group as keys and their respective values. For example, if the arg_line value is —help , then the dictionary is <‘HELP’: ‘help’>. If arg_line is -s T 10 , then the dictionary becomes <‘SEP’: ‘T’, ‘OP1′: ’10’>. You can expand the code block below to see an implementation of seq with regular expressions.
An Implementation of seq With Regular Expressions Show/Hide
The code below implements a limited version of seq with a regular expression to handle the command line parsing and validation:
You can execute the code above by running this command:
This should output the following:
Try this command with other combinations, including the —help option.
You didn’t see a version option supplied here. This was done intentionally to reduce the length of the example. You may consider adding the version option as an extended exercise. As a hint, you could modify the regular expression by replacing the line (—(?P help).*)| with (—(?P help).*)|(—(?P version).*)| . An additional if block would also be needed in main() .
At this point, you know a few ways to extract options and arguments from the command line. So far, the Python command line arguments were only strings or integers. Next, you’ll learn how to handle files passed as arguments.
File Handling
It’s time now to experiment with Python command line arguments that are expected to be file names. Modify sha1sum.py to handle one or more files as arguments. You’ll end up with a downgraded version of the original sha1sum utility, which takes one or more files as arguments and displays the hexadecimal SHA1 hash for each file, followed by the name of the file:
sha1sum() is applied to the data read from each file that you passed at the command line, rather than the string itself. Take note that m.update() takes a bytes-like object as an argument and that the result of invoking read() after opening a file with the mode rb will return a bytes object. For more information about handling file content, check out Reading and Writing Files in Python, and in particular, the section Working With Bytes.
The evolution of sha1sum_file.py from handling strings at the command line to manipulating the content of files is getting you closer to the original implementation of sha1sum :
The execution of the Python program with the same Python command line arguments gives this:
Because you interact with the shell interpreter or the Windows command prompt, you also get the benefit of the wildcard expansion provided by the shell. To prove this, you can reuse main.py , which displays each argument with the argument number and its value:
You can see that the shell automatically performs wildcard expansion so that any file with a base name matching main , regardless of the extension, is part of sys.argv .
The wildcard expansion isn’t available on Windows. To obtain the same behavior, you need to implement it in your code. To refactor main.py to work with wildcard expansion, you can use glob . The following example works on Windows and, though it isn’t as concise as the original main.py , the same code behaves similarly across platforms:
In main_win.py , expand_args relies on glob.glob() to process the shell-style wildcards. You can verify the result on Windows and any other operating system:
This addresses the problem of handling files using wildcards like the asterisk ( * ) or question mark ( ? ), but how about stdin ?
If you don’t pass any parameter to the original sha1sum utility, then it expects to read data from the standard input. This is the text you enter at the terminal that ends when you type Ctrl + D on Unix-like systems or Ctrl + Z on Windows. These control sequences send an end of file (EOF) to the terminal, which stops reading from stdin and returns the data that was entered.
In the next section, you’ll add to your code the ability to read from the standard input stream.
Standard Input
When you modify the previous Python implementation of sha1sum to handle the standard input using sys.stdin , you’ll get closer to the original sha1sum :
Two conventions are applied to this new sha1sum version:
- Without any arguments, the program expects the data to be provided in the standard input, sys.stdin , which is a readable file object.
- When a hyphen ( — ) is provided as a file argument at the command line, the program interprets it as reading the file from the standard input.
Try this new script without any arguments. Enter the first aphorism of The Zen of Python, then complete the entry with the keyboard shortcut Ctrl + D on Unix-like systems or Ctrl + Z on Windows:
You can also include one of the arguments as stdin mixed with the other file arguments like so:
Another approach on Unix-like systems is to provide /dev/stdin instead of — to handle the standard input:
On Windows there’s no equivalent to /dev/stdin , so using — as a file argument works as expected.
The script sha1sum_stdin.py isn’t covering all necessary error handling, but you’ll cover some of the missing features later in this tutorial.
Standard Output and Standard Error
Command line processing may have a direct relationship with stdin to respect the conventions detailed in the previous section. The standard output, although not immediately relevant, is still a concern if you want to adhere to the Unix Philosophy. To allow small programs to be combined, you may have to take into account the three standard streams:
The output of a program becomes the input of another one, allowing you to chain small utilities. For example, if you wanted to sort the aphorisms of the Zen of Python, then you could execute the following:
The output above is truncated for better readability. Now imagine that you have a program that outputs the same data but also prints some debugging information:
Executing the Python script above gives:
The ellipsis ( . ) indicates that the output was truncated to improve readability.
Now, if you want to sort the list of aphorisms, then execute the command as follows:
You may realize that you didn’t intend to have the debug output as the input of the sort command. To address this issue, you want to send traces to the standard errors stream, stderr , instead:
Execute zen_sort_stderr.py to observe the following:
Now, the traces are displayed to the terminal, but they aren’t used as input for the sort command.
Custom Parsers
You can implement seq by relying on a regular expression if the arguments aren’t too complex. Nevertheless, the regex pattern may quickly render the maintenance of the script difficult. Before you try getting help from specific libraries, another approach is to create a custom parser. The parser is a loop that fetches each argument one after another and applies a custom logic based on the semantics of your program.
A possible implementation for processing the arguments of seq_parse.py could be as follows:
parse() is given the list of arguments without the Python file name and uses collections.deque() to get the benefit of .popleft() , which removes the elements from the left of the collection. As the items of the arguments list unfold, you apply the logic that’s expected for your program. In parse() you can observe the following:
- The while loop is at the core of the function, and terminates when there are no more arguments to parse, when the help is invoked, or when an error occurs.
- If the separator option is detected, then the next argument is expected to be the separator.
- operands stores the integers that are used to calculate the sequence. There should be at least one operand and at most three.
A full version of the code for parse() is available below:
Click to expand the full example. Show/Hide
Note that some error handling aspects are kept to a minimum so as to keep the examples relatively short.
This manual approach of parsing the Python command line arguments may be sufficient for a simple set of arguments. However, it becomes quickly error-prone when complexity increases due to the following:
- A large number of arguments
- Complexity and interdependency between arguments
- Validation to perform against the arguments
The custom approach isn’t reusable and requires reinventing the wheel in each program. By the end of this tutorial, you’ll have improved on this hand-crafted solution and learned a few better methods.
A Few Methods for Validating Python Command Line Arguments
You’ve already performed validation for Python command line arguments in a few examples like seq_regex.py and seq_parse.py . In the first example, you used a regular expression, and in the second example, a custom parser.
Both of these examples took the same aspects into account. They considered the expected options as short-form ( -s ) or long-form ( —separator ). They considered the order of the arguments so that options would not be placed after operands. Finally, they considered the type, integer for the operands, and the number of arguments, from one to three arguments.
Type Validation With Python Data Classes
The following is a proof of concept that attempts to validate the type of the arguments passed at the command line. In the following example, you validate the number of arguments and their respective type:
Unless you pass the —help option at the command line, this script expects two or three arguments:
- A mandatory string: firstname
- A mandatory string: lastname
- An optional integer: age
Because all the items in sys.argv are strings, you need to convert the optional third argument to an integer if it’s composed of digits. str.isdigit() validates if all the characters in a string are digits. In addition, by constructing the data class Arguments with the values of the converted arguments, you obtain two validations:
- If the number of arguments doesn’t correspond to the number of mandatory fields expected by Arguments , then you get an error. This is a minimum of two and a maximum of three fields.
- If the types after conversion aren’t matching the types defined in the Arguments data class definition, then you get an error.
You can see this in action with the following execution:
In the execution above, the number of arguments is correct and the type of each argument is also correct.
Now, execute the same command but omit the third argument:
The result is also successful because the field age is defined with a default value, 0 , so the data class Arguments doesn’t require it.
On the contrary, if the third argument isn’t of the proper type—say, a string instead of integer—then you get an error:
The expected value Van Rossum , isn’t surrounded by quotes, so it’s split. The second word of the last name, Rossum , is a string that’s handled as the age, which is expected to be an int . The validation fails.
Note: For more details about the usage of data classes in Python, check out The Ultimate Guide to Data Classes in Python 3.7.
Similarly, you could also use a NamedTuple to achieve a similar validation. You’d replace the data class with a class deriving from NamedTuple , and check_type() would change as follows:
A NamedTuple exposes functions like _asdict that transform the object into a dictionary that can be used for data lookup. It also exposes attributes like __annotations__ , which is a dictionary storing types for each field, and For more on __annotations__ , check out Python Type Checking (Guide).
As highlighted in Python Type Checking (Guide), you could also leverage existing packages like Enforce, Pydantic, and Pytypes for advanced validation.
Custom Validation
Not unlike what you’ve already explored earlier, detailed validation may require some custom approaches. For example, if you attempt to execute sha1sum_stdin.py with an incorrect file name as an argument, then you get the following:
bad_file.txt doesn’t exist, but the program attempts to read it.
Revisit main() in sha1sum_stdin.py to handle non-existing files passed at the command line:
To see the complete example with this extra validation, expand the code block below:
Complete Source Code of sha1sum_val.py Show/Hide
When you execute this modified script, you get this:
Note that the error displayed to the terminal is written to stderr , so it doesn’t interfere with the data expected by a command that would read the output of sha1sum_val.py :
This command pipes the output of sha1sum_val.py to cut to only include the first field. You can see that cut ignores the error message because it only receives the data sent to stdout .
The Python Standard Library
Despite the different approaches you took to process Python command line arguments, any complex program might be better off leveraging existing libraries to handle the heavy lifting required by sophisticated command line interfaces. As of Python 3.7, there are three command line parsers in the standard library:
The recommended module to use from the standard library is argparse . The standard library also exposes optparse but it’s officially deprecated and only mentioned here for your information. It was superseded by argparse in Python 3.2 and you won’t see it discussed in this tutorial.
argparse
You’re going to revisit sha1sum_val.py , the most recent clone of sha1sum , to introduce the benefits of argparse . To this effect, you’ll modify main() and add init_argparse to instantiate argparse.ArgumentParser :
For the cost of a few more lines compared to the previous implementation, you get a clean approach to add —help and —version options that didn’t exist before. The expected arguments (the files to be processed) are all available in field files of object argparse.Namespace . This object is populated on line 17 by calling parse_args() .
To look at the full script with the modifications described above, expand the code block below:
Complete Source Code of sha1sum_argparse.py Show/Hide
To illustrate the immediate benefit you obtain by introducing argparse in this program, execute the following:
getopt
getopt finds its origins in the getopt C function. It facilitates parsing the command line and handling options, option arguments, and arguments. Revisit parse from seq_parse.py to use getopt :
getopt.getopt() takes the following arguments:
- The usual arguments list minus the script name, sys.argv[1:]
- A string defining the short options
- A list of strings for the long options
Note that a short option followed by a colon ( : ) expects an option argument, and that a long option trailed with an equals sign ( = ) expects an option argument.
The remaining code of seq_getopt.py is the same as seq_parse.py and is available in the collapsed code block below:
Complete Source Code of seq_getopt.py Show/Hide
Next, you’ll take a look at some external packages that will help you parse Python command line arguments.
A Few External Python Packages
Building upon the existing conventions you saw in this tutorial, there are a few libraries available on the Python Package Index (PyPI) that take many more steps to facilitate the implementation and maintenance of command line interfaces.
The following sections offer a glance at Click and Python Prompt Toolkit. You’ll only be exposed to very limited capabilities of these packages, as they both would require a full tutorial—if not a whole series—to do them justice!
Click
As of this writing, Click is perhaps the most advanced library to build a sophisticated command line interface for a Python program. It’s used by several Python products, most notably Flask and Black. Before you try the following example, you need to install Click in either a Python virtual environment or your local environment. If you’re not familiar with the concept of virtual environments, then check out Python Virtual Environments: A Primer.
To install Click, proceed as follows:
So, how could Click help you handle the Python command line arguments? Here’s a variation of the seq program using Click:
Setting ignore_unknown_options to True ensures that Click doesn’t parse negative arguments as options. Negative integers are valid seq arguments.
As you may have observed, you get a lot for free! A few well-carved decorators are sufficient to bury the boilerplate code, allowing you to focus on the main code, which is the content of seq() in this example.
Note: For more about Python decorators, check out Primer on Python Decorators.
The only import remaining is click . The declarative approach of decorating the main command, seq() , eliminates repetitive code that’s otherwise necessary. This could be any of the following:
- Defining a help or usage procedure
- Handling the version of the program
- Capturing and setting up default values for options
- Validating arguments, including the type
The new seq implementation barely scratches the surface. Click offers many niceties that will help you craft a very professional command line interface:
- Output coloring
- Prompt for omitted arguments
- Commands and sub-commands
- Argument type validation
- Callback on options and arguments
- File path validation
- Progress bar
There are many other features as well. Check out Writing Python Command-Line Tools With Click to see more concrete examples based on Click.
Python Prompt Toolkit
There are other popular Python packages that are handling the command line interface problem, like docopt for Python. So, you may find the choice of the Prompt Toolkit a bit counterintuitive.
The Python Prompt Toolkit provides features that may make your command line application drift away from the Unix philosophy. However, it helps to bridge the gap between an arcane command line interface and a full-fledged graphical user interface. In other words, it may help to make your tools and programs more user-friendly.
You can use this tool in addition to processing Python command line arguments as in the previous examples, but this gives you a path to a UI-like approach without you having to depend on a full Python UI toolkit. To use prompt_toolkit , you need to install it with pip :
You may find the next example a bit contrived, but the intent is to spur ideas and move you slightly away from more rigorous aspects of the command line with respect to the conventions you’ve seen in this tutorial.
As you’ve already seen the core logic of this example, the code snippet below only presents the code that significantly deviates from the previous examples:
The code above involves ways to interact and possibly guide users to enter the expected input, and to validate the input interactively using three dialog boxes:
- button_dialog
- message_dialog
- input_dialog
The Python Prompt Toolkit exposes many other features intended to improve interaction with users. The call to the handler in main() is triggered by calling a function stored in a dictionary. Check out Emulating switch/case Statements in Python if you’ve never encountered this Python idiom before.
You can see the full example of the program using prompt_toolkit by expanding the code block below:
Complete Source Code for seq_prompt.py Show/Hide
When you execute the code above, you’re greeted with a dialog prompting you for action. Then, if you choose the action Sequence, another dialog box is displayed. After collecting all the necessary data, options, or arguments, the dialog box disappears, and the result is printed at the command line, as in the previous examples:

As the command line evolves and you can see some attempts to interact with users more creatively, other packages like PyInquirer also allow you to capitalize on a very interactive approach.
To further explore the world of the Text-Based User Interface (TUI), check out Building Console User Interfaces and the Third Party section in Your Guide to the Python Print Function.
If you’re interested in researching solutions that rely exclusively on the graphical user interface, then you may consider checking out the following resources:
Conclusion
In this tutorial, you’ve navigated many different aspects of Python command line arguments. You should feel prepared to apply the following skills to your code:
- The conventions and pseudo-standards of Python command line arguments
- The origins of sys.argv in Python
- The usage of sys.argv to provide flexibility in running your Python programs
- The Python standard libraries like argparse or getopt that abstract command line processing
- The powerful Python packages like click and python_toolkit to further improve the usability of your programs
Whether you’re running a small script or a complex text-based application, when you expose a command line interface you’ll significantly improve the user experience of your Python software. In fact, you’re probably one of those users!
Next time you use your application, you’ll appreciate the documentation you supplied with the —help option or the fact that you can pass options and arguments instead of modifying the source code to supply different data.
Additional Resources
To gain further insights about Python command line arguments and their many facets, you may want to check out the following resources:
You may also want to try other Python libraries that target the same problems while providing you with different solutions:
Watch Now This tutorial has a related video course created by the Real Python team. Watch it together with the written tutorial to deepen your understanding: Command Line Interfaces in Python
Get a short & sweet Python Trick delivered to your inbox every couple of days. No spam ever. Unsubscribe any time. Curated by the Real Python team.

About Andre Burgaud

Andre is a seasoned software engineer passionate about technology and programming languages, in particular, Python.
Each tutorial at Real Python is created by a team of developers so that it meets our high quality standards. The team members who worked on this tutorial are:


![]()
Master Real-World Python Skills With Unlimited Access to Real Python

Join us and get access to thousands of tutorials, hands-on video courses, and a community of expert Pythonistas:
Master Real-World Python Skills
With Unlimited Access to Real Python
Join us and get access to thousands of tutorials, hands-on video courses, and a community of expert Pythonistas:
What Do You Think?
What’s your #1 takeaway or favorite thing you learned? How are you going to put your newfound skills to use? Leave a comment below and let us know.
Commenting Tips: The most useful comments are those written with the goal of learning from or helping out other students. Get tips for asking good questions and get answers to common questions in our support portal. Looking for a real-time conversation? Visit the Real Python Community Chat or join the next “Office Hours” Live Q&A Session. Happy Pythoning!
Источник
Overview
With Python being a very popular programming language, as well as having support for most operating systems and many libraries that make command-line argument processing easy — it’s become widely used to create command line tools for many purposes. These tools can range from simple CLI apps to those that are more complex, like AWS’ awscli tool.
Complex tools like this are typically controlled by the user via command line arguments, which allows the user to use specific commands, set options, and more. For example, these options could tell the tool to output additional information, read data from a specified source, or send output to a certain location.
In general, arguments are passed to CLI tools differently, depending on your operating system:
- Unix-like:
-followed by a letter, like-h, or--followed by a word, like--help - Windows:
/followed by either a letter, or word, like/help
These different approaches exist due to historical reasons. Many programs on Unix-like systems support both the single and double dash notation. The single dash notation is mostly used with single letter options, while double dashes present a more readable options list, which is particularly useful for complex options that need to be more explicit.
Note: In this article we’ll solely be focusing on the Unix-like format of - and --.
Keep in mind that both the name and the meaning of an argument are specific to a program — there is no general definition, other than a few common conventions like --help for further information on the usage of the tool. As the developer of a Python script, you will decide which arguments to provide to the caller and what they do. This requires proper evaluation.
As your list of available arguments grows, your code will become more complex in trying to accurately parse them. Luckily, in Python there are a number of libraries available to help you with this. We’ll cover a few of the most common solutions, which range from «do-it-yourself» with sys.argv, to the «done-for-you» approach with argparse.
Handling Command Line Arguments with Python
Python 3+ and the ecosystem around supports a number of different ways of handling command line arguments. There are many libraries that fascilitate parsing command-line arguments.
The built-in way is to use the sys module. In terms of names, and its usage, it relates directly to the C library (libc).
The second way is the getopt module, which handles both short and long options, including the evaluation of the parameter values.
The argparse module, which is derived from the optparse module (available up to Python 2.7).
The docopt module, which is available on GitHub, also allows the same functionality.
Recently, the absl library has also been gaining steam, as a means to replace optparse and getopt().
Each of these ways has their pros and cons, so it’s worth evaluating each to see which suits your needs best.
The sys Module
This is a basic module that has been shipped with Python from the early days. It takes a very similar approach to the C library using argc/argv to access the arguments. The sys module implements the command line arguments in a simple list structure named sys.argv.
Each list element represents a single argument. The first item in the list,
sys.argv[0], is the name of the Python script. The rest of the list elements,sys.argv[1]tosys.argv[n], are the command line arguments 2 through n.
As a delimiter between the arguments, a space is used. Argument values that contain a space in it have to be surrounded by quotes in order to be properly parsed by sys.
The equivalent of argc is just the number of elements in the list. To obtain this value, use the Python len() operator. We’ll show this in a code example later on.
Printing the First CLI Argument
In this first example, our script will determine the way it was called. This information is kept in the first command line argument, indexed with 0. The code below shows how you obtain the name of your Python script:
import sys

print("The script has the name %s" % (sys.argv[0])
Save this code in a file named arguments-program-name.py, and then call it as shown below. The output is as follows and contains the file name, including its full path:
$ python arguments-program-name.py
The script has the name arguments-program-name.py
$ python /home/user/arguments-program-name.py
The script has the name /home/user/arguments-program-name.py
As you can see from the second call above, we not only get the name of the Python file, but also the full path used to call it.
Counting the Number of Arguments
In this second example we simply count the number of command line arguments using the built-in len() method. sys.argv is the list that we have to examine. In the code below, we get the number of arguments and then subtract 1 because one of those arguments (i.e. the first one) is always set as the name of the file, which isn’t always useful to us. Thus, the actual number of arguments passed by the user is len(sys.argv) - 1:
import sys

# Count the arguments
arguments = len(sys.argv) - 1
print ("The script is called with %i arguments" % (arguments))
Save and name this file arguments-count.py. Some examples of calling this script is shown below. This includes three different scenarios:
- A call without any further command line arguments
- A call with two arguments
- A call with two arguments, where the second one is a quoted string containing a space
$ python arguments-count.py
The script is called with 0 arguments
$ python arguments-count.py --help me
The script is called with 2 arguments
$ python arguments-count.py --option "long string"
The script is called with 2 arguments
Iterating Through Arguments
Our third example outputs every single argument sent to the Python script, except the program name itself. Therefore, we loop through the command line arguments starting with the second list element. Recall that this is index 1 since lists are 0-based in Python:
import sys

# Count the arguments
arguments = len(sys.argv) - 1

# Output argument-wise
position = 1
while (arguments >= position):
    print ("Parameter %i: %s" % (position, sys.argv[position]))
    position = position + 1
Below we call our code, which was saved to the file arguments-output.py. As done with our previous example, the output illustrates three different calls:
- A call without any arguments
- A call with two arguments
- A call with two arguments, where the second argument is a quoted string containing a space
$ python arguments-output.py
$ python arguments-output.py --help me
Parameter 1: --help
Parameter 2: me
$ python arguments-output.py --option "long string"
Parameter 1: --option
Parameter 2: long string
Remember, the point of showing the quoted string example is that parameters are usually delimited by a space, unless they are surrounded by quotes.
Abseil Flags (absl)
Abseil’s Flags library is meant to bring command line arguments to production, with distributed command line arguments. When a module uses command-line flags, and is imported into another module — the other module imports the flags as well, and can process them by forwarding them to the imported module.
This makes complex command-line arguments shared between modules easier and less verbose.
Additionally, the library lets you define the default values, descriptions of, and data type of the arguments, so additional checks and conversions aren’t necessary.
from absl import flags
import sys

# Flag name, default value, help message.
flags.DEFINE_string('name', 'User', 'The name of the user.')

# Read sys.argv into FLAGS
FLAGS = flags.FLAGS
FLAGS(sys.argv)

print(f"Hello {FLAGS.name}!")
The supported data types are:
DEFINE_integer()DEFINE_string()DEFINE_bool()DEFINE_enum()DEFINE_list()DEFINE_float()
As well as DEFINE_multi_integer(), DEFINE_multi_string() and DEFINE_multi_enum() for multi-argument input. Additionally, running --help, --helpfull, etc. print the existing flags and their descriptions, in different formats.
Check out our hands-on, practical guide to learning Git, with best-practices, industry-accepted standards, and included cheat sheet. Stop Googling Git commands and actually learn it!
The library also allows you to define validations — both in terms of range, such as integer-based values having an upper_bound or lower_bound that’s acceptable, and running arbitrary methods to check for values:
def validate_name(value):
    return len(value) > 15

flags.register_validator('name',
                         validate_name,
                         message='Name is over 15 characters long.',
                         flag_values=FLAGS)
Collecting these into a concrete example:
from absl import flags
import sys

flags.DEFINE_string('name', 'User', 'The name of the user.')
flags.DEFINE_integer('tasks', 0, 'The number of tasks a user has.', lower_bound=0)

FLAGS = flags.FLAGS
FLAGS(sys.argv)

print(f"{FLAGS.name} has {FLAGS.tasks} tasks to work on.")
$ python flags.py --name=John --tasks=5
John has 5 tasks to work on.
$ python flags.py --name=John --tasks=-1

Traceback (most recent call last):
  File "/Library/Frameworks/Python.framework/Versions/3.9/lib/python3.9/site-packages/absl/flags/_flag.py", line 180, in _parse
    return self.parser.parse(argument)
  File "/Library/Frameworks/Python.framework/Versions/3.9/lib/python3.9/site-packages/absl/flags/_argument_parser.py", line 168, in parse
    raise ValueError('%s is not %s' % (val, self.syntactic_help))
ValueError: -1 is not a non-negative integer
...
The argparse Module
The argparse module has been available since Python 3.2, and an enhancement of the optparse module that exists up to Python 2.7. The Python documentation contains an API description and a tutorial that covers all the methods in detail.
The module offers a command line interface with a standardized output, whereas the former two solutions leave much of the work in your hands. argparse allows the verification of fixed and optional arguments, with name checking as either short or long style. As a default optional argument, it includes -h, along with its long version --help. This argument is accompanied by a default help message describing the accepted arguments.
The code below shows the parser initialization, and the output below that shows the basic call, followed by the help message. In contrast to the Python calls we used in the previous examples, keep in mind to use Python 3 with these examples:
# Include standard modules
import argparse

# Initiate the parser
parser = argparse.ArgumentParser()
parser.parse_args()
$ python3 arguments-argparse-basic.py
$ python3 arguments-argparse-basic.py -h
usage: arguments-argparse-basic.py [-h]

optional arguments:
  -h, --help  show this help message and exit
$ python3 arguments-argparse-basic.py --verbose
usage: arguments-argparse-basic.py [-h]
arguments-argparse-basic.py: error: unrecognized arguments: --verbose
In the next step, we will add a custom description to the help message for our users. Initializing the parser in this way allows an additional text. The code below stores the description in the text variable, which is explicitly given to the argparse class as the description parameter. Calling this code below, you can see what the output looks like:
# Include standard modules
import argparse

# Define the program description
text = 'This is a test program. It demonstrates how to use the argparse module with a program description.'

# Initiate the parser with a description
parser = argparse.ArgumentParser(description=text)
parser.parse_args()
$ python3 arguments-argparse-description.py --help
usage: arguments-argparse-description.py [-h]

This is a test program. It demonstrates how to use the argparse module with a
program description.

optional arguments:
  -h, --help  show this help message and exit
As the final step we will add an optional argument named -V, which has a corresponding long style argument named --version. To do so we use the method add_argument() that we call with three parameters (displayed for --version, only):
- The name of the parameter:
--version - The help text for the parameter:
help="show program version" - Action (without additional value):
action="store_true"
The source code for that is displayed in below. Reading the arguments into the variable called args is done via the parse_args() method from the parser object. Note that you submit both the short and the long version in one call. Finally, you check if the attributes args.V or args.version are set and output the version message:
# Include standard modules
import argparse

# Initiate the parser
parser = argparse.ArgumentParser()
parser.add_argument("-V", "--version", help="show program version", action="store_true")

# Read arguments from the command line
args = parser.parse_args()

# Check for --version or -V
if args.version:
    print("This is myprogram version 0.1")
$ python3 arguments-argparse-optional.py -V
This is myprogram version 0.1
$ python3 arguments-argparse-optional.py --version
This is myprogram version 0.1
The --version argument does not require a value to be given on the command line. That’s why we set the action argument to "store_true". In other cases you might need an additional assigned value, for example if you specify a certain volume, height, or width. This is shown in the next example. As a default case, please note that all the arguments are interpreted as strings:
# Include standard modules
import argparse

# Initiate the parser
parser = argparse.ArgumentParser()

# Add long and short argument
parser.add_argument("--width", "-w", help="set output width")

# Read arguments from the command line
args = parser.parse_args()

# Check for --width
if args.width:
    print("Set output width to %s" % args.width)
Here we show what happens when submitting different argument values. This includes both the short and the long version, as well as the help message:
$ python3 arguments-argparse-optional2.py -w 10
Set output width to 10
$ python3 arguments-argparse-optional2.py --width 10
Set output width to 10
$ python3 arguments-argparse-optional2.py -h
usage: arguments-argparse-optional2.py [-h] [--width WIDTH]

optional arguments:
  -h, --help            show this help message and exit
  --width WIDTH, -w WIDTH
                        set output width
The getopt Module
As you may have noticed before, the sys module splits the command line string into single facets only. The Python getopt module goes a bit further and extends the separation of the input string by parameter validation. Based on the getopt C function, it allows both short and long options, including a value assignment.
In practice, it requires the sys module to process input data properly. To do so, both the sys module and the getopt module have to be loaded beforehand. Next, from the list of input parameters we remove the first list element (see the code below), and store the remaining list of command line arguments in the variable called argument_list:
# Include standard modules
import getopt, sys

# Get full command-line arguments
full_cmd_arguments = sys.argv

# Keep all but the first
argument_list = full_cmd_arguments[1:]

print argument_list
The arguments in argument_list can now be parsed using the getopts() method. But before doing that, we need to tell getopts() about which parameters are valid. They are defined like this:
short_options = "ho:v"
long_options = ["help", "output=", "verbose"]
This means that these arguments are ones we consider to be valid, along with some extra info:
------------------------------------------
long argument   short argument  with value
------------------------------------------
--help           -h              no
--output         -o              yes
--verbose        -v              no
------------------------------------------
You might have noticed that the o short option was proceeded by a colon, :. This tells getopt that this option should be assigned a value.
This now allows us to process a list of arguments. The getopt() method requires three parameters to be configured — the list of actual arguments from argv, as well as both the valid short and long options (shown in the previous code snippet).
The method call itself is kept in a try-catch-statement to cover errors during the evaluation. An exception is raised if an argument is discovered that is not part of the list as defined before. The Python script will print the error message to the screen, and exit with error code 2:
try:
    arguments, values = getopt.getopt(argument_list, short_options, long_options)
except getopt.error as err:
    # Output error, and return with an error code
    print (str(err))
    sys.exit(2)
Finally, the arguments with the corresponding values are stored in the two variables named arguments and values. Now, you can easily evaluate these variables in your code. We can use a for-loop to iterate through the list of recognized arguments, one entry after the next.
# Evaluate given options
for current_argument, current_value in arguments:
    if current_argument in ("-v", "--verbose"):
        print ("Enabling verbose mode")
    elif current_argument in ("-h", "--help"):
        print ("Displaying help")
    elif current_argument in ("-o", "--output"):
        print (("Enabling special output mode (%s)") % (current_value))
Below you can see the output from executing this code. We’ll show how the program reacts with both valid and invalid program arguments:
$ python arguments-getopt.py -h
Displaying help
$ python arguments-getopt.py --help
Displaying help
$ python arguments-getopt.py --output=green --help -v
Enabling special output mode (green)
Displaying help
Enabling verbose mode
$ python arguments-getopt.py -verbose
option -e not recognized
The last call to our program may seem a bit confusing at first. To understand it, you need to know that the shorthand options (sometimes also called flags) can be used together with a single dash. This allows your tool to more easily accept many options. For example, calling python arguments-getopt.py -vh is the same as calling python arguments-getopt.py -v -h. So in the last call above, the getopt module thought the user was trying to pass -e as an option, which is invalid.
Conclusion
In this article we showed many different methods for retrieving command line arguments in Python, including using sys, getopt, and argparse. These modules vary in functionality, some providing much more than others. sys is fully flexible, whereas both getoptand argparse require some structure. In contrast, they cover most of the complex work that sys leaves up to you. After working through the examples provided, you should be able to determine which module suits your project best.
In this article we did not talk about other solutions like the docopts module, we just mentioned it. This module follows a totally different approach, and will be explained in detail in one of the next articles.
References
- sys module
- getopt module
- Abseil flags module
- argparse module
- argparse tutorial
Watch Now This tutorial has a related video course created by the Real Python team. Watch it together with the written tutorial to deepen your understanding: Command Line Interfaces in Python
Adding the capability of processing Python command-line arguments provides a user-friendly interface to your text-based command line program. It’s similar to what a graphical user interface is for a visual application that’s manipulated by graphical elements or widgets.
Python exposes a mechanism to capture and extract your Python command-line arguments. These values can be used to modify the behavior of a program. For example, if your program processes data read from a file, then you can pass the name of the file to your program, rather than hard-coding the value in your source code.
By the end of this tutorial, you’ll know:
- The origins of Python command-line arguments
- The underlying support for Python command-line arguments
- The standards guiding the design of a command-line interface
- The basics to manually customize and handle Python command-line arguments
- The libraries available in Python to ease the development of a complex command-line interface
If you want a user-friendly way to supply Python command-line arguments to your program without importing a dedicated library, or if you want to better understand the common basis for the existing libraries that are dedicated to building the Python command-line interface, then keep on reading!
The Command-Line Interface
A command-line interface (CLI) provides a way for a user to interact with a program running in a text-based shell interpreter. Some examples of shell interpreters are Bash on Linux or Command Prompt on Windows. A command-line interface is enabled by the shell interpreter that exposes a command prompt. It can be characterized by the following elements:
- A command or program
- Zero or more command line arguments
- An output representing the result of the command
- Textual documentation referred to as usage or help
Not every command-line interface may provide all these elements, but this list isn’t exhaustive, either. The complexity of the command line ranges from the ability to pass a single argument, to numerous arguments and options, much like a Domain Specific Language. For example, some programs may launch web documentation from the command line or start an interactive shell interpreter like Python.
The two following examples with the Python command illustrates the description of a command-line interface:
$ python -c "print('Real Python')"
Real Python
In this first example, the Python interpreter takes option -c for command, which says to execute the Python command-line arguments following the option -c as a Python program.
Another example shows how to invoke Python with -h to display the help:
$ python -h
usage: python3 [option] ... [-c cmd | -m mod | file | -] [arg] ...
Options and arguments (and corresponding environment variables):
-b     : issue warnings about str(bytes_instance), str(bytearray_instance)
         and comparing bytes/bytearray with str. (-bb: issue errors)
[ ... complete help text not shown ... ]
Try this out in your terminal to see the complete help documentation.
The C Legacy
Python command-line arguments directly inherit from the C programming language. As Guido Van Rossum wrote in An Introduction to Python for Unix/C Programmers in 1993, C had a strong influence on Python. Guido mentions the definitions of literals, identifiers, operators, and statements like break, continue, or return. The use of Python command-line arguments is also strongly influenced by the C language.
To illustrate the similarities, consider the following C program:
 1// main.c
 2#include <stdio.h>
 3
 4int main(int argc, char *argv[]) {
 5    printf("Arguments count: %dn", argc);
 6    for (int i = 0; i < argc; i++) {
 7        printf("Argument %6d: %sn", i, argv[i]);
 8    }
 9    return 0;
10}
Line 4 defines main(), which is the entry point of a C program. Take good note of the parameters:
argcis an integer representing the number of arguments of the program.argvis an array of pointers to characters containing the name of the program in the first element of the array, followed by the arguments of the program, if any, in the remaining elements of the array.
You can compile the code above on Linux with gcc -o main main.c, then execute with ./main to obtain the following:
$ gcc -o main main.c
$ ./main
Arguments count: 1
Argument      0: ./main
Unless explicitly expressed at the command line with the option -o, a.out is the default name of the executable generated by the gcc compiler. It stands for assembler output and is reminiscent of the executables that were generated on older UNIX systems. Observe that the name of the executable ./main is the sole argument.
Let’s spice up this example by passing a few Python command-line arguments to the same program:
$ ./main Python Command Line Arguments
Arguments count: 5
Argument      0: ./main
Argument      1: Python
Argument      2: Command
Argument      3: Line
Argument      4: Arguments
The output shows that the number of arguments is 5, and the list of arguments includes the name of the program, main, followed by each word of the phrase "Python Command Line Arguments", which you passed at the command line.
The compilation of main.c assumes that you used a Linux or a Mac OS system. On Windows, you can also compile this C program with one of the following options:
- Windows Subsystem for Linux (WSL): It’s available in a few Linux distributions, like Ubuntu, OpenSUSE, and Debian, among others. You can install it from the Microsoft Store.
- Windows Build Tools: This includes the Windows command line build tools, the Microsoft C/C++ compiler
cl.exe, and a compiler front end namedclang.exefor C/C++. - Microsoft Visual Studio: This is the main Microsoft integrated development environment (IDE). To learn more about IDEs that can be used for both Python and C on various operating systems, including Windows, check out Python IDEs and Code Editors (Guide).
- mingw-64 project: This supports the GCC compiler on Windows.
If you’ve installed Microsoft Visual Studio or the Windows Build Tools, then you can compile main.c as follows:
You’ll obtain an executable named main.exe that you can start with:
C:/>main
Arguments count: 1
Argument      0: main
You could implement a Python program, main.py, that’s equivalent to the C program, main.c, you saw above:
# main.py
import sys

if __name__ == "__main__":
    print(f"Arguments count: {len(sys.argv)}")
    for i, arg in enumerate(sys.argv):
        print(f"Argument {i:>6}: {arg}")
You don’t see an argc variable like in the C code example. It doesn’t exist in Python because sys.argv is sufficient. You can parse the Python command-line arguments in sys.argv without having to know the length of the list, and you can call the built-in len() if the number of arguments is needed by your program.
Also, note that enumerate(), when applied to an iterable, returns an enumerate object that can emit pairs associating the index of an element in sys.arg to its corresponding value. This allows looping through the content of sys.argv without having to maintain a counter for the index in the list.
Execute main.py as follows:
$ python main.py Python Command Line Arguments
Arguments count: 5
Argument      0: main.py
Argument      1: Python
Argument      2: Command
Argument      3: Line
Argument      4: Arguments
sys.argv contains the same information as in the C program:
- The name of the program
main.pyis the first item of the list. - The arguments
Python,Command,Line, andArgumentsare the remaining elements in the list.
With this short introduction into a few arcane aspects of the C language, you’re now armed with some valuable knowledge to further grasp Python command-line arguments.
Two Utilities From the Unix World
To use Python command-line arguments in this tutorial, you’ll implement some partial features of two utilities from the Unix ecosystem:
- sha1sum
- seq
You’ll gain some familiarity with these Unix tools in the following sections.
sha1sum
sha1sum calculates SHA-1 hashes, and it’s often used to verify the integrity of files. For a given input, a hash function always returns the same value. Any minor changes in the input will result in a different hash value. Before you use the utility with concrete parameters, you may try to display the help:
$ sha1sum --help
Usage: sha1sum [OPTION]... [FILE]...
Print or check SHA1 (160-bit) checksums.

With no FILE, or when FILE is -, read standard input.

  -b, --binary         read in binary mode
  -c, --check          read SHA1 sums from the FILEs and check them
      --tag            create a BSD-style checksum
  -t, --text           read in text mode (default)
  -z, --zero           end each output line with NUL, not newline,
                       and disable file name escaping
[ ... complete help text not shown ... ]
Displaying the help of a command line program is a common feature exposed in the command-line interface.
To calculate the SHA-1 hash value of the content of a file, you proceed as follows:
$ sha1sum main.c
125a0f900ff6f164752600550879cbfabb098bc3  main.c
The result shows the SHA-1 hash value as the first field and the name of the file as the second field. The command can take more than one file as arguments:
$ sha1sum main.c main.py
125a0f900ff6f164752600550879cbfabb098bc3  main.c
d84372fc77a90336b6bb7c5e959bcb1b24c608b4  main.py
Thanks to the wildcards expansion feature of the Unix terminal, it’s also possible to provide Python command-line arguments with wildcard characters. One such a character is the asterisk or star (*):
$ sha1sum main.*
3f6d5274d6317d580e2ffc1bf52beee0d94bf078  main.c
f41259ea5835446536d2e71e566075c1c1bfc111  main.py
The shell converts main.* to main.c and main.py, which are the two files matching the pattern main.* in the current directory, and passes them to sha1sum. The program calculates the SHA1 hash of each of the files in the argument list. You’ll see that, on Windows, the behavior is different. Windows has no wildcard expansion, so the program may have to accommodate for that. Your implementation may need to expand wildcards internally.
Without any argument, sha1sum reads from the standard input. You can feed data to the program by typing characters on the keyboard. The input may incorporate any characters, including the carriage return Enter. To terminate the input, you must signal the end of file with Enter, followed by the sequence Ctrl+D:
 1$ sha1sum
 2Real
 3Python
 487263a73c98af453d68ee4aab61576b331f8d9d6  -
You first enter the name of the program, sha1sum, followed by Enter, and then Real and Python, each also followed by Enter. To close the input stream, you type Ctrl+D. The result is the value of the SHA1 hash generated for the text RealnPythonn. The name of the file is -. This is a convention to indicate the standard input. The hash value is the same when you execute the following commands:
$ python -c "print('RealnPythonn', end='')" | sha1sum
87263a73c98af453d68ee4aab61576b331f8d9d6  -
$ python -c "print('RealnPython')" | sha1sum
87263a73c98af453d68ee4aab61576b331f8d9d6  -
$ printf "RealnPythonn" | sha1sum
87263a73c98af453d68ee4aab61576b331f8d9d6  -
Up next, you’ll read a short description of seq.
seq
seq generates a sequence of numbers. In its most basic form, like generating the sequence from 1 to 5, you can execute the following:
To get an overview of the possibilities exposed by seq, you can display the help at the command line:
$ seq --help
Usage: seq [OPTION]... LAST
  or:  seq [OPTION]... FIRST LAST
  or:  seq [OPTION]... FIRST INCREMENT LAST
Print numbers from FIRST to LAST, in steps of INCREMENT.

Mandatory arguments to long options are mandatory for short options too.
  -f, --format=FORMAT      use printf style floating-point FORMAT
  -s, --separator=STRING   use STRING to separate numbers (default: n)
  -w, --equal-width        equalize width by padding with leading zeroes
      --help     display this help and exit
      --version  output version information and exit
[ ... complete help text not shown ... ]
For this tutorial, you’ll write a few simplified variants of sha1sum and seq. In each example, you’ll learn a different facet or combination of features about Python command-line arguments.
On Mac OS and Linux, sha1sum and seq should come pre-installed, though the features and the help information may sometimes differ slightly between systems or distributions. If you’re using Windows 10, then the most convenient method is to run sha1sum and seq in a Linux environment installed on the WSL. If you don’t have access to a terminal exposing the standard Unix utilities, then you may have access to online terminals:
- Create a free account on PythonAnywhere and start a Bash Console.
- Create a temporary Bash terminal on repl.it.
These are two examples, and you may find others.
The sys.argv Array
Before exploring some accepted conventions and discovering how to handle Python command-line arguments, you need to know that the underlying support for all Python command-line arguments is provided by sys.argv. The examples in the following sections show you how to handle the Python command-line arguments stored in sys.argv and to overcome typical issues that occur when you try to access them. You’ll learn:
- How to access the content of
sys.argv - How to mitigate the side effects of the global nature of
sys.argv - How to process whitespaces in Python command-line arguments
- How to handle errors while accessing Python command-line arguments
- How to ingest the original format of the Python command-line arguments passed by bytes
Let’s get started!
Displaying Arguments
The sys module exposes an array named argv that includes the following:
argv[0]contains the name of the current Python program.argv[1:], the rest of the list, contains any and all Python command-line arguments passed to the program.
The following example demonstrates the content of sys.argv:
 1# argv.py
 2import sys
 3
 4print(f"Name of the script      : {sys.argv[0]=}")
 5print(f"Arguments of the script : {sys.argv[1:]=}")
Here’s how this code works:
- Line 2 imports the internal Python module
sys. - Line 4 extracts the name of the program by accessing the first element of the list
sys.argv. - Line 5 displays the Python command-line arguments by fetching all the remaining elements of the list
sys.argv.
Execute the script argv.py above with a list of arbitrary arguments as follows:
$ python argv.py un deux trois quatre
Name of the script      : sys.argv[0]='argv.py'
Arguments of the script : sys.argv[1:]=['un', 'deux', 'trois', 'quatre']
The output confirms that the content of sys.argv[0] is the Python script argv.py, and that the remaining elements of the sys.argv list contains the arguments of the script, ['un', 'deux', 'trois', 'quatre'].
To summarize, sys.argv contains all the argv.py Python command-line arguments. When the Python interpreter executes a Python program, it parses the command line and populates sys.argv with the arguments.
Reversing the First Argument
Now that you have enough background on sys.argv, you’re going to operate on arguments passed at the command line. The example reverse.py reverses the first argument passed at the command line:
 1# reverse.py
 2
 3import sys
 4
 5arg = sys.argv[1]
 6print(arg[::-1])
In reverse.py the process to reverse the first argument is performed with the following steps:
- Line 5 fetches the first argument of the program stored at index
1ofsys.argv. Remember that the program name is stored at index0ofsys.argv. - Line 6 prints the reversed string.
args[::-1]is a Pythonic way to use a slice operation to reverse a list.
You execute the script as follows:
$ python reverse.py "Real Python"
nohtyP laeR
As expected, reverse.py operates on "Real Python" and reverses the only argument to output "nohtyP laeR". Note that surrounding the multi-word string "Real Python" with quotes ensures that the interpreter handles it as a unique argument, instead of two arguments. You’ll delve into argument separators in a later section.
Mutating sys.argv
sys.argv is globally available to your running Python program. All modules imported during the execution of the process have direct access to sys.argv. This global access might be convenient, but sys.argv isn’t immutable. You may want to implement a more reliable mechanism to expose program arguments to different modules in your Python program, especially in a complex program with multiple files.
Observe what happens if you tamper with sys.argv:
# argv_pop.py

import sys

print(sys.argv)
sys.argv.pop()
print(sys.argv)
You invoke .pop() to remove and return the last item in sys.argv.
Execute the script above:
$ python argv_pop.py un deux trois quatre
['argv_pop.py', 'un', 'deux', 'trois', 'quatre']
['argv_pop.py', 'un', 'deux', 'trois']
Notice that the fourth argument is no longer included in sys.argv.
In a short script, you can safely rely on the global access to sys.argv, but in a larger program, you may want to store arguments in a separate variable. The previous example could be modified as follows:
# argv_var_pop.py

import sys

print(sys.argv)
args = sys.argv[1:]
print(args)
sys.argv.pop()
print(sys.argv)
print(args)
This time, although sys.argv lost its last element, args has been safely preserved. args isn’t global, and you can pass it around to parse the arguments per the logic of your program. The Python package manager, pip, uses this approach. Here’s a short excerpt of the pip source code:
def main(args=None):
    if args is None:
        args = sys.argv[1:]
In this snippet of code taken from the pip source code, main() saves into args the slice of sys.argv that contains only the arguments and not the file name. sys.argv remains untouched, and args isn’t impacted by any inadvertent changes to sys.argv.
Escaping Whitespace Characters
In the reverse.py example you saw earlier, the first and only argument is "Real Python", and the result is "nohtyP laeR". The argument includes a whitespace separator between "Real" and "Python", and it needs to be escaped.
On Linux, whitespaces can be escaped by doing one of the following:
- Surrounding the arguments with single quotes (
') - Surrounding the arguments with double quotes (
") - Prefixing each space with a backslash (
)
Without one of the escape solutions, reverse.py stores two arguments, "Real" in sys.argv[1] and "Python" in sys.argv[2]:
$ python reverse.py Real Python
laeR
The output above shows that the script only reverses "Real" and that "Python" is ignored. To ensure both arguments are stored, you’d need to surround the overall string with double quotes (").
You can also use a backslash () to escape the whitespace:
$ python reverse.py Real Python
nohtyP laeR
With the backslash (), the command shell exposes a unique argument to Python, and then to reverse.py.
In Unix shells, the internal field separator (IFS) defines characters used as delimiters. The content of the shell variable, IFS, can be displayed by running the following command:
$ printf "%qn" "$IFS"
$' tn'
From the result above, ' tn', you identify three delimiters:
- Space (
' ') - Tab (
t) - Newline (
n)
Prefixing a space with a backslash () bypasses the default behavior of the space as a delimiter in the string "Real Python". This results in one block of text as intended, instead of two.
Note that, on Windows, the whitespace interpretation can be managed by using a combination of double quotes. It’s slightly counterintuitive because, in the Windows terminal, a double quote (") is interpreted as a switch to disable and subsequently to enable special characters like space, tab, or pipe (|).
As a result, when you surround more than one string with double quotes, the Windows terminal interprets the first double quote as a command to ignore special characters and the second double quote as one to interpret special characters.
With this information in mind, it’s safe to assume that surrounding more than one string with double quotes will give you the expected behavior, which is to expose the group of strings as a single argument. To confirm this peculiar effect of the double quote on the Windows command line, observe the following two examples:
C:/>python reverse.py "Real Python"
nohtyP laeR
In the example above, you can intuitively deduce that "Real Python" is interpreted as a single argument. However, realize what occurs when you use a single double quote:
C:/>python reverse.py "Real Python
nohtyP laeR
The command prompt passes the whole string "Real Python" as a single argument, in the same manner as if the argument was "Real Python". In reality, the Windows command prompt sees the unique double quote as a switch to disable the behavior of the whitespaces as separators and passes anything following the double quote as a unique argument.
For more information on the effects of double quotes in the Windows terminal, check out A Better Way To Understand Quoting and Escaping of Windows Command Line Arguments.
Handling Errors
Python command-line arguments are loose strings. Many things can go wrong, so it’s a good idea to provide the users of your program with some guidance in the event they pass incorrect arguments at the command line. For example, reverse.py expects one argument, and if you omit it, then you get an error:
 1$ python reverse.py
 2Traceback (most recent call last):
 3  File "reverse.py", line 5, in <module>
 4    arg = sys.argv[1]
 5IndexError: list index out of range
The Python exception IndexError is raised, and the corresponding traceback shows that the error is caused by the expression arg = sys.argv[1]. The message of the exception is list index out of range. You didn’t pass an argument at the command line, so there’s nothing in the list sys.argv at index 1.
This is a common pattern that can be addressed in a few different ways. For this initial example, you’ll keep it brief by including the expression arg = sys.argv[1] in a try block. Modify the code as follows:
 1# reverse_exc.py
 2
 3import sys
 4
 5try:
 6    arg = sys.argv[1]
 7except IndexError:
 8    raise SystemExit(f"Usage: {sys.argv[0]} <string_to_reverse>")
 9print(arg[::-1])
The expression on line 4 is included in a try block. Line 8 raises the built-in exception SystemExit. If no argument is passed to reverse_exc.py, then the process exits with a status code of 1 after printing the usage. Note the integration of sys.argv[0] in the error message. It exposes the name of the program in the usage message. Now, when you execute the same program without any Python command-line arguments, you can see the following output:
$ python reverse.py
Usage: reverse.py <string_to_reverse>

$ echo $?
1
reverse.py didn’t have an argument passed at the command line. As a result, the program raises SystemExit with an error message. This causes the program to exit with a status of 1, which displays when you print the special variable $? with echo.
Calculating the sha1sum
You’ll write another script to demonstrate that, on Unix-like systems, Python command-line arguments are passed by bytes from the OS. This script takes a string as an argument and outputs the hexadecimal SHA-1 hash of the argument:
 1# sha1sum.py
 2
 3import sys
 4import hashlib
 5
 6data = sys.argv[1]
 7m = hashlib.sha1()
 8m.update(bytes(data, 'utf-8'))
 9print(m.hexdigest())
This is loosely inspired by sha1sum, but it intentionally processes a string instead of the contents of a file. In sha1sum.py, the steps to ingest the Python command-line arguments and to output the result are the following:
- Line 6 stores the content of the first argument in
data. - Line 7 instantiates a SHA1 algorithm.
- Line 8 updates the SHA1 hash object with the content of the first program argument. Note that
hash.updatetakes a byte array as an argument, so it’s necessary to convertdatafrom a string to a bytes array. - Line 9 prints a hexadecimal representation of the SHA1 hash computed on line 8.
When you run the script with an argument, you get this:
$ python sha1sum.py "Real Python"
0554943d034f044c5998f55dac8ee2c03e387565
For the sake of keeping the example short, the script sha1sum.py doesn’t handle missing Python command-line arguments. Error handling could be addressed in this script the same way you did it in reverse_exc.py.
From the sys.argv documentation, you learn that in order to get the original bytes of the Python command-line arguments, you can use os.fsencode(). By directly obtaining the bytes from sys.argv[1], you don’t need to perform the string-to-bytes conversion of data:
 1# sha1sum_bytes.py
 2
 3import os
 4import sys
 5import hashlib
 6
 7data = os.fsencode(sys.argv[1])
 8m = hashlib.sha1()
 9m.update(data)
10print(m.hexdigest())
The main difference between sha1sum.py and sha1sum_bytes.py are highlighted in the following lines:
- Line 7 populates
datawith the original bytes passed to the Python command-line arguments. - Line 9 passes
dataas an argument tom.update(), which receives a bytes-like object.
Execute sha1sum_bytes.py to compare the output:
$ python sha1sum_bytes.py "Real Python"
0554943d034f044c5998f55dac8ee2c03e387565
The hexadecimal value of the SHA1 hash is the same as in the previous sha1sum.py example.
The Anatomy of Python Command-Line Arguments
Now that you’ve explored a few aspects of Python command-line arguments, most notably sys.argv, you’re going to apply some of the standards that are regularly used by developers while implementing a command-line interface.
Python command-line arguments are a subset of the command-line interface. They can be composed of different types of arguments:
- Options modify the behavior of a particular command or program.
- Arguments represent the source or destination to be processed.
- Subcommands allow a program to define more than one command with the respective set of options and arguments.
Before you go deeper into the different types of arguments, you’ll get an overview of the accepted standards that have been guiding the design of the command-line interface and arguments. These have been refined since the advent of the computer terminal in the mid-1960s.
Standards
A few available standards provide some definitions and guidelines to promote consistency for implementing commands and their arguments. These are the main UNIX standards and references:
- POSIX Utility Conventions
- GNU Standards for Command Line Interfaces
- docopt
The standards above define guidelines and nomenclatures for anything related to programs and Python command-line arguments. The following points are examples taken from those references:
- POSIX:
- A program or utility is followed by options, option-arguments, and operands.
- All options should be preceded with a hyphen or minus (
-) delimiter character. - Option-arguments should not be optional.
- GNU:
- All programs should support two standard options, which are
--versionand--help. - Long-named options are equivalent to the single-letter Unix-style options. An example is
--debugand-d.
- All programs should support two standard options, which are
- docopt:
- Short options can be stacked, meaning that
-abcis equivalent to-a -b -c. - Long options can have arguments specified after a space or the equals sign (
=). The long option--input=ARGis equivalent to--input ARG.
- Short options can be stacked, meaning that
These standards define notations that are helpful when you describe a command. A similar notation can be used to display the usage of a particular command when you invoke it with the option -h or --help.
The GNU standards are very similar to the POSIX standards but provide some modifications and extensions. Notably, they add the long option that’s a fully named option prefixed with two hyphens (--). For example, to display the help, the regular option is -h and the long option is --help.
In the following sections, you’ll learn more about each of the command line components, options, arguments, and sub-commands.
Options
An option, sometimes called a flag or a switch, is intended to modify the behavior of the program. For example, the command ls on Linux lists the content of a given directory. Without any arguments, it lists the files and directories in the current directory:
$ cd /dev
$ ls
autofs
block
bsg
btrfs-control
bus
char
console
Let’s add a few options. You can combine -l and -s into -ls, which changes the information displayed in the terminal:
$ cd /dev
$ ls -ls
total 0
0 crw-r--r--  1 root root       10,   235 Jul 14 08:10 autofs
0 drwxr-xr-x  2 root root             260 Jul 14 08:10 block
0 drwxr-xr-x  2 root root              60 Jul 14 08:10 bsg
0 crw-------  1 root root       10,   234 Jul 14 08:10 btrfs-control
0 drwxr-xr-x  3 root root              60 Jul 14 08:10 bus
0 drwxr-xr-x  2 root root            4380 Jul 14 15:08 char
0 crw-------  1 root root        5,     1 Jul 14 08:10 console
An option can take an argument, which is called an option-argument. See an example in action with od below:
$ od -t x1z -N 16 main
0000000 7f 45 4c 46 02 01 01 00 00 00 00 00 00 00 00 00  >.ELF............<
0000020
od stands for octal dump. This utility displays data in different printable representations, like octal (which is the default), hexadecimal, decimal, and ASCII. In the example above, it takes the binary file main and displays the first 16 bytes of the file in hexadecimal format. The option -t expects a type as an option-argument, and -N expects the number of input bytes.
In the example above, -t is given type x1, which stands for hexadecimal and one byte per integer. This is followed by z to display the printable characters at the end of the input line. -N takes 16 as an option-argument for limiting the number of input bytes to 16.
Arguments
The arguments are also called operands or parameters in the POSIX standards. The arguments represent the source or the destination of the data that the command acts on. For example, the command cp, which is used to copy one or more files to a file or a directory, takes at least one source and one target:
 1$ ls main
 2main
 3
 4$ cp main main2
 5
 6$ ls -lt
 7main
 8main2
 9...
In line 4, cp takes two arguments:
main: the source filemain2: the target file
It then copies the content of main to a new file named main2. Both main and main2 are arguments, or operands, of the program cp.
Subcommands
The concept of subcommands isn’t documented in the POSIX or GNU standards, but it does appear in docopt. The standard Unix utilities are small tools adhering to the Unix philosophy. Unix programs are intended to be programs that do one thing and do it well. This means no subcommands are necessary.
By contrast, a new generation of programs, including git, go, docker, and gcloud, come with a slightly different paradigm that embraces subcommands. They’re not necessarily part of the Unix landscape as they span several operating systems, and they’re deployed with a full ecosystem that requires several commands.
Take git as an example. It handles several commands, each possibly with their own set of options, option-arguments, and arguments. The following examples apply to the git subcommand branch:
git branchdisplays the branches of the local git repository.git branch custom_pythoncreates a local branchcustom_pythonin a local repository.git branch -d custom_pythondeletes the local branchcustom_python.git branch --helpdisplays the help for thegit branchsubcommand.
In the Python ecosystem, pip has the concept of subcommands, too. Some pip subcommands include list, install, freeze, or uninstall.
Windows
On Windows, the conventions regarding Python command-line arguments are slightly different, in particular, those regarding command line options. To validate this difference, take tasklist, which is a native Windows executable that displays a list of the currently running processes. It’s similar to ps on Linux or macOS systems. Below is an example of how to execute tasklist in a command prompt on Windows:
C:/>tasklist /FI "IMAGENAME eq notepad.exe"

Image Name                     PID Session Name        Session#    Mem Usage
========================= ======== ================ =========== ============
notepad.exe                  13104 Console                    6     13,548 K
notepad.exe                   6584 Console                    6     13,696 K
Note that the separator for an option is a forward slash (/) instead of a hyphen (-) like the conventions for Unix systems. For readability, there’s a space between the program name, taskslist, and the option /FI, but it’s just as correct to type taskslist/FI.
The particular example above executes tasklist with a filter to only show the Notepad processes currently running. You can see that the system has two running instances of the Notepad process. Although it’s not equivalent, this is similar to executing the following command in a terminal on a Unix-like system:
$ ps -ef | grep vi | grep -v grep
andre     2117     4  0 13:33 tty1     00:00:00 vi .gitignore
andre     2163  2134  0 13:34 tty3     00:00:00 vi main.c
The ps command above shows all the current running vi processes. The behavior is consistent with the Unix Philosophy, as the output of ps is transformed by two grep filters. The first grep command selects all the occurrences of vi, and the second grep filters out the occurrence of grep itself.
With the spread of Unix tools making their appearance in the Windows ecosystem, non-Windows-specific conventions are also accepted on Windows.
Visuals
At the start of a Python process, Python command-line arguments are split into two categories:
-
Python options: These influence the execution of the Python interpreter. For example, adding option
-Ois a means to optimize the execution of a Python program by removingassertand__debug__statements. There are other Python options available at the command line. -
Python program and its arguments: Following the Python options (if there are any), you’ll find the Python program, which is a file name that usually has the extension
.py, and its arguments. By convention, those can also be composed of options and arguments.
Take the following command that’s intended to execute the program main.py, which takes options and arguments. Note that, in this example, the Python interpreter also takes some options, which are -B and -v.
$ python -B -v main.py --verbose --debug un deux
In the command line above, the options are Python command-line arguments and are organized as follows:
- The option
-Btells Python not to write.pycfiles on the import of source modules. For more details about.pycfiles, check out the section What Does a Compiler Do? in Your Guide to the CPython Source Code. - The option
-vstands for verbose and tells Python to trace all import statements. - The arguments passed to
main.pyare fictitious and represent two long options (--verboseand--debug) and two arguments (unanddeux).
This example of Python command-line arguments can be illustrated graphically as follows:
Within the Python program main.py, you only have access to the Python command-line arguments inserted by Python in sys.argv. The Python options may influence the behavior of the program but are not accessible in main.py.
A Few Methods for Parsing Python Command-Line Arguments
Now you’re going to explore a few approaches to apprehend options, option-arguments, and operands. This is done by parsing Python command-line arguments. In this section, you’ll see some concrete aspects of Python command-line arguments and techniques to handle them. First, you’ll see an example that introduces a straight approach relying on list comprehensions to collect and separate options from arguments. Then you will:
- Use regular expressions to extract elements of the command line
- Learn how to handle files passed at the command line
- Apprehend the standard input in a way that’s compatible with the Unix tools
- Differentiate the regular output of the program from the errors
- Implement a custom parser to read Python command-line arguments
This will serve as a preparation for options involving modules in the standard libraries or from external libraries that you’ll learn about later in this tutorial.
For something uncomplicated, the following pattern, which doesn’t enforce ordering and doesn’t handle option-arguments, may be enough:
# cul.py

import sys

opts = [opt for opt in sys.argv[1:] if opt.startswith("-")]
args = [arg for arg in sys.argv[1:] if not arg.startswith("-")]

if "-c" in opts:
    print(" ".join(arg.capitalize() for arg in args))
elif "-u" in opts:
    print(" ".join(arg.upper() for arg in args))
elif "-l" in opts:
    print(" ".join(arg.lower() for arg in args))
else:
    raise SystemExit(f"Usage: {sys.argv[0]} (-c | -u | -l) <arguments>...")
The intent of the program above is to modify the case of the Python command-line arguments. Three options are available:
-cto capitalize the arguments-uto convert the arguments to uppercase-lto convert the argument to lowercase
The code collects and separates the different argument types using list comprehensions:
- Line 5 collects all the options by filtering on any Python command-line arguments starting with a hyphen (
-). - Line 6 assembles the program arguments by filtering out the options.
When you execute the Python program above with a set of options and arguments, you get the following output:
$ python cul.py -c un deux trois
Un Deux Trois
This approach might suffice in many situations, but it would fail in the following cases:
- If the order is important, and in particular, if options should appear before the arguments
- If support for option-arguments is needed
- If some arguments are prefixed with a hyphen (
-)
You can leverage other options before you resort to a library like argparse or click.
Regular Expressions
You can use a regular expression to enforce a certain order, specific options and option-arguments, or even the type of arguments. To illustrate the usage of a regular expression to parse Python command-line arguments, you’ll implement a Python version of seq, which is a program that prints a sequence of numbers. Following the docopt conventions, a specification for seq.py could be this:
Print integers from <first> to <last>, in steps of <increment>.

Usage:
  python seq.py --help
  python seq.py [-s SEPARATOR] <last>
  python seq.py [-s SEPARATOR] <first> <last>
  python seq.py [-s SEPARATOR] <first> <increment> <last>

Mandatory arguments to long options are mandatory for short options too.
  -s, --separator=STRING use STRING to separate numbers (default: n)
      --help             display this help and exit

If <first> or <increment> are omitted, they default to 1. When <first> is
larger than <last>, <increment>, if not set, defaults to -1.
The sequence of numbers ends when the sum of the current number and
<increment> reaches the limit imposed by <last>.
First, look at a regular expression that’s intended to capture the requirements above:
 1args_pattern = re.compile(
 2    r"""
 3    ^
 4    (
 5        (--(?P<HELP>help).*)|
 6        ((?:-s|--separator)s(?P<SEP>.*?)s)?
 7        ((?P<OP1>-?d+))(s(?P<OP2>-?d+))?(s(?P<OP3>-?d+))?
 8    )
 9    $
10""",
11    re.VERBOSE,
12)
To experiment with the regular expression above, you may use the snippet recorded on Regular Expression 101. The regular expression captures and enforces a few aspects of the requirements given for seq. In particular, the command may take:
- A help option, in short (
-h) or long format (--help), captured as a named group calledHELP - A separator option,
-sor--separator, taking an optional argument, and captured as named group calledSEP - Up to three integer operands, respectively captured as
OP1,OP2, andOP3
For clarity, the pattern args_pattern above uses the flag re.VERBOSE on line 11. This allows you to spread the regular expression over a few lines to enhance readability. The pattern validates the following:
- Argument order: Options and arguments are expected to be laid out in a given order. For example, options are expected before the arguments.
- Option values**: Only
--help,-s, or--separatorare expected as options. - Argument mutual exclusivity: The option
--helpisn’t compatible with other options or arguments. - Argument type: Operands are expected to be positive or negative integers.
For the regular expression to be able to handle these things, it needs to see all Python command-line arguments in one string. You can collect them using str.join():
arg_line = " ".join(sys.argv[1:])
This makes arg_line a string that includes all arguments, except the program name, separated by a space.
Given the pattern args_pattern above, you can extract the Python command-line arguments with the following function:
def parse(arg_line: str) -> Dict[str, str]:
    args: Dict[str, str] = {}
    if match_object := args_pattern.match(arg_line):
        args = {k: v for k, v in match_object.groupdict().items()
                if v is not None}
    return args
The pattern is already handling the order of the arguments, mutual exclusivity between options and arguments, and the type of the arguments. parse() is applying re.match() to the argument line to extract the proper values and store the data in a dictionary.
The dictionary includes the names of each group as keys and their respective values. For example, if the arg_line value is --help, then the dictionary is {'HELP': 'help'}. If arg_line is -s T 10, then the dictionary becomes {'SEP': 'T', 'OP1': '10'}. You can expand the code block below to see an implementation of seq with regular expressions.
The code below implements a limited version of seq with a regular expression to handle the command line parsing and validation:
# seq_regex.py

from typing import List, Dict
import re
import sys

USAGE = (
    f"Usage: {sys.argv[0]} [-s <separator>] [first [increment]] last"
)

args_pattern = re.compile(
    r"""
    ^
    (
        (--(?P<HELP>help).*)|
        ((?:-s|--separator)s(?P<SEP>.*?)s)?
        ((?P<OP1>-?d+))(s(?P<OP2>-?d+))?(s(?P<OP3>-?d+))?
    )
    $
""",
    re.VERBOSE,
)

def parse(arg_line: str) -> Dict[str, str]:
    args: Dict[str, str] = {}
    if match_object := args_pattern.match(arg_line):
        args = {k: v for k, v in match_object.groupdict().items()
                if v is not None}
    return args

def seq(operands: List[int], sep: str = "n") -> str:
    first, increment, last = 1, 1, 1
    if len(operands) == 1:
        last = operands[0]
    if len(operands) == 2:
        first, last = operands
        if first > last:
            increment = -1
    if len(operands) == 3:
        first, increment, last = operands
    last = last + 1 if increment > 0 else last - 1
    return sep.join(str(i) for i in range(first, last, increment))

def main() -> None:
    args = parse(" ".join(sys.argv[1:]))
    if not args:
        raise SystemExit(USAGE)
    if args.get("HELP"):
        print(USAGE)
        return
    operands = [int(v) for k, v in args.items() if k.startswith("OP")]
    sep = args.get("SEP", "n")
    print(seq(operands, sep))

if __name__ == "__main__":
    main()
You can execute the code above by running this command:
This should output the following:
Try this command with other combinations, including the --help option.
You didn’t see a version option supplied here. This was done intentionally to reduce the length of the example. You may consider adding the version option as an extended exercise. As a hint, you could modify the regular expression by replacing the line (--(?P<HELP>help).*)| with (--(?P<HELP>help).*)|(--(?P<VER>version).*)|. An additional if block would also be needed in main().
At this point, you know a few ways to extract options and arguments from the command line. So far, the Python command-line arguments were only strings or integers. Next, you’ll learn how to handle files passed as arguments.
File Handling
It’s time now to experiment with Python command-line arguments that are expected to be file names. Modify sha1sum.py to handle one or more files as arguments. You’ll end up with a downgraded version of the original sha1sum utility, which takes one or more files as arguments and displays the hexadecimal SHA1 hash for each file, followed by the name of the file:
# sha1sum_file.py

import hashlib
import sys

def sha1sum(filename: str) -> str:
    hash = hashlib.sha1()
    with open(filename, mode="rb") as f:
        hash.update(f.read())
    return hash.hexdigest()

for arg in sys.argv[1:]:
    print(f"{sha1sum(arg)}  {arg}")
sha1sum() is applied to the data read from each file that you passed at the command line, rather than the string itself. Take note that m.update() takes a bytes-like object as an argument and that the result of invoking read() after opening a file with the mode rb will return a bytes object. For more information about handling file content, check out Reading and Writing Files in Python, and in particular, the section Working With Bytes.
The evolution of sha1sum_file.py from handling strings at the command line to manipulating the content of files is getting you closer to the original implementation of sha1sum:
$ sha1sum main main.c
9a6f82c245f5980082dbf6faac47e5085083c07d  main
125a0f900ff6f164752600550879cbfabb098bc3  main.c
The execution of the Python program with the same Python command-line arguments gives this:
$ python sha1sum_file.py main main.c
9a6f82c245f5980082dbf6faac47e5085083c07d  main
125a0f900ff6f164752600550879cbfabb098bc3  main.c
Because you interact with the shell interpreter or the Windows command prompt, you also get the benefit of the wildcard expansion provided by the shell. To prove this, you can reuse main.py, which displays each argument with the argument number and its value:
$ python main.py main.*
Arguments count: 5
Argument      0: main.py
Argument      1: main.c
Argument      2: main.exe
Argument      3: main.obj
Argument      4: main.py
You can see that the shell automatically performs wildcard expansion so that any file with a base name matching main, regardless of the extension, is part of sys.argv.
The wildcard expansion isn’t available on Windows. To obtain the same behavior, you need to implement it in your code. To refactor main.py to work with wildcard expansion, you can use glob. The following example works on Windows and, though it isn’t as concise as the original main.py, the same code behaves similarly across platforms:
 1# main_win.py
 2
 3import sys
 4import glob
 5import itertools
 6from typing import List
 7
 8def expand_args(args: List[str]) -> List[str]:
 9    arguments = args[:1]
10    glob_args = [glob.glob(arg) for arg in args[1:]]
11    arguments += itertools.chain.from_iterable(glob_args)
12    return arguments
13
14if __name__ == "__main__":
15    args = expand_args(sys.argv)
16    print(f"Arguments count: {len(args)}")
17    for i, arg in enumerate(args):
18        print(f"Argument {i:>6}: {arg}")
In main_win.py, expand_args relies on glob.glob() to process the shell-style wildcards. You can verify the result on Windows and any other operating system:
C:/>python main_win.py main.*
Arguments count: 5
Argument      0: main_win.py
Argument      1: main.c
Argument      2: main.exe
Argument      3: main.obj
Argument      4: main.py
This addresses the problem of handling files using wildcards like the asterisk (*) or question mark (?), but how about stdin?
If you don’t pass any parameter to the original sha1sum utility, then it expects to read data from the standard input. This is the text you enter at the terminal that ends when you type Ctrl+D on Unix-like systems or Ctrl+Z on Windows. These control sequences send an end of file (EOF) to the terminal, which stops reading from stdin and returns the data that was entered.
In the next section, you’ll add to your code the ability to read from the standard input stream.
Standard Input
When you modify the previous Python implementation of sha1sum to handle the standard input using sys.stdin, you’ll get closer to the original sha1sum:
# sha1sum_stdin.py

from typing import List
import hashlib
import pathlib
import sys

def process_file(filename: str) -> bytes:
    return pathlib.Path(filename).read_bytes()

def process_stdin() -> bytes:
    return bytes("".join(sys.stdin), "utf-8")

def sha1sum(data: bytes) -> str:
    sha1_hash = hashlib.sha1()
    sha1_hash.update(data)
    return sha1_hash.hexdigest()

def output_sha1sum(data: bytes, filename: str = "-") -> None:
    print(f"{sha1sum(data)}  {filename}")

def main(args: List[str]) -> None:
    if not args:
        args = ["-"]
    for arg in args:
        if arg == "-":
            output_sha1sum(process_stdin(), "-")
        else:
            output_sha1sum(process_file(arg), arg)

if __name__ == "__main__":
    main(sys.argv[1:])
Two conventions are applied to this new sha1sum version:
- Without any arguments, the program expects the data to be provided in the standard input,
sys.stdin, which is a readable file object. - When a hyphen (
-) is provided as a file argument at the command line, the program interprets it as reading the file from the standard input.
Try this new script without any arguments. Enter the first aphorism of The Zen of Python, then complete the entry with the keyboard shortcut Ctrl+D on Unix-like systems or Ctrl+Z on Windows:
$ python sha1sum_stdin.py
Beautiful is better than ugly.
ae5705a3efd4488dfc2b4b80df85f60c67d998c4  -
You can also include one of the arguments as stdin mixed with the other file arguments like so:
$ python sha1sum_stdin.py main.py - main.c
d84372fc77a90336b6bb7c5e959bcb1b24c608b4  main.py
Beautiful is better than ugly.
ae5705a3efd4488dfc2b4b80df85f60c67d998c4  -
125a0f900ff6f164752600550879cbfabb098bc3  main.c
Another approach on Unix-like systems is to provide /dev/stdin instead of - to handle the standard input:
$ python sha1sum_stdin.py main.py /dev/stdin main.c
d84372fc77a90336b6bb7c5e959bcb1b24c608b4  main.py
Beautiful is better than ugly.
ae5705a3efd4488dfc2b4b80df85f60c67d998c4  /dev/stdin
125a0f900ff6f164752600550879cbfabb098bc3  main.c
On Windows there’s no equivalent to /dev/stdin, so using - as a file argument works as expected.
The script sha1sum_stdin.py isn’t covering all necessary error handling, but you’ll cover some of the missing features later in this tutorial.
Standard Output and Standard Error
Command line processing may have a direct relationship with stdin to respect the conventions detailed in the previous section. The standard output, although not immediately relevant, is still a concern if you want to adhere to the Unix Philosophy. To allow small programs to be combined, you may have to take into account the three standard streams:
stdinstdoutstderr
The output of a program becomes the input of another one, allowing you to chain small utilities. For example, if you wanted to sort the aphorisms of the Zen of Python, then you could execute the following:
$ python -c "import this" | sort
Although never is often better than *right* now.
Although practicality beats purity.
Although that way may not be obvious at first unless you're Dutch.
...
The output above is truncated for better readability. Now imagine that you have a program that outputs the same data but also prints some debugging information:
# zen_sort_debug.py

print("DEBUG >>> About to print the Zen of Python")
import this
print("DEBUG >>> Done printing the Zen of Python")
Executing the Python script above gives:
$ python zen_sort_debug.py
DEBUG >>> About to print the Zen of Python
The Zen of Python, by Tim Peters

Beautiful is better than ugly.
Explicit is better than implicit.
Simple is better than complex.
Complex is better than complicated.
...
DEBUG >>> Done printing the Zen of Python
The ellipsis (...) indicates that the output was truncated to improve readability.
Now, if you want to sort the list of aphorisms, then execute the command as follows:
$ python zen_sort_debug.py | sort

Although never is often better than *right* now.
Although practicality beats purity.
Although that way may not be obvious at first unless you're Dutch.
Beautiful is better than ugly.
Complex is better than complicated.
DEBUG >>> About to print the Zen of Python
DEBUG >>> Done printing the Zen of Python
Errors should never pass silently.
...
You may realize that you didn’t intend to have the debug output as the input of the sort command. To address this issue, you want to send traces to the standard errors stream, stderr, instead:
# zen_sort_stderr.py
import sys

print("DEBUG >>> About to print the Zen of Python", file=sys.stderr)
import this
print("DEBUG >>> Done printing the Zen of Python", file=sys.stderr)
Execute zen_sort_stderr.py to observe the following:
$ python zen_sort_stderr.py | sort
DEBUG >>> About to print the Zen of Python
DEBUG >>> Done printing the Zen of Python

Although never is often better than *right* now.
Although practicality beats purity.
Although that way may not be obvious at first unless you're Dutch
....
Now, the traces are displayed to the terminal, but they aren’t used as input for the sort command.
Custom Parsers
You can implement seq by relying on a regular expression if the arguments aren’t too complex. Nevertheless, the regex pattern may quickly render the maintenance of the script difficult. Before you try getting help from specific libraries, another approach is to create a custom parser. The parser is a loop that fetches each argument one after another and applies a custom logic based on the semantics of your program.
A possible implementation for processing the arguments of seq_parse.py could be as follows:
 1def parse(args: List[str]) -> Tuple[str, List[int]]:
 2    arguments = collections.deque(args)
 3    separator = "n"
 4    operands: List[int] = []
 5    while arguments:
 6        arg = arguments.popleft()
 7        if not operands:
 8            if arg == "--help":
 9                print(USAGE)
10                sys.exit(0)
11            if arg in ("-s", "--separator"):
12                separator = arguments.popleft()
13                continue
14        try:
15            operands.append(int(arg))
16        except ValueError:
17            raise SystemExit(USAGE)
18        if len(operands) > 3:
19            raise SystemExit(USAGE)
20
21    return separator, operands
parse() is given the list of arguments without the Python file name and uses collections.deque() to get the benefit of .popleft(), which removes the elements from the left of the collection. As the items of the arguments list unfold, you apply the logic that’s expected for your program. In parse() you can observe the following:
- The
whileloop is at the core of the function, and terminates when there are no more arguments to parse, when the help is invoked, or when an error occurs. - If the
separatoroption is detected, then the next argument is expected to be the separator. operandsstores the integers that are used to calculate the sequence. There should be at least one operand and at most three.
A full version of the code for parse() is available below:
# seq_parse.py

from typing import Dict, List, Tuple
import collections
import re
import sys

USAGE = (f"Usage: {sys.argv[0]} "
         "[--help] | [-s <sep>] [first [incr]] last")

def seq(operands: List[int], sep: str = "n") -> str:
    first, increment, last = 1, 1, 1
    if len(operands) == 1:
        last = operands[0]
    if len(operands) == 2:
        first, last = operands
        if first > last:
            increment = -1
    if len(operands) == 3:
        first, increment, last = operands
    last = last + 1 if increment > 0 else last - 1
    return sep.join(str(i) for i in range(first, last, increment))

def parse(args: List[str]) -> Tuple[str, List[int]]:
    arguments = collections.deque(args)
    separator = "n"
    operands: List[int] = []
    while arguments:
        arg = arguments.popleft()
        if not len(operands):
            if arg == "--help":
                print(USAGE)
                sys.exit(0)
            if arg in ("-s", "--separator"):
                separator = arguments.popleft() if arguments else None
                continue
        try:
            operands.append(int(arg))
        except ValueError:
            raise SystemExit(USAGE)
        if len(operands) > 3:
            raise SystemExit(USAGE)

    return separator, operands

def main() -> None:
    sep, operands = parse(sys.argv[1:])
    if not operands:
        raise SystemExit(USAGE)
    print(seq(operands, sep))

if __name__ == "__main__":
    main()
Note that some error handling aspects are kept to a minimum so as to keep the examples relatively short.
This manual approach of parsing the Python command-line arguments may be sufficient for a simple set of arguments. However, it becomes quickly error-prone when complexity increases due to the following:
- A large number of arguments
- Complexity and interdependency between arguments
- Validation to perform against the arguments
The custom approach isn’t reusable and requires reinventing the wheel in each program. By the end of this tutorial, you’ll have improved on this hand-crafted solution and learned a few better methods.
A Few Methods for Validating Python Command-Line Arguments
You’ve already performed validation for Python command-line arguments in a few examples like seq_regex.py and seq_parse.py. In the first example, you used a regular expression, and in the second example, a custom parser.
Both of these examples took the same aspects into account. They considered the expected options as short-form (-s) or long-form (--separator). They considered the order of the arguments so that options would not be placed after operands. Finally, they considered the type, integer for the operands, and the number of arguments, from one to three arguments.
Type Validation With Python Data Classes
The following is a proof of concept that attempts to validate the type of the arguments passed at the command line. In the following example, you validate the number of arguments and their respective type:
# val_type_dc.py

import dataclasses
import sys
from typing import List, Any

USAGE = f"Usage: python {sys.argv[0]} [--help] | firstname lastname age]"

@dataclasses.dataclass
class Arguments:
    firstname: str
    lastname: str
    age: int = 0

def check_type(obj):
    for field in dataclasses.fields(obj):
        value = getattr(obj, field.name)
        print(
            f"Value: {value}, "
            f"Expected type {field.type} for {field.name}, "
            f"got {type(value)}"
        )
        if type(value) != field.type:
            print("Type Error")
        else:
            print("Type Ok")

def validate(args: List[str]):
    # If passed to the command line, need to convert
    # the optional 3rd argument from string to int
    if len(args) > 2 and args[2].isdigit():
        args[2] = int(args[2])
    try:
        arguments = Arguments(*args)
    except TypeError:
        raise SystemExit(USAGE)
    check_type(arguments)

def main() -> None:
    args = sys.argv[1:]
    if not args:
        raise SystemExit(USAGE)

    if args[0] == "--help":
        print(USAGE)
    else:
        validate(args)

if __name__ == "__main__":
    main()
Unless you pass the --help option at the command line, this script expects two or three arguments:
- A mandatory string:
firstname - A mandatory string:
lastname - An optional integer:
age
Because all the items in sys.argv are strings, you need to convert the optional third argument to an integer if it’s composed of digits. str.isdigit() validates if all the characters in a string are digits. In addition, by constructing the data class Arguments with the values of the converted arguments, you obtain two validations:
- If the number of arguments doesn’t correspond to the number of mandatory fields expected by
Arguments, then you get an error. This is a minimum of two and a maximum of three fields. - If the types after conversion aren’t matching the types defined in the
Argumentsdata class definition, then you get an error.
You can see this in action with the following execution:
$ python val_type_dc.py Guido "Van Rossum" 25
Value: Guido, Expected type <class 'str'> for firstname, got <class 'str'>
Type Ok
Value: Van Rossum, Expected type <class 'str'> for lastname, got <class 'str'>
Type Ok
Value: 25, Expected type <class 'int'> for age, got <class 'int'>
Type Ok
In the execution above, the number of arguments is correct and the type of each argument is also correct.
Now, execute the same command but omit the third argument:
$ python val_type_dc.py Guido "Van Rossum"
Value: Guido, Expected type <class 'str'> for firstname, got <class 'str'>
Type Ok
Value: Van Rossum, Expected type <class 'str'> for lastname, got <class 'str'>
Type Ok
Value: 0, Expected type <class 'int'> for age, got <class 'int'>
Type Ok
The result is also successful because the field age is defined with a default value, 0, so the data class Arguments doesn’t require it.
On the contrary, if the third argument isn’t of the proper type—say, a string instead of integer—then you get an error:
python val_type_dc.py Guido Van Rossum
Value: Guido, Expected type <class 'str'> for firstname, got <class 'str'>
Type Ok
Value: Van, Expected type <class 'str'> for lastname, got <class 'str'>
Type Ok
Value: Rossum, Expected type <class 'int'> for age, got <class 'str'>
Type Error
The expected value Van Rossum, isn’t surrounded by quotes, so it’s split. The second word of the last name, Rossum, is a string that’s handled as the age, which is expected to be an int. The validation fails.
Similarly, you could also use a NamedTuple to achieve a similar validation. You’d replace the data class with a class deriving from NamedTuple, and check_type() would change as follows:
from typing import NamedTuple

class Arguments(NamedTuple):
    firstname: str
    lastname: str
    age: int = 0

def check_type(obj):
    for attr, value in obj._asdict().items():
        print(
            f"Value: {value}, "
            f"Expected type {obj.__annotations__[attr]} for {attr}, "
            f"got {type(value)}"
        )
        if type(value) != obj.__annotations__[attr]:
            print("Type Error")
        else:
            print("Type Ok")
A NamedTuple exposes functions like _asdict that transform the object into a dictionary that can be used for data lookup. It also exposes attributes like __annotations__, which is a dictionary storing types for each field, and For more on __annotations__, check out Python Type Checking (Guide).
As highlighted in Python Type Checking (Guide), you could also leverage existing packages like Enforce, Pydantic, and Pytypes for advanced validation.
Custom Validation
Not unlike what you’ve already explored earlier, detailed validation may require some custom approaches. For example, if you attempt to execute sha1sum_stdin.py with an incorrect file name as an argument, then you get the following:
$ python sha1sum_stdin.py bad_file.txt
Traceback (most recent call last):
  File "sha1sum_stdin.py", line 32, in <module>
    main(sys.argv[1:])
  File "sha1sum_stdin.py", line 29, in main
    output_sha1sum(process_file(arg), arg)
  File "sha1sum_stdin.py", line 9, in process_file
    return pathlib.Path(filename).read_bytes()
  File "/usr/lib/python3.8/pathlib.py", line 1222, in read_bytes
    with self.open(mode='rb') as f:
  File "/usr/lib/python3.8/pathlib.py", line 1215, in open
    return io.open(self, mode, buffering, encoding, errors, newline,
  File "/usr/lib/python3.8/pathlib.py", line 1071, in _opener
    return self._accessor.open(self, flags, mode)
FileNotFoundError: [Errno 2] No such file or directory: 'bad_file.txt'
bad_file.txt doesn’t exist, but the program attempts to read it.
Revisit main() in sha1sum_stdin.py to handle non-existing files passed at the command line:
 1def main(args):
 2    if not args:
 3        output_sha1sum(process_stdin())
 4    for arg in args:
 5        if arg == "-":
 6            output_sha1sum(process_stdin(), "-")
 7            continue
 8        try:
 9            output_sha1sum(process_file(arg), arg)
10        except FileNotFoundError as err:
11            print(f"{sys.argv[0]}: {arg}: {err.strerror}", file=sys.stderr)
To see the complete example with this extra validation, expand the code block below:
# sha1sum_val.py

from typing import List
import hashlib
import pathlib
import sys

def process_file(filename: str) -> bytes:
    return pathlib.Path(filename).read_bytes()

def process_stdin() -> bytes:
    return bytes("".join(sys.stdin), "utf-8")

def sha1sum(data: bytes) -> str:
    m = hashlib.sha1()
    m.update(data)
    return m.hexdigest()

def output_sha1sum(data: bytes, filename: str = "-") -> None:
    print(f"{sha1sum(data)}  {filename}")

def main(args: List[str]) -> None:
    if not args:
        output_sha1sum(process_stdin())
    for arg in args:
        if arg == "-":
            output_sha1sum(process_stdin(), "-")
            continue
        try:
            output_sha1sum(process_file(arg), arg)
        except (FileNotFoundError, IsADirectoryError) as err:
            print(f"{sys.argv[0]}: {arg}: {err.strerror}", file=sys.stderr)

if __name__ == "__main__":
    main(sys.argv[1:])
When you execute this modified script, you get this:
$ python sha1sum_val.py bad_file.txt
sha1sum_val.py: bad_file.txt: No such file or directory
Note that the error displayed to the terminal is written to stderr, so it doesn’t interfere with the data expected by a command that would read the output of sha1sum_val.py:
$ python sha1sum_val.py bad_file.txt main.py | cut -d " " -f 1
sha1sum_val.py: bad_file.txt: No such file or directory
d84372fc77a90336b6bb7c5e959bcb1b24c608b4
This command pipes the output of sha1sum_val.py to cut to only include the first field. You can see that cut ignores the error message because it only receives the data sent to stdout.
The Python Standard Library
Despite the different approaches you took to process Python command-line arguments, any complex program might be better off leveraging existing libraries to handle the heavy lifting required by sophisticated command-line interfaces. As of Python 3.7, there are three command line parsers in the standard library:
argparsegetoptoptparse
The recommended module to use from the standard library is argparse. The standard library also exposes optparse but it’s officially deprecated and only mentioned here for your information. It was superseded by argparse in Python 3.2 and you won’t see it discussed in this tutorial.
argparse
You’re going to revisit sha1sum_val.py, the most recent clone of sha1sum, to introduce the benefits of argparse. To this effect, you’ll modify main() and add init_argparse to instantiate argparse.ArgumentParser:
 1import argparse
 2
 3def init_argparse() -> argparse.ArgumentParser:
 4    parser = argparse.ArgumentParser(
 5        usage="%(prog)s [OPTION] [FILE]...",
 6        description="Print or check SHA1 (160-bit) checksums."
 7    )
 8    parser.add_argument(
 9        "-v", "--version", action="version",
10        version = f"{parser.prog} version 1.0.0"
11    )
12    parser.add_argument('files', nargs='*')
13    return parser
14
15def main() -> None:
16    parser = init_argparse()
17    args = parser.parse_args()
18    if not args.files:
19        output_sha1sum(process_stdin())
20    for file in args.files:
21        if file == "-":
22            output_sha1sum(process_stdin(), "-")
23            continue
24        try:
25            output_sha1sum(process_file(file), file)
26        except (FileNotFoundError, IsADirectoryError) as err:
27            print(f"{sys.argv[0]}: {file}: {err.strerror}", file=sys.stderr)
For the cost of a few more lines compared to the previous implementation, you get a clean approach to add --help and --version options that didn’t exist before. The expected arguments (the files to be processed) are all available in field files of object argparse.Namespace. This object is populated on line 17 by calling parse_args().
To look at the full script with the modifications described above, expand the code block below:
# sha1sum_argparse.py

import argparse
import hashlib
import pathlib
import sys

def process_file(filename: str) -> bytes:
    return pathlib.Path(filename).read_bytes()

def process_stdin() -> bytes:
    return bytes("".join(sys.stdin), "utf-8")

def sha1sum(data: bytes) -> str:
    sha1_hash = hashlib.sha1()
    sha1_hash.update(data)
    return sha1_hash.hexdigest()

def output_sha1sum(data: bytes, filename: str = "-") -> None:
    print(f"{sha1sum(data)}  {filename}")

def init_argparse() -> argparse.ArgumentParser:
    parser = argparse.ArgumentParser(
        usage="%(prog)s [OPTION] [FILE]...",
        description="Print or check SHA1 (160-bit) checksums.",
    )
    parser.add_argument(
        "-v", "--version", action="version",
        version=f"{parser.prog} version 1.0.0"
    )
    parser.add_argument("files", nargs="*")
    return parser

def main() -> None:
    parser = init_argparse()
    args = parser.parse_args()
    if not args.files:
        output_sha1sum(process_stdin())
    for file in args.files:
        if file == "-":
            output_sha1sum(process_stdin(), "-")
            continue
        try:
            output_sha1sum(process_file(file), file)
        except (FileNotFoundError, IsADirectoryError) as err:
            print(f"{parser.prog}: {file}: {err.strerror}", file=sys.stderr)

if __name__ == "__main__":
    main()
To illustrate the immediate benefit you obtain by introducing argparse in this program, execute the following:
$ python sha1sum_argparse.py --help
usage: sha1sum_argparse.py [OPTION] [FILE]...

Print or check SHA1 (160-bit) checksums.

positional arguments:
  files

optional arguments:
  -h, --help     show this help message and exit
  -v, --version  show program's version number and exit
To delve into the details of argparse, check out Build Command-Line Interfaces With Python’s argparse.
getopt
getopt finds its origins in the getopt C function. It facilitates parsing the command line and handling options, option arguments, and arguments. Revisit parse from seq_parse.py to use getopt:
def parse():
    options, arguments = getopt.getopt(
        sys.argv[1:],                      # Arguments
        'vhs:',                            # Short option definitions
        ["version", "help", "separator="]) # Long option definitions
    separator = "n"
    for o, a in options:
        if o in ("-v", "--version"):
            print(VERSION)
            sys.exit()
        if o in ("-h", "--help"):
            print(USAGE)
            sys.exit()
        if o in ("-s", "--separator"):
            separator = a
    if not arguments or len(arguments) > 3:
        raise SystemExit(USAGE)
    try:
        operands = [int(arg) for arg in arguments]
    except ValueError:
        raise SystemExit(USAGE)
    return separator, operands
getopt.getopt() takes the following arguments:
- The usual arguments list minus the script name,
sys.argv[1:] - A string defining the short options
- A list of strings for the long options
Note that a short option followed by a colon (:) expects an option argument, and that a long option trailed with an equals sign (=) expects an option argument.
The remaining code of seq_getopt.py is the same as seq_parse.py and is available in the collapsed code block below:
# seq_getopt.py

from typing import List, Tuple
import getopt
import sys

USAGE = f"Usage: python {sys.argv[0]} [--help] | [-s <sep>] [first [incr]] last"
VERSION = f"{sys.argv[0]} version 1.0.0"

def seq(operands: List[int], sep: str = "n") -> str:
    first, increment, last = 1, 1, 1
    if len(operands) == 1:
        last = operands[0]
    elif len(operands) == 2:
        first, last = operands
        if first > last:
            increment = -1
    elif len(operands) == 3:
        first, increment, last = operands
    last = last - 1 if first > last else last + 1
    return sep.join(str(i) for i in range(first, last, increment))

def parse(args: List[str]) -> Tuple[str, List[int]]:
    options, arguments = getopt.getopt(
        args,                              # Arguments
        'vhs:',                            # Short option definitions
        ["version", "help", "separator="]) # Long option definitions
    separator = "n"
    for o, a in options:
        if o in ("-v", "--version"):
            print(VERSION)
            sys.exit()
        if o in ("-h", "--help"):
            print(USAGE)
            sys.exit()
        if o in ("-s", "--separator"):
            separator = a
    if not arguments or len(arguments) > 3:
        raise SystemExit(USAGE)
    try:
        operands = [int(arg) for arg in arguments]
    except:
        raise SystemExit(USAGE)
    return separator, operands

def main() -> None:
    args = sys.argv[1:]
    if not args:
        raise SystemExit(USAGE)
    sep, operands = parse(args)
    print(seq(operands, sep))

if __name__ == "__main__":
    main()
Next, you’ll take a look at some external packages that will help you parse Python command-line arguments.
A Few External Python Packages
Building upon the existing conventions you saw in this tutorial, there are a few libraries available on the Python Package Index (PyPI) that take many more steps to facilitate the implementation and maintenance of command-line interfaces.
The following sections offer a glance at Click and Python Prompt Toolkit. You’ll only be exposed to very limited capabilities of these packages, as they both would require a full tutorial—if not a whole series—to do them justice!
Click
As of this writing, Click is perhaps the most advanced library to build a sophisticated command-line interface for a Python program. It’s used by several Python products, most notably Flask and Black. Before you try the following example, you need to install Click in either a Python virtual environment or your local environment. If you’re not familiar with the concept of virtual environments, then check out Python Virtual Environments: A Primer.
To install Click, proceed as follows:
$ python -m pip install click
So, how could Click help you handle the Python command-line arguments? Here’s a variation of the seq program using Click:
# seq_click.py

import click

@click.command(context_settings=dict(ignore_unknown_options=True))
@click.option("--separator", "-s",
              default="n",
              help="Text used to separate numbers (default: \n)")
@click.version_option(version="1.0.0")
@click.argument("operands", type=click.INT, nargs=-1)
def seq(operands, separator) -> str:
    first, increment, last = 1, 1, 1
    if len(operands) == 1:
        last = operands[0]
    elif len(operands) == 2:
        first, last = operands
        if first > last:
            increment = -1
    elif len(operands) == 3:
        first, increment, last = operands
    else:
        raise click.BadParameter("Invalid number of arguments")
    last = last - 1 if first > last else last + 1
    print(separator.join(str(i) for i in range(first, last, increment)))

if __name__ == "__main__":
    seq()
Setting ignore_unknown_options to True ensures that Click doesn’t parse negative arguments as options. Negative integers are valid seq arguments.
As you may have observed, you get a lot for free! A few well-carved decorators are sufficient to bury the boilerplate code, allowing you to focus on the main code, which is the content of seq() in this example.
The only import remaining is click. The declarative approach of decorating the main command, seq(), eliminates repetitive code that’s otherwise necessary. This could be any of the following:
- Defining a help or usage procedure
- Handling the version of the program
- Capturing and setting up default values for options
- Validating arguments, including the type
The new seq implementation barely scratches the surface. Click offers many niceties that will help you craft a very professional command-line interface:
- Output coloring
- Prompt for omitted arguments
- Commands and sub-commands
- Argument type validation
- Callback on options and arguments
- File path validation
- Progress bar
There are many other features as well. Check out Writing Python Command-Line Tools With Click to see more concrete examples based on Click.
Python Prompt Toolkit
There are other popular Python packages that are handling the command-line interface problem, like docopt for Python. So, you may find the choice of the Prompt Toolkit a bit counterintuitive.
The Python Prompt Toolkit provides features that may make your command line application drift away from the Unix philosophy. However, it helps to bridge the gap between an arcane command-line interface and a full-fledged graphical user interface. In other words, it may help to make your tools and programs more user-friendly.
You can use this tool in addition to processing Python command-line arguments as in the previous examples, but this gives you a path to a UI-like approach without you having to depend on a full Python UI toolkit. To use prompt_toolkit, you need to install it with pip:
$ python -m pip install prompt_toolkit
You may find the next example a bit contrived, but the intent is to spur ideas and move you slightly away from more rigorous aspects of the command line with respect to the conventions you’ve seen in this tutorial.
As you’ve already seen the core logic of this example, the code snippet below only presents the code that significantly deviates from the previous examples:
def error_dlg():
    message_dialog(
        title="Error",
        text="Ensure that you enter a number",
    ).run()

def seq_dlg():
    labels = ["FIRST", "INCREMENT", "LAST"]
    operands = []
    while True:
        n = input_dialog(
            title="Sequence",
            text=f"Enter argument {labels[len(operands)]}:",
        ).run()
        if n is None:
            break
        if n.isdigit():
            operands.append(int(n))
        else:
            error_dlg()
        if len(operands) == 3:
            break

    if operands:
        seq(operands)
    else:
        print("Bye")

actions = {"SEQUENCE": seq_dlg, "HELP": help, "VERSION": version}

def main():
    result = button_dialog(
        title="Sequence",
        text="Select an action:",
        buttons=[
            ("Sequence", "SEQUENCE"),
            ("Help", "HELP"),
            ("Version", "VERSION"),
        ],
    ).run()
    actions.get(result, lambda: print("Unexpected action"))()
The code above involves ways to interact and possibly guide users to enter the expected input, and to validate the input interactively using three dialog boxes:
button_dialogmessage_dialoginput_dialog
The Python Prompt Toolkit exposes many other features intended to improve interaction with users. The call to the handler in main() is triggered by calling a function stored in a dictionary. Check out Emulating switch/case Statements in Python if you’ve never encountered this Python idiom before.
You can see the full example of the program using prompt_toolkit by expanding the code block below:
# seq_prompt.py

import sys
from typing import List
from prompt_toolkit.shortcuts import button_dialog, input_dialog, message_dialog

def version():
    print("Version 1.0.0")

def help():
    print("Print numbers from FIRST to LAST, in steps of INCREMENT.")

def seq(operands: List[int], sep: str = "n"):
    first, increment, last = 1, 1, 1
    if len(operands) == 1:
        last = operands[0]
    elif len(operands) == 2:
        first, last = operands
        if first > last:
            increment = -1
    elif len(operands) == 3:
        first, increment, last = operands
    last = last - 1 if first > last else last + 1
    print(sep.join(str(i) for i in range(first, last, increment)))

def error_dlg():
    message_dialog(
        title="Error",
        text="Ensure that you enter a number",
    ).run()

def seq_dlg():
    labels = ["FIRST", "INCREMENT", "LAST"]
    operands = []
    while True:
        n = input_dialog(
            title="Sequence",
            text=f"Enter argument {labels[len(operands)]}:",
        ).run()
        if n is None:
            break
        if n.isdigit():
            operands.append(int(n))
        else:
            error_dlg()
        if len(operands) == 3:
            break

    if operands:
        seq(operands)
    else:
        print("Bye")

actions = {"SEQUENCE": seq_dlg, "HELP": help, "VERSION": version}

def main():
    result = button_dialog(
        title="Sequence",
        text="Select an action:",
        buttons=[
            ("Sequence", "SEQUENCE"),
            ("Help", "HELP"),
            ("Version", "VERSION"),
        ],
    ).run()
    actions.get(result, lambda: print("Unexpected action"))()

if __name__ == "__main__":
    main()
When you execute the code above, you’re greeted with a dialog prompting you for action. Then, if you choose the action Sequence, another dialog box is displayed. After collecting all the necessary data, options, or arguments, the dialog box disappears, and the result is printed at the command line, as in the previous examples:
As the command line evolves and you can see some attempts to interact with users more creatively, other packages like PyInquirer also allow you to capitalize on a very interactive approach.
To further explore the world of the Text-Based User Interface (TUI), check out Building Console User Interfaces and the Third Party section in Your Guide to the Python Print Function.
If you’re interested in researching solutions that rely exclusively on the graphical user interface, then you may consider checking out the following resources:
- How to Build a Python GUI Application With wxPython
- Python and PyQt: Building a GUI Desktop Calculator
- Build a Mobile Application With the Kivy Python Framework
Conclusion
In this tutorial, you’ve navigated many different aspects of Python command-line arguments. You should feel prepared to apply the following skills to your code:
- The conventions and pseudo-standards of Python command-line arguments
- The origins of
sys.argvin Python - The usage of
sys.argvto provide flexibility in running your Python programs - The Python standard libraries like
argparseorgetoptthat abstract command line processing - The powerful Python packages like
clickandpython_toolkitto further improve the usability of your programs
Whether you’re running a small script or a complex text-based application, when you expose a command-line interface you’ll significantly improve the user experience of your Python software. In fact, you’re probably one of those users!
Next time you use your application, you’ll appreciate the documentation you supplied with the --help option or the fact that you can pass options and arguments instead of modifying the source code to supply different data.
Additional Resources
To gain further insights about Python command-line arguments and their many facets, you may want to check out the following resources:
- Comparing Python Command-Line Parsing Libraries – Argparse, Docopt, and Click
- Python, Ruby, and Golang: A Command-Line Application Comparison
You may also want to try other Python libraries that target the same problems while providing you with different solutions:
- Typer
- Plac
- Cliff
- Cement
- Python Fire
Watch Now This tutorial has a related video course created by the Real Python team. Watch it together with the written tutorial to deepen your understanding: Command Line Interfaces in Python
In this python tutorial, you will learn about the Python exit command with a few examples. Here we will check:
- Python quit() function
- Python exit() function
- Python sys.exit() function
- Python os.exit() function
- Python raise SystemExit
- Program to stop code execution in python
- Difference between exit() and sys.exit() in python
Let us check out the exit commands in python like quit(), exit(), sys.exit() commands.
Python quit() function
In python, we have an in-built quit() function which is used to exit a python program. When it encounters the quit() function in the system, it terminates the execution of the program completely.
It should not be used in production code and this function should only be used in the interpreter.
Example:
for val in range(0,5):
    if val == 3:
        print(quit)
        quit()
    print(val)
After writing the above code (python quit() function), Ones you will print “ val ” then the output will appear as a “ 0 1 2 “. Here, if the value of “val” becomes “3” then the program is forced to quit, and it will print the quit message.
You can refer to the below screenshot python quit() function.

Python exit() function
We can also use the in-built exit() function in python to exit and come out of the program in python. It should be used in the interpreter only, it is like a synonym of quit() to make python more user-friendly
Example:
for val in range(0,5):
    if val == 3:
        print(exit)
        exit()
    print(val)
After writing the above code (python exit() function), Ones you will print “ val ” then the output will appear as a “ 0 1 2 “. Here, if the value of “val” becomes “3” then the program is forced to exit, and it will print the exit message too.
You can refer to the below screenshot python exit() function.

Python sys.exit() function
In python, sys.exit() is considered good to be used in production code unlike quit() and exit() as sys module is always available. It also contains the in-built function to exit the program and come out of the execution process. The sys.exit() also raises the SystemExit exception.
Example:
import sys
marks = 12
if marks < 20:
    sys.exit("Marks is less than 20")
else:
    print("Marks is not less than 20")
After writing the above code (python sys.exit() function), the output will appear as a “ Marks is less than 20 “. Here, if the marks are less than 20 then it will exit the program as an exception occurred and it will print SystemExit with the argument.
You can refer to the below screenshot python sys.exit() function.

Python os.exit() function
So first, we will import os module. Then, the os.exit() method is used to terminate the process with the specified status. We can use this method without flushing buffers or calling any cleanup handlers.
Example:
import os
for i in range(5):
    if i == 3:
        print(exit)
        os._exit(0)
    print(i)
After writing the above code (python os.exit() function), the output will appear as a “ 0 1 2 “. Here, it will exit the program, if the value of ‘i’ equal to 3 then it will print the exit message.
You can refer to the below screenshot python os.exit() function.

Python raise SystemExit
The SystemExit is an exception which is raised, when the program is running needs to be stop.
Example:
for i in range(8):
    if i == 5:
        print(exit)
        raise SystemExit
    print(i)
After writing the above code (python raise SystemExit), the output will appear as “ 0 1 2 3 4 “. Here, we will use this exception to raise an error. If the value of ‘i’ equal to 5 then, it will exit the program and print the exit message.
You can refer to the below screenshot python raise SystemExit.

Program to stop code execution in python
To stop code execution in python first, we have to import the sys object, and then we can call the exit() function to stop the program from running. It is the most reliable way for stopping code execution. We can also pass the string to the Python exit() method.
Example:
import sys
my_list = []
if len(my_list) < 5:
  sys.exit('list length is less than 5')
After writing the above code (program to stop code execution in python), the output will appear as a “ list length is less than 5 “. If you want to prevent it from running, if a certain condition is not met then you can stop the execution. Here, the length of “my_list” is less than 5 so it stops the execution.
You can refer to the below screenshot program to stop code execution in python.

Difference between exit() and sys.exit() in python
- exit() – If we use exit() in a code and run it in the shell, it shows a message asking whether I want to kill the program or not. The exit() is considered bad to use in production code because it relies on site module.
- sys.exit() – But sys.exit() is better in this case because it closes the program and doesn’t ask. It is considered good to use in production code because the sys module will always be there.
In this Python tutorial, we learned about the python exit command with example and also we have seen how to use it like:
- Python quit() function
- Python exit() function
- Python sys.exit() function
- Python os.exit() function
- Python raise SystemExit
- Program to stop code execution in python
- Difference between exit() and sys.exit() in python

Python is one of the most popular languages in the United States of America. I have been working with Python for a long time and I have expertise in working with various libraries on Tkinter, Pandas, NumPy, Turtle, Django, Matplotlib, Tensorflow, Scipy, Scikit-Learn, etc… I have experience in working with various clients in countries like United States, Canada, United Kingdom, Australia, New Zealand, etc. Check out my profile.
