Время прочтения
16 мин
Просмотры 2.8K

К старту курса по Fullstack-разработке на Python делимся заключительной частью руководства по программированию сокетов, эта часть посвящена устранению неполадок и справочным сведениям.
К концу руководства вы освоите основные функции и методы модуля Python socket, научитесь применять пользовательский класс для отправки сообщений и данных между конечными точками и работать со всем этим в собственных клиент-серверных приложениях.
Устранение проблем
Что-то будет «отказываться» работать, это неизбежно. И что тогда делать? Не переживайте, это случается с каждым. Надеемся, что с помощью этого руководства, отладчика и любимой поисковой системы вы сможете продолжить работу с частью исходного кода.
Иначе вам прямая дорога в модуль socket на Python. Обязательно прочитайте всю документацию по каждой вызываемой функции или методу. А чтобы почерпнуть какие-то идеи, загляните ещё в справочный раздел.
Иногда дело не в исходном коде. Он может быть правильным, а проблема связана с другим хостом, клиентом или сервером. Или сетью. А возможно, проводится «атака посредника», в качестве которого используется роутер, брандмауэр или какое-то другое сетевое устройство.
Для решения таких проблем нужны дополнительные инструменты. Ниже приводятся инструменты и утилиты, которые могут в этом пригодиться или хотя бы подвести к решению.
ping
Отправкой запроса проверки связи по ICMP в ping проверяется, работает ли хост и подключён ли он к сети. Взаимодействие ping со стеком протоколов TCP/IP прямое, поэтому его работа не зависит от каких бы то ни было приложений, запускаемых на хосте.
Вот пример запуска ping на macOS:
$ ping -c 3 127.0.0.1
PING 127.0.0.1 (127.0.0.1): 56 data bytes
64 bytes from 127.0.0.1: icmp_seq=0 ttl=64 time=0.058 ms
64 bytes from 127.0.0.1: icmp_seq=1 ttl=64 time=0.165 ms
64 bytes from 127.0.0.1: icmp_seq=2 ttl=64 time=0.164 ms

--- 127.0.0.1 ping statistics ---
3 packets transmitted, 3 packets received, 0.0% packet loss
round-trip min/avg/max/stddev = 0.058/0.129/0.165/0.050 ms
Статистика внизу может быть полезной, тчобы найти разрыв постоянного подключения и ответить на вопрос, теряются ли пакеты? Какова временнáя задержка? Можно посмотреть и время приёма-передачи.
Если между вами и другим хостом есть брандмауэр, запрос проверки связи в ping может быть запрещён. Политики соблюдения этого запрета реализуются администраторами брандмауэра, для которых обнаружение их хостов нежелательно. Если это ваш случай (и добавлены правила брандмауэра для взаимодействия хостов), убедитесь, что этими правилами также разрешается передача сообщений по ICMP между хостами.
ICMP — это протокол, применяемый в ping, а также протокол TCP и другие более низкоуровневые протоколы, используемые для передачи сообщений об ошибках. Причина странного поведения или медленных подключений может быть в ICMP.
ICMP-сообщения идентифицируются по типу и коду. Чтобы дать вам представление о важности их информации, приведём несколько таких сообщений:
Информацию о фрагментации и ICMP-сообщениях см. в статье об обнаружении наименьшего MTU на пути следования пакета в сети. Это пример того, чтó может быть причиной странного поведения.
netstat
В разделе «Просмотр состояния сокета» вы узнали, как можно использовать netstat для отображения информации о сокетах и их текущем состоянии. Эта утилита доступна на macOS, Linux и Windows.
В том разделе столбцы Recv-Q и Send-Q в выводе примера отсутствовали. В них показано количество байтов, которые хранятся в сетевых буферах и поставлены в очередь на передачу или приём, но по какой-то причине не считаны или не записаны в удалённом или локальном приложении.
То есть они остаются в ожидании в сетевых буферах, очередях ОС. Одна из причин — в приложении ограничено использование ресурсов ЦП либо нельзя вызвать socket.recv() или socket.send() и обработать байты. Или это проблемы с сетью, которые отражаются на передаче данных, например перегрузка сети или неисправное сетевое оборудование / кабели.
Посмотрим, сколько данных вы сможете отправить, прежде чем увидите ошибку. Попробуйте тестовый клиент с подключением к тестовому серверу и многократным вызовом socket.send(). В тестовом сервере никогда не вызывается socket.recv(), а лишь принимается подключение. Это становится причиной заполнения сетевых буферов на сервере, после чего в клиенте выдаётся ошибка.
Сначала запустите сервер:
$ python app-server-test.py 127.0.0.1 65432
Listening on ('127.0.0.1', 65432)
Затем, чтобы увидеть ошибку, запустите клиент:
$ python app-client-test.py 127.0.0.1 65432 binary test
Error: socket.send() blocking io exception for ('127.0.0.1', 65432):
BlockingIOError(35, 'Resource temporarily unavailable')
Вот вывод netstat, когда в клиенте и на сервере продолжается выполнение. При этом в клиенте многократно выводится приведённое выше сообщение об ошибке:
$ netstat -an | grep 65432
Proto Recv-Q Send-Q  Local Address          Foreign Address        (state)
tcp4  408300      0  127.0.0.1.65432        127.0.0.1.53225        ESTABLISHED
tcp4       0 269868  127.0.0.1.53225        127.0.0.1.65432        ESTABLISHED
tcp4       0      0  127.0.0.1.65432        *.*                    LISTEN
Первая запись — это сервер (у Local Address порт 65432):
Proto Recv-Q Send-Q  Local Address          Foreign Address        (state)
tcp4  408300      0  127.0.0.1.65432        127.0.0.1.53225        ESTABLISHED
Обратите внимание на 408300 в Recv-Q.
Вторая запись — это клиент (у Foreign Address порт 65432):
Proto Recv-Q Send-Q  Local Address          Foreign Address        (state)
tcp4       0 269868  127.0.0.1.53225        127.0.0.1.65432        ESTABLISHED
Обратите внимание на 269868 в Send-Q.
В клиенте, конечно, пытались записать байты, но на сервере они не считывались. Это стало причиной заполнения очереди сетевого буфера как на стороне приёма на сервере, так и на стороне отправки в клиенте.
Windows
Если работаете с Windows, обязательно ознакомьтесь с набором утилит Windows Sysinternals.
Одна из них — TCPView.exe. Это графический netstat для Windows. Кроме адресов, номеров портов и состояния сокета, в ней нарастающим итогом показывается число отправленных и полученных пакетов и байтов. Как и в случае с утилитой lsof в Unix, здесь вы получаете имя и идентификатор процесса. Другие параметры отображения см. в меню.

Wireshark
Иногда нужно увидеть, что происходит при передаче по сети. Забудьте, чтó там в журнале приложения или какое значение возвращается из библиотечного вызова. Вам нужно видеть, чтó отправляется или получается в сети на самом деле. Здесь как с отладчиками: когда нужно увидеть это, они незаменимы.
Wireshark — это анализатор сетевых протоколов и приложение для захвата трафика, запускаемое на macOS, Linux, Windows и других ОС. Существует две версии: wireshark с графическим интерфейсом и текстовая tshark для терминала.
Захват трафика — это отличный способ понаблюдать за поведением приложения в сети и узнать: чтó, как часто и сколько в нём отправляется и получается. А ещё увидеть, когда клиент или сервер закрывается, когда в них прерывается подключение или прекращается отправка ответов. Эта информация может очень пригодиться при устранении проблем.
В интернете много хороших руководств и других ресурсов по основам использования Wireshark и TShark.
Вот пример захвата трафика в интерфейсе «внутренней петли» с помощью Wireshark:
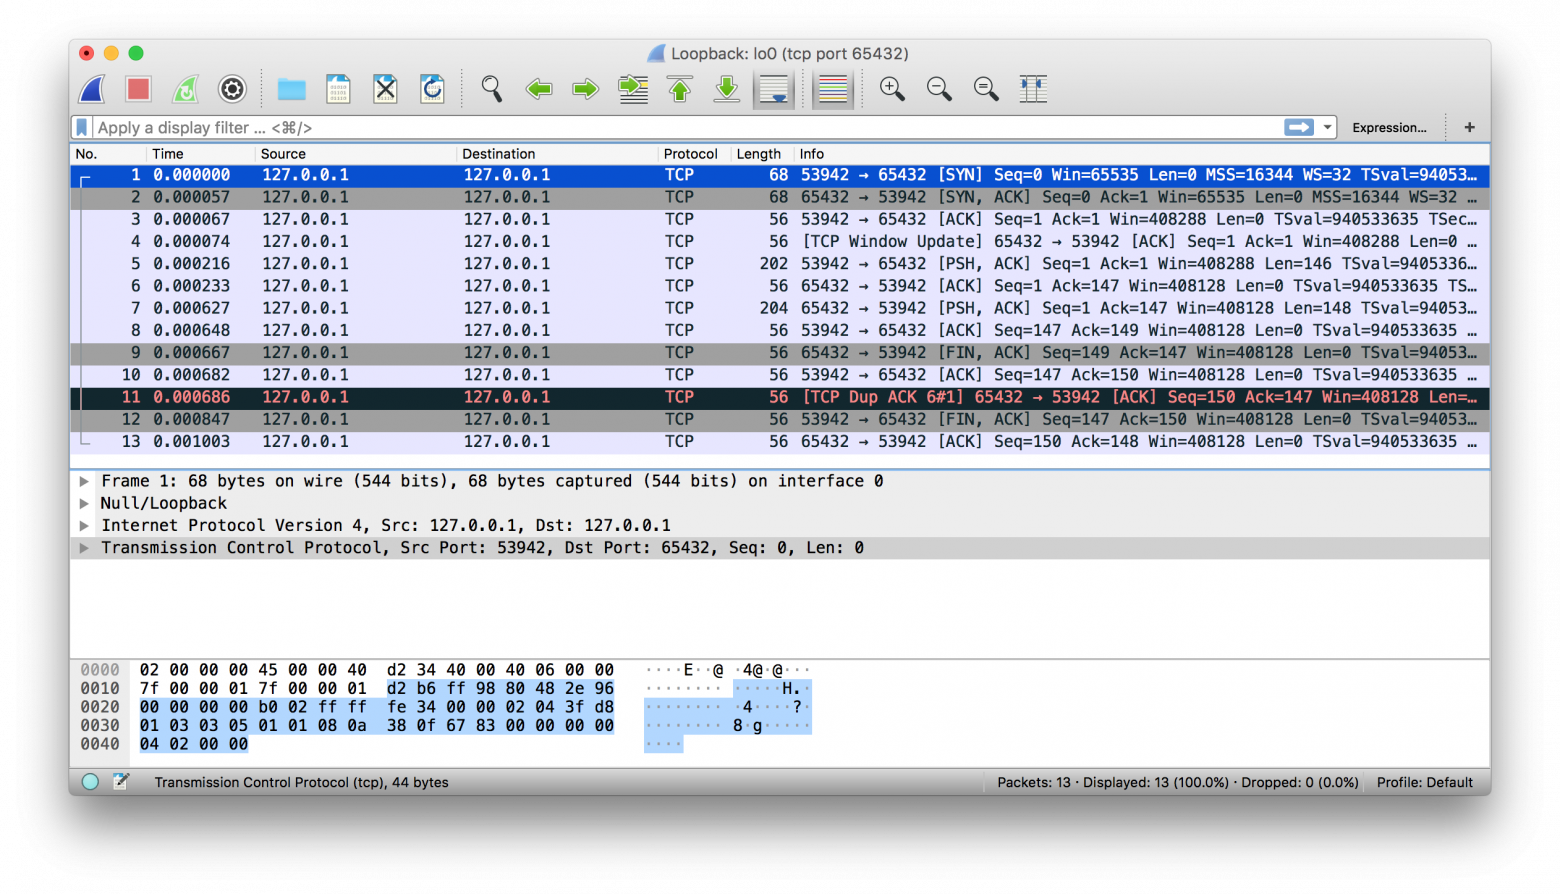
А вот тот же пример с tshark:
$ tshark -i lo0 'tcp port 65432'
Capturing on 'Loopback'
    1   0.000000    127.0.0.1 → 127.0.0.1    TCP 68 53942 → 65432 [SYN] Seq=0 Win=65535 Len=0 MSS=16344 WS=32 TSval=940533635 TSecr=0 SACK_PERM=1
    2   0.000057    127.0.0.1 → 127.0.0.1    TCP 68 65432 → 53942 [SYN, ACK] Seq=0 Ack=1 Win=65535 Len=0 MSS=16344 WS=32 TSval=940533635 TSecr=940533635 SACK_PERM=1
    3   0.000068    127.0.0.1 → 127.0.0.1    TCP 56 53942 → 65432 [ACK] Seq=1 Ack=1 Win=408288 Len=0 TSval=940533635 TSecr=940533635
    4   0.000075    127.0.0.1 → 127.0.0.1    TCP 56 [TCP Window Update] 65432 → 53942 [ACK] Seq=1 Ack=1 Win=408288 Len=0 TSval=940533635 TSecr=940533635
    5   0.000216    127.0.0.1 → 127.0.0.1    TCP 202 53942 → 65432 [PSH, ACK] Seq=1 Ack=1 Win=408288 Len=146 TSval=940533635 TSecr=940533635
    6   0.000234    127.0.0.1 → 127.0.0.1    TCP 56 65432 → 53942 [ACK] Seq=1 Ack=147 Win=408128 Len=0 TSval=940533635 TSecr=940533635
    7   0.000627    127.0.0.1 → 127.0.0.1    TCP 204 65432 → 53942 [PSH, ACK] Seq=1 Ack=147 Win=408128 Len=148 TSval=940533635 TSecr=940533635
    8   0.000649    127.0.0.1 → 127.0.0.1    TCP 56 53942 → 65432 [ACK] Seq=147 Ack=149 Win=408128 Len=0 TSval=940533635 TSecr=940533635
    9   0.000668    127.0.0.1 → 127.0.0.1    TCP 56 65432 → 53942 [FIN, ACK] Seq=149 Ack=147 Win=408128 Len=0 TSval=940533635 TSecr=940533635
   10   0.000682    127.0.0.1 → 127.0.0.1    TCP 56 53942 → 65432 [ACK] Seq=147 Ack=150 Win=408128 Len=0 TSval=940533635 TSecr=940533635
   11   0.000687    127.0.0.1 → 127.0.0.1    TCP 56 [TCP Dup ACK 6#1] 65432 → 53942 [ACK] Seq=150 Ack=147 Win=408128 Len=0 TSval=940533635 TSecr=940533635
   12   0.000848    127.0.0.1 → 127.0.0.1    TCP 56 53942 → 65432 [FIN, ACK] Seq=147 Ack=150 Win=408128 Len=0 TSval=940533635 TSecr=940533635
   13   0.001004    127.0.0.1 → 127.0.0.1    TCP 56 65432 → 53942 [ACK] Seq=150 Ack=148 Win=408128 Len=0 TSval=940533635 TSecr=940533635
^C13 packets captured
Далее приводим вам в помощь справочные материалы по программированию сокетов.
Справочный раздел
Этот раздел может использоваться в качестве справочника общего содержания с дополнительной информацией и ссылками на внешние ресурсы.
Документация Python
- Модуль socket.
- Практическое руководство по программированию сокетов.
Ошибки
Следующее взято из документации к модулю socket на Python:
«Все ошибки сопровождаются вызовом исключений. При недопустимых типах аргументов и нехватке памяти могут вызываться обычные исключения. Начиная с Python 3.3 ошибки, связанные с семантикой сокетов или адресов, сопровождаются вызовом
OSErrorили одного из его подклассов». (Источник).
Вот типичные ошибки, с которыми вы можете столкнуться при работе с сокетами:
Семейства адресов сокетов
socket.AF_INET и socket.AF_INET6 — это семейства адресов и протоколов для первого аргумента в socket.socket(). В API предполагается адрес определённого формата — в зависимости от того, создан сокет с помощью socket.AF_INET или socket.AF_INET6.
Ниже приведена выдержка из документации Python к модулю socket о значении host в кортеже адресов:
«Для IPv4-адресов вместо адреса хоста принимаются две специальные формы: пустая строка — это
INADDR_ANY, а строка'<broadcast>'— этоINADDR_BROADCAST. Такое поведение несовместимо с IPv6, так что они вам, возможно, не понадобятся, если вы намерены поддерживать IPv6 в своих программах на Python». (Источник)
Подробнее см. в документации по семействам сокетов на Python.
В этом руководстве применяются сокеты IPv4. Если в вашей сети поддерживается IPv6, попробуйте по возможности протестировать и использовать эту версию. Это легко делается с функцией socket.getaddrinfo(). Её аргументы host и port преобразуются в последовательность из пяти кортежей со всеми аргументами, необходимыми для создания сокета, подключённого к этому сервису. В socket.getaddrinfo() принимаются и интерпретируются переданные IPv6-адреса и имена хостов, которые разрешаются не только в IPv4, но и в IPv6-адреса.
В следующем примере возвращается информация об адресе для TCP-подключения к example.org в порте 80:
>>> socket.getaddrinfo("example.org", 80, proto=socket.IPPROTO_TCP)
[(<AddressFamily.AF_INET6: 10>, <SocketType.SOCK_STREAM: 1>,
 6, '', ('2606:2800:220:1:248:1893:25c8:1946', 80, 0, 0)),
 (<AddressFamily.AF_INET: 2>, <SocketType.SOCK_STREAM: 1>,
 6, '', ('93.184.216.34', 80))]
На вашем компьютере результаты могут отличаться, если IPv6 не включена. Возвращаемые выше значения можно передавать в socket.socket() и socket.connect(). В документации Python к модулю socket, в разделе с примерами, содержится пример клиента и сервера.
Использование имён хостов
Кстати, этот раздел примени́м в основном к использованию имён хостов с .bind() и .connect() или .connect_ex(), когда задействуется интерфейс «внутренней петли» (localhost). Но примени́м он и в любой момент, когда вы используете имя хоста и ожидается его разрешение в определённый адрес. Причём имя хоста имеет особое значение для приложения, что отражается на его поведении или делаемых в нём допущениях. Это отличается от типичного сценария, когда в клиенте имя хоста используется для подключения к серверу, разрешённому при помощи DNS, например www.example.com.
Следующее взято из документации к модулю socket на Python:
«Если использовать имя хоста в хостовой части адреса сокета IPv4/v6, в программе может проявиться недетерминированное поведение, поскольку в Python используется первый адрес, возвращаемый из DNS-разрешения. Адрес сокета будет разрешён в фактический адрес IPv4/v6 по-разному в зависимости от результатов из DNS-разрешения и/или конфигурации хоста. Для детерминированного поведения используйте в хостовой части числовой адрес». (Источник).
Стандартным именем localhost предусматривается его разрешение в 127.0.0.1 или ::1, интерфейс «внутренней петли». В вашей системе наверняка так и будет. А может, и нет. Это зависит от того, как она сконфигурирована для разрешения имён. Как и во всём, что связано с ИТ, всегда имеются исключения, и нет никаких гарантий, что при использовании имени localhost произойдёт подключение к интерфейсу «внутренней петли».
Например, на Linux см. файл конфигурации man nsswitch.conf диспетчера службы имён. На macOS и Linux стóит ещё заглянуть в файл /etc/hosts. На Windows см. C:WindowsSystem32driversetchosts. В файле hosts имеется статическая таблица сопоставления имён и адресов в простом текстовом формате. DNS — это совершенно иная часть пазла.
Примечательно, что с июня 2018 года существует черновой вариант RFC Let ‘localhost’ be localhost («Пусть ‘localhost’ будет localhost»), где обсуждаются соглашения, допущения и вопросы безопасности, связанные с применением имени localhost.
Важно понимать: когда в приложении используются имена хостов, в качестве адресов может возвращаться буквально всё что угодно. Не делайте допущений относительно имени, если в приложении важна безопасность. Представляет это повод для беспокойства или нет — зависит от приложения и окружения.
Даже если в приложении важность безопасности неочевидна, соответствующие рекомендации всё равно применяются. Если в приложении имеется доступ к сети, оно должно сопровождаться и быть защищено. То есть это как минимум:
- Регулярные обновления системного ПО и исправления уязвимостей, в том числе на Python. Обязательно также проверяйте и обновляйте любые сторонние библиотеки.
- Чтобы подключаться только к доверенным системам, по возможности используйте выделенный брандмауэр или межсетевой экран узлов.
- Какие DNS-серверы сконфигурированы? Вы доверяете им и их администраторам?
- Убедитесь, что данные запроса максимально очищены и проверены, прежде чем вызывать другой код, в котором они обрабатываются. Используйте для этого фаззинг-тесты и запускайте их регулярно.
Независимо от того, используете вы имена хостов или нет, если в приложении нужна поддержка безопасных подключений через шифрование и аутентификацию, то вам, вероятно, стóит попробовать TLS. Но это — тема отдельной статьи и в настоящем руководстве не рассматривается. Чтобы начать с ним работу, см. документацию по модулю ssl на Python. Это тот же протокол, который применяется в браузерах для безопасного подключения к сайтам.
Интерфейсы, IP-адреса, разрешения имён… Переменных много. Что же делать? Если у вас нет процесса рассмотрения сетевых приложений, используйте эти рекомендации:
Для клиентов или серверов, если нужно аутентифицировать хост, к которому подключаетесь, стóит попробовать TLS.
Блокирующие вызовы
Блокирующий вызов — это функция или метод сокета, на которых работа приложения временно приостанавливается. Например, .accept(), .connect(), .send() и .recv() блокируются, то есть немедленного возвращения в них не происходит. Прежде чем от блокирующих вызовов возвращается значение, они находятся в ожидании завершения системных (ввод-вывод). Поэтому источник вызова блокируется до их завершения, или истечения тайм-аута, или возникновения другой ошибки.
Чтобы в блокирующих вызовах сокетов происходило немедленное возвращение значений, такие вызовы можно настроить на неблокируемый режим. При этом, чтобы обрабатывать готовую операцию сокета, нужно как минимум провести рефакторинг или перепроектирование приложения.
Поскольку в вызове значения возвращаются немедленно, данные могут быть не готовы. Вызываемая сторона находится в сети в ожидании — ей не хватило времени завершить свою работу. В этом случае текущий статус — это errno-значение socket.EWOULDBLOCK. Неблокируемый режим поддерживается с помощью .setblocking().
По умолчанию сокеты всегда создаются в блокируемом режиме. Описание трёх режимов см. в примечаниях по тайм-аутам сокетов.
Закрытие подключений
В TCP примечательно то, что в клиенте или на сервере совершенно допустимо закрывать свою сторону подключения, пока другая остаётся открытой. Это называется «полуоткрытым» подключением. Желательно оно или нет — решается в приложении. Вообще говоря, нежелательно. В этом состоянии со стороны, чей конец подключения закрыт, данные больше отправляться не смогут. Они будут только приниматься.
Этот подход рекомендуется не как обязательный, но в HTTP в качестве примера используется заголовок с именем Connection для стандартизации того, как в приложениях должны закрываться или сохраняться открытыми подключения. Подробнее см. в разделе 6.3 RFC 7230 о протоколе передачи гипертекста (HTTP/1.1), синтаксисе и маршрутизации сообщений.
При разработке и написании приложения и его протокола прикладного уровня рекомендуется заранее продумать закрытие подключений. Иногда это просто и очевидно, а иногда могут потребоваться создание прототипов и предварительное тестирование. Всё зависит от приложения и от того, как обрабатывается цикл сообщений с ожидаемыми данными. Просто убедитесь, что сокеты всегда своевременно закрываются после завершения работы.
Порядок следования байтов
Подробнее о том, как порядок байтов хранится в памяти разных ЦП, см. в соответствующей статье «Википедии». При интерпретации отдельных байтов это не проблема. Но при обработке нескольких байтов, считываемых и обрабатываемых как одно значение, например 4-байтовое целое число, порядок байтов нужно изменить на противоположный, если взаимодействовать с компьютером, на котором другой порядок следования байтов.
Порядок байтов важен и для текстовых строк, представленных в виде многобайтовых последовательностей, таких как «Юникод». Если только вы не используете всегда true, строгий ASCII и не контролируете реализацию клиента и сервера, вам наверняка лучше использовать «Юникод» с кодировкой вроде UTF-8 или той, которой поддерживается маркер последовательности байтов.
Важно явно определить кодировку, применяемую в протоколе прикладного уровня. Это можно сделать, установив в качестве обязательной для всего текста UTF-8 или использовав заголовок content-encoding, в котором эта кодировка указана. Так приложение избавляется от необходимости определять кодировку, которую по возможности следует избегать.
Это становится проблематичным, когда имеются данные, которые хранятся в файлах или базе данных, и недоступны метаданные, в которых указана их кодировка. Когда данные передаются на другую конечную точку, в ней придётся попробовать определить кодировку. Идеи для обсуждения см. в статье «Википедии» о «Юникоде», в которой упоминается о RFC 3629: UTF-8, формат преобразования ISO 10646:
«Однако в RFC 3629 (стандарт UTF-8) рекомендуется запрещать маркер последовательности байтов в протоколах с UTF-8, но обсуждаются случаи, когда это бывает невозможно. Кроме того, под большим ограничением на возможные шаблоны в UTF-8 (например, не может быть одиночных байтов с установленным старшим битом) подразумевается, что должна быть возможность отличать UTF-8 от других кодировок символов без применения маркера последовательности байтов». (Источник).
А вывод из этого такой: всегда сохранять кодировку, используемую для обрабатываемых в приложении данных, если она может меняться. То есть пытаться каким-то образом сохранять кодировку в виде метаданных, если это не всегда UTF-8 или какая-то другая кодировка с маркером последовательности байтов. Затем можно отправить её в заголовке вместе с данными, чтобы сообщить получателю, что это такое.
В TCP/IP применяется обратный порядок байтов, который называется сетевым. Сетевой порядок используется для представления целых чисел на нижних уровнях стека протоколов, таких как IP-адреса и номера портов. В модуль socket на Python включены функции, в которых целые числа преобразуются в порядок байтов сети и хоста и обратно:
Кроме того, чтобы с помощью строк формата упаковывать и распаковывать двоичные данные, можно использовать модуль struct:
import struct
network_byteorder_int = struct.pack('>H', 256)
python_int = struct.unpack('>H', network_byteorder_int)[0]
Заключение
В этом руководстве рассмотрено много вопросов! Сети и сокеты — это большие темы. Если они вам в новинку, пусть вас не смущают все эти термины и сокращения.
Чтобы понять, как здесь всё сочетается, нужно ознакомиться с кучей подробностей. Но в Python начинаешь лучше понимать целое, осваивая отдельные части и проводя с ними больше времени. Теперь вы можете задействовать свой пользовательский класс и, опираясь на него, проще и быстрее создавать собственные приложения с сокетами.
Ознакомиться с примерами можно по ссылке ниже:
исходный код из руководства для примеров в этом руководстве.
Поздравляем с тем, что добрались до конца! Вы уже готовы применять сокеты в собственных приложениях. Желаю вам успехов в разработке сокетов.
Научим вас аккуратно работать с данными, чтобы вы прокачали карьеру и стали востребованным IT-специалистом. Новогодняя акция — скидки до 50% по промокоду HABR:

- Профессия Fullstack-разработчик на Python (16 месяцев)
- Профессия Data Scientist (24 месяца)
Source code: Lib/socket.py
This module provides access to the BSD socket interface. It is available on
all modern Unix systems, Windows, MacOS, and probably additional platforms.
Note
Some behavior may be platform dependent, since calls are made to the operating
system socket APIs.
The Python interface is a straightforward transliteration of the Unix system
call and library interface for sockets to Python’s object-oriented style: the
socket() function returns a socket object whose methods implement
the various socket system calls. Parameter types are somewhat higher-level than
in the C interface: as with read() and write() operations on Python
files, buffer allocation on receive operations is automatic, and buffer length
is implicit on send operations.
See also
- Module
socketserver - Classes that simplify writing network servers.
- Module
ssl - A TLS/SSL wrapper for socket objects.
18.1.1. Socket families
Depending on the system and the build options, various socket families
are supported by this module.
The address format required by a particular socket object is automatically
selected based on the address family specified when the socket object was
created. Socket addresses are represented as follows:
-
The address of an
AF_UNIXsocket bound to a file system node
is represented as a string, using the file system encoding and the
'surrogateescape'error handler (see PEP 383). An address in
Linux’s abstract namespace is returned as a bytes-like object with
an initial null byte; note that sockets in this namespace can
communicate with normal file system sockets, so programs intended to
run on Linux may need to deal with both types of address. A string or
bytes-like object can be used for either type of address when
passing it as an argument.Changed in version 3.3: Previously,
AF_UNIXsocket paths were assumed to use UTF-8
encoding.
-
A pair
(host, port)is used for theAF_INETaddress family,
where host is a string representing either a hostname in Internet domain
notation like'daring.cwi.nl'or an IPv4 address like'100.50.200.5',
and port is an integer. -
For
AF_INET6address family, a four-tuple(host, port, flowinfo,is used, where flowinfo and scopeid represent the
scopeid)sin6_flowinfo
andsin6_scope_idmembers instruct sockaddr_in6in C. For
socketmodule methods, flowinfo and scopeid can be omitted just for
backward compatibility. Note, however, omission of scopeid can cause problems
in manipulating scoped IPv6 addresses. -
AF_NETLINKsockets are represented as pairs(pid, groups). -
Linux-only support for TIPC is available using the
AF_TIPC
address family. TIPC is an open, non-IP based networked protocol designed
for use in clustered computer environments. Addresses are represented by a
tuple, and the fields depend on the address type. The general tuple form is
(addr_type, v1, v2, v3 [, scope]), where:-
addr_type is one of
TIPC_ADDR_NAMESEQ,TIPC_ADDR_NAME,
orTIPC_ADDR_ID. -
scope is one of
TIPC_ZONE_SCOPE,TIPC_CLUSTER_SCOPE, and
TIPC_NODE_SCOPE. -
If addr_type is
TIPC_ADDR_NAME, then v1 is the server type, v2 is
the port identifier, and v3 should be 0.If addr_type is
TIPC_ADDR_NAMESEQ, then v1 is the server type, v2
is the lower port number, and v3 is the upper port number.If addr_type is
TIPC_ADDR_ID, then v1 is the node, v2 is the
reference, and v3 should be set to 0.
-
-
A tuple
(interface, )is used for theAF_CANaddress family,
where interface is a string representing a network interface name like
'can0'. The network interface name''can be used to receive packets
from all network interfaces of this family.CAN_ISOTPprotocol require a tuple(interface, rx_addr, tx_addr)
where both additional parameters are unsigned long integer that represent a
CAN identifier (standard or extended).
-
A string or a tuple
(id, unit)is used for theSYSPROTO_CONTROL
protocol of thePF_SYSTEMfamily. The string is the name of a
kernel control using a dynamically-assigned ID. The tuple can be used if ID
and unit number of the kernel control are known or if a registered ID is
used.New in version 3.3.
-
AF_BLUETOOTHsupports the following protocols and address
formats:-
BTPROTO_L2CAPaccepts(bdaddr, psm)wherebdaddris
the Bluetooth address as a string andpsmis an integer. -
BTPROTO_RFCOMMaccepts(bdaddr, channel)wherebdaddr
is the Bluetooth address as a string andchannelis an integer. -
BTPROTO_HCIaccepts(device_id,)wheredevice_idis
either an integer or a string with the Bluetooth address of the
interface. (This depends on your OS; NetBSD and DragonFlyBSD expect
a Bluetooth address while everything else expects an integer.)Changed in version 3.2: NetBSD and DragonFlyBSD support added.
-
BTPROTO_SCOacceptsbdaddrwherebdaddris a
bytesobject containing the Bluetooth address in a
string format. (ex.b'12:23:34:45:56:67') This protocol is not
supported under FreeBSD.
-
-
AF_ALGis a Linux-only socket based interface to Kernel
cryptography. An algorithm socket is configured with a tuple of two to four
elements(type, name [, feat [, mask]]), where:- type is the algorithm type as string, e.g.
aead,hash,
skcipherorrng. - name is the algorithm name and operation mode as string, e.g.
sha256,hmac(sha256),cbc(aes)ordrbg_nopr_ctr_aes256. - feat and mask are unsigned 32bit integers.
Availability Linux 2.6.38, some algorithm types require more recent Kernels.
New in version 3.6.
- type is the algorithm type as string, e.g.
-
AF_VSOCKallows communication between virtual machines and
their hosts. The sockets are represented as a(CID, port)tuple
where the context ID or CID and port are integers.Availability: Linux >= 4.8 QEMU >= 2.8 ESX >= 4.0 ESX Workstation >= 6.5
New in version 3.7.
-
Certain other address families (
AF_PACKET,AF_CAN)
support specific representations.
For IPv4 addresses, two special forms are accepted instead of a host address:
the empty string represents INADDR_ANY, and the string
'<broadcast>' represents INADDR_BROADCAST. This behavior is not
compatible with IPv6, therefore, you may want to avoid these if you intend
to support IPv6 with your Python programs.
If you use a hostname in the host portion of IPv4/v6 socket address, the
program may show a nondeterministic behavior, as Python uses the first address
returned from the DNS resolution. The socket address will be resolved
differently into an actual IPv4/v6 address, depending on the results from DNS
resolution and/or the host configuration. For deterministic behavior use a
numeric address in host portion.
All errors raise exceptions. The normal exceptions for invalid argument types
and out-of-memory conditions can be raised; starting from Python 3.3, errors
related to socket or address semantics raise OSError or one of its
subclasses (they used to raise socket.error).
Non-blocking mode is supported through setblocking(). A
generalization of this based on timeouts is supported through
settimeout().
18.1.2. Module contents
The module socket exports the following elements.
18.1.2.1. Exceptions
-
exception
socket.error¶ -
A deprecated alias of
OSError.Changed in version 3.3: Following PEP 3151, this class was made an alias of
OSError.
-
exception
socket.herror¶ -
A subclass of
OSError, this exception is raised for
address-related errors, i.e. for functions that use h_errno in the POSIX
C API, includinggethostbyname_ex()andgethostbyaddr().
The accompanying value is a pair(h_errno, string)representing an
error returned by a library call. h_errno is a numeric value, while
string represents the description of h_errno, as returned by the
hstrerror()C function.Changed in version 3.3: This class was made a subclass of
OSError.
-
exception
socket.gaierror¶ -
A subclass of
OSError, this exception is raised for
address-related errors bygetaddrinfo()andgetnameinfo().
The accompanying value is a pair(error, string)representing an error
returned by a library call. string represents the description of
error, as returned by thegai_strerror()C function. The
numeric error value will match one of theEAI_*constants
defined in this module.Changed in version 3.3: This class was made a subclass of
OSError.
-
exception
socket.timeout¶ -
A subclass of
OSError, this exception is raised when a timeout
occurs on a socket which has had timeouts enabled via a prior call to
settimeout()(or implicitly through
setdefaulttimeout()). The accompanying value is a string
whose value is currently always “timed out”.Changed in version 3.3: This class was made a subclass of
OSError.
18.1.2.2. Constants
The AF_* and SOCK_* constants are now
AddressFamilyand
SocketKindIntEnumcollections.New in version 3.4.
-
socket.AF_UNIX¶ -
socket.AF_INET¶ -
socket.AF_INET6¶ -
These constants represent the address (and protocol) families, used for the
first argument tosocket(). If theAF_UNIXconstant is not
defined then this protocol is unsupported. More constants may be available
depending on the system.
-
socket.SOCK_STREAM¶ -
socket.SOCK_DGRAM¶ -
socket.SOCK_RAW¶ -
socket.SOCK_RDM¶ -
socket.SOCK_SEQPACKET¶ -
These constants represent the socket types, used for the second argument to
socket(). More constants may be available depending on the system.
(OnlySOCK_STREAMandSOCK_DGRAMappear to be generally
useful.)
-
socket.SOCK_CLOEXEC¶ -
socket.SOCK_NONBLOCK¶ -
These two constants, if defined, can be combined with the socket types and
allow you to set some flags atomically (thus avoiding possible race
conditions and the need for separate calls).Availability: Linux >= 2.6.27.
New in version 3.2.
-
SO_* -
socket.SOMAXCONN¶ -
MSG_* -
SOL_* -
SCM_* -
IPPROTO_* -
IPPORT_* -
INADDR_* -
IP_* -
IPV6_* -
EAI_* -
AI_* -
NI_* -
TCP_* -
Many constants of these forms, documented in the Unix documentation on sockets
and/or the IP protocol, are also defined in the socket module. They are
generally used in arguments to thesetsockopt()andgetsockopt()
methods of socket objects. In most cases, only those symbols that are defined
in the Unix header files are defined; for a few symbols, default values are
provided.Changed in version 3.6:
SO_DOMAIN,SO_PROTOCOL,SO_PEERSEC,SO_PASSSEC,
TCP_USER_TIMEOUT,TCP_CONGESTIONwere added.Changed in version 3.7:
TCP_NOTSENT_LOWATwas added.
-
socket.AF_CAN¶ -
socket.PF_CAN¶ -
SOL_CAN_* -
CAN_* -
Many constants of these forms, documented in the Linux documentation, are
also defined in the socket module.Availability: Linux >= 2.6.25.
New in version 3.3.
-
socket.CAN_BCM¶ -
CAN_BCM_* -
CAN_BCM, in the CAN protocol family, is the broadcast manager (BCM) protocol.
Broadcast manager constants, documented in the Linux documentation, are also
defined in the socket module.Availability: Linux >= 2.6.25.
New in version 3.4.
-
socket.CAN_RAW_FD_FRAMES¶ -
Enables CAN FD support in a CAN_RAW socket. This is disabled by default.
This allows your application to send both CAN and CAN FD frames; however,
you one must accept both CAN and CAN FD frames when reading from the socket.This constant is documented in the Linux documentation.
Availability: Linux >= 3.6.
New in version 3.5.
-
socket.CAN_ISOTP¶ -
CAN_ISOTP, in the CAN protocol family, is the ISO-TP (ISO 15765-2) protocol.
ISO-TP constants, documented in the Linux documentation.Availability: Linux >= 2.6.25
New in version 3.7.
-
socket.AF_RDS¶ -
socket.PF_RDS¶ -
socket.SOL_RDS¶ -
RDS_* -
Many constants of these forms, documented in the Linux documentation, are
also defined in the socket module.Availability: Linux >= 2.6.30.
New in version 3.3.
-
socket.SIO_RCVALL¶ -
socket.SIO_KEEPALIVE_VALS¶ -
socket.SIO_LOOPBACK_FAST_PATH¶ -
RCVALL_* -
Constants for Windows’ WSAIoctl(). The constants are used as arguments to the
ioctl()method of socket objects.Changed in version 3.6:
SIO_LOOPBACK_FAST_PATHwas added.
-
TIPC_* -
TIPC related constants, matching the ones exported by the C socket API. See
the TIPC documentation for more information.
-
socket.AF_ALG¶ -
socket.SOL_ALG¶ -
ALG_* -
Constants for Linux Kernel cryptography.
Availability: Linux >= 2.6.38.
New in version 3.6.
-
socket.AF_VSOCK¶ -
socket.IOCTL_VM_SOCKETS_GET_LOCAL_CID¶ -
VMADDR* -
SO_VM* -
Constants for Linux host/guest communication.
Availability: Linux >= 4.8.
New in version 3.7.
-
socket.AF_LINK¶ -
Availability: BSD, OSX.
New in version 3.4.
-
socket.has_ipv6¶ -
This constant contains a boolean value which indicates if IPv6 is supported on
this platform.
-
socket.BDADDR_ANY¶ -
socket.BDADDR_LOCAL¶ -
These are string constants containing Bluetooth addresses with special
meanings. For example,BDADDR_ANYcan be used to indicate
any address when specifying the binding socket with
BTPROTO_RFCOMM.
-
socket.HCI_FILTER¶ -
socket.HCI_TIME_STAMP¶ -
socket.HCI_DATA_DIR¶ -
For use with
BTPROTO_HCI.HCI_FILTERis not
available for NetBSD or DragonFlyBSD.HCI_TIME_STAMPand
HCI_DATA_DIRare not available for FreeBSD, NetBSD, or
DragonFlyBSD.
18.1.2.3. Functions
18.1.2.3.1. Creating sockets
The following functions all create socket objects.
-
socket.socket(family=AF_INET, type=SOCK_STREAM, proto=0, fileno=None)¶ -
Create a new socket using the given address family, socket type and protocol
number. The address family should beAF_INET(the default),
AF_INET6,AF_UNIX,AF_CANorAF_RDS. The
socket type should beSOCK_STREAM(the default),
SOCK_DGRAM,SOCK_RAWor perhaps one of the otherSOCK_
constants. The protocol number is usually zero and may be omitted or in the
case where the address family isAF_CANthe protocol should be one
ofCAN_RAW,CAN_BCMorCAN_ISOTP. If fileno is specified, the other
arguments are ignored, causing the socket with the specified file descriptor
to return. Unlikesocket.fromfd(), fileno will return the same
socket and not a duplicate. This may help close a detached socket using
socket.close().The newly created socket is non-inheritable.
Changed in version 3.3: The AF_CAN family was added.
The AF_RDS family was added.Changed in version 3.4: The CAN_BCM protocol was added.
Changed in version 3.4: The returned socket is now non-inheritable.
Changed in version 3.7: The CAN_ISOTP protocol was added.
-
socket.socketpair([family[, type[, proto]]])¶ -
Build a pair of connected socket objects using the given address family, socket
type, and protocol number. Address family, socket type, and protocol number are
as for thesocket()function above. The default family isAF_UNIX
if defined on the platform; otherwise, the default isAF_INET.The newly created sockets are non-inheritable.
Changed in version 3.2: The returned socket objects now support the whole socket API, rather
than a subset.Changed in version 3.4: The returned sockets are now non-inheritable.
Changed in version 3.5: Windows support added.
-
socket.create_connection(address[, timeout[, source_address]])¶ -
Connect to a TCP service listening on the Internet address (a 2-tuple
(host, port)), and return the socket object. This is a higher-level
function thansocket.connect(): if host is a non-numeric hostname,
it will try to resolve it for bothAF_INETandAF_INET6,
and then try to connect to all possible addresses in turn until a
connection succeeds. This makes it easy to write clients that are
compatible to both IPv4 and IPv6.Passing the optional timeout parameter will set the timeout on the
socket instance before attempting to connect. If no timeout is
supplied, the global default timeout setting returned by
getdefaulttimeout()is used.If supplied, source_address must be a 2-tuple
(host, port)for the
socket to bind to as its source address before connecting. If host or port
are ‘’ or 0 respectively the OS default behavior will be used.Changed in version 3.2: source_address was added.
-
socket.fromfd(fd, family, type, proto=0)¶ -
Duplicate the file descriptor fd (an integer as returned by a file object’s
fileno()method) and build a socket object from the result. Address
family, socket type and protocol number are as for thesocket()function
above. The file descriptor should refer to a socket, but this is not checked —
subsequent operations on the object may fail if the file descriptor is invalid.
This function is rarely needed, but can be used to get or set socket options on
a socket passed to a program as standard input or output (such as a server
started by the Unix inet daemon). The socket is assumed to be in blocking mode.The newly created socket is non-inheritable.
Changed in version 3.4: The returned socket is now non-inheritable.
-
socket.fromshare(data)¶ -
Instantiate a socket from data obtained from the
socket.share()
method. The socket is assumed to be in blocking mode.Availability: Windows.
New in version 3.3.
-
socket.SocketType¶ -
This is a Python type object that represents the socket object type. It is the
same astype(socket(...)).
18.1.2.3.2. Other functions
The socket module also offers various network-related services:
-
socket.getaddrinfo(host, port, family=0, type=0, proto=0, flags=0)¶ -
Translate the host/port argument into a sequence of 5-tuples that contain
all the necessary arguments for creating a socket connected to that service.
host is a domain name, a string representation of an IPv4/v6 address
orNone. port is a string service name such as'http', a numeric
port number orNone. By passingNoneas the value of host
and port, you can passNULLto the underlying C API.The family, type and proto arguments can be optionally specified
in order to narrow the list of addresses returned. Passing zero as a
value for each of these arguments selects the full range of results.
The flags argument can be one or several of theAI_*constants,
and will influence how results are computed and returned.
For example,AI_NUMERICHOSTwill disable domain name resolution
and will raise an error if host is a domain name.The function returns a list of 5-tuples with the following structure:
(family, type, proto, canonname, sockaddr)In these tuples, family, type, proto are all integers and are
meant to be passed to thesocket()function. canonname will be
a string representing the canonical name of the host if
AI_CANONNAMEis part of the flags argument; else canonname
will be empty. sockaddr is a tuple describing a socket address, whose
format depends on the returned family (a(address, port)2-tuple for
AF_INET, a(address, port, flow info, scope id)4-tuple for
AF_INET6), and is meant to be passed to thesocket.connect()
method.The following example fetches address information for a hypothetical TCP
connection toexample.orgon port 80 (results may differ on your
system if IPv6 isn’t enabled):>>> socket.getaddrinfo("example.org", 80, proto=socket.IPPROTO_TCP) [(<AddressFamily.AF_INET6: 10>, <SocketType.SOCK_STREAM: 1>, 6, '', ('2606:2800:220:1:248:1893:25c8:1946', 80, 0, 0)), (<AddressFamily.AF_INET: 2>, <SocketType.SOCK_STREAM: 1>, 6, '', ('93.184.216.34', 80))]
Changed in version 3.2: parameters can now be passed using keyword arguments.
-
socket.getfqdn([name])¶ -
Return a fully qualified domain name for name. If name is omitted or empty,
it is interpreted as the local host. To find the fully qualified name, the
hostname returned bygethostbyaddr()is checked, followed by aliases for the
host, if available. The first name which includes a period is selected. In
case no fully qualified domain name is available, the hostname as returned by
gethostname()is returned.
-
socket.gethostbyname(hostname)¶ -
Translate a host name to IPv4 address format. The IPv4 address is returned as a
string, such as'100.50.200.5'. If the host name is an IPv4 address itself
it is returned unchanged. Seegethostbyname_ex()for a more complete
interface.gethostbyname()does not support IPv6 name resolution, and
getaddrinfo()should be used instead for IPv4/v6 dual stack support.
-
socket.gethostbyname_ex(hostname)¶ -
Translate a host name to IPv4 address format, extended interface. Return a
triple(hostname, aliaslist, ipaddrlist)where hostname is the primary
host name responding to the given ip_address, aliaslist is a (possibly
empty) list of alternative host names for the same address, and ipaddrlist is
a list of IPv4 addresses for the same interface on the same host (often but not
always a single address).gethostbyname_ex()does not support IPv6 name
resolution, andgetaddrinfo()should be used instead for IPv4/v6 dual
stack support.
-
socket.gethostname()¶ -
Return a string containing the hostname of the machine where the Python
interpreter is currently executing.Note:
gethostname()doesn’t always return the fully qualified domain
name; usegetfqdn()for that.
-
socket.gethostbyaddr(ip_address)¶ -
Return a triple
(hostname, aliaslist, ipaddrlist)where hostname is the
primary host name responding to the given ip_address, aliaslist is a
(possibly empty) list of alternative host names for the same address, and
ipaddrlist is a list of IPv4/v6 addresses for the same interface on the same
host (most likely containing only a single address). To find the fully qualified
domain name, use the functiongetfqdn().gethostbyaddr()supports
both IPv4 and IPv6.
-
socket.getnameinfo(sockaddr, flags)¶ -
Translate a socket address sockaddr into a 2-tuple
(host, port). Depending
on the settings of flags, the result can contain a fully-qualified domain name
or numeric address representation in host. Similarly, port can contain a
string port name or a numeric port number.
-
socket.getprotobyname(protocolname)¶ -
Translate an Internet protocol name (for example,
'icmp') to a constant
suitable for passing as the (optional) third argument to thesocket()
function. This is usually only needed for sockets opened in “raw” mode
(SOCK_RAW); for the normal socket modes, the correct protocol is chosen
automatically if the protocol is omitted or zero.
-
socket.getservbyname(servicename[, protocolname])¶ -
Translate an Internet service name and protocol name to a port number for that
service. The optional protocol name, if given, should be'tcp'or
'udp', otherwise any protocol will match.
-
socket.getservbyport(port[, protocolname])¶ -
Translate an Internet port number and protocol name to a service name for that
service. The optional protocol name, if given, should be'tcp'or
'udp', otherwise any protocol will match.
-
socket.ntohl(x)¶ -
Convert 32-bit positive integers from network to host byte order. On machines
where the host byte order is the same as network byte order, this is a no-op;
otherwise, it performs a 4-byte swap operation.
-
socket.ntohs(x)¶ -
Convert 16-bit positive integers from network to host byte order. On machines
where the host byte order is the same as network byte order, this is a no-op;
otherwise, it performs a 2-byte swap operation.Deprecated since version 3.7: In case x does not fit in 16-bit unsigned integer, but does fit in a
positive C int, it is silently truncated to 16-bit unsigned integer.
This silent truncation feature is deprecated, and will raise an
exception in future versions of Python.
-
socket.htonl(x)¶ -
Convert 32-bit positive integers from host to network byte order. On machines
where the host byte order is the same as network byte order, this is a no-op;
otherwise, it performs a 4-byte swap operation.
-
socket.htons(x)¶ -
Convert 16-bit positive integers from host to network byte order. On machines
where the host byte order is the same as network byte order, this is a no-op;
otherwise, it performs a 2-byte swap operation.Deprecated since version 3.7: In case x does not fit in 16-bit unsigned integer, but does fit in a
positive C int, it is silently truncated to 16-bit unsigned integer.
This silent truncation feature is deprecated, and will raise an
exception in future versions of Python.
-
socket.inet_aton(ip_string)¶ -
Convert an IPv4 address from dotted-quad string format (for example,
‘123.45.67.89’) to 32-bit packed binary format, as a bytes object four characters in
length. This is useful when conversing with a program that uses the standard C
library and needs objects of typestruct in_addr, which is the C type
for the 32-bit packed binary this function returns.inet_aton()also accepts strings with less than three dots; see the
Unix manual page inet(3) for details.If the IPv4 address string passed to this function is invalid,
OSErrorwill be raised. Note that exactly what is valid depends on
the underlying C implementation ofinet_aton().inet_aton()does not support IPv6, andinet_pton()should be used
instead for IPv4/v6 dual stack support.
-
socket.inet_ntoa(packed_ip)¶ -
Convert a 32-bit packed IPv4 address (a bytes-like object four
bytes in length) to its standard dotted-quad string representation (for example,
‘123.45.67.89’). This is useful when conversing with a program that uses the
standard C library and needs objects of typestruct in_addr, which
is the C type for the 32-bit packed binary data this function takes as an
argument.If the byte sequence passed to this function is not exactly 4 bytes in
length,OSErrorwill be raised.inet_ntoa()does not
support IPv6, andinet_ntop()should be used instead for IPv4/v6 dual
stack support.
-
socket.inet_pton(address_family, ip_string)¶ -
Convert an IP address from its family-specific string format to a packed,
binary format.inet_pton()is useful when a library or network protocol
calls for an object of typestruct in_addr(similar to
inet_aton()) orstruct in6_addr.Supported values for address_family are currently
AF_INETand
AF_INET6. If the IP address string ip_string is invalid,
OSErrorwill be raised. Note that exactly what is valid depends on
both the value of address_family and the underlying implementation of
inet_pton().Availability: Unix (maybe not all platforms), Windows.
Changed in version 3.4: Windows support added
-
socket.inet_ntop(address_family, packed_ip)¶ -
Convert a packed IP address (a bytes-like object of some number of
bytes) to its standard, family-specific string representation (for
example,'7.10.0.5'or'5aef:2b::8').
inet_ntop()is useful when a library or network protocol returns an
object of typestruct in_addr(similar toinet_ntoa()) or
struct in6_addr.Supported values for address_family are currently
AF_INETand
AF_INET6. If the bytes object packed_ip is not the correct
length for the specified address family,ValueErrorwill be raised.
OSErroris raised for errors from the call toinet_ntop().Availability: Unix (maybe not all platforms), Windows.
Changed in version 3.4: Windows support added
-
socket.CMSG_LEN(length)¶ -
Return the total length, without trailing padding, of an ancillary
data item with associated data of the given length. This value
can often be used as the buffer size forrecvmsg()to
receive a single item of ancillary data, but RFC 3542 requires
portable applications to useCMSG_SPACE()and thus include
space for padding, even when the item will be the last in the
buffer. RaisesOverflowErrorif length is outside the
permissible range of values.Availability: most Unix platforms, possibly others.
New in version 3.3.
-
socket.CMSG_SPACE(length)¶ -
Return the buffer size needed for
recvmsg()to
receive an ancillary data item with associated data of the given
length, along with any trailing padding. The buffer space needed
to receive multiple items is the sum of theCMSG_SPACE()
values for their associated data lengths. Raises
OverflowErrorif length is outside the permissible range
of values.Note that some systems might support ancillary data without
providing this function. Also note that setting the buffer size
using the results of this function may not precisely limit the
amount of ancillary data that can be received, since additional
data may be able to fit into the padding area.Availability: most Unix platforms, possibly others.
New in version 3.3.
-
socket.getdefaulttimeout()¶ -
Return the default timeout in seconds (float) for new socket objects. A value
ofNoneindicates that new socket objects have no timeout. When the socket
module is first imported, the default isNone.
-
socket.setdefaulttimeout(timeout)¶ -
Set the default timeout in seconds (float) for new socket objects. When
the socket module is first imported, the default isNone. See
settimeout()for possible values and their respective
meanings.
-
socket.sethostname(name)¶ -
Set the machine’s hostname to name. This will raise an
OSErrorif you don’t have enough rights.Availability: Unix.
New in version 3.3.
-
socket.if_nameindex()¶ -
Return a list of network interface information
(index int, name string) tuples.
OSErrorif the system call fails.Availability: Unix.
New in version 3.3.
-
socket.if_nametoindex(if_name)¶ -
Return a network interface index number corresponding to an
interface name.
OSErrorif no interface with the given name exists.Availability: Unix.
New in version 3.3.
-
socket.if_indextoname(if_index)¶ -
Return a network interface name corresponding to an
interface index number.
OSErrorif no interface with the given index exists.Availability: Unix.
New in version 3.3.
18.1.3. Socket Objects
Socket objects have the following methods. Except for
makefile(), these correspond to Unix system calls applicable
to sockets.
Changed in version 3.2: Support for the context manager protocol was added. Exiting the
context manager is equivalent to calling close().
-
socket.accept()¶ -
Accept a connection. The socket must be bound to an address and listening for
connections. The return value is a pair(conn, address)where conn is a
new socket object usable to send and receive data on the connection, and
address is the address bound to the socket on the other end of the connection.The newly created socket is non-inheritable.
Changed in version 3.4: The socket is now non-inheritable.
Changed in version 3.5: If the system call is interrupted and the signal handler does not raise
an exception, the method now retries the system call instead of raising
anInterruptedErrorexception (see PEP 475 for the rationale).
-
socket.bind(address)¶ -
Bind the socket to address. The socket must not already be bound. (The format
of address depends on the address family — see above.)
-
socket.close()¶ -
Mark the socket closed. The underlying system resource (e.g. a file
descriptor) is also closed when all file objects frommakefile()
are closed. Once that happens, all future operations on the socket
object will fail. The remote end will receive no more data (after
queued data is flushed).Sockets are automatically closed when they are garbage-collected, but
it is recommended toclose()them explicitly, or to use a
withstatement around them.Changed in version 3.6:
OSErroris now raised if an error occurs when the underlying
close()call is made.Note
close()releases the resource associated with a connection but
does not necessarily close the connection immediately. If you want
to close the connection in a timely fashion, callshutdown()
beforeclose().
-
socket.connect(address)¶ -
Connect to a remote socket at address. (The format of address depends on the
address family — see above.)If the connection is interrupted by a signal, the method waits until the
connection completes, or raise asocket.timeouton timeout, if the
signal handler doesn’t raise an exception and the socket is blocking or has
a timeout. For non-blocking sockets, the method raises an
InterruptedErrorexception if the connection is interrupted by a
signal (or the exception raised by the signal handler).Changed in version 3.5: The method now waits until the connection completes instead of raising an
InterruptedErrorexception if the connection is interrupted by a
signal, the signal handler doesn’t raise an exception and the socket is
blocking or has a timeout (see the PEP 475 for the rationale).
-
socket.connect_ex(address)¶ -
Like
connect(address), but return an error indicator instead of raising an
exception for errors returned by the C-levelconnect()call (other
problems, such as “host not found,” can still raise exceptions). The error
indicator is0if the operation succeeded, otherwise the value of the
errnovariable. This is useful to support, for example, asynchronous
connects.
-
socket.detach()¶ -
Put the socket object into closed state without actually closing the
underlying file descriptor. The file descriptor is returned, and can
be reused for other purposes.New in version 3.2.
-
socket.dup()¶ -
Duplicate the socket.
The newly created socket is non-inheritable.
Changed in version 3.4: The socket is now non-inheritable.
-
socket.fileno()¶ -
Return the socket’s file descriptor (a small integer), or -1 on failure. This
is useful withselect.select().Under Windows the small integer returned by this method cannot be used where a
file descriptor can be used (such asos.fdopen()). Unix does not have
this limitation.
-
socket.get_inheritable()¶ -
Get the inheritable flag of the socket’s file
descriptor or socket’s handle:Trueif the socket can be inherited in
child processes,Falseif it cannot.New in version 3.4.
-
socket.getpeername()¶ -
Return the remote address to which the socket is connected. This is useful to
find out the port number of a remote IPv4/v6 socket, for instance. (The format
of the address returned depends on the address family — see above.) On some
systems this function is not supported.
-
socket.getsockname()¶ -
Return the socket’s own address. This is useful to find out the port number of
an IPv4/v6 socket, for instance. (The format of the address returned depends on
the address family — see above.)
-
socket.getsockopt(level, optname[, buflen])¶ -
Return the value of the given socket option (see the Unix man page
getsockopt(2)). The needed symbolic constants (SO_*etc.)
are defined in this module. If buflen is absent, an integer option is assumed
and its integer value is returned by the function. If buflen is present, it
specifies the maximum length of the buffer used to receive the option in, and
this buffer is returned as a bytes object. It is up to the caller to decode the
contents of the buffer (see the optional built-in modulestructfor a way
to decode C structures encoded as byte strings).
-
socket.gettimeout()¶ -
Return the timeout in seconds (float) associated with socket operations,
orNoneif no timeout is set. This reflects the last call to
setblocking()orsettimeout().
-
socket.ioctl(control, option)¶ -
Platform: Windows The
ioctl()method is a limited interface to the WSAIoctl system
interface. Please refer to the Win32 documentation for more
information.On other platforms, the generic
fcntl.fcntl()andfcntl.ioctl()
functions may be used; they accept a socket object as their first argument.Currently only the following control codes are supported:
SIO_RCVALL,SIO_KEEPALIVE_VALS, andSIO_LOOPBACK_FAST_PATH.Changed in version 3.6:
SIO_LOOPBACK_FAST_PATHwas added.
-
socket.listen([backlog])¶ -
Enable a server to accept connections. If backlog is specified, it must
be at least 0 (if it is lower, it is set to 0); it specifies the number of
unaccepted connections that the system will allow before refusing new
connections. If not specified, a default reasonable value is chosen.Changed in version 3.5: The backlog parameter is now optional.
-
socket.makefile(mode=’r’, buffering=None, *, encoding=None, errors=None, newline=None)¶ -
Return a file object associated with the socket. The exact returned
type depends on the arguments given tomakefile(). These arguments are
interpreted the same way as by the built-inopen()function, except
the only supported mode values are'r'(default),'w'and'b'.The socket must be in blocking mode; it can have a timeout, but the file
object’s internal buffer may end up in an inconsistent state if a timeout
occurs.Closing the file object returned by
makefile()won’t close the
original socket unless all other file objects have been closed and
socket.close()has been called on the socket object.Note
On Windows, the file-like object created by
makefile()cannot be
used where a file object with a file descriptor is expected, such as the
stream arguments ofsubprocess.Popen().
-
socket.recv(bufsize[, flags])¶ -
Receive data from the socket. The return value is a bytes object representing the
data received. The maximum amount of data to be received at once is specified
by bufsize. See the Unix manual page recv(2) for the meaning of
the optional argument flags; it defaults to zero.Note
For best match with hardware and network realities, the value of bufsize
should be a relatively small power of 2, for example, 4096.Changed in version 3.5: If the system call is interrupted and the signal handler does not raise
an exception, the method now retries the system call instead of raising
anInterruptedErrorexception (see PEP 475 for the rationale).
-
socket.recvfrom(bufsize[, flags])¶ -
Receive data from the socket. The return value is a pair
(bytes, address)
where bytes is a bytes object representing the data received and address is the
address of the socket sending the data. See the Unix manual page
recv(2) for the meaning of the optional argument flags; it defaults
to zero. (The format of address depends on the address family — see above.)Changed in version 3.5: If the system call is interrupted and the signal handler does not raise
an exception, the method now retries the system call instead of raising
anInterruptedErrorexception (see PEP 475 for the rationale).
-
socket.recvmsg(bufsize[, ancbufsize[, flags]])¶ -
Receive normal data (up to bufsize bytes) and ancillary data from
the socket. The ancbufsize argument sets the size in bytes of
the internal buffer used to receive the ancillary data; it defaults
to 0, meaning that no ancillary data will be received. Appropriate
buffer sizes for ancillary data can be calculated using
CMSG_SPACE()orCMSG_LEN(), and items which do not fit
into the buffer might be truncated or discarded. The flags
argument defaults to 0 and has the same meaning as for
recv().The return value is a 4-tuple:
(data, ancdata, msg_flags,. The data item is a
address)bytesobject holding the
non-ancillary data received. The ancdata item is a list of zero
or more tuples(cmsg_level, cmsg_type, cmsg_data)representing
the ancillary data (control messages) received: cmsg_level and
cmsg_type are integers specifying the protocol level and
protocol-specific type respectively, and cmsg_data is a
bytesobject holding the associated data. The msg_flags
item is the bitwise OR of various flags indicating conditions on
the received message; see your system documentation for details.
If the receiving socket is unconnected, address is the address of
the sending socket, if available; otherwise, its value is
unspecified.On some systems,
sendmsg()andrecvmsg()can be used to
pass file descriptors between processes over anAF_UNIX
socket. When this facility is used (it is often restricted to
SOCK_STREAMsockets),recvmsg()will return, in its
ancillary data, items of the form(socket.SOL_SOCKET,, where fds is a
socket.SCM_RIGHTS, fds)bytesobject
representing the new file descriptors as a binary array of the
native Cinttype. Ifrecvmsg()raises an
exception after the system call returns, it will first attempt to
close any file descriptors received via this mechanism.Some systems do not indicate the truncated length of ancillary data
items which have been only partially received. If an item appears
to extend beyond the end of the buffer,recvmsg()will issue
aRuntimeWarning, and will return the part of it which is
inside the buffer provided it has not been truncated before the
start of its associated data.On systems which support the
SCM_RIGHTSmechanism, the
following function will receive up to maxfds file descriptors,
returning the message data and a list containing the descriptors
(while ignoring unexpected conditions such as unrelated control
messages being received). See alsosendmsg().import socket, array def recv_fds(sock, msglen, maxfds): fds = array.array("i") # Array of ints msg, ancdata, flags, addr = sock.recvmsg(msglen, socket.CMSG_LEN(maxfds * fds.itemsize)) for cmsg_level, cmsg_type, cmsg_data in ancdata: if (cmsg_level == socket.SOL_SOCKET and cmsg_type == socket.SCM_RIGHTS): # Append data, ignoring any truncated integers at the end. fds.fromstring(cmsg_data[:len(cmsg_data) - (len(cmsg_data) % fds.itemsize)]) return msg, list(fds)
Availability: most Unix platforms, possibly others.
New in version 3.3.
Changed in version 3.5: If the system call is interrupted and the signal handler does not raise
an exception, the method now retries the system call instead of raising
anInterruptedErrorexception (see PEP 475 for the rationale).
-
socket.recvmsg_into(buffers[, ancbufsize[, flags]])¶ -
Receive normal data and ancillary data from the socket, behaving as
recvmsg()would, but scatter the non-ancillary data into a
series of buffers instead of returning a new bytes object. The
buffers argument must be an iterable of objects that export
writable buffers (e.g.bytearrayobjects); these will be
filled with successive chunks of the non-ancillary data until it
has all been written or there are no more buffers. The operating
system may set a limit (sysconf()valueSC_IOV_MAX)
on the number of buffers that can be used. The ancbufsize and
flags arguments have the same meaning as forrecvmsg().The return value is a 4-tuple:
(nbytes, ancdata, msg_flags,, where nbytes is the total number of bytes of
address)
non-ancillary data written into the buffers, and ancdata,
msg_flags and address are the same as forrecvmsg().Example:
>>> import socket >>> s1, s2 = socket.socketpair() >>> b1 = bytearray(b'----') >>> b2 = bytearray(b'0123456789') >>> b3 = bytearray(b'--------------') >>> s1.send(b'Mary had a little lamb') 22 >>> s2.recvmsg_into([b1, memoryview(b2)[2:9], b3]) (22, [], 0, None) >>> [b1, b2, b3] [bytearray(b'Mary'), bytearray(b'01 had a 9'), bytearray(b'little lamb---')]
Availability: most Unix platforms, possibly others.
New in version 3.3.
-
socket.recvfrom_into(buffer[, nbytes[, flags]])¶ -
Receive data from the socket, writing it into buffer instead of creating a
new bytestring. The return value is a pair(nbytes, address)where nbytes is
the number of bytes received and address is the address of the socket sending
the data. See the Unix manual page recv(2) for the meaning of the
optional argument flags; it defaults to zero. (The format of address
depends on the address family — see above.)
-
socket.recv_into(buffer[, nbytes[, flags]])¶ -
Receive up to nbytes bytes from the socket, storing the data into a buffer
rather than creating a new bytestring. If nbytes is not specified (or 0),
receive up to the size available in the given buffer. Returns the number of
bytes received. See the Unix manual page recv(2) for the meaning
of the optional argument flags; it defaults to zero.
-
socket.send(bytes[, flags])¶ -
Send data to the socket. The socket must be connected to a remote socket. The
optional flags argument has the same meaning as forrecv()above.
Returns the number of bytes sent. Applications are responsible for checking that
all data has been sent; if only some of the data was transmitted, the
application needs to attempt delivery of the remaining data. For further
information on this topic, consult the Socket Programming HOWTO.Changed in version 3.5: If the system call is interrupted and the signal handler does not raise
an exception, the method now retries the system call instead of raising
anInterruptedErrorexception (see PEP 475 for the rationale).
-
socket.sendall(bytes[, flags])¶ -
Send data to the socket. The socket must be connected to a remote socket. The
optional flags argument has the same meaning as forrecv()above.
Unlikesend(), this method continues to send data from bytes until
either all data has been sent or an error occurs.Noneis returned on
success. On error, an exception is raised, and there is no way to determine how
much data, if any, was successfully sent.Changed in version 3.5: The socket timeout is no more reset each time data is sent successfully.
The socket timeout is now the maximum total duration to send all data.Changed in version 3.5: If the system call is interrupted and the signal handler does not raise
an exception, the method now retries the system call instead of raising
anInterruptedErrorexception (see PEP 475 for the rationale).
-
socket.sendto(bytes, address)¶ -
socket.sendto(bytes, flags, address) -
Send data to the socket. The socket should not be connected to a remote socket,
since the destination socket is specified by address. The optional flags
argument has the same meaning as forrecv()above. Return the number of
bytes sent. (The format of address depends on the address family — see
above.)Changed in version 3.5: If the system call is interrupted and the signal handler does not raise
an exception, the method now retries the system call instead of raising
anInterruptedErrorexception (see PEP 475 for the rationale).
-
socket.sendmsg(buffers[, ancdata[, flags[, address]]])¶ -
Send normal and ancillary data to the socket, gathering the
non-ancillary data from a series of buffers and concatenating it
into a single message. The buffers argument specifies the
non-ancillary data as an iterable of
bytes-like objects
(e.g.bytesobjects); the operating system may set a limit
(sysconf()valueSC_IOV_MAX) on the number of buffers
that can be used. The ancdata argument specifies the ancillary
data (control messages) as an iterable of zero or more tuples
(cmsg_level, cmsg_type, cmsg_data), where cmsg_level and
cmsg_type are integers specifying the protocol level and
protocol-specific type respectively, and cmsg_data is a
bytes-like object holding the associated data. Note that
some systems (in particular, systems withoutCMSG_SPACE())
might support sending only one control message per call. The
flags argument defaults to 0 and has the same meaning as for
send(). If address is supplied and notNone, it sets a
destination address for the message. The return value is the
number of bytes of non-ancillary data sent.The following function sends the list of file descriptors fds
over anAF_UNIXsocket, on systems which support the
SCM_RIGHTSmechanism. See alsorecvmsg().import socket, array def send_fds(sock, msg, fds): return sock.sendmsg([msg], [(socket.SOL_SOCKET, socket.SCM_RIGHTS, array.array("i", fds))])
Availability: most Unix platforms, possibly others.
New in version 3.3.
Changed in version 3.5: If the system call is interrupted and the signal handler does not raise
an exception, the method now retries the system call instead of raising
anInterruptedErrorexception (see PEP 475 for the rationale).
-
socket.sendmsg_afalg([msg, ]*, op[, iv[, assoclen[, flags]]])¶ -
Specialized version of
sendmsg()forAF_ALGsocket.
Set mode, IV, AEAD associated data length and flags forAF_ALGsocket.Availability: Linux >= 2.6.38
New in version 3.6.
-
socket.sendfile(file, offset=0, count=None)¶ -
Send a file until EOF is reached by using high-performance
os.sendfileand return the total number of bytes which were sent.
file must be a regular file object opened in binary mode. If
os.sendfileis not available (e.g. Windows) or file is not a
regular filesend()will be used instead. offset tells from where to
start reading the file. If specified, count is the total number of bytes
to transmit as opposed to sending the file until EOF is reached. File
position is updated on return or also in case of error in which case
file.tell()can be used to figure out the number of
bytes which were sent. The socket must be ofSOCK_STREAMtype.
Non-blocking sockets are not supported.New in version 3.5.
-
socket.set_inheritable(inheritable)¶ -
Set the inheritable flag of the socket’s file
descriptor or socket’s handle.New in version 3.4.
-
socket.setblocking(flag)¶ -
Set blocking or non-blocking mode of the socket: if flag is false, the
socket is set to non-blocking, else to blocking mode.This method is a shorthand for certain
settimeout()calls:sock.setblocking(True)is equivalent tosock.settimeout(None)sock.setblocking(False)is equivalent tosock.settimeout(0.0)
-
socket.settimeout(value)¶ -
Set a timeout on blocking socket operations. The value argument can be a
nonnegative floating point number expressing seconds, orNone.
If a non-zero value is given, subsequent socket operations will raise a
timeoutexception if the timeout period value has elapsed before
the operation has completed. If zero is given, the socket is put in
non-blocking mode. IfNoneis given, the socket is put in blocking mode.For further information, please consult the notes on socket timeouts.
-
socket.setsockopt(level, optname, value: int)
-
socket.setsockopt(level, optname, value: buffer)
-
socket.setsockopt(level, optname, None, optlen: int) -
Set the value of the given socket option (see the Unix manual page
setsockopt(2)). The needed symbolic constants are defined in the
socketmodule (SO_*etc.). The value can be an integer,
Noneor a bytes-like object representing a buffer. In the later
case it is up to the caller to ensure that the bytestring contains the
proper bits (see the optional built-in modulestructfor a way to
encode C structures as bytestrings). When value is set toNone,
optlen argument is required. It’s equivalent to call setsockopt C
function with optval=NULL and optlen=optlen.Changed in version 3.6: setsockopt(level, optname, None, optlen: int) form added.
-
socket.shutdown(how)¶ -
Shut down one or both halves of the connection. If how is
SHUT_RD,
further receives are disallowed. If how isSHUT_WR, further sends
are disallowed. If how isSHUT_RDWR, further sends and receives are
disallowed.
-
Duplicate a socket and prepare it for sharing with a target process. The
target process must be provided with process_id. The resulting bytes object
can then be passed to the target process using some form of interprocess
communication and the socket can be recreated there usingfromshare().
Once this method has been called, it is safe to close the socket since
the operating system has already duplicated it for the target process.Availability: Windows.
New in version 3.3.
Note that there are no methods read() or write(); use
recv() and send() without flags argument instead.
Socket objects also have these (read-only) attributes that correspond to the
values given to the socket constructor.
-
socket.family¶ -
The socket family.
-
socket.type¶ -
The socket type.
-
socket.proto¶ -
The socket protocol.
18.1.4. Notes on socket timeouts
A socket object can be in one of three modes: blocking, non-blocking, or
timeout. Sockets are by default always created in blocking mode, but this
can be changed by calling setdefaulttimeout().
- In blocking mode, operations block until complete or the system returns
an error (such as connection timed out). - In non-blocking mode, operations fail (with an error that is unfortunately
system-dependent) if they cannot be completed immediately: functions from the
selectcan be used to know when and whether a socket is available for
reading or writing. - In timeout mode, operations fail if they cannot be completed within the
timeout specified for the socket (they raise atimeoutexception)
or if the system returns an error.
Note
At the operating system level, sockets in timeout mode are internally set
in non-blocking mode. Also, the blocking and timeout modes are shared between
file descriptors and socket objects that refer to the same network endpoint.
This implementation detail can have visible consequences if e.g. you decide
to use the fileno() of a socket.
18.1.4.1. Timeouts and the connect method
The connect() operation is also subject to the timeout
setting, and in general it is recommended to call settimeout()
before calling connect() or pass a timeout parameter to
create_connection(). However, the system network stack may also
return a connection timeout error of its own regardless of any Python socket
timeout setting.
18.1.4.2. Timeouts and the accept method
If getdefaulttimeout() is not None, sockets returned by
the accept() method inherit that timeout. Otherwise, the
behaviour depends on settings of the listening socket:
- if the listening socket is in blocking mode or in timeout mode,
the socket returned byaccept()is in blocking mode; - if the listening socket is in non-blocking mode, whether the socket
returned byaccept()is in blocking or non-blocking mode
is operating system-dependent. If you want to ensure cross-platform
behaviour, it is recommended you manually override this setting.
18.1.5. Example
Here are four minimal example programs using the TCP/IP protocol: a server that
echoes all data that it receives back (servicing only one client), and a client
using it. Note that a server must perform the sequence socket(),
bind(), listen(), accept() (possibly
repeating the accept() to service more than one client), while a
client only needs the sequence socket(), connect(). Also
note that the server does not sendall()/recv() on
the socket it is listening on but on the new socket returned by
accept().
The first two examples support IPv4 only.
# Echo server program import socket HOST = '' # Symbolic name meaning all available interfaces PORT = 50007 # Arbitrary non-privileged port with socket.socket(socket.AF_INET, socket.SOCK_STREAM) as s: s.bind((HOST, PORT)) s.listen(1) conn, addr = s.accept() with conn: print('Connected by', addr) while True: data = conn.recv(1024) if not data: break conn.sendall(data)
# Echo client program import socket HOST = 'daring.cwi.nl' # The remote host PORT = 50007 # The same port as used by the server with socket.socket(socket.AF_INET, socket.SOCK_STREAM) as s: s.connect((HOST, PORT)) s.sendall(b'Hello, world') data = s.recv(1024) print('Received', repr(data))
The next two examples are identical to the above two, but support both IPv4 and
IPv6. The server side will listen to the first address family available (it
should listen to both instead). On most of IPv6-ready systems, IPv6 will take
precedence and the server may not accept IPv4 traffic. The client side will try
to connect to the all addresses returned as a result of the name resolution, and
sends traffic to the first one connected successfully.
# Echo server program import socket import sys HOST = None # Symbolic name meaning all available interfaces PORT = 50007 # Arbitrary non-privileged port s = None for res in socket.getaddrinfo(HOST, PORT, socket.AF_UNSPEC, socket.SOCK_STREAM, 0, socket.AI_PASSIVE): af, socktype, proto, canonname, sa = res try: s = socket.socket(af, socktype, proto) except OSError as msg: s = None continue try: s.bind(sa) s.listen(1) except OSError as msg: s.close() s = None continue break if s is None: print('could not open socket') sys.exit(1) conn, addr = s.accept() with conn: print('Connected by', addr) while True: data = conn.recv(1024) if not data: break conn.send(data)
# Echo client program import socket import sys HOST = 'daring.cwi.nl' # The remote host PORT = 50007 # The same port as used by the server s = None for res in socket.getaddrinfo(HOST, PORT, socket.AF_UNSPEC, socket.SOCK_STREAM): af, socktype, proto, canonname, sa = res try: s = socket.socket(af, socktype, proto) except OSError as msg: s = None continue try: s.connect(sa) except OSError as msg: s.close() s = None continue break if s is None: print('could not open socket') sys.exit(1) with s: s.sendall(b'Hello, world') data = s.recv(1024) print('Received', repr(data))
The next example shows how to write a very simple network sniffer with raw
sockets on Windows. The example requires administrator privileges to modify
the interface:
import socket # the public network interface HOST = socket.gethostbyname(socket.gethostname()) # create a raw socket and bind it to the public interface s = socket.socket(socket.AF_INET, socket.SOCK_RAW, socket.IPPROTO_IP) s.bind((HOST, 0)) # Include IP headers s.setsockopt(socket.IPPROTO_IP, socket.IP_HDRINCL, 1) # receive all packages s.ioctl(socket.SIO_RCVALL, socket.RCVALL_ON) # receive a package print(s.recvfrom(65565)) # disabled promiscuous mode s.ioctl(socket.SIO_RCVALL, socket.RCVALL_OFF)
The next example shows how to use the socket interface to communicate to a CAN
network using the raw socket protocol. To use CAN with the broadcast
manager protocol instead, open a socket with:
socket.socket(socket.AF_CAN, socket.SOCK_DGRAM, socket.CAN_BCM)
After binding (CAN_RAW) or connecting (CAN_BCM) the socket, you
can use the socket.send(), and the socket.recv() operations (and
their counterparts) on the socket object as usual.
This last example might require special privileges:
import socket import struct # CAN frame packing/unpacking (see 'struct can_frame' in <linux/can.h>) can_frame_fmt = "=IB3x8s" can_frame_size = struct.calcsize(can_frame_fmt) def build_can_frame(can_id, data): can_dlc = len(data) data = data.ljust(8, b'x00') return struct.pack(can_frame_fmt, can_id, can_dlc, data) def dissect_can_frame(frame): can_id, can_dlc, data = struct.unpack(can_frame_fmt, frame) return (can_id, can_dlc, data[:can_dlc]) # create a raw socket and bind it to the 'vcan0' interface s = socket.socket(socket.AF_CAN, socket.SOCK_RAW, socket.CAN_RAW) s.bind(('vcan0',)) while True: cf, addr = s.recvfrom(can_frame_size) print('Received: can_id=%x, can_dlc=%x, data=%s' % dissect_can_frame(cf)) try: s.send(cf) except OSError: print('Error sending CAN frame') try: s.send(build_can_frame(0x01, b'x01x02x03')) except OSError: print('Error sending CAN frame')
Running an example several times with too small delay between executions, could
lead to this error:
OSError: [Errno 98] Address already in use
This is because the previous execution has left the socket in a TIME_WAIT
state, and can’t be immediately reused.
There is a socket flag to set, in order to prevent this,
socket.SO_REUSEADDR:
s = socket.socket(socket.AF_INET, socket.SOCK_STREAM) s.setsockopt(socket.SOL_SOCKET, socket.SO_REUSEADDR, 1) s.bind((HOST, PORT))
the SO_REUSEADDR flag tells the kernel to reuse a local socket in
TIME_WAIT state, without waiting for its natural timeout to expire.
See also
For an introduction to socket programming (in C), see the following papers:
- An Introductory 4.3BSD Interprocess Communication Tutorial, by Stuart Sechrest
- An Advanced 4.3BSD Interprocess Communication Tutorial, by Samuel J. Leffler et
al,
both in the UNIX Programmer’s Manual, Supplementary Documents 1 (sections
PS1:7 and PS1:8). The platform-specific reference material for the various
socket-related system calls are also a valuable source of information on the
details of socket semantics. For Unix, refer to the manual pages; for Windows,
see the WinSock (or Winsock 2) specification. For IPv6-ready APIs, readers may
want to refer to RFC 3493 titled Basic Socket Interface Extensions for IPv6.
Sockets and the socket API are used to send messages across a network. They provide a form of inter-process communication (IPC). The network can be a logical, local network to the computer, or one that’s physically connected to an external network, with its own connections to other networks. The obvious example is the Internet, which you connect to via your ISP.
In this tutorial, you’ll create:
- A simple socket server and client
- An improved version that handles multiple connections simultaneously
- A server-client application that functions like a full-fledged socket application, complete with its own custom header and content
By the end of this tutorial, you’ll understand how to use the main functions and methods in Python’s socket module to write your own client-server applications. You’ll know how to use a custom class to send messages and data between endpoints, which you can build upon and utilize for your own applications.
The examples in this tutorial require Python 3.6 or above, and have been tested using Python 3.10. To get the most out of this tutorial, it’s best to download the source code and have it on hand for reference while reading:
Networking and sockets are large subjects. Literal volumes have been written about them. If you’re new to sockets or networking, it’s completely normal if you feel overwhelmed with all of the terms and pieces.
Don’t be discouraged though. This tutorial is for you! As with anything Python-related, you can learn a little bit at a time. Bookmark this article and come back when you’re ready for the next section.
Background
Sockets have a long history. Their use originated with ARPANET in 1971 and later became an API in the Berkeley Software Distribution (BSD) operating system released in 1983 called Berkeley sockets.
When the Internet took off in the 1990s with the World Wide Web, so did network programming. Web servers and browsers weren’t the only applications taking advantage of newly connected networks and using sockets. Client-server applications of all types and sizes came into widespread use.
Today, although the underlying protocols used by the socket API have evolved over the years, and new ones have developed, the low-level API has remained the same.
The most common type of socket applications are client-server applications, where one side acts as the server and waits for connections from clients. This is the type of application that you’ll be creating in this tutorial. More specifically, you’ll focus on the socket API for Internet sockets, sometimes called Berkeley or BSD sockets. There are also Unix domain sockets, which can only be used to communicate between processes on the same host.
Socket API Overview
Python’s socket module provides an interface to the Berkeley sockets API. This is the module that you’ll use in this tutorial.
The primary socket API functions and methods in this module are:
socket().bind().listen().accept().connect().connect_ex().send().recv().close()
Python provides a convenient and consistent API that maps directly to system calls, their C counterparts. In the next section, you’ll learn how these are used together.
As part of its standard library, Python also has classes that make using these low-level socket functions easier. Although it’s not covered in this tutorial, you can check out the socketserver module, a framework for network servers. There are also many modules available that implement higher-level Internet protocols like HTTP and SMTP. For an overview, see Internet Protocols and Support.
TCP Sockets
You’re going to create a socket object using socket.socket(), specifying the socket type as socket.SOCK_STREAM. When you do that, the default protocol that’s used is the Transmission Control Protocol (TCP). This is a good default and probably what you want.
Why should you use TCP? The Transmission Control Protocol (TCP):
- Is reliable: Packets dropped in the network are detected and retransmitted by the sender.
- Has in-order data delivery: Data is read by your application in the order it was written by the sender.
In contrast, User Datagram Protocol (UDP) sockets created with socket.SOCK_DGRAM aren’t reliable, and data read by the receiver can be out-of-order from the sender’s writes.
Why is this important? Networks are a best-effort delivery system. There’s no guarantee that your data will reach its destination or that you’ll receive what’s been sent to you.
Network devices, such as routers and switches, have finite bandwidth available and come with their own inherent system limitations. They have CPUs, memory, buses, and interface packet buffers, just like your clients and servers. TCP relieves you from having to worry about packet loss, out-of-order data arrival, and other pitfalls that invariably happen when you’re communicating across a network.
To better understand this, check out the sequence of socket API calls and data flow for TCP:
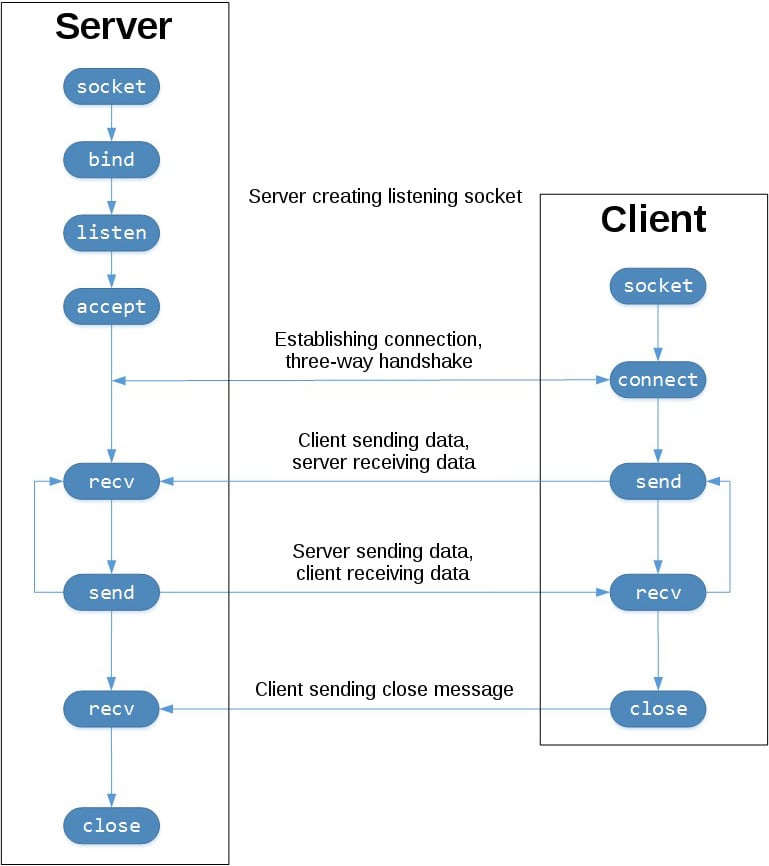
The left-hand column represents the server. On the right-hand side is the client.
Starting in the top left-hand column, note the API calls that the server makes to set up a “listening” socket:
socket().bind().listen().accept()
A listening socket does just what its name suggests. It listens for connections from clients. When a client connects, the server calls .accept() to accept, or complete, the connection.
The client calls .connect() to establish a connection to the server and initiate the three-way handshake. The handshake step is important because it ensures that each side of the connection is reachable in the network, in other words that the client can reach the server and vice-versa. It may be that only one host, client, or server can reach the other.
In the middle is the round-trip section, where data is exchanged between the client and server using calls to .send() and .recv().
At the bottom, the client and server close their respective sockets.
Echo Client and Server
Now that you’ve gotten an overview of the socket API and how the client and server communicate, you’re ready to create your first client and server. You’ll begin with a simple implementation. The server will simply echo whatever it receives back to the client.
Echo Server
Here’s the server:
# echo-server.py
import socket
HOST = "127.0.0.1" # Standard loopback interface address (localhost)
PORT = 65432 # Port to listen on (non-privileged ports are > 1023)
with socket.socket(socket.AF_INET, socket.SOCK_STREAM) as s:
s.bind((HOST, PORT))
s.listen()
conn, addr = s.accept()
with conn:
print(f"Connected by {addr}")
while True:
data = conn.recv(1024)
if not data:
break
conn.sendall(data)
Okay, so what exactly is happening in the API call?
socket.socket() creates a socket object that supports the context manager type, so you can use it in a with statement. There’s no need to call s.close():
with socket.socket(socket.AF_INET, socket.SOCK_STREAM) as s:
pass # Use the socket object without calling s.close().
The arguments passed to socket() are constants used to specify the address family and socket type. AF_INET is the Internet address family for IPv4. SOCK_STREAM is the socket type for TCP, the protocol that will be used to transport messages in the network.
The .bind() method is used to associate the socket with a specific network interface and port number:
# echo-server.py
# ...
with socket.socket(socket.AF_INET, socket.SOCK_STREAM) as s:
s.bind((HOST, PORT))
# ...
The values passed to .bind() depend on the address family of the socket. In this example, you’re using socket.AF_INET (IPv4). So it expects a two-tuple: (host, port).
host can be a hostname, IP address, or empty string. If an IP address is used, host should be an IPv4-formatted address string. The IP address 127.0.0.1 is the standard IPv4 address for the loopback interface, so only processes on the host will be able to connect to the server. If you pass an empty string, the server will accept connections on all available IPv4 interfaces.
port represents the TCP port number to accept connections on from clients. It should be an integer from 1 to 65535, as 0 is reserved. Some systems may require superuser privileges if the port number is less than 1024.
Here’s a note on using hostnames with .bind():
“If you use a hostname in the host portion of IPv4/v6 socket address, the program may show a non-deterministic behavior, as Python uses the first address returned from the DNS resolution. The socket address will be resolved differently into an actual IPv4/v6 address, depending on the results from DNS resolution and/or the host configuration. For deterministic behavior use a numeric address in host portion.” (Source)
You’ll learn more about this later, in Using Hostnames. For now, just understand that when using a hostname, you could see different results depending on what’s returned from the name resolution process. These results could be anything. The first time you run your application, you might get the address 10.1.2.3. The next time, you get a different address, 192.168.0.1. The third time, you could get 172.16.7.8, and so on.
In the server example, .listen() enables a server to accept connections. It makes the server a “listening” socket:
# echo-server.py
# ...
with socket.socket(socket.AF_INET, socket.SOCK_STREAM) as s:
s.bind((HOST, PORT))
s.listen()
conn, addr = s.accept()
# ...
The .listen() method has a backlog parameter. It specifies the number of unaccepted connections that the system will allow before refusing new connections. Starting in Python 3.5, it’s optional. If not specified, a default backlog value is chosen.
If your server receives a lot of connection requests simultaneously, increasing the backlog value may help by setting the maximum length of the queue for pending connections. The maximum value is system dependent. For example, on Linux, see /proc/sys/net/core/somaxconn.
The .accept() method blocks execution and waits for an incoming connection. When a client connects, it returns a new socket object representing the connection and a tuple holding the address of the client. The tuple will contain (host, port) for IPv4 connections or (host, port, flowinfo, scopeid) for IPv6. See Socket Address Families in the reference section for details on the tuple values.
One thing that’s imperative to understand is that you now have a new socket object from .accept(). This is important because it’s the socket that you’ll use to communicate with the client. It’s distinct from the listening socket that the server is using to accept new connections:
# echo-server.py
# ...
with socket.socket(socket.AF_INET, socket.SOCK_STREAM) as s:
s.bind((HOST, PORT))
s.listen()
conn, addr = s.accept()
with conn:
print(f"Connected by {addr}")
while True:
data = conn.recv(1024)
if not data:
break
conn.sendall(data)
After .accept() provides the client socket object conn, an infinite while loop is used to loop over blocking calls to conn.recv(). This reads whatever data the client sends and echoes it back using conn.sendall().
If conn.recv() returns an empty bytes object, b'', that signals that the client closed the connection and the loop is terminated. The with statement is used with conn to automatically close the socket at the end of the block.
Echo Client
Now let’s look at the client:
# echo-client.py
import socket
HOST = "127.0.0.1" # The server's hostname or IP address
PORT = 65432 # The port used by the server
with socket.socket(socket.AF_INET, socket.SOCK_STREAM) as s:
s.connect((HOST, PORT))
s.sendall(b"Hello, world")
data = s.recv(1024)
print(f"Received {data!r}")
In comparison to the server, the client is pretty simple. It creates a socket object, uses .connect() to connect to the server and calls s.sendall() to send its message. Lastly, it calls s.recv() to read the server’s reply and then prints it.
Running the Echo Client and Server
In this section, you’ll run the client and server to see how they behave and inspect what’s happening.
Open a terminal or command prompt, navigate to the directory that contains your scripts, ensure that you have Python 3.6 or above installed and on your path, then run the server:
Your terminal will appear to hang. That’s because the server is blocked, or suspended, on .accept():
# echo-server.py
# ...
with socket.socket(socket.AF_INET, socket.SOCK_STREAM) as s:
s.bind((HOST, PORT))
s.listen()
conn, addr = s.accept()
with conn:
print(f"Connected by {addr}")
while True:
data = conn.recv(1024)
if not data:
break
conn.sendall(data)
It’s waiting for a client connection. Now, open another terminal window or command prompt and run the client:
$ python echo-client.py
Received b'Hello, world'
In the server window, you should notice something like this:
$ python echo-server.py
Connected by ('127.0.0.1', 64623)
In the output above, the server printed the addr tuple returned from s.accept(). This is the client’s IP address and TCP port number. The port number, 64623, will most likely be different when you run it on your machine.
Viewing Socket State
To see the current state of sockets on your host, use netstat. It’s available by default on macOS, Linux, and Windows.
Here’s the netstat output from macOS after starting the server:
$ netstat -an
Active Internet connections (including servers)
Proto Recv-Q Send-Q Local Address Foreign Address (state)
tcp4 0 0 127.0.0.1.65432 *.* LISTEN
Notice that Local Address is 127.0.0.1.65432. If echo-server.py had used HOST = "" instead of HOST = "127.0.0.1", netstat would show this:
$ netstat -an
Active Internet connections (including servers)
Proto Recv-Q Send-Q Local Address Foreign Address (state)
tcp4 0 0 *.65432 *.* LISTEN
Local Address is *.65432, which means all available host interfaces that support the address family will be used to accept incoming connections. In this example, socket.AF_INET was used (IPv4) in the call to socket(). You can see this in the Proto column: tcp4.
The output above is trimmed to show the echo server only. You’ll likely see much more output, depending on the system you’re running it on. The things to notice are the columns Proto, Local Address, and (state). In the last example above, netstat shows that the echo server is using an IPv4 TCP socket (tcp4), on port 65432 on all interfaces (*.65432), and it’s in the listening state (LISTEN).
Another way to access this, along with additional helpful information, is to use lsof (list open files). It’s available by default on macOS and can be installed on Linux using your package manager, if it’s not already:
$ lsof -i -n
COMMAND PID USER FD TYPE DEVICE SIZE/OFF NODE NAME
Python 67982 nathan 3u IPv4 0xecf272 0t0 TCP *:65432 (LISTEN)
lsof gives you the COMMAND, PID (process ID), and USER (user ID) of open Internet sockets when used with the -i option. Above is the echo server process.
netstat and lsof have a lot of options available and differ depending on the OS that you’re running them on. Check the man page or documentation for both. They’re definitely worth spending a little time with and getting to know. You’ll be rewarded. On macOS and Linux, use man netstat and man lsof. For Windows, use netstat /?.
Here’s a common error that you’ll encounter when a connection attempt is made to a port with no listening socket:
$ python echo-client.py
Traceback (most recent call last):
File "./echo-client.py", line 9, in <module>
s.connect((HOST, PORT))
ConnectionRefusedError: [Errno 61] Connection refused
Either the specified port number is wrong or the server isn’t running. Or maybe there’s a firewall in the path that’s blocking the connection, which can be easy to forget about. You may also see the error Connection timed out. Get a firewall rule added that allows the client to connect to the TCP port!
There’s a list of common errors in the reference section.
Communication Breakdown
Now you’ll take a closer look at how the client and server communicated with each other:
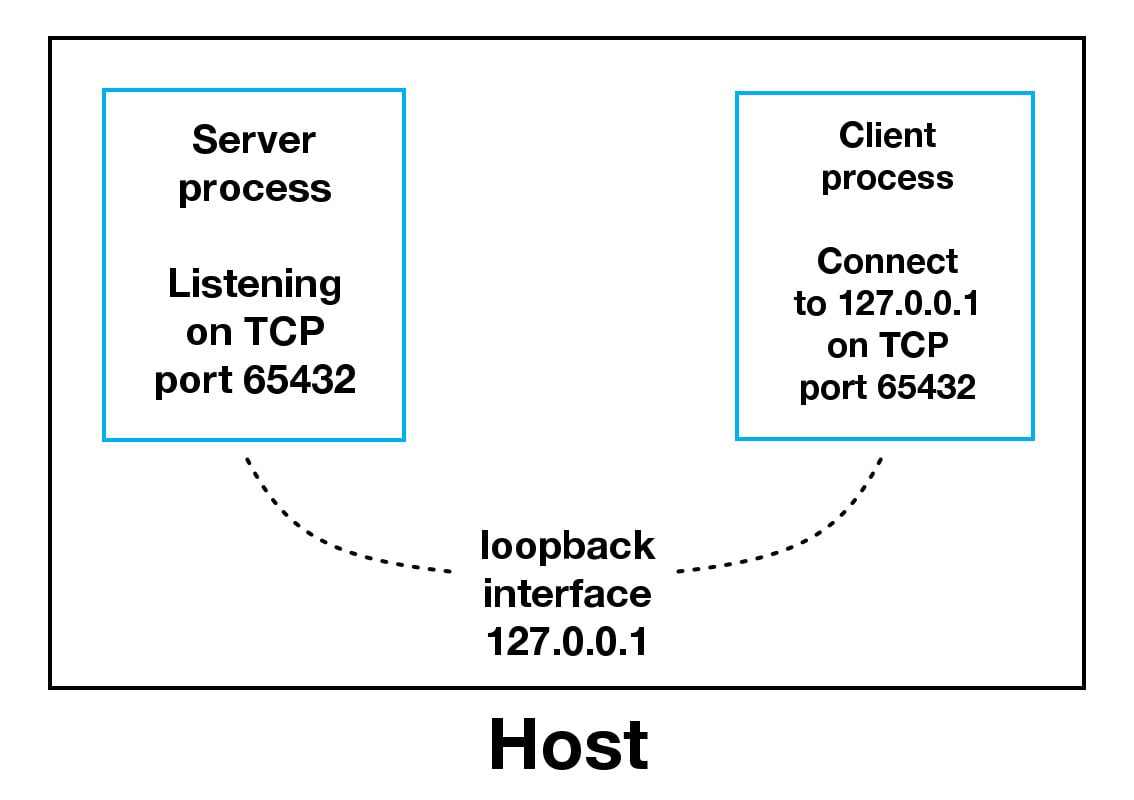
When using the loopback interface (IPv4 address 127.0.0.1 or IPv6 address ::1), data never leaves the host or touches the external network. In the diagram above, the loopback interface is contained inside the host. This represents the internal nature of the loopback interface and shows that connections and data that transit it are local to the host. This is why you’ll also hear the loopback interface and IP address 127.0.0.1 or ::1 referred to as “localhost.”
Applications use the loopback interface to communicate with other processes running on the host and for security and isolation from the external network. Because it’s internal and accessible only from within the host, it’s not exposed.
You can see this in action if you have an application server that uses its own private database. If it’s not a database used by other servers, it’s probably configured to listen for connections on the loopback interface only. If this is the case, other hosts on the network can’t connect to it.
When you use an IP address other than 127.0.0.1 or ::1 in your applications, it’s probably bound to an Ethernet interface that’s connected to an external network. This is your gateway to other hosts outside of your “localhost” kingdom:
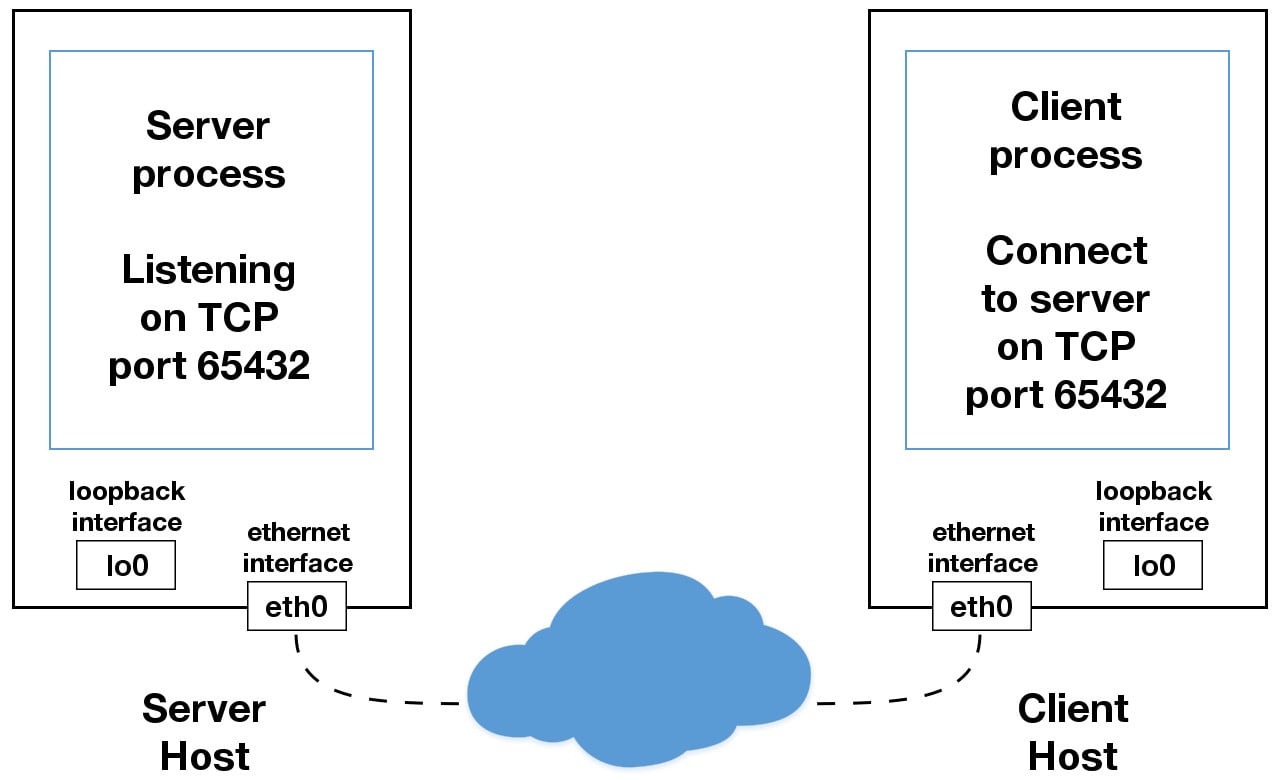
Be careful out there. It’s a nasty, cruel world. Be sure to read the section Using Hostnames before venturing from the safe confines of “localhost.” There’s a security note that applies even if you’re not using hostnames but are using IP addresses only.
Handling Multiple Connections
The echo server definitely has its limitations. The biggest one is that it serves only one client and then exits. The echo client has this limitation too, but there’s an additional problem. When the client uses s.recv(), it’s possible that it will return only one byte, b'H' from b'Hello, world':
# echo-client.py
# ...
with socket.socket(socket.AF_INET, socket.SOCK_STREAM) as s:
s.connect((HOST, PORT))
s.sendall(b"Hello, world")
data = s.recv(1024)
print(f"Received {data!r}")
The bufsize argument of 1024 used above is the maximum amount of data to be received at once. It doesn’t mean that .recv() will return 1024 bytes.
The .send() method also behaves this way. It returns the number of bytes sent, which may be less than the size of the data passed in. You’re responsible for checking this and calling .send() as many times as needed to send all of the data:
“Applications are responsible for checking that all data has been sent; if only some of the data was transmitted, the application needs to attempt delivery of the remaining data.” (Source)
In the example above, you avoided having to do this by using .sendall():
“Unlike send(), this method continues to send data from bytes until either all data has been sent or an error occurs.
Noneis returned on success.” (Source)
You have two problems at this point:
- How do you handle multiple connections concurrently?
- You need to call
.send()and.recv()until all data is sent or received.
What can you do? There are many approaches to concurrency. A popular approach is to use Asynchronous I/O. asyncio was introduced into the standard library in Python 3.4. The traditional choice is to use threads.
The trouble with concurrency is it’s hard to get right. There are many subtleties to consider and guard against. All it takes is for one of these to manifest itself and your application may suddenly fail in not-so-subtle ways.
This isn’t meant to scare you away from learning and using concurrent programming. If your application needs to scale, it’s a necessity if you want to use more than one processor or one core. However, for this tutorial, you’ll use something that’s even more traditional than threads and easier to reason about. You’re going to use the granddaddy of system calls: .select().
The .select() method allows you to check for I/O completion on more than one socket. So you can call .select() to see which sockets have I/O ready for reading and/or writing. But this is Python, so there’s more. You’re going to use the selectors module in the standard library so that the most efficient implementation is used, regardless of the operating system you happen to be running on:
“This module allows high-level and efficient I/O multiplexing, built upon the select module primitives. Users are encouraged to use this module instead, unless they want precise control over the OS-level primitives used.” (Source)
Still, by using .select(), you’re not able to run concurrently. That said, depending on your workload, this approach may still be plenty fast. It depends on what your application needs to do when it services a request, and the number of clients it needs to support.
asyncio uses single-threaded cooperative multitasking and an event loop to manage tasks. With .select(), you’ll be writing your own version of an event loop, albeit more simply and synchronously. When using multiple threads, even though you have concurrency, you currently have to use the GIL (Global Interpreter Lock) with CPython and PyPy. This effectively limits the amount of work you can do in parallel anyway.
This is all to say that using .select() may be a perfectly fine choice. Don’t feel like you have to use asyncio, threads, or the latest asynchronous library. Typically, in a network application, your application is I/O bound anyway: it could be waiting on the local network, for endpoints on the other side of the network, for disk writes, and so forth.
If you’re getting requests from clients that initiate CPU bound work, look at the concurrent.futures module. It contains the class ProcessPoolExecutor, which uses a pool of processes to execute calls asynchronously.
If you use multiple processes, the operating system is able to schedule your Python code to run in parallel on multiple processors or cores, without the GIL. For ideas and inspiration, see the PyCon talk John Reese — Thinking Outside the GIL with AsyncIO and Multiprocessing — PyCon 2018.
In the next section, you’ll look at examples of a server and client that address these problems. They use .select() to handle multiple connections simultaneously and call .send() and .recv() as many times as needed.
Multi-Connection Client and Server
In the next two sections, you’ll create a server and client that handles multiple connections using a selector object created from the selectors module.
Multi-Connection Server
First, turn your attention to the multi-connection server. The first part sets up the listening socket:
# multiconn-server.py
import sys
import socket
import selectors
import types
sel = selectors.DefaultSelector()
# ...
host, port = sys.argv[1], int(sys.argv[2])
lsock = socket.socket(socket.AF_INET, socket.SOCK_STREAM)
lsock.bind((host, port))
lsock.listen()
print(f"Listening on {(host, port)}")
lsock.setblocking(False)
sel.register(lsock, selectors.EVENT_READ, data=None)
The biggest difference between this server and the echo server is the call to lsock.setblocking(False) to configure the socket in non-blocking mode. Calls made to this socket will no longer block. When it’s used with sel.select(), as you’ll see below, you can wait for events on one or more sockets and then read and write data when it’s ready.
sel.register() registers the socket to be monitored with sel.select() for the events that you’re interested in. For the listening socket, you want read events: selectors.EVENT_READ.
To store whatever arbitrary data you’d like along with the socket, you’ll use data. It’s returned when .select() returns. You’ll use data to keep track of what’s been sent and received on the socket.
Next is the event loop:
# multiconn-server.py
# ...
try:
while True:
events = sel.select(timeout=None)
for key, mask in events:
if key.data is None:
accept_wrapper(key.fileobj)
else:
service_connection(key, mask)
except KeyboardInterrupt:
print("Caught keyboard interrupt, exiting")
finally:
sel.close()
sel.select(timeout=None) blocks until there are sockets ready for I/O. It returns a list of tuples, one for each socket. Each tuple contains a key and a mask. The key is a SelectorKey namedtuple that contains a fileobj attribute. key.fileobj is the socket object, and mask is an event mask of the operations that are ready.
If key.data is None, then you know it’s from the listening socket and you need to accept the connection. You’ll call your own accept_wrapper() function to get the new socket object and register it with the selector. You’ll look at that in a moment.
If key.data is not None, then you know it’s a client socket that’s already been accepted, and you need to service it. service_connection() is then called with key and mask as arguments, and that’s everything you need to operate on the socket.
Here’s what your accept_wrapper() function does:
# multiconn-server.py
# ...
def accept_wrapper(sock):
conn, addr = sock.accept() # Should be ready to read
print(f"Accepted connection from {addr}")
conn.setblocking(False)
data = types.SimpleNamespace(addr=addr, inb=b"", outb=b"")
events = selectors.EVENT_READ | selectors.EVENT_WRITE
sel.register(conn, events, data=data)
# ...
Because the listening socket was registered for the event selectors.EVENT_READ, it should be ready to read. You call sock.accept() and then call conn.setblocking(False) to put the socket in non-blocking mode.
Remember, this is the main objective in this version of the server because you don’t want it to block. If it blocks, then the entire server is stalled until it returns. That means other sockets are left waiting even though the server isn’t actively working. This is the dreaded “hang” state that you don’t want your server to be in.
Next, you create an object to hold the data that you want included along with the socket using a SimpleNamespace. Because you want to know when the client connection is ready for reading and writing, both of those events are set with the bitwise OR operator:
# multiconn-server.py
# ...
def accept_wrapper(sock):
conn, addr = sock.accept() # Should be ready to read
print(f"Accepted connection from {addr}")
conn.setblocking(False)
data = types.SimpleNamespace(addr=addr, inb=b"", outb=b"")
events = selectors.EVENT_READ | selectors.EVENT_WRITE
sel.register(conn, events, data=data)
# ...
The events mask, socket, and data objects are then passed to sel.register().
Now take a look at service_connection() to see how a client connection is handled when it’s ready:
# multiconn-server.py
# ...
def service_connection(key, mask):
sock = key.fileobj
data = key.data
if mask & selectors.EVENT_READ:
recv_data = sock.recv(1024) # Should be ready to read
if recv_data:
data.outb += recv_data
else:
print(f"Closing connection to {data.addr}")
sel.unregister(sock)
sock.close()
if mask & selectors.EVENT_WRITE:
if data.outb:
print(f"Echoing {data.outb!r} to {data.addr}")
sent = sock.send(data.outb) # Should be ready to write
data.outb = data.outb[sent:]
# ...
This is the heart of the simple multi-connection server. key is the namedtuple returned from .select() that contains the socket object (fileobj) and data object. mask contains the events that are ready.
If the socket is ready for reading, then mask & selectors.EVENT_READ will evaluate to True, so sock.recv() is called. Any data that’s read is appended to data.outb so that it can be sent later.
Note the else: block to check if no data is received:
# multiconn-server.py
# ...
def service_connection(key, mask):
sock = key.fileobj
data = key.data
if mask & selectors.EVENT_READ:
recv_data = sock.recv(1024) # Should be ready to read
if recv_data:
data.outb += recv_data
else:
print(f"Closing connection to {data.addr}")
sel.unregister(sock)
sock.close()
if mask & selectors.EVENT_WRITE:
if data.outb:
print(f"Echoing {data.outb!r} to {data.addr}")
sent = sock.send(data.outb) # Should be ready to write
data.outb = data.outb[sent:]
# ...
If no data is received, this means that the client has closed their socket, so the server should too. But don’t forget to call sel.unregister() before closing, so it’s no longer monitored by .select().
When the socket is ready for writing, which should always be the case for a healthy socket, any received data stored in data.outb is echoed to the client using sock.send(). The bytes sent are then removed from the send buffer:
# multiconn-server.py
# ...
def service_connection(key, mask):
# ...
if mask & selectors.EVENT_WRITE:
if data.outb:
print(f"Echoing {data.outb!r} to {data.addr}")
sent = sock.send(data.outb) # Should be ready to write
data.outb = data.outb[sent:]
# ...
The .send() method returns the number of bytes sent. This number can then be used with slice notation on the .outb buffer to discard the bytes sent.
Multi-Connection Client
Now take a look at the multi-connection client, multiconn-client.py. It’s very similar to the server, but instead of listening for connections, it starts by initiating connections via start_connections():
# multiconn-client.py
import sys
import socket
import selectors
import types
sel = selectors.DefaultSelector()
messages = [b"Message 1 from client.", b"Message 2 from client."]
def start_connections(host, port, num_conns):
server_addr = (host, port)
for i in range(0, num_conns):
connid = i + 1
print(f"Starting connection {connid} to {server_addr}")
sock = socket.socket(socket.AF_INET, socket.SOCK_STREAM)
sock.setblocking(False)
sock.connect_ex(server_addr)
events = selectors.EVENT_READ | selectors.EVENT_WRITE
data = types.SimpleNamespace(
connid=connid,
msg_total=sum(len(m) for m in messages),
recv_total=0,
messages=messages.copy(),
outb=b"",
)
sel.register(sock, events, data=data)
# ...
num_conns is read from the command-line and is the number of connections to create to the server. Just like the server, each socket is set to non-blocking mode.
You use .connect_ex() instead of .connect() because .connect() would immediately raise a BlockingIOError exception. The .connect_ex() method initially returns an error indicator, errno.EINPROGRESS, instead of raising an exception that would interfere with the connection in progress. Once the connection is completed, the socket is ready for reading and writing and is returned by .select().
After the socket is set up, the data you want to store with the socket is created using SimpleNamespace. The messages that the client will send to the server are copied using messages.copy() because each connection will call socket.send() and modify the list. Everything needed to keep track of what the client needs to send, has sent, and has received, including the total number of bytes in the messages, is stored in the object data.
Check out the changes made from the server’s service_connection() for the client’s version:
def service_connection(key, mask):
sock = key.fileobj
data = key.data
if mask & selectors.EVENT_READ:
recv_data = sock.recv(1024) # Should be ready to read
if recv_data:
- data.outb += recv_data
+ print(f"Received {recv_data!r} from connection {data.connid}")
+ data.recv_total += len(recv_data)
- else:
- print(f"Closing connection {data.connid}")
+ if not recv_data or data.recv_total == data.msg_total:
+ print(f"Closing connection {data.connid}")
sel.unregister(sock)
sock.close()
if mask & selectors.EVENT_WRITE:
+ if not data.outb and data.messages:
+ data.outb = data.messages.pop(0)
if data.outb:
- print(f"Echoing {data.outb!r} to {data.addr}")
+ print(f"Sending {data.outb!r} to connection {data.connid}")
sent = sock.send(data.outb) # Should be ready to write
data.outb = data.outb[sent:]
It’s fundamentally the same but for one important difference. The client keeps track of the number of bytes it’s received from the server so that it can close its side of the connection. When the server detects this, it closes its side of the connection too.
Note that by doing this, the server depends on the client being well-behaved: the server expects the client to close its side of the connection when it’s done sending messages. If the client doesn’t close, the server will leave the connection open. In a real application, you may want to guard against this in your server by implementing a timeout to prevent client connections from accumulating if they don’t send a request after a certain amount of time.
Running the Multi-Connection Client and Server
Now it’s time to run multiconn-server.py and multiconn-client.py. They both use command-line arguments. You can run them without arguments to see the options.
For the server, pass host and port numbers:
$ python multiconn-server.py
Usage: multiconn-server.py <host> <port>
For the client, also pass the number of connections to create to the server, num_connections:
$ python multiconn-client.py
Usage: multiconn-client.py <host> <port> <num_connections>
Below is the server output when listening on the loopback interface on port 65432:
$ python multiconn-server.py 127.0.0.1 65432
Listening on ('127.0.0.1', 65432)
Accepted connection from ('127.0.0.1', 61354)
Accepted connection from ('127.0.0.1', 61355)
Echoing b'Message 1 from client.Message 2 from client.' to ('127.0.0.1', 61354)
Echoing b'Message 1 from client.Message 2 from client.' to ('127.0.0.1', 61355)
Closing connection to ('127.0.0.1', 61354)
Closing connection to ('127.0.0.1', 61355)
Below is the client output when it creates two connections to the server above:
$ python multiconn-client.py 127.0.0.1 65432 2
Starting connection 1 to ('127.0.0.1', 65432)
Starting connection 2 to ('127.0.0.1', 65432)
Sending b'Message 1 from client.' to connection 1
Sending b'Message 2 from client.' to connection 1
Sending b'Message 1 from client.' to connection 2
Sending b'Message 2 from client.' to connection 2
Received b'Message 1 from client.Message 2 from client.' from connection 1
Closing connection 1
Received b'Message 1 from client.Message 2 from client.' from connection 2
Closing connection 2
Great! Now you’ve run the multi-connection client and server. In the next section, you’ll take this example even further.
Application Client and Server
The multi-connection client and server example is definitely an improvement compared with where you started. However, now you can take one more step and address the shortcomings of the previous multiconn example in a final implementation: the application client and server.
You want a client and server that handle errors appropriately so that other connections aren’t affected. Obviously, your client or server shouldn’t come crashing down in a ball of fury if an exception isn’t caught. This is something you haven’t had to worry about until now, because the examples have intentionally left out error handling for brevity and clarity.
Now that you’re familiar with the basic API, non-blocking sockets, and .select(), you can add some error handling and address the elephant in the room, which the examples have kept hidden from you behind that large curtain over there. Remember that custom class that was mentioned way back in the introduction? That’s what you’re going to explore next.
First, you’ll address the errors:
“All errors raise exceptions. The normal exceptions for invalid argument types and out-of-memory conditions can be raised; starting from Python 3.3, errors related to socket or address semantics raise
OSErroror one of its subclasses.” (Source)
So, one thing you need to do is catch OSError. Another important consideration in relation to errors is timeouts. You’ll see them discussed in many places in the documentation. Timeouts happen and are a so-called normal error. Hosts and routers are rebooted, switch ports go bad, cables go bad, cables get unplugged, you name it. You should be prepared for these and other errors, handling them in your code.
What about the elephant in the room? As hinted by the socket type socket.SOCK_STREAM, when using TCP, you’re reading from a continuous stream of bytes. It’s like reading from a file on disk, but instead you’re reading bytes from the network. However, unlike reading a file, there’s no f.seek().
In other words, you can’t reposition the socket pointer, if there was one, and move around the data.
When bytes arrive at your socket, there are network buffers involved. Once you’ve read them, they need to be saved somewhere, or else you will have dropped them. Calling .recv() again reads the next stream of bytes available from the socket.
You’ll be reading from the socket in chunks. So, you need to call .recv() and save the data in a buffer until you’ve read enough bytes to have a complete message that makes sense to your application.
It’s up to you to define and keep track of where the message boundaries are. As far as the TCP socket is concerned, it’s just sending and receiving raw bytes to and from the network. It knows nothing about what those raw bytes mean.
This is why you need to define an application-layer protocol. What’s an application-layer protocol? Put simply, your application will send and receive messages. The format of these messages are your application’s protocol.
In other words, the length and format that you choose for these messages define the semantics and behavior of your application. This is directly related to what you learned in the previous paragraph regarding reading bytes from the socket. When you’re reading bytes with .recv(), you need to keep up with how many bytes were read, and figure out where the message boundaries are.
How can you do this? One way is to always send fixed-length messages. If they’re always the same size, then it’s easy. When you’ve read that number of bytes into a buffer, then you know you have one complete message.
However, using fixed-length messages is inefficient for small messages where you’d need to use padding to fill them out. Also, you’re still left with the problem of what to do about data that doesn’t fit into one message.
In this tutorial, you’ll learn a generic approach, one that’s used by many protocols, including HTTP. You’ll prefix messages with a header that includes the content length as well as any other fields you need. By doing this, you’ll only need to keep up with the header. Once you’ve read the header, you can process it to determine the length of the message’s content. With the content length, you can then read that number of bytes to consume it.
You’ll implement this by creating a custom class that can send and receive messages that contain text or binary data. You can improve and extend this class for your own applications. The most important thing is that you’ll be able to see an example of how this is done.
Before you get started, there’s something you need to know regarding sockets and bytes. As you learned earlier, when sending and receiving data via sockets, you’re sending and receiving raw bytes.
If you receive data and want to use it in a context where it’s interpreted as multiple bytes, for example a 4-byte integer, you’ll need to take into account that it could be in a format that’s not native to your machine’s CPU. The client or server on the other end could have a CPU that uses a different byte order than your own. If this is the case, then you’ll need to convert it to your host’s native byte order before using it.
This byte order is referred to as a CPU’s endianness. See Byte Endianness in the reference section for details. You’ll avoid this issue by taking advantage of Unicode for your message header and using the encoding UTF-8. Since UTF-8 uses an 8-bit encoding, there are no byte ordering issues.
You can find an explanation in Python’s Encodings and Unicode documentation. Note that this applies to the text header only. You’ll use an explicit type and encoding defined in the header for the content that’s being sent, the message payload. This will allow you to transfer any data that you’d like (text or binary), in any format.
You can easily determine the byte order of your machine by using sys.byteorder. For example, you could see something like this:
$ python -c 'import sys; print(repr(sys.byteorder))'
'little'
If you run this in a virtual machine that emulates a big-endian CPU (PowerPC), then something like this happens:
$ python -c 'import sys; print(repr(sys.byteorder))'
'big'
In this example application, your application-layer protocol defines the header as Unicode text with a UTF-8 encoding. For the actual content in the message, the message payload, you’ll still have to swap the byte order manually if needed.
This will depend on your application and whether or not it needs to process multi-byte binary data from a machine with a different endianness. You can help your client or server implement binary support by adding additional headers and using them to pass parameters, similar to HTTP.
Don’t worry if this doesn’t make sense yet. In the next section, you’ll see how all of this works and fits together.
Sending an Application Message
There’s still a bit of a problem. You have a variable-length header, which is nice and flexible, but how do you know the length of the header when reading it with .recv()?
When you previously learned about using .recv() and message boundaries, you also learned that fixed-length headers can be inefficient. That’s true, but you’re going to use a small, 2-byte, fixed-length header to prefix the JSON header that contains its length.
You can think of this as a hybrid approach to sending messages. In effect, you’re bootstrapping the message receive process by sending the length of the header first. This makes it easy for your receiver to deconstruct the message.
To give you a better idea of the message format, check out a message in its entirety:
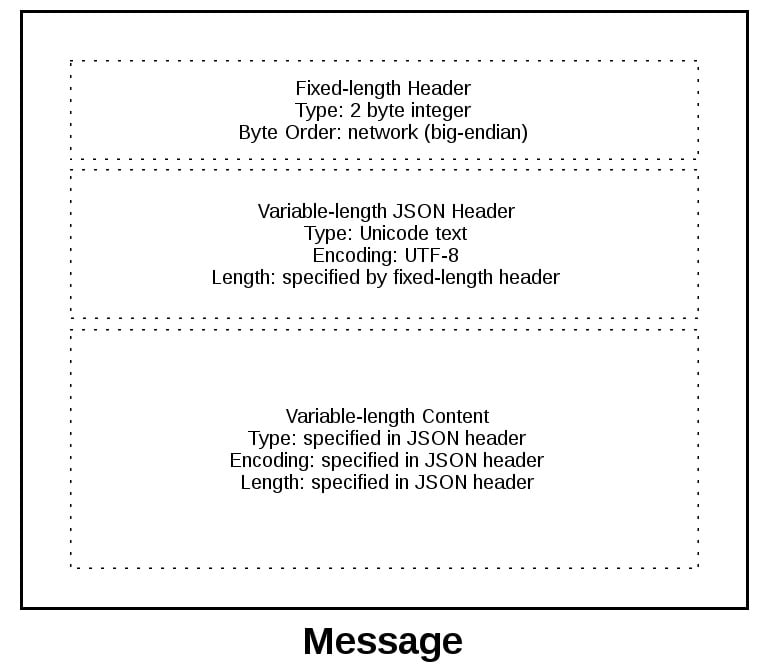
A message starts with a fixed-length header of two bytes, which is an integer in network byte order. This is the length of the next header, the variable-length JSON header. Once you’ve read two bytes with .recv(), then you know you can process the two bytes as an integer and then read that number of bytes before decoding the UTF-8 JSON header.
The JSON header contains a dictionary of additional headers. One of those is content-length, which is the number of bytes of the message’s content (not including the JSON header). Once you’ve called .recv() and read content-length bytes, then you’ve reached a message boundary, meaning you’ve read an entire message.
Application Message Class
Finally, the payoff! In this section, you’ll study the Message class and see how it’s used with .select() when read and write events happen on the socket.
This example application reflects what types of messages a client and server could reasonably use. You’re far beyond toy echo clients and servers at this point!
To keep things simple and still demonstrate how things would work in a real application, this example uses an application protocol that implements a basic search feature. The client sends a search request and the server does a lookup for a match. If the request sent by the client isn’t recognized as a search, the server assumes it’s a binary request and returns a binary response.
After reading the following sections, running the examples, and experimenting with the code, you’ll see how things work. You can then use the Message class as a starting point and modify it for your own use.
The application is not that far off from the multiconn client and server example. The event loop code stays the same in app-client.py and app-server.py. What you’re going to do is move the message code into a class named Message and add methods to support reading, writing, and processing of the headers and content. This is a great example for using a class.
As you learned before and you’ll see below, working with sockets involves keeping state. By using a class, you keep all of the state, data, and code bundled together in an organized unit. An instance of the class is created for each socket in the client and server when a connection is started or accepted.
The class is mostly the same for both the client and the server for the wrapper and utility methods. They start with an underscore, like Message._json_encode(). These methods simplify working with the class. They help other methods by allowing them to stay shorter and support the DRY principle.
The server’s Message class works in essentially the same way as the client’s and vice-versa. The difference is that the client initiates the connection and sends a request message, followed by processing the server’s response message. Conversely, the server waits for a connection, processes the client’s request message, and then sends a response message.
It looks like this:
| Step | Endpoint | Action / Message Content |
|---|---|---|
| 1 | Client | Sends a Message containing request content |
| 2 | Server | Receives and processes client request Message |
| 3 | Server | Sends a Message containing response content |
| 4 | Client | Receives and processes server response Message |
Here’s the file and code layout:
| Application | File | Code |
|---|---|---|
| Server | app-server.py |
The server’s main script |
| Server | libserver.py |
The server’s Message class |
| Client | app-client.py |
The client’s main script |
| Client | libclient.py |
The client’s Message class |
Message Entry Point
Understanding how the Message class works can be a challenge because there’s an aspect of its design that might not be immediately obvious. Why? Managing state.
After a Message object is created, it’s associated with a socket that’s monitored for events using selector.register():
# app-server.py
# ...
def accept_wrapper(sock):
conn, addr = sock.accept() # Should be ready to read
print(f"Accepted connection from {addr}")
conn.setblocking(False)
message = libserver.Message(sel, conn, addr)
sel.register(conn, selectors.EVENT_READ, data=message)
# ...
When events are ready on the socket, they’re returned by selector.select(). You can then get a reference back to the message object using the data attribute on the key object and call a method in Message:
# app-server.py
# ...
try:
while True:
events = sel.select(timeout=None)
for key, mask in events:
if key.data is None:
accept_wrapper(key.fileobj)
else:
message = key.data
try:
message.process_events(mask)
# ...
# ...
Looking at the event loop above, you’ll see that sel.select() is in the driver’s seat. It’s blocking, waiting at the top of the loop for events. It’s responsible for waking up when read and write events are ready to be processed on the socket. Which means, indirectly, it’s also responsible for calling the method .process_events(). That’s why .process_events() is the entry point.
Here’s what the .process_events() method does:
# libserver.py
# ...
class Message:
def __init__(self, selector, sock, addr):
# ...
# ...
def process_events(self, mask):
if mask & selectors.EVENT_READ:
self.read()
if mask & selectors.EVENT_WRITE:
self.write()
# ...
That’s good: .process_events() is simple. It can only do two things: call .read() and .write().
This is where managing state comes in. If another method depended on state variables having a certain value, then they would only be called from .read() and .write(). This keeps the logic as simple as possible as events come in on the socket for processing.
You might be tempted to use a mix of some methods that check the current state variables and, depending on their value, call other methods to process data outside .read() or .write(). In the end, this would likely prove too complex to manage and keep up with.
You should definitely modify the class to suit your own needs so that it works best for you, but you’ll probably have the best results if you keep the state checks and the calls to methods that depend on that state to the .read() and .write() methods if possible.
Now look at .read(). This is the server’s version, but the client’s is the same. It just uses a different method name, .process_response() instead of .process_request():
# libserver.py
# ...
class Message:
# ...
def read(self):
self._read()
if self._jsonheader_len is None:
self.process_protoheader()
if self._jsonheader_len is not None:
if self.jsonheader is None:
self.process_jsonheader()
if self.jsonheader:
if self.request is None:
self.process_request()
# ...
The ._read() method is called first. It calls socket.recv() to read data from the socket and store it in a receive buffer.
Remember that when socket.recv() is called, all of the data that makes up a complete message may not have arrived yet. socket.recv() may need to be called again. This is why there are state checks for each part of the message before the appropriate method to process it is called.
Before a method processes its part of the message, it first checks to make sure enough bytes have been read into the receive buffer. If they have, it processes its respective bytes, removes them from the buffer and writes its output to a variable that’s used by the next processing stage. Because there are three components to a message, there are three state checks and process method calls:
| Message Component | Method | Output |
|---|---|---|
| Fixed-length header | process_protoheader() |
self._jsonheader_len |
| JSON header | process_jsonheader() |
self.jsonheader |
| Content | process_request() |
self.request |
Next, check out .write(). This is the server’s version:
# libserver.py
# ...
class Message:
# ...
def write(self):
if self.request:
if not self.response_created:
self.create_response()
self._write()
# ...
The .write() method checks first for a request. If one exists and a response hasn’t been created, .create_response() is called. The .create_response() method sets the state variable response_created and writes the response to the send buffer.
The ._write() method calls socket.send() if there’s data in the send buffer.
Remember that when socket.send() is called, all of the data in the send buffer may not have been queued for transmission. The network buffers for the socket may be full, and socket.send() may need to be called again. This is why there are state checks. The .create_response() method should only be called once, but it’s expected that ._write() will need to be called multiple times.
The client version of .write() is similar:
# libclient.py
# ...
class Message:
def __init__(self, selector, sock, addr, request):
# ...
def write(self):
if not self._request_queued:
self.queue_request()
self._write()
if self._request_queued:
if not self._send_buffer:
# Set selector to listen for read events, we're done writing.
self._set_selector_events_mask("r")
# ...
Because the client initiates a connection to the server and sends a request first, the state variable _request_queued is checked. If a request hasn’t been queued, it calls .queue_request(). The queue_request() method creates the request and writes it to the send buffer. It also sets the state variable _request_queued so that it’s only called once.
Just like for the server, ._write() calls socket.send() if there’s data in the send buffer.
The notable difference in the client’s version of .write() is the last check to see if the request has been queued. This will be explained more in the section Client Main Script, but the reason for this is to tell selector.select() to stop monitoring the socket for write events. If the request has been queued and the send buffer is empty, then you’re done writing and you’re only interested in read events. There’s no reason to be notified that the socket is writable.
To wrap up this section, consider this thought: the main purpose of this section was to explain that selector.select() is calling into the Message class via the method .process_events() and to describe how state is managed.
This is important because .process_events() will be called many times over the life of the connection. Therefore, make sure that any methods that should only be called once are either checking a state variable themselves, or the state variable set by the method is checked by the caller.
Server Main Script
In the server’s main script app-server.py, arguments are read from the command line that specify the interface and port to listen on:
$ python app-server.py
Usage: app-server.py <host> <port>
For example, to listen on the loopback interface on port 65432, enter:
$ python app-server.py 127.0.0.1 65432
Listening on ('127.0.0.1', 65432)
Use an empty string for <host> to listen on all interfaces.
After creating the socket, a call is made to socket.setsockopt() with the option socket.SO_REUSEADDR:
# app-server.py
# ...
host, port = sys.argv[1], int(sys.argv[2])
lsock = socket.socket(socket.AF_INET, socket.SOCK_STREAM)
# Avoid bind() exception: OSError: [Errno 48] Address already in use
lsock.setsockopt(socket.SOL_SOCKET, socket.SO_REUSEADDR, 1)
lsock.bind((host, port))
lsock.listen()
print(f"Listening on {(host, port)}")
lsock.setblocking(False)
sel.register(lsock, selectors.EVENT_READ, data=None)
# ...
Setting this socket option avoids the error Address already in use. You’ll see this when starting the server on a port that has connections in the TIME_WAIT state.
For example, if the server actively closed a connection, it’ll remain in the TIME_WAIT state for two minutes or more, depending on the operating system. If you try to start the server again before the TIME_WAIT state expires, then you’ll get an OSError exception of Address already in use. This is a safeguard to make sure that any delayed packets in the network aren’t delivered to the wrong application.
The event loop catches any errors so that the server can stay up and continue to run:
# app-server.py
# ...
try:
while True:
events = sel.select(timeout=None)
for key, mask in events:
if key.data is None:
accept_wrapper(key.fileobj)
else:
message = key.data
try:
message.process_events(mask)
except Exception:
print(
f"Main: Error: Exception for {message.addr}:n"
f"{traceback.format_exc()}"
)
message.close()
except KeyboardInterrupt:
print("Caught keyboard interrupt, exiting")
finally:
sel.close()
When a client connection is accepted, a Message object is created:
# app-server.py
# ...
def accept_wrapper(sock):
conn, addr = sock.accept() # Should be ready to read
print(f"Accepted connection from {addr}")
conn.setblocking(False)
message = libserver.Message(sel, conn, addr)
sel.register(conn, selectors.EVENT_READ, data=message)
# ...
The Message object is associated with the socket in the call to sel.register() and is initially set to be monitored for read events only. Once the request has been read, you’ll modify it to listen for write events only.
An advantage of taking this approach in the server is that in most cases, when a socket is healthy and there are no network issues, it’ll always be writable.
If you told sel.register() to also monitor EVENT_WRITE, then the event loop would immediately wake up and notify you that this is the case. However, at this point, there’s no reason to wake up and call .send() on the socket. There’s no response to send, because a request hasn’t been processed yet. This would consume and waste valuable CPU cycles.
Server Message Class
In the section Message Entry Point, you learned how the Message object was called into action when socket events were ready via .process_events(). Now you’ll learn what happens as data is read on the socket and a component, or piece, of the message is ready to be processed by the server.
The server’s message class is in libserver.py, which is part of the source code you downloaded earlier. You can also download the code by clicking the link below:
The methods appear in the class in the order in which processing takes place for a message.
When the server has read at least two bytes, the fixed-length header can be processed:
# libserver.py
# ...
class Message:
def __init__(self, selector, sock, addr):
# ...
# ...
def process_protoheader(self):
hdrlen = 2
if len(self._recv_buffer) >= hdrlen:
self._jsonheader_len = struct.unpack(
">H", self._recv_buffer[:hdrlen]
)[0]
self._recv_buffer = self._recv_buffer[hdrlen:]
# ...
The fixed-length header is a 2-byte integer in network, or big-endian, byte order. It contains the length of the JSON header. You’ll use struct.unpack() to read the value, decode it, and store it in self._jsonheader_len. After processing the piece of the message it’s responsible for, .process_protoheader() removes it from the receive buffer.
Just like with the fixed-length header, when there’s enough data in the receive buffer to contain the JSON header, it can be processed as well:
# libserver.py
# ...
class Message:
# ...
def process_jsonheader(self):
hdrlen = self._jsonheader_len
if len(self._recv_buffer) >= hdrlen:
self.jsonheader = self._json_decode(
self._recv_buffer[:hdrlen], "utf-8"
)
self._recv_buffer = self._recv_buffer[hdrlen:]
for reqhdr in (
"byteorder",
"content-length",
"content-type",
"content-encoding",
):
if reqhdr not in self.jsonheader:
raise ValueError(f"Missing required header '{reqhdr}'.")
# ...
The method self._json_decode() is called to decode and deserialize the JSON header into a dictionary. Because the JSON header is defined as Unicode with a UTF-8 encoding, utf-8 is hardcoded in the call. The result is saved to self.jsonheader. After processing the piece of the message that it’s responsible for, process_jsonheader() removes it from the receive buffer.
Next is the actual content, or payload, of the message. It’s described by the JSON header in self.jsonheader. When content-length bytes are available in the receive buffer, the request can be processed:
# libserver.py
# ...
class Message:
# ...
def process_request(self):
content_len = self.jsonheader["content-length"]
if not len(self._recv_buffer) >= content_len:
return
data = self._recv_buffer[:content_len]
self._recv_buffer = self._recv_buffer[content_len:]
if self.jsonheader["content-type"] == "text/json":
encoding = self.jsonheader["content-encoding"]
self.request = self._json_decode(data, encoding)
print(f"Received request {self.request!r} from {self.addr}")
else:
# Binary or unknown content-type
self.request = data
print(
f"Received {self.jsonheader['content-type']} "
f"request from {self.addr}"
)
# Set selector to listen for write events, we're done reading.
self._set_selector_events_mask("w")
# ...
After saving the message content to the data variable, .process_request() removes it from the receive buffer. Then, if the content type is JSON, .process_request() decodes and deserializes it. If it’s not, this example application assumes that it’s a binary request and simply prints the content type.
The last thing .process_request() does is modify the selector to monitor write events only. In the server’s main script, app-server.py, the socket is initially set to monitor read events only. Now that the request has been fully processed, you’re no longer interested in reading.
A response can now be created and written to the socket. When the socket is writable, .create_response() is called from .write():
# libserver.py
# ...
class Message:
# ...
def create_response(self):
if self.jsonheader["content-type"] == "text/json":
response = self._create_response_json_content()
else:
# Binary or unknown content-type
response = self._create_response_binary_content()
message = self._create_message(**response)
self.response_created = True
self._send_buffer += message
A response is created by calling other methods, depending on the content type. In this example application, a simple dictionary lookup is done for JSON requests when action == 'search'. For your own applications, you can define other methods that get called here.
After creating the response message, the state variable self.response_created is set so that .write() doesn’t call .create_response() again. Finally, the response is appended to the send buffer. This is seen by and sent via ._write().
One tricky bit to figure out is how to close the connection after the response is written. You can put the call to .close() in the method ._write():
# libserver.py
# ...
class Message:
# ...
def _write(self):
if self._send_buffer:
print(f"Sending {self._send_buffer!r} to {self.addr}")
try:
# Should be ready to write
sent = self.sock.send(self._send_buffer)
except BlockingIOError:
# Resource temporarily unavailable (errno EWOULDBLOCK)
pass
else:
self._send_buffer = self._send_buffer[sent:]
# Close when the buffer is drained. The response has been sent.
if sent and not self._send_buffer:
self.close()
# ...
Although it’s somewhat hidden, this is an acceptable trade-off given that the Message class only handles one message per connection. After the response is written, there’s nothing left for the server to do. It’s completed its work.
Client Main Script
In the client’s main script, app-client.py, arguments are read from the command line and used to create requests and start connections to the server:
$ python app-client.py
Usage: app-client.py <host> <port> <action> <value>
Here’s an example:
$ python app-client.py 127.0.0.1 65432 search needle
After creating a dictionary representing the request from the command-line arguments, the host, port, and request dictionary are passed to .start_connection():
# app-client.py
# ...
def start_connection(host, port, request):
addr = (host, port)
print(f"Starting connection to {addr}")
sock = socket.socket(socket.AF_INET, socket.SOCK_STREAM)
sock.setblocking(False)
sock.connect_ex(addr)
events = selectors.EVENT_READ | selectors.EVENT_WRITE
message = libclient.Message(sel, sock, addr, request)
sel.register(sock, events, data=message)
# ...
A socket is created for the server connection, as well as a Message object using the request dictionary.
Like for the server, the Message object is associated with the socket in the call to sel.register(). However, for the client, the socket is initially set to be monitored for both read and write events. Once the request has been written, you’ll modify it to listen for read events only.
This approach gives you the same advantage as the server: not wasting CPU cycles. After the request has been sent, you’re no longer interested in write events, so there’s no reason to wake up and process them.
Client Message Class
In the section Message Entry Point, you learned how the message object was called into action when socket events were ready via .process_events(). Now you’ll learn what happens after data is read and written on the socket and a message is ready to be processed by the client.
The client’s message class is in libclient.py, which is part of the source code you downloaded earlier. You can also download the code by clicking the link below:
The methods appear in the class in the order in which processing takes place for a message.
The first task for the client is to queue the request:
# libclient.py
# ...
class Message:
# ...
def queue_request(self):
content = self.request["content"]
content_type = self.request["type"]
content_encoding = self.request["encoding"]
if content_type == "text/json":
req = {
"content_bytes": self._json_encode(content, content_encoding),
"content_type": content_type,
"content_encoding": content_encoding,
}
else:
req = {
"content_bytes": content,
"content_type": content_type,
"content_encoding": content_encoding,
}
message = self._create_message(**req)
self._send_buffer += message
self._request_queued = True
# ...
The dictionaries used to create the request, depending on what was passed on the command line, are in the client’s main script, app-client.py. The request dictionary is passed as an argument to the class when a Message object is created.
The request message is created and appended to the send buffer, which is then seen by and sent via ._write(). The state variable self._request_queued is set so that .queue_request() isn’t called again.
After the request has been sent, the client waits for a response from the server.
The methods for reading and processing a message in the client are the same as for the server. As response data is read from the socket, the process header methods are called: .process_protoheader() and .process_jsonheader().
The difference is in the naming of the final process methods and the fact that they’re processing a response, not creating one: .process_response(), ._process_response_json_content(), and ._process_response_binary_content().
Last, but certainly not least, is the final call for .process_response():
# libclient.py
# ...
class Message:
# ...
def process_response(self):
# ...
# Close when response has been processed
self.close()
# ...
Message Class Wrapup
To conclude your learning about the Message class, it’s worth mentioning a couple of things that are important to notice with a few of the supporting methods.
Any exceptions raised by the class are caught by the main script in the except clause inside the event loop:
# app-client.py
# ...
try:
while True:
events = sel.select(timeout=1)
for key, mask in events:
message = key.data
try:
message.process_events(mask)
except Exception:
print(
f"Main: Error: Exception for {message.addr}:n"
f"{traceback.format_exc()}"
)
message.close()
# Check for a socket being monitored to continue.
if not sel.get_map():
break
except KeyboardInterrupt:
print("Caught keyboard interrupt, exiting")
finally:
sel.close()
Note the line: message.close().
This is a really important line, for more than one reason! Not only does it make sure that the socket is closed, but message.close() also removes the socket from being monitored by .select(). This greatly simplifies the code in the class and reduces complexity. If there’s an exception or you explicitly raise one yourself, you know .close() will take care of the cleanup.
The methods Message._read() and Message._write() also contain something interesting:
# libclient.py
# ...
class Message:
# ...
def _read(self):
try:
# Should be ready to read
data = self.sock.recv(4096)
except BlockingIOError:
# Resource temporarily unavailable (errno EWOULDBLOCK)
pass
else:
if data:
self._recv_buffer += data
else:
raise RuntimeError("Peer closed.")
# ...
Note the except BlockingIOError: line.
The ._write() method has one too. These lines are important because they catch a temporary error and skip over it using pass. The temporary error is when the socket would block, for example if it’s waiting on the network or the other end of the connection, also known as its peer.
By catching and skipping over the exception with pass, .select() will eventually trigger a new call, and you’ll get another chance to read or write the data.
Running the Application Client and Server
After all of this hard work, it’s time to have some fun and run some searches!
In these examples, you’ll run the server so that it listens on all interfaces by passing an empty string for the host argument. This will allow you to run the client and connect from a virtual machine that’s on another network. It emulates a big-endian PowerPC machine.
First, start the server:
$ python app-server.py '' 65432
Listening on ('', 65432)
Now run the client and enter a search. See if you can find him:
$ python app-client.py 10.0.1.1 65432 search morpheus
Starting connection to ('10.0.1.1', 65432)
Sending b'x00d{"byteorder": "big", "content-type": "text/json", "content-encoding": "utf-8", "content-length": 41}{"action": "search", "value": "morpheus"}' to ('10.0.1.1', 65432)
Received response {'result': 'Follow the white rabbit. 🐰'} from ('10.0.1.1', 65432)
Got result: Follow the white rabbit. 🐰
Closing connection to ('10.0.1.1', 65432)
You might notice that the terminal is running a shell that’s using a text encoding of Unicode (UTF-8), so the output above prints nicely with emojis.
Now see if you can find the puppies:
$ python app-client.py 10.0.1.1 65432 search 🐶
Starting connection to ('10.0.1.1', 65432)
Sending b'x00d{"byteorder": "big", "content-type": "text/json", "content-encoding": "utf-8", "content-length": 37}{"action": "search", "value": "xf0x9fx90xb6"}' to ('10.0.1.1', 65432)
Received response {'result': '🐾 Playing ball! 🏐'} from ('10.0.1.1', 65432)
Got result: 🐾 Playing ball! 🏐
Closing connection to ('10.0.1.1', 65432)
Notice the byte string sent over the network for the request in the sending line. It’s easier to see if you look for the bytes printed in hex that represent the puppy emoji: xf0x9fx90xb6. If your terminal is using Unicode with the encoding UTF-8, you’ll be able to enter the emoji for the search.
This demonstrates that you’re sending raw bytes over the network and they need to be decoded by the receiver to be interpreted correctly. This is why you went to all of the trouble to create a header that contains the content type and encoding.
Here’s the server output from both client connections above:
Accepted connection from ('10.0.2.2', 55340)
Received request {'action': 'search', 'value': 'morpheus'} from ('10.0.2.2', 55340)
Sending b'x00g{"byteorder": "little", "content-type": "text/json", "content-encoding": "utf-8", "content-length": 43}{"result": "Follow the white rabbit. xf0x9fx90xb0"}' to ('10.0.2.2', 55340)
Closing connection to ('10.0.2.2', 55340)
Accepted connection from ('10.0.2.2', 55338)
Received request {'action': 'search', 'value': '🐶'} from ('10.0.2.2', 55338)
Sending b'x00g{"byteorder": "little", "content-type": "text/json", "content-encoding": "utf-8", "content-length": 37}{"result": "xf0x9fx90xbe Playing ball! xf0x9fx8fx90"}' to ('10.0.2.2', 55338)
Closing connection to ('10.0.2.2', 55338)
Look at the sending line to see the bytes that were written to the client’s socket. This is the server’s response message.
You can also test sending binary requests to the server if the action argument is anything other than search:
$ python app-client.py 10.0.1.1 65432 binary 😃
Starting connection to ('10.0.1.1', 65432)
Sending b'x00|{"byteorder": "big", "content-type": "binary/custom-client-binary-type", "content-encoding": "binary", "content-length": 10}binaryxf0x9fx98x83' to ('10.0.1.1', 65432)
Received binary/custom-server-binary-type response from ('10.0.1.1', 65432)
Got response: b'First 10 bytes of request: binaryxf0x9fx98x83'
Closing connection to ('10.0.1.1', 65432)
Because the request’s content-type is not text/json, the server treats it as a custom binary type and doesn’t perform JSON decoding. It simply prints the content-type and returns the first ten bytes to the client:
$ python app-server.py '' 65432
Listening on ('', 65432)
Accepted connection from ('10.0.2.2', 55320)
Received binary/custom-client-binary-type request from ('10.0.2.2', 55320)
Sending b'x00x7f{"byteorder": "little", "content-type": "binary/custom-server-binary-type", "content-encoding": "binary", "content-length": 37}First 10 bytes of request: binaryxf0x9fx98x83' to ('10.0.2.2', 55320)
Closing connection to ('10.0.2.2', 55320)
Troubleshooting
Inevitably, something won’t work, and you’ll be wondering what to do. Don’t worry, it happens to everyone. Hopefully, with the help of this tutorial, your debugger, and your favorite search engine, you’ll be able to get going again with the source code part.
If not, your first stop should be Python’s socket module documentation. Make sure you read all of the documentation for each function or method you’re calling. Also, read through the Reference section below for ideas. In particular, check the Errors section.
Sometimes, it’s not all about the source code. The source code might be correct, and it’s just the other host, the client, or server. Or it could be the network. Maybe a router, firewall, or some other networking device is playing man-in-the-middle.
For these types of issues, additional tools are essential. Below are a few tools and utilities that might help or at least provide some clues.
ping
ping will check if a host is alive and connected to the network by sending an ICMP echo request. It communicates directly with the operating system’s TCP/IP protocol stack, so it works independently from any application running on the host.
Below is an example of running ping on macOS:
$ ping -c 3 127.0.0.1
PING 127.0.0.1 (127.0.0.1): 56 data bytes
64 bytes from 127.0.0.1: icmp_seq=0 ttl=64 time=0.058 ms
64 bytes from 127.0.0.1: icmp_seq=1 ttl=64 time=0.165 ms
64 bytes from 127.0.0.1: icmp_seq=2 ttl=64 time=0.164 ms
--- 127.0.0.1 ping statistics ---
3 packets transmitted, 3 packets received, 0.0% packet loss
round-trip min/avg/max/stddev = 0.058/0.129/0.165/0.050 ms
Note the statistics at the end of the output. This can be helpful when you’re trying to discover intermittent connectivity problems. For example, is there any packet loss? How much latency is there? You can check the round-trip times.
If there’s a firewall between you and the other host, a ping’s echo request may not be allowed. Some firewall administrators implement policies that enforce this. The idea is that they don’t want their hosts to be discoverable. If this is the case and you have firewall rules added to allow the hosts to communicate, then make sure that the rules also allow ICMP to pass between them.
ICMP is the protocol used by ping, but it’s also the protocol TCP and other lower-level protocols use to communicate error messages. If you’re experiencing strange behavior or slow connections, this could be the reason.
ICMP messages are identified by type and code. To give you an idea of the important information they carry, here are a few:
| ICMP Type | ICMP Code | Description |
|---|---|---|
| 8 | 0 | Echo request |
| 0 | 0 | Echo reply |
| 3 | 0 | Destination network unreachable |
| 3 | 1 | Destination host unreachable |
| 3 | 2 | Destination protocol unreachable |
| 3 | 3 | Destination port unreachable |
| 3 | 4 | Fragmentation required, and DF flag set |
| 11 | 0 | TTL expired in transit |
See the article Path MTU Discovery for information regarding fragmentation and ICMP messages. This is an example of something that can cause strange behavior.
netstat
In the section Viewing Socket State, you learned how netstat can be used to display information about sockets and their current state. This utility is available on macOS, Linux, and Windows.
That section didn’t mention the columns Recv-Q and Send-Q in the example output. These columns will show you the number of bytes that are held in network buffers that are queued for transmission or receipt, but for some reason haven’t been read or written by the remote or local application.
In other words, the bytes are waiting in network buffers in the operating system’s queues. One reason could be that the application is CPU bound or is otherwise unable to call socket.recv() or socket.send() and process the bytes. Or there could be network issues affecting communications, like congestion or failing network hardware or cabling.
To demonstrate this and see how much data you can send before seeing an error, you can try out a test client that connects to a test server and repeatedly calls socket.send(). The test server never calls socket.recv(). It just accepts the connection. This causes the network buffers on the server to fill, which eventually raises an error on the client.
First, start the server:
$ python app-server-test.py 127.0.0.1 65432
Listening on ('127.0.0.1', 65432)
Then run the client to see what the error is:
$ python app-client-test.py 127.0.0.1 65432 binary test
Error: socket.send() blocking io exception for ('127.0.0.1', 65432):
BlockingIOError(35, 'Resource temporarily unavailable')
Here’s netstat output from while the client and server are still running, with the client printing out the error message above multiple times:
$ netstat -an | grep 65432
Proto Recv-Q Send-Q Local Address Foreign Address (state)
tcp4 408300 0 127.0.0.1.65432 127.0.0.1.53225 ESTABLISHED
tcp4 0 269868 127.0.0.1.53225 127.0.0.1.65432 ESTABLISHED
tcp4 0 0 127.0.0.1.65432 *.* LISTEN
The first entry is the server (Local Address has port 65432):
Proto Recv-Q Send-Q Local Address Foreign Address (state)
tcp4 408300 0 127.0.0.1.65432 127.0.0.1.53225 ESTABLISHED
Notice the Recv-Q: 408300.
The second entry is the client (Foreign Address has port 65432):
Proto Recv-Q Send-Q Local Address Foreign Address (state)
tcp4 0 269868 127.0.0.1.53225 127.0.0.1.65432 ESTABLISHED
Notice the Send-Q: 269868.
The client sure was trying to write bytes, but the server wasn’t reading them. This caused the server’s network buffer queue to fill on the receive side and the client’s network buffer queue to fill on the send side.
Windows
If you work with Windows, there’s a suite of utilities that you should definitely check out if you haven’t already: Windows Sysinternals.
One of them is TCPView.exe. TCPView is a graphical netstat for Windows. In addition to addresses, port numbers, and socket state, it’ll show you running totals for the number of packets and bytes sent and received. Like with the Unix utility lsof, you also get the process name and ID. Check the menus for other display options.
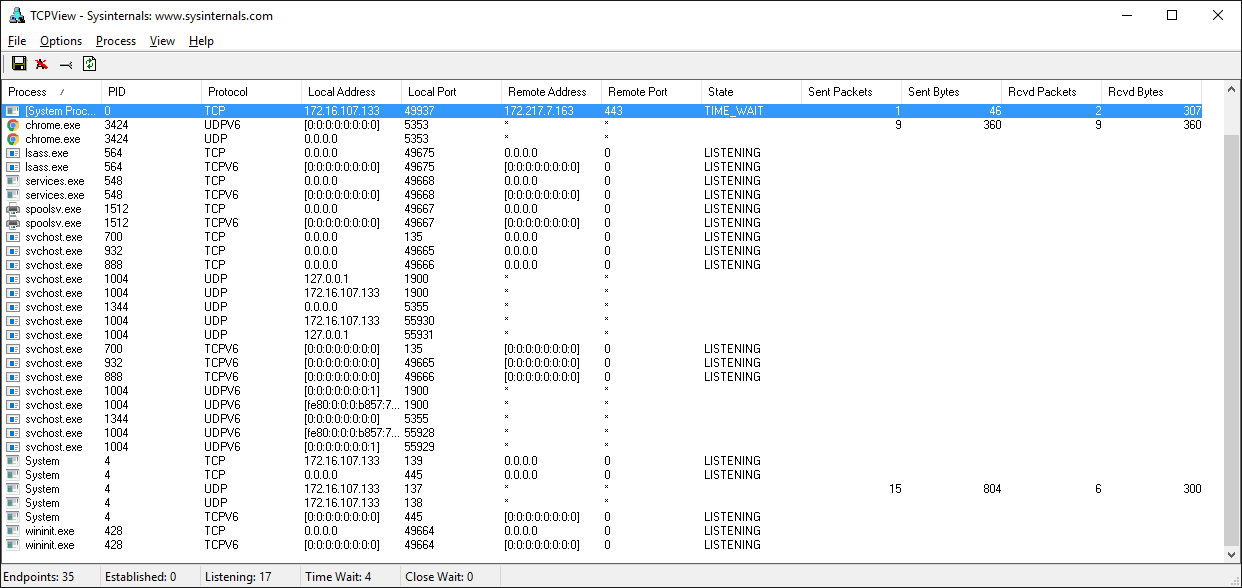
Wireshark
Sometimes you need to see what’s happening on the wire. Forget about what the application log says or what the value is that’s being returned from a library call. You want to see what’s actually being sent or received on the network. Just like with debuggers, when you need to see it, there’s no substitute.
Wireshark is a network protocol analyzer and traffic capture application that runs on macOS, Linux, and Windows, among others. There’s a GUI version named wireshark and also a terminal, text-based version named tshark.
Running a traffic capture is a great way to watch how an application behaves on the network and gather evidence about what it sends and receives, and how often and how much. You’ll also be able to see when a client or server closes or aborts a connection or stops responding. This information can be extremely helpful when you’re troubleshooting.
There are many good tutorials and other resources on the web that will walk you through the basics of using Wireshark and TShark.
Here’s an example of a traffic capture using Wireshark on the loopback interface:
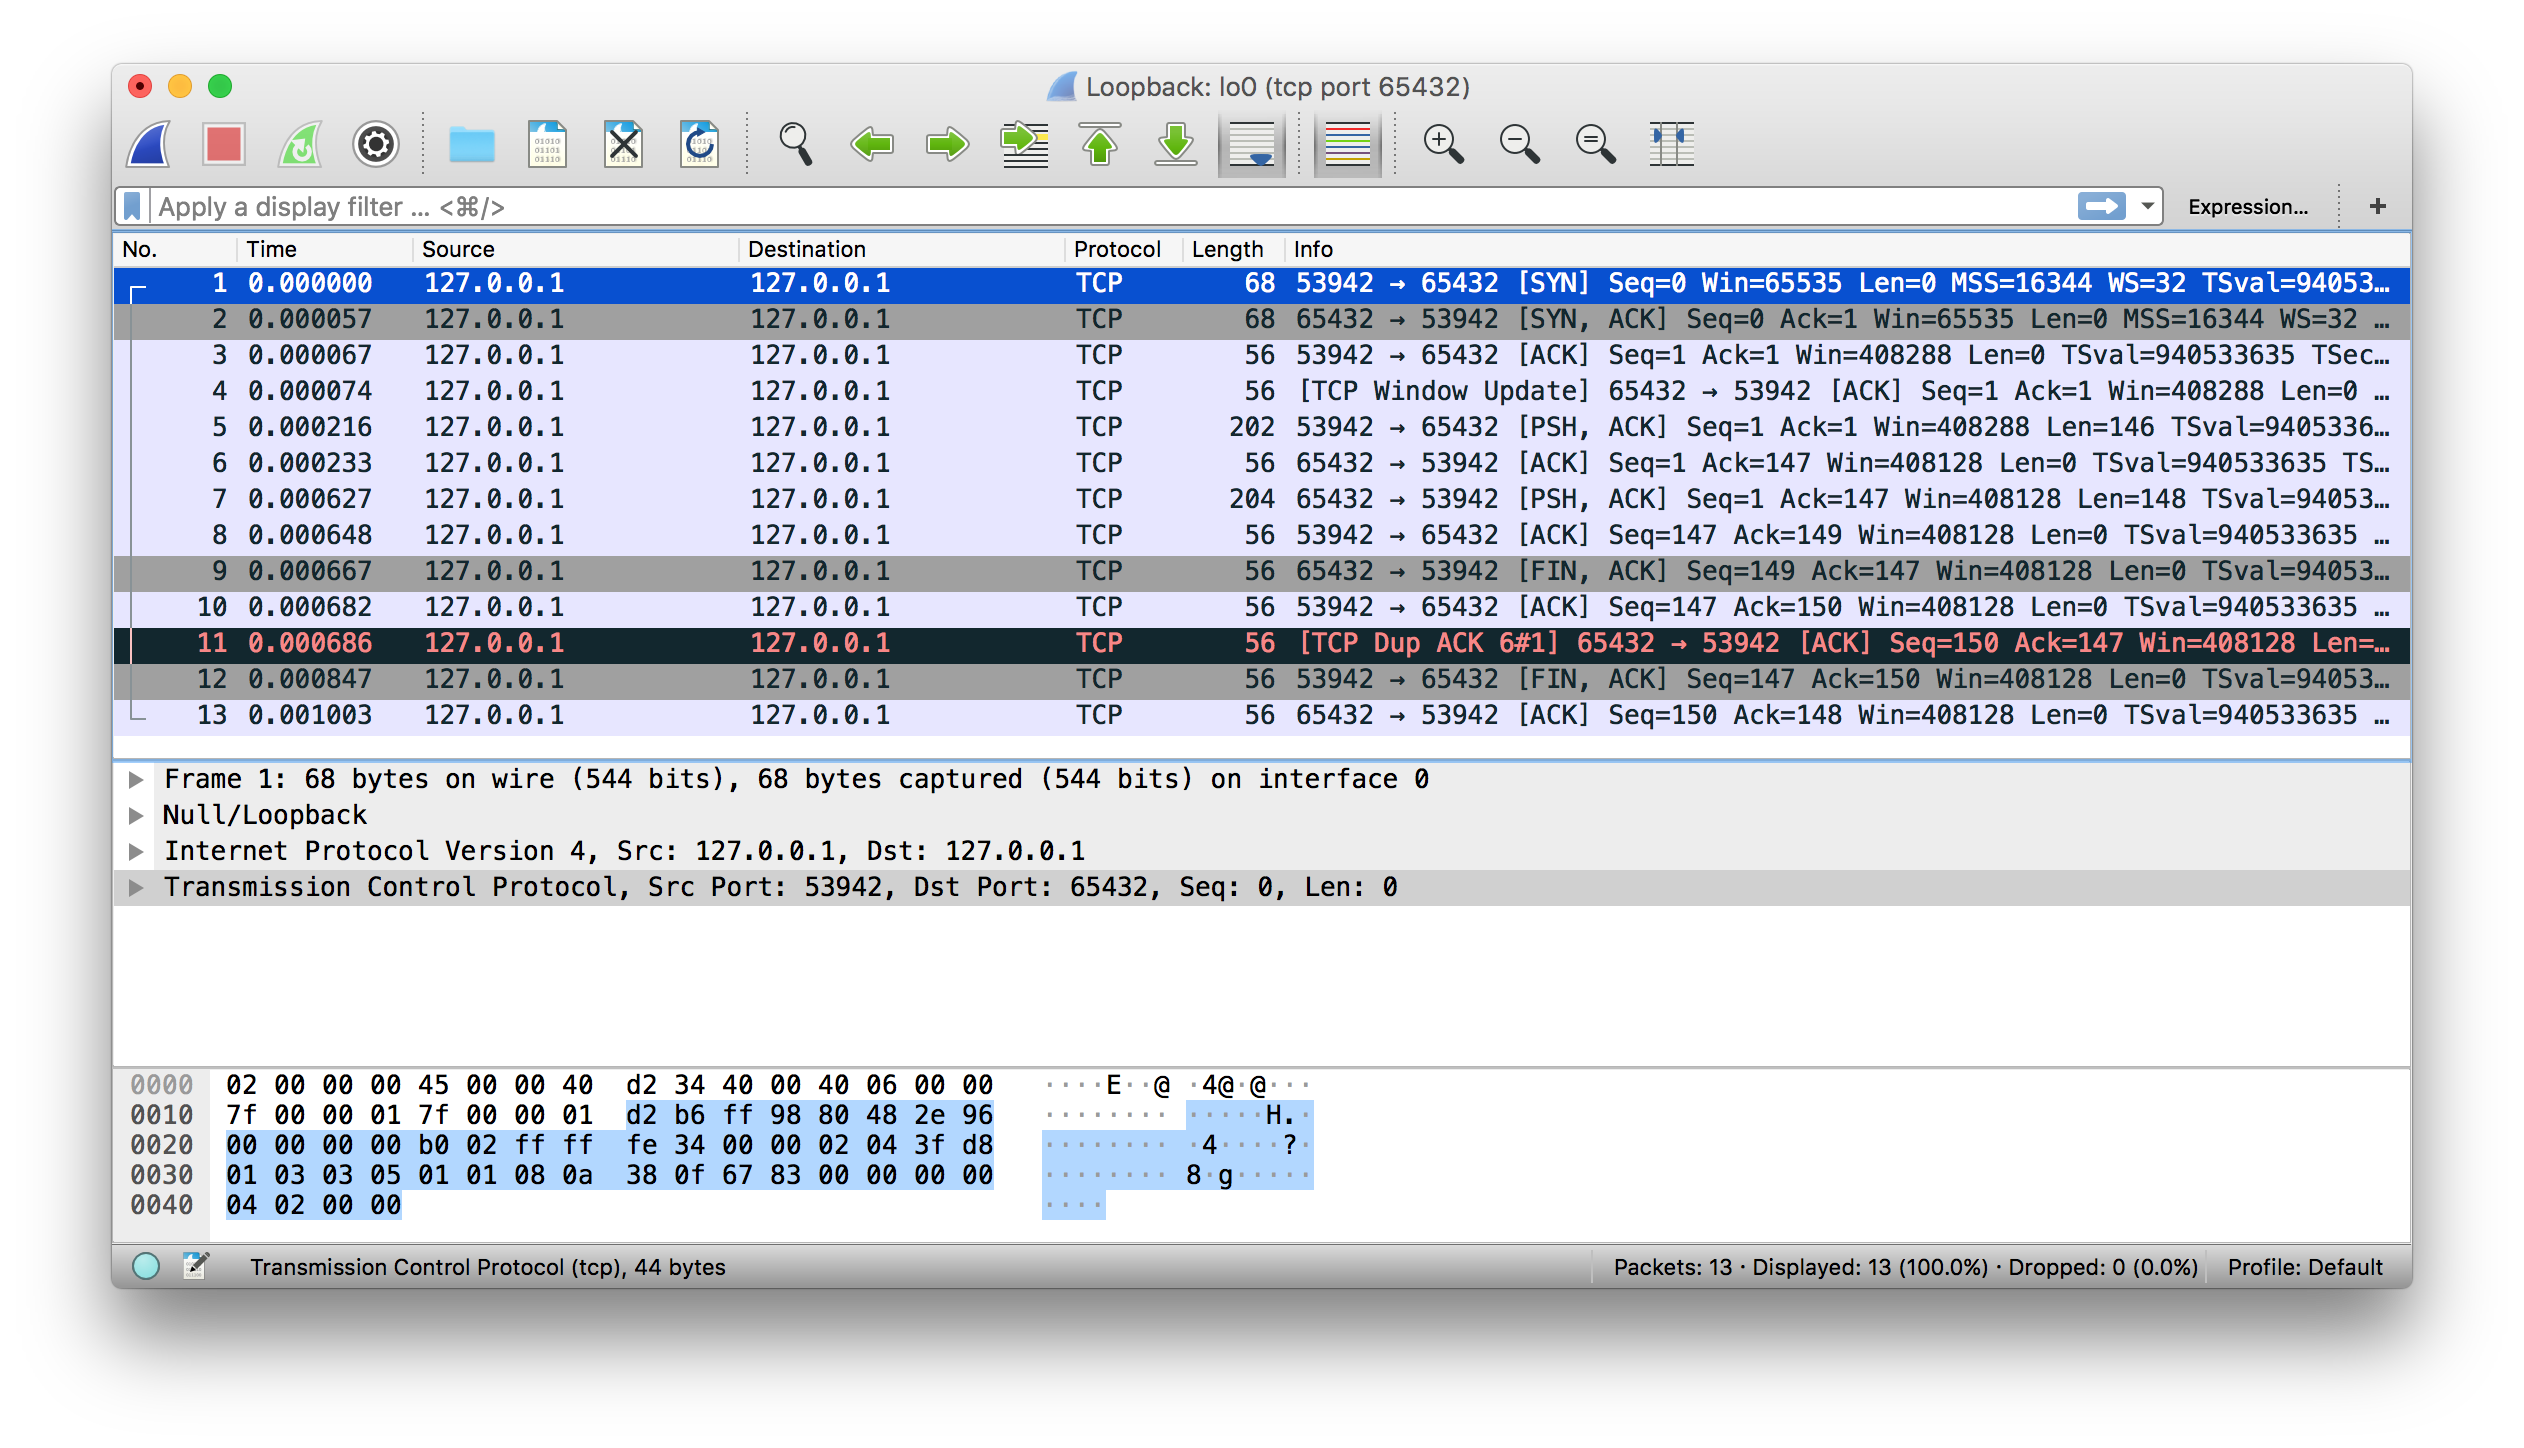
Here’s the same example shown above using tshark:
$ tshark -i lo0 'tcp port 65432'
Capturing on 'Loopback'
1 0.000000 127.0.0.1 → 127.0.0.1 TCP 68 53942 → 65432 [SYN] Seq=0 Win=65535 Len=0 MSS=16344 WS=32 TSval=940533635 TSecr=0 SACK_PERM=1
2 0.000057 127.0.0.1 → 127.0.0.1 TCP 68 65432 → 53942 [SYN, ACK] Seq=0 Ack=1 Win=65535 Len=0 MSS=16344 WS=32 TSval=940533635 TSecr=940533635 SACK_PERM=1
3 0.000068 127.0.0.1 → 127.0.0.1 TCP 56 53942 → 65432 [ACK] Seq=1 Ack=1 Win=408288 Len=0 TSval=940533635 TSecr=940533635
4 0.000075 127.0.0.1 → 127.0.0.1 TCP 56 [TCP Window Update] 65432 → 53942 [ACK] Seq=1 Ack=1 Win=408288 Len=0 TSval=940533635 TSecr=940533635
5 0.000216 127.0.0.1 → 127.0.0.1 TCP 202 53942 → 65432 [PSH, ACK] Seq=1 Ack=1 Win=408288 Len=146 TSval=940533635 TSecr=940533635
6 0.000234 127.0.0.1 → 127.0.0.1 TCP 56 65432 → 53942 [ACK] Seq=1 Ack=147 Win=408128 Len=0 TSval=940533635 TSecr=940533635
7 0.000627 127.0.0.1 → 127.0.0.1 TCP 204 65432 → 53942 [PSH, ACK] Seq=1 Ack=147 Win=408128 Len=148 TSval=940533635 TSecr=940533635
8 0.000649 127.0.0.1 → 127.0.0.1 TCP 56 53942 → 65432 [ACK] Seq=147 Ack=149 Win=408128 Len=0 TSval=940533635 TSecr=940533635
9 0.000668 127.0.0.1 → 127.0.0.1 TCP 56 65432 → 53942 [FIN, ACK] Seq=149 Ack=147 Win=408128 Len=0 TSval=940533635 TSecr=940533635
10 0.000682 127.0.0.1 → 127.0.0.1 TCP 56 53942 → 65432 [ACK] Seq=147 Ack=150 Win=408128 Len=0 TSval=940533635 TSecr=940533635
11 0.000687 127.0.0.1 → 127.0.0.1 TCP 56 [TCP Dup ACK 6#1] 65432 → 53942 [ACK] Seq=150 Ack=147 Win=408128 Len=0 TSval=940533635 TSecr=940533635
12 0.000848 127.0.0.1 → 127.0.0.1 TCP 56 53942 → 65432 [FIN, ACK] Seq=147 Ack=150 Win=408128 Len=0 TSval=940533635 TSecr=940533635
13 0.001004 127.0.0.1 → 127.0.0.1 TCP 56 65432 → 53942 [ACK] Seq=150 Ack=148 Win=408128 Len=0 TSval=940533635 TSecr=940533635
^C13 packets captured
Next up, you’ll get more references to support your socket programming journey!
Reference
You can use this section as a general reference with additional information and links to external resources.
Python Documentation
- Python’s socket module
- Python’s Socket Programming HOWTO
Errors
The following is from Python’s socket module documentation:
“All errors raise exceptions. The normal exceptions for invalid argument types and out-of-memory conditions can be raised; starting from Python 3.3, errors related to socket or address semantics raise
OSErroror one of its subclasses.” (Source)
Here are some common errors you’ll probably encounter when working with sockets:
| Exception | errno Constant |
Description |
|---|---|---|
| BlockingIOError | EWOULDBLOCK | Resource temporarily unavailable. For example, in non-blocking mode, when calling .send() and the peer is busy and not reading, the send queue (network buffer) is full. Or there are issues with the network. Hopefully this is a temporary condition. |
| OSError | EADDRINUSE | Address already in use. Make sure that there’s not another process running that’s using the same port number and that your server is setting the socket option SO_REUSEADDR: socket.setsockopt(socket.SOL_SOCKET, socket.SO_REUSEADDR, 1). |
| ConnectionResetError | ECONNRESET | Connection reset by peer. The remote process crashed or did not close its socket properly, also known as an unclean shutdown. Or there’s a firewall or other device in the network path that’s missing rules or misbehaving. |
| TimeoutError | ETIMEDOUT | Operation timed out. No response from peer. |
| ConnectionRefusedError | ECONNREFUSED | Connection refused. No application listening on specified port. |
Socket Address Families
socket.AF_INET and socket.AF_INET6 represent the address and protocol families used for the first argument to socket.socket(). APIs that use an address expect it to be in a certain format, depending on whether the socket was created with socket.AF_INET or socket.AF_INET6.
| Address Family | Protocol | Address Tuple | Description |
|---|---|---|---|
socket.AF_INET |
IPv4 | (host, port) |
host is a string with a hostname like 'www.example.com' or an IPv4 address like '10.1.2.3'. port is an integer. |
socket.AF_INET6 |
IPv6 | (host, port, flowinfo, scopeid) |
host is a string with a hostname like 'www.example.com' or an IPv6 address like 'fe80::6203:7ab:fe88:9c23'. port is an integer. flowinfo and scopeid represent the sin6_flowinfo and sin6_scope_id members in the C struct sockaddr_in6. |
Note the excerpt below from Python’s socket module documentation regarding the host value of the address tuple:
“For IPv4 addresses, two special forms are accepted instead of a host address: the empty string represents
INADDR_ANY, and the string'<broadcast>'representsINADDR_BROADCAST. This behavior is not compatible with IPv6, therefore, you may want to avoid these if you intend to support IPv6 with your Python programs.” (Source)
See Python’s Socket families documentation for more information.
This tutorial uses IPv4 sockets, but if your network supports it, try testing and using IPv6 if possible. One way to support this easily is by using the function socket.getaddrinfo(). It translates the host and port arguments into a sequence of five-tuples that contains all of the necessary arguments for creating a socket connected to that service. socket.getaddrinfo() will understand and interpret passed-in IPv6 addresses and hostnames that resolve to IPv6 addresses, in addition to IPv4.
The following example returns address information for a TCP connection to example.org on port 80:
>>>
>>> socket.getaddrinfo("example.org", 80, proto=socket.IPPROTO_TCP)
[(<AddressFamily.AF_INET6: 10>, <SocketType.SOCK_STREAM: 1>,
 6, '', ('2606:2800:220:1:248:1893:25c8:1946', 80, 0, 0)),
 (<AddressFamily.AF_INET: 2>, <SocketType.SOCK_STREAM: 1>,
 6, '', ('93.184.216.34', 80))]
Results may differ on your system if IPv6 isn’t enabled. The values returned above can be used by passing them to socket.socket() and socket.connect(). There’s a client and server example in the Example section of Python’s socket module documentation.
Using Hostnames
For context, this section applies mostly to using hostnames with .bind() and .connect(), or .connect_ex(), when you intend to use the loopback interface, “localhost.” However, it also applies any time you’re using a hostname and there’s an expectation of it resolving to a certain address and having a special meaning to your application that affects its behavior or assumptions. This is in contrast to the typical scenario of a client using a hostname to connect to a server that’s resolved by DNS, like www.example.com.
The following is from Python’s socket module documentation:
“If you use a hostname in the host portion of IPv4/v6 socket address, the program may show a non-deterministic behavior, as Python uses the first address returned from the DNS resolution. The socket address will be resolved differently into an actual IPv4/v6 address, depending on the results from DNS resolution and/or the host configuration. For deterministic behavior use a numeric address in host portion.” (Source)
The standard convention for the name “localhost” is for it to resolve to 127.0.0.1 or ::1, the loopback interface. This will more than likely be the case for you on your system, but maybe not. It depends on how your system is configured for name resolution. As with all things IT, there are always exceptions, and there are no guarantees that using the name “localhost” will connect to the loopback interface.
For example, on Linux, see man nsswitch.conf, the Name Service Switch configuration file. Another place to check on macOS and Linux is the file /etc/hosts. On Windows, see C:WindowsSystem32driversetchosts. The hosts file contains a static table of name-to-address mappings in a simple text format. DNS is another piece of the puzzle altogether.
Interestingly enough, as of June 2018, there’s an RFC draft Let ‘localhost’ be localhost that discusses the conventions, assumptions, and security around using the name “localhost.”
What’s important to understand is that when you use hostnames in your application, the returned addresses could literally be anything. Don’t make assumptions regarding a name if you have a security-sensitive application. Depending on your application and environment, this may or may not be a concern for you.
Regardless of whether or not you’re using hostnames, if your application needs to support secure connections through encryption and authentication, then you’ll probably want to look into using TLS. This is its own separate topic and beyond the scope of this tutorial. See Python’s ssl module documentation to get started. This is the same protocol that your web browser uses to connect securely to web sites.
With interfaces, IP addresses, and name resolution to consider, there are many variables. What should you do? Here are some recommendations that you can use if you don’t have a network application review process:
| Application | Usage | Recommendation |
|---|---|---|
| Server | loopback interface | Use an IP address, such as 127.0.0.1 or ::1. |
| Server | ethernet interface | Use an IP address, such as 10.1.2.3. To support more than one interface, use an empty string for all interfaces/addresses. See the security note above. |
| Client | loopback interface | Use an IP address, such as 127.0.0.1 or ::1. |
| Client | ethernet interface | Use an IP address for consistency and non-reliance on name resolution. For the typical case, use a hostname. See the security note above. |
For clients or servers, if you need to authenticate the host that you’re connecting to, look into using TLS.
Blocking Calls
A socket function or method that temporarily suspends your application is a blocking call. For example, .accept(), .connect(), .send(), and .recv() block, meaning they don’t return immediately. Blocking calls have to wait on system calls (I/O) to complete before they can return a value. So you, the caller, are blocked until they’re done or a timeout or other error occurs.
Blocking socket calls can be set to non-blocking mode so they return immediately. If you do this, then you’ll need to at least refactor or redesign your application to handle the socket operation when it’s ready.
Because the call returns immediately, data may not be ready. The callee is waiting on the network and hasn’t had time to complete its work. If this is the case, then the current status is the errno value socket.EWOULDBLOCK. Non-blocking mode is supported with .setblocking().
By default, sockets are always created in blocking mode. See Notes on socket timeouts for a description of the three modes.
Closing Connections
An interesting thing to note with TCP is that it’s completely legal for the client or server to close their side of the connection while the other side remains open. This is referred to as a “half-open” connection. It’s the application’s decision whether or not this is desirable. In general, it’s not. In this state, the side that has closed their end of the connection can no longer send data. They can only receive it.
This approach isn’t necessarily recommended, but as an example, HTTP uses a header named “Connection” that’s used to standardize how applications should close or persist open connections. For details, see section 6.3 in RFC 7230, Hypertext Transfer Protocol (HTTP/1.1): Message Syntax and Routing.
When designing and writing your application and its application-layer protocol, it’s a good idea to go ahead and work out how you expect connections to be closed. Sometimes this is obvious and simple, or it’s something that can take some initial prototyping and testing. It depends on the application and how the message loop is processed with its expected data. Just make sure that sockets are always closed in a timely manner after they complete their work.
Byte Endianness
See Wikipedia’s article on endianness for details on how different CPUs store byte orderings in memory. When interpreting individual bytes, this isn’t a problem. However, when you’re handling multiple bytes that are read and processed as a single value, for example a 4-byte integer, the byte order needs to be reversed if you’re communicating with a machine that uses a different endianness.
Byte order is also important for text strings that are represented as multi-byte sequences, like Unicode. Unless you’re always using true, strict ASCII and control the client and server implementations, you’re probably better off using Unicode with an encoding like UTF-8 or one that supports a byte order mark (BOM).
It’s important to explicitly define the encoding used in your application-layer protocol. You can do this by mandating that all text is UTF-8 or using a “content-encoding” header that specifies the encoding. This prevents your application from having to detect the encoding, which you should avoid if possible.
This becomes problematic when there is data involved that’s stored in files or a database and there’s no metadata available that specifies its encoding. When the data is transferred to another endpoint, it’ll have to try to detect the encoding. For a discussion, see Wikipedia’s Unicode article, which references RFC 3629: UTF-8, a transformation format of ISO 10646:
“However RFC 3629, the UTF-8 standard, recommends that byte order marks be forbidden in protocols using UTF-8, but discusses the cases where this may not be possible. In addition, the large restriction on possible patterns in UTF-8 (for instance there cannot be any lone bytes with the high bit set) means that it should be possible to distinguish UTF-8 from other character encodings without relying on the BOM.” (Source)
The takeaway from this is to always store the encoding used for data that’s handled by your application if it can vary. In other words, try to somehow store the encoding as metadata if it’s not always UTF-8 or some other encoding with a BOM. Then you can send that encoding in a header along with the data to tell the receiver what it is.
The byte ordering used in TCP/IP is big-endian and is referred to as network order. Network order is used to represent integers in lower layers of the protocol stack, like IP addresses and port numbers. Python’s socket module includes functions that convert integers to and from network and host byte order:
| Function | Description |
|---|---|
socket.ntohl(x) |
Convert 32-bit positive integers from network to host byte order. On machines where the host byte order is the same as network byte order, this is a no-op; otherwise, it performs a 4-byte swap operation. |
socket.ntohs(x) |
Convert 16-bit positive integers from network to host byte order. On machines where the host byte order is the same as network byte order, this is a no-op; otherwise, it performs a 2-byte swap operation. |
socket.htonl(x) |
Convert 32-bit positive integers from host to network byte order. On machines where the host byte order is the same as network byte order, this is a no-op; otherwise, it performs a 4-byte swap operation. |
socket.htons(x) |
Convert 16-bit positive integers from host to network byte order. On machines where the host byte order is the same as network byte order, this is a no-op; otherwise, it performs a 2-byte swap operation. |
You can also use the struct module to pack and unpack binary data using format strings:
import struct
network_byteorder_int = struct.pack('>H', 256)
python_int = struct.unpack('>H', network_byteorder_int)[0]
Conclusion
You covered a lot of ground in this tutorial! Networking and sockets are large subjects. If you’re new to networking or sockets, don’t be discouraged by all of the terms and acronyms.
There are a lot of pieces to become familiar with in order to understand how everything works together. However, just like Python, it will start to make more sense as you get to know the individual pieces and spend more time with them.
In this tutorial, you:
- Looked at the low-level socket API in Python’s
socketmodule and saw how it can be used to create client-server applications - Built a client and server that can handle multiple connections using a
selectorsobject - Created your own custom class and used it as an application-layer protocol to exchange messages and data between endpoints
From here, you can use your custom class and build upon it to learn and help make creating your own socket applications easier and faster.
To review the examples, you can click the link below:
Congratulations on making it to the end! You are now well on your way to using sockets in your own applications. Best of luck on your sockets development journey.
In any networking application, it’s common that one end will be trying to connect, while the other fails to respond due to a problem like a networking media failure. Fortunately, the Python socket library has an elegant method of handing these errors via the socket.error exceptions. Find out how to use them here.
How to do it
Let’s create a few try-except code blocks and put one potential error type in each block. In order to get a user input, the argparse module can be used. This module is more powerful than simply parsing command-line arguments using sys.argv. In the try-except blocks, put typical socket operations, for example, create a socket object, connect to a server, send data, and wait for a reply.
The following recipe illustrates the concepts in a few lines of code.
Listing 1.7 shows socket_errors as follows:
#!/usr/bin/env python
# Python Network Programming Cookbook — Chapter – 1
# This program is optimized for Python 2.7. It may run on any
# other Python version with/without modifications.
import sys
import socket
import argparse
def main():
# setup argument parsing
parser = argparse.ArgumentParser(description=’Socket Error Examples’)
parser.add_argument(‘—host’, action=»store», dest=»host», required=False)
parser.add_argument(‘—port’, action=»store», dest=»port», type=int, required=False)
parser.add_argument(‘—file’, action=»store», dest=»file», required=False)
given_args = parser.parse_args()
host = given_args.host
port = given_args.port
filename = given_args.file
# First try-except block — create socket
try:
s = socket.socket(socket.AF_INET, socket.SOCK_STREAM)
except socket.error, e:
print «Error creating socket: %s» % e
sys.exit(1)
# Second try-except block — connect to given host/port
try:
s.connect((host, port))
except socket.gaierror, e:
print «Address-related error connecting to server: %s» % e
sys.exit(1)
except socket.error, e:
print «Connection error: %s» % e
sys.exit(1)
# Third try-except block — sending data
try:
s.sendall(«GET %s HTTP/1.0rnrn» % filename)
except socket.error, e:
print «Error sending data: %s» % e
sys.exit(1)
while 1:
# Fourth tr-except block — waiting to receive data from remote host
try:
buf = s.recv(2048)
except socket.error, e:
print «Error receiving data: %s» % e
sys.exit(1)
if not len(buf):
break
# write the received data
sys.stdout.write(buf)
if __name__ == ‘__main__’:
main()
How it works
In Python, passing command-line arguments to a script and parsing them in the script can be done using the argparse module. This is available in Python 2.7. For earlier versions of Python, this module is available separately in Python Package Index (PyPI). You can install this via easy_install or pip.
In this recipe, three arguments are set up: a hostname, port number, and filename. The usage of this script is as follows:
$ python 1_7_socket_errors.py –host=<HOST> —port=<PORT> —file=<FILE>
If you try with a non-existent host, this script will print an address error as follows:
$ python 1_7_socket_errors.py —host=www.pytgo.org —port=8080 —file=1_7_socket_errors.py
Address-related error connecting to server: [Errno -5] No address associated with hostname
If there is no service on a specific port and if you try to connect to that port, then this will throw a connection timeout error as follows:
$ python 1_7_socket_errors.py —host=www.python.org —port=8080 —file=1_7_socket_errors.py
This will return the following error since the host, www.python.org, is not listening on port 8080:
Connection error: [Errno 110] Connection timed out
However, if you send an arbitrary request to a correct request to a correct port, the error may not be caught in the application level. For example, running the following script returns no error, but the HTML output tells us what’s wrong with this script:
$ python 1_7_socket_errors.py —host=www.python.org —port=80 —file=1_7_socket_errors.py
HTTP/1.1 404 Not found
Server: Varnish
Retry-After: 0
content-type: text/html
Content-Length: 77
Accept-Ranges: bytes
Date: Thu, 20 Feb 2014 12:14:01 GMT
Via: 1.1 varnish
Age: 0
Connection: close
<html>
<head>
<title> </title>
</head>
<body>
unknown domain: </body></html>
In this example, four try-except blocks have been used. All blocks use socket.error except for the second one, which uses socket.gaierror. This is used for address-related errors. There are two other types of exceptions: socket.herror is used for legacy C API, and if you use the settimeout() method in a socket, socket.timeout will be raised when a timeout occurs on that socket.
This quick tip was taken from «Python Network Programming Cookbook» published by Packt. Network Computing readers can pick it up for free by clicking
here (which will automatically add the eBook to your cart) or by using the code RGPNPC50 at the checkout. The code expires Oct. 23, 2016. From October 10-16 you can save 50% on more Python ebooks by joining Packt for Python Week.
Socket programming in Python
This is a quick guide/tutorial on socket programming in python. Socket programming python is very similar to C.
To summarise the basics, sockets are the fundamental «things» behind any kind of network communications done by your computer.
For example when you type www.google.com in your web browser, it opens a socket and connects to google.com to fetch the page and show it to you. Same with any chat client like gtalk or skype.
Any network communication goes through a socket.
In this tutorial we shall be programming Tcp sockets in python. You can also program udp sockets in python.
Coding a simple socket client
First we shall learn how to code a simple socket client in python. A client connects to a remote host using sockets and sends and receives some data.
1. Creating a socket
This first thing to do is create a socket. The socket.socket function does this.
Quick Example :
#Socket client example in python

import socket	#for sockets

#create an AF_INET, STREAM socket (TCP)
s = socket.socket(socket.AF_INET, socket.SOCK_STREAM)

print 'Socket Created'
Function socket.socket creates a socket and returns a socket descriptor which can be used in other socket related functions
The above code will create a socket with the following properties …
Address Family : AF_INET (this is IP version 4 or IPv4)
Type : SOCK_STREAM (this means connection oriented TCP protocol)
Error handling
If any of the socket functions fail then python throws an exception called socket.error which must be caught.
#handling errors in python socket programs

import socket	#for sockets
import sys	#for exit

try:
	#create an AF_INET, STREAM socket (TCP)
	s = socket.socket(socket.AF_INET, socket.SOCK_STREAM)
except socket.error, msg:
	print 'Failed to create socket. Error code: ' + str(msg[0]) + ' , Error message : ' + msg[1]
	sys.exit();

print 'Socket Created'
Ok , so you have created a socket successfully. But what next ? Next we shall try to connect to some server using this socket. We can connect to www.google.com
Note
Apart from SOCK_STREAM type of sockets there is another type called SOCK_DGRAM which indicates the UDP protocol. This type of socket is non-connection socket. In this tutorial we shall stick to SOCK_STREAM or TCP sockets.
2. Connect to a Server
We connect to a remote server on a certain port number. So we need 2 things , IP address and port number to connect to. So you need to know the IP address of the remote server you are connecting to. Here we used the ip address of google.com as a sample.
First get the IP address of the remote host/url
Before connecting to a remote host, its ip address is needed. In python the getting the ip address is quite simple.
import socket	#for sockets
import sys	#for exit

try:
	#create an AF_INET, STREAM socket (TCP)
	s = socket.socket(socket.AF_INET, socket.SOCK_STREAM)
except socket.error, msg:
	print 'Failed to create socket. Error code: ' + str(msg[0]) + ' , Error message : ' + msg[1]
	sys.exit();

print 'Socket Created'

host = 'www.google.com'

try:
	remote_ip = socket.gethostbyname( host )

except socket.gaierror:
	#could not resolve
	print 'Hostname could not be resolved. Exiting'
	sys.exit()

print 'Ip address of ' + host + ' is ' + remote_ip
Now that we have the ip address of the remote host/system, we can connect to ip on a certain ‘port’ using the connect function.
Quick example
import socket	#for sockets
import sys	#for exit

try:
	#create an AF_INET, STREAM socket (TCP)
	s = socket.socket(socket.AF_INET, socket.SOCK_STREAM)
except socket.error, msg:
	print 'Failed to create socket. Error code: ' + str(msg[0]) + ' , Error message : ' + msg[1]
	sys.exit();

print 'Socket Created'

host = 'www.google.com'
port = 80

try:
	remote_ip = socket.gethostbyname( host )

except socket.gaierror:
	#could not resolve
	print 'Hostname could not be resolved. Exiting'
	sys.exit()

print 'Ip address of ' + host + ' is ' + remote_ip

#Connect to remote server
s.connect((remote_ip , port))

print 'Socket Connected to ' + host + ' on ip ' + remote_ip
Run the program
$ python client.py
Socket Created
Ip address of www.google.com is 74.125.236.83
Socket Connected to www.google.com on ip 74.125.236.83
It creates a socket and then connects. Try connecting to a port different from port 80 and you should not be able to connect which indicates that the port is not open for connection. This logic can be used to build a port scanner.
OK, so we are now connected. Lets do the next thing , sending some data to the remote server.
Free Tip
The concept of «connections» apply to SOCK_STREAM/TCP type of sockets. Connection means a reliable «stream» of data such that there can be multiple such streams each having communication of its own. Think of this as a pipe which is not interfered by data from other pipes. Another important property of stream connections is that packets have an «order» or «sequence».
Other sockets like UDP , ICMP , ARP dont have a concept of «connection». These are non-connection based communication. Which means you keep sending or receiving packets from anybody and everybody.
3. Sending Data
Function sendall will simply send data.
Lets send some data to google.com
import socket	#for sockets
import sys	#for exit

try:
	#create an AF_INET, STREAM socket (TCP)
	s = socket.socket(socket.AF_INET, socket.SOCK_STREAM)
except socket.error, msg:
	print 'Failed to create socket. Error code: ' + str(msg[0]) + ' , Error message : ' + msg[1]
	sys.exit();

print 'Socket Created'

host = 'www.google.com'
port = 80

try:
	remote_ip = socket.gethostbyname( host )

except socket.gaierror:
	#could not resolve
	print 'Hostname could not be resolved. Exiting'
	sys.exit()

print 'Ip address of ' + host + ' is ' + remote_ip

#Connect to remote server
s.connect((remote_ip , port))

print 'Socket Connected to ' + host + ' on ip ' + remote_ip

#Send some data to remote server
message = "GET / HTTP/1.1rnrn"

try :
	#Set the whole string
	s.sendall(message)
except socket.error:
	#Send failed
	print 'Send failed'
	sys.exit()

print 'Message send successfully'
In the above example , we first connect to an ip address and then send the string message «GET / HTTP/1.1rnrn» to it. The message is actually an «http command» to fetch the mainpage of a website.
Now that we have send some data , its time to receive a reply from the server. So lets do it.
4. Receiving Data
Function recv is used to receive data on a socket. In the following example we shall send the same message as the last example and receive a reply from the server.
#Socket client example in python

import socket	#for sockets
import sys	#for exit

#create an INET, STREAMing socket
try:
	s = socket.socket(socket.AF_INET, socket.SOCK_STREAM)
except socket.error:
	print 'Failed to create socket'
	sys.exit()

print 'Socket Created'

host = 'www.google.com';
port = 80;

try:
	remote_ip = socket.gethostbyname( host )

except socket.gaierror:
	#could not resolve
	print 'Hostname could not be resolved. Exiting'
	sys.exit()

#Connect to remote server
s.connect((remote_ip , port))

print 'Socket Connected to ' + host + ' on ip ' + remote_ip

#Send some data to remote server
message = "GET / HTTP/1.1rnrn"

try :
	#Set the whole string
	s.sendall(message)
except socket.error:
	#Send failed
	print 'Send failed'
	sys.exit()

print 'Message send successfully'

#Now receive data
reply = s.recv(4096)

print reply
Here is the output of the above code :
$ python client.py
Socket Created
Ip address of www.google.com is 74.125.236.81
Socket Connected to www.google.com on ip 74.125.236.81
Message send successfully
HTTP/1.1 302 Found
Location: http://www.google.co.in/
Cache-Control: private
Content-Type: text/html; charset=UTF-8
Set-Cookie: expires=; expires=Mon, 01-Jan-1990 00:00:00 GMT; path=/; domain=www.google.com
Set-Cookie: path=; expires=Mon, 01-Jan-1990 00:00:00 GMT; path=/; domain=www.google.com
Set-Cookie: domain=; expires=Mon, 01-Jan-1990 00:00:00 GMT; path=/; domain=www.google.com
Set-Cookie: expires=; expires=Mon, 01-Jan-1990 00:00:00 GMT; path=/; domain=.www.google.com
Set-Cookie: path=; expires=Mon, 01-Jan-1990 00:00:00 GMT; path=/; domain=.www.google.com
Set-Cookie: domain=; expires=Mon, 01-Jan-1990 00:00:00 GMT; path=/; domain=.www.google.com
Set-Cookie: expires=; expires=Mon, 01-Jan-1990 00:00:00 GMT; path=/; domain=google.com
Set-Cookie: path=; expires=Mon, 01-Jan-1990 00:00:00 GMT; path=/; domain=google.com
Set-Cookie: domain=; expires=Mon, 01-Jan-1990 00:00:00 GMT; path=/; domain=google.com
Set-Cookie: expires=; expires=Mon, 01-Jan-1990 00:00:00 GMT; path=/; domain=.google.com
Set-Cookie: path=; expires=Mon, 01-Jan-1990 00:00:00 GMT; path=/; domain=.google.com
Set-Cookie: domain=; expires=Mon, 01-Jan-1990 00:00:00 GMT; path=/; domain=.google.com
Set-Cookie: PREF=ID=51f26964398d27b0:FF=0:TM=1343026094:LM=1343026094:S=pa0PqX9FCPvyhBHJ; expires=Wed, 23-Jul-2014 06:48:14 GMT; path=/; domain=.google.com
Google.com replied with the content of the page we requested. Quite simple!
Now that we have received our reply, its time to close the socket.
5. Close socket
Function close is used to close the socket.
s.close()
Thats it.
Lets Revise
So in the above example we learned how to :
1. Create a socket
2. Connect to remote server
3. Send some data
4. Receive a reply
Its useful to know that your web browser also does the same thing when you open www.google.com
This kind of socket activity represents a CLIENT. A client is a system that connects to a remote system to fetch data.
The other kind of socket activity is called a SERVER. A server is a system that uses sockets to receive incoming connections and provide them with data. It is just the opposite of Client. So www.google.com is a server and your web browser is a client. Or more technically www.google.com is a HTTP Server and your web browser is an HTTP client.
Now its time to do some server tasks using sockets.
Coding socket servers in Python
OK now onto server things. Servers basically do the following :
1. Open a socket
2. Bind to a address(and port).
3. Listen for incoming connections.
4. Accept connections
5. Read/Send
We have already learnt how to open a socket. So the next thing would be to bind it.
1. Bind a socket
Function bind can be used to bind a socket to a particular address and port. It needs a sockaddr_in structure similar to connect function.
Quick example
import socket
import sys

HOST = ''	# Symbolic name meaning all available interfaces
PORT = 8888	# Arbitrary non-privileged port

s = socket.socket(socket.AF_INET, socket.SOCK_STREAM)
print 'Socket created'

try:
	s.bind((HOST, PORT))
except socket.error , msg:
	print 'Bind failed. Error Code : ' + str(msg[0]) + ' Message ' + msg[1]
	sys.exit()

print 'Socket bind complete'
Now that bind is done, its time to make the socket listen to connections. We bind a socket to a particular IP address and a certain port number. By doing this we ensure that all incoming data which is directed towards this port number is received by this application.
This makes it obvious that you cannot have 2 sockets bound to the same port. There are exceptions to this rule but we shall look into that in some other article.
2. Listen for incoming connections
After binding a socket to a port the next thing we need to do is listen for connections. For this we need to put the socket in listening mode. Function socket_listen is used to put the socket in listening mode. Just add the following line after bind.
s.listen(10)
print 'Socket now listening'
The parameter of the function listen is called backlog. It controls the number of incoming connections that are kept «waiting» if the program is already busy. So by specifying 10, it means that if 10 connections are already waiting to be processed, then the 11th connection request shall be rejected. This will be more clear after checking socket_accept.
Now comes the main part of accepting new connections.
3. Accept connection
Function socket_accept is used for this.
import socket
import sys

HOST = ''	# Symbolic name meaning all available interfaces
PORT = 8888	# Arbitrary non-privileged port

s = socket.socket(socket.AF_INET, socket.SOCK_STREAM)
print 'Socket created'

try:
	s.bind((HOST, PORT))
except socket.error , msg:
	print 'Bind failed. Error Code : ' + str(msg[0]) + ' Message ' + msg[1]
	sys.exit()

print 'Socket bind complete'

s.listen(10)
print 'Socket now listening'

#wait to accept a connection - blocking call
conn, addr = s.accept()

#display client information
print 'Connected with ' + addr[0] + ':' + str(addr[1])
Output
Run the program. It should show
$ python server.py
Socket created
Socket bind complete
Socket now listening
So now this program is waiting for incoming connections on port 8888. Dont close this program , keep it running.
Now a client can connect to it on this port. We shall use the telnet client for testing this. Open a terminal and type
$ telnet localhost 8888
It will immediately show
$ telnet localhost 8888
Trying 127.0.0.1...
Connected to localhost.
Escape character is '^]'.
Connection closed by foreign host.
And the server output will show
$ python server.py
Socket created
Socket bind complete
Socket now listening
Connected with 127.0.0.1:59954
So we can see that the client connected to the server. Try the above steps till you get it working perfect.
We accepted an incoming connection but closed it immediately. This was not very productive. There are lots of things that can be done after an incoming connection is established. Afterall the connection was established for the purpose of communication. So lets reply to the client.
Function sendall can be used to send something to the socket of the incoming connection and the client should see it. Here is an example :
import socket
import sys

HOST = ''	# Symbolic name meaning all available interfaces
PORT = 8888	# Arbitrary non-privileged port

s = socket.socket(socket.AF_INET, socket.SOCK_STREAM)
print 'Socket created'

try:
	s.bind((HOST, PORT))
except socket.error , msg:
	print 'Bind failed. Error Code : ' + str(msg[0]) + ' Message ' + msg[1]
	sys.exit()

print 'Socket bind complete'

s.listen(10)
print 'Socket now listening'

#wait to accept a connection - blocking call
conn, addr = s.accept()

print 'Connected with ' + addr[0] + ':' + str(addr[1])

#now keep talking with the client
data = conn.recv(1024)
conn.sendall(data)

conn.close()
s.close()
Run the above code in 1 terminal. And connect to this server using telnet from another terminal and you should see this :
$ telnet localhost 8888
Trying 127.0.0.1...
Connected to localhost.
Escape character is '^]'.
happy
happy
Connection closed by foreign host.
So the client(telnet) received a reply from server.
We can see that the connection is closed immediately after that simply because the server program ends after accepting and sending reply. A server like www.google.com is always up to accept incoming connections.
It means that a server is supposed to be running all the time. After all its a server meant to serve.
So we need to keep our server RUNNING non-stop. The simplest way to do this is to put the accept in a loop so that it can receive incoming connections all the time.
4. Live Server — accepting multiple connections
So a live server will be alive always. Lets code this up
import socket
import sys

HOST = ''	# Symbolic name meaning all available interfaces
PORT = 5000	# Arbitrary non-privileged port

s = socket.socket(socket.AF_INET, socket.SOCK_STREAM)
print 'Socket created'

try:
	s.bind((HOST, PORT))
except socket.error , msg:
	print 'Bind failed. Error Code : ' + str(msg[0]) + ' Message ' + msg[1]
	sys.exit()

print 'Socket bind complete'

s.listen(10)
print 'Socket now listening'

#now keep talking with the client
while 1:
    #wait to accept a connection - blocking call
	conn, addr = s.accept()
	print 'Connected with ' + addr[0] + ':' + str(addr[1])

	data = conn.recv(1024)
	reply = 'OK...' + data
	if not data:
		break

	conn.sendall(reply)

conn.close()
s.close()
We havent done a lot there. Just put the socket_accept in a loop.
Now run the server program in 1 terminal , and open 3 other terminals.
From each of the 3 terminal do a telnet to the server port.
Each of the telnet terminal would show :
$ telnet localhost 5000
Trying 127.0.0.1...
Connected to localhost.
Escape character is '^]'.
happy
OK .. happy
Connection closed by foreign host.
And the server terminal would show
$ python server.py
Socket created
Socket bind complete
Socket now listening
Connected with 127.0.0.1:60225
Connected with 127.0.0.1:60237
Connected with 127.0.0.1:60239
So now the server is running nonstop and the telnet terminals are also connected nonstop. Now close the server program. All telnet terminals would show «Connection closed by foreign host.»
Good so far. But still the above code does not establish an effective communication channel between the server and the client.
The server program accepts connections in a loop and just send them a reply, after that it does nothing with them. Also it is not able to handle more than 1 connection at a time.
So now its time to handle the connections, and handle multiple connections together.
5. Handling Multiple Connections
To handle every connection we need a separate handling code to run along with the main server accepting connections. One way to achieve this is using threads.
The main server program accepts a connection and creates a new thread to handle communication for the connection, and then the server goes back to accept more connections.
We shall now use threads to create handlers for each connection the server accepts.
import socket
import sys
from thread import *

HOST = ''	# Symbolic name meaning all available interfaces
PORT = 8888	# Arbitrary non-privileged port

s = socket.socket(socket.AF_INET, socket.SOCK_STREAM)
print 'Socket created'

#Bind socket to local host and port
try:
	s.bind((HOST, PORT))
except socket.error , msg:
	print 'Bind failed. Error Code : ' + str(msg[0]) + ' Message ' + msg[1]
	sys.exit()

print 'Socket bind complete'

#Start listening on socket
s.listen(10)
print 'Socket now listening'

#Function for handling connections. This will be used to create threads
def clientthread(conn):
	#Sending message to connected client
	conn.send('Welcome to the server. Type something and hit entern') #send only takes string

	#infinite loop so that function do not terminate and thread do not end.
	while True:

		#Receiving from client
		data = conn.recv(1024)
		reply = 'OK...' + data
		if not data:
			break

		conn.sendall(reply)

	#came out of loop
	conn.close()

#now keep talking with the client
while 1:
    #wait to accept a connection - blocking call
	conn, addr = s.accept()
	print 'Connected with ' + addr[0] + ':' + str(addr[1])

	#start new thread takes 1st argument as a function name to be run, second is the tuple of arguments to the function.
	start_new_thread(clientthread ,(conn,))

s.close()
Run the above server and open 3 terminals like before. Now the server will create a thread for each client connecting to it.
The telnet terminals would show :
$ telnet localhost 8888
Trying 127.0.0.1...
Connected to localhost.
Escape character is '^]'.
Welcome to the server. Type something and hit enter
hi
OK...hi
asd
OK...asd
cv
OK...cv
The server terminal might look like this
$ python server.py
Socket created
Socket bind complete
Socket now listening
Connected with 127.0.0.1:60730
Connected with 127.0.0.1:60731
The above connection handler takes some input from the client and replies back with the same.
So now we have a server thats communicative. Thats useful now.
Conclusion
By now you must have learned the basics of socket programming in python. You can try out some experiments like writing a chat client or something similar.
When testing the code you might face this error
Bind failed. Error Code : 98 Message Address already in use
When it comes up, simply change the port number and the server would run fine.
If you think that the tutorial needs some addons or improvements or any of the code snippets above dont work then feel free to make a comment below so that it gets fixed.