🐛 Bug
Attempting to install torch 1.2.0 on linux results in a MemoryError
$ pip install torch==1.2.0
Collecting torch==1.2.0
  Downloading https://files.pythonhosted.org/packages/05/65/5248be50c55ab7429dd5c11f5e2f9f5865606b80e854ca63139ad1a584f2/torch-1.2.0-cp37-cp37m-manylinux1_x86_64.whl (748.9MB)
     |████████████████████████████████| 748.9MB 18.6MB/s eta 0:00:01ERROR: Exception:
Traceback (most recent call last):
  File "/home/hugo/miniconda3/envs/ptesting/lib/python3.7/site-packages/pip/_internal/cli/base_command.py", line 188, in main
    status = self.run(options, args)
  File "/home/hugo/miniconda3/envs/ptesting/lib/python3.7/site-packages/pip/_internal/commands/install.py", line 345, in run
    resolver.resolve(requirement_set)
  File "/home/hugo/miniconda3/envs/ptesting/lib/python3.7/site-packages/pip/_internal/legacy_resolve.py", line 196, in resolve
    self._resolve_one(requirement_set, req)
  File "/home/hugo/miniconda3/envs/ptesting/lib/python3.7/site-packages/pip/_internal/legacy_resolve.py", line 359, in _resolve_one
    abstract_dist = self._get_abstract_dist_for(req_to_install)
  File "/home/hugo/miniconda3/envs/ptesting/lib/python3.7/site-packages/pip/_internal/legacy_resolve.py", line 307, in _get_abstract_dist_for
    self.require_hashes
  File "/home/hugo/miniconda3/envs/ptesting/lib/python3.7/site-packages/pip/_internal/operations/prepare.py", line 199, in prepare_linked_requirement
    progress_bar=self.progress_bar
  File "/home/hugo/miniconda3/envs/ptesting/lib/python3.7/site-packages/pip/_internal/download.py", line 1064, in unpack_url
    progress_bar=progress_bar
  File "/home/hugo/miniconda3/envs/ptesting/lib/python3.7/site-packages/pip/_internal/download.py", line 924, in unpack_http_url
    progress_bar)
  File "/home/hugo/miniconda3/envs/ptesting/lib/python3.7/site-packages/pip/_internal/download.py", line 1152, in _download_http_url
    _download_url(resp, link, content_file, hashes, progress_bar)
  File "/home/hugo/miniconda3/envs/ptesting/lib/python3.7/site-packages/pip/_internal/download.py", line 861, in _download_url
    hashes.check_against_chunks(downloaded_chunks)
  File "/home/hugo/miniconda3/envs/ptesting/lib/python3.7/site-packages/pip/_internal/utils/hashes.py", line 75, in check_against_chunks
    for chunk in chunks:
  File "/home/hugo/miniconda3/envs/ptesting/lib/python3.7/site-packages/pip/_internal/download.py", line 829, in written_chunks
    for chunk in chunks:
  File "/home/hugo/miniconda3/envs/ptesting/lib/python3.7/site-packages/pip/_internal/utils/ui.py", line 156, in iter
    for x in it:
  File "/home/hugo/miniconda3/envs/ptesting/lib/python3.7/site-packages/pip/_internal/download.py", line 818, in resp_read
    decode_content=False):
  File "/home/hugo/miniconda3/envs/ptesting/lib/python3.7/site-packages/pip/_vendor/urllib3/response.py", line 531, in stream
    data = self.read(amt=amt, decode_content=decode_content)
  File "/home/hugo/miniconda3/envs/ptesting/lib/python3.7/site-packages/pip/_vendor/urllib3/response.py", line 479, in read
    data = self._fp.read(amt)
  File "/home/hugo/miniconda3/envs/ptesting/lib/python3.7/site-packages/pip/_vendor/cachecontrol/filewrapper.py", line 65, in read
    self._close()
  File "/home/hugo/miniconda3/envs/ptesting/lib/python3.7/site-packages/pip/_vendor/cachecontrol/filewrapper.py", line 52, in _close
    self.__callback(self.__buf.getvalue())
  File "/home/hugo/miniconda3/envs/ptesting/lib/python3.7/site-packages/pip/_vendor/cachecontrol/controller.py", line 300, in cache_response
    cache_url, self.serializer.dumps(request, response, body=body)
  File "/home/hugo/miniconda3/envs/ptesting/lib/python3.7/site-packages/pip/_vendor/cachecontrol/serialize.py", line 72, in dumps
    return b",".join([b"cc=4", msgpack.dumps(data, use_bin_type=True)])
MemoryError
To Reproduce
Steps to reproduce the behavior:
- pip install torch==1.2.0 (on linux)
Expected behavior
Installation, without MemoryError
Environment
Please copy and paste the output from our
environment collection script
(or fill out the checklist below manually).
Collecting environment information…
PyTorch version: N/A
Is debug build: N/A
CUDA used to build PyTorch: N/A
OS: Ubuntu 18.04.2 LTS
GCC version: (Ubuntu 7.4.0-1ubuntu1~18.04.1) 7.4.0
CMake version: Could not collect
Python version: 3.7
Is CUDA available: N/A
CUDA runtime version: Could not collect
GPU models and configuration: Could not collect
Nvidia driver version: Could not collect
cuDNN version: Could not collect
Versions of relevant libraries:
[pip] Could not collect
[conda] Could not collect
cc @ezyang @gchanan
Image Credits: cryptocurrency360.com
Hello there. This is Part 4 of our PyTorch 101 series and we will cover multiple GPU usage in this post.
In this part we will cover,
- How to use multiple GPUs for your network, either using data parallelism or model parallelism.
- How to automate selection of GPU while creating a new objects.
- How to diagnose and analyse memory issues should they arise.
So, let’s get started.
Before we begin, let me remind you this part 4 of our PyTorch series.
- Understanding Graphs, Automatic Differentiation and Autograd
- Building Your First Neural Network
- Going Deep with PyTorch
- Memory Management and Using Multiple GPUs
- Understanding Hooks
You can get all the code in this post, (and other posts as well) in the Github repo here.
Moving tensors around CPU / GPUs
Every Tensor in PyTorch has a to() member function. It’s job is to put the tensor on which it’s called to a certain device whether it be the CPU or a certain GPU. Input to the to function is a torch.device object which can initialised with either of the following inputs.
cpufor CPUcuda:0for putting it on GPU number 0. Similarly, if you want to put the tensors on
Generally, whenever you initialise a Tensor, it’s put on the CPU. You can move it to the GPU then. You can check whether a GPU is available or not by invoking the torch.cuda.is_available function.
if torch.cuda.is_available():
	dev = "cuda:0"
else:
	dev = "cpu"

device = torch.device(dev)

a = torch.zeros(4,3)
a = a.to(device)       #alternatively, a.to(0)
You can also move a tensor to a certain GPU by giving it’s index as the argument to to function.
Importantly, the above piece of code is device agnostic, that is, you don’t have to separately change it for it to work on both GPU and the CPU.
cuda() function
Another way to put tensors on GPUs is to call cuda(n) function on them where n is the index of the GPU. If you just call cuda, then the tensor is placed on GPU 0.
The torch.nn.Module class also has to adnd cuda functions which puts the entire network on a particular device. Unlike, Tensors calling to on the nn.Module object is enough, and there’s no need to assign the returned value from the to function.
clf = myNetwork()
clf.to(torch.device("cuda:0")    # or clf = clf.cuda()
Automatic selection of GPU
While it’s good to be able to explicitly decide on which GPU does a tensor go, generally, we create a lot of tensors during our operations. We want them to be automatically created on a certain device, so as to reduce cross device transfers which can slow our code down. In this regard, PyTorch provides us with some functionality to accomplish this.
First, is the torch.get_device function. It’s only supported for GPU tensors. It returns us the index of the GPU on which the tensor resides. We can use this function to determine the device of the tensor, so that we can move a created tensor automatically to this device.
#making sure t2 is on the same device as t2

a = t1.get_device()
b = torch.tensor(a.shape).to(dev)
We can also call cuda(n) while creating new Tensors. By default all tensors created by cuda call are put on GPU 0, but this can be changed by the following statement.
torch.cuda.set_device(0) # or 1,2,3
If a tensor is created as a result of an operation between two operands which are on same device, so will be the resultant tensor. If operands are on different devices, it will lead to an error.
new_* functions
One can also make use of the bunch of new_ functions that made their way to PyTorch in version 1.0. When a function like new_ones is called on a Tensor it returns a new tensor cof same data type, and on the same device as the tensor on which the new_ones function was invoked.
ones = torch.ones((2,)).cuda(0)

# Create a tensor of ones of size (3,4) on same device as of "ones"
newOnes = ones.new_ones((3,4))

randTensor = torch.randn(2,4)
A detailed list of new_ functions can be found in PyTorch docs the link of which I have provided below.
Using Multiple GPUs
There are two ways how we could make use of multiple GPUs.
- Data Parallelism, where we divide batches into smaller batches, and process these smaller batches in parallel on multiple GPU.
- Model Parallelism, where we break the neural network into smaller sub networks and then execute these sub networks on different GPUs.
Data Parallelism
Data Parallelism in PyTorch is achieved through the nn.DataParallel class. You initialize a nn.DataParallel object with a nn.Module object representing your network, and a list of GPU IDs, across which the batches have to be parallelised.
parallel_net = nn.DataParallel(myNet, gpu_ids = [0,1,2])
Now, you can simply execute the nn.DataParallel object just like a nn.Module .
predictions = parallel_net(inputs)           # Forward pass on multi-GPUs
loss = loss_function(predictions, labels)     # Compute loss function
loss.mean().backward()                        # Average GPU-losses + backward pass
optimizer.step()
However, there are a few things I want to shed light over. Despite the fact our data has to be parallelised over multiple GPUs, we have to initially store it on a single GPU.
We also need to make sure the DataParallel object is on that particular GPU as well. The syntax remains similar to what we did earlier with nn.Module.
input        = input.to(0)
parallel_net = parellel_net.to(0)
In effect, the following diagram describes how nn.DataParallel works.
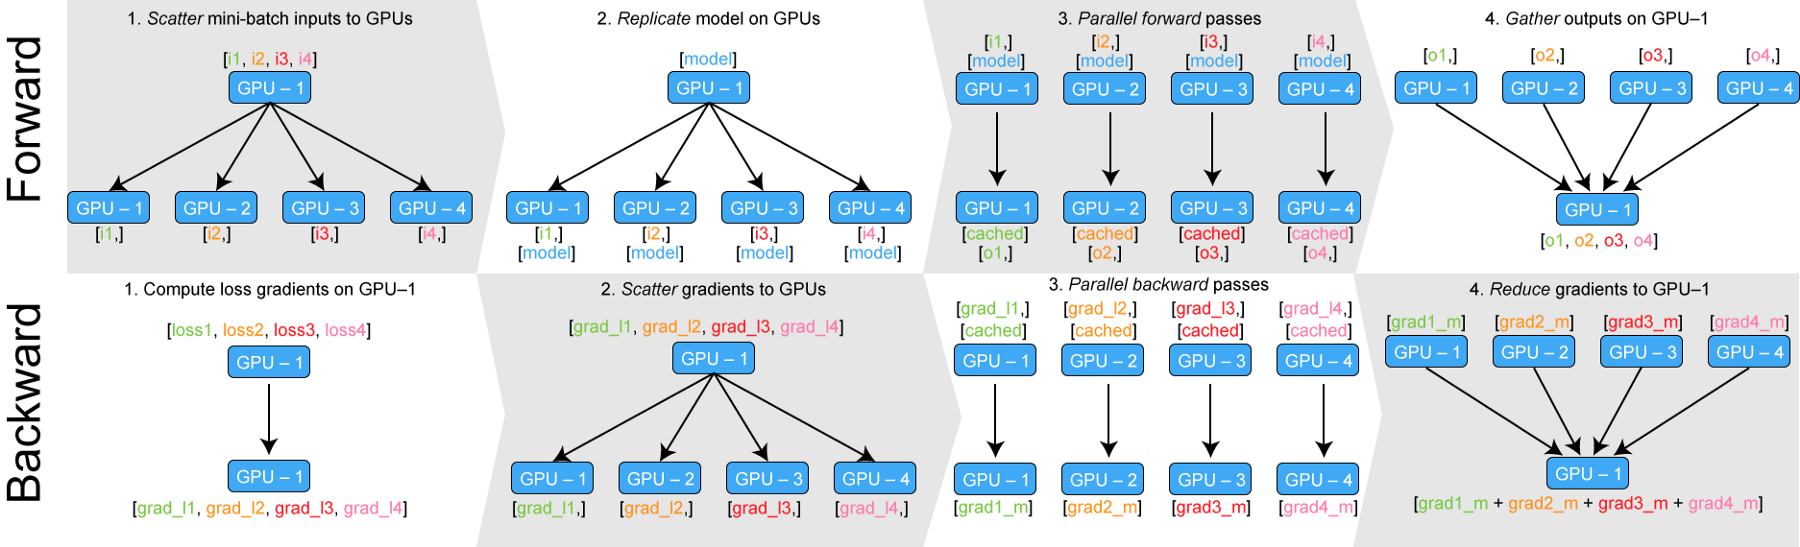
DataParallel takes the input, splits it into smaller batches, replicates the neural network across all the devices, executes the pass and then collects the output back on the original GPU.
One issue with DataParallel can be that it can put asymmetrical load on one GPU (the main node). There are generally two ways to circumvent these problem.
- First, is to compute the loss during the forward pass. This makes sure at least the loss calculation phase is parallelised.
- Another way is to implement a parallel loss function layer. This is beyond the scope of this article. However, for those interested I have given a link to a medium article detailing implementation of such a layer at the end of this article.
Model Parallelism
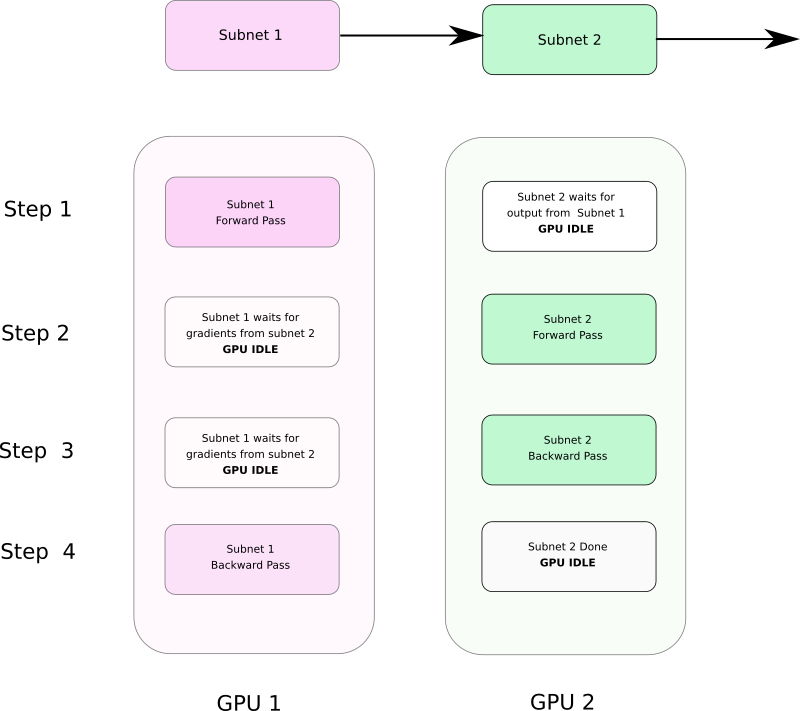
Model parallelism means that you break your network into smaller subnetworks that you then put on different GPUs. The main motivation for doing such a thing is that your network might be too large to fit inside a single GPU.
Note that model parallelism is often slower than data parallelism as splitting a single network into multiple GPUs introduces dependencies between GPUs which prevents them from running in a truly parallel way. The advantage one derives out of model parallelism is not about speed, but ability to run networks whose size is too large to fit on a single GPU.
As we see in figure b, Subnet 2 waits for Subnet 1 during forward pass, while Subnet 1 waits for Subnet 2 during backward pass.
Implementing Model parallelism is PyTorch is pretty easy as long as you remember 2 things.
- The input and the network should always be on the same device.
toandcudafunctions have autograd support, so your gradients can be copied from one GPU to another during backward pass.
We will use the following piece of code to understand this better.
class model_parallel(nn.Module):
	def __init__(self):
		super().__init__()
		self.sub_network1 = ...
		self.sub_network2 = ...

		self.sub_network1.cuda(0)
		self.sub_network2.cuda(1)

	def forward(x):
		x = x.cuda(0)
		x = self.sub_network1(x)
		x = x.cuda(1)
		x = self.sub_network2(x)
		return x
In the init function we have put the sub-networks on GPUs 0 and 1 respectively.
Notice in the forward function, we transfer the intermediate output from sub_network1 to GPU 1 before feeding it to sub_network2. Since cuda has autograd support, the loss backpropagated from sub_network2 will be copied to buffers of sub_network1 for further backpropagation.
Troubleshooting Out of Memory Errors
In this section we will cover how to diagnose memory issues and possible solutions if your network is using more memory than it is needed.
While going out of memory may necessitate reducing batch size, one can do certain check to ensure that usage of memory is optimal.
Tracking Memory Usage with GPUtil
One way to track GPU usage is by monitoring memory usage in a console with nvidia-smi command. The problem with this approach is that peak GPU usage, and out of memory happens so fast that you can’t quite pinpoint which part of your code is causing the memory overflow.
For this we will use an extension called GPUtil, which you can install with pip by running the following command.
pip install GPUtilThe usage is pretty simple too.
import GPUtil
GPUtil.showUtilization()
Just put the second line wherever you want to see the GPU Utilisation. By placing this statement at different places in the code you can figure out what part is exactly causing the the network to go OOM.
Let us now talk about possible methods for remedying OOM errors.
Dealing with Memory Losses using del keyword
PyTorch has a pretty aggressive garbage collector. As soon as a variable goes out of scope, the garbage collection will free it.
It is to be kept in mind that Python doesn’t enforce scoping rules as strongly as other languages such as C/C++. A variable is only freed when there exists no pointers to it. (This has to do with the fact that variables needn’t be declared in Python)
As a result, memory occupied by tensos holding your input, output tensors can still not be freed even once you are out of training loop. Consider the following chunk of code.
for x in range(10):
	i = x

print(i)   # 9 is printed
Running the above snippet of code will print values of i even when we are outside are the loop where we initialised i. Similarly, tensors holding loss and output can live beyond the training loop. In order to truly free up the space held by these tensors, we use del keyword.
del out, lossIn fact, as a general rule of thumb, if you are done with a tensor, you should del as it won’t be garbage collected unless there is no reference to it left.
Using Python Data Types Instead Of 1-D Tensors
Often, we aggregate values in our training loop to compute some metrics. Biggest example of this is that we update the running loss each iteration. However, if not done carefully in PyTorch, such a thing can lead to excess use of memory than what is required.
Consider the following snippet of code.
total_loss = 0

for x in range(10):
  # assume loss is computed
  iter_loss = torch.randn(3,4).mean()
  iter_loss.requires_grad = True     # losses are supposed to differentiable
  total_loss += iter_loss            # use total_loss += iter_loss.item) instead
We expect that in the subsequent iterations, the reference to iter_loss is reassigned to new iter_loss, and the object representing iter_loss from earlier representation will be freed. But this doesn’t happen. Why?
Since iter_loss is differentiable, the line total_loss += iter_loss creates a computation graph with one AddBackward function node. During subsequent iterations, AddBackward nodes are added to this graph and no object holding values of iter_loss is freed. Normally, the memory allocated to a computation graph is freed when backward is called upon it, but here, there’s no scope of calling backward.
loss
The solution to this is to add a python data type, and not a tensor to total_loss which prevents creation of any computation graph.
We merely replace the line total_loss += iter_loss with total_loss += iter_loss.item(). item returns the python data type from a tensor containing single values.
Emptying Cuda Cache
While PyTorch aggressively frees up memory, a pytorch process may not give back the memory back to the OS even after you del your tensors. This memory is cached so that it can be quickly allocated to new tensors being allocated without requesting the OS new extra memory.
This can be a problem when you are using more than two processes in your workflow.
The first process can hold onto the GPU memory even if it’s work is done causing OOM when the second process is launched. To remedy this, you can write the command at the end of your code.
torch.cuda.empy_cache()This will make sure that the space held by the process is released.
import torch
from GPUtil import showUtilization as gpu_usage

print("Initial GPU Usage")
gpu_usage()

tensorList = []
for x in range(10):
  tensorList.append(torch.randn(10000000,10).cuda())   # reduce the size of tensor if you are getting OOM


print("GPU Usage after allcoating a bunch of Tensors")
gpu_usage()

del tensorList

print("GPU Usage after deleting the Tensors")
gpu_usage()

print("GPU Usage after emptying the cache")
torch.cuda.empty_cache()
gpu_usage()
The following output is produced when this code is executed on a Tesla K80
Initial GPU Usage
| ID | GPU | MEM |
------------------
|  0 |  0% |  5% |
GPU Usage after allcoating a bunch of Tensors
| ID | GPU | MEM |
------------------
|  0 |  3% | 30% |
GPU Usage after deleting the Tensors
| ID | GPU | MEM |
------------------
|  0 |  3% | 30% |
GPU Usage after emptying the cache
| ID | GPU | MEM |
------------------
|  0 |  3% |  5% |
Using torch.no_grad() for Inference
PyTorch, by default, will create a computational graph during the forward pass. During creation of this graph, it will allocate buffers to store gradients and intermediate values which are used for computing the gradient during the backward pass.
During the backward pass, all of these buffers, with the exception of those allocated for leaf variables are freed.
However, during inference, there is no backward pass and these buffers are never freed, leading up to piling up of memory. Therefore, whenever you want to execute a piece of code that doesn’t need to be backpropagated, put it inside a torch.no_grad() context manager.
with torch.no_grad()
	# your code
Using CuDNN Backend
You can make use of the cudnn benchmark instead of the vanilla benchmark. CuDNN can provided a lot of optimisation which can bring down your space usage, especially when the input to your neural network is of fixed size. Add the following lines on top of your code to enable CuDNN benchmark.
torch.backends.cudnn.benchmark = True
torch.backends.cudnn.enabled = True
Using 16-bit Floats
The new RTX and Volta cards by nVidia support both 16-bit training and inference.
model = model.half()     # convert a model to 16-bit
input = input.half()     # convert a model to 16-bit
However, the 16-bit training options have to be taken with a pinch of salt.
While usage of 16-bit tensors can cut your GPU usage by almost half, there are a few issues with them.
- In PyTorch, batch-norm layers have convergence issues with half precision floats. If that’s the case with you, make sure that batch norm layers are
float32.
model.half()  # convert to half precision
for layer in model.modules():
  if isinstance(layer, nn.BatchNorm2d):
    layer.float()
Also, you need to make sure when the output is passed through different layers in the forward function, the input to the batch norm layer is converted from float16 to float32 and then the output needs to be converted back to float16
One can find a good discussion of 16-bit training in PyTorch here.
2. You can have overflow issues with 16-bit float. Once, I remember I had such an overflow while trying to store the Union area of two bounding boxes (for computation of IoUs) in a float16. So make sure you have a realistic bound on the value you are trying to save in a float16.
Nvidia has recently released a PyTorch extension called Apex, that facilitates numerically safe mixed precision training in PyTorch. I have provided the link to that at the end of the article.
Conclusion
That concludes are discussion on memory management and use of Multiple GPUs in PyTorch. Following are the important links that you may wanna follow up this article with.
Further Reading
- PyTorch
newfunctions - Parallelised Loss Layer: Training Neural Nets on Larger Batches: Practical Tips for 1-GPU, Multi-GPU & Distributed setups
- GPUtil Github page
- A discussion on half precision training in PyTorch
- Nvidia Apex Github page
- Nvidia Apex tutorial
Are you looking for an answer to the topic “pytorch cuda out of memory“? We answer all your questions at the website barkmanoil.com in category: Newly updated financial and investment news for you. You will find the answer right below.
Keep Reading

How do I fix Cuda out of memory error?
To Solve RuntimeError: CUDA out of memory. Tried to allocate Error Just reduce the batch size In my case I was on batch size of 32 So that I just changed it to 15 And My error was solved.
What does Cuda out of memory mean?
My model reports “cuda runtime error(2): out of memory” As the error message suggests, you have run out of memory on your GPU. Since we often deal with large amounts of data in PyTorch, small mistakes can rapidly cause your program to use up all of your GPU; fortunately, the fixes in these cases are often simple.
PYTORCH COMMON MISTAKES – How To Save Time 🕒
PYTORCH COMMON MISTAKES – How To Save Time 🕒
PYTORCH COMMON MISTAKES – How To Save Time 🕒
Images related to the topicPYTORCH COMMON MISTAKES – How To Save Time 🕒
How do I clear my graphics card memory?
What can I do to free up the GPU’s memory in Windows 11?
- Adjust paging file settings for the game drive. …
- Use the 3GB switch. …
- Perform program and game updates. …
- Update the graphics driver. …
- Tweak the graphics card settings. …
- Check for unnecessary background programs. …
- Adjust the program’s video resolution.
What causes Cuda error?
What is the Error? This error occurs due to the following two reasons: Inconsistency between the number of labels/classes and the number of output units. The input of the loss function may be incorrect.
How do I increase virtual memory?
How to Increase Your Virtual Memory
- Head to Control Panel > System and Security > System.
- Select Advanced System Settings to open your System Properties. Now open the Advanced tab.
- Under Performance, select Settings. Open the Advanced tab. Under Virtual memory, select Change. Here are your Virtual Memory options.
What is CUDA memory?
It is used for storing data that will not change over the course of kernel execution. It supports short-latency, high-bandwidth, read-only access by the device when all threads simultaneously access the same location. There is a total of 64K constant memory on a CUDA capable device. The constant memory is cached.
How does PyTorch allocate memory?
Memory management
PyTorch uses a caching memory allocator to speed up memory allocations. This allows fast memory deallocation without device synchronizations. However, the unused memory managed by the allocator will still show as if used in nvidia-smi .
See some more details on the topic pytorch cuda out of memory here:
Frequently Asked Questions — PyTorch 1.11.0 documentation
My model reports “cuda runtime error(2): out of memory” … As the error message suggests, you have run out of memory on your GPU. Since we often deal with large …
+ Read More
“RuntimeError: CUDA error: out of memory” – Stack Overflow
The error occurs because you ran out of memory on your GPU. One way to solve it is to reduce the batch size until your code runs without …
+ Read More Here
How to avoid “CUDA out of memory” in PyTorch – Local Coder
Actually, CUDA runs out of total memory required to train the model. You can reduce the batch size. Say, even if batch size of 1 is not working (happens when …
+ Read More
What Is Causing Gpu To Run Out Of Memory Pytorch?
In my model, it appears that “cuda runtime error(2): out of memory” is occurring due to a GPU memory drain. Because PyTorch typically manages …
+ View More Here
How do I increase virtual memory in Windows?
Click Start > Settings > Control Panel. Double-click the System icon. In the System Properties dialog box, click the Advanced tab and click Performance Options. In the Performance Options dialog, under Virtual memory, click Change.
How much virtual memory do I need for mining?
Most mining software requires at least 16 GB virtual memory. In systems with many GPU’s, even more virtual memory is required to be able to work well with all mining software and algorithms. A good rule of thumb is to allocate 4 GB plus the total amount of memory on all GPU’s.
Why is my GPU out of memory?
Out-of-memory error occurs when MATLAB asks CUDA(or the GPU Device) to allocate memory and it returns an error due to insufficient space. For a big enough model, the issue will occur across differnet releases since the issue is with the GPU hardware.
How do I fix my video memory running out?
Quick Navigation :
- Fix: Check If Your Computer Meet the Game’s System Requirements.
- Fix 2: Customize the Virtual Memory Size.
- Fix 3: Update the Graphics Driver.
- Fix 4: Modify the Graphics Card Settings.
- Fix 5: Check If There Is a Latest Game Patch.
- User Comments.
SOLUTION: Cuda error in cudaprogram.cu:388 : out of memroy gpu memory: 12:00 GB totla, 11.01 GB free
SOLUTION: Cuda error in cudaprogram.cu:388 : out of memroy gpu memory: 12:00 GB totla, 11.01 GB free
SOLUTION: Cuda error in cudaprogram.cu:388 : out of memroy gpu memory: 12:00 GB totla, 11.01 GB free
Images related to the topicSOLUTION: Cuda error in cudaprogram.cu:388 : out of memroy gpu memory: 12:00 GB totla, 11.01 GB free

How do you check which Cuda version is installed?
3 ways to check CUDA version
- Perhaps the easiest way to check a file. Run cat /usr/local/cuda/version.txt. …
- Another method is through the cuda-toolkit package command nvcc . Simple run nvcc –version . …
- The other way is from the NVIDIA driver’s nvidia-smi command you have installed. Simply run nvidia-smi .
What is CUDA computing?
CUDA® is a parallel computing platform and programming model developed by NVIDIA for general computing on graphical processing units (GPUs). With CUDA, developers are able to dramatically speed up computing applications by harnessing the power of GPUs.
What does Nvidia SMI do?
The NVIDIA System Management Interface (nvidia-smi) is a command line utility, based on top of the NVIDIA Management Library (NVML), intended to aid in the management and monitoring of NVIDIA GPU devices.
What happens if virtual memory is too high?
The bigger the virtual memory space, the bigger the adress table becomes in which is written, which virtual adress belongs to which physical adress. A big table can theoreticaly result in slower translation of the adresses and therefore in slower reading and writing speeds.
What should my virtual memory be set at 16GB RAM?
If you are lucky enough that you have more than 16 GB of RAM in the system, we suggest that the page file minimum be set between 1 and 1.5 times the amount of RAM.
How much virtual memory should 8gb RAM have?
To calculate the “general rule” recommended size of virtual memory in Windows 10 per the 8 GB your system has, here’s the equation 1024 x 8 x 1.5 = 12288 MB.
How is memory allocated in CUDA?
Memory management on a CUDA device is similar to how it is done in CPU programming. You need to allocate memory space on the host, transfer the data to the device using the built-in API, retrieve the data (transfer the data back to the host), and finally free the allocated memory.
How does CUDA unified memory?
Unified Memory combines the advantages of explicit copies and zero-copy access: the GPU can access any page of the entire system memory and at the same time migrate the data on-demand to its own memory for high bandwidth access.
How does CUDA managed memory work?
When code running on a CPU or GPU accesses data allocated this way (often called CUDA managed data), the CUDA system software and/or the hardware takes care of migrating memory pages to the memory of the accessing processor.
Does PyTorch automatically use GPU?
If you are tracking your models using Weights & Biases, all your system metrics, including GPU utilization, will be automatically logged. Some of the most important metrics logged are GPU memory allocated, GPU utilization, CPU utilization, etc.
reduce batch_size to solve CUDA out of memory in PyTorch
reduce batch_size to solve CUDA out of memory in PyTorch
reduce batch_size to solve CUDA out of memory in PyTorch
Images related to the topicreduce batch_size to solve CUDA out of memory in PyTorch

How do I enable CUDA in PyTorch?
5 Steps to Install PyTorch With CUDA 10.0
- Check if CUDA 10.0 is installed. cat /usr/local/cuda/version.txt.
- [For conda] Run conda install with cudatoolkit. conda install pytorch torchvision cudatoolkit=10.0 -c pytorch.
- Verify PyTorch is installed. Run Python with. import torch. …
- Verify PyTorch is using CUDA 10.0. Run Python with.
Do I need to install CUDA for PyTorch?
To install PyTorch via pip, and do not have a CUDA-capable system or do not require CUDA, in the above selector, choose OS: Windows, Package: Pip and CUDA: None. Then, run the command that is presented to you.
Related searches to pytorch cuda out of memory
- pytorch backward cuda out of memory
- pytorch runtimeerror cuda out of memory. tried to allocate
- Avoid cuda out of memory
- pytorch lightning cuda out of memory
- pytorch cuda out of memory. tried to allocate
- windows pytorch cuda out of memory
- Model to device CUDA out of memory
- pytorch gpu cuda out of memory
- cuda out of memory reserved in total by pytorch
- pytorch cuda memory
- pytorch ddp cuda out of memory
- catch cuda out of memory
- cuda out of memory pytorch clear
- model to device cuda out of memory
- CUDA out of memory pytorch
- cuda out of memory tried to allocate
- avoid cuda out of memory
- pytorch load model cuda out of memory
- pytorch cuda out of memory inference
- pytorch runtimeerror cuda out of memory
- pytorch catch cuda out of memory error
- pytorch inference cuda out of memory
- cuda out of memory kaggle
- CUDA out of memory tried to allocate
- pytorch cuda running out of memory
- cuda out of memory pytorch
- pytorch dataloader cuda out of memory
- pytorch cuda out of memory after epoch
Information related to the topic pytorch cuda out of memory
Here are the search results of the thread pytorch cuda out of memory from Bing. You can read more if you want.
You have just come across an article on the topic pytorch cuda out of memory. If you found this article useful, please share it. Thank you very much.