QR Code has error correction capability to restore data if the code is dirty or damaged. Four error correction levels are available for users to choose according to the operating environment. Raising this level improves error correction capability but also increases the amount of data QR Code size.
To select error correction level, various factors such as the operating environment and QR Code size need to be considered.
Level Q or H may be selected for factory environment where QR Code get dirty, whereas Level L may be selected for clean environment with the large amount of data. Typically, Level M (15%) is most frequently selected.
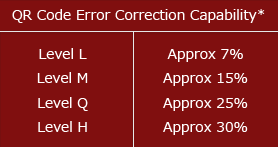
*Data restoration rate for total codewords (codeword is a unit that constructs the data area. One codeword of QR Code is equal to 8 bits.)
The QR Code error correction feature is implemented by adding a Reed-Solomon Code*to the original data.
The error correction capability depends on the amount of data to be corrected. For example, if there are 100 codewords of QR Code to be encoded,50 of which need to be corrected, 100 codewords of Reed-Solomon Code are required, as Reed-Solomon Code requires twice the amount of codewords to be corrected.
In this case, the total codewords are 200, 50 of which can be corrected. Thus, the error correction rate for the total codewords is 25%. This corresponds to QR Code error correction Level Q.
In the example above, the error correction rate for QR Code codewords can be considered as 50%. However, it is not always the case that codewords of not Reed-Solomon Code but only QR Code are susceptible to dirt and damage.QR Code therefore represents its error correction rate as a ratio of the total codewords.
*Reed-Solomon Code is a mathematical error correction method used for music CDs etc. The technology was originally developed as a measure against communication noise for artificial satellites and planetary probes. It is capable of making a correction at the byte level, and is suitable for concentrated burst errors.
General
QR Code Error Correction
14 Dec 2011

Part of the robustness of QR codes in the physical environment is their ability to sustain «damage» and continue to function even when a part of the QR code image is obscured, defaced or removed.
This is acheived by using the Reed-Solomon Error Correction algorithm — some serious algebra that happens in background when the QR code is created. The original data in the QR code is converted into a polynomial, the number of unique points required to uniquely define that polynomial is determined, and this point set is added back into the QR code so that it then also contains the original data expressed as a polynomial.
If that description threatened to make your head explode, just call it «mathematically adding backup data to the QR code».
There are 4 error correction levels used for QR codes, with each one adding different amounts of «backup» data depending on how much damage the QR code is expected to suffer in its intended environment, and hence how much error correction may be required:
- Level L — up to 7% damage
- Level M — up to 15% damage
- Level Q — up to 25% damage
- Level H — up to 30% damage
A fundamental part of the way QR codes work is that the more data you put into them, the more rows and columns of modules will be introduced into the QR code to compensate for the increased data load. As the error correction level increases, this means there will also be an increase in the number of rows and columns of modules required to store the original data plus the increasing amount of backup code words. This is shown in the diagram below — the QR code becomes more dense as the error correction increases from Level L to Level H even though the QR codes contain exactly the same website URL.
Quite conveniently, there’s also 2 modules down in the bottom left-hand corner of every QR code that display what the error correction level used in that QR code is.

So here are the take-outs:
- The lower the error correction level, the less dense the QR code image is, which improves minimum printing size.
- The higher the error correction level, the more damage it can sustain before it becomes unreadabale.
- Level L or Level M represent the best compromise between density and ruggedness for general marketing use.
- Level Q and Level H are generally recommended for industrial environments where keeping the QR code clean or un-damaged will be a challenge.
As an aside, this is also one of the reasons why a QR code containing the same data will look different depending on which QR code generator you use — it depends on the error correction level being used by that particular website. Even though there is a single ISO standard for QR codes, there are variables within the ISO standard (error correction level being one of them) that will result in a different looking QR code image based on how that particular QR code creation website sets these variables.
This doesn’t mean that any particular QR code generator is any more or any less standards-compliant than any other, it just means that the people behind the different generators have made different choices when setting the underlying technical specifications and parameters for the QR codes that their website creates.
Subscribers Get More QR Stuff!
Become a QR Stuff paid subscriber and get unlimited QR codes, unlimited scans, analytics reporting, editable dynamic QR codes, high resolution and vector QR code images, batch processing, password-protected QR codes, QR code styling, QR code pausing and scheduling and more, for one low subscription fee.
Full subscriptions start from just $11.95 for a 1 month subscription (lower monthly rates for longer periods) or you can set up a 24 hour trial subscription for $3.95 to check out what we can do for you. Subscribe now.

Unlike traditional barcodes, 2D codes support a comprehensive QR code error correction feature compared to its counterpart.
In the digital era, committing a mistake in the business industry can make companies lose millions in profits. Because of that, marketers are looking for a digital marketing solution that lessens the errors it makes, especially in choosing a data storing tool like barcodes.
Since it is challenging to identify what kind of barcodes have a built-in error correction system, QR code experts introduce the QR code technology.
Thanks to Irving Reed and Gustave Solomon’s Reed-Solomon error-correction algorithm QR codes can still be scanned even if it gets dirty or worn out.
Because of that, the information a person store in a QR code is secure and useful for a long time.
As long as the content, like a URL, doesn’t expire or get redirected to another domain, there will be no problem.
Just like in any technological advancement, understanding how it functions becomes a part of a person’s technological learning.
If you want to learn more about how the QR code’s error correction feature works and what is the best QR code generator to use, here are the following concepts.
How does the QR code error correction feature work?

The error correction feature works through the use of the Reed-Solomon error-correcting algorithm to the original data.
This error-correcting algorithm works by duplicating the original data for optimal scanning capability.
This way, it will still be scannable even if the QR code experience a tear or damage due to extreme weathering conditions.
Before the Reed-Solomon error-correcting algorithm is used for technologies such as CDs and DVDs.
This kind of code measures against the communication noise created by artificial satellites and planetary probes. CD and DVD manufacturers use this code to correct data at the byte level and other burst errors.
With a different kind of tear or damage, here are the following QR code error correction levels can have. Starting from Level L to Level H.
Level L
This is the lowest level of error correction rate that a QR code can have. QR code software uses this level if the user intends to generate a less dense QR code image.
Level L has the highest QR code error correction rate of approximately seven percent (7%).
Level M
Level M is the middle tier of the error correction level that QR code experts recommend for marketing use. Because of this, marketers can correct their QR codes at a medium level. Level M has the highest error correction rate of approximately fifteen percent (15%).
Level Q
This level is the second to the highest error correction level. This error correction level has the highest error correction rate of approximately twenty-five percent (25%).
Level H
Level H is the highest error correction level that can withstand an extreme level of damage in their QR code. The level Q and H error correction levels are most recommended for industrial and manufacturing companies.
These codes can experience environmental and man-made conditions leading to inevitable damage. This level has the highest error correction rate of approximately thirty percent (30%).
By knowing these following levels, you can spot the error correction level of a QR code without the need of running decoding software. You can spot these levels by looking at the following symbols on the codes.
How to spot these error correction levels?
There are four different error correction level symbols that you can view on these black and checkered boxes.
These symbols can let you determine what kind of QR code is being generated by a user.
These level symbols are as follows. Here are the following ways how to spot them.
1. View a copy of your QR code and look for its error correction area.
The first step to do when looking at its error correction area is to find a QR code that you can find in your room.
These codes can be found in your electronics or gadgets. Once you have found one, look at the bottom left portion of the code beside the lower eye.
That bottom left portion code beside the bottom eye is the area where you can view its error correction rate.
2. Know what level of error correction it has.
Once you have located the error correction area, you can determine its level of error correction by looking at its code nature.
If the code is fully shaded, the level of it is level L.
When the code is shaded halfway at the bottom, it has level M. If it is halfway shaded at the upper area, then it has a level Q error correction rate.
Lastly, when the code at the bottom left portion beside the lower eye is not visible, it has the highest error correction level, level H.
3. Test generate a QR code and decide which QR code generator has a high error correction level.
The best way to generate a QR code that offers safe and secure QR codes is by looking for the best QR code generator that generates QR codes with a high error correction level.
Through this, you will ensure that the QR code generator you use provides safe and secure QR codes for your personal, industrial, and manufacturing use.
One of the known QR code generators that creates QR codes with a level H error correction rate is QRTIGER.
QRTIGER is a safe and trusted reliable QR code generator, where you can also generate creative QR code designs and make it more appealing compared to traditional black and white QR code.
With its ad-free and easy-to-use interface, users can get through their QR code generating securely and easily.
Benefits of looking at a QR code’s error correction area
To know the QR code’s purpose for usage
One of its benefits is to know its purpose of usage.
In this way, people will know what error correction rate the QR code is intended to be protected with.
Through this, they can distinguish if that QR code is made for personal, marketing, or industrial use.
Measure its damage-resistance
By looking at the code’s error correction area, people can determine and measure its resistance to any damage or dirt.
Because of this, companies and marketers can save funds by choosing the right error correction feature that they want to implement in their QR codes.
Enable users to save money
As companies and marketers know what code error correction feature they want to add to their QR code, the money they spend for a long-term marketing campaign is saved. Because of that, they can save money and resources for the future.
Saves the environment
The error correction feature helps marketers and companies to save money and resources. Because of that, they will no longer need to print more QR codes as they can withstand any damage.
Through the use of it, they can reduce paper usage and help save the environment.
Educate people about how QR code error correction works
If you are a technology-loving person and you want to share your knowledge about trivial tech like QR codes, the use of locating its miracle in correcting errors can help enlighten people.
Because of this, they can increase other people’s knowledge about it and become a QR code expert along the process.
People can understand what QR code error correction generator they want to use in generating these codes.
QR code error correction – saves and secures information at best
Today, tech individuals use to improve and enhance the QR code’s structure to secure its scan-ability capability. Because of that, one of the features they improve is its error correction capability.
Users can generate free QR codes without having to worry about any scanning errors.
Create your QR code now with QRTIGER- the most advanced QR code software with a high level of error correction feature
QRTIGER is used by brands such as Cartier, Vaynermedia, Hilton, and many more because of its high error correction.
It is a QR code generator online which is ISO 27001 certified so you can ensure your QR codes’ information are safe and secured.
png_800_75.jpeg)
When generating a QR Code, you can choose between different levels of error correction. Error correction helps, that a QR Code stays readable, even if some pixels are missing. Sometimes this is done on purpose when placing a logo in the QR Code, but sometimes the code just gets damaged, like CDs get scratched, but they will be still readable by CD players.
There are 4 different levels of QR Code error correction
- Level L – up to 7% damage
- Level M – up to 15% damage
- Level Q – up to 25% damage
- Level H – up to 30% damage (recommend for QR Codes with an embedded logo)
The higher the error correction level, the more pixels of the QR Code may be damaged, but the bigger the QR Code gets. The following example shows the QR Code with the same URL for all four types of error correction levels:
As you can see the QR Code with the same URL encoded gets bigger the higher the error correction level is. The QR Code with level L has 25×25 pixel whereas the code with level H is already 29×29 pixel wide.
Designer QR Codes and Error Correction

You can use error correction to create a Designer QR Code. In a designer QR Code you can embed your own logo, brand the code with your own colors or use your own shapes. The logo should be centered in the QR Code and may take up to 30% of the surface when selecting level H for error correction. If you design a QR Code, always make sure that the QR Code stays readable by scanning the code with different devices and QR Code Reader Apps.
Recommended Error Correction Level
We recommend to always use the highest error correction level H for designer QR Codes, so you can maximize the size of your logo in the QR Code. If you just have a black & white QR Code the error correction level L is sufficient.
You can directly jump to our EPS QR Code Generator to create QR Codes with different levels of error correction right away. The editor shows a preview of the QR Code in the selected level.
Quick Response codes, usually called QR codes, are a great way to transmit data from paper to a digital device.
All you need to read them is a camera on a mobile device (which is pretty common these days).
In fact, most QR codes can be read within a camera app, although if you’re experimenting with them, it can be worth installing a custom QR code scanner app that can give you more details about the contents of the code.
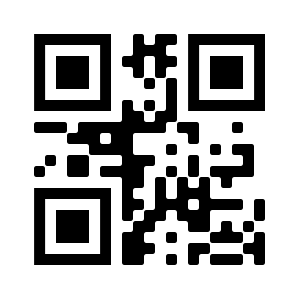
Try scanning the following QR code by pointing a mobile phone camera at it (on some phones you may need to adjust the settings so that a camera recognises a QR code).
This pattern represents the very simple text “ABCDEFG”.
The black and white squares on the code just represent binary digits (bits), which might be interpreted as text, URLs, or even pictures.
The bits include information about what kind of data it contains.
QR codes are used in all sorts of situations — advertising, making payments, providing information, contact tracing, and even headstones.
Because they are often in public places, they might be read under poor lighting conditions and are vulnerable to damage, so they rely on error correction codes to make sure the data can be scanned reliably.
Exercise: The game of “will it scan?”
Project
Look for QR codes that you come across in your daily life.
Find examples of ways that they can be “damaged” e.g. torn paper, bad lighting, glare and reflections on glass, or accidental markings.
Try scanning them with a QR reader.
Include scanning the back of a QR code in a window, and try odd angles.
How often do imperfect codes still scan?
Exercise: Testing the limits by damaging a QR code
Project
Print out a couple of copies of a QR code.
You can either make one online using a free QR code generator, or print out the QR codes for testing in a PDF file given here:
- Scan the printed QR code to check that it works.
- Now colour in one of the white squares with a black pen, so that you’re changing one of the binary digits (bits).
Hint: Don’t colour in near the three large squares in the corners, as most QR scanners need these to align the image. - Scan your “damaged” QR code again.
Did changing one of the bits change how it scanned? - Now try colouring in a second white square (bit), or you can use white-out and change a black square to white.
- Does the image with two changed bits still give the same message?
- Try changing about 5 of the bits.
Does it still scan?
What about 10 bits? - At some point it will refuse to scan the code.
Try to find out how many bits you need to change to make this happen.
In the previous exercise, you should have found that a small number of changes to the bits doesn’t cause a change in the message.
What is happening here is exactly the same principle that’s at work in the parity magic trick.
When one bit is changed (either white to black, or black to white), it’s easy for the software to detect that this has happened, and it can change it back.
However, QR codes use a stronger error control code than the parity trick; even if you change several bits, it can usually work out the original message.
This is error correction at work.
Eventually, when too many bits are changed, QR codes can’t make the correction.
What’s really impressive is that they still perform error detection: they won’t read the data incorrectly, instead they just refuse to give any data at all, rather than giving you incorrect data.
You would have been able to do this in the parity trick if someone changed two or more cards.
You can tell something is wrong, but you can’t be sure about how to fix it.
The main thing is that at least you know that something is wrong.
The “damage” to the data (such as colouring in a white square on a QR code) is causing an error in the data; it is sometimes referred to as “corruption” of the data, or “noise”.
On a QR code, data corruption could be caused by things like splashing the surface, getting ripped from wear and tear, people bumping it and leaving a mark, or light reflecting off the paper and creating a bright spot where it should be black.
In situations other than QR codes, it is caused by physical damage to disks (such as scratching a DVD), and in data transmission it might come from electrical interference messing with wifi transmission, or unreliable equipment randomly changing some of the transmission.
The powerful method that QR codes use to deal with data corruption is called Reed-Solomon error correction, which we’ll discuss in the next section.
Forward error correction (FEC)
Jargon Buster
This is when enough extra bits are added to data so that when it is received, reconstruction of the data can happen even when some of the bits are corrupted.
It’s putting a little extra information into the data in advance (forward) so that it can be corrected if necessary.
The parity magic trick is a form of FEC, and QR codes use the Reed-Solomon method for FEC.
Automatic repeat request (ARQ)
Jargon Buster
This is an error control system where an error in the data can be detected, but it can’t be corrected, so the sender has to be asked to repeat the data transmission.
This happens when scanning product codes on grocery items; if the check digit doesn’t match, an error is detected.
The scanner will give an error message, and the user has to scan the product again (repeat the transmission).
It also happens with credit cards (which use the Luhn algorithm) — if you type a credit card number incorrectly into a website, it will usually just ask you to type it again (a repeat request) and certainly won’t try to correct it.
ARQ doesn’t need as much extra space for the error control digits, but you have to be in a position to have the data sent again.
On a QR code, that would involve asking the owner to provide a new copy, which isn’t very practical.
This is why QR codes rely on FEC.
The Reed-Solomon method, used in QR codes, works in a similar way to the parity error correction used earlier in this chapter — it adds extra bits to the data so that errors can be corrected.
However, the Reed-Solomon code is able to deal with a lot more errors in the data than the parity method can.
Reed-Solomon error correction has been around since 1960, and remains one of the most widely used ways of dealing with errors introduced accidentally when data is stored.
It is used for hard disks and optical disks (CDs, DVDs and Blu-ray), and, of course, QR codes.
The Reed-Solomon method is a form of Forward Error Correction, which is important on file storage devices: if an error is detected in a file on a disk that was saved a year ago, you can’t travel back in time and ask someone to save another copy.
(Actually, you kind of can travel back in time: if someone made a backup of the file a year ago, you could use that, but small errors occur in storage devices regularly, so it’s not ideal to go to backups every time there’s a small failure in a disk.)
Fun fact
Curiosity
Reed-Solomon error correction is also used by the Voyager spacecraft to make sure data sent back from the edge of the solar system can be reconstructed if it encounters interference — which is very likely!
Signals from Voyager 1 can take 20 hours to get to earth, so an ARQ (asking for it to retransmit if the data has an error) would be very impractical.
Channel coding
Jargon Buster
Forward error correction is sometimes called channel coding, because it adjusts how the data is represented in advance to protect it against problems likely to be caused by the channel it is being transmitted through.
It’s called a channel even if (in the case of storage), the data is basically being transmitted through time to a future user.
Code-rate and overhead
Jargon Buster
The code-rate of an error correction method is based on how much of the final coded message contains the original data.
For example, with a 5×5 grid of bits that we used in the parity trick (25 bits in the data) there were 11 bits added (the extra row and column), giving 36 bits in total.
In this case the code-rate is 25/36, which is about 69.4%.
In other words, only about 69.4% of the data is useful to the end user.
The rest (30.6% of the data) is overhead, which is there just in case the data gets corrupted along the way.
Of course, this is way better than sending the data twice, because that would be a code-rate of 50% and the overhead is 50%, since the original data was only half of the data that ended up being sent.
In general, if bits of useful data are represented using bits in total, the code-rate is .
If you have no error correction bits added, the code-rate is 100%, but you’ll never know if the data has been corrupted!
Exercise: Calculating code-rate and overhead
Project
If a 9×9 block of data has a parity row and column added to it, what is the code-rate and overhead?
Hint: the 9×9 block has 81 bits in it, so you’ll want to work out how many bits there are after the extra column and row of parity bits have been added.
Exercise answers
Spoiler!
The code-rate is 81%, and the overhead is 19%, but how was it calculated?
The maximum number of errors that a Reed-Solomon code can correct is one half of the amount of extra error correcting data added to it.
This means that if k bits of useful data are represented using n bits in total, the maximum number of bit errors that can be corrected, is .
For example, if a QR code has 55 bytes of data, and 14 bytes of error correction added, then it can correct up to 7 bytes (56 bits) of errors.
In this case, and , so the rate is 79.7%. Reed-Solomon codes can detect twice as many errors as they can correct, so it can detect up to errors (14 bytes in the example).
It will probably detect errors if there are more than that many, but at that stage there are so many errors that it might accidentally be treated as an error correction situation for some different data.
A key feature of Reed-Solomon codes is that the code-rate can be adjusted depending on how many errors are expected.
In the case of QR codes, a mark or splash on the code could easily change several of the bits, and by using a lower code-rate (more redundant bits), larger amounts of corruption can be tolerated.
A simplistic way of thinking of Reed-Solomon codes is that they are like the parity error correction method, except instead of being based on single bits being added to a row of data, they are based on much larger groups of bits being added — the “parity” in this case is multiple bits.
This allows for the code-rate to be adjusted, and also copes well with a lot of adjacent bits being corrupted (for example, when there’s a scratch on a DVD, a burst of interference in a radio transmission, or dirt splashed on a QR code).
The layout of a QR code is based on a standard that shows where different elements are stored in the code
There are 40 possible sizes (called “versions”), and each has 4 different encodings for the data (numeric, alphanumeric, byte and Kanji), and also a choice of 4 error correction levels (low, medium, quartile, and high).
Each black or white square (“dot” or “module”) corresponds to one bit of data.
The example at the start of this section is the smallest size QR code (version 1), and is 21 dots wide and 21 dots tall.
Some of the dots are used up for the alignment markers.
The error correction levels indicate how much of the QR code is used up for error correction.
The highest level means that 30% of the data can be corrupted, yet still be corrected.
The example above uses low error correction, which means that it can only correct the data if no more than 7% of the data is changed.
For the “quartile” level of error correction, which can correct up to 25% of the data being corrupted, about half of the data in the QR code is used for error correction.
For example, a Version 3 QR code (29×29 dots) holds 70 bytes of information, and to get quartile level error correction, it needs to use 34 of the bytes for the data, and 36 bytes for Reed-Solomon codes, which means that the code-rate is 34/70, or 48.5%.
That might seem wasteful, but it’s incredibly resilient to errors.
The “low” level of error detection of Version 3 QR codes had 55 bytes for data and 15 bytes for Reed-Solomon codes, which is a rate of 78.6%, yet it can still correct the information if up to 7% of the data (about 5 bytes, or 40 dots) is corrupted.
(Theoretically Reed-Solomon codes should be able to deal with about 10% of the data being corrupted in this situation, but there’s a bit more going on in the details that we haven’t covered here!)
In contrast, the 5×5 block of data with parity error correction (used in the magic trick earlier in this chapter) could correct only 1 bit error out of the 25 data bits, which is 4% of the data being corrupted.
However, for this case, the code-rate is 25/36, or 69%, since the 25 bits had 11 extra bits added to them.
So Reed-Solomon codes can get a good level of error correction without having to have the code-rate too low.
Experiment
Project
For the Level 1 QR code above, change one dot at a time, scanning the QR code after each change, and find out at what point it is unable to correct the error.
What percentage of corruption is this code able to deal with?
Researching these questions will give you an idea of how error detection and correction have evolved historically, and how they will have an important role in the future.
There’s some information below that can help with getting into these ideas.
- How did early tape storage systems depend on error detection?
- When did the modern credit card first appear, and why did it use Luhn’s error detection algorithm?
- What technology made barcode scanning possible?
- When did barcodes start being widely used, and how did they use error detection to make them reliable?
- When did QR codes appear, and what technology was needed before the public could use them conveniently?
- What is RFID, how is it being used instead of barcodes, and what is the role of error correction in this situation?
- How is error correction essential for quantum computing?
The need for error control has been around for a long time.
Early computing storage, like reels of tape, stored important information like bank balances, but they couldn’t be read reliably, so it was obvious to add a parity check to them.
Even then, a single parity bit added to each 8 bits had a 50/50 chance of detecting multiple errors, but usually the tape would have errors across multiple bytes (perhaps it wasn’t lined up quite right), so it would become obvious that the data was unreliable, and had to be read again — this was an ARQ situation, based on error detection!
These days, magnetic media like tapes and disks use more effective error correction codes, typically a Reed-Solomon code, so that they can reliably reconstruct data that has been read incorrectly — that is, they use Forward Error Correction (FEC).
Credit cards appeared in the 1960s, and the last digit of a credit card is a check digit calculated using Luhn’s algorithm, which involves multiplying every second digit by 2.
The same algorithm is still used over half a century later for credit cards; there are more reliable checksums that could be calculated, but this form of error detection is embedded into machinery and software all around the world, so it looks like we’re stuck with it!
The idea of scanning product codes using something like a barcode has been around for a long time, but it was only in the 1970s, with the availability of lasers, that it was feasible to scan product codes in a commercial situation (see here for some interesting history of the barcode).
Prior to that, all products needed to have a price sticker on them, which made it hard to change prices or have specials; or if they didn’t have prices, checkout operators would need to be able to figure out the price.
With the wide range of products appearing in supermarkets at the time, this was becoming challenging, so the barcode was welcomed once it was feasible to produce scanning devices.
A Universal Product Code (UPC) standard was developed that included a check digit to make scanning reliable, and this time an error detection checksum was used based on multiplying every second digit by 3.
This system can always detect if a single digit is read incorrectly, but if two digits are incorrect, there’s a one in ten chance that they will cancel each other out.
If every digit in the product code has been read in randomly (perhaps the barcode is completely messed up), there’s a one in ten chance that the check digit will be correct, and in this case, the problem would only be detected if the product isn’t in the shop’s database.
These sorts of undetected errors are very unlikely, and we’ve come to trust barcode scanners — these days, many people don’t even check that they’ve been charged for the right products, thanks to error detection codes.
Two-dimensional (or “matrix”) barcodes allow for the storage of much more data.
There are many types of 2D barcodes in use, but the one that the public sees the most often is the “quick response” (QR) code invented in 1994.
Because QR codes can store so much more data, it is a lot easier to add error correction bits to them, so they are capable of Forward Error Correction.
This in turn has made them useful in places where they might be subject to wear and tear — printed on paper, stuck on notice boards, windows, and places that are exposed to the elements.
There are even buildings with QR codes on their roof — these can be scanned from planes or satellite images!
The widespread availability of smartphones with cameras from around 2003 meant that the public had all the equipment with them to scan a QR code, and these days the software for decoding a QR code is even built into the camera on a smartphone.
Technology has been changing rapidly, but the role of error detection and correction has been crucial in keeping these systems cheap and reliable.
Even in the future, error correction looks to be essential for RFID tags (which might replace bar codes), for high speed data transmission, and even for quantum computing, for dealing with unstable qubits.
- QR codes are explained in some detail on Wikipedia, including details of where the error correction information is stored in the code (in the diagrams, data is labeled D1, D2…, and error correction information is labeled E1, E2..).
The exact format is quite complicated, with information zig-zagging around the layout, and it isn’t necessary to understand that level of detail to be able to explain the error correction process. - There is a fairly gentle explanation of Reed-Solomon coding by Russ Cox available (with examples using the “Go” language), although this is only for those who really want to know more details.
- This Wikiversity page gives an explanation of “Reed–Solomon codes for coders”.
It uses Python code to explain the process, but you will also need to understand the mathematical concepts of polynomials and finite fields that Reed-Solomon codes rely on. - Computerphile covers Reed-Solomon codes in this video (which builds on this video).
- Here’s a blog with “wounded” QR codes.
- This is the website of the company that invented QR codes, which has more details about them.
- There’s more general information about Error Correction on Wikipedia.

You know what are QR Codes and how to create one. You have probably noticed the scannability of a QR Code despite there being dirt or damage. And you have also seen QR Codes with a logo. Despite there being a damage or an error, the QR Code being used scans perfectly fine. This is because of QR Code error correction feature.

The error correction capability enables the restoration of the data even after there is distortion, dirt, or damage. Hence, a QR Code keeps functioning even when a part of it is removed, damaged, or even obscured with a finger.
How does QR Code Error Correction work
Error correction happens by the implementation of the Reed-Solomon Code. In a nutshell, it adds backup data to the QR Code mathematically.

There are four levels of error correction:
1.Level L: up to 7% error correction capability
2. Level M: up to 15% error correction capability
3. Level Q: up to 25% error correction capability
4. Level H: up to 30% error correction capability
Raising the level improves error correction. But one must take into consideration that it also makes the QR Code dense.
Certain online QR Code generators such as Scanova allow users to choose the level of error correction while creating a QR Code. Check if your QR Code Generator has this feature.
Besides making the QR Code scannable, error correction also creates a room for creativity. It is error correction that allows you to add logo to your QR Codes. By removing some data from QR Code, it introduces an error. Then the logo is added. Hence, one should always choose a higher level of error correction while creating a QR Code with logo.
How to decide the level of error correction
Factors such as operating environment and QR Code size are important determinants of error correction level.
- In case of an environmental setup such as industries, where QR Code may get dirty, Level Q or H may be chosen. It will help to maintain the scannability despite wear-and-tear
- For general marketing purposes, Level L and M are suitable
Higher levels are also recommended as one decides to go ahead and get a QR Code tattooed. This is because higher the level of error correction, greater the data modules and thus, greater the scannability. Since QR Codes are easy to create, use, and have diverse types, their popularity is soaring everyday.
Now let’s discuss how to create one.
How to create a QR Code
Now comes the actual question comes—how to create a QR Code with error correction?
1. Find a QR Code generator
First, you’d need to find a QR Code generator that offers you the error correction feature. A simple Google search will fetch you many options to choose from.
But going through each result to find the best one is a tedious process. To make it easier for you, here is a detailed comparison of the best QR Code generators available online. You can find the best one for yourself.
2. Create a QR Code
Using the Scanova QR Code generator, here’s how you can do it:
a. Go to Scanova
b. Select the most relevant QR Code category for your use case

c. Add the content you want to encode and click Continue
d. Next, name your QR Code and click Create QR Code
e. On the page that loads next, you will see the image of the QR Code. Alongside, you’ll see the Edit Design option
f. Click on the Edit Design and you’ll see two design options to choose from——Custom Logo Design and Custom Background Design
Custom Logo Design: It allows you to add your business’s logo and colors to the QR Code. It also allows you to change the pattern of the QR Code’s eyes and data modules.
Custom Background Design: It allows you to add an image as the QR Code’s background. It also allows you to change the pattern of the QR Code’s eyes and data modules.

Custom logo design
g. Now, click on the Custom Logo Design option. Here, you can customize the QR Code design as per your wish and select the desired error correction level
![]()
h. Go to the Error Correction tab and select the level of error correction for your QR Code

Note that if you have added a logo, an appropriate level of error correction will be chosen automatically to ensure good scannability.
i. Once you finalize the QR Code design, click Done Editing. Go ahead to Download your QR Code. A pop-up will appear prompting you to sign-up for a 14-day free trial
j. Once you sign-up, proceed to download your QR Code. Now, you’ve to specify the size and format of the QR Code image to be downloaded

k. Once you enter these details, click Export
Your QR Code with error correction will be downloaded. It is advisable that you download the image in vector format (SVG, EPS) if you want to add your QR Code in print material.
That’s all you need to know about the error correction feature.
[cta-subscribe]
-
Tags
QR Code Guide
Yashika, our QR Code subject expert, loves to write and share her knowledge to solve problems. When not writing, you will find her with a mythology book or listening to music.
View Archive
Now comes the hard part.
Most of the Math in QR codes in performed in the Galois Field of order 28 = 256. In this set, denoted as GF(256):
- includes the numbers from 0 to 255;
- has an «addition» operation, which is actually the binary XOR and not the usual sum (so the «sum» of two elements will still be part of GF(256));
- has a «multiplication» operation, which is similar to the usual arithmetic multiplication but with some differences so that multiplying two elements will still give us an element of GF(256) (the neutral element is still 1).

The algorithm chosen for EDC in QR codes is the Reed-Solomon error correction, which is widely used for streaming data (e.g. CDs, wireless communications) because it allows to correct errors found in bursts, rather than single isolated cases. I won’t go into details, but we’re stuck with this kind of odd arithmetic.
Operations on GF(256)
The «addition» (XOR’ing) is quite simple. The neutral element with relation to XOR is still 0, as a ^ 0 = a. Also every element is the opposite of itself, since a ^ a = 0.
And since «subtraction» is defined as adding the opposite of the second term, this also means that the «subtraction» is equivalent of the «addition»! In fact: a — b = a ^ (-b) = a ^ b.
Now, about the multiplication. A Galois Field is cyclic, meaning that every non-zero element can be expressed as the power of a «primitive element» α. So, in GF(256), if a = αn and b = αm, then a ⋅ b = αn ⋅ αm = αn + m.
But, as we said, a Galois Field is cyclic, so α256 = α. This means that we can take the exponent n + m modulo 255, so we can simplify our computations a bit. In the end, a ⋅ b = α(n + m) % 255 (if both a and b are non-zero; the result is of course 0 otherwise).
This also means that for every a, a256 = a, and then a255 = 1, therefore a254 = a-1, i.e. is the inverse of a. So now we have a way to do divisions: a / b = αn / αm = αn(αm)254 = α(n + m * 254) % 255.
Operations in code
XOR’ing is no sweat for JavaScript or any other capable language, but multiplication is another story. The easiest thing to do is creating logarithmic and exponential tables, so it’ll be easy to convert a number from and to its exponential notation.
But how do we find α? It’s not so hard, as there are φ(255) = 192 primitive elements in GF(256), where φ is Euler’s totient function. For the sake of simplicity, we can take α = 2.
Since we’re dealing with values all below 256, we can use JavaScript’s Uint8Arrays, but if you wish you can use just regular arrays:
const LOG = new Uint8Array(256);
const EXP = new Uint8Array(256);
for (let exponent = 1, value = 1; exponent < 256; exponent++) {
  value = value > 127 ? ((value << 1) ^ 285) : value << 1;
  LOG[value] = exponent % 255;
  EXP[exponent % 255] = value;
}
Enter fullscreen mode
Exit fullscreen mode
We just start at 1, then double value at each iteration (shifting by 1 to the left). If value goes over 255, we XOR it with 285. Why 285? I won’t go into details (if you’re curious, you can find them here), as it has something to do with the relation between elements of a Galois field and polynomials, but rest assured that we’ll get all 255 non-zero elements like this.
In the end we’ll have:
> LOG
< Uint8Array(256) [0, 0, 1, 25, 2, 50, 26, 198, 3, 223, 51, 238, ...]
> EXP
< Uint8Array(256) [1, 2, 4, 8, 16, 32, 64, 128, 29, 58, 116, 232, ...]
Enter fullscreen mode
Exit fullscreen mode
Now we can implement the functions for multiplication and division:
function mul(a, b) {
  return a && b ? EXP[(LOG[a] + LOG[b]) % 255] : 0;
}
function div(a, b) {
  return EXP[(LOG[a] + LOG[b] * 254) % 255];
}
Enter fullscreen mode
Exit fullscreen mode
But how will that serve us for error correction? Let’s see…
Polynomials in GF(256)
Yes, the Reed-Solomon algorithm uses polynomials! You’ve probably seen them since high school, and have this form:
anxn + an — 1xn — 1 + … + a1x + a0
where a0, …, an are the coefficients, while x is the variable. You’ve probably seen (and solved, in the form of equations) them in the field of real numbers, with either real or complex solutions.
But coefficients, exponents and variables could be meant to be in any other field (ring would be enough, actually), even GF(256), inheriting its operations too. So, the «addition» is GF(256)’s addition, i.e. XOR, while multiplication is the one seen above. Exponentiation is just repeated multiplication by itself, as usual.
The good news here is that, as long as our concern is just generation, we do not need to solve any equation!
Polynomial multiplication
Addition is a commutative operation, meaning that a + b = b + a. It is in GF(256) too, because a ^ b = b ^ a. And multiplication is too, but it’s also distributive over the addition, meaning that a(b + c) = ab + ac. And this holds in GF(256) too.
This basically means that we can multiply polynomials between them like we used to do with polynomials on real numbers. Suppose we have
p1(x) = anxn + an — 1xn — 1 + … + a1x + a0
p2(x) = bmxm + bm — 1xm — 1 + … + b1x + b0
Take the first term of p1(x), i.e. anxn, then multiply it with all the terms of p2(x):
anxn⋅p2(x) = anbmxn + m + anbm — 1xn + m — 1 + … + anb1xn + 1 + anb0xn
Then do the same with the second term of p1(x), then the third, and so on. Finally, sum them all together. If this makes your head spin, let’s start with and example: x2 + 3x + 2 and 2x2 + x + 7. As we’ve said above, we have to do the following:
(x2 + 3x + 2)(2x2 + x + 7)
= x2(2x2 + x + 7) + 3x(2x2 + x + 7) + 2(2x2 + x + 7)
= 2x4 + x3 + 7x2 + 6x3 + 3x2 + 21x + 4x2 + 2x + 14
= 2x4 + (6 + 1)x3 + (7 + 3 + 4)x2 + (21 + 2)x + 14
= 2x4 + 7x3 + 14x2 + 23x + 14
We end up with a polynomial with 5 terms, which is the sum of the amount of terms of both polynomials, minus 1.
In code
We can represent a polynomial with the array of its coefficients, so that x2 + 3x + 2 could be translated to [1, 3, 2]. Again, since the coefficients can’t go over 255, we can use Uint8Array to optimize performances.
Of course all the operations are meant to be done in GF(256), so we’re using XOR for addition and the mul function defined above.
Please read the comments in the code snippet below carefully 😁
function polyMul(poly1, poly2) {
  // This is going to be the product polynomial, that we pre-allocate.
  // We know it's going to be `poly1.length + poly2.length - 1` long.
  const coeffs = new Uint8Array(poly1.length + poly2.length - 1);

  // Instead of executing all the steps in the example, we can jump to
  // computing the coefficients of the result
  for (let index = 0; index < coeffs.length; index++) {
    let coeff = 0;
    for (let p1index = 0; p1index <= index; p1index++) {
      const p2index = index - p1index;
      // We *should* do better here, as `p1index` and `p2index` could
      // be out of range, but `mul` defined above will handle that case.
      // Just beware of that when implementing in other languages.
      coeff ^= mul(poly1[p1index], poly2[p2index]);
    }
    coeffs[index] = coeff;
  }
  return coeffs;
}
Enter fullscreen mode
Exit fullscreen mode
Polynomial divisions
Ooooh boy. Remember long divisions in high school? Same thing here. (Except we’ll just need the rest of the division, not the quotient, but let’s save that for later.)
Let’t take a dividend polynomial 4x3 + 4x2 + 7x + 5, and a divisor polynomial 2x + 1. Basically these are the steps:
- divide the first term of the dividend polynomial (4x3) with the first term of the divisor (2x, and get 2x2);
- multiply the divisor polynomial by the above quotient (you’ll get 4x3 + 2x2);
- get the rest by subtracting the result from the dividend (you’ll get 2x2 + 7x + 5);
- if the degree of the rest is lower than the degree of the divisor, you’re done; otherwise, the rest becomes your new dividend and you go back to step 1.
For the division above (in the field of real numbers), you’ll get a polynomial quotient of 2x2 + x + 3, and a rest of 2. Now let’s do this in JavaScript, and in GF(256).
In code
The quotient polynomial will always be long the difference in length of the dividend and the divisor, plus one.
But it turns out that we don’t need the quotient for the Reed-Solomon error correction algorithm, just the rest. So we’re defining a function that returns only the rest of the division. The size of the quotient is needed just to count the steps to do.
The code below should be self-explanatory given the example above (it really just does the steps above), but if it’s not feel free to ask in the comments:
function polyRest(dividend, divisor) {
  const quotientLength = dividend.length - divisor.length + 1;
  // Let's just say that the dividend is the rest right away
  let rest = new Uint8Array(dividend);
  for (let count = 0; count < quotientLength; count++) {
    // If the first term is 0, we can just skip this iteration
    if (rest[0]) {
      const factor = div(rest[0], divisor[0]);
      const subtr = new Uint8Array(rest.length);
      subtr.set(polyMul(divisor, [factor]), 0);
      rest = rest.map((value, index) => value ^ subtr[index]).slice(1);
    } else {
      rest = rest.slice(1);
    }
  }
  return rest;
}
Enter fullscreen mode
Exit fullscreen mode
Now what?
Theory says that a Reed-Solomon error correction data sequence spanning n codewords allows to recover up to n/2 unreadable codewords, they being among the data sequence or in error correction sequence itself (!). Kinda cool, is it?
Remember the error correction table from the first part?
| Level | Letter | Data recovery |
|---|---|---|
| Low | L | ~7% |
| Medium | M | ~15% |
| Quartile | Q | ~25% |
| High | H | ~30% |
Those percentages are not results, but rather goals: for example, we want the quartile level of correction to be able to recover 25% (a quarter) of the codewords. This means that for this level of correction, there must be as many error correction codewords as data codewords.
For example, a version 2 QR code contains 44 codewords in total. We want to recover up to 11 (25%) of them, which means that we must reserve 22 codewords for EDC. If it looks expensive, it’s because it is… but necessary if we want our QR codes to be readable even when damaged.
(The above applies for smaller QR codes. For larger ones, data is often split into two groups, and each group into several blocks — up to 67. Each block has its own error correction sequence, but while data blocks for the second group are always one codeword larger then the blocks from the first group, error correction sequences are all long the same and sized for the larger block, so even for quartile level EDC sequences could be slighly more in total codewords than data. We’ll discuss about spliting data into blocks later in the series.)
From this, it’s also clear we can’t do much better than level H of error correction. If, for example, we wanted 18 codewords to be recoverable out of 44, then we had to use 36 codewords just for error correction, leaving just 8 codewords for data — i.e. less than 18! It’s clear it makes little sense, as we’d be better off just repeating the data.
Now let’s focus on how to get those error correction codewords out of our data.
Working with (big) polynomials
In the second part, we’ve sequenced our data (the string https://www.qrcode.com/) into an array of bytes (or codewords, in QR code jargon). Now we’ve treated polynomials as arrays of values between 0 and 255, so basically using Uint8Arrays for both of them. And that’s handy, since for error correction we have to view our data as a polynomial with the codewords as coefficients. Perfect!
Basically, we have our data that becomes this polynomial, called the message polynomial:
65x27 + 118x26 + 135x25 + 71x24 + … + 17x + 236
But we have 44 total codewords in our version 2 QR code, so we have to multiply this by x to the power of the error correction codewords, i.e. 16. In the end we have:
65x43 + 118x42 + 135x41 + 71x40 + … + 17x17 + 236x16
Now that we have our big polynomial, we have to divide it by… something, and take the rest of this division: the coefficients of the rest polynomial are going to be our error correction codewords!
But what’s this divisor polynomial? Also called…
The generator polynomial
If we have to fill n codewords with error correction data, we need the generator polynomial to be of degree n, so that the rest is of degree n — 1 and so the coefficients are exactly n. What we’re going to compute is a polynomial like this:
(x — α0)(x — α1)(x — α2)…(x — αn — 2)(x — αn — 1)
Now, as we’ve said, in GF(256) subtraction is the same as addition, and we’ve also chosen α to be 2. Finally, there are 16 codewords for medium correction in a version 2 QR code, so our generator polynomial is this one:
(x + 1)(x + 2)(x + 4)(x + 8)(x + 16)(x + 32)(x + 64)(x + 128)(x + 29)(x + 58)(x + 116)(x + 232)(x + 205)(x + 135)(x + 19)(x + 38)
The values in the factors are basically the ones from the EXP table computed before. Anyway, let’s get our polyMul function rolling!
function getGeneratorPoly(degree) {
  let lastPoly = new Uint8Array([1]);
  for (let index = 0; index < degree; index++) {
    lastPoly = polyMul(lastPoly, new Uint8Array([1, EXP[index]]));
  }
  return lastPoly;
}
Enter fullscreen mode
Exit fullscreen mode
Normally, you’d want to pre-compute or cache these polynomials instead of generating them each time. Anyway, our polynomial will be this one:
getGeneratorPoly(16);
// Uint8Array(17) [1, 59, 13, 104, 189, 68, 209, 30, 8, 163, 65, 41, 229, 98, 50, 36, 59]
Enter fullscreen mode
Exit fullscreen mode
Finally, we’re getting our EDC codewords, by dividing our message polynomial with the generator polynomial:
function getEDC(data, codewords) {
  const degree = codewords - data.length;
  const messagePoly = new Uint8Array(codewords);
  messagePoly.set(data, 0);
  return polyRest(messagePoly, getGeneratorPoly(degree));
}
Enter fullscreen mode
Exit fullscreen mode
In the end:
const data = getByteData('https://www.qrcode.com/', 8, 28);
getEDC(data, 44);
// Uint8Array(16) [52, 61, 242, 187, 29, 7, 216, 249, 103, 87, 95, 69, 188, 134, 57, 20]
Enter fullscreen mode
Exit fullscreen mode
And we’re done! 🙌 It’s been a long, but fundamental chapter.
… at least for now. Because much still has to be done in order to create a working QR code.
Stay tuned for the next part, which will be a shorter one. We’ll define some details around error correction, and learn how to actually displace all the codewords in the grid. In the following part, we’ll talk about masking.
