Introduction
This guide provides an overview of queues in RabbitMQ. Since
many features in a messaging system are related to queues, it
is not meant to be an exhaustive guide but rather an overview
that provides links to other guides.
This guide covers queues primarily in the context of AMQP 0-9-1,
however, much of the content is applicable to other supported protocols.
Some protocols (e.g. STOMP and MQTT) are based around the idea of topics.
For them, queues act as data accumulation buffer for consumers.
However, it is still important to understand the role queues play
because many features still operate at the queue level, even for those protocols.
Streams is an alternative messaging data structure available in RabbitMQ.
Streams provide different features from queues.
Some key topics covered in this guide are
- Queue basics
- Queue names
- Queue properties
- Message ordering in a queue
- Queue durability and how it relates to message persistence
- Replicated queue types
- Temporary and exclusive queues
- Runtime resource usage by queue replicas
- Queue metrics
- TTL and length limits
- Priority queues
For topics related to consumers, see the Consumers guide. Quorum queues
and streams also have dedicated guides.
The Basics
A queue is a sequential data structure
with two primary operations: an item can be enqueued (added) at the tail and dequeued (consumed)
from the head. Queues play a prominent role in the messaging technology space:
many messaging protocols and tools assume that publishers and consumers
communicate using a queue-like storage mechanism.
Queues in RabbitMQ are FIFO («first in, first out»).
Some queue features, namely priorities and requeueing by consumers, can affect
the ordering as observed by consumers.
Names
Queues have names so that applications can reference them.
Applications may pick queue names or ask the broker to generate a name
for them. Queue names may be up to 255 bytes of UTF-8 characters.
Queue names starting with «amq.» are reserved for internal
use by the broker. Attempts to declare a queue with a name that
violates this rule will result in a channel-level exception
with reply code 403 (ACCESS_REFUSED).
Server-named Queues
In AMQP 0-9-1, the broker can generate a unique queue name on behalf of
an app. To use this feature, pass an empty string as the queue name
argument: The same generated name may be obtained by subsequent
methods in the same channel by using the empty string where a queue
name is expected. This works because the channel remembers the last
server-generated queue name.
Server-named queues are meant to be used for state that is transient
in nature and specific to a particular consumer (application instance).
Applications can share such names in message metadata to let other applications respond
to them (as demonstrated in tutorial six).
Otherwise, the names of server-named queues should be known and used only by the
declaring application instance. The instance should also set up appropriate
bindings (routing) for the queue, so that publishers can use well-known
exchanges instead of the server-generated queue name directly.
Properties
Queues have properties that define how they behave. There is a set
of mandatory properties and a map of optional ones:
- Name
- Durable (the queue will survive a broker restart)
- Exclusive (used by only one connection and the queue will be deleted when that connection closes)
- Auto-delete (queue that has had at least one consumer is deleted when last consumer unsubscribes)
- Arguments (optional; used by plugins and broker-specific features such as message TTL, queue length limit, etc)
Note that not all property combination make sense in practice. For example, auto-delete
and exclusive queues should be server-named. Such queues are supposed to
be used for client-specific or connection (session)-specific data.
When auto-delete or exclusive queues use well-known (static) names, in case of client disconnection
and immediate reconnection there will be a natural race condition between RabbitMQ nodes
that will delete such queues and recovering clients that will try to re-declare them.
This can result in client-side connection recovery failure or exceptions, and create unnecessary confusion
or affect application availability.
Declaration and Property Equivalence
Before a queue can be used it has to be declared. Declaring
a queue will cause it to be created if it does not already
exist. The declaration will have no effect if the queue does
already exist and its attributes are the same as those in the
declaration. When the existing queue attributes are not the
same as those in the declaration a channel-level exception
with code 406 (PRECONDITION_FAILED) will be raised.
Optional Arguments
Optional queue arguments, also known as «x-arguments» because of their
field name in the AMQP 0-9-1 protocol, is a map (dictionary) of arbitrary key/value
pairs that can be provided by clients when a queue is declared.
The map is used by various features and plugins such as
- Queue type (e.g. quorum or classic)
- Message and queue TTL
- Queue length limit
- Max number of priorities
- Consumer priorities
and so on.
Most optional arguments can be dynamically changed after queue declaration but there are
exceptions. For example, queue type (x-queue-type) and max number
of queue priorities (x-max-priority) must be set at queue declaration time
and cannot be changed after that.
Optional queue arguments can be set in a couple of ways:
- To groups of queues using policies (recommended)
- On a per-queue basis when a queue is declared by a client
The former option is more flexible, non-intrusive, does not require application
modifications and redeployments. Therefore it is highly recommended for most users.
Note that some optional arguments such as queue type or max number of priorities can
only be provided by clients because they cannot be dynamically changed and must be known
at declaration time.
The way optional arguments are provided by clients varies from client library
to client library but is usually an argument next to the durable,
auto_delete and other arguments of the function (method) that
declares queues.
Message Ordering
Queues in RabbitMQ are ordered collections of messages.
Messages are enqueued and dequeued (delivered to consumers) in the FIFO manner.
FIFO ordering is not guaranteed for priority and sharded queues.
Ordering also can be affected by the presence of multiple competing consumers,
consumer priorities, message redeliveries.
This applies to redeliveries of any kind: automatic after channel closure and
negative consumer acknowledgements.
Applications can assume messages published on a single channel will be enqueued
in publishing order in all the queues they get routed to.
When publishing happens on multiple connections or channels, their sequences of messages
will be routed concurrently and interleaved.
Consuming applications can assume that initial deliveries (those where the redelivered property
is set to false) to a single consumer are performed in the same FIFO order as they were enqueued.
For repeated deliveries (the redelivered property is set to true), original ordering
can be affected by the timing of consumer acknowledgements and redeliveries, and thus
not guaranteed.
In case of multiple consumers, messages will be dequeued for delivery in the FIFO order
but actual delivery will happen to multiple consumers. If all of the consumers have
equal priorities, they will be picked on a round-robin basis.
Only consumers on channels that have not exceeded their prefetch value
(the number of outstanding unacknowledged deliveries) will be considered.
Durability
Queues can be durable or transient. Metadata of a durable queue is stored on disk,
while metadata of a transient queue is stored in memory when possible.
The same distinction is made for messages at publishing time
in some protocols, e.g. AMQP 0-9-1 and MQTT.
In environments and use cases where durability is important, applications
must use durable queues and make sure that publish mark published messages as persisted.
Transient queues will be deleted on node boot. They therefore will not survive a node restart,
by design. Messages in transient queues will also be discarded.
Durable queues will be recovered on node boot, including messages in them published as persistent.
Messages published as transient will be discarded during recovery, even if they were stored
in durable queues.
How to Choose
In most other cases, durable queues are the recommended option. For replicated queues,
the only reasonable option is to use durable queues.
Throughput and latency of a queue is not affected by whether a queue is durable or not
in most cases. Only environments with very high queue or binding churn — that is, where queues are deleted
and re-declared hundreds or more times a second — will see latency improvements for
some operations, namely on bindings. The choice between durable and transient queues
therefore comes down to the semantics of the use case.
Temporary queues can be a reasonable choice for workloads with transient clients, for example,
temporary WebSocket connections in user interfaces, mobile applications and devices
that are expected to go offline or use switch identities. Such clients usually have
inherently transient state that should be replaced when the client reconnects.
Some queue types do not support transient queues. Quorum queues must
be durable due to the assumptions and requirements of the underlying replication protocol,
for example.
Temporary Queues
With some workloads queues are supposed to be short lived. While clients can
delete the queues they declare before disconnection, this is not always convenient.
On top of that, client connections can fail, potentially leaving unused
resources (queues) behind.
There are three ways to make queue deleted automatically:
- Exclusive queues (covered below)
- TTLs (also covered below)
- Auto-delete queues
An auto-delete queue will be deleted when its last consumer
is cancelled (e.g. using the basic.cancel in AMQP 0-9-1)
or gone (closed channel or connection, or lost TCP connection with the server).
If a queue never had any consumers, for instance, when all consumption happens
using the basic.get method (the «pull» API), it won’t be automatically
deleted. For such cases, use exclusive queues or queue TTL.
Exclusive Queues
An exclusive queue can only be used (consumed from, purged, deleted, etc)
by its declaring connection. An attempt to use an exclusive queue from
a different connection will result in a channel-level exception
RESOURCE_LOCKED with an error message that says
cannot obtain exclusive access to locked queue.
Exclusive queues are deleted when their declaring connection is closed
or gone (e.g. due to underlying TCP connection loss). They therefore
are only suitable for client-specific transient state.
It is common to make exclusive queues server-named.
Exclusive queues are declared on the «client-local» node (the node that the client declaring
the queue is connected to), regardless of the queue_master_locator value.
Replicated and Distributed Queues
Quorum queues is replicated, data safety and consistency-oriented queue type.
Classic queues historically supported replication but it is deprecated and should be avoided.
Queues can also be federated
across loosely coupled nodes or clusters.
Note that intra-cluster replication and federation
are orthogonal features and should not be considered direct alternatives.
Streams is another replicated data structure supported by RabbitMQ, with a different
set of supported operations and features.
Time-to-Live and Length Limit
Queues can have their length limited.
Queues and messages can have a TTL.
Both features can be used for data expiration and as a way of limiting
how many resources (RAM, disk space) a queue can use at most, e.g.
when consumers go offline or their throughput falls behind publishers.
In Memory and Durable Storage
Queues keep messages in RAM and/or on disk. In some protocols (e.g. AMQP 0-9-1)
this is in part controlled by the client. In AMQP 0-9-1, this is done
via a message property (delivery_mode or, in some clients, persistent).
Publishing messages as transient suggests that RabbitMQ should keep as many messages
as possible in RAM. Queues will, however, page even transient messages to disk when
they find themselves under memory pressure.
Persistent messages routed to durable queues are persisted in batches
or when a certain amount of time passes (fraction of a second).
Lazy queues page messages out to disk more aggressively
regardless of their persistence property.
See Memory Usage, Alarms,
Memory Alarms, Free Disk Space Alarms,
Production Checklist, and Message Store Configuration
guide for details.
Priorities
Queues can have 0 or more priorities. This feature is opt-in:
only queues that have maximum number of priorities configured via an optional argument
(see above) will do prioritisation.
Publishers specify message priority using the priority field
in message properties.
If priority queues are desired, we recommend using between 1 and 10.
Currently using more priorities will consume more resources (Erlang processes).
CPU Utilisation and Parallelism Considerations
Currently a single queue replica (whether leader or follower) is limited to a single CPU core
on its hot code path. This design therefore assumes that most systems
use multiple queues in practice. A single queue is generally
considered to be an anti-pattern (and not just for resource utilisation
reasons).
In case when it is desirable to trade off message ordering for parallelism
(better CPU core utilisation), rabbitmq-sharding
provides an opinionated way of doing so transparently to the clients.
Metrics and Monitoring
RabbitMQ collects multiple metrics about queues. Most of them are available
via RabbitMQ HTTP API and management UI, which is designed for monitoring.
This includes queue length, ingress and egress rates, number of consumers, number of
messages in various states (e.g. ready for delivery or unacknowledged),
number of messages in RAM vs. on disk, and so on.
rabbitmqctl can list queues and some basic metrics.
Runtime metrics such as VM scheduler usage, queue (Erlang) process GC activity, amount of
RAM used by the queue process, queue process mailbox length can be accessed
using the rabbitmq-top plugin and
individual queue pages in the management UI.
Consumers and Acknowledgements
Messages can be consumed by registering a consumer (subscription),
which means RabbitMQ will push messages to the client, or fetched
individually for protocols that support this (e.g. the basic.get AMQP 0-9-1 method),
similarly to HTTP GET.
Delivered messages can be acknowledged by consumer explicitly
or automatically as soon as a delivery is written to connection socket.
Automatic acknowledgement mode generally will provide higher throughput
rate and uses less network bandwidth. However, it offers the least number
of guarantees when it comes to failures. As a rule of
thumb, consider using manual acknowledgement mode first.
Prefetch and Consumer Overload
Automatic acknowledgement mode can also overwhelm
consumers which cannot process messages as quickly as they are delivered.
This can result in permanently growing memory usage and/or
OS swapping for the consumer process.
Manual acknowledgement mode provides a way to set a limit on the number
of outstanding (unconfirmed) deliveries: channel QoS (prefetch).
Consumers using higher (several thousands or more) prefetch levels can experience
the same overload problem as consumers using automatic acknowledgements.
High number of unacknowledged messages will lead to higher memory usage by
the broker.
Message States
Enqueued messages therefore can be in one of two states:
- Ready for delivery
- Delivered but not yet acknowledged by consumer
Message breakdown by state can be found in the management UI.
Determining Queue Length
It is possible to determine queue length in a number of ways:
- With AMQP 0-9-1, using a property on the queue.declare method response
(queue.declare-ok). The field name is message_count. How it is accessed
varies from client library to client library. - Using RabbitMQ HTTP API.
- Using the rabbitmqctl list_queues command.
Queue length is defined as the number of messages ready for delivery.
Getting Help and Providing Feedback
If you have questions about the contents of this guide or
any other topic related to RabbitMQ, don’t hesitate to ask them
on the RabbitMQ mailing list.
Help Us Improve the Docs <3
If you’d like to contribute an improvement to the site,
its source is available on GitHub.
Simply fork the repository and submit a pull request. Thank you!
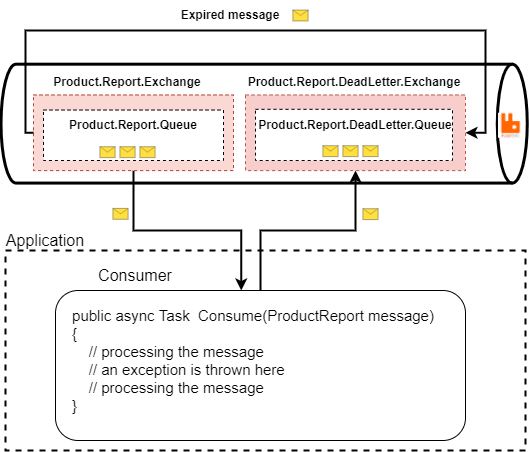
In a previous tutorial we had implemented a Spring Boot + RabbitMQ example to send publish message to
RabbitMQ Queue. In this tutorial we will be implementing a Spring Boot + RabbitMQ example to retry messages on exception and
if exception still exists after maximum retries then put message in a dead letter queue where it can be analyzed and corrected later.
What is a Dead Letter Queue?
In English vocabulary Dead letter mail is an undeliverable mail that cannot be delivered to the addressee.
A dead-letter queue (DLQ), sometimes which is also known as an undelivered-message queue, is a holding queue for messages that cannot be delivered to their
destinations due
to some reason or other.
According to Wikipedia page —
In message queueing the dead letter queue is a service implementation to store messages that meet one or more of the following failure criteria:
- Message that is sent to a queue that does not exist.
- Queue length limit exceeded.
- Message length limit exceeded.
- Message is rejected by another queue exchange.
- Message reaches a threshold read counter number, because it is not consumed. Sometimes this is called a «back out queue».
Later on we can analyze the messages in the DLQ to know the reason why the messages are failing.

RabbitMQ - Table Of Contents
What is Messaging?
Getting Started with RabbitMQ - Install and start RabbitMQ.
Spring Boot + RabbitMQ Publish Message Example
Spring Boot + RabbitMQ Tutorial - Configure Listeners to consume messages using MessageListenerContainer
Spring Boot + RabbitMQ Consume Message Example using RabbitListener
Spring Boot + RabbitMQ Tutorial - Implement Exchange Types
Spring Boot + RabbitMQ Tutorial - Retry and Error Handling Example
Spring Cloud Stream - RabbitMQ Publish Message Example
Spring Cloud Stream - RabbitMQ Consume Message Example
Pivotal Cloud Foundry Tutorial - Deploying Spring Boot + RabbitMQ Application to PCF
Video
This tutorial is explained in the below Youtube Video.
We will be implementing two modules —
-
Spring Boot Producer Module — It will produce a message and put it in RabbitMQ queue. It will also be responsible for creating
the required queues including the dead letter queue. -
Spring Boot Consumer Module — It will consume a message from RabbitMQ queue. We will be throwing an exception and then
retrying the message. After maximum retries it will then be put in dead letter queue.

Spring Boot + RabbitMQ Producer Module
The Maven project will be as follows-

The pom.xml will have the following dependencies-
<project xmlns="http://maven.apache.org/POM/4.0.0" xmlns:xsi="http://www.w3.org/2001/XMLSchema-instance"
	xsi:schemaLocation="http://maven.apache.org/POM/4.0.0 http://maven.apache.org/xsd/maven-4.0.0.xsd">
	<modelVersion>4.0.0</modelVersion>
	<groupId>com.javainuse</groupId>
	<artifactId>spring-boot-rabbitmq-producer</artifactId>
	<version>0.0.1-SNAPSHOT</version>

	<packaging>jar</packaging>

	<parent>
		<groupId>org.springframework.boot</groupId>
		<artifactId>spring-boot-starter-parent</artifactId>
		<version>2.1.1.RELEASE</version>
		<relativePath />
	</parent>

	<properties>
		<project.build.sourceEncoding>UTF-8</project.build.sourceEncoding>
		<project.reporting.outputEncoding>UTF-8</project.reporting.outputEncoding>
		<java.version>1.8</java.version>
	</properties>

	<dependencies>
		<dependency>
			<groupId>org.springframework.boot</groupId>
			<artifactId>spring-boot-starter-amqp</artifactId>
		</dependency>
		<dependency>
			<groupId>org.springframework.boot</groupId>
			<artifactId>spring-boot-starter-web</artifactId>
		</dependency>
		<dependency>
			<groupId>org.springframework.boot</groupId>
			<artifactId>spring-boot-starter-logging</artifactId>
		</dependency>
	</dependencies>

	<build>
		<plugins>
			<plugin>
				<groupId>org.springframework.boot</groupId>
				<artifactId>spring-boot-maven-plugin</artifactId>
			</plugin>
		</plugins>
	</build>

</project>
Define the domain class Employee as follows-
package com.javainuse.model;

import com.fasterxml.jackson.annotation.JsonIdentityInfo;
import com.fasterxml.jackson.annotation.ObjectIdGenerators;

@JsonIdentityInfo(generator = ObjectIdGenerators.IntSequenceGenerator.class, property = "@id", scope = Employee.class)
public class Employee {

	private String empName;
	private String empId;
	private int salary;

	public String getEmpName() {
		return empName;
	}

	public void setEmpName(String empName) {
		this.empName = empName;
	}

	public String getEmpId() {
		return empId;
	}

	public void setEmpId(String empId) {
		this.empId = empId;
	}

	public int getSalary() {
		return salary;
	}

	public void setSalary(int salary) {
		this.salary = salary;
	}

	@Override
	public String toString() {
		return "Employee [empName=" + empName + ", empId=" + empId + ", salary=" + salary + "]";
	}
}
Next define the configuration class where we-
- Create Direct Exchanges named — deadLetterExchange and javainuseExchange.
-
Create Queue named javainuse and dlq. For the javainuse queue specify the x-dead-letter-exchange argument as the deadLetterExchange.
This means that any message in javainuse queue that cannot be delivered will be sent to the deadLetterExchange. - Bind the javainuse queue with javainuseExchange and the dlq queue with deadLetterExchange.
package com.javainuse.config;

import org.springframework.amqp.core.AmqpTemplate;
import org.springframework.amqp.core.Binding;
import org.springframework.amqp.core.BindingBuilder;
import org.springframework.amqp.core.DirectExchange;
import org.springframework.amqp.core.Queue;
import org.springframework.amqp.core.QueueBuilder;
import org.springframework.amqp.rabbit.connection.ConnectionFactory;
import org.springframework.amqp.rabbit.core.RabbitTemplate;
import org.springframework.amqp.support.converter.Jackson2JsonMessageConverter;
import org.springframework.amqp.support.converter.MessageConverter;
import org.springframework.context.annotation.Bean;
import org.springframework.context.annotation.Configuration;

@Configuration
public class RabbitMQConfig {

	@Bean
	DirectExchange deadLetterExchange() {
		return new DirectExchange("deadLetterExchange");
	}

	@Bean
	DirectExchange exchange() {
		return new DirectExchange("javainuseExchange");
	}

	@Bean
	Queue dlq() {
		return QueueBuilder.durable("deadLetter.queue").build();
	}

	@Bean
	Queue queue() {
		return QueueBuilder.durable("javainuse.queue").withArgument("x-dead-letter-exchange", "deadLetterExchange")
				.withArgument("x-dead-letter-routing-key", "deadLetter").build();
	}

	@Bean
	Binding DLQbinding() {
		return BindingBuilder.bind(dlq()).to(deadLetterExchange()).with("deadLetter");
	}

	@Bean
	Binding binding() {
		return BindingBuilder.bind(queue()).to(exchange()).with("javainuse");
	}

	@Bean
	public MessageConverter jsonMessageConverter() {
		return new Jackson2JsonMessageConverter();
	}

	public AmqpTemplate rabbitTemplate(ConnectionFactory connectionFactory) {
		final RabbitTemplate rabbitTemplate = new RabbitTemplate(connectionFactory);
		rabbitTemplate.setMessageConverter(jsonMessageConverter());
		return rabbitTemplate;
	}
}
Create the RabbitMQWebController class where we expose API to send message to RabbitMQ Exchange.
package com.javainuse.controller;

import org.springframework.amqp.core.AmqpTemplate;
import org.springframework.beans.factory.annotation.Autowired;
import org.springframework.web.bind.annotation.GetMapping;
import org.springframework.web.bind.annotation.RequestMapping;
import org.springframework.web.bind.annotation.RequestParam;
import org.springframework.web.bind.annotation.RestController;

@RestController
@RequestMapping(value = "/javainuse-rabbitmq/")
public class RabbitMQWebController {

	@Autowired
	private AmqpTemplate amqpTemplate;

	@GetMapping(value = "/producer")
	public String producer(@RequestParam("empName") String empName,@RequestParam("empId") String empId,@RequestParam("salary") int salary) {
		Employee emp=new Employee();
		emp.setEmpId(empId);
		emp.setEmpName(empName);
		emp.setSalary(salary);

		amqpTemplate.convertAndSend("javainuseExchange", "javainuse", emp);
		return "Message sent to the RabbitMQ Successfully";
	}
}
Create the Spring Boot Bootstrap class with SpringBootApplication annotation.
package com.javainuse;

import org.springframework.boot.SpringApplication;
import org.springframework.boot.autoconfigure.SpringBootApplication;

@SpringBootApplication
public class SpringBootHelloWorldApplication {

	public static void main(String[] args) {
		SpringApplication.run(SpringBootHelloWorldApplication.class, args);
	}
}
Spring Boot Consumer Module
The project will be as follows-

Define the pom.xml as follows- Add the spring-boot-starter-amqp dependency.
<?xml version="1.0" encoding="UTF-8"?>
<project xmlns="http://maven.apache.org/POM/4.0.0" xmlns:xsi="http://www.w3.org/2001/XMLSchema-instance"
	xsi:schemaLocation="http://maven.apache.org/POM/4.0.0 http://maven.apache.org/xsd/maven-4.0.0.xsd">
	<modelVersion>4.0.0</modelVersion>

	<groupId>com.javainuse</groupId>
	<artifactId>spring-boot-rabbitmq-consumer</artifactId>
	<version>0.0.1-SNAPSHOT</version>
	<packaging>jar</packaging>

	<name>spring-boot-rabbitmq-consumer</name>

	<parent>
		<groupId>org.springframework.boot</groupId>
		<artifactId>spring-boot-starter-parent</artifactId>
		<version>2.1.1.RELEASE</version>
		<relativePath /> <!-- lookup parent from repository -->
	</parent>

	<properties>
		<project.build.sourceEncoding>UTF-8</project.build.sourceEncoding>
		<project.reporting.outputEncoding>UTF-8</project.reporting.outputEncoding>
		<java.version>1.8</java.version>
	</properties>

	<dependencies>
		<dependency>
			<groupId>org.springframework.boot</groupId>
			<artifactId>spring-boot-starter-amqp</artifactId>
		</dependency>
		<dependency>
			<groupId>org.springframework.boot</groupId>
			<artifactId>spring-boot-starter-web</artifactId>
		</dependency>
		<dependency>
			<groupId>org.springframework.boot</groupId>
			<artifactId>spring-boot-starter-logging</artifactId>
		</dependency>
	</dependencies>

	<build>
		<plugins>
			<plugin>
				<groupId>org.springframework.boot</groupId>
				<artifactId>spring-boot-maven-plugin</artifactId>
			</plugin>
		</plugins>
	</build>


	<description>SpringBootRabbitMQConsumer</description>
</project>
Define the domain class Employee as follows-
package com.javainuse.model;

import com.fasterxml.jackson.annotation.JsonIdentityInfo;
import com.fasterxml.jackson.annotation.ObjectIdGenerators;

@JsonIdentityInfo(generator = ObjectIdGenerators.IntSequenceGenerator.class, property = "@id", scope = Employee.class)
public class Employee {

	private String empName;
	private String empId;
	private int salary;

	public String getEmpName() {
		return empName;
	}

	public void setEmpName(String empName) {
		this.empName = empName;
	}

	public String getEmpId() {
		return empId;
	}

	public void setEmpId(String empId) {
		this.empId = empId;
	}

	@Override
	public String toString() {
		return "Employee [empName=" + empName + ", empId=" + empId + ", salary=" + salary + "]";
	}

	public int getSalary() {
		return salary;
	}

	public void setSalary(int salary) {
		this.salary = salary;
	}
}
Define a custom checked exception named InvalidSalaryException as follows-
package com.javainuse.exception;

public class InvalidSalaryException extends Exception {

	private static final long serialVersionUID = -3154618962130084535L;

}
Define the RabbitMQConsumer class which consumes the message from RabbitMQ using RabbitListener.The RabbitMQ Listener listens to RabbitMQ Queue for any incoming messages.
For the basic configuration we specify the the Queue/Topic Name (the name of the queue/topic where the message should be consumed).
Also here we will be checking the incoming message for salary field. If this field is negative we will be throwing an InvalidSalaryException.
In this article we will implement a RabbitMQ Error Handling.
Whenever any data in the message is
transmitted that the receiver does not accept, or when a message is sent to a queue that does not
exist. The message is retried and sent up to a set number of times. Even if the communication is not
received by the recipient but is sent from the sender’s end.
Now In such instances, the message queue is marked as undeliverable or deadLetter queue.
RabbitMQ provides a method for handling message failures in a really efficient way known as the Retry
and Error Handling feature.
What is Dead Message in RabbitMQ.
If certain messages become undeliverable or unhandled even though when message received by the
broker. This can
occur whenever the amount of time that the message spent in a queue is longer than the time it takes
to live TTL, when the queue hits its capacity or the consumer admits a message negatively. Such a
message is known as dead
message.
However there is a better way to handle this situation. Setting up a RabbitMQ dead letter
exchange and a dead letter queue enables for the storage and processing of orphaned messages.
Now there is no need to lose messages completely.
RabbitMQ Tutorial :
- Install RabbitMQ on Windows
- Install RabbitMQ using Docker on Windows
- Spring Boot RabbitMQ Example
- Spring Boot + RabbitMQ + Error Handling
Example -
Spring Cloud Stream + RabbitMQ Example
- Spring Boot + Pivotal Cloud Foundry (PCF) + RabbitMQ Example
- RabbitMQ Interview Questions
In this case, if the employee experience provided in the RequestParam does not meet the criteria,
then retry and error handling feature is invoked, and the message queue is declared as deadLetter
queue.
Let’s start developing Spring Boot for Producer and Consumer applications.
Producer
Project Structure

Maven Dependencies
We will use the Spring AMQP dependency to develop AMQP-based messaging solutions.
<?xml version="1.0" encoding="UTF-8"?>
<project xmlns="http://maven.apache.org/POM/4.0.0"
	xmlns:xsi="http://www.w3.org/2001/XMLSchema-instance"
	xsi:schemaLocation="http://maven.apache.org/POM/4.0.0 https://maven.apache.org/xsd/maven-4.0.0.xsd">
	<modelVersion>4.0.0</modelVersion>
	<parent>
		<groupId>org.springframework.boot</groupId>
		<artifactId>spring-boot-starter-parent</artifactId>
		<version>2.5.1</version>
		<relativePath /> <!-- lookup parent from repository -->
	</parent>
	<groupId>com.techgeeknext</groupId>
	<artifactId>SpringBootRabbitMQProducer</artifactId>
	<version>0.0.1-SNAPSHOT</version>
	<name>SpringBootRabbitMQProducer</name>
	<description>Spring Boot RabbitMQ + Error Handling</description>
	<properties>
		<java.version>1.8</java.version>
	</properties>
	<dependencies>

		<dependency>
			<groupId>org.springframework.boot</groupId>
			<artifactId>spring-boot-starter</artifactId>
		</dependency>

		<dependency>
			<groupId>org.springframework.boot</groupId>
			<artifactId>spring-boot-starter-amqp</artifactId>
		</dependency>
		<dependency>
			<groupId>org.springframework.boot</groupId>
			<artifactId>spring-boot-starter-web</artifactId>
		</dependency>
		<dependency>
			<groupId>org.springframework.boot</groupId>
			<artifactId>spring-boot-starter-logging</artifactId>
		</dependency>

		<dependency>
			<groupId>org.projectlombok</groupId>
			<artifactId>lombok</artifactId>
			<version>1.18.20</version>
			<scope>provided</scope>
		</dependency>

	</dependencies>

	<build>
		<plugins>
			<plugin>
				<groupId>org.springframework.boot</groupId>
				<artifactId>spring-boot-maven-plugin</artifactId>
			</plugin>
		</plugins>
	</build>

</project>
Take a look at our suggested posts:
Employee Model Class
Using lombok, which will generate getters and setters automatically.
package com.techgeeknext.model;


import com.fasterxml.jackson.annotation.JsonIdentityInfo;
import com.fasterxml.jackson.annotation.ObjectIdGenerators;
import lombok.Getter;
import lombok.Setter;
import lombok.ToString;

@Setter
@ToString
@Getter
@JsonIdentityInfo(generator = ObjectIdGenerators.IntSequenceGenerator.class, property = "@id"
		, scope = Employee.class)
public class Employee {

    private String name;
    private String domain;
    private int experience;

}
RabbitMQ Configuration Class
We require x-dead-letter-exchange and x-dead-letter-routing-key in order
to configure a dead letter.
It instructs the broker to use the standard exchange.
The deadLetterExchange is used to bind dlq, and the techgeeknextExchange
is used to bind
techgeeknext.
The Jackson2JsonMessageConverter translates an object to JSON and then from JSON to a Java object.
package com.techgeeknext.config;

import org.springframework.amqp.core.AmqpTemplate;
import org.springframework.amqp.core.Binding;
import org.springframework.amqp.core.BindingBuilder;
import org.springframework.amqp.core.DirectExchange;
import org.springframework.amqp.core.Queue;
import org.springframework.amqp.core.QueueBuilder;
import org.springframework.amqp.rabbit.connection.ConnectionFactory;
import org.springframework.amqp.rabbit.core.RabbitTemplate;
import org.springframework.amqp.support.converter.Jackson2JsonMessageConverter;
import org.springframework.amqp.support.converter.MessageConverter;
import org.springframework.context.annotation.Bean;
import org.springframework.context.annotation.Configuration;

@Configuration
public class RabbitMQProducerConfig {

    @Bean
    DirectExchange deadLetterExchange() {
        return new DirectExchange("deadLetterExchange");
    }

    @Bean
    DirectExchange exchange() {
        return new DirectExchange("techgeeknextExchange");
    }

    @Bean
    Queue dlq() {
        return QueueBuilder.durable("deadLetter.queue").build();
    }

    @Bean
    Queue queue() {
        return QueueBuilder.durable("techgeeknext.queue")
                .withArgument("x-dead-letter-exchange", "deadLetterExchange")
                .withArgument("x-dead-letter-routing-key", "deadLetter").build();
    }

    @Bean
    Binding DLQbinding() {
        return BindingBuilder.bind(dlq())
                .to(deadLetterExchange()).with("deadLetter");
    }

    @Bean
    Binding binding() {
        return BindingBuilder.bind(queue())
                .to(exchange()).with("techgeeknext");
    }

    @Bean
    public MessageConverter jsonMessageConverter() {
        return new Jackson2JsonMessageConverter();
    }

    public AmqpTemplate rabbitTemplate(ConnectionFactory connectionFactory) {
        final RabbitTemplate rabbitTemplate = new RabbitTemplate(connectionFactory);
        rabbitTemplate.setMessageConverter(jsonMessageConverter());
        return rabbitTemplate;
    }
}
Controller
Produceer method is used to send the message to the consumer through AMQP message.
package com.techgeeknext.controller;

import com.techgeeknext.model.Employee;
import org.springframework.amqp.core.AmqpTemplate;
import org.springframework.beans.factory.annotation.Autowired;
import org.springframework.web.bind.annotation.GetMapping;
import org.springframework.web.bind.annotation.RequestParam;
import org.springframework.web.bind.annotation.RestController;

@RestController

public class RabbitMQProducerController {

    @Autowired
    private AmqpTemplate amqpTemplate;

    @GetMapping(value = "/sendMessage")
    public String producer(@RequestParam("name") String name, @RequestParam("domain") String domain,
						   @RequestParam("exp") int exp) {
        Employee emp = new Employee();
        emp.setName(name);
        emp.setDomain(domain);
        emp.setExperience(exp);

        //The convertAndSend method converts the java object to an amqp message,
        // and then sends this message via the routing key to the exchange.
        amqpTemplate.convertAndSend("techgeeknextExchange", "techgeeknext", emp);
        return "Message sent to RabbitMQ server successfully!!";
    }
}
Consumer
Project Structure

Maven Dependencies
We will use the Spring AMQP dependency to develop AMQP-based messaging solutions.
<?xml version="1.0" encoding="UTF-8"?>
<project xmlns="http://maven.apache.org/POM/4.0.0" xmlns:xsi="http://www.w3.org/2001/XMLSchema-instance"
	xsi:schemaLocation="http://maven.apache.org/POM/4.0.0 https://maven.apache.org/xsd/maven-4.0.0.xsd">
	<modelVersion>4.0.0</modelVersion>
	<parent>
		<groupId>org.springframework.boot</groupId>
		<artifactId>spring-boot-starter-parent</artifactId>
		<version>2.5.1</version>
		<relativePath/> <!-- lookup parent from repository -->
	</parent>
	<groupId>com.techgeeknext</groupId>
	<artifactId>SpringBootRabbitMQConsumer</artifactId>
	<version>0.0.1-SNAPSHOT</version>
	<name>SpringBootRabbitMQConsumer</name>
	<description>Spring Boot RabbitMQ + Error Handling Example</description>
	<properties>
		<java.version>1.8</java.version>
	</properties>
	<dependencies>
		<dependency>
			<groupId>org.springframework.boot</groupId>
			<artifactId>spring-boot-starter</artifactId>
		</dependency>

		<dependency>
			<groupId>org.springframework.boot</groupId>
			<artifactId>spring-boot-starter-amqp</artifactId>
		</dependency>
		<dependency>
			<groupId>org.springframework.boot</groupId>
			<artifactId>spring-boot-starter-web</artifactId>
		</dependency>
		<dependency>
			<groupId>org.springframework.boot</groupId>
			<artifactId>spring-boot-starter-logging</artifactId>
		</dependency>
		<dependency>
			<groupId>org.projectlombok</groupId>
			<artifactId>lombok</artifactId>
			<scope>provided</scope>
		</dependency>
	</dependencies>

	<build>
		<plugins>
			<plugin>
				<groupId>org.springframework.boot</groupId>
				<artifactId>spring-boot-maven-plugin</artifactId>
			</plugin>
		</plugins>
	</build>

</project>
Properties
Here in application.yml file, we have activated the RabbitMQ retry mechanism for Spring Boot.
spring:
  rabbitmq:
    listener:
      simple:
        retry:
          enabled: true

##After an interval of 3s the message should be retried.
          initial-interval: 3s

##Maximum 6 times the message should be retried.
##It is then sent to the dead letter Queue.
          max-attempts: 6

##The maximum interval should not be more than 10s between two retries.
          max-interval: 10s

##The gap is multiplied by 2 between second repetition.
## But the maximum interval can never be exceeded
          multiplier: 2
##So the retry interval values will be 3s, 6s, 10s, 10s, 10s. As 10 sec is the max interval specified.

server:
  port: 8081
Custom Checked Exception
Create custom checked exception called CustomInvalidException.
package com.techgeeknext.exception;

public class CustomInvalidException extends Exception {

    private static final long serialVersionUID = -3154618962130084535L;

}
RabbitMQ Consumer
Create the class EmployeeConsumerService that uses RabbitListener to consume message from RabbitMQ.
For
incoming messages the RabbitMQ Listener listens for RabbitMQ Queueue. The Queue/Topic Name (name of
the queue/topic where the message should be consumed) is used for the basic configuration.
We’ll also check the employee experience field here and throw CustomInvalidException in the
case of
a negative or invalid experience.
package com.techgeeknext.service;

import com.techgeeknext.exception.CustomInvalidException;
import com.techgeeknext.model.Employee;
import org.slf4j.Logger;
import org.slf4j.LoggerFactory;
import org.springframework.amqp.rabbit.annotation.RabbitListener;
import org.springframework.stereotype.Component;


@Component
public class EmployeeConsumerService {

	private static final Logger logger = LoggerFactory.getLogger(EmployeeConsumerService.class);

	@RabbitListener(queues = "techgeeknext.queue")
	public void consumeMessage(Employee employee) throws CustomInvalidException {
		logger.info("Recieved Message From RabbitMQ techgeeknextExchange: " + employee);
		if (employee.getExperience() < 0 || employee.getExperience() > 30 ) {
			throw new CustomInvalidException();
		}
	}
}
Test
- Now, test this application at local. Start local RabbitMQ.
- Start the Producer Spring Boot Application.
- Produce/send the message with invalid Employee experience as 35 to consumer by using endpoint as
http://localhost:8080/sendMessage?name=techgeeknext&domain=XYZ&exp=35 - Now start the Consumer Spring Boot Application.
- Consumer : The message is sent by rabbitMQ queue to the consumer’s application, which is designated
techgeeknext.queue. Since the employee experience is invalid,
it’ll throw CustomInvalidException. This message is tried again 6 times and then placed in the queue of the dead letter.. ____ _ __ _ _ /\ / ___'_ __ _ _(_)_ __ __ _ ( ( )___ | '_ | '_| | '_ / _` | \/ ___)| |_)| | | | | || (_| | ) ) ) ) ' |____| .__|_| |_|_| |___, | / / / / =========|_|==============|___/=/_/_/_/ :: Spring Boot :: (v2.5.1) 16:00:31.805 INFO 8532 --- [main] c.t.SpringBootRabbitMQConsumer: Starting SpringBootRabbitMQConsumer using Java 12.0.2 on LAPTOP-S6R44CQL with PID 8532 (D:SpringBootRabbitMQConsumertargetclasses started in D:SpringBootRabbitMQConsumer) 16:00:31.808 INFO 8532 --- [main] c.t.SpringBootRabbitMQConsumer: No active profile set, falling back to default profiles: default 16:00:32.848 INFO 8532 --- [main] o.s.b.w.embedded.tomcat.TomcatWebServer : Tomcat initialized with port(s): 8081 (http) 16:00:32.856 INFO 8532 --- [main] o.apache.catalina.core.StandardService : Starting service [Tomcat] 16:00:32.856 INFO 8532 --- [main] org.apache.catalina.core.StandardEngine : Starting Servlet engine: [Apache Tomcat/9.0.46] 16:00:32.939 INFO 8532 --- [main] o.a.c.c.C.[Tomcat].[localhost].[/] : Initializing Spring embedded WebApplicationContext 16:00:32.939 INFO 8532 --- [main] w.s.c.ServletWebServerApplicationContext : Root WebApplicationContext: initialization completed in 1088 ms 16:00:33.417 INFO 8532 --- [main] o.s.b.w.embedded.tomcat.TomcatWebServer : Tomcat started on port(s): 8081 (http) with context path '' 16:00:33.418 INFO 8532 --- [main] o.s.a.r.c.CachingConnectionFactory : Attempting to connect to: [localhost:5672] 16:00:33.458 INFO 8532 --- [main] o.s.a.r.c.CachingConnectionFactory : Created new connection: rabbitConnectionFactory#37b56ac7:0/SimpleConnection@6ebc9573 [delegate=amqp://guest@127.0.0.1:5672/, localPort= 64346] 16:00:33.510 INFO 8532 --- [main] c.t.SpringBootRabbitMQConsumer: Started SpringBootRabbitMQConsumer in 2.069 seconds (JVM running for 2.353) 16:03:10.713 INFO 8532 --- [ntContainer#0-1] c.t.service.EmployeeConsumerService: Recieved Message From RabbitMQ techgeeknextExchange: Employee(name=techgeeknext, domain=XYZ, experience=35) 16:03:13.719 INFO 8532 --- [ntContainer#0-1] c.t.service.EmployeeConsumerService: Recieved Message From RabbitMQ techgeeknextExchange: Employee(name=techgeeknext, domain=XYZ, experience=35) 16:03:19.735 INFO 8532 --- [ntContainer#0-1] c.t.service.EmployeeConsumerService: Recieved Message From RabbitMQ techgeeknextExchange: Employee(name=techgeeknext, domain=XYZ, experience=35) 16:03:29.746 INFO 8532 --- [ntContainer#0-1] c.t.service.EmployeeConsumerService: Recieved Message From RabbitMQ techgeeknextExchange: Employee(name=techgeeknext, domain=XYZ, experience=35) 16:03:39.758 INFO 8532 --- [ntContainer#0-1] c.t.service.EmployeeConsumerService: Recieved Message From RabbitMQ techgeeknextExchange: Employee(name=techgeeknext, domain=XYZ, experience=35) 16:03:49.760 INFO 8532 --- [ntContainer#0-1] c.t.service.EmployeeConsumerService: Recieved Message From RabbitMQ techgeeknextExchange: Employee(name=techgeeknext, domain=XYZ, experience=35) 16:03:49.784 WARN 8532 --- [ntContainer#0-1] o.s.a.r.r.RejectAndDontRequeueRecoverer : Retries exhausted for message (Body:'{"@id":1,"name":"techgeeknext","domain":"XYZ","experience":35}' MessageProperties [headers={__TypeId__=com.techgeeknext.model.Employee}, contentType=application/json, contentEncoding=UTF-8, contentLength=0, receivedDeliveryMode=PERSISTENT, priority=0, redelivered=false, receivedExchange=techgeeknextExchange, receivedRoutingKey=techgeeknext, deliveryTag=2, consumerTag=amq.ctag-u4Xd3zuiVqOKGf8FzwA7qg, consumerQueue=techgeeknext.queue]) org.springframework.amqp.rabbit.support.ListenerExecutionFailedException: Listener method 'public void com.techgeeknext.service.EmployeeConsumerService.recievedMessage(com.techgeeknext.model.Employee) throws com.techgeeknext.exception.CustomInvalidException' threw exception at org.springframework.amqp.rabbit.listener.adapter.MessagingMessageListenerAdapter.invokeHandler(MessagingMessageListenerAdapter.java:247) ~[spring-rabbit-2.3.8.jar:2.3.8] at org.springframework.amqp.rabbit.listener.adapter.MessagingMessageListenerAdapter.invokeHandlerAndProcessResult(MessagingMessageListenerAdapter.java:191) ~[spring-rabbit-2.3.8.jar:2.3.8] at org.springframework.amqp.rabbit.listener.adapter.MessagingMessageListenerAdapter.onMessage(MessagingMessageListenerAdapter.java:137) ~[spring-rabbit-2.3.8.jar:2.3.8] at org.springframework.amqp.rabbit.listener.AbstractMessageListenerContainer.doInvokeListener(AbstractMessageListenerContainer.java:1654) ~[spring-rabbit-2.3.8.jar:2.3.8] at org.springframework.amqp.rabbit.listener.AbstractMessageListenerContainer.actualInvokeListener(AbstractMessageListenerContainer.java:1573) ~[spring-rabbit-2.3.8.jar:2.3.8] at java.base/jdk.internal.reflect.NativeMethodAccessorImpl.invoke0(Native Method) ~[na:na] at java.base/jdk.internal.reflect.NativeMethodAccessorImpl.invoke(NativeMethodAccessorImpl.java:62) ~[na:na] at java.base/jdk.internal.reflect.DelegatingMethodAccessorImpl.invoke(DelegatingMethodAccessorImpl.java:43) ~[na:na] at java.base/java.lang.reflect.Method.invoke(Method.java:567) ~[na:na] at org.springframework.aop.support.AopUtils.invokeJoinpointUsingReflection(AopUtils.java:344) ~[spring-aop-5.3.8.jar:5.3.8] at org.springframework.aop.framework.ReflectiveMethodInvocation.invokeJoinpoint(ReflectiveMethodInvocation.java:198) ~[spring-aop-5.3.8.jar:5.3.8] at org.springframework.aop.framework.ReflectiveMethodInvocation.proceed(ReflectiveMethodInvocation.java:163) ~[spring-aop-5.3.8.jar:5.3.8] at org.springframework.retry.interceptor.RetryOperationsInterceptor$1.doWithRetry(RetryOperationsInterceptor.java:93) ~[spring-retry-1.3.1.jar:na] at org.springframework.retry.support.RetryTemplate.doExecute(RetryTemplate.java:329) ~[spring-retry-1.3.1.jar:na] at org.springframework.retry.support.RetryTemplate.execute(RetryTemplate.java:225) ~[spring-retry-1.3.1.jar:na] at org.springframework.retry.interceptor.RetryOperationsInterceptor.invoke(RetryOperationsInterceptor.java:116) ~[spring-retry-1.3.1.jar:na] at org.springframework.aop.framework.ReflectiveMethodInvocation.proceed(ReflectiveMethodInvocation.java:186) ~[spring-aop-5.3.8.jar:5.3.8] at org.springframework.aop.framework.JdkDynamicAopProxy.invoke(JdkDynamicAopProxy.java:215) ~[spring-aop-5.3.8.jar:5.3.8] at org.springframework.amqp.rabbit.listener.$Proxy65.invokeListener(Unknown Source) ~[na:2.3.8] at org.springframework.amqp.rabbit.listener.AbstractMessageListenerContainer.invokeListener(AbstractMessageListenerContainer.java:1561) ~[spring-rabbit-2.3.8.jar:2.3.8] at org.springframework.amqp.rabbit.listener.AbstractMessageListenerContainer.doExecuteListener(AbstractMessageListenerContainer.java:1552) - Rabbitmq Exchange

- Rabbitmq Queues


  .   _____  __ _ _
 /\ / ___'_ __ _ _(_)_ __  __ _
( ( )___ | '_ | '_| | '_ / _` |
 \/  ___)| |_)| | | | | || (_| |  ) ) ) )
  '  |____| .__|_| |_|_| |___, | / / / /
 =========|_|==============|___/=/_/_/_/
 :: Spring Boot ::(v2.5.1)

16:00:18.798  INFO 17000 --- [ main] c.t.SpringBootRabbitMQProducer : Starting SpringBootRabbitMQProducer using Java 12.0.2 on LAPTOP-S6R44CQL with PID 17000 (D:SpringBootRabbitMQProducertargetclasses started in D:SpringBootRabbitMQProducer)
16:00:18.801  INFO 17000 --- [ main] c.t.SpringBootRabbitMQProducer : No active profile set, falling back to default profiles: default
16:00:19.922  INFO 17000 --- [ main] o.s.b.w.embedded.tomcat.TomcatWebServer  : Tomcat initialized with port(s): 8080 (http)
16:00:19.932  INFO 17000 --- [ main] o.apache.catalina.core.StandardService   : Starting service [Tomcat]
16:00:19.933  INFO 17000 --- [ main] org.apache.catalina.core.StandardEngine  : Starting Servlet engine: [Apache Tomcat/9.0.46]
16:00:20.008  INFO 17000 --- [ main] o.a.c.c.C.[Tomcat].[localhost].[/] : Initializing Spring embedded WebApplicationContext
16:00:20.008  INFO 17000 --- [ main] w.s.c.ServletWebServerApplicationContext : Root WebApplicationContext: initialization completed in 1174 ms
16:00:20.525  INFO 17000 --- [ main] o.s.b.w.embedded.tomcat.TomcatWebServer  :
Tomcat started on port(s): 8080 (http) with context path ''
16:00:20.534  INFO 17000 --- [ main] c.t.SpringBootRabbitMQProducer :
Started SpringBootRabbitMQProducer in 2.073 seconds (JVM running for 2.362)
16:00:44.371  INFO 17000 --- [nio-8080-exec-2] o.a.c.c.C.[Tomcat].[localhost].[/] :
Initializing Spring DispatcherServlet 'dispatcherServlet'
16:00:44.372  INFO 17000 --- [nio-8080-exec-2] o.s.web.servlet.DispatcherServlet  :
Initializing Servlet 'dispatcherServlet'
16:00:44.374  INFO 17000 --- [nio-8080-exec-2] o.s.web.servlet.DispatcherServlet  :
Completed initialization in 2 ms
16:01:04.917  INFO 17000 --- [nio-8080-exec-3] o.s.a.r.c.CachingConnectionFactory :
Attempting to connect to: [localhost:5672]
16:01:05.029  INFO 17000 --- [nio-8080-exec-3] o.s.a.r.c.CachingConnectionFactory :
Created new connection: rabbitConnectionFactory#14229fa7:0/SimpleConnection@58b43bdf
[delegate=amqp://guest@127.0.0.1:5672/, localPort= 61153]


Download Source Code
The full source code for this article can be found on below.
Download it here —
- Producer Spring Boot + RabbitMQ + Error Handling Example
- Consumer Spring Boot + RabbitMQ + Error Handling Example
![Cover image for Automated dead-letter queue handling for EasyNetQ [RabbitMQ]](https://res.cloudinary.com/practicaldev/image/fetch/s--H9xZJuNJ--/c_imagga_scale,f_auto,fl_progressive,h_420,q_auto,w_1000/https://dev-to-uploads.s3.amazonaws.com/uploads/articles/vze8u1xd917kgmyaa4qd.png)
![]()
📃What is EasyNetQ?
EasyNetQ is designed to make publishing and subscribing with RabbitMQ as easy as possible. of course, you can always use the RabbitMQ client to do this, but it brings lots of complexity of maintenance cumbersome to your application.
Digging into this library is out of the scope of this article, you can read more about this incredibly simple library Here.
📃What is the dead-letter queue?
Messages from a queue can be «dead-lettered»; that is, republished to an exchange when any of the following events occur:
-
The message is negatively acknowledged by a consumer using basic.reject or basic.nack with requeue parameter set to false.
-
The message expires due to per-message TTL
-
The message is dropped because its queue exceeded a length limit.
🔔EasyNetQ weakness!!
Honestly. it’s not a weakness, EasyNetQ tries to keep the implementation as simple as possible, because of this principle you cannot find so many features which already exist in the RabbitMQ client in this library.
But one of the biggest issues that a developer perhaps faces during the implementation of RabbitMQ functionality is dead-letter management.
EasyNetQ does not support automatic dead-letter definition. It means in case any of the conditions are mentioned, the failed message will be moved to the default error queue of RabbitMQ.
❓What’s wrong with one Error queue?
Good question! dealing with different types of failed messages and monitoring the failed messages for different queues is not possible in this case. It means there should be a different dead-letter queue for each discrete queue.
🌱Solution

Here, I have implemented a Nuget package (EasyDeadLetter) for this purpose, which can be easily implemented with the minimum changes in any project.
All you need to do is follow the four steps :
1- First of all, Decorate your class object with QeueuAttribute
2- The second step is to define your dead-letter queue with the same QueueAttribute and also inherit the dead-letter object from the Main object class.
3- Now, it’s time to decorate your main queue object with the EasyDeadLetter attribute and set the type of dead-letter queue.
4- In the final step, you need to register EasyDeadLetterStrategy as the default error handler (IConsumerErrorStrategy).
That’s all. from now on any failed message will be moved to the related dead-letter queue.
📑Resources
NuGet Package
🌱Easy Dead-Letter 🌱
📕Handling dead-letter queues in EasyNetQ (RabbitMQ)
Messages from a queue can be «dead-lettered»; that is, republished to an exchange when any of the following events occur:
- The message is negatively acknowledged by a consumer using basic.reject or basic.nack with requeue parameter set to false.
- The message expires due to per-message TTL;
- The message is dropped because its queue exceeded a length limit
🔔 Problem
If you are using RabbitMQ client for dotnet there is no problem, you can define dead-letter queues during a queue declaration, But using RabbitMQ client brings lots of implementation complexity to the application, because of that so many developers prefer to use the EasyNetQ library which is a wrapper on RabbitMQ client(Amazing and simple)
There is no implementation for dead-letter queues in EasyNetQ to keep the library easy to use, It means in case of any exception in the…
🤞If you want to support me, please share this article with your community.
Follow me on Linkedin
Update Your DEV Experience Level:
Go to your customization settings to nudge your home feed to show content more relevant to your developer experience level. 🛠
Read next

Generate Random Numbers with .NET 6
Emanuele Bartolesi — Oct 23 ’22

Grabbing list of animes from my anime list using openapi and dotnet
David Li — Oct 23 ’22

A brief history of async/await
max-arshinov — Oct 22 ’22

My Favorite New C# Feature: Target-Typed New
Matt Eland — Oct 23 ’22
Once unpublished, all posts by majidqafouri will become hidden and only accessible to themselves.
If majidqafouri is not suspended, they can still re-publish their posts from their dashboard.
Note:
Once unpublished, this post will become invisible to the public and only accessible to Majid Qafouri.
They can still re-publish the post if they are not suspended.
Thanks for keeping DEV Community 👩💻👨💻 safe. Here is what you can do to flag majidqafouri:
Make all posts by majidqafouri less visible
majidqafouri consistently posts content that violates DEV Community 👩💻👨💻’s
code of conduct because it is harassing, offensive or spammy.
Introduction
This post builds upon the basics of RabbitMQ in .NET. If you are new to this topic you should check out all the previous posts listed on this page. I won’t provide any details on bits of code that we’ve gone through before.
Most of the posts on RabbitMQ on this blog are based on the work of RabbitMQ guru Michael Stephenson.
It can happen that the Receiver is unable to process a message it has received from the message queue.
In some cases the receiver may not be able to accept an otherwise well-formed message. That message needs to be put back into the queue for later re-processing.
There’s also a case where processing a message throws an exception every time the receiver tries to process it. It will keep putting the message back to the queue only to receive the same exception over and over again. This also blocks the other messages from being processed. We call such a message a Poison Message.
In a third scenario the Receiver simply might not understand the message. It is malformed, contains unexpected properties etc.
The receiver can follow 2 basic strategies: retry processing the message or discard it after the first exception. Both options are easy to implement with RabbitMQ .NET.
Demo
If you’ve gone through the other posts on RabbitMQ on this blog then you’ll have a Visual Studio solution ready to be extended. Otherwise just create a new blank solution in Visual Studio 2012 or 2013. Add a new solution folder called FailingMessages to the solution. In that solution add the following projects:
- A console app called BadMessageReceiver
- A console app called BadMessageSender
- A C# library called MessageService
Add the following NuGet package to all three projects:

Add a project reference to MessageService from BadMessageReceiverand BadMessageSender. Add a class called RabbitMqService to MessageService with the following code to set up the connection with the local RabbitMQ instance:
public class RabbitMqService
{
		private string _hostName = "localhost";
		private string _userName = "guest";
		private string _password = "guest";

		public static string BadMessageBufferedQueue = "BadMessageQueue";

		public IConnection GetRabbitMqConnection()
		{
			ConnectionFactory connectionFactory = new ConnectionFactory();
			connectionFactory.HostName = _hostName;
			connectionFactory.UserName = _userName;
			connectionFactory.Password = _password;

			return connectionFactory.CreateConnection();
		}
}
Let’s set up the queue. Add the following code to Main of BadMessageSender:
RabbitMqService rabbitMqService = new RabbitMqService();
IConnection connection = rabbitMqService.GetRabbitMqConnection();
IModel model = connection.CreateModel();
model.QueueDeclare(RabbitMqService.BadMessageBufferedQueue, true, false, false, null);
Run the Sender project. Check in the RabbitMq management console that the queue has been set up.
Comment out the call to model.QueueDeclare, we won’t need it.
Add the following code in Program.cs of the Sender:
private static void RunBadMessageDemo(IModel model)
{
	Console.WriteLine("Enter your message. Quit with 'q'.");
	while (true)
	{
		string message = Console.ReadLine();
		if (message.ToLower() == "q") break;
		IBasicProperties basicProperties = model.CreateBasicProperties();
		basicProperties.SetPersistent(true);
		byte[] messageBuffer = Encoding.UTF8.GetBytes(message);
		model.BasicPublish("", RabbitMqService.BadMessageBufferedQueue, basicProperties, messageBuffer);
	}
}
This is probably the most basic message sending logic available in RabbitMQ .NET. Insert a call to this method from Main.
Now let’s turn to the Receiver. Add the following code to Main in Program.cs of BadMessageReceiver:
RabbitMqService messageService = new RabbitMqService();
IConnection connection = messageService.GetRabbitMqConnection();
IModel model = connection.CreateModel();
ReceiveBadMessages(model);
…where ReceiveBadMessages looks as follows:
private static void ReceiveBadMessages(IModel model)
{
	model.BasicQos(0, 1, false);
	QueueingBasicConsumer consumer = new QueueingBasicConsumer(model);
	model.BasicConsume(RabbitMqService.BadMessageBufferedQueue, false, consumer);
	while (true)
	{
		BasicDeliverEventArgs deliveryArguments = consumer.Queue.Dequeue() as BasicDeliverEventArgs;
		String message = Encoding.UTF8.GetString(deliveryArguments.Body);
		Console.WriteLine("Message from queue: {0}", message);
		Random random = new Random();
		int i = random.Next(0, 2);

		//pretend that message cannot be processed and must be rejected
		if (i == 1) //reject the message and discard completely
		{
			Console.WriteLine("Rejecting and discarding message {0}", message);
			model.BasicReject(deliveryArguments.DeliveryTag, false);
		}
		else //reject the message but push back to queue for later re-try
		{
			Console.WriteLine("Rejecting message and putting it back to the queue: {0}", message);
			model.BasicReject(deliveryArguments.DeliveryTag, true);
		}
	}
}
The only new bit compared to the basics is the BasicReject method. It accepts the delivery tag and a boolean parameter. If that’s set to false then the message is sent back to RabbitMQ which in turn will discard it, i.e. the message is not re-entered into the queue. Else if it’s true then the message is put back into the queue for a retry.
Let’s run the demo. Start the Sender app first. Then right-click the Receiver app in VS, select Debug and Run new instance. You’ll have two console windows up and running. Start sending messages from the Sender. Depending on the outcome of the random integer on the Receiver side you should see an output similar to this one:

In the above case the following has happened:
- Message “hello” was received and immediately discarded
- Same happened to “hello again”
- Message “bye” was put back into the queue several times before it was finally discarded – see the output below

Note that I didn’t type “bye” multiple times. The reject-requeue-retry cycle was handled automatically.
The message “bye” in this case was an example of a Poison Message. In the code it was eventually rejected because the random number generator produced a 0.
This strategy was OK for demo purposes but you should do something more sophisticated in a real project. You can’t just rely on random numbers. On the other hand if you don’t build in any mechanism to finally discard a message then it will just keep coming back to the receiver. That will cause a “traffic jam” in the message queue as all messages will keep waiting to be delivered.
We’ll look at some other strategies in the next post.
View the list of posts on Messaging here.